GEOMETRY INSTITUTE - DAY 2 · 2006-03-01 · TEAXTEAM Geometry Institute 2.1 GEOMETRY INSTITUTE -...
107
TEAXTEAM Geometry Institute 2.1 GEOMETRY INSTITUTE - DAY 2 Geometry of Location TIMELINE: Time Topic TEKS Approach 60 The Buried Treasure 10 Reflection on The Buried Treasure 60 Isometries- Rotations & Translations 10 Midsegment Investigation 20 Lets Get to the Center of This! 20 Surprising Intersections in Triangles 30 Euler Line-Centers of a Triangle 30 Euler Line 10 Nine Point Circle 10 Isosceles Triangle Exploration 10 Folding a Triangle 30 Are All Triangles Isosceles? 10 Flow Chart Proofs 10 Scrambled Proofs 20 Geometry Court 15 Reflections & post its 5 Give assignment 360 Total suggested time (in minutes)
Transcript of GEOMETRY INSTITUTE - DAY 2 · 2006-03-01 · TEAXTEAM Geometry Institute 2.1 GEOMETRY INSTITUTE -...

TEAXTEAM Geometry Institute 2.1
GEOMETRY INSTITUTE - DAY 2
Geometry of Location TIMELINE:
Time Topic TEKS Approach
60 The Buried Treasure
10 Reflection on The Buried Treasure
60 Isometries- Rotations & Translations
10 Midsegment Investigation
20 Lets Get to the Center of This!
20 Surprising Intersections in Triangles
30 Euler Line-Centers of a Triangle
30 Euler Line
10 Nine Point Circle
10 Isosceles Triangle Exploration
10 Folding a Triangle
30 Are All Triangles Isosceles?
10 Flow Chart Proofs
10 Scrambled Proofs
20 Geometry Court
15 Reflections & post its
5 Give assignment
360 Total suggested time (in minutes)

TEAXTEAM Geometry Institute 2.2
Day 2: Materials Needed: Sketchpad
Sketches
Buried Treasure
Buried Treasure.soln on instructor’s machine
THE “∆”
Scripts
Centroid
Circumcenter
Orthocenter
Circle through 3 pts
Altitude feet
Buried treasure solution
Day 3 assignment
Scrambled proofs in envelopes
Flowchart proof templates

TEXTEAM Geometry Institute 2.3
THE BURIED TREASURE Among his great-grandfather’s papers, José found a parchment describing the
location of a hidden treasure. The treasure was buried by a band of pirates on a deserted
island which contained an oak tree, a pine tree, and a gallows where the pirates hanged
traitors. The map looked like the accompanying figure and gave the following directions.
“Count the steps from the gallows to the oak tree. At the oak, turn 90° to the right.
Take the same number of steps and then put a spike in the ground. Next, return to the
gallows and walk to the pine tree, counting the number of steps. At the pine tree, turn 90°
to the left, take the same number of steps, and then put another spike in the ground. The
treasure is buried halfway between the spikes.”
José found the island and the trees but could not find the gallows or the spikes, which
had long since rotted. José dug all over the island, but because the island was large, he
gave up. Devise a plan to help José find the treasure.
Figure 1
TEXTEAM Geometry Institute 2.4
THE BURIED TREASURE
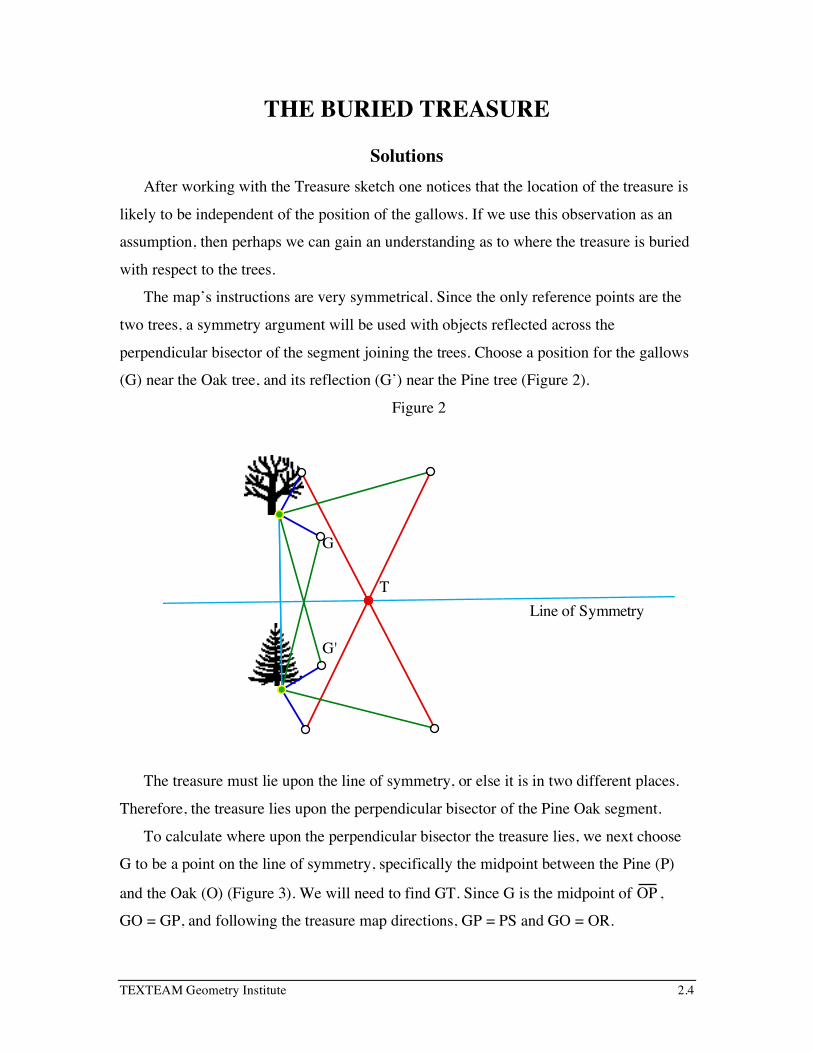
Solutions After working with the Treasure sketch one notices that the location of the treasure is
likely to be independent of the position of the gallows. If we use this observation as an
assumption, then perhaps we can gain an understanding as to where the treasure is buried
with respect to the trees.
The map’s instructions are very symmetrical. Since the only reference points are the
two trees, a symmetry argument will be used with objects reflected across the
perpendicular bisector of the segment joining the trees. Choose a position for the gallows
(G) near the Oak tree, and its reflection (G’) near the Pine tree (Figure 2).
Figure 2
Line of Symmetry
G'
T
G
The treasure must lie upon the line of symmetry, or else it is in two different places.
Therefore, the treasure lies upon the perpendicular bisector of the Pine Oak segment.
To calculate where upon the perpendicular bisector the treasure lies, we next choose
G to be a point on the line of symmetry, specifically the midpoint between the Pine (P)
and the Oak (O) (Figure 3). We will need to find GT. Since G is the midpoint of OP ,
GO = GP, and following the treasure map directions, GP = PS and GO = OR.

TEXTEAM Geometry Institute 2.5
Figure 3
Treasure (T)
Oak (O)
Pine (P)
G
Spike1 (R)
Spike2 (S)
OR = PS by transitivity. OR || PS since they are both perpendicular to the same line,
therefore ORSP is a parallelogram, specifically a rectangle. OP = RS, and since G is the
midpoint of OP and T is the midpoint of RS it follows that GP = TS. Therefore GTSP is
a parallelogram, more specifically a square. So one solution to help José is the following:
he needs to find and mark the midpoint between the Pine and the Oak. Then starting at
the pine tree he should walk toward the marker while counting his steps, then make a 90°
turn to the right and pace off the same number of paces. The treasure is at this point.
SOLUTION BY COORDINATE GEOMETRY:
José should be happy now with his treasure, but in the preceding argument we make a
fairly big assumption, and our conclusion is only as strong as our assumptions. Using
coordinate geometry we can develop a proof of the treasure’s location without making
such assumptions.
1. Pick convenient coordinate axes.
The pine and oak trees are the only clear references. Let the pine tree be the origin
and the oak tree some point on the y-axis (0, a). The gallows are in an unknown
position, say (x, y).
2. Calculate the position of Spike2 (S).
Recall from geometric transformations that R O,-90° (x, y) = (y, -x), and
TEXTEAM Geometry Institute 2.6
R O,90° (x, y) = (-y, x). Rotating the gallows position -90° about the pine tree gives the
coordinate of S as (y, -x).

TEXTEAM Geometry Institute 2.7
3. Calculate the position of Spike1 (R).
Rotating the gallows position 90° about the oak tree will take a little more effort. If
the oak tree were the origin then the rotation of 90° would be simple. So lets reduce
our task to a more simple task. Translate the entire picture, T (0, -a). This will place the
oak tree on the origin. Rotate the translated gallows (x, y - a) 90° about the origin to
(-y + a, x). Now translate the picture T (0, a) and the picture is back where it began. The
position of R is now (-y + a, x + a).
4. Our last task is to calculate where the treasure is located.
Use the midpoint formula
to calculate the position of
the treasure halfway
between the spikes.
Spike1: R (-y + a, x + a)
Spike2: S (y, -x)
Treasure: T (a/2, a/2)
The coordinate geometry
analysis of the problem
proves that the position of
the treasure is invariant
with respect to the gallows.
EXPLANATION BY ISOMETRIES:
So far the explanations have given a solution, but they haven’t given us much insight
as to why the treasure is invariant with respect to the gallows. Sketchpad can assist in the
explanation by transformations.
The exact position of the gallows is unknown, therefore we indicate the position of
the Gallows by the letter G and make no more assumptions about its position. Construct
the segment joining the Oak tree (O) and Pine tree (P). Construct lines l and k
perpendicular to OP passing through O and P respectively. Lines l and k are parallel to
each other. Construct GA as the altitude of the ∆POG. By the instructions given in the
Figure 4

TEXTEAM Geometry Institute 2.8
map, construct the positions of the spikes (R and S), and the treasure (T). Hide all
unnecessary lines and points. (Figure 5)

TEXTEAM Geometry Institute 2.9
Figure 5
k
l
Pine (P)
G
Oak (O)
A
Spike2 (S)
Spike1 (R)
Treasure (T)
In the coordinate proof the spike positions were found by rotating the position of the
gallows about the trees. We will use this technique again in this proof. Rotate ∆OAG 90°
about O, forming ∆OBR. Rotate ∆PAG -90° about P, forming ∆PCS. It is simple to show
B lies on l and C lies on k. Since isometries preserve distance the following congruencies
hold: GA ! RB; GA ! SC , and by transitivity RB ! SC . Since RB || SC ,
∠BRT ≅ ∠CST. By SAS ∆RBT ≅ ∆SCT. From this we can conclude B, T, C are
collinear, T is the midpoint of BC and therefore equidistant from l and k. (Figure 6)
Figure 6
l
k
Oak (O)
G
Pine (P)
Spike1 (R)
Spike2 (S)
A
Treasure (T)
B
C

TEXTEAM Geometry Institute 2.10
With T established as the midpoint of BC , we will change our focus to the trapezoid
OBCP. Naming M the midpoint of OP , yields the median MT . The length of the median
is the average of the two bases, thus MT = OB + PC2
. But by the original rotation we
know that OB + PC = OA + AP = OP, therefore MT = OP2
. From this we can conclude
that ∆PMT is an isosceles right triangle.
Figure 7
k
l
Pine (P)
G
Oak (O)
A
Spike2 (S)
Spike1 (R)
Treasure (T)
C
B
M
The buried treasure problem is a good illustration of how technology may be used to
arrive at the solution of a non-trivial mathematical problem in a highly intuitive manner.

TEXTEAM Geometry Institute 2.11
THE BURIED TREASURE
Reflections 1. Discuss the presentation styles used in this problem.
• Technology
• Coordinate geometry
• Transformations in the coordinate plane
• Cooperative groups
2. Discuss the geometry learned from this problem.
3. Discuss the geometric concepts used in the solution to this problem.
• Perpendicular bisectors
• Medians of a trapezoid
• Properties of parallel lines
• Right triangles
• Isosceles triangles
• Coordinate geometry
• Translations and rotations on a coordinate plane
• Alternate methods of proofs
4. How could one adapt this problem to the classroom?
5. Direction of the day. This problem will lead to:
• Isometries with a special emphasis on translations and rotations.
• The intersection of perpendicular bisectors of sides of triangles and other
interesting triangle intersections.
• Various methods of proofs from paper folding to group activity proofs.

TEXTEAM Geometry Institute 2.10
ISOMETRIES Institute Notes
Lesson Pages Time TEKS
Translations 20 min.
Reflections 5 min.
Rotations 30 min.
Composition of Isometries 5 min.
MATERIALS AND SETUP
Computer lab with Geometer’s Sketchpad installed
LEARNING STYLES
Cooperative learning, technology
ADDITIONAL RESOURCES
Patty paper (translucent paper) activities by Key Curriculum,
reflection devices such as “Mira” or “Reflecta”
MATH LINKS
Coordinate geometry, algebra, tiling
OTHER LINKS
Physics, chemistry
LESSON OVERVIEW
Just as geometry means literally “earth measure”, so isometry means literally “equal
measure”. An isometry in plane geometry, therefore, is a transformation of the plane
which preserves the distance between any two points in the plane. Any translation is an
isometry, as is any rotation or reflection. A dilation is not an isometry because dilations
do not preserve distance. Because they preserve the length of line segments, isometries
provide another way of studying congruence - a more visual, a more dynamic way which
is well adapted to the use of computers or graphing calculators. For instance, another way
of saying that triangles ∆A1B1C1 and ∆A2B2C2 are congruent is to say that there is an

TEXTEAM Geometry Institute 2.11
isometry transforming (or mapping) ∆A1B1C1 onto ∆A2B2C2 and the congruence can be
demonstrated physically on the screen by actually moving one triangle onto the other.
Isometries provide powerful tools for solving problems or proving results in
geometry. This is well illustrated in the Buried Treasure problem and the synthetic proof
associated with the Bullet train problem discussed on the last day. In the coordinate
plane, isometries provide an important bridge between geometry and algebra because
they can always be realized as functions defined on the plane and taking values in the
plane.. They could be used very effectively, therefore, in any algebra course following a
geometry course especially in analyzing families of functions and relations - evenness,
oddness, inverse functions etc.
Participants will be able to move through the instructions at their own pace. Some
may have time to look at compositions.
Translations
The teachers work through the translations lab to learn how to translate a figure using
Sketchpad (section 1A - C). Skim through the remainder of section 1. Then move to
section 2, investigating properties of translations. Encourage the teachers to “drag” points
around the screen to see the power of the software. Next, move to section 3 and
investigate translations on the coordinate grid.

TEXTEAM Geometry Institute 2.12
Reflections
Trainer mentions that reflections are approached in the same manner as translations.
Rotations
As was done with translations, focus on the first part of section 1, then move through
sections 2 and 3.
Compositions of Isometries
If time allows, participants can use this lesson to see the relationships among
compositions of translations, reflections and rotations.

TEXTEAM Geometry Institute 2.13
NOTES

TEXTEAM Geometry Institute 2.13
ISOMETRIES
Teacher Guide GOAL:
Explore the properties of isometries (reflections, rotations, translations and
composition of transformations).
PREREQUISITES:
Intuitive understanding of isometries and corresponding parts.
Use of the coordinate grid, definition of perpendicular bisector.
MATERIALS:
Computer lab worksheets and a computer.
Sketches: Mystery Map, Comp of 2 Reflections.
PROCEDURE:
The first three lessons contain the following strands:
1. instructions on transforming a figure,
2. investigations on the properties of the transformation, and
3. finding coordinate rules for the transformations.
The lesson on composition of transformations investigates coordinate rules for
compositions as well as theorems relating the composition of reflections to other
isometries.
• Divide the class into thirds, and assign one of the following topics to each third:
Translations Reflections Rotations
• Within each third, put students in pairs to work on the computer lab, giving each
student a copy of the appropriate worksheet to record observations and justifications.
• Allow students to work through the lab.
• Allow each third to compare their results.
• Each third should select a presenter and a keyboardist to lead a discussion of their
topic to the entire class.

TEXTEAM Geometry Institute 2.14
• After all three presentations are given, put students in pairs to work through the
Compositions of Isometries lab.
• Ask student pairs to lead a discussion of each question after everyone has finished the
lab.

TEXTEAM Geometry Institute 2.15
NOTES TO TEACHER:
• The rotation of 180° is sometimes called a half-turn.
• In the study of functions, the definition of even function is:
The point (x, y) lies on the graph of an even function if and only if the point
(–x, y) also lies on the function.
The definition of an odd function is:
The point (x, y) lies on the graph of an odd function if and only if the point
(–x, –y) also lies on the function.
The connection could be made between the even function definition and a reflection
across the y-axis, and the odd function definition and half-turns.
EXTENSIONS:
Several Institute lessons use isometries:
Isosceles Triangle Exploration
Buried Treasure
Tiling
Connect the Dots
Isometries are used to prove many theorems. See Transformational Geometry by Martin.
Study the relationship between isometry and symmetry. See Symmetry by Hargattai.
SOLUTIONS: (TRANSLATIONS)
1. E. The two areas are equal.
F. Corresponding angle measures and side lengths are equal.
I. If part F is incomplete, then part I should contain observations not listed in part F.
2. D. The red segments have the same slope, making them parallel. The segments have
the same length.
E. A parallelogram. Justifications may include one pair of sides both parallel and
congruent, or both pairs of opposite sides congruent.
3. D. The x-coordinate increased by 3 and the y-coordinate decreased by 2.
E. (x + 3, y – 2)
F. (x + h, y + k)
G. Answers will vary.

TEXTEAM Geometry Institute 2.16
SOLUTIONS: (REFLECTIONS)
1. D. Flip.
F. The two areas are equal. The corresponding angles and sides are congruent.
2. E. The green line is the perpendicular bisector of the red segment.
3. G. (x, – y)
I. (– x, y)
K. (y, x)
SOLUTIONS: (ROTATIONS)
1. E. The two areas are equal.
F. The corresponding angles and sides are congruent.
2. D. The two red segments are congruent, and form a 70° angle.
F. The center of rotation is the center of the circle formed by the traced images.
The red segments are radii of the circle traced by the polygon vertex.
3. F. Answers may vary.
G. (–y, x)
I. (–x, –y)

TEXTEAM Geometry Institute 2.17
SOLUTIONS: (COMPOSITIONS OF ISOMETRIES)
1. E. T(3, –2): (x, y) → (x + 3, y – 2)
G. T(4, –1): (x, y) → (x + 4, y – 1)
H. T(a + c, b + d)
I. Yes, since addition is commutative.
2. A. ℜO, 100°
B. ℜO, (a+b)°
C. Yes, addition is commutative.
3. B. A composition of a translation and a reflection in a line parallel to the translation.
4. B. The composition of reflections with respect to two intersecting lines is a rotation
about the point of intersection. The angle of rotation is twice the measure of the
angle formed by the intersecting lines.
C. A half-turn. (rotation of 180°)
5. E. Translation. Twice the distance between the parallel lines.
TEXTEAM Geometry Institute 2.18
ISOMETRIES
Translations GOAL:
Explore the properties of translations.
PROCEDURE:
1. Investigate the measurements of corresponding parts of translated polygons.
A. Open a new sketch on Sketchpad. • Under the File menu, select New Sketch.
B. Construct a polygon in the shape of an “ ”. • Select the point tool from the toolbar. • While holding down the shift key, click the six corners of the . (The vertices
must be clicked in a clockwise direction around the .) • Under the Construct menu, select Segment. • While holding down the option key, click in the white space. • Under the Edit menu, select Select All Points. • Under the Construct menu, select Polygon Interior.
C. Translate the polygon horizontally 3 inches and vertically 2 inches. • Select the arrow from the toolbar. • Under the Edit menu, select Select All. • Under the Transform menu, select Translate…. • Click on By Rectangular Vector. • Type “3”. (The “3” should appear in the horizontal-box.) • Press the Tab key. • Type “–2”. (The “–2” should appear in the vertical-box.) • Click on “OK”. • Under the Display menu, scroll to Color, then select blue.
D. Measure the area of each polygon. • Click in the white space. • While holding down the shift key, click in the area of each polygon. • Under the Measure menu, select Area.

TEXTEAM Geometry Institute 2.19
E. Manipulate either polygon, and write a conclusion about the relationship between the two areas. • Click-hold-drag various parts of either polygon.
F. Write some conjectures about the angle measures and side lengths of the two
polygons. G. Measure corresponding sides.
• Click in the white space. • While holding down the Shift key, click on a side of the gray polygon followed
by the corresponding side of the blue polygon. (To assure the correct selection, check the bottom, left corner for the message “And Select Segment”.)
• Under the Measure menu, select Length. • Under the Measure menu, select Slope.
H. Measure corresponding angles. • Click in the white space. • To measure an angle: While holding down the Shift key, select three
consecutive vertices. (The angle now selected is the angle whose vertex is the middle point. Therefore, the order points are selected is very important.)
• Under the Measure menu, select Angle. • Click in the white space. • Measure the corresponding angle in the other polygon.
I. Manipulate the polygons. If necessary add to the conjectures made in F based on the measurements from G and H.

TEXTEAM Geometry Institute 2.20
2. Investigate the segments joining corresponding vertices of translated polygons.
A. Construct segments joining two consecutive pairs of corresponding vertices. • Click in the white space. • Under the Display menu, change the color to red. • While holding down the Shift key, click on a vertex of the gray polygon and its
corresponding vertex of the blue polygon. • Under the Construct menu, select Segment. • Repeat the construction to create a segment joining another pair of
corresponding vertices. B. Measure the length and slope of the two red segments. C. Manipulate the polygons by dragging any part of the red lines. D. Write more than one conclusion about the two red segments. E. What type of special quadrilateral is formed by the two red segments and the
two corresponding sides of the polygons? Justify your response.
3. Use coordinates to define a translation.
A. Create a coordinate grid. • Under the Graph menu, select Show Grid. • Under the Graph menu, select Hide Axes. • Under the Graph menu, verify that there is a check mark next to Snap to Grid.
B. Drag each vertex of one polygon to a grid point. C. Find the coordinates of the endpoints of one red segment.
• Click on an endpoint of a red segment. • Under the Measure menu, select Coordinates. • Click-hold-drag the coordinate measure to move it near the point selected. • Repeat for the other endpoint of the red segment.
D. Describe the change from the gray coordinate to the blue coordinate.

TEXTEAM Geometry Institute 2.21
E. In general, any point of the gray polygon has coordinates (x, y). Write the coordinates of the corresponding point of the blue polygon.
T(3, –2): (x, y) → (_______ , _______)
F. Write a general rule for translating a figure h units in the horizontal direction and k units in the vertical direction.
T(h, k): (x, y) → (_______ , _______)
G. Draw a figure below. Sketch the image of the figure under the translation,
T(-3, 4).

TEXTEAM Geometry Institute 2.22
ISOMETRIES
Reflections GOAL:
Explore the properties of reflections.
PROCEDURE:
1. Investigate the measurements of corresponding parts of reflected polygons.
A. Open a new sketch on Sketchpad. • Under the File menu, select New Sketch.
B. Construct a polygon in the shape of an “ ”. • Select the point tool from the toolbar. • While holding down the shift key, click the ten corners of the . (The vertices
must be clicked in a clockwise direction around the .) • Under the Construct menu, select Segment. • While holding down the option key, click in the white space. • Under the Edit menu, select Select All Points. • Under the Construct menu, select Polygon Interior.
C. Reflect the polygon across a line. • Click and hold the segment tool on the toolbar, and select the line tool. • Click-hold-drag to draw a line. • Under the Transform menu, select Mark Mirror. • Click and hold the line tool on the toolbar, and select the segment tool. • Select the arrow from the toolbar. • Under the Edit menu, select Select All. • Under the Transform menu, select Reflect. • Under the Display menu, scroll to Color, then select blue. • Click in the white space. • Select the line of reflection. • Under the Display menu, scroll to Color, then select green.

TEXTEAM Geometry Institute 2.23
D. The orientation of the reflected “ ” (image) is said to be opposite the original “ ” (pre-image).
Describe in words what it means for images to have opposite orientation. E. Measure the area of each polygon.
• Click in the white space. • While holding down the shift key, click in the area of each polygon. • Under the Measure menu, select Area.
F. Manipulate either polygon, and write a conclusion about the relationship between the two areas. Write any other conjectures about angle measures and segment lengths. • Click-hold-drag various parts of either polygon.
G. Measure corresponding sides.
• Click in the white space. • While holding down the Shift key, click on a side of the gray polygon followed
by the corresponding side of the blue polygon. (To assure the correct selection, check the bottom, left corner for the message “And Select Segment”.)
• Under the Measure menu, select Length.
H. Measure corresponding angles. • Click in the white space. • To measure an angle: While holding down the Shift key, select three
consecutive vertices. (The angle now selected is the angle whose vertex is the middle point. Therefore, the order points are selected is very important.)
• Under the Measure menu, select Angle. • Click in the white space. • Measure the corresponding angle in the other polygon.
I. Manipulate the polygons. If necessary add to the conjectures made in F based on the measurements from G and H.

TEXTEAM Geometry Institute 2.24
2. Investigate the relationship between the line of reflection and the segment joining
corresponding points of the pre-image and image.
A. Construct segments joining pairs of corresponding vertices. • Click in the white space. • Under the Display menu, change the color to red. • While holding down the Shift key, click on a vertex of the gray polygon and its
corresponding vertex of the blue polygon. • Under the Construct menu, select Segment. • Click at the intersection of the red and green lines. • Repeat for another pair of corresponding vertices.
B. Measure the distance between the point of intersection and the endpoints of the red segment. • While holding down the shift key, select an endpoint of the red segment. • Under the Measure menu, select Distance. • Click in the white space. • Measure the distance from the intersection and the other endpoint.
C. Measure the angles formed by the red and green lines. D. Manipulate the polygons by dragging any part of the red segment as well as
the green line. E. Describe the relationship between the red segment and the green line.
3. Use coordinates to define a reflection about the coordinate axes.
A. Under the File menu, select New Sketch . B. Create a coordinate grid.
• Under the Graph menu, select Show Grid. • Under the Graph menu, verify that there is a check mark next to Snap to Grid.
C. Plot point (2,1). • Under the Graph menu, select Plot Points… . • Type 2 in the “x-box”, press the tab key, and type 1 in the “y-box”. • Click on “Free Points”. • Press the return key twice to plot the point.

TEXTEAM Geometry Institute 2.25
D. Reflect the point across the x-axis. • Double click on the x-axis to mark it as a mirror. • Select (2,1) .
Under the Transform menu, select Reflect . E. Measure the coordinates of the pre-image and image points.
• While holding down the shift key, select the point (2,1). • Under the Measure menu, select Coordinates.
F. Drag either point around and describe the relationship between the coordinates of the pre-image and image.
G. If point P(x, y) is reflected across the x-axis, then P', the image of P, has
coordinates:
Rx: (x, y) → (_______ , _______ )
H. Delete the image point.
I. Repeat steps D through G to explore reflections across the y-axis.
Ry: (x, y) → (_______ , _______ )
J. Delete the image point.
K. Repeat steps D through G to explore reflections across the line y = x . • Select the line tool from the toolbar. • Click at the origin and drag to (1,1). To assure the correct position, check the
bottom left corner for the message “Passing through…” • Select the arrow tool from the toolbar. • From this point follow steps D through G.
Ry = x: (x, y) → (_______ , _______ )
TEXTEAM Geometry Institute 2.26
ISOMETRIES
Rotations GOAL:
Explore the properties of rotations.
PROCEDURE:
1. Investigate the measurements of the corresponding parts of rotated polygons.
A. Open a new sketch on Sketchpad.
• Under the File menu, select New Sketch.
B. Construct a polygon in the shape of a “ ”, in the lower right corner of the
sketch.
• Select the point tool from the toolbar. • While holding down the shift key click the eight corners of the . (The
vertices must be clicked in a clockwise direction around the .) • Under the Construct menu, select Segment. • While holding down the option key, click in the white space. • Under the Edit menu, select Select All Points. • Under the Construct menu, select Polygon Interior.
C. Rotate the polygon 70° about a fixed point (the center of rotation).
• Select the point tool from the toolbar. • Click in the center of the screen. • Under the Transform menu, select Mark Center. • Select the arrow tool from the toolbar. • Under the Edit menu, select Select All. • Under the Transform menu, select Rotate…. • Type “70”. (The “70” should appear in the By-box) • Click on “OK”. • Under the Display menu, scroll to Color, then select blue.
TEXTEAM Geometry Institute 2.27
D. Measure the area of each polygon. • Click in the white space. • While holding down the shift key, click in the area of each polygon. • Under the Measure menu, select Area.
E. Manipulate either polygon, and write a conclusion about the relationship between the two areas. • Click-hold-drag various parts of either polygon.
F. Write some conjectures about the angle measures and side lengths of the two
polygons. G. Measure corresponding sides.
• Click in the white space. • While holding down the Shift key, click on a side of the gray polygon followed
by the corresponding side of the blue polygon. (To assure the correct selection, check the bottom, left corner for the message “And Select Segment”.)
• Under the Measure menu, select Length.
H. Measure corresponding angles. • Click in the white space. • To measure an angle: While holding down the Shift key, select three
consecutive vertices. (The angle now selected is the angle whose vertex is the middle point. Therefore, the order points are selected is very important.)
• Under the Measure menu, select Angle. • Click in the white space. • Measure the corresponding angle in the other polygon.
I. Manipulate the polygons. If necessary add to the conjectures made in F based on the measurements from G and H.

TEXTEAM Geometry Institute 2.28
2. Investigate the segments joining corresponding vertices of the polygons to the center
of rotation.
A. Construct segments joining corresponding vertices to the center of rotation. • Click in the white space. • Under the Display menu, change the color to red. • While holding down the Shift key, click on a vertex of the gray polygon and
the center of rotation. • Under the Construct menu, select Segment. • Repeat the construction to create a segment joining the corresponding vertex
to the center of rotation. B. Measure the length of the two red segments, and the angle they form. C. Manipulate the polygons by dragging any part of the red lines. D. Write more than one conclusion about the two red segments. E. Trace the polygon interior about the center of rotation.
• Click the interior of the blue polygon. • Under the Display menu, select Trace Polygon. • Click and hold the arrow tool from the toolbar, and scroll over to the
rotation arrow. • Click-hold-drag either polygon interior.
F. Describe the relationship between the traced images and the center of rotation. How do the red segments fit into this relationship?
G. Turn off the Trace Polygon.
• Select the blue polygon. • Under the Display menu, select Trace Polygon.

TEXTEAM Geometry Institute 2.29
3. Use coordinates to define a rotation of 90° and 180° about the origin.
A. Under the File menu, select New Sketch . • Under the Display menu, select Preferences…. • Click on Points, then “OK”.
B. Create a coordinate grid. • Under the Graph menu, select Show Grid. • Under the Graph menu, verify that there is a check mark next to Snap to Grid.
C. Plot point (2, 1). • Under the Graph menu, select Plot Points…. • Type 2 in the x-box, press the tab key, and type 1 in the y-box. • Click on “Free Points”. • Press the return key twice to plot the point.
D. Rotate the point, about the origin, 90°. • Double click on the origin to mark it as the center of rotation. • Select (2,1). • Under the Transform menu, select Rotate…, by 90°.
E. Measure the coordinates of the pre-image and image points. • While holding down the shift key, select the point (2, 1). • Under the Measure menu, select Coordinates.
F. Drag either point around and describe the relationship between the coordinates of the pre-image and image.
G. If point P(x, y) is rotated about the origin O, then P', the image of P, has
coordinates:
ℜO, 90°: (x, y) → (_______ , _______ ) H. Delete the image point. I. Repeat steps D through G to explore rotations of 180°.
ℜO, 180°: (x, y) → (_______ , _______ )

TEXTEAM Geometry Institute 2.30
ISOMETRIES
Compositions of Isometries GOAL:
Investigate the connections among translations, rotations, reflections and their
compositions.
PROCEDURE:
1. Investigate the composition of two translations.
A. Open a new sketch on Sketchpad. B. Create Axes under the Graph menu and Show Grid. C. Construct a polygon in the 2nd quadrant (upper left). D. Translate the polygon horizontally 3 inches (right) and vertically 2 inches
(down) and color the translated polygon red. E. Write a rule for the translation defined in C.
T(_____, _____): (x, y) → (x + 3, y – 2)
F. Translate the red polygon horizontally 1 inch (right) and vertically 1 inch
(up) and color the second translation blue. G. Measure the coordinates of a one or more pairs of corresponding vertices of
the original polygon and the blue polygon. Drag the vertex around and observe the relationship between the coordinates. Write a single transformation which maps the original polygon to the blue polygon.
H. Write a general statement describing the composition of two translations.
T(a, b) ° T(c, d) = T(_______, _______)
I. Are compositions of translations commutative? Explain.

TEXTEAM Geometry Institute 2.31
2. Investigate the composition of two rotations.
A. Write a rule for a 70° rotation about a point O, composed with a 30° rotation about the same point.
ℜ O, 30° ° ℜ O, 70° = ℜ _______, _______
B. Write a general statement describing the composition of two rotations about a common center of rotation.
ℜ O, a° ° ℜ O, b° = ℜ _______, _______
C. Are compositions of two rotations about a common center of rotation commutative? Explain.
3. Identify a “Mystery Map”.
A. Open the sketch titled, “Mystery Map”. B. Write the compositions of transformations used to create the footprints.
4. Investigate the composition of two reflections with respect to intersecting lines.
A. Open the sketch titled, “Comp of 2 reflections”. B. Write a general statement about the composition of two reflections with
respect to intersecting lines. C. What single transformation would give the same result as a composition of
two reflections with respect to a pair of perpendicular lines?
TEXTEAM Geometry Institute 2.32
5. Investigate the composition of two reflections with respect to parallel lines.
A. Open a new sketch. B. Construct any polygon. C. Draw a line and reflect the polygon with respect to the line. D. Construct a line parallel to the line of reflection and reflect the second
polygon with respect to the parallel line. E. Find a single transformation that will map the original polygon to the final
polygon. How is this transformation related to the distance between the two parallel lines?
EXTENSION:
Investigate the following two theorems, using Sketchpad or by cutting out congruent
triangles.
Theorem: Any composition of congruence mappings (isometries) can be written as one
of the following transformations: translation, rotation, reflection, or glide
reflection.
Theorem: Any congruence mapping can be written as a composition of at most three
reflections.

TEXTEAM Geometry Institute 2.32
MIDSEGMENT RELATIONSHIPS
Institute Notes Lesson Pages Time TEKS
Midsegment Investigation 10 min. 5b
MATERIALS AND SETUP
Computer demonstration with Geometer’s Sketchpad installed
LEARNING STYLES
Technology
MATH LINKS
Similarity, calculus
LESSON OVERVIEW
This activity deals with midsegment relationships in triangles and quadrilaterals using
either a TI-92 or Sketchpad. On Sketchpad it is a more advanced lesson with fewer
detailed computer instructions. Trainers give the participants an overview of the lesson.
They may try it later on their TI-92s.
The lesson extends the use of the median of a trapezoid in the Buried Treasure
problem. It is a good example of the scope of ideas that can be investigated with
technology. The first part deals with a traditional topic: the midsegment of a triangle. But
it quickly moves into more non-traditional ideas, such as nesting triangles and joining
midpoints in quadrilaterals and other polygons. The technology allows students to easily
construct images and look at a wide variety of examples to gain intuition about the
questions posed.
On Sketchpad, the lesson makes use of an interesting feature of the software: script
tools. These must be installed on the machines before teachers can easily create the
figures. Constructing geometric figures such as rectangles and trapezoids without the
script tools is a worthwhile exercise as it requires that the user understand the geometric
properties of the figures. Although the task is a valuable experience, it takes time away
from the goals of this particular lesson.

TEXTEAM Geometry Institute 2.33

TEXTEAM Geometry Institute 2.34
NOTES

TEXTEAM Geometry Institute 2.34
TRIANGLE MIDSEGMENT INVESTIGATION
Teacher Guide GOAL:
Investigate the relationships formed when the midsegment of a triangle or other
polygon is drawn.
PREREQUISITES:
Definition of midpoint of a segment.
MATERIALS:
Computer lab worksheet and a computer.
PROCEDURES:
• Put students in pairs to work on the computer lab, giving each student a copy of the
worksheet to record their conjectures and justifications.
• Allow students to work through the lab.
• Ask student pairs to lead the discussion of each question after everyone has finished
the lab. Encourage students to offer alternate conjectures and let the class discuss the
validity of each conjecture. Each conjecture should be justified.
SOLUTIONS:
Note: These are general solutions. Students should be encouraged to put the conjectures
in their own words and provide alternate conjectures, no matter how trivial.
1. The areas of the four interior triangles are equal. The perimeters of these triangles are
also equal.
2. The lengths of the midsegments are 1/2 the lengths of the parallel sides of the original
triangle.
3. Each side of the original triangle has a slope equal to a side of the triangle formed by
the midsegments. Therefore, a midsegment joining two sides of a triangle is parallel
to the third side of the triangle.
4. Corresponding angles of the four smaller triangles and of the large triangle are
congruent. These angles are congruent because of the various angle relationships
formed by parallel lines.

TEXTEAM Geometry Institute 2.35
5. All of the corresponding angles are congruent. The length of each midsegment is 1/2
the length of the midsegment before it. Thus, the length of a midsegment nested n
times is 1/2n of the length of the original side.
6. The nested triangles approach the centroid of the triangle.
TEXTEAM Geometry Institute 2.36
EXTENSION SOLUTIONS:
1. a. rectangle
b. rhombus
c. rhombus
d. parallelogram
e. rectangle
f. parallelogram
2. For any concave or convex quadrilateral, the segments joining consecutive midpoints
form a parallelogram.
3. a. regular pentagons continue to be formed
b. no pattern
c. regular hexagons continue to be formed
d. no pattern
e. regular octagons continue to be formed
f. no pattern

TEXTEAM Geometry Institute 2.37
MIDSEGMENT INVESTIGATION
GOAL:
Investigate the relationships formed when the midsegment of a triangle or other
polygon is drawn.
Sketchpad TIPS:
• To select more than one object, hold the down the Shift key while selecting the
objects.
• To use the Measure or Construct menus, select the required objects first. Then go to
the menu bar. (For example: To construct a midpoint: select the segment; select
Midpoint from the Construct menu. To measure an angle: select the three vertices
which determine the angle; select Angle from the Measure menu.)
• Be sure to select the arrow tool from the toolbar when you want to select any objects.
• You can create scripts to duplicate more complicated constructions. (This may be
useful when you are constructing the nested triangles in #5.) To do this, make the
construction. Select the entire construction by dragging a box around the objects.
Then select the command Make Script under the Work menu. Now the construction
can be repeated by selecting the prerequisite objects and playing the script. If the
script is saved into the "Sample Scripts" folder, the script will become a script tool
and can be accessed from the toolbar by holding down the key.
• Be sure your constructions are rigid. To do this, drag the sketch around to see if the
properties hold true. Always use the Construct menu to create things like right angles
and midpoints. NEVER place an object by what "looks" right unless you want it to be
a random placing.
PROCEDURE:
• Draw a triangle using the segment tool.
• Construct the midpoints of each side of the triangle and create a triangle with these endpoints.
• Drag a vertex of the large triangle. The midsegments should remain midsegments.

TEXTEAM Geometry Institute 2.38
Use the tools provided in Sketchpad to make measurements to investigate the following
questions. Be sure to drag each sketch to see a variety of triangles before making any
conclusions. Include any pictures with labels that are needed to clarify your conclusions.
1. Construct the polygon interiors of each triangle by selecting the vertices of the
triangle. Measure the area and perimeter of each polygon. What do you notice? How
can you explain this?
2. Measure the sides of each of the triangles by selecting each side. (It might be useful
to label the points first using the “hand” on the toolbar.) What is the relationship
between the length of the sides of the original triangle and the lengths of the
midsegments? How can you explain this?
3. Measure the slope of the sides of each triangle by selecting each side. What is the
relationship between the slopes of the sides of the original triangle and the triangle
formed by the midpoints? What does this tell you about the midsegment of a triangle
and a side of the triangle?

TEXTEAM Geometry Institute 2.39
4. Measure the angles in each of the triangles. What do you notice? How can you
explain this?
5. Construct the midpoints of the midsegments of the original triangle. Construct
another triangle. Repeat this to create a nest of triangles. Make some conclusions
about the nested triangles.
EXTENSION:
What is the limit of an infinite number of these iterations?

TEXTEAM Geometry Institute 2.40
MIDSEGMENT EXTENSION PROCEDURE:
Repeat the procedures in the Midsegment Investigation beginning with a quadrilateral.
Make some conclusions about nested quadrilaterals. Use script tools to create special
types of quadrilaterals. Explain your answers.
1. For each of the quadrilaterals named below, join, in order, the midpoints of the sides.
What special kind of quadrilateral do you appear to get? Include a picture of your
sketch.
a. rhombus
b. rectangle
c. isosceles trapezoid
d. random trapezoid
e. kite
f. parallelogram
2. Investigate nested quadrilaterals. Start with a random quadrilateral with no congruent
sides. Test your conclusions for concave, as well as convex quadrilaterals.
Write a report including a sketch and justifications of your conclusions.

TEXTEAM Geometry Institute 2.41
3. Investigate nested pentagons, hexagons etc. Use the script tools to construct regular
(equilateral and equiangular) polygons. Then draw your own polygons by connecting
the correct number of segments. What patterns, if any, occur?
a. regular pentagon
b. random pentagon
c. regular hexagon
d. random hexagon
e. regular octagon
f. random octagon
TEXTEAM Geometry Institute 2.42
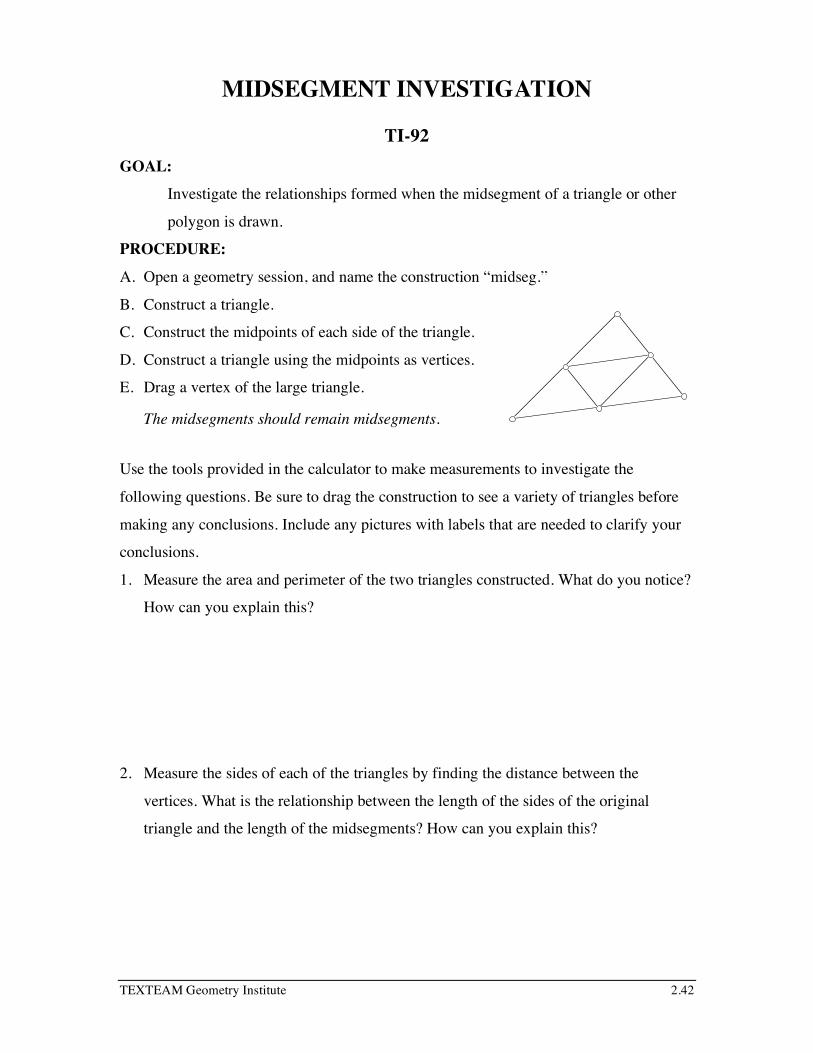
MIDSEGMENT INVESTIGATION
TI-92 GOAL:
Investigate the relationships formed when the midsegment of a triangle or other
polygon is drawn.
PROCEDURE:
A. Open a geometry session, and name the construction “midseg.”
B. Construct a triangle.
C. Construct the midpoints of each side of the triangle.
D. Construct a triangle using the midpoints as vertices.
E. Drag a vertex of the large triangle.
The midsegments should remain midsegments.
Use the tools provided in the calculator to make measurements to investigate the
following questions. Be sure to drag the construction to see a variety of triangles before
making any conclusions. Include any pictures with labels that are needed to clarify your
conclusions.
1. Measure the area and perimeter of the two triangles constructed. What do you notice?
How can you explain this?
2. Measure the sides of each of the triangles by finding the distance between the
vertices. What is the relationship between the length of the sides of the original
triangle and the length of the midsegments? How can you explain this?

TEXTEAM Geometry Institute 2.43
3. What relationship (if any) is there between the sides of the original triangle and the
sides of the triangle formed by the midpoints? What does this tell you about the
midsegment of a triangle and a side of the triangle?
4. Measure the angles in each of the triangles. What do you notice?
How can you explain this?
5. Construct the midpoints of the midsegments of the original triangle. Construct
another triangle. Repeat this to create a nest of triangles.
Make some conclusions about the nested triangles.
(Helpful Hint: Clear All before beginning this construction, to speed calculator.)
EXTENSION:
What is the limit of an infinite number of these iterations?

TEXTEAM Geometry Institute 2.44
MIDSEGMENT INVESTIGATION
TI-92 Operation Commands
TI-92 Operations Keystrokes Angle measurement.
Select the three points of the angle so that the vertex, of the desired angle, is the middle point selected.
3:Angle (Move until THIS POINT appears)
(Move until THIS POINT appears)
(Move until THIS POINT appears)
Area of a triangle measurement.
2:Area
(Move until THIS TRIANGLE appears)
Calculator entry. Press the cursor pad to scroll through measurements on the screen.
Press ENTER to display the variable name of the selected measurement in the calculation entry line.
The calculation entry is the interface for entering mathematical expressions involving geometric measurements.
6:Calculate
Clear All. 8:Clear All Delete selected object. ← Distance between two points. 1:Distance&Length
(Move until DISTANCE FROM THIS POINT appears)
(Move until TO THAT POINT appears)
Drag point. (Move until THIS VERTEX POINT appears) Hold
Midpoint construction. 3: Midpoint (Move until MIDPOINT OF THIS
SIDE OF THE TRIANGLE appears) (Repeat for the remaining two sides)
Open a geometry session. 8:Geometry 3:New “session name”
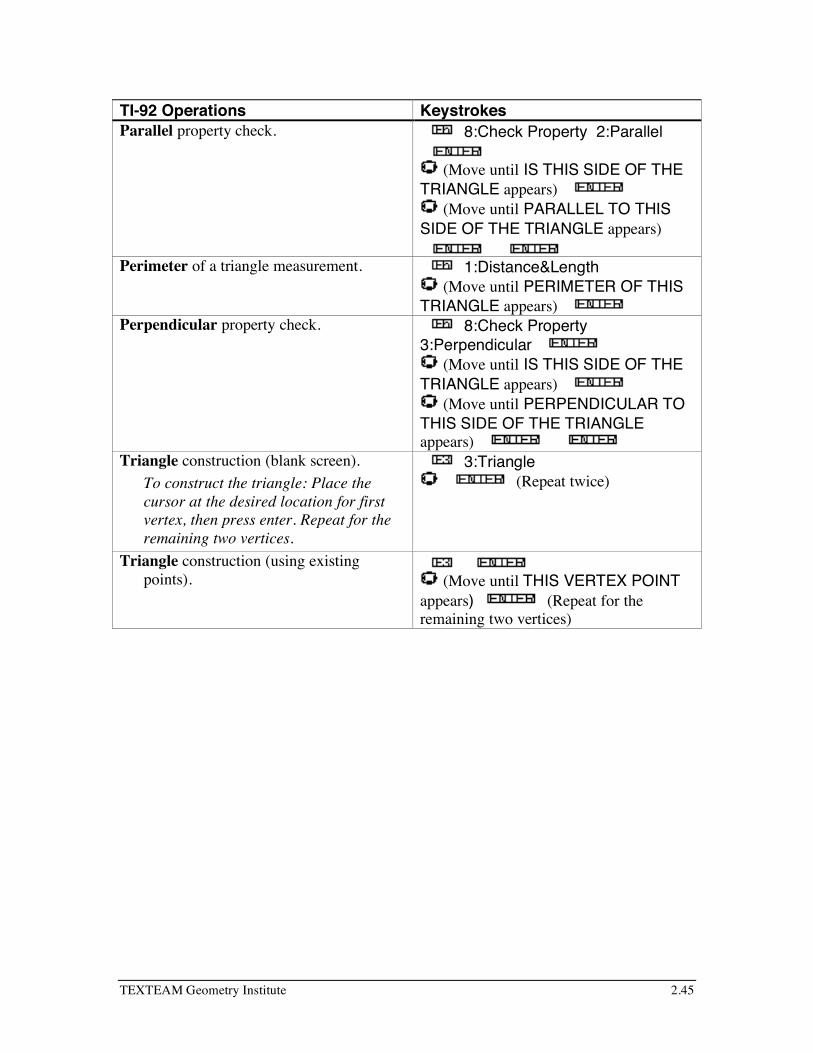
TEXTEAM Geometry Institute 2.45
TI-92 Operations Keystrokes Parallel property check. 8:Check Property 2:Parallel
(Move until IS THIS SIDE OF THE
TRIANGLE appears) (Move until PARALLEL TO THIS
SIDE OF THE TRIANGLE appears)
Perimeter of a triangle measurement. 1:Distance&Length (Move until PERIMETER OF THIS
TRIANGLE appears) Perpendicular property check. 8:Check Property
3:Perpendicular (Move until IS THIS SIDE OF THE
TRIANGLE appears) (Move until PERPENDICULAR TO
THIS SIDE OF THE TRIANGLE appears)
Triangle construction (blank screen). To construct the triangle: Place the cursor at the desired location for first vertex, then press enter. Repeat for the remaining two vertices.
3:Triangle (Repeat twice)
Triangle construction (using existing points).
(Move until THIS VERTEX POINT
appears) (Repeat for the remaining two vertices)

TEXTEAM Geometry Institute 2.48
LET’S GET TO THE CENTER OF THIS!!! Teacher Guide
GOAL:
Find the different centers of triangles by folding. Reinforce understanding of
medians, altitudes, angle bisectors, and perpendicular bisectors.
MATERIALS:
Pencil, paper, scissors, ruler, tape or glue, compass, straightedge.
PREREQUISITES:
Angle bisector, perpendicular bisector, median, altitude, tangent to a circle.
NOTES TO TEACHER:
This lesson is designed for groups to work through independently. Depending on the
level of your students and their ability to work independently, you may need to provide
more direct instruction. On Triangle 3, you can have students measure the lengths of the
segments formed by the centroid to find their ratios. (The vertex to centroid equals twice
the distance from the centroid to the midpoint of the opposite side, or 2/3 the length of the
median.) Suggest that students trace the folds with a pencil and straight edge to see
results more clearly.
PROCEDURE:
1. Form groups of 3 if possible.
2. Either let the groups complete all the questions before a class discussion of their
results or have discussion after each question.
3. Repeat for right triangles and obtuse triangles and report. Divide class and have a
discussion of results.
Alternative procedure:
Assign one type of fold for each group and compare results.

TEXTEAM Geometry Institute 2.49
SOLUTIONS:
Triangle 1
• They all meet at one point—they are concurrent.
• The point is equidistant from all 3 sides because an angle bisector is the locus of all
points equidistant from the two rays that form the sides.
• Inscribed
Triangle 2
• They all meet at one point.
• The point is equidistant from the 3 vertices because a perpendicular bisector is the
locus of all points equidistant from the segment endpoints.
• Circumscribed
Triangle 3
• They all meet at one point.
Triangle 4
• They all meet at one point.
EXTENSIONS:
Explore the different centers using special cases like isosceles, right, equilateral, and
obtuse triangles. Determine where the different centers lie. This lesson could easily be
adapted for the computer, TI-92, MIRA, or constructions.

TEXTEAM Geometry Institute 2.50
LET’S GET TO THE CENTER OF THIS!!! GOAL:
Find the different centers of triangles by folding.
PROCEDURE:
1. Work in a group sharing tasks.
2. Cut out 4 large acute scalene triangles that are congruent by:
• folding a piece of notebook paper into fourths,
• using a straightedge, draw a large acute scalene triangle on the top fourth, and cut
it out to get 4 congruent triangles.
• Number the triangles 1, 2, 3, and 4.
3. Complete the four triangle folding problems below.
4. After the second step in each problem, glue or tape your triangle down to a sheet of
paper.
• Name the center it makes.
• Explain what lines form the center and why.
5. Explain in writing or orally to the class (as your teacher directs) your procedure and
conclusions.
PROBLEMS:
TRIANGLE 1
1. Fold the angle bisectors:
• Start at a vertex and align one ray of the angle on top of the other.
• Crease along the fold line to form the angle bisector.
• Pass triangle to the next person until all three angle bisectors have been folded.

TEXTEAM Geometry Institute 2.51
2. State a conclusion about the three angle bisectors.
• The point where they all meet is called the incenter.
• The incenter is equidistant from some parts of the triangle.
Use a ruler to discover which parts.
• Explain why this occurs.
3. Use a compass to draw a circle with center at the incenter that is tangent to each side
of the triangle 1.
• Explain how to determine the radius of this circle.
• State a relation between the circle and Triangle 1.
• How can this fact help one to recall the name of this point?
TRIANGLE 2
1. Fold the perpendicular bisectors:
• Bring the 2 endpoints of a side together.
• Crease along the fold line to form the perpendicular bisector of the side.
• Pass the triangle to the next person until all three perpendicular bisectors have
been folded.
2. State a conclusion about the three perpendicular bisectors.
• The point where they all meet is called the circumcenter.
• The circumcenter is equidistant from some parts of the triangle. Use a ruler to
discover which parts.
• Explain why this occurs.
3. Use a compass to draw a circle with center at the circumcenter that passes through
only three points of Triangle 2.
• Explain a way to determine the radius of this circle.
• State a relation between this circle and Triangle 2.
• How can this fact help one to recall the name of this point?

TEXTEAM Geometry Institute 2.52
TRIANGLE 3
1. Fold the medians:
• Pinch the midpoint by folding 2 adjacent vertices on top of each other.
• Use a straightedge to fold from the midpoint to the opposite vertex.
• Pass the triangle to the next person until all three medians have been folded.
2. State a conclusion about the three medians.
• The point where they all meet is called the centroid.
• Carefully poke the point of a pencil or compass through the centroid.
Does the triangle balance?
Try this with a different point.
• The centroid is the center of gravity for Triangle 3.
• Use this fact to remember the name of this point.
TRIANGLE 4
1. Fold the altitudes:
• Slide one of the endpoints of a side along the side until the fold touches the vertex
opposite that side.
• Crease along the fold line to form the altitude.
• Pass the triangle to the next person until all three altitudes have been folded.
2. State a conclusion about the three altitudes.
• The point where they all meet is called the orthocenter.
• Orthogonal is another word for perpendicular.
• Use this fact to remember the name of this point.
TEXTEAM Geometry Institute 2.56
SURPRISING INTERSECTIONS IN TRIANGLES Teacher Guide
GOAL:
Demonstrate that, in a triangle, the three medians intersect in a point, the three
perpendicular bisectors intersect in a point and the three altitudes intersect in a
point.
PREREQUISITES:
Median, perpendicular bisector, altitude, similar triangles and ratios,
parallelogram, locus.
MATERIALS:
Large cardboard triangle, metal ruler, pin or compass point.
NOTES TO TEACHER:
This is designed as three teacher-led discusions and demonstrations.
They may be used together or at separate times.
PROCEDURE:
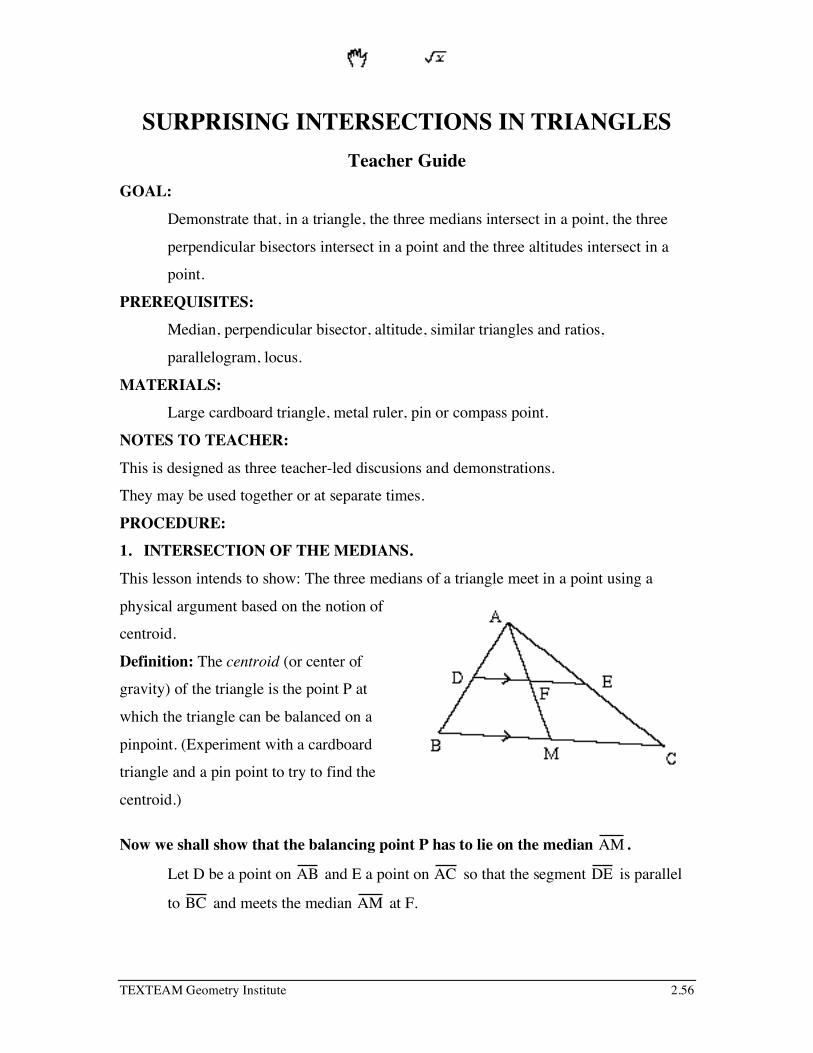
1. INTERSECTION OF THE MEDIANS.
This lesson intends to show: The three medians of a triangle meet in a point using a
physical argument based on the notion of
centroid.
Definition: The centroid (or center of
gravity) of the triangle is the point P at
which the triangle can be balanced on a
pinpoint. (Experiment with a cardboard
triangle and a pin point to try to find the
centroid.)
Now we shall show that the balancing point P has to lie on the median AM .
Let D be a point on AB and E a point on AC so that the segment DE is parallel
to BC and meets the median AM at F.

TEXTEAM Geometry Institute 2.57
Then F is the midpoint of DE by a similar triangles argument.
∆ADF ~ ∆ABM and ∆AEF ~ ∆ACM.

TEXTEAM Geometry Institute 2.58
Therefore, DFBM
=AF
AM and AF
AM=EF
CM and, by transitivity, DF
BM=EF
CM.
But since M is the midpoint of BC , BM = CM and so DF = EF,
making F the midpoint of DE .
Place a straight edge along the median AM . If the segment DE were a toothpick, it's
midpoint would lie on the straight edge and the toothpick would balance on the straight
edge.
∆ABC can be thought of as a row of toothpicks of varied lengths all parallel to BC and
each with its midpoint on AM . All the toothpicks balance on the straight edge along
AM .
In other words, the entire triangle balances on a straight edge along the median.
It follows that the centroid P lies on AM .
The same argument shows that P also lies on the other 2 medians.
Hence the three medians meet at P, the centroid.
2. INTERSECTION OF THE PERPENDICULAR BISECTORS.
Show: The three perpendicular bisectors of the sides of ∆ABC meet in a point, Q.
Let LA, LB, LC be the perpendicular bisectors of BC , AC , and AB , respectively.
LA is the locus of all points in the plane equidistant from B and C.
Similarly, LB is the locus of all points
equidistant from A and C.
The point Q where LA meets LB is then
equidistant from A and B and must,
therefore, lie on LC , the perpendicular
bisector of AB .
Q is called the circumcenter of the
triangle.
TEXTEAM Geometry Institute 2.59
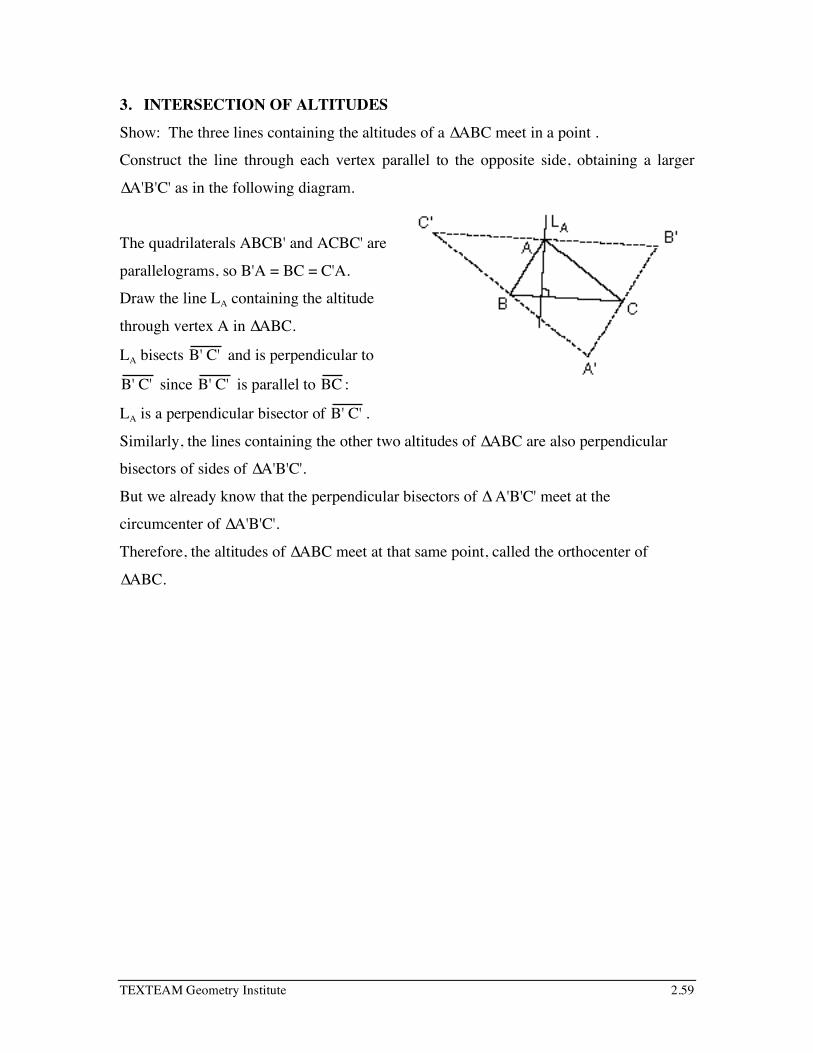
3. INTERSECTION OF ALTITUDES
Show: The three lines containing the altitudes of a ∆ABC meet in a point .
Construct the line through each vertex parallel to the opposite side, obtaining a larger
∆A'B'C' as in the following diagram.
The quadrilaterals ABCB' and ACBC' are
parallelograms, so B'A = BC = C'A.
Draw the line LA containing the altitude
through vertex A in ∆ABC.
LA bisects B' C' and is perpendicular to
B' C' since B' C' is parallel to BC :
LA is a perpendicular bisector of B' C' .
Similarly, the lines containing the other two altitudes of ∆ABC are also perpendicular
bisectors of sides of ∆A'B'C'.
But we already know that the perpendicular bisectors of ∆ A'B'C' meet at the
circumcenter of ∆A'B'C'.
Therefore, the altitudes of ∆ABC meet at that same point, called the orthocenter of
∆ABC.

TEXTEAM Geometry Institute 2.45
CONCURRENT LINES Institute Notes
Lesson Pages Time TEKS
Let’s Get to the Center of This!!! 20 min. 3b, 5b, 9a, 11a
Surprising Intersections in Triangles 20 min. 3b, 5b, 9a, 11a
Centers of a Triangle 30 min. 3b, 5b, 9a, 11a
The Euler Line 30 min. 3b, 5b, 9a, 11a
The Nine-Point Circle 10 min. 3b, 5b, 9a, 11a
MATERIALS AND SETUP
Various shaped large cardboard triangles, computer lab with Geometer’s Sketchpad
installed
LEARNING STYLES
Cooperative learning, hands on, technology
MATH LINKS
Algebra, coordinate geometry, circles
OTHER LINKS
Physics
LESSON OVERVIEWS
A study of the Euler Line is an excellent review and summary of many properties of
the triangle. These lessons demonstrate that geometry may be approached using a variety
of learning styles.
Let’s Get to the Center of This!!!
This hands on activity builds intuition about the incenter, circumcenter, centroid and
orthocenter of a triangle. Form groups of four. Each participant follows the instructions
for folding one of the triangles, then results are compared within each group.
Surprising Intersections in Triangles

TEXTEAM Geometry Institute 2.46
Using large cardboard triangles, groups demonstrate that the triangle may be balanced
along each median. They then demonstrate that the triangle can be balanced on the point
of a pencil located at the center of gravity, the intersection of the three medians.

TEXTEAM Geometry Institute 2.47
Centers of a Triangle
Centers of a Triangle uses Sketchpad to quickly construct the centroid, orthocenter
and circumcenter of a triangle. Then, by manipulating the constructions, the collinearity
of these three points is easily observed. The lesson extends the hands-on and algebraic
approaches to discovering and verifying the existence of the Euler Line. When used in
the classroom, this lesson assumes the student has an understanding of the centers of a
triangle and their construction. The last section of the lesson refers to a presentation
sketch which comes with Sketchpad and nicely summarizes all the centers of a triangle
and their constructions. In the classroom, students should be encouraged to refer back to
the sketch to review the terminology.
Ask the participants to go through the lesson and investigate the presentation sketch
which follows. The sketch demonstrates the use of action buttons on Sketchpad, which,
with some guidance, are not difficult to incorporate into teacher demonstrations.
Euler Line
This lesson is an excellent example of the connection between algebra and geometry.
It uses algebra to discover the coordinates of the different centers (centroid, circumcenter
and orthocenter) of the triangle. These coordinates are then used to show that the centers
of a triangle lie on the same line—the Euler Line.
There are two parts to the Euler Line Activity(using either variable or numerical
coordinates). As a group, complete Part I, which will be used as a reference for Parts II-
IV. Then separate the participants into three groups, each of which is to complete one of
the Parts II, III, and IV. (There can be many groups within the three groups.) Use the
answers from each group to complete Part V.
The Nine Point Circle
Participants may only have time for an overview during the Institute. This lesson may
be considered an enrichment activity for students or a long term project. It is a nice
integration of geometry and algebra. The computer can be used to check the student’s
algebra along the way, by “measuring” coordinates and equations.

TEXTEAM Geometry Institute 2.48
HISTORICAL NOTES
The coordinate proof of the Euler Line is an example of something that cannot
conveniently be proven in geometry without the use of algebra. The fact that the centroid,
circumcenter, and orthocenter are collinear was first discovered by Leonhard Euler
(1707-1783) two thousand years after Euclid. Purely geometric proofs seem to be much
harder and rather obscure.

TEXTEAM Geometry Institute 2.49
NOTES
TEXTEAM Geometry Institute 2.60
THE EULER LINE Teacher Guide
GOAL:
Use algebra to discover the Euler Line.
MATERIALS:
Euler Line Worksheet(s).
PREREQUISITES:
Write linear equations given a point and slope.
Determine slope and midpoint given two points.
PROCEDURE:
• Depending on the level of the class, use either IA, the Euler Line with Numerical
Coordinates (easier), or IB, the Euler Line with Variable Coordinates (more difficult).
• The remaining pages (Centroid, Circumcenter, Orthocenter and Conclusion) are the
same and are to be used with either first page.
• Divide the class into groups. Have each group complete the first page. Each group is
then assigned either the Centroid, Circumcenter, or Orthocenter page to complete
(more than one group may work on each part). The Centroid page involves a little
more work—questions 6, 7 and 8 can easily be omitted.
• After each group has completed their section, ask for results and complete the
conclusion page as a class.
Part I: Group Activity—to be used as a reference for Parts II - IV.
Version A uses specific coordinates of vertices of a triangle.
Version B uses variable coordinates of vertices of a triangle (more
difficult).
Part II : The Centroid
Part III : The Circumcemter
Part IV : The Orthocenter
!
" #
$ #
Have one group complete each part.
Part V: Class activity. Combine results from parts II - IV to reach the Euler line
conclusion.

TEXTEAM Geometry Institute 2.61
SOLUTIONS:
Euler Line Discovery Numerical Coordinates
IA. 1. D(12, 6); E(3, 6); F(9, 0) 2. slope AC = 2; slope BC= –1, slope AB= 0 3. slope perpendicular to AC = ! 1
2, slope perpendicular to BC = 1, slope
perpendicular to AB is undefined (vertical line) II. 1. slope AD = 1
2; slope BE= ! 2
5; slope CF = –4
2. Medians
3. AD : y = 12 x; BE : y = ! 2
5x !18( ) ; CF : y = !4 x ! 9( )
4. (8, 4) 5. Yes 6. 8 7. 4 8. (8, 4) The coordinates of the centroid are the averages of the coordinates of the
vertices. III. 1. Slope of perpendicular bisector to AC = ! 1
2; slope of perpendicular bisector to
BC = 1; slope of perpendicular bisector to AB undefined (vertical line) 2. perpendicular bisector of AB : x = 9;
perpendicular bisector of AC : y – 6 = – 12x ! 3( ) ;
perpendicular bisector of BC : y – 6 = x – 12 3. (9, 3) 4. Yes
IV. 1. 1 2. !
1
2
3. Undefined 4. altitudes 5. altitude from A: y = x; altitude from B: y = ! 1
2x !18( ) ; altitude from C: x = 6
6. (6, 6) 7. Yes
V. 1. –1 2. –1 3. Same
The line from the centroid through the circumcenter is the same as the line from the centroid through the orthocenter. That is, the three points lie on the same line.

TEXTEAM Geometry Institute 2.62

TEXTEAM Geometry Institute 2.63
Euler Line Discovery Variable Coordinates
IB. 1. D(c2 ,
a + b 2 ); E (
c2 ,
b2 ); F(
a2 , 0)
2. slope AC = cb ; slope BC=
c a – b ;
slope AB= 0
3. slope perpendicular to AC = – bc ;
slope perpendicular to BC= a – b
c
slope perpendicular to AB is undefined (vertical line)
II. 1. slope AD= c
a + b ; slope BE= c
b – 2a ;
slope CF = 2c
2b – a
2. medians
3. AB : y = c
a + b x; BE : y = 2
b – 2a (x – a) ;
DF : y – c = 2c
2b – a (x – b)
4. (a + b
3 , c3 )
5. Yes
6. a + b
3
7. c
3
8. (a + b
3 , c3
) The coordinates of the centroid are the averages of the coordinates of
the vertices.
III. 1. slope of perpendicular bisector to AC = – bc ;
slope of perpendicular bisector to BC= a – b
c
slope of perpendicular bisector to AB is undefined (vertical line)

TEXTEAM Geometry Institute 2.64
2. perpendicular bisector of AB : x = a2 ;
perpendicular bisector of AC : y – c2 = –
bc(x –
b2)
perpendicular bisector of BC : y ! c2
=a ! b
c
" #
$ % x !
a + b
2
" #
$ %
3. (a2 ,
c2 + b2 – ab 2c )
4. Yes
IV. 1. a – b
c
2. – bc
3. Undefined
4. altitudes
5. altitude from A: y = a – b
c x;
altitude from B: y = – bc(x – a) ;
altitude from C: x = b
6. (b, ab – b2
c )
7. Yes
V. 1. c2 + 3b2 – 3ab
ac – 2bc
2. c2 + 3b2 – 3ab
ac – 2bc
3. Slopes are equal.
Slope of line from the centroid through the circumcenter is the same as the slope of the
line from the centroid through the orthocenter. That is, the three points are collinear (lie
on the same line).

TEXTEAM Geometry Institute 2.65
IA. THE EULER LINE WITH NUMERICAL
COORDINATES Triangle ABC has coordinates A(0, 0), B(18, 0) and C(6, 12). Draw the triangle on the
coordinate plane below.
1. D, E, and F are midpoints of BC , AC , and AB respectively. Find the coordinates of
D, E, and F.
D (_____, ______) E (_____, ______) F (_____, ______)
Label the coordinates on the picture above.
2. Find the slope of each side of the triangle.
Slope AC = _______ Slope BC= _______ Slope AB= _______
3. Find the slopes of the lines perpendicular to AC , BC and AB .
Slope of line perpendicular to AC = _______
Slope of line perpendicular to BC = ________
Slope of line perpendicular to AB = ________

TEXTEAM Geometry Institute 2.69
IB. THE EULER LINE WITH VARIABLE
COORDINATES
Position a triangle on the coordinate plane so one vertex is at the origin, one side is along
the positive x-axis and the triangle is above the x-axis as pictured. By translating and
rotating, any triangle in the plane can be moved to this position.
DE
F
C
BA (a,0)(0,0)
(b,c)
1. D, E, and F are midpoints of BC , AC , and AB respectively. Find the coordinates of
D, E, and F.
D (_____, ______) E (_____, ______) F (_____, ______)
Label the coordinates on the picture above.
2. Find the slope of each side of the triangle.
Slope AC = _______ Slope BC= _______ Slope AB= _______
3. Find the slopes of the lines perpendicular to AC , and BC . Is it possible to find the
slope of a line perpendicular to AB?
Slope of line perpendicular to AC = _______
Slope of line perpendicular to BC= _______

TEXTEAM Geometry Institute 2.71
II. THE CENTROID Using the information from page IA or IB, answer the following questions. 1. Find the slopes of AD , BE , and CF .
slope AD= _______
slope BE= _______
slope CF = _______
2. What are these segments called? __________________
3. Write linear equation for medians AD , BE and CF .
4. Solve two of the median equations simultaneously to find the coordinates of their
point of intersection.
(______, ______) 5. See if the third median passes through that point.
The point is called the centroid of the triangle.

TEXTEAM Geometry Institute 2.72
6. Find the average of the x-coordinates of the points A, B, and C.
7. Find the average of the y-coordinates of the points A, B, and C.
8. Write the values found in 6 and 7 as an ordered pair. (_______, ______)
Compare this point to the coordinates of the centroid.
What conclusions can be made?

TEXTEAM Geometry Institute 2.73
III. THE CIRCUMCENTER Using the information from page IA or IB, answer the following questions. 1. Find the slope of the perpendicular bisectors of AC , and BC .
Slope of perpendicular bisector to AC = _________ Slope of perpendicular bisector to BC= _________
2. Write linear equations for the perpendicular bisectors of AB , AC and BC .
3. Find the coordinates of the point of intersection of any two of the perpendicular
bisectors by solving two equations simultaneously.
(________, ________)
4. See if the third perpendicular bisector passes through that point.
The point is called the circumcenter of the triangle.

TEXTEAM Geometry Institute 2.74
IV. THE ORTHOCENTER
Using the information from page IA or IB, answer the following questions. 1. On the picture on the first page, draw a line segment from vertex A perpendicular to
BC .
What is the slope of this line? ____________
2. Also, draw a line segment from vertex B perpendicular to AC .
What is the slope of this line? ____________
3. Draw a line segment from vertex C perpendicular to AB .
What is the slope of this line? ____________
4. These segments are called ________________.
5. Write linear equations for the altitudes from vertices A, B and C.
6. Find the coordinates of the point of intersection of two altitudes by solving their
equations simultaneously.
(________, ________)
7. See if the third altitude passes through that point.
The point is called the orthocenter.

TEXTEAM Geometry Institute 2.75
V. THE EULER LINE Conclusion
Fill in the information: Coordinates of the Centroid (__________, _________) Coordinates of the Circumcenter (__________, _________) Coordinates of the Orthocenter (__________, _________) 1. Find the slope between the centroid and the circumcenter.
2. Find the slope between the centroid and the orthocenter.
3. What is true about those slopes?
What does that mean about the three points?
Conclusion:
The centroid, circumcenter, and orthocenter of a triangle are collinear—the line that
connects them is called the Euler Line. This fact was unknown to the ancient Greeks and
was first discovered by Leonhard Euler (1707-1783) two thousand years after Euclid.
Purely geometric proofs seem to be much harder and rather obscure.

TEXTEAM Geometry Institute 2.76
THE NINE-POINT CIRCLE Teacher Guide
GOAL:
Explore the relationship between circles and special points of a triangle.
PREREQUISITES:
Midpoint, Altitude, Orthocenter, Equation of a Circle
MATERIALS:
Computer lab worksheet and a computer.
Scripts: Circle through 3 pts, Altitude feet.
PROCEDURE:
• Put students in pairs to work on the computer lab, giving each student a copy of the
worksheet to record their conjectures and justifications.
• Allow students to work through the lab.
• Ask student pairs to lead the discussion of each question after everyone has finished
the lab. Encourage students to offer alternate conjectures and let the class discuss the
validity of each conjecture. Each conjecture should be justified.
SOLUTIONS:
Note: These are general solutions. Students should be encouraged to put the conjectures
in their own words and provide alternate conjectures, no matter how trivial.
F. The two circles are the same.
G. The circle intersects the segment from a vertex to the orthocenter at the segment’s
midpoint.
EXTENSION:
Answers will vary depending on the coordinates of the vertices chosen by the students.
General Procedure:
• Given the coordinates of the vertices of the triangle, calculate the coordinates of the midpoints of each side.
• Since the midpoints lie on the circle, substitute these points into the center-radius equation of a circle. This will create a system of three equations and three unknowns
(h, k and r). • Solve for the unknowns and write the equation of the nine-point circle. Students should check their equation with Sketchpad.

TEXTEAM Geometry Institute 2.77
THE NINE-POINT CIRCLE
GOAL:
Explore the relationship between circles and special points of a triangle.
PROCEDURE:
A. Open a new sketch on Sketchpad.
• Under the File menu, select New Sketch.
B. Draw and label a triangle.
• Select the segment tool from the toolbar. • In the sketch, click-drag-release to create the first line segment of the triangle. • From the endpoint of the segment, click-drag-release to create the second side of
the triangle. (Caution: Be sure to line up the endpoints of the segments to form a vertex of the triangle. Remember to look at the bottom left corner of the sketch for guidance.)
• To draw the last side, connect the two open endpoints. • Label the vertices of the triangle A, B, and C by selecting the hand tool from the
toolbar. • Move the hand until the finger points to a vertex. (Watch the hand turn black and
the bottom left corner say “Show Label”.) Click on the vertex. • Repeat for the other two vertices.
C. Construct the midpoints of the three sides of the triangle.
• Select the arrow from the toolbar. • Click on a side of the triangle. • While holding down the Shift key, click on the other two sides. • Release the Shift key. • Under the Construct menu, select Point at Midpoint.
D. Using the Circle through 3 pts script tool, construct a circle through the three
midpoints.
• Select and hold the script tool from the toolbar. • While holding, drag toInstitute Scripts, then Circle through 3 pts. At this point,
release the mouse. • Click and release on each midpoint of ∆ABC to create a circle.

TEXTEAM Geometry Institute 2.78
E. Using the Altitude feet script tool, create the altitude feet which are the
intersections of each altitude of the triangle and the opposite side.
• From the script tool on the toolbar, select Institute Scripts, then select Altitude feet.
• Click and release on each of the vertices of ∆ABC.
F. Construct the circle through the three altitude feet. Make a conjecture about the
two circles you have constructed.
G. Write a conjecture about the intersection points of the circle(s) constructed and
the segments from each vertex to the orthocenter.
The circle you have just created is known as the Nine-Point Circle. Write a brief
summary explaining the connection between the nine-point circle and the
exploration you have just completed.

TEXTEAM Geometry Institute 2.79
EXTENSION:
Under the Measure menu, select the Coordinates. (You may want to manipulate the
triangle to have “nice” coordinates.) Using these coordinates, write the equation of
the circle formed. Show all your work, then use Sketchpad to check your answer.
• Select the arrow tool from the toolbar. • Click on a vertex of the original triangle. • While holding down the Shift key, click on the other two vertices of the triangle. • Under the Measure menu, select Coordinates. • Click-drag-release a vertex of the triangle so that you have “nice” coordinates.
SHOW WORK FOR THE EQUATION OF THE CIRCLE.
Click on the circle and select Equation from the Measure menu to check your work.

TEXTEAM Geometry Institute 2.84
ISOSCELES TRIANGLE EXPLORATION
Teacher Guide GOAL:
To discover properties of isosceles triangles.
MATERIALS:
Pencil, paper, scissors, and rulers.
NOTES TO TEACHER:
This works best as a teacher directed activity. After every step of the procedure, the
teacher should ask probing questions that lead students to develop and reinforce
vocabulary and relationships. Some examples are listed after each step in italics.
PROCEDURE:
1. Fold a sheet of paper in half.
What shape is this?
Is everyone’s shape the same?
2. Use a ruler to draw one diagonal (connect one pair of opposite vertices).
What is a diagonal?
3. Cut along the diagonal.
What shapes do you have?
How many do you have?
What do you notice about them?
What kind of triangles are they? Why?
Are they congruent? Why?
4. Discard the two smaller triangles and keep the folded one.
Before you unfold, what kind of triangle do you have? Why?
When you unfold it, what kind of triangle will you have? Why?
What are the names of the different parts of the isosceles triangle?
5. Open up the triangle and label the vertices A, B, and C, with A being the vertex
angle. Label the fold point as D on BC . Write down all the relationships and
information about the isosceles triangle. (Give the students 5 or 10 minutes to write

TEXTEAM Geometry Institute 2.85
out all the things they can see. Encourage friendly competition to get the most
conclusions. Draw a large isosceles triangle on the board and let students come up
and add conclusions. Have each student explain WHY they reached each conclusion.
A partial list is presented below.)
!B " !C; AD!BC; AD bi sects !BAC ; AD bi sects BC ;
D is the midpoint of BC ; AB ! AC ; !ABD " !ACD .

TEXTEAM Geometry Institute 2.86
FOLDING A TRIANGLE
Teacher Guide GOAL:
Participants will investigate:
I. The sum of the angles in a triangle is 180°.
II. The length of the segment joining the midpoints of two sides of a triangle
is parallel to the third side and 1/2 its length.
III. The area of a triangle is 1/2 the product of its base and its height.
PREREQUISTES:
Scalene, acute, obtuse, right, altitude, area of rectangle, midpoint.
MATERIALS:
Scissors, pencil or marker, protractor, waxed paper (for overhead demonstration).
NOTES TO TEACHER:
These three lessons can be done on separate days or combined into one lesson.
To save time, save paper triangles. This activity is also useful when repeated to look at
the different aspects of a triangle as the class reaches different points in the curriculum. It
is powerful to see students doing the same paper fold, but as their fundamental geometric
knowledge increases, they are able to see more within the activity.
SOLUTIONS:
I. Solutions to FOLDING A TRIANGLE Sum of the Angles
1. The sum of the angles is 180°.
2. When folded as explained above and shown in the diagrams, the three angles form
a straight angle.
3. This is the degenerate case. It forms two right angles with a sum of 180°.
4. The folds will have to be repeated a second time after flipping the first result over.
II. Solutions to FOLDING A TRIANGLE Midpoints
1. Isosceles triangle. E is the midpoint of AB
2. Isosceles triangle. F is the midpoint of BC

TEXTEAM Geometry Institute 2.87
3. Students should be able to observe that EF and AC are parallel. This can be
reinforced by actually measuring alternate interior angles, or by measuring the
distances between EF and AC .

TEXTEAM Geometry Institute 2.88
4. G is the midpoint of AD and H is the midpoint of DC .
5. Secondly, the length of EF is one-half the length of AC .
III. Solutions to FOLDING A TRIANGLE Area
1. The students should discover that the length of the rectangle is 1/2 the base AC
(b) of the original triangle and the width of the rectangle is 1/2 the altitude BD (h)
of the original triangle. Thus, the area of the rectangle is 1/4 bh.
2. The folding should reveal that the area of the rectangle is 1/2 the area of the
triangle. So, if we double the area of the rectangle, we will obtain the area of the
triangle. 2 1
4
! " # $ bh( ) =
1
2
! " # $ bh( )
%
& ' (
) *
3. A =1
2bh

TEXTEAM Geometry Institute 2.89
FOLDING A TRIANGLE
Sum of the Angles PROCEDURE:
• Cut out a large scalene, acute triangle. Label the vertices A, B, C as shown.
• Fold the altitude BD as shown in figure 1.
• Fold the vertex B onto the base of the altitude, D as shown in figure 2.
• Fold the base angle vertices A and C onto point D as shown in figure 3.
1. What is the sum of ∠ A, ∠ B and ∠ C?
2. How do you know this to be true?
3. What is the result when the experiment is conducted with ∠ A as a right angle?
4. What is the result when the experiment is conducted with ∠ A as an obtuse angle?

TEXTEAM Geometry Institute 2.90
FOLDING A TRIANGLE
Midpoints PROCEDURE:
• Cut out a large scalene, acute triangle. Label the vertices A, B, C as shown.
• Fold the altitude BD as shown in figure 1.
• Fold the vertex B onto the base of the altitude, D as shown in figure 2.
• Label the new fold formed as EF .
1. In figure 2, what type of triangle is ∆AED and why?
What does that imply about point E on side AB?
2. In figure 2, what type of triangle is ∆DFC and why?
What does that imply about point F on side BC ?
3. What is a relationship between EF and AC ?
• Next fold the base angles A and C onto point D as shown in figure 3.
• Label your triangle as shown in figure 3.
4. What is the relationship between point G and AD ?
What is the relationship between point H and DC ?
5. Using this relationship, what is a second conclusion that you can reach about the
relationship between EF and AC ?

TEXTEAM Geometry Institute 2.91
FOLDING A TRIANGLE
Area PROCEDURE:
• Cut out a large scalene, acute triangle. Label the vertices A, B, C as shown.
• Fold the altitude BD as shown in figure 1.
• Fold the vertex B onto the base of the altitude, D as shown in figure 2.
• Label the new fold formed as EF .
• Next fold the base angles A and C onto point D as shown in figure 3.
• Label your triangle as shown in figure 3.
1. Determine the width and the length of the rectangle pictured in figure 3 in terms of
the base and the altitude of the original triangle. (Another word for altitude is height).
Use the folds to make comparisons.
2. How does the area of the rectangle compare to the area of the original triangle?
3. Use your observations to write a formula for the area of a triangle in terms of its base
and height.

TEXTEAM Geometry Institute 2.84
ISOSCELES TRIANGLE EXPLORATION
Teacher Guide GOAL:
To discover properties of isosceles triangles.
MATERIALS:
Pencil, paper, scissors, and rulers.
NOTES TO TEACHER:
This works best as a teacher directed activity. After every step of the procedure, the
teacher should ask probing questions that lead students to develop and reinforce
vocabulary and relationships. Some examples are listed after each step in italics.
PROCEDURE:
1. Fold a sheet of paper in half.
What shape is this?
Is everyone’s shape the same?
2. Use a ruler to draw one diagonal (connect one pair of opposite vertices).
What is a diagonal?
3. Cut along the diagonal.
What shapes do you have?
How many do you have?
What do you notice about them?
What kind of triangles are they? Why?
Are they congruent? Why?
4. Discard the two smaller triangles and keep the folded one.
Before you unfold, what kind of triangle do you have? Why?
When you unfold it, what kind of triangle will you have? Why?
What are the names of the different parts of the isosceles triangle?
5. Open up the triangle and label the vertices A, B, and C, with A being the vertex
angle. Label the fold point as D on BC . Write down all the relationships and
information about the isosceles triangle. (Give the students 5 or 10 minutes to write

TEXTEAM Geometry Institute 2.85
out all the things they can see. Encourage friendly competition to get the most
conclusions. Draw a large isosceles triangle on the board and let students come up
and add conclusions. Have each student explain WHY they reached each conclusion.
A partial list is presented below.)
!B " !C; AD!BC; AD bi sects !BAC ; AD bi sects BC ;
D is the midpoint of BC ; AB ! AC ; !ABD " !ACD .

TEXTEAM Geometry Institute 2.86
FOLDING A TRIANGLE
Teacher Guide GOAL:
Participants will investigate:
I. The sum of the angles in a triangle is 180°.
II. The length of the segment joining the midpoints of two sides of a triangle
is parallel to the third side and 1/2 its length.
III. The area of a triangle is 1/2 the product of its base and its height.
PREREQUISTES:
Scalene, acute, obtuse, right, altitude, area of rectangle, midpoint.
MATERIALS:
Scissors, pencil or marker, protractor, waxed paper (for overhead demonstration).
NOTES TO TEACHER:
These three lessons can be done on separate days or combined into one lesson.
To save time, save paper triangles. This activity is also useful when repeated to look at
the different aspects of a triangle as the class reaches different points in the curriculum. It
is powerful to see students doing the same paper fold, but as their fundamental geometric
knowledge increases, they are able to see more within the activity.
SOLUTIONS:
I. Solutions to FOLDING A TRIANGLE Sum of the Angles
1. The sum of the angles is 180°.
2. When folded as explained above and shown in the diagrams, the three angles form
a straight angle.
3. This is the degenerate case. It forms two right angles with a sum of 180°.
4. The folds will have to be repeated a second time after flipping the first result over.
II. Solutions to FOLDING A TRIANGLE Midpoints
1. Isosceles triangle. E is the midpoint of AB
2. Isosceles triangle. F is the midpoint of BC
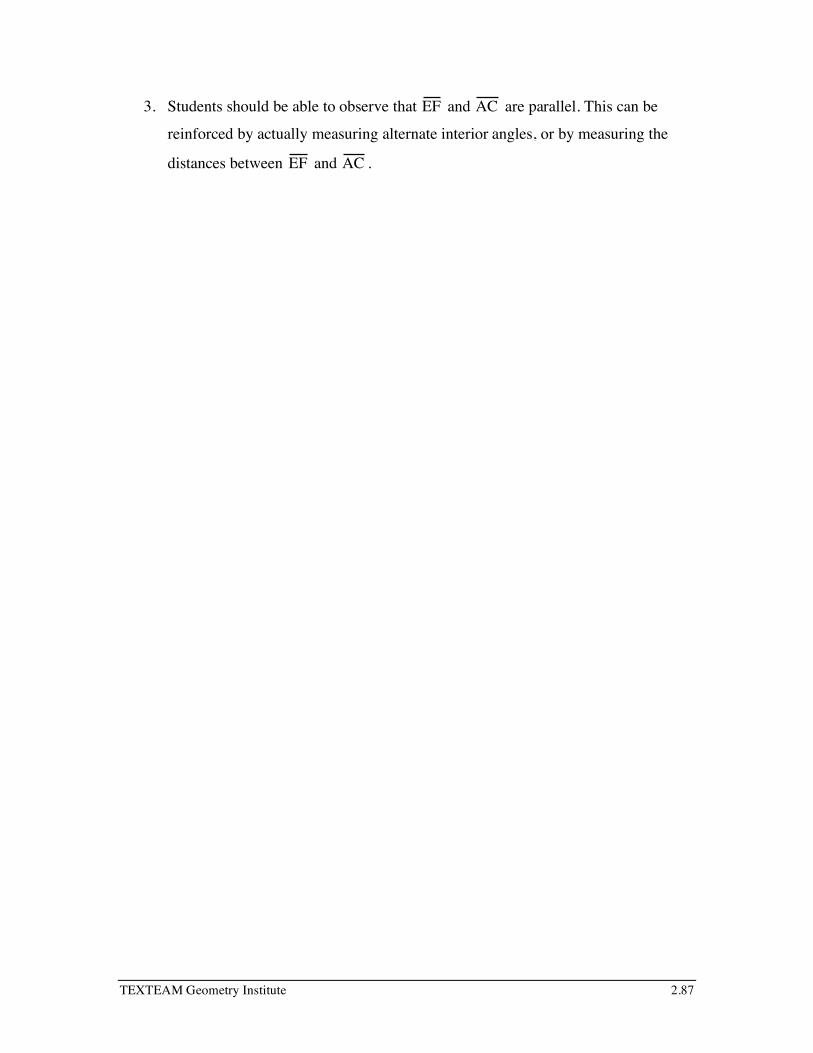
TEXTEAM Geometry Institute 2.87
3. Students should be able to observe that EF and AC are parallel. This can be
reinforced by actually measuring alternate interior angles, or by measuring the
distances between EF and AC .

TEXTEAM Geometry Institute 2.88
4. G is the midpoint of AD and H is the midpoint of DC .
5. Secondly, the length of EF is one-half the length of AC .
III. Solutions to FOLDING A TRIANGLE Area
1. The students should discover that the length of the rectangle is 1/2 the base AC
(b) of the original triangle and the width of the rectangle is 1/2 the altitude BD (h)
of the original triangle. Thus, the area of the rectangle is 1/4 bh.
2. The folding should reveal that the area of the rectangle is 1/2 the area of the
triangle. So, if we double the area of the rectangle, we will obtain the area of the
triangle. 2 1
4
! " # $ bh( ) =
1
2
! " # $ bh( )
%
& ' (
) *
3. A =1
2bh

TEXTEAM Geometry Institute 2.89
FOLDING A TRIANGLE
Sum of the Angles PROCEDURE:
• Cut out a large scalene, acute triangle. Label the vertices A, B, C as shown.
• Fold the altitude BD as shown in figure 1.
• Fold the vertex B onto the base of the altitude, D as shown in figure 2.
• Fold the base angle vertices A and C onto point D as shown in figure 3.
1. What is the sum of ∠ A, ∠ B and ∠ C?
2. How do you know this to be true?
3. What is the result when the experiment is conducted with ∠ A as a right angle?
4. What is the result when the experiment is conducted with ∠ A as an obtuse angle?

TEXTEAM Geometry Institute 2.90
FOLDING A TRIANGLE
Midpoints PROCEDURE:
• Cut out a large scalene, acute triangle. Label the vertices A, B, C as shown.
• Fold the altitude BD as shown in figure 1.
• Fold the vertex B onto the base of the altitude, D as shown in figure 2.
• Label the new fold formed as EF .
1. In figure 2, what type of triangle is ∆AED and why?
What does that imply about point E on side AB?
2. In figure 2, what type of triangle is ∆DFC and why?
What does that imply about point F on side BC ?
3. What is a relationship between EF and AC ?
• Next fold the base angles A and C onto point D as shown in figure 3.
• Label your triangle as shown in figure 3.
4. What is the relationship between point G and AD ?
What is the relationship between point H and DC ?
5. Using this relationship, what is a second conclusion that you can reach about the
relationship between EF and AC ?

TEXTEAM Geometry Institute 2.91
FOLDING A TRIANGLE
Area PROCEDURE:
• Cut out a large scalene, acute triangle. Label the vertices A, B, C as shown.
• Fold the altitude BD as shown in figure 1.
• Fold the vertex B onto the base of the altitude, D as shown in figure 2.
• Label the new fold formed as EF .
• Next fold the base angles A and C onto point D as shown in figure 3.
• Label your triangle as shown in figure 3.
1. Determine the width and the length of the rectangle pictured in figure 3 in terms of
the base and the altitude of the original triangle. (Another word for altitude is height).
Use the folds to make comparisons.
2. How does the area of the rectangle compare to the area of the original triangle?
3. Use your observations to write a formula for the area of a triangle in terms of its base
and height.
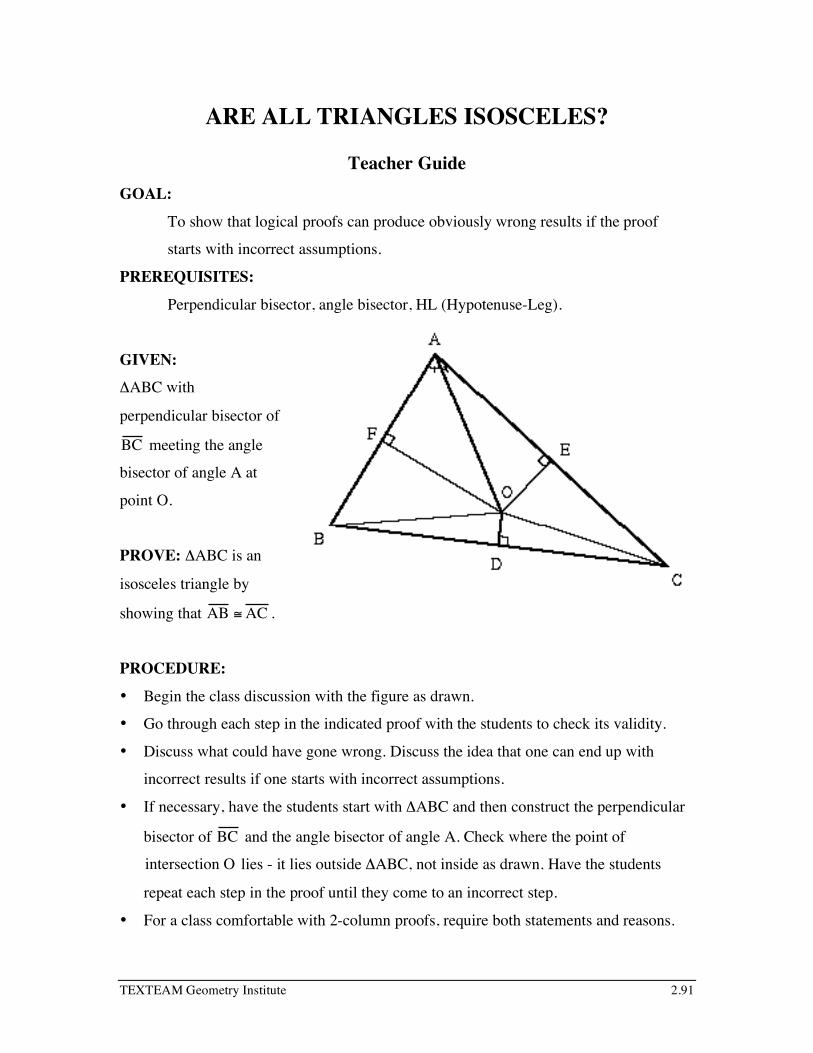
TEXTEAM Geometry Institute 2.91
ARE ALL TRIANGLES ISOSCELES?
Teacher Guide GOAL:
To show that logical proofs can produce obviously wrong results if the proof
starts with incorrect assumptions.
PREREQUISITES:
Perpendicular bisector, angle bisector, HL (Hypotenuse-Leg).
GIVEN:
ΔABC with
perpendicular bisector of
BC meeting the angle
bisector of angle A at
point O.
PROVE: ΔABC is an
isosceles triangle by
showing that AB !AC .
PROCEDURE:
• Begin the class discussion with the figure as drawn.
• Go through each step in the indicated proof with the students to check its validity.
• Discuss what could have gone wrong. Discuss the idea that one can end up with
incorrect results if one starts with incorrect assumptions.
• If necessary, have the students start with ΔABC and then construct the perpendicular
bisector of BC and the angle bisector of angle A. Check where the point of
intersection O lies - it lies outside ΔABC, not inside as drawn. Have the students
repeat each step in the proof until they come to an incorrect step.
• For a class comfortable with 2-column proofs, require both statements and reasons.

TEXTEAM Geometry Institute 2.92
SOLUTIONS:
Statements Reasons
1. ΔABC with perpendicular bisector
of BC meeting the angle bisector of
angle A at point O.
1. Given
2. OB ! OC 2. O lies on the perpendicular bisector of BC
3. OE ! OF 3. O is equidistant from AB!
and AC!
4. !AOF " !AOE 4. HA or SAA
5. AF = AE 5. CPCTC
6. !FOB " !EOC 6. HL
7. BF = CE 7. CPCTC
8. AF + EC = AB;
AE + EC = AC
8. Segment Addition
9. AF + BF = AE + CE 9. Addition Property of Equality
10. AB = AC 10. Substitution
REFERENCES:
This problem is taken from the book: Mathematical Recreations and Essays by W.W.
Rouse Ball and H.S.M. Coxeter (page 80) published by Dover Press (13th. edition, 1987).
Several other such incorrect proofs are given, and the book as a whole is full of puzzles
or interesting results which could be used as material for an algebra or geometry class.

TEXTEAM Geometry Institute 2.93
ARE ALL TRIANGLES ISOSCELES?
GIVEN:
ΔABC with perpendicular
bisector of BC meeting
the angle bisector of angle
A at point O.
PROVE:
ΔABC is an isosceles
triangle by showing that
AB !AC .
Statements Reasons
1. ΔABC with perpendicular bisector
of BC meeting the angle bisector of
angle A at point O.
1. Given
2. OB ! OC 2. O lies on the perpendicular bisector of BC
3. OE ! OF 3. O is equidistant from AB!
and AC!
4. !AOF " !AOE 4.
5. AF = AE 5.
6. !FOB " !EOC 6.
7. BF = CE 7.
8. AF + EC = AB;
AE + EC = AC
8.
9. AF + BF = AE + CE 9.
10. AB = AC 10.
The result obviously is not correct. What can be wrong with the proof. Each step in the
proof is logically correct, but the final conclusion is incorrect. Why is that?

TEXTEAM Geometry Institute 2.94
FLOWCHART PROOFS
Teacher Guide GOAL:
Make logical thinking visible by using a flowchart as a concept map to show a
step-by-step logical development of a proof.
PREREQUISITES:
Concepts used in specific proofs.
MATERIALS:
Overhead templates cut from transparency with elements of a sample proof
written out. Index cards cut into rectangles.
PROCEDURE:
Demonstrate a sample flowchart proof on the overhead.
Discuss logic, progression from givens toward conclusion, and possible alternate
flowcharts for the same proof.
Have students work in small groups.
• Write Given information and Conclusion on separate cards.
• Determine deduced information and write on separate cards.
• Create a flowchart of cards leading from Given cards to Conclusion card.
• Each group should present its flowchart proof to the class.
• Allow for alternate logical sequences.
Sample flowchart proof.

TEXTEAM
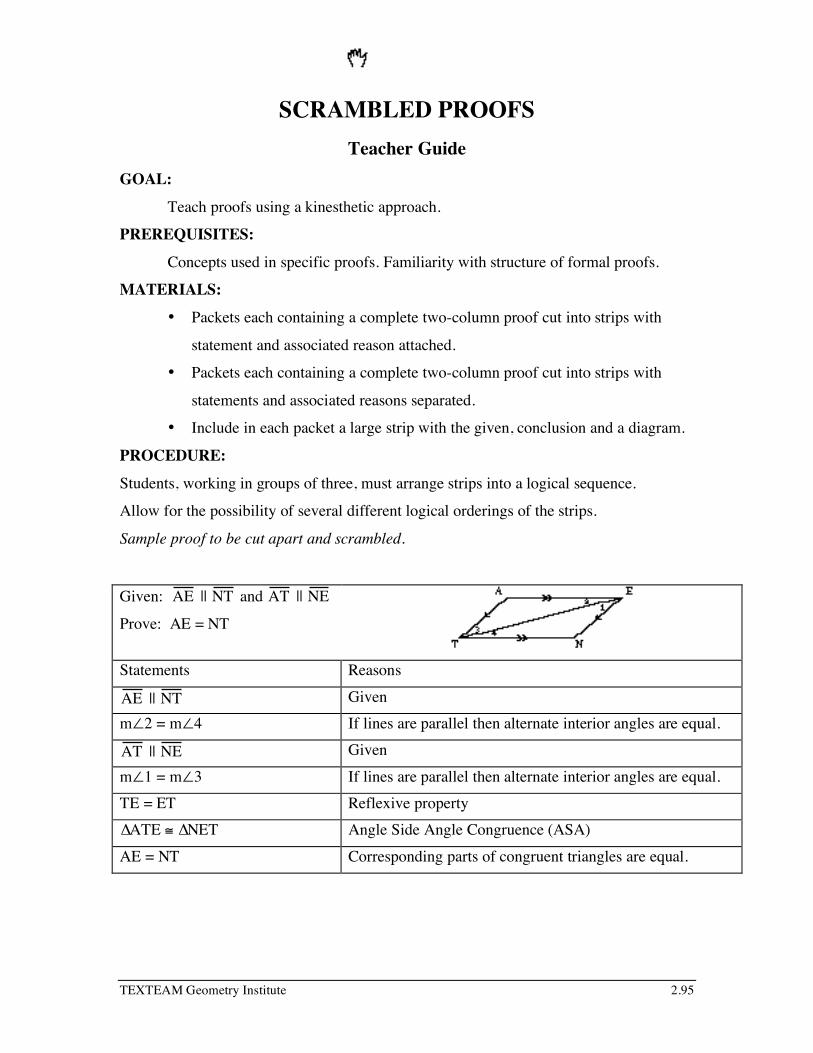
TEXTEAM Geometry Institute 2.95
SCRAMBLED PROOFS Teacher Guide
GOAL:
Teach proofs using a kinesthetic approach.
PREREQUISITES:
Concepts used in specific proofs. Familiarity with structure of formal proofs.
MATERIALS:
• Packets each containing a complete two-column proof cut into strips with
statement and associated reason attached.
• Packets each containing a complete two-column proof cut into strips with
statements and associated reasons separated.
• Include in each packet a large strip with the given, conclusion and a diagram.
PROCEDURE:
Students, working in groups of three, must arrange strips into a logical sequence.
Allow for the possibility of several different logical orderings of the strips.
Sample proof to be cut apart and scrambled.
Given: AE || NT and AT || NE
Prove: AE = NT
Statements Reasons
AE || NT Given m∠2 = m∠4 If lines are parallel then alternate interior angles are equal.
AT || NE Given
m∠1 = m∠3 If lines are parallel then alternate interior angles are equal. TE = ET Reflexive property ∆ATE ≅ ∆NET Angle Side Angle Congruence (ASA)
AE = NT Corresponding parts of congruent triangles are equal.

TEXTEAM Geometry Institute 2.96
EXTENSION:
Statements and reasons that are not necessary to the proofs could also be included in the
envelopes.

TEXTEAM Geometry Institute 2.96
GEOMETRY COURT Teacher Guide
GOAL:
Prove triangles are congruent using group participation and presentation.
PREREQUISITES:
Formal proof method. SAS, SSS, ASA, AAS, HL and CPCTC.
NOTES TO TEACHER:
Prepare students by demonstrating several formal proofs.
Emphasize that assertions require justification by definitions, postulates, or previously
proven theorems. Compare and contrast this to the presentation of evidence in court
cases.
PROCEDURE:
• Divide the class: Half are attorneys, 1/4 are paralegals, 1/4 are defendants.
• Create groups of 2 attorneys.
• Have the attorneys select a paralegal to form a firm, then have the firm create a firm
name and prepare letterhead for firm use.
• Each defendant chooses a law firm.
• Select 8-12 congruent triangle proofs and assign to class as cases.
Responsibilities of each group:
• Attorneys, paralegal, and defendant should prepare all the cases and prepare to
prove any chosen case in front of the judge (the teacher) and the jury (the
students). Every group member will be responsible for submitting all the proofs of
the cases. These are graded separately for each student.
• Paralegals should be creative in preparing the cases in final draft form on
letterhead.
• Defendant should make sure his/her chosen firm has proven all the cases beyond a
shadow of a doubt.
• The judge (teacher) selects and hears all cases as presented by the attorney.
• The jury (classmates) renders a judgment.

TEXTEAM Geometry Institute 2.97
Preparation for court:
• Firms prepare congruent triangle proofs using clear, valid reasoning.
• Every firm will turn in a case folder containing the proofs completed by each
student and one copy prepared by paralegal.
Court:
• Each firm will submit their case folder to the judge.
• On court day the judge randomly selects one case for each firm to present to the
jury.
• Jury hears the case and renders a judgment based on the clarity, correctness and
persuasiveness of the presentation.

TEXTEAM Geometry Institute 2.98
GEOMETRY COURT
PROCEDURE:
• Half the class are attorneys, 1/4 are paralegals, 1/4 are defendants.
• Create groups of 2 attorneys.
• Attorneys select a paralegal to form a firm, then create a firm name and prepare
letterhead for firm use.
• Each defendant chooses a law firm.
• 8-12 congruent triangle proofs are assigned to the class as cases.
Responsibilities of each group:
• Attorneys, paralegal, and defendant prepare all the cases and be prepared to prove
any chosen case in front of the judge (the teacher) and the jury (the students).
Every group member will be responsible for submitting all the proofs of the cases.
These are graded separately for each student.
• Paralegals should be creative in preparing the cases in final draft form on
letterhead.
• Defendant should make sure his/her chosen firm has proven all the cases beyond a
shadow of a doubt.
• The judge (teacher) selects and hears all cases.
• The jury (classmates) renders a judgment.
Preparation for court:
• Firms prepare congruent triangle proofs using clear, valid reasoning.
• Every firm will turn in a case folder containing the proofs completed by each
student and one copy prepared by paralegal.
Court:
• Each firm will submit their case folder to the judge.
• On court day the judge randomly selects one case for each firm’s attorney to
present to the jury.

TEXTEAM Geometry Institute 2.99
• Jury hears the case and renders a judgment based on the clarity, correctness and
persuasiveness of the presentation.