Generating Form Letters With Your Visual FoxPro Data
25
Generating Form letters with your Visual FoxPro Data Written by Sylvester Alelele 1 Generating Form Letters with your Visual FoxPro Data Summary: A modern data management application must also include the means for application users and staff to easily perform everyday tasks such as generating letters based on the data entered into the application. Integrating the ability to easily produce mails and letters can greatly increase the appeal of an application by putting all of the tools required to perform simple routine tasks in the hands of the users of the application. Microsoft’s Visual FoxPro includes powerful and flexible text merge commands that can be used to let you easily provide letter creation and document publishing functionality to the users of your application. This article explains how to combine Visual FoxPro’s text merge commands with its powerful automation capabilities to create great letters and documents. Introduction: One of the least covered commands in Visual FoxPro is the text merge commands. In fact even in the Visual FoxPro documentation, you will find little coverage of text merge except for a description of the text merge commands in the Reference plus some extensive documentation of the Visual FoxPro mail merge wizard. This means that except if you have had some priori experience with VFP Text merge, it is largely trial and error until you get it right (as we discovered that the examples given in the reference are quite trivia and leave you yourself to figure out things…but then that is the Job of a Software Engineer now is it not?)! Hopefully, this article will bridge that gap and show you how to use the Text Merge commands together with VFP’s powerful automation capabilities to let users of your application publish custom letters and documents. The letters or documents you generate can be published to Microsoft Word or sent directly to the printer or even sent via email. Because the examples in this article are based on a real life application (unlike the examples you will find in the Visual FoxPro documentation), you will have a ready made example along with detailed explanations to implement in your own applications. About Text Merge: First off, the purpose of the text merge commands in Visual FoxPro is to allow you to combine text with memory variables and field values stored in your application’s tables. The text merge commands can identify fields and variables if you enclose them in specified delimiters (the default delimiters in Visual FoxPro is the angular brackets << and >>. The syntax of the TEXT…ENDTEXT command is: TEXT <<delimited text>> . . . ENDTEXT
-
Upload
sylvester-alelele -
Category
Documents
-
view
1.217 -
download
4
description
How can you generate letters and documents based on data you have already entered into a Database Management System. This example demonstrates this using Microsoft Visual FoxPro
Transcript of Generating Form Letters With Your Visual FoxPro Data

Generating Form letters with your Visual FoxPro Data
Written by Sylvester Alelele 1
Generating Form Letters with your Visual FoxPro Data
Summary: A modern data management application must also include the means for application users and staff to easily perform everyday tasks such as generating letters based on the data entered into the application. Integrating the ability to easily produce mails and letters can greatly increase the appeal of an application by putting all of the tools required to perform simple routine tasks in the hands of the users of the application. Microsoft’s Visual FoxPro includes powerful and flexible text merge commands that can be used to let you easily provide letter creation and document publishing functionality to the users of your application. This article explains how to combine Visual FoxPro’s text merge commands with its powerful automation capabilities to create great letters and documents.
Introduction: One of the least covered commands in Visual FoxPro is the text merge commands. In fact even in the Visual FoxPro documentation, you will find little coverage of text merge except for a description of the text merge commands in the Reference plus some extensive documentation of the Visual FoxPro mail merge wizard. This means that except if you have had some priori experience with VFP Text merge, it is largely trial and error until you get it right (as we discovered that the examples given in the reference are quite trivia and leave you yourself to figure out things…but then that is the Job of a Software Engineer now is it not?)! Hopefully, this article will bridge that gap and show you how to use the Text Merge commands together with VFP’s powerful automation capabilities to let users of your application publish custom letters and documents.
The letters or documents you generate can be published to Microsoft Word or sent directly to the printer or even sent via email. Because the examples in this article are based on a real life application (unlike the examples you will find in the Visual FoxPro documentation), you will have a ready made example along with detailed explanations to implement in your own applications.
About Text Merge: First off, the purpose of the text merge commands in Visual FoxPro is to allow you to combine text with memory variables and field values stored in your application’s tables. The text merge commands can identify fields and variables if you enclose them in specified delimiters (the default delimiters in Visual FoxPro is the angular brackets << and >>. The syntax of the TEXT…ENDTEXT command is:
TEXT
<<delimited text>>
.
.
.
ENDTEXT

Generating Form letters with your Visual FoxPro Data
Written by Sylvester Alelele 2
The results of the merged text can be stored to a low-level file or to a memory variable or even output to the current default output device. So how can we utilize this little known command to add flexible, user-friendly features in a real-life Visual FoxPro application?
Applying the Text…EndText Command: In our integrated Schools Management System, we realized that the school often has to generate and send standard letters to parents based on data already entered and stored in the system. For example, payment overdue notices could be sent for school fees that are overdue for payment or a ‘Called Parents Notice’ could be sent to summon a parent to the school and so on.
Previously, prior to the introduction of our system, a report would have to be generated based on information already entered in the system. Then the Admin department or the principal would have had to draft a letter that a secretary would subsequently type out with Microsoft Word. The typed letter would then be printed on the company’s letter headed paper. The letter thus prepared and signed would then be posted, hand-delivered or perhaps sent with the child to be delivered to its parent after school. Now given this scenario, imagine the effort in a school with about 1000 pupils (and many of our schools in Africa indeed have populations that exceed this such as the school based on which this example is based) for an Administrator to prepare the same letter for 100 pupils!
Luckily for us, Visual FoxPro’s Text merge commands sped quickly to the rescue, enabling us to offer a quick and elegant solution! Please note that it would do you good to create a project to contain the objects described here-in so we begin there as our logical first step. So lets us now take a step-by-step look at how this works:
1. Create a Visual FoxPro Project by choosing the File->New menu command. When the New dialog box displays, select the Project option button and then choose the New Filebutton. Give your project the name ‘TextMerge’ (or for that matter any name that you please. But from now on, any activities or objects (tables, forms, etc) to be created should be created inside this project except the objects that you will need to create in Microsoft Word.
2. The Logical first type is to determine the type of functionality we need. For us, we identified the type of letters that the schools management most often needed to generate and then had these categorized and grouped. We needed a system that would allow users to create and store standard document templates (based on the data entered into the system) and then to ‘generate’ these letters or documents when the need arose by selecting the appropriate records to be merged. Now imagine that you have the following table that contains students data:

Generating Form letters with your Visual FoxPro Data
Written by Sylvester Alelele 3
Using the system described herein, you could generate a custom letter either say for a specific ‘StudentID’ or perhaps for all students or perhaps for all students with a non-zero balance.
3. The second step will now be to create and save a genuine template of the company’s letterhead using your Microsoft Word program. Luckily, Microsoft Word ships with just about every system unit these days so that having a copy of Microsoft Word should not be a program. The reader should please note that we have not tried out this example with another word processing program though a text file generated with Text…EndText should work just fine in any word processing program. But that is where Microsoft always just gets it right! They have made sure that Microsoft Word is just there…just handy so this example assumes that you have Microsoft Word 2007 installed and you can create a letterhead template by performing the following action:
a. From Microsoft Word, choose the Office button and then select the Newcommand from the Office menu.
b. Select Blank and Recent from the list on the left pane and then select Blank Document from the icons on the left.
c. Choose the Create button. A blank document is created and displayed on which you can now add all the graphics and names that make up your organization’s letterhead. In our case, we shall just add it to the top of the document, on the header.
d. After you have created your letterhead and added all the graphics and text, choose the Office button and then choose the save As menu command from that menu. The Save As sub menu displays.
e. Choose the Word Template menu command from the Save As sub menu. The Save As menu command displays. A document name is already proposed for you with a .dotx file extention (versions earlier than Word 2007 saved templates with the .dot extension). Make sure that you save the document in the root folder of your application so that your Visual FoxPro application can easily find it.
Generating Form letters with your Visual FoxPro Data
Written by Sylvester Alelele 4
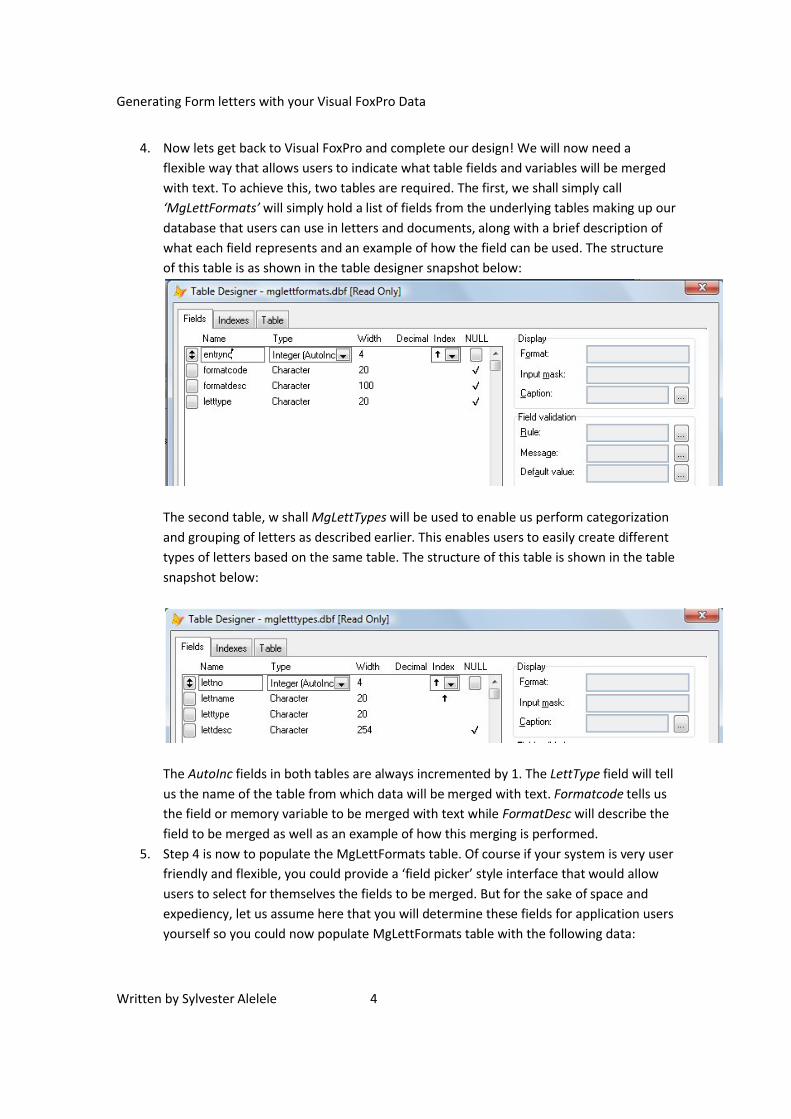
4. Now lets get back to Visual FoxPro and complete our design! We will now need a flexible way that allows users to indicate what table fields and variables will be merged with text. To achieve this, two tables are required. The first, we shall simply call ‘MgLettFormats’ will simply hold a list of fields from the underlying tables making up our database that users can use in letters and documents, along with a brief description of what each field represents and an example of how the field can be used. The structure of this table is as shown in the table designer snapshot below:
The second table, w shall MgLettTypes will be used to enable us perform categorization and grouping of letters as described earlier. This enables users to easily create different types of letters based on the same table. The structure of this table is shown in the table snapshot below:
The AutoInc fields in both tables are always incremented by 1. The LettType field will tell us the name of the table from which data will be merged with text. Formatcode tells us the field or memory variable to be merged with text while FormatDesc will describe the field to be merged as well as an example of how this merging is performed.
5. Step 4 is now to populate the MgLettFormats table. Of course if your system is very user friendly and flexible, you could provide a ‘field picker’ style interface that would allow users to select for themselves the fields to be merged. But for the sake of space and expediency, let us assume here that you will determine these fields for application users yourself so you could now populate MgLettFormats table with the following data:
Generating Form letters with your Visual FoxPro Data
Written by Sylvester Alelele 5
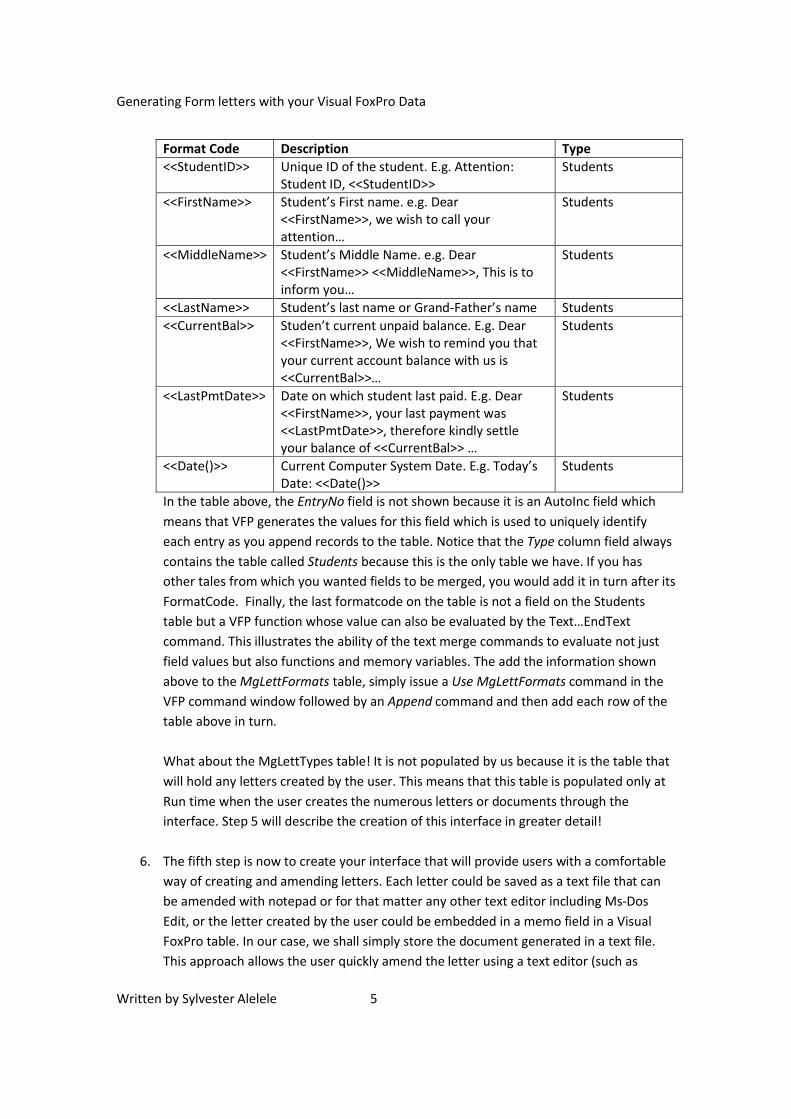
Format Code Description Type<<StudentID>> Unique ID of the student. E.g. Attention:
Student ID, <<StudentID>>Students
<<FirstName>> Student’s First name. e.g. Dear<<FirstName>>, we wish to call your attention…
Students
<<MiddleName>> Student’s Middle Name. e.g. Dear <<FirstName>> <<MiddleName>>, This is to inform you…
Students
<<LastName>> Student’s last name or Grand-Father’s name Students<<CurrentBal>> Studen’t current unpaid balance. E.g. Dear
<<FirstName>>, We wish to remind you that your current account balance with us is <<CurrentBal>>…
Students
<<LastPmtDate>> Date on which student last paid. E.g. Dear <<FirstName>>, your last payment was <<LastPmtDate>>, therefore kindly settle your balance of <<CurrentBal>> …
Students
<<Date()>> Current Computer System Date. E.g. Today’s Date: <<Date()>>
Students
In the table above, the EntryNo field is not shown because it is an AutoInc field which means that VFP generates the values for this field which is used to uniquely identify each entry as you append records to the table. Notice that the Type column field always contains the table called Students because this is the only table we have. If you has other tales from which you wanted fields to be merged, you would add it in turn after its FormatCode. Finally, the last formatcode on the table is not a field on the Students table but a VFP function whose value can also be evaluated by the Text…EndText command. This illustrates the ability of the text merge commands to evaluate not just field values but also functions and memory variables. The add the information shown above to the MgLettFormats table, simply issue a Use MgLettFormats command in the VFP command window followed by an Append command and then add each row of the table above in turn.
What about the MgLettTypes table! It is not populated by us because it is the table that will hold any letters created by the user. This means that this table is populated only at Run time when the user creates the numerous letters or documents through the interface. Step 5 will describe the creation of this interface in greater detail!
6. The fifth step is now to create your interface that will provide users with a comfortable way of creating and amending letters. Each letter could be saved as a text file that can be amended with notepad or for that matter any other text editor including Ms-Dos Edit, or the letter created by the user could be embedded in a memo field in a Visual FoxPro table. In our case, we shall simply store the document generated in a text file. This approach allows the user quickly amend the letter using a text editor (such as

Generating Form letters with your Visual FoxPro Data
Written by Sylvester Alelele 6
Notepad or Ms-Dos Edit or even Ms. Word). Our user interface will include several formsthat will allow users not just to create letters but to print them as well, so we shall have to go through the creation of each form in turn:
a. Maintain Standard Letters: This is the form that we shall use to allow users to select either existing letters to be amended or to create completely new documents. We can create this form along with the code for it by performing the following action:
i. Switch to the Documents tab of your project, select Form and then choose the New Form button to add a new blank form to your project which will open in the form Designer. Save it under the name frmMgStandLetts for this example to work!
ii. Set the following properties and code for this Form:1. Caption: Maintain Standard Letters2. Name: frmMgStandletts3. Data Environment: Add the table MgLettTypes that you had
created earlier to the Data environment of the form.4. Init event: Add the following code to the Init Event of the form:
PARAMETERS cLettType AS CharacterLOCAL strMsg as Character
IF TYPE('cLettType') = "C" THENstrMsg = "MGLettType = '" + RTRIM(cLettType) + "'"THISFORM.cmbLettType.Value = cletttypeTHISFORM.cmbLettType.Enabled = .F.SET FILTER TO &strMsgTHISFORM.lstLettList.Requery
ENDIF
iii. Add a TextBox control by selecting it from the toolbox and drawing it on your form. Set the following properties and code for this control:
1. Enabled: .F.2. Name: txtLettNo3. Special Effect: 1-Plain4. Value: 0 (zero)5. Visible: .F.6. Valid: You can add the following code to the Valid event of the
text box:
* Validate the Record and displayLOCAL strMsg as Character
SELECT MGLettTypes

Generating Form letters with your Visual FoxPro Data
Written by Sylvester Alelele 7
GO THIS.Value IF EOF()
THIS.Value = 0strMsg = "Letter not found or does not exist!"MESSAGEBOX(strMsg,MBINFO,chrProgTitle)RETURN
ENDIF
THISFORM.txtLetterName.Value = MGLettTypes.LettNameTHISFORM.CMBLettType.value = MGLettTypes.LettTypeTHISFORM.edtLettDesc.Value = MGLettTypes.LettDesc
iv. Add a Label Control to the form by similarly taking it from the toolbox and drawing to size. Set the following properties for it:
1. BorderStyle: 1-Fixed Single2. Caption: Letter Name
v. Add Again another Label control and then set the following properties for that control as well:
1. BorderStyle: 1-Fixed Single2. Caption: Letter Type
vi. Add a Text Box Control to the Form and then set the following properties for it:
1. Name: txtLetterName2. SelectOnEntry: .T.3. SpecialEffect: 1-Plain
vii. Add a Combo Box Control to the Form from the toolbox and then set the following properties for it:
1. Name: cmbLettType2. RowSource: Students,Employees (identities where the records
will come from for the letter to be created. Each entry is a Type/table
3. RowSourceType: 1-Value4. SelectOnEntry: .T.5. SpecialEffect: 1-Plain
viii. Again, you must add another Label control and then set the following properties for it:
1. Caption: Letter Descriptionix. You will add an Edit Box that will be used to display the description of a
letter and then set the following properties for it:1. Name: edtLettDesc2. SelectOnEntry: .T.3. SpecialEffect: 1-Plain

Generating Form letters with your Visual FoxPro Data
Written by Sylvester Alelele 8
x. Again Add an additional two Label controls and then set their Captionproperties to Letter Name and Letter Type respectively. Also, set their BorderStyle properties to 1-Fixed Single.
xi. Add a ListBox control and then set the following properties for the list box control after drawing to size:
1. Click: Set code in the Click event of the list box that will be executed as a user selects an item on the list or clicks on an item on the list with the mouse. This code will display the value of the bound column of the list box control and will call the Validevent of the txtLettNo text box added earlier to search the underlying table and display the record it contains for editing. The code to add here is:
* Display the record for editingTHISFORM.txtLettNo.Value = THIS.ValueTHISFORM.txtLettNo.Valid
2. ColumnCount: 33. ColumnWidths: 0,163,504. Name: lstMgtLettList5. RowSource: mgletttypes6. RowSourceType: 2-Alias7. SpecialEffect: 1-Plain8. Value: 0 (zero)
xii. Add a command button control that you will use to close and exit this form and then set the following properties and code for it:
1. Caption: \<Close2. Click: You can write the following code for the click event of the
Close button to close the form when you are done using it:
THISFORM.Release
3. Name: cmdClosexiii. Add a second command button that you can use to save the letters you
have created. The Save command button will make an entry in your table of letters and then present you with the letter editing window. You can set the following properties and code for it:
1. Caption: \<Save2. Click: This code is run when then user clicks the command
button and adds a new record to your table and provides a means for you to create the document. Add the following code to this event:

Generating Form letters with your Visual FoxPro Data
Written by Sylvester Alelele 9
LOCAL cFileStr as Character,strMsg as Character
strMsg = THISFORM.cmbLettType.Value IF thisform.txtLettNo.Value <> 0 then
* Save any changes that the user may have madeSELECT MGLettTypesGO THISFORM.txtlettNo.Value REPLACE MGLettTypes.LettName WITH THISFORM.txtLetterName.Value REPLACE MGLettTypes.LettType WITH THISFORM.cmbLettType.Value REPLACE MGLettTypes.LettDesc WITH THISFORM.edtLettDesc.Value
* This is an existing Letter... read it inIF ISBLANK(THISFORM.TXTLetterName.Value) THEN
strMsg = "Each Existing letter must have a name"MESSAGEBOX(strMsg,MBINFO,chrProgTile)THISFORM.txtLetterName.SetFocus RETURN
ENDIF* Now Read it instrMsg = RTRIM(thisform.txtLetterName.Value) + ".txt"cfileSTR = FILETOSTR(strMsg)DO FORM frmlettersWrite.scx WITH THISFORM.cmbLettType.Value, strMsg
ELSE * This letter does not exist...create itSELECT MGLettTypesGO TOPLOCATE FOR ALLTRIM(MGLettTypes.LettName) = ALLTRIM(THISFORM.TXTLetterName.Value)IF NOT FOUND() THEN
APPEND BLANKREPLACE MGLettTypes.LettName WITH THISFORM.txtLetterName.Value REPLACE MGLettTypes.LettType WITH THISFORM.cmbLettType.Value REPLACE MGLettTypes.LettDesc WITH THISFORM.edtLettDesc.Value
ENDIFstrMsg = RTRIM(thisform.txtLetterName.Value) + ".txt"DO FORM frmLettersWrite.Scx WITH THISFORM.cmbLetttype.Value, strMsg
ENDIF
This code is simple! It the letter already exists, (then txtLettNotext box cannot contain the value zero since its value is filled when you click or select a value from the lstMgtLettList list box.The program saves any changes you have made and then uses the name of the letter as represented by txtLettName to obtain the text of the letter into a character variable using the FILETOSTR function after a .txt extension is added to the name. The DO FORM frmLettersWrite.Scx WITH line than calls the Form frmMgLettersWrite.Scx passing it two parameters – the type of letter and the text of the letter as stored in the variable strMsg.
If the letter does not exist (txtLettNo.Value = 0) then the program simply appends the new letter to the table, adds a .txt extension to the name of the letter and then opens the frmLettersWrite window passing both the letter type (cmbLettType.Value) and the name of the letter (strMsg).

Generating Form letters with your Visual FoxPro Data
Written by Sylvester Alelele 10
This code is quite straight-forward so why the need for the error code listed below? Let the code description for that event answer this question!
3. Error: When errors occur, the code that you add to this even of the button will run. This allows you an elegant way of taking care of likely problems that may occur. Add the following code to the Error event:
LPARAMETERS nError, cMethod, nLine* Trap the error and then take some actionLOCAL strMsg as Character ,nAnswer as Integer,nFileHandle as Integer
STORE 0 TO nAnswer,nFileHandleSTORE "" TO strMsgDO CASE
CASE nError = 1 && File does not existstrMsg = "The file you are attempting to open does not exist." + CHR(13)strMsg = strMsg + "Would you like to create a new FILE(Yes), locate the "
+ CHR(13)strMsg = strMsg + "existing FILE(No) or abort this operation(Cancel)!" +
CHR(13)nAnswer = MESSAGEBOX(strMsg,3,"Letter Creator")DO CASE
CASE nAnswer = 2 && CancelRETURN TO MASTER
CASE nAnswer = 6 && YesstrMsg = RTRIM(THISFORM.txtLetterName.Value) + ".txt"nFileHandle = FCREATE(strMsg)= FWRITE(nFileHandle,"Write Letter Text Here...")FCLOSE(nFileHandle)RETRY && Retry the line that caused the error
CASE nAnswer = 7 && NostrMsg = GETFILE("txt")IF ISBLANK(strMsg) && User returned nothing
RETURN TO MASTERELSE && User returned something
THISFORM.txtletterName.Value = strMsgRETRY
ENDIFOTHERWISE && Since we cant determikne what to do, cancel the
oprRETURN TO MASTER
ENDCASEOTHERWISE
strMsg = "Error No: " + ALLTRIM(STR(nError)) + " has occurred."strMsg = strMsg + "Please contact application vendors now!"MESSAGEBOX(strMsg,MBEXCLAMATION,chrProgTitle)RETURN TO MASTER
ENDCASE
The purpose of this code is simple. As you click the save button to perform a task, if an error occurs, do not let the program just crash, handle it elegantly. The FileToStr function always returns an Error No 1 – File does not exist if you attempt to read the contents of a text file that the system cannot find on disk into a file. So the system then prompts you to create the file, retry the

Generating Form letters with your Visual FoxPro Data
Written by Sylvester Alelele 11
operation or abandon it altogether. This way, our little program does not unceremoniously quit!
4. Name: cmdSavexiv. Add a Third command button that will let you remove letters or
documents you don’t want any longer. After all, if you can add documents, you should also be able to remove some. You can now set the following code and properties for this command button:
1. Caption: \<Delete2. Click: You can add code to the Click event of this button to be
run when the user clicks the button. The code is:
* Delete the letter from the systemLOCAL strMsg AS CharacterSTORE "" TO strMsg
IF THISFORM.txtLettNo.Value <> 0* A record is currently displayed...mark it for deletion * in the table and then remove it from diskSELECT MGLettTypesGO THISFORM.txtlettNo.Value DELETE && Mark record for deletopn* This is an existing Letter... read it inIF ISBLANK(THISFORM.TXTLetterName.Value) THEN
strMsg = "Each Existing letter must have a name"MESSAGEBOX(strMsg,MBINFO,chrProgTile)THISFORM.txtLetterName.SetFocus RETURN
ENDIF* Now Read it instrMsg = RTRIM(thisform.txtLetterName.Value) + ".txt"ERASE &strMsg && Delete the file without further warningDO FORM frmlettersWrite.scx WITH THISFORM.cmbLettType.Value,
strMsgENDIF
In the code above, after the record is removed from the MgLettTypes table with a DELETE command, the ERASEcommand is used to delete the physical text file on disk. We have not bothered creating an error routine since the ERASEcommand does not generate a file not found error for non-existent files.
3. Name: cmdDelLinexv. A Final command button called New will simply perform the function of
providing a blank record template. You can set the following properties and code for this button:
1. Caption: \<New
Generating Form letters with your Visual FoxPro Data
Written by Sylvester Alelele 12
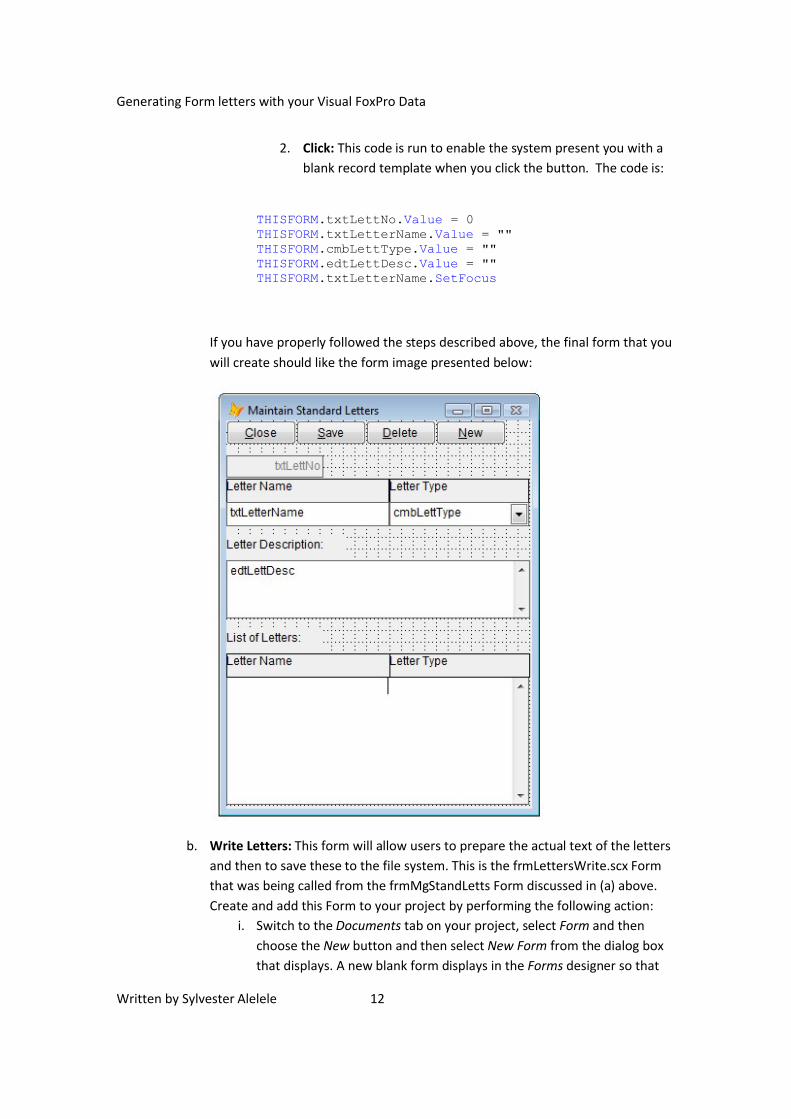
2. Click: This code is run to enable the system present you with a blank record template when you click the button. The code is:
THISFORM.txtLettNo.Value = 0THISFORM.txtLetterName.Value = ""THISFORM.cmbLettType.Value = ""THISFORM.edtLettDesc.Value = ""THISFORM.txtLetterName.SetFocus
If you have properly followed the steps described above, the final form that you will create should like the form image presented below:
b. Write Letters: This form will allow users to prepare the actual text of the letters and then to save these to the file system. This is the frmLettersWrite.scx Form that was being called from the frmMgStandLetts Form discussed in (a) above.Create and add this Form to your project by performing the following action:
i. Switch to the Documents tab on your project, select Form and thenchoose the New button and then select New Form from the dialog box that displays. A new blank form displays in the Forms designer so that

Generating Form letters with your Visual FoxPro Data
Written by Sylvester Alelele 13
you can now create the interface that allows users to create documents based on existing table data. Make sure you save this Form as frmLettersWrite.Scx
ii. Form Properties: Set the following Form Properties and code for the form you have just created:
1. Caption: Write Letters2. Init: In the Init event of the form, you can add the following
code that will be the first executed as the form is run:
PARAMETERS cLettType,cFileName,cFileTextLOCAL strMsg AS Character strMsg = ""THISFORM.txtLettType.Value = cLettTypestrMsg = "LettType = '" + ALLTRIM(THISFORM.txtLettType.Value) + "'"SELECT MgLettFormatsGO TOPSET FILTER TO &STRMSGSKIP SKIP -1THISFORM.lstLettFormats.Refresh
* Open the existing letter template and then display it for editingTHISFOrm.TXTFILEName.Value = cFileNamestrMsg = FILETOSTR(cFileName)THISFORM.EDIT1.Value = strMsg
Because Forms can receive parameters, the PARAMETERScommand accepts input from the calling procedure. These include the type of letter (i.e. table from which information will me merged), the name of the file and the text of any already opened file that will be displayed on the Edit box. Notice how the SET FILTER command is used to filter the MgLettFormats table created earlier. This is how the system knows what table field formats to display to users.
3. Name: frmLettersWrite4. ShowTips: .T.5. WindowType: 1-Modal
iii. Add a list Box Control to your form that will be used to display the field list. These are the table fields whose values can be merged with the text that the user will write along with an example of how each such field is meant to be used. Set the following properties and code for this control:
1. ColumnCount: 42. ColumnWidths: 0,150,300,03. Name: lstLettFormats4. RowSource: MgLettFormats
Generating Form letters with your Visual FoxPro Data
Written by Sylvester Alelele 14
5. RowSourceType: 2-Alias6. SpecialEffect: 1-Plain
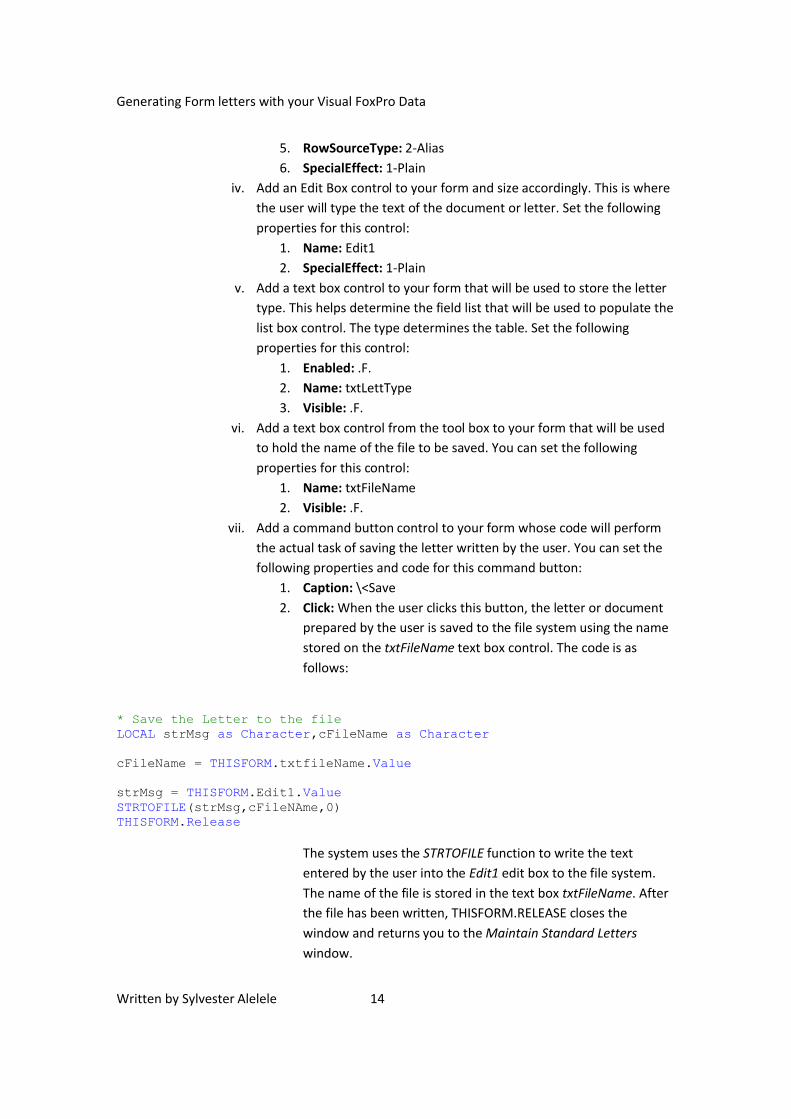
iv. Add an Edit Box control to your form and size accordingly. This is where the user will type the text of the document or letter. Set the following properties for this control:
1. Name: Edit12. SpecialEffect: 1-Plain
v. Add a text box control to your form that will be used to store the letter type. This helps determine the field list that will be used to populate the list box control. The type determines the table. Set the following properties for this control:
1. Enabled: .F.2. Name: txtLettType3. Visible: .F.
vi. Add a text box control from the tool box to your form that will be used to hold the name of the file to be saved. You can set the following properties for this control:
1. Name: txtFileName2. Visible: .F.
vii. Add a command button control to your form whose code will perform the actual task of saving the letter written by the user. You can set the following properties and code for this command button:
1. Caption: \<Save2. Click: When the user clicks this button, the letter or document
prepared by the user is saved to the file system using the name stored on the txtFileName text box control. The code is as follows:
* Save the Letter to the fileLOCAL strMsg as Character,cFileName as Character
cFileName = THISFORM.txtfileName.Value
strMsg = THISFORM.Edit1.ValueSTRTOFILE(strMsg,cFileNAme,0)THISFORM.Release
The system uses the STRTOFILE function to write the text entered by the user into the Edit1 edit box to the file system. The name of the file is stored in the text box txtFileName. After the file has been written, THISFORM.RELEASE closes the window and returns you to the Maintain Standard Letters window.
Generating Form letters with your Visual FoxPro Data
Written by Sylvester Alelele 15
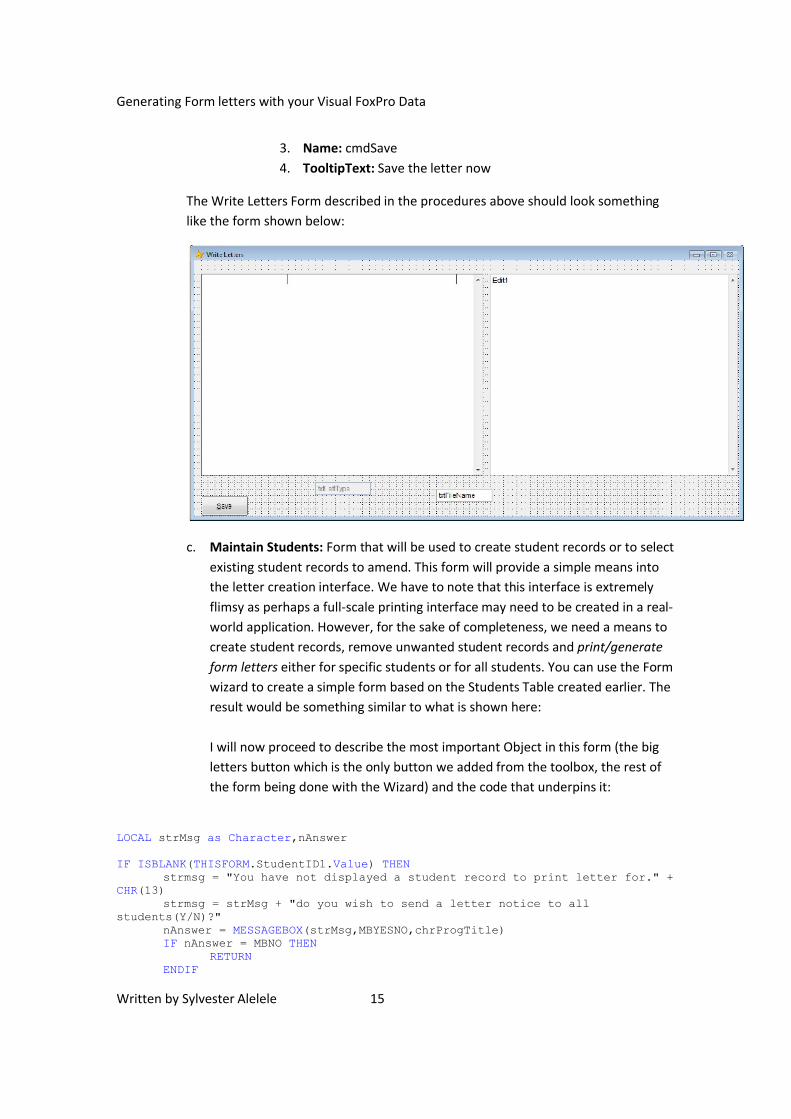
3. Name: cmdSave4. TooltipText: Save the letter now
The Write Letters Form described in the procedures above should look something like the form shown below:
c. Maintain Students: Form that will be used to create student records or to select existing student records to amend. This form will provide a simple means into the letter creation interface. We have to note that this interface is extremely flimsy as perhaps a full-scale printing interface may need to be created in a real-world application. However, for the sake of completeness, we need a means to create student records, remove unwanted student records and print/generate form letters either for specific students or for all students. You can use the Form wizard to create a simple form based on the Students Table created earlier. The result would be something similar to what is shown here:
I will now proceed to describe the most important Object in this form (the big letters button which is the only button we added from the toolbox, the rest of the form being done with the Wizard) and the code that underpins it:
LOCAL strMsg as Character,nAnswer
IF ISBLANK(THISFORM.StudentID1.Value) THEN strmsg = "You have not displayed a student record to print letter for." +
CHR(13)strmsg = strMsg + "do you wish to send a letter notice to all
students(Y/N)?"nAnswer = MESSAGEBOX(strMsg,MBYESNO,chrProgTitle)IF nAnswer = MBNO THEN
RETURNENDIF

Generating Form letters with your Visual FoxPro Data
Written by Sylvester Alelele 16
strMsg = "ALL"ELSE
strMsg = "StudentID = '" + THISFORM.StudentID1.Value + "'"ENDIF
* Proceed
DO FORM frmMgLettTypes WITH "Students",strMsg
This code is simple. If a student record is currently displayed then we assume that the letter is to be sent to a single student only! However, if the screen is blank, then we prompt the user asking if the letter is to be sent to all students in the table. strMsg holds the criteria for printing (either ALL or StudentID = )! The line DO frmMgLettTypes WITH calls the Print Standard Letters window passing the letter type (Students) and the criteria that identifies what student to print for (strMsg)!
d. Print Standard Letters: This is the form through which users will select an existing letter of the specified category/type to print to any one of several destinations of their choice. Create this window as follows:
i. Switch to the Documents tab in your Project, select Form and then choose the New button. Then select the New Form button from the dialog box that displays. A new form is created and presented in the Form Designer where you can now proceed to build as described here. Save this form with the name frmMgLettTypes.
ii. Form Properties and Code: You will set the following properties and write the following code for this Form:
1. Caption: Print Standard Letters2. Data Session: 2-Private Data Session3. Name: frmMgLettTypes4. ShowTips: .T.5. WindowType: 1-Modal6. Data Environment: Add the table MgLettTypes that you had
created earlier to the data environment of this Form7. Init: Add the following code to the Init event of the form that
will be run as soon as the Form is initialized:
* Filter the table to show only letters of the desired typePARAMETERS cLettType,cPrintCriteriaLOCAL strMsg as Character
strMsg = "LettType = '" + cLettType + "'"SELECT MgLettTypesGO TOPSET FILTER TO &strMsgthisform.grdMgLettTypes.Refresh THISFORM.txtlettType.Value = cLettType

Generating Form letters with your Visual FoxPro Data
Written by Sylvester Alelele 17
IF TYPE('cPrintCriteria') = "L" THEN* Its a Logical because the user failed to specify a criteriaTHISFORM.txtPrintCriteria.Value = "ALL"
ENDIF
SET ORDER TO LettNo
The PARAMETERS line accepts parameters called from the calling Form. The Parameters include the name of the letter to be printer and the criteria that determines the records to be included in the print.
8. DoIt: This is a custom method that you will add to this form. This is where the actual Text merging is done using the TEXTMERGE function. To add this method and write the code for it, perform the following action:
a. Choose the New Method menu command from the Form menu. The New Method dialog box displays.
b. Enter ‘DoIt’ in the Name box and then choose the Addbutton to have the method added.
c. Choose Close button to return to the Form when you are done adding the method. DoIt will now be added to the Properties sheet for your form.
d. From the properties window, scroll until you find DoItand then double-click it to open the code window
e. You can now add the following code to your DoItmethod:
PARAMETERS cOutPutTextRETURN TEXTMERGE(cOutPutText)
This code has just two lines! The PARAMETER line received the code to be merged. The next line uses the TEXTMERGE function to perform the actual merging of the text with the
iii. Add a Grid control to the Form from the toolbox and then set the following properties and write the following code for the Grid control:
1. AfterRowColChange: You can write the following code for this event:
LPARAMETERS nColIndexTHISFORM.Refresh
2. ColumnCount: 43. DeleteMark: .F.4. Name: grdMgLettTypes
Generating Form letters with your Visual FoxPro Data
Written by Sylvester Alelele 18
5. ReadOnly: .T.6. RecordSource: MgLettTypes7. RecordSourceType: 1-Alias
iv. Add a Label Control and set the following properties for it:1. Caption: Description
v. Add an Edit Box Control and set the following properties for it:1. ControSource: MgLettTypes.LettDesc2. Name: edtLettDesc3. SpecialEffect: 1-Plain
vi. Add a Text Box Control to the form and then set the following properties and code for it:
1. Name: txtPrintCriteria2. Visible: .F.
vii. Add a text box control to the Form and then set the following properties for this control:
1. Enabled: .F.2. Name: txtLettType3. Visible: .F.
viii. Add a TextBox control to the form and then set the following properties for it:
1. Enabled: .F.2. Name: txtLettNo3. Valid: You can write the following code for the Valid event of
this text box:* Search the table and then display a record meeting the criteriaLOCAL cFilter as CharacterSTORE "" TO cFilter
IF THIS.Value = 0 THEN RETURN
ENDIF SELECT MgLettTypescfilter = FILTER()SET FILTER TO GO TOP SET ORDER TO LettNoGO THIS.Value
THISFORM.txtLettName.Value = MgLettTypes.LettNameTHISFORM.edtLettDesc.Value = MgLettTypes.LettDesc
SET FILTER TO &cFilterTHISFORM.lstMgLettTypes.Refresh GO TOP

Generating Form letters with your Visual FoxPro Data
Written by Sylvester Alelele 19
This code scans the MgLettTypes table to see if the letter identified by the value entered in the txtLettNo field exists. If it does, the name of the letter is put in the txtLettName text box.
4. Value: 05. Visible: .F.
If you have properly followed the instructions for creating the Form described above, the final Form design should like the one in the following example:
e. Preview Form Letters: This is a print preview form of sorts! Again, we will note that in a real-world application that goes beyond a simple ‘how-to’ a professional preview tool would have been created by the user. Nevertheless, this simple interface will server to illustrate the desired concept that perhaps some users will want to see what the generated document looks like before sending it to the final destination. We will proceed to the creation of this form as follows:
i. Switch to the Documents tab of the project Manager and then choose the New button. Select New Form button from the dialog box that displays. A new blank form is added and opened on the Forms Designer
Generating Form letters with your Visual FoxPro Data
Written by Sylvester Alelele 20
where you can now proceed to lay it out. Save the new form under the name frmMgPrevLetts.
ii. Set the following properties and code for this form:1. Caption: Preview Form Letters2. DataSession: 2-Private3. Init: You can write the following code for the Init Event of this
Form:
PARAMETERS cLetter
IF TYPE('cLetter') = "C" THEN THISFORM.edit1.Value = cLetter
ENDIF
This little piece of code receives a PARAMETER for the Form cLetter that contains the merged text. This merged text is them simply displayed on the Edit Box so that the user can see it and make any final, desired changes to it before finally sending it to destination.
4. Name: frmMgPrevLetts5. WindowType: 1-Modal
iii. Add an Edit Box control to the Form and then set the following properties and code for this control:
1. Name: Edit1iv. Add a command button control to the Form that you will use to close
the Form. You can set the following properties and code for it:1. Cancel: \<Cancel2. Name: cmdClose3. Click: You can write the following code for the Click event of the
control to close the form:THISFORM.Release
v. Add a Second Command Button control to the Form that you will use to send the contents of the Edit Box control to the printer. You can set the following properties and code for it:
1. Caption: \<Print2. Name: cmdPrint3. Click: You can write the following code in the Click event of this
button that will send the contents of Edit Box to the current default printer:
LOCAL cMsgcMsg = ""
Generating Form letters with your Visual FoxPro Data
Written by Sylvester Alelele 21
cMsg = THISFORM.edit1.Value SET CONSOLE ON SET PRINTER ON PROMPTSET PRINTER TO DEFAULT?? cMsgSET PRINTER OFFSET CONSOLE OFF
vi. Add a Third command button control that you will use to enable you print the contents of Edit Box to Microsoft Word. You can set the following properties and code for it:
1. Caption: \<Word2. Name: cmdWord3. Click: You can write the following code in the Click event of the
button that uses Automation to send documents to Microsoft Word 2007:
LOCAL oW AS Object,cToFind AS Character,cOutPutTex AS Character STORE "" TO cToFind,cOutPutText* create a Word Document and put the document in itoW = CREATEOBJECT("Word.Application")cToFind = cMainPath + "\CoyLetterHead.Dotx"*oW.Documents.Add("D:\CampusManagerSMS\CoyLetterHead.Dotx")oW.Documents.Add(cToFind)cOutPutText = THISFORM.eDIT1.Value oW.Selection.TypeText(cOutPutText)oW.Visible = .T.
In the code above, the CREATEOBJECT function creates an instance of Microsoft Word and stores the object reference returned in the variable oW. The Variable, cToFind holds a path to the default letter head template we had already created and cOutPutText holds the contents of the Edit Box control. Once Word is launched with the default document, the line oW.Selection.TypeText(cOutPutText) sends the cOutPutText to it and word is made visible with oW.Visible = .T.
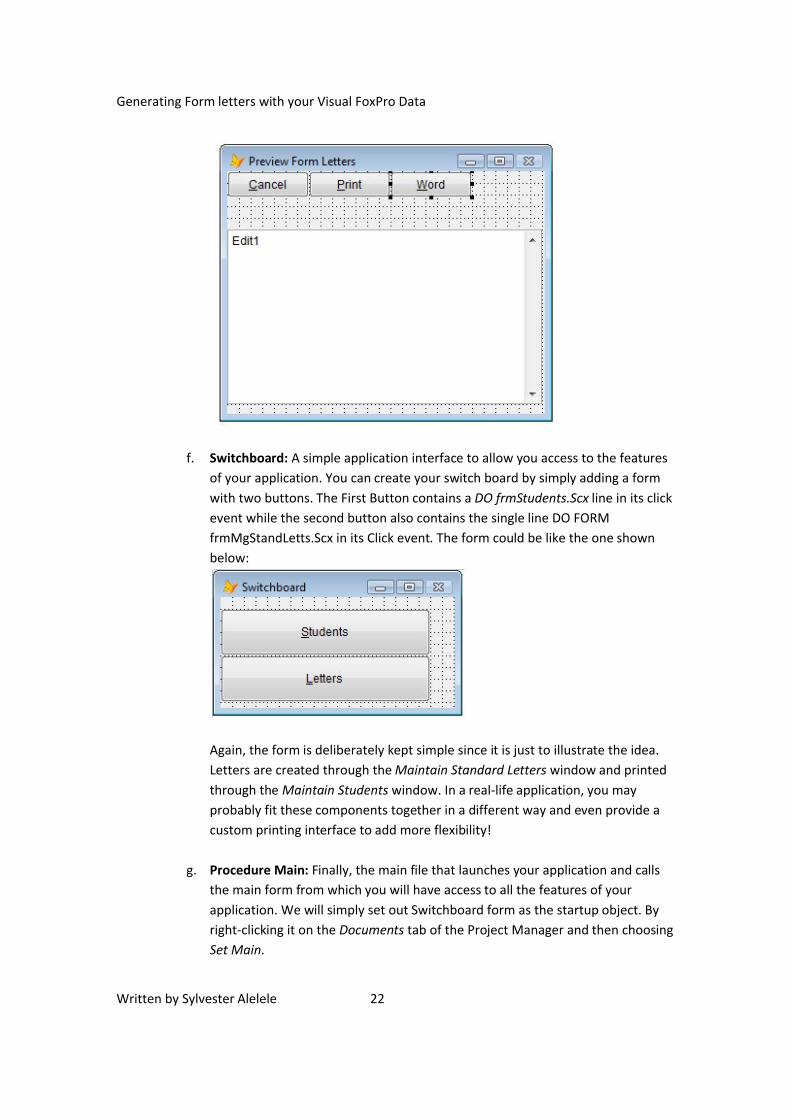
If you have properly followed the steps described here, the final form should look like this:
Generating Form letters with your Visual FoxPro Data
Written by Sylvester Alelele 22
f. Switchboard: A simple application interface to allow you access to the features of your application. You can create your switch board by simply adding a form with two buttons. The First Button contains a DO frmStudents.Scx line in its click event while the second button also contains the single line DO FORM frmMgStandLetts.Scx in its Click event. The form could be like the one shown below:
Again, the form is deliberately kept simple since it is just to illustrate the idea. Letters are created through the Maintain Standard Letters window and printed through the Maintain Students window. In a real-life application, you may probably fit these components together in a different way and even provide a custom printing interface to add more flexibility!
g. Procedure Main: Finally, the main file that launches your application and calls the main form from which you will have access to all the features of your application. We will simply set out Switchboard form as the startup object. By right-clicking it on the Documents tab of the Project Manager and then choosing Set Main.

Generating Form letters with your Visual FoxPro Data
Written by Sylvester Alelele 23
7. ConclusionThis is it friends! Give your application a test run. Try to create a letter. The Maintain Standard Letters window will like this when run:
When you choose the Save button, the Write Windows window should open so you can create your letter. It should initially look like this:

Generating Form letters with your Visual FoxPro Data
Written by Sylvester Alelele 24
After you have created your letter, it should look something like the following window after which you must choose the Save button to save the letter. The form should now look something like this:
Now you can print this document from the Student window by choosing the Lettersbutton. When you display a student record and then choose that button, the Print Standard Letters window would look like:

Generating Form letters with your Visual FoxPro Data
Written by Sylvester Alelele 25
You could now highlight the letter you want to print and then choose the Word button top send it to word. Microsoft Word 2007 should open with the merged text that should look something like the following: