GENERAL ASTRONOMY OBSERVING TUTORIALS: ASTEROID...
7
GENERAL ASTRONOMY OBSERVING TUTORIALS: ASTEROID LIGHT CURVES Version 1.0: 9 Nov 2017
Transcript of GENERAL ASTRONOMY OBSERVING TUTORIALS: ASTEROID...

GENERAL ASTRONOMY OBSERVING TUTORIALS:ASTEROID LIGHT CURVESVersion 1.0: 9 Nov 2017

Steps to creating a light of a moving object [e.g. asteroid]
1. Log in to deimos using your assigned username and password. In this tutorial, I will use as an example the asteroid 1884 Skip which was observed by the observer code gbi on 9 November 2017 (day 313).
2. Make a folder with a name appropriate to the images of the object (e.g. mkdir 1884Skip). Change to that folder (cd 1884Skip) and copy all images from user gbi on day 313 to the image directory to the folder (cp /usr/local/telescope/user/images/gbi313*.fts .)
3. Run sort-files (sort-files) to sort images into filter-specific folders, This renames file names to contain times and sorts by filter. cd to the subfolder containing your images (R in this case).
4. Make a image file list (fitslist > fts.lis). This create a text file fts.lis. Look at the list (more fts.lis) and determine the names of the first and last images. Example:
DEIMOS:~/Gemini/GA_Fall17/1884Skip/R> fitslist sorting... Image file name Object Fil Time UT Date/time RA Dec Z FWHM[Z=1.0] ZP Offsets (Ha,Dec) -------------------------------------------------------------------------------------------------------------------------------------------------------------- 1884Skip_2017_11_09_0229_R.fts 1884 Skip R 20.0 2017-11-09 02:29:38 01:28:22.3 43:53:17 1.3 2.2" [1.9"] - -109.0", 130.1" 1884Skip_2017_11_09_0239_R.fts 1884 Skip R 20.0 2017-11-09 02:39:47 01:28:21.6 43:53:18 1.2 2.2" [1.9"] - -107.2", 124.5" 1884Skip_2017_11_09_0250_R.fts 1884 Skip R 20.0 2017-11-09 02:50:47 01:28:21.1 43:53:18 1.2 2.0" [1.8"] - -107.4", 119.5" 1884Skip_2017_11_09_0300_R.fts 1884 Skip R 20.0 2017-11-09 03:00:38 01:28:20.2 43:53:19 1.2 1.9" [1.7"] - -107.5", 114.5” …
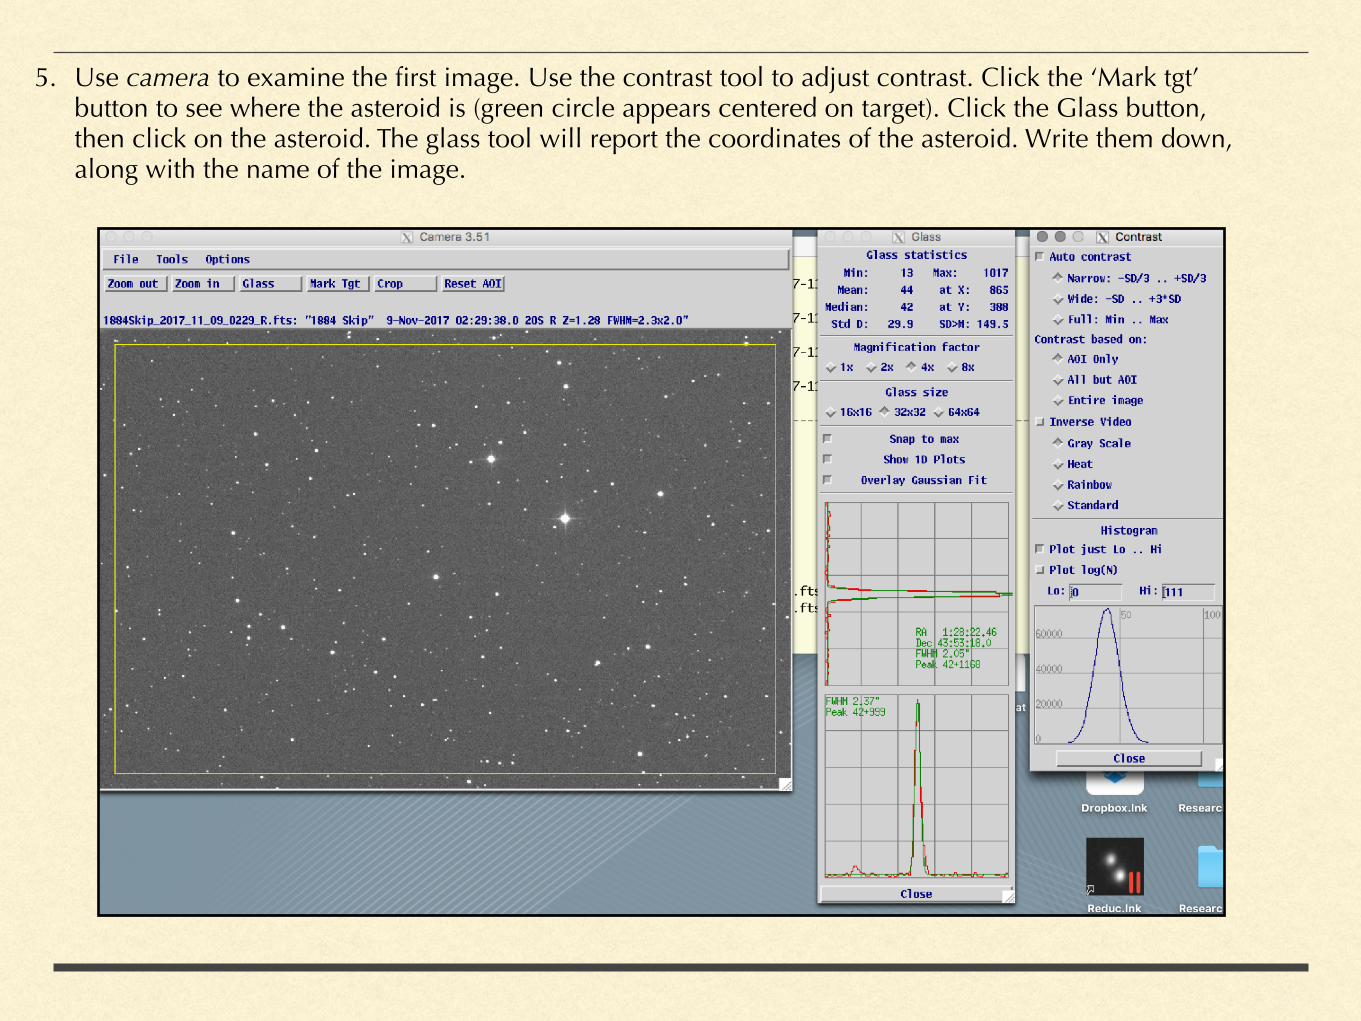
5. Use camera to examine the first image. Use the contrast tool to adjust contrast. Click the ‘Mark tgt’ button to see where the asteroid is (green circle appears centered on target). Click the Glass button, then click on the asteroid. The glass tool will report the coordinates of the asteroid. Write them down, along with the name of the image.
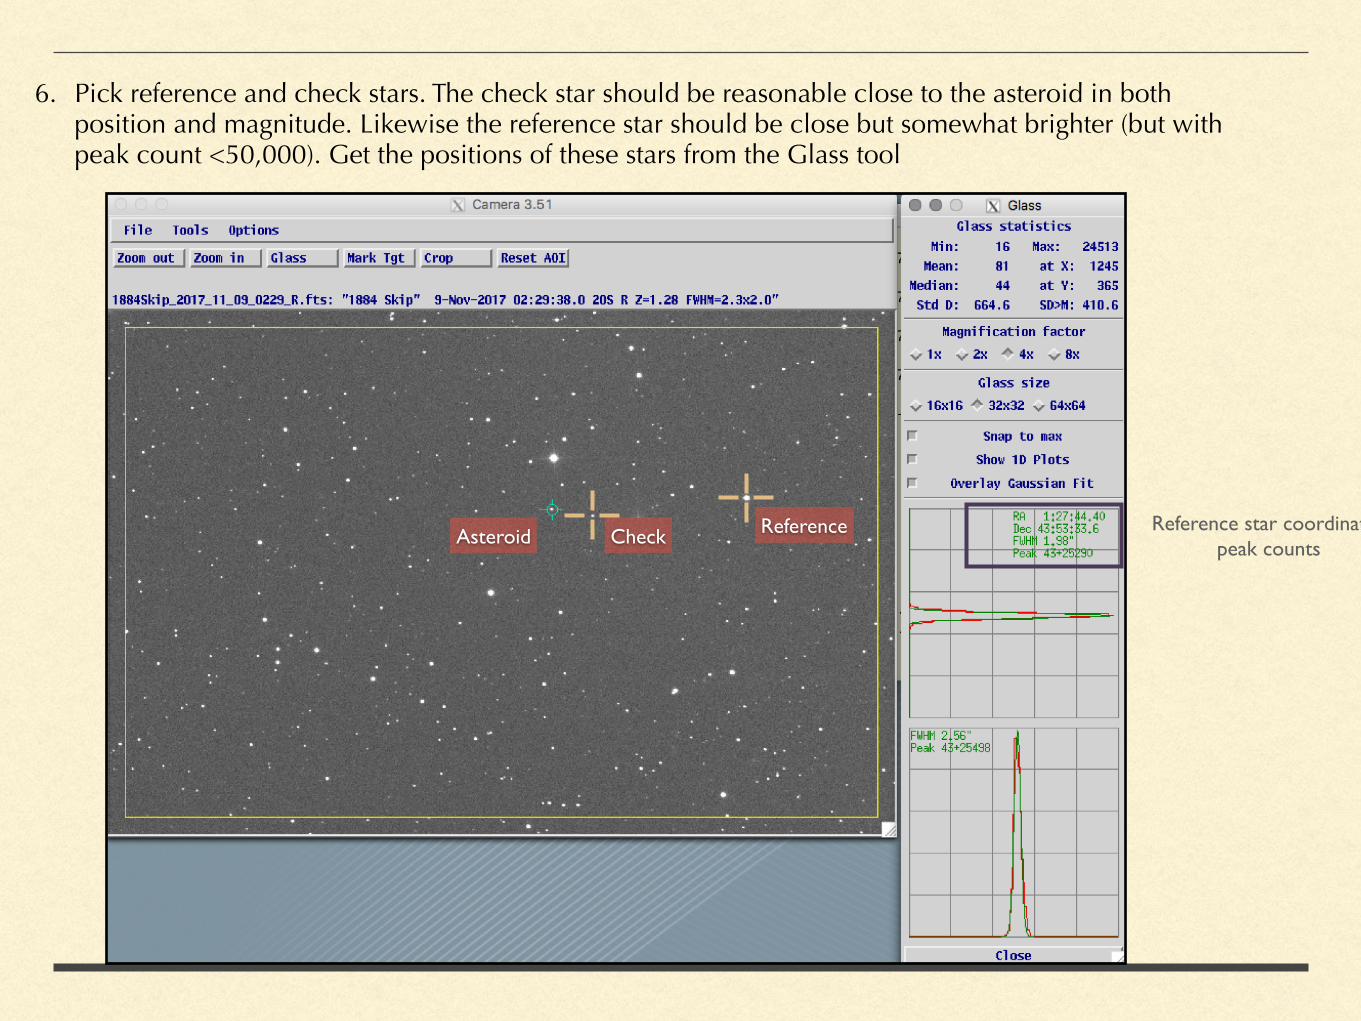
6. Pick reference and check stars. The check star should be reasonable close to the asteroid in both position and magnitude. Likewise the reference star should be close but somewhat brighter (but with peak count <50,000). Get the positions of these stars from the Glass tool
ReferenceCheckAsteroidReference star coordinates,
peak counts
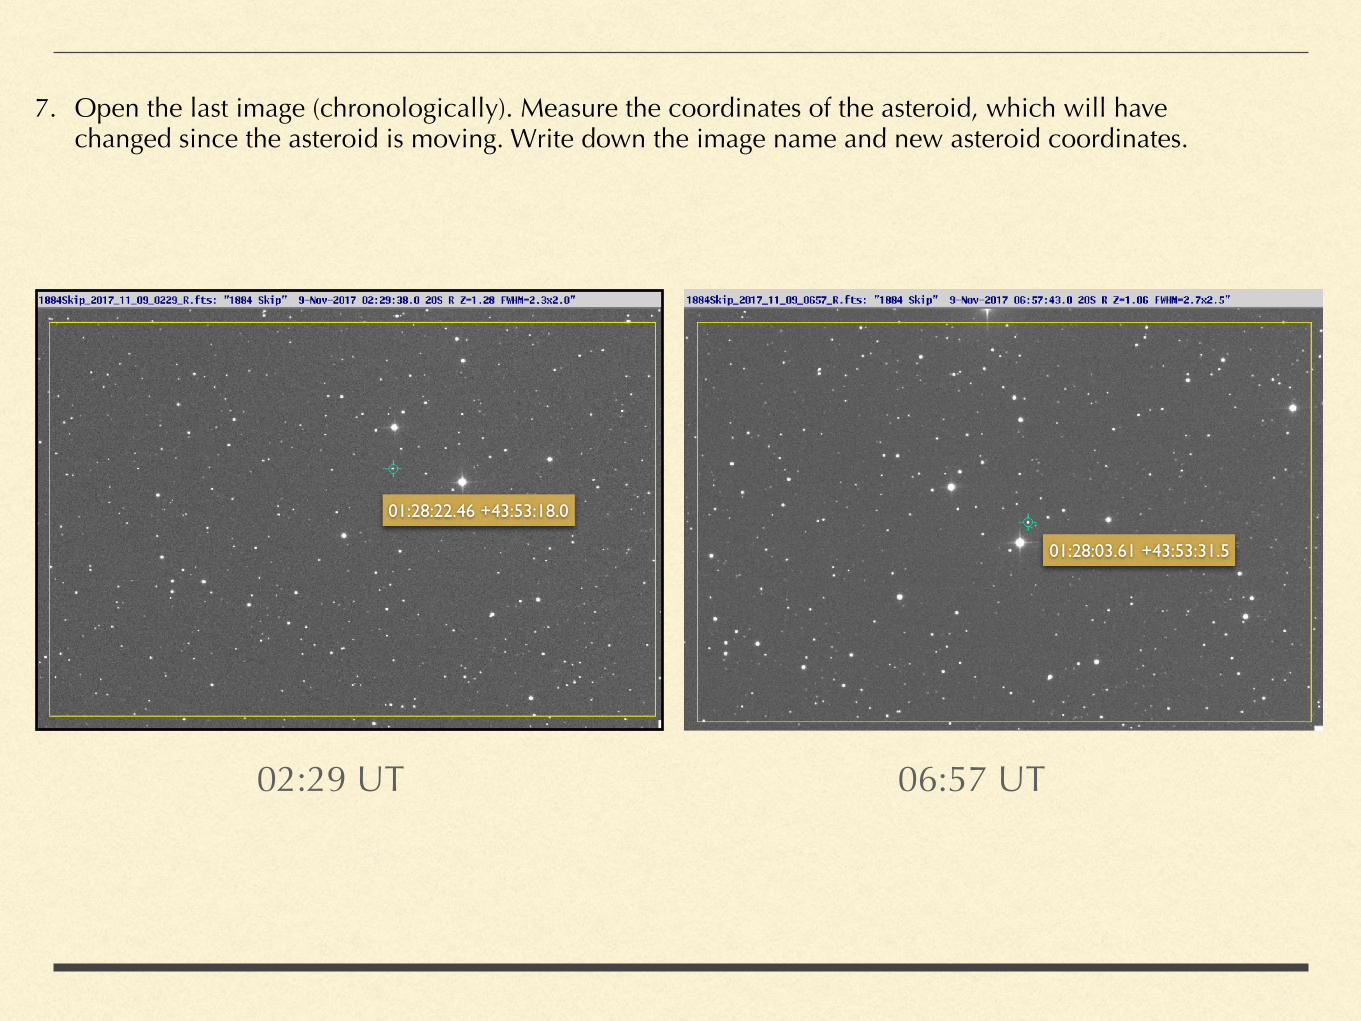
7. Open the last image (chronologically). Measure the coordinates of the asteroid, which will have changed since the asteroid is moving. Write down the image name and new asteroid coordinates.
02:29 UT 06:57 UT
01:28:22.46 +43:53:18.0
01:28:03.61 +43:53:31.5
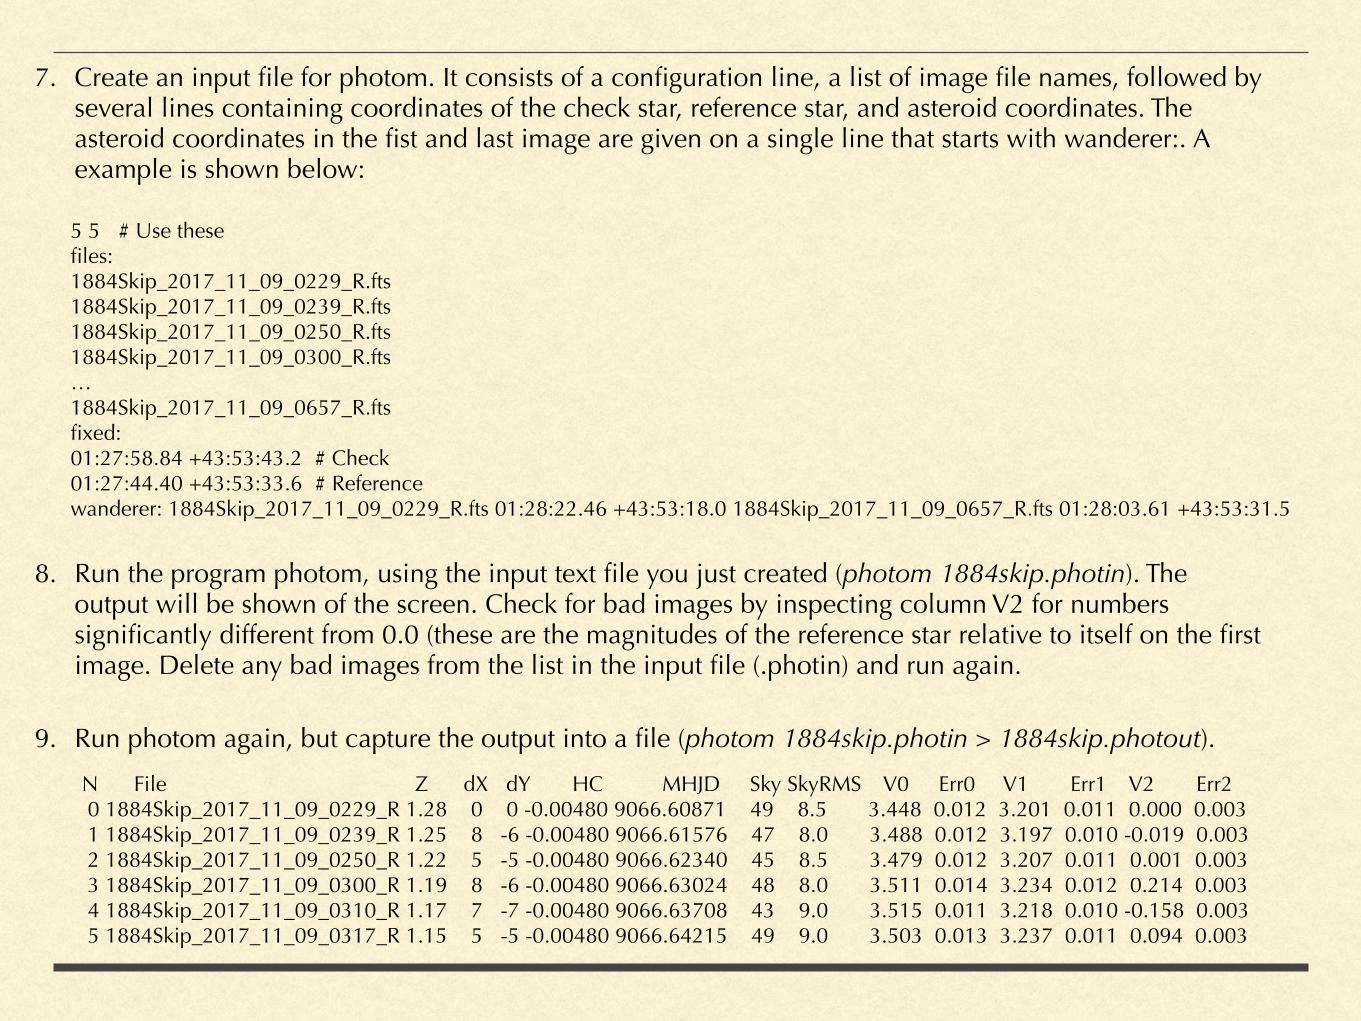
7. Create an input file for photom. It consists of a configuration line, a list of image file names, followed by several lines containing coordinates of the check star, reference star, and asteroid coordinates. The asteroid coordinates in the fist and last image are given on a single line that starts with wanderer:. A example is shown below:
5 5 # Use these files: 1884Skip_2017_11_09_0229_R.fts 1884Skip_2017_11_09_0239_R.fts 1884Skip_2017_11_09_0250_R.fts 1884Skip_2017_11_09_0300_R.fts … 1884Skip_2017_11_09_0657_R.fts fixed: 01:27:58.84 +43:53:43.2 # Check 01:27:44.40 +43:53:33.6 # Reference wanderer: 1884Skip_2017_11_09_0229_R.fts 01:28:22.46 +43:53:18.0 1884Skip_2017_11_09_0657_R.fts 01:28:03.61 +43:53:31.5
8. Run the program photom, using the input text file you just created (photom 1884skip.photin). The output will be shown of the screen. Check for bad images by inspecting column V2 for numbers significantly different from 0.0 (these are the magnitudes of the reference star relative to itself on the first image. Delete any bad images from the list in the input file (.photin) and run again.
9. Run photom again, but capture the output into a file (photom 1884skip.photin > 1884skip.photout).
N File Z dX dY HC MHJD Sky SkyRMS V0 Err0 V1 Err1 V2 Err2 0 1884Skip_2017_11_09_0229_R 1.28 0 0 -0.00480 9066.60871 49 8.5 3.448 0.012 3.201 0.011 0.000 0.003 1 1884Skip_2017_11_09_0239_R 1.25 8 -6 -0.00480 9066.61576 47 8.0 3.488 0.012 3.197 0.010 -0.019 0.003 2 1884Skip_2017_11_09_0250_R 1.22 5 -5 -0.00480 9066.62340 45 8.5 3.479 0.012 3.207 0.011 0.001 0.003 3 1884Skip_2017_11_09_0300_R 1.19 8 -6 -0.00480 9066.63024 48 8.0 3.511 0.014 3.234 0.012 0.214 0.003 4 1884Skip_2017_11_09_0310_R 1.17 7 -7 -0.00480 9066.63708 43 9.0 3.515 0.011 3.218 0.010 -0.158 0.003 5 1884Skip_2017_11_09_0317_R 1.15 5 -5 -0.00480 9066.64215 49 9.0 3.503 0.013 3.237 0.011 0.094 0.003

1. Run plot-photom, which plots the output of photom with several options (type plot-photom -h to see options. The example below overrides the default y-axis range (+1.0 to -1.0), plots the asteroid vs. JD and vs. phase using the known period P = 0.128 days, double plots the phase, and plots the check star (green points and line). The .pdf plots can be shown on the screen using display.
plot-photom -lcdp -y 0.3,-0.3 -P 0.128 -T 'Asteroid 1884 Skip' 1884skip.photout HJD-magnitude plot file = 1884skip_lc_jd.pdf Phase-magnitude plot file = 1884skip_lc_phase.pdf Wrote ASCII output file 1884skip_hjd.dat Wrote ASCII output file 1884skip_phase.dat
Light curve vs JD Light curve vs rotation phase