For Mac OSX Users Manual
17
For Mac OSX Users Manual Microboards Technology LLC Version 1.01
Transcript of For Mac OSX Users Manual
For Mac OSX
Users Manual Microboards Technology LLC Version 1.01

2
MICROBOARDS TECHNOLOGY, LLC PrintWrite for Mac
3
TABLE OF CONTENTS
Introduction ...........................................................................................................................5
GX-2 Disc Publisher .......................................................................................................... 5 MX Series Disc Publishers ................................................................................................ 5 Installing PrintWrite ........................................................................................................... 6
Launching PrintWrite ...................................................................................................... 6 Creating Projects...................................................................................................................7
Common Project Steps ..................................................................................................... 7 Adding Files to Record ................................................................................................... 7 Selecting a Label to Print ............................................................................................... 7 Supported Image Formats.............................................................................................. 7 Selecting the Number of Discs ....................................................................................... 8 Job Options Panel .......................................................................................................... 8 Submitting a Job............................................................................................................. 9 Job List Panel................................................................................................................. 9 Working with Saved Projects........................................................................................ 10 The Toolbar.................................................................................................................. 10 The Menu ..................................................................................................................... 11
Copy Disc........................................................................................................................ 13 Master Selection........................................................................................................... 13
Burn Image...................................................................................................................... 13 Adding the Disc Image ................................................................................................. 13
Data CD, Data DVD, and Data BD.................................................................................. 14 Adding Data Files ......................................................................................................... 14
DVD Video ...................................................................................................................... 14 Adding Video Files ....................................................................................................... 14
Audio CD......................................................................................................................... 15 Adding Audio Files ....................................................................................................... 15
Stream............................................................................................................................. 15 Loading Discs for Stream ............................................................................................. 15 Selecting the Labels to Print......................................................................................... 15 Supported Image Formats............................................................................................ 16
Print Only ........................................................................................................................ 16 Uninstalling PrintWrite .........................................................................................................17 Technical Support ...............................................................................................................17

4

MICROBOARDS TECHNOLOGY, LLC PrintWrite for Mac
5
Introduction Microboards PrintWrite software is designed to be the disc publishing solution for use with the Microboards GX-2 and MX Series Disc Publisher models. Whether you are publishing only a few discs a day on a GX Disc Publisher or hundreds on an MX Disc Publisher, PrintWrite is the publishing software designed by Microboards specifically for your disc publishing equipment.
GX-2 Disc Publisher Input/Output Capacity: 50 discs Number of Drives: 1 Print-Only Mode: Uses PrintWrite to print labels The GX-2 Disc Publisher is designed for office desktop use and is the perfect solution for businesses and organizations requiring short runs of discs.
MX Series Disc Publishers Input/Output Capacity: 100 discs Number of Drives: MX-1: 1 recorder drive MX-2: 2 recorder drives Print-Only Mode: Uses PrintWrite to print labels, or can print directly out
of other applications The MX-1 and MX-2 Disc Publishers are ideal for organizations that need to produce anywhere from one to thousands of discs! Designed for industrial environments, the MX comes with either 1 (MX-1) or 2 (MX-2) high-speed DVD/CD or BD/DVD/CD recorders and the industry’s fastest, lowest cost-per-disc inkjet printer, all integrated into a robust publishing solution.
6
Installing PrintWrite PrintWrite is installed as part of the Microboards Disc Publisher installation. Installation of both PrintWrite and the Disc Publisher must be performed by a user with full administrative rights, or a user with access to an administrative password.
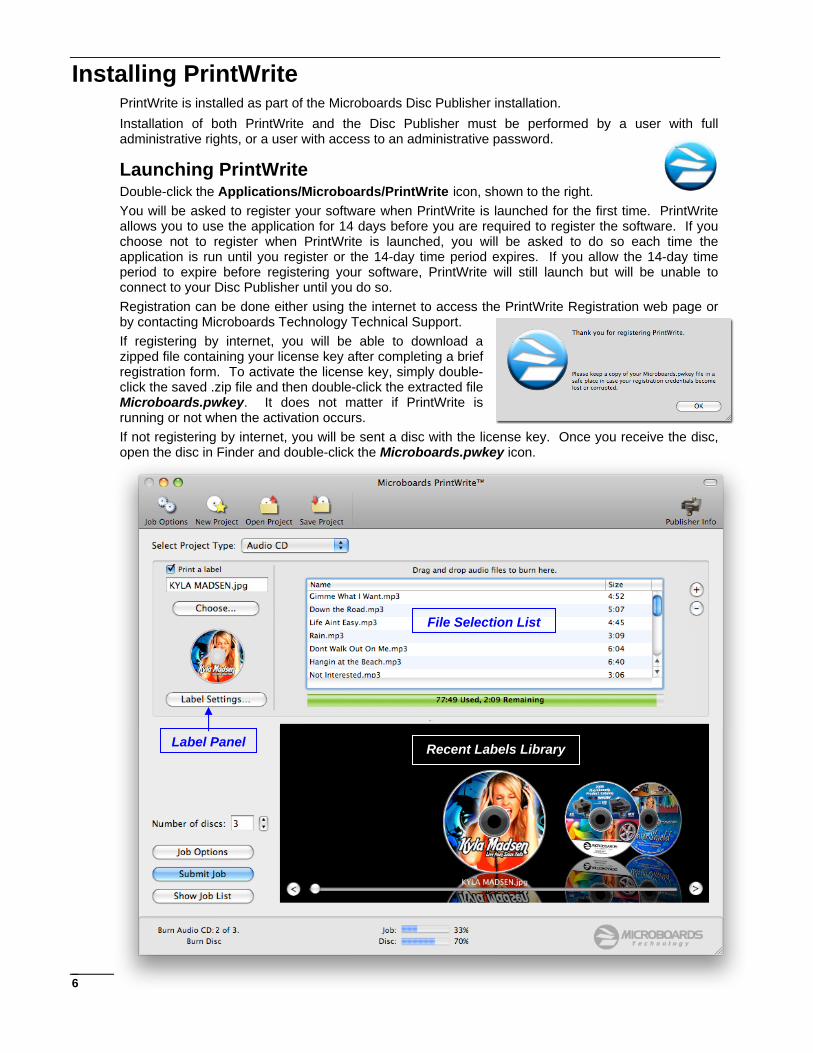
Launching PrintWrite Double-click the Applications/Microboards/PrintWrite icon, shown to the right. You will be asked to register your software when PrintWrite is launched for the first time. PrintWrite allows you to use the application for 14 days before you are required to register the software. If you choose not to register when PrintWrite is launched, you will be asked to do so each time the application is run until you register or the 14-day time period expires. If you allow the 14-day time period to expire before registering your software, PrintWrite will still launch but will be unable to connect to your Disc Publisher until you do so. Registration can be done either using the internet to access the PrintWrite Registration web page or by contacting Microboards Technology Technical Support. If registering by internet, you will be able to download a zipped file containing your license key after completing a brief registration form. To activate the license key, simply double-click the saved .zip file and then double-click the extracted file Microboards.pwkey. It does not matter if PrintWrite is running or not when the activation occurs. If not registering by internet, you will be sent a disc with the license key. Once you receive the disc, open the disc in Finder and double-click the Microboards.pwkey icon.
File Selection List
Label Panel Recent Labels Library
MICROBOARDS TECHNOLOGY, LLC PrintWrite for Mac
7
Creating Projects
Simply select the type of project you want to create. Everything you will need to create that project type will appear on the screen.
Common Project Steps While the steps in building each project may differ from project type to project type, there are many steps that are the same from project to project. Those steps are detailed here, with references back to this section when describing the steps for each specific project type.
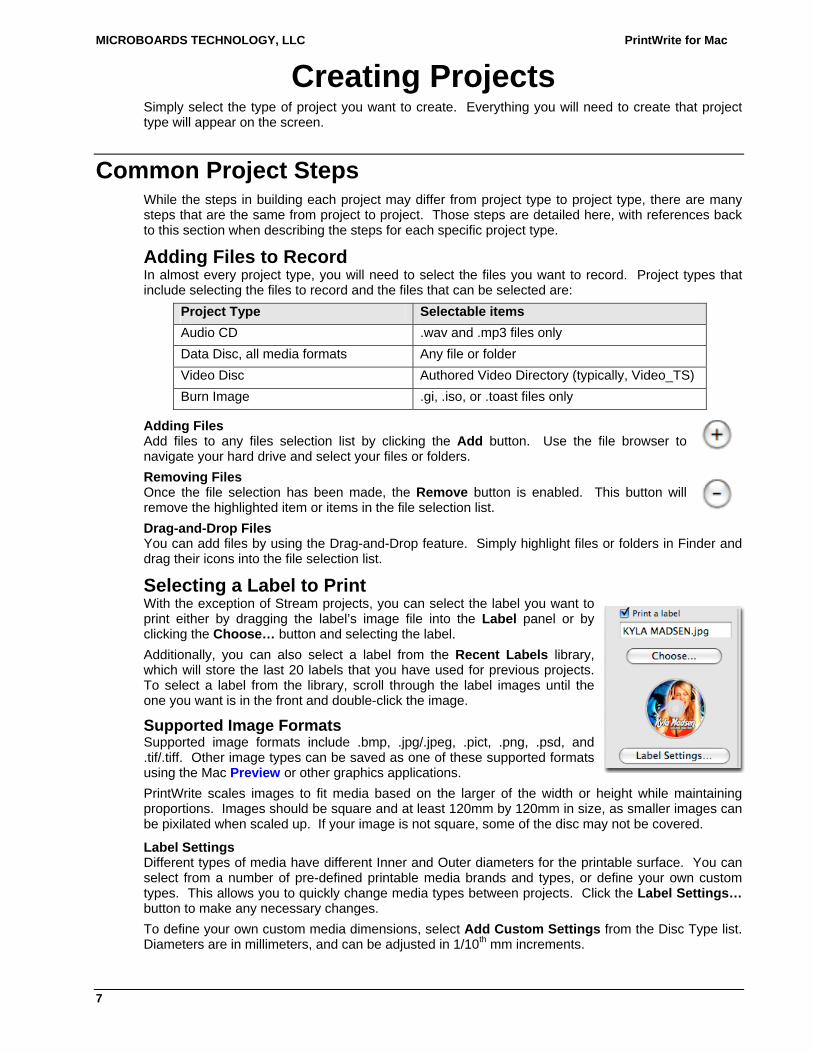
Adding Files to Record In almost every project type, you will need to select the files you want to record. Project types that include selecting the files to record and the files that can be selected are:
Project Type Selectable items Audio CD .wav and .mp3 files only Data Disc, all media formats Any file or folder Video Disc Authored Video Directory (typically, Video_TS) Burn Image .gi, .iso, or .toast files only
Adding Files Add files to any files selection list by clicking the Add button. Use the file browser to navigate your hard drive and select your files or folders. Removing Files Once the file selection has been made, the Remove button is enabled. This button will remove the highlighted item or items in the file selection list. Drag-and-Drop Files You can add files by using the Drag-and-Drop feature. Simply highlight files or folders in Finder and drag their icons into the file selection list.
Selecting a Label to Print With the exception of Stream projects, you can select the label you want to print either by dragging the label’s image file into the Label panel or by clicking the Choose… button and selecting the label. Additionally, you can also select a label from the Recent Labels library, which will store the last 20 labels that you have used for previous projects. To select a label from the library, scroll through the label images until the one you want is in the front and double-click the image.
Supported Image Formats Supported image formats include .bmp, .jpg/.jpeg, .pict, .png, .psd, and .tif/.tiff. Other image types can be saved as one of these supported formats using the Mac Preview or other graphics applications. PrintWrite scales images to fit media based on the larger of the width or height while maintaining proportions. Images should be square and at least 120mm by 120mm in size, as smaller images can be pixilated when scaled up. If your image is not square, some of the disc may not be covered.
Label Settings Different types of media have different Inner and Outer diameters for the printable surface. You can select from a number of pre-defined printable media brands and types, or define your own custom types. This allows you to quickly change media types between projects. Click the Label Settings… button to make any necessary changes. To define your own custom media dimensions, select Add Custom Settings from the Disc Type list. Diameters are in millimeters, and can be adjusted in 1/10th mm increments.

8
You can also change the resolution under the Media Type and Quality settings and save these changes into your custom Disc Type. Options available for these settings will vary depending on the model of Disc Publisher you have. As a rule, Photo will use more ink and take longer to print than Text & Graphics. Similarly, the quality setting of Best will take more ink and time than Normal. To save your settings as a new defined media type, enter in a name under which to save the settings and click the Save button. Your media type is now added to the Printable Media Type list.
Selecting the Number of Discs If you will be creating more than one disc from a project, adjust the entry in the Number of Discs field accordingly.
Job Options Panel Several of the project types have Job Options that can be modified. The default settings will be applicable to virtually all needs; unless you have a specific reason to do so, there is no need to change any of the settings. To view the Job Options panel, click the Job Options button in the main panel or the Job Options button in the toolbar. The panel will expand from either the left or right side of the main panel, depending on the placement of the main panel. Each of these options must be set before the job is submitted. Changes to these settings will not affect jobs already in the Job List. Not all settings will apply to all project types. Job Options that cannot be modified for a given project will be disabled. The Print Only Project type does not include any modifiable Job Options.
Create Master Image (Applies to all burn projects except Stream) This option allows you to create a master image from which the copying will occur rather than burning directly from your original files. While this will add to the amount of time it takes to complete the project, it does reduce the possibility of burn failure. By default, this option is unchecked for all applicable projects except for the Copy Disc project. For the Copy Disc project, this option will be checked and is the same as Copy the master disc to my hard drive selection (page 13).
This option will be checked and cannot be changed for any applicable burn project using a 2-drive Disc Publisher in which both drives are enabled (see page 12) and the
number of discs being burned in the project is greater than one.
Test Burn (Applies to all burn projects) Use this option if you want to test the functionality without burning to a disc. Some media, such as DVD+R, cannot be simulated to. Using this option will result in rejected discs and a failed job. Verify (Applies to Data Disc, DVD Video, and Audio CD projects) Placing a check in the Verify option will read and compare the copies to the master disc or source files as each disc completes the burn process, except for Audio CD projects; for that project type, Verify will perform a read check on the files. Selecting this option will increase the amount of time it takes to process each disc. You cannot combine Test Burn with Verify.

MICROBOARDS TECHNOLOGY, LLC PrintWrite for Mac
9
Open/Close Disc (Applies to Data Disc projects only) Available options are Open and Closed. By default, Closed is the selected setting. By selecting Open, the recorded disc can later have data appended to it while a Closed disc can not.
Disc Format (Applies to Data Disc projects only) Available options are ISO 9660 and UDF. The default setting is always recommended. Number of Failed Discs (Applies to all burn projects) This setting will control how many failures will be allowed before PrintWrite halts the project. Raising the number will allow for more tolerance, but increases the number of discs that could potentially be discarded. The default value of this setting is 3 discs.
Write Speed (Applies to all burn projects) Available options are Maximum, Medium, and Minimum. The default setting is Maximum. The exact burn speeds of each will depend on the drive model and type of media used for the project.
Copy Disc Burn
Image Data Disc
DVD Video Audio CD Stream
Create Master Image
Test Burn
Verify Read Check
Open/Close Disc
Disc Format
Number of Failed Discs
Write Speed
Submitting a Job Once you have the correct project type and have completed building the project, load the correct media type for your project and click the Submit Job button. Always load your media prior to clicking the Submit Job button, as the publisher may begin to load immediately. The progress of the currently active job will be displayed at the bottom of the main panel. Both the progress of the current job and the disc currently being processed is shown.
Job List Panel To view the Job List panel, click the Show Job List button. The panel will expand from either below or above the main panel, depending on the placement of the main panel. The Job List will show the state of completed, running, and waiting jobs, as well as a description of the job and a disc count for applicable jobs.
Project Types and Available Job Options

10
Hold Job can only be applied to jobs in a Waiting state. If you have several jobs in the list and need to delay one or more jobs for a job that needs to be completed as soon as possible, you can place the jobs that can wait on Hold. Once the priority job has begun, you can Resume the held jobs. Highlight a job and click the Hold job button to place the selected job in a holding state. Hold can be used if you needed to delay a job that had been submitted but is not yet processing. Resume Job can only be applied to jobs listed in a Holding state. You can highlight any held job and click the Resume job button to have the job continue. Cancel Job can be applied to any job in any state other than Finished. Doing so will halt the highlighted job after any discs currently being burned or printed are complete. Clicking the Cancel job button will cancel the currently selected job in the list.
Working with Saved Projects Once a project has been saved, you can re-open it by selecting Open Project in the File menu, by clicking the Open button in the Toolbar, or by double-clicking the saved project icon. Any of these methods will display the project design to give you the opportunity to review the project before submitting the job.
The Toolbar There are 5 functions that can be accessed using the Toolbar at the top of the main panel. Job Options Please see Common Project Steps: Job Options Panel, page 8. New Project Clicking this button will clear out the project you are currently designing. This will not affect any jobs already submitted. This function is also available in the File menu. Open Project You can click this button to open any previously-saved project from PrintWrite for Mac. Opening a saved project will replace anything you already have designed in the main panel. This function is also available in the File menu. Save Project Click this button to save the project currently showing in the main panel. This function is also available in the File menu. Publisher Info Click this button, located on the far right side of the toolbar, to open the Publisher Information panel. The panel will open either to the left or right of the main panel, and will close the Job Options panel if open.
Included on the Publisher Information panel are the model of Disc Publisher, the ink levels of the connected publisher, and the System Status. For the MX Disc Publisher models, each ink color has an individual cartridge. All 4 ink levels will be displayed, as shown to the right. For the GX Disc Publisher, with a color composite ink cartridge, the information will show the percentage remaining of the lowest color level, not the percentage of ink remaining for the entire composite cartridge. If the composite cartridge is almost empty of yellow, for instance, the ink level displayed will be that of the yellow ink. Because of this, your composite cartridge may not feel empty, by weight, when the ink level is reporting as empty. Color composite ink cartridges cannot continue to be run if any of the 3 colors of ink are empty.
MICROBOARDS TECHNOLOGY, LLC PrintWrite for Mac
11
The Menu Only those menu items unique to PrintWrite will be discussed.
Utilities Menu: Clear Robotics Selecting this option will add a Clear Robotics job to the Job List. This job will run the initialization sequence, which first clears the disc conveyor and clears the drive or drives.
Utilities Menu: Test Robotics The Test Robotics function will add a Test Robotics job to the Job List. This job will singulate and load a disc to each drive in the publisher and eject the disc into the output bin without burning or printing.
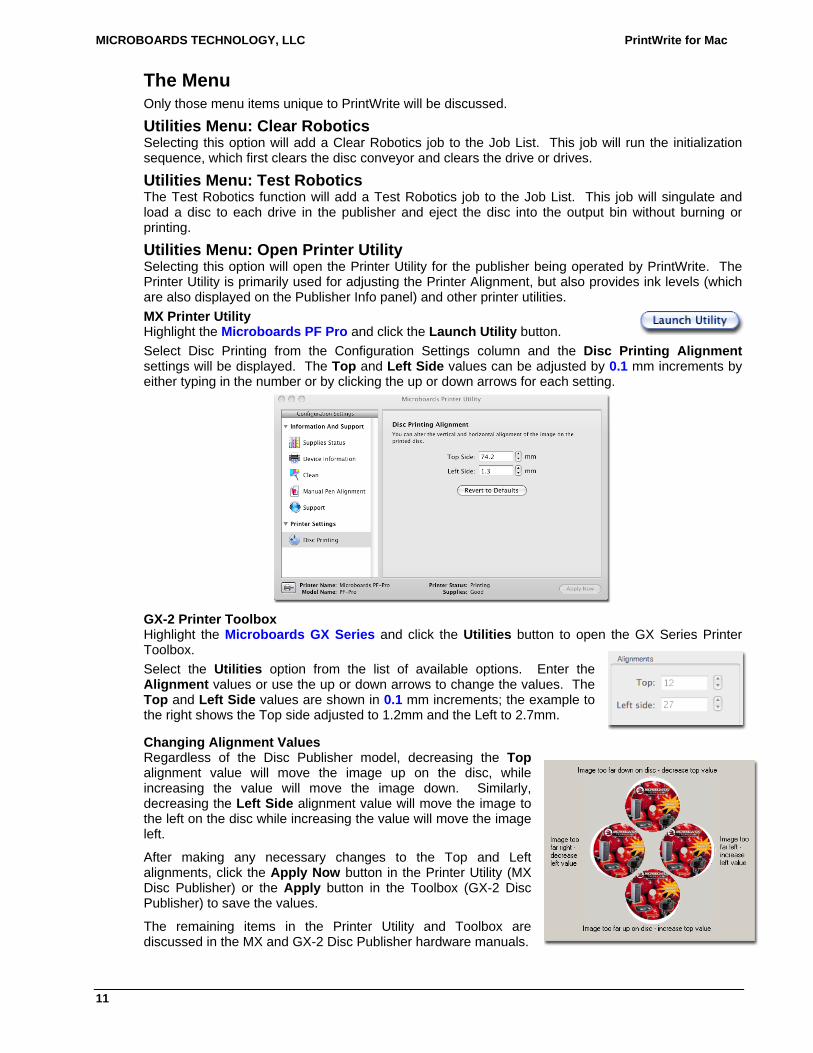
Utilities Menu: Open Printer Utility Selecting this option will open the Printer Utility for the publisher being operated by PrintWrite. The Printer Utility is primarily used for adjusting the Printer Alignment, but also provides ink levels (which are also displayed on the Publisher Info panel) and other printer utilities. MX Printer Utility Highlight the Microboards PF Pro and click the Launch Utility button. Select Disc Printing from the Configuration Settings column and the Disc Printing Alignment settings will be displayed. The Top and Left Side values can be adjusted by 0.1 mm increments by either typing in the number or by clicking the up or down arrows for each setting.
GX-2 Printer Toolbox Highlight the Microboards GX Series and click the Utilities button to open the GX Series Printer Toolbox. Select the Utilities option from the list of available options. Enter the Alignment values or use the up or down arrows to change the values. The Top and Left Side values are shown in 0.1 mm increments; the example to the right shows the Top side adjusted to 1.2mm and the Left to 2.7mm.
Changing Alignment Values Regardless of the Disc Publisher model, decreasing the Top alignment value will move the image up on the disc, while increasing the value will move the image down. Similarly, decreasing the Left Side alignment value will move the image to the left on the disc while increasing the value will move the image left.
After making any necessary changes to the Top and Left alignments, click the Apply Now button in the Printer Utility (MX Disc Publisher) or the Apply button in the Toolbox (GX-2 Disc Publisher) to save the values.
The remaining items in the Printer Utility and Toolbox are discussed in the MX and GX-2 Disc Publisher hardware manuals.
12
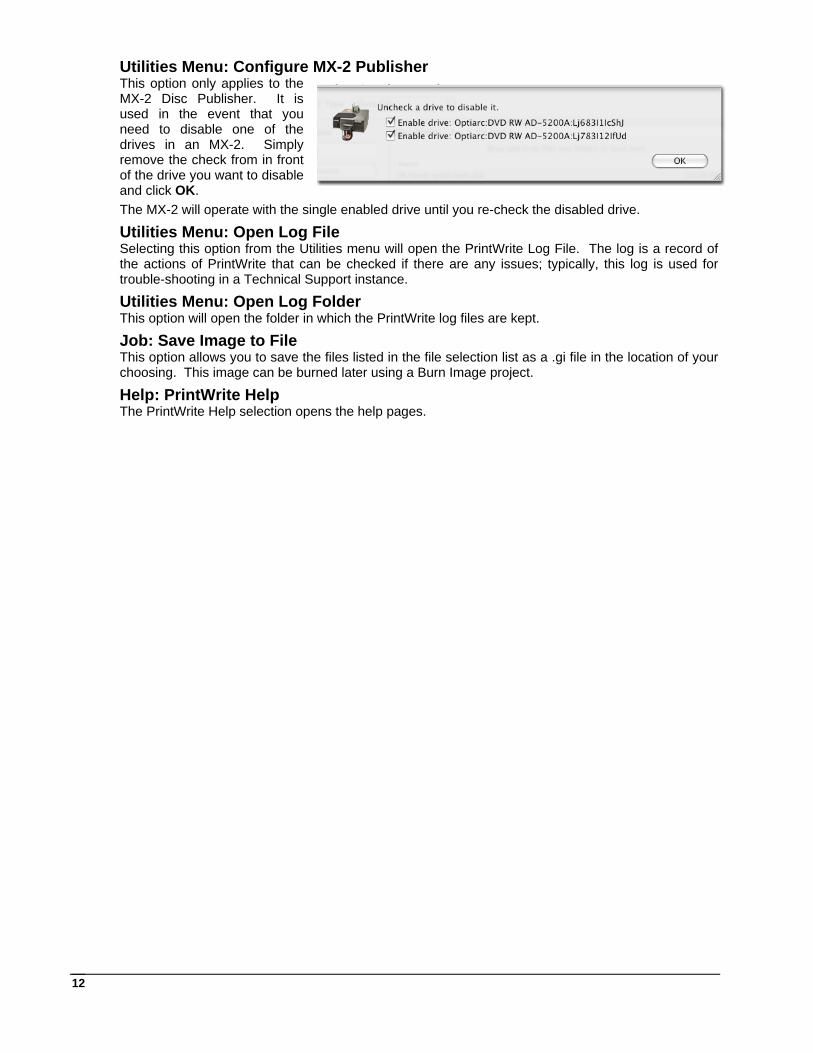
Utilities Menu: Configure MX-2 Publisher This option only applies to the MX-2 Disc Publisher. It is used in the event that you need to disable one of the drives in an MX-2. Simply remove the check from in front of the drive you want to disable and click OK. The MX-2 will operate with the single enabled drive until you re-check the disabled drive.
Utilities Menu: Open Log File Selecting this option from the Utilities menu will open the PrintWrite Log File. The log is a record of the actions of PrintWrite that can be checked if there are any issues; typically, this log is used for trouble-shooting in a Technical Support instance.
Utilities Menu: Open Log Folder This option will open the folder in which the PrintWrite log files are kept.
Job: Save Image to File This option allows you to save the files listed in the file selection list as a .gi file in the location of your choosing. This image can be burned later using a Burn Image project.
Help: PrintWrite Help The PrintWrite Help selection opens the help pages.
MICROBOARDS TECHNOLOGY, LLC PrintWrite for Mac
13
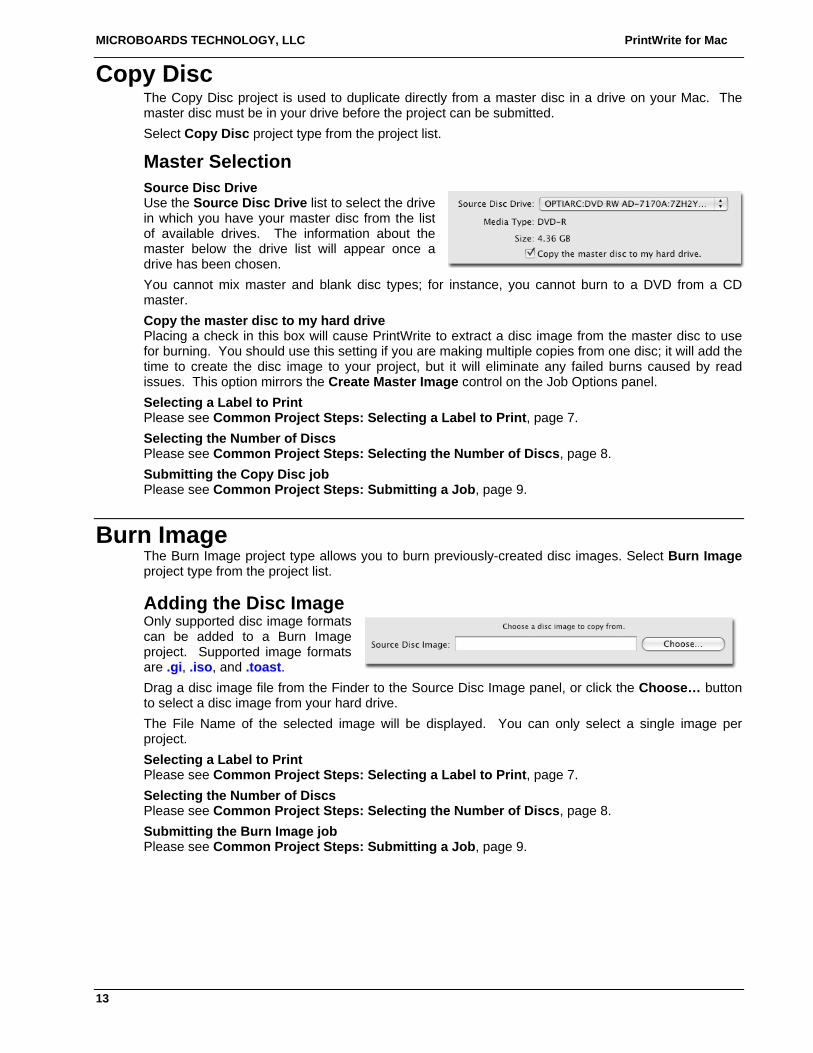
Copy Disc The Copy Disc project is used to duplicate directly from a master disc in a drive on your Mac. The master disc must be in your drive before the project can be submitted. Select Copy Disc project type from the project list.
Master Selection Source Disc Drive Use the Source Disc Drive list to select the drive in which you have your master disc from the list of available drives. The information about the master below the drive list will appear once a drive has been chosen. You cannot mix master and blank disc types; for instance, you cannot burn to a DVD from a CD master. Copy the master disc to my hard drive Placing a check in this box will cause PrintWrite to extract a disc image from the master disc to use for burning. You should use this setting if you are making multiple copies from one disc; it will add the time to create the disc image to your project, but it will eliminate any failed burns caused by read issues. This option mirrors the Create Master Image control on the Job Options panel. Selecting a Label to Print Please see Common Project Steps: Selecting a Label to Print, page 7. Selecting the Number of Discs Please see Common Project Steps: Selecting the Number of Discs, page 8. Submitting the Copy Disc job Please see Common Project Steps: Submitting a Job, page 9.
Burn Image The Burn Image project type allows you to burn previously-created disc images. Select Burn Image project type from the project list.
Adding the Disc Image Only supported disc image formats can be added to a Burn Image project. Supported image formats are .gi, .iso, and .toast. Drag a disc image file from the Finder to the Source Disc Image panel, or click the Choose… button to select a disc image from your hard drive. The File Name of the selected image will be displayed. You can only select a single image per project. Selecting a Label to Print Please see Common Project Steps: Selecting a Label to Print, page 7. Selecting the Number of Discs Please see Common Project Steps: Selecting the Number of Discs, page 8. Submitting the Burn Image job Please see Common Project Steps: Submitting a Job, page 9.
14
Data CD, Data DVD, and Data BD The three Data project types allow you to burn data to the appropriate disc type. The process for each type will be the same, with the only difference being the displayed capacity of the media. Select the appropriate project type from the project list
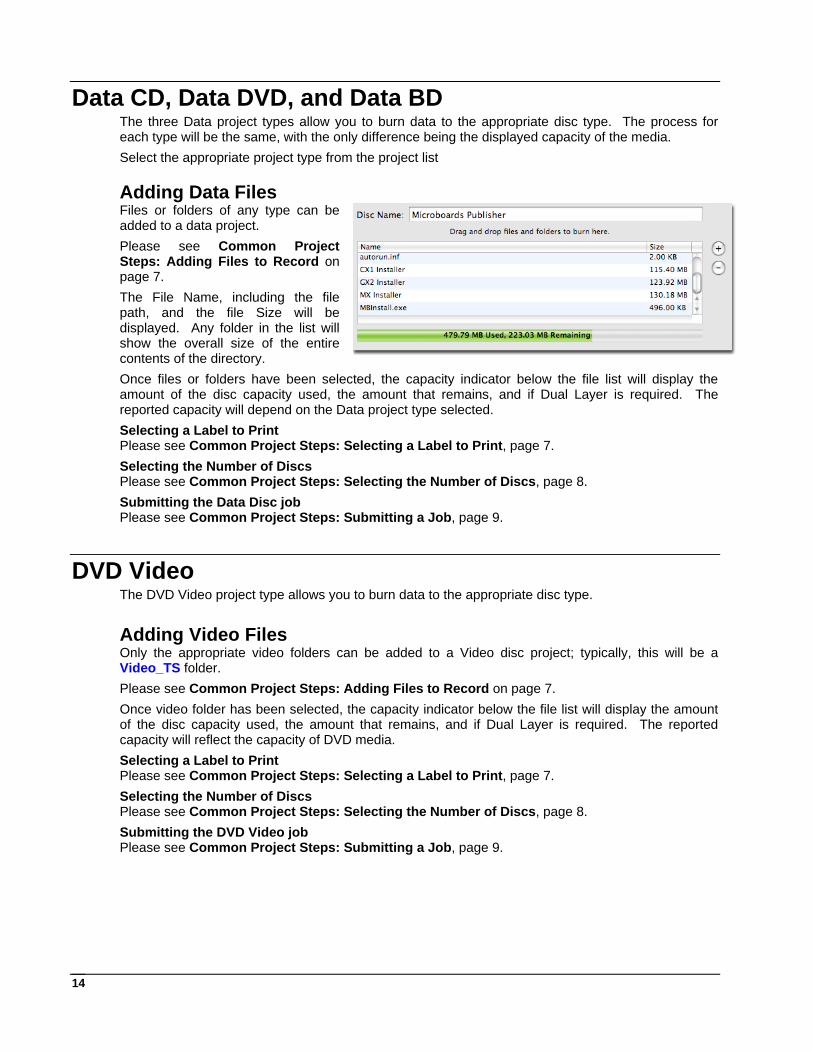
Adding Data Files Files or folders of any type can be added to a data project. Please see Common Project Steps: Adding Files to Record on page 7. The File Name, including the file path, and the file Size will be displayed. Any folder in the list will show the overall size of the entire contents of the directory. Once files or folders have been selected, the capacity indicator below the file list will display the amount of the disc capacity used, the amount that remains, and if Dual Layer is required. The reported capacity will depend on the Data project type selected. Selecting a Label to Print Please see Common Project Steps: Selecting a Label to Print, page 7. Selecting the Number of Discs Please see Common Project Steps: Selecting the Number of Discs, page 8. Submitting the Data Disc job Please see Common Project Steps: Submitting a Job, page 9.
DVD Video The DVD Video project type allows you to burn data to the appropriate disc type.
Adding Video Files Only the appropriate video folders can be added to a Video disc project; typically, this will be a Video_TS folder. Please see Common Project Steps: Adding Files to Record on page 7. Once video folder has been selected, the capacity indicator below the file list will display the amount of the disc capacity used, the amount that remains, and if Dual Layer is required. The reported capacity will reflect the capacity of DVD media. Selecting a Label to Print Please see Common Project Steps: Selecting a Label to Print, page 7. Selecting the Number of Discs Please see Common Project Steps: Selecting the Number of Discs, page 8. Submitting the DVD Video job Please see Common Project Steps: Submitting a Job, page 9.
MICROBOARDS TECHNOLOGY, LLC PrintWrite for Mac
15
Master 1
Master 2 Blanks
Audio CD The Audio CD project type allows you to create your own audio CD compilations.
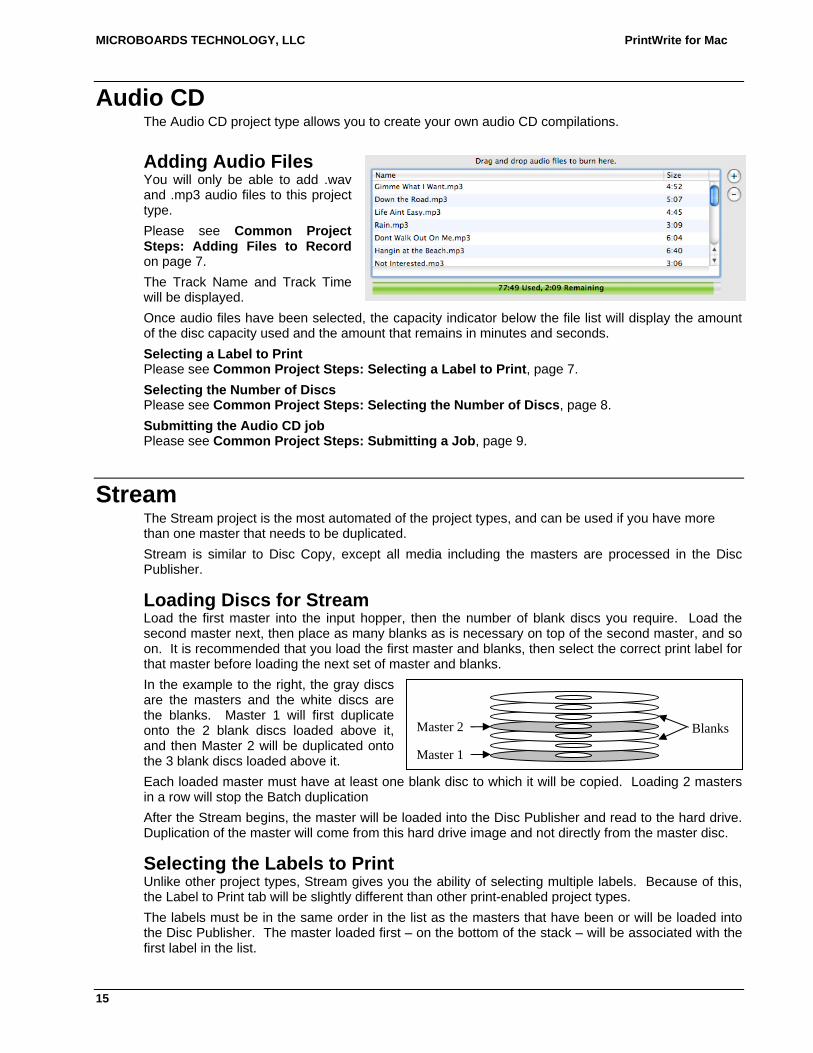
Adding Audio Files You will only be able to add .wav and .mp3 audio files to this project type. Please see Common Project Steps: Adding Files to Record on page 7. The Track Name and Track Time will be displayed. Once audio files have been selected, the capacity indicator below the file list will display the amount of the disc capacity used and the amount that remains in minutes and seconds. Selecting a Label to Print Please see Common Project Steps: Selecting a Label to Print, page 7. Selecting the Number of Discs Please see Common Project Steps: Selecting the Number of Discs, page 8. Submitting the Audio CD job Please see Common Project Steps: Submitting a Job, page 9.
Stream The Stream project is the most automated of the project types, and can be used if you have more than one master that needs to be duplicated. Stream is similar to Disc Copy, except all media including the masters are processed in the Disc Publisher.
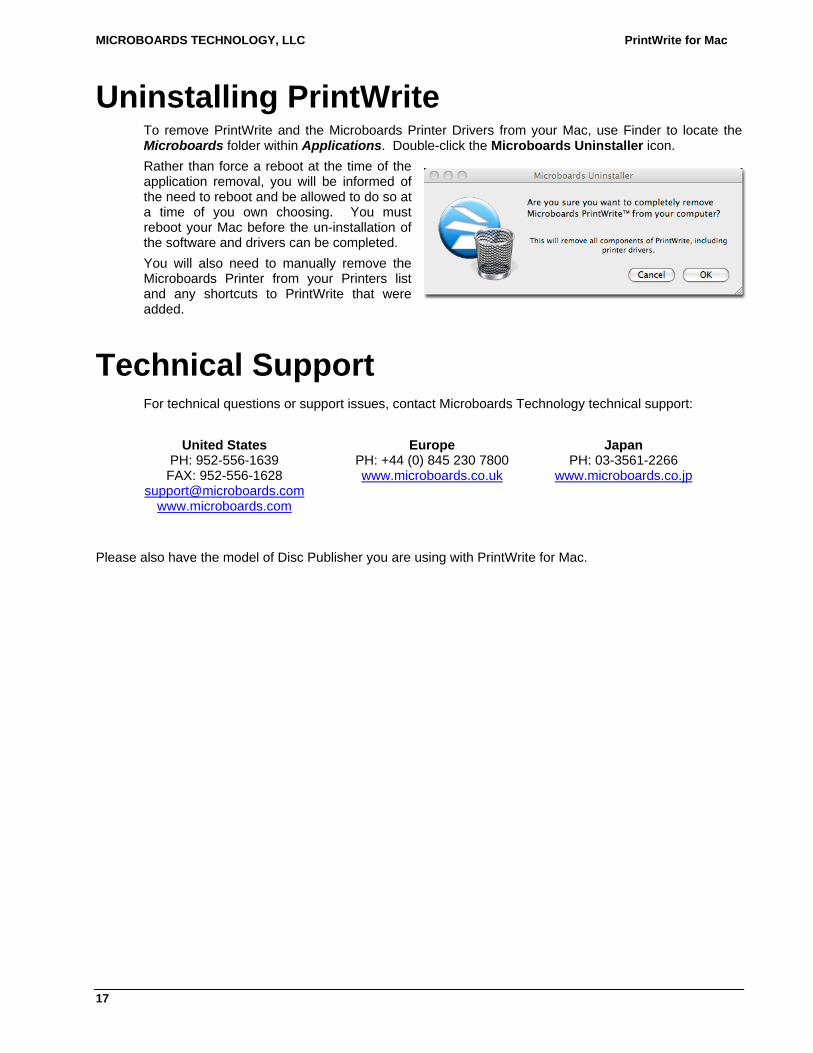
Loading Discs for Stream Load the first master into the input hopper, then the number of blank discs you require. Load the second master next, then place as many blanks as is necessary on top of the second master, and so on. It is recommended that you load the first master and blanks, then select the correct print label for that master before loading the next set of master and blanks. In the example to the right, the gray discs are the masters and the white discs are the blanks. Master 1 will first duplicate onto the 2 blank discs loaded above it, and then Master 2 will be duplicated onto the 3 blank discs loaded above it. Each loaded master must have at least one blank disc to which it will be copied. Loading 2 masters in a row will stop the Batch duplication After the Stream begins, the master will be loaded into the Disc Publisher and read to the hard drive. Duplication of the master will come from this hard drive image and not directly from the master disc.
Selecting the Labels to Print Unlike other project types, Stream gives you the ability of selecting multiple labels. Because of this, the Label to Print tab will be slightly different than other print-enabled project types. The labels must be in the same order in the list as the masters that have been or will be loaded into the Disc Publisher. The master loaded first – on the bottom of the stack – will be associated with the first label in the list.

16
Supported Image Formats Supported image formats include .bmp, .jpg/.jpeg, .pict, .png, .psd, and .tif/.tiff. Other image types can be saved as one of these supported formats using the Mac Preview or other graphics applications. PrintWrite scales images to fit media based on the larger of the width or height while maintaining proportions. Images should be square and at least 120mm by 120mm in size, as smaller images can be pixilated when scaled up. If your image is not square, some of the disc may not be covered.
If you do not want the copies of specific masters to be printed but will be printing on others, you must load those masters and blanks after all masters and blanks that are to be printed.
The method of adding images is similar to that of adding files to the file selection list in a Data Disc project. Add Button Add labels to the Stream project label selection list by clicking the Add button. Use the browser to navigate your hard drive and select your labels. Recent Labels Library You can add labels by double-clicking the center image in the Recent Labels library. Drag-and-Drop Files You can add labels by using the Drag-and-Drop feature. Simply highlight labels in Finder and drag their icons into the label selection list. You cannot drag and drop images from the Recent Labels library. Removing Labels Once the label selection has been made, the Remove button is enabled. Click this button to remove whichever label in the label selection list is highlighted. Selecting the Number of Discs The Stream job will continue to run as long as there are discs, with the loading of the masters and blanks determining the number of each duplicate to be made. Submitting the Stream job Please see Common Project Steps: Submitting a Job, page 9. Always verify the master, blank, and label order before submitting a Stream job.
Print Only The Print Only project type allows you to print to a disc without burning any information. This project type is useful if you have pre-burned discs. You may also print prior to burning the discs, but in that case it is highly recommended that you allow the ink to dry fully before burning the disc in the disc publisher. Since there is no duplication occurring with the Print Only project type, setting up the project is very simple. Selecting a Label to Print Please see Common Project Steps: Selecting a Label to Print, page 7. Selecting the Number of Discs Please see Common Project Steps: Selecting the Number of Discs, page 8. Submitting the Print Only job Please see Common Project Steps: Submitting a Job, page 9.
MICROBOARDS TECHNOLOGY, LLC PrintWrite for Mac
17
Uninstalling PrintWrite
To remove PrintWrite and the Microboards Printer Drivers from your Mac, use Finder to locate the Microboards folder within Applications. Double-click the Microboards Uninstaller icon. Rather than force a reboot at the time of the application removal, you will be informed of the need to reboot and be allowed to do so at a time of you own choosing. You must reboot your Mac before the un-installation of the software and drivers can be completed. You will also need to manually remove the Microboards Printer from your Printers list and any shortcuts to PrintWrite that were added.
Technical Support
For technical questions or support issues, contact Microboards Technology technical support:
United States PH: 952-556-1639
FAX: 952-556-1628 [email protected]
www.microboards.com
Europe PH: +44 (0) 845 230 7800 www.microboards.co.uk
Japan PH: 03-3561-2266
www.microboards.co.jp
Please also have the model of Disc Publisher you are using with PrintWrite for Mac.