FKM Plugin User Guide - ITRS Group · 6 . FKM User Guide 1.0 1.5 Audience This document is a...
61
ITRS Group FKM Plugin User Guide Version 1.0 September 22, 2017
Transcript of FKM Plugin User Guide - ITRS Group · 6 . FKM User Guide 1.0 1.5 Audience This document is a...

ITRS Group
FKM Plugin User Guide
Version 1.0 September 22, 2017

2
FKM User Guide 1.0
Copyright 2017. ITRS Group Ltd. All rights reserved. Information in this document is subject to change without notice. The software described in this
document is furnished under a license agreement or nondisclosure agreement. The software may be used or copied only in accordance with the terms of those agreements. No part of this publication may
be reproduced, stored in a retrieval system, or transmitted in any form or any means electronic or mechanical, including photocopying and recording for any purpose other than the purchaser's personal
use without the written permission of ITRS Group Ltd.
ITRS Group Ltd 6th Floor, The Bonhill Building, 15 Bonhill Street,
London, EC2A 4DN, UK t: +44 (0)20 7638 6700 f: +44 (0)20 7256 5760

3
FKM User Guide 1.0
Contents
1. General Information .......................................................................................................... 4
1.1 Overview ...................................................................................................................... 4
1.2 Features ...................................................................................................................... 4
1.3 User Requirements ...................................................................................................... 5
1.4 System Requirements .................................................................................................. 5
1.5 Audience ...................................................................................................................... 6
2. Installation and Setup ....................................................................................................... 7
3. Using FKM Plugin ............................................................................................................15
3.1 Monitor a log file for a specific error message .............................................................15
3.2 Set the FKM in Multiple Trigger Mode .........................................................................22
3.3 Clear a trigger when the problem has been fixed ........................................................27
3.4 Display a meaningful message in the dataview ...........................................................31
3.5 Extract a fragment of a line in a log file .......................................................................35
3.6 Use wildcards when you enter filenames ....................................................................48
3.7 View the file in FKM dataview .....................................................................................54
3.8 Change the FKM dataview columns in the Active Console ..........................................56
3.9 Limit the number of displayed triggers using multiple trigger mode .............................58
4. Appendix ..........................................................................................................................61
4.1 FKM Technical Reference Guide ................................................................................61
4.2 FKM Frequently Asked Questions ...............................................................................61
4.3 FKM Training Modules ................................................................................................61
4.4 Glossary .....................................................................................................................61

4
FKM User Guide 1.0
1. General Information
1.1 Overview
The universal File Keyword Monitor or FKM plugin provides users a fast and simple method for monitoring multiple files. This plugin allows:
• Searching of specific keywords contained within the file
• Checking if the file has been updated
• Checking if the file has remained unchanged for a given period of time This functionality, in combination with the Geneos Gateway rules feature, can quickly inform users of a developing problem. By monitoring a server log file for error messages, users can identify a potential risk or problem on the monitored server via the dataview format.
1.2 Features
FKM also allows quick viewing of any text-based monitored files so users can see the content directly from Active Console, enabling a fast response to issues. Viewing functionality can also be restricted to specific users or user groups for sensitive files. FKM has two main modes:
• Single-trigger – shows one trigger row per key, per file. This means that if the same key appears twice or more in a file, then only the details for the latest-detected line matching that key will be shown
• Multiple-trigger – shows a new trigger row for each detected key. Detected keys for each file are then indexed by increasing number starting at 0. Later numbers indicate later detected keys
Go to the FKM Technical Reference Guide for more details about triggerMode.
Stream-based inputs such as TibRV messages can be monitored in conjunction with the appropriate plugins, as well as Windows Event Logs. The FKM plugin operates by reading multiple files that appear as a row in the published dataview. Each file can be configured with a set of fail keys and warning keys, and has a variety of scanning types.
5
FKM User Guide 1.0
Another feature of FKM is to dynamically ignore known problems on a single machine without reconfiguring the plugin. Ignore files provide a mechanism for configuring ignore keys for an FKM file externally to the gateway setup. An ignore key can be used to disregard the known messages in a server log that may imply a possible error, but these messages are plain scripts or system-defined. Ignore keys should be defined before the fail or warning keys in a table, because keys in a key table are checked against a file line in order of definition.
Go to the FKM Technical Reference Guide for more details on Ignore files feature.
1.3 User Requirements
To maximize the potential usage of FKM plugin in Geneos, users must be able to perform and adhere to these requirements:
• Basic understanding of log files works and scripting operations
• Use of regex (regular expressions)
• Work on different type of logs such as system, application, and security
1.4 System Requirements
It is highly recommended that you use the most recent Netprobe version to take advantage of the newest features, enhancements, and bug fixes.
• Go to the Netprobe User Guide Resources site to view the start guide and other system
requirements • Go to the Netprobe Downloads section to view the latest releases
• Go to the Release Notes section to view the latest release update with bug fixes and
feature enhancement references
• Running gateway and Netprobe
• ActiveConsole is connected to the gateway
Go to the ActiveConsole and Gateway Setup Technical Reference Guides for more details.

6
FKM User Guide 1.0
1.5 Audience
This document is a reference guide and is mainly intended for beginners or new users of Geneos. Nevertheless, it can be used by all users of Geneos.
• Beginner or new user – provide basic instructions on how to install, setup, and configure this plugin
For external users, it is expected that they can resolve any technical issues pertaining to FKM plugin. These are the types of users that can be the points of contact in each organisation.
• End-user – monitors the live data and reports the problem to Application Team
• Geneos Admin User – configures the plugin based on the given information by
Application Team
• Application Team – provides information on how to monitor the log files for FKM

7
FKM User Guide 1.0
2. Installation and Setup
Ensure that you have read and can follow the system requirements prior to installation and setup of this plugin. • Path: Gateway > Probes > Managed entity > Samplers > FKM Plugin > Source file
1. On the ActiveConsole, double-click the gateway to open the Gateway Setup Editor.
2. In Gateway Setup Editor, on the Navigation panel, click the Probes section.

8
FKM User Guide 1.0
3. To create a new probe, click Yes, and then click New Probe.
4. On the Basic tab, complete the necessary fields.
5. In the Name field, enter the name of the probe. This must be unique among all other configured probes of the gateway setup.
The probe name is case sensitive and mandatory.
6. In the Hostname field, enter the hostname or IP address of the host where the
Netprobe is connecting.
This is a mandatory field.
7. In the Port field, enter the listening port for the Netprobe that the gateway should connect to. By default, the port is set to “7036”. However, deploying multiple Netprobes on a single host will require different listening ports and should be configured with the specified port numbers.

9
FKM User Guide 1.0
8. Click the Validate button to check your configuration.
The Validate button allows you to check if there are any errors or warnings in your configuration setup. Refer to the Errors tab to troubleshoot the identified errors or warnings.
Note: Save your configuration changes after the final configuration setup of the plugin. This is a recommended practice because the recurrent saving of files might overwrite your history logs. There is no undo functionality within Gateway Setup Editor. However, the gateway.setup.xml file may be used to revert the changes to its previous state.
• Path: Gateway > Probes > Managed entity > Samplers > FKM Plugin > Source file
9. In Gateway Setup Editor, on the Navigation panel, click the Managed entities section.

10
FKM User Guide 1.0
10. To create a new managed entity, click Yes, and then click New Managed entity.
11. On the Basic tab, complete the necessary fields.
12. In the Name field, enter the name of the managed entity. This must be unique among all other configured entities of the gateway setup.
13. On the Options probe menu, select the probe you have created.
14. In the Sampler section, click Add new.

11
FKM User Guide 1.0
15. In the Sampler Ref field, enter the filename of the plugin.
16. Click the Jump button.
17. Click Yes to create the sampler.
The Jump button automatically creates a sampler placeholder in the Samplers section.

12
FKM User Guide 1.0
• Path: Gateway > Probes > Managed entity > Samplers > FKM Plugin > Source file
18. In the Samplers section, select FKM on the Plugin menu.
The Name field specifies the sampler name you created in the Managed entity section. The name of the sampler must be unique among all other samplers. The first character of your sampler name cannot be a special character.
19. Click the Validate button to check your configuration setup.
20. Click the Save button to save your changes. Go back to the Managed entity section and repeat the process to create additional plugins if necessary. Note: Creating a new sampler for each monitored log file is not required. One managed entity group can hold multiple samplers, and one sampler can monitor multiple logs files.
Once completed, the newly created FKM plugin displays in the Samplers section.
13
FKM User Guide 1.0
• Path: Gateway > Probes > Managed entity > Samplers > FKM Plugin > Source file
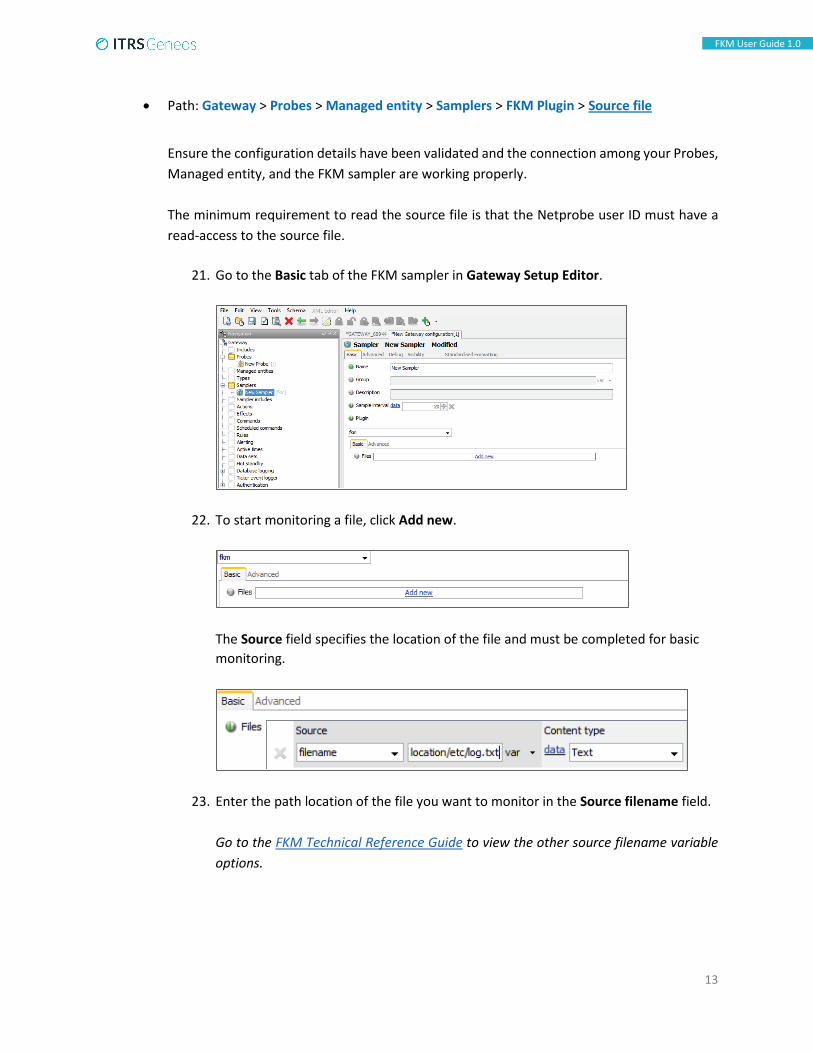
Ensure the configuration details have been validated and the connection among your Probes, Managed entity, and the FKM sampler are working properly. The minimum requirement to read the source file is that the Netprobe user ID must have a read-access to the source file.
21. Go to the Basic tab of the FKM sampler in Gateway Setup Editor.
22. To start monitoring a file, click Add new.
The Source field specifies the location of the file and must be completed for basic monitoring.
23. Enter the path location of the file you want to monitor in the Source filename field. Go to the FKM Technical Reference Guide to view the other source filename variable options.

14
FKM User Guide 1.0
24. Select the file format that matches the file to be monitored on the Content type menu. The default value for this field is “Text”. Go to the FKM Technical Reference Guide to view the other content type options.
25. Click the Validate button to check your configuration setup.
26. Click the Save button to save your changes.
27. Go to the FKM dataview in ActiveConsole to check if your configuration to monitor the source file is working. In Geneos ActiveConsole, the Managed entity that contains the configuration details of your FKM plugin will open.
If the FKM dataview does not show any results, these are the possible errors:
• File does not exist
• File is inaccessible or no read-access from Netprobe
15
FKM User Guide 1.0
3. Using FKM Plugin
3.1 Monitor a log file for a specific error message
This functionality allows the log files to quickly identify messages that are relevant to the user. It also helps the user to interpret the output in the dataview when the log file is updated. To start, ensure that the ActiveConsole is connected to the gateway.
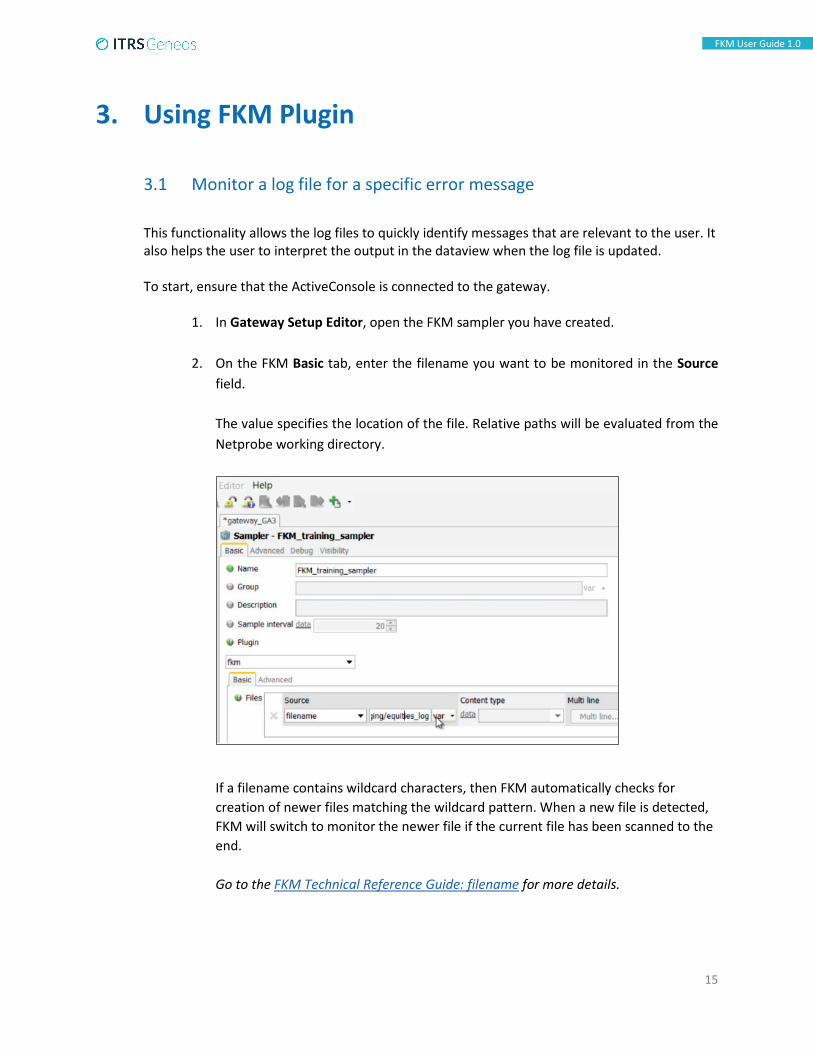
1. In Gateway Setup Editor, open the FKM sampler you have created.
2. On the FKM Basic tab, enter the filename you want to be monitored in the Source field.
The value specifies the location of the file. Relative paths will be evaluated from the Netprobe working directory.
If a filename contains wildcard characters, then FKM automatically checks for creation of newer files matching the wildcard pattern. When a new file is detected, FKM will switch to monitor the newer file if the current file has been scanned to the end. Go to the FKM Technical Reference Guide: filename for more details.

16
FKM User Guide 1.0
3. Once the filename is completed, click Tables. Tables are logical devices for grouping keys and strings together that you will be searching for.
4. On the Tables screen, click Add new.
When the string is found, set the Severity option depending on the business requirement.

17
FKM User Guide 1.0
5. Select Fail on the Severity menu.
6. Select data on the Key table menu.
7. In the Tables group, click Data…
Clicking the Data… button brings up a new screen.
8. Click Add new.

18
FKM User Guide 1.0
9. Click the Key… button to add a key.
Clicking the Key… button brings up the Key configuration screen.
10. Select Match on the Set key menu. A match set key specifies the text that must appear in the log file to causing a match.
11. Enter the specific error message you want to monitor in a file in the Search string field.

19
FKM User Guide 1.0
12. Select Basic on the Rules menu. Basic matching searches the file line of the Search string using case insensitive comparison.
Green radio buttons indicate that the configuration setup is correct.
13. Close the screen until you return to the FKM Sampler in Gateway Setup Editor.
14. Click the Validate button to check your configuration.
15. Click the Save button to save your changes.
Now you have an FKM sampler with a search string, try to monitor a log file for a specific error message.

20
FKM User Guide 1.0
16. In the ActiveConsole, open the FKM sampler you have created to access the dataview section.
In the FKM Sampler dataview, you can see the filename you are monitoring.
If you do not have a log file that is being regularly updated, use simulation to update your monitored file. Check if it can monitor the search string keyword with the expected status.
21
FKM User Guide 1.0
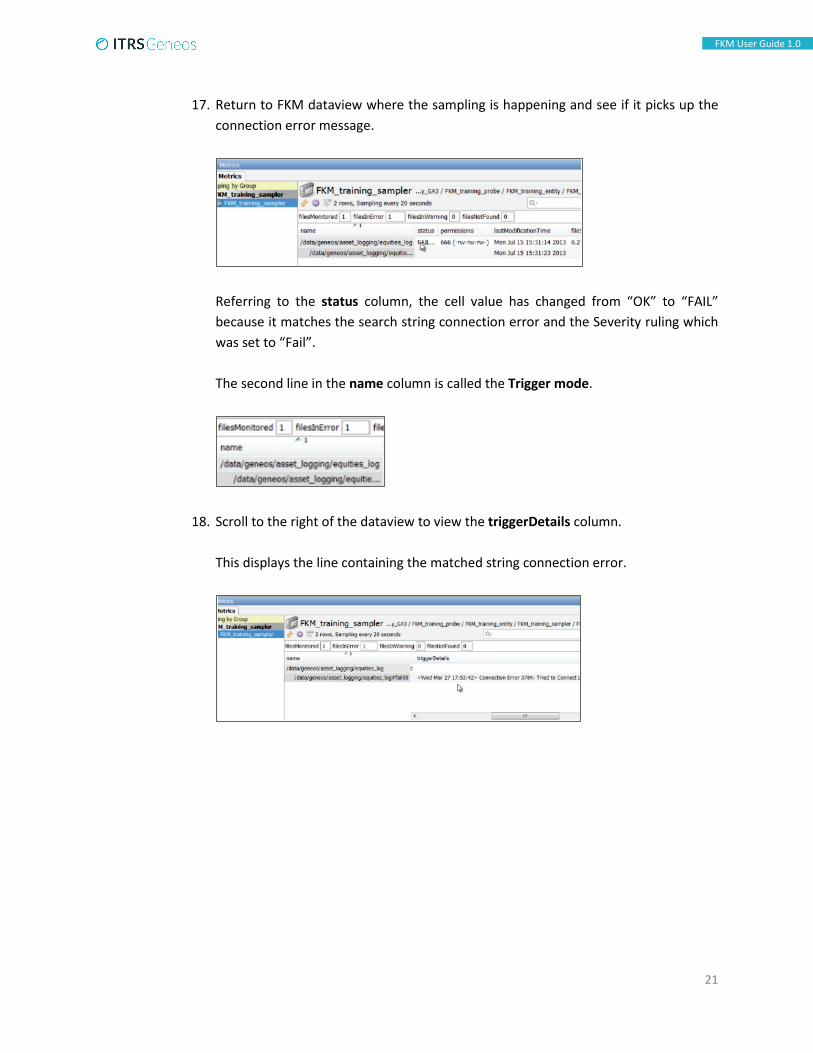
17. Return to FKM dataview where the sampling is happening and see if it picks up the connection error message.
Referring to the status column, the cell value has changed from “OK” to “FAIL” because it matches the search string connection error and the Severity ruling which was set to “Fail”. The second line in the name column is called the Trigger mode.
18. Scroll to the right of the dataview to view the triggerDetails column. This displays the line containing the matched string connection error.

22
FKM User Guide 1.0
3.2 Set the FKM in Multiple Trigger Mode
To view all lines that match the key in the dataview, set the trigger mode to multiple.
1. In Gateway Setup Editor, open the FKM sampler you have created.
2. Click the Advanced tab.
3. Select Multiple on the Trigger mode menu. In multiple trigger mode, FKM shows a new trigger row for each detected key. Detected keys for each file are then indexed by increasing number starting at 0. Later numbers indicate later detected key.
4. Click the Validate button to check your configuration.
5. Click the Save button to save your changes.

23
FKM User Guide 1.0
6. Return to the server.
7. Update the log file.
8. Verify that the dataview has recorded the update with a trigger row.
9. Return to the server.
10. Run the cat command.
11. Verify that the dataview has added a second trigger row instead of replacing the existing trigger row.
The advantage of setting the trigger mode to multiple is the previous record remains in the dataview, and is not replaced by a new set of data.

24
FKM User Guide 1.0
Display more than one trigger row per key
By default, the FKM plugin only displays the most recently detected line that matches the key. If you want to see all the lines matching the key, you must use the multiple trigger mode.
12. In Gateway Setup Editor, open the FKM sampler you have created.
13. Click the Advanced tab.
14. Select Single on the Trigger mode menu. In single trigger mode, FKM shows only one trigger row per key and per file. This means that if the same key appears twice (or more) in a file, then only the details for the latest detected line matching that key will be displayed in the dataview.
15. Close the screen.
16. Click the Validate button to check your configuration.

25
FKM User Guide 1.0
17. Click the Save button to save your changes. If you do not have a log file that is being regularly updated, use simulation to update your monitored file. Create a file that you can concatenate into the log file to be monitored.
18. Cat the file to the end of the log file.
19. Return to the dataview.
20. Verify that the addition to the log file has been detected and registered on the dataview.
21. Return to the server and cat the error file into the end of the log file.

26
FKM User Guide 1.0
22. Return to the FKM dataview in the ActiveConsole.
23. Check that the existing trigger row has been replaced by the latest update to the log file.
The lastModificationTime values have changed and the previous row has been deleted.
27
FKM User Guide 1.0
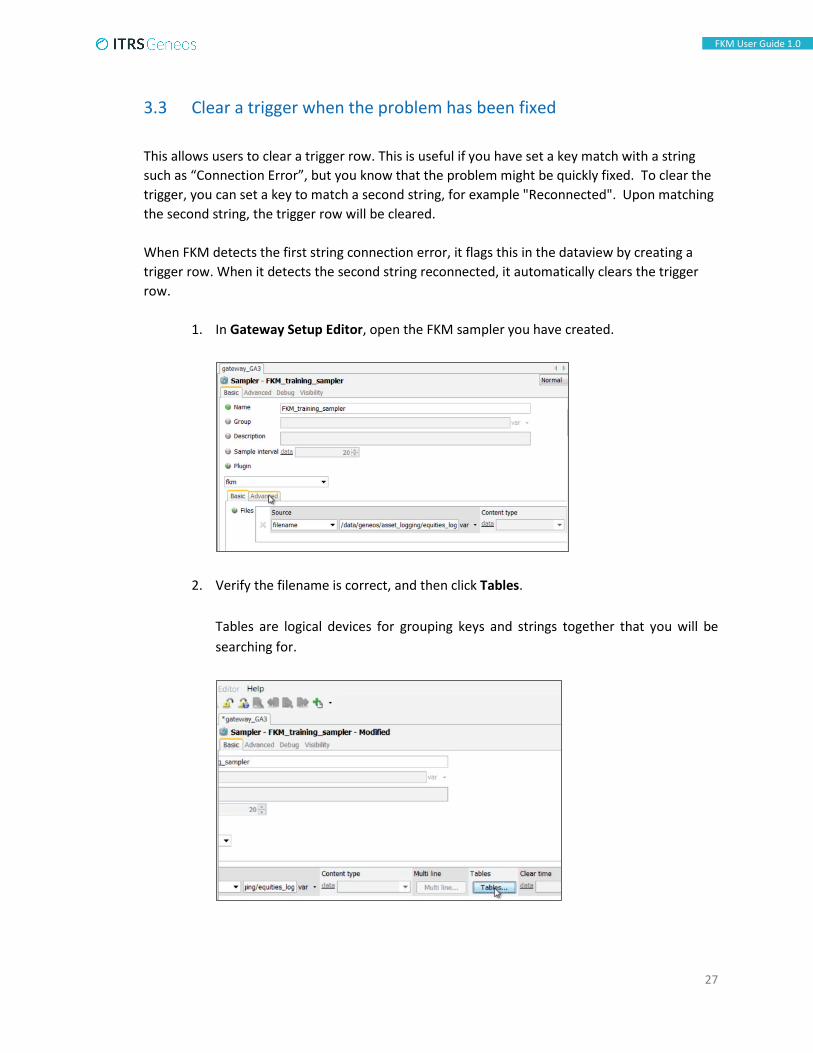
3.3 Clear a trigger when the problem has been fixed
This allows users to clear a trigger row. This is useful if you have set a key match with a string such as “Connection Error”, but you know that the problem might be quickly fixed. To clear the trigger, you can set a key to match a second string, for example "Reconnected". Upon matching the second string, the trigger row will be cleared. When FKM detects the first string connection error, it flags this in the dataview by creating a trigger row. When it detects the second string reconnected, it automatically clears the trigger row.
1. In Gateway Setup Editor, open the FKM sampler you have created.
2. Verify the filename is correct, and then click Tables. Tables are logical devices for grouping keys and strings together that you will be searching for.

28
FKM User Guide 1.0
3. Click Data… in the Tables group.
4. Click Key… in the Data section.
5. In the Clear key group, type “Reconnected” in the Search string field.
When FKM spots “Reconnected” in the log file, this automatically clears the key from the dataview.

29
FKM User Guide 1.0
6. Select Basic on the Rules menu. Note: There is no regular expression needed on this setup.
7. Close the screens until you return on the FKM Basic tab.
8. Click the Validate button to check your configuration.
9. Click the Save button to save your changes.
10. Cat the match search string file onto the end of the log file. Note: If you have not created a file containing a line with the search string, create one now. If you haven't created a log file, create one for testing purposes.
11. Return to the dataview and verify that the trigger has been created.

30
FKM User Guide 1.0
12. Return to the server.
13. Cat the clear search string file into the end of the log file.
Note: If you have not created a file containing a line with the Clear string, create one.
14. Return to the dataview and verify that the trigger has been cleared.
Wait until the dataview reaches the sampling time, then refresh the data. Once completed, this automatically clears a trigger when a problem has been fixed.

31
FKM User Guide 1.0
3.4 Display a meaningful message in the dataview
This allows users to display a relevant message in the triggerDetails column of the FKM dataview. This is used to specify any error messages encountered.
1. In Gateway Setup Editor, open the FKM sampler you have created.
2. Verify the filename is correct, and then click Tables. Tables are logical devices for grouping together to the keys and strings that you will be searching for.

32
FKM User Guide 1.0
3. Click Data… in the Tables group.
4. Click Key… in the Data section.
The Key… button brings up the previous configuration details you have setup for Search string and Rules fields.

33
FKM User Guide 1.0
5. In the Message field, enter the specific message you want to display in the dataview. Note: Ensure the display message is clear and can be easily understood by all users.
6. Close the screens until you return on the FKM Basic tab.
7. Click the Validate button to check your configuration.
8. Click the Save button to save your changes.
9. Go to the server.
10. Add an error message into the end of your monitored file.

34
FKM User Guide 1.0
11. Return to the FKM dataview.
12. Check that the message has been displayed in the Status field of the file row and in the triggerDetails column of the Trigger row.
The Status field shows the specified error message.
The triggerDetails field shows the specified error message.

35
FKM User Guide 1.0
3.5 Extract a fragment of a line in a log file
This allows users to extract part of a line in a log file. This can be useful when many similar messages are sent to a log file, but most of them are of no interest. The Geneos Extractor feature allows you to search a specific range of characters, for example all numbers between 1020 and 3780, excluding all the numbers before and after the range. Note: The prerequisite of this configuration setup is to set the trigger mode to Multiple.
There are three parts that take you through the process:
• Set up an extractor • Write a rule to test the value of data produced by the Extractor • Execute an action when the value meets the criteria of the test

36
FKM User Guide 1.0
Set up an Extractor Note: Create a dummy log file and files that you can then use to simulate an application writing to a log file.
1. In Gateway Setup Editor, open the FKM sampler you have created.
2. Verify the filename is correct, and then click Tables. Tables are logical devices for grouping together the keys and strings that you will be searching for.

37
FKM User Guide 1.0
3. Click Data… in the Tables group.
4. Click Key… in the Data section.
The Key… button brings up the Key configuration fields.

38
FKM User Guide 1.0
5. Enter the search string value in the Search string field.
The sample regular expression in the screenshot will look for digits from 0-9.
6. Select Regexp on the Rules menu. Note: Regular expression, or Regex, is a sequence of characters that define a search pattern. It is one of the requirements the user needs to know to maximize the potential usage of FKM plugin in Geneos. Feel free to use an online tool to learn, build, and test regular expressions.
7. Click Add new in the Extractors section.
Green radio buttons indicate that the configuration setup is correct.

39
FKM User Guide 1.0
8. Enter the name of the extractor in the Name field. The Extractors Name field sets the name of the extractor and is also used as the column name in FKM dataview. This must not be the same as any existing FKM columns and should also be different to any other extractors defined in the key.
9. Enter the regular expression in the Regex field.
10. Close the screen until you return on the FKM Basic tab.
11. Click the Validate button to check your configuration.
12. Click the Save button to save your changes.
13. Check the FKM dataview in the ActiveConsole to verify that the Extractor column has been created.
The last column shows the Error Code that you have created from the Extractors section.

40
FKM User Guide 1.0
Write a rule
14. In Gateway Setup Editor, click the Rules section.
15. To create a rule, click Yes.
16. On the Rules Basic tab, click New Rule.
41
FKM User Guide 1.0
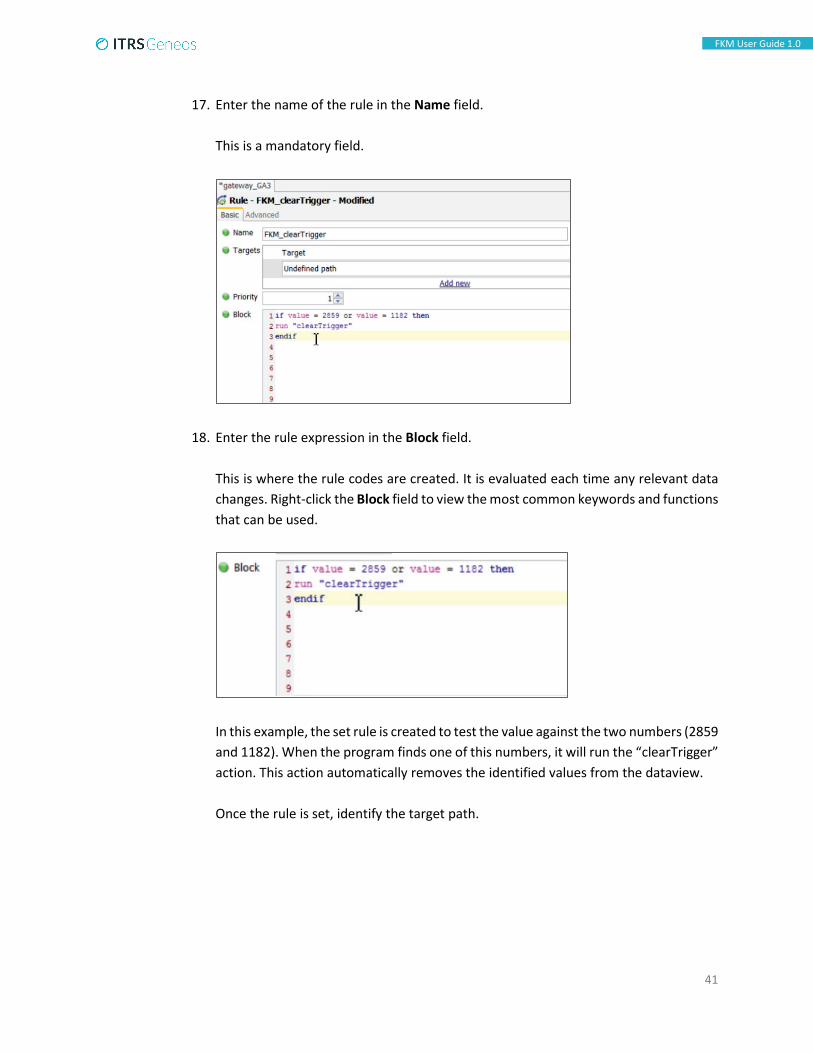
17. Enter the name of the rule in the Name field. This is a mandatory field.
18. Enter the rule expression in the Block field. This is where the rule codes are created. It is evaluated each time any relevant data changes. Right-click the Block field to view the most common keywords and functions that can be used.
In this example, the set rule is created to test the value against the two numbers (2859 and 1182). When the program finds one of this numbers, it will run the “clearTrigger” action. This action automatically removes the identified values from the dataview. Once the rule is set, identify the target path.

42
FKM User Guide 1.0
19. Return to the FKM ActiveConsole.
20. Right-click the cell of the column where the rule is to be implemented.
21. Hover or click Copy.
22. Click Path.
An example of Path directory: /geneos/gateway[(@name="GATEWAY_68944")]/directory/probe[(@name="New Probe")]/managedEntity[(@name="Exercises")]/sampler[(@name="fkmtest")][(@type="")]/dataview[(@name="fkmtest")]/rows/row[(@name="/sbox/home/useralias/etc/fkm_log.txt#fail00000")]/cell[(@column="lastModificationTime")]
23. Paste the path of the cell in the Targets field by pressing [CTRL + V].
43
FKM User Guide 1.0
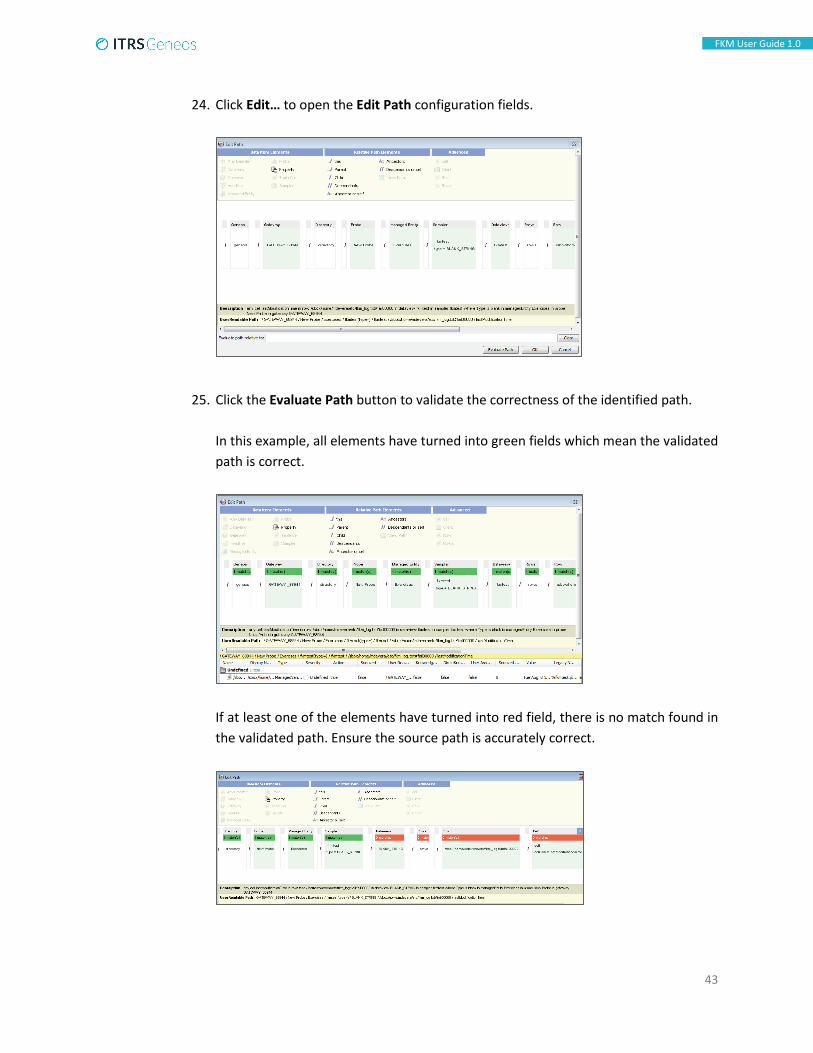
24. Click Edit… to open the Edit Path configuration fields.
25. Click the Evaluate Path button to validate the correctness of the identified path.
In this example, all elements have turned into green fields which mean the validated path is correct.
If at least one of the elements have turned into red field, there is no match found in the validated path. Ensure the source path is accurately correct.

44
FKM User Guide 1.0
Note: An alternative way to copy the path is through drag and drop. In the ActiveConsole of FKM dataview, click and drag the identified row into the Targets field of Rule Gateway Setup Editor. Then, click Edit… to evaluate the path. However, the recommended practice is to right-click the cell and copy the path. This ensures a more accurate source path upon identifying the source location.
26. Click the Validate button to check your configuration. Note: Once the configuration is validated, the user might encounter an error that the rule is a non-existent action. To correct this, follow the instructions on how to ‘Execute an action’ because an action must be created once a rule is written.
45
FKM User Guide 1.0
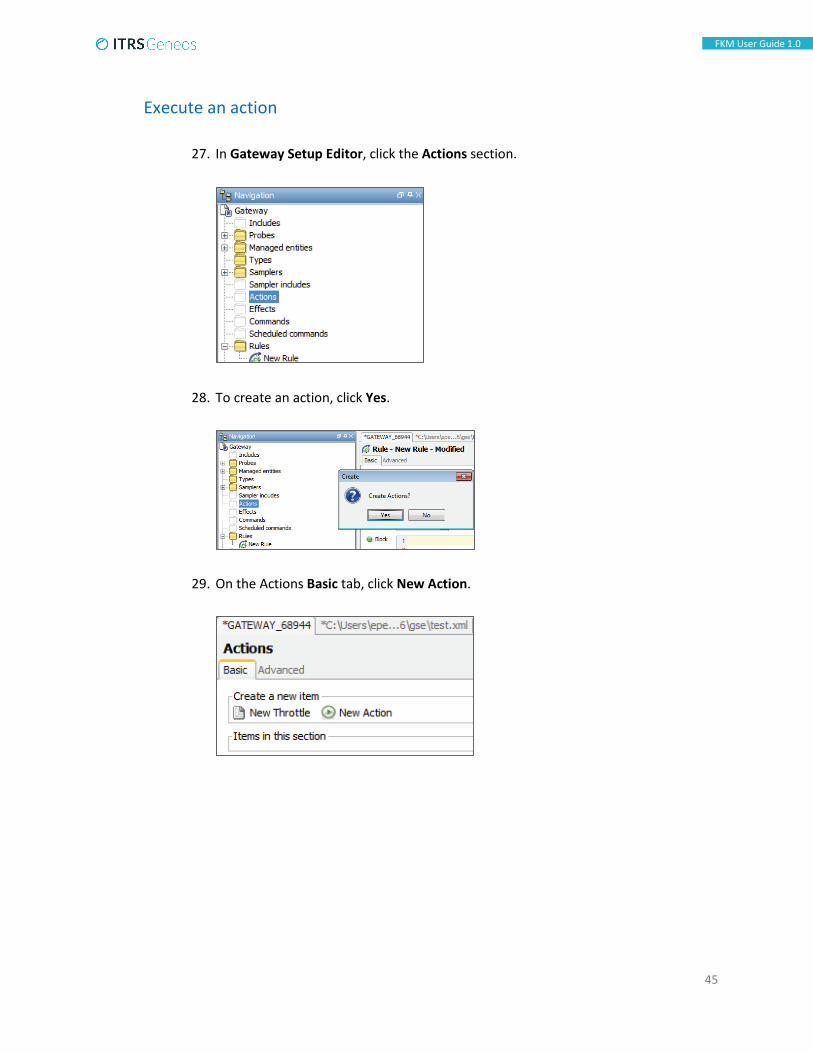
Execute an action
27. In Gateway Setup Editor, click the Actions section.
28. To create an action, click Yes.
29. On the Actions Basic tab, click New Action.

46
FKM User Guide 1.0
30. Enter the name of the action in the Name field to create an internal command.
31. Select Internal command on the Options menu. Script type actions allow the gateway to run a shell-script or executable file in response to gateway events. This is a mandatory field.
32. In the Internal command group, select FKM:clearTrigger on the Name menu.

47
FKM User Guide 1.0
33. Click the Validate button to check your configuration.
34. Click the Save button to save your changes At this stage, the search string, key dialog, and extractor are looking for specific numbers, and a rule to check those numbers has been configured. If it matches one of the identified numbers, then it will trigger the action.
35. Go to the server and open the PuTTY session.
36. Practise concatenating files into the end of your log file, and then observe the effect
in the dataview.
Remember the rule you set in the Block field.
If the number does not match the value set in the rule, then it will display in the Error Code cell. In this example, the value “3784” appears in the Error Code cell.
If the number matches any of the value set in the rule, it will quickly display in the FKM dataview cell. However, due to the action made which is “clearTrigger”, this will automatically disappear from the dataview cell after a few seconds.

48
FKM User Guide 1.0
3.6 Use wildcards when you enter filenames
This allows users to use wildcards in file names configuration. This can be useful in a situation where you have several filenames with the same extension, for example .log, and you do not want to enter each file name individually into the sampler. Note: For simulation purposes, create at least three log files with the same extension.
1. In Gateway Setup Editor, open the FKM sampler you have created.
2. On the Basic tab, scroll to the right to click Add new. The Add new button adds a new Source field in the Files section.
3. Enter the full path name in the newly added Source filename. Use the wildcard by adding an asterisk (*) before the log extension name in the filename.

49
FKM User Guide 1.0
4. Verify the filename is correct, and then click Tables. Tables are logical devices for grouping together keys and strings that you will be searching for.
5. Click Add new in the Tables section.
6. Click Data… in the Tables group.
7. Click Key… in the Data section.

50
FKM User Guide 1.0
The Key… button brings up the previous configuration details you have setup for Search string and Rules fields.
8. Enter the search string value in the Search string field.
9. Select Basic on the Rules menu.
10. Close the screens until you return on the FKM Basic tab.
11. Click the Validate button to check your configuration.

51
FKM User Guide 1.0
12. Click the Advanced tab.
13. On the Advanced tab, scroll down until you see the fields related to wildcard.
14. Select the Wildcard monitor all matches check box.
• If this check box is not activated, the FKM dataview will display only the latest file to be changed.
• If this is selected, it will display all the files matching the asterisk (*) .config or
the log extension name you used.

52
FKM User Guide 1.0
15. Select Modified on the Wildcard match time menu.
Modified option refers to an actual change in the text of the file.
16. Close the screens until you return on the FKM Basic tab.
17. Click the Validate button to check your configuration.
18. Click the Save button to save your changes.
Note: For simulation purposes, you may perform the following instructions.
19. Return to the ActiveConsole.
20. Check that the dataview has been updated with all the files that match the wildcard (*).

53
FKM User Guide 1.0
21. Go to the server.
22. Cat err_file1 to aix.conf
The aix.conf file has been changed.
23. Repeat with err_file2 and err_file3 to solaris.conf and linux.conf
24. Go to the ActiveConsole and see if the wildcard features are reflected in the dataview.

54
FKM User Guide 1.0
3.7 View the file in FKM dataview
• Path: ActiveConsole > State Tree > FKM > Dataview > Column field > View File
The View File command option allows a user to remotely view the file being monitored by FKM. There are two file viewing modes:
• Snapshot view – displays only the selected parts of the file at the time when the query is made
• Continuous view – displays the same as the snapshot, but will continue to update the file view window when additional lines are added to the file
1. In Geneos ActiveConsole, open the FKM sampler you have created.
2. Right-click the name of the file you want to view, then click View File…
Note: The View File is an example of a command that are specific to some plugins or components. Not all cells in the dataview has this functionality.
3. The View File dialog opens.
The View File dialog allows users to specify how much of the file to view is relative to the end of the file. The maximum size of data from the file that can be displayed is 1 megabyte (1024 kilobytes). This is to prevent performance slowdown caused by the handling of large files that are sent over to the view.
4. Click OK.

55
FKM User Guide 1.0
The Output tab appears to display your log file details.

56
FKM User Guide 1.0
3.8 Change the FKM dataview columns in the Active Console
The column setting allows users to configure the list of columns to be displayed by FKM in the dataview. Users may want to add or remove any existing columns, depending on the needed information to be displayed in the dataview.
1. In Gateway Setup Editor, open the FKM sampler.
2. Click the Advanced tab.
3. Click Add new in the Columns section.
4. On the Column menu, select the column name you want to be displayed in the dataview.

57
FKM User Guide 1.0
5. Click the Validate button to check your configuration setup.
6. Click the Save button to save your changes.
7. Return to the ActiveConsole dataview to check whether your configuration setup has been implemented correctly.

58
FKM User Guide 1.0
3.9 Limit the number of displayed triggers using multiple trigger mode
Use the maxConditionPerKey parameter to control the trigger rows or conditions that are recorded per file. This is used primarily in multiple trigger mode and single grouped message mode to limit the number of triggers to be created. In this use case, set the trigger mode to multiple and use the maxConditionPerKey to limit the number of rows which by default displays more than 1,000 rows or lines of triggers. The first set of instructions allows users to define a keyword to be searched from the log file.
1. In Gateway Setup Editor, open the FKM Sampler you want to modify.
2. On the Basic tab, in the Tables column, click Tables…
3. In the Table section, complete the necessary fields.
4. Select Fail on the Severity menu.
5. Select data on the Key table menu.

59
FKM User Guide 1.0
6. Click Data…
7. In the Keys section, click Key…
8. Enter the keyword in the Search string field. The search string keyword is “test”.
9. In Gateway Setup Editor, open the FKM Sampler you want to modify.
10. Go to the Advanced tab.

60
FKM User Guide 1.0
11. Select Multiple on the Trigger mode menu.
12. Scroll down until you see the maxConditionPerKey parameter.
13. Enter the limit number to be displayed in the Max conditions per key field.
Note: If a new trigger arrives after this limit has been reached, the older trigger for the key will be removed and replaced with the new trigger.
Here is an example of FKM dataview with MaxConditionPerKey set to “5”.

61
FKM User Guide 1.0
4. Appendix
4.1 FKM Technical Reference Guide
4.2 FKM Frequently Asked Questions
4.3 FKM Training Modules
4.4 Glossary
Term Definition FKM File Keyword Monitor plugin provides users a fast and
simple monitoring method of multiple files Text-based monitored files
Files whose primary input and output are based on text which is used in the Source filename to locate the path to be monitored
Stream-based Selecting this setting specifies that the file monitored is a stream. Streams are created by certain other Netprobe plug-ins which monitor data streams, such as the TIB-RVSTREAM plug-in. The value specified here should match the stream name as exported by the other plug-ins
Window Event Logs Event logs are only available in Netprobes running on a Microsoft Windows system. There are usually three default event logs present on a Windows system, named Application, Security and System. Other applications may install their own custom event logs, with a custom log name
Dataview FKM plug-in operates by reading multiple files. Its data appears as a row in the published dataview in ActiveConsole
Fail Key A “fail” state is produced for any matching keys. This corresponds with a severity of critical (and appears red), if using the suggested rules. Fail tables are checked before warning tables by default
Warning Key A “warning” state is produced for any matching keys in a warning table
Ignore Key Filter out file lines which would otherwise match a key and create a trigger. This ignores the specified line but has no effect if continue trigger scan is set
Regex Regular expression is a sequence of characters that define a search pattern. It is one of the requirements the user needs to know to maximize the potential usage of FKM plugin in Geneos


![Chemical Resistance Guide EPDM & FKM[1]](https://static.fdocuments.net/doc/165x107/5524fe114a7959e0488b49f4/chemical-resistance-guide-epdm-fkm1.jpg)