
FITTING INSTRUCTIONS 1 - MSA 4X4 Accessories · 6 FORD EVEREST 1 Prepare vehicle by removing 3rd...
25
FITTING INSTRUCTIONS FORD EVEREST 2015 - CURRENT Image for illustration purposes only.
Transcript of FITTING INSTRUCTIONS 1 - MSA 4X4 Accessories · 6 FORD EVEREST 1 Prepare vehicle by removing 3rd...
1 1FITTING INSTRUCTIONS FORD EVEREST 2015 - CURRENT
Image for illustration purposes only.

2 CONTENTS
2 CONTENTS
3 CONGRATULATIONS
4 GETTING STARTED
5 IMPORTANT INFORMATION
6 FITTER’S QUICK INSTALLATION GUIDE
7 3D DIAGRAM
8 FITTING DIAGRAM
9 BRACKET POSITIONS
10 VEHICLE PREPARATION
11 DRAWER REMOVAL
13 DOUBLE DRAWER INSTALLATION
18 DRAWER RE-INSTALLATION
19 TOP PANEL INSTALLATION
21 SINGLE DRAWER INSTALLATION
22 DRAWER REMOVAL & INSTALLATION
AFTER THE DRAWERS HAVE BEEN COMPLETELY INSTALLED
23 OPERATING INSTRUCTIONS
24 CARE & MAINTENANCE
25 WARRANTY

3 3
CONGRATULATIONS ON YOUR PURCHASE OF A QUALITY MSA 4X4 DRAWER SYSTEM!
Years of design, development and manufacturing knowledge goes into every MSA 4X4 product to ensure that our products are the very best they can be!
Established in 2000, MSA 4X4 Accessories are the 4WD market leaders in quality Canvas products which include Certified ADR Compliant Canvas Seat Covers, Rear Wheel Bags, Rear Wheel Rubbish Bins, Vehicle Organisers and more.
We pride ourselves on our innovative products which include the world first, revolutionary Fridge Dropslide, the new patent pending Explorer Aluminium Storage Drawer System which delivers a whole new level of access to the drawer contents, the original Water Bra,
fully adjustable air lumbar support systems, and an extensive range of 4x4 accessories that have stood the test of time. As testament to our innovative culture, we have been awarded 19 patents in Australia & Internationally across our range of products
including innovations currently within the patent process. We are a growing team with a vast knowledge of what works and what doesn’t work out in the real world and constantly strive to deliver the highest quality product to our customers. We treat every product design with fear of failure in mind, ensuring our products are always the very best they can be. All our products are designed to be as
simple as possible to use and are supported by our MSA 4X4 Lifetime Guarantee.
Our products are available through a network of over 600 stockists Australia wide.
3 3CONGRATULATIONS ON YOUR PURCHASE OF A QUALITY MSA 4X4 DRAWER SYSTEM!

4 GETTING STARTED:
1 x Drawer Module 2 x Keys (located inside each drawer module)1 x Wing & Fit Kit box if ordered 1 x Double Drawer Joining Kit if ordered 1 x Crash Test Certificate1 x Joining Wire (if L + R drawers ordered)
If anything is missing, please contact us via msa4x4.com.au
Here’s what comes in the box:

5IMPORTANT INFORMATION
IMPORTANT INFORMATIONIt is important that you read and understand the below information before installing your new MSA 4X4 Explorer Aluminium Storage Drawer System. MAINTAINING ADR COMPLIANCE OF YOUR DRAWER SYSTEMMSA 4X4 storage drawer systems have been legally crash tested and are supplied as an ADR compliant drawer module and fit kit system when the correct number fit kits for the Toyota EWFK-EVERES-LEFT and EWFK-EVERES-RIGHT are used for the installation and joining of the drawer modules. Failure to use a matching fit kit or components for the particular vehicle installation or the use of other components to install MSA 4X4 storage drawers may void the ADR compliance of the storage drawer system and/or the warranty.
UNDERSTANDING DIFFERENCES BETWEEN LEFT & RIGHT HAND SIDE MODULES RHS - DRIVER’S SIDE | LHS - PASSENGER’S SIDEMSA 4X4 storage drawer systems are of a modular design, they do come in left and right had side modules as the need for wires and switches must enter the frame from one side. The modules are clearly marked “left” and “right” on the packaging boxes. On the right (RHS) drawer, the wiring and the LED light switch is on the RHS of the drawer. On the left (LHS) drawer the wiring and switch is on the LHS of the drawer.
FRONT & REAR DEFINITIONS FOR FITTING INSTRUCTION PURPOSESThe “Front” is related to the front face of the drawer system, where the lock is located. (Towards the rear of the vehicle.) The “Rear” is related to the rear of the drawer system. (Towards the front of the vehicle.)
MAINTAINING ADR COMPLIANCE OF YOUR CHILD RESTRAINTSADR Compliant Child Restraint points are installed as standard in MSA 4X4 Storage drawer systems. The anchor point bolt for the Child Restraint is marked on the rear of the drawer. This is the second bolt down from the top. The bolt installed is an M8 x 30mm High Tensile bolt, please use this bolt for child restraint anchors. Do not replace this bolt as it will result in the child restraint anchor not being ADR compliant.
MAINTAINING ADR COMPLIANCE OF CARGO BARRIER INSTALLATIONThe top two bolts on both sides of the rear frame can be used for Cargo Barrier mounting, these points have been crash tested and are ADR Compliant when used with the supplied bolts. The same second bolt down from the top only can be used as a Cargo Barrier mount and a Child Restraint point from the same bolt if needed. (see image above)

6
FORD EVEREST
1 Prepare vehicle by removing 3rd row of seats, any trims and carpet.2 Clean, vacuum and wipe down the floor of the vehicle. 3 Install both base frames and loosely fit all base frame bolts.4 Install Right (driver’s) side module in to vehicle and loosely fit all base frame bolts – refer to fitting diagram for specific bolt frame locations.5 Install Left (passenger’s) side module into vehicle and loosely fit all bolts and spacer blocks – refer to fitting diagram for specific bolt and spacer block locations.6 Join drawers with join kit bolts and tighten. 7 Prepare both drawers by installing any wing brackets or spacer blocks – refer to fitting diagram for more detailed instruction.8 Fit wing panels to give indication of drawer module position.9 Centre the drawer frame in the car.10 Drill holes in the floor through the cross channels and install bolts & washers as per the fitting diagram.11 Tighten all fitting bolts to specified torque tensions.12 Do any wiring required for power supply to drawer frames.13 Re-install drawers into frame.14 Check that drawers function correctly.15 Install the large frame top panels.16 Install top panel front trim and install wing panel trims.
FITTER’S QUICK INSTALLATION GUIDE

7EXPLORER ALUMINIUM DRAWER SYSTEM

8

9BRACKET POSITIONS
75mmbracket
60mmbracket
3D
75mmbracket
60mmbracket
3C
10 VEHICLE PREPARATION
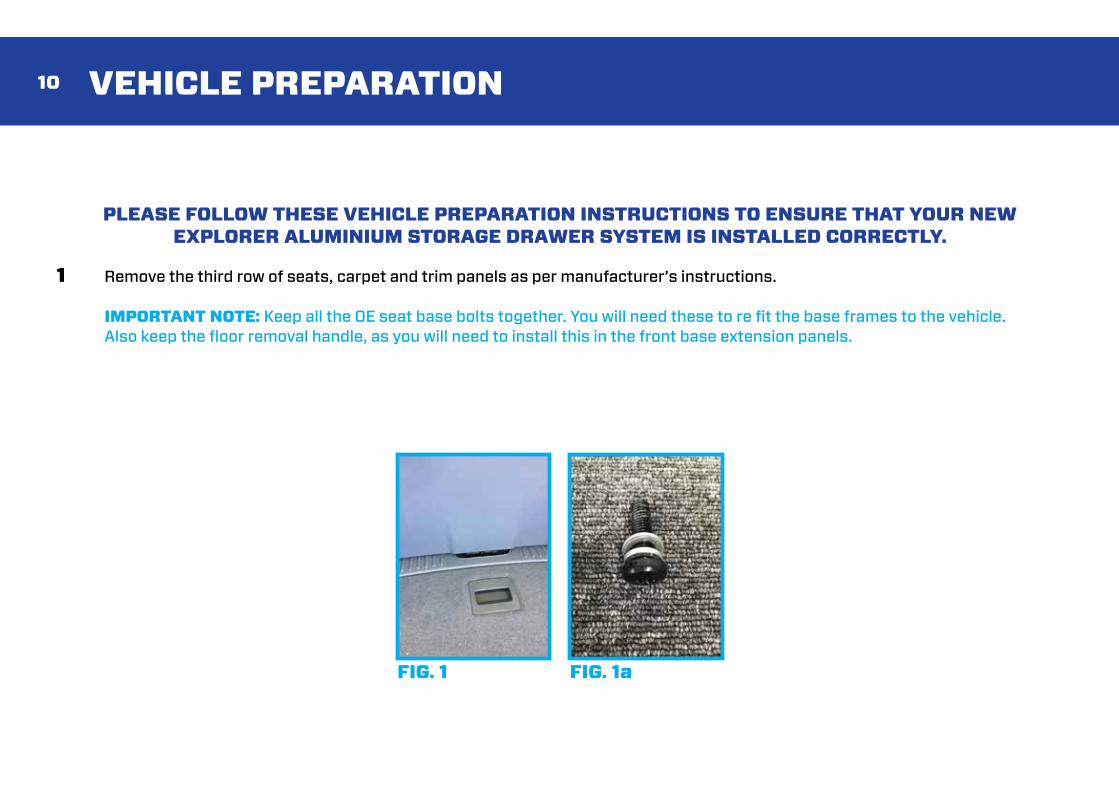
PLEASE FOLLOW THESE VEHICLE PREPARATION INSTRUCTIONS TO ENSURE THAT YOUR NEW EXPLORER ALUMINIUM STORAGE DRAWER SYSTEM IS INSTALLED CORRECTLY.
1 Remove the third row of seats, carpet and trim panels as per manufacturer’s instructions.
IMPORTANT NOTE: Keep all the OE seat base bolts together. You will need these to re fit the base frames to the vehicle. Also keep the floor removal handle, as you will need to install this in the front base extension panels.
FIG. 1 FIG. 1a

11DRAWER REMOVAL
PLEASE FOLLOW THESE DRAWER MODULE PREPARATION INSTRUCTIONS TO ENSURE THAT YOUR NEW EXPLORER ALUMINIUM STORAGE DRAWER SYSTEM IS INSTALLED CORRECTLY.
Note: Drawer preparation requires the drawer to be open to full extension. A long flat surface is required for this preparation. Tip: A cordless drill, hex bit to 1/4 and 3/8 drive socket adapters, a set of 1/4 and 3/8 drive hex head bits and a set of metric spanners are recommended for installation ease.1 Remove one drawer module from its packaging and place on a flat surface – a 2.4 metre flat bench is recommended.2 Remove the carpeted top panel by removing the 17 x M6 countersunk allen head bolts. This is quickest with a cordless drill, 1/4 drive adapter and 1/4 drive 4mm hex head socket bit. Set the panel aside. (FIG. 2 & 2a) DRAWER REMOVAL 3 To remove the drawer, start by pulling the drawer out to 3/4 extension.4 Support the end of the open drawer near the lock with a corner piece of packing from the box. (FIG. 3)
FIG. 2 FIG. 2a FIG. 3

12
5 You can now see the internal workings of the drawer system. Remove the two black injection moulded guide stopper blocks by removing the 4 x 4mm allen head bolts in each block. This is best done with a small hex bit attached to a flexible drive shaft and a cordless drill. (FIG. 4 & 4a) 6 Once both blocks are removed, the drawer can now be pulled out onto the brass contacts and the middle aluminium extrusions on each side of the drawer can be carefully slid forward. The drawer is free to be lifted clear of the frame. (FIG. 5 & 5a) 7 The drawer can now be moved away, taking care not to allow the loose centre extrusion to run out, please place the drawer on two pieces of the angled cardboard packing. This protects the brass rollers at the rear and the lock mechanism.
FIG. 4 FIG. 4a FIG. 5 FIG. 5a
DRAWER REMOVAL

13DOUBLE DRAWER INSTALLATION
PLEASE FOLLOW THESE DRAWER MODULE PREPARATION INSTRUCTIONS TO ENSURE THAT YOUR NEW EXPLORER ALUMINIUM STORAGE DRAWER SYSTEM IS INSTALLED CORRECTLY.
PLEASE NOTE: Leave all mounting bolts loosely installed and hand tight until module is aligned.PLEASE REFER TO FITTING DIAGRAM ON PG. 8
RIGHT SIDE (DRIVER) DRAWER PREPARATION
1 Install the carpeted base trim panels to the front underside of the drawer frame. There are 7 pre-drilled holes in the carpeted panel. Ensure that the holes are clear and then push through the M5 x 30mm counter sunk head bolts. Start all 7 bolts to the underside of the frame threads before tightening. After all bolts are started, then the panel can be completely tightened down. (FIG. 1, 2 & 3) 2 Place base frames in the correct position and facing the correct way. Now opening one bag at a time, use the correct bag for the location stated on page 8 fitting diagram. At this point, you will need to re-use the O/E high tensile seat base bolts and supplied washers into the existing vehicle threads through the base frames. (FIG. 4)
FIG. 1 FIG. 2 FIG. 3 FIG. 4

14
PLEASE FOLLOW THESE DRAWER MODULE PREPARATION INSTRUCTIONS TO ENSURE THAT YOUR NEW EXPLORER ALUMINIUM STORAGE DRAWER SYSTEM IS INSTALLED CORRECTLY.
PLEASE NOTE: Leave all mounting bolts loosely installed and hand tight until module is aligned.PLEASE REFER TO FITTING DIAGRAM ON PG. 8
3 With assistance, carefully place the RHS drawer module into the vehicle, align the holes in the top of the rear base frame with the holes in the drawer cross channel and use the M10 x 25mm tab head bolts and washers from bag 2 (FIG. 5) Push the tab head bolts through the pre-drilled holes in the frame to connect the rear frame to the rear cross channel. (FIG. 6, 7 & 7b) Next, install the M10 x 60mm tab head bolts, 33mm spacer block and washers from bag 4 to connect the front base frame to the holes in the outside of the frame. (FIG. 8) PLEASE NOTE: Leave these nuts loose until final alignment of the drawer system. 4 With assistance, carefully place the LHS drawer module into the vehicle. Now repeat the installation process for the LHS drawer as used on the RHS.
DOUBLE DRAWER INSTALLATION
FIG. 8FIG. 7bFIG. 7FIG. 5 FIG. 6

15
PLEASE FOLLOW THESE DRAWER MODULE PREPARATION INSTRUCTIONS TO ENSURE THAT YOUR NEW EXPLORER ALUMINIUM STORAGE DRAWER SYSTEM IS INSTALLED CORRECTLY.
PLEASE NOTE: Leave all mounting bolts loosely installed and hand tight until module is aligned.PLEASE REFER TO FITTING DIAGRAM ON PG. 8
5 There are 8 x M8 allen head bolts and nyloc nuts used to join the drawer frames. Starting at the front and rear top of the frame, ensure frame tops and the front black aluminium bases are perfectly level and tighten the two top bolts. Now repeat this process for the remaining 6 bolts. (FIG. 9)
FIG. 9
DOUBLE DRAWER INSTALLATION

DOUBLE DRAWER INSTALLATION
PLEASE NOTE: Leave all mounting bolts loosely installed and hand tight until module is aligned.PLEASE REFER TO FITTING DIAGRAM ON PG. 8
WING BRACKET INSTALLATION
6 Starting with the 75mm angled bracket, install at the front RHS of the frame through the pre-drilled holes using 2 x M6 hex head bolts. Use a 10mm socket and extension bar to install these bolts, flat and spring washers. Install the bolts from the inside of the frame out into the bracket. Align the bracket parallel with the drawer frame and tighten both bolts with the 10mm socket. (FIG. 10)7 Install the 60mm angled bracket in the middle pre-drilled holes of the RHS of the drawer frame. (FIG. 11) 8 Install bracket number 3C to the rear RHS of the frame. This bracket is cut to clear the vehicle wheel arch. (FIG. 12) PLEASE NOTE: Only three (3) bolts are to be used in this bracket. The top two and the one lower at the rear of the frame. Use the 3 x M6 allen head bolts and washers. Leave all bolts loosely installed until all 3 are started, then align the bracket parallel with the drawer frame and tighten both bolts with the 10mm socket. Repeat the same procedure to install brackets 3D, 75mm and 65mm angled brackets to the LHS passenger drawer.
FIG. 10 FIG. 12FIG. 11
16

9 To ensure you centralise and correctly position the drawers, install the four top wing panels. To secure these, use the supplied M6 countersunk bolts through the top wood into the locating nuts. (FIG. 14) 10 Once you are happy with the positioning of your drawers, you can now tighten down all frame to base frame and base frame to vehicle bolts.11 Now is the time to take care of any wiring to the drawer frames. With this model, we recommend you to cut the fuse holders off of both drawers and replace them with male spade end connectors. This will allow you to connect the supplied drawer joining wire under the drawers in the base of the frame with the fuse being accessible from the spare wheel access panel. (FIG. 15) Please be sure to cable tie or tape these wires out of the way of the sliding drawer base. (FIG. 16) 12 Now check that the power supply to the drawers is functional using an electrical tester on the brass electrical contacts on top of the front black aluminium base. Once checked, you can now install the original lift out handle you removed when taking out your rear seats. (FIG. 17)
DOUBLE DRAWER INSTALLATION
FIG. 14 FIG. 15 FIG. 16 FIG. 17
17

18DOUBLE DRAWER INSTALLATION
DRAWER RE-INSTALLATION
1 First remove the fuse in the power supply to the drawers, as allowing the drawer frame to touch the main frame may blow the fuse. The best way to re-install the drawer into the frame is to rest the two brass rollers at the rear base of the drawer onto the end of the contacts on the base frame (FIG. 1) Then, hold the drawer horizontally parallel with the frame and slide the two centre slide extrusions in to the roller bearings. (FIG. 2 & 3) 2 After the centre extrusion has passed the middle roller bearings, the rear stopper blocks can be re-installed by placing the blocks in the aligning holes and tightening the 4 x M4 allen head bolts on each side. Please ensure all these 8 bolts have the spring washers installed. Do not over-tighten these bolts, just firm is enough (a 7-9 on the screw clutch setting on a cordless drill is a good guide). Repeat this process for the second drawer. (FIG. 4) 3 The fuse to the power supply can now be installed and the drawer LED strip lights checked for function.4 Check that the power supply to the drawers is functional by opening the drawer to full extension so that the brass electrical contacts under the rear of the drawer frame, make contact. Check switch function. The LED Strip inside the drawer should light up. When pushing the drawer back in to the frame, the LED light will immediately switch off, to prevent the light from accidentally being left on.
DOUBLE DRAWER INSTALLATION
FIG. 1 FIG. 2 FIG. 3 FIG. 4
18
DOUBLE DRAWER INSTALLATION
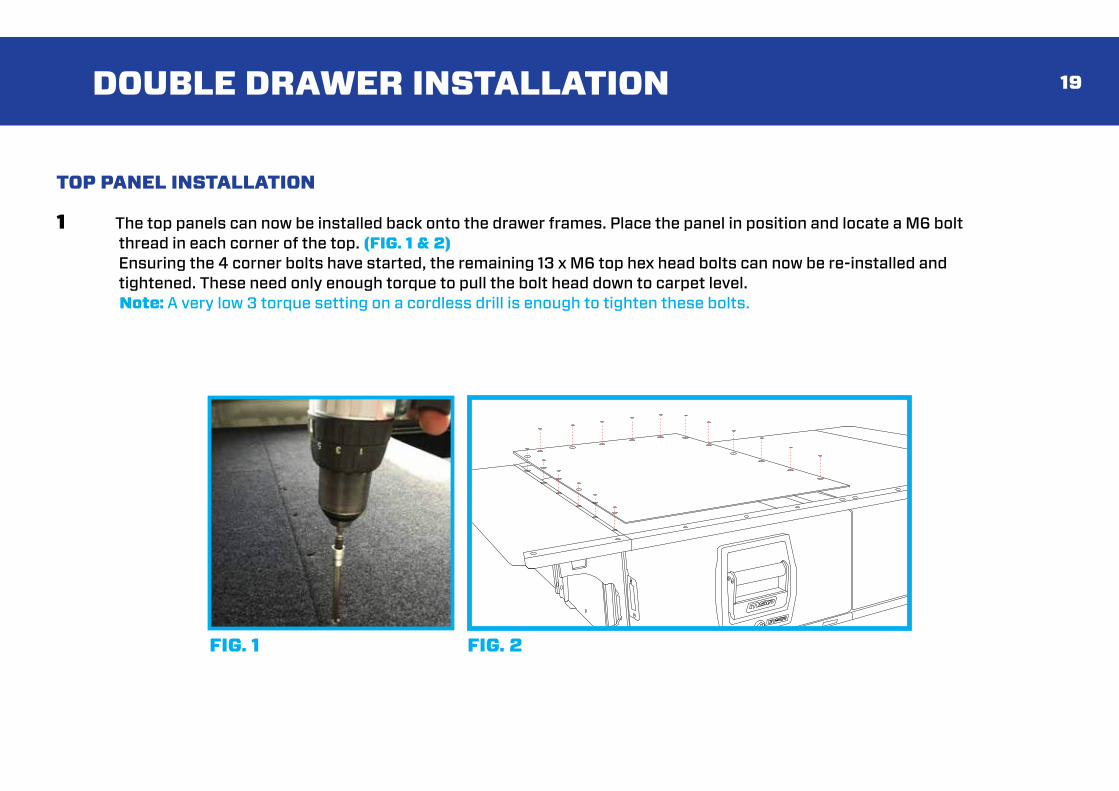
TOP PANEL INSTALLATION
1 The top panels can now be installed back onto the drawer frames. Place the panel in position and locate a M6 bolt thread in each corner of the top. (FIG. 1 & 2) Ensuring the 4 corner bolts have started, the remaining 13 x M6 top hex head bolts can now be re-installed and tightened. These need only enough torque to pull the bolt head down to carpet level. Note: A very low 3 torque setting on a cordless drill is enough to tighten these bolts.
FIG. 1 FIG. 2
19

2 The double width top panel trim can now be installed, this is held into place with 10 x small stainless steel countersunk self-tap screws, push the trim firmly over the end of the double carpeted panels and centralise. Install 1 self-tap screw to each end of the trim to secure it into place, taking particular care to install them in a perfect vertical line. (FIG. 3, 4 & 5)3 Reinstall all wing panels.4 The matching wing panel trims can now be installed using the same process. (FIG. 6)5 The drawer system is now completely installed and ready for use. (FIG. 7)
DOUBLE DRAWER INSTALLATION
FIG. 3
FIG. 7FIG. 6
FIG. 4 FIG. 5
20

21
SINGLE DRAWER INSTALLATIONRefer to page 8 diagram & double drawer installation pages 13 - 24,
ignoring any instructions referring to double drawers.
Note: If carpet is to be installed on the side of the single drawer, this can be adhered using a spray contact adhesive. (Single drawer side frame carpet pieces can be purchased for your Explorer Aluminium Storage Drawer System)
Part No: E930-ESIN-CARP
1 If you are installing the LHS drawer, install the base frame direct to the vehicle floor. 2 If you are installing the RHS, you will need to place the 6mm packer between the base frame and the vehicle floor to keep this frame level.
SINGLE DRAWER INSTALLATION
Base frame LHS Base frame RHS Packer

22 DRAWER REMOVAL & RE-INSTALLATION AFTER THE DRAWERS HAVE BEEN COMPLETELY INSTALLED
The MSA 4X4 Aluminium Drawer systems have been expertly designed to allow easy removal of the drawers from the frames if needed, without the need to remove the top decks of the system.1 Open the drawers to full extension and the stay-open contacts engage at the underside rear of the drawer. (FIG. 1) 2 Remove the fuse from the power supply to the drawers.3 On either side of the sliding frame are two black injection moulded stopper blocks. These two blocks need to be removed to remove the drawer from the frame.4 With a small screwdriver, pry the end cap away from the block, taking care not to mark the cap. Once removed, this will then give access to 4 x M4 allen head bolts with spring washers. (FIG. 2)5 Remove these 4 bolts on each side with a hex bit and take care not to lose the washers. (FIG. 3 & 4) 6 After the two blocks have been removed, the two middle pieces of the over extension slide can be slid back into the frame and out of the way. (FIG. 5)7 The drawer is now completely free from the frame and just resting on the contacts. It can be lifted away from the frame.
To re-install the drawers, follow the procedure in reverse, taking care to align the middle sliding extension carefully to not cause any marking. 1 Sit the drawer rollers on the two contacts at the front of the frame. (FIG. 1) 2 Push the drawer three quarters of the way in to the middle slide extension while pulling the extensions out forward towards the front of the drawer frame. The stopper blocks can now be installed in both sides, taking care not to over-tighten. When all 8 bolts are installed and tightened, then replace the two end caps. 3 Replace the fuse in the power supply.
FIG. 1 FIG. 3 FIG. 4 FIG. 5FIG. 2

23OPERATING INSTRUCTIONS
1 To open the drawer, turn the supplied key to the right, then remove the key and pull on the blue aluminium handle. This will release the drawer from the frame.2 For LED strip light function; pull the drawer out to full extension – the drawer will roll over the first (small stage) of an electrical bumper to supply power to the LED strip light.3 To keep the storage drawer open on a slope; pull the drawer out a little further, the electrical contact will remain working and the drawer will then roll onto a stronger stage bumper which is the patented stay-open/electrical contact device. This will keep the drawer open.4 The LED strip light can be turned off by the recessed switch on the outer side of the front panel. The LED strip light will only work when the drawer is fully open. This prevents leaving the light on and closing the drawer.5 To close the storage drawer; the drawer can be pushed closed without pulling the handle, a small push on the drawer face will push the drawer rollers over the stay-open device.6 The drawer can be pushed shut and key locked if necessary.

24 CARE & MAINTENANCE
• Clean any exposed parts regularly to ensure that bearings and bearing tracks remain free from dirt, sand and grit, and spray bearings with INNOX / WD-40.
• Wipe down powdercoated aluminium extrusions with clean, warm, soapy water using a soft cloth. Do not use harsh chemicals or thinner based cleaners on your Explorer Aluminium Storage Drawer System.
• If Aluminium panels are gouged, chipped or scratched, try touching up the damaged area with closely matching paint.
• The LED Strip Light is designed to turn on at full extension. If the LED strip does not light up on full extension - first check power supply then check the brass contacts are clean underneath the rear of the drawer - check that the fuse in the fuse block is ok.
• Carpet can be vacuumed or wiped with a wet sponge.
• Trim can be touched up with a black permanent marker pen.

25LIFETIME GUARANTEE
All MSA 4X4 Accessories products are designed and manufactured to the highest quality standards to perform as they should. We stand behind our products with a Lifetime Manufacturer’s Warranty. All claims under this warranty should be made by returning the product at your cost to MSA 4X4 Accessories Pty Ltd, 43 Harrington Street, Arundel, QLD 4214, with the detail of the fault, proof of purchase, proof of identification and vehicle fitment details where relevant. Lifetime manufacturer’s warranty applies to the original purchaser only.
If we determine that an MSA 4X4 Accessories product is defective in materials or workmanship during the Lifetime Warranty, we will either repair or replace the product. Repair or replacement is solely at the discretion of MSA 4X4 Accessories Pty Ltd. This warranty does not apply to failure or damage caused by incorrect or faulty fitment, accidental or intentional damage, misuse or abuse, failure of other products, operation of the product outside of its environmental or technical specifications, or repair or modification carried out by anyone other than MSA 4X4 Accessories Pty Ltd. No charges will be accepted for external labour or materials.
Lifetime warranty is applicable to all MSA 4X4 Accessories Fridge Slides, Fridge Barriers, Storage Drawers, and steel or aluminium products, excluding MSA 4X4’s Driving Mirrors & Power Panels. MSA 4X4 Accessories Lifetime warranty does not cover any coating faults, rust, scratches, chips, carpet or battery packs. Fabric product Lifetime Warranty covers all manufacture and fabric components. Lifetime Warranty will not cover any fading of fabrics.
MSA 4X4 Accessories products are designed for lifestyle applications. Due to the harshness of the mining environment, MSA 4X4 Accessories products used in mining applications that may be operating outside of their environmental and technical specifications, are therefore excluded from a Lifetime Warranty. MSA 4X4 Accessories products used in mining applications are warranted for up to 1 year.
Our goods come with guarantees that cannot be excluded under the Australian Consumer Law. You are entitled to a replacement or refund for a major failure and for compensation for any other reasonably foreseeable loss or damage. You are also entitled to have the goods repaired or replaced if the goods fail to be of acceptable quality and the failure does not amount to a major failure.
Address:43 Harrington Street,Arundel QLD, 4214
ABN: 50 150 429 566
Phone:+61 7 5594 6664
Email:[email protected]
Website:msa4x4.com.au