FIS LYNX 2000 Cleaver - Fiber Instrument Sales · LYNX 2000 Cleaver Instruction Manual Page 1 of 2...
2
Instruction Manual Cautions • Read these Instructions Before use. • Avoid water, dust, high heat, and high humidity. • Avoid impacts. LYNX Cleaver Contents • LYNX 2000 Cleaver Unit • 1.5mm Allen Wrench • Instruction Manual • Storage Case • Do Not use acetone to clean the rubber pads. • Use proper fiber handling techniques to avoid injury Cover Rubber Pads Blade Carriage Blade Fiber Clamp Fiber V-grooves Fiber Disposal Bin Operation Procedure 1. Open Cover and Fiber Clamp, place stripped fiber into appropri- ate V-groove. Align the fiber buffer or coating to the cleave length you desire. Make sure the fiber lies straight across both rub- ber pads. 2. Close the Cover, the Fi- ber Clamp will automatically drop down to hold the fiber in place 3. As soon as the Cover is closed the Blade Carriage will automati- cally slide to the rear. 4. Carefully open the Cover. The cleaved fiber stub will have be automatically de- posited into the Fiber Dis- posal Bin 5. Open the Fiber Clamp and remove your cleaved fiber. The cleaver is ready for the next cleave. FIS LYNX 2000 Cleaver Rev B; 6/2013 LYNX 2000 Cleaver Instruction Manual Page 1 of 2
-
Upload
phamkhuong -
Category
Documents
-
view
235 -
download
0
Transcript of FIS LYNX 2000 Cleaver - Fiber Instrument Sales · LYNX 2000 Cleaver Instruction Manual Page 1 of 2...
Instruction Manual
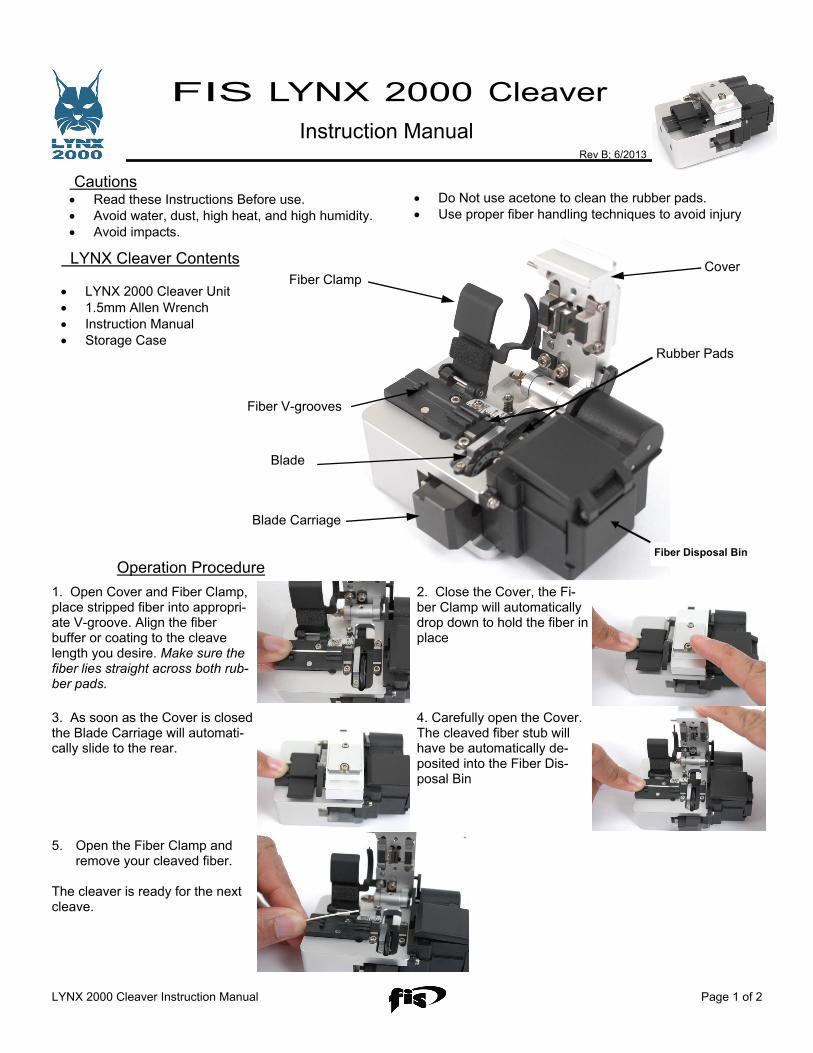
Cautions • Read these Instructions Before use. • Avoid water, dust, high heat, and high humidity. • Avoid impacts.
LYNX Cleaver Contents
• LYNX 2000 Cleaver Unit • 1.5mm Allen Wrench • Instruction Manual • Storage Case
• Do Not use acetone to clean the rubber pads. • Use proper fiber handling techniques to avoid injury
Cover
Rubber Pads
Blade Carriage
Blade
Fiber Clamp
Fiber V-grooves
Fiber Disposal Bin Operation Procedure
1. Open Cover and Fiber Clamp, place stripped fiber into appropri-ate V-groove. Align the fiber buffer or coating to the cleave length you desire. Make sure the fiber lies straight across both rub-ber pads.
2. Close the Cover, the Fi-ber Clamp will automatically drop down to hold the fiber in place
3. As soon as the Cover is closed the Blade Carriage will automati-cally slide to the rear.
4. Carefully open the Cover. The cleaved fiber stub will have be automatically de-posited into the Fiber Dis-posal Bin
5. Open the Fiber Clamp and remove your cleaved fiber.
The cleaver is ready for the next cleave.
FIS LYNX 2000 Cleaver
Rev B; 6/2013
LYNX 2000 Cleaver Instruction Manual Page 1 of 2
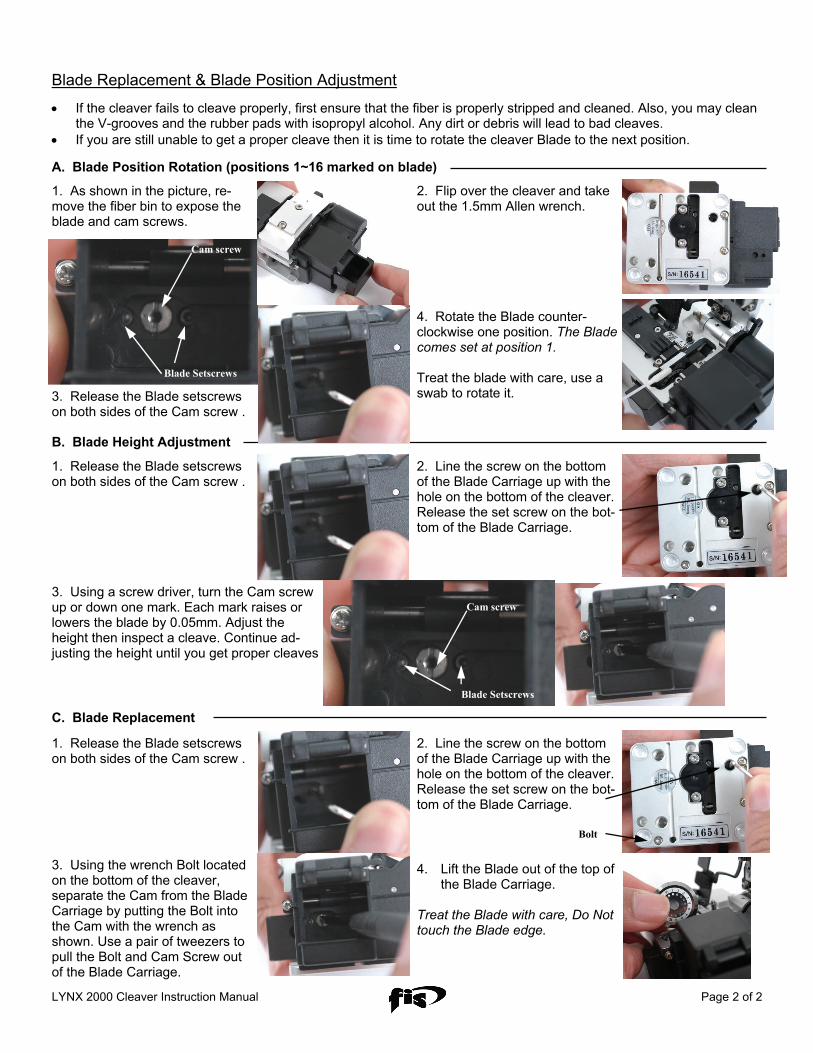
Blade Replacement & Blade Position Adjustment
• If the cleaver fails to cleave properly, first ensure that the fiber is properly stripped and cleaned. Also, you may clean the V-grooves and the rubber pads with isopropyl alcohol. Any dirt or debris will lead to bad cleaves.
• If you are still unable to get a proper cleave then it is time to rotate the cleaver Blade to the next position.
A. Blade Position Rotation (positions 1~16 marked on blade)
1. As shown in the picture, re-move the fiber bin to expose the blade and cam screws.
2. Flip over the cleaver and take out the 1.5mm Allen wrench.
3. Release the Blade setscrews on both sides of the Cam screw .
4. Rotate the Blade counter-clockwise one position. The Blade comes set at position 1. Treat the blade with care, use a swab to rotate it.
1. Release the Blade setscrews on both sides of the Cam screw .
2. Line the screw on the bottom of the Blade Carriage up with the hole on the bottom of the cleaver. Release the set screw on the bot-tom of the Blade Carriage.
3. Using a screw driver, turn the Cam screw up or down one mark. Each mark raises or lowers the blade by 0.05mm. Adjust the height then inspect a cleave. Continue ad-justing the height until you get proper cleaves
B. Blade Height Adjustment
C. Blade Replacement
1. Release the Blade setscrews on both sides of the Cam screw .
2. Line the screw on the bottom of the Blade Carriage up with the hole on the bottom of the cleaver. Release the set screw on the bot-tom of the Blade Carriage.
3. Using the wrench Bolt located on the bottom of the cleaver, separate the Cam from the Blade Carriage by putting the Bolt into the Cam with the wrench as shown. Use a pair of tweezers to pull the Bolt and Cam Screw out of the Blade Carriage.
4. Lift the Blade out of the top of the Blade Carriage.
Treat the Blade with care, Do Not touch the Blade edge.
Blade Setscrews
Bolt
Cam screw
Cam screw
Blade Setscrews
LYNX 2000 Cleaver Instruction Manual Page 2 of 2