Final Assignment Air Car Chassis Design using Sketchup.
20
Final Assignment Air Car Chassis Design using Sketchup
-
Upload
blaze-cunningham -
Category
Documents
-
view
223 -
download
3
Transcript of Final Assignment Air Car Chassis Design using Sketchup.

Final AssignmentAir Car Chassis Design using Sketchup
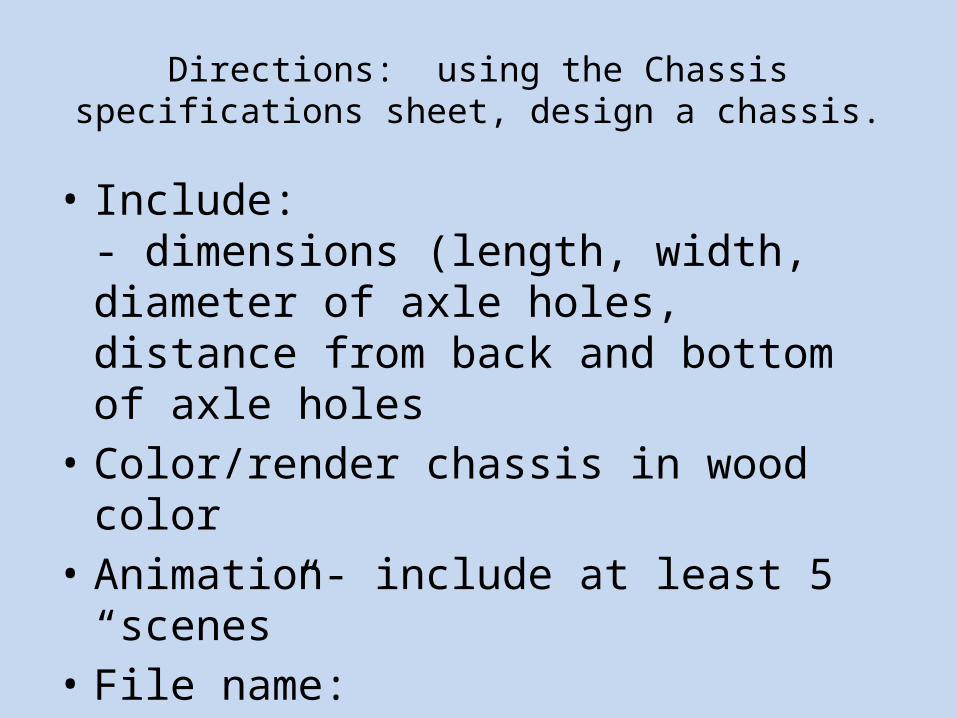
Directions: using the Chassis specifications sheet, design a chassis.
• Include:- dimensions (length, width, diameter of axle holes, distance from back and bottom of axle holes
• Color/render chassis in wood color• Animation- include at least 5 “scenes”• File name: lastname_first_chassis_10a

Scoring Rubric
10 -All of a 7 score plus the following:- dimensions (length, width, diameter of axle holes, distance from back and bottom of axle holes
Color/render chassis in wood colorAnimation- include at least 5 “scenes”
7- rectangle dimensioned with axle holesFile name: lastname_first_chassis_10a

1. Open blank sketchupdraw a rectangle from the origin to a
size of 5 1/2” by 1 ½ “ by ¾”
• First draw a rectangle to the size above5.5”,1.5” +enter
• Then delete the person• Now click on ‘zoom extents’

2. Make rectangle ¾” high
• Use ‘push/pull’
• Type in .75” +enter
• Add dimensions

3. Add axle holes• Using ‘tape measurer’, begin at the bottom
front right corner point- click and then move (not drag) the tape measurer along the vertical line until you reach ¼”
• Click to create a reference point at ¼”• Then click and drag with the tape meas. across
the front to the left edge

4. Create holes
• Click with Tape M. and dragalong bottom to ¾”, make mark
• Drag up with Tape M. to inter-sect
• Use the circle tool – make a circle with diameter of 3/16” *TYPE IN .09375”

5. Label circle dimension and extrude the hole to the other side of the block
• Delete the dashed construction lines using the eraser tool
• Use the dimension tool to label the diameter of the circle

6. Extrude hole
• Use the push/pull to extrude hole to the other side of the block
• A-while holding inthe Push/Pull, typein 1.5” +enter

7. Repeat for the other axle hole!
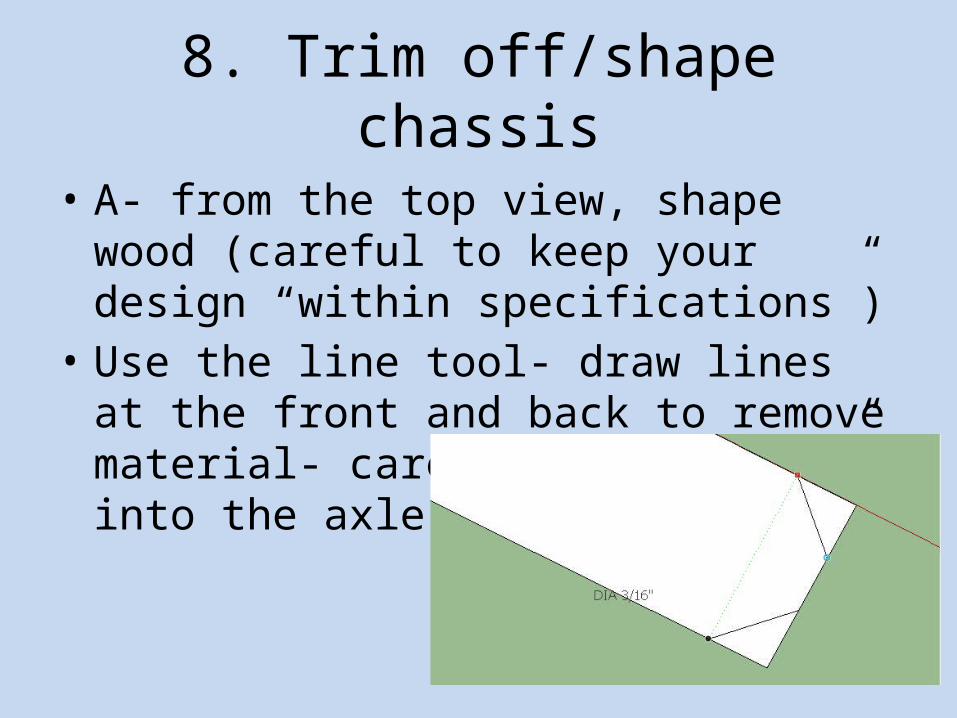
8. Trim off/shape chassis
• A- from the top view, shape wood (careful to keep your design “within specifications”)
• Use the line tool- draw lines at the front and back to remove material- careful not to “cut” into the axle holes!

9. Modify chassis design
• We will use the tape measurer to make construction lines. These lines will help us remove material from between the axles.
• We want a thickness of ¾” from a size of 1 ½”.• So 1 ½” – ¾” = ¾” ¾ divided by 2 is 3/8. End
result is that we want to remove 3/8” from each side of the rectangle

• Click and drag with the tape measurer from the edge of the chassis to 3/8”

• Do the same on the other edge

• Now use the line tool to draw on the chassis and use the construction (dashed lines) for reference

• Now use the push/pull tool to remove material


Add a wood color

Animation
1. Rotate to a wide view of your design2. Go to ‘view’, ‘animation’, ‘add scene’3. Then zoom in a bit and make another scene4. Add at least 5 scenes total 5. As you work on this, click ‘play’ to See how your video looks

Hand in the File!1. Lastname_first_chassis_classmod <<<(10a or 9b)2. Rename your file after you close the file
“drag and drop” your file into our drop folder


![[Sketchup] Creating Vray Water Material in Sketchup _ Artvisualizer Blog.pdf](https://static.fdocuments.net/doc/165x107/577c78081a28abe0548e6fab/sketchup-creating-vray-water-material-in-sketchup-artvisualizer-blogpdf.jpg)