eXRay - Value Creating Solutions · • Export Patient Data (For Qualitas) • Invoicing for...
19
1/20/2019 eXRay.NET Guide v1.0.1 VALUE CREATING SOLUTIONS SDN BHD.
Transcript of eXRay - Value Creating Solutions · • Export Patient Data (For Qualitas) • Invoicing for...

1/20/2019
eXRay.NET Guide v1.0.1
VALUE CREATING SOLUTIONS SDN BHD.

Contents Introduction .................................................................................................................................................. 2
Difference between v1 and v2 ...................................................................................................................... 3
Types of Users ........................................................................................................................................... 3
How do we go about creation of different kinds users? .......................................................................... 3
Version 1 Work-Flow................................................................................................................................. 4
Version 2 Workflow ...................................................................................................................................... 5
Modules ........................................................................................................................................................ 6
Steps as fresh for Manager Role ................................................................................................................... 7
EMGS / PRE-EMGS ........................................................................................................................................ 8
Registration ............................................................................................................................................... 8
Forgot Password ..................................................................................................................................... 10
Login ........................................................................................................................................................ 12
Clinic User ........................................................................................................................................... 14
Creating Clinic Details ......................................................................................................................... 14
Creating User Profile ........................................................................................................................... 15
Uploading Patient with X-Ray image(s) .............................................................................................. 17

Introduction Welcome to eXRay.NET v2. This is Web based application would be compatible to a radiology center to
report and the clinics to upload DICOM images. And it also has the capability to receive JPEG images if
the DICOM is exported. EMGS format, Normal format and Fomema format reporting is available
currently. Billing and other administration module are incorporated.
This guide helps all kinds of users to learn the application and guide.
You could always contact us for supporting in case you have any doubts.
Email: [email protected]
Before we start, let us make you understand the differences between old and new versions.

Difference between v1 and v2
# Module Old New
1 New User By Clinic By Manager
2 Confirmation By Clinic By Manager
3 Email Of Clinic Of Manager, Qualitas
4 User ID Email Address Username
5 Password Recovery By Clinic Clinic should call Qualitas
6 EMGS, PRE-EMGS, Local Cases Modules are Separate like Applications To be registered separately
1 Application, 1 Access, 1 User per Clinic
7 New Self Reporting Doctor By VCS By Manager
8 New Radiologist By VCS By Admin
9 New User By VCS By Admin
Types of Users • Super Administrator
• Administrator
• Manager (Qualitas/Daya)
• Doctor
• Clinic
• Radiologist
• Clinic
How do we go about creation of different kinds users? ➢ Administrator, Billing, Radiologist, Manager can create the user and password on their own and
contact VCS supporting team to assign the role.
➢ Upon role assignment the user can start using the application by logging in.
➢ One they logged in, they should first create the profile

Version 1 Work-Flow

Version 2 Workflow
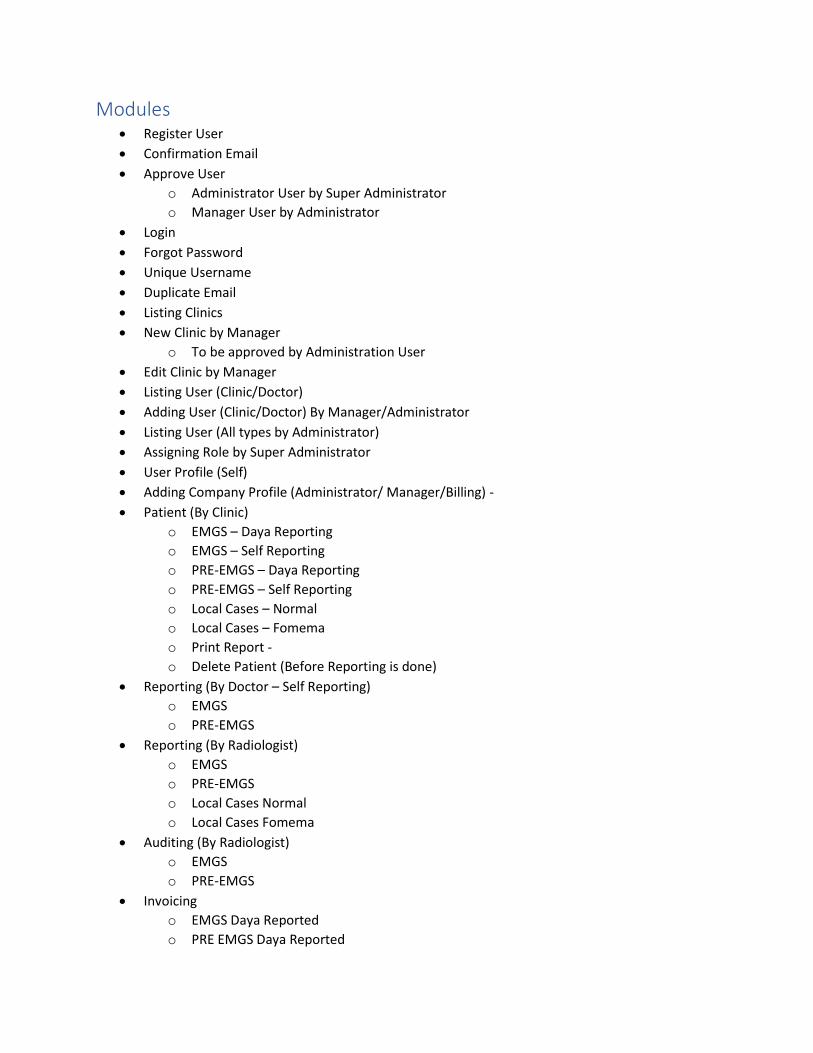
Modules • Register User
• Confirmation Email
• Approve User
o Administrator User by Super Administrator
o Manager User by Administrator
• Login
• Forgot Password
• Unique Username
• Duplicate Email
• Listing Clinics
• New Clinic by Manager
o To be approved by Administration User
• Edit Clinic by Manager
• Listing User (Clinic/Doctor)
• Adding User (Clinic/Doctor) By Manager/Administrator
• Listing User (All types by Administrator)
• Assigning Role by Super Administrator
• User Profile (Self)
• Adding Company Profile (Administrator/ Manager/Billing) -
• Patient (By Clinic)
o EMGS – Daya Reporting
o EMGS – Self Reporting
o PRE-EMGS – Daya Reporting
o PRE-EMGS – Self Reporting
o Local Cases – Normal
o Local Cases – Fomema
o Print Report -
o Delete Patient (Before Reporting is done)
• Reporting (By Doctor – Self Reporting)
o EMGS
o PRE-EMGS
• Reporting (By Radiologist)
o EMGS
o PRE-EMGS
o Local Cases Normal
o Local Cases Fomema
• Auditing (By Radiologist)
o EMGS
o PRE-EMGS
• Invoicing
o EMGS Daya Reported
o PRE EMGS Daya Reported

o Local Cases Normal
o Local Cases Fomema
• Statement
o EMGS Self Reported
o PRE-EMGS Self Reported
• Invoice Acknowledgement (By Clinic for Daya)
• Export Patient Data (For Qualitas)
• Invoicing for Qualitas
o EMGS
o PRE-EMGS
o Local Cases
• Invoicing Acknowledgement (By Daya)
• Dashboard
o Super Administrator
o Administrator
o Manager
o Clinic
o Radiologist
o Doctor
o Billing
Steps as fresh for Manager Role For Manager Role user below are the steps to follow.
o Login (Using Manager Role User ID and Password)
o Create the Clinic
o Wait until it is approved by Administrator
o Create User (Clinic/Doctor)
o Confirm the User by clicking on link from the email
o Login using new User ID and Password
o Create Profile
▪ Choose the clinic from the list (Only approved clinics will be listed here)
o Then pass the User details to relevant user or person
o Reset password if the user has forgotten the password
o Provide the user ID and Password if they user forgotten the ID and Password
o Multiple Clinic User/Doctor User IDs can be assigned to same Clinic
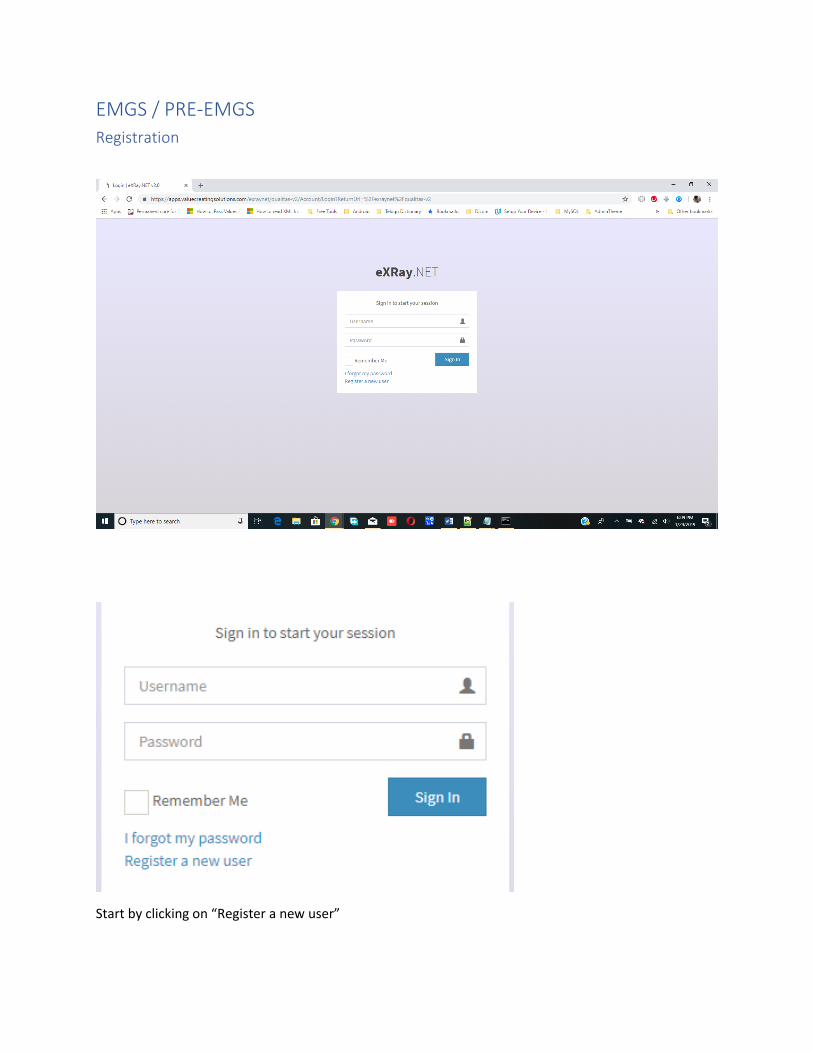
EMGS / PRE-EMGS
Registration
Start by clicking on “Register a new user”

➢ Key in all required details
➢ “Username” unique. It should be at least 6 characters. It will not accept the spaces.
➢ Email should be valid as the application sends a confirmation link to your email by email and
also it should be unique as well
➢ Password should have at least 1 capital 1 number. Sample is App12345. Should be at least 8
characters. To be more secured, please do add special characters.
➢ Please check “I agree to the terms”.
➢ Before checking please go thru the terms
➢ Upon completion, please click on “Register” button
➢ The user should see above message upon registration

➢ The above is the sample email from no-reply@valuecreatingsolutions.
➢ After clicking on the link, you would get this message in your browser
Forgot Password

When the user happens to forgot the password, click on the link “I forgot my password” from Login
screen
As you could see above screen type the “Username” and click “Submit” button.
User receives a confirmation email from [email protected].
Click on the link and proceed. Then the user sees as below

Above screen appears when the reset process is successful. User can click on “here” and go to Login and
login.
Login Upon logging in, the application has capability of detecting what role user has logged and basing on that
the user gets access to relevant modules. Each user may have more than 1 role. Below are the modules
that can be accessed by relevant role users.
❖ Administrator Role
✓ Approving Manager Role
✓ Creation of Clinic
✓ Approving new Clinic
✓ Creation of New Clinic Role User
✓ Creation of Clinic Role User Profile
✓ Creation of New Doctor User
✓ Creation of New Doctor User Profile
✓ Listing Patients

✓ Listing Clinics
✓ Listing All Users
✓ Blocking User
❖ Billing
✓ Generate Invoice
✓ List of Invoices
✓ List of Clinics
❖ Manager Role
✓ Approve the Clinic user
✓ Approve the Self Reporting Doctor User
✓ Listing Patients
✓ Listing Clinics
✓ Listing All Users
❖ Doctor Role
✓ View the List of EMGS/PRE-EMGS Patients of related Clinic
✓ Reporting
❖ Clinic Role
✓ Registration
✓ Create the clinic
✓ Create Profile
✓ Upload Patient Details along with X-Ray image(s)
✓ Delete Patient if the information is incorrect (Only before Reporting)
✓ View the report
✓ Print the report
✓ View the Clinic Profile
✓ Amend the Clinic Details

Clinic User After logging in as a clinic user, as usual the clinic user also can see the dashboard as below
From here the user needs do the following
➢ Create clinic details
➢ Create user profile
Creating Clinic Details Click on Details from the left side menu.

Upon clicking the user should be able to see the below web form. So the user can continue to key in all
details. All the details to be keyed-in in order to get approval from Qualitas.
Creating User Profile Click on the Profile button that is located on the right menu that pops out after clicking on username.
Please see the below picture

Then the user can see the below web form to fill up.
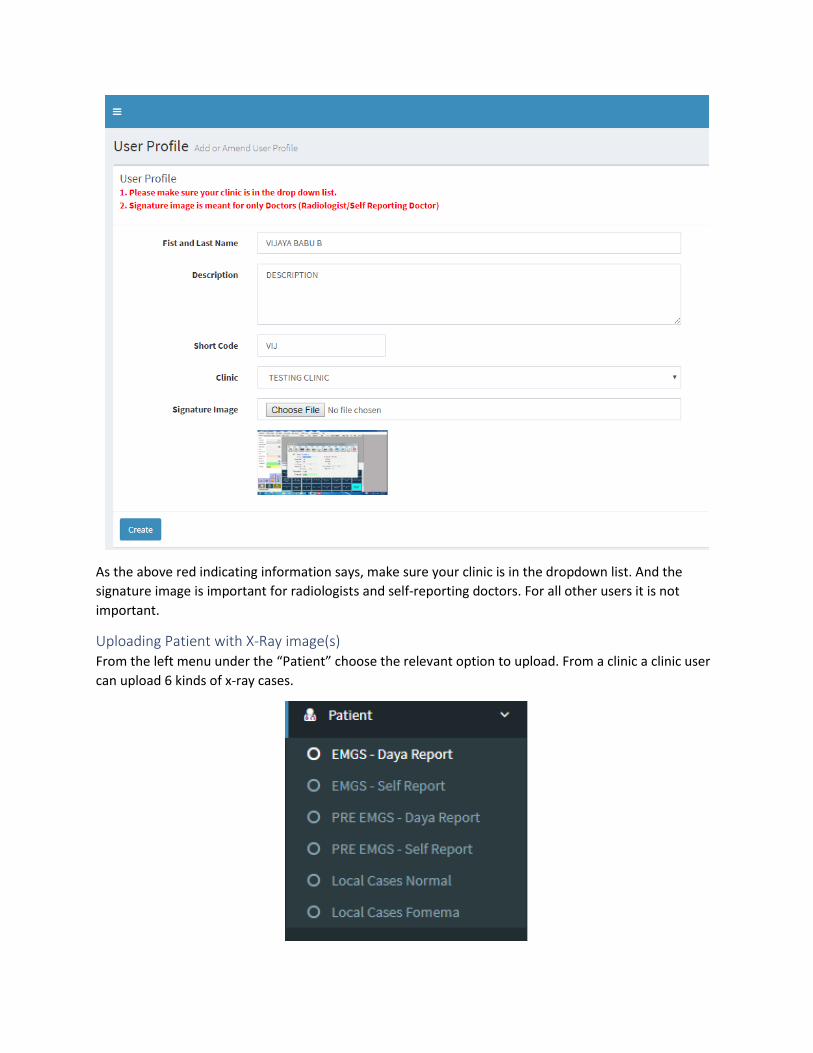
As the above red indicating information says, make sure your clinic is in the dropdown list. And the
signature image is important for radiologists and self-reporting doctors. For all other users it is not
important.
Uploading Patient with X-Ray image(s) From the left menu under the “Patient” choose the relevant option to upload. From a clinic a clinic user
can upload 6 kinds of x-ray cases.

There are 4 indicators. Once it turns to blue color the clinic user can print the report. And it is applied to
all types of cases.
The 3 icons at the end of the line of every patient name to be notified from left to right
X-Ray image(s) viewer, DICOM viewer and Deletion button if the patient information has been saved
incorrectly. If it is not deleted by clinic user it is consider reported and will be billed.
Report/Audit column shows the initials of doctors who have reported and audited. This initial is created in the user profile under the
short code.