
Experiment 5 PICLab programming - Physics@Brock
11
Experiment 5 PICLab programming Brock’s own PICLab is the development board package that will be used in several exper- iments in this lab. The microcontroller used in PICLab is the Microchip PIC16F877-20 or PIC16F887. With a 20-MHz oscillator, most instructions require 200 ns (4 clock cycles) to execute. In addition to the PIC itself, the PICLab board contains power sup- ply, display, and interface circuits necessary to communicate with the board via a USB port of a Linux workstation or PC. The goal of this lab is to learn how to add operating softwaer to this hardware platrform. PICLab bootloader A small bootstrap utility program has been pre-loaded into the memory of your PICLab, and a computer program called picl has been written to provide transparent communications with the PICLab board. picl IDE picl is an Integrated Development Environment of the PICLab board. It allows you to write assembler programs, compile and download them to the memory of the PIC, and to examine the state of the PIC memory or registers during the debugging process. picl can also provide a real-time text and graphical display of data sent by your running program. picl also includes a PICLab simulator. Implemented in software is most of the functionality of PICLab, including the internal hardware of the microcontroller and the external hardware elements such as the LED display, keypad, LCD display and serial port. The user subroutines that are preloaded on PICLab are also simulated in software. Hence, your code developed with the simulator should run as expected on the real PICLab. With the simulator you can easily single step through your code and monitor the outcome of each instruction. Further, Virtual Pic allows you to view how an instruction is executed inside the PIC and the path that your data follows on every cycle of the PIC clock. You can easily switch execution of your code between the simulator and the PICLab board by making or breaking the PICLab connection. 29
Transcript of Experiment 5 PICLab programming - Physics@Brock
Experiment 5
PICLab programming
Brock’s own PICLab is the development board package that will be used in several exper-iments in this lab. The microcontroller used in PICLab is the Microchip PIC16F877-20or PIC16F887. With a 20-MHz oscillator, most instructions require 200 ns (4 clockcycles) to execute. In addition to the PIC itself, the PICLab board contains power sup-ply, display, and interface circuits necessary to communicate with the board via a USBport of a Linux workstation or PC. The goal of this lab is to learn how to add operatingsoftwaer to this hardware platrform.
PICLab bootloader
A small bootstrap utility program has been pre-loaded into the memory of your PICLab, and acomputer program called picl has been written to provide transparent communications with thePICLab board.
picl IDE
picl is an Integrated Development Environment of the PICLab board. It allows you to writeassembler programs, compile and download them to the memory of the PIC, and to examine thestate of the PIC memory or registers during the debugging process. picl can also provide a real-timetext and graphical display of data sent by your running program.
picl also includes a PICLab simulator. Implemented in software is most of the functionality ofPICLab, including the internal hardware of the microcontroller and the external hardware elementssuch as the LED display, keypad, LCD display and serial port. The user subroutines that arepreloaded on PICLab are also simulated in software. Hence, your code developed with the simulatorshould run as expected on the real PICLab.
With the simulator you can easily single step through your code and monitor the outcome of eachinstruction. Further, Virtual Pic allows you to view how an instruction is executed inside the PICand the path that your data follows on every cycle of the PIC clock.
You can easily switch execution of your code between the simulator and the PICLab board bymaking or breaking the PICLab connection.
29

PICLab schematic
Figure 5.1: Block diagram of a PICLab board
Fig. 5.1 provides an overall block diagram of the PICLab board, showing the essential connectionsbetween the PIC itself and the other components of the PICLab board. Together with the picl
help menus and the PIC reference documentation (see the References section of the class website)this information should be sufficient for you to get your PICs to work.
30

Connecting PICLab
By default, picl enters the PIC Simulator mode on start-up with the ’Connect’ icon showing asingle plug meaning that PICLab is not currently connected to PICL. With your PICLab boardconnected to the USB port of your Linux workstation and the port set to /dev/piclab, click theconnection icon. The icon changes to two connected plugs, a message ’Connected to PICLab at57600 baud” appears in the status box, and picl is ready to communicate with PICLab. Checkthe ’Auto connect’ box in the ’Settings’ menu to detect and connect to PICLab on start-up. 1
PICLab interface
On your Linux workstation, invoke the graphical user interface to PICLab by typing:
picl &
Figure 5.2: picl application window, connected to PICLab
Fig. 5.2 shows what picl window should look like on your screen. Typically, you enter one or moreopcodes in the entry window and click Build . If the assembly completes without errors, PICLabloads the given instruction(s) to the Flash program memory and executes them.2 This code will noterase if the PIC is reset or the power is turned off. You can execute the program currently storedin the PIC memory by clicking the Run button.As the program runs, PICLab sends a variety of data back to the user. You can open severalwindows in the View menu to keep track of how the values in the PIC registers and memorychange as a result of your instructions being executed.Click the ? button for help on the PIC opcodes, assembler directive commands and a list of theutility subroutines pre-written for you to use in your programs. Click ’Exit’ in the ’File’ menuiwhen done, your working environment will be saved.
1To program PICLab from your laptop or PC, you need picl and the Tcl/Tk 8.4 interpreter installed; it is freelyavailable for all platforms at www.activestate.com. You may also need to specify the connection: e.g. /dev/piclabor /dev/ttyUSBn under Linux or COMn under Windows, where n is the desired port. Under Windows, a USB serialdevice is identified as a COM port.
2By default, the loader chooses 0x0400 as the starting address of the user program, out of the total programaddress space of PIC of 0x0000–0x1FFF; the loader itself is using 0x0000–0x03FF.
31

5.1 Assembler instructions and code development
You are now ready to begin programming. As you progress through the exercises, be sure tounderstand the function of each instruction (see the help menu) and the overall logic of the programcode. Familiarity with the PIC instruction set and with these basic technoques of interacting withPICLab will make programming the PICLab board a more pleasurable experience.
��! Start the picl application. Connect to PICLab. In the following steps, the comments shownin brackets do not need to be entered; the text can be formatted using the tab key.
Begin by sending to the PIC an instruction to turn on bit 7 of its Port D. This pin is connectedto the decimal point of the seven-segment displays. In the entry window, input the followingopcode:
bsf PORTD,7 ; set bit 7 of file register PORTD
Click the Build button. The LED attached to bit 7 of Port D on the PIC should turn on.Modify the above instruction to read as follows:
bcf PORTD,7 ; clear bit 7 of file register PORTD
Clicking Build should turn off the LED.��! You will now implement a loop. Enter the following code:
begin bsf PORTD,7 ; set bit 7 of file register PORTD
bcf PORTD,7 ; clear bit 7 of file register PORTD
goto begin ; branch to label called "begin"
Since the program is toggling the Port D bit on and off a couple of times every microsecond,the LED should appear continuously lit, but somewhat dimmer. The PICLab board is nowexecuting an infinite loop and will not respond to commands.
Connect an oscilloscope to pin 7 of PORTD on the expansion connector. Sketch and label theoutput waveform.
? Explain the timing in terms of the PIC instruction execution times. Is the timing in agreementwith your expectations?��! Press the Reset button on the PICLab board to interrupt the program and regain controlof the hardware.
You can slow down the LED flashing rate by introducing a long, in PIC terms, delay aftereach of the bit operations. A utility subroutine called Wait is available to implement such adelay. The W register is loaded with a delay value to be passed to the subroutine. Try thefollowing code:
32
begin bsf PORTD,7 ; set bit 7 of file register PORTD
movlw 250 ; pass delay count to Wait subroutine
call Wait ; execute a delay of 250*150us
bcf PORTD,7 ; clear bit 7 of file register PORTD
movlw 250 ; delay value for Wait subroutine
call Wait ; execute a delay of 250*150us
goto begin ; branch to label called "begin"
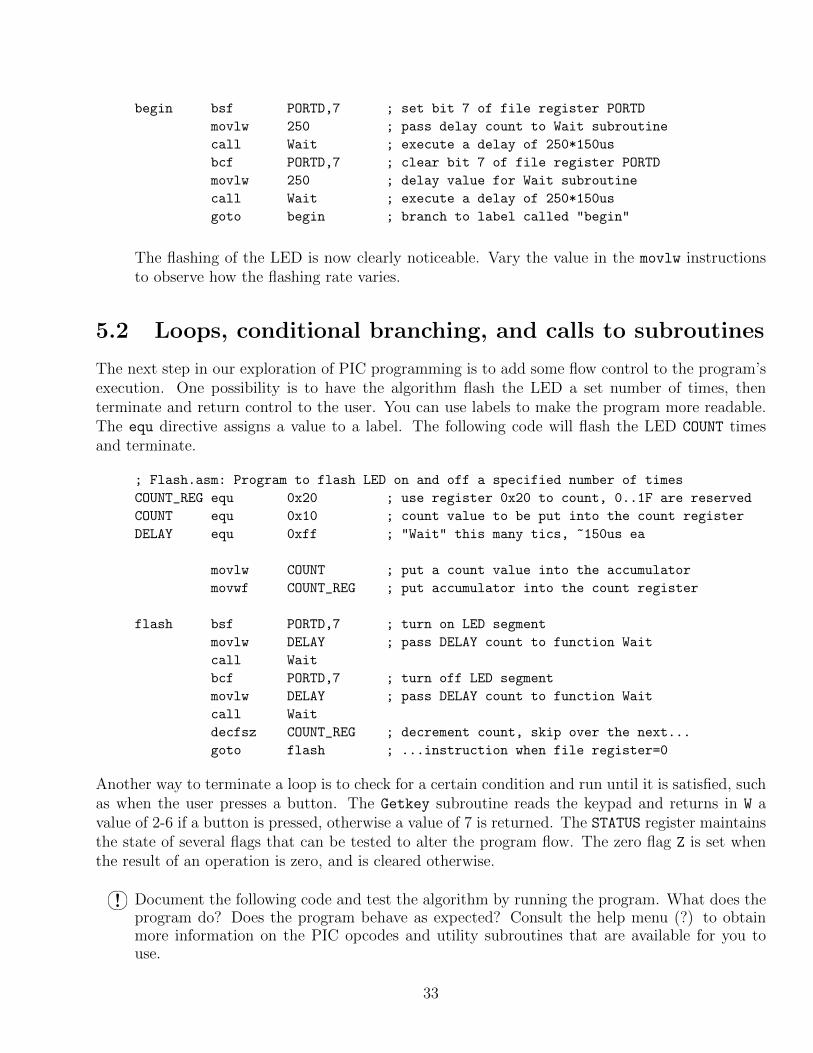
The flashing of the LED is now clearly noticeable. Vary the value in the movlw instructionsto observe how the flashing rate varies.
5.2 Loops, conditional branching, and calls to subroutines
The next step in our exploration of PIC programming is to add some flow control to the program’sexecution. One possibility is to have the algorithm flash the LED a set number of times, thenterminate and return control to the user. You can use labels to make the program more readable.The equ directive assigns a value to a label. The following code will flash the LED COUNT timesand terminate.
; Flash.asm: Program to flash LED on and off a specified number of times
COUNT_REG equ 0x20 ; use register 0x20 to count, 0..1F are reserved
COUNT equ 0x10 ; count value to be put into the count register
DELAY equ 0xff ; "Wait" this many tics, ~150us ea
movlw COUNT ; put a count value into the accumulator
movwf COUNT_REG ; put accumulator into the count register
flash bsf PORTD,7 ; turn on LED segment
movlw DELAY ; pass DELAY count to function Wait
call Wait
bcf PORTD,7 ; turn off LED segment
movlw DELAY ; pass DELAY count to function Wait
call Wait
decfsz COUNT_REG ; decrement count, skip over the next...
goto flash ; ...instruction when file register=0
Another way to terminate a loop is to check for a certain condition and run until it is satisfied, suchas when the user presses a button. The Getkey subroutine reads the keypad and returns in W avalue of 2-6 if a button is pressed, otherwise a value of 7 is returned. The STATUS register maintainsthe state of several flags that can be tested to alter the program flow. The zero flag Z is set whenthe result of an operation is zero, and is cleared otherwise.��! Document the following code and test the algorithm by running the program. What does the
program do? Does the program behave as expected? Consult the help menu (?) to obtainmore information on the PIC opcodes and utility subroutines that are available for you touse.
33

; Showkey.asm: Program to ...........................................
KEYSAVE equ 0x20 ; .......................................
clrf PORTD ; .......................................
readkey call Getkey ; .......................................
movwf KEYSAVE ; .......................................
sublw 7 ; .......................................
btfsc STATUS,Z ; .......................................
goto readkey ; .......................................
movf KEYSAVE,W ; .......................................
movwf PORTD ; .......................................
sublw 2 ; .......................................
btfss STATUS,Z ; .......................................
goto readkey ; .......................................
return ; required if code follows main program .
In the above example, a simple return from a subroutine (instruction return) is being used. In thepicl convention, the entire user code is assumed to be a subroutine of the PICLab loader, and so atthe very end of the code, an automatic return is always inserted for you. This is why your one-line“programs” like bsf PORTD 7 worked just fine even though they did not have a return operation.However, you must insert an explicit return at the end of every subroutine that you yourself write,and at the end of your main program if any code follows it.
An extra return somewhere in the middle of the code can also be used as a simple debugging tool.Upon encountering such a “premature” return, the program will terminate, pass the control to thePICLab loader, and it in turn will update all of the open windows of picl with the current valuesof various registers, memory contents, etc. You will then be able to examine the current status ofyour PIC and decide if the code you wrote is doing exactly what you intended it to do.
You may also execute a call Break instruction to update picl with the recent values from thePIC, and to continue program execution. This subroutine is not a part of the PIC instruction set,but is made available through the utility loader function set. You can use the ! symbol in a blankline as a short form for call Break.
Note: The call Break and ! instructions may cause unexpected program behaviour when placedin your code following a conditional branch instruction or as part of a jump table.
In addition to the simple returns, the PIC instruction set has other flow control instructions thatallow one to take some programming shortcuts. For example, addwf PCL F instruction incrementsthe current program counter (PC) by a value stored in the W register before proceeding to theinstruction stored at that location. In this way, an indexed goto statement is implemented. Theretlw is a combined load-and-return instruction; it first loads the W register with a literal value andthen exits by executing a return-from-subroutine instruction.
? You can use a lookup table to convert binary data into bit patterns that corresponds toa decimal digit on the seven-segment display. Determine from the PICLab schematic themapping of PORTD pins to the display segments and write down the bit patterns that representdecimal digits 0 through 7 on the seven-segment display.
34

��! Append the following code to the above program (that is why you needed the explicit returnat the end of it) and convert your keypad data by calling the Convert subroutine at anappropriate time in your program. Explain the program flow of this code. What is thepurpose of the andlw instruction?
Convert andlw 7 ; .......................................
addwf PCL,F ; .......................................
retlw %00111111 ; seven-segment bit pattern for digit "0"
retlw %________ ; .......................................
retlw %________ ; .......................................
retlw %________ ; .......................................
retlw %________ ; .......................................
retlw %________ ; .......................................
retlw %________ ; .......................................
retlw %________ ; .......................................
Each seven-segment display consists of eight LEDs connected together at the cathode (-). ThePORTD pins connect to the individual LED anodes (+). With the common cathode pins of eachdisplay connected to ground, it would require 32 bits to control the four displays of the PICLabboard.A more efficient use of resources employs the technique of time multiplexing to generate an outputon the four displays. Here, the digits are displayed sequentially with only one of the four digitsenabled at anytime. If the switching between digits is sufficiently rapid, the persistence of thehuman eye creates the illusion that all the digits are on at the same time.Four output pins (PORTB pins 0–3) control the voltage at the display cathodes via current-drivingtransistors. The corresponding anodes of the four displays are connected in parallel (refer to thePICLab schematic, Fig. 5.1). A software loop then enables each of the displays in turn while thebit pattern corresponding to that digit is presented on the PORTD pins. With multiplexing, the pincount has been reduced to 12 from 32, a saving of 20 input/output pins.��! Develop a flowchart to multiplex four different digits of data on the PICLab display. Convert
the flowchart to PIC instructions and test your code.��! Vary the loop timing to determine the minimum refresh rate necessary to prevent the displayfrom flickering.
5.3 Macros and subroutines
A Macro is a group of instructions that are referred to as a single new instruction. During assembly,every time a Macro instruction is encountered, the original group of instructions is assembled intothe program.A subroutine consists of a group of instructions within the user program that begin with a subroutinename tt label and end with a return statement. A call label instruction branches the programto label and executes the subroutine code until the return instruction restores the program flowto the instruction following the call.
35

The following code incorporates some practical programming techniques to implement a displaymultiplexing scheme. A macro definition is shown as well as an efficient method of implementing ajump table to select one of several branch possibilities.��! Analyse and document the code; explain clearly the functionality of the subroutines, then
compare the functionality of this program with your version. You may want to save your codeinto a file (say, Show4.asm) before you build and run it. Be sure to add some of your owncode to provide meaningful values to 7seg 0 ... 7seg 3, then run the program.
; ..... Show4.asm: multiplex the four-digit seven-segment display ........
7seg_0 equ 0x20 ; least significant display digit .......
7seg_1 equ 0x21
7seg_2 equ 0x22
7seg_3 equ 0x23 ; most significant display digit ........
7seg_ptr equ 0x24 ; pointer to current digit displayed.....
Move macro src,dst ; register to register move, modifies W
movf src,W ; the macro defines a new Move
movwf dst ; instruction that is not available
endm ; as part of the PIC instruction set
; your code goes here, with a call to Scan7seg
return
Scan7seg ; .......................................
incf 7seg_ptr,F ; .......................................
movlw 3 ; .......................................
andwf 7seg_ptr,F ; .......................................
movlw 0xf0 ; .......................................
andwf PORTB,F ; .......................................
call Show7seg ; .......................................
iorwf PORTB,F ; .......................................
return ; .......................................
Show7seg ; .......................................
movf 7seg_ptr,W ; .......................................
addwf PCL,F ; .......................................
goto Show0 ; .......................................
goto Show1 ; .......................................
goto Show2 ; .......................................
goto Show3 ; .......................................
Show0 Move 7seg_0,PORTD ; .......................................
retlw %00000001 ; bit 0 selects display 0, active high ..
Show1 Move 7seg_1,PORTD ; .......................................
retlw %00000010 ; .......................................
Show2 Move 7seg_2,PORTD ; .......................................
36

retlw %00000100 ; .......................................
Show3 Move 7seg_3,PORTD ; .......................................
retlw %00001000 ; .......................................
The bits of a port are generally assigned various functions so you must take care to modify only thepertinent bits when using byte size instructions. This masking process requires reading the currentport value, modifying only specific bits, then writing back the data to the port. Bit manipulationinstructions are not useful when the bit to be modified varies, as in the selection of the digit to bedisplayed.
5.4 Interrupts
You will note that depending on the code that you added, the above program will initialize the digitvalues and display them indefinitely, or you will have implemented a loop that modifies the digitvariables and calls the Scan7seg subroutine. In the first case, the PIC is fully occupied scanningthe display and can perform no other function; in the second case the refresh rate is determined byrepeated calls to a subroutine.The ideal way to execute a periodic sequence of events is to use an interrupt. A hardware timer onthe PIC interrupts the program flow every 5ms and executes a call to a user interrupt service routine(ISR). The ISR code runs in the background independently of the user program. You can, withan ISR, update the display variables or wait for input while the Scan7seg ISR scans the displayat a constant rate. Note that the execution time of the ISR must be less than the time betweeninterrupts or your program will hang. With this in mind, your ISR is disabled when the PIC isreset.To define an interrupt service subroutine that will be remembered by the PIC until redefined, addthe #UserISRon directive following your ISR subroutine code:
#UserISRon Scan7seg ;set Scan7seg as user ISR and enable interrupt
The ISR routine will only execute while your program is running. To test some ISR code, youcan program a one-line instruction (e.g. here goto here) to execute an infinite loop; the ISRroutine will execute until the PICLab board is reset. The user ISR routine can be turned on andoff from within your program with the following instructions:
bcf Flags,USERISR ;reset user ISR flag, disable user ISR
bsf Flags,USERISR ;set user ISR flag, enable user ISR
5.5 Analog-to-digital conversion
The PIC can sample one of eight input channels with a 10-bit resolution. To perform an analog-to-digital conversion (ADC), an input channel is selected. A delay follows, to allow the input voltageto be sampled. A start of conversion flag is set to begin the ADC and another flag is set when theconversion is completed. The data is then ready to be used.The ReadAD subroutine performs all of the above tasks. Load the W register with the number of theinput channel and call the routine. After 50µs, the lower eight bits of data are returned in the WL
37

file register and the two most significant bits are in WH. The Getkey routine reads A/D channel 0and uses the three most significant bits of the converted value to determine which key was pressed.��! picl has predefined pointers to the 7-segment LED displays called Digit0..Digit3, a subrou-
tine equivalent to Scan7seg called Refresh and a routine LedTable, similar to your Convertroutine, that converts a value 0-0x0F contained in W to the 7-segment pattern for the corre-sponding hex digit. For convenience and to make your code more compact, use these as partof your programs.
The following code reads a 10-bit value from the A/D converter channel connected to thekeypad and displays it as three hexadecimal digits on the LED display. Complete the missingcode and verify that the program functions as expected:
#UserISRon Refresh ;define LED display scanning routine as user ISR
bsf Flags,USERISR ;enable execution of user interrupt routine
begin ..... ..... ;select the keypad channel
..... ..... ;read 10-bit A/D value, store in WH:WL
..... ..... ;place lower 8 bits of 10-bit A/D value in W
..... ..... ;set bits 4-7 to zero, bits 0-3 are A/D bits 0-3
call LedTable ;convert value in W to 7-segment hex digit
movwf Digit0 ;display hex digit for A/D bits 0-3
swapf WL,W ;place swapped nibbles (hex digits) from WL into W
..... ..... ;set bits 4-7 to zero, bits 0-3 are A/D bits 4-7
..... ..... ;convert value in W to 7-segment hex digit
..... ..... ;display hex digit for A/D bits 4-7
..... ..... ;place upper 2 bits of 10-bit A/D value in W
..... ..... ;convert value in W to 7-segment hex digit
..... ..... ;display hex digit for A/D bits 8-9
..... ..... ;loop code
5.6 Utility subroutines and data output
There are several pre-loaded subroutines available for use as part of your programs. Click on thehelp menu ’?’, and browse the ’Routines’ subdirectories. You should become familiar with theseroutines; they are bug-free and will make your programming task much easier.Several of these routines make the output and conversion of data a simple matter. For example, theBin2BCD routine takes the 16-bit binary value stored in the file registers WH and WL and converts itto a five-digit signed or unsigned decimal value stored in registers Dec0-Dec4. The BCD2LED routineconverts and outputs this result to the 7-segment display. Alternately, the contents of Dec0-Dec4can be sent to the ’PICLab output’ window in picl as an ASCII 3 string by calling the BCD2TCL
routine, or to the LCD display by calling the BCD2LCD routine. The PICLab LCD display uses theASCII character set. These routines require parameters to be set prior to execution.
3ASCII refers to the American Standard Code for Information Interchange, where an 8-bit value is used torepresent the character set of alphanumeric characters a-z, A-Z, 0-9 as well as other symbols typically found on akeyboard, such as ?, +, !. Coded in the range of ASCII=0-0x1F, are non-printed control characters.
38

To send to picl a single ASCII character stored in W, use the TxByte routine. To send a valuein W in the range of 0-9 as the corresponding ASCII decimal character, use the TxDigit routine.The Hex2TCL routine outputs the value in W as a 2-character hexadecimal string, while the Dec2TCL
routine outputs the value in W in the valid range of 0-99 as a 2-character decimal string.The characters sent to picl are stored in a buffer until a newline character ASCII=0x0A, is received.This is handy when several columns of data need to be sent; they will be displayed on the sameline until terminated by a newline character. To separate your data values with a space, send the’space’ character, ASCII=0x20.The following code segment outputs the value in WH:WL as a decimal string to the PICLab outputwindow:
call Bin2BCD ;convert 16-bit value in WH:WL to decimal string
movlw 6 ;set field width for BCD2TCL to 6 characters
call BCD2TCL ;send string to TCL buffer
movlw ’\n ;load W register with ASCII newline character
call TxByte ;send character, flush buffer to display contents
For the following exercises, begin by sketching a flowchart of the logical steps required to performthe given task, then convert each step to one or more PIC instructions that will define your program.Be sure to thoroughly document your code. Test your code initially on the PIC simulator, thenexecute your program on PICLab:
1. write a program that reads the keypad channel and displays the result as a decimal value 0-1023 on the 7-segment LED display. The value should change as the various keypad switchesare pressed;
2. write a program that outputs three pairs of coordinate points (1,2), (2,4), (3,8) to the PICLaboutput window. The data should appear as an array of three rows by two columns. Click theGraph button to generate a Gnuplot graph of your data. Check the Lines box to interpolate
the data with line segments;
3. write programs that implement in software the summing and shift/add algorithms used tomultiply two 4-bit numbers that were implemented in hardware as part of Experiment 6.Begin by reviewing the arithmetic instructions available to the PIC and their effect on thecarry C and zero Z flags contained in the STATUS register.
39


![CT3manual[1] - brock](https://static.fdocuments.net/doc/165x107/54e7e9594a7959d76d8b48c8/ct3manual1-brock.jpg)


