EPIC Teacher Guide - Download Version
146
Agilix GoCourse Teacher Guide 2.5 SP1
-
Upload
sharon-scott -
Category
Documents
-
view
26 -
download
2
Transcript of EPIC Teacher Guide - Download Version

Agilix GoCourse Teacher Guide
2.5 SP1

© 2007-2008 Agilix Labs, Inc. All Rights Reserved.
COPYRIGHT NOTICE Copyright © 2007-2008 Agilix Labs, Inc. All rights reserved. Licensed software and documentation. Use, copy, and disclosure restricted by license agreement.
TRADEMARKS Agilix is a registered trademark and GoCourse is a trademark of Agilix Labs, Inc. Other trademarks are the property of their respective owners.
DISCLAIMER Every effort has been made to ensure the accuracy of the features and techniques presented in this publication. However, Agilix Labs, Inc., accepts no responsibility, and offers no warranty whether expressed or implied, for the accuracy of this publication. No part of this publication may be reproduced, stored in a retrieval system, or transmitted, in any form or by any means, electronic, mechanical, recording, or otherwise, without the express written permission of Agilix Labs, Inc. The information in this document is subject to change without notice. Agilix Labs, Inc., makes no warranty of any kind in regard to the contents of this document, including, but not limited to, any implied warranties of merchantability quality or fitness for any particular purpose. Agilix Labs, Inc., shall not be liable for errors contained in it or for incidental or consequential damages concerning the furnishing, performance or use of this document.
Agilix Labs, Inc. 733 East Technology Avenue
Orem, Utah 84097, USA http://www.agilix.com

iii
Table of Contents Welcome to the Agilix GoCourse Learning System! .................................................................. 1
Courses and Sections ..................................................................................................................................................................... 5 Section Types .................................................................................................................................................................................... 6
Installing and Configuring GoCourse .......................................................................................... 7 GoCourse Player Requirements ................................................................................................................................................. 7
Microsoft .NET 3.5 Framework .............................................................................................................................................. 8 To install the GoCourse Player: ................................................................................................................................................................ 8
Creating a GoCourse Account ..................................................................................................................................................16 Creating a New Account through the GoCourse Player Setup Screen ...............................................................16
Default setup: ............................................................................................................................................................................................... 17 Advanced Setup: ......................................................................................................................................................................................... 19
Updating Courses ..........................................................................................................................................................................23 Changing Sync Time Frequency .........................................................................................................................................23 Manually Updating Courses.................................................................................................................................................25
Getting Around in GoCourse ...................................................................................................... 27 To start GoCourse ....................................................................................................................................................................27
The GoCourse Home Page ........................................................................................................................................................28 Using the Toolbar Buttons ...................................................................................................................................................30 GoCourse Display Options ...................................................................................................................................................30
Section Home Pages ....................................................................................................................................................................31 The Section Home Page (﴾View Mode)﴿ .............................................................................................................................31
Navigating a Section ....................................................................................................................................................................32 Using the Navigation Panel .................................................................................................................................................32 Using the Navigation Arrows ..............................................................................................................................................32 Edit Section Outline .................................................................................................................................................................33 Edit a Learning Activity ..........................................................................................................................................................33
Managing Your Section .............................................................................................................. 35 Creating a New Section ..............................................................................................................................................................36 Setting Up the Gradebook .........................................................................................................................................................39
To setup, change or modify the Gradebook setup: ...................................................................................................40 Assigning Gradebook Dates ................................................................................................................................................43

Table of Contents
iv
Guidelines for using dates for Range sections: .............................................................................................................................. 43 Defining Section Properties .................................................................................................................................................44
Minimum Passing Score .......................................................................................................................................................................... 44 Section Completion Rule ......................................................................................................................................................................... 44
Making Changes to Gradebook Setup ............................................................................................................................45 Section Content Editing ..............................................................................................................................................................46
Adding New Content ..............................................................................................................................................................46 Hide a Learning Activity.........................................................................................................................................................47 Adding Assignments for New Categories ......................................................................................................................48
Managing the Gradebook ..........................................................................................................................................................51 Enrollment Changes Notification .......................................................................................................................................52 Hide/Show Non-Gradable Items........................................................................................................................................52 Show Score/Show Time (﴾min)﴿ .............................................................................................................................................54 Home Page Indicators of Items to Grade .......................................................................................................................55
Grading Assignments ...................................................................................................................................................................56 To grade assignments: ...........................................................................................................................................................56 Speed Grade Tool ....................................................................................................................................................................60 Manually Grade Assignments .............................................................................................................................................64 Grading Assignment Options ..............................................................................................................................................65
Attach Teacher Document ...................................................................................................................................................................... 65 Attach Notes Comments ......................................................................................................................................................................... 65 Attach Audio Comments ......................................................................................................................................................................... 66 Giving the Student No Credit ................................................................................................................................................................ 67 Clear All Rubric Scores.............................................................................................................................................................................. 67 Allow Another Submission ..................................................................................................................................................................... 67 Curve Grades ................................................................................................................................................................................................ 68 Stop Accepting Submissions ................................................................................................................................................................. 69 Flunk Unsubmitted ..................................................................................................................................................................................... 69 Posting Grades to the Server ................................................................................................................................................................. 69
Discussion Posts .............................................................................................................................................................................71 Setting up Groups for Discussions ....................................................................................................................................71 Start a New Discussion Thread ...........................................................................................................................................77
......................................................................................................................................79 Speed Grade Tool ....................................................................................................................................................................83 Manually Grade Posts .............................................................................................................................................................86 Grading Discussion Options ................................................................................................................................................87
Attach Notes Comments ......................................................................................................................................................................... 87 Attach Audio Comments ......................................................................................................................................................................... 87 Giving the Student No Credit ................................................................................................................................................................ 88 Clear All Rubric Scores.............................................................................................................................................................................. 88 Curve Grades ................................................................................................................................................................................................ 89 Stop Accepting Submissions ................................................................................................................................................................. 89 Flunk Unsubmitted ..................................................................................................................................................................................... 90 Posting Grades to the Server ................................................................................................................................................................. 90
Grading Exams ................................................................................................................................................................................91 To grade exams: .......................................................................................................................................................................92 Speed Grade Tool ....................................................................................................................................................................96 Manually Grade Assignments .............................................................................................................................................99

GoCourse Teacher Guide
v
Reviewing the Exam Results ............................................................................................................................................. 100 Objective Mastery..................................................................................................................................................................................... 100 Question Detail .......................................................................................................................................................................................... 100
Grading Exam Options ........................................................................................................................................................ 103 Calculated vs. Modified Grades .......................................................................................................................................................... 103 Allow Another Submission ................................................................................................................................................................... 104 Curve Grades .............................................................................................................................................................................................. 104 Stop Accepting Submissions ............................................................................................................................................................... 104 Flunk Unsubmitted ................................................................................................................................................................................... 105
Gradebook Actions .................................................................................................................................................................... 106 Update Gradebook ............................................................................................................................................................... 106 Send Mail .................................................................................................................................................................................. 106 Export Grades ......................................................................................................................................................................... 106 Report Final Grades .............................................................................................................................................................. 106 Choose Gradebook Columns ........................................................................................................................................... 107
Sending Announcements ........................................................................................................................................................ 108 Using Conferencing ................................................................................................................................................................... 110
Conference Toolbar .............................................................................................................................................................. 110 Enable Conferencing ............................................................................................................................................................ 111 See Conference Details ....................................................................................................................................................... 112
Hover Your Mouse ................................................................................................................................................................................... 112 The Plus Button ......................................................................................................................................................................................... 112
Group By ................................................................................................................................................................................... 113 Set Up a Conference ............................................................................................................................................................ 114 Start a Conference ................................................................................................................................................................ 118 Disable Conferencing for a Section: .............................................................................................................................. 120
Managing GoCourse ................................................................................................................. 123 To Access the GoCourse Tools Menu. ................................................................................................................................ 123 Update Courses ........................................................................................................................................................................... 124 Managing Courses ..................................................................................................................................................................... 125 Managing Accounts .................................................................................................................................................................. 127 Administer GoCourse ................................................................................................................................................................ 128 Printing ........................................................................................................................................................................................... 129 Full Screen ..................................................................................................................................................................................... 130 Check for Updates ...................................................................................................................................................................... 131 Enable Automatic Updates ..................................................................................................................................................... 131 Configure Alternate Storage .................................................................................................................................................. 132 Manage Alternate Storage Password ................................................................................................................................. 134 GoCourse Options ...................................................................................................................................................................... 135
Diagnostics Options ............................................................................................................................................................. 136 Online Help ................................................................................................................................................................................... 137 About GoCourse ......................................................................................................................................................................... 138
Support Information ................................................................................................................. 139 GoCourse Updates ..................................................................................................................................................................... 139

Table of Contents
vi
Technical Support Options ..................................................................................................................................................... 139 Email Support ............................................................................................................................................................................... 139 Websites ......................................................................................................................................................................................... 140

1
Chapter 1
Welcome to Agilix GoCourse! Agilix GoCourse is a distributed learning management system designed to help your education institution improve student learning outcomes, enhance course authoring, streamline Gradebook management and normal out-of-class teaching activities, and provide students with a rich learning application.
Agilix GoCourse provides the following capabilities:
Delivers a robust Gradebook to easily grade assignments, participate in discussion boards, and view exam results
Ability to easily author rich, multi-media course and curriculum content through use of templates
Tie learning objectives to all learning activities and exam questions within a course
Enables course content to be quickly applied to one or more class sections
There are two GoCourse applications that are used based on different roles:
GoCourse Player a windows application for teachers, students and authors that allows you to download all of your course content to your computer, manage your gradebook and author course content even when you are not connected to the network
GoCourse Online an Internet application for students and administrators that does not require a special application to install and works with any browser that supports the Flash 9 player
Both GoCourse Player and GoCourse Online provide students the following capabilities:

Chapter 1: Welcome to Agilix GoCourse!
2
Ability to view course content on ones computer
Ability to submit assignments, discussion posts and take exams
The GoCourse Player also provides these capabilities:
Setup the Gradebook for the sections you will teach
Teachers can manage the Gradebook and grade student submitted assignments, discussion posts and exams
Teachers can update course content for your sections
Because both the GoCourse Player and GoCourse Online support students, they are able to go back and forth between the two applications. GoCourse saves all student information on the server, allowing them to go back and forth between the GoCourse Player and the GoCourse Online application.
Both applications look similar:
The GoCourse Player home page is on the left, the GoCourse Online home page is below.

GoCourse Teacher Guide
3
Here is a sample home page of a course, with the table of contents on the left. GoCourse Player is on the left, GoCourse Online is below.
For teachers, they can only use the GoCourse Player to manage the Gradebook and grade assignments, posts and exams. But students can see their grades on both systems, as the example below shows.

Chapter 1: Welcome to Agilix GoCourse!
4
This guide is for teachers and instructors who will be managing sections within their institutions. It focuses extensively on the Teacher Gradebook within the GoCourse Player along with other teacher activities.
This guide does not cover course or section authoring. Section authoring can only be done in the GoCourse Player. For more information on course and section authoring, please view the GoCourse Author Guide.

GoCourse Teacher Guide
5
Courses and Sections
Before we explore teacher activities in GoCourse, it is useful to start with a discussion of courses and sections.
Learning content in GoCourse is organized around courses and sections. A course is a master group of learning activities that can only be created and/or changed by an individual with Course Edit rights. A section is a specific instance of the master course content, which can be edited to by an individual with Section Edit rights.
Here are some general guidelines about courses and sections:
Courses can created by the administrator, or if the author has domain course create and edit rights, the author can create a course in the GoCourse Player without requiring the administrator to set it up for them and publish it to the server.
Sections can created by the administrator, or if the instructor has domain section create and edit rights, the instructor can create a section in the GoCourse Player without requiring the administrator to set it up for them.
Sections inherit content from a master course.
Changes made to course content are automatically rolled into any active sections.
Changes to section content are not rolled back to the course content (﴾if the teacher has edit rights for this section)﴿.
The default teacher permissions do not provide section content editing rights. (﴾This can be given to you by your system administrator.)﴿ The default rights are to setup and manage the Gradebook.
Teachers cannot delete course content, but they can hide it from the students enrolled in a section of the course with section content editing rights.
Teachers can add new content to a course section if they have section content editing rights.
A user can be given both author and teacher rights. If the user wants to add content that would be used over and over, the new content needs to be added to the course. If the change is just for a specific class with no plans to reuse it, then the content should be added only to the section (﴾requires section content editing rights)﴿.

Chapter 1: Welcome to Agilix GoCourse!
6
Section Types
There are two types of sections in GoCourse:
Range Sections with a defined start and stop date, usually matching semesters within a educational institution.
Continuous Open ended sections that can start at any time that are often used in virtual schools.
Range sections allow support for specific dates:
When a learning activity becomes visibletime for students to take them.
When gradable activities are due.
When grades are returned back to students. This date allows you to not release any grades, especially from exams, so that the exam can be taken by all students before any grades are returned back to the students.
These dates are defined in the Gradebook. soon area. Anything within a seven day window will show in the Due Soon area on the home page.
Continuous sections, on the other hand, do not support this date setting. This is because the section can be started at any time by individual students because these sections are open ended.

7
Chapter 2
Installing and Configuring GoCourse
GoCourse Player Requirements
To install and run the GoCourse Player, your computer must meet the following minimum requirements:
Operating System Minimum Requirements Recommended Requirements
Windows XP SP2 500Mhz Pentium class processor
256MB RAM
100MB hard disk
1Ghz Pentium class processor
512MB RAM
200MB hard disk
Windows Vista 1Ghz Pentium class processor
512MB RAM
100MB hard disk
1.5Ghz Pentium class processor
1GB RAM
200MB hard disk
In addition to the above system requirements, the following may also be necessary:
If installing from CD, you will need a CD-ROM or DVD drive (﴾most installations will be via the Internet)﴿
If installing on a Tablet PC, you will need Microsoft® Windows® XP Tablet PC Edition for Tablet PCs, including the Microsoft.Ink.dll CLR2.0 Update Patch installed. If it is not detected on your system, GoCourse automatically installs it during installation.

Chapter 2: Installing and Configuring GoCourse
8
Note: If the patch is not detected during GoCourse installation, you will be directed to a Microsoft website to download and install the patch. This will require an active Internet connection. Please follow the instructions provided on-screen.
Microsoft .NET 3.5 Framework
In addition, GoCourse requires the Microsoft .NET Framework 3.5 SP1 be installed on your system. You will need to install it on your computer if it has not been previously installed.
During the installation process, GoCourse will verify that the .NET Framework 3.5.1 is installed. If it is not present, the InstallShield Wizard will connect to the Internet to download the necessary files from a secure website. Please follow the instructions displayed on screen to install the .NET Framework 3.5.1. Once the .NET installation is complete, the GoCourse installation will continue.
Note: You will require an active Internet connection to download and install the .NET Framework 3.0 files. Depending on your connection speed, this may take several minutes.
To install the GoCourse Player:
1. Before you start this process, make sure you have Windows administrator rights for the computer on which you want to install GoCourse! Without admininstrator rights, you will not be able to install GoCourse. If you do not know if you have admininstrator rights, go to User Accounts in the Control Panel. It will say if you are an Administrator or
administrator to either install GoCourse for you or give your administrator rights.
2. Go to http://gls.gocourse.net and click the Download GoCourse Player for Windows link (﴾below the login area)﴿.

GoCourse Teacher Guide
9
3. GoCourse requires Microsoft .NET Framework 3.5.1 be installed on your system (﴾see GoCourse Player Requirements)﴿. During the installation process, GoCourse will verify that the .NET Framework files are installed. If it is not present, the InstallShield Wizard will connect to the Internet to download the necessary files from a secure website. Please follow the instructions displayed on screen to install the .NET Framework 3.5.1.
Note: You will require an active Internet connection to download and install the .NET Framework 3.0 files. Depending on your connection speed, this may take several minutes.
Once the .NET Framework 3.5.1 installation is complete, the GoCourse installation will continue.
4. The Choose Language screen appears.
You can install GoCourse in English (﴾United States)﴿, Chinese (﴾Simplified)﴿, Portuguese (﴾Brazil)﴿, or Spanish (﴾Traditional Sort)﴿.
To select a different language, click the drop down arrow and select the desired language from the list.

Chapter 2: Installing and Configuring GoCourse
10
5. Make your selection and click OK.
Note: This user guide is only provided in English.
The GoCourse setup will continue, and the InstallShield Wizard will be displayed.
6. Click Next.
The License Agreement screen appears.

GoCourse Teacher Guide
11
7. Click the radio button labeled I accept the terms in the license agreement to select it, and then click Next to continue.

Chapter 2: Installing and Configuring GoCourse
12
The Customer Information screen appears.
8. Enter your name and organization (﴾such as your school name)﴿.
9. Select the desired Application Sharing option.
Anyone who uses this computer this setting allows anyone with access to this computer to also have access to this copy of GoCourse.
Only for me this setting prevents others who might be using this computer, but who are not logged in using your account, from accessing your GoCourse files.
10. Click Next.

GoCourse Teacher Guide
13
The Setup Type screen appears.
11. To accept the default settings, select Complete and click Next.
OR if you wish to customize your installation, select Custom, and click Next.
OR
10
OR

Chapter 2: Installing and Configuring GoCourse
14
The custom option allows you to install the GoCourse Capture Printer, which is a useful tool for students. It enables them to print anything to a GoCourse note, upon which they can annotate and which they can search.
12. Make your selection(﴾s)﴿ and click Next to continue.
The Ready to Install screen appears.
13. Click Install.
During installation, a screen appears showing the progress of the installation.

GoCourse Teacher Guide
15
14. When the installation is complete, the InstallShield Wizard Completed screen will appear. Click Finish.
InstallShield will close and a GoCourse Player icon will appear on your desktop.

Chapter 2: Installing and Configuring GoCourse
16
Creating a GoCourse Account
Before using GoCourse Player, you will need to set up your account and establish a connection to the server. There are multiple options available to you for accomplishing this task:
Creating a New Account through the GoCourse Player Setup Screen
The Setup screen will appear the first time you launch GoCourse. This screen provides three options for setting up your account:
Default Setup Some schools may choose to provide account configuration details to students via a website. If this is the case, select the Get Started Now option. You will be asked to enter the URL for your GoCourse website.
I If you do not have your server configuration details, choose this option. You will be able to create or teach courses but you will not be able to publish them until you have configured your account and domain information.
Advanced If your administrator has provided you with the account setup details, you may choose to select the Manual option and enter the details yourself. You will need to know the various server URLs, your login prefix, as well as your username and password.

GoCourse Teacher Guide
17
Default setup:
1. To configure GoCourse, there are three things you need from your system administrator:
The URL to connect to your server for your institution, which will look something like this http://domain_name.gocourse.net where domain_name is the short name of your
domain (﴾also called login prefix)﴿ Your username Your password
2.
3. Click the Continue button.
4. GoCourse will then automatically log you into your domain with one of two scenarios:
No courses are setup on your domain for which you have any rights.
There are courses and/or sections for which you have rights. GoCourse will then begin downloading content for your courses and/or sections along with the content that has been published for them. If these are new courses, GoCourse will download the basic information for the course, which will contain only the course shell.
5. GoCourse will give you a Setup Complete message.

Chapter 2: Installing and Configuring GoCourse
18
6. Click OK.
GoCourse will take you to the GoCourse home page.

GoCourse Teacher Guide
19
Advanced Setup:
1. To set up GoCourse using the Advanced Setup, get all of the server URL information from your system administrator. You will need to know the following in addition to your username and password:
DLAP Server. This is the main GoCourse server. It defaults to https://gls.agilix.com/dlap.ashx. Most of the time you will not need to change this.
Web Server. This is the unique URL for your institution. It will generally be in this form: http://domain_name.gocourse.net where domain_name is the short name of your domain.
Cache Server. This is an optional server. Your administrator will tell you if it is used, otherwise you can ignore this field.
Login Prefix.
2. Click the Advanced Configuration link. The Advanced Setup screen will appear.

Chapter 2: Installing and Configuring GoCourse
20
3. Add the Web server, Cache server (﴾if it is used)﴿ and Login prefix information you received from your system administrator.
4. Click the Continue button.
5. The Enter User Information screen is displayed. Enter your username and password.

GoCourse Teacher Guide
21
6. If you have any courses or sections to download, GoCourse will do it now.
GoCourse displays the Setup Complete dialog.

Chapter 2: Installing and Configuring GoCourse
22
7. Click OK.
GoCourse takes you to the GoCourse home page.

GoCourse Teacher Guide
23
Updating Courses
GoCourse is able to automatically synchronize content with the server at regularly scheduled intervals. If you are a course author, when you publish updates to the server
If you are a section instructor, continually synchronizing content allows you to stay current with the server, meaning that your content is always up to date, and you receive student submitted assignments, discussion posts, and exams in a timely manner.
The default synchronization setting is every four hours, but this can be changed to suit your preferences. In addition, you can manually invoke a synchronization with the server at any time.
Changing Sync Time Frequency
GoCourse will start a synchronization session with the server based on the setting defined in the Options window. The default interval is four hours.
1. To change this setting, from the Tools menu, select Options.
The Options dialog will appear.
2. To change the frequency of updates, from the General tab, select desired interval from the drop- Update course data every

Chapter 2: Installing and Configuring GoCourse
24
You can set the frequency from 30 minutes to once per day.
GoCourse can only synchronize with the server when you are connected to the Internet. If you are not connected to the Internet, GoCourse is unable to synchronize with the server. When you re-connect, GoCourse will automatically detect the connection and check the length between the last synchronization and your update frequency setting. If the length of time is longer than your update setting, it will immediately sync with the server. If the length of time is shorter than your update setting, then it will wait to sync with server until the next scheduled update.

GoCourse Teacher Guide
25
Manually Updating Courses
At any time, you can manually synchronize GoCourse player with the server.
This can be done two ways:
Select Tools | Update Courses or
Select F12 (﴾the shortcut key)﴿
changes on the status bar at the bottom right of the GoCourse player.
Instead of displaying a message indicating the last time your course content was updated,
it will now display a message similar to the following, indicating that it is currently synchronizing with the server.
When the synchronization is complete, the status bar will display the new update time.
Note: Additional Tools menu options will be reviewed in a later chapter.


27
Chapter 3
Getting Around in GoCourse Like any application, the GoCourse Player has its own collection of toolbars, buttons, and other controls. You may wish to review this section to familiarize yourself with GoCourse features and terminology before continuing.
To start GoCourse
Double-click the desktop icon to launch GoCourse.

Chapter 3: Getting Around GoCourse
28
The GoCourse Home Page
When you launch the GoCourse Player, the main GoCourse Home Page is displayed.
The GoCourse Home page acts as a "dashboard," allowing you to quickly access your courses, and view up-to-the-minute information at a glance.
Toolbar The buttons on the toolbar provide basic navigation, allowing you to move easily between your courses, sections, calendar, and notes.
Button Bar This panel provides a set of buttons taking you to the corresponding pages for each group of items (﴾Courses/Sections, Announcements, Inbox, Due Soon and Items to Grade)﴿.
Course/Section List Your current courses and sections are listed in the main window.
Clicking on a course/section title takes you directly to the home page for the selected course/section.
Clicking on the View link will take you back to the last place you viewed.
Clicking on the Edit link will allow you view the course/section in edit mode.
Clicking on the Gradebook link will display the Gradebook for that section (﴾for instructors)﴿.
Toolbar
Course List
Button Bar
Announcements
Due Soon
Inbox
Status Bar

GoCourse Teacher Guide
29
Note the following icons which may appear at the left of the course/section title:
The blue book indicates you are the author of the course
The red pen indicates you are the teacher of the section
86% A percentage next to the title indicates your score for a section in which you are enrolled as a student
Announcements Announcements that you as an instructor may send or from a system administrator are displayed in the announcements window. Clicking the announcement link will display the announcement details.
Due Soon -- Upcoming tasks, appointments, and assignments are listed in this window. Expanding the window will display the list in greater detail. Clicking an individual item link will display the item detail.
Inbox Your inbox will include new discussion board posts, turned in assignments from students and exams that you may need to grade (﴾as an instructor)﴿ and announcements within the last 7 days. Expanding the window will allow you to view this information in greater detail. Clicking an individual item link will open the item.
Status Bar Indicates the last time GoCourse synchronized with the server, your online/offline status (﴾the green circle indicates "online," the red circle indicates "offline")﴿ and whether or not you have items queued to send to the server.

Chapter 3: Getting Around GoCourse
30
Using the Toolbar Buttons
You can access many GoCourse features from the GoCourse Toolbar.
Button Image Button Name Description
Back / Forward
Allow you to move forward and back through downloaded course content.
Home Opens the GoCourse home page.
Calendar Opens the Calendar, using the most recently selected Calendar view.
Search Allows you to search for a word or phrase in GoCourse notes,
documents. Options in the Search drop-down list allow you to further refine your search parameters.
Conferencing Opens the Conferencing window allowing an instructor to create a conference for any Section for which Conferencing has been enabled.
My Notes Opens the My Notes folder.
New Note Launches the Speed Note taking tool, which enables students to take notes while viewing course content.
Tools Opens the GoCourse Tools menu, allowing you access to tools for managing your courses, accounts, and other settings.
GoCourse Display Options
The GoCourse window is fully adjustable, allowing you to adjust the screen size and many panel sizes to suit your working preferences. When you place your cursor over the edge of a GoCourse window or panel, a pair of arrows, indicating the direction you can drag the selected border, will appear on those areas that are adjustable. In addition, the arrow button on the bar separating panels acts as a toggle, allowing you to close the navigation panel to allow greater display area in the presentation panel.

GoCourse Teacher Guide
31
Section Home Pages
GoCourse has multiple views depending on whether you have author, teacher or student rights.
n a section of the course. You may actually have both author and teacher rights to a course and section of the same title. In that case, you will actually see both entries in GoCourse home page (﴾one with the blue book, the other with the red pen.)﴿
The Section Home Page (﴾View Mode)﴿
When you initially select a course, whether by selecting the section title or the view link under the course title, a Course Home Page, similar to the following illustration, is displayed:
When viewing the course, the Home Page is divided into two major sections:
Left Navigation Panel The course outline and all the modules included in the course are listed in the left navigation panel. The toggle button allows you to hide/show the left navigation panel, as desired.
Main Window Course content is displayed in the main window.
Left Navigation
Panel
Section name
Main Window
Hide/Show the left navigation
panel
Manage the Gradebook
Edit Section Content
Navigation arrows

Chapter 3: Getting Around GoCourse
32
What is displayed in the main window on the course home page is largely determined by the author of the course. Course creation will be discussed in greater detail in the next chapter.
The teacher home page offers these key characteristics (﴾in view mode)﴿:
Section name The section name is displayed.
Gradebook This link takes you directly to the Teacher Gradebook.
Section Outline The Section Outline link allows for editing content only for the section of the course. Requires your system administrator to grant you section content editing rights.
Navigating a Section
GoCourse offers two mode of navigation:
Through the left Navigation Panel
Through the Navigation Arrows.
Using the Navigation Panel
The GoCourse left navigation panel displays the section outline as defined by the course author.
Using the navigation panel is similar to browsing your folders using Windows Explorer. You can drill down into each folder by clicking on the triangle symbol next to a folder to expand it and display its contents. This allows you to jump between the various learning objects in the section without consideration for the sequence, eliminating the need to use the "back" button before you can drill down into another area of the course.
The navigation panel can be turned on or off by clicking the Hide/Show button along its right-hand border.
Using the Navigation Arrows
The navigation arrows (﴾Next and Previous)﴿, located at the right hand side of the GoCourse Player toolbar, provide another method for viewing your course content.

GoCourse Teacher Guide
33
Simply click on the navigation arrows to proceed through the section material in sequential order. The navigation arrows automatically walk you through all the hierarchies of the section outline.
Note: When the section navigate to the next available learning activity. The Navigation Panel can be used to view anything already reviewed, but it cannot be used to go forward.
Edit Section Outline
The default is not to see the Section Outline link. If you are given section content editing rights, the Section Outline link will be displayed and enables you to jump into section edit mode. When invoked, you jump directly into the section builder.
If you do not see the Section Outline link, you do not have the rights to edit section content.
Edit a Learning Activity
The Edit button on the Author toolbar also allows you to directly edit a specific learning activity. Requires section content editing rights.


35
Chapter 4
Managing Your Section The GoCourse Player provides you with the tools to manage your section. We will review them in this chapter:
Creating a new Section
Setting up the Gradebook
Using the Gradebook to grade assignments, discussions, exams and track student progress
Setting up discussion groups and starting discussion threads
Sending announcements
Sending email to students
Setting up and joining a conference

Chapter 4: Manage Your Section
36
Creating a New Section
There are two primary ways that new sections are created:
1. New sections can be created at the system level, often by the system administrator, but sometimes through integration with other systems, and
2. New sections can be created by the instructor using GoCourse.
Note: The system administrator will need to give you, the instructor, domain rights to create sections for the second method to work the one we will describe below.
To create a new section:
1. Open the GoCourse Player.
2. Click the Teach a New Section of a Course button.
If there are no courses or sections it will be in the middle of the My Courses area, under the Create a New Course button. If there are courses in the My Courses area, then click the Red Pen with a + sign.

GoCourse Teacher Guide
37
Note: If you get an Access denied error, you do not have domain section creation rights.
3. Select the course from the course catalog.
4. Verify that this is the course you want to use for your section. If it is click the Next button.

Chapter 4: Manage Your Section
38
5. Give the section a title.
6. Choose the type of section:
a. Range Sections with defined start and end dates, usually matching semester dates within an educational institution. If you select Range, enter the Start and End dates.

GoCourse Teacher Guide
39
b. Continuous Open ended sections that can start at any time that are often used in virtual schools. If you select Continuous section, select the number of days a student will have to complete the course.
7. Click Create Section.
8. Click Enroll Students.
9. Click one of the Find buttons to add a student.
10. Highlight the student and click Enroll.
11. Click Yes to verify that you want to enroll this student.
12. Continue until you have added all the students for the Section.
You are ready to set up the gradebook for your new Section.
Setting Up the Gradebook
As a teacher, you are able to set up the Gradebook for a section. Gradebook Setup allows you to define the various learning activity categories, weights, scores, dates, and if applicable, grading periods for the course or section. This is useful to do before your section starts.
The author may have already set up the Gradebook for the course, which automatically is inherited by your section. You can change or add to the current Gradebook setup. Some things can only be done by instructors, such as setting the visible date, due date and when results are visible date for each gradable activity.
Teacher Gradebook setup activities. There are two main concepts we need to describe first categories and weights (﴾scores)﴿ to understand how the author may have set up the Gradebook:
Categories are grading areas that get scored consistently. Each category is given a weight (﴾score)﴿. The default categories are Include and Exclude. The Include category can
that
Weights (﴾Score)﴿ specify how an activity is graded relative to other activities in a course. For example, exams may need to have a higher weight than assignments or discussions. Therefore, you would assign a higher weight.
Weights are completely relative. Some like them to add up to 100, so that it is easy to see what percentage of the overall grade is determined by that category. But, they do not need to add up to 100; they can add up to anything. The affect of a weight is its score relative to the total points. For example, a score of 100 out of 500 total is the same as a score of 10 out of a 50 total. The percentage of the total score is the weight.

Chapter 4: Manage Your Section
40
Note: If you want to have all gradable activities to have the same weight on the overall grade, you do not need to set up new categories and their weights. However, if you want to give different gradable activities different weights on the overall grade, then you will want to change the Include category, add new categories and set the different weight for each.
Authors will typically do the following:
Define the categories
Set weights for the categories
Assign each gradable activity to a category
Optionally turn on grading periods (﴾which is primarily used for grades K-12 in the U.S.)﴿
Set up the default section properties
These can all be changed for your section if change is needed. Your changes will only apply to this section and you will need to do it for each section independently.
To setup, change or modify the Gradebook setup:
1. From the Edit toolbar, click the Gradebook Setup button.
This opens the Gradebook Setup screen. If the Show non-gradable items box has been checked, you should uncheck it during Gradebook setup. You can always check it again later.

GoCourse Teacher Guide
41
2. On the left are the categories potentially defined by the author. To add a new category, Add)﴿ button to activate it, and click on the button.
3. A new category will be added to the list, with a score of zero (﴾0)﴿. Click on the auto-generated category name and type in your preferred name for the new category.
4. Click on the zero (﴾0)﴿ next to the new category and enter the new score this score will determine the weighting of this category.
5. If you do not need one of the author defined categories, you Delete)﴿ button
to the left of any category you do not need to activate it, and click on the button to delete the category.
6. If the course author set up the Gradebook, you will notice that each gradable learning activity has been assigned to a category. This was done by adding a check to assign each learning activity (﴾column)﴿ to a category (﴾row)﴿, as illustrated below.
7. You will need to add new assignments for any new categories you have created so that you can give students grades for those activities. GoCourse can even accommodate gradable activities for which there is nothing electronically turned in, such as giving grades for participation, attendance or other areas. (﴾See Adding Assignments for New Categories for more information.)﴿

Chapter 4: Manage Your Section
42
Note: If you want to set up learning activities that do not count towards the student grade, use the Exclude option. Have the green check
8. The GoCourse Gradebook also supports grading periods, which is common in K-12. To turn on this option, click the
Enable Grading Periods check box in the left-hand column.
New checks are created for each column, allowing you to assign specific learning activities for each grading period. The score next to the grading period gives it a relative weighting.
The default is three grading periods and a final exam, with an equal weight for each grading period and final exam. This can be modified, as necessary.

GoCourse Teacher Guide
43
Assigning Gradebook Dates
The Gradebook Setup allows you to assign specific dates for each learning activity, in one case, even those that are not gradable.
Visible from date determines when a learning activity becomes visible to students. If this is not set, then it is immediately visible when students first start the section,
never shown to students.)﴿
Due date when a gradable learning activity is due
Results visible from date when results are visible to students
Note: These dates can only be set in Range sections.
Guidelines for using dates for Range sections:
Always give yourself a few days before the range section starts for students to set up the gradebook, especially to set up these dates. This can be done by the system administrator for your institution to set the start (﴾and probably end)﴿ date of when the section is available to you compared to students.
For major and final exams, it is recommended to either Visible
from date the precise date. You can always change this date when it becomes known.
It is generally a good idea to put due dates on all gradable activities. This will cause each gradable activity
Again, you can change the dates if needed at a later time.
Results visible from date is best use for major exams. It prevents the results to get back to one or more students that could potentially be used by other students. Give yourself enough time to review the exams after the exams were due to set this date. Then all students can get feedback on the exam at the same time.

Chapter 4: Manage Your Section
44
Defining Section Properties
There is one additional item that needs to be done in the Gradebook setup. Again, this may have been defined by the author, but it is helpful for your to understand it in case it needs to be changed for your section.
There are two section properties that are outlined in the table below.
Section Type Characteristics
Passing score The minimum score allowed to receive a passing score. This also becomes the default that each gradable activity uses as its minimum passing score, although it can be changed using the Curve slider.
Completion The primary rule which determines how a section will be considered complete.
Minimum Passing Score
The minimum passing score is set to 70. You can change it by moving the slider or directly entering a new score.
Section Completion Rule
Section completion depends on the type of sections that will be created from your course.
There are four settings for the section completion value, three automatic ones which are used primarily for Continuous sections:
Completion Setting Description
Manual The teacher (﴾or administrator)﴿ must change the enrollment state manually from the GoCourse Administrator utility. It is best used only for Range sections.
Automatic when all items are complete
Section is completed when the student has completed all learning activities. All items must have a checkmark or a grade. Checkmarks are given based on minimum viewing time, independent of sequencing settings (﴾whether default or forced)﴿.
Automatic when all gradable items are complete
Section is completed when the student has completed all gradable activities.
Automatic when all items in a specific category are complete
Section is completed when the student has completed all items in a specific category.

GoCourse Teacher Guide
45
Guidelines for setting up section completion:
Use Manual if your section is a Range section, and you would rather manually complete the section.
Use Automatic when all items are complete if you want your students to complete everything, including going through all learning activities. Generally more used in Continuous sections, but also useful for Range sections.
Use Automatic when all gradable items are complete if you only need your students to complete gradable items. Generally more used in Continuous sections, but also useful for Range sections.
Use Automatic when all items in a specific category are complete if your section has only one primary category that must be completed. This could be used, for example, if you primarily assign all gradable activities to one category, like the Include category. Generally more used in Continuous sections, but also useful for Range sections.
Choose the Section Completion option that best fits your section.
Save your Gradebook Setup changes by selecting clicking on the Save button.
Making Changes to Gradebook Setup
If you do not make any changes to the Gradebook Setup, your section will be based completely on the Gradebook Setup defined by the author in the course.
If you do make changes to the Gradebook Setup, while you inherit all definitions from the course Gradebook Setup, your section will now be independent from future course Gradebook setup changes. You will see this in the bottom right of the Gradebook Setup window the message below.

Chapter 4: Manage Your Section
46
Section Content Editing
By default, teachers are unable to add content to a section. Many times instructors are both the course author and the section teacher. It is ALWAYS better to add content to the course and not the section. This allows the content to be easily used over again. The only time it is useful to add content to the section is:
When the instructor is not the course author and needs to make some additions to tailor the class to their students or their teaching style
When the instructor is not the author and needs to add additional gradebook categories
When the instructor needs to add one time content for a section
In these cases, it may be worthwhile for your institution to give you section content editing privileges. With these privileges, you can have the ability to add new content to the section. This content is not synchronized with the course, but still it gives you the flexibility to add new content for your students to meet unique needs or to supplement the course as you desire. At the same time, with section content editing privileges, you may want to hide content from the course, while changing it to new content you prefer instead.
Adding New Content
The objective of this guide is to not review all the details of authoring new content. See the GoCourse Author Guide for that. In addition to the section above where we reviewed how to
ng new content:
1. Add new learning activities by highlighting the learning activity that is just above where you want to place the new content.
2. Click the Insert then Activity button.
3. Select the Activity type (﴾or template)﴿ to use for this content. Here are some of the more common ones:
> Text for rich text, images
> Document/HTML to add a Word or Excel document, Acrobat PDF or Flash file
> HTML best to add a web page (﴾HTML file)﴿
> Media & Text to add rich text with a video or graphic image
> Narrated PowerPoint to add a PowerPoint that can optionally have audio that is synchronized with the slides
> Discussion Board to add a discussion forum
> Exam to add an assessment

GoCourse Teacher Guide
47
4. Each of these templates has a slightly different action. Generally, you will click the Edbutton to edit the content. You may want to refer to the GoCourse Author Guide for more details about each template.
5. GoCourse will prompt you to save your Section. Click Yes.
6. After editing your content (﴾when appropriate)﴿, click the Checklist button. Check the items in the Checklist.
7. Save your work by clicking the Save button.
8. Click Section Outline to return to the main section editing window.
9. Add a description in the Properties Panel in the Description box.
10. Publish your section by clicking the Publish Section button. You may need to check unresolved issues, if any, before you publish (﴾by
Once the new changes are made to the section content, they will be available for your students in the section.
Hide a Learning Activity
There may be a time when you want to hide content in your section that is in the course. This can be done with a few steps.
1. Select the learning activity you want to hide.
2. In the Properties Panel on the General tab, click the box Withhold from students.
3. Publish the section content by clicking on the Publish Section button.
Once the new changes have been published to the server, students will not see the learning activity anymore in this section.
Note: In order to hide content with other sections based on this course, you will need to manually do this for each section you teach.

Chapter 4: Manage Your Section
48
Adding Assignments for New Categories
By default, teachers are unable to add content to a section. However, if you need to add additional items to the section content, just ask your system administrator to set it up for you.
One example where it may be useful to add new content is if you added any new categories to the Gradebook setup. This will allow you to enter the grades into the GoCourse Gradebook. This could include gradable items like attendance, class participation, peer grades, or any other gradable activity that cannot be turned in electronically into the GoCourse Gradebook.
To add assignments for new categories:
1. When still in the Gradebook setup (﴾or Gradebook)﴿, click on the Section Outline button.
Note: section. Talk to your system administrator to see if you can be given editing rights for the section.
2. Identify where during the section, it will be appropriate for you to add a grade. You may have more than one assignment for this new category. For example, for class participation, you may want to give your students multiple grade that all apply to this
it earlier or later in the section. Highlight the learning activity right before you want to place the new assignment.
3. Add the new assignment by clicking on Insert Activity.
4. Select the Text template and click OK.
5. Name the assignment to correspond with your category and click OK.

GoCourse Teacher Guide
49
6. Click on the Edit button.
7. Click anywhere in the dotted line. Add a simple explanation of what the gradable activity is for.
8. Click the Checklist messages under the Issues box. One will go away once you save, the second when you add a simple rubric.)﴿
9. Click the Save button.
10. Click the Section Outline button.
11. In the Properties panel, do the following:
a. Check the box Gradable assignment
b. Uncheck the box Visible in table of contents
c. Check Disable student submissions.
This will turn the activity into a gradable assignment that students will not see and will not be required to turn in anything.
12. Click on the Grading Criteria button.

Chapter 4: Manage Your Section
50
13. This brings up the Grading Criteria dialog. Click the Add Row button.
14. Add a maximum score you will give to the student for this gradable activity and a brief description.
15. Setup button (﴾under Tools)﴿.
16. You will be asked to save the change you just made. Click Yes.
17. Uncheck the Show non-gradable items button.
18. You will see the new gradable activity.
19. Select the new category for the new gradable activity.
GoCourse Teacher Guide
51
Managing the Gradebook
The GoCourse Gradebook provides a rich set of tools to make grading student assignments and exams, providing feedback, and reviewing grades as easy as possible for you as the teacher.
This "toolbox" includes:
Notifying you of any enrollment changes
Show Score/Show Time (﴾in minutes)﴿
View student submitted assignments
Provide student feedback with text or audio comments and attach a marked up version ocument
Grade assignments and discussions using a rubric, which automatically calculates the score
Speed grading tool that accelerates grading assignments
Allow additional student submissions for assignments (﴾and sometimes for exams)﴿
Curve grades using a slider that automatically recalculates grades for assignments, posts and exams
Ability to override assignment, discussion and exam grades
Grady essay questions
Posting grades to the server

Chapter 4: Manage Your Section
52
Enrollment Changes Notification
As changes are made to section enrollment, such as a new student being added or another student dropping the class, these changes are communicated to the Teacher with an Enrollment Change dialog.
Upon opening the GoCourse Player, the Enrollment Change dialog will appear, informing the teacher of the enrollment change(﴾s)﴿.
New student(﴾s)﴿ will be added and departing student(﴾s)﴿ removed from the Gradebook.
If a departing student is transferring to another section of the same course, GoCourse will automatically move all their section data to the new section.
Hide/Show Non-Gradable Items
Depending on the task you are performing in the Gradebook, you may wish to view every learning activity included in a course, or you may wish to limit your view to only those items for which students will be graded.
To show all learning activities, check the Show non-gradable items box

GoCourse Teacher Guide
53
To only show gradable activities, uncheck the Show non-gradable items box
This option is available in both the Gradebook and Gradebook Setup views.

Chapter 4: Manage Your Section
54
Show Score/Show Time (﴾min)﴿
It may be useful for an instructor to periodically review the amount of time students are spending on each learning activity. The Show Time option let the teacher see both how much time students are spending on individual learning activities, as well as the amount of time spent reviewing all course content. If a student is not spending any time or is spending a great deal of time and is getting a poor grade, this tool can help the teacher better determine ways to help the student.
The Show Score/Show Time (﴾min)﴿ drop-down options allow you to view either the score your students have received on particular assignments, or the amount of time they are spending on each one.
Similarly, you can also choose to view Gradebook items from the entire Course, or for a selected Period by choosing it from the Show Course drop-down list.
You may change either of these settings at any time, as desired.

GoCourse Teacher Guide
55
Home Page Indicators of Items to Grade
The teacher view of the GoCourse Home Page provides information about what needs to be graded:
Next to each section, you are show how many items need to be graded for each section.
The Gradebook button at the bottom of the page allows you to quickly jump to the Items to Grade page.
Jumping to the Items to Grade page displays a detailed list of how many items in each class and each assignment are ready to be graded.
Clicking on any of the links will take you directly to Gradebook page containing the item(﴾s)﴿ to be graded.
If there is only one assignment of a particular type to be graded, GoCourse will highlight that student and item in the list, and display the item for you to review.
If there are multiple assignments of a particular type to be graded, GoCourse will highlight the item in the list, and offer you the option to launch Speed Grade, which allows you to jump directly to each ungraded item of this type in the list.
Gradebook Button
New Items to Grade

Chapter 4: Manage Your Section
56
Grading Assignments
Student assignments will typically be submitted electronically in the form of documents, graphics, slide presentations, etc. GoCourse allows you to view these items in their native application for easy review and grading.
To grade assignments:
1. Go to the Gradebook.
2. Select the assignment by clicking on the assignment title.
This brings up the assignment grading screen.
On the left is the list of students. Students who have assignments ready to grade are bold. There will also be a document icon two columns over from their name that shows that GoCourse has automatically downloaded their assignment.
There are six column in the left area:
Course % Student name Grade the grade for this gradable activity Student Document icon
assignment

GoCourse Teacher Guide
57
Teacher Document icon student submitted assignment
Check mark the grade has been returned to the student
On the right side of the assignment are two views:
All Students View Individual Student View
The All Students View below is shown when you first start grading an assignment:
The All Students View has the following items:
Breadcrumb shows which assignment you are grading and where it is located in the section outline
Assignment description the description of the assignment Summary score the high, average and low scores plus a pass/fail pie chart Curve Slider an optional tool to change the grades on the fly by moving a
slider Actions various actions to help grade the assignment (﴾these are discussed in
the table below)﴿ Rubric the grading criteria for the assignment
Assignment Description
Summary score
Rubric
Breadcrumb
Curve Slider
Actions

Chapter 4: Manage Your Section
58
There are four Action buttons available in the All Students View:
Action Function
Stop Accepting Submissions Sets the Due Date to when this is selected, thereby preventing anymore submissions are accepted.
Speed Grade Opens the Speed Grading tool to grade the assignments.
Return All Grades Returns all the grades to students.
Flunk Unsubmitted Use of this action gives any student who has not turned in the assignment a zero score.
The Individual Student View is shown when you open the Speed Grade tool or manually grade each student:
Student name
View options
Open Student document &
Attach Teacher
Document
Rubric calculated grade
Initiate Teacher audio message
comments
Enter rubric scores
For text comments from the Teacher
Actions
Grade links

GoCourse Teacher Guide
59
The Individual Student View has the following items:
View options go back to the All Students View (﴾the All Students button)﴿ or to the Next or Previous student
Student name the student currently being viewed/graded Rubric calculated grade the score that gets automatically entered as you fill in
the rubric Student document links to open the student submitted assignment Add Teacher Document links to add your marked up version of the student
document Student comments the comments the student added with his/her submitted
assignment Initiate Teacher audio message you can record an audio message that your
student can listen to when they receive the returned assignment Enter rubric scores where you enter grades based on the grading criteria for
the assignment Actions various actions to help grade the assignment (﴾discussed in the table
below)﴿ Grade links two options to use when entering the rubric: No Credit and Clear
Al (﴾discussed in the table below)﴿ Text comments where you can add text comments that will be sent back to the
student
There are three Action buttons and two Grade links available in the Individual Student View:
Action/Link Function
Return Grade Returns the grade and comments to the student.
Allow Another Submission
Gives the student another opportunity to resubmit the assignment. The teacher comments are sent back to the student. No grade is given.
Clear Grade Clears the entries and the grade entered into the calculated grade field.
No Credit (﴾link)﴿ Sets all rubric scores to zero and sets the calculated grade to zero.
Clear All (﴾link)﴿ Clears the entries you entered into the rubric.
At this point, there are two options to grade the individual student submitted assignments:
Use the Speed Grade tool to grade or Manually grade each student within the Individual Student View.
Both give the same results.

Chapter 4: Manage Your Section
60
Speed Grade Tool
1. To use the Speed Grade tool, when in the All Students View, click on the Speed Grade button.
This switches GoCourse to the Individual Student View, launches the Speed Grade tool and automatically opens the student document.
The Speed Grade tool gives you many of the options as grading each paper manually from the Gradebook. The advantages of the Speed Grade tool:
Automatically opens the student document. Hides when the mouse moves off of the tool so you can read the student
assignment. When you go to the next ungraded assignment, it automatically opens it.

GoCourse Teacher Guide
61
2. After reviewing the student assignment, enter the rubric scores. The total will be automatically calculated.
If you need to do it over again, click on the Clear All link. It will delete the rubric scores and allow you to enter them over again.
3. Provide any feedback either text feedback, audio feedback, and/or feedback within the document itself.
4. Enter text feedback in the text box at the bottom of the Speed Grade tool.
5. Optionally, add an Audio feedback by selecting the Audio Record button. This opens the record control:
6. Click on the Record button to start the recording, Pause to pause the recording and Stop to end the recording.
7. At this point, you can Play the recording and optionally remove the audio by clicking the Remove Audio link.
Note: In order to record audio feedback, a microphone is required.
8. Optionally add your comments within the document. This is done by first saving the changed document to a folder of your choice.
Then select the arrow next to Attach Teacher Document icon and select Insert.
9. This brings up an Open File dialog. Browse to select the file and click Open.

Chapter 4: Manage Your Section
62
You can also delete your commented-attached document, so it will not be sent back to the student. This is done by selecting arrow next to the Attach Teacher document icon and selecting Delete.
10. If a student submits an assignment that fails to meet the minimum requirements, you may choose to set all rubric scores to zero and give No Credit for the assignment. This option is provided on the Grading page, next to the rubric score total field.
11. You can optionally give the student an opportunity to submit an another revision of their assignment by selecting the Allow Another Submission button.
When you select Allow Another Submission, the button is grayed-name is still bold.
12. When you are done grading this assignment, click the Next Ungraded button. This takes you to the next student document to grade.
You will notice as you finish grading each student, that the data is transferred to the Gradebook. In the example below, the first two students are completed and the teacher
first student.

GoCourse Teacher Guide
63
13. When completed, close the Speed Grade to by clicking on the Close button.

Chapter 4: Manage Your Section
64
Manually Grade Assignments
You do not have to use the Speed Grade tool. You can also use the gradebook to grade each student assignment.
To manually grade assignments:
1. Open the gradable assignment activity in the Gradebook.
2. Select the first student who has an assignment to be graded.
3. Click on the Student Document link.
This opens the student document.
4. After you have reviewed the document, enter the rubric score in the Score column. Use the tab key to go to the next score field.
The Gradebook automatically adds up the scores to give an overall grade, which gets filled the Grade field.
Options include:
No Credit. Sets all the rubric scores to zero. Clear All. Clear all the rubric scores, so you can re-enter them.
5. Add your feedback using the Text box, the Audio Record option and/or adding your document by selecting the arrow next to the Add Teacher Document icon.
Grading manually does add one additional option over the Speed Grade tool: the ability to return the grade to the student. This can be done when grading each student assignment or when finished grading all student assignments.
6. Return Grade button at the bottom of the page.
Note: If you have specified a date in the Gradebook Setup for when students will receive feedback for this assignment, the student will not receive their grade or any feedback you attach until after the specified date has passed.
7. their grade and optionally give the student an opportunity to submit an another revision of their assignment. First select the Clear Grade button, which will blank out the rubric scores, and then select the Allow Another Submission button.

GoCourse Teacher Guide
65
When you select Allow Another Submission, the button is grayed-out aname is still bold.
8. When you are done grading this assignment, click the Next Ungraded button. This takes you to the next student document to grade.
Grading Assignment Options
There are a number of options when grading student assignments that we will review here.
Attach Teacher Document
As you review Student assignments, you may choose to make notes or add comments directly to their document text. GoCourse allows you to return the marked-up document to the Student, while retaining a copy of the original document.
1. Open the Student Document for review in its native format, making any desired notes or comments to the text.
2. Save the document as you normally would (﴾usually by clicking a Save button in the application)﴿ in a folder that you can easily remember.
3. Close the document.
4. Click on the arrow next to the Attach Teacher Document icon and select Insert.
5. Browse to the file, select it and click Open.
GoCourse will add the modified document as a Teacher Document. The Teacher Document link will now be active. In addition, an icon will appear in the assignment list indicating that a Teacher Document has been added.
After you post the grade for the assignment (﴾via the Return Grade button)﴿, the Teacher Document will be uploaded to the server the next time you synchronize, and provided to the Student upon their next scheduled course update.
Attach Notes Comments
Whether you have a lot to say about a student's work, or only a little, GoCourse provides a quick and easy way to send your written comments back with their graded assignments.
1. Scroll to the bottom of the Grading page.
2. In the Notes box, enter your comments as desired.

Chapter 4: Manage Your Section
66
The GoCourse Rich Text Editor formatting options are available to you for formatting your Note text. You can apply standard formatting to your text (﴾font style, size, color, bold, italics, underline, etc.)﴿, as well as to include numbered or bulleted lists, and adjust the alignment (﴾left, center, right)﴿ of your Note text. In addition, you can insert graphics into your Note.
After you post the grade for the assignment (﴾via the Return Grade button)﴿, your Comments will be uploaded to the server the next time you synchronize, and provided to the Student upon their next scheduled course update.
Attach Audio Comments
GoCourse provides Teachers with the option of including a brief Audio comment on a student's work.
Note: This option requires you to have a microphone and speakers attached to your computer.
1. From the Gradebook page for the desired Student Assignment, click on the Add Audio button.
A recording bar will appear:
2. When you are ready to begin recording your comments, press the Record button, and begin speaking into the computer microphone.
A timer will track the length of your recording. If you need to stop for a moment during your recording, you may press the Pause button. When you are ready to resume, press the Play button, and the recording will continue.
3. When you have finished recording your comments, press the Stop button.
4. To hear how your recording sounds, press the Play button.
The recording will play. A tracking bar will move across the timer window as the recording plays, indicating where you are in the recording. At any time, you may press the Pause button to temporarily stop the playback, and the Play button to resume. Pressing the Stop button will end the playback.

GoCourse Teacher Guide
67
5. If you are not satisfied with the recording, you may delete it by clicking the Remove Audio link next to the recording bar. You will be asked to confirm the deletion. You may re-record your comments, if desired.
6. When you click the Return Grade button for this assignment, any Audio comments you have added will be included with the feedback sent to the student.
Audio comments may not be deleted after they have been sent to the student.
Giving the Student No Credit
If a student submits an assignment that fails to meet the minimum requirements, you may choose to set all rubric scores to zero and give No Credit for the assignment. This option is provided on the Grading page, next to the rubric score total field.
Optionally, you may request that the student resubmit the assignment. See Allow Another Submission for more details.
Clear All Rubric Scores
In the midst of entering grades, you may wish to clear all of the scores you have entered for a particular assignment and start over. The Clear All option, which is located to the right of the rubric score total field, allows you to reset all rubric scores to a blank score.
Allow Another Submission
GoCourse recognizes four states for an assignment:
Turned in not graded
Another submission allowed
Another allowed submission returned, not graded
Assignment graded
When the teacher selects Allow Another Submission, any comments the teacher has made go back to the student, and they have the chance to resubmit the assignment. A note that they can resubmit will be displayed at the bottom of the assignment window.

Chapter 4: Manage Your Section
68
and the Allows Another Submission button is grayed-out. At the Teacher's discretion, the initial grade received can be handled in any of the following ways:
The original grade is posted in the Gradebook, and remains there until the new assignment is submitted and graded.
The Teacher can select Clear All to remove the original rubric scores. No grade will be posted until the new assignment is submitted and graded.
The Teacher can select No Credit to set all rubric scores to zero. A grade of zero will be posted until the new assignment is submitted and graded.
Curve Grades
Once you have finished grading all assignments, you have a number of options. One is to create a grade curve.
1. If you are still grading All Students button to go back to the All Students View.
2. To add a grade curve, check the Curve Grades checkbox (﴾next to the grades summary)﴿.
The grade curve affects the minimum passing score, which defaults to the value set in the Gradebook Setup. You can change this minimum passing score by moving the slider up or down.
3. Click the Slider to see the current value.
4. With your mouse still pushed, move the slider to the left to lower the minimum grade or to the right to raise the minimum grade value.
Notice that the grade summary display will adjust to reflect the new curve.
Use caution when adjusting the curve, so that you do not set the passing score either too high or too low. Minor changes to the curve typically provide sufficient adjustment.

GoCourse Teacher Guide
69
Stop Accepting Submissions
While you may not have specified a visibility date or due date in the Gradebook Setup, you can still cut off submissions for a particular assignment when the relevant time period has passed. Clicking the Stop Accepting Assignments button sets the Due Date for this assignment to now and prevents students from submitting this assignment beyond this point.
You can check the Gradebook setup to see the date set to when you clicked the Stop Accepting Submissions button.
Flunk Unsubmitted
Any students who have not submitted this assignment before you click the Flunk Unsubmitted button will automatically receive a 0% grade for the assignment after you select the Flunk Unsubmitted button.
Posting Grades to the Server
Posting grades is a very simple process. When you are finished grading a assignment and entering any desired notes, click the Return Grades
button. This is done in the Individual Student View.
You can also do this for the entire class when you are finished grading by clicking the Return All Grades button. This is done in the All Students View.
In either scenario, the student's grade for this assignment will be posted to the Gradebook the next time you synchronize with the server. The grade, and any feedback you have provided will be sent to the student at their next subsequent course update.
A checkmark will appear in the Assignment list to indicate that this item has been sent to the student (﴾through the server)﴿.

Chapter 4: Manage Your Section
70
If you have a few students to whom you are Allowing another submission, you can manually
second submission is graded.
Note: If you have specified a date in the Gradebook Setup for when students will receive feedback for this assignment, the student will not receive their grade or any feedback you attach until the specified date has been reached.

GoCourse Teacher Guide
71
Discussion Posts
GoCourse enables the teacher to do the following with discussion groups:
Set up groups for discussions
Start a new thread for discussions for each group
Setting up Groups for Discussions
It is possible to set up more than one group within your class of students for group discussions.
To set up multiple groups:
1. From the home page, select the View link to go to the section content.
2. Navigate to the desired discussion activity using the navigation pane.
3. Click on the Group Select button.
This brings up the Group Select window.
There are options to create the groups:
Create using a specific number of groups
Create using an approximate

Chapter 4: Manage Your Section
72
number of students per group
There are seven options to assign members to each group:
Group Assignment Option Description
Random Randomly selects students
Round Robin Selects every n number of students for n number of groups
Alphabetical Breaks the students into groups alphabetically
Homogeneous by performance Groups students with similar grades.
Heterogeneous by performance Organizes groups with a relatively equal number of students with higher and lower grades in each group.
Heterogeneous by performance Top/Bottom
Organizes groups differently one group has a mix of the highest and lowest grade students, whereas another group has medium level grade students. Other groups, if more than two, are in between the two.
Heterogeneous by performance 1st Q/3rd Q; 2nd Q/4th Q
Organizes groups by selecting so many students from different quartiles some from the first and third for one group and the second and fourth for another.
Random Group Assignment
Group assignments are generated randomly by GoCourse.

GoCourse Teacher Guide
73
Round Robin Group Assignment
Group assignments are generated every n students for n number of groups.
Alphabetical Group Assignment
Group assignments are generated alphabetically.

Chapter 4: Manage Your Section
74
Homogeneous by Performance Group Assignment
Group assignments are generated by grouping students with similar course grades. For example, the above generated three groups be these course grades:
Group 1 83, 82, 78, 75, 69, 62 (﴾low scores)﴿
Group 2 88, 87, 86, 86, 83
Group 3 98, 94, 94, 91, 88 (﴾high scores)﴿
This group generation method seeks to put students with equal ability in the same groups.
Heterogeneous by Performance Group Assignment

GoCourse Teacher Guide
75
Group assignments are generated by creating groups with a relatively equal number of students higher and lower grades. For example, the above generated three groups be these course grades:
Group 1 94, 88, 86, 82, 78, 62
Group 2 94, 88, 86, 83, 69
Group 3 98, 91, 87, 83, 75
Each group has a relatively equal number of high and low scoring students.
Heterogeneous by Performance Top/Bottom Group Assignment
Group assignments are generated by creating groups with this pattern:
One group has a mix of the highest and lowest grade students
Another group has the most medium level grade students
Any groups in between are between the first and last groups in highest and lowest grade students
For example, the above generated three groups be these course grades:
Group 1 98, 94, 94, 75, 69, 62 (﴾highest and lowest grades)﴿
Group 2 91, 88, 83, 82, 78
Group 3 88, 87, 86, 86, 83 (﴾medium level grades)﴿

Chapter 4: Manage Your Section
76
Heterogeneous by Performance 1st Q/3rd Q & 2nd Q/4th Q Group Assignment
Group assignments are generated by creating groups with these rules.
One group includes a number from the first and third quartile
Another group includes a number from the second and fourth quartile
For example, the above generated four groups be these course grades:
Group 1 87, 86, 69, 62 (﴾two each from second and fourth quartile)﴿
Group 2 88, 88, 78, 75 (﴾two each from second and fourth quartile)﴿
Group 3 94, 91, 83, 82 (﴾two each from first and third quartile)﴿
Group 4 98, 94, 86, 83 (﴾two each from first and third quartile)﴿
98 94 94 91 88 88 87 86 86 83 83 82 78 75 69 62
4 4 3 3 2 2 1 1 4 4 3 3 2 2 1 1
The first two from quartile one and the first two from quartile three are assigned to the same group and so on.

GoCourse Teacher Guide
77
Start a New Discussion Thread
The instructor is able to start one or more new discussion threads for each learning activity set to discussion board.
To start a new discussion thread:
1. Select the learning activity in the navigation panel that is designated a discussion board.
2. Optionally define the discussion groups by selecting the Group Setup button (﴾see previous topic)﴿.
3. Click the New Thread button.
This opens a new post window.
4. Enter your message that will start the discussion.

Chapter 4: Manage Your Section
78
5. Once your message is ready, click on the Post button.
6. The message is sent to the server. The color is changed in GoCourse.
At any point you can edit or delete the post by clicking on the Edit or Delete buttons respectively.
If this is a gradable activity, you will see the Rubric button at the bottom right of the learning activity. This opens the grading criteria that the author defined for this discussion. Students will see the same rubric so they understand how the activity will be graded.
You can set up more than one thread within a single discussion.

GoCourse Teacher Guide
79
Grading student posts is similar to grading student assignments with a few exceptions, which
To grade student posts:
1. Go to the Gradebook.
2. Select the discussion post by clicking on the activity title.
This brings up the discussion grading screen.
posts ready to grade are bold. There will also be a column showing the total number of posts for each student.
There are five column in the left area:
Course % rade Student name Grade the grade for this gradable activity Posts the total number of posts each student submitted Check mark the grade has been returned to the student
On the right side of the discussion grading screen are two views:
All Students View

Chapter 4: Manage Your Section
80
Individual Student View
The All Students View is when you first start grading a discussion:
The All Students View has the following items:
Breadcrumb shows which discussion you are working on and where it is located in the section outline
Assignment description the description of the discussion Summary score the high, average and low scores plus a pass/fail pie chart Curve Slider an optional tool to change the grades on the fly by moving a
slider Actions various actions to help grade the discussion (﴾these are discussed in the
table below)﴿ Rubric the grading criteria for the discussion
Discussion Description
Summary score
Rubric
Breadcrumb
Curve Slider
Actions

GoCourse Teacher Guide
81
There are four Action buttons available in the All Students View:
Action Function
Stop Accepting Submissions Sets the Due Date to when this is selected and no more posts are accepted.
Speed Grade Opens the Speed Grading tool to grade the posts.
Return All Grades Returns all the grades to students.
Flunk Unsubmitted Use of this action gives any student who has not submitted a post a zero score.
The Individual Student View is shown when you open the Speed Grade tool or manually grade each student:
Student name
View options
Enter rubric scores
Text comments from the Teacher
Actions
Grade links
Scoring and View Posts
tabs
Rubric calculated grade

Chapter 4: Manage Your Section
82
The Individual Student View has the following items:
View options go back to the All Students View (﴾the All Students button)﴿ or to the Next or Previous student
Student name the student currently being viewed/graded Rubric calculated grade the score that gets automatically entered as you fill in
the rubric Scoring tab tab with the rubric to grade the posts Posts tab tab to view the students posts Enter rubric scores where you enter grades based on the grading criteria for
the discussion Actions various actions to help grade the posts (﴾discussed in the table below)﴿ Grade links two options to use when entering the rubric: No Credit and Clear
Al (﴾discussed in the table below)﴿ Text comments where you can add text comments that will be sent back to the
student when they receive their grade
There are three Action buttons and two Grade links available in the Individual Student View:
Action/Link Function
Return Grade Returns the grade and comments to the student.
Clear Grade Clears the entries and the grade entered into the calculated grade field.
No Credit (﴾link)﴿ Sets all rubric scores to zero and sets the calculated grade to zero.
Clear All (﴾link)﴿ Clears the entries you entered into the rubric.
At this point, there are two options to grade the individual student posts:
Use the Speed Grade tool to grade or Manually grade each student within the Individual Student View.
Both give the same results.

GoCourse Teacher Guide
83
Speed Grade Tool
1. To use the Speed Grade tool, when in the All Students View, click on the Speed Grade button.
This switches GoCourse to the Individual Student View, launches the Speed Grade tool and automatically opens the student document.
The Speed Grade tool gives you many of the options as grading posts manually from the Gradebook. The advantages of the Speed Grade tool:
Hides when the mouse moves off of the tool so you can read the student posts. Allows you to enter the rubric while you are reviewing the student posts. Keeps the posts tab open when you go to the next student.
2. Back in the Individual Student View, click the Posts tab.

Chapter 4: Manage Your Section
84
yellow, making it easy to review.
3. After reviewing the student post(﴾s)﴿, enter the rubric scores. The total will be automatically calculated.
If you need to do it over again, click on the Clear All link. It will delete the rubric scores and allow you to enter them over again.
4. Provide any feedback either text feedback and/or audio feedback.
5. Enter text feedback in the text box at the bottom of the Speed Grade tool.
6. Optionally, add an Audio feedback by selecting the Audio Record button. This opens the record control:
7. Click on the Record button to start the recording, Pause to pause the recording and Stop to end the recording.
8. At this point, you can Play the recording and optionally remove the audio by clicking the Remove Audio link.

GoCourse Teacher Guide
85
Note: In order to record audio feedback, a microphone is required.
9. If a student submits posts that fail to meet the minimum requirements, you may choose to set all rubric scores to zero and give No Credit for the assignment. This option is provided on the Grading page, next to the rubric score total field.
10. When you are done grading this posts, click the Next Ungraded button. This takes you to the next student to grade and keeps the Posts tab open.
You will notice as you finish grading each student, that the data is transferred to the Gradebook. In the example below, the first two students are completed and the teacher
student.
11. When completed, close the Speed Grade to by clicking on the Close button.

Chapter 4: Manage Your Section
86
Manually Grade Posts
You do not have to use the Speed Grade tool. You can also use the gradebook to grade each student post.
To manually grade posts:
1. Open the gradable discussion activity.
2. Select the first student who has posts to be graded.
3. Click on the Posts tab.
4. This shows the Post Count for the student and highlights their post in yellow.
5. After you have reviewed the post, click on the Scoring tab.
6. Enter the rubric score in the Score column. Use the tab key to go to the next score field.
The Gradebook automatically adds up the scores to give an overall grade, which gets filled the Grade field.
Options include:
No Credit. Sets all the rubric scores to zero. Clear All. Clear all the rubric scores, so you can re-enter them.
7. Add your feedback using the Text box and/or the Audio Record button.
Grading manually does add one additional option over the Speed Grade tool: the ability to return the grade to the student. This can be done when grading each student assignment or when finished grading all student assignments.
8. To r Return Grade button at the bottom of the page.
Note: If you have specified a date in the Gradebook Setup for when students will receive feedback for discussion board, the student will not receive their grade or any feedback you attach until after the specified date has passed.
9. When you are done grading this , click the Next Student button. This takes you to the next student posts to grade.

GoCourse Teacher Guide
87
Grading Discussion Options
There are a number of options when grading student posts that we will review here.
Attach Notes Comments
Whether you have a lot to say about a student's work, or only a little, GoCourse provides a quick and easy way to send your written comments back with their graded assignments.
1. Scroll to the bottom of the Grading page.
2. In the Notes box, enter your comments as desired.
The GoCourse Rich Text Editor formatting options are available to you for formatting your Note text. You can apply standard formatting to your text (﴾font style, size, color, bold, italics, underline, etc.)﴿, as well as to include numbered or bulleted lists, and adjust the alignment (﴾left, center, right)﴿ of your Note text. In addition, you can insert graphics into your Note.
After you post the grade for the assignment (﴾via the Return Grade button)﴿, your Comments will be uploaded to the server the next time you synchronize, and provided to the Student upon their next scheduled course update.
Attach Audio Comments
GoCourse provides Teachers with the option of including a brief Audio comment on a student's work.
Note: This option requires you to have a microphone and speakers attached to your computer.
1. From the Individual Student View , click on the Audio icon.
A recording bar will appear:
2. When you are ready to begin recording your comments, press the Record button, and begin speaking into the computer microphone.
A timer will track the length of your recording. If you need to stop for a moment during your recording, you may press the Pause button. When you are ready to resume, press the Play button, and the recording will continue.

Chapter 4: Manage Your Section
88
3. When you have finished recording your comments, press the Stop button.
4. To hear how your recording sounds, press the Play button.
The recording will play. A tracking bar will move across the timer window as the recording plays, indicating where you are in the recording. At any time, you may press the Pause button to temporarily stop the playback, and the Play button to resume. Pressing the Stop button will end the playback.
5. If you are not satisfied with the recording, you may delete it by clicking the Remove Audio link next to the recording bar. You will be asked to confirm the deletion. You may re-record your comments, if desired.
6. When you click the Return Grade button for this assignment, any Audio comments you have added will be included with the feedback sent to the student.
Audio comments may not be deleted after they have been sent to the student.
Giving the Student No Credit
If a student submits posts that fail to meet the minimum requirements, you may choose to set all rubric scores to zero and give No Credit for the assignment. This option is provided on the Grading page, next to the rubric score total field.
Clear All Rubric Scores
In the midst of entering grades, you may wish to clear all of the scores you have entered for a particular assignment and start over. The Clear All option, which is located to the right of the rubric score total field, allows you to reset all rubric scores to a blank score.

GoCourse Teacher Guide
89
Curve Grades
One option once you have finished grading all posts is to grade the activity on a curve.
1. All Students button to go back to the All Students View.
2. To add a grade curve, check the Curve Grades checkbox (﴾next to the grades summary)﴿.
The grade curve affects the minimum passing score, which defaults to the value set in the Gradebook Setup. You can change this minimum passing score by moving the slider up or down.
3. Click the Slider to see the current value.
4. With your mouse still pushed, move the slider to the left to lower the minimum grade or to the right to raise the minimum grade value.
Notice that the grade summary display will adjust to reflect the new curve.
Use caution when adjusting the curve, so that you do not set the passing score either too high or too low. Minor changes to the curve typically provide sufficient adjustment.
Stop Accepting Submissions
While you may not have specified a visibility date or due date in the Gradebook Setup, you can still cut off submissions for a discussion when the relevant time period has passed. Clicking the Stop Accepting Assignments button sets the Due Date for this discussion to now and prevents students from submitting posts beyond this point.
You can check the Gradebook setup to see the date set to when you clicked the Stop Accepting Submissions button.

Chapter 4: Manage Your Section
90
Flunk Unsubmitted
Any students who have not submitted a posts before you click the Flunk Unsubmitted button will automatically receive a 0% grade for the assignment after you select the Flunk Unsubmitted button.
Posting Grades to the Server
Posting grades is a very simple process. When you are finished grading a posts and entering any desired notes, click the Return Grades
button. This is done in the Individual Student View.
You can also do this for the entire class when you are finished grading by clicking the Return All Grades button. This is done in the All Students View.
In either scenario, the student's grade for the discussion will be posted to the Gradebook the next time you synchronize with the server. The grade, and any feedback you have provided will be sent to the student at their next subsequent course update.
A checkmark will appear in the Discussion list to indicate that this item has been sent to the student (﴾through the server)﴿.
Note: If you have specified a date in the Gradebook Setup for when students will receive feedback for this assignment, the student will not receive their grade or any feedback you attach until the specified date has been reached.

GoCourse Teacher Guide
91
Grading Exams
Before you start grading exams, it is helpful to review GoCourse support for exams:
It is a good idea to use the Visible from date to hide medium and high stakes exams until you want students to take these exams. This date is defined in the Gradebook setup, and is only supported for Range sections (﴾those with a defined start and stop date)﴿.
There are three types of exams in GoCourse based on their security level:
> Client graded exams This type of exam allows students to see their results immediately and is ideal for formative assessments, like quizzes, that help students check their understanding of the information being presented in the lesson.
> Server graded exams This type of exam is most commonly used for medium stakes exams. Students do not receive their results immediately. (﴾See rules below.)﴿
> Password protected exams These are for higher stakes exams where you want everyone to begin the exam at a certain time (﴾and possibly end within a certain time)﴿, so that all students are taking the exam at the same time. The password is the same for all students.
Assessments with no essay questions are automatically graded by the GoCourse Player for client graded exams and the GoCourse Server for server graded exams.
Assessments with essay questions require you to grade the essay questions before they are returned back to the student.
There are a few rules that determine when students see the results for their exams:
> For client graded exams, results are seen immediately, unless there are essay questions.
> For server graded exams and password protected exams:
If no date has been entered in the Results visible from date field in the Gradebook setup for the assessment, students get the results once everyone has taken the exam and the teacher has finished grading essay questions.
If a date has been entered in the Results visible from date field in the Gradebook setup for the assessment, students get the results once the date set has been reached.
Some assessments have a time limit, others do not.
Some assessments can be retaken multiple times by students. The results from the last test is the score in the gradebook.
You can override the grade determined in the gradebook for a given student.

Chapter 4: Manage Your Section
92
You are able to throw out poor questions. There are rules in the Gradebook that help to identify the problem questions. Students grades are adjusted when a question is removed.
Like assignments and posts, you can change the curve up or down for an exam with the use of a simple slider.
To grade exams:
1. Go to the Gradebook.
2. Select the exam by clicking on the exam title.
This brings up the exam grading screen.
On the le exams that need to be reviewed by the instructor are bold this is usually to grade an essay question. Those student names not in bold have already been graded.
There are three columns in the left area:
Course % Student name Grade the grade for this gradable activity
On the right side of the exam are two views:

GoCourse Teacher Guide
93
All Students View Individual Student View
The All Students View below is shown when you first start grading or reviewing an exam:
The All Students View has the following items:
Breadcrumb shows which exam you are grading and where it is located in the section outline
Exam description the description of the exam Summary score the high, average and low scores plus a pass/fail pie chart Curve Slider an optional tool to change the grades on the fly by moving a
slider Actions various actions to help grade the exam (﴾these are discussed in the
table below)﴿ Exam tabs two views that show objective mastery and exam question details
Exam Description
Summary score
Exam tabs
Breadcrumb
Curve Slider
Actions

Chapter 4: Manage Your Section
94
There are three Action buttons available in the exam All Students View:
Action Function
Stop Accepting Submissions Sets the Due Date to when this is selected, thereby preventing anymore submissions are accepted.
Speed Grade Opens the Speed Grading tool to grade the exam.
Flunk Unsubmitted Use of this action gives any student who has not taken the exam a zero score.
The Individual Student View is shown when you open the Speed Grade tool or manually grade each student :
View options
Calculated grade
Exam actions
results by question
Student name
Exam tabs
Teacher feedback

GoCourse Teacher Guide
95
The Individual Student View has the following items:
View options go back to the All Students View (﴾the All Students button)﴿ or to the Next or Previous student
Student name the student currently being viewed/graded Calculated grade the score that gets automatically calculated by GoCourse
plus your essay exam grades Exam actions two actions that can allow another student submission or that
clear the calculated grade Exam tabs
enter a score for each essay question and 2)﴿ give feedback, both text and audio, to the student on their exam results
There are two Action buttons Individual Student View:
Action/Link Function
Allow Another Submission For exams that do not allow exams to be retaken, this option allows the teacher to give the student another opportunity to take the exam. The teacher comments are sent back to the student. No grade is given.
Clear Grade Clears the grade entered into the calculated grade field.
Grading the Exam
Rather than applying a rubric like grading assignments and posts, grading an exam follows a different process.
First, GoCourse automatically calculates the score based on the correct and incorrect answers for all questions except essay questions.
Second, if essay questions exist, the teacher manually grades them. Third, the teacher optionally provides the student feedback.
At this point, there are two options to grade the essay questions.
Use the Speed Grade tool to grade or Manually grade each student within the Individual Student View.
Both give the same results.

Chapter 4: Manage Your Section
96
Speed Grade Tool
1. To use the Speed Grade tool, when in the All Students View, click on the Speed Grade button.
This switches GoCourse to the Individual Student View and launches the Speed Grade tool.
The Speed Grade tool gives you many of the options as grading each exam manually from the Gradebook. The advantages of the Speed Grade tool:
Goes directly hunt for them.
Allows you to still review the answers the student gave (﴾in the Individual Student View window)﴿, by minimizing when you pull your mouse off of the Speed Grade tool.
Allows you to provide feedback directly in the tool.
2. Reviewing the essay answers and enter a score for each essay question.
3. You can go to the next essay question by clicking the question number. The student grade will be automatically calculated.

GoCourse Teacher Guide
97
4. Provide any feedback either text feedback or audio feedback.
5. Enter text feedback in the text box on the right side of the Speed Grade tool.
6. Optionally, add an Audio feedback by selecting the Audio Record button.
7. This opens the record control:
8. Click on the Record button to start the recording, Pause to pause the recording and Stop to end the recording.
9. At this point, you can Play the recording and optionally remove the audio by clicking the Remove Audio link.
Note: In order to record audio feedback, a microphone is required.
10. If the Exam automatically allows multiple submissions (﴾which is specified during Exam creation by the author)﴿, the Allow Another Submission button will be inactive. However, if this automatic option was not selected, the teacher may choose to accept another submission from a particular student by clicking this button.
11. When you are done grading these essay questions, click the Next Ungraded button. This takes you to the next student to grade.
You will notice as you finish grading each student, that the data is transferred to the Gradebook. In the example below, the first two students are completed and the teacher
student.

Chapter 4: Manage Your Section
98
12. When completed grading essay questions, close the Speed Grade to by clicking on the Close button.

GoCourse Teacher Guide
99
Manually Grade Assignments
You do not have to use the Speed Grade tool. You can also use the gradebook to grade essay questions. To manually grade exams:
1. Open the exam activity in the Gradebook.
2. Select the first student who has essay questions to be graded.
3. In the Questions/answers tab, scroll down until you find an essay question with the yellow highlighted box to enter your score.
4. After you graded the essay questions for the student, the Gradebook automatically adds up the scores to give an overall grade, which gets filled the Grade field.
5. Optionally add your feedback by clicking on the Teacher notes tab, then using the Text box or the Audio Record option.
Note: If you have specified a date in the Gradebook Setup for when students will receive feedback for the exam, the student will not receive their grade or any feedback you attach until after the specified date has passed.
6. If the Exam automatically allows multiple submissions (﴾which is specified during Exam creation)﴿, the Allow Another Submission button will be inactive. However, if this automatic option was not selected, the teacher may choose to accept another submission from a particular student by clicking this button.
7. When you are done grading this exam, click the Next Ungraded button. This takes you to the next student document to grade.

Chapter 4: Manage Your Section
100
Reviewing the Exam Results
Once the exams have been graded, then is a great time to review the student objective mastery and check into the question detail. These can be viewed in the two tabs in the exam All Students View.
Objective Mastery
The Objective Mastery tab shows all learning objectives that were associated with question in the exam. The graph on the left show the percentage objective mastery that the students have achieved as a result of taking this exam.
Each objective referenced in the exam is shown along with the questions that related to the objective mastery. There are a number of things this can show you:
What objectives are being mastered through the course and what objectives still need more work.
Potential areas in the course that are not effectively teaching the content, which highlight areas that may need more attention with the students.
Question Detail
The Question Detail tab shows the overall results of the exam by question. It provides some valuable information to check the validity of the exam, and look for any other potential problems:
It shows alerts on potential questions that may have problems.
It shows which questions were missed the most by students.
It allows you to sort on various columns.
e of students got the answer correct and what was the response for each answer.
You can remove any invalid question from the overall results if they are problematic.

GoCourse Teacher Guide
101
Alerts
The yellow yield sign provides alerts on questions that may be problematic. GoCourse looks for these potential problems:
Duplicate answers
Two correct answers
No correct answer
Confusing wording
It is worthwhile to see the question details for questions that have alerts:
1. Click on the triangle to the left of the question to see the question details.
This shows how many answered the question correctly and what percentage answered wrong answers.
2. If you determine the question to be invalid, you can remove the item from the exam. Students scores will be readjusted to take into account the removed question. Click on the checkbox next to Remove Item From Grade if you want to do this.

Chapter 4: Manage Your Section
102
Note: Be aware that if Exam questions were randomized from a test pool, it is likely that some students may not have been presented with the "bad" question. In this instance, no adjustment will be made to their grades when the question is removed from grading. However, if, for example, all students were tested on the same ten questions, and one was removed as "bad," grades for all students would then be modified based on the new, nine-question grading scale.
Sorting by Alerts, Number of Answers and Overall Percentage
You can sort the questions in three ways:
By alert (﴾default view)﴿ click on the yield sign
By question number click on the #
By percentage of questions answered correctly click on the %
Question Detail Sorted by Percentage Answered Incorrectly

GoCourse Teacher Guide
103
Grading Exam Options
As a teacher, you have some options with exams. You can:
Modify the exam grade manually
Allow another submission for assessments that do not provide this option to students
Curve the exam grades
Stop allowing students to take the exam after a certain day and time
Calculated vs. Modified Grades
As with all GoCourse assignments, the teacher can override the calculated grade by entering the new value in the Grade field. The (﴾Calculated)﴿ notation following the grade would then be replaced with the word (﴾Modified)﴿, and a button would be added to the page allowing the teacher to quickly Revert to the calculated grade at any time.
GoCourse automatically calculates exam grades based on the correct and incorrect answers identified when an exam is created by the course author. However, there may be times when these calculated grades need to be modified, at the teacher's discretion.
To modify a grade:
1. Open the grading page for the exam grade you wish to modify.
2. In the Grade box, type in the new grade.
GoCourse will append the grade with the text "Modified" so that you can easily tell whether the grade was calculated or modified. The new grade will be updated to the list.
3. Clicking the Revert to Calculated Grade button will return the grade to the original, calculated grade, and post the calculated grade to the list.

Chapter 4: Manage Your Section
104
Note: The Modified grade option is only available for exam grades. If adjustments need to be made for assignment or discussion board grading, the teacher can modify the score entered into the grading rubric for an individual student, or modify the grading curve to adjust the grades for the entire class.
Allow Another Submission
If the exam automatically allows multiple submissions (﴾which is specified during exam creation)﴿, the Allow Another Submission button will be inactive. However, if this automatic option was not selected, the teacher may choose to accept another submission from a particular student by clicking this button.
Curve Grades
When all exams have been graded, you have the option to change the grade on a curve.
1. To add a grade curve, check the Curve Grades checkbox (﴾next to the grades summary)﴿.
The grade curve affects the minimum passing score, which defaults to the value set in the Gradebook Setup. You can change this minimum passing score by moving the slider up or down.
2. Click the Slider to see the current value.
3. With your mouse still pushed, move the slider to the left to lower the minimum grade or to the right to raise the minimum grade value.
Notice that the grade summary display will adjust to reflect the new curve.
Use caution when adjusting the curve, so that you do not set the passing score either too high or too low. Minor changes to the curve typically provide sufficient adjustment.
Stop Accepting Submissions
While you may not have specified a visibility date or due date in the Gradebook Setup, you can still cut off submissions for taking an exam when the relevant time period has passed. Clicking the Stop Accepting Assignments

GoCourse Teacher Guide
105
button sets the Due Date for the exam to now and prevents students from taking the exam beyond this point.
You can check the Gradebook setup to see the date set to when you clicked the Stop Accepting Submissions button.
Flunk Unsubmitted
Any students who have not taken the exam before you click the Flunk Unsubmitted button will automatically receive a 0% grade for the assignment after you select the Flunk Unsubmitted button.

Chapter 4: Manage Your Section
106
Gradebook Actions
There are five actions supported in the Gradebook. We will review these here.
Update Gradebook
This option will synchronize your Gradebook with the grades stored on the server. You will see the action on the GoCourse status bar.
Send Mail
The Send Mail action allows you to send an email to one or more students. This will be sent to the email address stored in the student profile. If no email address is stored, nothing will be sent to the student.
Click the button to select one or more students to send the email.
The All option will send it to everyone with a role in the section, including teaching assistants and those who may be auditing the section.
The Students option will just send it to all students.
The Teachers option will send it to any other teacher or teaching assistant.
Type your message and click Send to send your email.
Export Grades
The Export Grades action will export the Gradebook in its current state to a comma delimited file (﴾.csv format)﴿.
Report Final Grades
The Report Final Grades action stores a special grade for a grading period or for the entire section. You can resubmit final grades as many times as you want. These special grades are generally the grades to be used by an external SIS or other system for report cards.

GoCourse Teacher Guide
107
Choose Gradebook Columns
The GoCourse Gradebook has more columns in the left side than what you see in the default view.
The default view is set to only display the Course % and Student Name. The image to the right shows five additional columns.
Simply check the boxes of the columns that you want to use.
The table below outlines all possible columns.
Column Description
Course % The overall grade for the section.
Reported This shows the currently reported grade for the grading period or the entire course, which was recorded using the Report Final Grades action. (﴾See previous Gradebook action.)﴿
Completed The percentage of the section that has been completed.
Status The student status for the section.
Start When the section started for the student.
End When the section will end for the student.
Student Name
There are four status values that can show up in the Status column:
Active Actively enrolled
Not Started Enrolled, but the start date has not yet passed
Expired Enrolled, but the end date has passed
Suspended The student has been suspended from school, but is still enrolled in the class

Chapter 4: Manage Your Section
108
Sending Announcements
From time to time, you may wish to post Announcements to the students -- such as reminders of upcoming deadlines, information about changes to your office hours, etc.
To Post an Announcement:
1. From the GoCourse Home Page, click the Announcements button at the bottom of the screen.
The Announcements window is displayed.
2. Click the New Announcement link.
The Edit Announcement window opens.
3. Enter a Title for your Announcement.
4. Enter your Announcement text in the note window. Optionally, apply any desired formatting to the message.
5. From the drop-down list, select the Section this Announcement applies to.
6. Select when you want the Announcement to Expire: Never, Today, Tomorrow, One Week, or select a Custom date from the calendar drop-down.

GoCourse Teacher Guide
109
7. When you have finished creating your Announcement, click Post.
A pop-up window will appear, asking if you want to post your Announcement now.
8. Click Yes to continue.
After the announcement is posted, you can view it by returning to the GoCourse Home Page. The announcement will be listed in the Announcements bar. You can view the full announcement by clicking the Announcements button to open the Announcements window.

Chapter 4: Manage Your Section
110
Using Conferencing
Your education institution may elect to implement the optional conferencing for live meeting support. For this to be available, three things are required:
1. Your institution signed up with a third party web conferencing vendor with which GoCourse has integrated (﴾currently, this only includes Elluminate)﴿.
2. Your system administrator has set up conferencing domain.
3. Your system administrator has enabled your section for web conferencing.
If these requirements are met, you can set up and join web conferences from within GoCourse.
You can set up conferences, disable conferences for a section, edit or delete a previously set up conference, and start a conference.
Conference Toolbar
The Conference Toolbar provides the basic functionality of the Conference window.
Action Description
Expand All Expands all of the current conferences to show the attendees and the description of the conference.
Collapse All Collapses all of the current conferences to show only the name, section, time and duration.
Group By Allows you to group your conferences by start date, by section or to have no grouping.
Create Create a new conference.
Edit Enables editing the conference to change the time, date, duration, attendees and description.
Delete Allows you to delete a previously set up conference.
Refresh Refreshes the list of conferences.

GoCourse Teacher Guide
111
Enable Conferencing
If your institution has set up conferencing, but it is not yet enabled for your section, you can enable it.
To enable conferencing for your section:
1. If you click the Conferencing button when your section is not enabled for conferencing, you will get an error message:
2. To enable conferencing, click Yes.
The Conferencing Setup window opens.
3. Check the Allow conferencing checkbox.
4. Click Save.
The main Conferencing window opens.
Note: If the Create button is still grayed out, your domain is not setup for conferencing. Talk to your administrator about setting up your domain for conferencing.

Chapter 4: Manage Your Section
112
See Conference Details
You can open the details on any conference in two ways:
1. By hovering your mouse over the conference name
2. By selecting the plus button to the left of the conference name:
Hover Your Mouse
When you hover your mouse over the conference name, a window pops up that displays the details.
The Plus Button
You can also show the details by selecting the plus button to the left of the conference name.

GoCourse Teacher Guide
113
Group By
GoCourse lets you change how you group the conferences. By default conferences are grouped by date. You can change this to group by section.
To change the grouping, click the Group by button.
To group by Section, select Section.
To have no grouping, select No grouping.
No Grouping
Group by Section
Group by Date

Chapter 4: Manage Your Section
114
Set Up a Conference
1. From the toolbar, click the Conferencing button.
2. If you have more than one account, the Choose Conferencing Account window appears.
3. Select your account and click OK. The Conferencing window appears.

GoCourse Teacher Guide
115
4. Click the Create button.
The Conference dialog opens.

Chapter 4: Manage Your Section
116
5. Click in the Name field and give this conference a name.
6. Select the date and time this conference will take place in the When field.
7. In the Minutes field, enter how many minutes this conference will last.
8. Click the Section drop-down menu and select a section. Only those sections with conferencing enabled will appear.
9. Invite everyone to this conference by selecting the Everyone in the Section radio button in the Attendees field.
OR
Invite only specific people in the section by selecting the Individual Students radio button. Click the Choose button and select the students you want to invite then click OK.
10. To send attendees an email invitation, click the checkbox preceding Send attendees an email.

GoCourse Teacher Guide
117
11. Enter a Description of the conference.
12. Click the Save button.

Chapter 4: Manage Your Section
118
Start a Conference
To start a conference:
1. With the Conference window open, putting your mouse on the title will show a popup. Click on the conference name.
2. A file download window opens.
3. Click Open.
You will see a message also show about joining the conference. This gives you a chance
When the downloading start, you will see various dialogs that indicate the progress of getting the conference started.

GoCourse Teacher Guide
119
4. Once the Elluminate conference starts, you will be able to designate the speed of your connection.
5. Select the speed. You will be connected with the Elluminate server.
As the instructor, you will be given Moderator privileges for the conference.
You are now ready to start the conference once your students show up, of course !

Chapter 4: Manage Your Section
120
Elluminate Live! Main Window
For more about Elluminate Live, see www.elluminate.com.
Disable Conferencing for a Section:
1. From the toolbar, click the Conferencing button.
2. Select your account and click OK.
The Conferencing window appears.

GoCourse Teacher Guide
121
3. Click the Setup button in the top right corner. The Conferencing Setup window appears.

Chapter 4: Manage Your Section
122
4. For the section in which you want to disable conferencing, click the checkbox to uncheck it.
5. Click Save to save your changes.
6. If you choose not to save your changes, click either the Cancel button or the Conferencing link (﴾top right)﴿.

123
Chapter 5
Managing GoCourse GoCourse Tools allow you to tailor certain aspects of GoCourse's functionality to your work preferences.
In this section, we will discuss the various settings available through the GoCourse Tools menu. These items will be presented sequentially, as displayed in the Tools Menu, for convenience.
To Access the GoCourse Tools Menu.
1. Click on the Tools button at the far-right hand side of the GoCourse Toolbar.
2. The Tools menu will appear.

Chapter 5: Managing GoCourse
124
Update Courses
GoCourse helps you stay up-to-date with available course content, appointments, tasks, and messages from your instructor automatically synchronized at intervals you specify (﴾see GoCourse Options for more details)﴿.
In addition to your regularly scheduled updates, you can also choose to manually synchronize your GoCourse content with the server using the Update Courses option.
Note: An active Internet connection is required to use this feature.
To manually update GoCourse content:
1. From the GoCourse Toolbar, click the Tools button and select Update Courses.
2. GoCourse will connect to the server, and download content from your courses that is more recent than your most recent previous update.
3. The most recent update date/time is displayed in the Status bar, in the lower right-hand corner of the GoCourse Player window.

GoCourse Teacher Guide
125
Managing Courses
If you need to delete an old course, or create a new course, you can use Manage Courses.
To manage your courses:
1. From the GoCourse Toolbar, click the Tools button and select Manage Courses.
The Manage Courses window is displayed, listing all of your courses.
The following options are available to you from this page:
View Displays the selected course content. Create Create a new course.
Note: In order to create a new course and publish it to the server, you will need domain course creation rights. Talk to your system administrator for more information.
Publish Publish your course to the server.

Chapter 5: Managing GoCourse
126
Purge Permanently removes the selected course from your computer. You will be asked to confirm that you wish to purge the course from your computer, and if you want to delete the associated My Notes folder .
Section Outline Jump into the section editor.
Note: If you do not see the Section Outline link, you do not have section content editing rights for the section that is highlighted. To see if you have section content editing rights for other sections, click on them. If the Section Outline link is displayed, you have section content editing rights for that section.
Gradebook Go directly to the section gradebook. Setup Allows you to go into the Gradebook Setup the selected section.
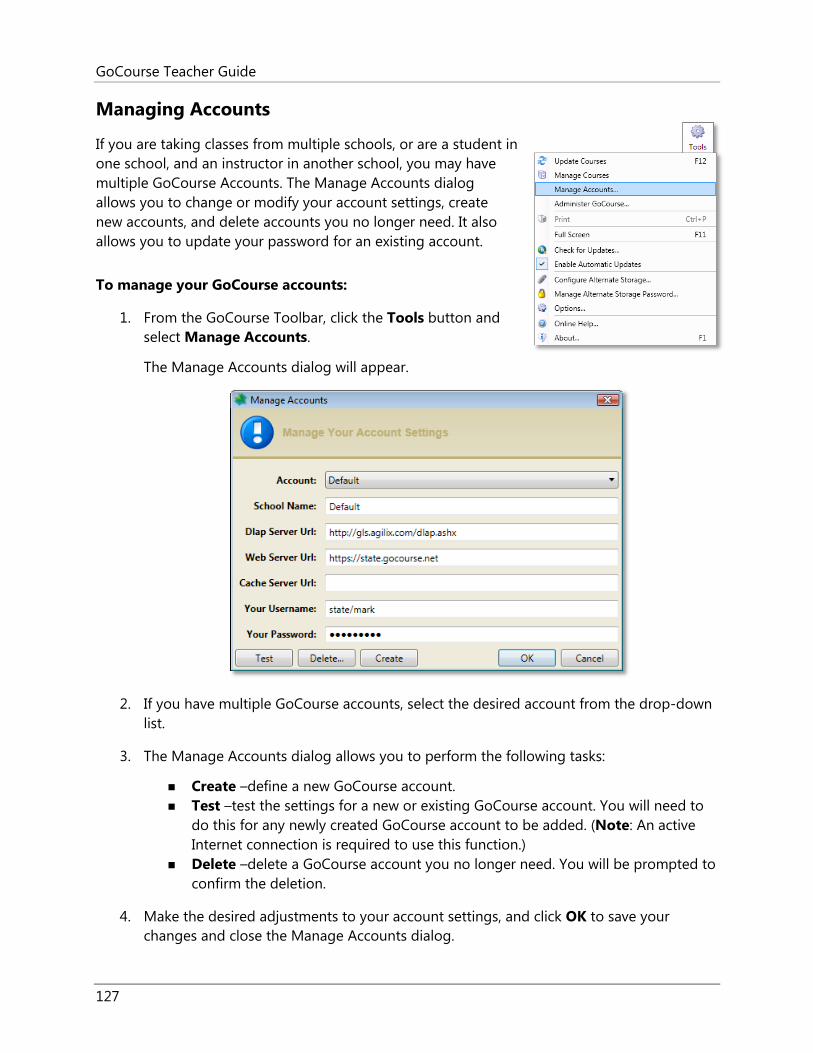
GoCourse Teacher Guide
127
Managing Accounts
If you are taking classes from multiple schools, or are a student in one school, and an instructor in another school, you may have multiple GoCourse Accounts. The Manage Accounts dialog allows you to change or modify your account settings, create new accounts, and delete accounts you no longer need. It also allows you to update your password for an existing account.
To manage your GoCourse accounts:
1. From the GoCourse Toolbar, click the Tools button and select Manage Accounts.
The Manage Accounts dialog will appear.
2. If you have multiple GoCourse accounts, select the desired account from the drop-down list.
3. The Manage Accounts dialog allows you to perform the following tasks:
Create define a new GoCourse account. Test test the settings for a new or existing GoCourse account. You will need to
do this for any newly created GoCourse account to be added. (﴾Note: An active Internet connection is required to use this function.)﴿
Delete delete a GoCourse account you no longer need. You will be prompted to confirm the deletion.
4. Make the desired adjustments to your account settings, and click OK to save your changes and close the Manage Accounts dialog.

Chapter 5: Managing GoCourse
128
Administer GoCourse
If you need to make changes on your domain as an administrator, the Administer GoCourse option will simplify doing that by taking you directly to your login page, and once you login, directly to the GoCourse Administrator utility for your domain.
To go to the GoCourse Administrator utility:
1. Select
GoCourse will launch your browser and take you directly to your domain login page.
2. Enter your username and password. GoCourse takes you directly to the GoCourse Administrator utility.
Note: While you can open the GoCourse Administrator utility, you must have administrator or other domain rights to be able to perform any actions in the utility.

GoCourse Teacher Guide
129
Printing
It is possible to print any note or course learning activity, except discussions and exams. Gradebooks also cannot be printed.
To print a Note or Course Document:
1. Open the item you wish to print.
2. From the GoCourse Toolbar, click the Tools button, and select Print from the pop-up menu.
3. The Print dialog box appears.
4. Choose your print settings as desired.
Note: The options available will vary depending on the printer you select.
5. Click Print to send the item to the printer.

Chapter 5: Managing GoCourse
130
Full Screen
You can quickly toggle between full screen mode and a regular screen mode. In full screen mode, GoCourse sheds the window that normal goes around the application.
To go into Full Screen mode:
1. Select Tools | Full Screen (﴾or select F11)﴿.
GoCourse will go into full screen mode. In this mode, the main toolbar shrinks to a smaller one. An exit button is added to the main toolbar next to the Tools icon on the top right.
2. To exit out of Full Screen mode, hit a Tools | Full Screen or an F11 again.

GoCourse Teacher Guide
131
Check for Updates
From time to time, Updates to GoCourse Player software are made available. Selecting the Check for Updates option connects you to the Agilix download server, and gives you the option of updating your GoCourse Player software if updates are available.
Note: An active Internet connection is required to use this feature.
Enable Automatic Updates
If you would like to be certain that you are always using the most up-to-date version of GoCourse Player, you may wish to select the Enable Automatic Updates option from the Tools menu. When this option is enabled, GoCourse periodically connects to the Agilix download server to check for the most recent updates to your GoCourse Player software.
Note: An active Internet connection is required to use this feature. If an active connection is not detected, Automatic Updates will attempt to check for updates at a later time.

Chapter 5: Managing GoCourse
132
Configure Alternate Storage
If you wish to save your GoCourse data, notes, and settings in a location other than the default, the Configure Alternate Storage option allows you to specify that location.
To Configure an Alternate Storage Location:
1. From the GoCourse Toolbar, click the Tools button and select Configure Alternate Storage.
The Configure Storage dialog appears.
You may select from the following alternate storage options:
Default Storage By default, GoCourse data is stored in your My Documents\Agilix GoCourse folder in Windows XP (﴾Documents\Agilix GoCourse folder in Windows Vista)﴿.
Portable Drive If you wish to store your GoCourse data on a portable drive such as a USB drive, portable hard drive, etc., select this option and click OK. A second window will open, allowing you to select the portable drive you wish to use.
Specific Path If you are working in a networked environment, or simply wish to store your GoCourse data in a different location on your computer, select this option. The Browse button will be activated, allowing you to specify the storage location.
Apply to all users If this option is selected, GoCourse data for all users on this machine will be stored in the location specified above.
2. Make your selection and click OK.

GoCourse Teacher Guide
133
3. If you have selected the Portable Drive option, and have more than one portable drive available, select the one you will always use with GoCourse.
4. If you have selected the Specific Path (﴾network drive)﴿ option, you will need to configure this for yourself, or if this is a shared computer, for any students that may use this computer. Click Browse to find the exact path you want to use.
5. Once you have entered a valid path, you are presented with an option to set a password.
6. If you want to add a password, enter it twice and select OK.
7. ord

Chapter 5: Managing GoCourse
134
Note: If you have created a password, you will be asked to enter it each time you open GoCourse. Be sure to choose a password you will remember, as there is no method to remind you of a forgotten password.
Manage Alternate Storage Password
From time to time, you may wish to change the password for accessing your alternate storage location. This is widely considered to be a wise precaution, and a useful security measure for protecting your data.
To change your alternate storage password:
1. From the GoCourse Toolbar, click the Tools button and select Manage Alternate Storage Password. The Change Drive Password dialog will appear.
2. Enter your Existing Password in the field provided.
3. To change your password, enter your New Password, and enter it a second time to Confirm the new password.
4. To remove your password, click the Clear Password button.
5. Click OK to save your changes, or Cancel to close the dialog without saving your changes.

GoCourse Teacher Guide
135
GoCourse Options
The Options dialog allows you to specify general settings and diagnostic logging functions.
To change GoCourse Options
1. From the GoCourse Toolbar, click the Tools button and select Options.
2. The Options window will appear, with the General tab displayed.
The options on this tab allow you to select your preferences from the list:
Automatically close capture window when completed. Show document capture help.
Note: The capture window and document capture help only appear when the GoCourse Capture printer is installed. The default installation does not install the Capture printer.
Show confirmation dialog for deletes. Update course data [select interval] You can set the interval to be as short as
every 30 minutes, or up to once a day. You can also select "Never," if you do not want GoCourse to automatically update course data.
Note: Be aware that if you select "Never," you will need to manually update your course data on a regular basis in order to remain current.

Chapter 5: Managing GoCourse
136
3. Click to place a checkmark in the boxes you wish to activate, or to remove the checkmark from features you do not wish to use at this time. You may change these settings at any time.
4. Click the Update course data every drop down box to change how often GoCourse syncs with the server.
5. Click OK to save your settings and close the Options dialog.
Note: The Options tab does not provide any value in this release. It can be ignored.
Diagnostics Options
If you have difficulty with GoCourse and contact Agilix customer support, you may be asked to turn on the diagnostics. The Diagnostics Options tab lets you turn on your Diagnostics logging.
To turn on diagnostics logging:
1. From the GoCourse Toolbar, click the Tools button and select Options.
2. Select the Diagnostics tab.
3. If you wish to use diagnostic logging, click the Start Logging button.
4. If you wish to view the diagnostic log, click View Log (﴾diagnostic logging must be enabled in order to use this option)﴿.
5. Click OK to save your settings and close the Options dialog.

GoCourse Teacher Guide
137
Online Help
Selecting Tools | Online Help launches the GoCourse Online Help application, where you can find answers to many of your common questions about using GoCourse.
Note: You may need to be online to use this feature.

Chapter 5: Managing GoCourse
138
About GoCourse
Selecting Tools | About opens the About GoCourse dialog, displaying version information about your GoCourse Player software. This information may be necessary should you have need to contact Customer Support.

139
Chapter 6
Support Information
GoCourse Updates
To manually check to see if there is a new update to GoCourse, select Help | Check for Updates. GoCourse will check with the update server to see if there is a new version. If there is, you will have an option to install the latest update.
You can also select Help | Enable Automatic Updates. With Automatic Updates enabled, whenever there is a new release of GoCourse available, you will be notified when you launch GoCourse. GoCourse will automatically check the Agilix GoCourse update server to see if there is a new release (﴾when you are connected to the network)﴿. You will be given the option to install the new update at that time, or you can wait until a later time.
Technical Support Options
If you encounter any problem with your copy of GoCourse, the following resources are available to you:
Email Support
Email support is available at [email protected].

Chapter 6: Support Information
140
Websites
For more information about GoCourse please visit our website at: http://www.agilix.com