ENTERPRISE WIDE RISK MANAGEMENT DEPARTMENT (EWRM · PDF fileenterprise wide risk management...
45
ENTERPRISE WIDE RISK MANAGEMENT DEPARTMENT (EWRM) PROJECT RISK AND INSURANCE MANAGEMENT SYSTEM USER MANUAL PROJECT MANAGER Prepared by : ERP21 SDN. BHD. LOT 8, JALAN PJU 3/39, SUNWAY DAMANSARA TECHNOLOGY PARK, 47810 PETALING JAYA, SELANGOR DARUL EHSAN. Phone No. : 603 – 7885 0468 Fax No. : 603 – 7885 0727
-
Upload
duongquynh -
Category
Documents
-
view
275 -
download
2
Transcript of ENTERPRISE WIDE RISK MANAGEMENT DEPARTMENT (EWRM · PDF fileenterprise wide risk management...
ENTERPRISE WIDE RISK MANAGEMENT DEPARTMENT (EWRM)
PROJECT RISK AND INSURANCE MANAGEMENT SYSTEM
USER MANUAL
PROJECT MANAGER
Prepared by :
ERP21 SDN. BHD.
LOT 8, JALAN PJU 3/39,
SUNWAY DAMANSARA TECHNOLOGY PARK,
47810 PETALING JAYA,
SELANGOR DARUL EHSAN.
Phone No. : 603 – 7885 0468
Fax No. : 603 – 7885 0727

Copyright ©2012 ERP21 Sdn Bhd
All rights reserved. No part of this publication may be reprinted, reproduced, stored in a retrieval
system or transmitted, in any form or by any means, without the prior permission in writing from the
owner.
First published and distributed in May 2012
TABLE OF CONTENTS
1.0 INTRODUCTION TO PRMS ..................................................................................................................... 4
1.1 VISION OF THE SYSTEM ................................................................................................................................. 4 1.2 BENEFITS OF THE SYSTEM .............................................................................................................................. 5 1.3 THE MAIN STAKEHOLDERS AND THE KEY BENEFITS .............................................................................................. 5 1.4 ABBREVIATION ........................................................................................................................................... 8
2.0 SYSTEM LOGIN ..................................................................................................................................... 9
3.0 SYSTEM MANAGEMENT ..................................................................................................................... 13
3.1 FORGOT PASSWORD FOR TNB STAFF ........................................................................................................... 13
4.0 PROCURE NEW INSURANCE POLICY .................................................................................................... 14
4.1 CONTRACT OF WORKS (NEW PROJECT) ......................................................................................................... 14 4.3 TRANSIT OF TNB’S ASSET ........................................................................................................................... 25
5.0 AMEND/EXTEND INSURANCE POLICY ................................................................................................. 27
5.1 AMEND/EXTEND CEAR INSURANCE POLICY .................................................................................................. 29 5.2 AMEND/EXTEND WC INSURANCE POLICY ..................................................................................................... 31 5.3 AMEND/EXTEND MOC INSURANCE POLICY ................................................................................................... 33 5.4 AMEND/EXTEND GIT INSURANCE POLICY ..................................................................................................... 36
6.0 NOTIFY CLAIM .................................................................................................................................... 38
6.1 PROJECT LISTING ....................................................................................................................................... 38 6.2 NOTIFY CLAIM WITHOUT COVER ................................................................................................................. 41
7.0 VIEW EXISTING CLAIM ........................................................................................................................ 44

User Manual – Project Manager
PRMS – User Manual Page 4 of 45
1.0 INTRODUCTION TO PRMS
Project Risk Management Information System (PRMS) is a new system developed for TNB’s
Enterprise Wide Risk Management (EWRM) department to address some the issues that are
inherent in the current business processes and IT systems.
1.1 Vision of the system
Vision of the system is to improve the overall management of project portfolio and
project risks with special focus on the delivery of end-to-end services for insurance
procurement and claim processing. The vision is supported by the following
objectives.
• To improve Project Risk Management practices for timely and accuracy of
declaration
• To improve recovery of loss through insurance and contractual clauses
• To improve communications and sharing of project insurance and claims issues
with project managers and relevant departments
• To create a standardised platform for risk assessment of projects across TNB
and
• To be able to measure and rank contractor performance based on their
capabilities and losses incurred in the project

User Manual – Project Manager
PRMS – User Manual Page 5 of 45
1.2 Benefits of the system
The major anticipated benefits of this project as follows.
• All projects undertaken are adequately covered by insurance as a risk mitigation
• To avoid potential rejection of claims or unresolved claims due to incomplete,
inaccurate or missing information
• To improve process efficiency and stakeholder satisfaction by lowering cost of
processing and faster service turnaround time whilst maintaining the agreed
quality targets
• To has more time available for EWRM to focus on value-adding, strategic and
planning activities to take the business to the next level of service performance
through continuous business process improvements
1.3 The main stakeholders and the key benefits
Stakeholder Key Benefits
TNB Management � assurance that the company comply fully to the national laws
and other regulatory bodies requirements with respect to OSH
� more accurate and up-to-date information to improve policy
decision making especially in the areas of risk management,
OSH and tender management

User Manual – Project Manager
PRMS – User Manual Page 6 of 45
Enterprise Wide
Risk Management
Department
(EWRM)
� comprehensive overview of project portfolio (project value,
status, performance, etc)
� improve overall customer service (faster service turnaround
time)
� reduce incidents of unsuccessful claims
� improve insurer’s confidence of TNB projects
� monitor project manager & contractor performance
� deliver a more comprehensive project risk management
platform
� better handling of critical equipments
� better detection of fraud
Project Manager � easier to complete project risks documentations (available
guides/templates on-line)
� easier to communicate or share critical project information e.g.
project issues
� improve customer service (more efficient insurance submission
& claims processing)
� improve decision making due to availability and accuracy of
critical project information
� easier to monitor contractor performance
Insured Party � assurance that all risks are adequately covered adequately
� reduce time in claims processing due to faster investigation time
Insurance Company
(Insurer) or Broker
� on-line access to insurance request resulting in faster
turnaround time for insurance proposal & quotations
(elimination of errors due to manual input, incomplete

User Manual – Project Manager
PRMS – User Manual Page 7 of 45
information, etc)
Contractor � improve quality of project deliverables due to improvements in
insurance & claims processes
Logistics Service
Department
� timely and more accurate information to improve logistics
planning and scheduling
Finance
Department
� earlier notification for payments disbursement (improve cash
flow planning)
� avoid potential penalty due to missed or late premium payments
Risk Managers &
Coordinator
� ability to check/verify that all projects have completed risk
assessment especially >RM100m
� assurance that critical risks are being managed & monitored
proactively by project managers
Occupational Safety
& Health
� ability to check/verify project conformance to OSH standards,
policy and guidelines
� complete and timely submissions of OSH-related incidents
Legal Services � single and up-to-date copy of all contract documents
� faster preparation and review of contract documents with
version controls
Procurement
Department
� more accurate & timely information to improve procurement
planning
� availability of contractor/supplier performance data is useful for
future contract negotiations
HODs � more accurate and timely KPI reporting
ICT Department � easier to support the system post-live (from many applications
to only a few)

User Manual – Project Manager
PRMS – User Manual Page 8 of 45
1.4 Abbreviation
Abbreviation Descriptions
PRMS Project Risk and Insurance Management System
TNB Tenaga Nasional Berhad
EWRM Enterprise Wide Risk Management Department
ERP21 ERP21 Sdn Bhd
ICT Information and Communication Technology
HOD Head of Department
OSH Occupational Safety & Health

User Manual – Project Manager
PRMS – User Manual Page 9 of 45
2.0 NEW USER REGISTRATION
A new user is required to register online as a main pre-requisite to access to the system.
Please follow the steps given below.
1) Open Internet Explorer (IE) browser in your desktop.
2) Please visit http://prms.tnb.com.my/ and a main page of the system will be displayed
as in figure 1.
3) Click at New User Registration. There are 2 types of user registration i.e. registration
for TNB’s and non TNB’s staff.
Figure 1
2.1 Registration of TNB’S Staff
Figure 2
1) Select ‘Yes’ at dropdown menu.
User Manual – Project Manager
PRMS – User Manual Page 10 of 45
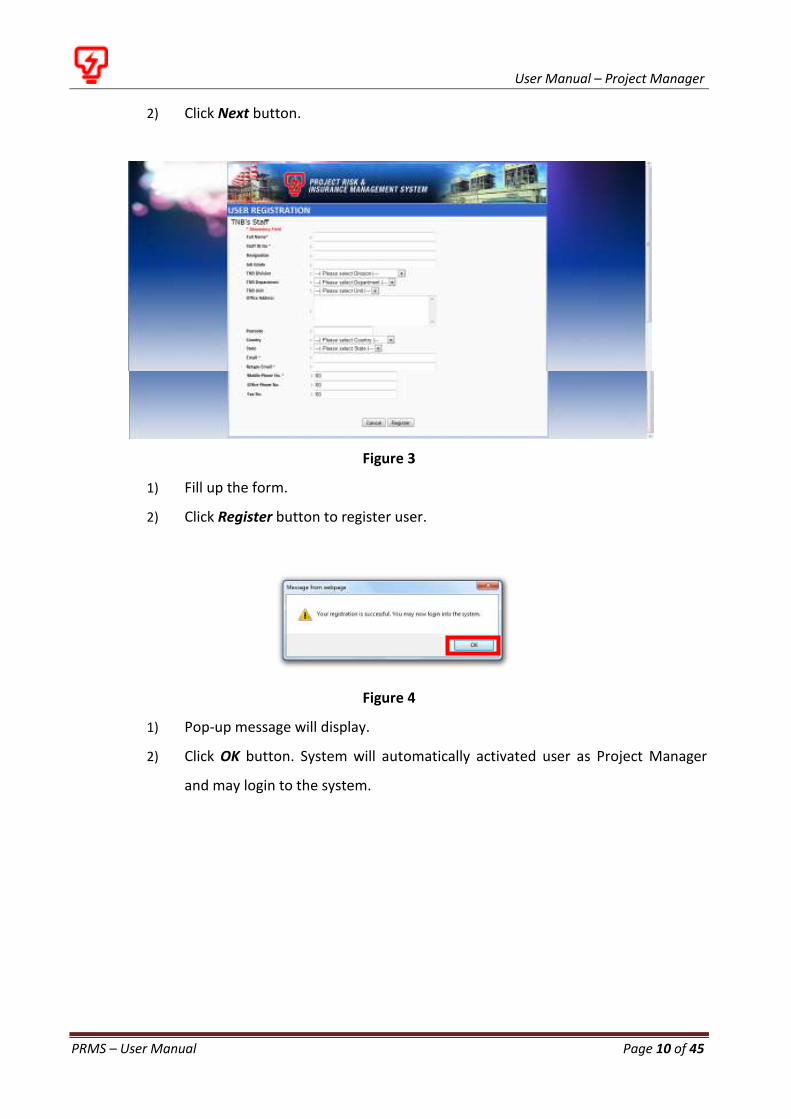
2) Click Next button.
Figure 3
1) Fill up the form.
2) Click Register button to register user.
Figure 4
1) Pop-up message will display.
2) Click OK button. System will automatically activated user as Project Manager
and may login to the system.

User Manual – Project Manager
PRMS – User Manual Page 11 of 45
2.2 Registration of Non-TNB’S Staff
Figure 5
1) Select user type.
2) Click Next button.
Figure 6
3) Select user role.
4) Click Next button.

User Manual – Project Manager
PRMS – User Manual Page 12 of 45
Figure 7
5) Fill up the form.
6) Click Cancel button to cancel registration.
7) Click Register button.
Figure 8
8) Pop-up message will be display.
9) Click OK button.

User Manual – Project Manager
PRMS – User Manual Page 13 of 45
3.0 SYSTEM LOGIN
Figure 9
Log into the system using your Staff No as Username and email password as the Password
to log into the system as in Figure 9.
1) Enter username and password.
2) Click Login button.
4.0 SYSTEM MANAGEMENT
4.1 Forgot Password for TNB Staff
Figure 10
1) Select ‘Yes’ at dropdown menu.
2) Click at ‘AD Password System’ hyperlink.
3) System will directly go to TNB’s AD Password System.

User Manual – Project Manager
PRMS – User Manual Page 14 of 45
5.0 PROCURE NEW INSURANCE POLICY
5.1 Contract of Works (New Project)
1) Go to menu Insurance Procurement >> Procure New Insurance Policy as in Figure
11.
Figure 11
2) Select CONTRACT OF WORKS at Type of works / services. Click Next button as in
Figure 12.
Figure 12
3) Click Enter New Project Information button as in Figure 13.
Figure 13

User Manual – Project Manager
PRMS – User Manual Page 15 of 45
4) Complete all information in tab Project Details, Project Manager Information,
and Contractor Information. Click Save button. Please refer to Figure 14 until
16.
Figure 14
Figure 15

User Manual – Project Manager
PRMS – User Manual Page 16 of 45
Figure 16
5) A pop up message will be displayed in Figure 17 when the record is successfully
saved. Click OK button.
Figure 17
6) In Search Existing Project screen as in Figure 18, at the bottom of the page is a
List of Project. Click hyperlink at the selected column namely as Contract No. to
view the project details and/or to request for insurance policy. You may search
your project by using the filtering component provided. Enter one or
combination of information and click Search button.

User Manual – Project Manager
PRMS – User Manual Page 17 of 45
Figure 18
7) In Project Information screen, you are able to view your Project Details, Project
Manager Information and Contractor Information. Please refer to Figure 19.
Figure 19
Click Edit Information button to edit the project information as in Figure 20. Click
Save button after editing information is complete.

User Manual – Project Manager
PRMS – User Manual Page 18 of 45
Figure 20
8) As in Figure 19, click Request for Insurance button to request insurance policy
of the selected project.
9) Select insurance policy required and click Next button as in Figure 21.
Figure 21

User Manual – Project Manager
PRMS – User Manual Page 19 of 45
10) Click at the selected insurance tab (e.g. CEAR Insurance Policy) and key in all the
information required. Click Save button to save the record. Please refer to
Figure 22.
Figure 22
11) A pop up message will be displayed as follows when the record is successfully
saved as in Figure 23. Click OK button.
Figure 23

User Manual – Project Manager
PRMS – User Manual Page 20 of 45
12) The information will automatically display at the bottom of the screen as in
Figure 24. To add new request of same insurance policy type, follow step 19
until 21.
Figure 24
13) Repeat step 19 until 21 to key in another insurance policy i.e at the tab of MOC
Insurance Policy and GIT Insurance Policy. Please refer to Figure 25 and 26.
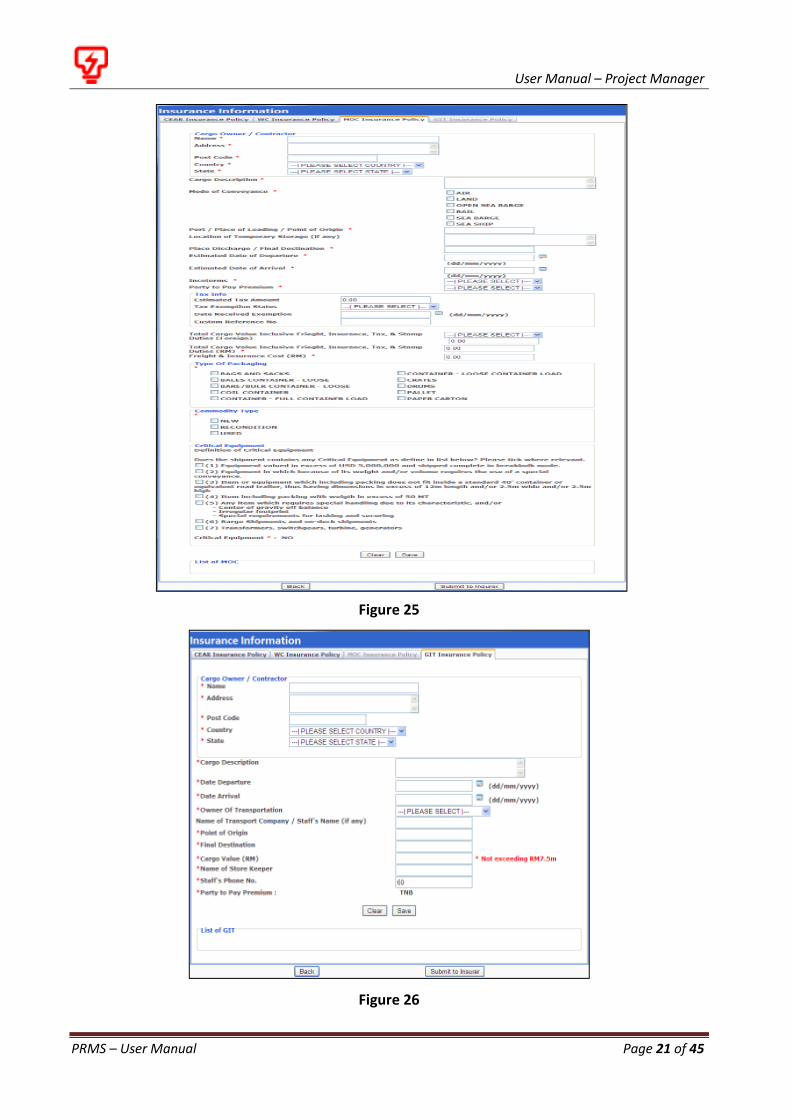
User Manual – Project Manager
PRMS – User Manual Page 21 of 45
Figure 25
Figure 26

User Manual – Project Manager
PRMS – User Manual Page 22 of 45
14) For tab WC Insurance Policy, data will automatically captured upon CEAR Insurance
Policy is saved. Even though, the value of Estimated Total Wages and Party to Pay
Premium of the WC insurance policy may be updated once click at the hyperlink in the
column of Estimated Total Wages (RM) as in Figure 27 and 28.
Figure 27
15) Once information is edited, click Save button to save the record.
Figure 28
16) Click Submit to Insurer button to submit all the insurance policies saved.
Figure 29
17) Confirmation message box appear. Click OK button to proceed OR Cancel button to
cancel submission.
Figure 30

User Manual – Project Manager
PRMS – User Manual Page 23 of 45
18) Following message will be displayed upon successful submission. Click OK
button. Project Manager and Contractor will receive acknowledgement email
that the insurance application has been sent to insurer.
Figure 31
5.2 Contract for Services
1) Go to menu Insurance Procurement >> Procure New Insurance Policy as in Figure
32.
Figure 32
2) Select CONTRACT FOR SERVICES at Type of works / services. Click Next button.
Figure 33

User Manual – Project Manager
PRMS – User Manual Page 24 of 45
3) Key in Project Information and click Submit button.
Figure 34
4) A pop up message will be displayed in Figure 35 when the record is successfully
saved. Click OK button.
Figure 35
5) The information will automatically display at the bottom of the screen as in
Figure 36. Under column of Action, either click edit button or delete button to
edit or delete the record. Edit the record and click Submit button to submit the
record. EWRM is able to access and edit the information submitted by the
Project Manager.
Figure 36

User Manual – Project Manager
PRMS – User Manual Page 25 of 45
5.3 Transit of TNB’s Asset
1) Go to menu Insurance Procurement >> Procure New Insurance Policy.
Figure 37
2) Select TRANSIT OF TNB’S ASSET at Type of works / services. Click Next button.
Figure 38
3) Click Request for Insurance button as in Figure 39.
Figure 39
4) Key in details of the information and click Save button to save the record. To
save and add new record of GIT click Save & Add New GIT button as in Figure
30.

User Manual – Project Manager
PRMS – User Manual Page 26 of 45
Figure 40
6) A pop up message will be displayed in Figure 41 when the record is successfully
saved. Click OK button.
Figure 41

User Manual – Project Manager
PRMS – User Manual Page 27 of 45
7) The information will automatically display at the bottom of the screen as in
Figure 42.
Figure 42
8) The following pop up message will be displayed in Figure 43 when the record is
successfully submitted. Click OK button. To add more request, repeat step 14
until 18.
Figure 43
6.0 AMEND/EXTEND INSURANCE POLICY
1) Go to menu Insurance Procurement >> Amend/Extend Insurance Policy.
Figure 44
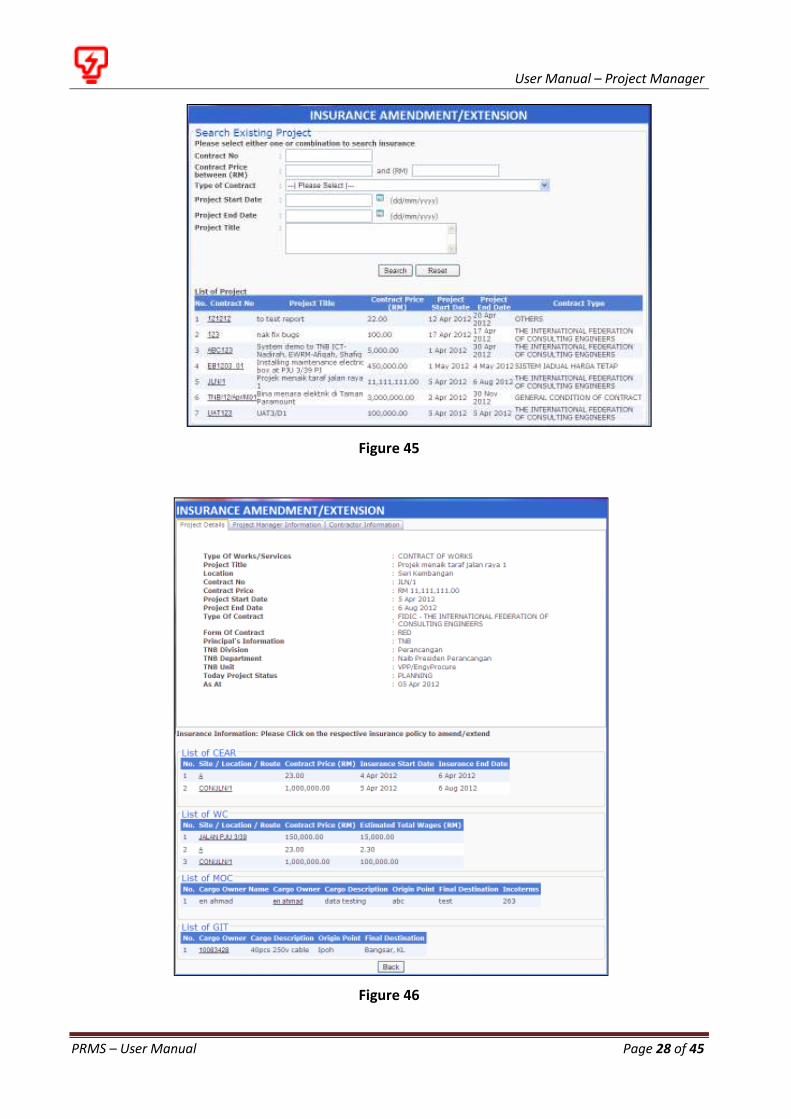
2) In Insurance Amendment/Extension screen, under List of Project, click hyperlink of
project’s contract number namely as Contract No. To view project details and list of
insurance policy that has been issued cover note or invoice or policy as in Figure 45
and 46. You may also search your project by using the filtering component provided.
Enter one or combination of information and click Search button.
User Manual – Project Manager
PRMS – User Manual Page 28 of 45
Figure 45
Figure 46

User Manual – Project Manager
PRMS – User Manual Page 29 of 45
6.1 Amend/Extend CEAR Insurance Policy
1) Under List of CEAR, click hyperlink at the column of Site/Location/Route for the
insurance policy that required amend/extend as in Figure 47.
Figure 47
2) Amend/extend policy information. Please refer to Figure 48.
Figure 48

User Manual – Project Manager
PRMS – User Manual Page 30 of 45
3) Upload evidence document by clicking Browse…. button. Please refer to Figure
49.
Figure 49
4) Please refer to Figure 50 to choose file to upload, enter Description and click
Upload button.
Figure 50
5) Document uploaded will be displayed at the bottom of the page as in Figure 51.
You may delete the document by single click at delete button or upload another
evidence document by repeating step 13 and 14.

User Manual – Project Manager
PRMS – User Manual Page 31 of 45
Figure 51
6) Click Submit button to submit your amendment/extension application. The
following pop up message will be displayed in Figure 52 when the policy is
successfully submitted. Click OK button. Project Manager and Contractor will
receive acknowledgement email that the insurance amendment/extension
application has been sent to insurer.
Figure 52
7) If the WC insurance policy is pairing with the CEAR policy in step 6, the policy
will automatically amended and submitted to insurer.
6.2 Amend/Extend WC Insurance Policy
1) Under List of WC, click hyperlink in column Site/Location/Route for the insurance policy
that need to be amend/extend.
Figure 53
User Manual – Project Manager
PRMS – User Manual Page 32 of 45
2) Amend Estimated Total Wages.
Figure 54
3) Upload evidence document by clicking button Browse….
Figure 55
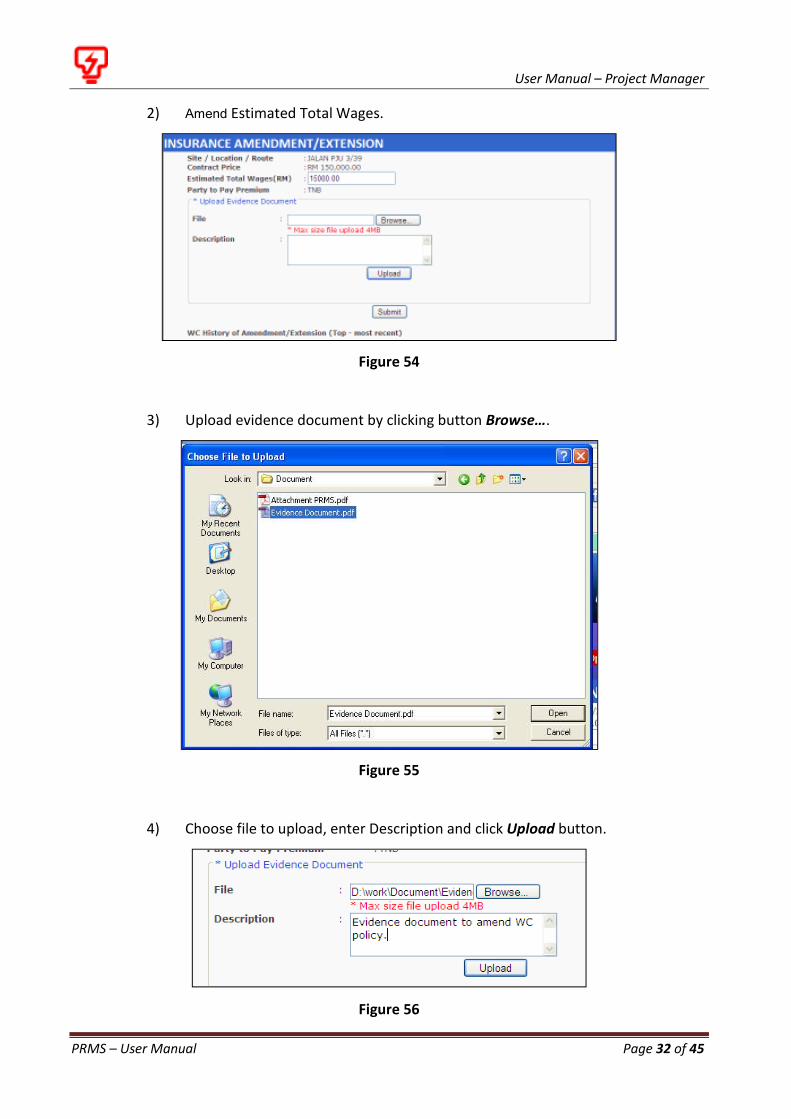
4) Choose file to upload, enter Description and click Upload button.
Figure 56

User Manual – Project Manager
PRMS – User Manual Page 33 of 45
5) Document uploaded will be displayed at the bottom of the page as in Figure 57.
You may delete the document by clicking delete button or upload another
evidence document by repeating step 13 and 14.
Figure 57
6) Click Submit button to submit your amendment/extension application. The
following pop up message will be displayed in Figure 58 when the application is
successfully submitted. Click OK button. Project Manager and Contractor will
receive acknowledgement email that the insurance amendment/extension
application has been sent to insurer.
Figure 58
6.3 Amend/Extend MOC Insurance Policy
1) At List of MOC, click hyperlink in column Cargo Owner for the insurance policy that
need to be amend/extend.
Figure 59

User Manual – Project Manager
PRMS – User Manual Page 34 of 45
2) Amend/extend policy information.
Figure 60

User Manual – Project Manager
PRMS – User Manual Page 35 of 45
3) Upload evidence document by clicking Browse… button.
Figure 61
4) Choose file to upload, enter Description and click Upload button.
Figure 62
5) Document uploaded will be displayed below Upload button. You may delete the
document by single click at delete button or upload another evidence document
by repeating step 13 and 14.
Figure 63
User Manual – Project Manager
PRMS – User Manual Page 36 of 45
6) Click Submit button to submit your amendment/extension application.
7) A pop up message will be displayed upon successful submission. Click OK
button. Project Manager and Contractor will receive acknowledgement email
that the insurance amendment/extension application has been sent to insurer.
Figure 64
6.4 Amend/Extend GIT Insurance Policy
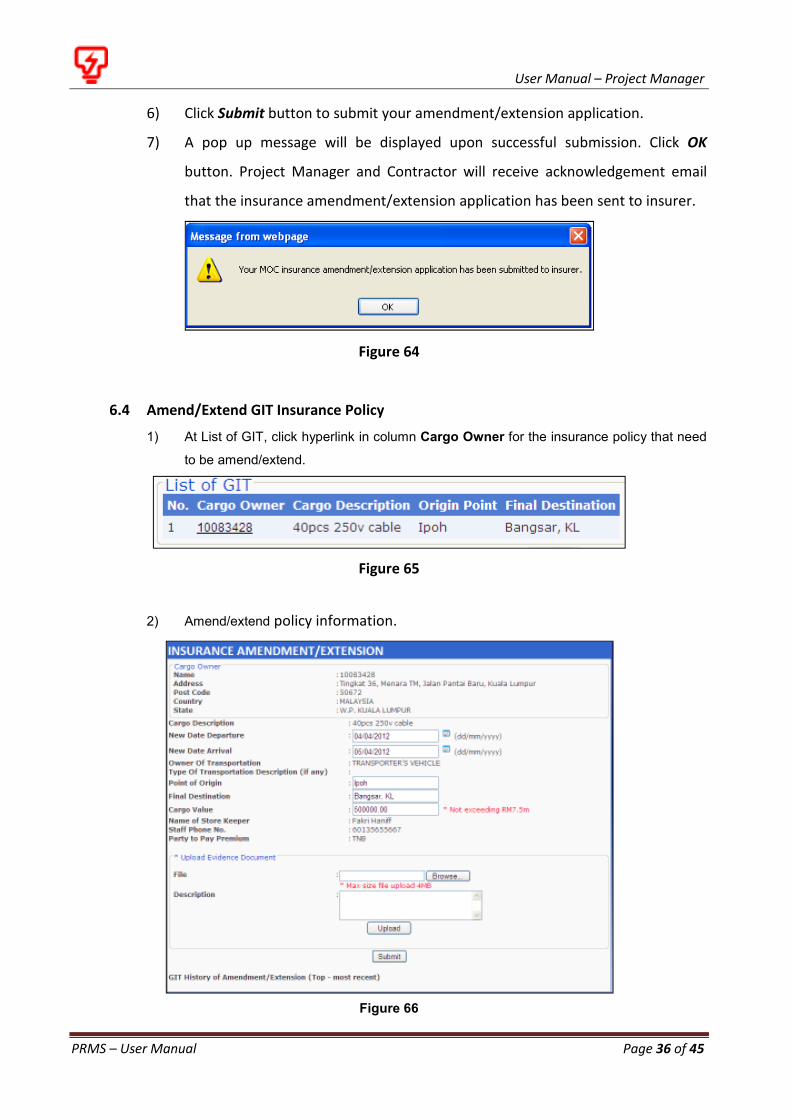
1) At List of GIT, click hyperlink in column Cargo Owner for the insurance policy that need
to be amend/extend.
Figure 65
2) Amend/extend policy information.
Figure 66
User Manual – Project Manager
PRMS – User Manual Page 37 of 45
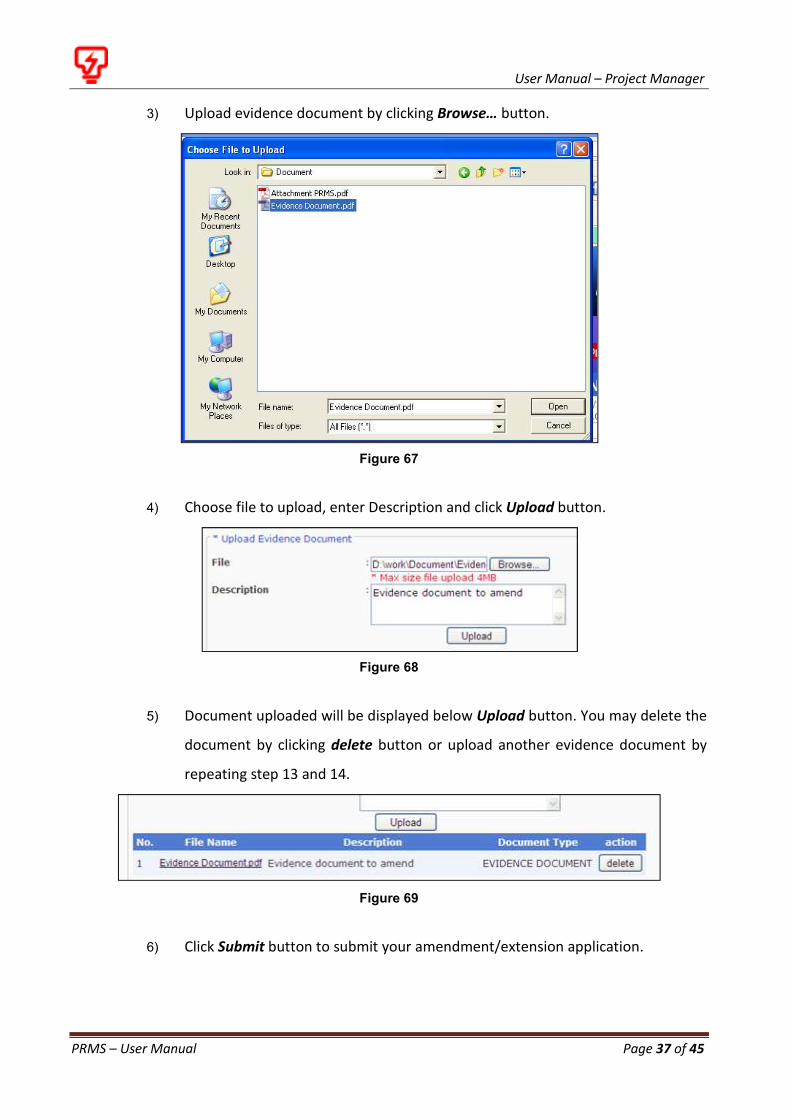
3) Upload evidence document by clicking Browse… button.
Figure 67
4) Choose file to upload, enter Description and click Upload button.
Figure 68
5) Document uploaded will be displayed below Upload button. You may delete the
document by clicking delete button or upload another evidence document by
repeating step 13 and 14.
Figure 69
6) Click Submit button to submit your amendment/extension application.
User Manual – Project Manager
PRMS – User Manual Page 38 of 45
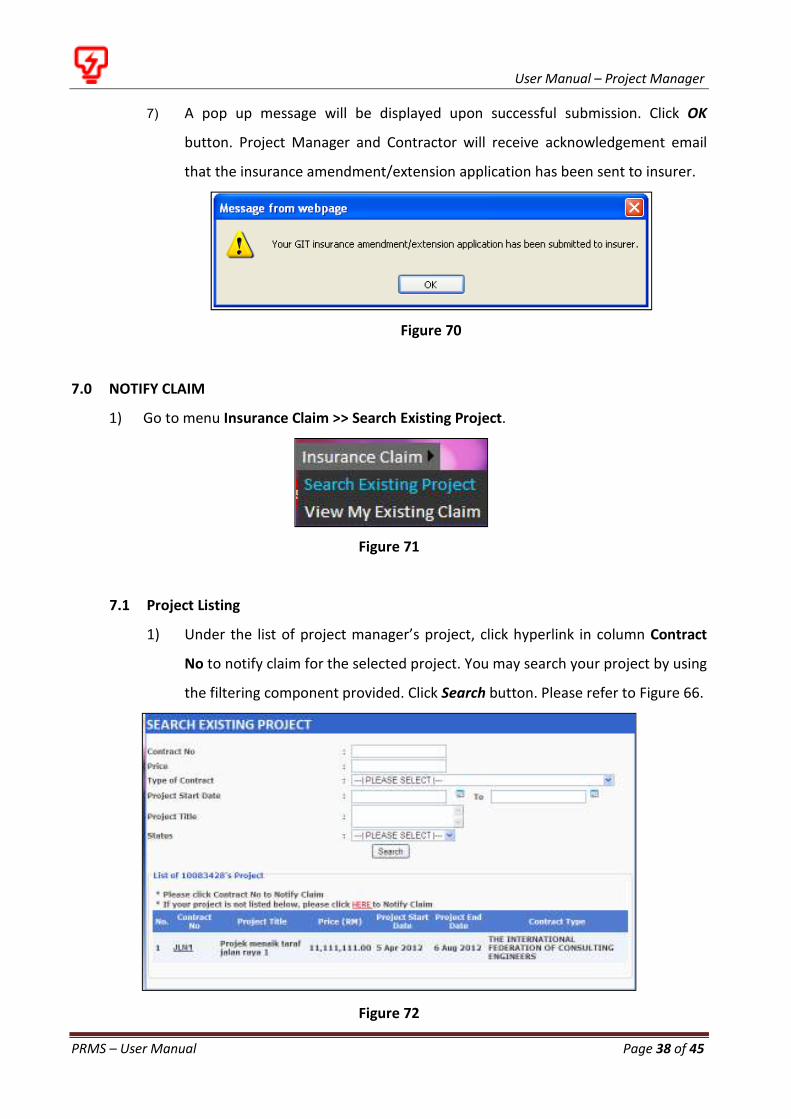
7) A pop up message will be displayed upon successful submission. Click OK
button. Project Manager and Contractor will receive acknowledgement email
that the insurance amendment/extension application has been sent to insurer.
Figure 70
7.0 NOTIFY CLAIM
1) Go to menu Insurance Claim >> Search Existing Project.
Figure 71
7.1 Project Listing
1) Under the list of project manager’s project, click hyperlink in column Contract
No to notify claim for the selected project. You may search your project by using
the filtering component provided. Click Search button. Please refer to Figure 66.
Figure 72

User Manual – Project Manager
PRMS – User Manual Page 39 of 45
2) You may search your project by using the filtering component provided. Click
Search button.
3) Enter claim information.
Figure 73
4) On selecting Insurance Policy, list of policy (that has been paid) for the selected
policy type will be displayed below. Choose one policy from the list.
Figure 74
User Manual – Project Manager
PRMS – User Manual Page 40 of 45
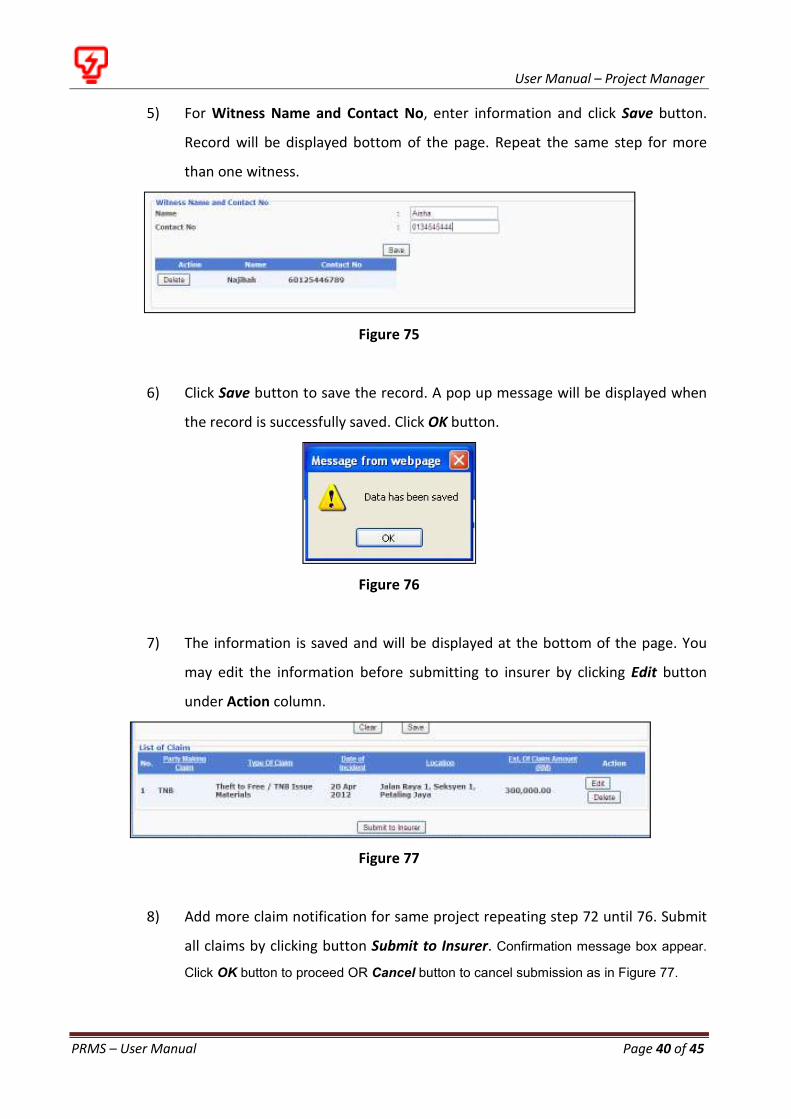
5) For Witness Name and Contact No, enter information and click Save button.
Record will be displayed bottom of the page. Repeat the same step for more
than one witness.
Figure 75
6) Click Save button to save the record. A pop up message will be displayed when
the record is successfully saved. Click OK button.
Figure 76
7) The information is saved and will be displayed at the bottom of the page. You
may edit the information before submitting to insurer by clicking Edit button
under Action column.
Figure 77
8) Add more claim notification for same project repeating step 72 until 76. Submit
all claims by clicking button Submit to Insurer. Confirmation message box appear.
Click OK button to proceed OR Cancel button to cancel submission as in Figure 77.

User Manual – Project Manager
PRMS – User Manual Page 41 of 45
Figure 78
9) A pop up message will be displayed upon successful submission of the claim(s) to
insurer. Click OK button. Insurer will receive acknowledgement email that
claim(s) notification has been submitted to them. Please refer to Figure 76.
Figure 77
7.2 Notify Claim Without Cover
1) If your project is not listed in List of Project, click at hyperlink HERE to Notify
Claim.
Figure 78`
2) Enter project details and click Next button as in Figure 74.
3) Edit the information of Project Manager and click Next button as in Figure 75.
4) Select Contractor’s Company Name and tick person in charge. Click Next button
as in Figure 79.
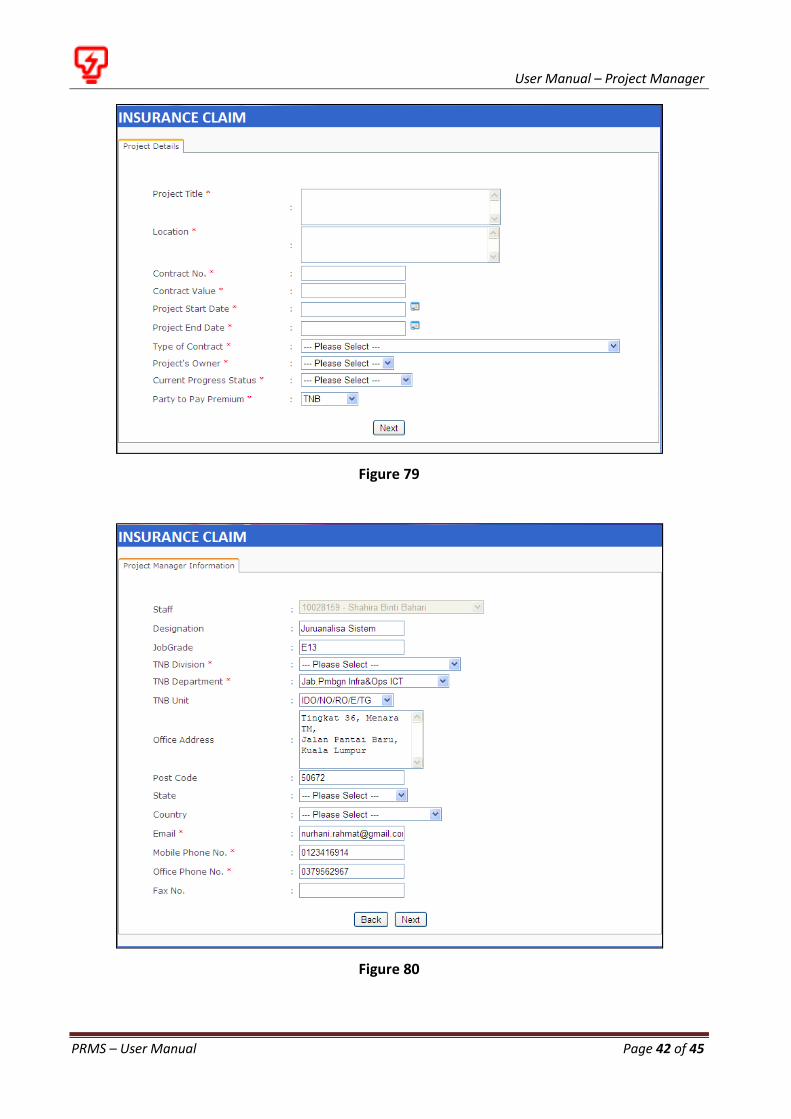
User Manual – Project Manager
PRMS – User Manual Page 42 of 45
Figure 79
Figure 80

User Manual – Project Manager
PRMS – User Manual Page 43 of 45
Figure 81
5) Enter Claim Information and click Save button as in Figure 82.
Figure 82

User Manual – Project Manager
PRMS – User Manual Page 44 of 45
6) A pop up message will be displayed upon successful saving. Click OK button.
Figure 83
7) List of notified claim will be displayed as follows for editing or deletion.
Figure 84
8.0 VIEW EXISTING CLAIM
1) Go to menu Insurance Claim >> View My Existing Claim.
Figure 85
2) List of Claim will be displayed as in Figure 84. You may search your existing claim by
using the searching component provided and click Search button. Click at hyperlink in
column Party Making Claim to view loss details.
3) List of Claim is displayed in Figure 84 as Loss Details.
4) Please refer to Figure 84 to view Loss details.

User Manual – Project Manager
PRMS – User Manual Page 45 of 45
Figure 86
Figure 87


![Risk Management (3C05/D22) Unit 3: Risk Management · 2004. 4. 29. · Risk-management planning Risk resolution [Boehm 1991] Risk monitoring Software risk management steps & techniques](https://static.fdocuments.net/doc/165x107/6122993708b35f7a264d6759/risk-management-3c05d22-unit-3-risk-2004-4-29-risk-management-planning.jpg)