EMC Unity™ 퀵 스타트 · 초기 구성 마법사를 이용하면 라이센스 설치,...
8
Copyright © 2016 EMC. All rights reserved. Dell, EMC and other trademarks are trademarks of Dell Inc. or its subsidiaries. P/N 300-015-569 Rev 01 Before you begin Purpose of this document Required: ❑ Create an EMC Online Support account: https://support.emc.com . You will need this account later in the installation process to activate software licenses and configure ESRS (EMC Secure Remote Services). ❑ If your Unity system arrived pre-racked, begin installation at Step 4 of this guide. ❑ Obtain the help of a second person to install the enclosure into the rack, or use a mechanical lift. ❑ If you have more than one enclosure to install, use the Unity Installation Guide to complete your installation. The installation guide includes racking and cabling instructions required for additional enclosures, which are not covered here. The Unity Installation Guide is located here: http://bit.ly/ unityinfohub . Recommended: ❑ Download the Connection Utility at http://bit.ly/ unityinfohub . You will need this utility if you want to assign static IP addresses to your system. You will not need this utility if you plan to use DHCP to automatically assign IP addresses to your system. ❑ If you are installing your system in a location with restricted internet access, download the Connection Utility and your license files before starting the installation process: http://bit.ly/unityinfohub . ❑ Watch the Unity Quick Start Installation video: http:/ /bit.ly/unityinfohub . ❑ Refer to the What’s next section for important details about adding enclosures and using the Unisphere online help. Unpack Record SN Power Up Assign Management Address Cable to Network Install Rails Launch Unisphere Install System 1 5 2 3 7 4 8 6 Dell EMC Unity ™ Quick Start >
Transcript of EMC Unity™ 퀵 스타트 · 초기 구성 마법사를 이용하면 라이센스 설치,...

Dell EMC Unity™ Quick Start >
Before you begin
Purpose of this document
Required:
❑ Create an EMC Online Support account: https://support.emc.com. You wil l need this account later in the installation process to activate software licenses and configure ESRS (EMC Secure Remote Services).
❑ If your Unity system arrived pre-racked, begin installation at Step 4 of this guide.
❑ Obtain the help of a second person to install the enclosure into the rack, or use a mechanical lift.
❑ If you have more than one enclosure to install, use the Unity Installation Guide to complete your installation. The installation guide includes racking and cabling instructions required for additional enclosures, which are not covered here. The Unity Installation Guide is located here: http://bit.ly/unityinfohub.
Recommended:
❑ Download the Connection Utility at http://bit.ly/unityinfohub. You wil l need this utility if you want to assign static IP addresses to your system. You wil l not need this utility if you plan to use DHCP to automatically assign IP addresses to your system.
❑ If you are installing your system in a location with restricted internet access, download the Connection Utility and your license files before starting the installation process: http://bit.ly/unityinfohub.
❑ Watch the Unity Quick Start Installation video: http://bit.ly/unityinfohub.
❑ Refer to the What’s next section for important details about adding enclosures and using the Unisphere online help.
Unpack
Record SNPower Up
AssignManagement
Address
Cable toNetwork
InstallRails
LaunchUnisphere
InstallSystem
1
5
2
37
4
8
6
Copyright © 2016 EMC. All rights reserved. Dell, EMC and other trademarks are trademarks of Dell Inc. or its subsidiaries. P/N 300-015-569 Rev 01

>
Copyrightare tradem
1. Unpack your systemVerify that you have the following components:❑ 2U Disk Processor Enclosure (DPE) with either 12-3.5” drive slots or 25-2.5” drive slots
❑ Rail kit, including 2 rails with 6 mounting screws
❑ 2 power cables (100-240Vac)
❑ Bezel
❑ Not provided by EMC, but you wil l also need:
• A Phil lips-head screwdriver with magnetic tip
• 2 CAT 5 or better Ethernet cables
2. Install the railsThe rails are designated Left and Right and cannot be interchanged. 1. First, orient the rails. Face the front of the cabinet when orienting the Left and Right rail placement.
The front of each rail is stamped L or R.
2. From the rear of the cabinet, insert the adaptors into the holes on the rear rack channel with the rail extended as shown in the image below.
3. Push the rail into the rear mounting holes until the spring clips snap into place on the outside of the rear rack channel:
CAUTIONEnsure the holes on the rail line up with the holes on the cabinet. This wil l ensure proper alignment of the rails. Also, check that the rails are level from front-to-back and left-to-right. Ensure you are using the same unit markers from the front of the cabinet to the rear of the cabinet.
Watch the Unity Quick Start Installation Video: http://bit.ly/unityinfohub
Extend rail
Rear Channel
View from rear of rack
FrontChannel Spring Clips
Adaptors
CL5774
© 2016 EMC. All rights reserved. Dell, EMC and other trademarksarks of Dell Inc. or its subsidiaries. P/N 300-015-569 Rev 01
>
Copyrightare tradem
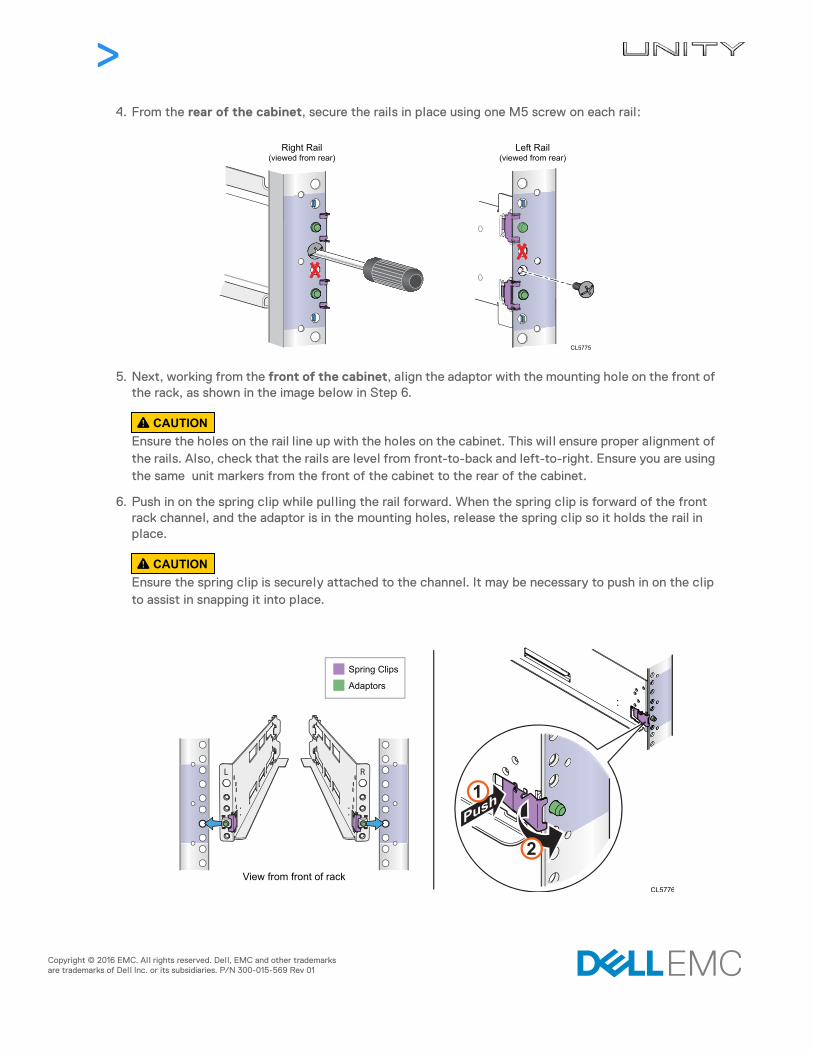
4. From the rear of the cabinet, secure the rails in place using one M5 screw on each rail:
5. Next, working from the front of the cabinet, align the adaptor with the mounting hole on the front of the rack, as shown in the image below in Step 6.
CAUTIONEnsure the holes on the rail line up with the holes on the cabinet. This wil l ensure proper alignment of the rails. Also, check that the rails are level from front-to-back and left-to-right. Ensure you are using the same unit markers from the front of the cabinet to the rear of the cabinet.
6. Push in on the spring clip while pulling the rail forward. When the spring clip is forward of the front rack channel, and the adaptor is in the mounting holes, release the spring clip so it holds the rail in place.
CAUTIONEnsure the spring clip is securely attached to the channel. It may be necessary to push in on the clip to assist in snapping it into place.
CL5775
Right Rail(viewed from rear)
Left Rail(viewed from rear)
View from front of rack
© 2016 EMC. All rights reserved. Dell, EMC and other trademarksarks of Dell Inc. or its subsidiaries. P/N 300-015-569 Rev 01

>
Copyrightare tradem
3. Install the system onto the rails
CAUTIONThe enclosure is heavy and should be installed into or removed from a rack by two people. To avoid personal injury and/or damage to the equipment, do not attempt to lift and install the enclosure into a rack without a mechanical lift and/or help from another person.
1. From the front of the rack, slide the enclosure onto the rails:
2. Secure the enclosure to the front vertical channels of the cabinet with 4 screws (2 per side).
CL5777
CL5778
© 2016 EMC. All rights reserved. Dell, EMC and other trademarksarks of Dell Inc. or its subsidiaries. P/N 300-015-569 Rev 01

>
Copyrightare tradem
4. Record your system serial numberLocate and record the product serial number tag on the front of the DPE chassis in either of the locations shown below. You wil l use this number to obtain product licenses later in the installation process:
5. Cable the system to the networkConnect two CAT 5 (or better) ethernet cables from your local network (LAN) to the RJ45 management ports at the rear of the system. The management ports have a white border around them.
PROD ID/SN: FNM01234567891
PN: 123-456-789 (OBERON)
PROD ID/SN: FNM01234567891
PN: 123-456-789 (OBERON)
CL5779
PROD ID/SN: FNM01234567891
PN: 123-456-789 (OBERON)
PROD ID/SN: FNM01234567891
PN: 123-456-789 (OBERON)
CL5780
12-drive enclosure: The underside of the top edge near the right side.
25-drive enclosure: Below the power status LED located between drive slots 16 and 17.
Serial Number: ___________________________________
XXX XXX XXXX XXR
EV:XXX
23
XXX
XXX
XXXX
XX
REV
:XXX
1 GbE
10 GbE
2 3
2 3 1GbE
1 GbE
10 GbE 23
231GbE
CL5782
© 2016 EMC. All rights reserved. Dell, EMC and other trademarksarks of Dell Inc. or its subsidiaries. P/N 300-015-569 Rev 01
>
Copyright are tradem
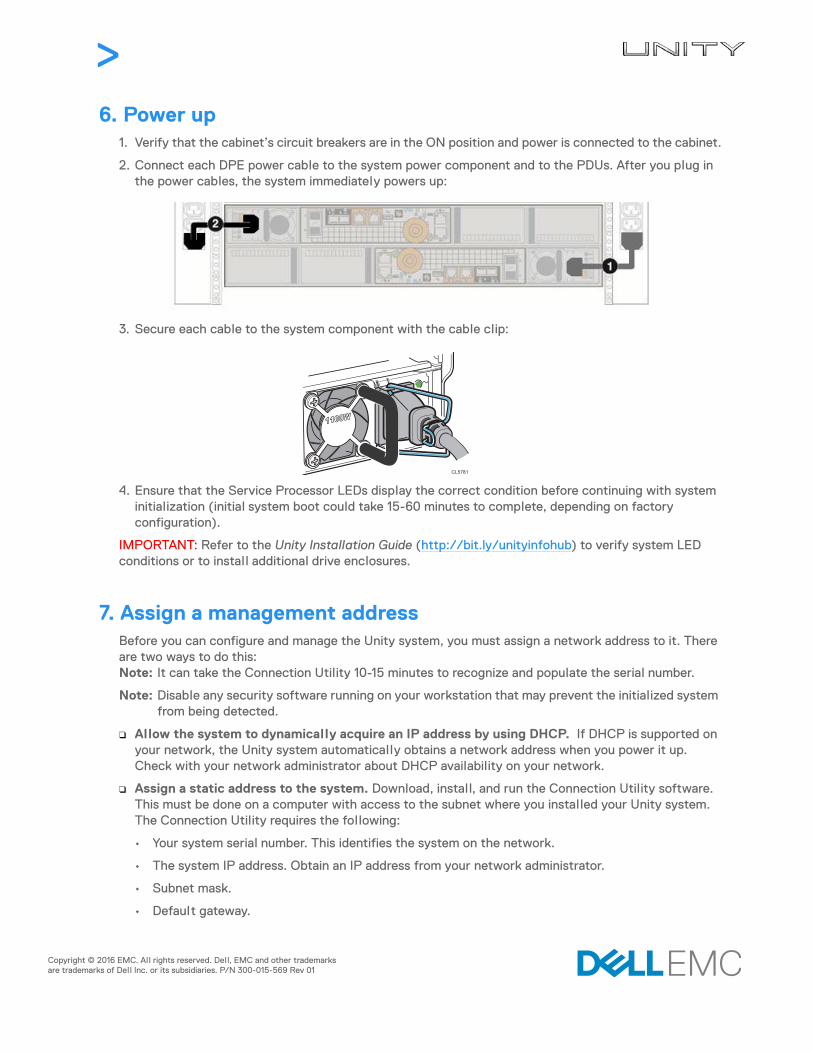
6. Power up1. Verify that the cabinet’s circuit breakers are in the ON position and power is connected to the cabinet.
2. Connect each DPE power cable to the system power component and to the PDUs. After you plug in the power cables, the system immediately powers up:
3. Secure each cable to the system component with the cable clip:
4. Ensure that the Service Processor LEDs display the correct condition before continuing with system initialization (initial system boot could take 15-60 minutes to complete, depending on factory configuration).
IMPORTANT: Refer to the Unity Installation Guide (http://bit.ly/unityinfohub) to verify system LED conditions or to install additional drive enclosures.
7. Assign a management addressBefore you can configure and manage the Unity system, you must assign a network address to it. There are two ways to do this:Note: It can take the Connection Utility 10-15 minutes to recognize and populate the serial number.
Note: Disable any security software running on your workstation that may prevent the initialized system from being detected.
❑ Allow the system to dynamically acquire an IP address by using DHCP. If DHCP is supported on your network, the Unity system automatically obtains a network address when you power it up. Check with your network administrator about DHCP availability on your network.
❑ Assign a static address to the system. Download, install, and run the Connection Utility software. This must be done on a computer with access to the subnet where you installed your Unity system. The Connection Utility requires the following:
• Your system serial number. This identifies the system on the network.
• The system IP address. Obtain an IP address from your network administrator.
• Subnet mask.
• Default gateway.
CL5781
© 2016 EMC. All rights reserved. Dell, EMC and other trademarksarks of Dell Inc. or its subsidiaries. P/N 300-015-569 Rev 01
>
Copyrightare tradem
8. Launch the Unisphere Initial Configuration WizardThe Initial Configuration Wizard walks you through the steps to install licenses, configure network settings, create pools, manage alerts, define support options, configure network interfaces, and create NAS servers.1. Complete the Configuration Worksheet. This worksheet is located in the Unity Installation Guide or
as a separate download from the Unity Info Hub: http://bit.ly/unityinfohub.
2. Access the Unisphere management application.
• If you manually configured the system with the Connection Utility, click Launch Unisphere, or open a web browser and enter the IP address that you assigned to the Unity system.
• If the system automatically acquired an IP address through DHCP, enter the Unity system serial number and its network domain in the browser's address bar as follows:Sample URL: FM100000000017.mylab.xyz.com
Note: If you receive a certificate error when trying to access Unisphere, refer to your internet browser instructions to either bypass the error or to install the self-signed array certificate. For more detail about your system certificate, refer to the EMC Unity Family Security Configuration Guide.
• Log in with the default user name and password. Please complete the tasks associated with this wizard before placing the system into use.
• Username: admin
• Password: Password123#
• Licensing your system includes:
• The Unisphere Initial Configuration Wizard automatically takes you to SW Licensing Central.
• Register, activate, and download your license files as described on SW Licensing Central.
• Install licenses on your array using the Unisphere Initial Configuration Wizard.
What’s next?❑ Use the Unisphere Online Help to further guide you through the configuration process.
❑ If you need to add Disk Array Enclosures (DAEs) to the system at a later time, use the (15- or 25-drive) Installing an Optional Disk-Array Enclosure guide at http://bit.ly/unityinfohub_cru.
Other languagesYou can access localized versions of this and other documents at support.emc.com.您可以在 support.emc.com 上访问本文及其他文档的本地化版本。
Локализованные версии этого и других документов можно найти на веб-сайте support.emc.com.Você pode acessar versões localizadas deste e de outros documentos em support.emc.com.본 문서 및 기타 문서의 한국어 버전은 support.emc.com 에서 이용할 수 있습니다 .
こ の ド キ ュ メ ン ト およびその他のドキ ュ メ ン ト の日本語版は、 support.emc.com か ら ご覧いただけます。
Des versions traduites du présent document et d’autres documents sont disponibles sur le site Web support.emc.com.Puede obtener acceso a versiones traducidas de este y otros documentos en support.emc.com.Lokalisierte Versionen dieses Dokuments und anderer Dokumente finden Sie unter http://support.emc.com.
© 2016 EMC. All rights reserved. Dell, EMC and other trademarksarks of Dell Inc. or its subsidiaries. P/N 300-015-569 Rev 01
>
Copyrightare tradem
© 2016 EMC. All rights reserved. Dell, EMC and other trademarksarks of Dell Inc. or its subsidiaries. P/N 300-015-569 Rev 01