ECITE Cloud Platform User Manual - George Mason...
46
ECITE Cloud Platform User Manual Copyright © 2015 NSF Spatiotemporal Innovation Center, All Rights Reserved Prepared for NSF EarthCube, ECITE 1 User Manual EarthCube Integration and Test Environment Hybrid Cloud Platform AWS Platform Powered By Dynamic Computing Cloud (DC2)
Transcript of ECITE Cloud Platform User Manual - George Mason...
ECITE Cloud Platform User Manual
Copyright © 2015 NSF Spatiotemporal Innovation Center, All Rights Reserved Prepared for NSF EarthCube, ECITE
1
User Manual
EarthCube Integration and Test Environment Hybrid Cloud
Platform
AWS Platform
Powered By Dynamic Computing Cloud (DC2)

ECITE Cloud Platform User Manual
Copyright © 2015 NSF Spatiotemporal Innovation Center, All Rights Reserved Prepared for NSF EarthCube, ECITE
2
Content
Preface .......................................................................................................................................................... 5
1. Basic Operation ........................................................................................................................................ 6
1.1 Login .................................................................................................................................................... 6
1.2 User and authorization type ............................................................................................................... 7
1.3 DC2 modules and functions ................................................................................................................ 8
1.4 Switch between cloud platforms, projects and cloud regions ............................................................ 9
1.5 Edit User Profile and Password ......................................................................................................... 11
1.6 Logout ............................................................................................................................................... 12
2. Modules and Functions for Cloud Project Manager ........................................................................... 12
2.1 Message Console ........................................................................................................................ 12
2.2 Display Projects/ Deactivate Projects ............................................................................................... 13
2.3 Set Project Funding Alert .................................................................................................................. 15
2.4 Create User ....................................................................................................................................... 16
2.5 Approve User .................................................................................................................................... 16
2.6 Activate User ..................................................................................................................................... 16
2.7 Deactivate User ................................................................................................................................. 17
2.8 Change User Password ...................................................................................................................... 18
2.9 Change User Profile........................................................................................................................... 18
2.10 Associate/Disassociate user role in project .................................................................................... 19
2.11 Display Instances ............................................................................................................................. 21
2.12 Display Images ................................................................................................................................ 21
2.13 Display Public Image ....................................................................................................................... 22
2.14 Volume ............................................................................................................................................ 22
2.15 Snapshot ......................................................................................................................................... 22
2.16 Recurring Snapshot ......................................................................................................................... 22
2.17 Display Key Pair/Security Group ..................................................................................................... 22
2.18 Display IP ......................................................................................................................................... 23
2.19 Monitor Funding Usage .................................................................................................................. 23
2.20 Display Cloud Storage ..................................................................................................................... 24

ECITE Cloud Platform User Manual
Copyright © 2015 NSF Spatiotemporal Innovation Center, All Rights Reserved Prepared for NSF EarthCube, ECITE
3
3. Modules and Functions for Privileged User ........................................................................................ 24
3.1 Message Console ........................................................................................................................ 24
3.2 Create Virtual Machine/Instance ...................................................................................................... 25
3.3 Access Instance ................................................................................................................................. 26
3.4 Start/stop Instance ........................................................................................................................... 27
3.5 Resize Instance .................................................................................................................................. 29
3.6 Terminate Instance ........................................................................................................................... 29
3.7 Create Image ..................................................................................................................................... 30
3.8 Monitor Funding Usage .................................................................................................................... 31
3.9 Submit Golden Image ........................................................................................................................ 32
3.10 Create and S3 buckets..................................................................................................................... 33
3.11 Upload/download file to/from S3 bucket ....................................................................................... 34
3.12 Allocate/Release and Associate/Disassociate IP Addresses ........................................................... 36
3.13 Creating a Key Pair/Security Group ................................................................................................ 40
3.13.1 Create Key Pair ......................................................................................................................... 40
3.13.2 Download Key .......................................................................................................................... 41
3.13.3 Delete Key ................................................................................................................................ 41
3.13.4 Civilize Key ................................................................................................................................ 42
3.13.5 Display Security Group ............................................................................................................. 42
4. Modules and Functions for End User .................................................................................................. 43
4.1 Message Console .............................................................................................................................. 43
4.1 Display Projects ................................................................................................................................. 43
4.2 Display Users ..................................................................................................................................... 43
4.3 Display Instances ............................................................................................................................... 43
4.4 Display Images .................................................................................................................................. 43
4.5 Display Public Image ......................................................................................................................... 43
4.6 Display Volume ................................................................................................................................. 43
4.7 Key Pair/Security Group .................................................................................................................... 43
4.9 Display IP ........................................................................................................................................... 43
4.10 Cloud Storage .................................................................................................................................. 43
4.11 Access Instance ............................................................................................................................... 43
4.12 Start/stop Instance ......................................................................................................................... 44

ECITE Cloud Platform User Manual
Copyright © 2015 NSF Spatiotemporal Innovation Center, All Rights Reserved Prepared for NSF EarthCube, ECITE
4

ECITE Cloud Platform User Manual
Copyright © 2015 NSF Spatiotemporal Innovation Center, All Rights Reserved Prepared for NSF EarthCube, ECITE
5
Preface
Dynamic Computing Cloud (DC2) is a unique software that manages, simplies, and
optimizes secure hybrid clouds interoparably: Amazon AWS, Eucalytus Cloud, and
OpenStack Cloud. DC2 uses different roles to control and grant user permissions;
projects are also used to manage a group of users. With DC2, cloud consumers can:
1. Associate AWS accounts to projects and track the billing details, manipulate
AWS compute, image, stack, VPC, S3 and other resources;
2. Fully operate Eucalyptus and burst into Amazon AWS;
3. Use Openstack with rich and scalable solutions.
This user manual is prepared to guide users to manage their cloud computing resource
for both EarthCube funded projects and community technology demonstrations. It is a
hands-on, step-by-step introduction to the capabilities of DC2. The first section
introduces the basic operation. Sections two to four describe modules and functions for
each user role.

ECITE Cloud Platform User Manual
Copyright © 2015 NSF Spatiotemporal Innovation Center, All Rights Reserved Prepared for NSF EarthCube, ECITE
6
1. Basic Operation
1.1 Login
To access DC2, you can bring up the system’s URL (e.g. http://domainname/dc2us) into
a web browser (Firefox or Chrome is recommended), the login page will show up as
below.
Enter user name and password, and click login will bring up the following DC2 main
page.

ECITE Cloud Platform User Manual
Copyright © 2015 NSF Spatiotemporal Innovation Center, All Rights Reserved Prepared for NSF EarthCube, ECITE
7
There are three major panels on the main page:
Panel 1 is a menu that includes all DC2 functionalities available to the current
user/role.
Panel 2 shows the user information. User can change account profile, logout, select
cloud platform (currently support Amazon and Eucalyptus), select project, select
their project roles and the cloud region.
Panel 3 is the workspace where the detailed result of each operation is displayed.
Panel 4 shows the detailed information about a selected resource (if available).
1.2 User and authorization type
This DC2 version is customized according to the requirement of ECITE and includes
three user roles:

ECITE Cloud Platform User Manual
Copyright © 2015 NSF Spatiotemporal Innovation Center, All Rights Reserved Prepared for NSF EarthCube, ECITE
8
Cloud Project Manager is the role that is responsible for a specific project and
monitors the project’s cloud usage. This is a role designated by the Account
Coordinator.
Privileged User is the role responsible for starting/stopping and provisioning cloud
instances for a specific project. This role may be fulfilled by either cloud service
team member or a person designated by the Cloud Project Manager. This user is
created by a cloud system administrator or the Cloud Project Manager. It is
suggested that each project has only one privileged user who is technically oriented.
End User is a general role that directly or indirectly accesses or uses a cloud
instance and/or cloud services from AIST Cloud. This user has the ability to stop
cloud instances.
Each role corresponds to different functional modules in the system, and the
corresponding relationship between role and system functions are described in the
sections 2 to 4.
1.3 DC2 modules and functions
DC2 functions can be categorized into five major modules:
1. Project/User Management is designed to help users manage their information and
virtual resources. Project management user can manage users of a project through
this module.

ECITE Cloud Platform User Manual
Copyright © 2015 NSF Spatiotemporal Innovation Center, All Rights Reserved Prepared for NSF EarthCube, ECITE
9
2. Virtual Resource is used to manage and monitor virtual resources. All user types
have access to this module, but the information they retrieve varies depending on
their roles.
3. Network security is used to manage security groups and keys, and all users have
access to this module for their designated security functions.
4. Billing/Resource monitoring is used to monitor the usage of virtual resources, user
operation, and billing information on a daily basis.
5. IP Management is used to manage the IP for the Eucalyptus cloud.
Sections 2 to 4 describe the operations of the functions under each role.
1.4 Switch between cloud platforms, projects and cloud regions
DC2 allows users to easily switch between different cloud platforms, projects and
regions to observe and operate the resources associated with that project/role and
region.
Select a cloud platform in the platform list on the upper-right corner. The dashboard will
show the function and information for the current cloud platform.

ECITE Cloud Platform User Manual
Copyright © 2015 NSF Spatiotemporal Innovation Center, All Rights Reserved Prepared for NSF EarthCube, ECITE
10
Select a project in the project list on the upper-right corner. If a user logs in as a project
role (i.e. Project manager, privilege user or end user), the content in the dashboard will
change based on the user’s role in the project selected.
For all roles, the virtual resources (e.g. Instance and storage) created, by default,
belong to that project selected in the dropdown list. There will be a “project” field in the
dialog for creating a virtual resource to indicate the selected project, which the virtual
resource is automatically assigned to (as shown in the example dialog below).
Select a region in the region list on the upper-right corner. Generally, the selection of
the region will not affect the information displayed in the dashboard, except the image
and public-image.

ECITE Cloud Platform User Manual
Copyright © 2015 NSF Spatiotemporal Innovation Center, All Rights Reserved Prepared for NSF EarthCube, ECITE
11
Meanwhile, the virtual resources created, by default, belong to the selected region.
1.5 Edit User Profile and Password
Every user in the system is allowed to change the profile and password of the own user
account. In order to change the password, click “Edit User” -> “Change Password” on
the right of the header area.
Input the old password and set the new password in the pop-up dialog. Click “Ok” to
finish.
In order to change the profile of your own account, click “Edit User” -> “Change Profile”
on the right of the header area. In the pop-up window, input your information. Click “OK”
to finish.

ECITE Cloud Platform User Manual
Copyright © 2015 NSF Spatiotemporal Innovation Center, All Rights Reserved Prepared for NSF EarthCube, ECITE
12
1.6 Logout
Click the Logout button in the upper-right corner will log out the current user.
Users will be automatically logged out if no operation occurred for a certain amount of
time (10 minutes by default).
2. Modules and Functions for Cloud Project Manager
2.1 Message Console
Cloud Project Managers can receive notifications via the message console regarding
billing (exceeds thresholds); golden image (submitted or approved); and/or user related
notifications (created or approved). To display the message console, select “Message
Management” -> “Message Console” from the module navigation menu.

ECITE Cloud Platform User Manual
Copyright © 2015 NSF Spatiotemporal Innovation Center, All Rights Reserved Prepared for NSF EarthCube, ECITE
13
2.2 Display Projects/ Deactivate Projects
“Displaying projects” functionality allow Cloud Project Managers to quickly analyze
allocated, remaining, and used funds that are assigned to each of the projects. To
display all projects in the cloud, select “Project Management” -> “Project” from the
“MODULE NAVIGATION” menu located in the left sidebar, projects will be shown in the
“Project” table.

ECITE Cloud Platform User Manual
Copyright © 2015 NSF Spatiotemporal Innovation Center, All Rights Reserved Prepared for NSF EarthCube, ECITE
14
CPMs can also deactivate projects. To deactivate a project, select “Project
management” -> “Project” in the left menu, and then select a project in the workspace.
Click “Operate” -> “Deactivate Project”, and confirm to deactivate the project in the pop-
up dialog by clicking “OK”. Then the “Activated” field for the selected project will be
changed to “false”.

ECITE Cloud Platform User Manual
Copyright © 2015 NSF Spatiotemporal Innovation Center, All Rights Reserved Prepared for NSF EarthCube, ECITE
15
2.3 Set Project Funding Alert
A cloud project manager can also set funding alerts to receive notifications about the
remaining funds when the amount of used fund hits the specified threshold value. The
platform will monitor the funding usage in real time. To set project funding alert, select
“Project Management” -> “Project”, and select one project in the project list. Click “Set
Project Funding Alert” in the workspace.
In the popup dialog, set the thresholds (e.g. 50%, 80%) when the alert will be sent. The
format of the threshold is shown in the dialog. Put in the email where the alert will be
sent to and click “OK”. The operation is completed when the success dialog shows up.

ECITE Cloud Platform User Manual
Copyright © 2015 NSF Spatiotemporal Innovation Center, All Rights Reserved Prepared for NSF EarthCube, ECITE
16
2.4 Create User
One of the core role for a cloud project manager is to lead normal and privileged users
and create accounts for them. To create a new user, in the left menu, select “Project
Management” -> “User”, and then click “Create User” in the workspace. A new webpage
will show up for the information of the new user.
2.5 Approve User
For security purposes, the users created by “Project Manager” are inactive until the
“Cybersecurity Admin” approves the user. Contact “Cybersecurity Admin” to approve
the newly created End-User
2.6 Activate User
Once the Cybersecurity admin approves the created user accounts, the project
managers can activate those accounts to make them functional. To activate a user,
select “Project Management” -> “User”, select a user from the user list. Then click
“Operate” -> Activate User”.

ECITE Cloud Platform User Manual
Copyright © 2015 NSF Spatiotemporal Innovation Center, All Rights Reserved Prepared for NSF EarthCube, ECITE
17
2.7 Deactivate User
Project managers may deactivate user accounts temporarily for a number of reasons.
Deactivation gives the flexibility to deactivate and activate whenever it is necessary. To
delete a user, select “Project Management” -> “User”, and select a user from the user
list. Then click “Operate” -> “Deactivate User”, and then click ”OK” in the pop-up window
called “Delete/Deactivate Confirm Dialog”, After confirmation, the selected user will be
removed from the user list.

ECITE Cloud Platform User Manual
Copyright © 2015 NSF Spatiotemporal Innovation Center, All Rights Reserved Prepared for NSF EarthCube, ECITE
18
2.8 Change User Password
Besides users themselves, the cloud project manager is able to change the password of
all the users associated with this project. To change user password, in the left menu,
select “Project Management” -> “Change user password”, and then select a user in the
user list. Enter new password into the pop-up window and click “OK”, the selected
user’s password will be updated.
2.9 Change User Profile
Same as the “Change password” function, the cloud project manager is able to change
the password of all the users associated with this project. The “change user profile”
functionality allows users to change their first and last name, and email address. To
change user profile, in the left menu, select “Project Management” -> “Change user
profile”, and select a user from the user list. Specify new user information in the pop-up
window.

ECITE Cloud Platform User Manual
Copyright © 2015 NSF Spatiotemporal Innovation Center, All Rights Reserved Prepared for NSF EarthCube, ECITE
19
Click “OK”, then the selected user’s profile would be updated.
2.10 Associate/Disassociate user role in project
Associate/Disassociate user role gives project managers the flexibility of
adding/removing normal and privileged user to project(s). To associate user role in the
project, click “Project/User Management” and select a user from the user list. Click
“Operate User”-> “Associate User to project”, and then specify the parameters in the
pop-up dialog. After that, the information about the user will be updated in the user list.

ECITE Cloud Platform User Manual
Copyright © 2015 NSF Spatiotemporal Innovation Center, All Rights Reserved Prepared for NSF EarthCube, ECITE
20
Similar to “Associate User to project”, select a user from the user list, and click on
“Disassociate user from project”. Specify the parameters and the information will be
updated.

ECITE Cloud Platform User Manual
Copyright © 2015 NSF Spatiotemporal Innovation Center, All Rights Reserved Prepared for NSF EarthCube, ECITE
21
2.11 Display Instances
This functionality allows project managers to view the list of instances that can be
accessed by users under their supervision. To display the list of instance, select “Virtual
Resource” -> Instance. The list will be shown in the instance table.
2.12 Display Images
An image is private and belongs to a certain amazon account user. To display the list of
images, select “Virtual Resource” -> Image. The list will be shown in the image table.

ECITE Cloud Platform User Manual
Copyright © 2015 NSF Spatiotemporal Innovation Center, All Rights Reserved Prepared for NSF EarthCube, ECITE
22
2.13 Display Public Image
This functionality allows users to display the list of public images that can accessed by
all amazon account users. To display the list of public images, select “Virtual
Resources” -> Image-Public. The list will be shown in the image-public table.
2.14 Volume
Cloud Project Managers can view the list of volumes initiated by the other users, and
this feature is helpful for analytics. To display the list of volumes, select “Virtual
Resources” -> Volume. The list will be shown in the volume table.
2.15 Snapshot
Snapshot allows users to backup volumes, so after users write data to an EBS volume,
user can create snapshots for data backup. To display the list of snapshots, select
“Virtual Resources” -> Snapshot. The list will be shown in the snapshot table.
2.16 Recurring Snapshot
This functionality allows user to set recurring snapshot to every (some) hours. To
display the list of recurring snapshots, select “Virtual Resources” -> “Recurring
Snapshot”. The list will be shown in the recurring snapshot table table.
2.17 Display Key Pair/Security Group
Key Pairs and Security Groups are important aspects of the system, therefore it is vital
to understand their functionality. If your security group is wide open, hackers could
attempt to break into the virtual machines, and if the key pair is not safe, then other

ECITE Cloud Platform User Manual
Copyright © 2015 NSF Spatiotemporal Innovation Center, All Rights Reserved Prepared for NSF EarthCube, ECITE
23
uses could log in to your VM. To display the list of key pairs, select “Network&Security”
-> Key Pair. The list will be shown in the key-pair table.
To display the list of security groups, select “Security Group” from Network&Security.
The list will be shown in the Security Group dashboard.
2.18 Display IP
The cloud project managers can also display the list of IPs allocated to their projects. To
display IP, select “IP Management” -> IP. The list will be shown in the IP dashboard.
2.19 Monitor Funding Usage
This rich and robust function allows users to review usage by projects, users, cloud
accounts, and etc. Users can either choose to view the graph online on the dashboard
or download it to view later. To monitor resource usage, select “Monitor” -> “Resource
usage” in the left menu, and specify the monitoring time period. Click “Submit”, and a
cost chart will be shown in the workspace.

ECITE Cloud Platform User Manual
Copyright © 2015 NSF Spatiotemporal Innovation Center, All Rights Reserved Prepared for NSF EarthCube, ECITE
24
The cost chart will be updated based on the attribute chosen from “Group By” list and
the current user role. There are three ways to group cost: Project, Available Zone, and
Users.
2.20 Display Cloud Storage
This functionality allows users to view the storage buckets. To display Cloud Storage,
select “Cloud Storage” -> S3 from Module Navigation located in the left sidebar. The list
of storage bucket will be shown in the S3 dashboard.
3. Modules and Functions for Privileged User
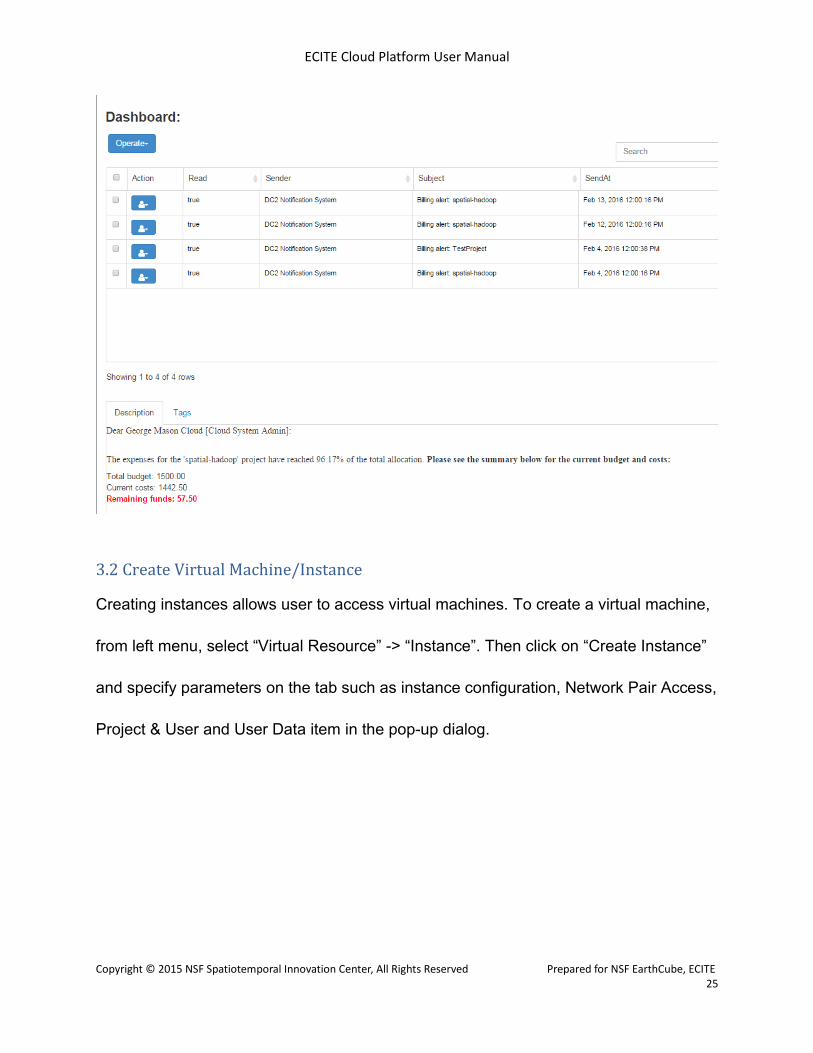
3.1 Message Console
Privileged Users can receive notifications via the message console regarding account,
billing, and golden image information. To display the message console, select “Message
Management” -> “Message Console” from the module navigation menu.
ECITE Cloud Platform User Manual
Copyright © 2015 NSF Spatiotemporal Innovation Center, All Rights Reserved Prepared for NSF EarthCube, ECITE
25
3.2 Create Virtual Machine/Instance
Creating instances allows user to access virtual machines. To create a virtual machine,
from left menu, select “Virtual Resource” -> “Instance”. Then click on “Create Instance”
and specify parameters on the tab such as instance configuration, Network Pair Access,
Project & User and User Data item in the pop-up dialog.

ECITE Cloud Platform User Manual
Copyright © 2015 NSF Spatiotemporal Innovation Center, All Rights Reserved Prepared for NSF EarthCube, ECITE
26
After submission, the system will take about 1 minute to create the VM, a “pending”
indicator will be shown in the table, and it cannot be used until the status changes to
“running”.
3.3 Access Instance
Once an instance is created, a user can an instance with either SSH terminal or remote
desktop assistant. To access a virtual machine, in the left menu, select “Virtual
Resource” -> “Instance”. Click on “access instance” in the drop-down list and select a
virtual machine in the list, a dialog as below will show up just like below right figure.

ECITE Cloud Platform User Manual
Copyright © 2015 NSF Spatiotemporal Innovation Center, All Rights Reserved Prepared for NSF EarthCube, ECITE
27
Based on the information in this dialog, you can access virtual machine using SSH.
Below is an example of what you would get after accessing the virtual machine
correctly.
3.4 Start/stop Instance
Note that, Start/stop instance only works for instances created on EBS.
To access an instance, a user must start the instance first. To start an instance, in the
left menu, select “Virtual Resource” -> “Instance”, select an instance created on EBS
and click on “start instance” in the drop-down list.
The status of the instance will turn to “pending”, and change to “running” after the
instance is running.

ECITE Cloud Platform User Manual
Copyright © 2015 NSF Spatiotemporal Innovation Center, All Rights Reserved Prepared for NSF EarthCube, ECITE
28
Once, the user has finished using the running instance, he should stop it, otherwise the
running instance will charge unnecessary fees. In the panel of “virtual machine”, select
an instance created on EBS and click on “stop instance” in the drop-down list.
The status of the instance will turn into “stopping”, and change to “stopped” after the
instance is stopped.

ECITE Cloud Platform User Manual
Copyright © 2015 NSF Spatiotemporal Innovation Center, All Rights Reserved Prepared for NSF EarthCube, ECITE
29
3.5 Resize Instance
Sometimes, privileged users may find out that the current instance type is not enough
for their application. Then, the user will need to resize the instance to a different
instance type. To resize an instance, select the desired image, click on “Operate” ->
“Resize Instance”. A dialog box will pop up, select a VM type from the drop down menu,
and then click on “OK”.
3.6 Terminate Instance
Sometimes, an instance may not have the correct settings required by the users,
therefore privileged users may terminate those types of instances to create new ones
from scratch according to their requirements. To terminate an instance, in the left menu,
select “Virtual Resource” -> “Instance”, select an instance you would like to terminate
and click on “terminate instance” in the drop-down list, a dialog will pop up and ask for
confirmation.

ECITE Cloud Platform User Manual
Copyright © 2015 NSF Spatiotemporal Innovation Center, All Rights Reserved Prepared for NSF EarthCube, ECITE
30
Then click OK button in the pop-up window, once confirmed, the status of the instance
will turn to “shutting-down”. After around half a minute, the instance would be removed
from instance list.
3.7 Create Image
Before creating instances, privileged users must create images. To create an Image,
select “Virtual Resource” -> Image, then click on “Create Image”. A new pop up window
will appear, specify the required parameters, and click “OK.

ECITE Cloud Platform User Manual
Copyright © 2015 NSF Spatiotemporal Innovation Center, All Rights Reserved Prepared for NSF EarthCube, ECITE
31
3.8 Monitor Funding Usage
This rich and robust function allows users to review usage by projects, users, cloud
accounts, and etc. Users can either choose to view the graph online on the dashboard
or download it to view later. To monitor resource usage, select “Billing Monitor” ->
“Funding usage” in the left menu, and specify the monitoring time period. Click “Submit”,
and a cost chart will be shown in the workspace.

ECITE Cloud Platform User Manual
Copyright © 2015 NSF Spatiotemporal Innovation Center, All Rights Reserved Prepared for NSF EarthCube, ECITE
32
3.9 Submit Golden Image
Golden images are the images that have passed security evaluation. A privileged user
has the permission to submit golden images. To submit a golden image, in the left
menu, select “Virtual Resource” -> “Image” and select an image. Click “Operate
Image”-> “Submit Golden Image”.
Then the submitted field of the selected image would be changed to “true”.

ECITE Cloud Platform User Manual
Copyright © 2015 NSF Spatiotemporal Innovation Center, All Rights Reserved Prepared for NSF EarthCube, ECITE
33
3.10 Create and S3 buckets
Privileged users can allocate space and create virtual storage using s3 buckets.To
create a S3 bucket, click “Storage” -> “S3” in the left menu, and then click on “Create S3
bucket” in the workspace.

ECITE Cloud Platform User Manual
Copyright © 2015 NSF Spatiotemporal Innovation Center, All Rights Reserved Prepared for NSF EarthCube, ECITE
34
After setting the information for the new S3 bucket, click “OK” and the new bucket will
be shown in the bucket list.
3.11 Upload/download file to/from S3 bucket
A user can upload and download files using the S3 functionalities. To upload a file to the
bucket, click “Storage” -> “S3” in the left menu, and then you need to enter a bucket by
double-clicking a bucket in the bucket list. Click “Operate S3” -> “Upload File to S3”.

ECITE Cloud Platform User Manual
Copyright © 2015 NSF Spatiotemporal Innovation Center, All Rights Reserved Prepared for NSF EarthCube, ECITE
35
In the pop-up window, choose the file you want to upload from the local computer and
click ‘Upload File’, and the system will tell you whether the file has been successfully
uploaded or not.
To download a file from the bucket, click “Storage” -> “S3” in the left menu, and then
you need to enter a bucket by double-clicking a bucket in the bucket list. Click “Operate

ECITE Cloud Platform User Manual
Copyright © 2015 NSF Spatiotemporal Innovation Center, All Rights Reserved Prepared for NSF EarthCube, ECITE
36
S3” -> “download from S3”. And then choose the file you would like to download in the
pop-up window. After that, a download link will pop up for downloading the selected file.
3.12 Allocate/Release and Associate/Disassociate IP Addresses
Privileged users are allowed to allocate IP addresses. To allocate IP to a user of a
particular project, select “IP Management”-> “IP” in the left menu. Click on “Allocate
Elastic IP” in the workspace, and then specify the parameters in the dialog.

ECITE Cloud Platform User Manual
Copyright © 2015 NSF Spatiotemporal Innovation Center, All Rights Reserved Prepared for NSF EarthCube, ECITE
37

ECITE Cloud Platform User Manual
Copyright © 2015 NSF Spatiotemporal Innovation Center, All Rights Reserved Prepared for NSF EarthCube, ECITE
38
To release a particular IP, select it from the IP list and then click on “Operate
IP”->“Allocate Elastic IP” in the workspace. Once it is done, a confirmation dialog will
pop up.
To associate a particular IP to an instance, select it from the IP list and then click on
“Operate IP”->“Associate IP to Instance” in the workspace. Once it is done, a
confirmation dialog will pop up.

ECITE Cloud Platform User Manual
Copyright © 2015 NSF Spatiotemporal Innovation Center, All Rights Reserved Prepared for NSF EarthCube, ECITE
39
To disassociate a particular IP to an instance, select it from the IP list and then click on
“Operate IP”->“Dis-associate IP to Instance” in the workspace. Once it is done, a
confirmation dialog will pop up.

ECITE Cloud Platform User Manual
Copyright © 2015 NSF Spatiotemporal Innovation Center, All Rights Reserved Prepared for NSF EarthCube, ECITE
40
3.13 Creating a Key Pair/Security Group
Key Pairs and Security Groups are important aspects of the system, therefore it is vital
to understand their functionality. If your security group is wide open, hackers could
attempt to break into the virtual machines, and if the key pair is not safe, then other
uses could log in to your VM. Key Pair / Security Group functionalities are described
down below:
3.13.1 Create Key Pair
To create a Key Pair, select “Network&Security” -> “Key Pair”, and then click on “Create
Key”. The dialog box will prompt to enter the Key Name, Description, and to select the
desired Project Name.

ECITE Cloud Platform User Manual
Copyright © 2015 NSF Spatiotemporal Innovation Center, All Rights Reserved Prepared for NSF EarthCube, ECITE
41
3.13.2 Download Key
To download a key, select “Network&Security” -> “Key Pair” from the Module Navigation
located in the left sidebar of the page, click on the row that contains the desired key,
then click on “Operate”, and select “Download Key”.
3.13.3 Delete Key
To delete a key, select “Network&Security” -> “Key Pair” from the Module Navigation
located in the left sidebar of the page, select the row that you want to delete, then click
on “Operate”, and select “Delete Key”.

ECITE Cloud Platform User Manual
Copyright © 2015 NSF Spatiotemporal Innovation Center, All Rights Reserved Prepared for NSF EarthCube, ECITE
42
3.13.4 Civilize Key
To civilize a key, select “Network&Security” -> “Key Pair” from the Module Navigation
located in the left sidebar of the page, click on the row that you want to civilize, then
click on “Operate”, and then select “Civilize Key”.
3.13.5 Display Security Group
To display the list of Security Group, select “Network & Security” -> “Security Group”,
from the module navigation located in the left sidebar.

ECITE Cloud Platform User Manual
Copyright © 2015 NSF Spatiotemporal Innovation Center, All Rights Reserved Prepared for NSF EarthCube, ECITE
43
4. Modules and Functions for End User
A lot of the end user functionalities are similar to Cloud Project Manager accounts and
Privileged User account’s functionalities. Therefore, please refer to the overlapping
functions from section 2 and 3.
4.1 Message Console
Please refer to section 3.1
4.1 Display Projects
Please refer to section 2.2
4.2 Display Users
End users can view the list of users that are associated to a specific project. To view the
list of users, select “Project Management” -> “Users”.
4.3 Display Instances
Please refer to section 2.11
4.4 Display Images
Please refer to section 2.12
4.5 Display Public Image
Please refer to section 2.13
4.6 Display Volume
Please refer to section 2.14
4.7 Key Pair/Security Group
Please refer to section 2.15
4.9 Display IP
Please refer to section 2.16
4.10 Cloud Storage
Please refer to section 2.20
4.11 Access Instance
An end user can an instance with either SSH terminal or remote desktop assistant. To
access a virtual machine, in the left menu, select “Virtual Resource” -> “Instance”. Click

ECITE Cloud Platform User Manual
Copyright © 2015 NSF Spatiotemporal Innovation Center, All Rights Reserved Prepared for NSF EarthCube, ECITE
44
on “access instance” in the drop-down list and select a virtual machine in the list, a
dialog as below will show up just like below right figure.
Based on the information in this dialog, you can access virtual machine using SSH.
Below is an example of what you would get after accessing the virtual machine
correctly.
4.12 Start/stop Instance
Note that, Start/stop instance only works for instances created on EBS.
To access an instance, a user must start the instance first. To start an instance, in the
left menu, select “Virtual Resource” -> “Instance”, select an instance created on EBS

ECITE Cloud Platform User Manual
Copyright © 2015 NSF Spatiotemporal Innovation Center, All Rights Reserved Prepared for NSF EarthCube, ECITE
45
and click on “start instance” in the drop-down list.
The status of the instance will turn to “pending”, and change to “running” after the
instance is running.
In the panel of “virtual machine”, select an instance created on EBS and click on “stop
instance” in the drop-down list.

ECITE Cloud Platform User Manual
Copyright © 2015 NSF Spatiotemporal Innovation Center, All Rights Reserved Prepared for NSF EarthCube, ECITE
46
The status of the instance will turn into “stopping”, and change to “stopped” after the
instance is stopped.