
e11867
48
Oracle® Business Intelligence Publisher Installation Guide Release 10.1.3.3.2 Part No. E11867-01 December 2007
-
Upload
krishnendu-sengupta -
Category
Documents
-
view
231 -
download
0
Transcript of e11867

8/4/2019 e11867
http://slidepdf.com/reader/full/e11867 1/48
Oracle® Business Intelligence Publisher
Installation Guide
Release 10.1.3.3.2
Part No. E11867-01
December 2007

8/4/2019 e11867
http://slidepdf.com/reader/full/e11867 2/48
Oracle Business Intelligence Publisher Installation Guide, Release 10.1.3.3.2
Part No. E11867-01
Copyright © 2004, 2007, Oracle. All rights reserved.
Primary Author: Leslie Grumbach Studdard
Contributing Author: Mike Donohue, Klaus Fabian, Kei Saito, Shinji Yoshida
The Programs (which include both the software and documentation) contain proprietary information; theyare provided under a license agreement containing restrictions on use and disclosure and are also protected
by copyright, patent, and other intellectual and industrial property laws. Reverse engineering, disassembly, or
decompilation of the Programs, except to the extent required to obtain interoperability with other
independently created software or as specified by law, is prohibited.
The information contained in this document is subject to change without notice. If you find any problems in
the documentation, please report them to us in writing. This document is not warranted to be error-free.
Except as may be expressly permitted in your license agreement for these Programs, no part of these
Programs may be reproduced or transmitted in any form or by any means, electronic or mechanical, for any
purpose.
If the Programs are delivered to the United States Government or anyone licensing or using the Programs on
behalf of the United States Government, the following notice is applicable:
U.S. GOVERNMENT RIGHTS
Programs, software, databases, and related documentation and technical data delivered to U.S. Government
customers are "commercial computer software" or "commercial technical data" pursuant to the applicable
Federal Acquisition Regulation and agency-specific supplemental regulations. As such, use, duplication,
disclosure, modification, and adaptation of the Programs, including documentation and technical data, shall
be subject to the licensing restrictions set forth in the applicable Oracle license agreement, and, to the extent
applicable, the additional rights set forth in FAR 52.227-19, Commercial Computer Software--Restricted
Rights (June 1987). Oracle Corporation, 500 Oracle Parkway, Redwood City, CA 94065.
The Programs are not intended for use in any nuclear, aviation, mass transit, medical, or other inherently
dangerous applications. It shall be the licensee's responsibility to take all appropriate fail-safe, backup,
redundancy and other measures to ensure the safe use of such applications if the Programs are used for such
purposes, and we disclaim liability for any damages caused by such use of the Programs.
The Programs may provide links to Web sites and access to content, products, and services from third parties.
Oracle is not responsible for the availability of, or any content provided on, third-party Web sites. You bear allrisks associated with the use of such content. If you choose to purchase any products or services from a third
party, the relationship is directly between you and the third party. Oracle is not responsible for: (a) the quality
of third-party products or services; or (b) fulfilling any of the terms of the agreement with the third party,
including delivery of products or services and warranty obligations related to purchased products or services.
Oracle is not responsible for any loss or damage of any sort that you may incur from dealing with any third
party.
Oracle is a registered trademark of Oracle Corporation and/or its affiliates. Other names may be trademarks
of their respective owners.

8/4/2019 e11867
http://slidepdf.com/reader/full/e11867 3/48
iii
Contents
Preface
1 Introduction
Introduction to Installing Oracle Business Intelligence Publisher......................................... 1-1
About the BI Publisher Installer and Installation Options......................................................1-1
About Postinstallation Tasks.................................................................................................... 1-5
2 Installing BI Publisher into Oracle Application Server or OC4J 10.1.3.1
Introduction............................................................................................................................... 2-1
Performing a Basic Install......................................................................................................... 2-1
Performing an Advanced Install............................................................................................... 2-4
3 Installing Manually into a J2EE Application Server
Introduction............................................................................................................................... 3-1
Installation Process Overview.................................................................................................. 3-2
Installing into a J2EE Application Server.................................................................................3-2
Oracle AS 10.1.3 or OC4J 10.1.3 Deployment............................................................................3-2
Apache Tomcat 5.5 Deployment............................................................................................... 3-3
IBM WebSphere 6.0 or 6.1 Deployment....................................................................................3-4
Sun Java System Web Server 6.1 Deployment......................................................................... 3-5
Sun Java System Web Server 7.0 Deployment......................................................................... 3-7BEA WebLogic 8.1 Deployment................................................................................................ 3-9
BEA WebLogic 9.2 Deployment.............................................................................................. 3-10
Configuring the BI Publisher Repository and Installing Fonts.............................................3-11

8/4/2019 e11867
http://slidepdf.com/reader/full/e11867 4/48
iv
4 Postinstallation Tasks
Introduction............................................................................................................................... 4-1
Configuring the Scheduler Database........................................................................................4-1
Configuring the Scheduler on Oracle Database 10g ............................................................... 4-2
Configuring the Scheduler on SQL Server with Oracle Application Server/OC4J 10.1.3.......4-2
Configuring the Scheduler on Microsoft SQL Server 2000 with Tomcat................................ 4-4
Setting Up the Demo Data Sources...........................................................................................4-5
Configuring the Demo File Data Source.................................................................................. 4-6
Configuring the Demo JDBC Data Source............................................................................... 4-6
Installing Oracle BI Publisher Desktop Tools......................................................................... 4-7
A Silent and Non-Interactive Installation
Silent Installation......................................................................................................................A-1
Non-Interactive Installation..................................................................................................... A-1Create the Response File...........................................................................................................A-2
Start the Installation................................................................................................................. A-5
Postinstallation......................................................................................................................... A-5
Security Tips for Silent and Non-Interactive Installations..................................................... A-6
Deinstallation............................................................................................................................A-6
B Deinstalling BI Publisher
Deinstallation Procedure.......................................................................................................... B-1

8/4/2019 e11867
http://slidepdf.com/reader/full/e11867 5/48
v
Preface
Intended Audience
Welcome to Release 10.1.3.3.2 of the Oracle Business Intelligence Publisher InstallationGuide.
This document is intended for administrators or implementers who wish to install
Oracle Business Intelligence Publisher (BI Publisher). This version of the Oracle Business
Intelligence Publisher Installation Guide applies to BI Publisher versions 10.1.3.3, 10.1.3.3.1,
and 10.1.3.3.2.
See Related Information Sources on page vi for more Oracle product information.
TTY Access to Oracle Support Services
Oracle provides dedicated Text Telephone (TTY) access to Oracle Support Serviceswithin the United States of America 24 hours a day, seven days a week. For TTY
support, call 800.446.2398.
Documentation Accessibility
Our goal is to make Oracle products, services, and supporting documentation
accessible, with good usability, to the disabled community. To that end, our
documentation includes features that make information available to users of assistive
technology. This documentation is available in HTML format, and contains markup to
facilitate access by the disabled community. Accessibility standards will continue to
evolve over time, and Oracle is actively engaged with other market-leading technology
vendors to address technical obstacles so that our documentation can be accessible to all
of our customers. For more information, visit the Oracle Accessibility Program Web site
at http://www.oracle.com/accessibility/ .

8/4/2019 e11867
http://slidepdf.com/reader/full/e11867 6/48
vi
Accessibility of Code Examples in Documentation
Screen readers may not always correctly read the code examples in this document. The
conventions for writing code require that closing braces should appear on an otherwise
empty line; however, some screen readers may not always read a line of text that
consists solely of a bracket or brace.
Accessibility of Links to External Web Sites in Documentation
This documentation may contain links to Web sites of other companies or organizations
that Oracle does not own or control. Oracle neither evaluates nor makes any
representations regarding the accessibility of these Web sites.
Structure1 Introduction
2 Installing BI Publisher into Oracle Application Server or OC4J 10.1.3.1
3 Installing Manually into a J2EE Application Server
4 Postinstallation Tasks
A Silent and Non-Interactive Installation
B Deinstalling BI Publisher
Related Information Sources
Oracle Business Intelligence Publisher User's Guide
This guide contains information for the user on creating, running, and scheduling
reports and information for the administrator on configuration and set up. The guide
also contains an API reference for developers.
Oracle Business Intelligence Publisher Certification Information
This document specifies the certified hardware and software configurations for Oracle
Business Intelligence Publisher. This document is updated periodically if new
configurations are certified and can be obtained from the Oracle Technology Network
[http://www.oracle.com/technology/software/products/ias/files/oracle_bi_publisher_].
Oracle Business Intelligence New Features GuideThis book describes the new features in the 10.1.3.3, 10.1.3.3.1, and 10.1.3.3.2 versions of
Oracle Business Intelligence Publisher and other products in the Oracle Business
Intelligence Enterprise Edition suite.

8/4/2019 e11867
http://slidepdf.com/reader/full/e11867 7/48
vii
Oracle Containers for J2EE Deployment Guide
This covers information and procedures for deploying an application to an OC4J
environment. This includes discussion of the deployment plan editor that comes with
Oracle Enterprise Manager 10g.
Third-Party Licensing Information
The application uses Apache Axis and the OpenSymphony Quartz Scheduler
open-source software packages. The Apache license agreement for Axis is included on
the install media under \doc\ApacheLicense.txt and can also be obtained from
http://www.apache.org/licenses/LICENSE-2.0. This license also covers the use of
OpenSymphony Quartz Scheduler.

8/4/2019 e11867
http://slidepdf.com/reader/full/e11867 8/48
8/4/2019 e11867
http://slidepdf.com/reader/full/e11867 9/48
Introduction 1-1
1Introduction
Introduction to Installing Oracle Business Intelligence Publisher
Oracle Business Intelligence Publisher offers you the most efficient, scalable reportingsolution available for complex, distributed environments. It provides a central
architecture for generating and delivering information to employees, customers, and
suppliers—both securely and in the right format. Oracle BI Publisher reduces the high
costs associated with the development, customization and maintenance of business
documents, while increasing the efficiency of reports management.
For the most current information please check:
Oracle Business Intelligence Publisher Web Page:
http://www.oracle.com/technology/products/xml-publisher/index.html
Oracle Business Intelligence Publisher Forum:
http://forums.oracle.com/forums/forum.jspa? forumID=245
About the BI Publisher Installer and Installation Options
The Oracle Universal Installer provided can be used to install BI Publisher with its own
standalone Oracle Containers for Java (OC4J) instance or to install BI Publisher into an
existing Oracle Application Server 10.1.3.1.0 (or later) Web container. However, you can
also deploy BI Publisher on other J2EE application servers, such as Tomcat or
Websphere.
BI Publisher has three installation options:• Basic - the Oracle Universal Installer Basic option provides a standalone application
server (Oracle Containers for Java 10.1.3.1) and Sun JDK (SUN 1.5.0-b5) with BI
Publisher.
• Advanced - the Oracle Universal Installer Advanced option installs BI Publisher

8/4/2019 e11867
http://slidepdf.com/reader/full/e11867 10/48
1-2 Oracle Business Intelligence Publisher Installation Guide
into an existing Oracle Application Server 10.1.3.1 (or later).
• Manual - you can install BI Publisher manually into one of the supported J2EE
servers.
For more information on using the Oracle Universal Installer options, see Installing BI
Publisher into Oracle Application Server OC4J 10.1.3.1, page 2-1.
For more information on deploying BI Publisher manually into a supported J2EE
application server, please refer to Installing Manually into a J2EE Application Server,
page 3-1.
Environment Requirements
As of the time of this release, the Oracle BI Publisher installer supports the following
operating systems:
• Microsoft Windows 2000 Server
• Microsoft Windows 2003 Server R2 (32 bit)
• Oracle Enterprise Linux 4, Update 4
• Red Hat Enterprise Linux 4.x, 5.x
• Novell SUSE Linux 9.x
To install BI Publisher on an operating system not supported by the installer, use the
manual install option.
For the current available installer platforms, see the Oracle Business Intelligence Publisher
Certification Information 10 g Release 3 (10.1.3.3) on the Oracle Technology Network
[http://www.oracle.com/technology/software/products/ias/files/oracle_bi_publisher_cer
tification.pdf].
Supported Application Servers
The BI Publisher server is supported in any J2EE application server that supports Java
1.4.2 or Java 5.0 (1.5). The following lists the application servers for which BI Publisher
has been certified.
• Oracle Application Server 10.1.3.1
• Oracle Containers for Java 10.1.3.1
• Apache Tomcat 5.5.x
• IBM Websphere 6.0, 6.1

8/4/2019 e11867
http://slidepdf.com/reader/full/e11867 11/48
Introduction 1-3
• Sun Java System Web Server 6.1, 7.0
• BEA WebLogic 8.1, 9.2
Note: The Basic installation provides a standalone Oracle Containers
for Java (OC4J) 10.1.3.1.
Supported Databases
Note: The database is optional for setting up BI Publisher, but required
if you intend to use BI Publisher's scheduler.
Supported Databases for the BI Publisher Scheduler Schema Repository
• Oracle 10g (10.1 and 10.2)
• Oracle 9i (9.2.0.4)
• Oracle 8i (8.1.7.4)
• IBM UDB DB2 v8.1
• IBM DB2 v6, v7
• Microsoft SQL Server 2000
• MySQL 4.1, 5.0
• Sybase ASE 12.5
BI Publisher is supported to run against any database that supports JDBC based on Java
1.4.2 or Java 5.0 (1.5). BI Publisher has certified against the following databases as a
source of data:
Databases Supported as Data Sources
• Oracle Enterprise Server 9i or 10g
• Microsoft SQL Server 2000, 2005
• IBM DB2 for z/OS 8 (NFM mode)
• IBM DB2 for UDB EE 8.2
• Sybase Adaptive Server
• Sybase IQ 12.x

8/4/2019 e11867
http://slidepdf.com/reader/full/e11867 12/48
1-4 Oracle Business Intelligence Publisher Installation Guide
• MySQL 4.1, 5.0
• NCR Teradata V2R5.1, V2R6.0, V2R6.1
Web Browser Requirements
The BI Publisher application requires one of the following Web browsers:
• Microsoft Internet Explorer 6.0, 7.0
• Mozilla Firefox 1.5.x, 2.0
About Oracle BI Publisher Desktop Tools
Oracle Business Intelligence Publisher provides Microsoft Office-based design tools that
automate the design process for creating templates for Oracle BI Publisher.
The BI Publisher desktop tools include the following:
• The Oracle BI Publisher Template Builder for Microsoft Word Add-in facilitates the
development of RTF layout templates. The application includes documentation,
demos, and samples. The Template Builder enables you to:
• Connect to the Oracle BI Publisher server to retrieve data to build your
template.
• Quickly insert common report elements such as data fields, tables, charts, and
cross tabulations.
• Upload your template to the Oracle BI Publisher server.
• Extract boilerplate text into an XLIFF translation file and test the translations.
• Validate your template.
• The Template Viewer enables you to preview your template in any of the supported
output types with your sample data.
• The Oracle BI Publisher Analyzer for Microsoft Excel (Excel Analyzer) is an add-in
for Microsoft Excel that enables you to:
• Export the results of the report query to an Excel spreadsheet.
• Log in to BI Publisher from Excel to refresh your data, apply new parameters,
and apply a template to the report data.
• Create templates in Excel and upload them to the BI Publisher repository.
• Access and run reports from an Excel session.

8/4/2019 e11867
http://slidepdf.com/reader/full/e11867 13/48
Introduction 1-5
The system requirements for the Oracle BI Publisher Desktop tools are:
System Requirements for BI Publisher Desktop Tools
Component Supported Versions
Client Operating System • Windows 2000
• Windows 2003 SP1 (32-bit only)
• Windows XP SP2 and later
• Windows Vista
Template Builder for Word Add-in • Microsoft Word 2000, 2002, 2003, 2007
Requires:
• Microsoft .NET Framework 2.0
• Java Runtime or JDK 1.4 or later
Excel Analyzer • Microsoft Excel 2000, 2002, 2003, 2007
Requires:
• Microsoft .NET Framework 2.0
See the topic Installing Oracle BI Publisher Desktop Tools, page 4-7.
About Postinstallation Tasks
After installing the BI Publisher server, perform the following to complete your
installation. These tasks are described in detail in Postinstallation Tasks, page 4-1.
• Configure the Scheduler database (required for the scheduler)
The scheduler is optional. If you choose to implement BI Publisher's scheduler, you
must install the schema to the target database.
• Configure the Demo Data sources (optional)
The BI Publisher installation includes demonstration reports. Some reports use a
File data source that is automatically configured by the installer. Some reports use a
JDBC data source and Oracle database sample schema that you must configure in

8/4/2019 e11867
http://slidepdf.com/reader/full/e11867 14/48
1-6 Oracle Business Intelligence Publisher Installation Guide
the BI Publisher Admin screens.
• Install the Oracle BI Publisher Template Builder for Microsoft Word Add-in
(optional)
Install this template building tool on the client computers of users who will be
developing RTF templates.
8/4/2019 e11867
http://slidepdf.com/reader/full/e11867 15/48
Installing BI Publisher into Oracle Application Server or OC4J 10.1.3.1 2-1
2Installing BI Publisher into Oracle
Application Server or OC4J 10.1.3.1
IntroductionThis chapter discusses the installation of BI Publisher using the Oracle Universal
Installer.
Performing a Basic Install
Basic Installation
The following steps guide you through the installer.
Run the Oracle Universal Installer:
1. Access the installation files.
• For Windows install:
From the Oracle BI Publisher product media, navigate to the install
directory.
Run the program setup.exe.
• For Linux or Unix install:
From the Oracle BI Publisher product media, navigate to the install directory:
cd install
Execute the runInstaller script.
./runInstaller
The installation program window appears and prompts you through each screen.
Provide the requested input for each screen.

8/4/2019 e11867
http://slidepdf.com/reader/full/e11867 16/48
2-2 Oracle Business Intelligence Publisher Installation Guide
To continue to the next screen, click Next. To return to a previous screen, click Back.
2. Specify file locations.
Accept the default drive and directories, or click Browse to change them. Do not
change the Source Path. You may accept the default Destination Name and Path or
change them as you wish.
3. Select installation type.
The installation type screen allows you to choose between Basic and Advanced
installs. The Basic type installs BI Publisher into a standalone OC4J bundled within
the install. The Advanced type installs BI Publisher into an existing Oracle
Application Server 10.1.3.1 (or later).
Select Basic.
4. Choose your OC4J Administrator (oc4jadmin) password.
The Basic install provides a standalone OC4J. Enter the password you wish to usefor this OC4J.
The Administrator password must be a minimum of 5 characters, maximum of 30
characters, and include at least one digit.
5. Review the summary information, which lists the components to be installed and
shows the installation location and size.
6. Click Install to begin the installation and display the Install screen.
The Install Screen
The Install screen displays the current task and the installation progress bar. The
installation process consists of three general phases:
Copy Files
Setup
Configuration
Click Stop Installation if you want to terminate the install process.
The Configuration Assistants Screen
This screen shows the name, status, and tool type for tools recommended to be run
before completing the installation.
This installer includes one tool: the BI Publisher Configuration Assistant.
The tool may have one of the following states, as shown in the status column:
• Succeeded: The tool ran successfully.
• Failed: The tool ran, but failed.

8/4/2019 e11867
http://slidepdf.com/reader/full/e11867 17/48
Installing BI Publisher into Oracle Application Server or OC4J 10.1.3.1 2-3
• Pending: The tool is waiting to run.
• Cancelled: The tool was cancelled by the user (by clicking Stop).
• In Progress: The tool is currently running.
When the configuration assistant completes, OUI automatically proceeds to the nextpage.
If the configuration assistant does not complete, the installation screen displays the
error message, and the configuration assistant writes its result code to the following
log file: C:\ProgramFiles\Oracle\Inventory\logs\installActionstimestamp.log
For all failed or skipped tools, OUI generates a list of the tool names and the
commands used to run them; you can copy/paste this information directly into a
shell script or batch file to run these tools after installation is complete. The
generated script file is named configtoolcmds.pl and is located in the
ORACLE_HOME\bin directory. The script is generated after you exit the installer.The End of Installation Screen
The End of Installation screen informs you that installation was successful and
provides instructions on starting and stopping BI Publisher, the BI Publisher login
URL and additional details about your installation. These details will also be saved
in BI_Publisher_readme.txt in the Destination path you specified in the
second screen of the installation procedure.
Log in to the BI Publisher Server:
At the end of the installation the BI Publisher server will be running.
Note: If you attempt to start BI Publisher when it is running, the start
command will return errors.
1. Launch the BI Publisher application using one of the following methods:
• On Windows:
From the Start menu, navigate to:
Start > Programs > Oracle - OracleHomeName > BI Publisher Server
OracleHomeName refers to the name you gave the Oracle Home where you
installed Oracle BI Publisher.
• Open your browser to http://hostname:port/xmlpserver
For example:
http://localhost:9704/xmlpserver

8/4/2019 e11867
http://slidepdf.com/reader/full/e11867 18/48
2-4 Oracle Business Intelligence Publisher Installation Guide
2. Log in with user name "Administrator" and password "Administrator".
Important: Please change the Administrator password on the
Account tab under Preferences.
Continue with Postinstallation Tasks, page 4-1.
Performing an Advanced Install
Advanced Installation
The following steps guide you through the installer for an Advanced installation.
Important: The BI Publisher installer requires that the OC4J home into
which you install BI Publisher be named "home". If there is no instance
of an OC4J home named "home", the installation will fail.
If you wish to install into an instance not named "home" please follow
the manual install instructions. See Installing Manually into a J2EE
Application Server, page 3-1.
Run the Oracle Universal Installer:
1. Access the installation files.
• For Windows install:
From the Oracle BI Publisher product media, navigate to the install directory.
Run the program setup.exe.
• For Linux or Unix install:
From the Oracle BI Publisher product media, navigate to the install directory:
cd install
Execute the runInstaller script.
./runInstaller
The installation program window appears and prompts you through each screen.
Provide the requested input for each screen.
To continue to the next screen, click Next. To return to a previous screen, click Back.
2. Specify file locations.
Accept the default drive and directories, or click Browse to change them. Do not
change the Source Path. You may accept the default Destination Name and Path or

8/4/2019 e11867
http://slidepdf.com/reader/full/e11867 19/48
Installing BI Publisher into Oracle Application Server or OC4J 10.1.3.1 2-5
change them as you wish.
3. Select installation type.
The installation type screen allows you to choose between Basic and Advanced
installs. The Basic type installs BI Publisher into a standalone OC4J bundled within
the install. The Advanced type installs BI Publisher into an existing OracleApplication Server 10.1.3.1 or later.
Select Advanced.
4. Choose your Application Server 10g home location. Click "Installed Products" to see
the list of Oracle Homes and display the location (path).
5. Enter the oc4j Administrator password for the Application Server into which you
are installing BI Publisher.
6. Review the summary information, which lists the components to be installed and
shows the installation location and size.
7. Click Install to begin the installation and display the Install screen.
The Install Screen
The Install screen displays the current task and the installation progress bar. The
installation process consists of three general phases:
Copy Files
Setup
Configuration
Click Stop Installation if you want to terminate the install process.
The Configuration Assistants Screen
This screen shows the name, status, and tool type for tools recommended to be run
before completing the installation.
This installer includes one tool: the BI Publisher Configuration Assistant.
The tool may have one of the following states, as shown in the status column:
• Succeeded: The tool ran successfully.
• Failed: The tool ran, but failed.
• Pending: The tool is waiting to run.
• Cancelled: The tool was cancelled by the user (by clicking Stop).
• In Progress: The tool is currently running.

8/4/2019 e11867
http://slidepdf.com/reader/full/e11867 20/48
2-6 Oracle Business Intelligence Publisher Installation Guide
When the configuration assistant completes, OUI automatically proceeds to the next
page.
If the configuration assistant does not complete, the installation screen displays the
error message, and the configuration assistant writes its result code to the following
log file: C:\Program
Files\Oracle\Inventory\logs\installActionstimestamp.log
For all failed or skipped tools, OUI generates a list of the tool names and the
commands used to run them; you can copy/paste this information directly into a
shell script or batch file to run these tools after installation is complete. The
generated script file is named configtoolcmds.pl and is located in the
ORACLE_HOME\bin directory. The script is generated after you exit the installer.
The End of Installation Screen
The End of Installation screen informs you that installation was successful and
provides instructions on starting and stopping BI Publisher, the BI Publisher login
URL and additional details about your installation. These details will also be saved
in BI_Publisher_readme.txt in the Destination path you specified in thesecond screen of the installation procedure.
At the end of the installation, the OUI will start the BI Publisher server.
Log in to BI Publisher:
At the end of the installation the BI Publisher server will be running.
1. Launch the BI Publisher Application:
• On Windows:
From the Start menu, navigate to:
Start > Programs > Oracle - OracleHomeName > BI Publisher Server
OracleHomeName refers to the name you gave the Oracle Home where you
installed Oracle BI Publisher.
• Open your browser to http://hostname:port/xmlpserver
Note that the port is the http port of your application server.
For example:
http://localhost:8888/xmlpserver
2. Log in with user Administrator and password Administrator.
Important: Please change the Administrator password on the
Account tab under Preferences.
Continue with Postinstallation Tasks, page 4-1.

8/4/2019 e11867
http://slidepdf.com/reader/full/e11867 21/48
Installing Manually into a J2EE Application Server 3-1
3Installing Manually into a J2EE Application
Server
IntroductionThe BI Publisher install media contains:
• BI Publisher server application
• BI Publisher runtime libraries
• BI Publisher fonts
• BI Publisher desktop tools
• Documentation: User's Guide, Javadocs, demos, and samples
Individual components are located as follows:
Directory Component
manual\fonts Font files
manual\generic xmlpserver.war (for non-oc4j application servers)
xmlpserver.ear (for non-oc4j application servers)
manual\oc4j xmlpserver.ear (for oc4j)
manual\XMLP XMLP repository
manual\XMLP\DemoFiles Data source for demo reports.

8/4/2019 e11867
http://slidepdf.com/reader/full/e11867 22/48
3-2 Oracle Business Intelligence Publisher Installation Guide
Directory Component
manual\XMLP\Tools Template Builder for Word Add-in
Installation Process Overview
The server application allows you to create, manage and schedule reports. You must
perform the following steps as described in this document to deploy Oracle BI Publisher
manually:
1. Deploy BI Publisher on the application server.
2. Configure the BI Publisher repository and install fonts.
3.Perform postinstallation tasks:Create the BI Publisher scheduler schema on the database server (required to send
and schedule reports).
Set up the BI Publisher Demo Reports
Installing into a J2EE Application Server
BI Publisher is a pure J2EE application and has been extensively tested on:
• Oracle AS 10.1.3
• OC4J Standalone 10.1.3
• Apache Tomcat 5.5
• IBM WebSphere 6.0, 6.1
• Sun Java System Web Server 6.1, 7.0
• BEA WebLogic 8.1, 9.2
Oracle AS 10.1.3 or OC4J 10.1.3 DeploymentDepending on how you have installed Oracle Application Server or OC4J, there are
several methods you can use to deploy BI Publisher. Oracle recommends using Oracle
Application Server Control to deploy Java applications. The following steps use the
admin_client.jar file to deploy BI Publisher on Oracle AS 10.1.3 or OC4J 10.1.3. Please
refer to the Oracle Containers for J2EE Deployment Guide to see which deployment

8/4/2019 e11867
http://slidepdf.com/reader/full/e11867 23/48
Installing Manually into a J2EE Application Server 3-3
method is best for your installation.
1. Deploy the xmlpserver.ear to your OC4J instance.
Syntax:
java -jar admin_client.jar
deployer:oc4j:opmn://<host>:<OPMN_Request_port>/<instance_name> oc4jadmin<oc4jadmin_Password > -deploy -file xmlpserver.ear-deploymentName xmlpserver -bindAllWebApps
Example:
C:\product\10.1.3.1\OracleAS_1\jdk\jre\bin\java -jaradmin_client.jar deployer:oc4j:opmn://localhost:6005/homeoc4jadmin oc4jadmin -deploy -fileC:\Temp\BIP_101332\manual\oc4j\xmlpserver.ear -deploymentNamexmlpserver -bindAllWebApps
2. Launch the BI Publisher application.
Open your browser to http://hostname:port/xmlpserver
For example:
http://localhost:8888/xmlpserver
3. If you see the login page, proceed to Configuring the BI Publisher Repository and
Installing Fonts, page 3-11.
Note: To generate documents in the widest range of locales, when
starting Oracle Containers for J2EE please specify the following
arguments to the Java Virtual Machine:
-Dfile.encoding=UTF-8 -Duser.language=en -Duser.country=US
This enables the BI Publisher installation to generate documents in all
the supported locales and languages regardless of the language and
locale of the server operating system.
Example:
C:\Java\jdk1.5.0_06\bin\java -Dfile.encoding=UTF-8-Duser.language=en -Duser.country=US -jarC:\OC4J\j2ee\home\oc4j.jar
Apache Tomcat 5.5 DeploymentThere are several approaches available to deploy applications to the Tomcat servlet
container. Please see the Apache Tomcat Application Developer's Guide to determine which
method is appropriate for your installation. The following steps use the Tomcat Web
Application Manager to deploy BI Publisher on Apache Tomcat 5.5:

8/4/2019 e11867
http://slidepdf.com/reader/full/e11867 24/48
3-4 Oracle Business Intelligence Publisher Installation Guide
Important: Apache Tomcat deployments of BI Publisher require that
folder and file names use ASCII characters only. Any non-ASCII
character will be displayed incorrectly.
1. Open the Tomcat home page.
2. Select Tomcat Manager and log in.
3. From the Tomcat Web Application Manager page, under the Deploy region,
browse for and select the manual\generic\xmlpserver.war from your install
media. Select the Deploy button.
4. Ensure the xmlpserver application successfully deployed. If successful, /xmplserver
will appear on the Tomcat Web Application Manager page under the list of
Applications.
5. Open your browser, http://hostname:port/xmlpserver to see the loginpage.
For example: http://localhost:8080/xmlpserver
6. If you see the login page, proceed to Configuring the BI Publisher Repository and
Installing Fonts, page 3-11.
IBM WebSphere 6.0 or 6.1 Deployment
This section describes one example of how to deploy the BI Publisher application to the
IBM WebSphere 6.0 or 6.1 application server. Refer to your WebSphere documentationfor the appropriate procedure to install into your environment.
1. Access the WebSphere Administrative Console, select Install New Application.
2. Choose the manual/generic/xmlpserver.ear file from your installation
media.
3. Select the Generate Default Bindings checkbox and click Next.
4. On the Select installation options page, select the Distribute application checkbox
and the Create MBeans for resources checkbox.
5. On the Map modules to servers page, select xmlpserver.war.
6. On the Map virtual hosts for Web modules page select xmlpserver.war.
7. On the Summary screen, review your selections, and select Finish.

8/4/2019 e11867
http://slidepdf.com/reader/full/e11867 25/48
Installing Manually into a J2EE Application Server 3-5
8. You will see the deployment status on the screen. Once you see the success
message, select the Save to Master Configuration link.
9. Restart BI Publisher.
From the WebSphere Administration Console, select the Enterprise Applications
link, choose "xmlpserver" and click the Stop button. Once stopped, choose"xmlpserver" and click the Start button.
10. Launch BI Publisher:
Open your browser to http://hostname:port/xmlpserver to see the login
page.
For example: http://localhost:8080/xmlpserver
11. If you see the login page, proceed to Configuring the BI Publisher Repository and
Installing Fonts, page 3-11.
Sun Java System Web Server 6.1 Deployment
This section describes one example of how to deploy the BI Publisher application.
Follow the guidelines in your Sun Java System Web Server 6.1 documentation for the
appropriate method for your installation.
Important: To successfully deploy BI Publisher on Sun Java System
Web Server 6.1 you must perform the predeployment and
postdeployment configuration steps described in this section:
• Before you deploy, you must ensure that the maxUploadSize
property is set appropriately as described in Step 1.
• After you deploy, you must configure the system.xml file as
described in Step 11.
The xdoparser.jar files include files from the W3C org.w3c.dom
package that are excluded from the same package included with
the Sun Java System Web Server system jar files. To ensure these
files are loaded from the xdoparser.jar file, you must configure the
server.xml file to load the xmlparser.jar files first.
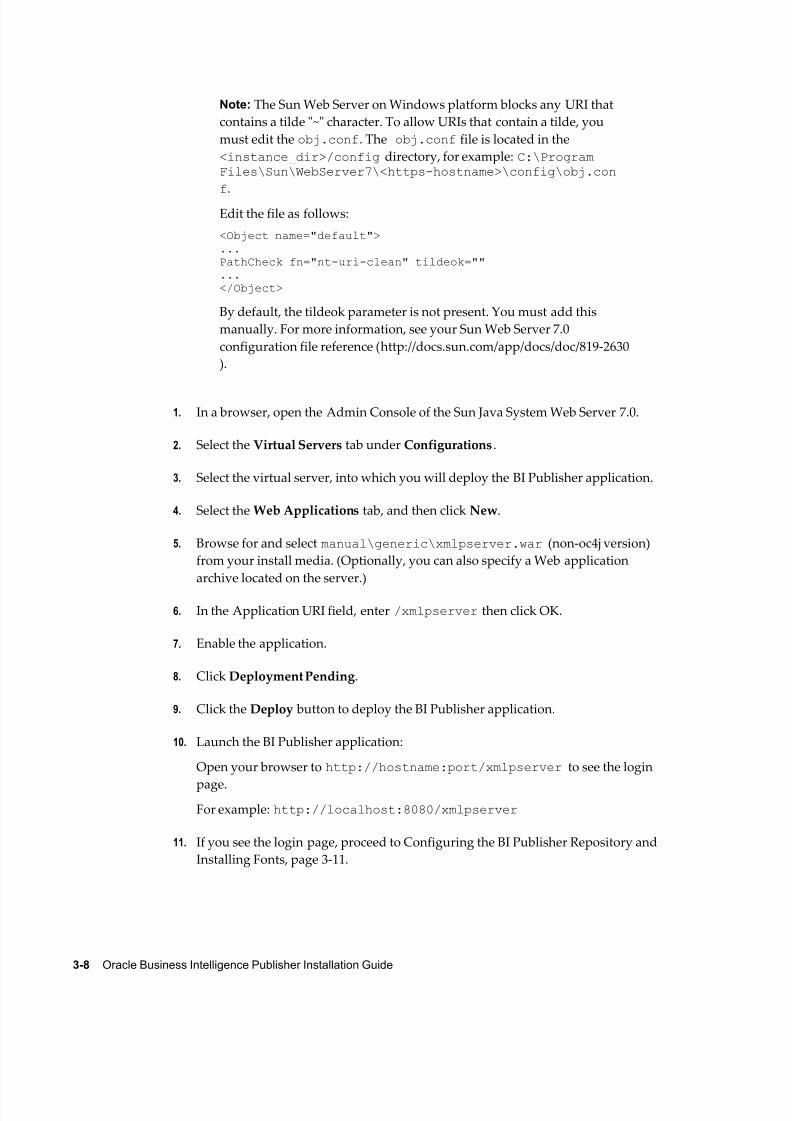
Note: The Sun Web Server on Windows platform blocks any URI that
contains a tilde "~" character. To allow URIs that contain a tilde, you
must edit the obj.conf. The obj.conf file is located in the
<instance_dir>/config directory. Edit the file as follows:

8/4/2019 e11867
http://slidepdf.com/reader/full/e11867 26/48
3-6 Oracle Business Intelligence Publisher Installation Guide
<Object name="default">...PathCheck fn="nt-uri-clean" tildeok=""...</Object>
By default, the tildeok parameter is not present. You must add this
manually. For more information, see the Sun Web Server 6.1configuration file reference:
http://docs.sun.com/source/817-1834-10/crobjsaf.html#wp18466.
1. Ensure the maxUploadSize property is set appropriately to handle the size of the
BI Publisher WAR file. It is recommended that you set the maxUploadSize
property to 100 megabytes.
To set the maxUploadSize property:
In the <WebServer-install-dir
>/bin/https/webapps/admin-app/WEB-INF/web.xml , add the followingparameter:
<init-param><param-name>maxUploadSize</param-name><param-value>100000000</param-value>
</init-param>
For example:
<servlet-name>webappdeploy</servlet-name><servlet-class>com.sun.web.admin.servlets.DeployServlet</servlet-class><init-param>
<param-name>maxUploadSize</param-name><param-value>100000000</param-value>
</init-param>
2. Restart the application server.
3. In a browser, open the Admin Console of the Sun Java System Web Server 6.1.
4. Select a Server from the list and click Manage.
5. Select the Virtual Server Class tab.
6. Select a Class from the list and click Manage.
7. From the Select a Virtual Server drop-down list, choose your server and clickManage.
8. Select the Web Applications tab.
9. On the Deploy Web Application page, browse for and select
manual\generic\xmlpserver.war (non-oc4j version) from your install media.

8/4/2019 e11867
http://slidepdf.com/reader/full/e11867 27/48
Installing Manually into a J2EE Application Server 3-7
In the Application URI field, enter /xmlpserver then click OK.
Please note where this WAR file deployed, indicated in the Installation Directory
field.
10. Click OK to deploy the application. A message appears informing that you must
apply the changes. Click Apply in the top right corner, then click Apply Changes.
11. Configure the Sun Java System Web Server server.xml file to load the
xdoparser.jar files first:
• Open <WebServer-install-dir >/<https-name-of-webserver-instance>/config/server.xml
• Add the following class path as the first entry for theserverclasspath
attribute value in the <JAVA> tag:
<WebServer-install-dir >/<https-name-of-webserver-instance>/webapps/<https-name-of-web-server-instance
>/xmlpserver/WEB-INF/lib/xdoparser.jarExample from server.xml:
<JAVA javahome="C:/Sun/WebServer6.1/bin/https/jdk"serverclasspath="C:/Sun/WebServer6.1/https-xmlphost/webapps/https-xmlphost/xmlpserver/WEBINF/lib/xmlparserv2-904.jar;C:/Sun/WebServer6.1/https-xmlphost/webapps/https-xmlphost/xmlpserver/WEBINF/lib/xdoparser.jar;C:/Sun/WebServer6.1/bin/https/jar/webserv-rt.jar;${java.home}/lib/tools.jar;C:/Sun/WebServer6.1/bin/https/jar/webserv-ext.jar;C:/Sun/WebServer6.1/bin/https/jar/webserv-jstl.jar;C:/Sun/WebServer6.1/bin/https/jar/ktsearch.jar"classpathsuffix="" envclasspathignored="true"nativelibrarypathprefix="" debug="false" debugoptions="-Xdebug-Xrunjdwp:transport=dt_socket,server=y,suspend=n"dynamicreloadinterval="-1">
12. Launch the BI Publisher application:
Open your browser to http://hostname:port/xmlpserver to see the login
page.
For example: http://localhost:8080/xmlpserver
13. If you see the login page, proceed to Configuring the BI Publisher Repository and
Installing Fonts, page 3-11.
Sun Java System Web Server 7.0 DeploymentThis section describes one example of how to deploy the BI Publisher application.
Follow the guidelines in your Sun Java System Web Server 7.0 documentation for the
appropriate method for your installation
8/4/2019 e11867
http://slidepdf.com/reader/full/e11867 28/48
3-8 Oracle Business Intelligence Publisher Installation Guide
Note: The Sun Web Server on Windows platform blocks any URI that
contains a tilde "~" character. To allow URIs that contain a tilde, you
must edit the obj.conf. The obj.conf file is located in the
<instance_dir>/config directory, for example: C:\ProgramFiles\Sun\WebServer7\<https-hostname>\config\obj.con
f.
Edit the file as follows:
<Object name="default">...PathCheck fn="nt-uri-clean" tildeok=""...</Object>
By default, the tildeok parameter is not present. You must add this
manually. For more information, see your Sun Web Server 7.0
configuration file reference (http://docs.sun.com/app/docs/doc/819-2630
).
1. In a browser, open the Admin Console of the Sun Java System Web Server 7.0.
2. Select the Virtual Servers tab under Configurations .
3. Select the virtual server, into which you will deploy the BI Publisher application.
4. Select the Web Applications tab, and then click New.
5. Browse for and select manual\generic\xmlpserver.war (non-oc4j version)
from your install media. (Optionally, you can also specify a Web application
archive located on the server.)
6. In the Application URI field, enter /xmlpserver then click OK.
7. Enable the application.
8. Click Deployment Pending.
9. Click the Deploy button to deploy the BI Publisher application.
10. Launch the BI Publisher application:
Open your browser to http://hostname:port/xmlpserver to see the login
page.
For example: http://localhost:8080/xmlpserver
11. If you see the login page, proceed to Configuring the BI Publisher Repository and
Installing Fonts, page 3-11.

8/4/2019 e11867
http://slidepdf.com/reader/full/e11867 29/48
Installing Manually into a J2EE Application Server 3-9
BEA WebLogic 8.1 Deployment
This section describes one example of how to deploy the BI Publisher application to the
BEA WebLogic 8.1 application server. Refer to your WebLogic documentation for the
appropriate procedure to install into your environment.Important: Do not use JRockit SDK 1.4.2_08 (bundled with WebLogic
8.1). The RandomAccessFile class included with JRockit inhibits the
proper generation of HTML, RTF and Excel outputs in BI Publisher
reports. Instead, use Sun SDK 1.4.2 or later.
Note: Use of exploded archive directories: Do not deploy
xmlpserver.ear (or xmlpserver.war) on WebLogic by uploading it from
the WebLogic console because the console deploys the application (or
Web module) in an archived file format. This is problematic to BI
Publisher configuration because you must updateWEB-INF/xmlp-server-config.xml manually after the
deployment. To workaround this issue, use an "exploded archive"
directory. To create an exploded archive directory, you manually
unpack the xmlpserver.ear and xmlpserver.war using a jar command.
For more information, see your WebLogic documentation.
1. Create an exploded archive directory.
Examplemkdir C:\BIPub\xmlpserver.warcd C:\BIPub\xmlpserver.war
jar -xvf manual\generic\xmlpserver.war
2. In a browser, open the WebLogic Administration console (for example:
http://hostname:7001/console).
3. Click <domain name>/Deployments/Web Application Modules from the left tree
pane.
4. Select Deploy a new Web Application Module.
5. Select C:\BIPub\xmlpserver.war as the Target Module and click Deploy.
WebLogic automatically deploys and starts up the BI Publisher server.
6. Open your browser to http://hostname:port/xmlpserver to see the login
page.
For example: http://localhost:8080/xmlpserver
7. If you see the login page, proceed to Configuring the BI Publisher Repository and

8/4/2019 e11867
http://slidepdf.com/reader/full/e11867 30/48
3-10 Oracle Business Intelligence Publisher Installation Guide
Installing Fonts, page 3-11.
BEA WebLogic 9.2 Deployment
This section describes one example of how to deploy the BI Publisher application to the
BEA WebLogic 9.2 application server. Refer to your WebLogic documentation for the
appropriate procedure to install into your environment.
Note: Use of exploded archive directories: Do not deploy
xmlpserver.ear (or xmlpserver.war) on WebLogic by uploading it from
the WebLogic console because the console deploys the application (or
Web module) in an archived file format. This is problematic to BI
Publisher configuration because you must update
WEB-INF/xmlp-server-config.xml manually after the
deployment. To workaround this issue, use an "exploded archive"
directory. To create an exploded archive directory, you manually
unpack the xmlpserver.ear and xmlpserver.war using a jar command.For more information, see your WebLogic documentation.
1. Create an exploded archive directory.
Example:
mkdir C:\BIPub\xmlpserver.warcd C:\BIPub\xmlpserver.warjar -xvf manual\generic\xmlpserver.war
2. In a browser, open the WebLogic Administration console (for example:
http://hostname:7001/console).
3. If you have not already done so, in the Change Center of the Administration
Console, click Lock & Edit.
4. In the left pane of the Administration Console, click Deployments.
5. In the right pane, click Install.
6. Select C:\BIPub\xmlpserver.war and click Next.
7. Select "Install this deployment as an application" and click Next.
8. Select "I will make the deployment accessible from the following location" from
Source accessibility.
9. Click Finish.
10. To activate these changes, in the Change Center of the Administration Console,

8/4/2019 e11867
http://slidepdf.com/reader/full/e11867 31/48
Installing Manually into a J2EE Application Server 3-11
click Activate Changes.
11. Perform the configurations described in Configuring the BI Publisher Repository
and Installing Fonts, page 3-11.
12. Start the service: click Deployments , then xmlpserver.
Configuring the BI Publisher Repository and Installing Fonts
After deploying BI Publisher in your application server, you must set up the BI
Publisher repository and install the font files.
To set up the repository, copy the xmlp repository directory to a location on your
server, then edit the configuration file to point to the saved location as follows:
1. Copy the XMLP repository directory from \manual on your installation media to
your server.
2. Open the xmlp-server-config.xml file located in the
<application installation>/WEB-INF/ directory, where your application
server unpacked the war or ear file.
Example:
In an AS/OC4J 10.1.3 deployment, the location is<ORACLE_HOME>/j2ee/home/applications/xmlpserver/xmlpserver/WEB-INF/xmlp-server-config.xml
If you are on BI Publisher version 10.1.3.3.1 or later, the file contains the following:
<? xml version="1.0" encoding="UTF-8"? >
<xmlpConfig xmlns="http://xmlns.oracle.com/oxp/xmlp"><resource>
<file path="${oracle.home}/xdo/repository"/></resource></xmlpConfig>
Note: If you are on version 10.1.3.3 of BI Publisher, the <file
path> element will appear as follows:
<file path="%s_Reports_Path%"/>. Replace the
"%s_Reports_Path%" string with the file path to the location where
you copied the XMLP repository directory on your server, as
described in the next step.
3. Replace ${oracle.home}/xdo/repository with file path to the location
where you copied the XMLP repository directory on your server.
For example, if you copied the repository directory to/home/repository/XMLP ,
update the xmlp-server-config.xml file as follows:
8/4/2019 e11867
http://slidepdf.com/reader/full/e11867 32/48
3-12 Oracle Business Intelligence Publisher Installation Guide
<? xml version="1.0" encoding="UTF-8"? ><xmlpConfig xmlns="http://xmlns.oracle.com/oxp/xmlp"><resource>
<file path="/home/repository/XMLP"/></resource></xmlpConfig>
Save xmlp-server-config.xml after updating.
4. Copy the font files from the manual\fonts on the install media to the fonts
directory of the Java Runtime Environment used by your J2EE container/application
server.
Example for Apache Tomcat:
C:\Program Files\Java\jre1.5.0_07\lib\fonts
Example for Oracle Application Server or OC4J:
<ORACLE_HOME>…\jdk\jre\lib\fonts
Example for WebSphere:
<WebSphere dir>/AppServer/java/jre/lib/font
5. Restart your application server.
6. Launch BI Publisher:
Open your browser to http://hostname:port/xmlpserver
For example:
http://localhost:8888/xmlpserver
7. Log in with user name "Administrator" and password "Administrator".
Important: Please change the Administrator password on the
Account tab under Preferences.
8/4/2019 e11867
http://slidepdf.com/reader/full/e11867 33/48
Postinstallation Tasks 4-1
4Postinstallation Tasks
Introduction
This chapter describes the required and optional tasks to be performed after thesuccessful installation of the BI Publisher server into an OC4J instance or other J2EE
application server.
The topics in this chapter include:
• Postinstall Checklist
• Configuring the Scheduler Database
• Configuring the Demo Data Sources
• Installing Oracle BI Publisher Desktop
Postinstall Checklist
To complete your BI Publisher install, perform these tasks:
• Configure the scheduler database
• Configure the JDBC demo data source
• Configure the File demo data source
• Install BI Publisher Desktop
Configuring the Scheduler Database
To schedule reports you must configure a database and install the BI Publisher
scheduler schema. See Environment Requirements, page 1-2 for the list of supported

8/4/2019 e11867
http://slidepdf.com/reader/full/e11867 34/48
4-2 Oracle Business Intelligence Publisher Installation Guide
databases.
The following scheduler setup options are described in detail in the following sections:
• Oracle Database with Oracle AS/OC4J 10.1.3 or Tomcat
• Microsoft SQL Server on Oracle AS/OC4J 10.1.3
• Microsoft SQL Server on Tomcat
Configuring the Scheduler on Oracle Database 10g
Follow the steps below to configure Oracle Database 10g for BI Publisher:
1. Create a user on the database with connect and resource privileges (for example:
bipubsched).
2. Log in to BI Publisher as a user with Administrator privileges and select the Admin
tab.
3. Under System Maintenance , select Scheduler Configuration.
4. Enter the database connection information for the target Oracle database and user.
Database Type: 10g
Connection String: jdbc:oracle:thin://<hostname>:<port#>:<oracle SID>
Username/Password for the database user (for example: bipubsched)
Database Driver Class: oracle.jdbc.driver.OracleDriver
5. Click the Test Connection button to make sure the connection information is valid.
6. Click the Install Schema button to install the scheduler tables.
7. Restart the BI Publisher application.
Proceed to Setting Up the Demo Data Sources, page 4-5.
Configuring the Scheduler on SQL Server with Oracle ApplicationServer/OC4J 10.1.3
Important: Your Microsoft SQL Server database must be set up using
"Mixed Mode" authentication.
1. Create a user on the database and assign the user the "db_owner" role.

8/4/2019 e11867
http://slidepdf.com/reader/full/e11867 35/48
Postinstallation Tasks 4-3
2. Download DataDirect JDBC drivers.
Oracle provides a JDBC driver for non-Oracle databases called Oracle DataDirect.
This document refers to Oracle DataDirect version 3.4. Please refer to the following
link for more information and to download the drivers:
• Download DataDirect JDBC Drivers:
http://www.oracle.com/technology/software/products/ias/htdocs/utilsoft.html
3. Set up DataDirect on OC4J.
For more information, see the Oracle Containers for J2EE Services Guide.
4. Register the DataDirect JDBC Driver on OC4J.
• Open OC4J Application Server Control (ASC).
• Choose the Administration tab and click Shared Libraries.
• On the Shared Libraries page, click Create.
• Enter the Shared Library Name (example: jdbc.datadirect) and Shared Library
Version (example: 1.0).
• Upload JDBC driver files and click OK:
• YMbase.jar
• YMresource.jar
• YMulti.jar
• YMdb2.jar
• YMsybase.jar
• YMsqlserver.jar
• On the Import Shared Libraries page, select "oracle.xml" and "oracle.toplink".
Click Finish.
5.Redeploy the application.• From the Enterprise Manager Application Server Control page, select the
Applications tab, then click Deploy.
• On the Select Archive step, in the Archive Location field, browse for and select
the xmlpserver.ear file. Select Next.

8/4/2019 e11867
http://slidepdf.com/reader/full/e11867 36/48
4-4 Oracle Business Intelligence Publisher Installation Guide
• Enter the Application Attributes.
Example:
Application Name: xmlpserver
Parent Application: default
Bind Web Module to Site: default-web-site
Context Root: xmplserver
Select Next.
• On the Deployment Settings step, click the Configure Class Loading task icon.
• On the Configure Class Loading page select the shared library you created
("jdbc.datadirect") and deselect "oracle.toplink", then click OK.
• From the Deployment Settings page, click Deploy to deploy the application.
• Restart the application.
6. Set up the connection to the Microsoft SQL Server database in BI Publisher.
• Log in to BI Publisher Enterprise as Administrator, click the Admin tab then
click Scheduler Configuration.
• Enter the SQL Server information (see the following for detail) and click Apply
to save it.
Database Type: Microsoft SQL Server
Connection String: jdbc:oracle:sqlserver://<hostname>:<port#>;DatabaseName=<database
name>;selectMethod=cursor
Username and Password for the database user
Database Driver Class: com.oracle.ias.jdbc.sqlserver.SQLServerDriver
• Click the Test Connection button.
• If successful, click Install Schema to install the scheduler schema.
• Restart the BI Publisher application to make your changes effective.
Proceed to Setting Up the Demo Data Sources, page 4-5.
Configuring the Scheduler on Microsoft SQL Server 2000 with Tomcat
1. Register the JDBC Driver for Microsoft SQL Server 2000 on Tomcat.

8/4/2019 e11867
http://slidepdf.com/reader/full/e11867 37/48
Postinstallation Tasks 4-5
You can download the JDBC Driver for Microsoft SQL Server 2000 from the
following location:
http://www.microsoft.com/downloads/details.aspx? familyid=9f1874b6-f8e1-4bd6-94
7c-0fc5bf05bf71&displaylang=en
• To register the JDBC driver for Microsoft SQL Server 2000:
Add JDBC driver files under $CATALINA_HOME/common/lib directory.
• Add the Microsoft JDBC driver for SQL Server 2000 files:
msbase.jar
mssqlserver.jar
msutil.jar
2. Set up the connection to the Microsoft SQL Server database in BI Publisher.
• Log in to BI Publisher Enterprise as Administrator, click the Admin tab andthen click Scheduler Configuration.
• Enter the SQL Server information (see the following for detail) and click Apply
to save it.
Database Type: Microsoft SQL Server
Connection String:
jdbc:oracle:sqlserver://<hostname>:<port#>;DatabaseName=<database
name>;selectMethod=cursor
Username and Password for the database user
Database Driver Class: com.oracle.ias.jdbc.sqlserver.SQLServerDriver
• Click the Test Connection button.
• If successful, click Install Schema to install the scheduler schema.
3. Restart the BI Publisher application.
Proceed to Setting Up the Demo Data Sources, page 4-5.
Setting Up the Demo Data SourcesBI Publisher provides a set of demonstration reports for you to view and run as
samples.
The sample reports use a file-based data source and a JDBC data source. Follow the
steps below to configure the data sources.

8/4/2019 e11867
http://slidepdf.com/reader/full/e11867 38/48
4-6 Oracle Business Intelligence Publisher Installation Guide
Configuring the Demo File Data Source
The XMLP directory contains the DemoFiles data source directory. Set up this folder as
a file-based data source as follows:
1. Locate the DemoFiles directory in your installation.
For example: C:\OracleBI\xmlp\XMLP\DemoFiles
If you performed a manual installation, the XMLP directory will be located where
you copied it in the step Configuring the BI Publisher Repository and Copying
Fonts, page 3-11.
2. Log in to BI Publisher with Administrator credentials.
3. Select the Admin tab.
4. In the Data Sources section, select File.
5. Select the data source with the name "demo files".
6. Enter the path to the DemoFiles folder.
For example: C:\OracleBI\xmlp\XMLP\DemoFiles
7. Click Apply to save the changes.
Configuring the Demo JDBC Data Source
Note: The demo data source must be connected to an Oracle Databasewith the sample schemas and users HR and OE unlocked.
1. Select the Admin tab.
2. In the Data Sources section, select the JDBC Connection link.
3. Select the select the data source with the name "demo".
4. In the Update Data Source screen, change the connection string to point to an
Oracle 10g database with unlocked OE user.
5. Click the Test Connection button to confirm that BI Publisher can access the
database.
6. Click Apply to save the changes.

8/4/2019 e11867
http://slidepdf.com/reader/full/e11867 39/48
Postinstallation Tasks 4-7
Installing Oracle BI Publisher Desktop Tools
The Oracle BI Publisher Desktop tools are recommended for users who will be
designing report layout templates.
Obtain the BI Publisher Desktop tools as follows:
Important: If you have installed an earlier version of the Template
Builder for Word or the Excel Analyzer you must remove the previous
version before installing a new version.
Important: To install the BI Publisher Desktop tools on Microsoft
Windows Vista, ensure the User Account Control (UAC) is set to on.
This is also the default setting. For more information, see the Microsoft
document: Turn User Account Control on or off
[http://windowshelp.microsoft.com/Windows/en-US/Help/58b3b879-92
4d-4e08-9358-c316055d3eae1033.mspx].
• From the Application:
The Oracle BI Publisher Template Builder for Microsoft Word Add-in and the Excel
Analyzer can be installed from the BI Publisher application for users with the
appropriate roles assigned (that is, BI Publisher Administrator, BI Publisher
Developer, and BI Publisher Excel Analyzer). The download link appears on the
Developer Tools region. For more information, see the topic: Creating an RTF
Template Using the Template Builder for Word in the Oracle Business Intelligence
Publisher User's Guide.
For users running non-Vista Windows clients, the Excel Analyzer can also be
downloaded on demand the first time the Analyzer for Excel button is selected
from the View page. For more information see the topic: Using the BI Publisher
Analyzer for Excel in the Oracle Business Intelligence Publisher User's Guide.
• The Oracle BI Publisher Template Builder for Microsoft Word Add-in and the
Analyzer for Excel can also be obtained from the install media:
Navigate to \manual\XMLP\Tools\ where the install executables
BIPublisherDesktop.exe and ExcelAnalyzer.exe are located. Double-click
the file and follow the installer prompts.

8/4/2019 e11867
http://slidepdf.com/reader/full/e11867 40/48

8/4/2019 e11867
http://slidepdf.com/reader/full/e11867 41/48
Silent and Non-Interactive Installation A-1
ASilent and Non-Interactive Installation
This appendix covers the following topics:
• Silent Installation
• Non-Interactive Installation
• Create the Response File
• Start the Installation
• Postinstallation
• Security Tips for Silent and Non-Interactive Installations
• Deinstallation
Silent Installation
Silent installation eliminates the need to monitor the Oracle BI Publisher installation
because there is no graphical output and no input by the user.
Silent installation is accomplished by supplying the Oracle Universal Installer with a
response file and specifying the -silent flag on the command line. The response file
is a text file containing variables and parameter values which provide answers to the
installer prompts.
If this is a first time installation of Oracle BI Publisher, you must create the registry keys
before starting. Registry key creation is described in Preinstallation.
Use silent installation when there are similar installations on more than one computer.
Additionally, use silent install when performing the Oracle BI Publisher installation
from a remote location using the command line.
Non-Interactive Installation
Non-interactive installations also use a response file to automate the installation. In
non-interactive installations, there is graphical output and users may enter input.
8/4/2019 e11867
http://slidepdf.com/reader/full/e11867 42/48
A-2 Oracle Business Intelligence Publisher Installation Guide
Non-interactive installation of Oracle BI Publisher is also accomplished by supplying
the Oracle Universal Installer with a response file but without specifying the -silent
flag on the command line. The response file is a text file containing variables and
parameter values which provide answers to the installer prompts. If you have not
provided responses to all of the installer prompts, you need to enter information during
the installation.If this is a first time installation of Oracle BI Publisher, you must create the registry keys
before starting. Registry key creation is described in Preinstallation.
Use non-interactive installation of Oracle BI Publisher when there are specific screens
you want to observe during installation.
Create the Response File
Before doing a silent or non-interactive installation, you must provide information
specific to your installation in a response file. The installer will fail if you attempt an
installation using a response file that is not configured correctly. Response files are textfiles that you can create or edit in a text editor.
Creating Response Files from Templates
Templates for response files are available in the stage\Response directory of your
install media. Response file templates are available for the following installation types:
Installation Type File Name
Basic Installation oracle.bi.publisher.install_type1.rsp
Advanced oracle.bi.publisher.install_type2.rsp
See the template files for descriptions of the parameters in the file.
Note: For Boolean parameters, specify either "true" or "false".
Creating Response Files by Using the Record Mode in the Installer
You can run the installer in record mode to save your inputs to a file that you can uselater as a response file. This feature is useful if you need to perform the same
installation on different computers.
To run the installer in record mode:
1. Start up the installer with the -record and -destinationFile parameters.
E:\> setup.exe -record -destinationFile newResponseFile
8/4/2019 e11867
http://slidepdf.com/reader/full/e11867 43/48
Silent and Non-Interactive Installation A-3
Replace newResponseFile with the full path to the response file that you want
the installer to create.
Example: C:\myBIPublisherResponse.rsp
2. Enter your values in the installer screens. The installer will write these values to the
file specified in the -destinationFile parameter.
When you click the Install button, the installer automatically writes all your values
to the specified file. At this point, you can complete the installation on this
computer, or you can exit without performing the installation.
Secure information, such as passwords, is not written to the file, so you must
modify the response file before you can use it. To set the password, modify the
s_adminpwd parameter. See the generated response file for a description of the
parameter.
Note: Response files created by record mode can only be used for
non-interactive installations. You cannot use a response file created by
record mode in a silent installation.
Example Response Files
The following sections shows example response files for the following Oracle BI
Publisher installation types:
• Example Response File for Basic Installation
• Example Response File for Advanced Installation
Note: Be sure that you read the description of each parameter=value in
the provided sample files, and edit value accordingly for your
environment.
Example Response File for a Basic Installation
The following shows an example of a response file for a silent installation of Oracle BI
Publisher as described in the topic: Performing a Basic Install, page 2-1.

8/4/2019 e11867
http://slidepdf.com/reader/full/e11867 44/48
A-4 Oracle Business Intelligence Publisher Installation Guide
RESPONSEFILE_VERSION=2.2.1.0.0UNIX_GROUP_NAME=<Value Unspecified>FROM_LOCATION="..\stage\products.xml"FROM_LOCATION_CD_LABEL=<Value Unspecified>NEXT_SESSION_RESPONSE=<Value Unspecified>ORACLE_HOME="C:\OHOME1"ORACLE_HOME_NAME="OHOME1"
TOPLEVEL_COMPONENT={"oracle.bi.publisher","10.1.3.2.1"}DEINSTALL_LIST={"oracle.bi.publisher","10.1.3.2.1"}SHOW_SPLASH_SCREEN=trueSHOW_WELCOME_PAGE=falseSHOW_COMPONENT_LOCATIONS_PAGE=falseSHOW_CUSTOM_TREE_PAGE=falseSHOW_SUMMARY_PAGE=trueSHOW_INSTALL_PROGRESS_PAGE=trueSHOW_REQUIRED_CONFIG_TOOL_PAGE=trueSHOW_CONFIG_TOOL_PAGE=trueSHOW_XML_PREREQ_PAGE=trueSHOW_RELEASE_NOTES=trueSHOW_END_OF_INSTALL_MSGS=trueSHOW_ROOTSH_CONFIRMATION=trueSHOW_END_SESSION_PAGE=true
SHOW_EXIT_CONFIRMATION=trueNEXT_SESSION=trueNEXT_SESSION_ON_FAIL=trueSHOW_DEINSTALL_CONFIRMATION=trueSHOW_DEINSTALL_PROGRESS=trueACCEPT_LICENSE_AGREEMENT=trueRESTART_SYSTEM=<Value Unspecified>CLUSTER_NODES=<Value Unspecified>OUI_HOSTNAME=<Value Unspecified>REMOVE_HOMES=<Value Unspecified>INSTALL_TYPE="install_type_1"s_ASHome=<Value Unspecified>s_adminpwd="Administrator1"
Example Response File for an Advanced InstallationThe following shows an example of a response file for a silent installation of Oracle BI
Publisher as described in the topic: Performing an Advanced Install, page 2-4.

8/4/2019 e11867
http://slidepdf.com/reader/full/e11867 45/48
Silent and Non-Interactive Installation A-5
RESPONSEFILE_VERSION=2.2.1.0.0UNIX_GROUP_NAME=<Value Unspecified>FROM_LOCATION="..\stage\products.xml"FROM_LOCATION_CD_LABEL=<Value Unspecified>NEXT_SESSION_RESPONSE=<Value Unspecified>ORACLE_HOME="C:\OHOME1"ORACLE_HOME_NAME="OHOME1"
TOPLEVEL_COMPONENT={"oracle.bi.publisher","10.1.3.2.1"}DEINSTALL_LIST={"oracle.bi.publisher","10.1.3.2.1"}SHOW_SPLASH_SCREEN=trueSHOW_WELCOME_PAGE=falseSHOW_COMPONENT_LOCATIONS_PAGE=falseSHOW_CUSTOM_TREE_PAGE=falseSHOW_SUMMARY_PAGE=trueSHOW_INSTALL_PROGRESS_PAGE=trueSHOW_REQUIRED_CONFIG_TOOL_PAGE=trueSHOW_CONFIG_TOOL_PAGE=trueSHOW_XML_PREREQ_PAGE=trueSHOW_RELEASE_NOTES=trueSHOW_END_OF_INSTALL_MSGS=trueSHOW_ROOTSH_CONFIRMATION=trueSHOW_END_SESSION_PAGE=true
SHOW_EXIT_CONFIRMATION=trueNEXT_SESSION=trueNEXT_SESSION_ON_FAIL=trueSHOW_DEINSTALL_CONFIRMATION=trueSHOW_DEINSTALL_PROGRESS=trueACCEPT_LICENSE_AGREEMENT=trueRESTART_SYSTEM=<Value Unspecified>CLUSTER_NODES=<Value Unspecified>OUI_HOSTNAME=myhost.mycompany.comREMOVE_HOMES=<Value Unspecified>INSTALL_TYPE="install_type_2"s_ASHome="C:\product\10.1.3.1\OracleAS_1"s_adminpwd="Administrator1"
Start the InstallationTo make the installer use the response file, specify the location of the response file that
you want to use as a parameter when starting the installer.
To perform a non-interactive installation:
E:\temp\BIPublisher\ > setup.exe -responseFileabsolute_path_and_filename
To perform a silent installation, use the -silent parameter:
E:\temp\BIPublisher\ > setup.exe -silent -responseFileabsolute_path_and_filename
Postinstallation
The success or failure of the non-interactive and silent installations is logged in the
installActions<time_stamp>.log file. Additionally, the silent installation creates
the silentInstall<time_stamp>.log file. The log files are created in the
C:\Program Files\Oracle\Inventory\Logs directory.

8/4/2019 e11867
http://slidepdf.com/reader/full/e11867 46/48
A-6 Oracle Business Intelligence Publisher Installation Guide
The silentInstall<time_stamp>.log file contains the following line if the
installation was successful:
The installation of Oracle BI Publisher <Installation Type> wassuccessful.
The installActions<time_stamp>.log file contains specific information for each
Oracle BI Publisher installation type.
Security Tips for Silent and Non-Interactive Installations
One of the pieces of information in the response file is the installation password.
To minimize security issues regarding the password in the response file, follow these
guidelines:
• Set the permissions on the response files so that they are readable only by the
operating system user who will be performing the silent or non-interactive
installation.
• If possible, remove the response files from the system after the silent or
non-interactive installation is completed.
Deinstallation
You can perform a silent deinstallation of Oracle BI Publisher by supplying a silent
deinstallation parameter to the response file you used for installation.
Modify the following parameter in your installation response file:
REMOVE_HOMES={"<ORACLE_HOME to be removed>"}
For example:
REMOVE_HOME="C:\oracle\ora_j2ee"
To perform a silent deinstallation, use the -deinstall parameter when entering the
command:
E:\> setup.exe -silent -deinstall -responseFileabsolute_path_and_filename
8/4/2019 e11867
http://slidepdf.com/reader/full/e11867 47/48
Deinstalling BI Publisher B-1
BDeinstalling BI Publisher
Deinstallation Procedure
Follow these steps to deinstall Oracle BI Publisher:
1. Remove the BI Publisher application from its J2EE container.
Consult your application server documentation for instructions on removing an
application.
2. Run the Oracle Universal Installer to remove application files.
Launch the OUI from the following path:
Start > Programs > Oracle > Oracle - Instance Name > Oracle Installation Products >
Universal Installer
3. Select Deinstall Products.
From the Inventory dialog, select Oracle Business Intelligence Publisher 10.1.3.3 and
click Remove.
4. If you performed a manual install, manually delete the BI Publisher repository
directory and font files.
5. Remove BI Publisher Desktop tools using Microsoft Windows Add or Remove
Programs utility.

8/4/2019 e11867
http://slidepdf.com/reader/full/e11867 48/48


