e-Journal Entry Quick Reference Guide Table of Contents · button, Journal ID, Journal state path,...
24
The e-Journal Process . . . . . . . . . . . . . . . . . . . . . . . . . . . . . . . . . . . . . . . . . . . . . . . . . . . . . . . . . . . . . . . . 2 Preparing an e-Journal . . . . . . . . . . . . . . . . . . . . . . . . . . . . . . . . . . . . . . . . . . . . . . . . . . . . . . . . . . . . . . . 3 Overview of My e-Journal Home Page . . . . . . . . . . . . . . . . . . . . . . . . . . . . . . . . . . . . . . . . . . . 3 Step 1- Initiating a New Journal Entry . . . . . . . . . . . . . . . . . . . . . . . . . . . . . . . . . . . . . . . . . . . . 4 Step 2- Filling Out the “Form” . . . . . . . . . . . . . . . . . . . . . . . . . . . . . . . . . . . . . . . . . . . . . . . . . . . . 7 Step 3- Resolving Validation Errors . . . . . . . . . . . . . . . . . . . . . . . . . . . . . . . . . . . . . . . . . . . . . . 11 Step 4- Providing Backup Documentation . . . . . . . . . . . . . . . . . . . . . . . . . . . . . . . . . . . . . . 12 Step 5- Understanding and Managing Approval Routing . . . . . . . . . . . . . . . . . . . . . . . . 15 Step 6- Submitting the Entry . . . . . . . . . . . . . . . . . . . . . . . . . . . . . . . . . . . . . . . . . . . . . . . . . . . 17 Additional Information . . . . . . . . . . . . . . . . . . . . . . . . . . . . . . . . . . . . . . . . . . . . . . . . . . . . . . . . . . . . . 18 Monitoring & Tracking e-Journals . . . . . . . . . . . . . . . . . . . . . . . . . . . . . . . . . . . . . . . . . . . . . . 18 Month-End Closing Process . . . . . . . . . . . . . . . . . . . . . . . . . . . . . . . . . . . . . . . . . . . . . . . . . . . . 22 Sharing the e-Journal . . . . . . . . . . . . . . . . . . . . . . . . . . . . . . . . . . . . . . . . . . . . . . . . . . . . . . . . . . 23 Advanced Search Options . . . . . . . . . . . . . . . . . . . . . . . . . . . . . . . . . . . . . . . . . . . . . . . . . . . . . 24 e-Journal Entry Quick Reference Guide Table of Contents 1 e-Journal Entry Quick Reference Guide
-
Upload
vuongkhanh -
Category
Documents
-
view
217 -
download
0
Transcript of e-Journal Entry Quick Reference Guide Table of Contents · button, Journal ID, Journal state path,...

The e-Journal Process . . . . . . . . . . . . . . . . . . . . . . . . . . . . . . . . . . . . . . . . . . . . . . . . . . . . . . . . . . . . . . . . 2
Preparing an e-Journal . . . . . . . . . . . . . . . . . . . . . . . . . . . . . . . . . . . . . . . . . . . . . . . . . . . . . . . . . . . . . . . 3Overview of My e-Journal Home Page . . . . . . . . . . . . . . . . . . . . . . . . . . . . . . . . . . . . . . . . . . . 3Step 1- Initiating a New Journal Entry . . . . . . . . . . . . . . . . . . . . . . . . . . . . . . . . . . . . . . . . . . . . 4Step 2- Filling Out the “Form” . . . . . . . . . . . . . . . . . . . . . . . . . . . . . . . . . . . . . . . . . . . . . . . . . . . . 7
Step 3- Resolving Validation Errors . . . . . . . . . . . . . . . . . . . . . . . . . . . . . . . . . . . . . . . . . . . . . . 11Step 4- Providing Backup Documentation . . . . . . . . . . . . . . . . . . . . . . . . . . . . . . . . . . . . . . 12Step 5- Understanding and Managing Approval Routing . . . . . . . . . . . . . . . . . . . . . . . . 15Step 6- Submitting the Entry . . . . . . . . . . . . . . . . . . . . . . . . . . . . . . . . . . . . . . . . . . . . . . . . . . . 17
Additional Information . . . . . . . . . . . . . . . . . . . . . . . . . . . . . . . . . . . . . . . . . . . . . . . . . . . . . . . . . . . . . 18Monitoring & Tracking e-Journals . . . . . . . . . . . . . . . . . . . . . . . . . . . . . . . . . . . . . . . . . . . . . . 18Month-End Closing Process . . . . . . . . . . . . . . . . . . . . . . . . . . . . . . . . . . . . . . . . . . . . . . . . . . . . 22Sharing the e-Journal . . . . . . . . . . . . . . . . . . . . . . . . . . . . . . . . . . . . . . . . . . . . . . . . . . . . . . . . . . 23Advanced Search Options . . . . . . . . . . . . . . . . . . . . . . . . . . . . . . . . . . . . . . . . . . . . . . . . . . . . . 24
e-Journal Entry Quick Reference Guide
Table of Contents
1e-Journal Entry Quick Reference Guide

The e-Journal Process
Q: What is an e-Journal?
The electronic journal entry process is a medium for creating and processing journal entries. The e-Journal process involves multiple people ful�lling various functions between creation and posting of the entry to the General Ledger.
Q: Who uses the e-Journal system?
There are three di�erent roles a user may have in the e-Journal system: • Preparer – initiates/creates journal entries • Departmental Approver – reviews/signi�es approval of journal transactions • Viewer – views journal entries
Q: What is the process of preparing and posting an e-Journal to the General Ledger?
The e-Journal process is described below:
1. Preparer initiates the journal entry by: a. Filling out the journal entry form (explanation, chart�elds, amounts, etc) b. Attaching or mailing in backup (supporting) documentation (as needed) c. Designating appropriate departmental approvers (if any) d. Verifying the information entered is correct and valid (the system automatically runs checks to verify debits/credits match, chart�eld combinations are valid, etc, when the preparer submits the entry) e. Submitting the entry 2. Departmental Approvers approve the entry or send it back to the Preparer if needed. 3. Preparer monitors the entry to ensure it is “submitted” to Central Administration by the journal entry due date (published on the Accounting Calendar). It is the Preparer’s responsibility to verify that all departmental approvals and backup documentation for the entry are submitted by midnight on the cuto� date. 4. Central Administration reviews/approves the entry (if corrections are needed, they may make the changes or send it back to the Preparer). 5. After �nal approval, the system veri�es the content is still valid, and if so the e-Journal is considered complete and the system integrates (sends) the entry into the University’s accounting system. 6. New entries saved in the University’s accounting system are posted to the General Ledger every business evening.
2e-Journal Entry Quick Reference Guide

Preparing an e-Journal Entry
This section provides a step by step guide to prepare e-Journals, describes each of the application tools in detail, and discusses best practices.
Overview of My e-Journal Home Page
Once you are approved to prepare e-Journals, you are given access to your own e-Journal home page. This page provides you with many resources and information including the status of your e-Journals.
Your e-Journal home page can be found by clicking on the e-journal tile displayed on the CIS home page then click on E-Journal entry.
Your Home page contains four di�erent sections: 1. Top menu bar – links to the 4 pages in the application: Home, Downloads, Journal, Search; a quick search by Journal ID; create a New Journal button. 2. Search box – this is a “quick search” menu with limited options. 3. Help & Documentation – all application help and support documents 4. Personalized worklist(s) – displays journal entries pending your action, and all journals you prepared that are still in process or recently completed. If you have not yet used the e-Journals application to prepare or approve entries, this section will be empty.
3e-Journal Entry Quick Reference Guide

Preparing an e-Journal Entry
This section provides a step by step guide to prepare e-Journals, describes each of the application tools in detail, and discusses best practices.
Overview of My e-Journal Home Page
Once you are approved to prepare e-Journals, you are given access to your own e-Journal home page. This page provides you with many resources and information including the status of your e-Journals.
Your e-Journal home page can be found by clicking on the e-journal tile displayed on the CIS home page then click on E-Journal entry.
Your Home page contains four di�erent sections: 1. Top menu bar – links to the 4 pages in the application: Home, Downloads, Journal, Search; a quick search by Journal ID; create a New Journal button. 2. Search box – this is a “quick search” menu with limited options. 3. Help & Documentation – all application help and support documents 4. Personalized worklist(s) – displays journal entries pending your action, and all journals you prepared that are still in process or recently completed. If you have not yet used the e-Journals application to prepare or approve entries, this section will be empty.
Step 1: Initiating a New Journal Entry
To start a new entry use the Journal link or the New Journal button in the top menu bar of your e-journal home page.
The e-Journal page contains 5 sections:
1. Header Section 2. Lines – chart�elds, amounts, etc 3. Backup Documentation – supporting documents can be attached & viewed here 4. Approvals – routing path and approval status visible here 5. Tracking – audit trail of actions taken on the entry
14e-Journal Entry Quick Reference Guide
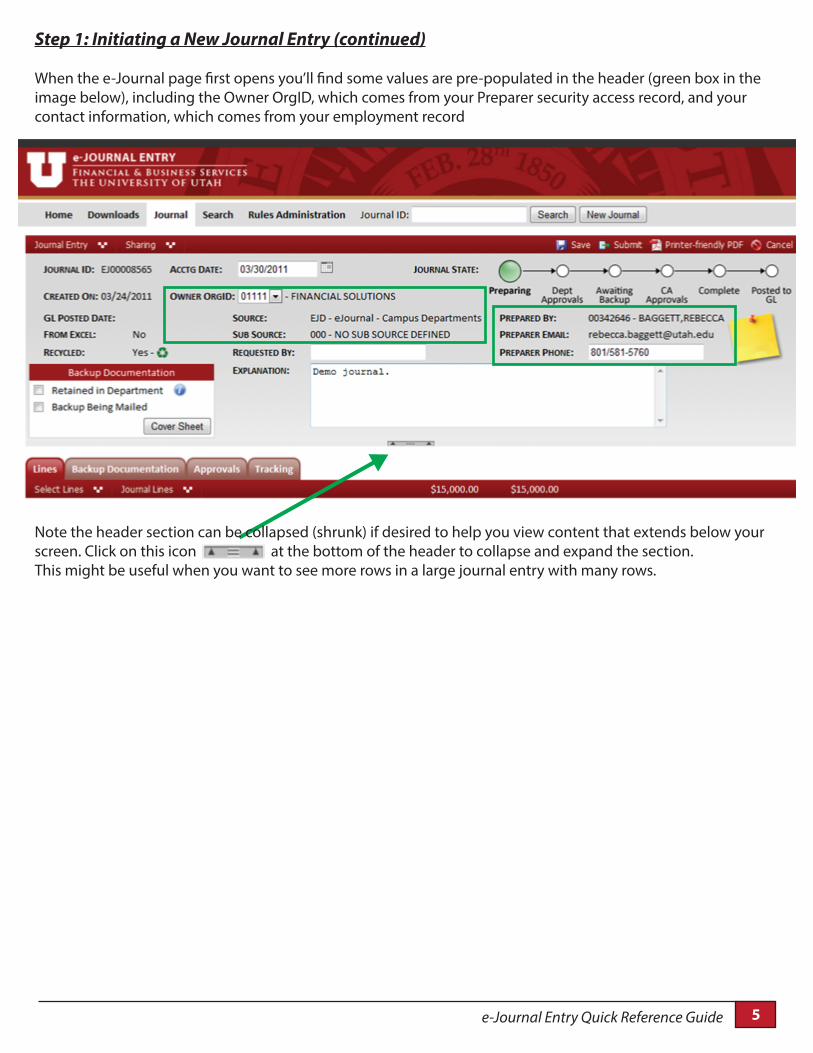
Step 1: Initiating a New Journal Entry (continued)
When the e-Journal page �rst opens you’ll �nd some values are pre-populated in the header (green box in the image below), including the Owner OrgID, which comes from your Preparer security access record, and your contact information, which comes from your employment record
15e-Journal Entry Quick Reference Guide
Note the header section can be collapsed (shrunk) if desired to help you view content that extends below your screen. Click on this icon at the bottom of the header to collapse and expand the section. This might be useful when you want to see more rows in a large journal entry with many rows.

Step 1: Initiating a new journal entry (continued)
Many features do not appear until the journal is �rst saved (the green squares below). This includes the Submit button, Journal ID, Journal state path, Sticky notes, and the Backup, Approvals and Tracking tabs.
Please see the full preparers guide on more information on sticky notes.
Save early to make all features available to you, and save often to avoid losing your work.
6e-Journal Entry Quick Reference Guide
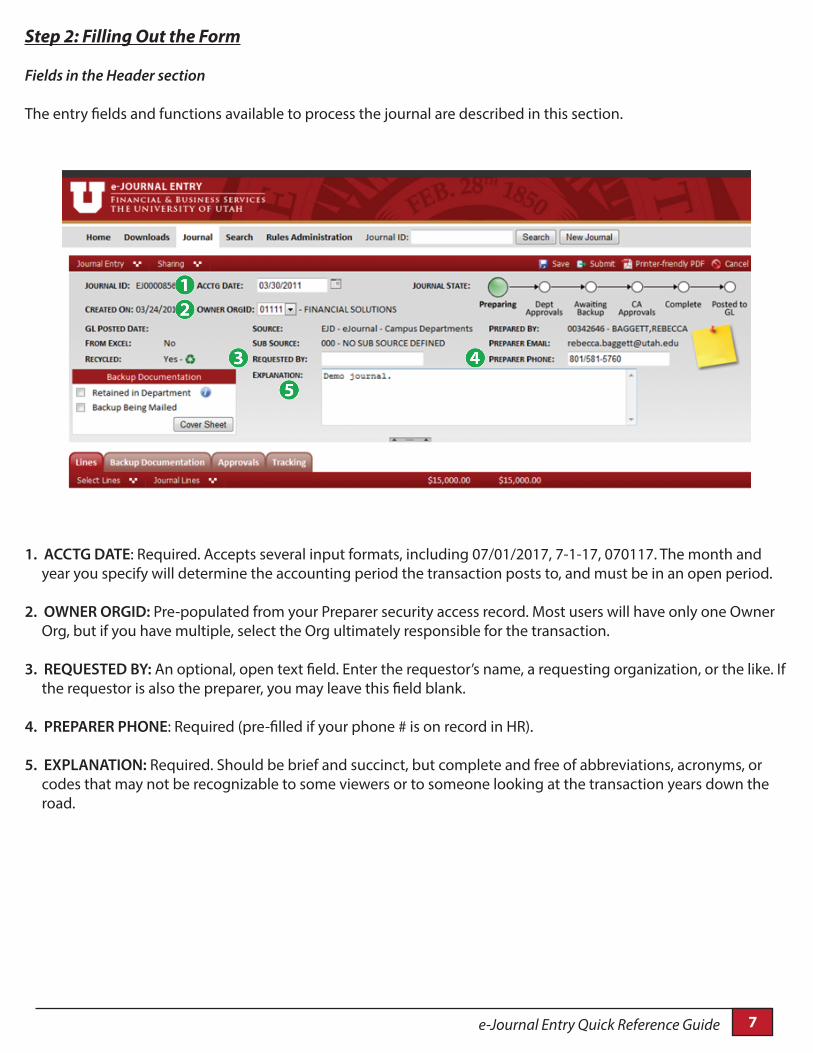
Step 2: Filling Out the Form
Fields in the Header section
The entry �elds and functions available to process the journal are described in this section.
1. ACCTG DATE: Required. Accepts several input formats, including 07/01/2017, 7-1-17, 070117. The month and year you specify will determine the accounting period the transaction posts to, and must be in an open period.
2. OWNER ORGID: Pre-populated from your Preparer security access record. Most users will have only one Owner Org, but if you have multiple, select the Org ultimately responsible for the transaction.
3. REQUESTED BY: An optional, open text �eld. Enter the requestor’s name, a requesting organization, or the like. If the requestor is also the preparer, you may leave this �eld blank.
4. PREPARER PHONE: Required (pre-�lled if your phone # is on record in HR).
5. EXPLANATION: Required. Should be brief and succinct, but complete and free of abbreviations, acronyms, or codes that may not be recognizable to some viewers or to someone looking at the transaction years down the road.
7e-Journal Entry Quick Reference Guide
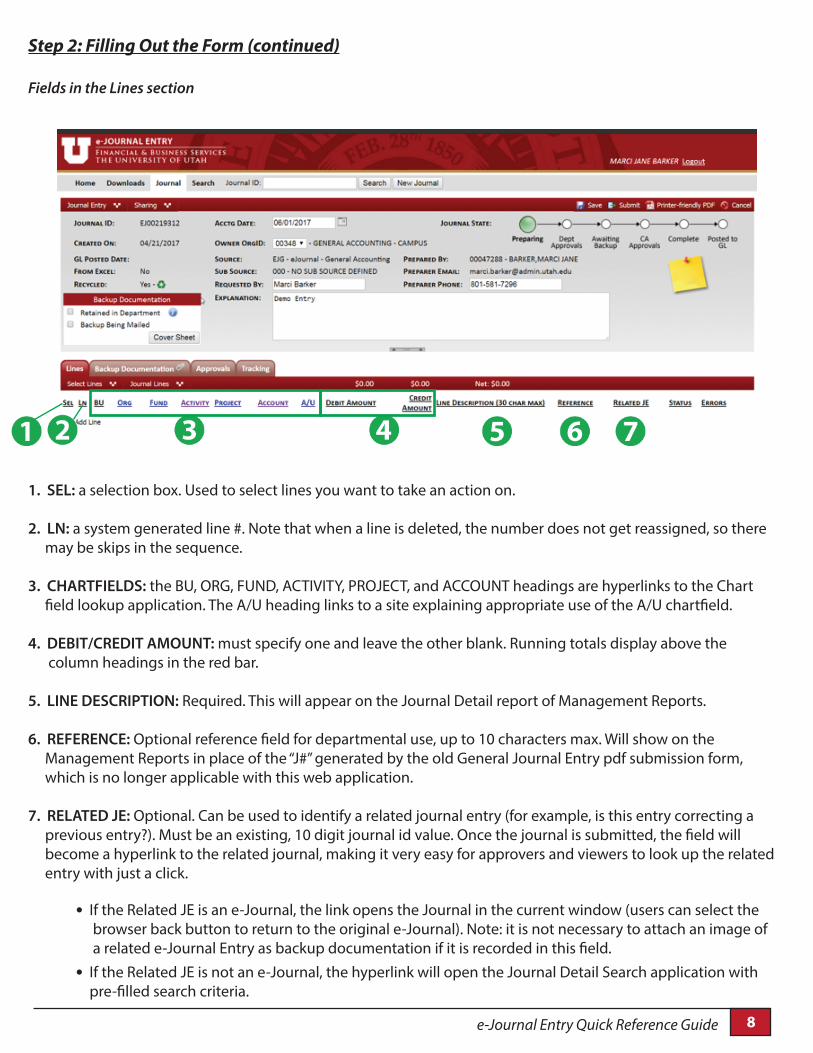
Step 2: Filling Out the Form (continued)
Fields in the Lines section
1. SEL: a selection box. Used to select lines you want to take an action on.
2. LN: a system generated line #. Note that when a line is deleted, the number does not get reassigned, so there may be skips in the sequence.
3. CHARTFIELDS: the BU, ORG, FUND, ACTIVITY, PROJECT, and ACCOUNT headings are hyperlinks to the Chart �eld lookup application. The A/U heading links to a site explaining appropriate use of the A/U chart�eld.
4. DEBIT/CREDIT AMOUNT: must specify one and leave the other blank. Running totals display above the column headings in the red bar.
5. LINE DESCRIPTION: Required. This will appear on the Journal Detail report of Management Reports.
6. REFERENCE: Optional reference �eld for departmental use, up to 10 characters max. Will show on the Management Reports in place of the “J#” generated by the old General Journal Entry pdf submission form, which is no longer applicable with this web application.
7. RELATED JE: Optional. Can be used to identify a related journal entry (for example, is this entry correcting a previous entry?). Must be an existing, 10 digit journal id value. Once the journal is submitted, the �eld will become a hyperlink to the related journal, making it very easy for approvers and viewers to look up the related entry with just a click.
• If the Related JE is an e-Journal, the link opens the Journal in the current window (users can select the browser back button to return to the original e-Journal). Note: it is not necessary to attach an image of a related e-Journal Entry as backup documentation if it is recorded in this �eld. • If the Related JE is not an e-Journal, the hyperlink will open the Journal Detail Search application with pre-�lled search criteria.
8e-Journal Entry Quick Reference Guide

Step 2: Filling Out the Form (continued)
Line Functions
Click on the “Journal Lines” menu in the red bar above the lines to �nd functions that help expedite entry of the lines:
1. Add Line(s) – can add one or multiple blank lines at a time.2. Show Lines With Errors – displays lines with errors in a separate window so they can be easily found on a large entry and resolved.3. Show Selected – if you want to focus on certain lines and hide all others, select the lines you want to view then click this function.4. Copy Selected – replicates all data on the line(s) selected into new lines, which can expedite entry of lines with common values. Take care when you copy lines that you change the values that should di�er.5. Delete Selected – removes selected lines from the journal entry.6. Restore Selected – only applicable if Central Administration has marked the line to not be sent to the GL. This function restores the line so it will be sent. 7. Add Line Button - can add one blank line at a time.
Use the Select Lines menu to check or uncheck all lines at once.
9e-Journal Entry Quick Reference Guide

Step 2: Filling Out the Form (continued)
Journal Functions Functions that a�ect the entire journal are available behind menus in the red bar above the journal header (see green box below). Only the most commonly used functions are displayed right on the bar:
For example, notice in the image above that “Save” and “Submit” are available on the menu to the left and displayed right on the bar. However, the “Validate” and “Trash” functions are only available in the drop down menu. The Journal Entry menu functions are described below:
1. Save – saves for later. Note that blank lines are deleted each time the journal is saved.2. Validate – checks the journal content to verify the chart�eld combinations are valid, the journal balances, all required �elds have been �lled out, etc. See Step 3 below for guidance on working through any errors found.3. Submit – saves, validates, and if no errors are found, submits the journal.4. Cancel – closes the journal without saving (goes back to the last save).5. Trash – discards the journal entry “permanently” and removes it from all user worklists. A trashed journal can be revived using the “recycle” function.
10e-Journal Entry Quick Reference Guide
11e-Journal Entry Quick Reference Guide
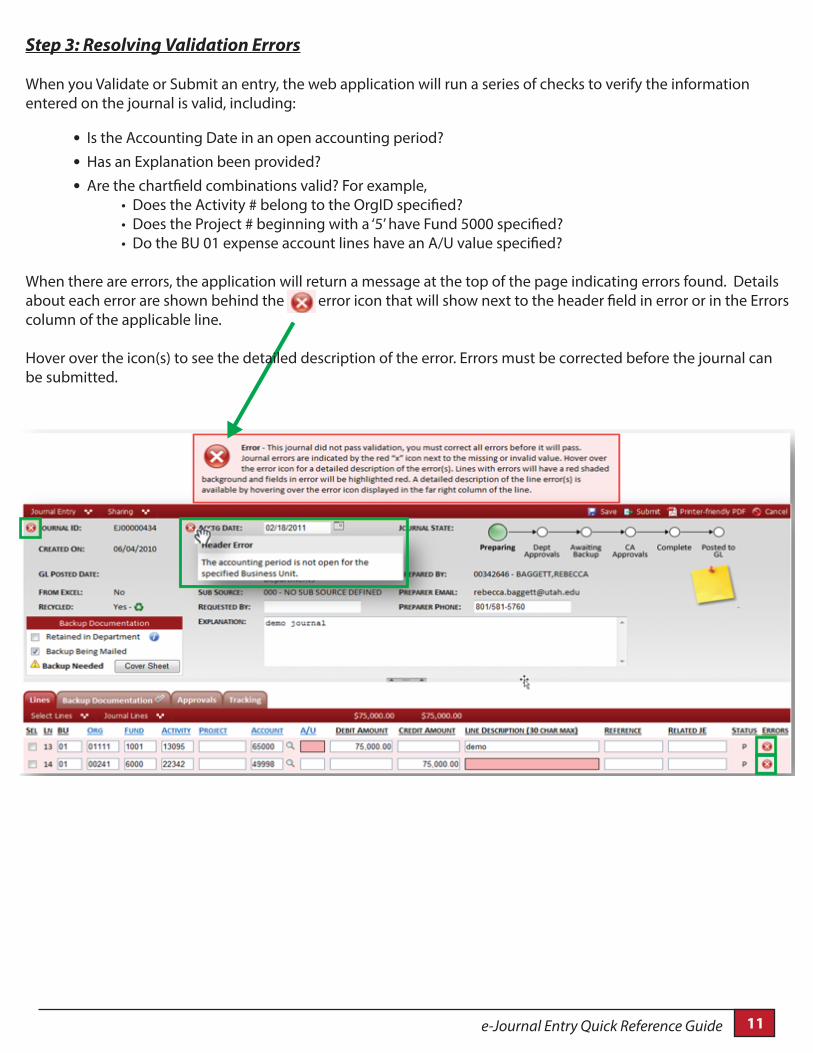
Step 3: Resolving Validation Errors
When you Validate or Submit an entry, the web application will run a series of checks to verify the information entered on the journal is valid, including:
• Is the Accounting Date in an open accounting period? • Has an Explanation been provided? • Are the chart�eld combinations valid? For example, • Does the Activity # belong to the OrgID speci�ed? • Does the Project # beginning with a ‘5’ have Fund 5000 speci�ed? • Do the BU 01 expense account lines have an A/U value speci�ed?
When there are errors, the application will return a message at the top of the page indicating errors found. Details about each error are shown behind the error icon that will show next to the header �eld in error or in the Errors column of the applicable line.
Hover over the icon(s) to see the detailed description of the error. Errors must be corrected before the journal can be submitted.

12e-Journal Entry Quick Reference Guide
Step 4: Providing Backup Documentation
Q: When should backup documentation be provided?
The general rule of thumb is that the journal entry should be self-explanatory. If the journal explanation and content are not su�cient to justify the transaction, supporting documentation should supplement the entry.
If the backup is simply the content of a related journal entry, the related entry may be identi�ed in the journal line “Related JE” �eld (see below) instead of being captured in a �le and attached.
Submitted backup documentation should be brief and succinct, free of extraneous information that may be part of an original document but not pertinent to the context of the journal. There are three di�erent ways to submit backup:
• Attach backup documentation electronically to the e-Journal • Retain back up documentation in the department • Mail or hand deliver backup documentation to General Accounting
Submitting electronic backup with an e-Journal
If the backup is already in electronic form, or you have the means to convert it into electronic form (scanning to create a pdf �le), the best way to attach it is to upload the �le right to the journal from the Backup Documentation tab. When submitted electronically, the approval routing can begin right away, signi�cantly reducing turnaround time for a journal to be posted to the General Ledger.
Select the Add Backup button to browse your computer �les and select the document(s) for upload. Supported �les: pdf, doc, docx, xls, xlsx, jpg, png, txt. When backup is attached, a paperclip icon displays on the Backup Documentation tab.

Step 4: Providing Backup Documentation (continued)
For more information, see the How to add Backup Documentation document on the e-Journal Page.
If the backup is too voluminous to reasonably deliver electronically, contains sensitive information (i.e. social security numbers), or does not add to viewers understanding of the transaction, then it may be appropriate to retain the documentation in the department instead of submitting it with the e-Journal.
Retaining backup in the department
To retain Backup Documentation in the department, select the “Retained in Department” check box in the Backup Documentation section of the journal header. See the green box below. The department will be held responsible for retaining the documentation according to policy - hover over the blue information icon to the right of the text to see the policy terms. Note: For everyday journal entries this is the preferable option.
13e-Journal Entry Quick Reference Guide

14e-Journal Entry Quick Reference Guide
Step 4: Providing Backup Documentation (continued)
Backup Being Mailed
Mail backup if you do not have the means to convert paper backup documentation into electronic form. Specify “Backup Being Mailed” (delivered) in the Backup Documentation section of the journal header.
A hard copy of the backup should be sent to General Accounting (faxes will not be accepted due to the low quality of the image), and must be accompanied by an e-Journal cover sheet. Click on the Cover Sheet button to generate the printable pdf. General Accounting will scan and attach the backup to the journal. They will not review journals for approval until the hard copy backup documentation has arrived and been attached.
The backup must be received in General Accounting by the journal cut-o� date in order for the entry to be processed and posted in the speci�ed accounting month.
If documentation for multiple journals is sent together, care must be taken to group the documentation with the appropriate cover sheet.
Step 5: Understanding and Managing Approval Routing
Departmental Approvals:
Central Administration does not require approval of e-Journals at the department-level, but preparers should follow their internal department’s guidelines to determine whether departmental approvals are appropriate. A couple things to consider when thinking about adding approvers…
• The person who prepares/submits the entry is essentially signifying approval when submitting the entry, so there is no need for the preparer to also be an approver.
• Each person designated as a departmental approver must log in and approve the entry before the e-Journal will be passed on to Central Administration and ultimately processed and posted.
• The application provides an alternative option to “Share” e-Journals, which allows you to notify individuals of the transaction, but no action will be required of them in order for the entry to proceed. More information on the “Share” function is described in on page 23 of this guide.
There are two ways to add departmental approvers: • Add an approver on each journal entry while it is being prepared or • Adding default approvers to all journal entries prepared by the preparer
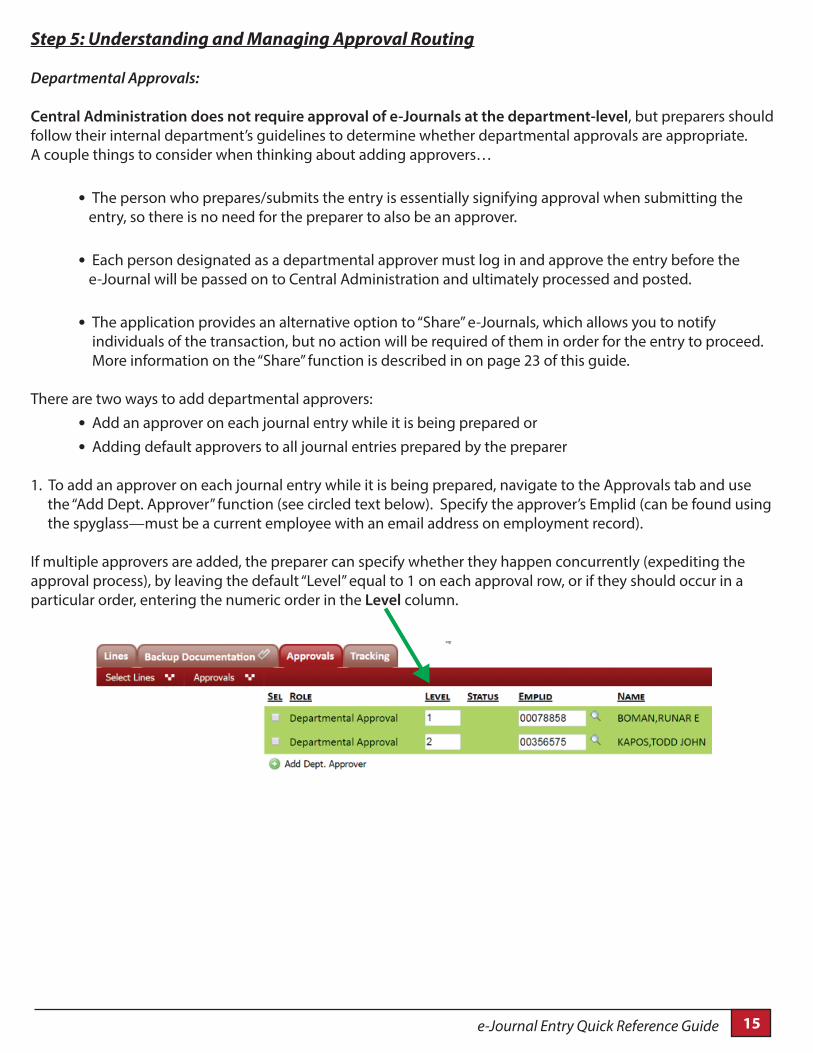
1. To add an approver on each journal entry while it is being prepared, navigate to the Approvals tab and use the “Add Dept. Approver” function (see circled text below). Specify the approver’s Emplid (can be found using the spyglass—must be a current employee with an email address on employment record).
If multiple approvers are added, the preparer can specify whether they happen concurrently (expediting the approval process), by leaving the default “Level” equal to 1 on each approval row, or if they should occur in a particular order, entering the numeric order in the Level column.
15e-Journal Entry Quick Reference Guide

Step 5: Understanding and Managing Approval Routing (continued)
2. A Preparer can have up to three default approvers added to his/her preparer security access form. Each default approver will be auto assigned to journal entries created by the Preparer, and must open and approve each entry the Preparer submits (unless manually removed from entries).
If you are already set up with access to e-Journals, you can add approvers or change the approvers using the “e-Journal Change Approver / Change Access Form”. These approvers will automatically default on each journal entry that you create.
Departmental approvers can also be removed by the Preparer at any time before the approval is satis�ed. If an approver is on vacation or otherwise unavailable to approve, simply delete the approver (select the approval row, click on the “Approvals” menu in the red heading bar, and choose “Delete Selected) and, if desired, add an alternate approver.
Departmental approvers do not have the ability to modify the content of the journal. They can either “Approve” or “Recycle” it. Recycling returns the entry to the Preparer to be modi�ed and resubmitted, and resets the approvals (must go through all approvals again). The preparer can also use the Recycle function to recall a submitted journal or revive a trashed journal, so long as the “Journal State” is not already in the “Complete” or “Posted” state. See the upper right hand corner of your e-Journal for the “state” of the journal. See page 18 in this guide for more information on the “State of an e-Journal”.
For more information, see the “How do I Change the Departmental Approver” document on the e-Journal webpage.
The Approval Path:
The approval path will show who will approve the e-journal and the approval status. After the e-Journal is submitted, the entire approval path will be visible on the Approvals tab.
The status of Level 1 departmental approvals changes from “Not Ready” to “Pending”, and the approvers are sent an email noti�cation of the pending approval. The message includes the approval deadline, a direct link to the e-Jour-nal, and provides basic instructions on how to satisfy the approval. When all Level 1 departmental approvals have been satis�ed, Level 2 approvals will change to “Pending” and approvers will be noti�ed, and so on. When all depart-mental approvals have been satis�ed, central approvals will begin.
16e-Journal Entry Quick Reference Guide

Step 5: Understanding and Managing Approval Routing (continued)
Tracking a single entry:
Viewers can open an e-Journal to monitor and track an entry in detail. As shown previously, the speci�c approval routing path and status is available on the Approvals tab. Also available is a complete audit trail of actions that have been taken on the journal. See the Tracking Tab in the green box below.
The Tracking tab displays the following:
• Action taken • When it was taken • By whom (User/Name) • Approval Role that was satis�ed, if applicable • Recipient of the action (Emplid/Name), if applicable • User comments supplementing the action, if applicable (visible by hovering over the Notes icon):
Step 6: Submitting the Entry
e-Journals must be submitted by midnight of the journal cuto� date posted on the Accounting Calendar.
If any Departmental Approvals are added, approvals must also be satis�ed by midnight, and any hardcopy backup submission must be delivered to General Accounting by end of business the same day.
Keep these requirements in mind as you prepare journal entries near the cuto� deadline and decide whether to mail in backup and/or add departmental approvers.
17e-Journal Entry Quick Reference Guide

Additional Information
Monitoring & Tracking an e-Journal Status
State of an e-Journal
Understanding the path or �ow of e-Journals, how they �t into the month-end closing process and the tools available in the web application for tracking journals will allow Preparers to e�ectively manage their portfolio of e-Journal entries.
An e-Journal routes electronically to individuals involved in processing and approving the journal. The general path of each e-Journal is depicted at the top of the header section of every journal entry in the web application when it is �rst saved - see the green box below.
The image below is taken from one e-Journal entry which shows the general path. Note the current status is highlighted in green, showing the journal is still being prepared.
Note: e-Journals pending departmental approvals or backup documentation are the Preparer’s responsibility to expedite prior to the journal entry cut-o� date.
18e-Journal Entry Quick Reference Guide

Monitoring & Tracking e-Journals Status (continued)
State of an e-Journal
Each step in the path identi�es the e-Journal’s processing status and is thus referred to as the “Journal State”. Below are de�nitions of each state:
1. Preparing – in the process of being created and still needs to be submitted.
2. Dept Approvals – the journal has been submitted, departmental approvals are pending.
3. Awaiting Backup – backup documentation is pending (the preparer has speci�ed that backup is being mailed and it is still en route, or backup has been requested by Central Administration and has not yet been provided).
4. CA Approvals – pending approval(s) by Central Administration.
5. Complete - �nal e-Journal state. Once an e-Journal is “Complete”, it is integrated into the University’s accounting system (PeopleSoft).
6. Posted to GL - e-Journals will generally be posted to the General Ledger each business evening. Note the Posted Date is displayed in the Journal Header.
For more information see the How to �nd the status of an e-Journal document on the e-Journal Page.
19e-Journal Entry Quick Reference Guide

Monitoring & Tracking e-Journals Status (continued)
State of an e-Journal
Each step in the path identi�es the e-Journal’s processing status and is thus referred to as the “Journal State”. Below are de�nitions of each state:
1. Preparing – in the process of being created and still needs to be submitted.
2. Dept Approvals – the journal has been submitted, departmental approvals are pending.
3. Awaiting Backup – backup documentation is pending (the preparer has speci�ed that backup is being mailed and it is still en route, or backup has been requested by Central Administration and has not yet been provided).
4. CA Approvals – pending approval(s) by Central Administration.
5. Complete - �nal e-Journal state. Once an e-Journal is “Complete”, it is integrated into the University’s accounting system (PeopleSoft).
6. Posted to GL - e-Journals will generally be posted to the General Ledger each business evening. Note the Posted Date is displayed in the Journal Header.
For more information see the How to �nd the status of an e-Journal document on the e-Journal Page.
Monitoring & Tracking e-Journals Status (continued)
Worklists:
Preparers have three worklists on the e-Journal Home page to help manage the portfolio of e-Journals they’ve initiated from the time of creation until they are posted to the General Ledger:
As shown below, the 3 worklists are:
1. Preparing 2. My Submitted Journals 3. My Completed Journals
20e-Journal Entry Quick Reference Guide

1. Preparing - displays entries that have not been submitted. The journal explanation, your personal sticky notes, and comments on recycled journals can all be viewed right from the worklist by hovering over the corresponding images.
2. My Submitted Journals – displays all journals that have been submitted but are not yet complete, and therefore still requiring someone’s action. The list is in order of the �ow of e-Journals, so those in the Department’s court that the Preparer must ensure meet the monthly cuto� (pending Dept Approvals or Awaiting Backup) are listed �rst, with those that have “reached” Central Administration listed last.
3. My Completed Journals – displays completed journals (no longer pending anyone’s action) for the “Open” accounting period, by default, with the option to view those in the accounting period “Last Closed”. This worklist veri�es that journals have �nished processing and shows when they were posted to the General Ledger.
21e-Journal Entry Quick Reference Guide
Monitoring & Tracking e-Journals Status (continued)

1. Preparing - displays entries that have not been submitted. The journal explanation, your personal sticky notes, and comments on recycled journals can all be viewed right from the worklist by hovering over the corresponding images.
2. My Submitted Journals – displays all journals that have been submitted but are not yet complete, and therefore still requiring someone’s action. The list is in order of the �ow of e-Journals, so those in the Department’s court that the Preparer must ensure meet the monthly cuto� (pending Dept Approvals or Awaiting Backup) are listed �rst, with those that have “reached” Central Administration listed last.
3. My Completed Journals – displays completed journals (no longer pending anyone’s action) for the “Open” accounting period, by default, with the option to view those in the accounting period “Last Closed”. This worklist veri�es that journals have �nished processing and shows when they were posted to the General Ledger.
Month-End Closing Process
It is the Preparer’s responsibility to verify that all departmental approvals and backup documentation for the entry are submitted, and the journal entry is posted to the General Ledger prior to the month end close date.
Near the end of each month, preparer’s will see a warning message when submitting e-Journals, warning of the approaching journal entry cut-o� date - see screen shot below.
The warning is a reminder that all departmental approvals must be completed and paper backup documentation received in General Accounting by the cut-o� in order to be processed that month.
Following the cut-o� date, the e-Journal system will prevent Preparers from submitting e-Journals for the accounting month being closed. Central Administration may discontinue accepting mailed in back-up documentation for the period, and Departmental Approvers will get an error if they attempt to approve the journal entry.
Their only option will be to recycle the e-Journal back to the Preparer so it can be resubmitted for the following accounting month. Central Administration then has just a few days to �nish scanning mailed-in backup and routing journals through each area for CA approvals before all e-Journal activity is cut o� for the period and month-end GL processing is done.
22e-Journal Entry Quick Reference Guide

Sharing the E-Journal Entry
The application provides an option to “Share” e-Journals, which allows you to notify individuals of the transac-tion, but no action will be required of them in order for the entry to proceed with processing.
e-Journals can easily be shared with others when you want to notify them of a transaction, ask them a question about the entry, etc. Click on the Sharing menu in the red header bar above the journal header to �nd the “Share” function.
Sharing does two key things:
1. Automatically gives recipients security authorization to view the journal, you do not need to worry about whether they have access.
2. Sends an email message composed by you to the individuals speci�ed. The message will not be visible to anyone else. The email contains a direct link to the e-Journal.
For more information, see the How do I share an e-Journal with others document on the e-Journal webpage.
23e-Journal Entry Quick Reference Guide

Advanced search options
Unlike the user worklists, the e-Journal Search menus allow any user to monitor e-Journals from a variety of perspectives. See the green box below for location of the Search tab.
They can be monitored globally (i.e., show me all e-Journals pending Departmental Approvals) or more narrowly such as by OrgID (i.e. show me all e-Journals where Chemistry is the Owning Org), by person (i.e. show me all journals created by Joe Smith or pending Joe Smith’s approval), by chart�eld, historical, current, etc. The results can be sorted dynamically by multiple columns by holding down the Shift key and clicking the columnar headings.
Note: when searching for a single Journal ID, only the last digits of the Journal ID need to be entered into the search box. The leading ‘EJ’ and Zeros may be omitted.
For more information, see the How do I use the search feature? document on the e-Journal webpage.
Please see the e-Journal Home page for the complete Preparer’s guide and for more information regarding e-Journal entries.
For reoccurring or more voluminous entries, the excel option for e-Journals might be a good solution for these entries.
For more information see the How can I upload entries via Excel? document on the e-Journal webpage.
24e-Journal Entry Quick Reference Guide