Disc Grinder Amoladora angular - HiKOKI€¦ · Disc Grinder Amoladora angular ... use the tool if...
17
Disc Grinder Amoladora angular 日立牌手提圓盤電磨機 Read through carefully and understand these instructions before use. Leer cuidadosamente y comprender estas instrucciones antes del uso. 使用前務請詳加閱讀。 G 10SR2 • G 12SR2 • G 13SR2 Handling Instructions Instrucciones de manejo 使用說明書 G12SR2
Transcript of Disc Grinder Amoladora angular - HiKOKI€¦ · Disc Grinder Amoladora angular ... use the tool if...

Disc Grinder
Amoladora angular
日立牌手提圓盤電磨機
Read through carefully and understand these instructions before use.Leer cuidadosamente y comprender estas instrucciones antes del uso.
使用前務請詳加閱讀。
G 10SR2 • G 12SR2 • G 13SR2
Handling InstructionsInstrucciones de manejo使用說明書
G12SR2

1 2
3
8
9
5
1
3
4
6
2
7
15° – 30°
A B
5 mm12 mm
21
1
English Español 中國語
1 Wernch Llave para tuercas 扳手2 Wheel nut Contratuerca molar 砂輪螺帽3 Depressed center wheel Muela de alisado 砂輪4 Wheel washer Arandela molar 輪墊圈5 Wheel guard Cubierta protectora de muela 輪罩6 Spindle Eje 主軸7 Push button Botón pulsador 鎖定銷8 Wear limit Límite de uso 磨損極限9 No. of carbon brush No. de carbón de contacto 碳刷號

2
GENERAL OPERATIONAL PRECAUTIONS
WARNING! When using electric tools, basic safetyprecautions should always be followed to reduce the riskof fire, electric shock and personal injury, including thefollowing.Read all these instructions before operating this productand save these instructions.For safe operations:1. Keep work area clean. Cluttered areas and benches
invite injuries.2. Consider work area environment. Do not expose
power tools to rain. Do not use power tools in dampor wet locations. Keep work area well lit.Do not use power tools where there is risk to causefire or explosion.
3. Guard against electric shock. Avoid body contactwith earthed or grounded surfaces. (e.g. pipes,radiators, ranges, refrigerators).
4. Keep children and infirm persons away. Do not letvisitors touch the tool or extension cord. All visitorsshould be kept away from work area.
5. Store idle tools. When not in use, tools should bestored in a dry, high or locked up place, out of reachof children and infirm persons.
6. Do not force the tool. It will do the job better andsafer at the rate for which it was intended.
7. Use the right tool. Do not force small tools orattachments to do the job of a heavy duty tool. Donot use tools for purposes not intended; for example,do not use circular saw to cut tree limbs or logs.
8. Dress properly. Do not wear loose clothing orjewelry, they can be caught in moving parts. Rubbergloves and non-skid footwear are recommendedwhen working outdoors. Wear protecting haircovering to contain long hair.
9. Use eye protection. Also use face or dust mask ifthe cutting operation is dusty.
10. Connect dust extraction equipment.If devices are provided for the connection of dustextraction and collection facilities ensure these areconnected and properly used.
11. Do not abuse the cord. Never carry the tool by thecord or yank it to disconnect it from the receptacle.Keep the cord away from heat, oil and sharp edges.
12. Secure work. Use clamps or a vise to hold the work.It is safer than using your hand and it frees bothhands to operate tool.
13. Do not overreach. Keep proper footing and balanceat all times.
14. Maintain tools with care. Keep cutting tools sharpand clean for better and safer performance. Followinstructions for lubrication and changing accessories.Inspect tool cords periodically and if damaged, haveit repaired by authorized service center. Inspectextension cords periodically and replace, if damaged.Keep handles dry, clean, and free from oil andgrease.
15. Disconnect tools. When not in use, before servicing,and when changing accessories such as blades, bitsand cutters.
16. Remove adjusting keys and wrenches. Form thehabit of checking to see that keys and adjustingwrenches are removed from the tool before turningit on.
17. Avoid unintentional starting. Do not carry a plugged-in tool with a finger on the switch. Ensure switchis off when plugging in.
18. Use outdoor extension leads. When tool is usedoutdoors, use only extension cords intended foroutdoor use.
19. Stay alert. Watch what you are doing. Use commonsense. Do not operate tool when you are tired.
20. Check damaged parts. Before further use of thetool, a guard or other part that is damaged shouldbe carefully checked to determine that it will operateproperly and perform its intended function. Checkfor alignment of moving parts, free running ofmoving parts, breakage of parts, mounting and anyother conditions that may affect its operation. Aguard or other part that is damaged should beproperly repaired or replaced by an authorizedservice center unless otherwise indicated in thishandling instructions. Have defective switchesreplaced by an authorized service center. Do notuse the tool if the switch does not turn it on andoff.
21. WarningThe use of any accessory or attachment, other thanthose recommended in this handling instructions,may present a risk of personal injury.
22. Have your tool repaired by a qualified person.This electric tool is in accordance with the relevantsafety requirements. Repairs should only be carriedout by qualified persons using original spare parts.Otherwise this may result in considerable dangerto the user.
PRECAUTIONS ON USING DISC GRINDER
1. Never operate these power tools without WheelGuards.
2. Check that speed marked on the wheel is equal toor greater than the rated speed of the grinder.Use only depressed center wheels rated at 80 m/s(72 m/s only for 100 mm disc grinders) or more.
3. Ensure that the wheel dimensions are compatiblewith the grinder and that the wheel fits the spindle.
4. Abrasive wheels shall be stored and handled withcare in accordance with manufacturer’s instructions.
5. Inspect the depressed center wheel before use, donot use chipped, cracked or otherwise defectiveproducts.
6. Always hold the body handle and side handle ofthe power tool firmly. Otherwise the counterforceproduced may result in inaccurate and evendangerous operation.
7. Do not use cutting-off wheels for side grinding.8. Do not use of separate reducing bushings or adapters
to adapt large hole abrasive wheels.9. The wheel continues to rotate after the tool is
switched off.
English

3
English
SPECIFICATIONS
*Be sure to check the nameplate on product as it is subject to change by areas.
STANDARD ACCESSORIES
(1) Wrench ........................................................................ 1(2) Side handle ................................................................ 1Standard accessories are subject to change withoutnotice.
APPLICATIONS
� Removal of casting fin and finishing of various typesof steel, bronze and aluminum materials and castings.
� Grinding of welded sections or sections cut bymeans of a cutting torch.
� Grinding of synthetic resins, slate, brick, marble, etc.
PRIOR TO OPERATION
1. Power sourceEnsure that the power source to be utilized conformsto the power requirements specified on the productnameplate.
2. Power switchEnsure that the power switch is in the OFF position.If the plug is connected to a receptacle while thepower switch is in the ON position, the power toolwill start operating immediately, which could causea serious accident.
3. Extension cordWhen the work area is removed from the powersource, use an extension cord of sufficient thicknessand rated capacity. The extension cord should bekept as short as practicable.
4. Fitting and adjusting the wheel guardThe wheel guard is a protective device to preventinjury should the depressed center wheel shatterduring operation. Ensure that the guard is properlyfitted and fastened before commencing grindingoperation.By slightly loosening the setting screw, the wheelguard can be turned and set at any desired anglefor maximum operational effectiveness. Ensure thatthe setting screw is thoroughly tightened afteradjusting the wheel guard.
5. Ensure that mounted wheels and points are fittedin accordance with the manufacturer’s instructions.Ensure that the depressed center wheel to be utilizedis the correct type and free of cracks or surfacedefects. Also ensure that the depressed center wheelis properly mounted and the wheel nut is securely
tightened. Refer to the section on “ASSEMBLINGAND DISASSEMBLING THE DEPRESSED CENTERWHEEL”.Ensure that blotters are used when they are providedwith the bonded abrasive product and when theyare required.Do not use separate reducing bushings or adaptorsto adapt large hole abrasive wheels.For tools intended to be fitted with threaded holewheel, ensure that the thread in the wheel is longenough to accept the spindle length.Do not use cutting off wheel for side grinding.
6. Conducting a trial runEnsure that the abrasive products is correctlymounted and tightened before use and run the toolat no-load for 30 seconds in a safe position, stopimmediately if there is considerable vibration or ifother defects are detected.If this condition occurs, check the machine todetermine the cause.
7. Confirm the push buttonConfirm that the push button is disengaged bypushing push button two or three times beforeswitching the power tool on (See Fig. 2).
8. Fixing the side handleScrew the side handle into the gear cover.
PRACTICAL GRINDER APPLICATION
1. PressureTo prolong the life of the machine and ensure afirst class finish, it is important that the machineshould not be overloaded by applying too muchpressure. In most applications, the weight of themachine alone is sufficient for effective grinding.Too much pressure will result in reduced rotationalspeed, inferior surface finish, and overloading whichcould reduce the life of the machine.
2. Grinding angleDo not apply the entire surface of the depressedcenter wheel to the material to be ground. Asshown in Fig. 1, the machine should be held at anangle of 15° – 30° so that the external edge of thedepressed center wheel contacts the material at anoptimum angle.
3. To prevent a new depressed center wheel fromdigging into the workpiece, initial grinding shouldbe performed by drawing the grinder across theworkpiece toward the operator (Fig. 1 direction B).
Model G10SR2 G12SR2 G13SR2
Voltage (by areas)* (110V, 120V, 220V, 230V, 240V)
Power Input* 650 W
No-load speed 11000/min 10000/min
Outer dia. × Hole dia. 100 × 16 mm 115 × 22 mm 125 × 22 mmWheel
Peripheral speed 72 m/s 80 m/s
Weight (Only main body) 1.4 kg

4
English
Once the leading edge of the depressed centerwheel is properly abraded, grinding may beconducted in either direction.
4. Precautions immediately after finishing operationThe wheel continues to rotate after the tool isswitched off.After switching off the machine, do not put it downuntil the depressed center wheel has come to acomplete stop. Apart from avoiding seriousaccidents, this precaution will reduce the amountof dust and swarf sucked into the machine.
CAUTION� Check that the work piece is properly supported.� Ensure that ventilation openings are kept clear when
working in dusty conditions.If it should become necessary to clear dust, firstdisconnect the tool from the mains supply (use non-metallic objects) and avoid damaging internal parts.
� Ensure that sparks resulting from use do not createa hazard e.g. do not hit persons, or ignite flammablesubstances.
� Always use eye and ear protection.Other personal protective equipment such as dustmask, gloves, helmet and apron should be wornwhen necessary.If in doubt, wear the protective equipment.
� When the machine is not use, the power sourceshould be disconnected.
ASSEMBLING AND DISASSEMBLING THEDEPRESSED CENTER WHEEL (Fig. 2)
CAUTIONBe sure to switch OFF and disconnect the attachmentplug from the receptacle to avoid a serious accident.
1. Assembling (Fig. 2)(1) Turn the disc grinder upside down so that the
spindle is facing upward.(2) Align the across flats of the wheel washer with the
notched part of the spindle, then attach them.(3) Fit the protuberance of the depressed center wheel
onto the wheel washer.(4) Screw the wheel nut onto the spindle.(5) While pushing the push button with one hand, lock
the spindle by turning the depressed center wheelslowly with the other hand.Tighten the wheel nut by using the supplied wrenchas shown in Fig. 2.
2. DisassemblingFollow the above procedures in reverse.
CAUTION� Confirm that the depressed center wheel is mounted
firmly.� Confirm that the push button is disengaged by
pushing push button two or three times beforeswitching the power tool on.
MAINTENANCE AND INSPECTION
1. Inspecting the depressed center wheelEnsure that the depressed center wheel is free ofcracks and surface defects.
2. Inspecting the mounting screwsRegularly inspect all mounting screws and ensurethat they are properly tightened. Should any of thescrews be loose, retighten them immediately. Failureto do so could result in serious hazard.
3. Inspecting the carbon brushes (Fig. 3)The motor employs carbon brushes which areconsumable parts. Since an excessively worn carbonbrush can result in motor trouble, replace the carbonbrushes with new ones having the same carbonbrush No. shown in the figure when it becomesworn to or near the “wear limit”. In addition, alwayskeep carbon brushes clean and ensue that theyslide freely within the brush holders.
4. Replacing carbon brushesDisassemble the brush caps with a slotted-headscrewdriver. The carbon brushes can then be easilyremoved.
5. Maintenance of the motorThe motor unit winding is the very “heart” of thepower tool. Exercise due care to ensure the windingdoes not become damaged and/or wet with oil orwater.
6. Service parts listCAUTION
Repair, modification and inspection of Hitachi PowerTools must be carried out by an Hitachi AuthorizedService Center.This Parts List will be helpful if presented with thetool to the Hitachi Authorized Service Center whenrequesting repair or other maintenance.In the operation and maintenance of power tools,the safety regulations and standards prescribed ineach country must be observed.
MODIFICATIONSHitachi Power Tools are constantly being improvedand modified to incorporate the latest technologicaladvancements.Accordingly, some parts may be changed withoutprior notice.
NOTEDue to HITACHI’s continuing program of research anddevelopment, the specifications herein are subject tochange without prior notice.

5
Español
PRECAUCIONES GENERALES PARAOPERACIÓN
¡ADVERTENCIA! Cuando utilice herramientas eléctricas,tome las medidas de seguridad básicas para reducir elriesgo de incendios, descargas eléctricas, y lesiones,incluyendo lo siguiente. Lea todas todas estasinstrucciones antes de utilizar este producto y guárdelas.Para realiza roperaciones seguras:1. Mantener el área de trabajo limpia, áreas y bancos
de trabajo desordenados son causa de dañospersonales.
2. Considerar el medio ambiente del área de trabajo.No exponer las herramientas eléctricas a la lluvia.No usar herramientas eléctricas en lugares moja-dos o húmedos. Mantener el área de trabajo bieniluminada.No utilice herramientas eléctricas cuando existael riesgo de incendios o de explosión.
3. Protegerse contra descargas eléctricas. Evitar elcontacto del cuerpo con las superficies puestasa tierra. (p. ej., tubos, radiadores, hornos demicroondas, o refrigeradores.)
4. Mantener a los niños y a las personas débilesalejados. No dejar que los visitantes toquen lasherramientas ni los cables de extensión. Todos losvisitantes deberán mantenerse alejados del áreade trabajo.
5. Guardar las herramientas que no se usen yponerlos en lugares secos, altos o cerrados, fueradel alcance de los niños y a las personas débiles.
6. No forzar las herramientas, éstas trabajarán másy con mayor seguridad cuando cumplan con lasespecificaciones para las cuales fueron diseñadas.
7. Usar las herramientas apropiadas. No forzarpequeñas herramientas o accesorios a realizar eltrabajo de herramientas de mayor potencia. Noutilizar herramientas para otros propósitos paralos cuales no fueron diseñadas, por ejemplo, noutilizar sierras circulares para cortar ramas deárboles o troncos.
8. Vestir apropiadamente. No ponerse ropas quequeden flojas ni tampoco joyas. Estas podrianquedar atrapadas en las partes móviles de lasherramientas. Cuando se trabaje en exteriores, serecomienda el uso de guantes de goma y calzadoque no resbale.
9. Usar gafas de protección. Usar también mascarillascontra el polvo si las condiciones de corte fuesenpolvorientas.
10. Conecte un equipo colector de polvo.Si existen dispositivos para la conexión de equiposde extracción y recolección de polvo, cercióresede queéstos estén conectados adecuadamente, yde utilizarlos en la forma correcta.
11. Cuidar del cable. Nunca lleve las herramientascolgando del cable, tampoco tire del cable paraefectuar la desconexión de las herramientas.Mantener el cable alejado del calor, aceite y bordesagudos.
12. Asegurar la pieza de trabajo usando para elloabrazaderas o un tornillo. Esto es más seguro queusar las manos, ademas, ambas manos quedanlibres para operar la herramienta.
13. No extenderse excesivamente para efectuar untrabajo. Mantener en todo momento un buenbalance y base de apoyo.
14. Mantener cuidadosamente las herramientas.Tenerlas siempre limpias y afiladas para obtener unmejor rendimiento y un funcionamiento másseguro. Seguir siempre las instrucciones para lalubricación y el cambio de accesorios. Inspeccionarperiódicamente los cables de las herramientas ysi estuviesen danãdos, hacer que los reparentécnicos ó expertos. Inspeccionar periodicamentelos cables de extensión y cambiarlos si estuviesenda ñados. Mantener los mangos secos, limpios,y libres de aceite y grasa.
15. Desconectar las herramientas cuando no se usen,antes de repararlas, y cuando se cambienaccesorios como por ejemplo, cuchillas, brocas,cortadores, etc.
16. Quitar las cuñas y las llaves de tuercas.Acostumbrarse a comprobar si se han quitado lascuñas y las llaves de tuercas antes de poner lasharramientas en funcionamiento.
17. Evitar puestas en funcionamiento sin fin alguno.No llevar las herramientas con los dedos en losinerruptores mientras que éstas están conectadas.Cuando se conecten las herramientas, cerciorarsede que los interruptores esten en la posición dedesconectados.
18. Para usos en exteriores usar cables de extensión.Cuando las herramientas vayan a ser usadas enexteriores, usar solamente cables de extensióndiseñados para tal propósito.
19. Estar siempre alerta y poner atención a lo quese está haciendo, usar el sentido común y nooperar con la herramienta cuando se esté cansado.
20. Comprobar las piezas dañadas. Antes de seguircon el funcionamiento de las herramientas, laspiezas que estén dañadas deberán comprobarsecuidadosamente para determinar si puedenfuncionar apropiadamente y cumplir con la funciónpara las que fueron diseñadas. Comprobar elalineamiento y agarrotamiento de piezas móviles,rotura de piezas, montura, y cualiquier otraanomalia que pudiese afectar al rendimiento dela herramienta. Cualquier pieza que estuviesedañada deberá repararse apropiadamente ocambiarse en un centro de reparaciones autorizado,al menos que se indique, lo contrario en estemanual de instrucciones. Procurar que losinterruptores defectuosos los cambie un centro dereparaciones autorizado.No usar las herramientas si sus interruptores nofuncionasen apropiadamente.
21. AdvertenciaLa utilización de cualquier accesorio o aditivo norecomendado en este manual de instruccionespuede conducir al riesgo de lesiones.
22. En caso de avería, haga que su herramienta seareparada por un técnico cualificado.Esta herramienta eléctrica está de acuerfdo conlos requisitos de seguridad pertinentes. Lasreparaciones solamente deberán realizarlastécnicos cualificadosutilizando piezas de repuestooriginales. De lo contrario, el usuario podríalesionarse.

6
Español
PRECAUCIONES AL UTILIZAR LAAMOLADORA ANGULAR
1. Nunca trabajar con estas herramientas eléctricas sincubiertas protectoras de la muela.
2. Compruebe que la velocidad marcada en la muelasea igual o mayor que la velocidad nominal de laamoladora.Emplee sólo muelas de centro hundido con unavelocidad nominal de 80 m/s (72 m/s sólo paraamoladoras angulares de 100mm) o más.
3. Compruebe que las dimensiones de la muela seancompatibles con la amoladora y que la muela encajaen el husillo.
4. Las muelas abrasivas se deben almacenar y tratarcon cuidado, de conformidad con las instruccionesdel fabricante.
5. Inspeccione la muela rectificadora antes del uso, yno utilice productos descascarados, agrietados odefectuosos de cualquier otro manera.
6. Sujetar siempre firmemente el asidero del cuerpoy el asidero lateral de la herramienta. De lo contrariola contrafuerza producida podría causar unfuncionamiento impreciso e incluso peligroso.
7. No utilice las muelas de tallado para el amoladolateral.
8. No utilice los bujes o adaptadores de reducciónseparados para adaptar muelas abrasivas de orificiogrande.
9. La muela continúa girando aún después de apagarla herramienta.
ACCESORIOS ESTANDAR
(1) Llave para tuercas .................................................... 1(2) Asidero lateral ........................................................... 1Los accesorios estándar están sujetos a cambio sin previoaviso.
APLICACIONES
� Eliminación de rebabas de juntas y acabado dediversos tipos de acero, bronce y aluminio,materiales y fundiciones.
� Alisado de secciones soldadas o secciones cortadaspor medio de soldadura.
� Alisado de resina sintética, pizarra,ladrillo, mármol,etc.
ANTES DE LA PUESTA EN MARCHA
1. AlimentaciónAsegurarse de que la alimentación de red que hade ser utilizada responda a las exigencias decorriente especificadas en la placa de característicasdel producto.
2. Conmutador de alimentaciónAsegurarse de que el conmutador de alimentaciónesté en la posición OFF (desconectado). Si la clavijaestá conectada en la caja del enchufe mientras elconmutador de alimentación está en posición ON(conectado) las herramientas eléctricas empezarán
a trabajar inmediatamente, provocando un serioaccidente.
3. Cable de prolongaciónCuando está alejada el área de trabajo de la redde alimentación, usar un cable de prolongación deun grosor y potencia nominal suficiente. El cablede prolongación debe ser mantenido lo más cortoposible.
4. Montar y ajustar la cubierta protectora de muelaLa cubierta protectora de muela es un dispositivoprotector para evitar heridas, en caso de que lamuela de alisado se quiebre durante la operación.Asegurarse de que la cubierta protectora esté biénmontada y apretada antes de comenzar con laoperación de alisado.Al soltar un poco el tornillo de ajuste, deja de girarla cubierta protectora de muela, por lo que se podráponer en cualquier ángulo deseado para unaefectividad máxima operacional. Asegurarse de queel tornillo de ajuste esté apretado firmementedespués de ajustar la cubierta protectora.
5. Asegúrese de que las muelas y las puntas montadasse encuentren instaladas de acuerdo con lasinstrucciones del fabricante.Asegurarse de que la muela de alisado a utilizarsea de tipo correcto y libre de rajas o defectos desuperficie. También asegurarse de que la muela dealisado esté montada debidamente y que lacontratuerca de muela esté apretada firmemente.Dirigirse a la sección de “montaje de muela dealisado”.
*Verificar indefectiblemente los datos de la placa de características de la máquina, pues varían de acuerdoal país de destino.
ESPECIFICACIONES
Modelos G10SR2 G12SR2 G13SR2
Voltaje (por áreas)* (110V, 120V, 220V, 230V, 240V)
Acometida* 650 W
Velocidad marcha en vacio 11000 /min 10000 /min
Diámetro exterior × diámetro del orificior 100 × 16 mm 115 × 22 mm 125 × 22 mmMuela
Velocidad periférica 72 m/s 80 m/s
Peso (Cuerpo principal solamente) 1,4 kg
7
Español
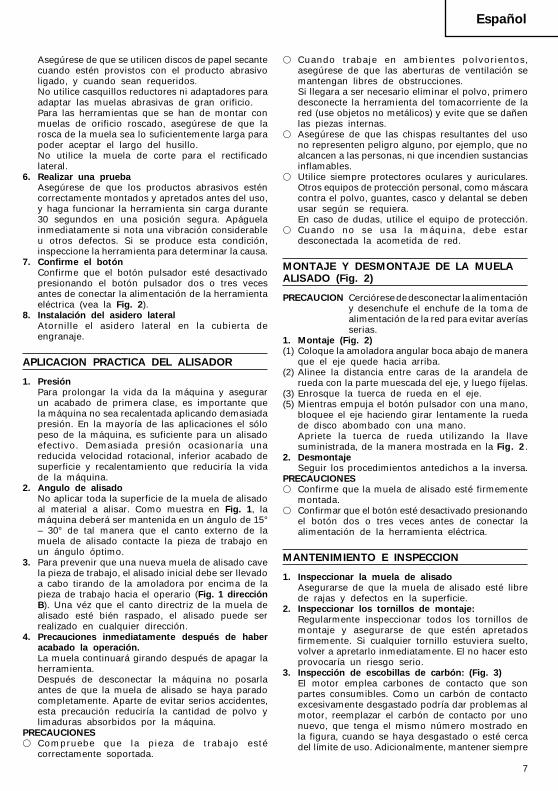
Asegúrese de que se utilicen discos de papel secantecuando estén provistos con el producto abrasivoligado, y cuando sean requeridos.No utilice casquillos reductores ni adaptadores paraadaptar las muelas abrasivas de gran orificio.Para las herramientas que se han de montar conmuelas de orificio roscado, asegúrese de que larosca de la muela sea lo suficientemente larga parapoder aceptar el largo del husillo.No utilice la muela de corte para el rectificadolateral.
6. Realizar una pruebaAsegúrese de que los productos abrasivos esténcorrectamente montados y apretados antes del uso,y haga funcionar la herramienta sin carga durante30 segundos en una posición segura. Apáguelainmediatamente si nota una vibración considerableu otros defectos. Si se produce esta condición,inspeccione la herramienta para determinar la causa.
7. Confirme el botónConfirme que el botón pulsador esté desactivadopresionando el botón pulsador dos o tres vecesantes de conectar la alimentación de la herramientaeléctrica (vea la Fig. 2).
8. Instalación del asidero lateralAtornille el asidero lateral en la cubierta deengranaje.
APLICACION PRACTICA DEL ALISADOR
1. PresiónPara prolongar la vida da la máquina y asegurarun acabado de primera clase, es importante quela máquina no sea recalentada aplicando demasiadapresión. En la mayoría de las aplicaciones el sólopeso de la máquina, es suficiente para un alisadoefectivo. Demasiada presión ocasionaría unareducida velocidad rotacional, inferior acabado desuperficie y recalentamiento que reduciría la vidade la máquina.
2. Angulo de alisadoNo aplicar toda la superficie de la muela de alisadoal material a alisar. Como muestra en Fig. 1, lamáquina deberá ser mantenida en un ángulo de 15°– 30° de tal manera que el canto externo de lamuela de alisado contacte la pieza de trabajo enun ángulo óptimo.
3. Para prevenir que una nueva muela de alisado cavela pieza de trabajo, el alisado inicial debe ser llevadoa cabo tirando de la amoladora por encima de lapieza de trabajo hacia el operario (Fig. 1 direcciónB). Una véz que el canto directriz de la muela dealisado esté bién raspado, el alisado puede serrealizado en cualquier dirección.
4. Precauciones inmediatamente después de haberacabado la operación.La muela continuará girando después de apagar laherramienta.Después de desconectar la máquina no posarlaantes de que la muela de alisado se haya paradocompletamente. Aparte de evitar serios accidentes,esta precaución reduciría la cantidad de polvo ylimaduras absorbidos por la máquina.
PRECAUCIONES� Compruebe que la pieza de trabajo esté
correctamente soportada.
� Cuando trabaje en ambientes polvorientos,asegúrese de que las aberturas de ventilación semantengan libres de obstrucciones.Si llegara a ser necesario eliminar el polvo, primerodesconecte la herramienta del tomacorriente de lared (use objetos no metálicos) y evite que se dañenlas piezas internas.
� Asegúrese de que las chispas resultantes del usono representen peligro alguno, por ejemplo, que noalcancen a las personas, ni que incendien sustanciasinflamables.
� Utilice siempre protectores oculares y auriculares.Otros equipos de protección personal, como máscaracontra el polvo, guantes, casco y delantal se debenusar según se requiera.En caso de dudas, utilice el equipo de protección.
� Cuando no se usa la máquina, debe estardesconectada la acometida de red.
MONTAJE Y DESMONTAJE DE LA MUELAALISADO (Fig. 2)
PRECAUCION Cerciórese de desconectar la alimentacióny desenchufe el enchufe de la toma dealimentación de la red para evitar averíasserias.
1. Montaje (Fig. 2)(1) Coloque la amoladora angular boca abajo de manera
que el eje quede hacia arriba.(2) Alinee la distancia entre caras de la arandela de
rueda con la parte muescada del eje, y luego fíjelas.(3) Enrosque la tuerca de rueda en el eje.(5) Mientras empuja el botón pulsador con una mano,
bloquee el eje haciendo girar lentamente la ruedade disco abombado con una mano.Apriete la tuerca de rueda utilizando la llavesuministrada, de la manera mostrada en la Fig. 2.
2. DesmontajeSeguir los procedimientos antedichos a la inversa.
PRECAUCIONES� Confirme que la muela de alisado esté firmemente
montada.� Confirmar que el botón esté desactivado presionando
el botón dos o tres veces antes de conectar laalimentación de la herramienta eléctrica.
MANTENIMIENTO E INSPECCION
1. Inspeccionar la muela de alisadoAsegurarse de que la muela de alisado esté librede rajas y defectos en la superficie.
2. Inspeccionar los tornillos de montaje:Regularmente inspeccionar todos los tornillos demontaje y asegurarse de que estén apretadosfirmemente. Si cualquier tornillo estuviera suelto,volver a apretarlo inmediatamente. El no hacer estoprovocaría un riesgo serio.
3. Inspección de escobillas de carbón: (Fig. 3)El motor emplea carbones de contacto que sonpartes consumibles. Como un carbón de contactoexcesivamente desgastado podría dar problemas almotor, reemplazar el carbón de contacto por unonuevo, que tenga el mismo número mostrado enla figura, cuando se haya desgastado o esté cercadel límite de uso. Adicionalmente, mantener siempre

8
Español
los carbones de contacto limpios y asegurarse deque corran libremente dentro de los sujetadores decarbón.
4. Reemplazar el carbón de contacto:Quitar la cápsula de carbón con un destornilladorcon cabeza pequeña. El carbón de contacto se dejaluego se quiat facilmente.
5. Mantenimiento de motorLa unidad de bobinado del motor es el verdadero“corazón” de las herramientas eléctricas. Prestar elmayor cuidado a asegurarse de que el bobinadono se dañe y/o se humedezca con aceite o agua.
6. Lista de repuestosPRECAUCIÓN
La reparación, modificación e inspección de lasherramientas eléctricas Hitachi deben ser realizadaspor un Centro de Servicio Autorizado de Hitachi.Esta lista de repuestos será de utilidad si espresentada junto con la herramienta al Centro deServicio Autorizado de Hitachi, para solicitar lareparación o cualquier otro tipo de mantenimiento.En el manejo y el mantenimiento de las herramientaseléctricas, se deberán observar las normas yreglamentos vigentes en cada país.
MODIFICACIONESHitachi Power Tools introduce constantementemejoras y modificaciones para incorporar los últimosavances tecnológicos.Por consiguiente, algunas partes pueden sermodificadas sin previo aviso.
OBSERVACIONDebido al programa continuo de investigación ydesarrollo de HITACHI éstas especificaciones estánsujetas a cambio sin previo aviso.

9
中國語
作業上的一般注意事項
警告﹗警告﹗警告﹗警告﹗警告﹗當使用電動工具時,為了減少造成火災、電擊
和人身傷害,必須時刻遵守基本注意事項,以及下述
操作注意事項。
在操作本機之前,請通讀本說明書,並予以妥善保
管。
安全操作注意事項︰
1. 工作場所應打掃乾淨,清理妥當,雜亂無章將導
致事故。
2. 確保妥適的作業環境。電動工具不可任其風吹雨
打。不得在潮濕的地方作業。工作場所需保持充
分的亮度。請勿在有可能造成火災或爆炸的地方
使用電動工具。
3. 謹防觸電事故。應避免身體同接地表面接觸。
(例如︰管道、散熱器、爐灶、冰箱等)
4. 不可讓孩童及老弱病殘者靠近工作場所。不可讓
訪客觸摸電動工具或延伸線纜。與作業無關的訪
客也必須保持安全距離。
5. 不使用的電動工具應存放到乾燥而孩童及老弱病
殘者伸手不及的高處,並加鎖保管。
6. 不得使勁用力推壓。電動工具需按設計條件才能
有效而安全地工作,絕不可勉強。
7. 妥選使用工具。不可用小型工具或附件去幹重
活。不可用於規定外的作業。舉例說,用圓鋸進
行伐木打枝或原木鋸切作業。
8. 工作時衣服穿戴要合適。不要讓鬆散的衣角和寶
石類捲入轉動部份。屋外作業時,最好手戴橡膠
手套,腳穿防滑膠鞋。同時要戴上能夠罩籠長髮
的工作帽。
9. 絕大多數的電動工具作業時,均需戴安全眼鏡。
進行粉塵飛揚的切削作業時,需戴防塵面罩。
10. 連接除塵設備。
如果提供連接除塵和集塵的設備,請確認是否已
經連接好並且使用正常。
11. 不要拿電線提起電動工具,也不得拉扯電線從電
源插座拆除插頭。電線需從熱源和油液隔開,並
避免與銳利的邊緣接觸。
12. 作業以安全第一為原則。工件要用夾具或臺鉗卡
緊。這樣做,比用手按壓更為可靠,也能夠讓雙
手專心操作。
13. 作業時腳步要站穩,身體姿勢要保持平衡。
14. 工具應維護妥善,經常保持鋒利、清潔才能充分
發揮性能,落實作業安全的要求。應按規定加注
潤滑脂、更換附件。線纜應定期檢查,如發現損
傷應即委託專業性的服務單位加以修復。延伸電
纜如有損傷應予更換。手柄要保持乾燥,並防止
沾附油脂類。
15. 不使用時,維修前以及更換附件(如:刀具、鑽
頭、鋸具等)之前,都必須拆卸電源插頭才行。
16. 開動前務必把調整用鍵和扳手類拆除下來。這一
點與安全有關。應養成習慣,嚴格遵守。
17. 謹防誤開動。插頭一插上電源插座,指頭就不可
隨便接觸電源開關。插接電源之前,應先確認:
開關是否切斷。
18. 屋外延伸線纜的使用。屋外作業時,必須使用專
用的延伸線纜。
19. 保持高度警覺,充分掌握情況,以正常的判斷力
從事作業。疲憊時切不可開動電動工具。
20. 檢查損壞部件。在繼續使用電動工具之前,應詳
細檢查各部零件以及防護裝置有無損壞,以便決
定能否正常工作,能否發揮正常效能。檢查轉動
部份的對準、空轉、各零件有無異常,安裝是否
妥善以及其它足以給工作帶來不良影響的情況。
如防護以及其它零件損傷了。除非本說明書中已
有記載否則應即委託服務中心進行修理或更換。
開關一發現缺陷,應即委託服務中心加以更換。
如開關不能正常地接通或切斷,絕不可使用該電
動工具。
21. 警告
為了防止人身傷害,不得使用電動工具去進行規
定外的作業。並祇能使用本說明書目錄中所指定
的附件。
22. 本工具必須委托有資格的維修人員進行維修。
本電動工具滿足相關的安全要求。維修必須由專
業人員使用純正配件來進行。否則有可能會給用
戶造成人身損害。
使用手提圓盤電磨機時應注意事項
1. 沒有砂輪防護裝置千萬不要使用圓盤電磨機這種
動力工具。
2. 確認砂輪上所標示的轉速等於或大於電磨機的額
定轉速。只能使用額定轉速為 80 m/秒 以上的砂
輪。(僅 100 mm 角磨機為 72 m/秒)以上的砂
輪。
3. 確保砂輪尺寸與電磨機相符、砂輪與主軸相配。

10
中國語
規 格
標 準 附 件
(1) 扳手 ................................... 1
(2) 側柄 ................................... 1
標準附件可能不預先通告而徑予更改。
用 途
� 用於去除鑄品毛刺,飛邊等物及拋光各種型號的
鋼,青銅,鋁及鑄造品。
� 研磨焊接部分或研磨用焊接切割的部分。
� 合成樹脂、石板、磚、大理石等的研磨。
作 業 之 前
1. 電源
確認所使用的電源與工具銘牌上標示的規格是否相符。
2. 電源開關
確認電源開關是否切斷。若電源開關接通,則插
頭插入電源插座時電動工具將出其不意地立刻轉
動,從而招致嚴重事故。
3. 延伸線纜
若作業場所移到離開電源的地點,應使用厚度足
夠、額定電容的延伸線纜,並且要盡可能地短些。
4. 安裝並調整輪罩
輪罩是一種保護裝置用來防止作業中因砂輪破裂
而受傷。開始研磨作業之前,請確認輪罩是否安
裝得緊固妥善。
稍微擰鬆固定螺絲後,即可轉動輪罩並將其固定
在所需角度,以得到最大工作效率。調整好輪罩
後,必須確認固定螺絲是否完全擰緊。
5. 確保所安裝的砂輪和節點已按照廠家的使用說明
固定。確保要使用的砂輪屬於正確類型、沒有裂
紋或表面缺陷。同時也要確認砂輪裝好,輪螺母
緊固。參照“砂輪的裝卸”一節。
確保使用隨研磨產品附帶的吸油紙或在需要時使
用吸油紙。
請勿用獨立的減速軸襯或接頭以使用大孔砂輪。
有關要用螺紋孔砂輪來安裝的工具,確保砂輪的
螺紋足夠長,以適合軸長。
請勿使用切斷砂輪進行側面研磨。
6. 試行運轉
在使用前確保已正確安裝並擰緊研磨產品,並在安
全場所在空載狀態下運轉 30 秒鐘,若有較大的
振動或察覺到其他缺陷,則應立即停止試運轉。
遇此情況時,檢查電動工具以究明原因。
4. 須按照廠家的使用說明書小心存放和使用磨輪。
5. 使用前檢查砂輪,不要使用破損、有裂縫的或有
其他缺陷的產品。
6. 始終抓緊電動工具的機身手柄和側柄。否則,所
產生的反作用力可能會導致錯誤的、甚至是危險
的操作。
7. 請勿使用切斷砂輪進行側面研磨。
8. 請勿將獨立的減速軸襯或接頭用於大孔砂輪。
9. 在切斷本電動工具的電源之後,砂輪仍會繼續旋
轉一段時間。
型式 G10SR2 G12SR2 G13SR2
電壓(按地區)* (110V, 120V, 220V, 230V, 240V)
輸入功率* 650 W
額定輸出功率 380 W
無負荷速度 11000 轉 /分 10000 轉 /分
砂輪外徑×穴徑 100×16 mm 115×22 mm 125×22 mm
外緣速度 72 m/秒 80 m/秒
重量(僅限於本體) 1.4 kg
* 當須改變地區時應檢查產品上的銘牌。

11
中國語
7. 檢查按鈕
在打開電源開關之前按兩三下按鈕,檢查它是否
已被釋放。(圖 2)
8. 固定側柄
把側柄旋進齒輪罩。
實用手提圓盤電磨機的應用
1. 壓力
本機不可施加過大壓力使其過載,以延長使用壽
命並確保加工品質。在大部份的用法中,機器本
身的重量即夠研磨。加壓過大將導致轉速降低、
表面加工不良以及過載,從而縮短機器壽命。
2. 研磨角度
切勿將砂輪之全表面施加於要研磨的材料上。如
圖 1 所示,機器應保持 15°-30° 使砂輪的外緣以最佳角度與工件相接觸。
3. 用新砂輪首次進行研磨,應將手提圓盤電磨機由
對面橫過工件往操作人員這邊拉,以免挖入工件
(圖 1 的 B 方向)。等砂輪的前緣適當磨損,
就可往任何方向進行研磨。
4. 收工後的注意事項
在切斷本電動工具的電源之後,砂輪仍會繼續旋
轉一段時間。
關掉機器之後,需等手提圓盤電磨機完全停止才
能放下,以免造成嚴重事故,而且還可減少吸入
機器的塵埃與切削量。
注意
� 檢查工件已被正確固定。
� 在多塵的條件下工作時,確保通風口暢通無堵
塞現象。
如果需要清除灰塵,首先使電動工具斷開電源
(使用非金屬物品)並避免損壞內部零件。
� 確保使用時產生的火花不會引起危險:例如,
不要濺在身體上或點燃易燃物。
� 始終採用視力和聽力保護。
必要時應使用其他個人保護裝置,如口罩、手
套、頭盔和圍裙等。
拿不準時,請使用保護裝置。
� 未使用本電動工具時,請斷開電源。
砂 輪 的 裝 卸(圖 2)
注意
確認開關已斷開並且從電源插座中拔去電源插頭以
避免嚴重事故。
1. 裝配(圖 2)
(1) 將圓盤電磨機的上部朝下,以使主軸朝上。
(2) 將砂輪墊圈的十字平面對準主軸的缺口部分,然
後裝上它們。
(3) 將砂輪的突起部安裝在砂輪墊圈上。
(4) 將砂輪螺帽擰在主軸上。
(5) 用一只手按下按鈕,同時用另一只手慢慢地轉動
砂輪以卡緊主軸。
如圖 2 所示,用附帶的扳手擰緊砂輪螺帽。
2. 拆卸
按照上述步驟相反的順序進行拆卸。
注意
� 確認砂輪安裝是否牢固。
� 確認鎖定銷被解除鎖定。可在打開電源開關之
前通過撳兩、三次鎖定銷進行檢查。
維 護 和 檢 查
1. 檢查砂輪
檢查砂輪確無破裂和表面缺陷。
2. 檢查安裝螺絲
要經常檢查安裝螺絲是否緊固妥善。若發現螺絲
鬆了,應立即重新扭緊,否則會導致嚴重的事
故。
3. 檢查碳刷(圖 3)
電動機上的碳刷是一種消耗品,其磨耗程度一旦
超出了“磨耗極限”,電動機將發生障礙。因
此,磨耗了的碳刷應即更換新件。此外,碳刷必
需常保乾淨狀態,這樣才能在刷握裡自由滑動。
4. 碳刷的更換
用一字形頭螺絲刀拆卸刷蓋,碳刷就可簡單地取
下。
5. 電動機的維護
電動機繞線是電動工具的心臟部。應仔細檢查有
無損傷,是否被油液或水沾濕。

12
中國語
6. 維修部件目錄
注意
日立電動工具的修理、維護和檢查必須由日立所認
可的維修中心進行。
當尋求修理或其他維護時,將本部件目錄與工具一
起提交給日立所認可的維修中心會對您有所幫助。
在操作和維護電動工具中,必須遵守各國的安全規
則和標准規定。
改進
日立電動工具隨時都在進行改進以適應最新的技術進
步。
因此,有些部件可能未預先通知而進行改進。
註
為求改進,本手冊所載規格可能不預先通知而徑予
更改。

13
501
502
1
2
34
67
5
8
9
10
17
18
19 20
21
22
23
24
25
26
27
28
29 30
31
32
33
34
35
36
38
37
39
40
41
42
43
44
45
46
47
48
49
50
51
52
53 54
55
56
57
5811
12
14
15
16
13
Item
Par
t N
ame
Q’t
yN
o.
1T
AP
PIN
G S
CR
EW
D5
× 25
12
GU
AR
D P
LAT
E1
3P
US
HIN
G B
UT
TO
N1
4G
EA
R C
OV
ER
AS
S’Y
15
SP
EC
IAL
NU
T M
71
6P
INIO
N1
7S
LOT
TE
D H
D. S
CR
EW
(SE
AL
LOC
K)
M4
× 10
2
8B
ALL
BE
AR
ING
608
VV
C2P
S2L
19
INN
ER
CO
VE
R1
10A
RM
AT
UR
E1
11FA
N G
UID
E1
12H
EX
. HD
. TA
PP
ING
SC
RE
W D4
× 70
2
13S
TA
TO
R1
14D
US
T S
EA
L2
15B
ALL
BE
AR
ING
626
VV
C2P
S2L
116
RU
BB
ER
BU
SH
ING
117
LOC
K P
IN1
18R
ET
AIN
ING
RIN
G F
OR
D11
SH
AFT
119
WA
VE
WA
SH
ER
120
GE
AR
1
21S
EA
L LO
CK
SC
RE
W(W
/SP
. WA
SH
ER
) M
4 ×
103
22B
EA
RIN
G C
OV
ER
(B
)1
23B
ALL
BE
AR
ING
600
1VV
CM
PS
2L1
24FE
LT P
AC
KIN
G1
25P
AC
KIN
G G
LAN
D1
26S
EA
L LO
CK
SC
RE
W(W
/SP
. WA
SH
ER
) M
4 ×
124
27W
OO
DR
UFF
KE
Y1
28S
PIN
DLE
1
29M
AC
HIN
E S
CR
EW
(W/S
P. W
AS
HE
R)
M5
× 16
2
30S
ET
PLA
TE
131
WH
EE
L G
UA
RD
AS
S’Y
132
WH
EE
L W
AS
HE
R1
33D
. C. W
HE
ELS
134
WH
EE
L N
UT
M14
135
GE
AR
AN
D P
INIO
N S
ET
136
SLI
DE
KN
OB
137
HO
US
ING
AS
S’Y
138
NA
ME
PLA
TE
139
EA
RT
H T
ER
MIN
AL
140
TE
RM
INA
L1
41N
OIS
E S
UP
PR
ES
SO
R1
42S
WIT
CH
HO
LDE
R1
Item
Par
t N
ame
Q’t
yN
o.
43P
ILLA
R T
ER
MIN
AL
144
SP
RIN
G1
45S
LID
E B
AR
145
SLI
DE
BA
R1
46H
ITA
CH
I LA
BE
L1
47B
RU
SH
CA
P2
48C
AR
BO
N B
RU
SH
249
BR
US
H H
OLD
ER
250
SW
ITC
H1
51M
AC
HiN
E S
CR
EW
(W
/WA
SH
ER
)D
3.5
× 6
2
52T
ER
MIN
AL
153
CO
RD
CLI
P1
54T
AP
PIN
G S
CR
EW
(W
/FLA
NG
E)
D4
× 16
1
55C
OR
D A
RM
OR
156
TA
IL C
OV
ER
1
57T
AP
PIN
G S
CR
EW
(W
/FLA
NG
E)
D4
× 45
4
58C
OR
D1
501
WR
EN
CH
150
2S
IDE
HA
ND
LE1

14

15

602Code No. C99119132Printed in China
Hitachi Koki Co., Ltd.