Digital MeDia BriDge receiver user’s guiDe
40
d m b DIGITAL MEDIA BRIDGE RECEIVER USER’S GUIDE Cilutions - Digital Media Bridge 877-515-4004 www.cilutions.com
Transcript of Digital MeDia BriDge receiver user’s guiDe

dmbDigital MeDia BriDge receiver user’s guiDe
cilutions - Digital Media Bridge877-515-4004
www.cilutions.com

Contents
Introduction 1About this Document 1Overview of the Receiver 2Installation 2• Windows Interactive Install 2 Silent install 3 Uninstall 3• Linux Interactive Install 4 Uninstall 4Operation 4• Windows Receiver as an Application 4 Receiver as a Service 4 Package Explorer Utility 4• Linux 7Configuration • Windows Receiver Configuration Utility 7 Editing Registry entries 8• Linux Editing pdr.ini or pdreceiver.ini 8• Configuring Video Relay 8Command Line Utilities (Linux Only) 8Logging and Tracing 8• Dbsview Utility (Windows only) 8• Log Files (Windows and Linux) 9File Installation and Delivery Notification 9 Video Stream Auto Launch 10Conditional File Reception 10• The Filtering Interface 10• Filter File Format 10• Regular Expressions Supported 11• The Receiver FAnnounce Interface 11Web Server Interface 12• epg.xml Interface 12• Downloadable User Interface/Skins 12Windows Registry Settings 12• Settings present on installation 12• Settings added after installation 12Internet Unicast Mode of Operation 12PDReceiver Streaming Support 13PDReceiver as Digital Signage 13
Introduction
Digital Media Bridge (DMB) is a content and video distribution family of products useful for delivering files and video streams to a wide variety of IP-based multicast and unicast computers and set top boxes in an automated, managed and controlled fashion.
DMB products support the mixing of streaming video and file transmissions over a shared network while seamlessly managing bandwidth in the subnet, guaranteeing performance of time critical applica-tions and preventing network congestion. With DMB a customer can be sure that content will be delivered in the most reliable manner and that the customer’s network will not suffer in the process.
The DMB 9100 (the Sender) manages the outbound multicast groups and unicast destinations, initiates file transfers, initiates streaming video relay and con-trols and meters the transmission process. The DMB 9200 (the Receiver) joins multicast groups, listens on unicast ports, receives and processes files and streaming video sent by the Sender, and provides reception status to the Sender when requested.
DMB supports distribution to “receive-only” sites, with no back channel to the Sender, and offers a wealth of features for scheduling, monitoring, and reporting the status of delivered files and video streams.
DMB also supports “file pull” capability where the Sender can retrieve a file from a Receiver or group of Receivers.
About this Document
This document is intended to provide the necessary information for a user to install, configure and oper-ate the DMB Receiver only. It does not address DMB Sender configuration.

Overview of the Receiver
The DMB Receiver provides both user and programmatic interfaces to the end-user when processing delivered content. This includes:
• Both data and video files delivered into well-known directories
• Both Multicast and Unicast reception support both Satellite and Internet distribution environments
• Delivery notification of content reception by invoking a user-developed installation program
• Automatic launching of a player application to play incoming live video streams
• Automatic relaying of incoming live video streams to downstream player platforms
• Playlist control on select Receivers (e.g., Set-Top-Box) supporting automatic playing of video on the local Receiver and optional multicast streaming of locally cached video files to downstream players
• An embedded Web Server with programmatic access to an XML formatted catalog of data and video assets
Installation : Windows Installation
The Windows DMB Receiver release is an Installshield executable file. The Linux release is typically an RPM file designed for automatic installation as well; there are alter-nate Linux releases supporting non-RPM platforms. The DMB Receiver also comes as a set-top-box (STB) release. The STB installation procedure is not covered in this docu-ment.
Installation : Windows : Interactive Install
1. Double click on the PDReceiver.exe executable to start the Installshield wizard. [Appendix A, figure A-1]
2. Click on the “Next” button to begin. 3. Chang the destination folder if desired. [Appendix A, figure A-2]
4. Click on the “Next” button to select the PDReceiver process model.
5. Select the PDReceiver process model. Most users run as a service and this model is recommended. This Ap- plication is useful for platforms which do not sup- port services (e.g., Windows 98) or if the user wants to include a progress meter for file reception or an icon in the system track to track status. [Appendix A, figure A-3]
6. Click on the “Next” button.
7. Enter a unique eight–character alphanumeric name in the Machine Name field for the destination receiver machine. [Appendix A, figure A-4]
Note: Take care to assign a meaningful name to the Machine Name (i.e., the siteid). These names are used by the Sender when addressing files and videos for distribution.
8. Enter the public IPMC Address and Port which matches the Sender to which this Receiver should bind. This value is known as the Public Address on the Sender when operating in MULTICAST mode. It is the address on which the public traffic (i.e, the catalog of configured files and videos) is carried. Accept the default settings for the rest of the fields.
9. To operate in UNICAST mode (e.g., run over the Internet) select the UNICAST option from the drop down list cor- responding to the Public IPMC. If the Receiver is on a NATed network (e.g., behind a firewall and on a private LAN using Network Address Translation to access the Internet) enter the Sender IP and Port to use for UDP Registration. This should be an address which the Receiver can access (e.g., the default is digitalmedab- ridge.com:2311 – publicly accessible values). For non- NATed UNICAST environments this field can be left blank. Appendix A, figure A-5 shows how to configure the PDReceiver in UNICAST mode with Hole Punching enabled. For more details on Unicast operation in a NATed environment refer to page 12.
10. Click on the “Next” button. [Appendix A, figure A-6] 11. Click on the “Next” button. [Appendix A, figure A-7]
12. Click on the “Next” button. [Appendix A, figure A-8]
13. Click on the “Finish” Button. The PDReceiver is installed on your system.
2

For a PDReceiver installed as an application two icons are placed on the desktop corresponding to the “PDReceiver” and “Package Explorer” applications. For a PDReceiver running as a service four icons are placed on the desktop corresponding to the “Start PDReceiver”, “Stop PDReceiv-er”, “PDReceiver Version” and “Package Explorer”. If installed as a service the PDReceiver should be in the Services Panel on the local computer and configured to start up auto-matically upon boot-up.
Installation : Windows : Silent Install
The PDReceiver.exe file can also be installed silently requiring no responses from a local user. This method supports, for example, remote installation using command line procedures.
A silent install will use the first 8 characters of the “Full Computer Name” of the local machine as the site-id. It auto-detects the IP address of the local network interface (multi-homed platforms are not supported) and config-ures package delivery for multicast reception.
The silent install command line options are: --silent=yes|no|1|0 if silent=yes or silen=1 { --ip_public1=<address> --port_public1=<port> --ip_public2=<address> --port_public2=<port> --db_delete_all=yes|no|1|0 --db_delete_fdb=yes|no|1|0 } A sample command is as follows:
PDReceiver /s /a --silent=yes --ip_public1=227.1.3.1--port_public1=6731
If the ip_public1 and port_public1 values are missing a default ip address of 224.1.3.1 and a port of 6531 will be used.
If the PDReceiver application is already installed prior to performing a silent install (so the silent install is an upgrade) any values provided in the command line will override the currently configured values; otherwise the currently configured values (e.g., ip_public1) will remain unchanged.
By default, on a machine where the PDReceiver is not al-ready installed and configured, silent install configures the PDReceiver as a Windows service.
The --db_delete_all and --db_delete_fdb command line options let a user delete all the local configuration files during a reinstall (e.g., the local clients database and the local files database) or just the files database (--db_de-lete_fdb). This is useful if the new version of PDReceiver is not compatible with the pre-existing database files on the machine. The PDReceiver release notes will instruct the user to include these options if necessary.
Installation : Windows : Uninstall
To uninstall the PDReceiver follow the steps below.
1. Close the PDReceiver application.
• If installed as an application, right–click the PDReceiv- er icon in the system tray located in the lower right cor- ner of your computer screen. Then select the Close op- tion.
• If installed as a service, double–click the Stop PDRe- ceiver Service shortcut on your desktop.
2. Select Start->Settings->Control Panel.
3. Double–click the Add/Remove Programs icon.
The Add/Remove Programs Properties box appears.
4. Scroll down and select the PDReceiver software.
The Add/Remove button is enabled.
5. Click Add/Remove.
A confirm file deletion prompt is displayed.
6. Click OK to completely remove the PDReceiver applica- tion and its components.
7. Delete all shared and read–only files when prompted.
8. Click Finish after all software components are removed.
9. Minimize any open applications so your desktop is visible.
10. Right–click on the PDReceiver icon and select Delete.
11. Right–click on the Package Explorer icon and select Delete.
3

Installation : Linux : Interactive Install
Note: The following procedure is for Linux Fedora Core 4 and is representative of the procedure for most Linux platforms, especially those supporting RPM packaging. There may be small differences between various Linux versions. These differences are typically covered in the release notes which accompany each Linux release.
1. Ensure that the current PDReceiver release has been removed from the root account.
rpm –e PDReceiver rm –r /usr/cilutions
2. From the root account run the PDReceiver installa- tion file. Type: “rpm –I PDReceiver-6.2.2.49-1.FC4. i386.rpm”.
Note: 6.2.2.49-1 is a version of the PDReceiver software and will change for every release, and FC4 is the version of the Linux and will change for every operating system version, e.g. Redhat Linux 8 would have RH8.
3. Follow any directions on the screen for post-install configuration.
Installation : Linux : Uninstall
To uninstall the LINUX PDReceiver software, follow the steps below.
1. Log into the root account of the LINUX system.
2. cd to the /usr/cilutions/pdreceiver/bin/ directory.
3. Type ./rc.pdreceiver rm to stop the pkgdemon.
4. Verify a process killed message is displayed.
5. cd to the /tmp directory. Type rpm –e PDReceiver to remove the software.
Operation
This section describes the steps to start, stop, check the version and use various other utilities packaged with the PDReceiver for both Windows and Linux users.
Operation : Windows : Receiver as an Application
1. Starting PDReceiver: Double-click on the icon labeled “PDReceiver” to start the PDReceiver application. A small icon appears in the system tray which confirms that PDReceiver is running. Note that this icon will turn red if there is a problem in the application (e.g., the Sender is not detected).
2. Stopping PDReceiver: Right–click the PDReceiver icon in the system tray located in the lower right corner of your computer screen. Then select the “Close” option.
3. Check Version of PDReceiver: Right–click the PDRe- ceiver icon in the system tray located in the lower right corner of your computer screen. Then select the “About” option.
Operation : Windows : Receiver as a Service
1. Starting PDReceiver: Double-click on the icon labeled “Start PDReceiver” to start the PDReceiver applica- tion. A small window opens up, and closes in few seconds after the service has started up. Select Start- >Settings->Control Panel->Administrative Tools- >Services. Find PDReceiver service and verify that the status is started.
2. Stopping PDReceiver: Double–click the “Stop PDRe- ceiver Service” icon on your desktop. The PDReceiver will be stopped.
3. Check Version of PDReceiver: Double–click the “PDRe- ceiver Version” icon on the desktop of your computer screen.
Operation : Windows : Package Explorer Utility
The Package Explorer Utility is used to monitor package transmissions from the Sender that are received by the remote client.
1. Starting Package Explorer: Double-click on the icon labeled “Package Explorer” to start the Package Explorer application. [Appendix A, figure B-1]
4

2. Package Explorer Window fields: The individual fields are:
a) Status: Provides the current state of the package at the receiver. It can have the following values:
• File Needed – A file in this state has been created at the PDSender and registered and addressed to this local PDReceiver; but it has not yet started to arrive. • Waiting for File – A file is in the PDSender transmit queue with the receiver waiting for it to be transmitted. • File Loading – The file is currently being re- ceived at the PDReceiver. • File Confirmed – The file has been received and all PDSender assurance criteria met. • Missed Packets – Some packets were lost dur- ing reception of this file. • Load Aborted – The file reception was stopped by an operator request at the receiver. • File Delivered – The file has been received and delivered to its destination directory on the remote. • File Decoding – The file has been received with errors and forward error correction is being applied. • Awaiting Signature – The file is waiting to be signed. This process regenerates the 128-bit MD5 signature to verify file integrity. • Signing – The file is currently being signed. • Awaiting Installation – The file is in the client’s destination folder and is waiting to run the installation program. • Installing – The receiver is running the installa- tion program on this file. • Awaiting Selection – The file has been regis- tered as a “Request” file and requires that an operator explicitly request the file before it will ask the Sender to transmit it. The operator can use Package Explorer to request the file.
b) FileID: An automatically generated number asso- ciated with the package. This number, generated at the Sender, uniquely identifies the package in the system.
c) Topic: A descriptive name, set at the Sender, used by Package Explorer to organize the presentation of the package by subject. This field can be up to ten alphanumeric characters; spaces or double quotes cannot be used.
d) Provider: The name of the client at the Sender who is the source of this file.
e) Title: A more detailed description of the file; this field can be up to 40 characters and include spaces.
3. Package Explorer Toolbar: Package Explorer toolbar options include the following options:
i. Package • Request: Manually requests a package. If the package is active (i.e., its start time has arrived) the receiver will automatically request it from the Send- er. If the package is not yet active the receiver will wait to receive it when the Sender begins transmitting.
• Unrequest: Manually unrequest a package that was previously requested.
Note: Packages may be manually requested and unrequested only if the package has been config- ured with the Interactivity option set to Request.
ii. Display • Refresh: Update the screen. • ShowDetails: Display in–depth information about a file. To use this option highlight the Status field for a file then select Display -> Show Details. [Appendix A, figure B-2]. The Delivery Status field is of particu- lar interest when examining package status. The values of this field can be:
• Delivered OK – file delivered successfully. No installation needed • Installed OK – file delivered and installed success- fully • Client Not Defined – destination client not pres- ent on the Receiver. File delivered to the DEFAULT client • Error in Client’s Directory – can’t deliver the file to the destination client’s directory. The file may be locked. • Error Executing FINSTALL – The file was delivered to the destination client but the installation program reported an error. The errno value may further define this error. • FINSTALL Timed Out – The file was delivered to the destination client but the installation pro- gram never completed. See registry for installation program timeout settings. • Disk space is less; can’t copy client to destina- tion – The file loaded successfully but the Re- ceiver cannot copy it to the destination client (the destination directory is likely on another drive)
5

• Error changing file ownership – The file was delivered to the destination client but the Receiver cannot change the ownership of the file to the same owner of the parent directory. • Disk Space Low at Broadcast Announcement - Not enough disk space to load the file. • Bandwidth low at Broadcast Announcement - Not enough bandwidth to load the file. See the PDReceiver Configuration Utility to adjust the total bandwidth permitted for incoming loads. • FAnnounce rejected – The Fannounce.exe util- ity rejected this load at announcement time. • Filtered Out – File filtered out at announce ment time.
• edit: lets a user create and modify clients or di- rectories for the files destinations. A user can associate a destination client name with an absolute directory and also designate the instal- lation program to be run when files are delivered for this client. [Appendix A, figure B-3]
• Client Name: A ten–character or less ASCII name corresponding to a directory where packages should be delivered. This name should corre- spond to the “Destination Client” name used at the Sender when registering a package. This is an alternative to using the DEFAULT Destination Client which always places packages in the direc- tory configured in the registry (typically …\load).
• Destination Directory: A location where packag- es are placed. If a destination directory does not exist, the software creates the directory and a sub–directory named “envelope.”
• Install Program: The name of the installation pro- gram to execute when a package is delivered. This item is optional. The default name for the executable is Finstall.exe (or Finstall.bat). This pro- gram will be launched each time a file is deliv- ered into the client’s destination directory. It should run to completion and provide an exit status where 0=SUCCESS and any other value is a user-defined error code.
• Working Directory: The PDReceiver software defines this directory as the current directory when it executes the installation program need- ed to install the delivered package.
Follow these steps to send packages to a particular cli- ent on the Receiver.
On the Receiver: • Create a client using the client editor. Note: Remember to fill in every field including the Install Program and Working directory if applicable.
On the Sender: • Locate the Destination Client field on the PDSender’s New Package screen. When sending a package to a client other than the default directory, enter the cli- ent’s name in the destination client field on the new package configuration screen. • Configure the other basic package settings and click on submit.
Note: A particular use of the installation program is the automatic unbundling of a group of files sent as a single image (e.g., a zip file or a tar file). The installation program can be explicitly defined using the client editor. If it is not defined the Receiver will look for the presence of a well- known install program in the destination directory. This is named Finstall.bat or Finstall.exe on Windows platforms or finstall on Linux platforms.
4. Directory Level: After the installation of the Receiver, the following sub-directories are created under the PDReceiver folder:
• .../bin: This directory contains the various PDReceiver utilities and executables, such as Package Explorer, PDReceiver configuration Interface, PDReceiver start, stop and version checking scripts, dbsview log viewer and other error and trace log files.
• .../db: This directory contains the local database pri marily for internal use. It also contains the delivered. log file, which is an audit trail of all delivered files to this receiver. Also, a user can optionally place a file named cliping.dat into this directory with a payload (up to 1K ascii characters) of health information to be returned to the Sender in response to an mping re- quest.
• .../load: The default directory where all the received files are stored for the DEFAULT client.
• .../temphold: This directory (named .../tmphold on Li nux) holds the incoming package while it is in the process of being received. After the package is fully loaded it is moved from this directory to the …/load directory (for the DEFAULT client).
6

v. …/update: The directory for the UPDATE client to be used for automatic updates of Package Deliv- ery software.
vi. …/wwwroot: The directory for the WWW client. Any skins or user interfaces, or files to be used by the in-built web server are placed in this directory.
Operation : Linux
Linux based systems support the Receiver as a daemon only.
• Starting PDReceiver: To start the PDReceiver change the directory to /usr/cilutions/pdreceiver/bin and run ./rc.pdreceiver.
• Stopping PDReceiver: To stop the PDReceiver change the directory to /usr/cilutions/pdreceiver/ bin and run ./rc.pdreceiver rm.
Configuration : Windows : Receiver Configuration Utility
This utility is installed with the Receiver software. It is used to reconfigure the Receiver for its site ID, public multicast address and various other parameters. Be sure to restart the PDReceiver for any changes to take effect.
• Starting the application: To start the PDReceiver select Start ->All Programs -> PDReceiver -> PDRe- ceiver Configuration or go to the C:\ProgramFiles\ Cilutions\PDReceiver\bin directory and run the pk- gcfg.exe executable. [Appendix A, figure C-1]
• Settings: The following parameters can be set using the pkgcfg utility:
• Site Identifier: Enter a unique eight–character alpha numeric name in this field for the destination receiver machine.
Note: A user may want to assign a meaningful name here since it will be used by the Sender ap- plication to address specific receivers.
• Primary Channel: Configuring the primary channel parameters:
• Local IP Address: Select the IP address of your ma- chine, on which the PDReceiver is running from the drop down list. On a multi-homed machine this is the network interface where incoming multicast traf- fic is expected.
• Public Address: Enter the public IPMC Address and Port matching that of the Sender if running in MUL- TICAST mode. This is the channel on which the public traffic is carried. For a Unicast site (non-mul- ticast operation) type UNICAST in the Public Address field and enter the Port. If this is a statically config- ured Unicast site the Port value must match the con- figured value for this site at the Sender. If this is a dynamically configured Unicast site (on a private LAN and using Network Address Translation [NAT] to communicate with the Sender) enter the corre- sponding PDSender public address and port to which the PDReceiver should tune to receive pack- ages. To suppress NAT and disable UDP Hole Punch- ing leave the PDSender public address and port blank. For more details on the Unicast mode op- eration of PDReceiver with UDP Hole Punching refer to Appendix B.
• Load: Configuring the channel’s package loading parameters: a) Maximum Bandwidth (Kbps): b) Load Timeout (sec):
• Post Load: Check the box to launch the installation, decode (for FEC repair) or signature (for MD5 signa- ture checking) programs immediately after receiv- ing the package. An unchecked box will cause the Receiver to wait for an idle time to perform these CPU intensive operations.
• Secondary Channel: Optional retransmit channel. Can be set to either Public Retransmit Address and port (must match the retransmit address on the Sender) or UNICAST:<port>. The port must not be in use on the local Receiver. Set the LocalIPAddress. The secondary UNICAST address serves to provide a Unicast, point-to-point UDP IP:Port set of values that the Sender should use when transmitting lost pack- ets to this Receiver. This is means of offloading retransmissions from the Primary Channel to the Internet.
7

• Load Progress meter: Check the enable check box to display the progress meter window during the loading of a package. Check the Always on top check box for the progress meter to remain in front of all other windows. This field only applies to the Receiver running as an application (not as a service).
Configuration : Windows : Editing Registry entries
The PDReceiver Configuration utility permits setting a few basic parameters. To reconfigure a wide range of param-eters the user must access the registry settings of the PDReceiver. To access these settings select Start -> Run…. Type regedit and click ok. This opens up the Registry Edi-tor. Select PDReceiver under SOFTWARE -> Cilutions. [Appendix A, figure C-2]
To modify any of the settings, select the setting, right click on it, select Modify. A small window pops up; enter the new value under the Value Data. Appendix B provides a comprehensive list of all registry settings.
Configuration : Linux : Editing pdr.ini or pdreceiver.ini
Similar to the Windows registry described in the previous section, a Linux-based system includes many of the same configuration settings. These values are stored in an INI file on the PDReceiver. This file is named either pdreceiver.ini (for native Linux) or pdr.ini (on embedded Set-top-Box platforms). [Appendix A, figure C-3] shows a typical pdr.ini file snapshot for a Linux based system.
The user can edit this file (e.g., using vi) and change set-tings as desired. Appendix C provides a comprehensive list of all registry settings.
Configuration : Configuring Video Relay
The PDReceiver accepts a live IPMC video stream from the Sender to be played on a local video player or relayed to other devices (so-called downstream players) on the local LAN. An example network configuration is depicted in [Appendix A, figure C-4].
Command Line Utilities (Linux Only)
The operational commands in /usr/cilutions/pdreceiver/bin are:
• pkgstat: Permits viewing the local catalog of files and their attributes. Also permits viewing global reception statistics. [Appendix A, figure D-1] shows the usage of the command on a Linux Receiver:
It is also possible to view the complete reception statis- tics and package attributes for a given file in the data- base. [Appendix A, figure D-2] displays the File Database Record for a given file.
• pkgcldef: Client definition utility to associate a virtual client name with an absolute pathname on the local receiver. Usage: pkgcldef <a|A|d|D|s|S> [name] [directory] [install exec] [working directory]
• pkgcssel: To explicitly request a “Selectable” file. Usage: pkgcssel <filename>
• pkgunsel: To unselect a previously requested file. Usage: pkgunsel <filename>
Logging and Tracing : Dbsview Utility (Windows only)
To view errors, set run-time tracing and view trace results on the Receiver, use the dbsview.exe application located at C:\Program Files\Cilutions\PDReceiver\bin\. To run, double click on dbsview.exe and the window depicted in [Appendix A, figure E-1] should appear.
8

The interface toolbar provides various options to con-figure the view of the debug window. The Close button closes the window. The Clear button clears the current view. The Refresh button refreshes the view with the most recent data, this is useful when auto refresh has been disabled or the refresh interval is long. The Trace Length sets the length of the trace buffer. A setting of 1000, for example, configures this buffer to hold up to 1000 trace log lines. The Configure button displays a smaller window, as shown in [Appendix A, figure E-2], that allows setting the level of tracing for the different threads of execution within the PDReceiver application. It also offers the option to enable auto-refresh with the ability to set the refresh interval in seconds. The filter string option allows viewing trace messages containing only the filter string in it. The Save button permits saving the log output into a file. By default, the file name is DBSVIEW.LOG which is in the same directory (…/bin) as the utility. Finally, the View button opens the DBSVIEW.LOG file in notepad.
Logging and Tracing : Log Files (Windows and Linux)
The PDReceiver provides various other logs to assist in monitoring the health of the application and packages. These logs are available on both Windows and Linux based systems. A few of the important log files are dis-cussed below:
• pkgtrace_log.txt: The file is present in the …/bin directory of the PDReceiver. Based on the trace flags set in the pdr.ini file for Linux or through dbsview or in DBSVIEW.ini for Windows, this file contains the trace log outputs of the PDReceiver. It is similar to the output generated by dbsview described in the previous sub-section. The same file on Linux is named as pkgtrace.log.
• pkgerror_log.txt: The file is present in the …/bin directory of the PDReceiver. The PDReceiver gener- ates error messages for various exception events that might happen during its operation. These error messages are stored in this file, and can be used to troubleshoot a failure or error. The same file on Linux is named as pkgerror.log.
• deliverd.log: The file is present in the …/db directo- ry of the PDReceiver and is an audit trail of all delivered files to this receiver. The file is useful in cases where you want to track all the files that were ever delivered to the receiver, as a catalog gets updated after a file has been unregistered, and may not provide you with details if a file ever existed on the receiver.
• pkgtrace.log (Windows only): The file provides a de- tailed historical record of all load failures and FEC re pair attempts performed on the PDReceiver for a pack age.
File Installation and Delivery Notification
A client wishing to either receive explicit notification or install a package can associate a client with a program. Each time a package is delivered into the client’s direc-tory this program will be executed. Package Delivery will look for the installation executable after delivering the package and envelope into a client’s directory. If the program exists, Package Delivery will invoke the program passing the full path name of the package (in short form on a Windows machine) as the first parameter and a pass/fail indicator (i.e., 0 for passed or a non-zero number for failed where the non-zero number indicates the failure reason) as the second parameter. This pass/fail indicator is used by Package Delivery to inform the client of an error condition that can only be resolved by the client (e.g. not enough disk space in the client’s file system to contain the package that Package Delivery is attempting to deliver). Package Delivery deletes the package should the package fail to be moved successfully into the client directory.
Under Windows the installation program must be a Micro-soft Windows executable or a batch file. The default name for this executable is finstall.bat or finstall.exe. The default name for this executable in Linux might be finstall.sh or finstall. If either of these executables are present in the cli-ent’s destination directory upon package delivery it will be executed. A sample finstall file in a Linux system is shown in [Appendix A, figure F-1].
Refer to the registry settings in Appendix B for informa-tion on controlling when the installation program runs. The Receiver installs packages one at a time waiting for each finstall to complete before starting another. And new packages may arrive while an finstall is in progress.
9

Video Stream Auto Launch
A user can have the Receiver automatically launch a local program in response to an incoming video stream an-nounced by the Sender. To do this the user places a well-known batch control file into the …\db directory on the Receiver. If this file is present the Receiver will launch the batch file as follows:
fPlayStream.bat <Pkgid> <IP> <Port> <description> <topic>
Pkgid – id of the incoming streamIP – IP address to bind. If “relay to LAN” this is the ad- dress of the local adapter where this is being re- layed, else its 127.0.0.1Port – Port to bind to play the incoming streamDescription – Text description of this videoTopic – Text topic of this video
[Appendix A, figure G-1]
Note: On Linux this file is named: fplaystream
Conditional File Reception
A user may establish the criteria for accepting files that are addressed to the Receiver by the Sender. There are two features supporting this:
• File Reception Filtering• File Announcement Real-time Control
Conditional File Reception : The Filtering Interface
Receiver Filtering allows a local user specify filtering cri-teria by providing an optional file designating additional criteria the DMB Receiver should include when accepting a package reception. The user has the following options for filtering:
• Disable all package reception• Enable normal package reception• Include packages based on a filter match• Exclude packages based on a filter match
Conditional File Reception : The Filtering Interface : Filter File Format
The filter file is in CSV format (i.e., comma separated) and designates:
• Provider – An up to 10 character, case-insensitive, alpha- numeric name with no spaces.
• Topic – An up to 10 character, case-insensitive, alphanu- meric name with no spaces.
• Filename – A case-sensitive alphanumeric name.
There can be a maximum of 100 filters in the filter file.
A sample filter file is:
#two files from provider: msnbcmsnbc,.*,100019.asfmsnbc,.*,100020.asf
#one file from provider: realreal,.*,100025.rm
#one file from provider: cnnsicnnsi,.*,100034.asf
#any file with a topic field that starts with GOTH.*,GOTH.*,.*
10

Conditional File Reception : The Filtering Interface :Regular Expressions Supported
The fields in the filter file may use basic regular expres-sions to designate the selection criteria. For instance, an entry of ABCINC,DCS,.* could be used to indicate all pack-ages from provider ABCINC and topic DCS. The metachar-acters for these expressions are as follows:
Regular ExpressionsMetacharacter Meaningc Any nonspecial character c match-
es itself\c Turn off any special meaning of
character c. A special case exists to allow \* when there is no other special metacharacter. It allows matching of the end of the Topic name to any string. This offers a high speed lookup of all entries matching the Provider and the beginning of the Topic name (as in the example in the preceding paragraph)
^ Beginning of line$ End of line. Any single character[...] Any of the characters in the ranges
like a-z are legal[^...] Any single character not in the
ranges are legalr* Zero or more occurrences of r
The filtering profile for a remote is controlled by string-type keys at the following location:
HKEY_LOCAL_MACHINE\SOFTWARE\Cilutions\PDReceiver
The keys are:
• SFS_FILTER_FILE – Points to an optional filter file of a format described below. Default of no file.
• SFS_FILTER_ACTION – One of Include or Exclude. Default of Include.
If there is no SFS_FILTER_FILE provided the Receiver will use the default criteria to determine package reception. That is, a package will be added to the remote’s local da-tabase if the remote’s siteid is in the package’s destination list (or the siteid is BROADCST).
The SFS_FILTER_ACTION is processed as follows:
• Disable – Determine package reception using the de- fault.
• include – First use the default criteria. Add the package to the remote’s local database if the attributes provided in the package’s catalog match any filter as indicated in SFS_FILTER_FILE list.
• Exclude – First use the default criteria. Then only add the package to the remote’s local database if the attributes provided in the package’s catalog do not match all filters as indicated in SFS_FILTER_FILE list.
Packages which are rejected after applying the filter will be logged on the receiver to provide an audit trail of such discards
• File Reception Filtering• File Announcement Real-time Control
Conditional File Reception : The Receiver FAnnounce Interface
The Receiver provides support for an announcement time client application to accept or reject an incoming file. When announced, the receiver looks in the load direc-tory for the destination client. If there is a program there named fannounce.exe the receiver invokes it as follows:
Fannounce.exe <fileid> <file name> <file length> <de-scription> <topic>
An exit status of 0 indicates that the file should be ac-cepted for load. Anything else rejects the load. This feature is useful for a caching receiver where fannounce has the logic to determine if the newly announced file needs to be refreshed in the local cache.
The fileid is useful if the fannounce program wants to ac-cess the local DB on the receiver which contains a com-plete set of attributes for a file.
Fannounce must execute faster than the announcement delay time configured in the Sender, typically 5 seconds.
11

Web Server Interface
The web server bundled with PDReceiver provides a web-based interface useful for user and program interaction.
Web Server Interface : epg.xml Interface
Similar to the functionality provided in the pkgstat utility described previously, the Receiver offers an XML format-ted API for viewing the local catalog of files/videos and their attributes. To access this API enter the URL “http://[Receiver’s IP Address]:8080/epg.xml” into a Web Browser with network access to the Receiver. [Appendix A, figure H-1] displays the snapshot of the interface.
Web Server Interface : Downloadable User Interface/Skins
The web server API allows a user to design custom inter-faces for the Receiver in form of skins. These skins consist of one or more files which can be rendered in an appro-priate browser (e.g., html, flash). These files can be down-loaded from the Sender to individual Receivers to take affect. The built-in Receiver client named WWW is reserved for this use.
Windows Registry Settings
The registry settings in the windows based PDReceiver can be broadly divided into two sections:
• Settings present in the registry on installation (see Appendix B,A)• Settings that can be added after installation (see Appendix B,B)
Internet Unicast Mode of Operation
The Receiver is a plug-and-play device. In Multicast mode it begins operation by joining its well-known public IPMC:Port to receive traffic from the Sender. In Unicast mode it begins operation by transmitting UDP registration packets to the Sender. On Internet-enabled locations sup-porting Network Address Translation (NAT) at the Sender and Receiver(s) the UDP packets create an end-to-end Uni-cast path of connectivity between the two platforms.
Diagram [Appendix A, figure I-1] shows an example UDP packet IP:Port addressing at the relevant networking equipment for registration of a Unicast Receiver and file download. The example platforms are:
• Receiver – which is DHCP enabled and has received an IP address, from the DHCP server on its local network, of 192.168.0.100.
• Receiver Router – has a current external IP address (dy- namic or static) of 75.41.32.10.
• sender router – has a current external IP address (static) of 72.55.33.21. Note that this address (which is the public Internet address for the Sender) can also be a domain name (something like mydmbsender.- com, for example). The Sender Router forwards all in coming traffic on ports 2311, 2315, 2317 and 9876 to the sender.
• sender – has local address 192.168.0.200 statically assigned.
The Receiver creates a UDP connection between itself and the Sender at start-up and maintains this connection by periodically sending another UDP Packet as necessary. The Receiver dynamically measures the NAT connection timeout value, by using an internal discovery algorithm, to determine the optimum time to wait between UDP Hole Punch packets to prevent the NAT connection from closing. This is known as the public connection between the Receiver and the Sender. File announcements and any overhead messages are sent on this public connection.
During file reception the Receiver opens a second UDP NAT connection between itself and the Sender. This is known as a private connection and only exists for the duration of the file reception.
12

PDReceiver Streaming Support
The Receiver is able to act as a video streaming server with the following capabilities:
• Receive and play live UDP Multicast of MPEG2 Transport stream video
• Receive and play live UDP Multicast of H.264 Video on select platforms
• Receive video files, either as Multicast or Unicast, and cache locally
• Automatically Multicast Stream MPEG2 and MPEG4 cached video files to downstream devices.
PDReceiver as Digital Signage
The PDReceiver includes a Digital Signage player useful for playback of video and image assets on either a Windows desktop or an Amino set-top box. For more information, please see other documentation on how to use PDReceiver as a digital signage solution in either a Unicast or Multicast environment.
13

Appendix A : Figures
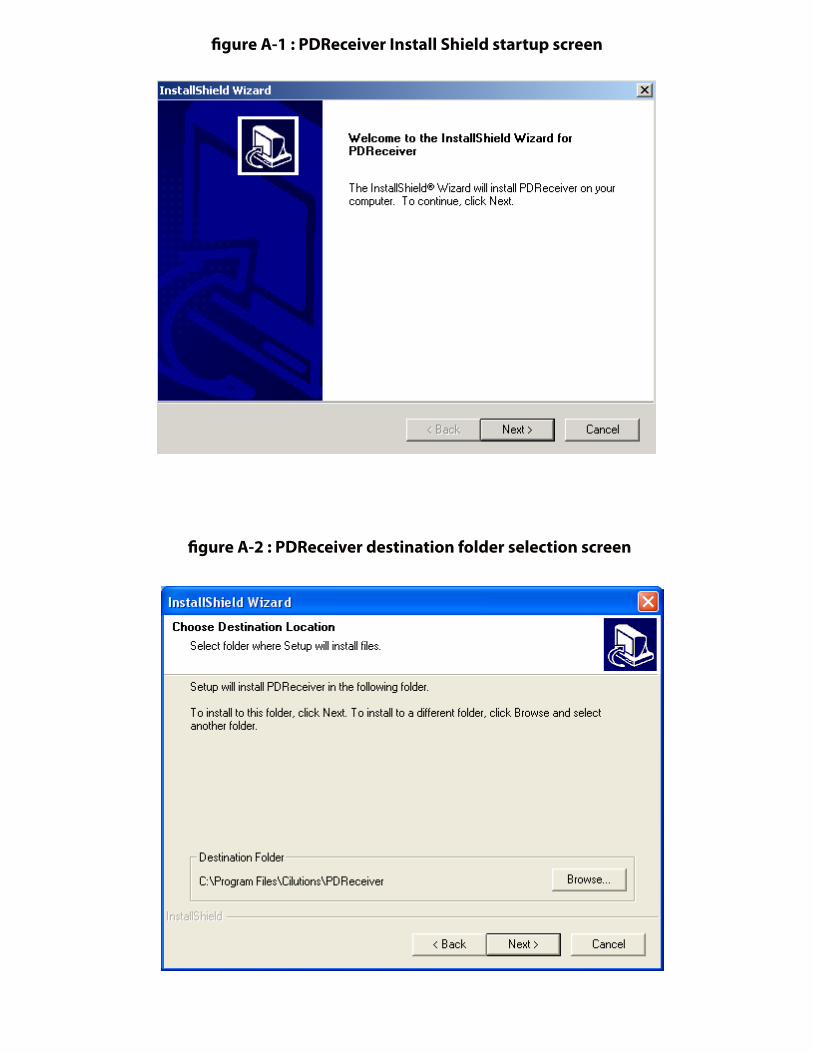
figure A-2 : PDReceiver destination folder selection screen
figure A-1 : PDReceiver Install Shield startup screen

figure A-3 : PDReceiver process model screen
figure A-4 : PDReceiver Configuration Screen (Multicast Mode)

figure A-5 : PDReceiver Configuration Screen (Unicast Mode in a NATed environment)
figure A-6 : Select Program folder screen

figure A-7 : Start Copying Files screen
figure A-8 : Setup Complete Screen
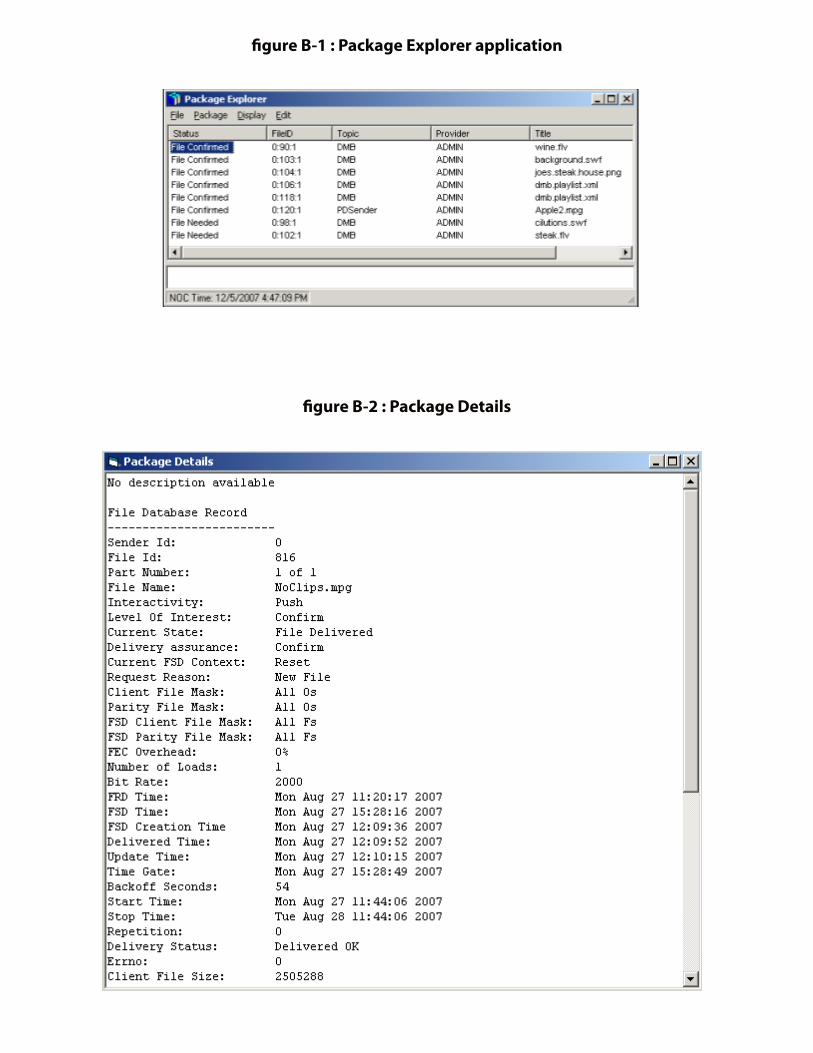
figure B-1 : Package Explorer application
figure B-2 : Package Details

figure B-3 : Client Editor Interface
figure C-1 : PDReceiver Configuration Utility
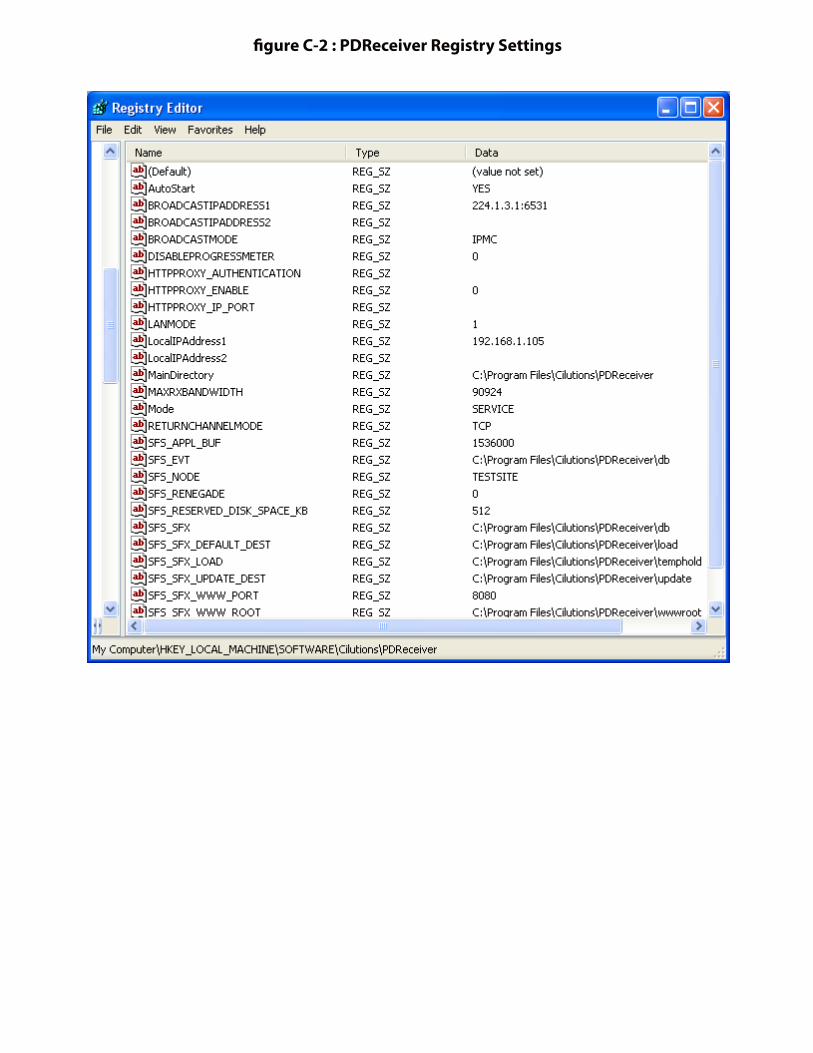
figure C-2 : PDReceiver Registry Settings

figure C-3 : Sample pdr.ini file

figure C-4 : Video relay on a local LAN through PDReceiver
The example configuration values at the Receiver are as follows:
• Public IPMC:Port (Used for listening for announcements) 224.1.3.1:6531 (Unique system-wide, matches Sender)
• SFS_STREAM_TO_LAN = N (default) 127.0.0.1:1235 (local video playback)
• SFS_STREAM_TO_LAN = Y 236.5.115.3:1235 (relay to local network)
• Local IP for video relay (if SFS_STREAM_TO_LAN = Y) SFS_STREAM_INTERFACE = 192.168.3.100
• Private IPMC:Port (Used for live stream) 224.1.6.1:6561 (Learned from Sender)

figure D-1 : pkgstat Command Usage
figure D-2 : File Database Record

figure E-1 : dbsview Debug Log Tracer
figure E-2 : dbsview Trace Configuration

figure F-1 : Finstall on Linux system
figure G-1 : fPlayStream.bat on Windows

figure H-1 : Epg.xml Interface

figure I-1 : Registration of a Unicast Receiver(See Internet Unicast Mode of Operation portion of document)

Appendix B : Windows Registry Settings

A. Settings present in the registry on installation
Parameter Default Value Description
autostart YES ‘YES’ starts the PDReceiver automatically on sys-tem startup.
BROADCASTIPADDRESS1 224.1.3.1:6531 The Public IPMC:Port that this Receiver should join. This address corresponds to the Sender in the network. For Unicast Receivers (i.e., non-mul-ticast) this value should be UNICAST:port
BROADCASTIPADDRESS2 An optional retransmit channel. Can be set to either to Public Retransmit Address and port (Must match the retransmit address on sender) or UNICAST:<port>. The port must not be in use by another application on the Receiver. This field is useful for setting UNICAST retransmission on the Receiver. Disabled by default
DISABLEPROGRESSMETER 0 Enables the pop-up file reception progress meter when the PDReceiver is running as an application (with it’s icon in the system tray). When running as a service the PDReceiver does not display a progress meter. 1=disables the progress meter.
HTTPPROXY_ENABLE 0 Permits configuring an HTTP proxy for return traf-fic to the Sender. 1=Enable Proxy, 0=Disable
HTTPPROXY_IP_PORT The HTTP Proxy to use for HTTP traffic. (e.g., 192.168.1.89:8080)
HTTPPROXY_AUTHENTICATION The HTTP Proxy username password if HTTP Proxy is enabled (e.g. user:pass)
LocalIPAddress1 The network adapter to use when joining to the BroadcastIPAddress1 IPMC:Port if the Receiver is on a multi-homed platform. For UNICAST Receiv-ers this field is mandatory.
LocalIPAddress2 Local IP address used for the optional retransmit channel.
MainDirectory …\PDReceiver Absolute Path of the Folder/Directory where the PDReceiver is installed
MAXRXBANDWIDTH The maximum rate at which this platform is authorized to receive incoming files or video streams. Value is in Kbits/second. 0=Unlimited. This value us calculated by the installation pro-gram during disk write analysis.
Mode Service/Application Mode in which the PDReceiver is running, as a service or application, based on the selection during installation
RETURNCHANNELMODE TCP Mode/Protocol in which the return channel traffic is sent back to the sender. TCP uses HTTP over TCP.

ReturnIPAddress The IP:Port where the receiver should HTTP/POST retransmission requests and confirmations. This will override any IP:Port announced by the PDSender. This is useful when running an Aggre-gation Server in the network to “catch” retrans-mission requests as a front-end to the Sender. If the user does not know what this should be just leave it blank and the Receiver will learn it from the Sender. If it is blank the Receiver will update this value with the IP:Port advertised by the sender.
SFS_APPL_BUF 1536000 The IP stack buffering to use during file reception. Larger amounts can minimize the chances of lost packets during reception.
SFS_NODE The unique 8 character siteid of the Receiver. This is set by the operator during installation and can be changed afterwards. By default it is the first 8 characters of the computer name.
SFS_RENEGADE 0 Designates that this Receiver has been deemed a renegade. That is, it is sending too many retrans-mission requests to the Sender and violating the Sender’s retransmission policy. If this is set to 1 it means that the Sender will no longer honor retransmission requests from this Receiver. The Receiver application must be restarted for the Receiver to resume sending requests.
SFS_RESERVED_DISK_SPACE_KB 512 The minimum amount of extra disk space avail-able on the local Receiver to begin accepting a file over and above the advertised file size. Value is in Kbytes.
SFS_SFX …\db Absolute Path of the local database directory on the Receiver
SFS_SFX_DEFAULT_DEST …\load Absolute Path where the Receiver delivers files sent to the DEFAULT destination client.
SFS_SFX_LOAD …\temphold Absolute Path where the Receiver accumulates files during reception. File in this directory, even though full sized, are not yet ready to be deliv-ered to the destination client.
SFS_SFX_UPDATE_DEST …\update Absolute Path of the Update Directory. Used internally to support updating the Receiver ap-plication remotely. This directory should not be used by a client.
SFS_SFX_WWW_ROOT …\wwwroot Absolute Path of the wwwroot Directory. This is the root location used by the web server embed-ded within the Receiver application. Files (e.g., index.html) sent to the WWW destination client are delivered to this directory.
SFS_SFX_WWW_PORT 8080 The IP Port used for the Receiver’s internal web server.

SFS_UDP_HOLE_PUNCH_INTERVAL_SEC 7200 For UNICAST only this is the interval between UDP Messages sent from the Receiver to the Sender. It is calculated by the Receiver at start-up and is used to keep Router NAT connections open. The Receiver updates this value after calcu-lating the optimum setting.
SenderIPAddressPort1 The Primary IP:Port (or domainname:Port) to use when the Receiver is in UNICAST mode (see BROADCASTIPADDRESS1). The Receiver will send a UDP Hole Punch packet here to register with the Sender at start-up.
SenderIPAddressPort2 The Retransmit IP:Port (or domainname:Port) to use when the Receiver is in UNICAST mode (see BROADCASTIPADDRESS2)
B. Settings that can be added after installation
Parameter Default Value Description
SFS_FINSTALL_SHOW show Used to control the desktop visibility of the in-stallation program (e.g., finstall.exe) when it is ex-ecuted. Values can be: show, hide or minimized.
TraceLogMaxSize 1000000 The maximum number of bytes in the …/pkg-trace_log.txt file. The file is truncated when it reaches this size.
ErrorLogMaxSize 1000000 The maximum number of bytes in the …/pk-gerror_log.txt file. The file is truncated when it reaches this size.
LAUNCH_IMMEDIATELY 0 1=Launch the installation program (e.g., finstall.exe) immediately upon file delivery. 0=wait until the Receiver is idle before installing. That is, has not started a new file reception for “InstallDelay” seconds. This setting also controls launching the decode program (to perform FEC repair) and the signature program (to recalculate the MD5 signa-ture). A user would typically only set this to 0 on a low powered receiver where the files all arrive back-to-back in batches and installation takes place after all files have arrived.
InstallDelay 10 The number of seconds to wait after a file recep-tion before launching any installation program (e.g. finstall.exe). This only applies if LAUNCH_IMMEDIATELY=0
PackageLoadTimeout 30 The number of seconds to wait on an incoming file or video stream before closing its connection and setting failed. A setting of 30 permits up to 30 seconds of idle time.
PackageLoggingLogMode 1 Controls the amount of tracing in the …/pkg-trace.log file. Values are: 0=trace all loads, 1=trace only failed loads, 2=turn off tracing.

PackageLoggingLogSize 500 The maximum size, in Kbytes, of the …/pkgtrace.log file. The file is truncated when it reaches this size
PostLoadDelay 3 The number of seconds to wait after the end of a file reception before starting the process of look-ing for files that need some recovery (e.g., need missing packets). If a new file reception begins before this timeout expires the receiver will post-pone recovery and try again later.
Decodetimeout 7200 The maximum number of seconds to wait when decoding a file (i.e., repairing lost packets using FEC).
signaturetimeout 7200 The maximum number of seconds to wait when signing a file (i.e., calculating its MD5 128 bit signature to verify file integrity)
MaxBackoffOverride 0 The number of seconds to wait before sending return traffic (retransmission requests or confir-mations) back to the Sender. This is used to over-ride the backoff times advertised by the Sender. Typically used in a demo mode to force faster recovery of lost packets.
FILTER_REGISTRY_ACTION Disable Values are: Disable, Include or Exclude. Reference the section on Reception Filters in this document for a description.
FILTER_REGISTRY_FILE The optional filter file fullpath name.
FILTER_REGISTRY_LOG The optional filter log fullpath name.
EnableDebug 0 1=Honor the trace flag settings (values in the ini file starting with TF) and put debug messages in …/pkgtrace_log.txt. 0=Disable.
DeleteOnDelivery 0 Used for testing long term file deliveries without filling up a hard drive. 1=Automatically delete each delivered file after writing it to the client’s destination directory. 0=normal operation.
ShowDetails 0 1=Show details in the file reception progress meter. 0=Show minimal data in the meter.
StatusAlwaysOnTop 1 1=Always display the file reception progress me-ter on top of all other windows on the desktop. 0=Not on top.
DebugDecode 0 If enabled (i.e., set to 1) the Receiver leaves all work files in …\temphold after it attempts to repair lost packets.
RefreshInterval 5 The number of seconds between automatic screen refreshes in the …\dbsview.exe tracing tool.
Finstalltimeout 7200 The maximum number of seconds to wait when installing a file. After this the Receiver will mark the file as “Installed Failed” and optionally report its status back to the Sender.

MaximumRetransmissionPercent 1000000 The maximum percentage of a file which may be retransmitted when recovering lost packets. When this value has been reached the Receiver will no longer request any missing packets. The default of 1000000 permits unlimited retransmis-sion.
Fannouncetimeout 3 The number of seconds to wait for the fan-nounce.exe program to run. This optional pro-gram is used to decide whether or not to accept a file load at announcement time.
SFS_UDP_DISCOVER_REMOTE_PORT 9876 UDP Discovery port. Used to learn the optimum time interval for sending UDP Packets to keep the connection open between the Receiver and the Sender. Useful only on UNICAST Receivers on a private LAN using NAT to connect to the Sender.

Appendix C : Linux pdr.ini Settings

A. Settings present in the file on installation
Parameter Default Value Description
version Version Number Tells the current version of the PDReceiver.user username User Namecompany Company name Company nameMainDirectory /PVR/pdreceiver Absolute Path of the PDReceiver Directory SFS_APPL_BUF 1536000 The IP stack buffering to use during file reception.
Larger amounts can minimize the chances of lost packets during reception.
SFS_SFX ../db Absolute Path of the DB Directory used to keep the internal system catalog for the Receiver.
SFS_EVT ../db Absolute Path of the DB Directory used to keep the internal system catalog for the Receiver.
SFS_SFX_DEFAULT_DEST ../load Absolute Path where the Receiver delivers files sent to the DEFAULT destination client.
SFS_SFX_LOAD ../tmphold Absolute Path where the Receiver accumulates files during reception. File in this directory, even though full sized, are not yet ready to be deliv-ered to the destination client.
SFS_SFX_UPDATE_DEST ../update Absolute Path of the Update Directory. Used internally to support updating the Receiver ap-plication. This directory should not be used by a client.
SFS_LOG_FILES_DIR /PVR/pdreceiver Absolute path for log files.
SFS_SFX_WWW_ROOT ../wwwroot Absolute Path of the wwwroot Directory. This is the root location used by the web server embed-ded within the Receiver application. Files (e.g., index.html) sent to the WWW destination client are delivered to this directory.
BroadcastIPAddress1 224.1.3.1:6531 The Public IPMC:Port that this Receiver should join. This address corresponds to the Sender in the network. For Unicast Receivers (i.e., non-mul-ticast) this value should be UNICAST:port
LocalIPAddress1 The network adapter to use when joining to the BroadcastIPAddress1 IPMC:Port if the Receiver is on a multi-homed platform. For UNICAST Receiv-ers this field is mandatory.
BroadcastIPAddress2 An optional retransmit channel. Can be set to either to Public Retransmit Address and port (Must match the retransmit address on sender) or UNICAST:<port>. The port must not be in use by another application on the Receiver. This field is useful for setting UNICAST retransmission on the Receiver. Disabled by default
LocalIPAddress2 Local IP address used for the optional retransmit channel.
SFS_STREAM_INTERFACE 127.0.0.1 The network adapter to use when relaying in-coming IP streaming video to the network.

SFS_STREAM_TO_LAN N Y=relay any and all incoming IP streaming video to the network. N=do not relay.
SFS_DELETE_ON_UNREGISTER 1 1=delete a delivered file from the client’s destina-tion directory when the file is unregistered at the Sender. 0=never delete a file after delivering it; the client will always delete if needed.
SenderIPAddressPort1 The Primary IP:Port (or domainname:Port) to use when the Receiver is in UNICAST mode (see BroadcastIPAddress1). The receiver will send a UDP Hole Punch packet here to register with the Sender at start-up.
SenderIPAddressPort2 The Retransmit IP:Port (or domainname:Port) to use when the Receiver is in UNICAST mode (see BroadcastIPAddress2)
AMINO_GENERIC_FILE_SIZE 10000000 The maximum number of bytes in the …/play-back.log file on Amino signage platforms. The file is truncated when it reaches this size.
LAUNCH_IMMEDIATELY 2 1=Launch the installation program (e.g., finstall) immediately upon file delivery. 0=wait until the Receiver is idle before installing. That is, has not started a new file reception for “InstallDelay” seconds.2=On Amino Signage platforms launch the finstall program to index video files upon arrival. This setting also controls launching the decode program (to perform FEC repair) and the signa-ture program (to recalculate the MD5 signature). A user would typically only set this to 0 on a low powered receiver where the files all arrive back-to-back in batches and installation takes place after all files have arrived.
PackageLoadTimeout 600 (set top box)10 (all other)
The number of seconds to wait on an incoming file or video stream before closing its connection and setting failed. A setting of 600 permits up to 10 minutes of idle time (can happen in a rain fade) during reception.
EnableDebug 0 1=Honor the trace flag settings (values in the ini file starting with TF) and put debug messages in …/pkgtrace.log. 0=Disable.
tFrecon 5 Traces all Reconciliation Class traffic (trace levels from 1 to 10). Disabled by default
tFloadr 2 Traces all File Reception Class traffic (trace levels from 1 to 10). Disabled by default
TFParsr 4 Traces all Final Delivery Class traffic (trace levels from 1 to 10). Disabled by default
SFS_NODE testsite The 8 character siteid of the Receiver. On Amino signage set-tops this is the last 8 digits of the se-rial number.

B. Settings that can be added after installation
Parameter Default Value Description
SFS_SFX_WWW_PORT 8080 The IP Port used for the Receiver’s internal web server.
SFS_UDP_DISCOVER_REMOTE_PORT 9876 UDP Discovery port. Used to learn the optimum time interval for sending UDP Packets to keep the connection open between the Receiver and the Sender. Useful only on UNICAST Receivers on a private LAN using NAT to connect to the Sender.
TraceLogMaxSize 1000000 The maximum number of bytes in the …/pkg-trace.log file. The file is truncated when it reaches this size.
TFDispatcher 0 Traces all Dispatcher Class traffic (trace levels from 1 to 10). 0=disabled.
TFWatch 0 Traces all Watchdog Class traffic (trace levels from 1 to 10). 0=disabled.
TFStateMachine 0 Traces all State Machine traffic (trace levels from 1 to 10). 0=disabled.
InstallDelay 10 The number of seconds to wait after a file recep-tion before launching any installation program (e.g. finstall). This only applies if LAUNCH_IMMEDIATELY=0
PostLoadDelay 3 The number of seconds to wait after the end of a file reception before starting the process of look-ing for files that need some recovery (e.g., need missing packets). If a new file reception begins before this timeout expires the receiver will post-pone recovery and try again later.
ReturnHTTPAddress The IP:Port where the receiver should HTTP/POST retransmission requests and confirmations. This will override any IP:Port announced by the PDSender. This is useful when running an Aggre-gation Server in the network to “catch” retrans-mission requests as a front-end to the Sender. If the user does not know what this should be just leave it blank and the Receiver will learn it from the Sender. Disabled by default
EnableHTTPProxy 0 Permits configuring an HTTP proxy for return traf-fic to the Sender. 1=Enable Proxy, 0=Disable
ReturnHTTPProxy The HTTP Proxy to use for HTTP traffic. (e.g., 192.168.1.89:8080)
HTTPAuthentication The HTTP Proxy username and password if HTTP Proxy is enabled (e.g., user:pass)
HTTPRetryTimeout 20 The number of seconds to wait before retrying an HTTP Connection after failing to connect to the sender.
Decodetimeout 7200 The maximum number of seconds to wait when decoding a file (i.e., repairing lost packets using FEC).

signaturetimeout 7200 The maximum number of seconds to wait when signing a file (i.e., calculating its MD5 128 bit signature to verify file integrity)
DebugDecode 0 If enabled (i.e., set to 1) the Receiver leaves all work files in …\tmphold after it attempts to repair lost packets.
Fannouncetimeout 3 The number of seconds to wait for the fannounce program to run. This optional program is used to decide whether or not to accept a file load at an-nouncement time.
MaxRxBandwidth 0 The maximum rate at which this platform is authorized to receive incoming files or video streams. Value is in Kbits/second. 0=Unlimited.
Finstalltimeout 7200 The maximum number of seconds to wait when installing a file.
MaximumRetransmissionPercent 1000000 The maximum percentage of a file which may be retransmitted when recovering lost packets. When this value has been reached the Receiver will no longer request any missing packets. The default of 1000000 permits unlimited retransmis-sion.
DeleteOnDelivery 0 Used for testing long term file deliveries without filling up a hard drive. 1=Automatically delete each delivered file after writing it to the client’s destination directory. 0=normal operation.
PromiscuousMode 0 Used to enable automatic reception of any an-nounced file. If set to 1 the local receiver will ac-cept all files regardless of the destination address. 0=the receiver will only accept files that are sent explicitly to its siteid or sent to BROADCST.