Di151f_gb Users Manual Fax Unit.pdf
170
The essentials of imaging www.mi nol taeu ro e.c om User Manual Di151f
-
Upload
miguel-perez-war -
Category
Documents
-
view
241 -
download
0
Transcript of Di151f_gb Users Manual Fax Unit.pdf

7/18/2019 Di151f_gb Users Manual Fax Unit.pdf
http://slidepdf.com/reader/full/di151fgb-users-manual-fax-unitpdf 1/170
The essentials of imagingwww.minoltaeuro e.com
User Manual
Di151f

7/18/2019 Di151f_gb Users Manual Fax Unit.pdf
http://slidepdf.com/reader/full/di151fgb-users-manual-fax-unitpdf 2/170
7/18/2019 Di151f_gb Users Manual Fax Unit.pdf
http://slidepdf.com/reader/full/di151fgb-users-manual-fax-unitpdf 3/170
Di151 Fax Unit 1
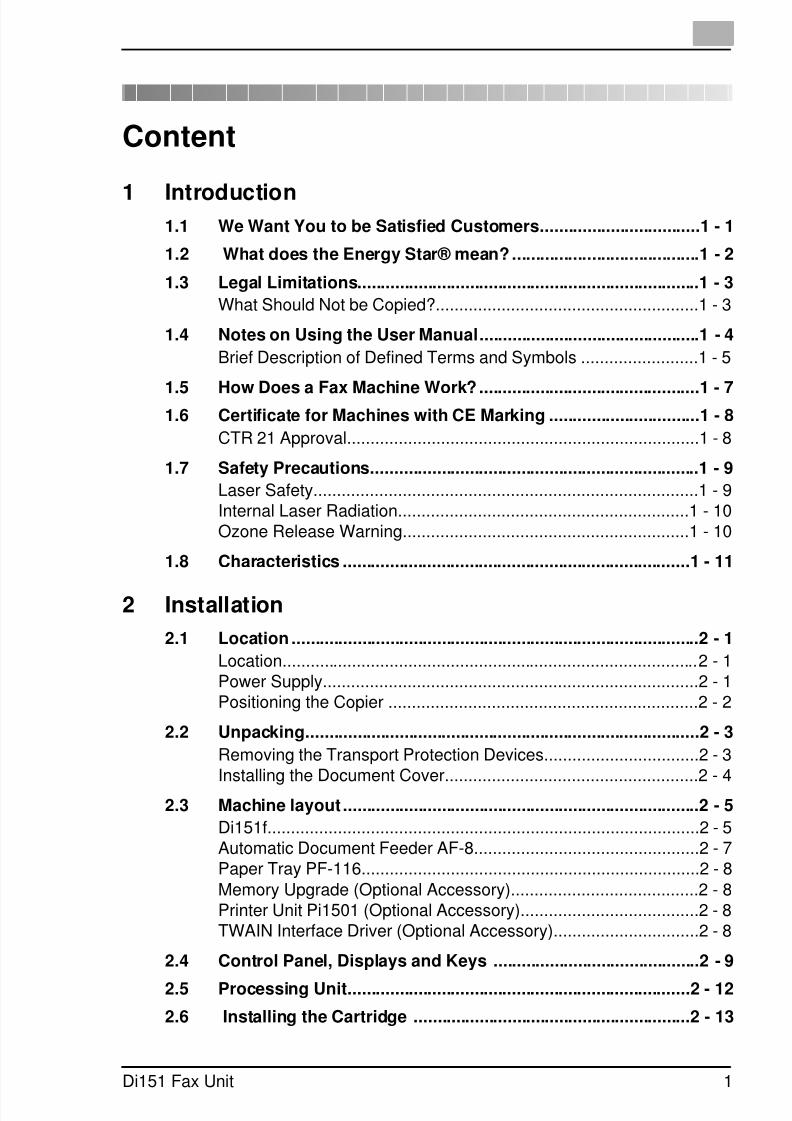
Content
1 Introduction1.1 We Want You to be Satisfied Customers..................................1 - 1
1.2 What does the Energy Star® mean? ........................................1 - 2
1.3 Legal Limitations.........................................................................1 - 3What Should Not be Copied?........................................................1 - 3
1.4 Notes on Using the User Manual...............................................1 - 4Brief Description of Defined Terms and Symbols .........................1 - 5
1.5 How Does a Fax Machine Work? ...............................................1 - 71.6 Certificate for Machines with CE Marking ................................1 - 8
CTR 21 Approval...........................................................................1 - 8
1.7 Safety Precautions......................................................................1 - 9Laser Safety..................................................................................1 - 9Internal Laser Radiation..............................................................1 - 10Ozone Release Warning.............................................................1 - 10
1.8 Characteristics ..........................................................................1 - 11
2 Installation2.1 Location .......................................................................................2 - 1
Location.........................................................................................2 - 1Power Supply................................................................................2 - 1Positioning the Copier ..................................................................2 - 2
2.2 Unpacking....................................................................................2 - 3Removing the Transport Protection Devices.................................2 - 3Installing the Document Cover......................................................2 - 4
2.3 Machine layout............................................................................2 - 5Di151f............................................................................................2 - 5Automatic Document Feeder AF-8................................................2 - 7Paper Tray PF-116........................................................................2 - 8Memory Upgrade (Optional Accessory)........................................2 - 8Printer Unit Pi1501 (Optional Accessory)......................................2 - 8TWAIN Interface Driver (Optional Accessory)...............................2 - 8
2.4 Control Panel, Displays and Keys ............................................2 - 9
2.5 Processing Unit.........................................................................2 - 12
2.6 Installing the Cartridge ...........................................................2 - 13

7/18/2019 Di151f_gb Users Manual Fax Unit.pdf
http://slidepdf.com/reader/full/di151fgb-users-manual-fax-unitpdf 4/170
2 Di151 Fax Unit
2.7 Adding Paper ............................................................................ 2 - 15250 Sheet Paper Tray .............................................................. 2 - 152nd Paper Tray — 500 Sheets ................................................. 2 - 17
2.8 Connecting the Telephone Line Cable ................................... 2 - 18Connecting the Power Cable...................................................... 2 - 18
2.9 Operating the Machine............................................................. 2 - 18
3 Entering data
3.1 Preparation.................................................................................. 3 - 1
3.2 Typing Conventions in this Manual .......................................... 3 - 1
3.3 Enter text..................................................................................... 3 - 1Special Characters ....................................................................... 3 - 2
3.4 Entering your Fax Number ........................................................ 3 - 3
3.5 Entering Your Company Name.................................................. 3 - 4
3.6 Entering Date and Time ............................................................. 3 - 5
3.7 Set Phone Type........................................................................... 3 - 6Dialling Mode................................................................................ 3 - 6PSTN or PBX................................................................................ 3 - 7PSTN ........................................................................................... 3 - 7Private Branch Exchange (PBX) ................................................. 3 - 8
3.8 Storing Numbers ........................................................................ 3 - 9Sub Addressing ............................................................................ 3 - 9Entering One-Touch Numbers.................................................... 3 - 10Entering Speed Dial Numbers .................................................... 3 - 11Changing One-Touch or Speed Dial Numbers........................... 3 - 12Erasing One-Touch- or Speed Dial Numbers............................. 3 - 14Entering Call Groups .................................................................. 3 - 15Changing Group Dials ................................................................ 3 - 17Erasing Call Groups ................................................................... 3 - 18
Phone Book ............................................................................... 3 - 183.9 Advanced Settings ................................................................... 3 - 19
Buzzer volume............................................................................ 3 - 19Header........................................................................................ 3 - 20Footer ......................................................................................... 3 - 21LCD Contrast.............................................................................. 3 - 22Power Save Mode ...................................................................... 3 - 23Energy Save Mode OFF............................................................. 3 - 24Remote Diagnosis ...................................................................... 3 - 25
Setting the Monitor Volume ........................................................ 3 - 26Automatic Reset ......................................................................... 3 - 27

7/18/2019 Di151f_gb Users Manual Fax Unit.pdf
http://slidepdf.com/reader/full/di151fgb-users-manual-fax-unitpdf 5/170
Di151 Fax Unit 3
4 Sending4.1 Transmission...............................................................................4 - 1
Notes on Original Documents .......................................................4 - 1Using Carryier Film .......................................................................4 - 2
Placing the Documents in the Feeder ..........................................4 - 2Placing Documents on the Glass .................................................4 - 2
4.2 Transmission Settings................................................................4 - 4Resolution .................................................................................... 4 - 4Default Setting Resolution.............................................................4 - 5Contrast.........................................................................................4 - 6Default Contrast Setting................................................................4 - 6Page Counter................................................................................4 - 7Closed User Group .......................................................................4 - 8
Default Transmission Setting ........................................................4 - 94.3 Dialling Mode.............................................................................4 - 10
Manual Dialling Using the Numeric Keypad ...............................4 - 10Automatic Dialling Using One-Touch Dialling ............................4 - 10Automatic Dialling Using Speed Dialling ....................................4 - 10Automatic Call Groups ...............................................................4 - 11Program Dialling..........................................................................4 - 11Combination Dialling ..................................................................4 - 12Phone Book ................................................................................4 - 12
Manual Redial ............................................................................4 - 124.4 Memory Transmission..............................................................4 - 13
4.5 Direct Transmission..................................................................4 - 14
4.6 Book TX......................................................................................4 - 15
4.7 Delayed Transmission (Timer).................................................4 - 16Program Dialling, Timer Transmission........................................4 - 17
4.8 Broadcasting .............................................................................4 - 18Program Dialling Broadcast Transmission..................................4 - 19
4.9 Relay Transmission ..................................................................4 - 20Program Dialling Relay Transmission.........................................4 - 22
4.10 Polling Transmission................................................................4 - 23
4.11 Mailbox Transmission ..............................................................4 - 24Program Dialling Mailbox Transmission......................................4 - 25
4.12 Batch Transmission..................................................................4 - 26
4.13 Delete Document.......................................................................4 - 27
7/18/2019 Di151f_gb Users Manual Fax Unit.pdf
http://slidepdf.com/reader/full/di151fgb-users-manual-fax-unitpdf 6/170
4 Di151 Fax Unit
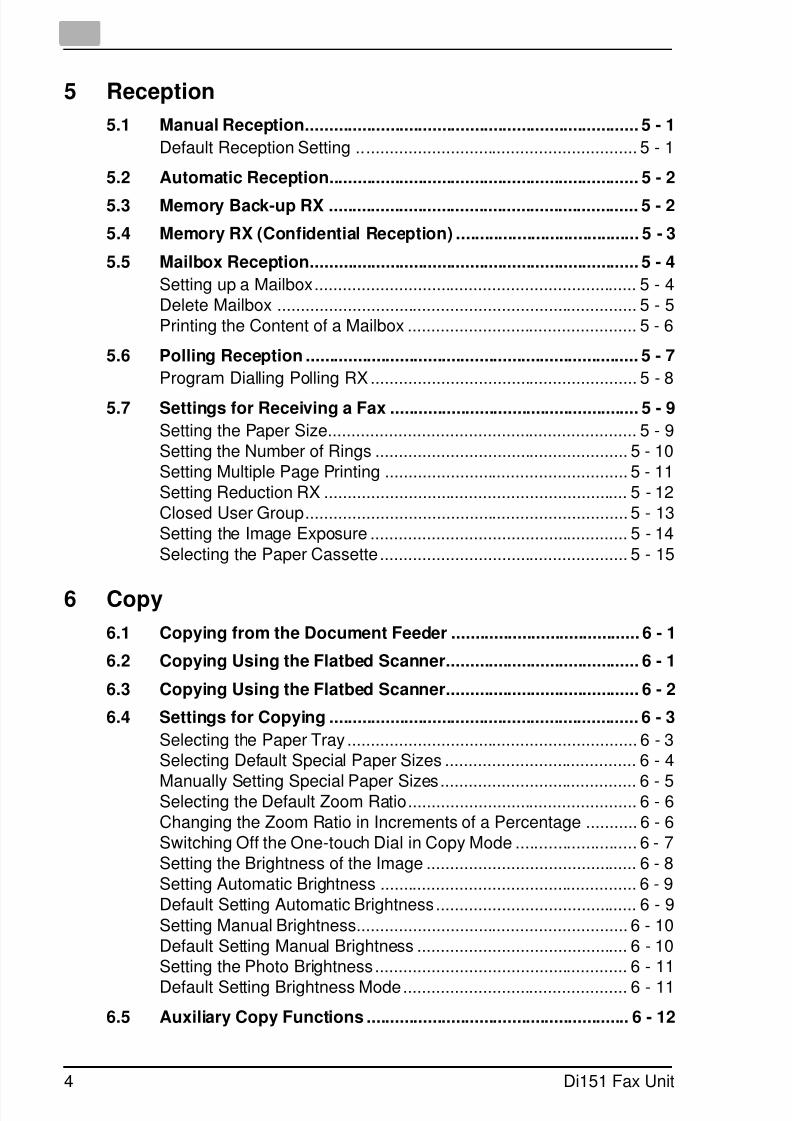
5 Reception5.1 Manual Reception....................................................................... 5 - 1
Default Reception Setting ............................................................ 5 - 1
5.2 Automatic Reception.................................................................. 5 - 2
5.3 Memory Back-up RX .................................................................. 5 - 2
5.4 Memory RX (Confidential Reception) ....................................... 5 - 3
5.5 Mailbox Reception...................................................................... 5 - 4Setting up a Mailbox..................................................................... 5 - 4Delete Mailbox ............................................................................. 5 - 5Printing the Content of a Mailbox ................................................. 5 - 6
5.6 Polling Reception ....................................................................... 5 - 7Program Dialling Polling RX ......................................................... 5 - 8
5.7 Settings for Receiving a Fax ..................................................... 5 - 9Setting the Paper Size.................................................................. 5 - 9Setting the Number of Rings ...................................................... 5 - 10Setting Multiple Page Printing .................................................... 5 - 11Setting Reduction RX ................................................................. 5 - 12Closed User Group..................................................................... 5 - 13Setting the Image Exposure ....................................................... 5 - 14Selecting the Paper Cassette..................................................... 5 - 15
6 Copy6.1 Copying from the Document Feeder ........................................ 6 - 1
6.2 Copying Using the Flatbed Scanner......................................... 6 - 1
6.3 Copying Using the Flatbed Scanner......................................... 6 - 2
6.4 Settings for Copying .................................................................. 6 - 3Selecting the Paper Tray .............................................................. 6 - 3Selecting Default Special Paper Sizes ......................................... 6 - 4
Manually Setting Special Paper Sizes.......................................... 6 - 5Selecting the Default Zoom Ratio................................................. 6 - 6Changing the Zoom Ratio in Increments of a Percentage ........... 6 - 6Switching Off the One-touch Dial in Copy Mode .......................... 6 - 7Setting the Brightness of the Image ............................................. 6 - 8Setting Automatic Brightness ....................................................... 6 - 9Default Setting Automatic Brightness........................................... 6 - 9Setting Manual Brightness.......................................................... 6 - 10Default Setting Manual Brightness ............................................. 6 - 10Setting the Photo Brightness...................................................... 6 - 11
Default Setting Brightness Mode................................................ 6 - 116.5 Auxiliary Copy Functions ........................................................ 6 - 12
7/18/2019 Di151f_gb Users Manual Fax Unit.pdf
http://slidepdf.com/reader/full/di151fgb-users-manual-fax-unitpdf 7/170
Di151 Fax Unit 5
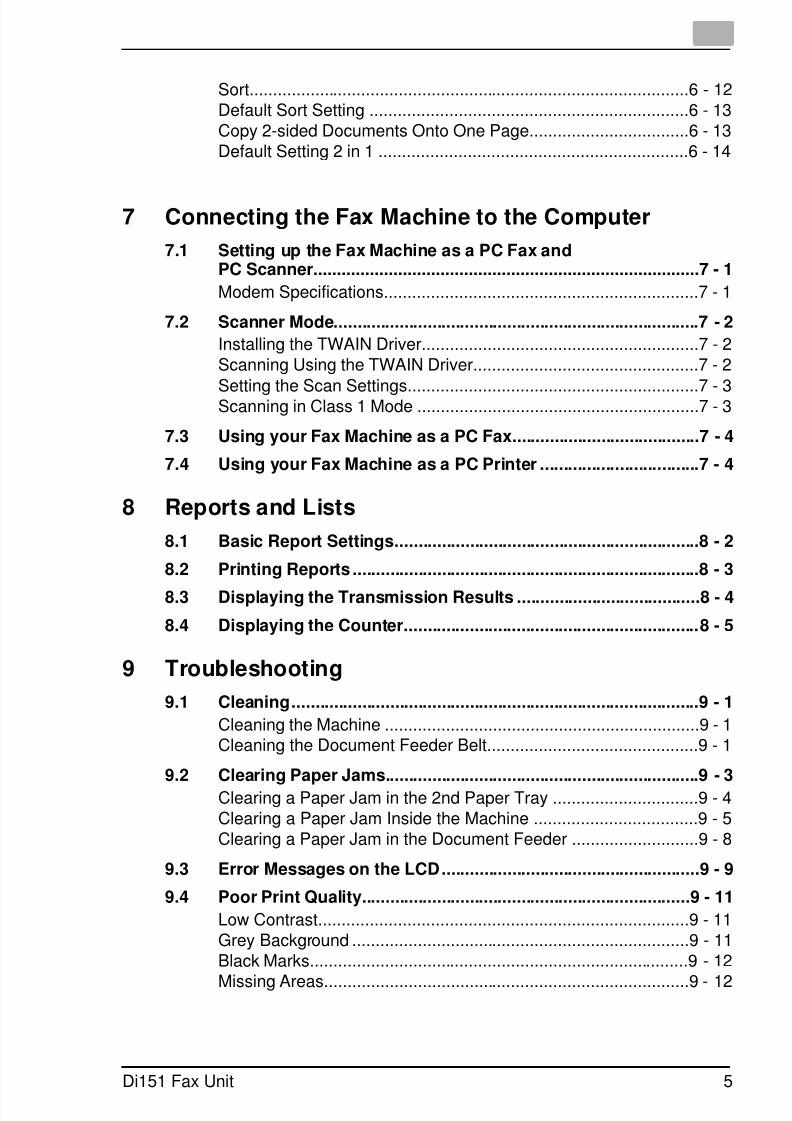
Sort..............................................................................................6 - 12Default Sort Setting ....................................................................6 - 13Copy 2-sided Documents Onto One Page..................................6 - 13Default Setting 2 in 1 ..................................................................6 - 14
7 Connecting the Fax Machine to the Computer7.1 Setting up the Fax Machine as a PC Fax and
PC Scanner..................................................................................7 - 1Modem Specifications...................................................................7 - 1
7.2 Scanner Mode..............................................................................7 - 2Installing the TWAIN Driver...........................................................7 - 2Scanning Using the TWAIN Driver................................................7 - 2
Setting the Scan Settings..............................................................7 - 3Scanning in Class 1 Mode ............................................................7 - 3
7.3 Using your Fax Machine as a PC Fax........................................7 - 4
7.4 Using your Fax Machine as a PC Printer ..................................7 - 4
8 Reports and Lists
8.1 Basic Report Settings.................................................................8 - 2
8.2 Printing Reports ..........................................................................8 - 3
8.3 Displaying the Transmission Results .......................................8 - 4
8.4 Displaying the Counter...............................................................8 - 5
9 Troubleshooting9.1 Cleaning.......................................................................................9 - 1
Cleaning the Machine ...................................................................9 - 1Cleaning the Document Feeder Belt.............................................9 - 1
9.2 Clearing Paper Jams...................................................................9 - 3Clearing a Paper Jam in the 2nd Paper Tray ...............................9 - 4Clearing a Paper Jam Inside the Machine ...................................9 - 5Clearing a Paper Jam in the Document Feeder ...........................9 - 8
9.3 Error Messages on the LCD.......................................................9 - 9
9.4 Poor Print Quality......................................................................9 - 11Low Contrast...............................................................................9 - 11Grey Background ........................................................................9 - 11Black Marks.................................................................................9 - 12
Missing Areas..............................................................................9 - 12
7/18/2019 Di151f_gb Users Manual Fax Unit.pdf
http://slidepdf.com/reader/full/di151fgb-users-manual-fax-unitpdf 8/170
6 Di151 Fax Unit
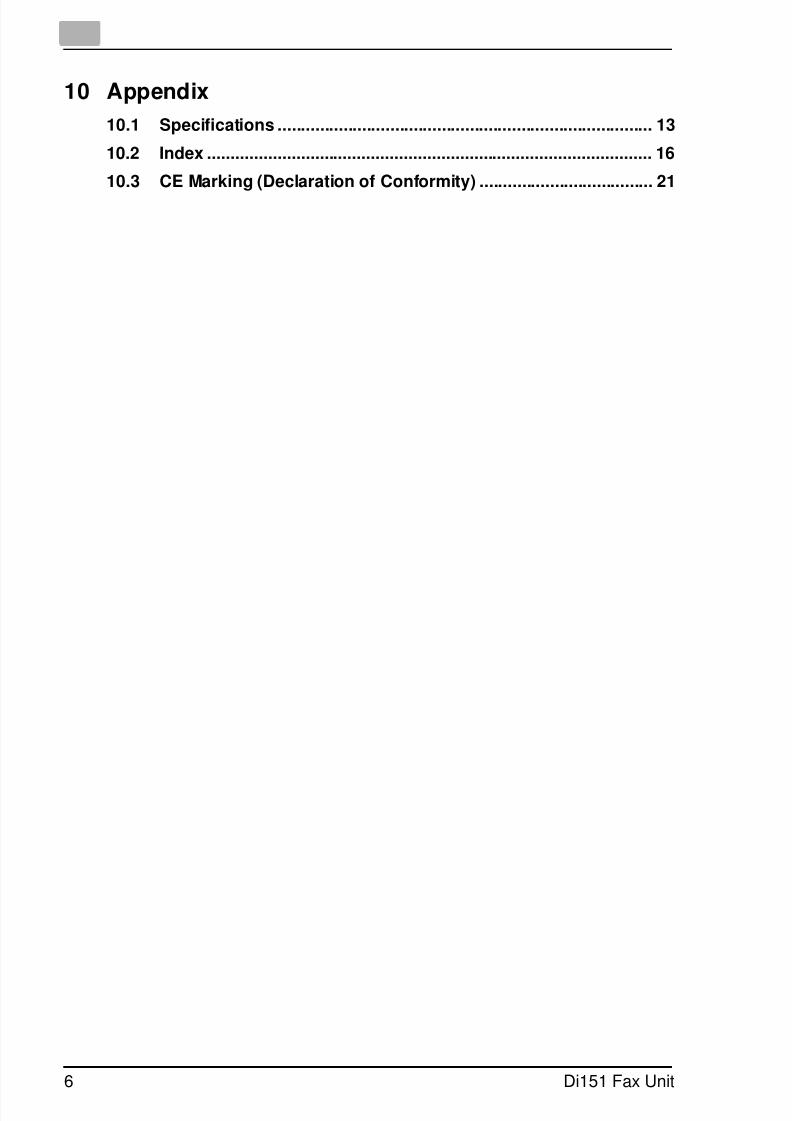
10 Appendix10.1 Specifications ................................................................................ 13
10.2 Index ............................................................................................... 16
10.3 CE Marking (Declaration of Conformity) ..................................... 21

7/18/2019 Di151f_gb Users Manual Fax Unit.pdf
http://slidepdf.com/reader/full/di151fgb-users-manual-fax-unitpdf 9/170
Introduction 1
Di151 Fax Unit 1-1
1 Introduction
1.1 We Want You to be Satisfied CustomersThank you for deciding to buy a Minolta multifunctional machine. Themulti-functional Di151 with fax option which is described in this usermanual will hereafter be referred to as the Di151f.
Read this User Manual carefully before starting up your machine andalways keep the instructions to hand.
To achieve the best possible results and effective use of the machine, thisUser Manual provides you with information on the following subjects.
Installation Entering data
Copying/sending/receiving
Reports and lists
Maintenance and trouble-shooting.
Additional information and help in the event of an error is available from:
The technical service of your Minolta representative
Our Internet Website http://www.minolta.com.uk.Please keep the serial number (see nameplate) and the date of purchaseto hand so that we can quickly provide you with the right help in the eventof an error.
We want you to be satisfied customers.
Subject to changes.
7/18/2019 Di151f_gb Users Manual Fax Unit.pdf
http://slidepdf.com/reader/full/di151fgb-users-manual-fax-unitpdf 10/170
1 Introduction
1-2 Di151 Fax Unit
1.2 What does the Energy Star® mean?
Photocopiers with the Energy Star ® switch to a state with low powerconsumption or switch off if not used for a long time. This function meansthat annual power costs can be reduced by up to 60%.
When copying at high speeds, the operating state automatically switchesto double-sided copying. This means that both the costs for photocopypaper and the amount of paper produced for use is reduced.
Did you know that the production of a piece of paper requires 10 times asmuch energy as the production of a photocopy?
The use of less paper also has a direct influence on the cost-effectivepower consumption.
This photocopier meets the energy efficiency criterion of the EnergyStar ® .
7/18/2019 Di151f_gb Users Manual Fax Unit.pdf
http://slidepdf.com/reader/full/di151fgb-users-manual-fax-unitpdf 11/170
Introduction 1
Di151 Fax Unit 1-3
1.3 Legal Limitations
What Should Not be Copied?
The photocopier should not be used to duplicate certain types of
documents for the purpose of distributing them documents as originals.The following list is by no means complete but is meant as a guideline forresponsible photocopying.
Financial documentation
❍ Cheques❍ Instructions to pay❍ Certificates of deposit❍ Obligations or other debt certificates❍ Stock/share certificates
Legal documentation❍ Lunch coupons❍ Stamps (stamped and unstamped)❍ Cheques or bill of exchange from government authorities❍ Tax stamps (stamped and unstamped)❍ Passports❍ Immigration papers❍ Vehicle documentation❍ House ownership, other documentation of ownership and
legal claims. General documentation
❍ Identity cards or other forms of identification❍ Copyright-protected work without permission of the copyright
holder.
In addition to this it is forbidden under any circumstances to copy nationalor foreign art without permission of the copyright holder.
In case of doubt about the type of document consult a legal expert.
7/18/2019 Di151f_gb Users Manual Fax Unit.pdf
http://slidepdf.com/reader/full/di151fgb-users-manual-fax-unitpdf 12/170
1 Introduction
1-4 Di151 Fax Unit
1.4 Notes on Using the User Manual
The different topics in this User Manual are distinguished by specialwriting styles and symbols. The following examples help you to becomefamiliar with the most important topics and how to handle them
appropriately.
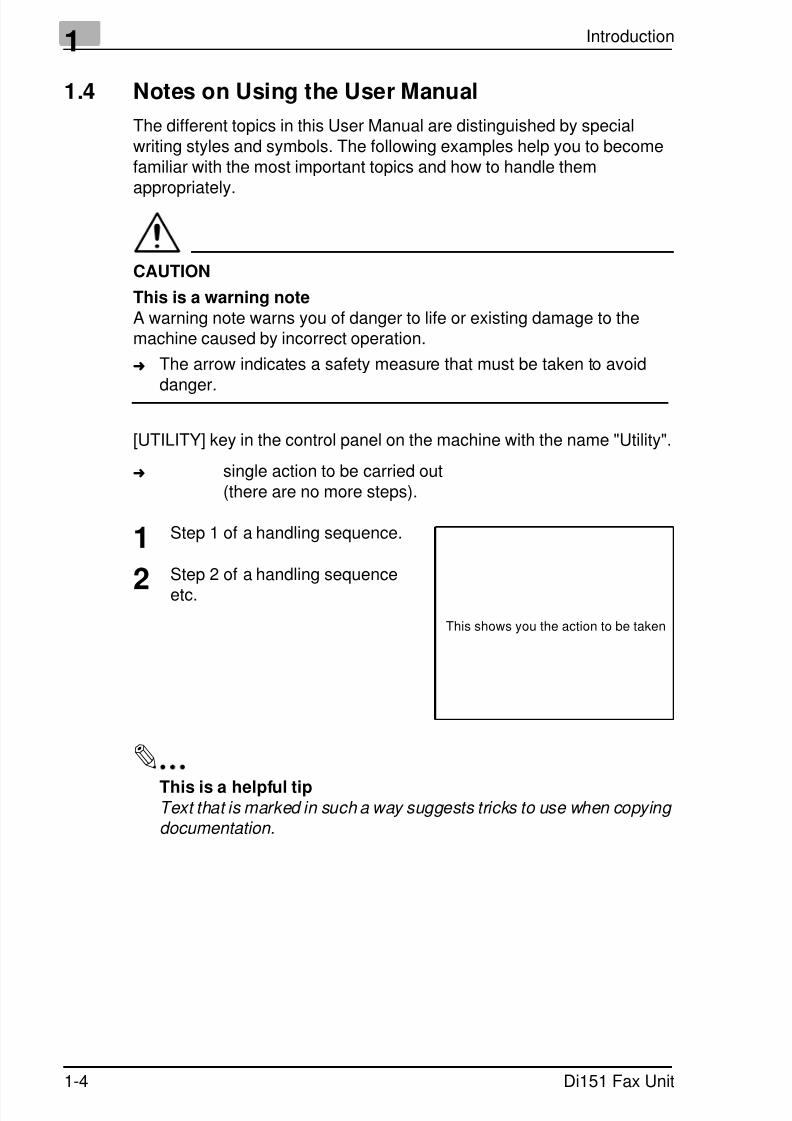
CAUTION
This is a warning noteA warning note warns you of danger to life or existing damage to themachine caused by incorrect operation.
➜ The arrow indicates a safety measure that must be taken to avoid
danger.
[UTILITY] key in the control panel on the machine with the name "Utility".
➜ single action to be carried out(there are no more steps).
1 Step 1 of a handling sequence.
2 Step 2 of a handling sequence
etc.
✎
This is a helpful tipText that is marked in such a way suggests tricks to use when copying
documentation.
This shows you the action to be taken
7/18/2019 Di151f_gb Users Manual Fax Unit.pdf
http://slidepdf.com/reader/full/di151fgb-users-manual-fax-unitpdf 13/170
Introduction 1
Di151 Fax Unit 1-5
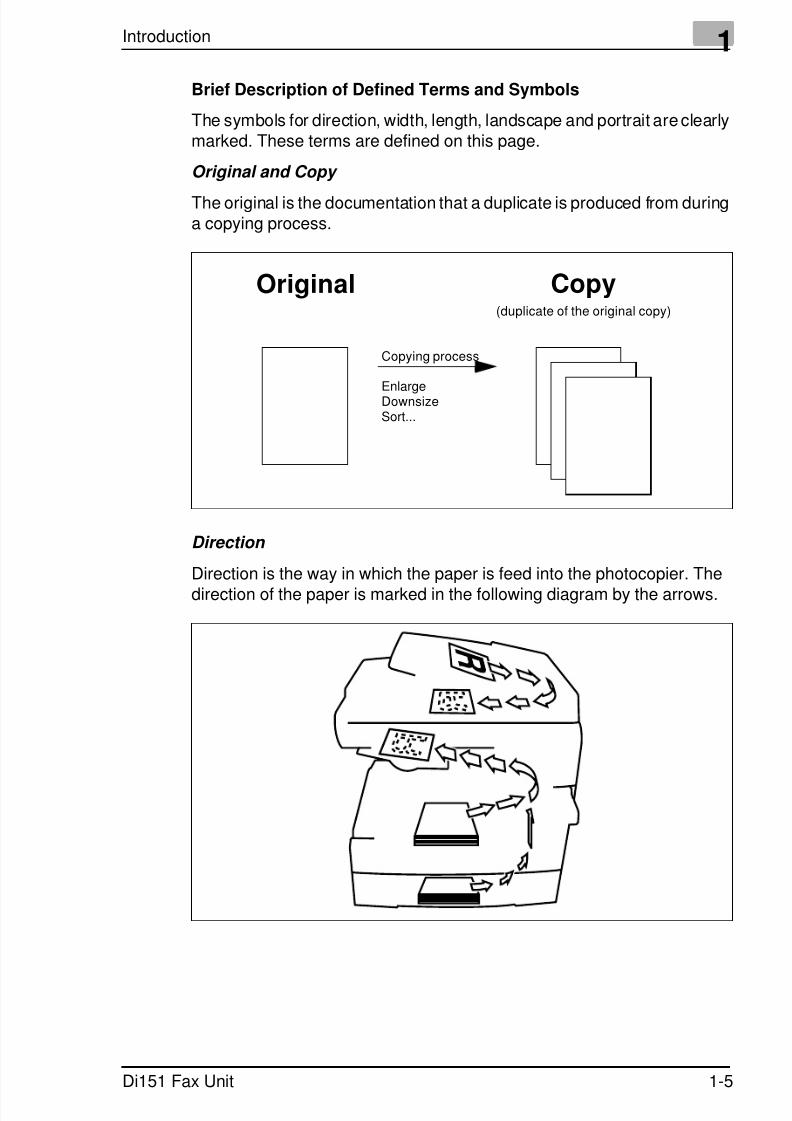
Brief Description of Defined Terms and Symbols
The symbols for direction, width, length, landscape and portrait are clearlymarked. These terms are defined on this page.
Original and Copy
The original is the documentation that a duplicate is produced from duringa copying process.
Direction
Direction is the way in which the paper is feed into the photocopier. The
direction of the paper is marked in the following diagram by the arrows.
Original Copy(duplicate of the original copy)
Copying process
EnlargeDownsizeSort...
7/18/2019 Di151f_gb Users Manual Fax Unit.pdf
http://slidepdf.com/reader/full/di151fgb-users-manual-fax-unitpdf 14/170
1 Introduction
1-6 Di151 Fax Unit
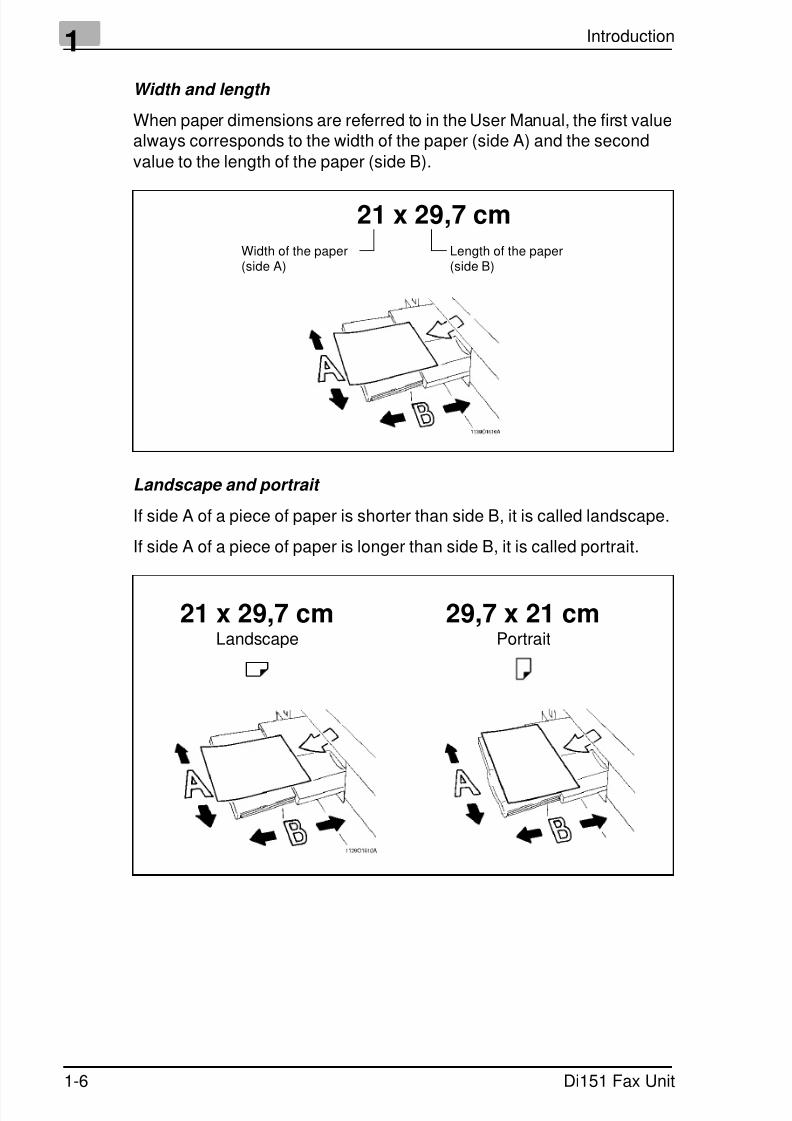
Width and length
When paper dimensions are referred to in the User Manual, the first valuealways corresponds to the width of the paper (side A) and the second
value to the length of the paper (side B).
Landscape and portrait
If side A of a piece of paper is shorter than side B, it is called landscape.
If side A of a piece of paper is longer than side B, it is called portrait.
21 x 29,7 cmWidth of the paper(side A)
Length of the paper(side B)
Landscape Portrait
21 x 29,7 cm 29,7 x 21 cm
7/18/2019 Di151f_gb Users Manual Fax Unit.pdf
http://slidepdf.com/reader/full/di151fgb-users-manual-fax-unitpdf 15/170
Introduction 1
Di151 Fax Unit 1-7
1.5 How Does a Fax Machine Work?
A fax machine can be connected to a normal telephone system withouttaking any special precautions, just like a normal telephone set. Thefunction of a fax machine is quite similar to that of a telephone.
The way a fax machine works is simple: Documents that are to betransmitted are at first scanned. The machine does not recognise theletters but reads the picture, dot by dot, and marks each dot as black orwhite. That is why you can not only transmit texts but also pictures andphotos. The information is then digitised and compressed so that the faxmachine can send it quickly over the telephone line to another faxmachine which reverses the process, reading and marking each dot asblack or white on a sheet of paper.
When you are "called" by a fax machine, your telephone rings as normal.
Therefore you cannot know whether your are receiving a fax call or atelephone call before picking up the receiver.
At the beginning of a fax transmission you will hear shrill sounds. Thosesounds are the so called "hand shaking" and function as an introductionsequence before the actual transmission, just as interlocutors - often -introduce themselves at the beginning of a telephone call. In theintroductory sequence the technical features of both machines arematched to make sure the transmission and the reception are conducted
to a high standard.
With your Di151f you do not need to listen to the introductory sequence.How to program the machine accordingly will be explained later in thismanual. Furthermore you will also find information about the settings that
come with the machine, that have to be made when installing, or thesettings that can be made at a later stage. Most of the features of the faxmachine work independently, so that you can program only the settingsyou need for the moment and ignore all others.
By the way, the word "fax" is a combination of the Latin "facere" (to make)and "simile" (similar) describing the process of making a copy which issimilar to the original. This artificial word "fax" has nowadays becomewidely accepted in everyday language, replacing the older term facsimile.A copy is therefore to be made "similar" to the original. Fax machines arealso called facsimile machines.
Now, enjoy your new fax machine.
7/18/2019 Di151f_gb Users Manual Fax Unit.pdf
http://slidepdf.com/reader/full/di151fgb-users-manual-fax-unitpdf 16/170
1 Introduction
1-8 Di151 Fax Unit
1.6 Certificate for Machines with CE Marking
CTR 21 Approval
Annex II
The equipment has been approved in accordance with Council Decision98/482/EC for pan-European single terminal connection to the publicswitched telephone network (PSTN). However, due to differencesbetween the individual PSTNs provided in different countries, the approvaldoes not, by itself, give an unconditional assurance of successfuloperation on every PSTN network termination point.
In cases of problems, you should contact your equipment supplier in thefirst instance.

7/18/2019 Di151f_gb Users Manual Fax Unit.pdf
http://slidepdf.com/reader/full/di151fgb-users-manual-fax-unitpdf 17/170
Introduction 1
Di151 Fax Unit 1-9
1.7 Safety Precautions
Follow the safety advice to ensure safe operation of the machine.
Connect the machine only to a 200 - 240 V/ 50 Hz earthed power point.
Make sure the power is not turned off over night.
Always pull at the plug, never at the wire, when you want disconnectthe machine from the power supply. If possible, connect the machinedirectly to a wall outlet.
To facilitate communication always keep the machine switched on and
program the correct user data. Make sure to enter the correct usernames.
Do not unscrew any parts, if not specifically requested in this manual.If necessary contact your technical service.
Never open the machine while it is transmitting or printing.
Take care not to let humidity into the machine.
Make sure no objects fall into the machine.
If any problem occurs that can not be solved by the proceduresdescribed in this manual make sure you contact the technical service.
Follow the recommended maintenance procedures regularly.
Do not open any parts of the machine or switch it off when thephotocopier is in use.
Do not allow any magnetic objects near the photocopier.
Switch the photocopier off immediately and remove the socket if themachine becomes unusually hot or if smoke or an unusual smelloccurs.
Used cartridges may be taken back by the technical service station as a
part of the maintenance procedures.
Laser Safety
This fax machine contains a page printer which operates by means of a
laser. This fax machine contains a page printer which operates by meansof a laser. This machine does not impose any danger as long as it is usedaccording to the procedures described in this manual. The laser is limitedto the interior of the machine. The environment is protected from the laseremission by the covers of the machine.

7/18/2019 Di151f_gb Users Manual Fax Unit.pdf
http://slidepdf.com/reader/full/di151fgb-users-manual-fax-unitpdf 18/170
1 Introduction
1-10 Di151 Fax Unit
Internal Laser Radiation
Medium radiation: 1.03 (mW) wave length: 770-810 (nm)
The machine works with an invisible class IIIb laser. The printer head unitmust not be opened, cleaned or repaired by the user.
Ozone Release Warning
During printer operation, a small quantity of ozone is released. Thisamount is not large enough to harm anyone. However, be sure the roomwhere the fax machine is being used has adequate ventilation, especiallyif you are printing a high volume of material or if the fax machine is beingused continuously over a long period.

7/18/2019 Di151f_gb Users Manual Fax Unit.pdf
http://slidepdf.com/reader/full/di151fgb-users-manual-fax-unitpdf 19/170
Introduction 1
Di151 Fax Unit 1-11
1.8 Characteristics
Your new copier is a compact multi-functional device facilitating your workand reducing your fax communication times. The features of the unitinclude scanning of originals into the memory for delayed transmission,
allowing simultaneous reception of fax messages and vice versa.Type
A6 - A3 format
Up to 33.600 bps transmission speed
MH/MR/MMR/JBIG, ECM coding
Automatic document feeder up to 50 pages (A4)
Double-spaced LCD with 20 characters
64 level grey scale.
Copying functions
2 in 1 copying
Sort function.
Fax functions
Delayed transmission
Relay broadcast initiation
Multi tasking operation interface
Polling RX/TX Confidential reception/mailbox transmission.

7/18/2019 Di151f_gb Users Manual Fax Unit.pdf
http://slidepdf.com/reader/full/di151fgb-users-manual-fax-unitpdf 20/170
1 Introduction
1-12 Di151 Fax Unit

7/18/2019 Di151f_gb Users Manual Fax Unit.pdf
http://slidepdf.com/reader/full/di151fgb-users-manual-fax-unitpdf 21/170
Installation 2
Di151 Fax Unit 2-1
2 Installation
2.1 LocationPlease take into consideration the following recommendations.
Avoid direct exposure to sunlight and place the machine away fromheaters.
Avoid humid or dusty locations.
Place the machine on an even, non-vibrating surface.
Keep the machine away from magnetic fields (TV sets, radios).
Avoid locations close to ventilation openings, air conditioners and
heaters. The machines should be easily accessible from all sides.
Make sure no liquids can enter the machine.
Keep all covers closed when the machine is in standby, as this willprevent the transmission or receipt of documents. If any cover isopened no transmission or reception is possible.
If any cover is opened during sending or receiving the procedure isinterrupted. This could lead to incorrect document scanning and
printing. Ensure there is enough space (approx. 40 cm clearance around the
machine), for optimum operation and easy access.
Do not place any items which are heavier than 3 kg on the machine.
Location
The optimum environmental conditions for your copier are:
Temperatures between 10°C and 32°C(with a max. fluctuation of 10°C per hour).
Humidity level between 15% and 85%(with a max. fluctuation of 20% per hour).
Power Supply
The following tolerances apply:
Voltage fluctuation: ±10%.
Frequency fluctuation: ±0,3%.
7/18/2019 Di151f_gb Users Manual Fax Unit.pdf
http://slidepdf.com/reader/full/di151fgb-users-manual-fax-unitpdf 22/170
2 Installation
2-2 Di151 Fax Unit
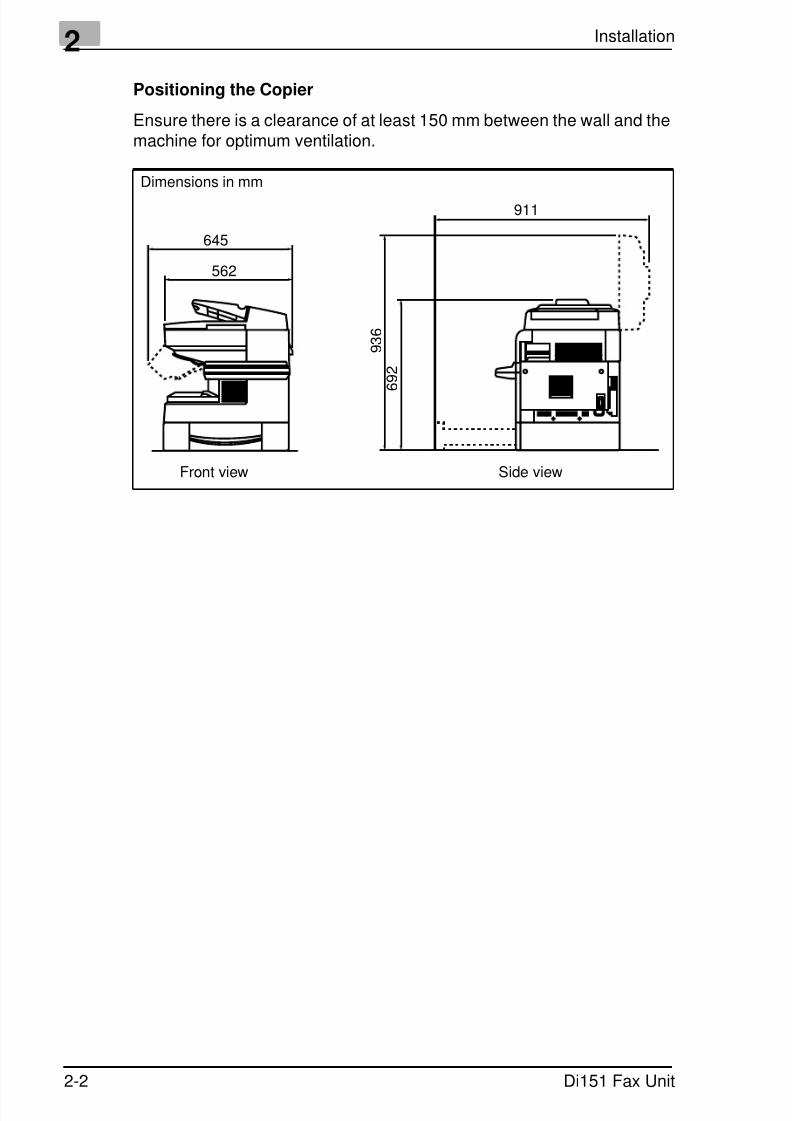
Positioning the Copier
Ensure there is a clearance of at least 150 mm between the wall and themachine for optimum ventilation.
Dimensions in mm
Front view Side view
645
562
911
6 9 2
9 3 6
7/18/2019 Di151f_gb Users Manual Fax Unit.pdf
http://slidepdf.com/reader/full/di151fgb-users-manual-fax-unitpdf 23/170
Installation 2
Di151 Fax Unit 2-3
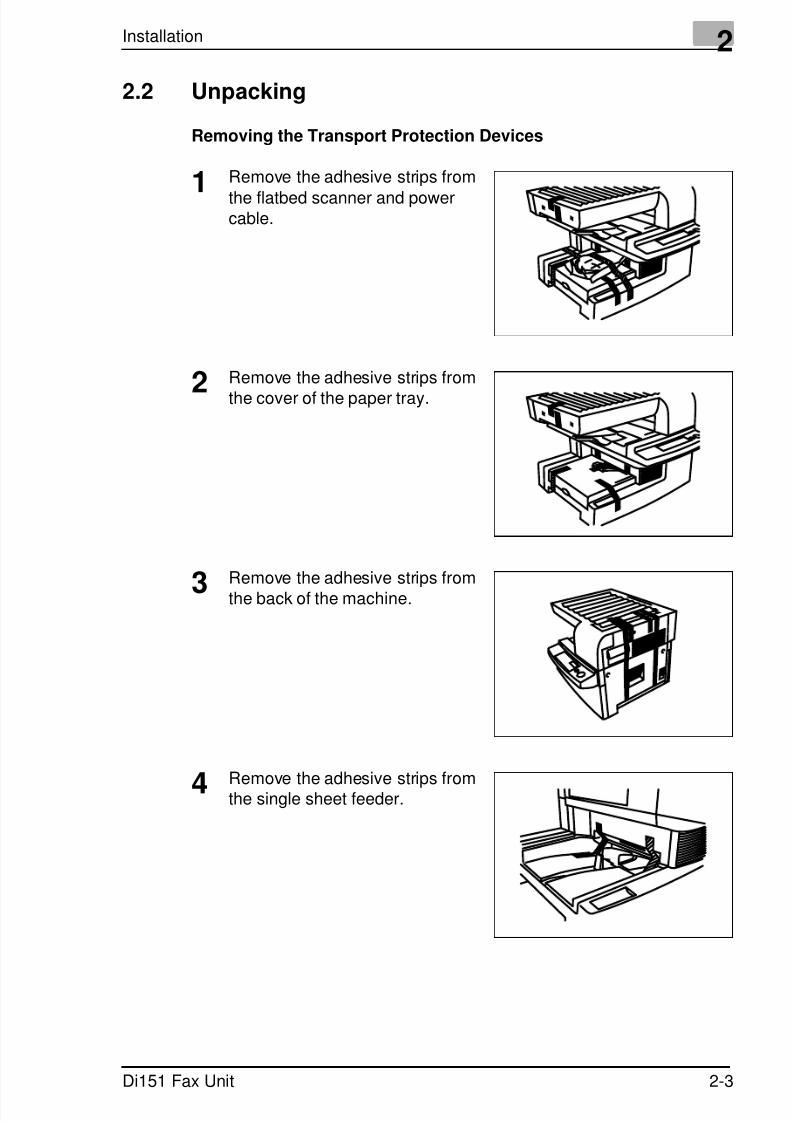
2.2 Unpacking
Removing the Transport Protection Devices
1 Remove the adhesive strips from
the flatbed scanner and powercable.
2 Remove the adhesive strips from
the cover of the paper tray.
3 Remove the adhesive strips from
the back of the machine.
4 Remove the adhesive strips fromthe single sheet feeder.
7/18/2019 Di151f_gb Users Manual Fax Unit.pdf
http://slidepdf.com/reader/full/di151fgb-users-manual-fax-unitpdf 24/170
2 Installation
2-4 Di151 Fax Unit
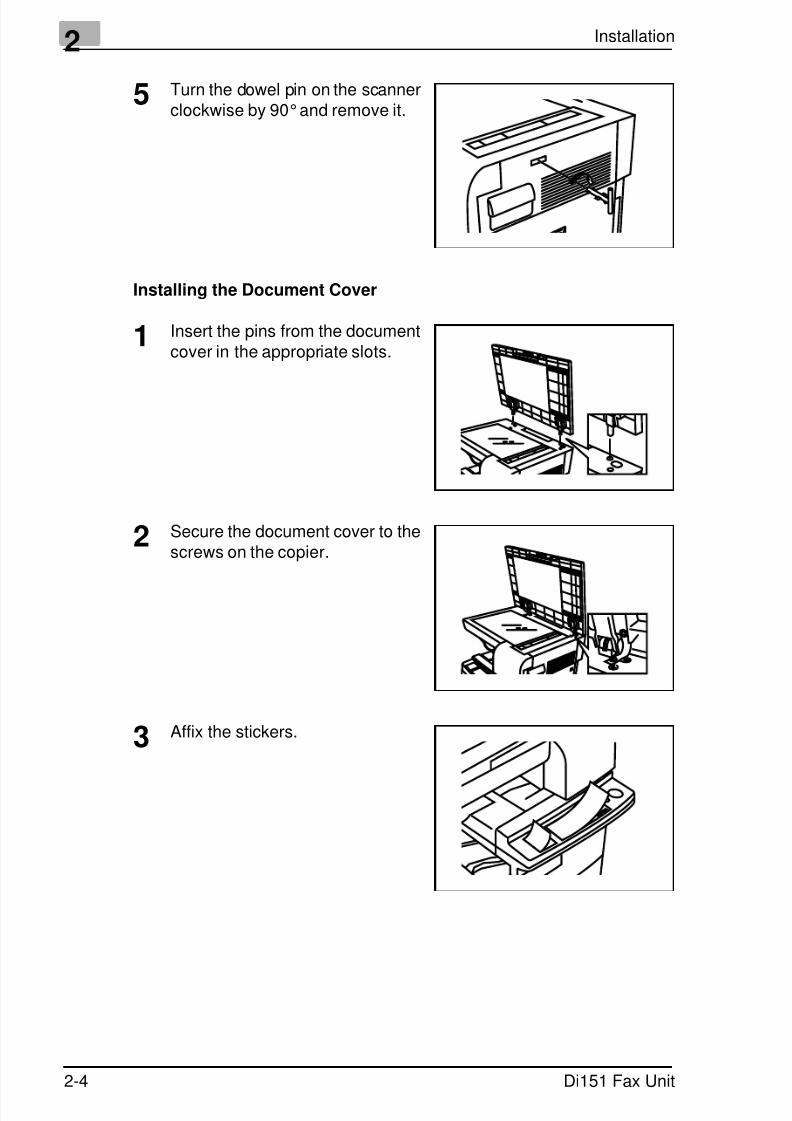
5 Turn the dowel pin on the scannerclockwise by 90°and remove it.
Installing the Document Cover
1 Insert the pins from the documentcover in the appropriate slots.
2 Secure the document cover to thescrews on the copier.
3 Affix the stickers.
7/18/2019 Di151f_gb Users Manual Fax Unit.pdf
http://slidepdf.com/reader/full/di151fgb-users-manual-fax-unitpdf 25/170
Installation 2
Di151 Fax Unit 2-5
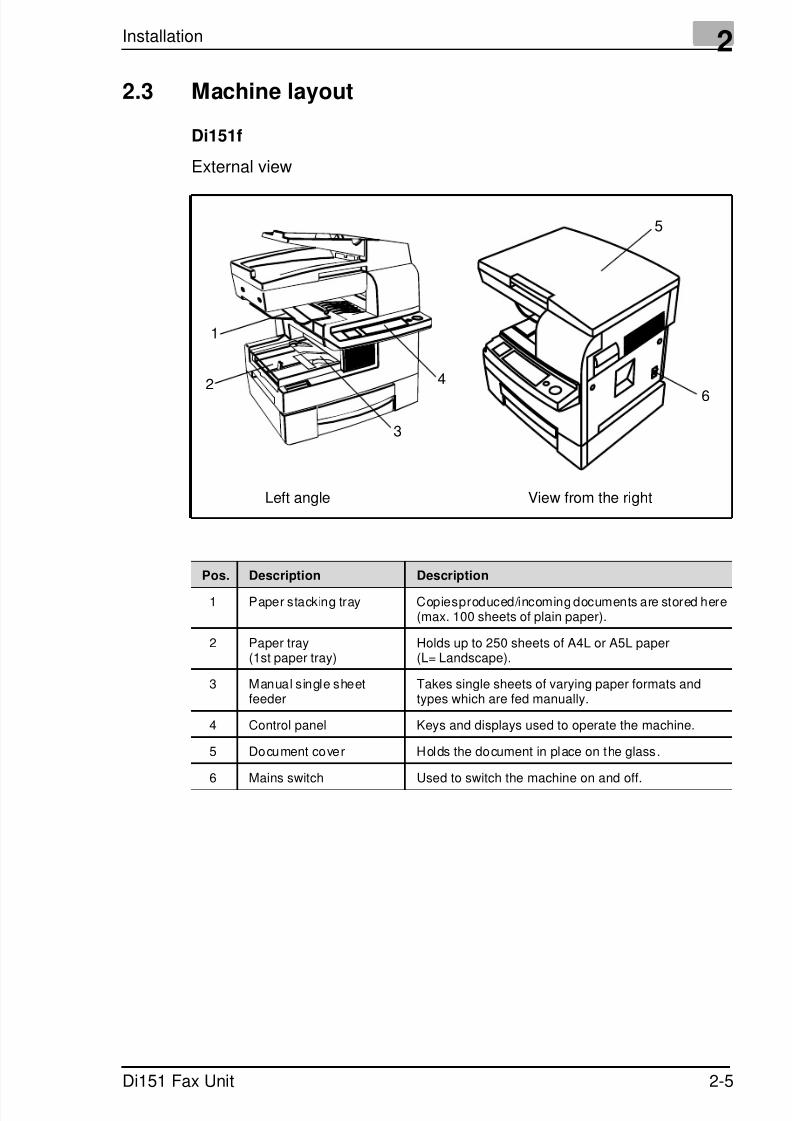
2.3 Machine layout
Di151f
External view
4
3
1
26
Left angle View from the right
5
Pos. Description Description
1 Paper stacking tray Copiesproduced/incoming documents are stored here(max. 100 sheets of plain paper).
2 Paper tray(1st paper tray)
Holds up to 250 sheets of A4L or A5L paper(L= Landscape).
3 Manual single sheetfeeder
Takes single sheets of varying paper formats andtypes which are fed manually.
4 Control panel Keys and displays used to operate the machine.
5 Document cover Holds the document in place on the glass.
6 Mains switch Used to switch the machine on and off.
7/18/2019 Di151f_gb Users Manual Fax Unit.pdf
http://slidepdf.com/reader/full/di151fgb-users-manual-fax-unitpdf 26/170
2 Installation
2-6 Di151 Fax Unit
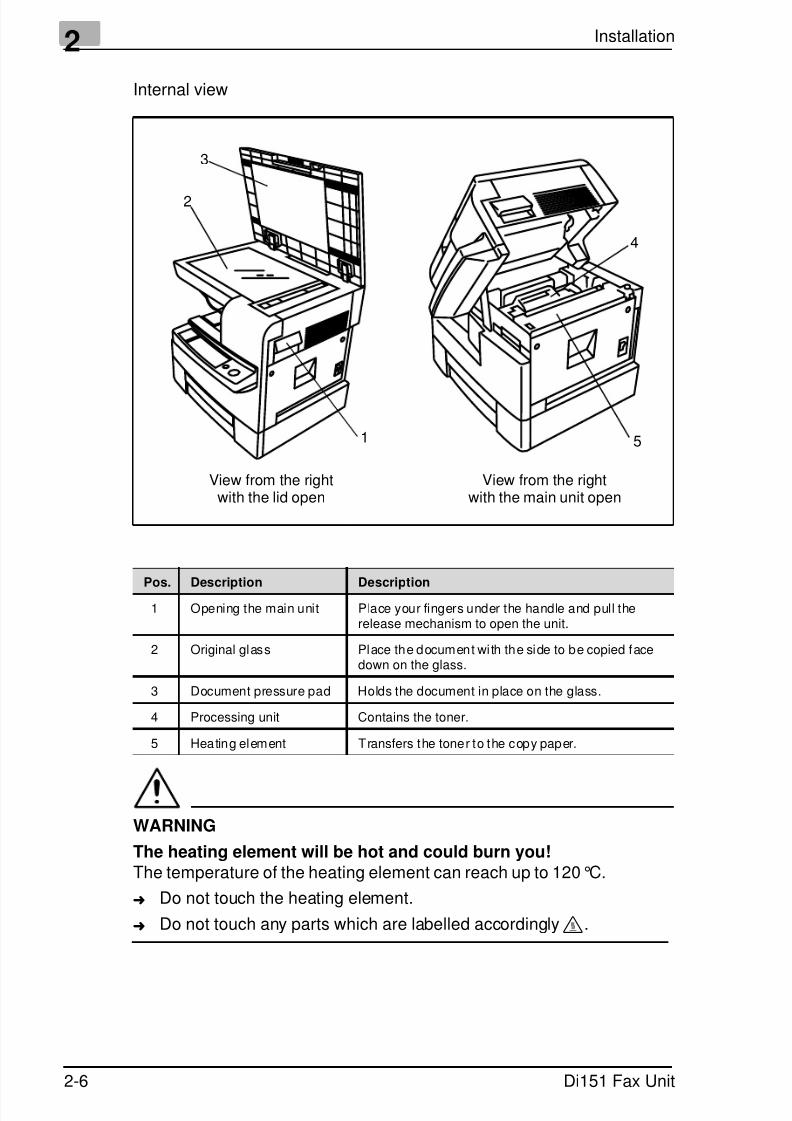
Internal view
WARNING
The heating element will be hot and could burn you!The temperature of the heating element can reach up to 120°C.
➜ Do not touch the heating element.
➜ Do not touch any parts which are labelled accordingly :.
View from the right View from the rightwith the main unit openwith the lid open
2
1
3
4
5
Pos. Description Description1 Opening the main unit Place your fingers under the handle and pull the
release mechanism to open the unit.
2 Original glass Place the document with the side to be copied facedown on the glass.
3 Document pressure pad Holds the document in place on the glass.
4 Processing unit Contains the toner.
5 Heating element Transfers the toner to the copy paper.
7/18/2019 Di151f_gb Users Manual Fax Unit.pdf
http://slidepdf.com/reader/full/di151fgb-users-manual-fax-unitpdf 27/170
Installation 2
Di151 Fax Unit 2-7
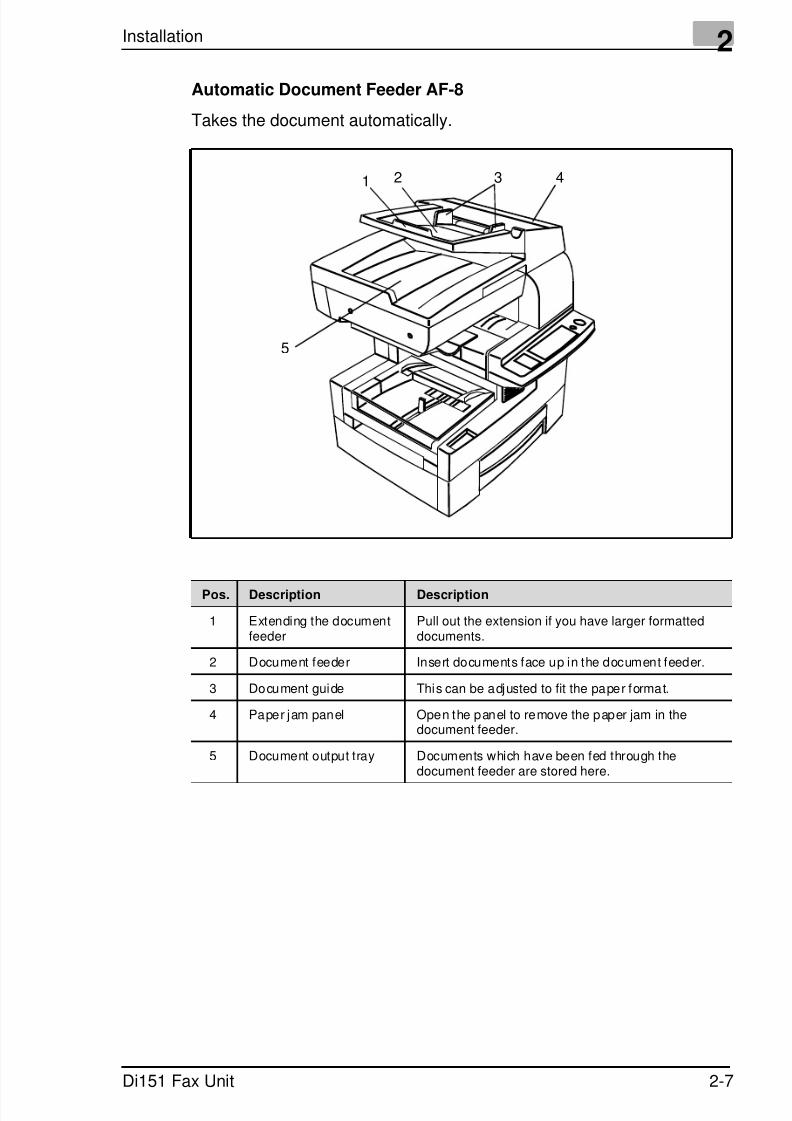
Automatic Document Feeder AF-8
Takes the document automatically.
321
5
4
Pos. Description Description
1 Extending the documentfeeder
Pull out the extension if you have larger formatteddocuments.
2 Document feeder Insert documents face up in the document feeder.
3 Document guide This can be adjusted to fit the paper format.
4 Paper jam panel Open the panel to remove the paper jam in thedocument feeder.
5 Document output tray Documents which have been fed through thedocument feeder are stored here.
7/18/2019 Di151f_gb Users Manual Fax Unit.pdf
http://slidepdf.com/reader/full/di151fgb-users-manual-fax-unitpdf 28/170
2 Installation
2-8 Di151 Fax Unit
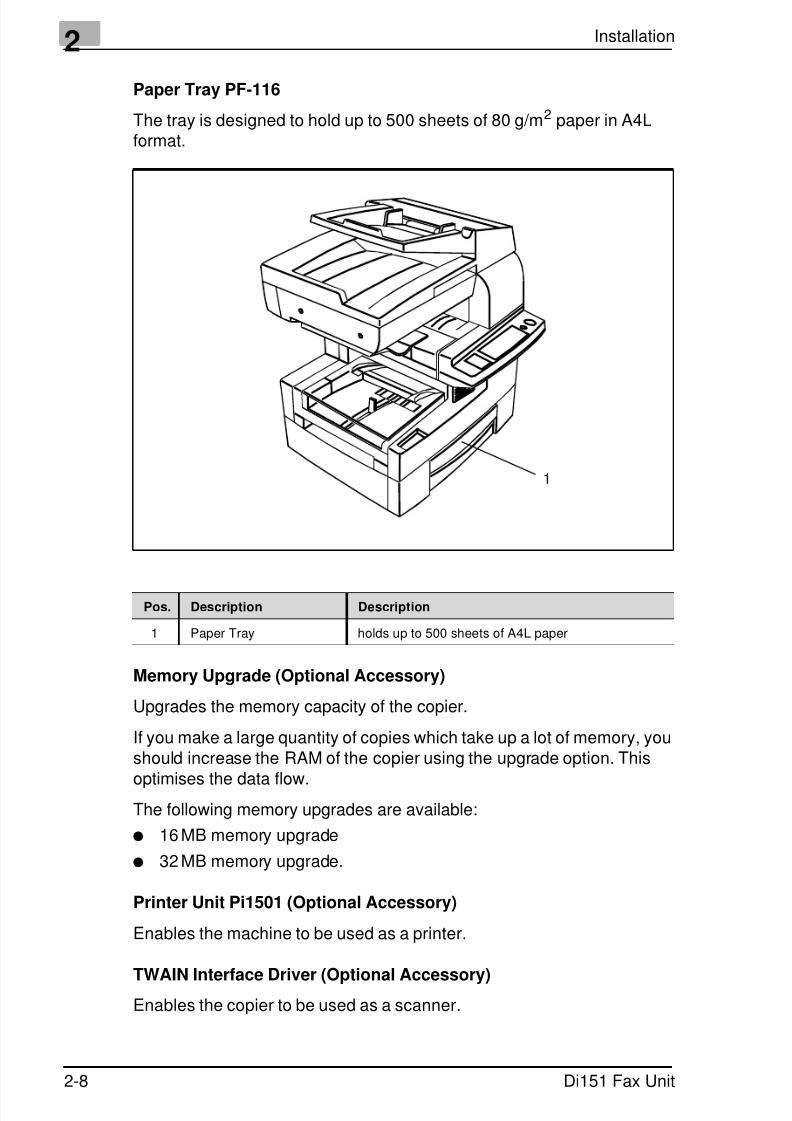
Paper Tray PF-116
The tray is designed to hold up to 500 sheets of 80 g/m2 paper in A4Lformat.
Memory Upgrade (Optional Accessory)
Upgrades the memory capacity of the copier.
If you make a large quantity of copies which take up a lot of memory, youshould increase the RAM of the copier using the upgrade option. This
optimises the data flow.The following memory upgrades are available:
16 MB memory upgrade
32 MB memory upgrade.
Printer Unit Pi1501 (Optional Accessory)
Enables the machine to be used as a printer.
TWAIN Interface Driver (Optional Accessory)Enables the copier to be used as a scanner.
1
Pos. Description Description
1 Paper Tray holds up to 500 sheets of A4L paper
7/18/2019 Di151f_gb Users Manual Fax Unit.pdf
http://slidepdf.com/reader/full/di151fgb-users-manual-fax-unitpdf 29/170
Installation 2
Di151 Fax Unit 2-9
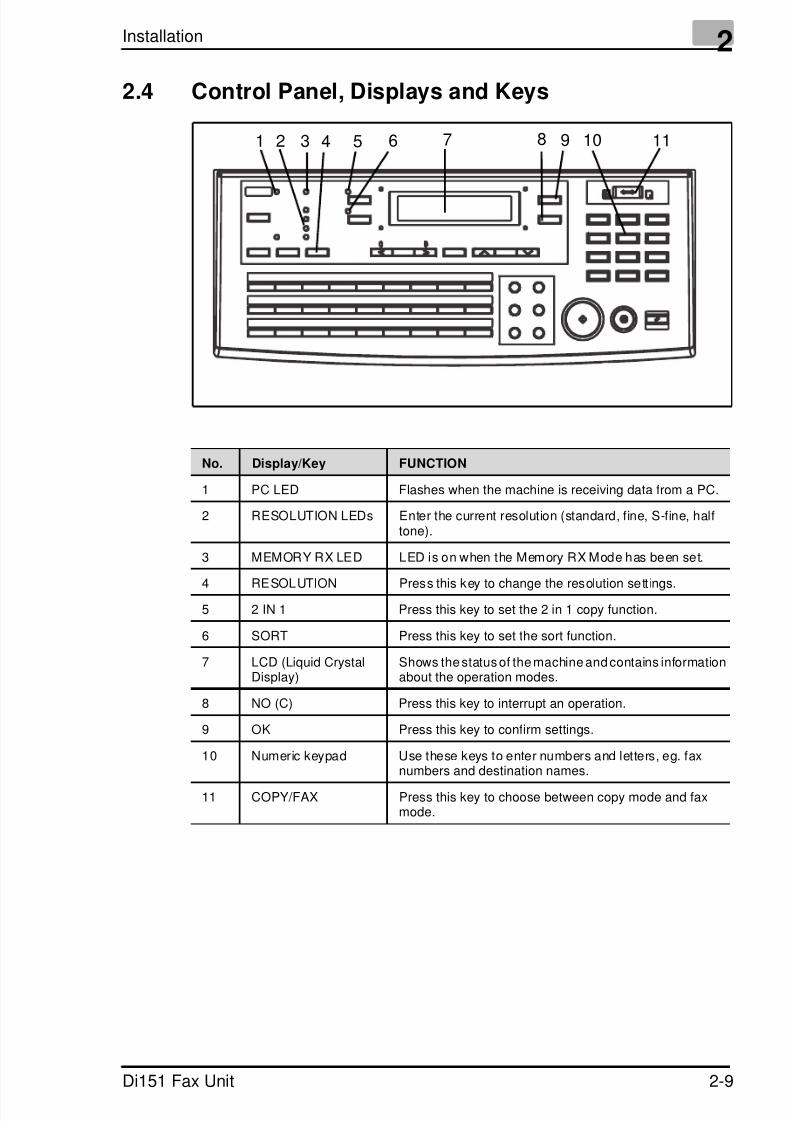
2.4 Control Panel, Displays and Keys
No. Display/Key FUNCTION
1 PC LED Flashes when the machine is receiving data from a PC.
2 RESOLUTION LEDs Enter the current resolution (standard, fine, S-fine, halftone).
3 MEMORY RX LED LED is on when the Memory RX Mode has been set.
4 RESOLUTION Press this key to change the resolution sett ings.5 2 IN 1 Press this key to set the 2 in 1 copy function.
6 SORT Press this key to set the sort function.
7 LCD (Liquid CrystalDisplay)
Shows the status of the machine and contains informationabout the operation modes.
8 NO (C) Press this key to interrupt an operation.
9 OK Press this key to confirm settings.
10 Numeric keypad Use these keys to enter numbers and letters, eg. faxnumbers and destination names.
11 COPY/FAX Press this key to choose between copy mode and faxmode.
1 2 3 4 5 6 10 118 97
7/18/2019 Di151f_gb Users Manual Fax Unit.pdf
http://slidepdf.com/reader/full/di151fgb-users-manual-fax-unitpdf 30/170
2 Installation
2-10 Di151 Fax Unit
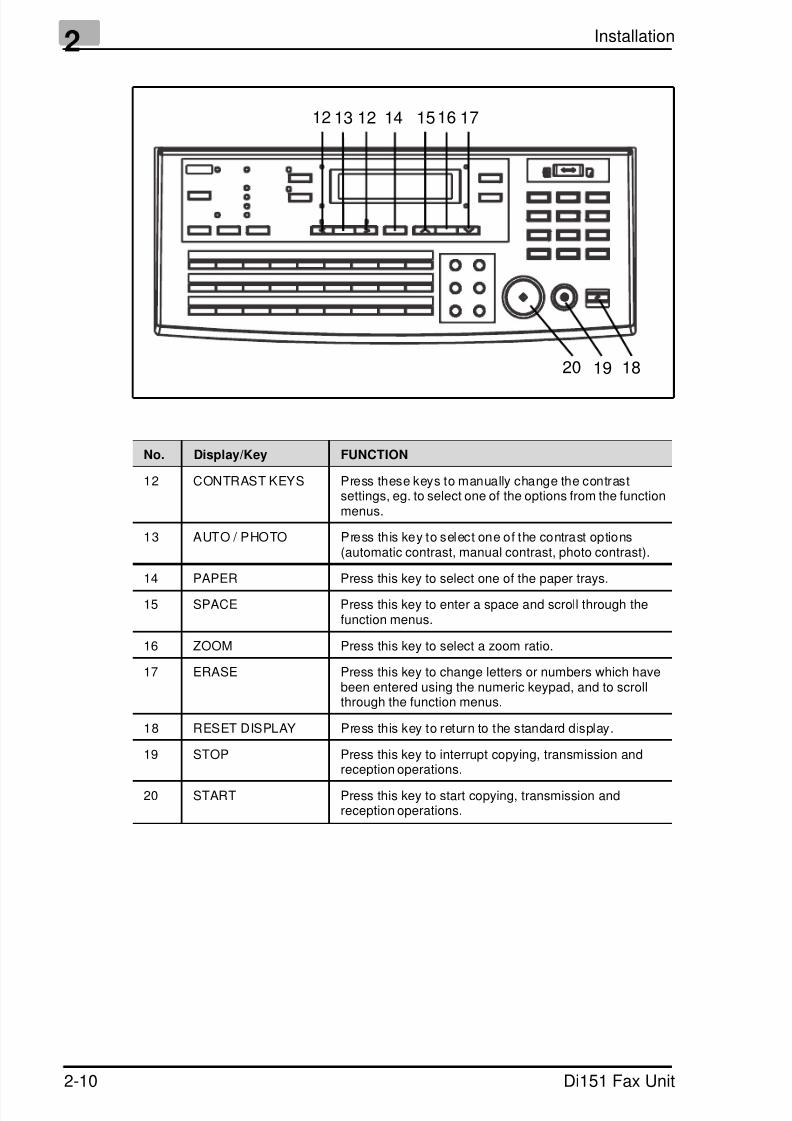
No. Display/Key FUNCTION
12 CONTRAST KEYS Press these keys to manually change the contrastsettings, eg. to select one of the options from the functionmenus.
13 AUTO / PHOTO Press this key to select one of the contrast options(automatic contrast, manual contrast, photo contrast).
14 PAPER Press this key to select one of the paper trays.
15 SPACE Press this key to enter a space and scroll through thefunction menus.
16 ZOOM Press this key to select a zoom ratio.
17 ERASE Press this key to change letters or numbers which havebeen entered using the numeric keypad, and to scrollthrough the function menus.
18 RESET DISPLAY Press this key to return to the standard display.
19 STOP Press this key to interrupt copying, transmission andreception operations.
20 START Press this key to start copying, transmission andreception operations.
1819
12 13 12 14 15 16 17
20

7/18/2019 Di151f_gb Users Manual Fax Unit.pdf
http://slidepdf.com/reader/full/di151fgb-users-manual-fax-unitpdf 31/170
Installation 2
Di151 Fax Unit 2-11
No. Display/Key FUNCTION
21 FUNCTION Press this key to open the menu.Select the requiredfunction using the numeric keys.
22 REDIAL/PAUSE Use this key to either redial or to generate a pause.
23 MANUAL DIAL Press this key to manually establish a connection, as youwould do with the telephone.
24 BOOK TX Press this key to transmit a book.
25 PHONE BOOK Press this key to search for a number stored in the phonebook.
26 SPEED DIAL Use this key to enter a two digit speed dial number.
27 ONE TOUCH Use this key to dial a stored number.You can also usethese keys to access various fax functions.
28 STORE Press this key to send documents stored in the memory.
29 CONFIRM Press this key to select the counter option and reportmenus.
30 UTILITY Press this key to access the settings menu.Select therequired function using the numeric keys.
31 ERROR LED This LED is on, if an error occurs.
2122232425262728293031

7/18/2019 Di151f_gb Users Manual Fax Unit.pdf
http://slidepdf.com/reader/full/di151fgb-users-manual-fax-unitpdf 32/170
2 Installation
2-12 Di151 Fax Unit
2.5 Processing Unit
This machine produces images and characters by applying the tonerthrough the drum cartridge onto the page to be printed.
The processing unit should be handled with care when installed or
replaced, to ensure proper performance at all times. Never expose thecartridge to direct sunlight or any other direct light. Store the cartridge inan environment that is not subject to extreme heat or humidity. Detailedinformation on the care and handling of the processing unit can be foundin the actual packaging and operating manual.
The cartridge should be replaced when "toner low" is displayed.
Please consult the regulations for disposal of such products in your area.
Used cartridges may be taken back by the technical service station as part
of the maintenance procedures.
✎
NoteTo avoid damage to the processing cartridge caused by light, cover it
with a cloth as soon as it is removed from the fax.
7/18/2019 Di151f_gb Users Manual Fax Unit.pdf
http://slidepdf.com/reader/full/di151fgb-users-manual-fax-unitpdf 33/170
Installation 2
Di151 Fax Unit 2-13
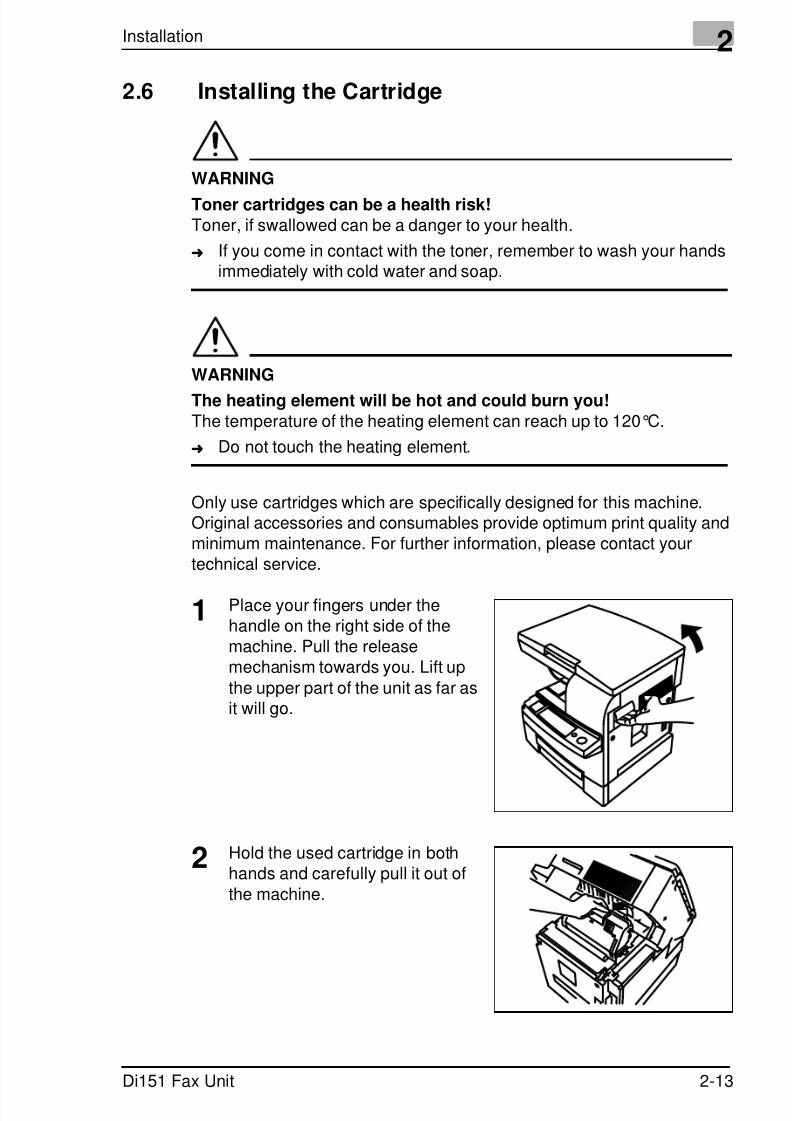
2.6 Installing the Cartridge
WARNING
Toner cartridges can be a health risk!Toner, if swallowed can be a danger to your health.
➜ If you come in contact with the toner, remember to wash your handsimmediately with cold water and soap.
WARNING
The heating element will be hot and could burn you!The temperature of the heating element can reach up to 120°C.
➜ Do not touch the heating element.
Only use cartridges which are specifically designed for this machine.Original accessories and consumables provide optimum print quality andminimum maintenance. For further information, please contact yourtechnical service.
1 Place your fingers under thehandle on the right side of themachine. Pull the releasemechanism towards you. Lift up
the upper part of the unit as far asit will go.
2 Hold the used cartridge in bothhands and carefully pull it out ofthe machine.
7/18/2019 Di151f_gb Users Manual Fax Unit.pdf
http://slidepdf.com/reader/full/di151fgb-users-manual-fax-unitpdf 34/170
2 Installation
2-14 Di151 Fax Unit
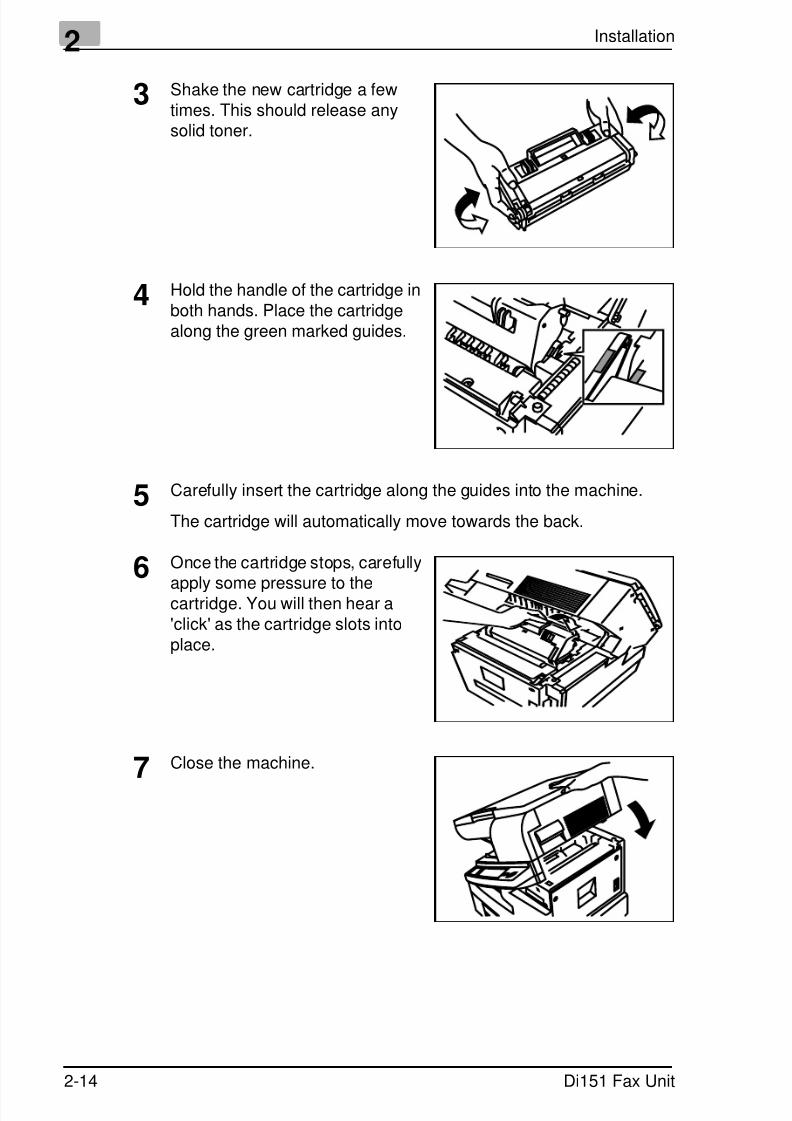
3 Shake the new cartridge a fewtimes. This should release anysolid toner.
4 Hold the handle of the cartridge inboth hands. Place the cartridgealong the green marked guides.
5 Carefully insert the cartridge along the guides into the machine.
The cartridge will automatically move towards the back.
6 Once the cartridge stops, carefully
apply some pressure to thecartridge. You will then hear a'click' as the cartridge slots intoplace.
7 Close the machine.

7/18/2019 Di151f_gb Users Manual Fax Unit.pdf
http://slidepdf.com/reader/full/di151fgb-users-manual-fax-unitpdf 35/170
Installation 2
Di151 Fax Unit 2-15
2.7 Adding Paper
250 Sheet Paper Tray
This paper tray will only take A4L or A5L paper. When filling the paper
tray, remember to remove any remaining paper as this may lead tomalfunctions.
1 Remove the transparent cover ofthe paper tray.
2 Pull the paper guides out as far asthey will go.
3 Add your paper and push it to theback of the tray.
4 Check that you have not exceeded
the maximum height (see markingon the side of the paper tray).

7/18/2019 Di151f_gb Users Manual Fax Unit.pdf
http://slidepdf.com/reader/full/di151fgb-users-manual-fax-unitpdf 36/170
2 Installation
2-16 Di151 Fax Unit
5 Push the paper guides until theytouch the paper.
6 Replace the transparent cover ofthe standard paper tray.

7/18/2019 Di151f_gb Users Manual Fax Unit.pdf
http://slidepdf.com/reader/full/di151fgb-users-manual-fax-unitpdf 37/170
Installation 2
Di151 Fax Unit 2-17
2nd Paper Tray — 500 Sheets
This paper tray will only take A4L paper.
1 Carefully pull the paper tray out asfar as it will go.
2 Press the paper lifting plate downuntil you hear a 'click'.
3 Add the paper. Ensure that the
corners of the stack of paper areunder both paper stoppers.
4 Check that you have not exceeded
the maximum height (see markingon the paper tray).
5 Close the paper tray.
7/18/2019 Di151f_gb Users Manual Fax Unit.pdf
http://slidepdf.com/reader/full/di151fgb-users-manual-fax-unitpdf 38/170
2 Installation
2-18 Di151 Fax Unit
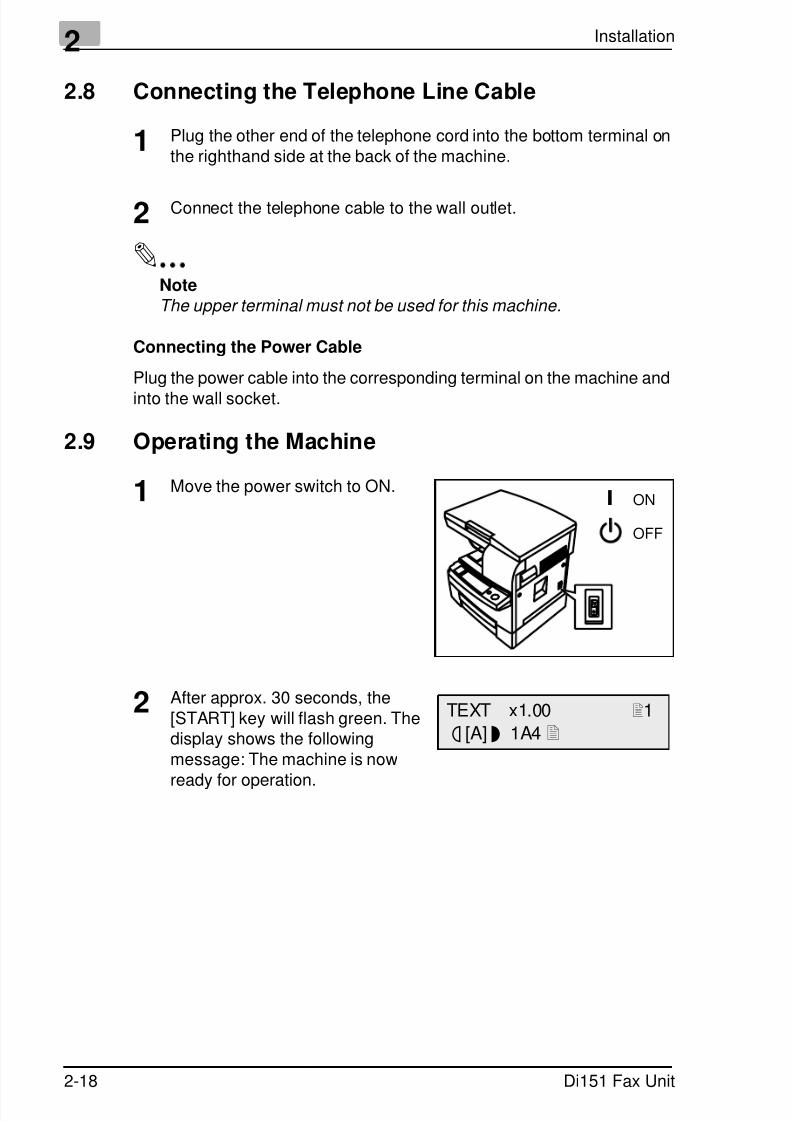
2.8 Connecting the Telephone Line Cable
1 Plug the other end of the telephone cord into the bottom terminal onthe righthand side at the back of the machine.
2 Connect the telephone cable to the wall outlet.
✎
NoteThe upper terminal must not be used for this machine.
Connecting the Power Cable
Plug the power cable into the corresponding terminal on the machine and
into the wall socket.
2.9 Operating the Machine
1 Move the power switch to ON.
2 After approx. 30 seconds, the[START] key will flash green. Thedisplay shows the followingmessage: The machine is now
ready for operation.
ON
OFF
TEXT x1.00 1
ä [A] ü 1A4

7/18/2019 Di151f_gb Users Manual Fax Unit.pdf
http://slidepdf.com/reader/full/di151fgb-users-manual-fax-unitpdf 39/170
Entering data 3
Di151 Fax Unit 3-1
3 Entering data
3.1 PreparationBefore you can operate all the functions on your fax machine, you mustenter several settings. This chapter explains how to set your name, yourline type and the remote locations with which you may wish tocommunicate.
You can cancel the setting at any time by pressing [NO] or [RESET]. Thesetting will then not be saved. If you do not press any key within 30seconds your fax machine will return to standby mode.
3.2 Typing Conventions in this ManualIf nothing else is requested, all keys are to be pressed one after the other.This is also the case if they are connected by a "to facilitate thelayout."Press [0] + [5] + [YES]" means: Press the numeric key [0], then thenumeric key [5] and then the key labelled [YES].
3.3 Enter text
You can use the one-touch keys to enter characters. To enter special
characters, follow the instructions given in the table below. Press [YES] tosave the relevant setting. To add a space, press [SPACE]. If you havemade a mistake, press the [DELETE] key to correct the mistake. Press theright or left arrow key (AUTO/PHOTO) to move the cursor whilst enteringletters and special characters.
7/18/2019 Di151f_gb Users Manual Fax Unit.pdf
http://slidepdf.com/reader/full/di151fgb-users-manual-fax-unitpdf 40/170
3 Entering data
3-2 Di151 Fax Unit
Special Characters
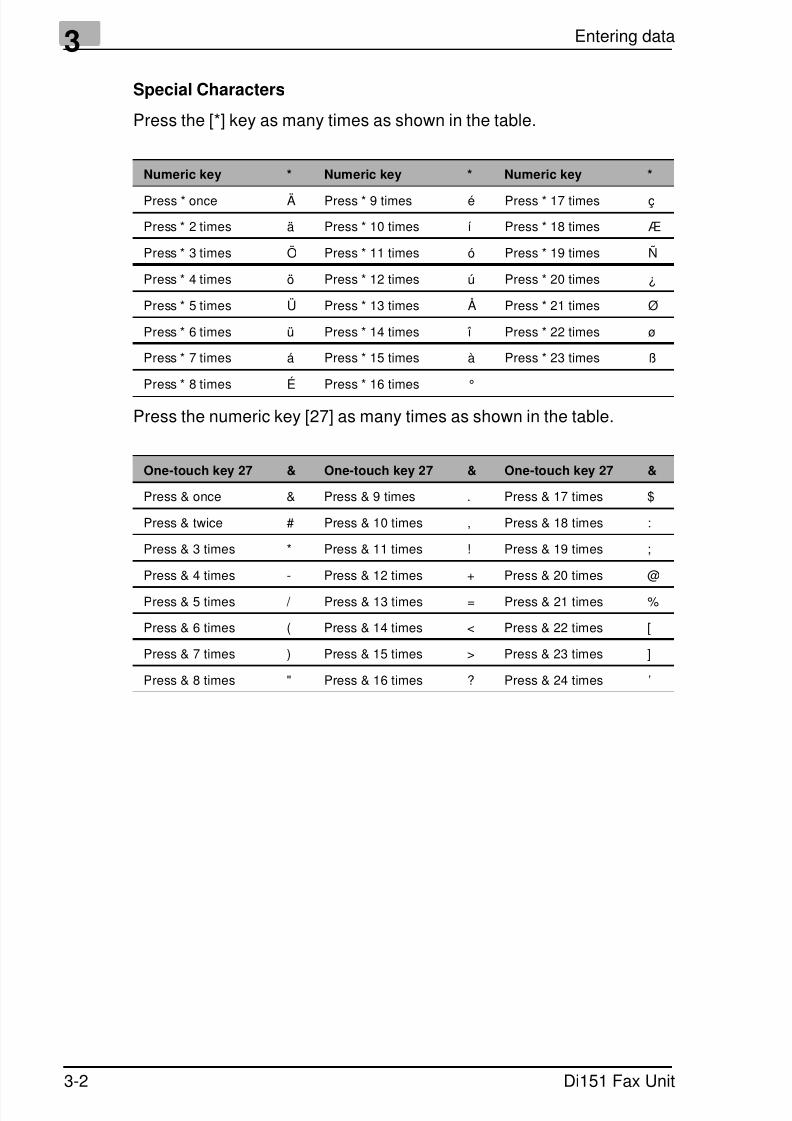
Press the [*] key as many times as shown in the table.
Press the numeric key [27] as many times as shown in the table.
Numeric key * Numeric key * Numeric key *
Press * once Ä Press * 9 times é Press * 17 times ç
Press * 2 times ä Press * 10 times í Press * 18 times Æ
Press * 3 times Ö Press * 11 times ó Press * 19 times Ñ
Press * 4 times ö Press * 12 times ú Press * 20 times ¿
Press * 5 times Ü Press * 13 times Å Press * 21 times Ø
Press * 6 times ü Press * 14 times î Press * 22 times ø
Press * 7 times á Press * 15 times à Press * 23 times ß
Press * 8 times É Press * 16 times °
One-touch key 27 & One-touch key 27 & One-touch key 27 &
Press & once & Press & 9 times . Press & 17 times $
Press & twice # Press & 10 times , Press & 18 times :
Press & 3 times * Press & 11 times ! Press & 19 times ;
Press & 4 times - Press & 12 times + Press & 20 times @
Press & 5 times / Press & 13 times = Press & 21 times %
Press & 6 times ( Press & 14 times < Press & 22 times [
Press & 7 times ) Press & 15 times > Press & 23 times ]
Press & 8 times " Press & 16 times ? Press & 24 times ’
7/18/2019 Di151f_gb Users Manual Fax Unit.pdf
http://slidepdf.com/reader/full/di151fgb-users-manual-fax-unitpdf 41/170
Entering data 3
Di151 Fax Unit 3-3
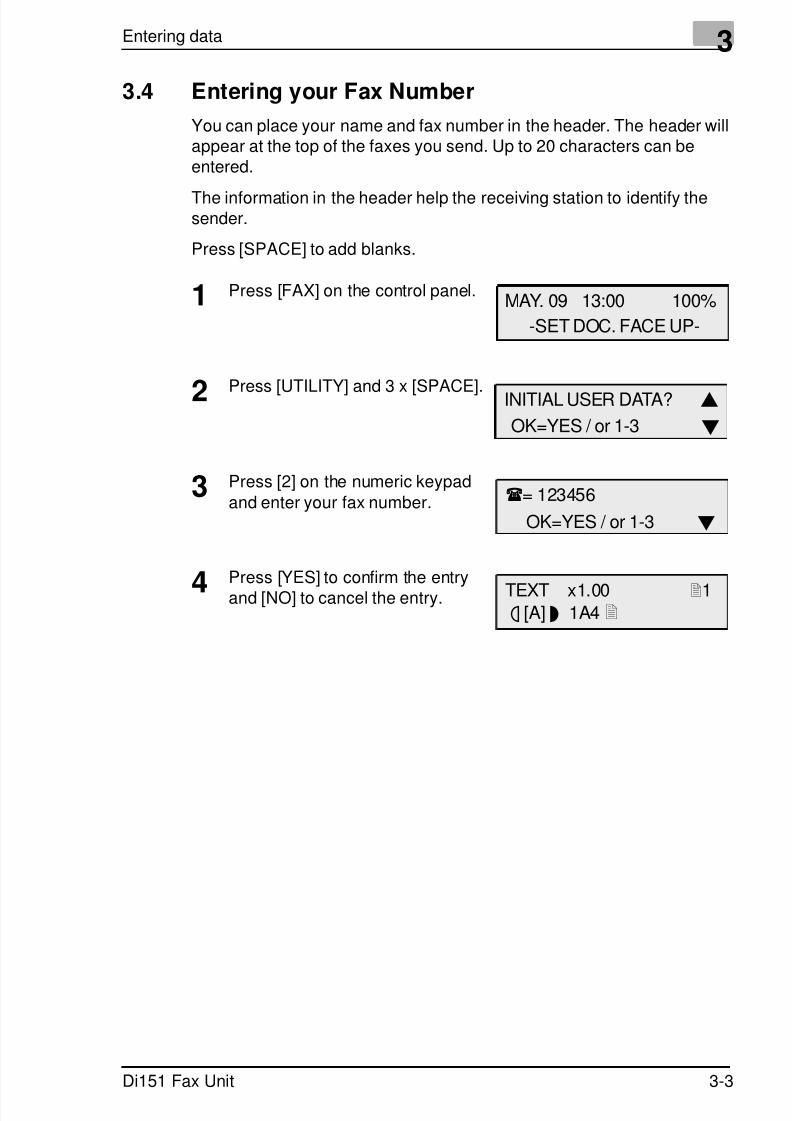
3.4 Entering your Fax Number
You can place your name and fax number in the header. The header willappear at the top of the faxes you send. Up to 20 characters can beentered.
The information in the header help the receiving station to identify thesender.
Press [SPACE] to add blanks.
1 Press [FAX] on the control panel.
2 Press [UTILITY] and 3 x [SPACE].
3 Press [2] on the numeric keypad
and enter your fax number.
4 Press [YES] to confirm the entry
and [NO] to cancel the entry.
MAY. 09 13:00 100%
-SET DOC. FACE UP-
INITIAL USER DATA?
OK=YES / or 1-3
= 123456
OK=YES / or 1-3
TEXT x1.00 1ä [A] ü 1A4

7/18/2019 Di151f_gb Users Manual Fax Unit.pdf
http://slidepdf.com/reader/full/di151fgb-users-manual-fax-unitpdf 42/170
3 Entering data
3-4 Di151 Fax Unit
3.5 Entering Your Company Name
You can either enter your company name, your name or both. Up to 32characters can be entered.
Refer to Section 3.3 for instructions on how to make the entries.
1 Press [FAX] on the control panel.
2 Press [UTILITY] and 7 x [SPACE].
3 Press [3] on the numeric keypadand enter your name.
4 Press [YES] to confirm the entryand [NO] to cancel the entry.
MAY. 09 13:00 100%
-SET DOC. FACE UP-
INITIAL USER DATA?
OK=YES / or 1-3
NAME=MINOLTA
OK=YES
TEXT x1.00 1
ä [A] ü 1A4

7/18/2019 Di151f_gb Users Manual Fax Unit.pdf
http://slidepdf.com/reader/full/di151fgb-users-manual-fax-unitpdf 43/170
Entering data 3
Di151 Fax Unit 3-5
3.6 Entering Date and Time
The date and time appear on the display, the activity report and the otherfax machine's printouts.
1 Press [FAX] on the control panel.
2 Press [UTILITY] and 7 x [SPACE].
3 Press [1] on the numeric keypad
and enter the time and date(YYMMDD).
4 Press [YES] to confirm the entryand [NO] to cancel the entry.
MAY. 09 13:00 100%-SET DOC. FACE UP-
INITIAL USER DATA?
OK=YES / or 1-3
14:46 '00 05 09SET TIME (OK=YES)
TEXT x1.00 1
ä [A] ü 1A4
7/18/2019 Di151f_gb Users Manual Fax Unit.pdf
http://slidepdf.com/reader/full/di151fgb-users-manual-fax-unitpdf 44/170
3 Entering data
3-6 Di151 Fax Unit
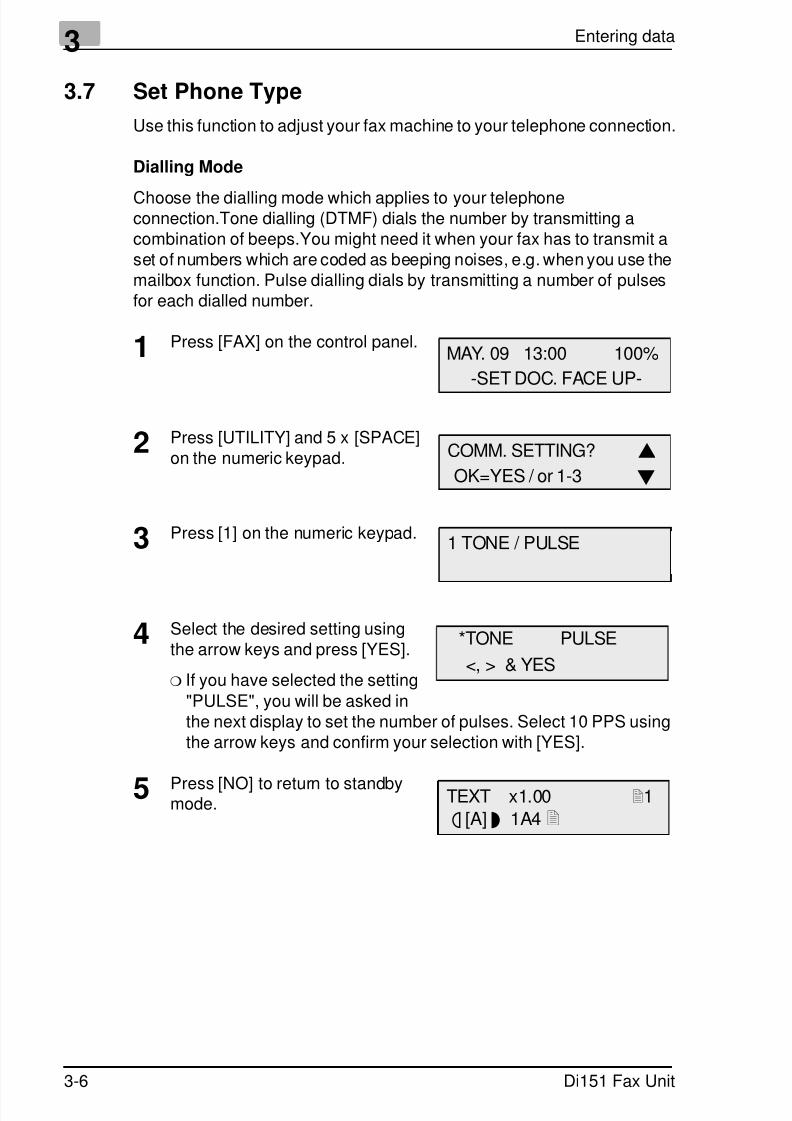
3.7 Set Phone Type
Use this function to adjust your fax machine to your telephone connection.
Dialling Mode
Choose the dialling mode which applies to your telephoneconnection.Tone dialling (DTMF) dials the number by transmitting acombination of beeps.You might need it when your fax has to transmit aset of numbers which are coded as beeping noises, e.g. when you use themailbox function. Pulse dialling dials by transmitting a number of pulsesfor each dialled number.
1 Press [FAX] on the control panel.
2 Press [UTILITY] and 5 x [SPACE]on the numeric keypad.
3 Press [1] on the numeric keypad.
4 Select the desired setting usingthe arrow keys and press [YES].
❍ If you have selected the setting
"PULSE", you will be asked inthe next display to set the number of pulses. Select 10 PPS usingthe arrow keys and confirm your selection with [YES].
5 Press [NO] to return to standbymode.
MAY. 09 13:00 100%
-SET DOC. FACE UP-
COMM. SETTING?
OK=YES / or 1-3
1 TONE / PULSE
*TONE PULSE
<, > & YES
TEXT x1.00 1
ä [A] ü 1A4
7/18/2019 Di151f_gb Users Manual Fax Unit.pdf
http://slidepdf.com/reader/full/di151fgb-users-manual-fax-unitpdf 45/170
Entering data 3
Di151 Fax Unit 3-7
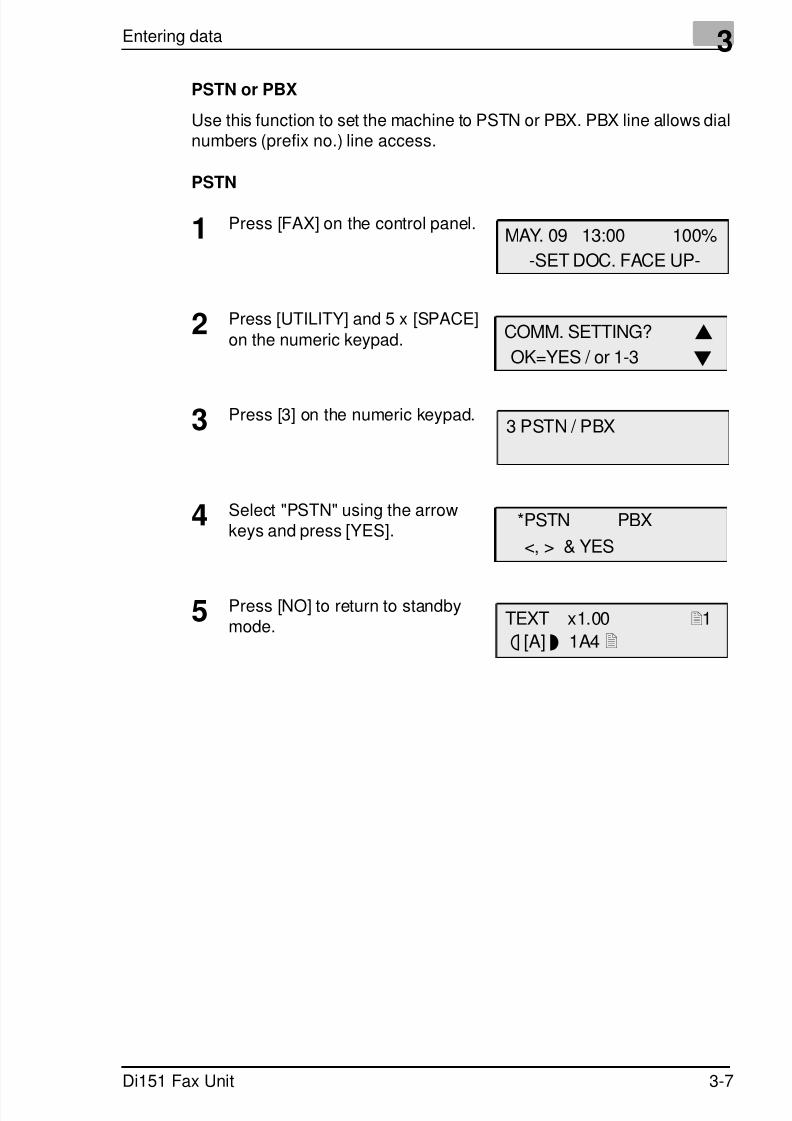
PSTN or PBX
Use this function to set the machine to PSTN or PBX. PBX line allows dialnumbers (prefix no.) line access.
PSTN
1 Press [FAX] on the control panel.
2 Press [UTILITY] and 5 x [SPACE]
on the numeric keypad.
3 Press [3] on the numeric keypad.
4 Select "PSTN" using the arrowkeys and press [YES].
5 Press [NO] to return to standbymode.
MAY. 09 13:00 100%
-SET DOC. FACE UP-
COMM. SETTING?
OK=YES / or 1-3
3 PSTN / PBX
*PSTN PBX
<, > & YES
TEXT x1.00 1
ä [A] ü 1A4
7/18/2019 Di151f_gb Users Manual Fax Unit.pdf
http://slidepdf.com/reader/full/di151fgb-users-manual-fax-unitpdf 46/170
3 Entering data
3-8 Di151 Fax Unit
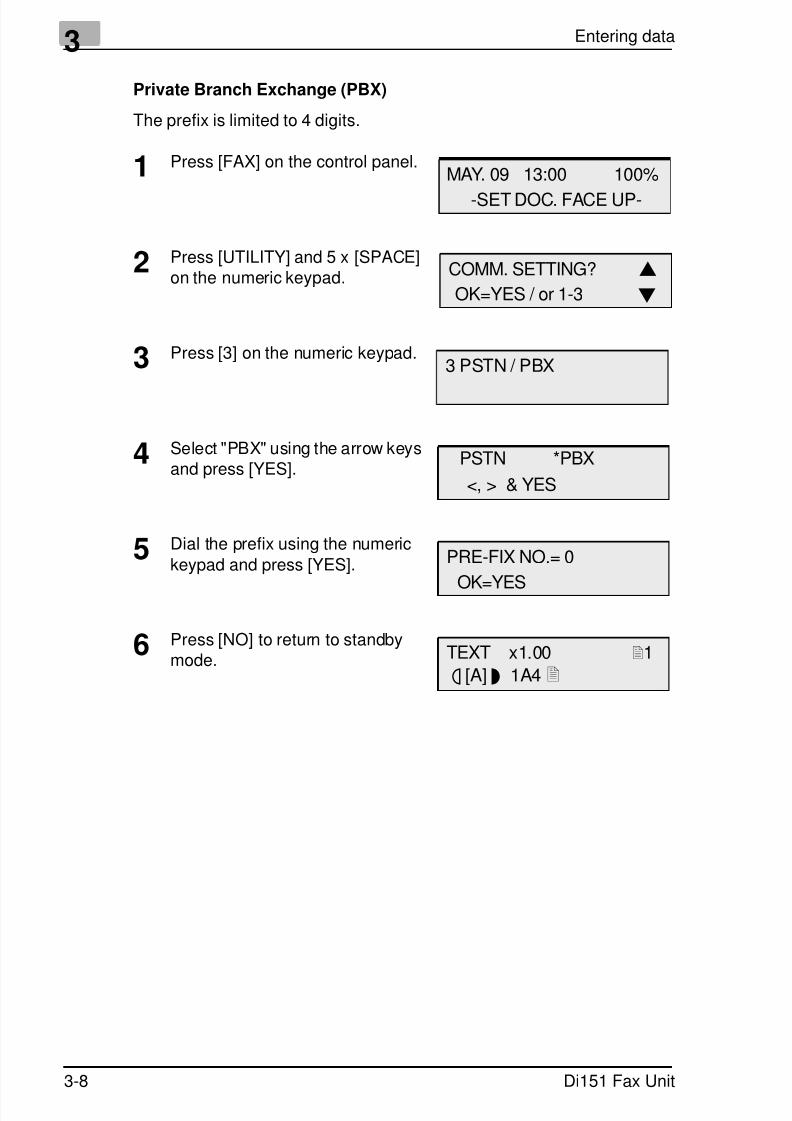
Private Branch Exchange (PBX)
The prefix is limited to 4 digits.
1 Press [FAX] on the control panel.
2 Press [UTILITY] and 5 x [SPACE]on the numeric keypad.
3 Press [3] on the numeric keypad.
4 Select "PBX" using the arrow keysand press [YES].
5 Dial the prefix using the numeric
keypad and press [YES].
6 Press [NO] to return to standbymode.
MAY. 09 13:00 100%
-SET DOC. FACE UP-
COMM. SETTING?
OK=YES / or 1-3
3 PSTN / PBX
PSTN *PBX
<, > & YES
PRE-FIX NO.= 0
OK=YES
TEXT x1.00 1
ä [A] ü 1A4

7/18/2019 Di151f_gb Users Manual Fax Unit.pdf
http://slidepdf.com/reader/full/di151fgb-users-manual-fax-unitpdf 47/170
Entering data 3
Di151 Fax Unit 3-9
3.8 Storing Numbers
Sub Addressing
When entering one-touch and speed dial numbers it is possible to enter a
sub-address. This enables you for instance to access sub-addressesdirectly from the server. The sub-address is limited to 20 digits.
Fax Server
If the TTI is9999then
56789
Norm
ID9999
12345
34567
56789
66112
12345
34567
56789
66112
With SUB
ID9999
SUB66112
Fax Server
If the TTI is
9999then
56789

7/18/2019 Di151f_gb Users Manual Fax Unit.pdf
http://slidepdf.com/reader/full/di151fgb-users-manual-fax-unitpdf 48/170
3 Entering data
3-10 Di151 Fax Unit
Entering One-Touch Numbers
Use this function to store your most frequently called fax numbers forinstant recall or to arrange call groups (for more information, refer to
"Entering Call Groups").
1 Press [FAX] on the control panel.
2 Press [UTILITY] and 2 x [SPACE].
3 Press [1] on the numeric keypadand then the required one-touchkey.
4 Use the numeric keypad to enterthe number and press [YES].
❍ Press [SPACE] to enter a sub-address.
5 Enter the name and press [YES].
6 Use the arrow keys to select therequired modem speed and press[YES].
7 Press the next one-touch key andcontinue repeating the processuntil all one-touch keys have been
entered.
8 Press [NO] twice to return tostandby mode.
MAY. 09 13:00 100%
-SET DOC. FACE UP-
DIAL REGISTRATION?
OK=YES / or 1-5
=_
=123456_
OK=YES (SUB=)
NAME=MINOLTA_
OK=YES
*33.6 14.4 9.6
<, > & YES
-SELECT REGIST. KEY-
(COMPLETE=NO)
TEXT x1.00 1
ä [A] ü 1A4

7/18/2019 Di151f_gb Users Manual Fax Unit.pdf
http://slidepdf.com/reader/full/di151fgb-users-manual-fax-unitpdf 49/170
Entering data 3
Di151 Fax Unit 3-11
Entering Speed Dial Numbers
Similar to the one-touch keys you can store fax numbers as speed dialnumbers. You dial a speed dial number by entering a two-digit identifier
code. Up to 100 speed dial numbers can be stored (00-99).
1 Press [FAX] on the control panel.
2 Press [UTILITY] and 2 x [SPACE].
3 Press [2] on the numeric keypad.
4 Enter the speed dial number'sidentifier code.
5 Use the numeric keypad to enterthe number and press [YES].
❍ Press [SPACE] to enter a sub-
address.
6 Enter the name and press [YES].
7 Use the arrow keys to select therequired modem speed and press[YES].
8 Continue repeating the processfrom step 4 until all speed dialnumbers have been entered.
9 Press [NO] twice to return to
standby mode.
MAY. 09 13:00 100%
-SET DOC. FACE UP-
DIAL REGISTRATION?
OK=YES / or 1-5
SPEED DIAL=_
SPEED DIAL= 01
=123456_
OK=YES (SUB=)
NAME=MINOLTA_
OK=YES
*33.6 14.4 9.6
<, > & YES
SPEED DIAL=_
TEXT x1.00 1ä [A] ü 1A4
7/18/2019 Di151f_gb Users Manual Fax Unit.pdf
http://slidepdf.com/reader/full/di151fgb-users-manual-fax-unitpdf 50/170
3 Entering data
3-12 Di151 Fax Unit
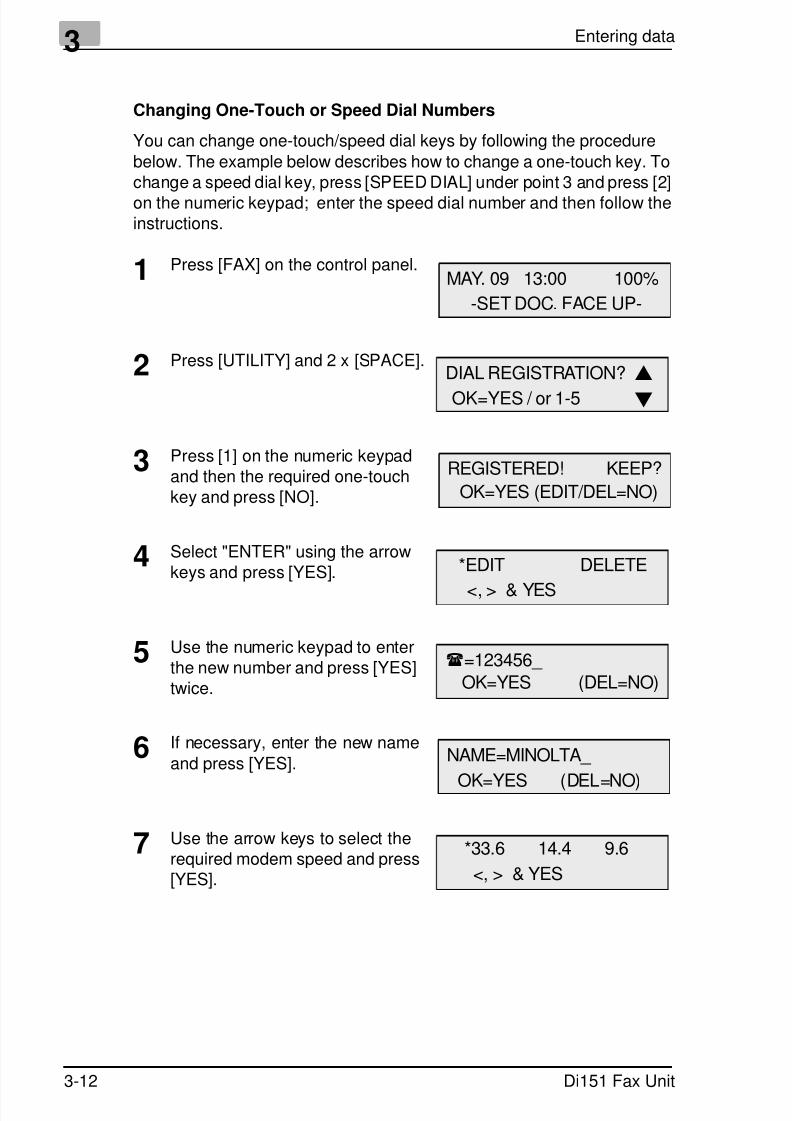
Changing One-Touch or Speed Dial Numbers
You can change one-touch/speed dial keys by following the procedure
below. The example below describes how to change a one-touch key. Tochange a speed dial key, press [SPEED DIAL] under point 3 and press [2]
on the numeric keypad; enter the speed dial number and then follow theinstructions.
1 Press [FAX] on the control panel.
2 Press [UTILITY] and 2 x [SPACE].
3 Press [1] on the numeric keypadand then the required one-touchkey and press [NO].
4 Select "ENTER" using the arrowkeys and press [YES].
5 Use the numeric keypad to enterthe new number and press [YES]twice.
6 If necessary, enter the new name
and press [YES].
7 Use the arrow keys to select therequired modem speed and press[YES].
MAY. 09 13:00 100%
-SET DOC. FACE UP-
DIAL REGISTRATION?
OK=YES / or 1-5
REGISTERED! KEEP?
OK=YES (EDIT/DEL=NO)
*EDIT DELETE
<, > & YES
=123456_
OK=YES (DEL=NO)
NAME=MINOLTA_
OK=YES (DEL=NO)
*33.6 14.4 9.6
<, > & YES
7/18/2019 Di151f_gb Users Manual Fax Unit.pdf
http://slidepdf.com/reader/full/di151fgb-users-manual-fax-unitpdf 51/170
Entering data 3
Di151 Fax Unit 3-13
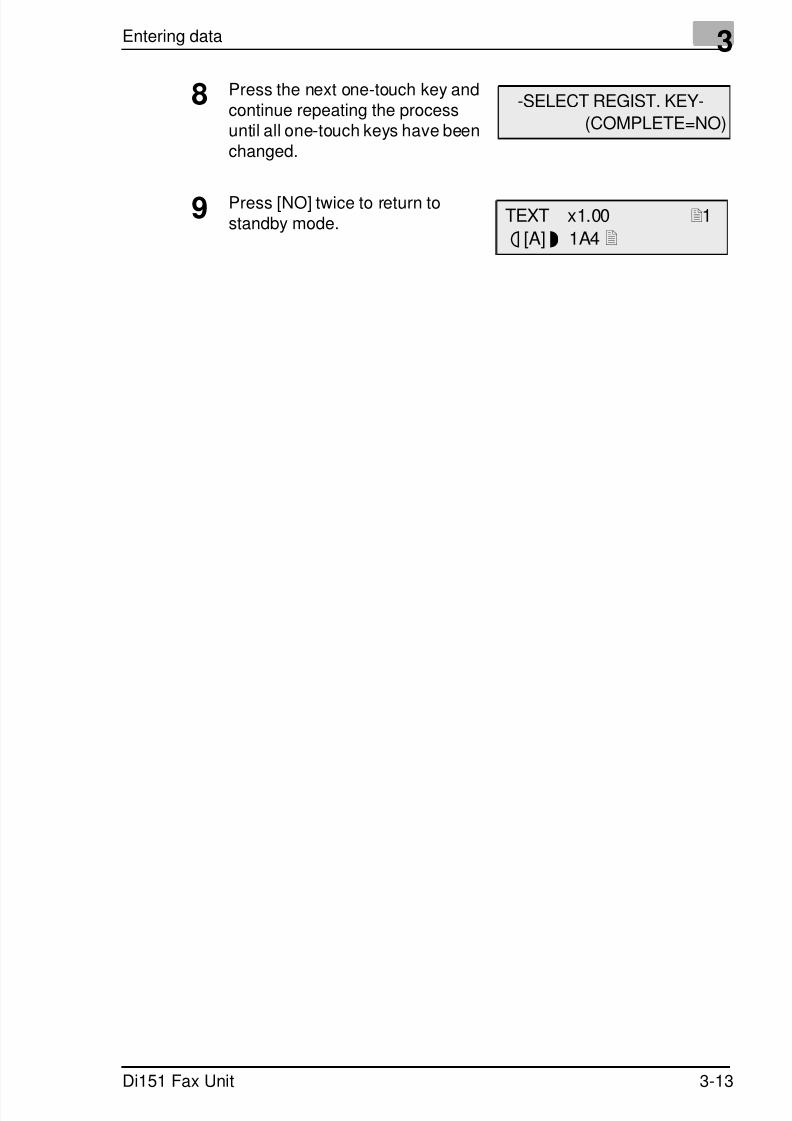
8 Press the next one-touch key andcontinue repeating the processuntil all one-touch keys have beenchanged.
9 Press [NO] twice to return tostandby mode.
-SELECT REGIST. KEY-
(COMPLETE=NO)
TEXT x1.00 1
ä [A] ü 1A4

7/18/2019 Di151f_gb Users Manual Fax Unit.pdf
http://slidepdf.com/reader/full/di151fgb-users-manual-fax-unitpdf 52/170
3 Entering data
3-14 Di151 Fax Unit
Erasing One-Touch- or Speed Dial Numbers
You can erase one-touch/speed dial keys by following the procedurebelow. The example below describes how to erase a one-touch key. To
change a speed dial key, press [SPEED DIAL] under point 3 and press [2]on the numeric keypad; enter the speed dial number and then follow the
instructions.
1 Press [FAX] on the control panel.
2 Press [UTILITY] and 2 x [SPACE].
3 Press [1] on the numeric keypadand then the required one-touchkey and press [NO].
4 Select "ENTER" using the arrow
keys and press [YES].
5 Press the next one-touch key andcontinue repeating the processuntil all one-touch keys have beendeleted.
6 Press [NO] twice to return tostandby mode.
MAY. 09 13:00 100%
-SET DOC. FACE UP-
DIAL REGISTRATION?
OK=YES / or 1-5
REGISTERED! KEEP?
OK=YES (EDIT/DEL=NO)
EDIT *DELETE
<, > & YES
-SELECT REGIST. KEY-
(COMPLETE=NO)
TEXT x1.00 1
ä [A] ü 1A4
7/18/2019 Di151f_gb Users Manual Fax Unit.pdf
http://slidepdf.com/reader/full/di151fgb-users-manual-fax-unitpdf 53/170
Entering data 3
Di151 Fax Unit 3-15
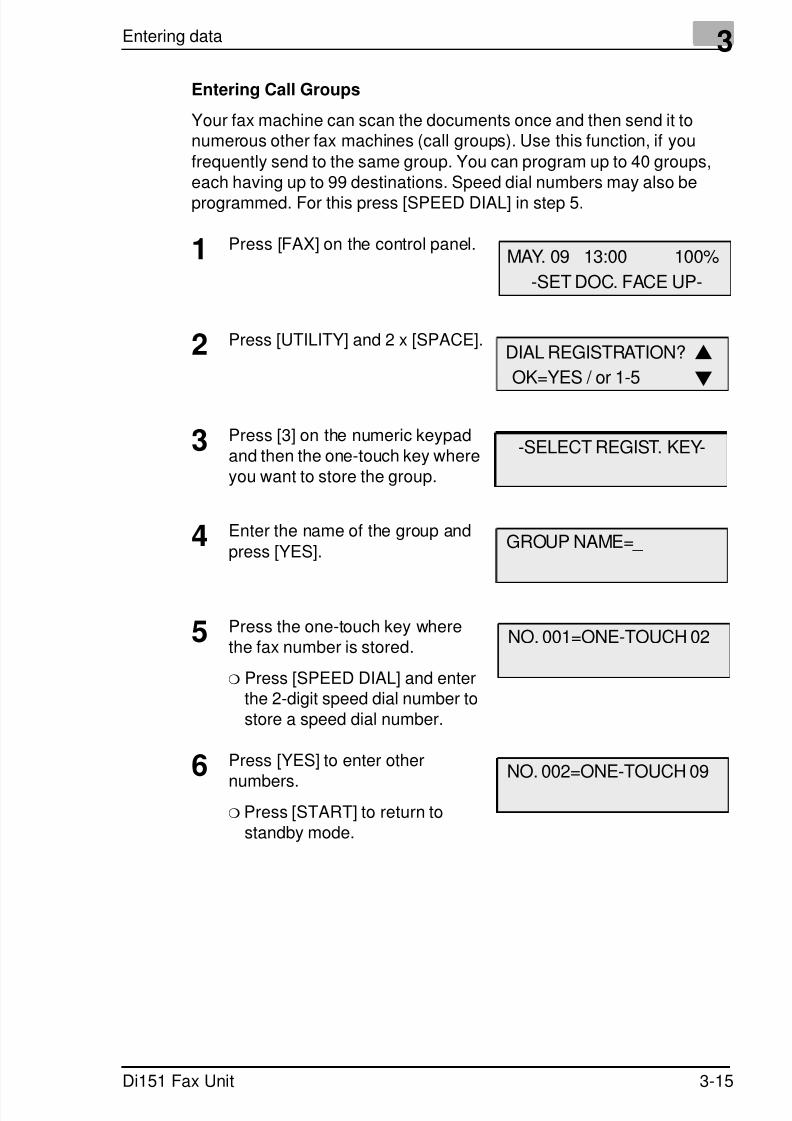
Entering Call Groups
Your fax machine can scan the documents once and then send it tonumerous other fax machines (call groups). Use this function, if you
frequently send to the same group. You can program up to 40 groups,each having up to 99 destinations. Speed dial numbers may also be
programmed. For this press [SPEED DIAL] in step 5.
1 Press [FAX] on the control panel.
2 Press [UTILITY] and 2 x [SPACE].
3 Press [3] on the numeric keypadand then the one-touch key whereyou want to store the group.
4 Enter the name of the group and
press [YES].
5 Press the one-touch key wherethe fax number is stored.
❍ Press [SPEED DIAL] and enterthe 2-digit speed dial number tostore a speed dial number.
6 Press [YES] to enter other
numbers.❍ Press [START] to return to
standby mode.
MAY. 09 13:00 100%
-SET DOC. FACE UP-
DIAL REGISTRATION?
OK=YES / or 1-5
-SELECT REGIST. KEY-
GROUP NAME=_
NO. 001=ONE-TOUCH 02
NO. 002=ONE-TOUCH 09

7/18/2019 Di151f_gb Users Manual Fax Unit.pdf
http://slidepdf.com/reader/full/di151fgb-users-manual-fax-unitpdf 54/170
3 Entering data
3-16 Di151 Fax Unit
7 Press [NO] twice to return to thestandard display.
✎
NoteFrom the call group menu, you can also store a sub-address or a
selective polling number.
TEXT x1.00 1
ä [A] ü 1A4
7/18/2019 Di151f_gb Users Manual Fax Unit.pdf
http://slidepdf.com/reader/full/di151fgb-users-manual-fax-unitpdf 55/170
Entering data 3
Di151 Fax Unit 3-17
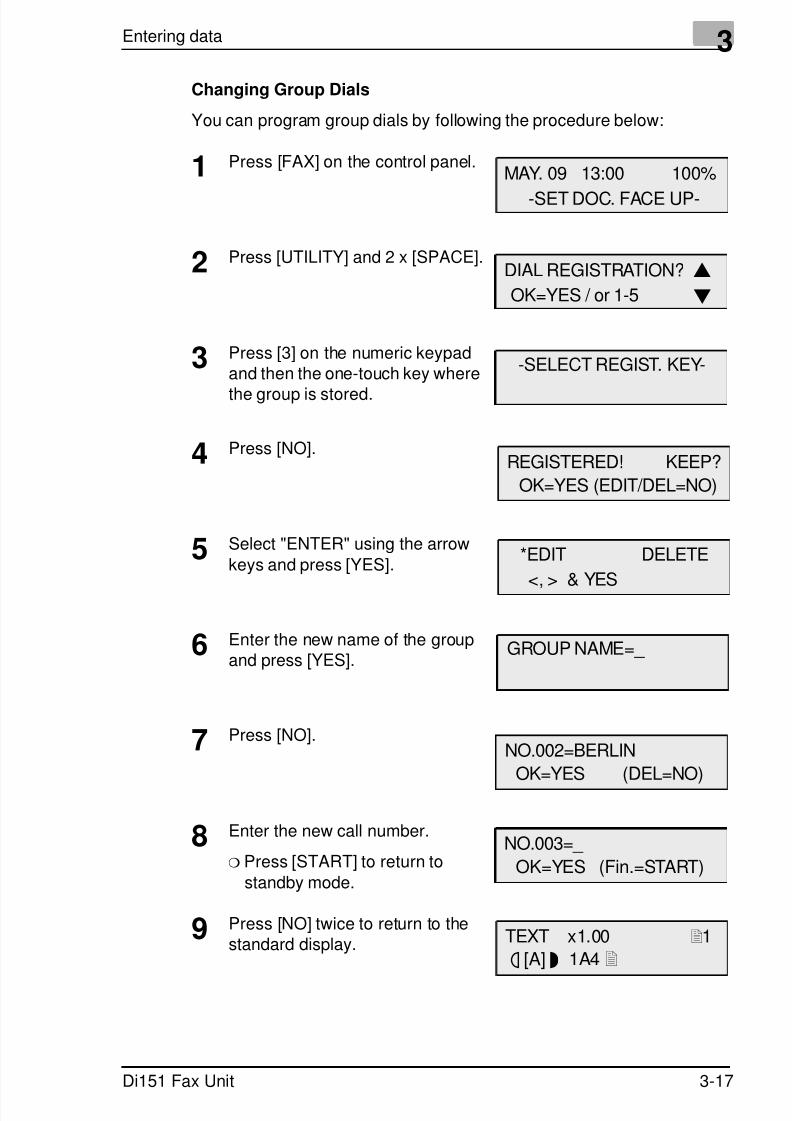
Changing Group Dials
You can program group dials by following the procedure below:
1 Press [FAX] on the control panel.
2 Press [UTILITY] and 2 x [SPACE].
3 Press [3] on the numeric keypadand then the one-touch key where
the group is stored.
4 Press [NO].
5 Select "ENTER" using the arrow
keys and press [YES].
6 Enter the new name of the groupand press [YES].
7 Press [NO].
8 Enter the new call number.
❍ Press [START] to return to
standby mode.
9 Press [NO] twice to return to thestandard display.
MAY. 09 13:00 100%
-SET DOC. FACE UP-
DIAL REGISTRATION?
OK=YES / or 1-5
-SELECT REGIST. KEY-
REGISTERED! KEEP?
OK=YES (EDIT/DEL=NO)
*EDIT DELETE
<, > & YES
GROUP NAME=_
NO.002=BERLIN
OK=YES (DEL=NO)
NO.003=_
OK=YES (Fin.=START)
TEXT x1.00 1
ä [A] ü 1A4
7/18/2019 Di151f_gb Users Manual Fax Unit.pdf
http://slidepdf.com/reader/full/di151fgb-users-manual-fax-unitpdf 56/170
3 Entering data
3-18 Di151 Fax Unit
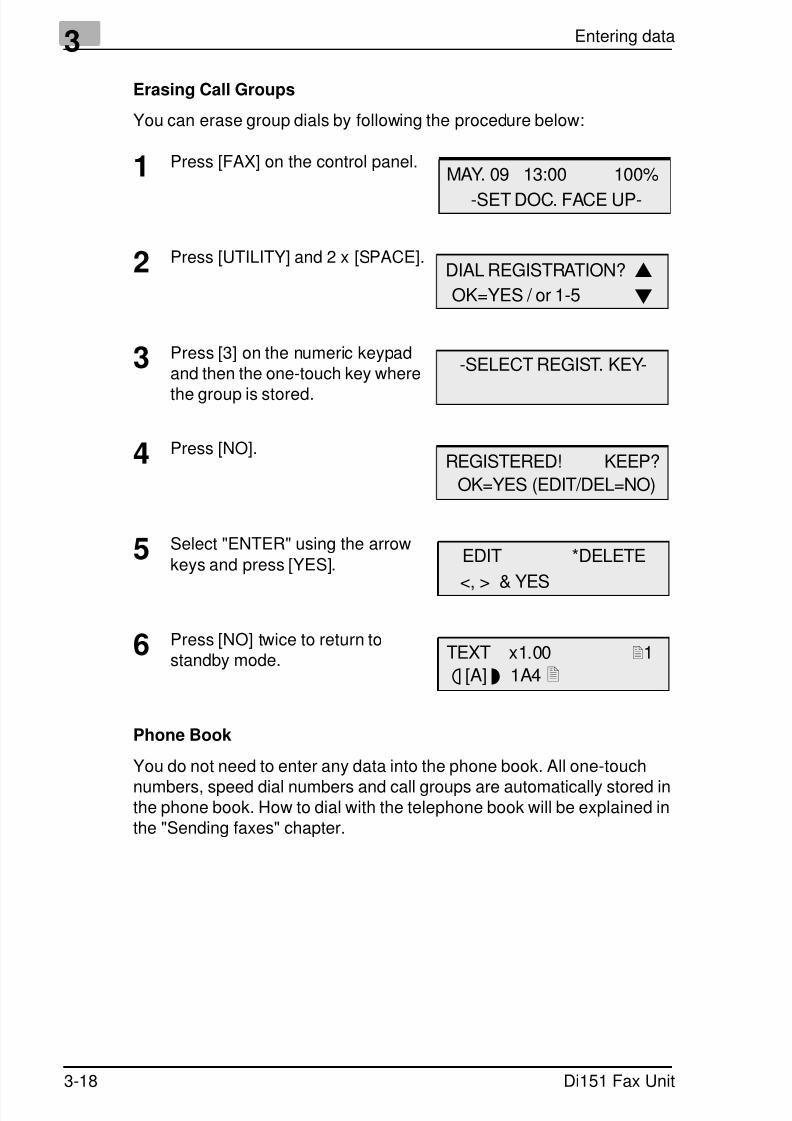
Erasing Call Groups
You can erase group dials by following the procedure below:
1 Press [FAX] on the control panel.
2 Press [UTILITY] and 2 x [SPACE].
3 Press [3] on the numeric keypadand then the one-touch key where
the group is stored.
4 Press [NO].
5 Select "ENTER" using the arrow
keys and press [YES].
6 Press [NO] twice to return tostandby mode.
Phone Book
You do not need to enter any data into the phone book. All one-touch
numbers, speed dial numbers and call groups are automatically stored inthe phone book. How to dial with the telephone book will be explained inthe "Sending faxes" chapter.
MAY. 09 13:00 100%
-SET DOC. FACE UP-
DIAL REGISTRATION?
OK=YES / or 1-5
-SELECT REGIST. KEY-
REGISTERED! KEEP?
OK=YES (EDIT/DEL=NO)
EDIT *DELETE
<, > & YES
TEXT x1.00 1
ä [A] ü 1A4

7/18/2019 Di151f_gb Users Manual Fax Unit.pdf
http://slidepdf.com/reader/full/di151fgb-users-manual-fax-unitpdf 57/170
Entering data 3
Di151 Fax Unit 3-19
3.9 Advanced Settings
You can adjust the machine to your personal requirements with thefollowing settings.
Buzzer volumeUse this function to set the buzzer tone, for example, when an erroroccurs. Follow the procedure below:
1 Press [FAX] on the control panel.
2 Press [UTILITY] and [6] on the
numeric keypad.
3 Select the desired setting usingthe arrow keys and press [YES].
4 Press [NO] to return to standby
mode.
MAY. 09 13:00 100%
-SET DOC. FACE UP-
6 BUZZER VOLUME
*HIGH LOW OFF
<, > & YES
TEXT x1.00
1ä [A] ü 1A4
7/18/2019 Di151f_gb Users Manual Fax Unit.pdf
http://slidepdf.com/reader/full/di151fgb-users-manual-fax-unitpdf 58/170
3 Entering data
3-20 Di151 Fax Unit
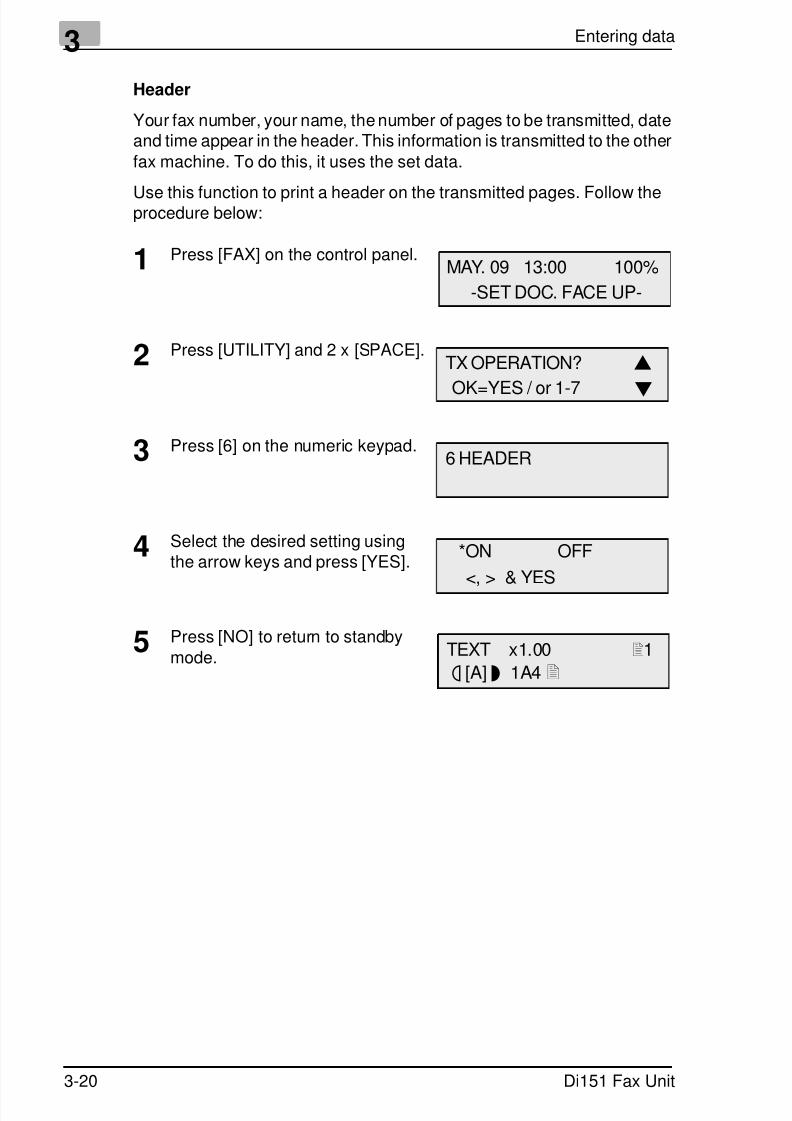
Header
Your fax number, your name, the number of pages to be transmitted, dateand time appear in the header. This information is transmitted to the other
fax machine. To do this, it uses the set data.
Use this function to print a header on the transmitted pages. Follow theprocedure below:
1 Press [FAX] on the control panel.
2 Press [UTILITY] and 2 x [SPACE].
3 Press [6] on the numeric keypad.
4 Select the desired setting usingthe arrow keys and press [YES].
5 Press [NO] to return to standby
mode.
MAY. 09 13:00 100%
-SET DOC. FACE UP-
TX OPERATION?
OK=YES / or 1-7
6 HEADER
*ON OFF
<, > & YES
TEXT x1.00 1
ä [A] ü 1A4
7/18/2019 Di151f_gb Users Manual Fax Unit.pdf
http://slidepdf.com/reader/full/di151fgb-users-manual-fax-unitpdf 59/170
Entering data 3
Di151 Fax Unit 3-21
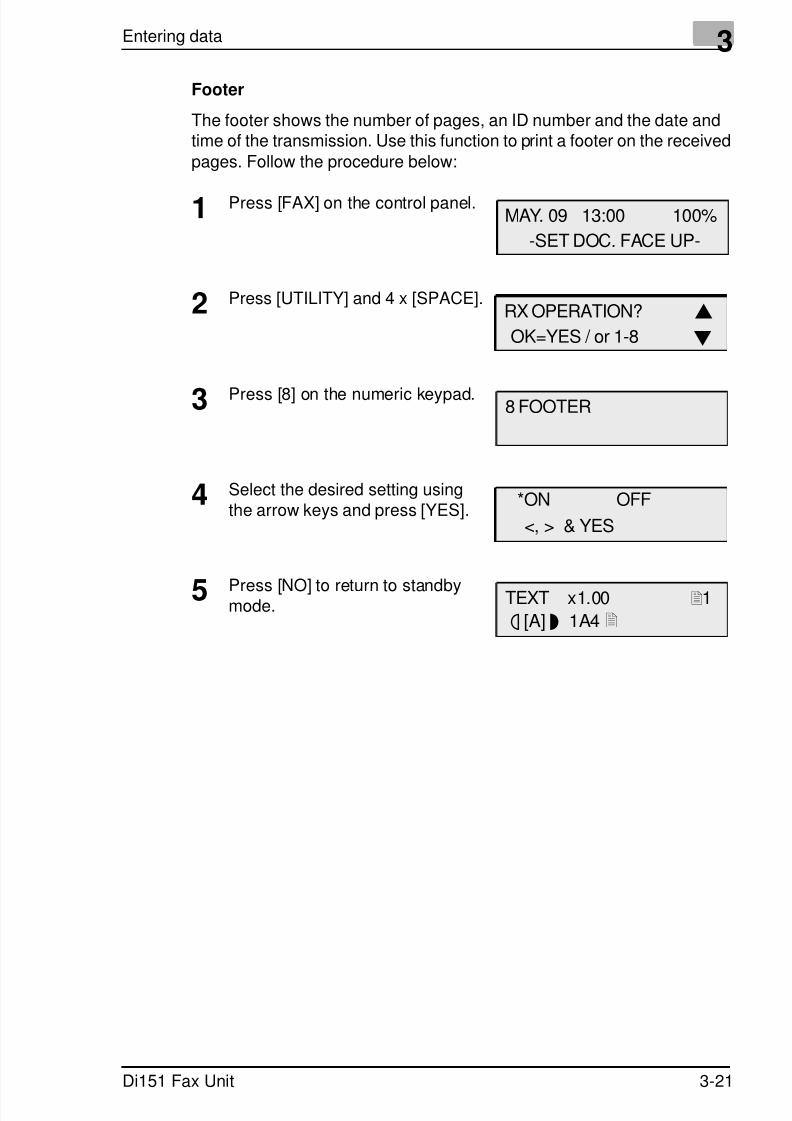
Footer
The footer shows the number of pages, an ID number and the date andtime of the transmission. Use this function to print a footer on the received
pages. Follow the procedure below:
1 Press [FAX] on the control panel.
2 Press [UTILITY] and 4 x [SPACE].
3 Press [8] on the numeric keypad.
4 Select the desired setting usingthe arrow keys and press [YES].
5 Press [NO] to return to standbymode.
MAY. 09 13:00 100%
-SET DOC. FACE UP-
RX OPERATION?
OK=YES / or 1-8
8 FOOTER
*ON OFF
<, > & YES
TEXT x1.00 1
ä [A] ü 1A4
7/18/2019 Di151f_gb Users Manual Fax Unit.pdf
http://slidepdf.com/reader/full/di151fgb-users-manual-fax-unitpdf 60/170
3 Entering data
3-22 Di151 Fax Unit
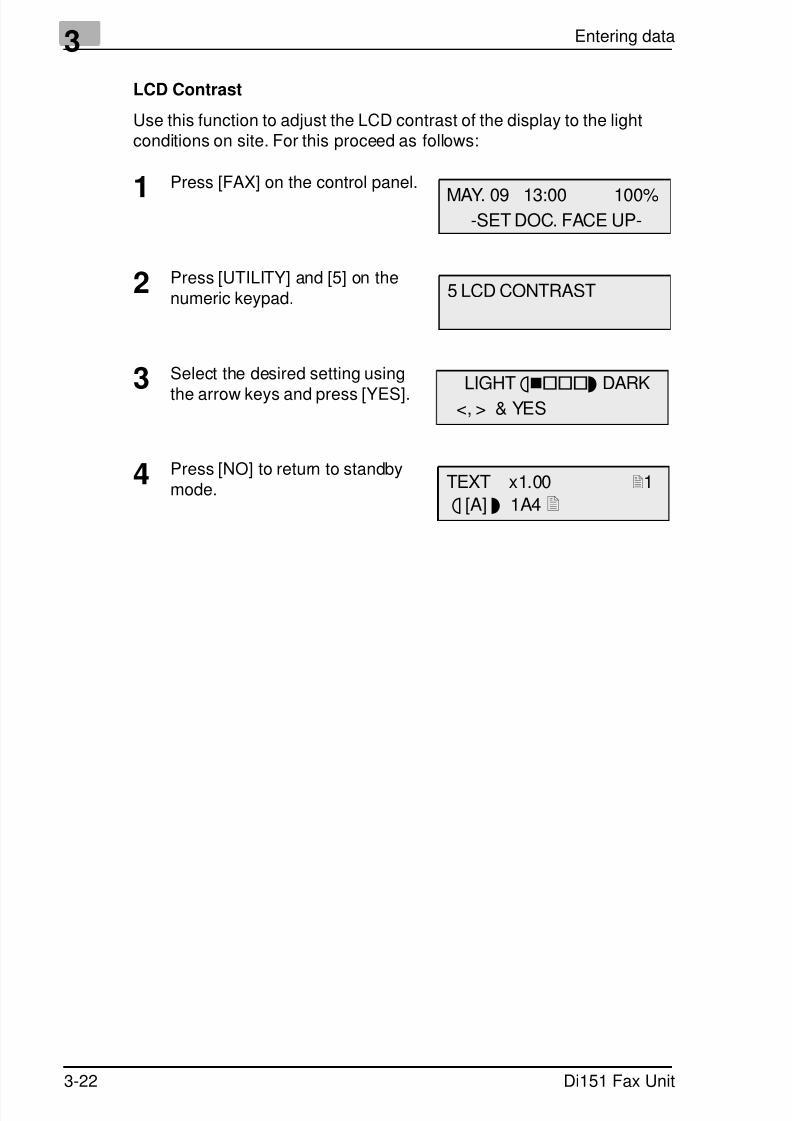
LCD Contrast
Use this function to adjust the LCD contrast of the display to the lightconditions on site. For this proceed as follows:
1 Press [FAX] on the control panel.
2 Press [UTILITY] and [5] on thenumeric keypad.
3 Select the desired setting using
the arrow keys and press [YES].
4 Press [NO] to return to standbymode.
MAY. 09 13:00 100%-SET DOC. FACE UP-
5 LCD CONTRAST
LIGHT ä
ü DARK<, > & YES
TEXT x1.00 1
ä [A] ü 1A4

7/18/2019 Di151f_gb Users Manual Fax Unit.pdf
http://slidepdf.com/reader/full/di151fgb-users-manual-fax-unitpdf 61/170
Entering data 3
Di151 Fax Unit 3-23
Power Save Mode
The power save function reduces the power consumption of the machinewhen in standby mode. The default setting is "ON". If you want to change
the setting, follow the procedure below:
1 Press [FAX] on the control panel.
2 Press [UTILITY] and [2] on thenumeric keypad.
3 Select the desired setting usingthe arrow keys and press [YES].
4 Use the numeric keypad to enterthe required time and press [YES].
5 Press [NO] to return to standbymode.
MAY. 09 13:00 100%
-SET DOC. FACE UP-
2 POWER SAVE MODE
*ON OFF
<, > & YES
TIMER= 15min. (1-120)
OK=YES
TEXT x1.00 1
ä [A] ü 1A4
7/18/2019 Di151f_gb Users Manual Fax Unit.pdf
http://slidepdf.com/reader/full/di151fgb-users-manual-fax-unitpdf 62/170
3 Entering data
3-24 Di151 Fax Unit
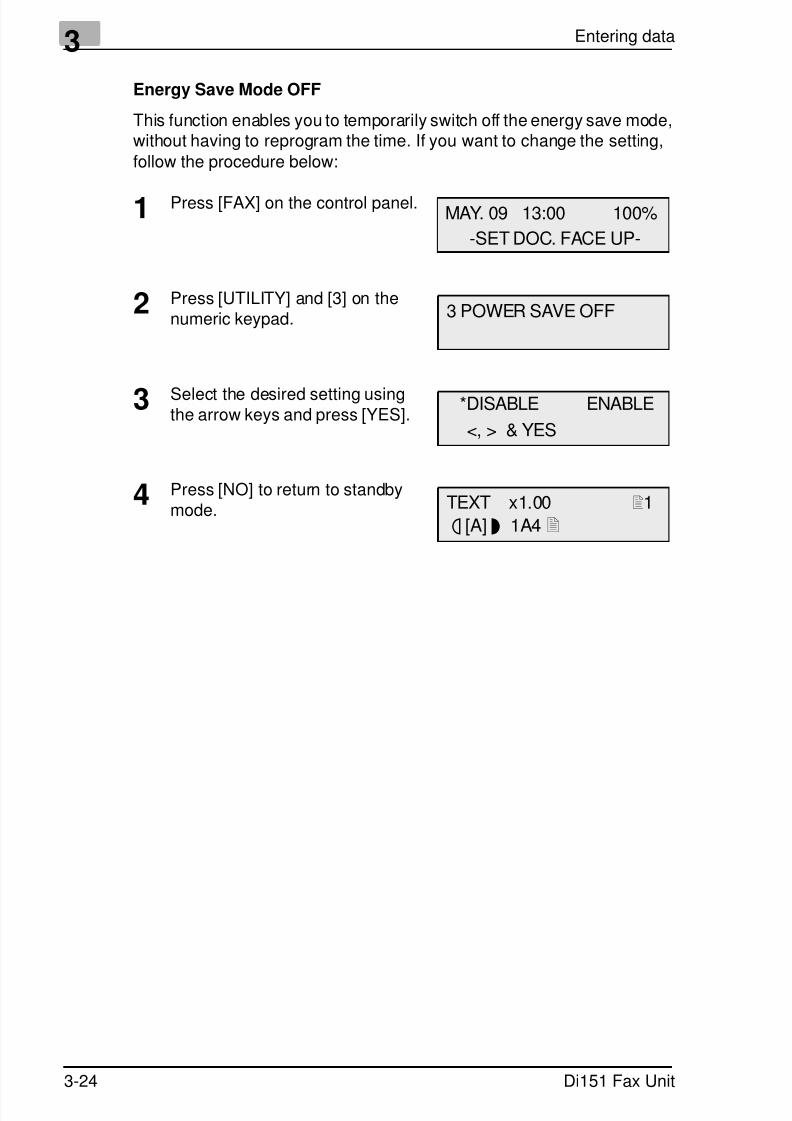
Energy Save Mode OFF
This function enables you to temporarily switch off the energy save mode,without having to reprogram the time. If you want to change the setting,
follow the procedure below:
1 Press [FAX] on the control panel.
2 Press [UTILITY] and [3] on thenumeric keypad.
3 Select the desired setting usingthe arrow keys and press [YES].
4 Press [NO] to return to standbymode.
MAY. 09 13:00 100%
-SET DOC. FACE UP-
3 POWER SAVE OFF
*DISABLE ENABLE
<, > & YES
TEXT x1.00 1
ä [A] ü 1A4

7/18/2019 Di151f_gb Users Manual Fax Unit.pdf
http://slidepdf.com/reader/full/di151fgb-users-manual-fax-unitpdf 63/170
Entering data 3
Di151 Fax Unit 3-25
Remote Diagnosis
This function enables the technical service to check settings using thetelephone line. If you want to change the setting, follow the procedure
below:
1 Press [FAX] on the control panel.
2 Press [UTILITY] and [7] on thenumeric keypad.
3 Select the desired setting usingthe arrow keys and press [YES].
4 Press [NO] to return to standbymode.
MAY. 09 13:00 100%
-SET DOC. FACE UP-
7 REMOTE MONITOR
*ON OFF
<, > & YES
TEXT x1.00 1
ä [A] ü 1A4

7/18/2019 Di151f_gb Users Manual Fax Unit.pdf
http://slidepdf.com/reader/full/di151fgb-users-manual-fax-unitpdf 64/170
3 Entering data
3-26 Di151 Fax Unit
Setting the Monitor Volume
With this function you can set the volume of the monitor, to hear the buildup of the communication.
1 Press [FAX] on the control panel.
2 Press [UTILITY] and 5 x [SPACE]on the numeric keypad.
3 Press [2] on the numeric keypad.
4 Select the desired setting usingthe arrow keys and press [YES].
5 Press [NO] to return to standby
mode.
MAY. 09 13:00 100%-SET DOC. FACE UP-
COMM. SETTING?
OK=YES / or 1-3
2 LINE MONITOR
*HIGH LOW OFF
<, > & YES
TEXT x1.00 1
ä [A] ü 1A4
7/18/2019 Di151f_gb Users Manual Fax Unit.pdf
http://slidepdf.com/reader/full/di151fgb-users-manual-fax-unitpdf 65/170
Entering data 3
Di151 Fax Unit 3-27
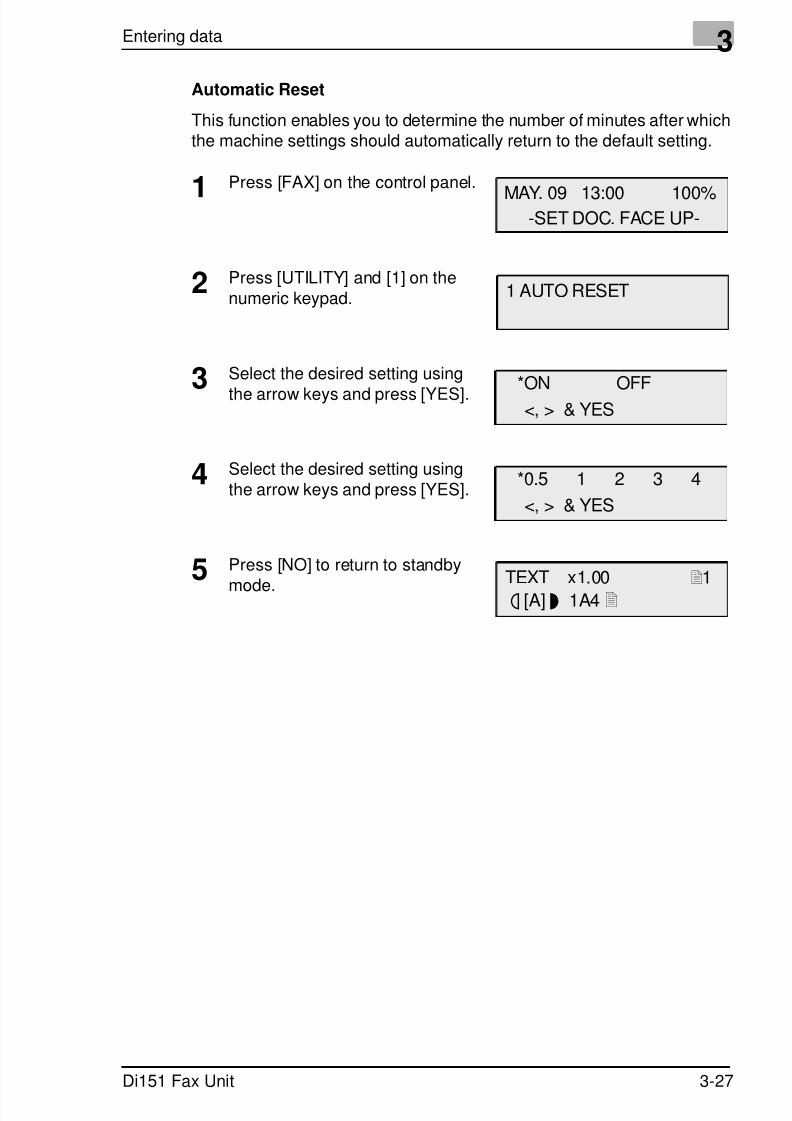
Automatic Reset
This function enables you to determine the number of minutes after whichthe machine settings should automatically return to the default setting.
1 Press [FAX] on the control panel.
2 Press [UTILITY] and [1] on thenumeric keypad.
3 Select the desired setting using
the arrow keys and press [YES].
4 Select the desired setting usingthe arrow keys and press [YES].
5 Press [NO] to return to standby
mode.
MAY. 09 13:00 100%-SET DOC. FACE UP-
1 AUTO RESET
*ON OFF<, > & YES
*0.5 1 2 3 4
<, > & YES
TEXT x1.00 1
ä [A] ü 1A4

7/18/2019 Di151f_gb Users Manual Fax Unit.pdf
http://slidepdf.com/reader/full/di151fgb-users-manual-fax-unitpdf 66/170
3 Entering data
3-28 Di151 Fax Unit

7/18/2019 Di151f_gb Users Manual Fax Unit.pdf
http://slidepdf.com/reader/full/di151fgb-users-manual-fax-unitpdf 67/170
Sending 4
Di151 Fax Unit 4-1
4 Sending
4.1 TransmissionNotes on Original Documents
Your new fax machine can transmit the following document sizes. You canplace up to 50 sheets of A4 paper in the Automatic Document Feeder(ADF).
If the document is longer than 500 mm, the machine recognises adocument jam and stops scanning the document.
Use yellow, green-yellow or light blue colours for information you do notwant to be transmitted.
Make sure ink, glue, correction fluid, etc. are completely dry before yousend a fax.
CAUTION
Staples and paper clips may damage the machine.➜ Remove all staples and paper clips before sending a document.
Feedingdirection
Feeding Feeding
direction direction
Maximumdocument size216 mm
Minimumdocument size148 mm
Effectivetext widthmax. 208 mm
1 0 6 m m 5
0 0 m m
7/18/2019 Di151f_gb Users Manual Fax Unit.pdf
http://slidepdf.com/reader/full/di151fgb-users-manual-fax-unitpdf 68/170
4 Sending
4-2 Di151 Fax Unit
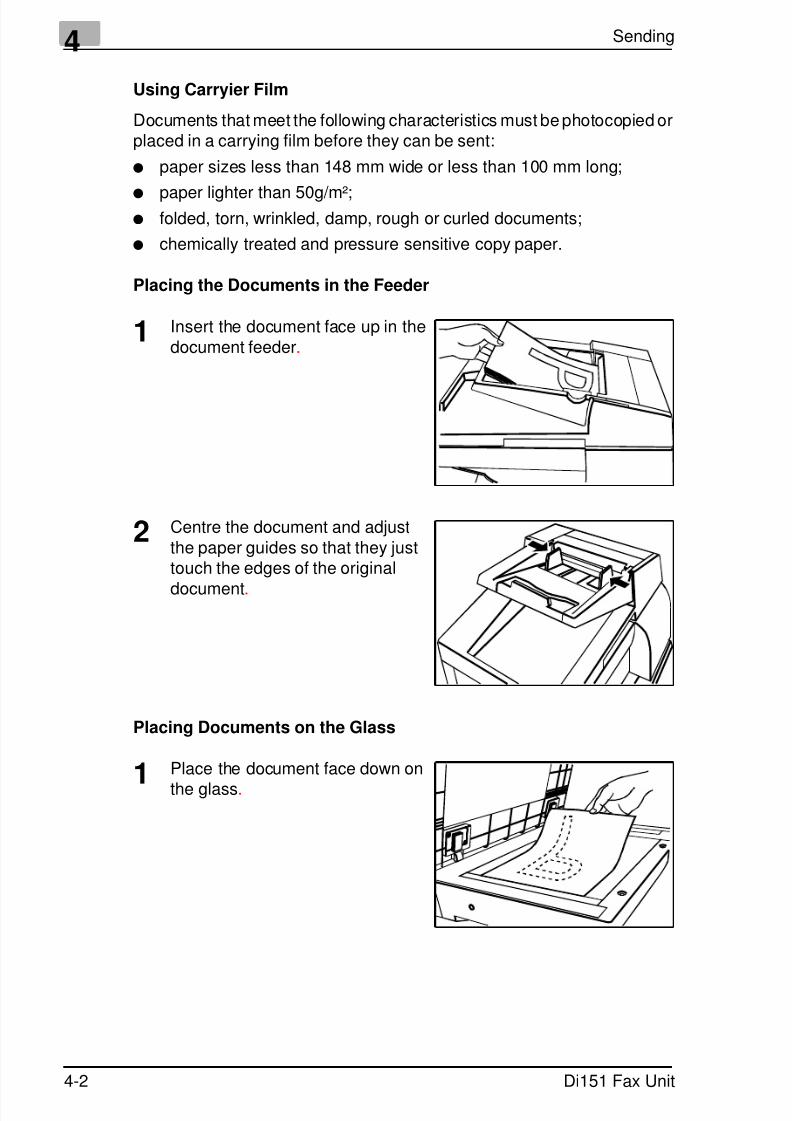
Using Carryier Film
Documents that meet the following characteristics must be photocopied orplaced in a carrying film before they can be sent:
paper sizes less than 148 mm wide or less than 100 mm long;
paper lighter than 50g/m²; folded, torn, wrinkled, damp, rough or curled documents;
chemically treated and pressure sensitive copy paper.
Placing the Documents in the Feeder
1 Insert the document face up in thedocument feeder.
2 Centre the document and adjustthe paper guides so that they justtouch the edges of the original
document.
Placing Documents on the Glass
1 Place the document face down on
the glass.
7/18/2019 Di151f_gb Users Manual Fax Unit.pdf
http://slidepdf.com/reader/full/di151fgb-users-manual-fax-unitpdf 69/170
Sending 4
Di151 Fax Unit 4-3
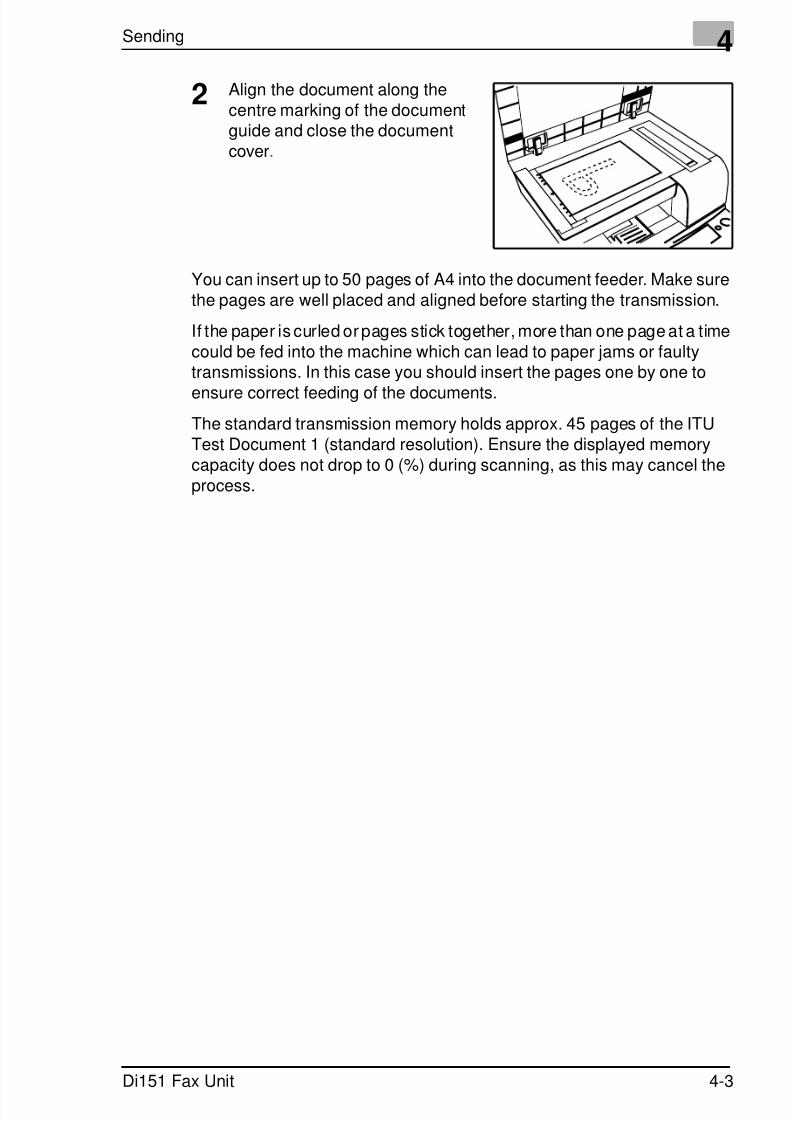
2 Align the document along thecentre marking of the documentguide and close the documentcover.
You can insert up to 50 pages of A4 into the document feeder. Make surethe pages are well placed and aligned before starting the transmission.
If the paper is curled or pages stick together, more than one page at a timecould be fed into the machine which can lead to paper jams or faultytransmissions. In this case you should insert the pages one by one to
ensure correct feeding of the documents.
The standard transmission memory holds approx. 45 pages of the ITUTest Document 1 (standard resolution). Ensure the displayed memorycapacity does not drop to 0 (%) during scanning, as this may cancel theprocess.
7/18/2019 Di151f_gb Users Manual Fax Unit.pdf
http://slidepdf.com/reader/full/di151fgb-users-manual-fax-unitpdf 70/170
4 Sending
4-4 Di151 Fax Unit
4.2 Transmission Settings
Resolution
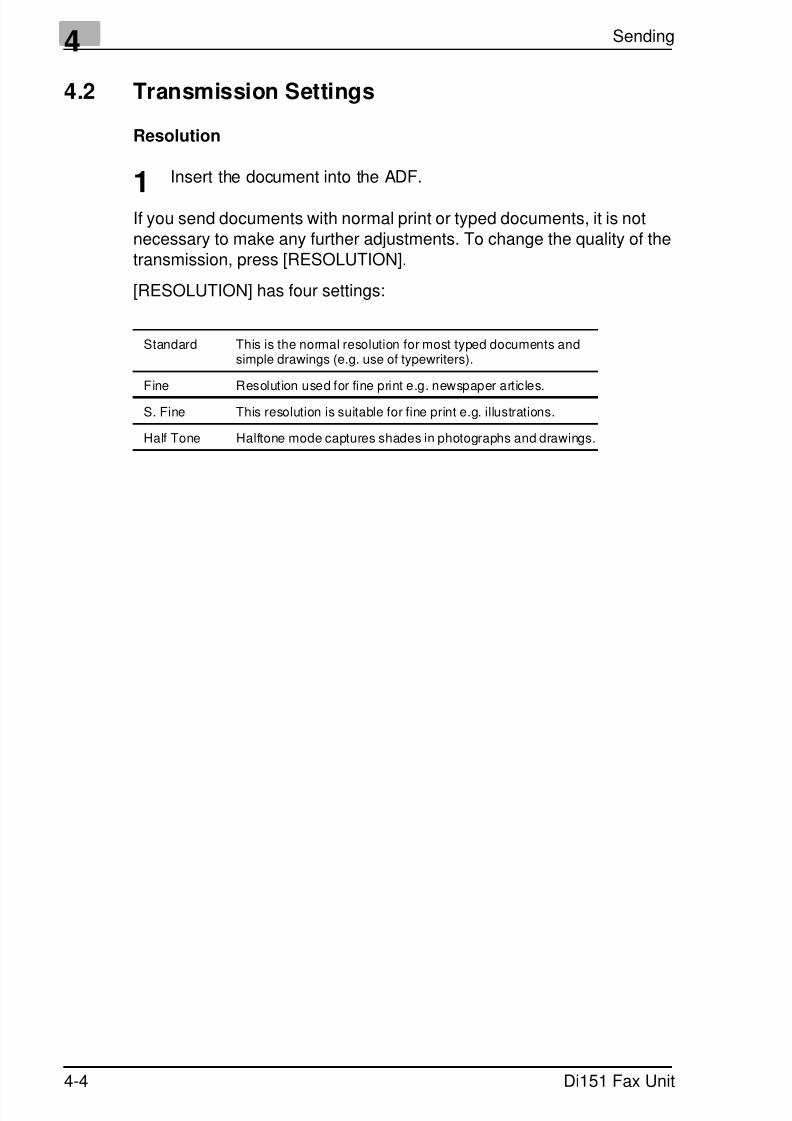
1 Insert the document into the ADF.
If you send documents with normal print or typed documents, it is notnecessary to make any further adjustments. To change the quality of thetransmission, press [RESOLUTION].
[RESOLUTION] has four settings:
Standard This is the normal resolution for most typed documents andsimple drawings (e.g. use of typewriters).
Fine Resolution used for fine print e.g. newspaper articles.
S. Fine This resolution is suitable for fine print e.g. illustrations.
Half Tone Halftone mode captures shades in photographs and drawings.

7/18/2019 Di151f_gb Users Manual Fax Unit.pdf
http://slidepdf.com/reader/full/di151fgb-users-manual-fax-unitpdf 71/170
Sending 4
Di151 Fax Unit 4-5
Default Setting Resolution
If you set the resolution via the control panel, this setting is only kept forthe current transmission. You can permanently change the default setting
of the resolution in the "Transmission Settings" menu. Follow theprocedure below:
1 Press [FAX] on the control panel.
2 Press [UTILITY] and 3 x [SPACE].
3 Press [2] on the numeric keypad,select the required setting usingthe arrow keys and press [YES].
4 Press [NO] to return to standbymode.
MAY. 09 13:00 100%
-SET DOC. FACE UP-
TX OPERATION?
OK=YES / or 1-7
*STD F S/F H/T
<, > & YES
TEXT x1.00 1
ä [A] ü 1A4
7/18/2019 Di151f_gb Users Manual Fax Unit.pdf
http://slidepdf.com/reader/full/di151fgb-users-manual-fax-unitpdf 72/170
4 Sending
4-6 Di151 Fax Unit
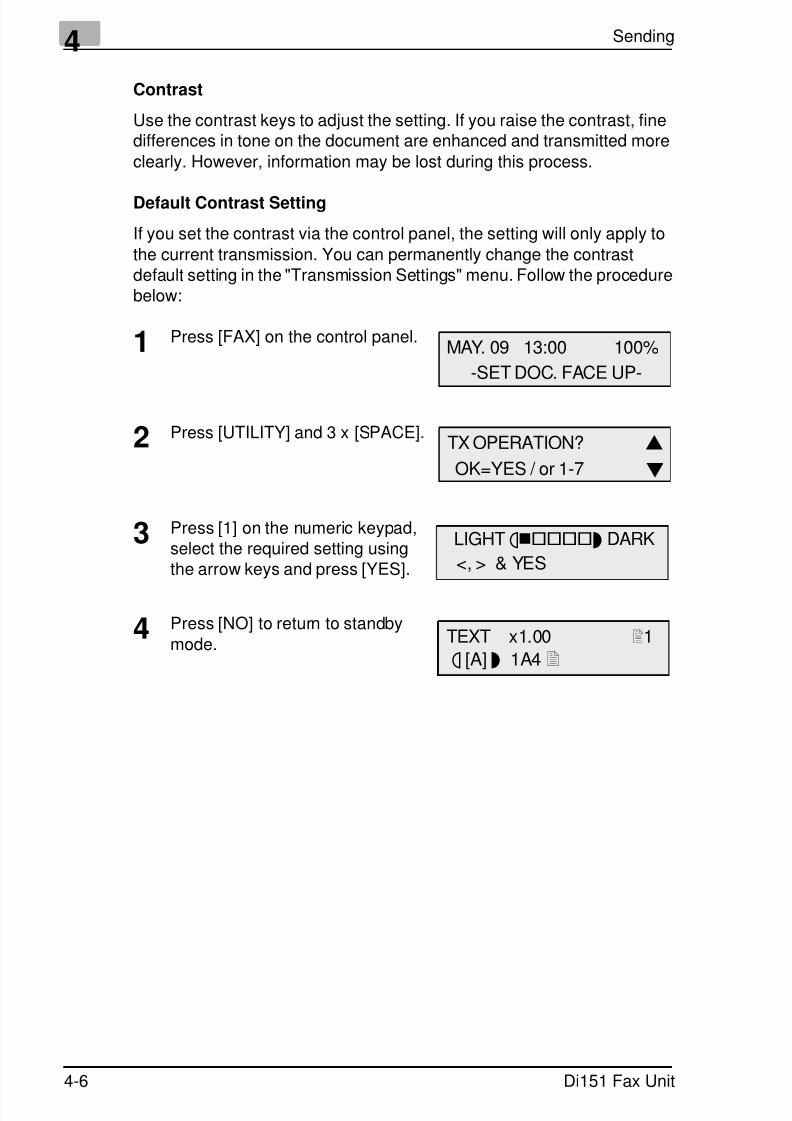
Contrast
Use the contrast keys to adjust the setting. If you raise the contrast, finedifferences in tone on the document are enhanced and transmitted more
clearly. However, information may be lost during this process.
Default Contrast Setting
If you set the contrast via the control panel, the setting will only apply to
the current transmission. You can permanently change the contrastdefault setting in the "Transmission Settings" menu. Follow the procedurebelow:
1 Press [FAX] on the control panel.
2 Press [UTILITY] and 3 x [SPACE].
3 Press [1] on the numeric keypad,select the required setting usingthe arrow keys and press [YES].
4 Press [NO] to return to standby
mode.
MAY. 09 13:00 100%
-SET DOC. FACE UP-
TX OPERATION?
OK=YES / or 1-7
LIGHT äü DARK
<, > & YES
TEXT x1.00 1
ä [A] ü 1A4
7/18/2019 Di151f_gb Users Manual Fax Unit.pdf
http://slidepdf.com/reader/full/di151fgb-users-manual-fax-unitpdf 73/170
Sending 4
Di151 Fax Unit 4-7
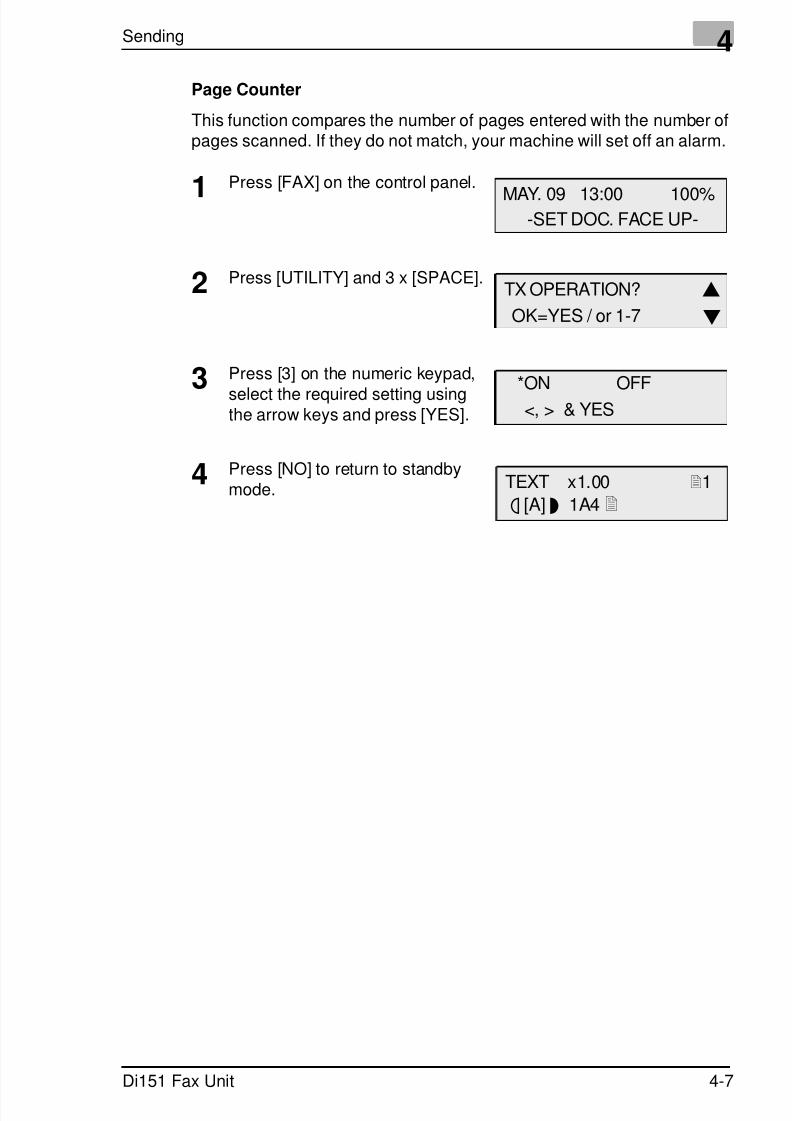
Page Counter
This function compares the number of pages entered with the number ofpages scanned. If they do not match, your machine will set off an alarm.
1 Press [FAX] on the control panel.
2 Press [UTILITY] and 3 x [SPACE].
3 Press [3] on the numeric keypad,
select the required setting usingthe arrow keys and press [YES].
4 Press [NO] to return to standbymode.
MAY. 09 13:00 100%-SET DOC. FACE UP-
TX OPERATION?
OK=YES / or 1-7
*ON OFF<, > & YES
TEXT x1.00 1
ä [A] ü 1A4
7/18/2019 Di151f_gb Users Manual Fax Unit.pdf
http://slidepdf.com/reader/full/di151fgb-users-manual-fax-unitpdf 74/170
4 Sending
4-8 Di151 Fax Unit
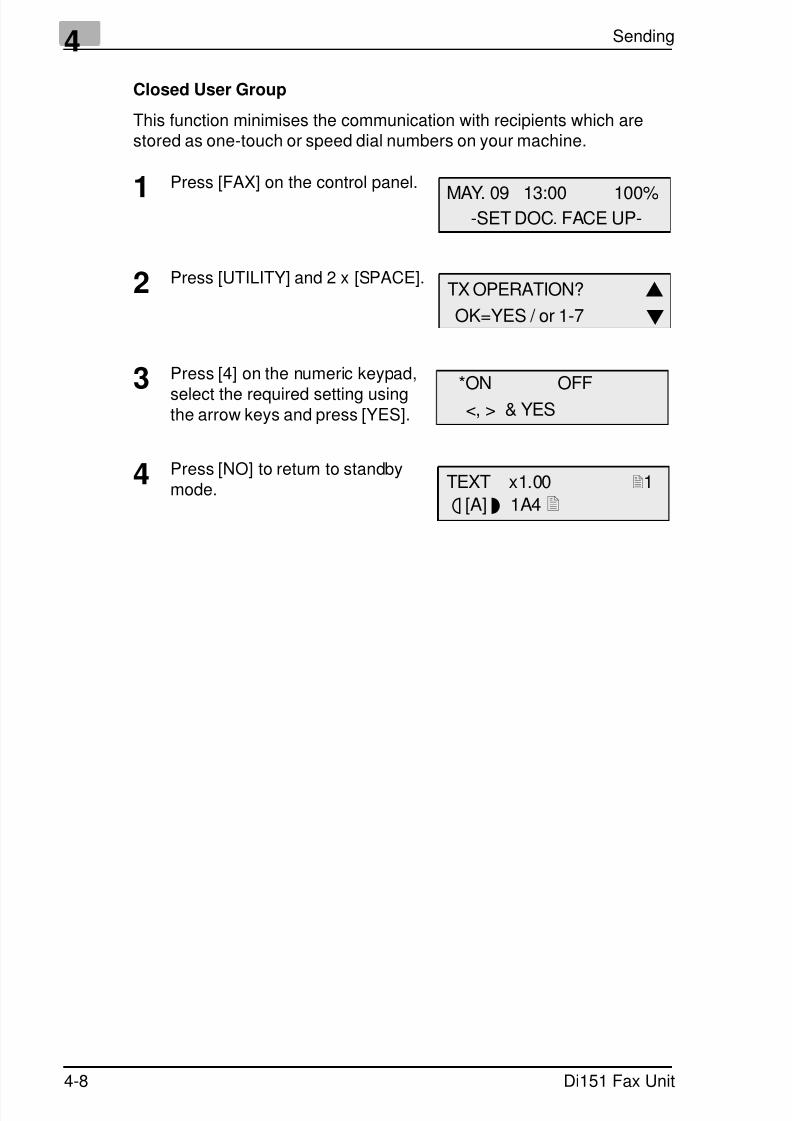
Closed User Group
This function minimises the communication with recipients which arestored as one-touch or speed dial numbers on your machine.
1 Press [FAX] on the control panel.
2 Press [UTILITY] and 2 x [SPACE].
3 Press [4] on the numeric keypad,
select the required setting usingthe arrow keys and press [YES].
4 Press [NO] to return to standbymode.
MAY. 09 13:00 100%-SET DOC. FACE UP-
TX OPERATION?
OK=YES / or 1-7
*ON OFF<, > & YES
TEXT x1.00 1
ä [A] ü 1A4

7/18/2019 Di151f_gb Users Manual Fax Unit.pdf
http://slidepdf.com/reader/full/di151fgb-users-manual-fax-unitpdf 75/170
Sending 4
Di151 Fax Unit 4-9
Default Transmission Setting
This function enables you to store the memory transmission or directtransmission as a default setting.
1 Press [FAX] on the control panel.
2 Press [UTILITY] and 3 x [SPACE].
3 Press [5] on the numeric keypad,
select the required setting usingthe arrow keys and press [YES].
4 Press [NO] to return to standbymode.
MAY. 09 13:00 100%-SET DOC. FACE UP-
TX OPERATION?
OK=YES / or 1-7
*MEM. TX ADF TX
<, > & YES
TEXT x1.00 1
ä [A] ü 1A4

7/18/2019 Di151f_gb Users Manual Fax Unit.pdf
http://slidepdf.com/reader/full/di151fgb-users-manual-fax-unitpdf 76/170
4 Sending
4-10 Di151 Fax Unit
4.3 Dialling Mode
Seven different dialling methods are available.
Insert the document face up into the ADF, press [FAX] on the controlpanel and dial using the required dialling option.
Manual Dialling Using the Numeric Keypad
1 Enter the fax number using thenumeric keypad and press[START]. You can check thenumber on the display and, ifnecessary, delete it and then enter the new number. A maximum of30 digits can be entered using the numeric keypad.
Automatic Dialling Using One-Touch Dialling
1 Press one of the one-touch keys
[01] - [27] which has already beenprogrammed. After scanning thedocument, the machine willautomatically dial the number.
Automatic Dialling Using Speed Dialling
1 Press [SPEED DIAL] and thenenter the 2-digit speed dial
number (00-99).
2 The name of the remote faxmachine appears on the display.Press [START] and the machinewill automatically start dialling
after it has scanned the document.
=123456_
(TX=START)
=123456_
SPEED DIAL=01
=TOKYO
(TX=START)
7/18/2019 Di151f_gb Users Manual Fax Unit.pdf
http://slidepdf.com/reader/full/di151fgb-users-manual-fax-unitpdf 77/170
Sending 4
Di151 Fax Unit 4-11
Automatic Call Groups
1 Press one of the one-touch keys[01]- [27]. If a group is stored, itsname will appear on the display.
After scanning the document, theDi151f will dial automatically.
Program Dialling
You can program the following functions in the last four one-touch keys[24]- [27]:
BroadcastingSee “Program Dialling Broadcast Transmission” on page 4-19
Delayed TransmissionSee “Program Dialling, Timer Transmission” on page 4-17
Mailbox TransmissionSee “Program Dialling Mailbox Transmission” on page 4-25
Polling ReceptionSee “Program Dialling Polling RX” on page 5-8
Relay TransmissionSee “Program Dialling Relay Transmission” on page 4-22.
GROUP NAME=MINOLTA
7/18/2019 Di151f_gb Users Manual Fax Unit.pdf
http://slidepdf.com/reader/full/di151fgb-users-manual-fax-unitpdf 78/170
4 Sending
4-12 Di151 Fax Unit
Combination Dialling
You can use this function to dial the pre-dial number you have stored in aone-touch key or as a speed dial number. It is necessary that the pre-dial
number and a [+] character (eg. 123+) are stored as one-touch number orspeed dial number.
1 Press the one-touch key or speeddial key where you have stored thepre-dial number.
2 Enter the rest of the number and
press [START].
You can also enter the second part of the number using the one-touch keys or the speed dial numbers.
Phone Book
The phone book lists all one-touch and speed dial numbers which arestored in your Di151f.
1 Press [PHONE BOOK]. Select thedesired setting using the arrow
keys and press [YES].
2 Press [START].
If you have selected [LIST], you can scroll through the phone book usingeither [SPACE] or [DELETE]. Pressing "SEARCH" enables you to searchfor a number or name alphabetically or numerically.
Manual Redial
1 Insert the document face up into the ADF and press [REDIAL/ PAUSE] and [START].
✎
Note
No further settings are required for the automatic redial function.
=123+
=123+456
(TX=START)
*LIST SEARCH
<, > & YES
*123456
OK=START

7/18/2019 Di151f_gb Users Manual Fax Unit.pdf
http://slidepdf.com/reader/full/di151fgb-users-manual-fax-unitpdf 79/170
Sending 4
Di151 Fax Unit 4-13
4.4 Memory Transmission
The memory transmission should be selected as the default transmissionmode. Since your fax has several functions, it is possible to scandocuments into the memory for later transmission even though your fax
machine is currently sending, receiving or printing from memory. As soonas the current operation has been completed, the newly scanneddocument will be processed. Memory transmission offers severaladvantages. Make sure the memory LED is on. If this is not the case,press [MEMORY].
1 Insert the document face up intothe ADF and press [FAX] on thecontrol panel.
2 Dial the telephone numbermanually or use one of the one-touch keys or speed dial numbers.
3 Press [START] to scan thedocument. It will be automaticallysent from memory.
✎ NoteYour Di151f comes with an ECM (Error Correction Mode). In this
mode, data that may be lost due to poor line quality is sent repeatedly.
This procedure considerably reduces the number of errors.
=ENTER FAX NO.
or FUNCTION
=123456_ (TX=START)
*MEMORY* 100%
123456 1
7/18/2019 Di151f_gb Users Manual Fax Unit.pdf
http://slidepdf.com/reader/full/di151fgb-users-manual-fax-unitpdf 80/170
4 Sending
4-14 Di151 Fax Unit
4.5 Direct Transmission
You can send directly from the ADF if not enough memory is available toscan all of the document you want to transmit. Make sure you haveswitched off [MEMORY TX].
1 Insert the document face up intothe ADF and press [FAX] on thecontrol panel.
2 Dial the number manually usingthe one-touch keys or speed dialkeys and press [START].
=ENTER FAX NO.or FUNCTION
=123456_
(TX=START)
7/18/2019 Di151f_gb Users Manual Fax Unit.pdf
http://slidepdf.com/reader/full/di151fgb-users-manual-fax-unitpdf 81/170
Sending 4
Di151 Fax Unit 4-15
4.6 Book TX
Use this function to send pages from books directly from the glass topwithout having to first photocopy the pages.
1 Place the book face down on theglass and press [BOOK TX].
2 Enter the fax number and press
[YES].
3 Press [YES].
❍ Press [NO] to select analternative format. Confirm thenew format by pressing [YES].
4 Press [YES] to continue scanningpages or [START] to start thetransmission.
=ENTER FAX NO.or FUNCTION
= 123456
OK=YES
SCAN BOOK (A4)SCAN=YES (SIZE=NO)
NEXT PAGE? (A4) 1
SCAN=YES (TX=START)
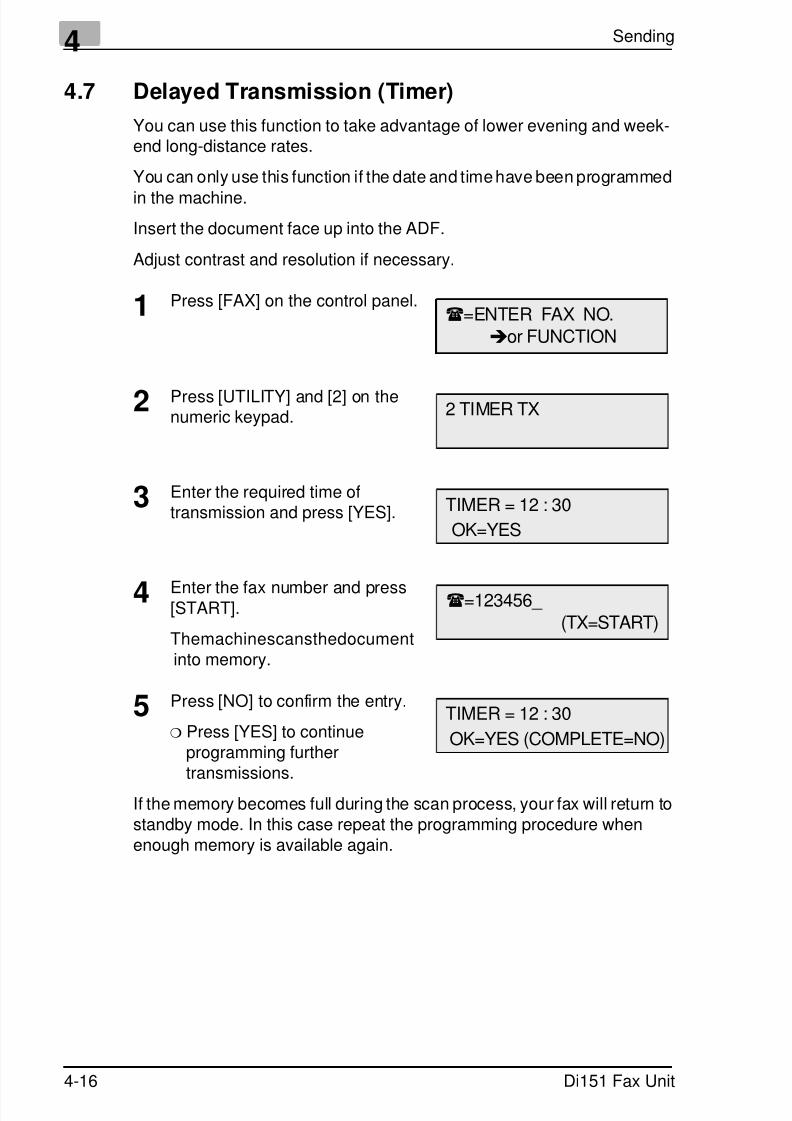
7/18/2019 Di151f_gb Users Manual Fax Unit.pdf
http://slidepdf.com/reader/full/di151fgb-users-manual-fax-unitpdf 82/170
4 Sending
4-16 Di151 Fax Unit
4.7 Delayed Transmission (Timer)
You can use this function to take advantage of lower evening and week-end long-distance rates.
You can only use this function if the date and time have been programmed
in the machine.
Insert the document face up into the ADF.
Adjust contrast and resolution if necessary.
1 Press [FAX] on the control panel.
2 Press [UTILITY] and [2] on thenumeric keypad.
3 Enter the required time oftransmission and press [YES].
4 Enter the fax number and press[START].
Themachinescansthedocumentinto memory.
5 Press [NO] to confirm the entry.
❍ Press [YES] to continueprogramming furthertransmissions.
If the memory becomes full during the scan process, your fax will return tostandby mode. In this case repeat the programming procedure whenenough memory is available again.
=ENTER FAX NO.
or FUNCTION
2 TIMER TX
TIMER = 12 : 30
OK=YES
=123456_ (TX=START)
TIMER = 12 : 30
OK=YES (COMPLETE=NO)
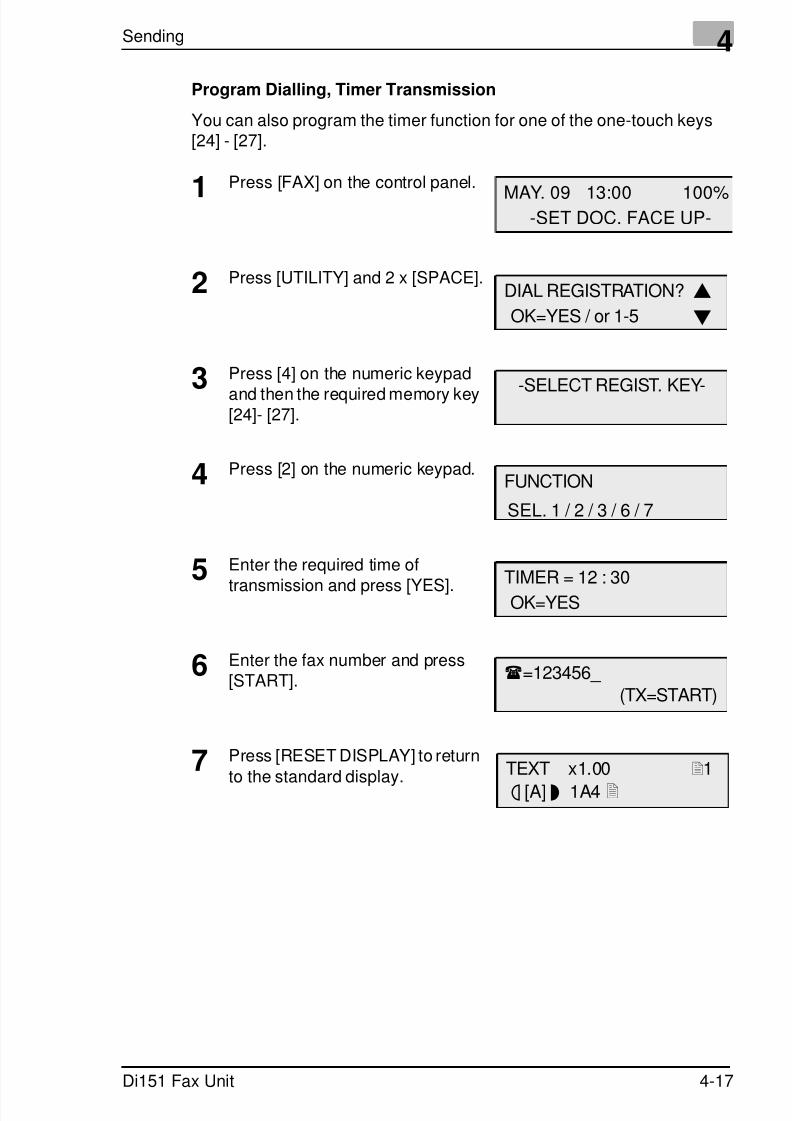
7/18/2019 Di151f_gb Users Manual Fax Unit.pdf
http://slidepdf.com/reader/full/di151fgb-users-manual-fax-unitpdf 83/170
Sending 4
Di151 Fax Unit 4-17
Program Dialling, Timer Transmission
You can also program the timer function for one of the one-touch keys[24] - [27].
1 Press [FAX] on the control panel.
2 Press [UTILITY] and 2 x [SPACE].
3 Press [4] on the numeric keypad
and then the required memory key[24]- [27].
4 Press [2] on the numeric keypad.
5 Enter the required time of
transmission and press [YES].
6 Enter the fax number and press[START].
7 Press [RESET DISPLAY] to return
to the standard display.
MAY. 09 13:00 100%-SET DOC. FACE UP-
DIAL REGISTRATION?
OK=YES / or 1-5
-SELECT REGIST. KEY-
FUNCTION
SEL. 1 / 2 / 3 / 6 / 7
TIMER = 12 : 30
OK=YES
=123456_
(TX=START)
TEXT x1.00 1
ä [A] ü 1A4

7/18/2019 Di151f_gb Users Manual Fax Unit.pdf
http://slidepdf.com/reader/full/di151fgb-users-manual-fax-unitpdf 84/170
4 Sending
4-18 Di151 Fax Unit
4.8 Broadcasting
Your Di151f can be used to send documents from memory to a max. of143 recipients, either manually, by using the one-touch dial, the speed dialor by using the group dial option. The machine dials and transmits the
document sequentially to each recipient. If one of the numbers isengaged, your fax machine will dial the next one and finally return to theengaged number and try again. After broadcasting, it will automaticallyprint a report and return to standby mode. If the function reservation reporthas been selected, a list of the destinations will be printed following the
transmission.
Insert the document face up in the document feeder.
Adjust contrast and resolution if necessary.
1 Press [FAX] on the control panel.
2 Press [UTILITY] and [1] on thenumeric keypad.
3 Enter the required fax number andpress [YES].
4 Repeat this procedure until you
have entered all recipients.
5 Press [START] to return to
standby mode.
6 Press [YES] to check therecipients or [START] to start the
transmission.
❍ When checking the recipients,you may confirm them by pressing [YES] or erase them from the
broadcast transmission by pressing [NO].
=ENTER FAX NO.or FUNCTION
1 BROADCAST
NO. 001=123456
OK=YES
NO. 002=234567
OK=YES
NO. 003=_ (Fin.=START)
CHECK DESTINATIONS?
OK=YES (Fin.=START)
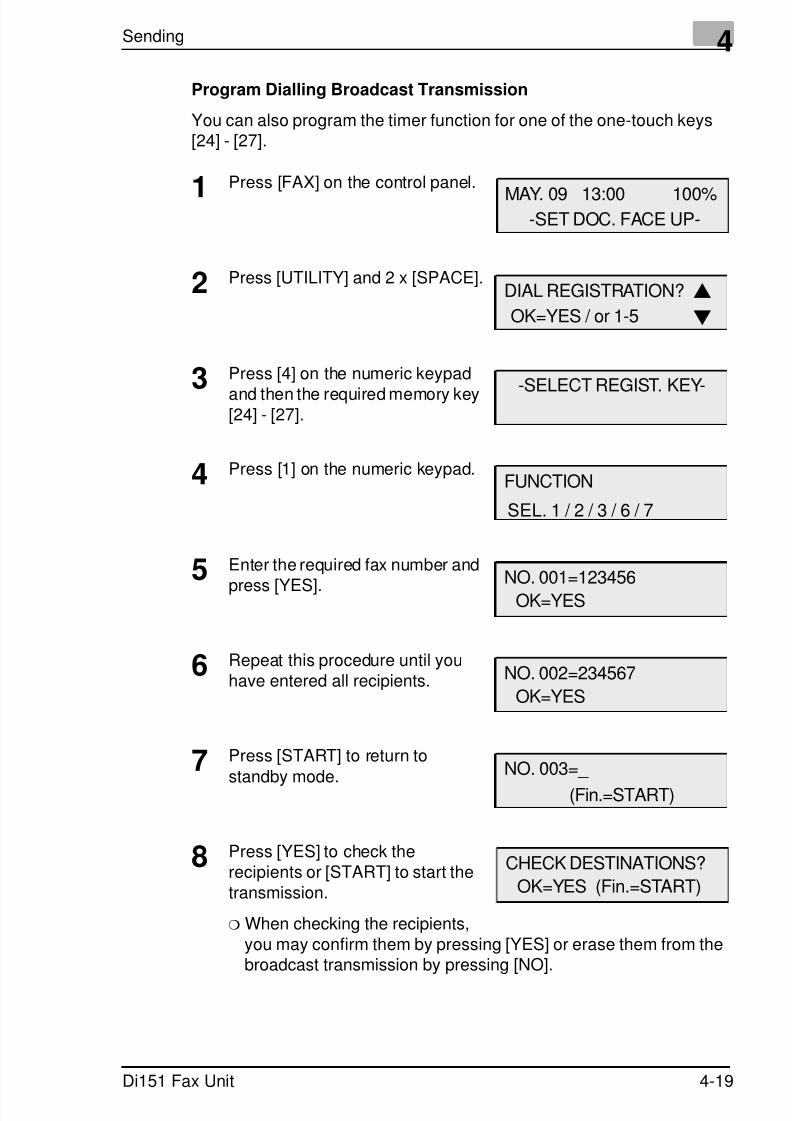
7/18/2019 Di151f_gb Users Manual Fax Unit.pdf
http://slidepdf.com/reader/full/di151fgb-users-manual-fax-unitpdf 85/170
Sending 4
Di151 Fax Unit 4-19
Program Dialling Broadcast Transmission
You can also program the timer function for one of the one-touch keys[24] - [27].
1 Press [FAX] on the control panel.
2 Press [UTILITY] and 2 x [SPACE].
3 Press [4] on the numeric keypad
and then the required memory key[24] - [27].
4 Press [1] on the numeric keypad.
5 Enter the required fax number and
press [YES].
6 Repeat this procedure until youhave entered all recipients.
7 Press [START] to return to
standby mode.
8 Press [YES] to check therecipients or [START] to start thetransmission.
❍ When checking the recipients,you may confirm them by pressing [YES] or erase them from thebroadcast transmission by pressing [NO].
MAY. 09 13:00 100%-SET DOC. FACE UP-
DIAL REGISTRATION?
OK=YES / or 1-5
-SELECT REGIST. KEY-
FUNCTION
SEL. 1 / 2 / 3 / 6 / 7
NO. 001=123456
OK=YES
NO. 002=234567
OK=YES
NO. 003=_
(Fin.=START)
CHECK DESTINATIONS?
OK=YES (Fin.=START)
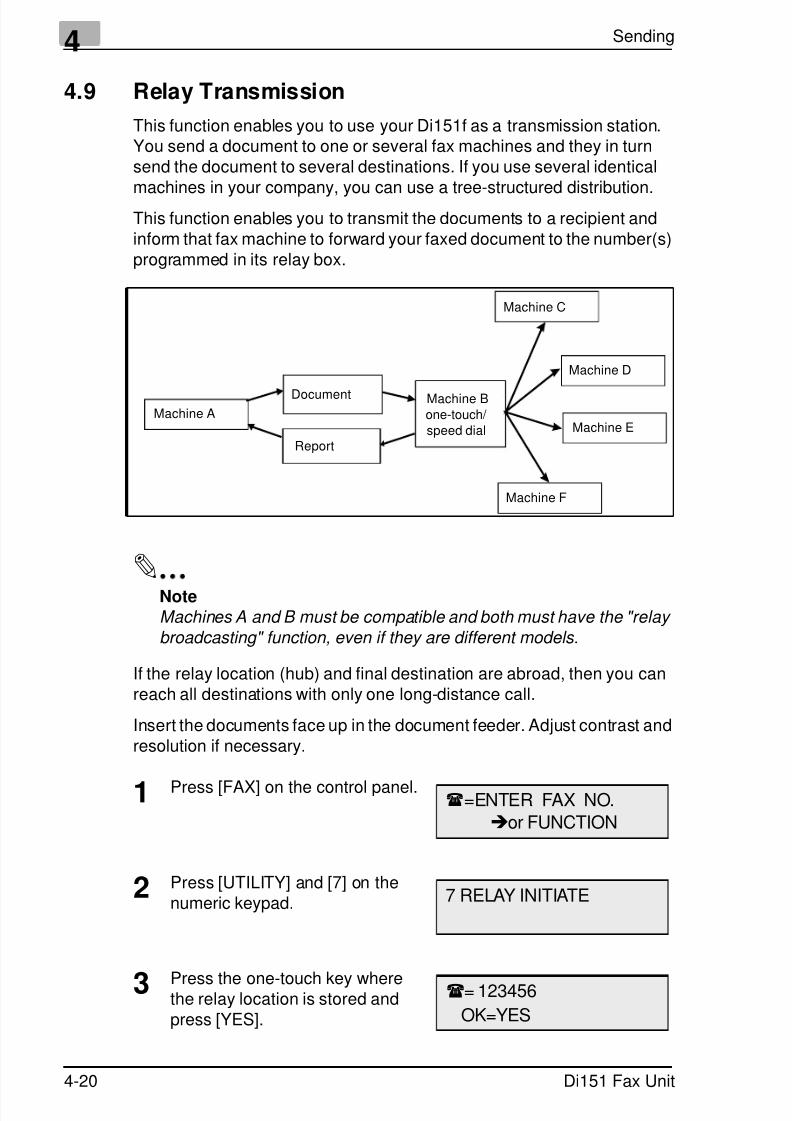
7/18/2019 Di151f_gb Users Manual Fax Unit.pdf
http://slidepdf.com/reader/full/di151fgb-users-manual-fax-unitpdf 86/170
4 Sending
4-20 Di151 Fax Unit
4.9 Relay Transmission
This function enables you to use your Di151f as a transmission station.You send a document to one or several fax machines and they in turnsend the document to several destinations. If you use several identical
machines in your company, you can use a tree-structured distribution.This function enables you to transmit the documents to a recipient andinform that fax machine to forward your faxed document to the number(s)programmed in its relay box.
✎
NoteMachines A and B must be compatible and both must have the "relay
broadcasting" function, even if they are different models.
If the relay location (hub) and final destination are abroad, then you canreach all destinations with only one long-distance call.
Insert the documents face up in the document feeder. Adjust contrast andresolution if necessary.
1 Press [FAX] on the control panel.
2 Press [UTILITY] and [7] on thenumeric keypad.
3 Press the one-touch key wherethe relay location is stored andpress [YES].
Machine ADocument
Report
Machine Bone-touch/ speed dial
Machine C
Machine D
Machine E
Machine F
=ENTER FAX NO.or FUNCTION
7 RELAY INITIATE
= 123456
OK=YES

7/18/2019 Di151f_gb Users Manual Fax Unit.pdf
http://slidepdf.com/reader/full/di151fgb-users-manual-fax-unitpdf 87/170
Sending 4
Di151 Fax Unit 4-21
4 Using the numeric keypad, enterthe one-touch number where therelay location has stored the relaygroup and press [YES].
5 Enter the speed dial numberwhere the relay location hasstored the recipient of thetransmission report and press[YES].
The machine scans the pages and automatically starts transmittingthem.
RELAY GP NO.=_
OK=YES
REPORT SD NO.=_
OK=YES (DEL=NO)
7/18/2019 Di151f_gb Users Manual Fax Unit.pdf
http://slidepdf.com/reader/full/di151fgb-users-manual-fax-unitpdf 88/170
4 Sending
4-22 Di151 Fax Unit
Program Dialling Relay Transmission
You can also program the timer function for one of the one-touch keys[24] - [27].
1 Press [FAX] on the control panel.
2 Press [UTILITY] and 2 x [SPACE].
3 Press [4] on the numeric keypad
and then the required memory key[24] - [27].
4 Press [7] on the numeric keypad.
5 Press the one-touch key where
the relay location is stored andpress [YES].
6 Using the numeric keypad, enterthe one-touch number where therelay location has stored the relaygroup and press [YES].
7 Enter the speed dial number
where the relay location hasstored the recipient of thetransmission report and press
[YES].
8 Press [RESET DISPLAY] to returnto the standard display.
MAY. 09 13:00 100%-SET DOC. FACE UP-
DIAL REGISTRATION?
OK=YES / or 1-5
-SELECT REGIST. KEY-
FUNCTION
SEL. 1 / 2 / 3 / 6 / 7
= 123456
OK=YES
RELAY GP NO.=_
OK=YES
REPORT SD NO.=_ OK=YES
TEXT x1.00 1
ä [A] ü 1A4

7/18/2019 Di151f_gb Users Manual Fax Unit.pdf
http://slidepdf.com/reader/full/di151fgb-users-manual-fax-unitpdf 89/170
Sending 4
Di151 Fax Unit 4-23
4.10 Polling Transmission
The Di151f enables you to store documents which the recipient canretrieve when required. The document can even consist of several pages.
Polling transmission offers you a single mode and a multiple mode. In
single mode, the document can only be polled once. Afterwards thedocument is automatically deleted. In multiple mode, the document isscanned and polled from memory. After the polling the document remainsin memory so that several pollings are possible. To delete the document,select "Delete Document".
Insert the document into the ADF in order to scan it. Adjust contrast andresolution if necessary.
1 Press [FAX] on the control panel.
2 Press [UTILITY] and [5] on the
numeric keypad.
3 Enter the 4-digit password using
the numeric keypad and press[YES].
4 Select the desired setting usingthe arrow keys and press [YES].
The machine scans the document into memory.
=ENTER FAX NO.or FUNCTION
5 POLLING TX
POLLING ID =1234
OK=YES
*SINGLE MULTI
<, > & YES
7/18/2019 Di151f_gb Users Manual Fax Unit.pdf
http://slidepdf.com/reader/full/di151fgb-users-manual-fax-unitpdf 90/170
4 Sending
4-24 Di151 Fax Unit
4.11 Mailbox Transmission
Use this function to transmit a document to a mail box. This is helpful ifonly a specific person should be reading the message. However, bothmachines must be the same model.
The transmission is only executed, if both mailbox ID codes are identical.This prevents the document from being transmitted to a wrong mailbox.
The document is scanned into the remote fax machine's memory and canonly be printed if the recipient enters the correct 4-digit mailbox passcode.
Insert the documents face up in the document feeder. Adjust contrast andresolution if necessary.
1 Press [FAX] on the control panel.
2 Press [UTILITY] and [3] on thenumeric keypad.
3 Use the numeric keypad to enterthe four-digit mailbox ID for the
recipient and press [YES].
4 Enter the fax number using thenumeric keypad and press[START].
The machine scans the document into memory.
=ENTER FAX NO.
or FUNCTION
3 MAILBOX TX
MAILBOX ID =1234
OK=YES
=123456_ (TX=START)
7/18/2019 Di151f_gb Users Manual Fax Unit.pdf
http://slidepdf.com/reader/full/di151fgb-users-manual-fax-unitpdf 91/170
Sending 4
Di151 Fax Unit 4-25
Program Dialling Mailbox Transmission
You can also program the timer function for one of the one-touch keys[24] - [27].
1 Press [FAX] on the control panel.
2 Press [UTILITY] and 2 x [SPACE].
3 Press [4] on the numeric keypad
and then the required memory key[24] - [27].
4 Press [3] on the numeric keypad.
5 Use the numeric keypad to enter
the four-digit mailbox ID for therecipient and press [YES].
6 Enter the fax number using thenumeric keypad and press[START].
7 Press [RESET DISPLAY] to return
to the standard display.
MAY. 09 13:00 100%-SET DOC. FACE UP-
DIAL REGISTRATION?
OK=YES / or 1-5
-SELECT REGIST. KEY-
FUNCTION
SEL. 1 / 2 / 3 / 6 / 7
MAILBOX ID =1234
OK=YES
=123456_ (TX=START)
TEXT x1.00 1
ä [A] ü 1A4

7/18/2019 Di151f_gb Users Manual Fax Unit.pdf
http://slidepdf.com/reader/full/di151fgb-users-manual-fax-unitpdf 92/170
4 Sending
4-26 Di151 Fax Unit
4.12 Batch Transmission
Use this function to store several documents in memory and send all ofthem at a specific time. In this way the receiving station need only becalled once. The recipient must be stored as a one-touch dial number.
1 Press [FAX] on the control panel.
2 Press [UTILITY] and 2 x [SPACE].
3 Press [5] on the numeric keypadand then the required one-touchkey.
4 Enter the required time of
transmission and press [YES].
5 Press [NO] to cancel the entry orpress a one-touch key to storefurther transmissions.
MAY. 09 13:00 100%
-SET DOC. FACE UP-
DIAL REGISTRATION?
OK=YES / or 1-5
-SELECT REGIST. KEY-
TX TIME = 12 : 30
OK=YES
-SELECT REGIST. KEY-
(COMPLETE=NO)
7/18/2019 Di151f_gb Users Manual Fax Unit.pdf
http://slidepdf.com/reader/full/di151fgb-users-manual-fax-unitpdf 93/170
Sending 4
Di151 Fax Unit 4-27
4.13 Delete Document
This function enables you to delete programmed transmissions and datastored in the memory. If more than one job has been stored, you can scrollthrough the entries using [SPACE] and [DELETE].
1 Press [FAX] on the control panel.
2 Press [UTILITY] and [8] on thenumeric keypad.
3 Press [YES] to delete the job.
❍ Press the arrow key to displayadditional information.
4 Press [RESET DISPLAY] to returnto the standard display.
The document is deleted.
=ENTER FAX NO.or FUNCTION
8 CANCEL RESERV.
01 [12:30] TIMER
DEL=YES (CONF.=)
TEXT x1.00 1
ä [A] ü 1A4

7/18/2019 Di151f_gb Users Manual Fax Unit.pdf
http://slidepdf.com/reader/full/di151fgb-users-manual-fax-unitpdf 94/170
4 Sending
4-28 Di151 Fax Unit
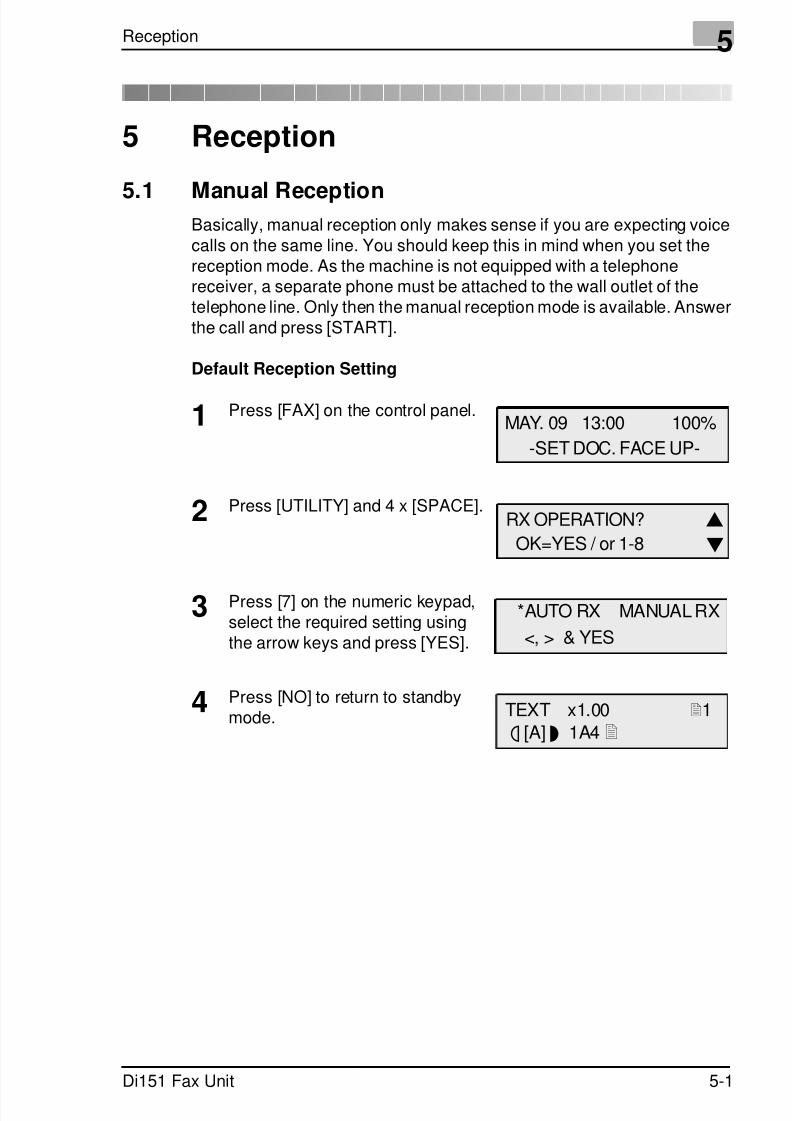
7/18/2019 Di151f_gb Users Manual Fax Unit.pdf
http://slidepdf.com/reader/full/di151fgb-users-manual-fax-unitpdf 95/170
Reception 5
Di151 Fax Unit 5-1
5 Reception
5.1 Manual ReceptionBasically, manual reception only makes sense if you are expecting voicecalls on the same line. You should keep this in mind when you set thereception mode. As the machine is not equipped with a telephonereceiver, a separate phone must be attached to the wall outlet of thetelephone line. Only then the manual reception mode is available. Answerthe call and press [START].
Default Reception Setting
1 Press [FAX] on the control panel.
2 Press [UTILITY] and 4 x [SPACE].
3 Press [7] on the numeric keypad,select the required setting usingthe arrow keys and press [YES].
4 Press [NO] to return to standbymode.
MAY. 09 13:00 100%
-SET DOC. FACE UP-
RX OPERATION?
OK=YES / or 1-8
*AUTO RX MANUAL RX
<, > & YES
TEXT x1.00 1
ä [A] ü 1A4
7/18/2019 Di151f_gb Users Manual Fax Unit.pdf
http://slidepdf.com/reader/full/di151fgb-users-manual-fax-unitpdf 96/170
5 Reception
5-2 Di151 Fax Unit
5.2 Automatic Reception
Automatic reception is set as a default. No further settings are required.
Your fax machine will answer calls after a set number of rings. The defaultsetting is 1.
5.3 Memory Back-up RX
Incoming data is stored in the memory as described below. As soon as theerror has been eliminated, the data will be automatically printed:
no paper
paper jam
no toner
printer cover open
no imaging unit.
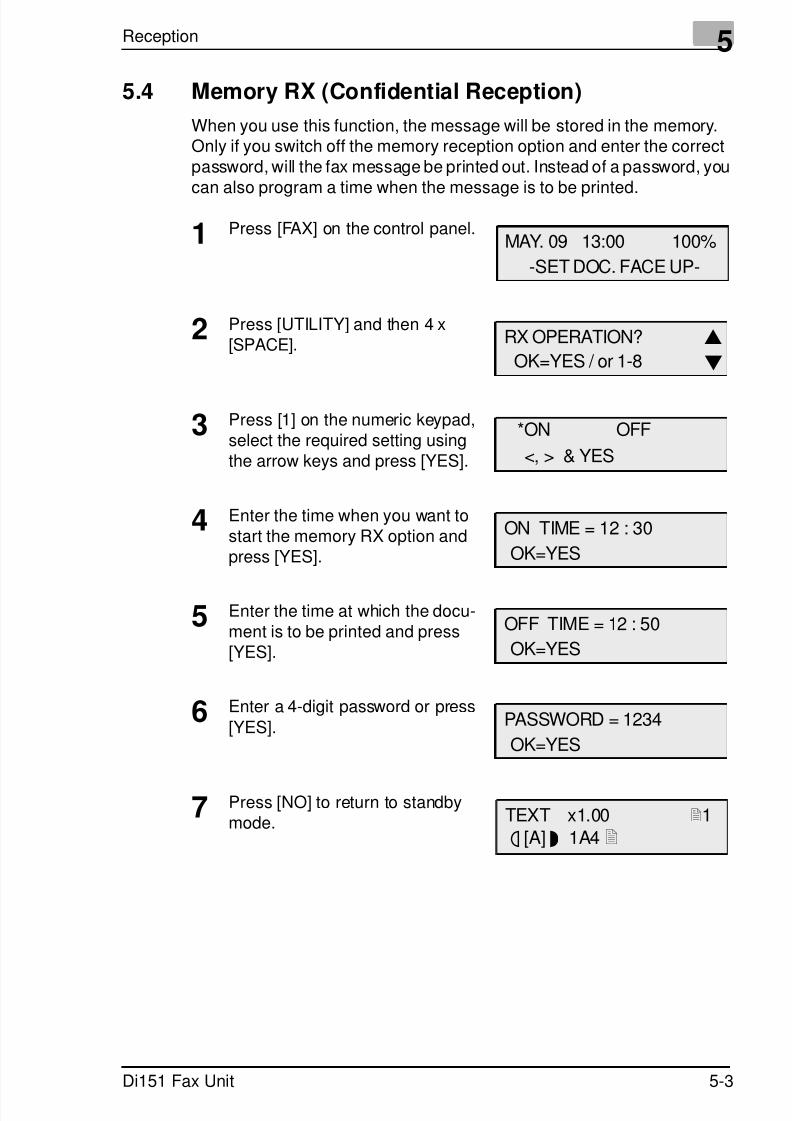
7/18/2019 Di151f_gb Users Manual Fax Unit.pdf
http://slidepdf.com/reader/full/di151fgb-users-manual-fax-unitpdf 97/170
Reception 5
Di151 Fax Unit 5-3
5.4 Memory RX (Confidential Reception)
When you use this function, the message will be stored in the memory.Only if you switch off the memory reception option and enter the correctpassword, will the fax message be printed out. Instead of a password, you
can also program a time when the message is to be printed.
1 Press [FAX] on the control panel.
2 Press [UTILITY] and then 4 x[SPACE].
3 Press [1] on the numeric keypad,select the required setting usingthe arrow keys and press [YES].
4 Enter the time when you want tostart the memory RX option andpress [YES].
5 Enter the time at which the docu-ment is to be printed and press[YES].
6 Enter a 4-digit password or press
[YES].
7 Press [NO] to return to standbymode.
MAY. 09 13:00 100%
-SET DOC. FACE UP-
RX OPERATION?
OK=YES / or 1-8
*ON OFF
<, > & YES
ON TIME = 12 : 30
OK=YES
OFF TIME = 12 : 50
OK=YES
PASSWORD = 1234
OK=YES
TEXT x1.00 1
ä [A] ü 1A4
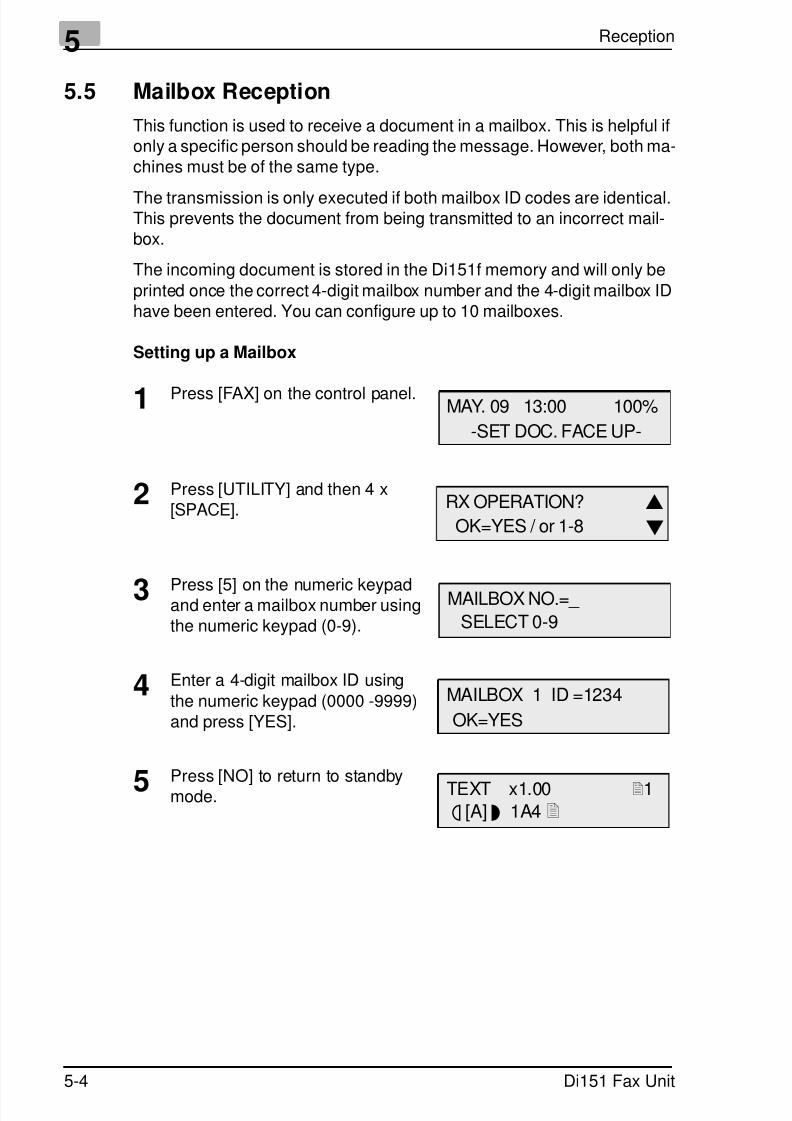
7/18/2019 Di151f_gb Users Manual Fax Unit.pdf
http://slidepdf.com/reader/full/di151fgb-users-manual-fax-unitpdf 98/170
5 Reception
5-4 Di151 Fax Unit
5.5 Mailbox Reception
This function is used to receive a document in a mailbox. This is helpful ifonly a specific person should be reading the message. However, both ma-chines must be of the same type.
The transmission is only executed if both mailbox ID codes are identical.This prevents the document from being transmitted to an incorrect mail-box.
The incoming document is stored in the Di151f memory and will only be
printed once the correct 4-digit mailbox number and the 4-digit mailbox IDhave been entered. You can configure up to 10 mailboxes.
Setting up a Mailbox
1 Press [FAX] on the control panel.
2 Press [UTILITY] and then 4 x[SPACE].
3 Press [5] on the numeric keypadand enter a mailbox number usingthe numeric keypad (0-9).
4 Enter a 4-digit mailbox ID using
the numeric keypad (0000 -9999)and press [YES].
5 Press [NO] to return to standby
mode.
MAY. 09 13:00 100%
-SET DOC. FACE UP-
RX OPERATION?
OK=YES / or 1-8
MAILBOX NO.=_
SELECT 0-9
MAILBOX 1 ID =1234
OK=YES
TEXT x1.00 1ä [A] ü 1A4
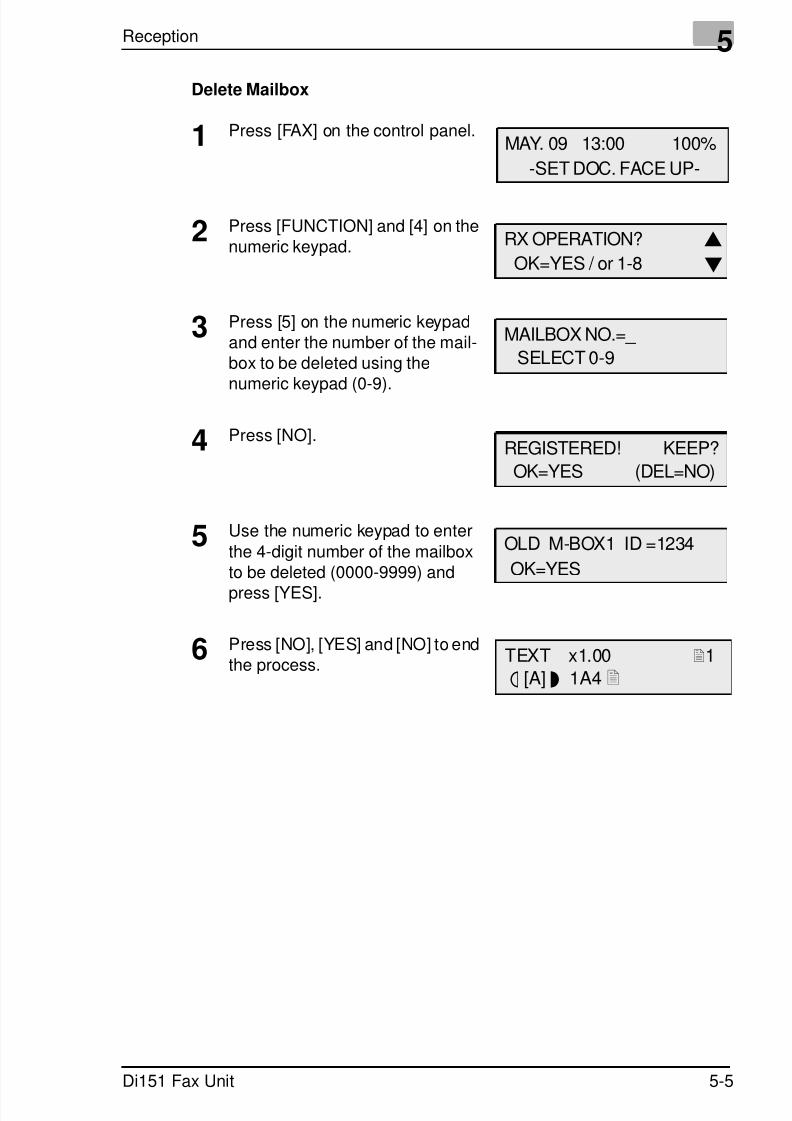
7/18/2019 Di151f_gb Users Manual Fax Unit.pdf
http://slidepdf.com/reader/full/di151fgb-users-manual-fax-unitpdf 99/170
Reception 5
Di151 Fax Unit 5-5
Delete Mailbox
1 Press [FAX] on the control panel.
2 Press [FUNCTION] and [4] on thenumeric keypad.
3 Press [5] on the numeric keypadand enter the number of the mail-box to be deleted using the
numeric keypad (0-9).
4 Press [NO].
5 Use the numeric keypad to enter
the 4-digit number of the mailboxto be deleted (0000-9999) and
press [YES].
6 Press [NO], [YES] and [NO] to endthe process.
MAY. 09 13:00 100%
-SET DOC. FACE UP-
RX OPERATION?
OK=YES / or 1-8
MAILBOX NO.=_
SELECT 0-9
REGISTERED! KEEP?
OK=YES (DEL=NO)
OLD M-BOX1 ID =1234
OK=YES
TEXT x1.00 1
ä [A] ü 1A4

7/18/2019 Di151f_gb Users Manual Fax Unit.pdf
http://slidepdf.com/reader/full/di151fgb-users-manual-fax-unitpdf 100/170
5 Reception
5-6 Di151 Fax Unit
Printing the Content of a Mailbox
1 Press [FAX] on the control panel.
2 Press [FUNCTION] and [4] on thenumeric keypad.
3 Use the numeric keypad to enterthe mailbox ID and press [YES].
Your fax machine prints the message.
MAY. 09 13:00 100%
-SET DOC. FACE UP-
4 PRINT MAILBOX RX
MAILBOX 1 ID =1234
OK=YES
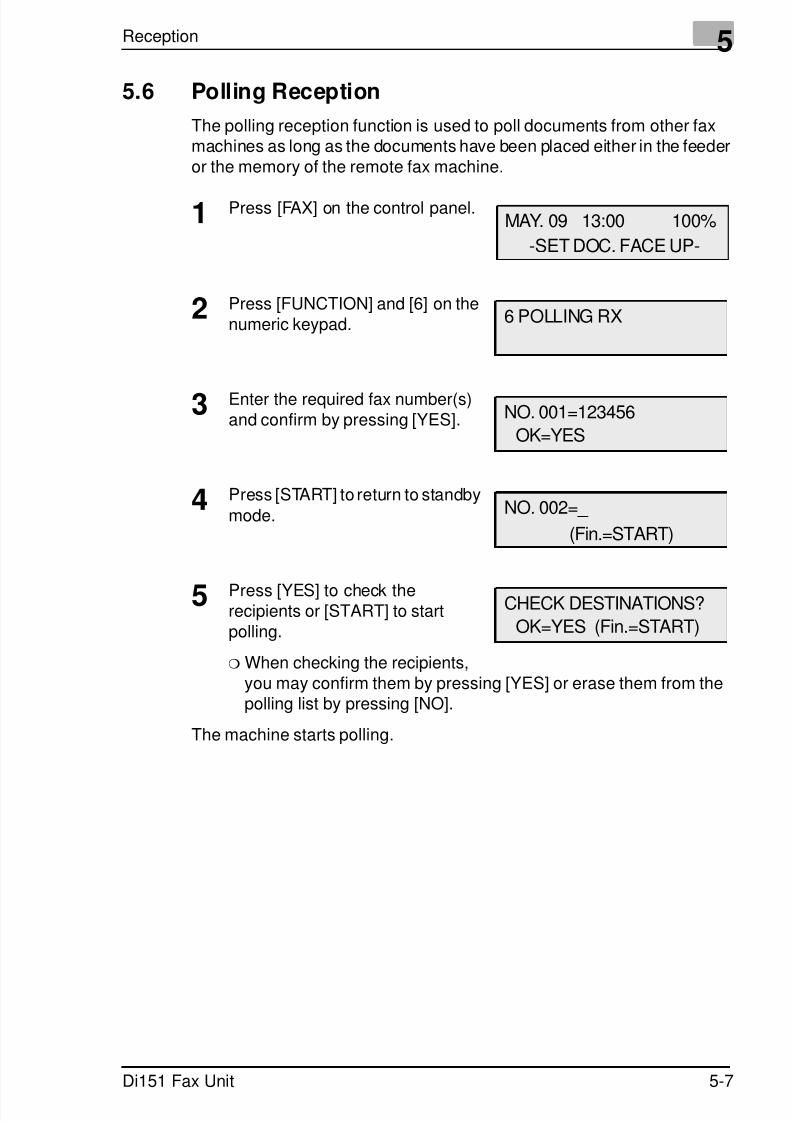
7/18/2019 Di151f_gb Users Manual Fax Unit.pdf
http://slidepdf.com/reader/full/di151fgb-users-manual-fax-unitpdf 101/170
Reception 5
Di151 Fax Unit 5-7
5.6 Polling Reception
The polling reception function is used to poll documents from other faxmachines as long as the documents have been placed either in the feederor the memory of the remote fax machine.
1 Press [FAX] on the control panel.
2 Press [FUNCTION] and [6] on thenumeric keypad.
3 Enter the required fax number(s)and confirm by pressing [YES].
4 Press [START] to return to standby
mode.
5 Press [YES] to check therecipients or [START] to startpolling.
❍ When checking the recipients,you may confirm them by pressing [YES] or erase them from thepolling list by pressing [NO].
The machine starts polling.
MAY. 09 13:00 100%
-SET DOC. FACE UP-
6 POLLING RX
NO. 001=123456
OK=YES
NO. 002=_
(Fin.=START)
CHECK DESTINATIONS?
OK=YES (Fin.=START)
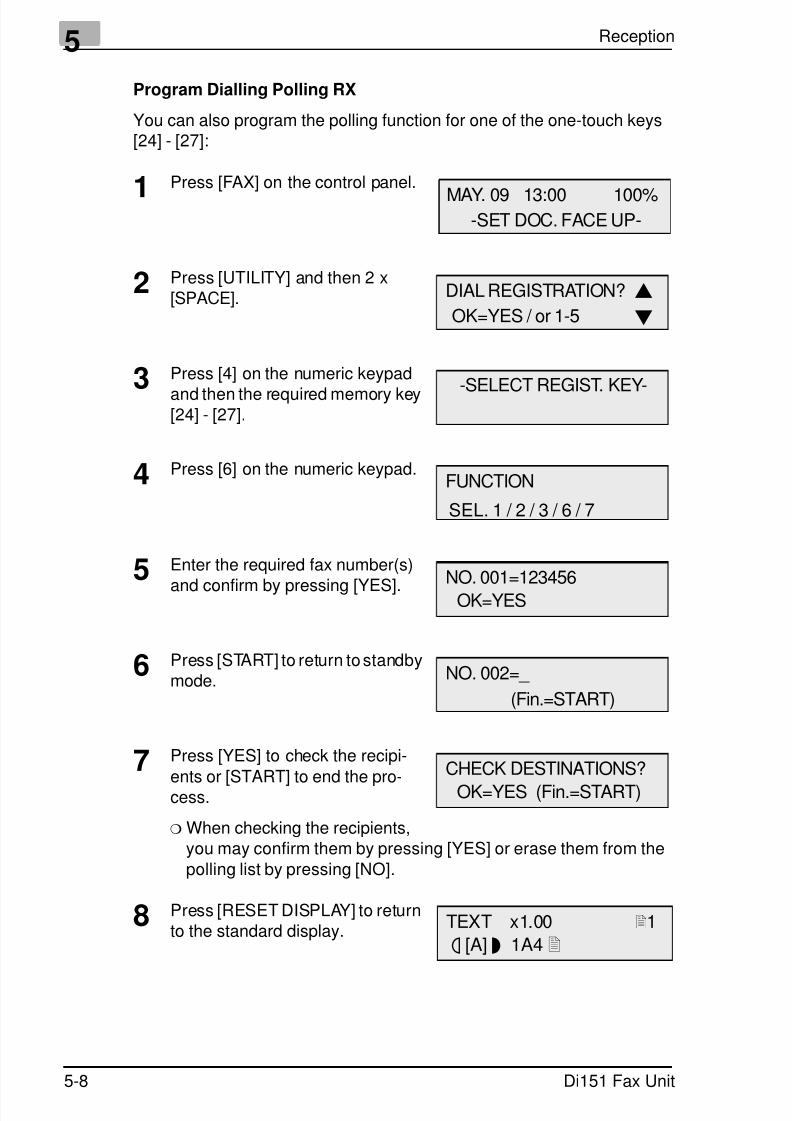
7/18/2019 Di151f_gb Users Manual Fax Unit.pdf
http://slidepdf.com/reader/full/di151fgb-users-manual-fax-unitpdf 102/170
5 Reception
5-8 Di151 Fax Unit
Program Dialling Polling RX
You can also program the polling function for one of the one-touch keys[24] - [27]:
1 Press [FAX] on the control panel.
2 Press [UTILITY] and then 2 x[SPACE].
3 Press [4] on the numeric keypad
and then the required memory key[24] - [27].
4 Press [6] on the numeric keypad.
5 Enter the required fax number(s)
and confirm by pressing [YES].
6 Press [START] to return to standbymode.
7 Press [YES] to check the recipi-
ents or [START] to end the pro-cess.
❍ When checking the recipients,you may confirm them by pressing [YES] or erase them from thepolling list by pressing [NO].
8 Press [RESET DISPLAY] to returnto the standard display.
MAY. 09 13:00 100%-SET DOC. FACE UP-
DIAL REGISTRATION?
OK=YES / or 1-5
-SELECT REGIST. KEY-
FUNCTION
SEL. 1 / 2 / 3 / 6 / 7
NO. 001=123456
OK=YES
NO. 002=_
(Fin.=START)
CHECK DESTINATIONS?
OK=YES (Fin.=START)
TEXT x1.00 1
ä [A] ü 1A4
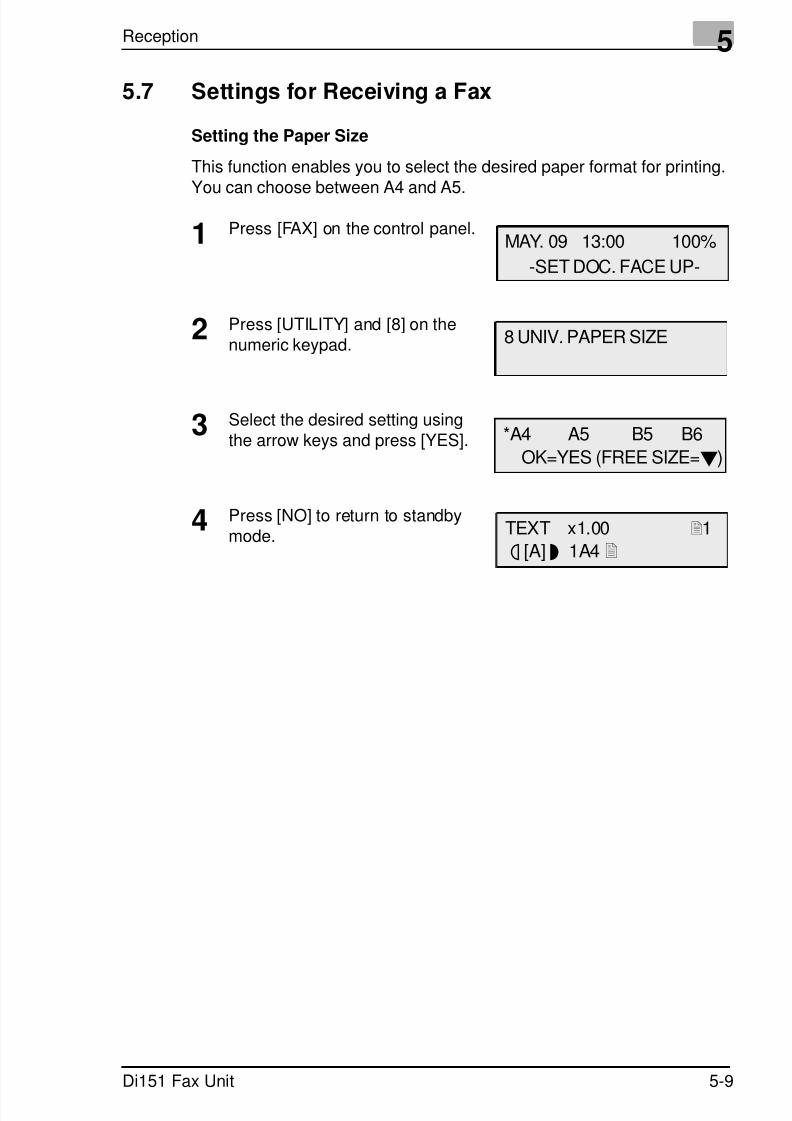
7/18/2019 Di151f_gb Users Manual Fax Unit.pdf
http://slidepdf.com/reader/full/di151fgb-users-manual-fax-unitpdf 103/170
Reception 5
Di151 Fax Unit 5-9
5.7 Settings for Receiving a Fax
Setting the Paper Size
This function enables you to select the desired paper format for printing.
You can choose between A4 and A5.
1 Press [FAX] on the control panel.
2 Press [UTILITY] and [8] on thenumeric keypad.
3 Select the desired setting usingthe arrow keys and press [YES].
4 Press [NO] to return to standbymode.
MAY. 09 13:00 100%
-SET DOC. FACE UP-
8 UNIV. PAPER SIZE
*A4 A5 B5 B6
OK=YES (FREE SIZE=)
TEXT x1.00 1
ä [A] ü 1A4
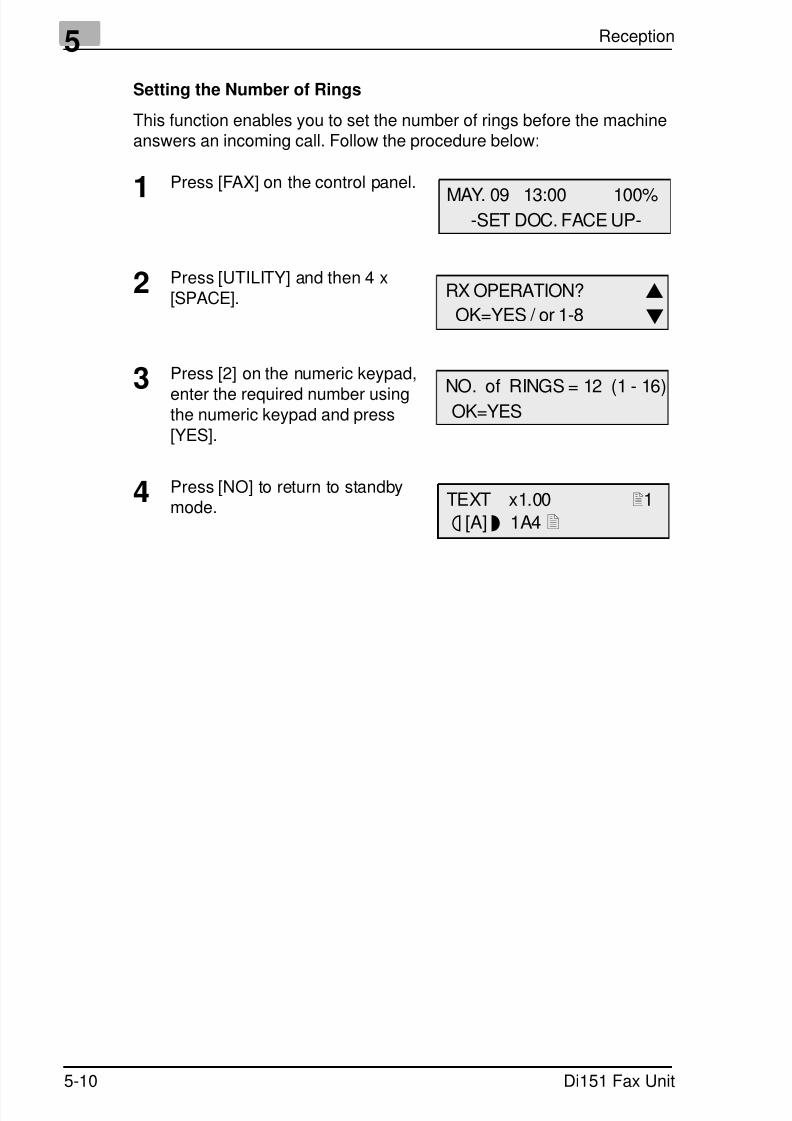
7/18/2019 Di151f_gb Users Manual Fax Unit.pdf
http://slidepdf.com/reader/full/di151fgb-users-manual-fax-unitpdf 104/170
5 Reception
5-10 Di151 Fax Unit
Setting the Number of Rings
This function enables you to set the number of rings before the machineanswers an incoming call. Follow the procedure below:
1 Press [FAX] on the control panel.
2 Press [UTILITY] and then 4 x[SPACE].
3 Press [2] on the numeric keypad,
enter the required number usingthe numeric keypad and press[YES].
4 Press [NO] to return to standbymode.
MAY. 09 13:00 100%-SET DOC. FACE UP-
RX OPERATION?
OK=YES / or 1-8
NO. of RINGS = 12 (1 - 16)OK=YES
TEXT x1.00 1
ä [A] ü 1A4
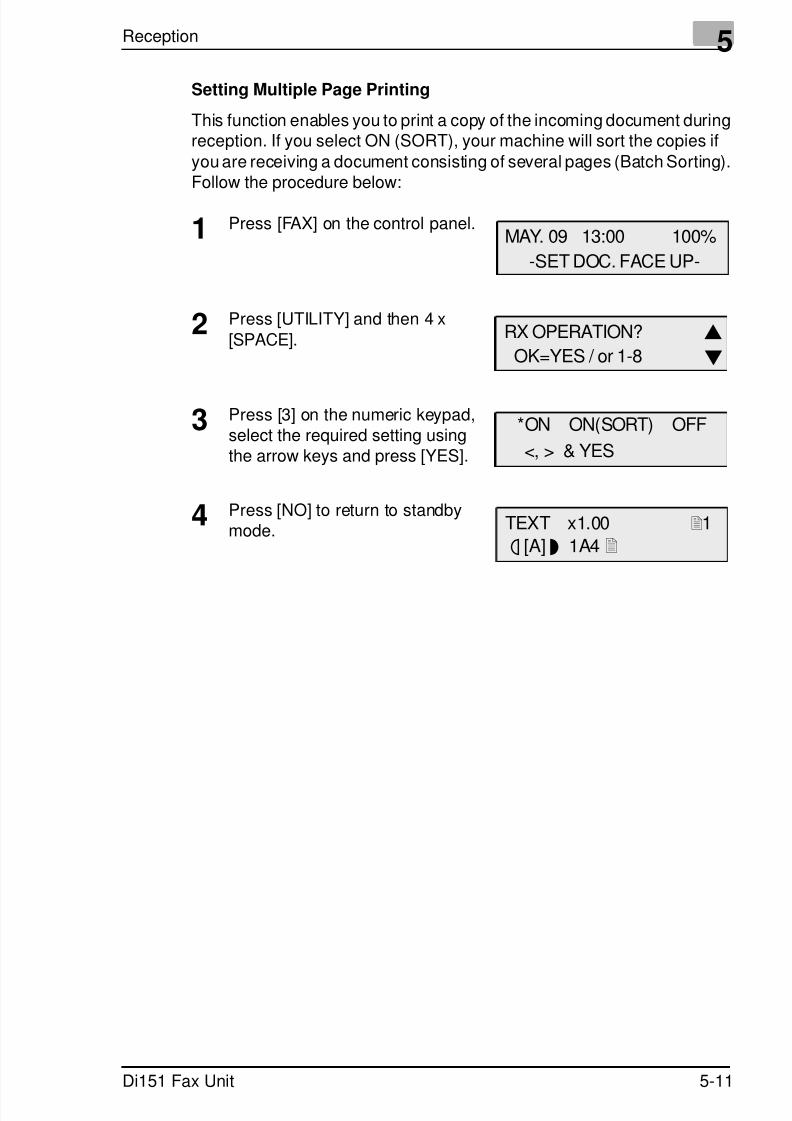
7/18/2019 Di151f_gb Users Manual Fax Unit.pdf
http://slidepdf.com/reader/full/di151fgb-users-manual-fax-unitpdf 105/170
Reception 5
Di151 Fax Unit 5-11
Setting Multiple Page Printing
This function enables you to print a copy of the incoming document duringreception. If you select ON (SORT), your machine will sort the copies if
you are receiving a document consisting of several pages (Batch Sorting).Follow the procedure below:
1 Press [FAX] on the control panel.
2 Press [UTILITY] and then 4 x
[SPACE].
3 Press [3] on the numeric keypad,select the required setting usingthe arrow keys and press [YES].
4 Press [NO] to return to standbymode.
MAY. 09 13:00 100%
-SET DOC. FACE UP-
RX OPERATION?
OK=YES / or 1-8
*ON ON(SORT) OFF
<, > & YES
TEXT x1.00 1
ä [A] ü 1A4
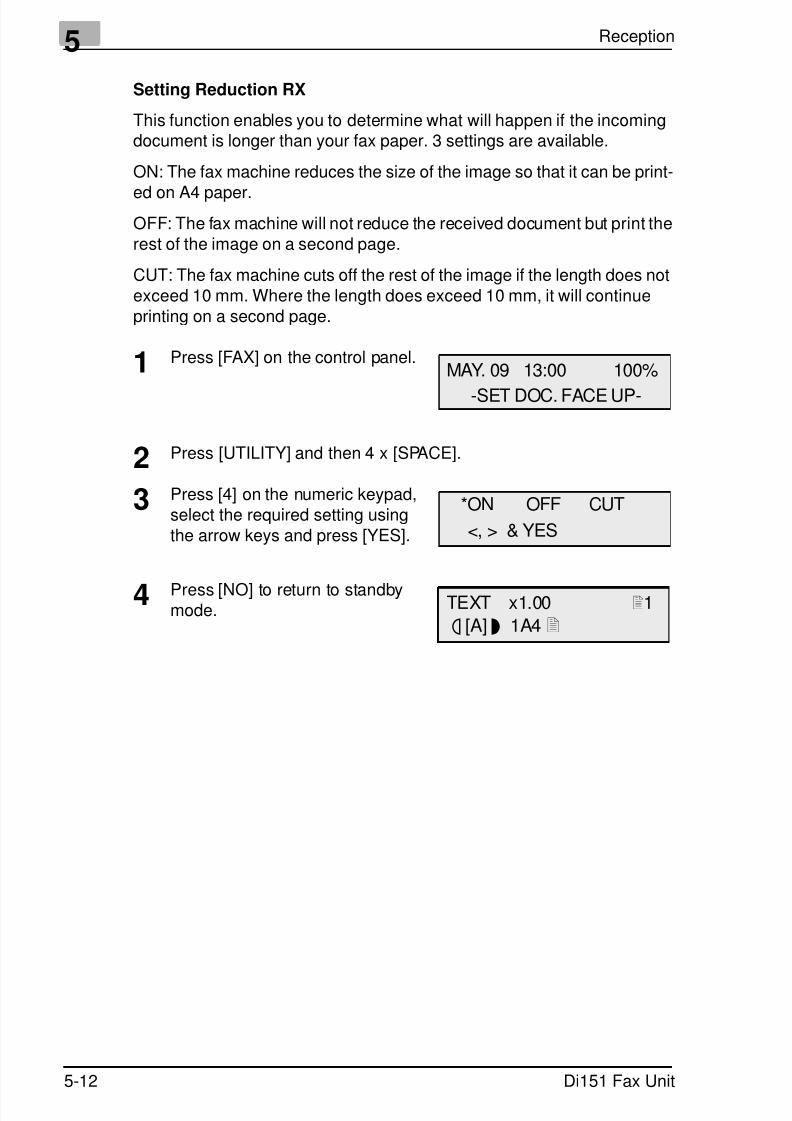
7/18/2019 Di151f_gb Users Manual Fax Unit.pdf
http://slidepdf.com/reader/full/di151fgb-users-manual-fax-unitpdf 106/170
5 Reception
5-12 Di151 Fax Unit
Setting Reduction RX
This function enables you to determine what will happen if the incomingdocument is longer than your fax paper. 3 settings are available.
ON: The fax machine reduces the size of the image so that it can be print-
ed on A4 paper.OFF: The fax machine will not reduce the received document but print therest of the image on a second page.
CUT: The fax machine cuts off the rest of the image if the length does notexceed 10 mm. Where the length does exceed 10 mm, it will continueprinting on a second page.
1 Press [FAX] on the control panel.
2 Press [UTILITY] and then 4 x [SPACE].
3 Press [4] on the numeric keypad,select the required setting usingthe arrow keys and press [YES].
4 Press [NO] to return to standbymode.
MAY. 09 13:00 100%
-SET DOC. FACE UP-
*ON OFF CUT
<, > & YES
TEXT x1.00 1
ä [A] ü 1A4
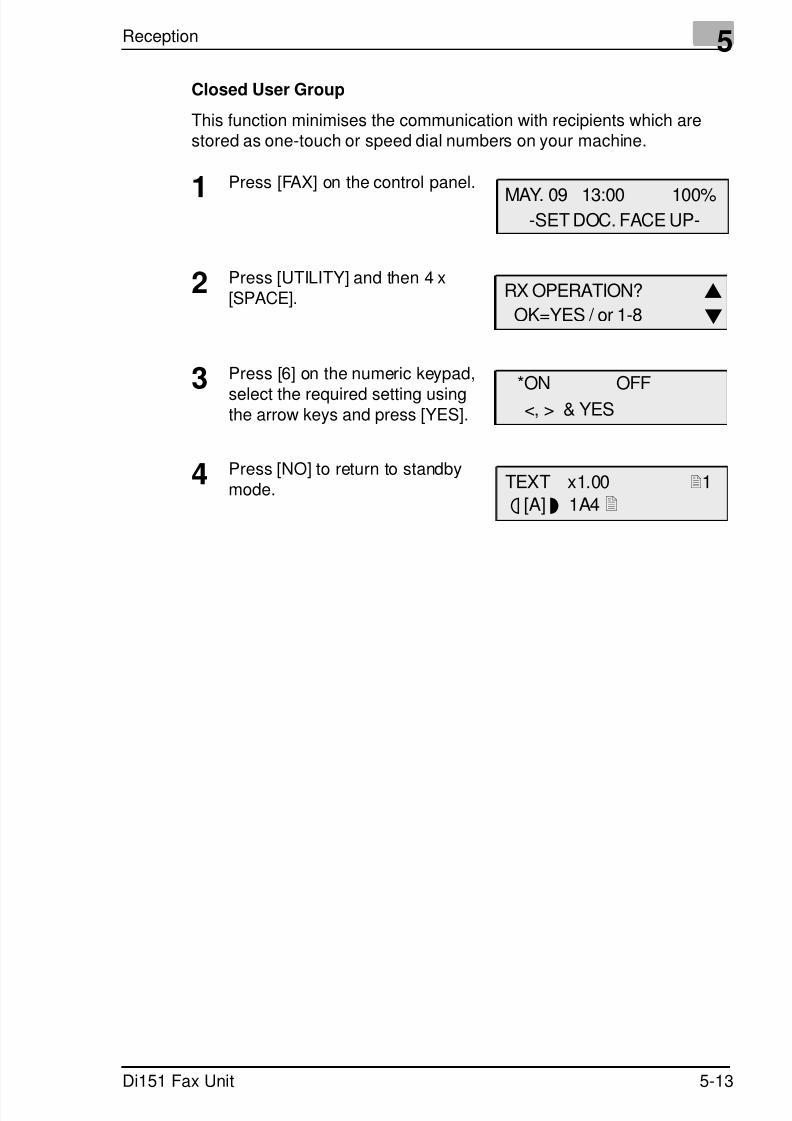
7/18/2019 Di151f_gb Users Manual Fax Unit.pdf
http://slidepdf.com/reader/full/di151fgb-users-manual-fax-unitpdf 107/170
Reception 5
Di151 Fax Unit 5-13
Closed User Group
This function minimises the communication with recipients which arestored as one-touch or speed dial numbers on your machine.
1 Press [FAX] on the control panel.
2 Press [UTILITY] and then 4 x[SPACE].
3 Press [6] on the numeric keypad,
select the required setting usingthe arrow keys and press [YES].
4 Press [NO] to return to standbymode.
MAY. 09 13:00 100%-SET DOC. FACE UP-
RX OPERATION?
OK=YES / or 1-8
*ON OFF<, > & YES
TEXT x1.00 1
ä [A] ü 1A4
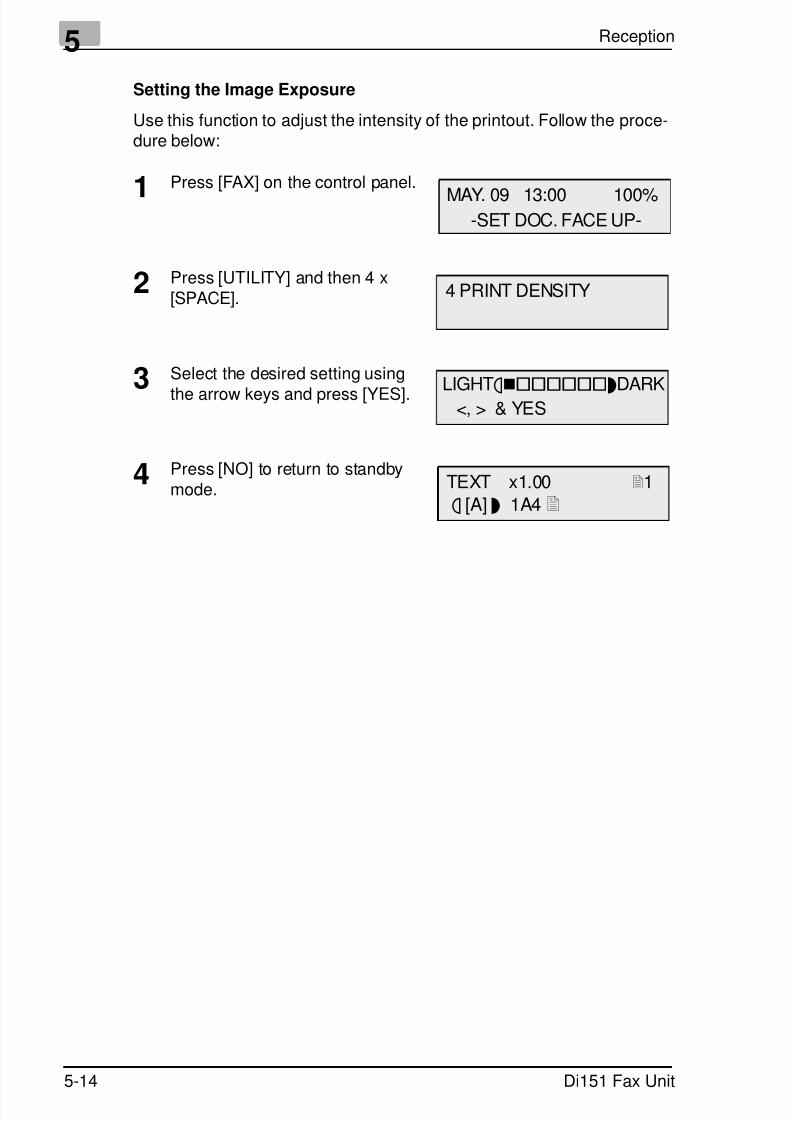
7/18/2019 Di151f_gb Users Manual Fax Unit.pdf
http://slidepdf.com/reader/full/di151fgb-users-manual-fax-unitpdf 108/170
5 Reception
5-14 Di151 Fax Unit
Setting the Image Exposure
Use this function to adjust the intensity of the printout. Follow the proce-dure below:
1 Press [FAX] on the control panel.
2 Press [UTILITY] and then 4 x[SPACE].
3 Select the desired setting using
the arrow keys and press [YES].
4 Press [NO] to return to standbymode.
MAY. 09 13:00 100%-SET DOC. FACE UP-
4 PRINT DENSITY
LIGHTä
üDARK<, > & YES
TEXT x1.00 1
ä [A] ü 1A4
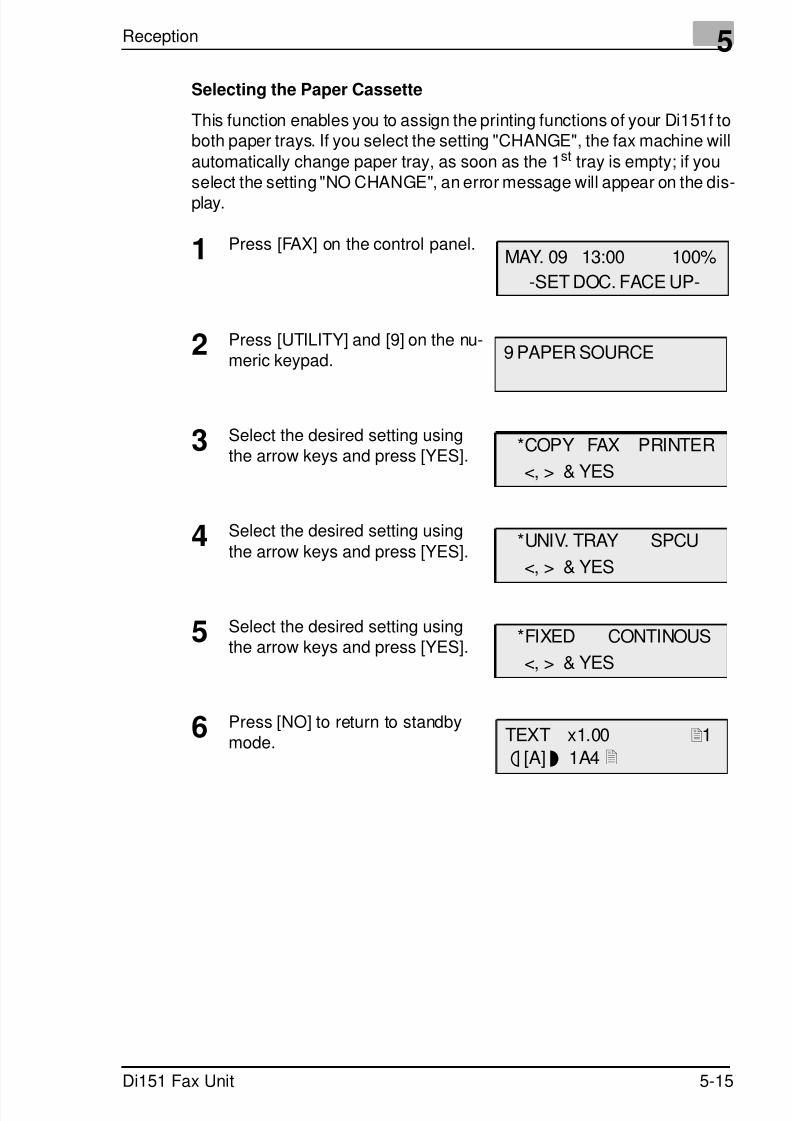
7/18/2019 Di151f_gb Users Manual Fax Unit.pdf
http://slidepdf.com/reader/full/di151fgb-users-manual-fax-unitpdf 109/170
Reception 5
Di151 Fax Unit 5-15
Selecting the Paper Cassette
This function enables you to assign the printing functions of your Di151f toboth paper trays. If you select the setting "CHANGE", the fax machine will
automatically change paper tray, as soon as the 1st tray is empty; if youselect the setting "NO CHANGE", an error message will appear on the dis-
play.
1 Press [FAX] on the control panel.
2 Press [UTILITY] and [9] on the nu-meric keypad.
3 Select the desired setting usingthe arrow keys and press [YES].
4 Select the desired setting using
the arrow keys and press [YES].
5 Select the desired setting usingthe arrow keys and press [YES].
6 Press [NO] to return to standbymode.
MAY. 09 13:00 100%
-SET DOC. FACE UP-
9 PAPER SOURCE
*COPY FAX PRINTER
<, > & YES
*UNIV. TRAY SPCU
<, > & YES
*FIXED CONTINOUS
<, > & YES
TEXT x1.00 1
ä [A] ü 1A4

7/18/2019 Di151f_gb Users Manual Fax Unit.pdf
http://slidepdf.com/reader/full/di151fgb-users-manual-fax-unitpdf 110/170
5 Reception
5-16 Di151 Fax Unit

7/18/2019 Di151f_gb Users Manual Fax Unit.pdf
http://slidepdf.com/reader/full/di151fgb-users-manual-fax-unitpdf 111/170
Copy 6
Di151 Fax Unit 6-1
6 Copy
6.1 Copying from the Document FeederYou can use your Di151f to produce up to 100 copies in one operation.
1 Place the document face up in thedocument feeder and press[COPY] on the control panel.
2 Enter the required number using the numeric keypad and press[START].
The machine starts copying.
6.2 Copying Using the Flatbed Scanner
1 Place the document face down onthe glass, close the cover andpress [COPY] on the controlpanel.
2 Enter the required number using the numeric keypad and press[START].
The machine starts copying.
TEXT x1.00 1
ä [A] ü 1A4
TEXT x1.00 1
ä [A] ü 1A4

7/18/2019 Di151f_gb Users Manual Fax Unit.pdf
http://slidepdf.com/reader/full/di151fgb-users-manual-fax-unitpdf 112/170
6 Copy
6-2 Di151 Fax Unit
6.3 Copying Using the Flatbed Scanner
1 Bend the leading edge of the copypaper slightly upwards.This willenable the feeder to grasp the
paper easier.
2 Always feed the copy paper intothe single sheet feeder one sheetat a time.
3 Insert the paper into the singlesheet feeder in such a way that it just touches the feeder. The side
to be printed must face upwards.
Instructions on how to proceed can be taken form the sections "SelectPaper Tray" and "Select Special Paper Sizes".
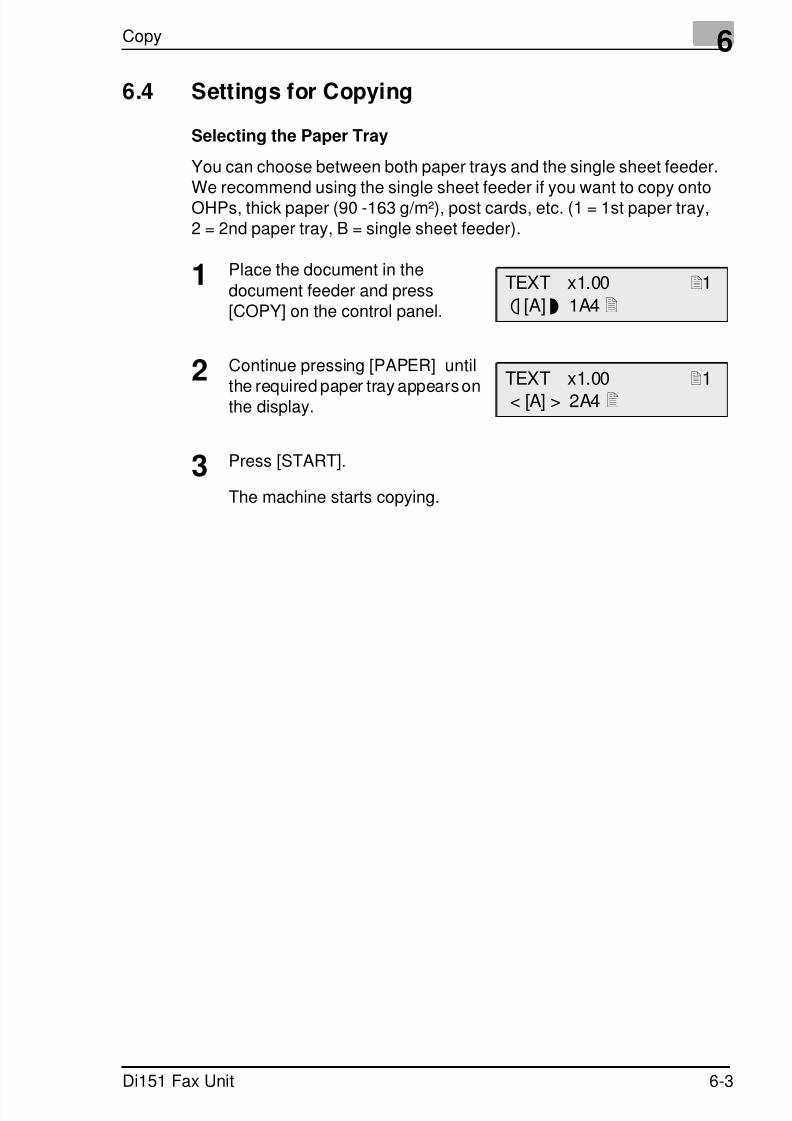
7/18/2019 Di151f_gb Users Manual Fax Unit.pdf
http://slidepdf.com/reader/full/di151fgb-users-manual-fax-unitpdf 113/170
Copy 6
Di151 Fax Unit 6-3
6.4 Settings for Copying
Selecting the Paper Tray
You can choose between both paper trays and the single sheet feeder.
We recommend using the single sheet feeder if you want to copy ontoOHPs, thick paper (90 -163 g/m²), post cards, etc. (1 = 1st paper tray,2 = 2nd paper tray, B = single sheet feeder).
1 Place the document in the
document feeder and press[COPY] on the control panel.
2 Continue pressing [PAPER] until
the required paper tray appears onthe display.
3 Press [START].
The machine starts copying.
TEXT x1.00 1
ä [A] ü 1A4
TEXT x1.00 1
< [A] > 2A4

7/18/2019 Di151f_gb Users Manual Fax Unit.pdf
http://slidepdf.com/reader/full/di151fgb-users-manual-fax-unitpdf 114/170
6 Copy
6-4 Di151 Fax Unit
Selecting Default Special Paper Sizes
1 Place the document in thedocument feeder and press[COPY] on the control panel.
2 Continue pressing [PAPER] untilthe single sheet feeder option
appears on the display and thenpress [NO].
3 Use the arrow keys to select therequired type of paper and press[YES].
4 Select the desired format usingthe arrow keys and press [YES].
5 Insert the selected copy paper in
the single sheet feeder and press[START].
The machine starts copying.
TEXT x1.00 1
ä [A] ü 1A4
TEXT x1.00 1
< [A] > A4C? YES/NO
PLAIN OHP *CARD
<, > & YES
*A4 A5 B5 B6
OK=YES (FREE SIZE=)
TEXT x1.00 1< [A] > []

7/18/2019 Di151f_gb Users Manual Fax Unit.pdf
http://slidepdf.com/reader/full/di151fgb-users-manual-fax-unitpdf 115/170
Copy 6
Di151 Fax Unit 6-5
Manually Setting Special Paper Sizes
1 Place the document in thedocument feeder and press[COPY] on the control panel.
2 Continue pressing [PAPER] untilthe single sheet feeder option
appears on the display and thenpress [NO].
3 Use the arrow keys to select therequired type of paper and press[YES].
4 Press [SPACE] to enter the paperformat.
5 Use the numeric keypad to enter
the x-value (length) and press[YES].
6 Use the numeric keypad to enterthe y-value (width) and press[YES].
7 Insert the selected copy paper inthe single sheet feeder and press
[START].
The machine starts copying.
TEXT x1.00 1
ä [A] ü 1A4
TEXT x1.00 1
< [A] > A4C? YES/NO
PLAIN OHP *CARD
<, > & YES
*A4 A5 B5 B6
OK=YES (FREE SIZE=)
x=279mm (182 - 355) xOK=YES y
y=210mm (128 - 215) xOK=YES y
TEXT x1.00 1< [A] > []

7/18/2019 Di151f_gb Users Manual Fax Unit.pdf
http://slidepdf.com/reader/full/di151fgb-users-manual-fax-unitpdf 116/170
6 Copy
6-6 Di151 Fax Unit
Selecting the Default Zoom Ratio
The following reproduction ratios may be selected:
x 1,00 (100%, A4 to A4)
x 1,15 (115%, B5 to A4)
x 1,41 (141%, A5 to A4) x 0,70 (70%, A4 to A5)
x 0,81 (81%, B5 to A5).
1 Place the document in thedocument feeder and press[COPY] on the control panel.
2 Continue pressing [ZOOM] untilthe required zoom ratio isdisplayed.
Changing the Zoom Ratio in Increments of a Percentage
This function enables you to change the zoom ratio in increments of 1%.
1 Place the document in thedocument feeder and press
[COPY] on the control panel.
2 Continue pressing [ZOOM] until azoom ratio is displayed which isthe closest to your required zoomratio.
3 Press [DELETE] to change the
zoom ratio in increments of 1%.
TEXT x1.00 1
ä [A] ü 1A4
TEXT x1.15 1ä [A] ü 1A4
TEXT x1.00 1
ä [A] ü 1A4
TEXT x1.15 1
ä [A] ü 1A4
TEXT x1.16
1ä [A] ü 1A4
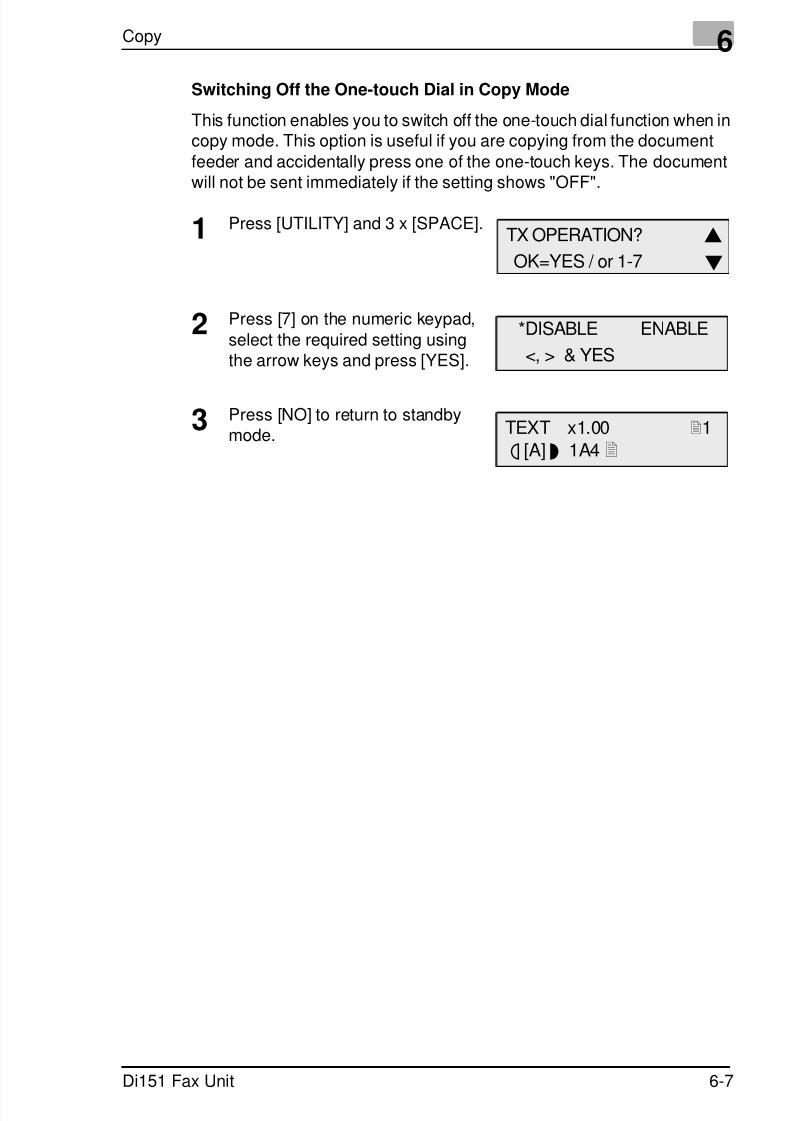
7/18/2019 Di151f_gb Users Manual Fax Unit.pdf
http://slidepdf.com/reader/full/di151fgb-users-manual-fax-unitpdf 117/170
Copy 6
Di151 Fax Unit 6-7
Switching Off the One-touch Dial in Copy Mode
This function enables you to switch off the one-touch dial function when incopy mode. This option is useful if you are copying from the document
feeder and accidentally press one of the one-touch keys. The documentwill not be sent immediately if the setting shows "OFF".
1 Press [UTILITY] and 3 x [SPACE].
2 Press [7] on the numeric keypad,
select the required setting usingthe arrow keys and press [YES].
3 Press [NO] to return to standbymode.
TX OPERATION?
OK=YES / or 1-7
*DISABLE ENABLE
<, > & YES
TEXT x1.00 1
ä [A] ü 1A4
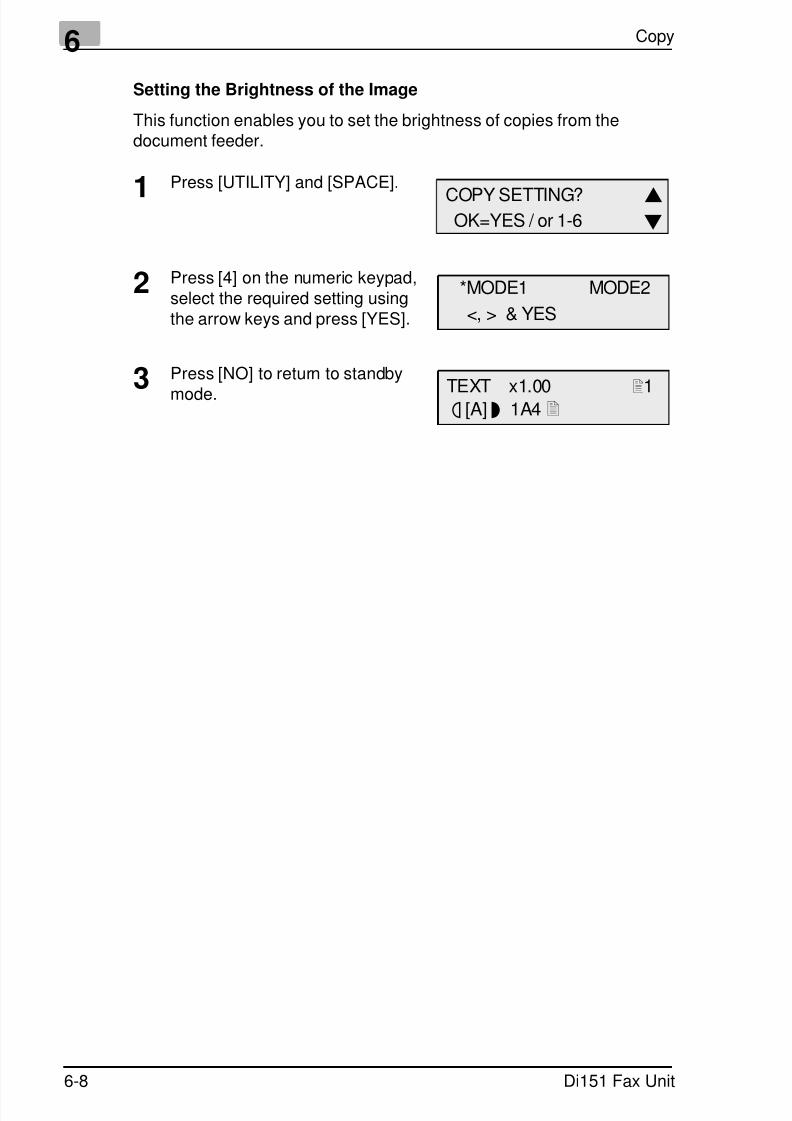
7/18/2019 Di151f_gb Users Manual Fax Unit.pdf
http://slidepdf.com/reader/full/di151fgb-users-manual-fax-unitpdf 118/170
6 Copy
6-8 Di151 Fax Unit
Setting the Brightness of the Image
This function enables you to set the brightness of copies from thedocument feeder.
1 Press [UTILITY] and [SPACE].
2 Press [4] on the numeric keypad,select the required setting usingthe arrow keys and press [YES].
3 Press [NO] to return to standby
mode.
COPY SETTING? OK=YES / or 1-6
*MODE1 MODE2
<, > & YES
TEXT x1.00
1ä [A] ü 1A4
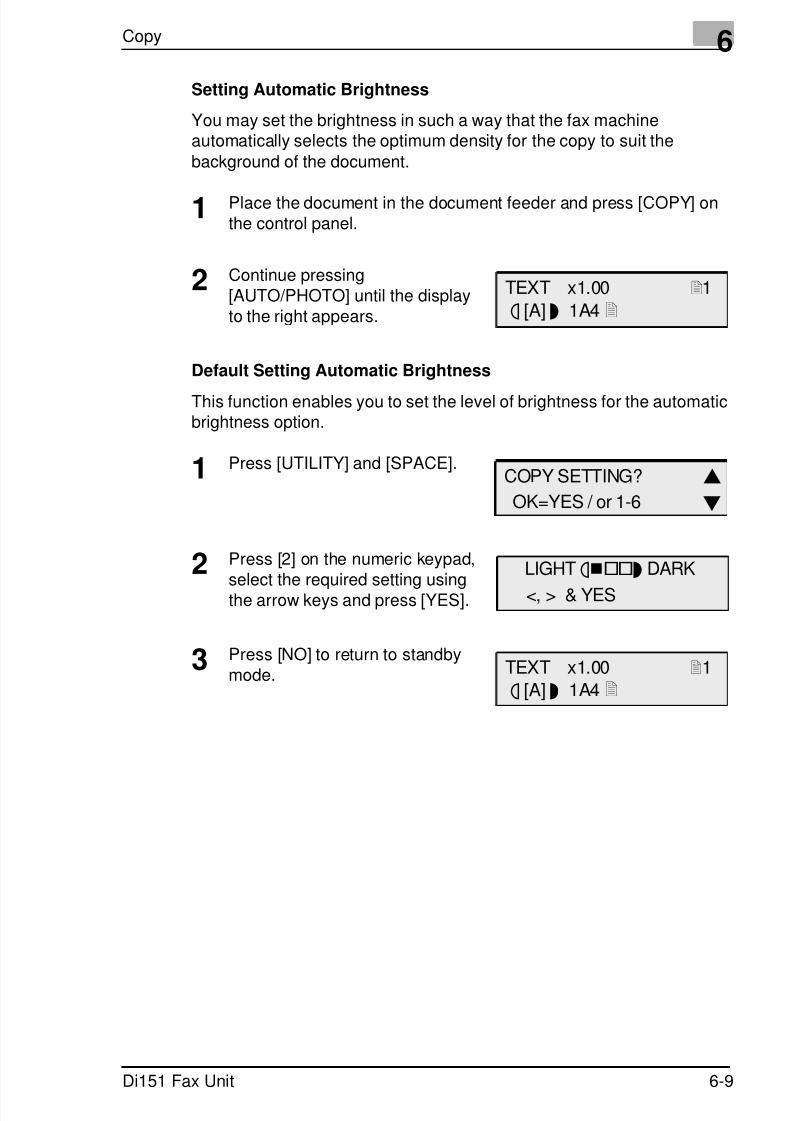
7/18/2019 Di151f_gb Users Manual Fax Unit.pdf
http://slidepdf.com/reader/full/di151fgb-users-manual-fax-unitpdf 119/170
Copy 6
Di151 Fax Unit 6-9
Setting Automatic Brightness
You may set the brightness in such a way that the fax machineautomatically selects the optimum density for the copy to suit the
background of the document.
1 Place the document in the document feeder and press [COPY] onthe control panel.
2 Continue pressing[AUTO/PHOTO] until the displayto the right appears.
Default Setting Automatic Brightness
This function enables you to set the level of brightness for the automaticbrightness option.
1 Press [UTILITY] and [SPACE].
2 Press [2] on the numeric keypad,select the required setting usingthe arrow keys and press [YES].
3 Press [NO] to return to standbymode.
TEXT x1.00 1
ä [A] ü 1A4
COPY SETTING?
OK=YES / or 1-6
LIGHT äü DARK
<, > & YES
TEXT x1.00 1
ä [A] ü 1A4

7/18/2019 Di151f_gb Users Manual Fax Unit.pdf
http://slidepdf.com/reader/full/di151fgb-users-manual-fax-unitpdf 120/170
6 Copy
6-10 Di151 Fax Unit
Setting Manual Brightness
This function enables you to make copies brighter or darker. 9 levels ofbrightness are available.
1 Place the document in the document feeder and press [COPY] on
the control panel.
2 Continue pressing[AUTO/PHOTO] until the displayto the right appears.
3 Use the arrow keys to select thedesired setting.
Default Setting Manual Brightness
This function enables you to set the level of brightness for the manualbrightness option.
1 Press [UTILITY] and [SPACE].
2 Press [3] on the numeric keypad,select the required setting usingthe arrow keys and press [YES].
3 Press [NO] to return to standby
mode.
TEXT x1.00 1
ä ü 1A4
TEXT x1.00 1
ä ü 1A4
COPY SETTING?
OK=YES / or 1-6
LIGHTäüDARK
<, > & YES
TEXT x1.00 1
ä [A] ü 1A4
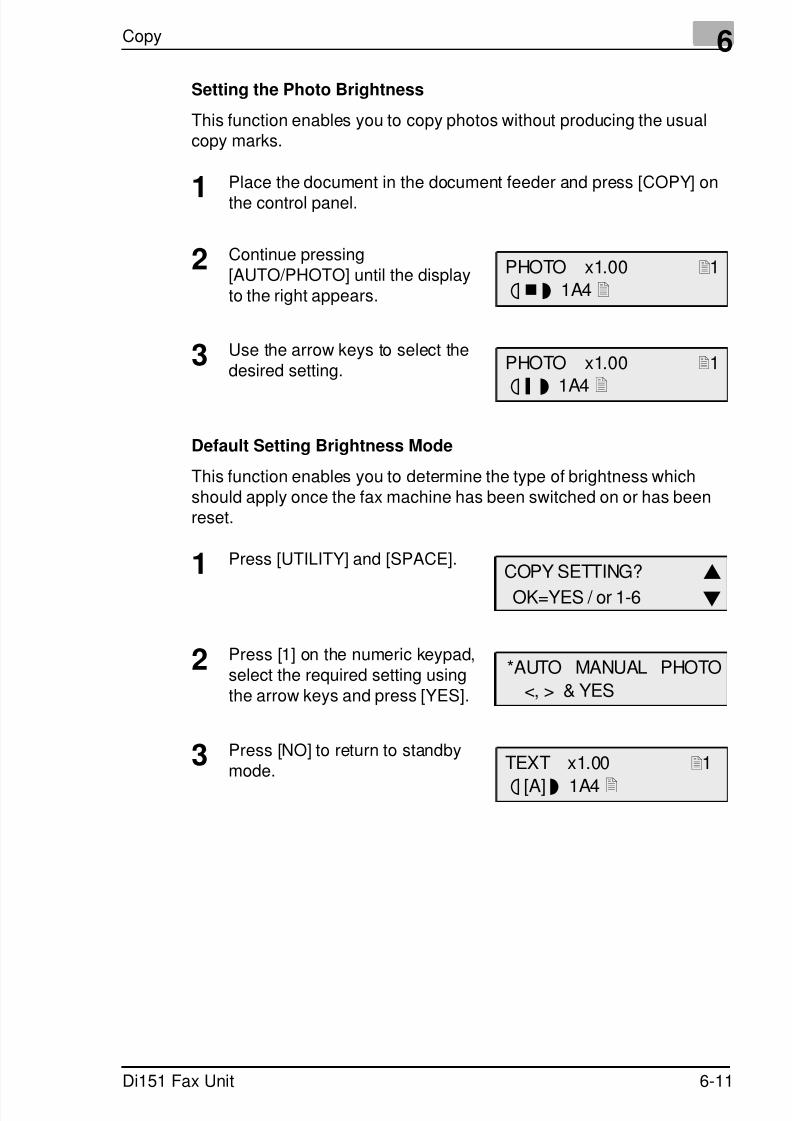
7/18/2019 Di151f_gb Users Manual Fax Unit.pdf
http://slidepdf.com/reader/full/di151fgb-users-manual-fax-unitpdf 121/170
Copy 6
Di151 Fax Unit 6-11
Setting the Photo Brightness
This function enables you to copy photos without producing the usualcopy marks.
1 Place the document in the document feeder and press [COPY] on
the control panel.
2 Continue pressing[AUTO/PHOTO] until the displayto the right appears.
3 Use the arrow keys to select thedesired setting.
Default Setting Brightness Mode
This function enables you to determine the type of brightness whichshould apply once the fax machine has been switched on or has beenreset.
1 Press [UTILITY] and [SPACE].
2 Press [1] on the numeric keypad,select the required setting usingthe arrow keys and press [YES].
3 Press [NO] to return to standbymode.
PHOTO x1.00 1
ä ü 1A4
PHOTO x1.00 1
ä ü 1A4
COPY SETTING?
OK=YES / or 1-6
*AUTO MANUAL PHOTO
<, > & YES
TEXT x1.00 1
ä [A] ü 1A4
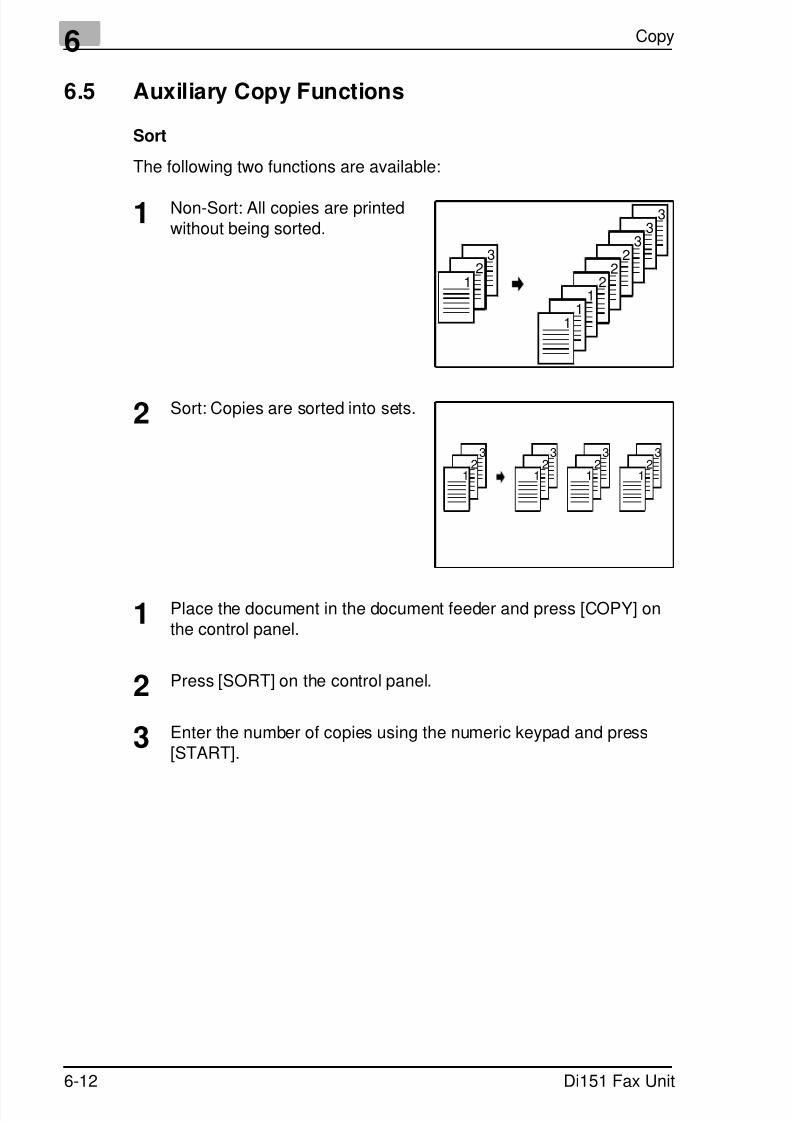
7/18/2019 Di151f_gb Users Manual Fax Unit.pdf
http://slidepdf.com/reader/full/di151fgb-users-manual-fax-unitpdf 122/170
6 Copy
6-12 Di151 Fax Unit
6.5 Auxiliary Copy Functions
Sort
The following two functions are available:
1 Non-Sort: All copies are printedwithout being sorted.
2 Sort: Copies are sorted into sets.
1 Place the document in the document feeder and press [COPY] onthe control panel.
2 Press [SORT] on the control panel.
3 Enter the number of copies using the numeric keypad and press[START].
32
1
33
32
22
11
1
32
1
32
1
32
1
32
1
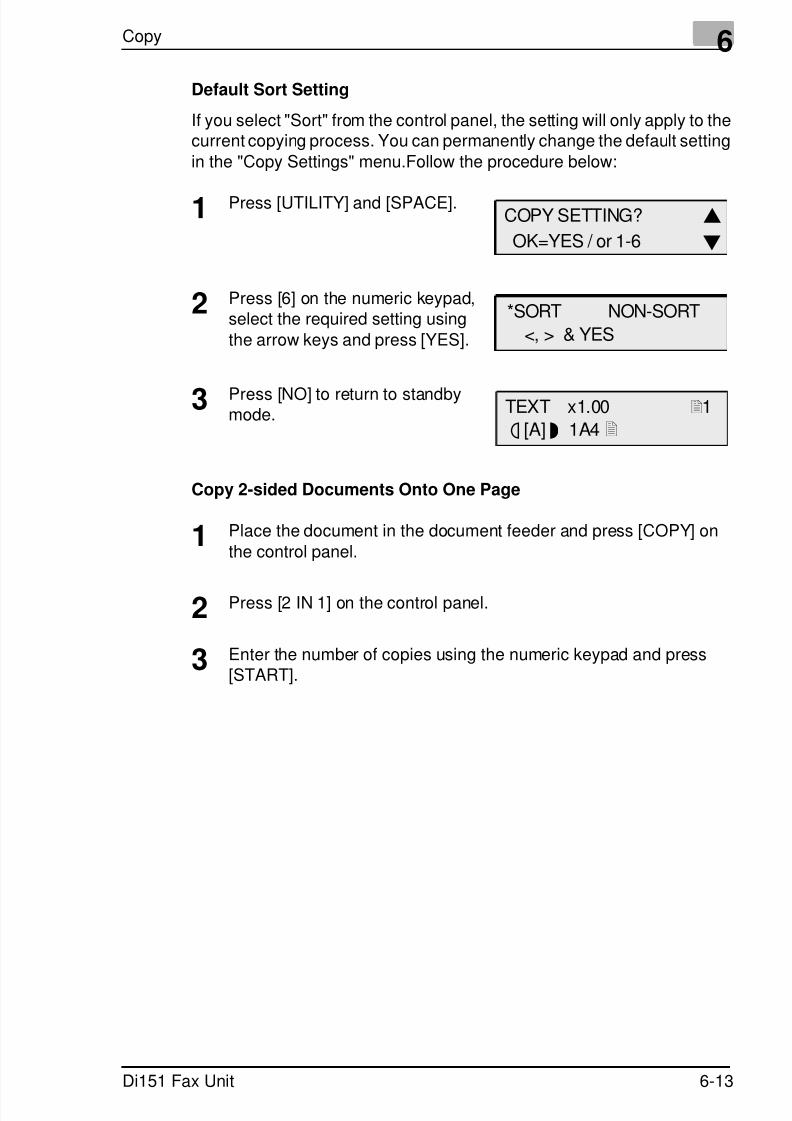
7/18/2019 Di151f_gb Users Manual Fax Unit.pdf
http://slidepdf.com/reader/full/di151fgb-users-manual-fax-unitpdf 123/170
Copy 6
Di151 Fax Unit 6-13
Default Sort Setting
If you select "Sort" from the control panel, the setting will only apply to thecurrent copying process. You can permanently change the default setting
in the "Copy Settings" menu.Follow the procedure below:
1 Press [UTILITY] and [SPACE].
2 Press [6] on the numeric keypad,select the required setting using
the arrow keys and press [YES].
3 Press [NO] to return to standbymode.
Copy 2-sided Documents Onto One Page
1 Place the document in the document feeder and press [COPY] on
the control panel.
2 Press [2 IN 1] on the control panel.
3 Enter the number of copies using the numeric keypad and press[START].
COPY SETTING?
OK=YES / or 1-6
*SORT NON-SORT
<, > & YES
TEXT x1.00 1
ä [A] ü 1A4
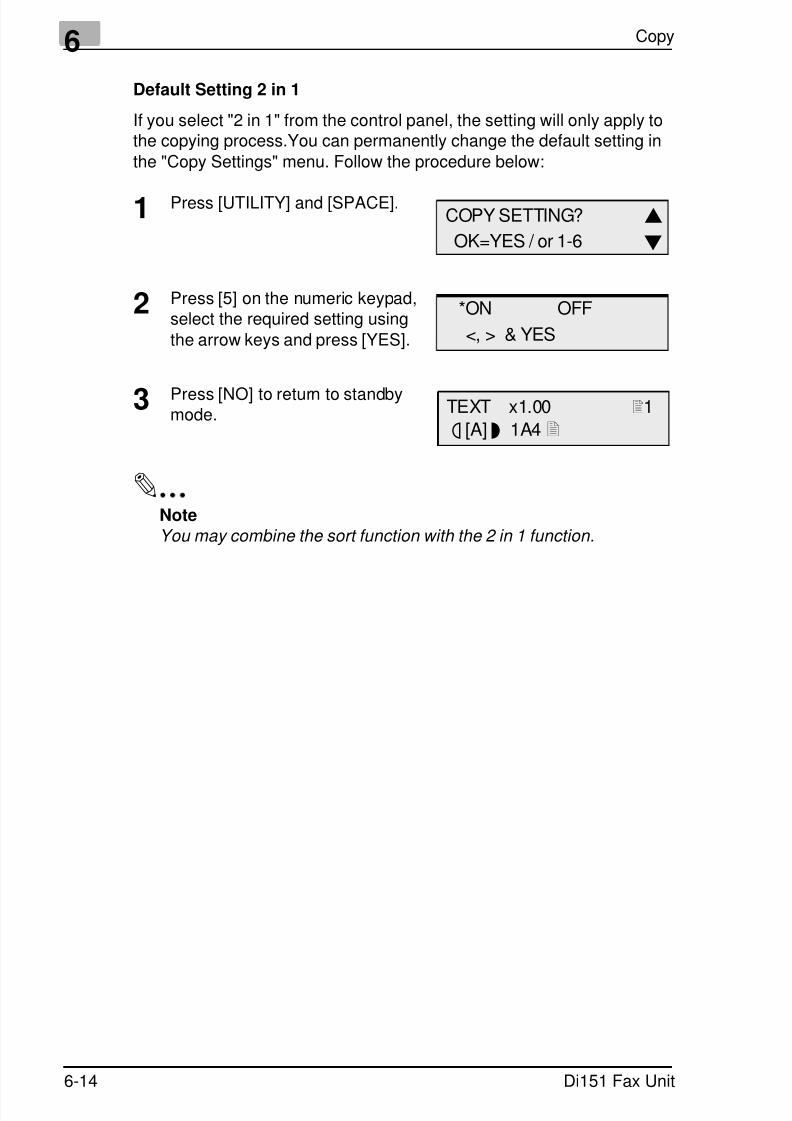
7/18/2019 Di151f_gb Users Manual Fax Unit.pdf
http://slidepdf.com/reader/full/di151fgb-users-manual-fax-unitpdf 124/170
6 Copy
6-14 Di151 Fax Unit
Default Setting 2 in 1
If you select "2 in 1" from the control panel, the setting will only apply tothe copying process.You can permanently change the default setting in
the "Copy Settings" menu. Follow the procedure below:
1 Press [UTILITY] and [SPACE].
2 Press [5] on the numeric keypad,select the required setting using
the arrow keys and press [YES].
3 Press [NO] to return to standbymode.
✎
NoteYou may combine the sort function with the 2 in 1 function.
COPY SETTING?
OK=YES / or 1-6
*ON OFF
<, > & YES
TEXT x1.00 1
ä [A] ü 1A4
7/18/2019 Di151f_gb Users Manual Fax Unit.pdf
http://slidepdf.com/reader/full/di151fgb-users-manual-fax-unitpdf 125/170
Connecting the Fax Machine to the Computer 7
Di151 Fax Unit 7-1
7 Connecting the Fax Machine to theComputer
7.1 Setting up the Fax Machine as a PC Fax andPC Scanner
If you have installed LaserFAX 3.5, Unimessage or WinFax Pro on yourPC for these functions, then there is no need to make any further changes.The software is available as an optional accessory. For further informationplease refer to the relevant software manual.
If you use the machine as a PC fax machine, only the machine's modem
is in use. The LaserFAX 3.5 will reach a compatibility level which allows atransfer rate of up to 14400 bps between the PC and the Di151.
Use a 9-pin RS-232C interface cable, wired 1:1 (available as an optionalaccessory).
Modem Specifications
The fax machine has the following protocol specifications:
Standard: EIA-578 Class 1 Fax/Modem, no data modem included.
Speed with HDLC support 300 bps.

7/18/2019 Di151f_gb Users Manual Fax Unit.pdf
http://slidepdf.com/reader/full/di151fgb-users-manual-fax-unitpdf 126/170
7 Connecting the Fax Machine to the Computer
7-2 Di151 Fax Unit
7.2 Scanner Mode
Installing the TWAIN Driver
Please proceed as follows:
1 Insert the driver disk in drive A: or D: (depending on the user specifichardware).
2 Click on "Start" and select "Execute".
3 Enter "A:\Setup" (or "D:\Setup" depending on the user specifichardware).
4 The driver installation menu will appear on the screen. Follow the
instructions until the installation has been completed.
Scanning Using the TWAIN Driver
Please proceed as follows, eg. using Microsoft Photo Editor:
1 Click on "File" in your PC program.
2 Click on "Scan Image".
3 Enter your settings under the control panel.
4 Insert the document in the document feeder or place it on the glassof the Di151.
5 Click on "Scan".
7/18/2019 Di151f_gb Users Manual Fax Unit.pdf
http://slidepdf.com/reader/full/di151fgb-users-manual-fax-unitpdf 127/170
Connecting the Fax Machine to the Computer 7
Di151 Fax Unit 7-3
Setting the Scan Settings
Scanning in Class 1 Mode
Please proceed as follows:
1 Insert the document into the document feeder of the Di151.
2 Use your fax software to dial 888 and click on "OK".
The documents in the document feeder are scanned.
Option Function
M ode Includes the settings "Text" for text documents and "Photo" forimages.
Brightness You may choose between "Normal, "Light" and "Dark".
Paper size Includes the paper formats A4, letter and legal.
Resolution Select form "200x100 dpi", "200x200 dpi" and "300x300 dpi".
Setting Here you can select the baud rate and the port.
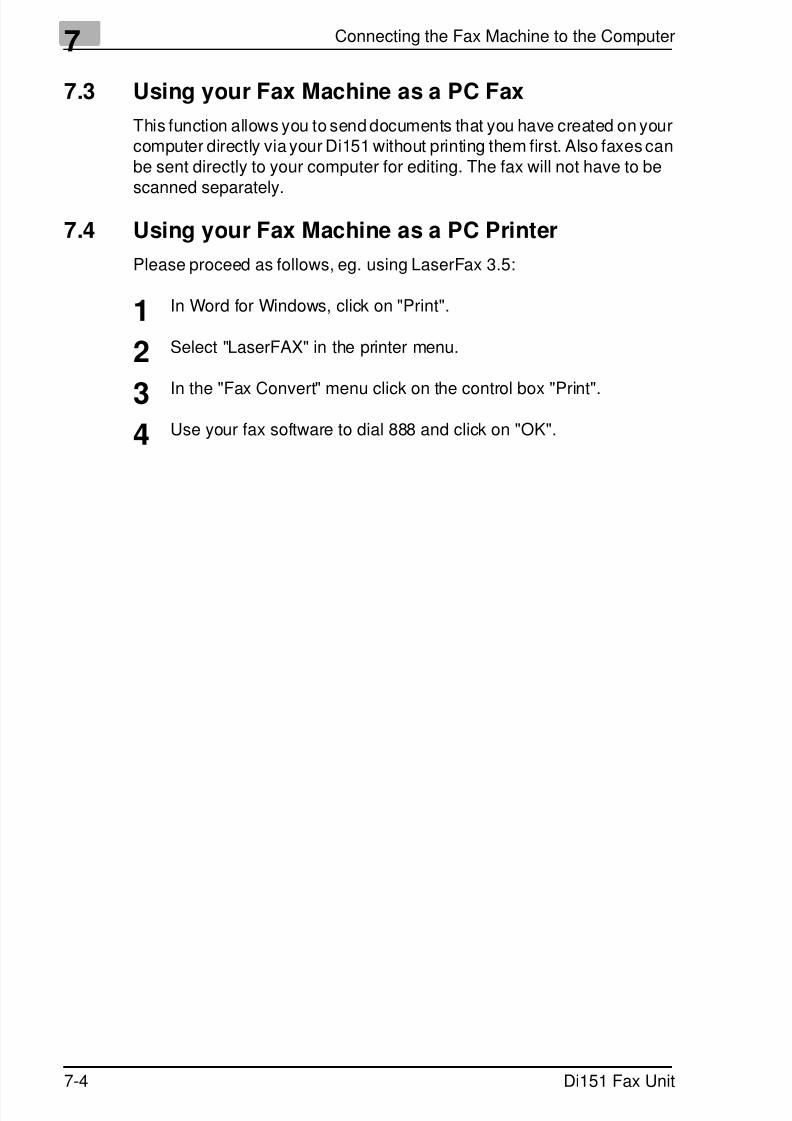
7/18/2019 Di151f_gb Users Manual Fax Unit.pdf
http://slidepdf.com/reader/full/di151fgb-users-manual-fax-unitpdf 128/170
7 Connecting the Fax Machine to the Computer
7-4 Di151 Fax Unit
7.3 Using your Fax Machine as a PC Fax
This function allows you to send documents that you have created on yourcomputer directly via your Di151 without printing them first. Also faxes canbe sent directly to your computer for editing. The fax will not have to be
scanned separately.
7.4 Using your Fax Machine as a PC Printer
Please proceed as follows, eg. using LaserFax 3.5:
1 In Word for Windows, click on "Print".
2 Select "LaserFAX" in the printer menu.
3 In the "Fax Convert" menu click on the control box "Print".
4 Use your fax software to dial 888 and click on "OK".
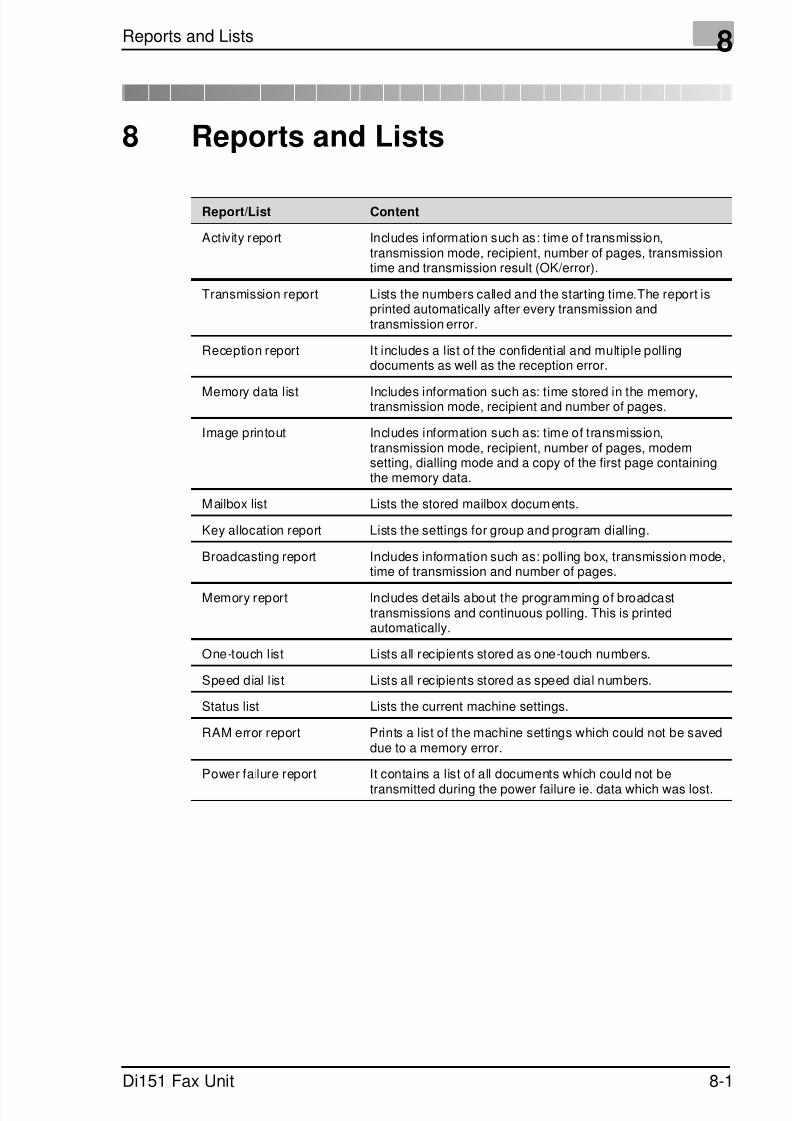
7/18/2019 Di151f_gb Users Manual Fax Unit.pdf
http://slidepdf.com/reader/full/di151fgb-users-manual-fax-unitpdf 129/170
Reports and Lists 8
Di151 Fax Unit 8-1
8 Reports and Lists
Report/List Content
Activity report Includes information such as: time of transmission,transmission mode, recipient, number of pages, transmissiontime and transmission result (OK/error).
Transmission report Lists the numbers called and the starting time.The report isprinted automatically after every transmission andtransmission error.
Reception report It includes a list of the confidential and multiple pollingdocuments as well as the reception error.
Memory data list Includes information such as: time stored in the memory,transmission mode, recipient and number of pages.
Image printout Includes information such as: time of transmission,transmission mode, recipient, number of pages, modemsetting, dialling mode and a copy of the first page containingthe memory data.
M ailbox list Lists the stored mailbox docum ents.
Key allocation report Lists the settings for group and program dialling.
Broadcasting report Includes information such as: polling box, transmission mode,time of transmission and number of pages.
Memory report Includes details about the programming of broadcasttransmissions and continuous polling. This is printedautomatically.
One-touch list Lists all recipients stored as one-touch numbers.
Speed dial list Lists all recipients stored as speed dial numbers.
Status list Lists the current machine settings.
RAM error report Prints a list of the machine settings which could not be saveddue to a memory error.
Power failure report It contains a list of all documents which could not be
transmitted during the power failure ie. data which was lost.
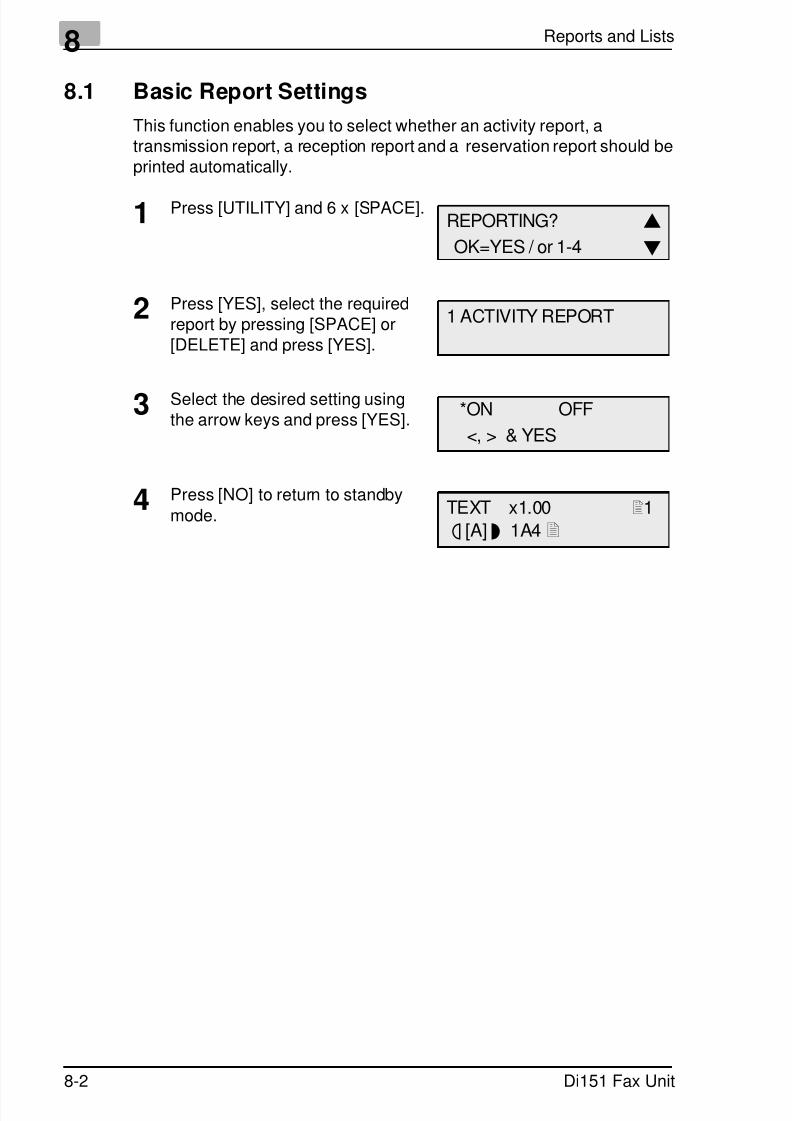
7/18/2019 Di151f_gb Users Manual Fax Unit.pdf
http://slidepdf.com/reader/full/di151fgb-users-manual-fax-unitpdf 130/170
8 Reports and Lists
8-2 Di151 Fax Unit
8.1 Basic Report Settings
This function enables you to select whether an activity report, atransmission report, a reception report and a reservation report should beprinted automatically.
1 Press [UTILITY] and 6 x [SPACE].
2 Press [YES], select the requiredreport by pressing [SPACE] or[DELETE] and press [YES].
3 Select the desired setting usingthe arrow keys and press [YES].
4 Press [NO] to return to standby
mode.
REPORTING?
OK=YES / or 1-4
1 ACTIVITY REPORT
*ON OFF
<, > & YES
TEXT x1.00 1
ä [A] ü 1A4
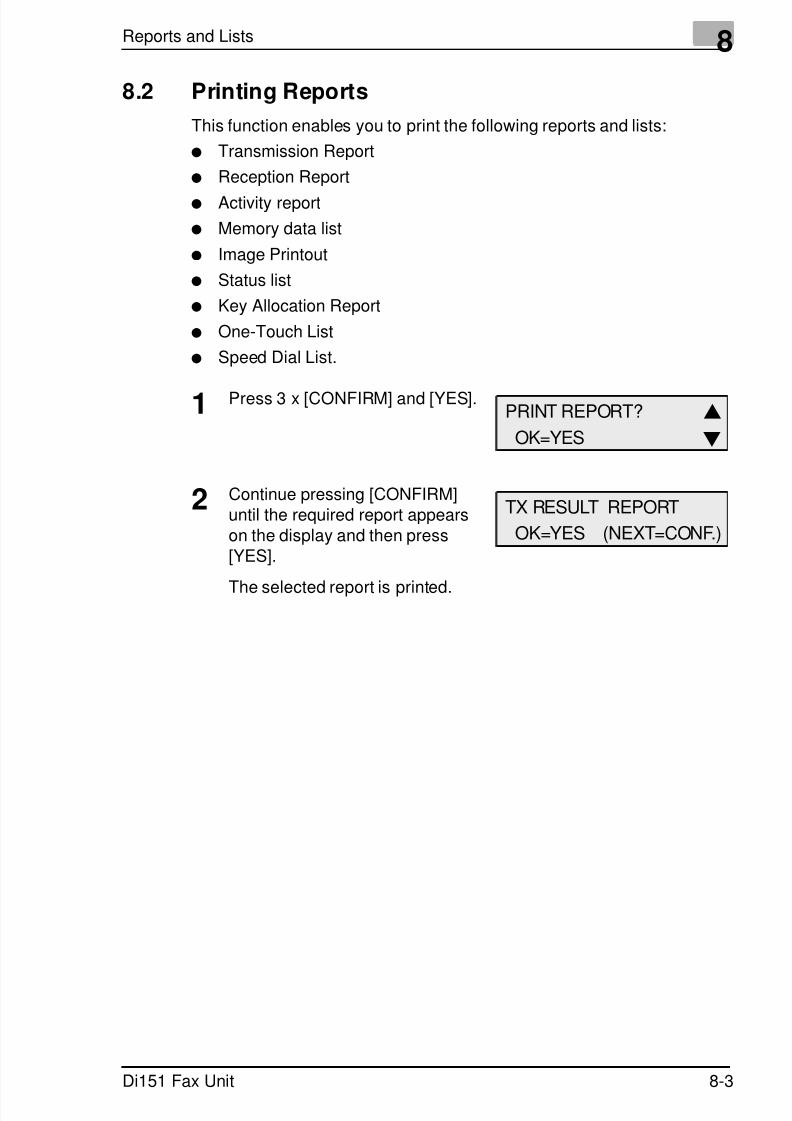
7/18/2019 Di151f_gb Users Manual Fax Unit.pdf
http://slidepdf.com/reader/full/di151fgb-users-manual-fax-unitpdf 131/170
Reports and Lists 8
Di151 Fax Unit 8-3
8.2 Printing Reports
This function enables you to print the following reports and lists:
Transmission Report
Reception Report
Activity report
Memory data list
Image Printout
Status list
Key Allocation Report
One-Touch List
Speed Dial List.
1 Press 3 x [CONFIRM] and [YES].
2 Continue pressing [CONFIRM]until the required report appearson the display and then press[YES].
The selected report is printed.
PRINT REPORT?
OK=YES
TX RESULT REPORT
OK=YES (NEXT=CONF.)
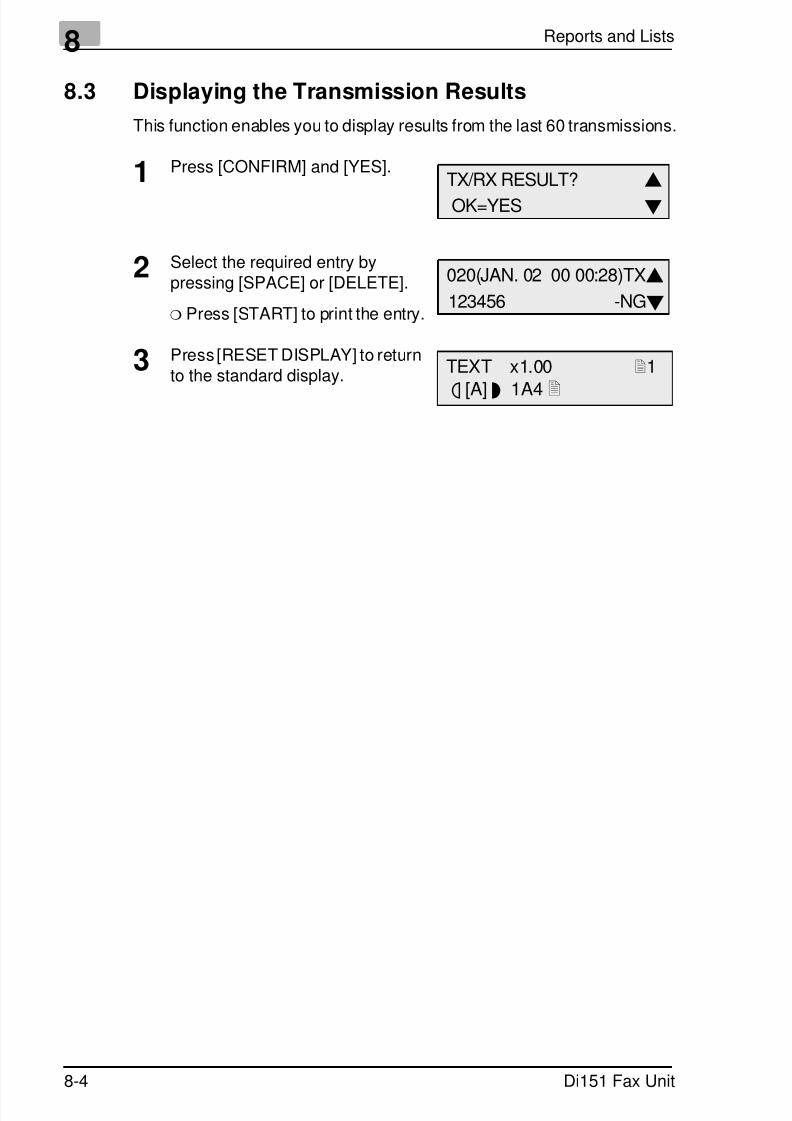
7/18/2019 Di151f_gb Users Manual Fax Unit.pdf
http://slidepdf.com/reader/full/di151fgb-users-manual-fax-unitpdf 132/170
8 Reports and Lists
8-4 Di151 Fax Unit
8.3 Displaying the Transmission Results
This function enables you to display results from the last 60 transmissions.
1 Press [CONFIRM] and [YES].
2 Select the required entry bypressing [SPACE] or [DELETE].
❍ Press [START] to print the entry.
3 Press [RESET DISPLAY] to returnto the standard display.
TX/RX RESULT?
OK=YES
020(JAN. 02 00 00:28)TX
123456 -NG
TEXT x1.00 1
ä [A] ü 1A4

7/18/2019 Di151f_gb Users Manual Fax Unit.pdf
http://slidepdf.com/reader/full/di151fgb-users-manual-fax-unitpdf 133/170
Reports and Lists 8
Di151 Fax Unit 8-5
8.4 Displaying the Counter
This function enables you to display the following counter options:
Number of pages printed
Number of pages scanned
Service counter
Number of pages sent
Number of pages received.
1 Press 2 x [CONFIRM] and [YES].
2 Select the required entry bypressing [SPACE] or [DELETE].
3 Press [YES] to return to standbymode.
4 Press [RESET DISPLAY] to returnto the standard display.
MACHINE COUNTER?
OK=YES
TOTAL PRINT=000105
CHECK FINISH=YES
TEXT x1.00 1
ä [A] ü 1A4
TEXT x1.00 1ä [A] ü 1A4

7/18/2019 Di151f_gb Users Manual Fax Unit.pdf
http://slidepdf.com/reader/full/di151fgb-users-manual-fax-unitpdf 134/170
8 Reports and Lists
8-6 Di151 Fax Unit
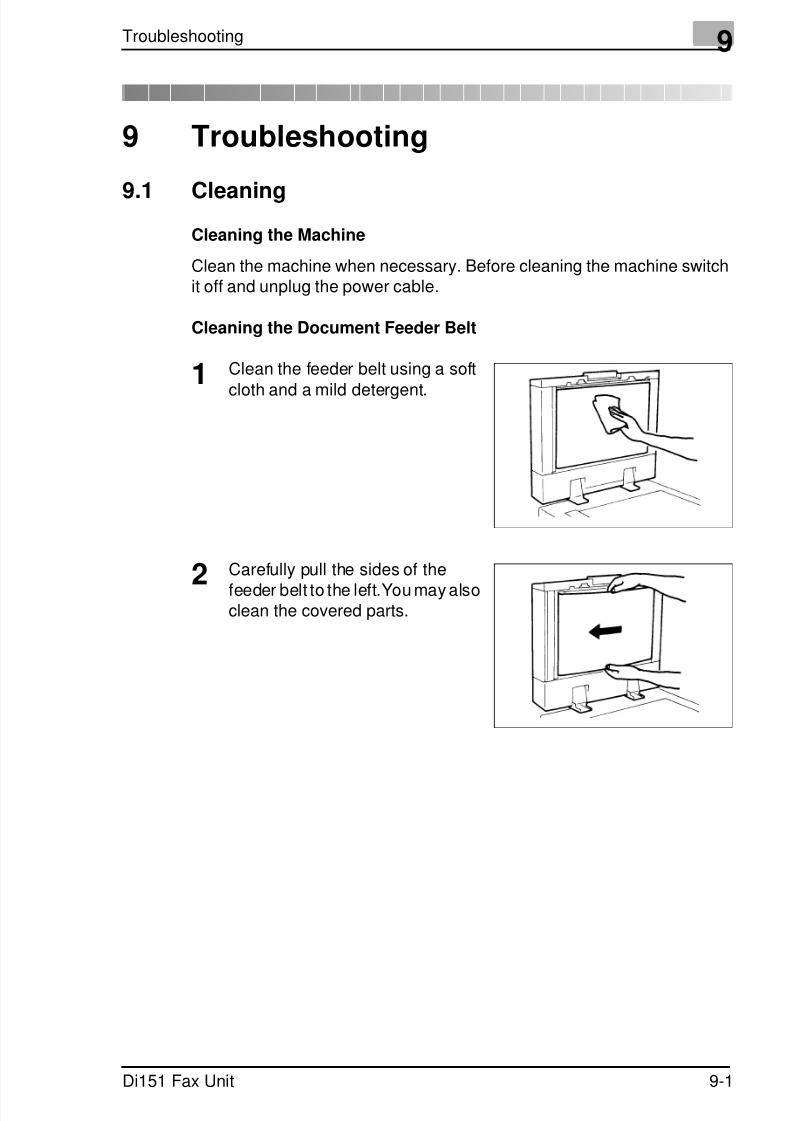
7/18/2019 Di151f_gb Users Manual Fax Unit.pdf
http://slidepdf.com/reader/full/di151fgb-users-manual-fax-unitpdf 135/170
Troubleshooting 9
Di151 Fax Unit 9-1
9 Troubleshooting
9.1 CleaningCleaning the Machine
Clean the machine when necessary. Before cleaning the machine switchit off and unplug the power cable.
Cleaning the Document Feeder Belt
1 Clean the feeder belt using a soft
cloth and a mild detergent.
2 Carefully pull the sides of the
feeder belt to the left.You may alsoclean the covered parts.
7/18/2019 Di151f_gb Users Manual Fax Unit.pdf
http://slidepdf.com/reader/full/di151fgb-users-manual-fax-unitpdf 136/170
9 Troubleshooting
9-2 Di151 Fax Unit
CAUTION
The machine may be damaged if instructions are not followed
properly➜ Never use alcohol or solvents!
➜ Always unplug the machine before you clean it!
✎
NoteMake sure the cloth does not get stuck in the machine and damages
any of the components. Never leave anything inside the machine. The
MINOLTA cleaning kit (No. 8918-561) is highly recommended for cleaning the rollers and the scanner.

7/18/2019 Di151f_gb Users Manual Fax Unit.pdf
http://slidepdf.com/reader/full/di151fgb-users-manual-fax-unitpdf 137/170
Troubleshooting 9
Di151 Fax Unit 9-3
9.2 Clearing Paper Jams
1 Remove the transparent cover ofthe paper tray.
2 Remove the paper from the papertray and then put it back in thepaper tray.
3 Push the paper guides until theytouch the paper.
4 Replace the cover of the papertray.
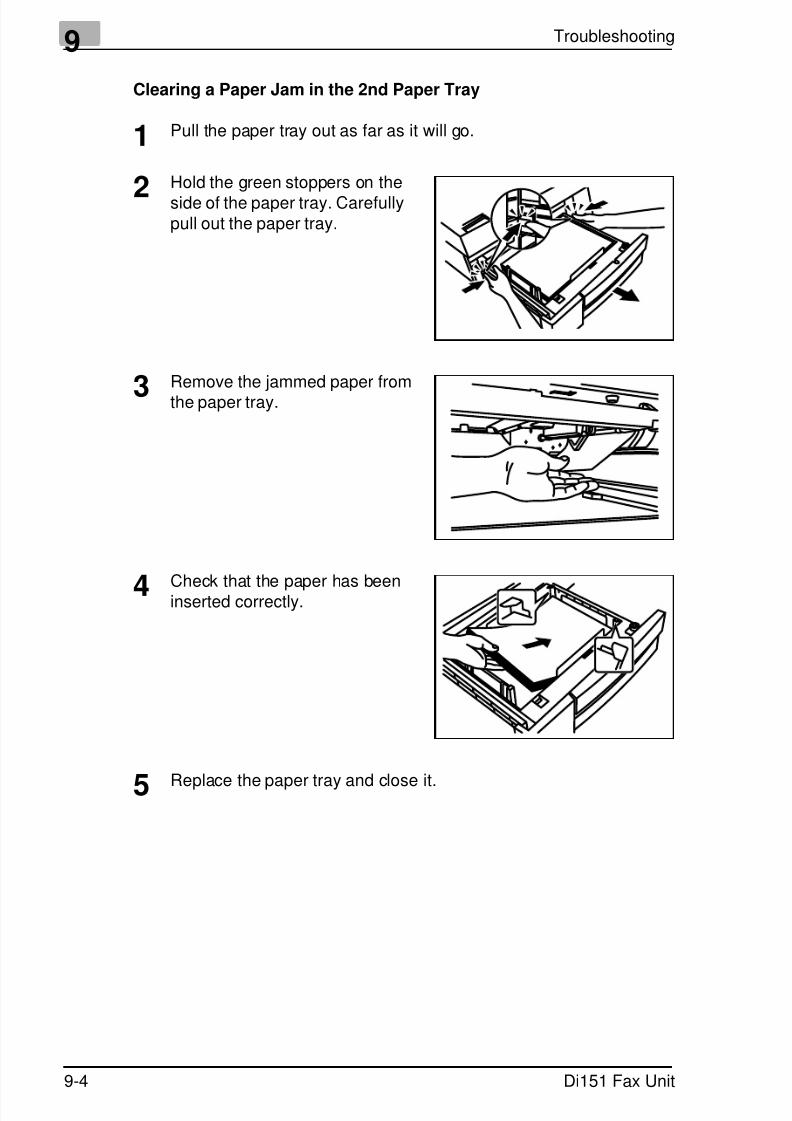
7/18/2019 Di151f_gb Users Manual Fax Unit.pdf
http://slidepdf.com/reader/full/di151fgb-users-manual-fax-unitpdf 138/170
9 Troubleshooting
9-4 Di151 Fax Unit
Clearing a Paper Jam in the 2nd Paper Tray
1 Pull the paper tray out as far as it will go.
2 Hold the green stoppers on the
side of the paper tray. Carefullypull out the paper tray.
3 Remove the jammed paper from
the paper tray.
4 Check that the paper has beeninserted correctly.
5 Replace the paper tray and close it.
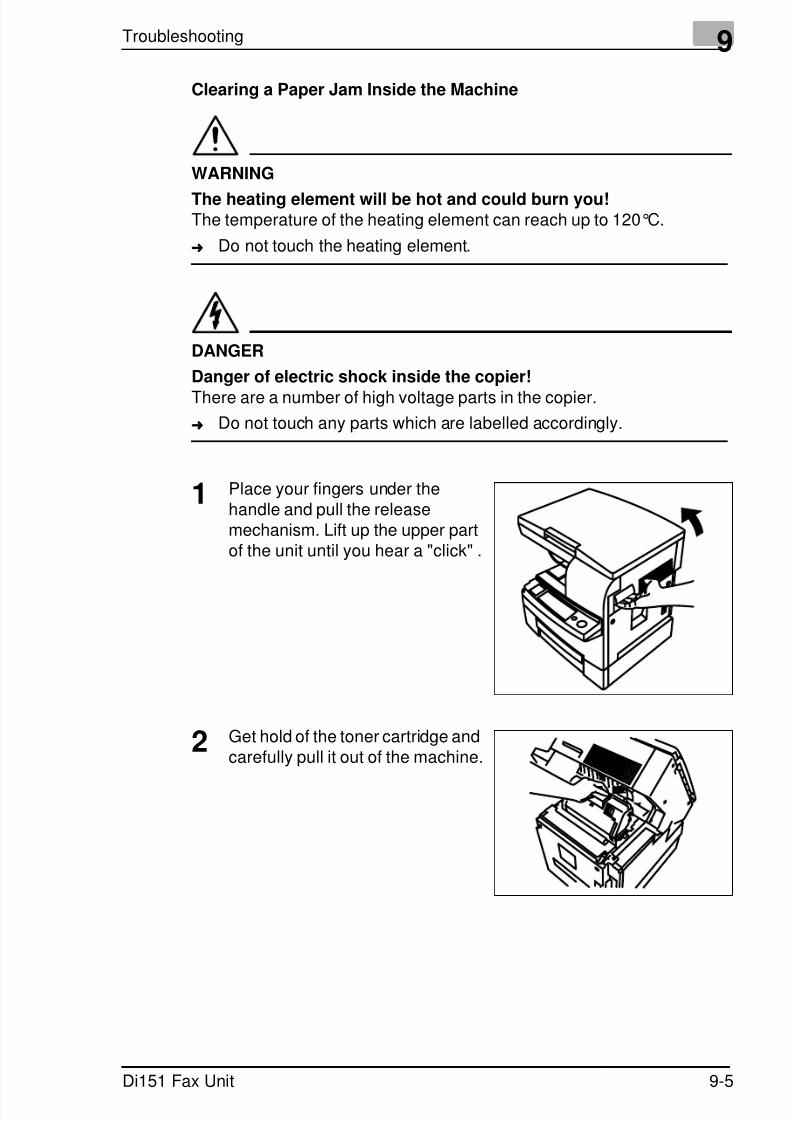
7/18/2019 Di151f_gb Users Manual Fax Unit.pdf
http://slidepdf.com/reader/full/di151fgb-users-manual-fax-unitpdf 139/170
Troubleshooting 9
Di151 Fax Unit 9-5
Clearing a Paper Jam Inside the Machine
WARNING
The heating element will be hot and could burn you!The temperature of the heating element can reach up to 120°C.
➜ Do not touch the heating element.
DANGER
Danger of electric shock inside the copier!There are a number of high voltage parts in the copier.
➜ Do not touch any parts which are labelled accordingly.
1 Place your fingers under thehandle and pull the releasemechanism. Lift up the upper partof the unit until you hear a "click" .
2 Get hold of the toner cartridge andcarefully pull it out of the machine.
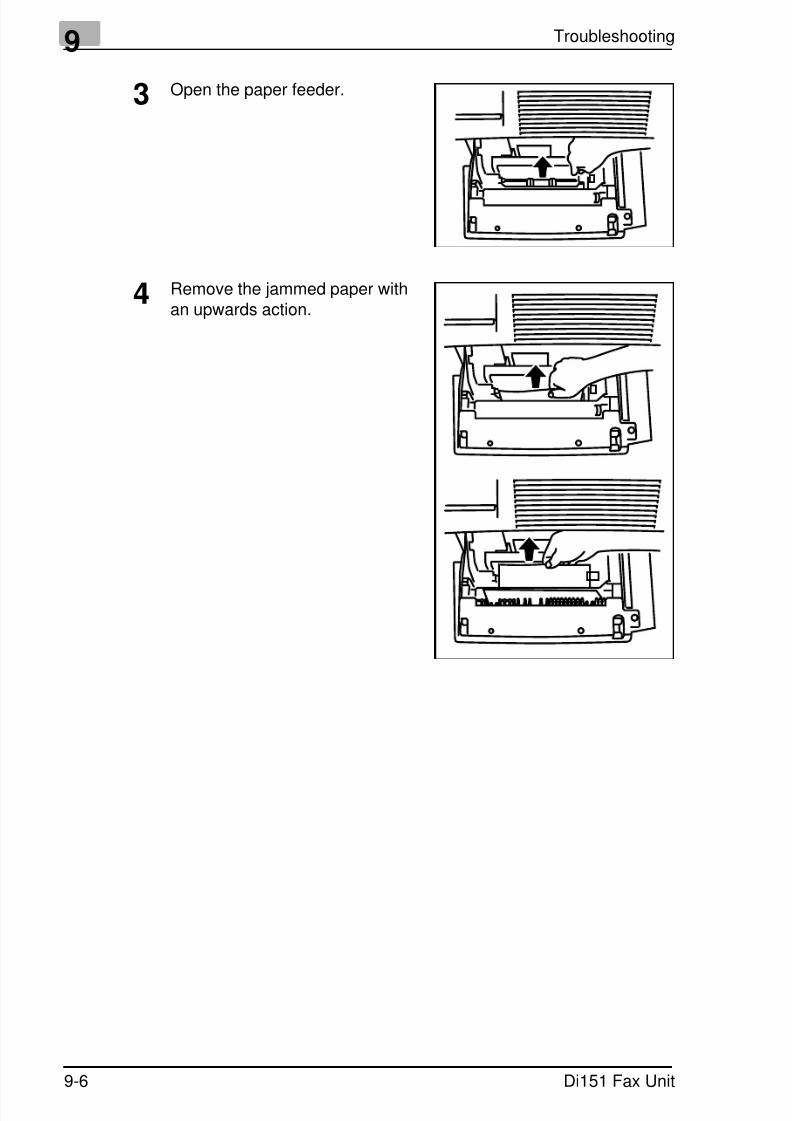
7/18/2019 Di151f_gb Users Manual Fax Unit.pdf
http://slidepdf.com/reader/full/di151fgb-users-manual-fax-unitpdf 140/170
9 Troubleshooting
9-6 Di151 Fax Unit
3 Open the paper feeder.
4 Remove the jammed paper withan upwards action.
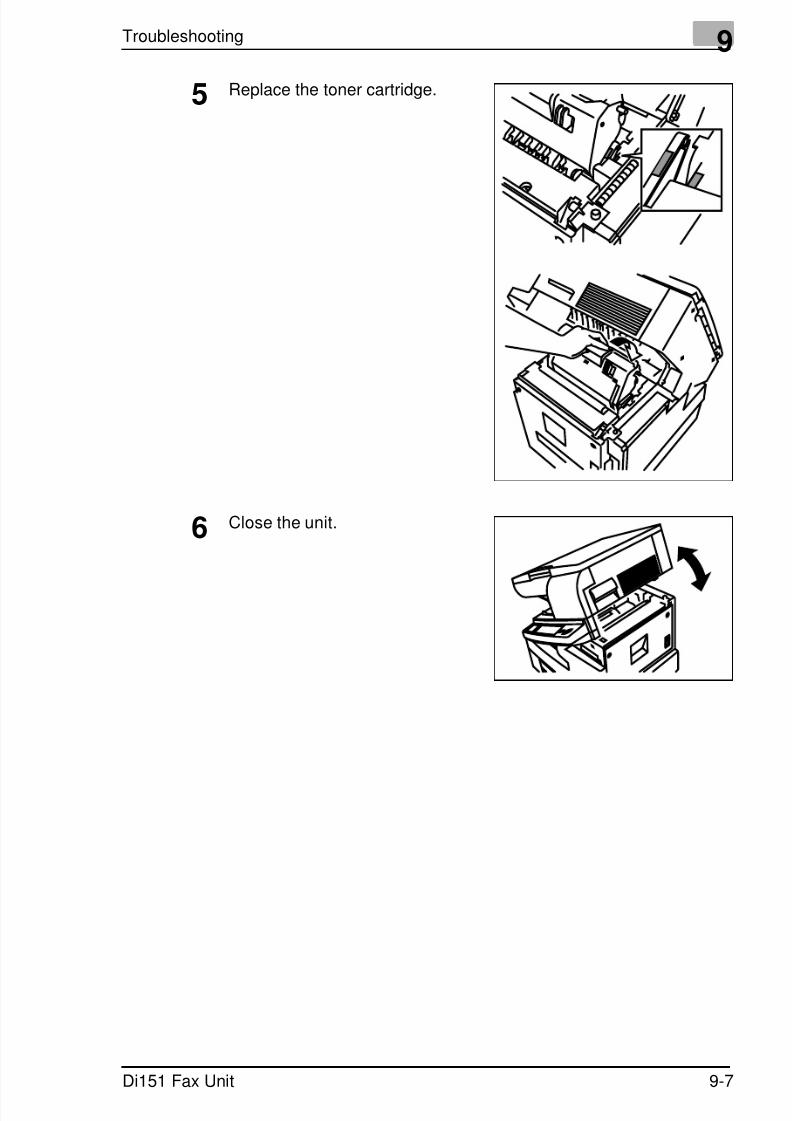
7/18/2019 Di151f_gb Users Manual Fax Unit.pdf
http://slidepdf.com/reader/full/di151fgb-users-manual-fax-unitpdf 141/170
Troubleshooting 9
Di151 Fax Unit 9-7
5 Replace the toner cartridge.
6 Close the unit.
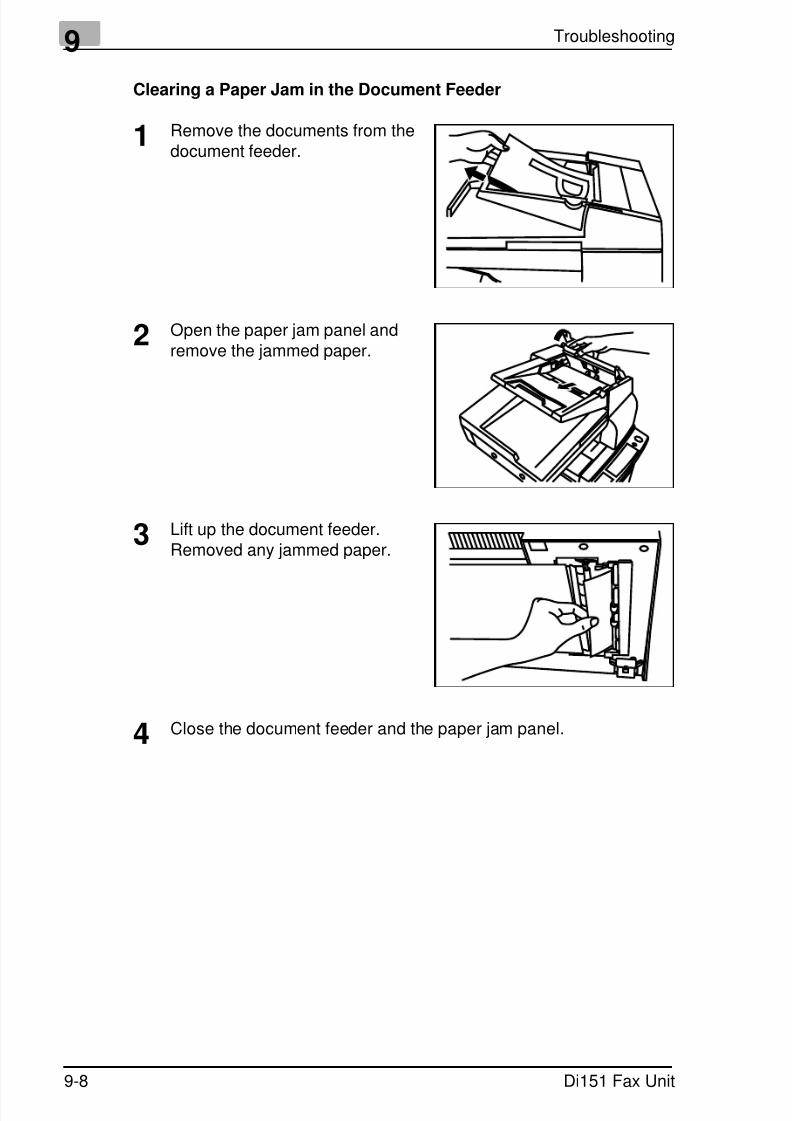
7/18/2019 Di151f_gb Users Manual Fax Unit.pdf
http://slidepdf.com/reader/full/di151fgb-users-manual-fax-unitpdf 142/170
9 Troubleshooting
9-8 Di151 Fax Unit
Clearing a Paper Jam in the Document Feeder
1 Remove the documents from thedocument feeder.
2 Open the paper jam panel andremove the jammed paper.
3 Lift up the document feeder.Removed any jammed paper.
4 Close the document feeder and the paper jam panel.

7/18/2019 Di151f_gb Users Manual Fax Unit.pdf
http://slidepdf.com/reader/full/di151fgb-users-manual-fax-unitpdf 143/170
Troubleshooting 9
Di151 Fax Unit 9-9
9.3 Error Messages on the LCD
Message Description Solution
*Machine is warming up*
-Original face up-
Wait a moment.
*Warning!*Machine open
The machine is open. Close the machine.
*Memory*- Original face up -
No document. Insert a document.
*Warning!*Mem. full/TX stopped
Memory full. Print out documents frommemory to increase thememory capacity.Upgrade the memory.
*Warning!*File full/TX stopped
More than 640 files havebeen stored.
Limit the number of files toless than 640.
Warning!*Document jam
Paper jam in the documentfeeder.
Remove the jammedpaper.
Warning!*No paper
The paper has run out. Insert the paper.
Warning!*RX paper jam 1
Printer paper jam inmachine.
Remove the jammedpaper.
Warning !*RX paper jam 2
Printer paper jam inside thefusing unit.
Remove the jammedpaper.
Warning !*
RX paper jam 3
Printer paper jam on the
paper transport roller.
Remove the jammed
paper.
Paper format error Incorrect paper format. Insert A4 paper in thepaper tray.
Warning !*Toner empty
The toner cartridge is empty. Replace the tonercartridge.
Warning !*ADF cover open
Document feeder cover isopen.
Close the ADF cover.
SERVICE CALL Malfunction Switch the machine off andthen on.If the same displayappears, contact the
technical service.
*Redial error" All redial attempts failed. Press [STOP] and sendagain.
*Transmission error* Press [STOP] and [YES].Try sending again.Ask the recipient to resend.
*Not stored* There is no number storedunder this one-touch key.
Select a different one-touch key or program therelevant one-touch key.
*Incorrect entry* Date or time have been
entered incorrectly.
Rectify error.
*Incorrect number of rings* The number of rings enteredis too high.
Enter up to 16 rings.
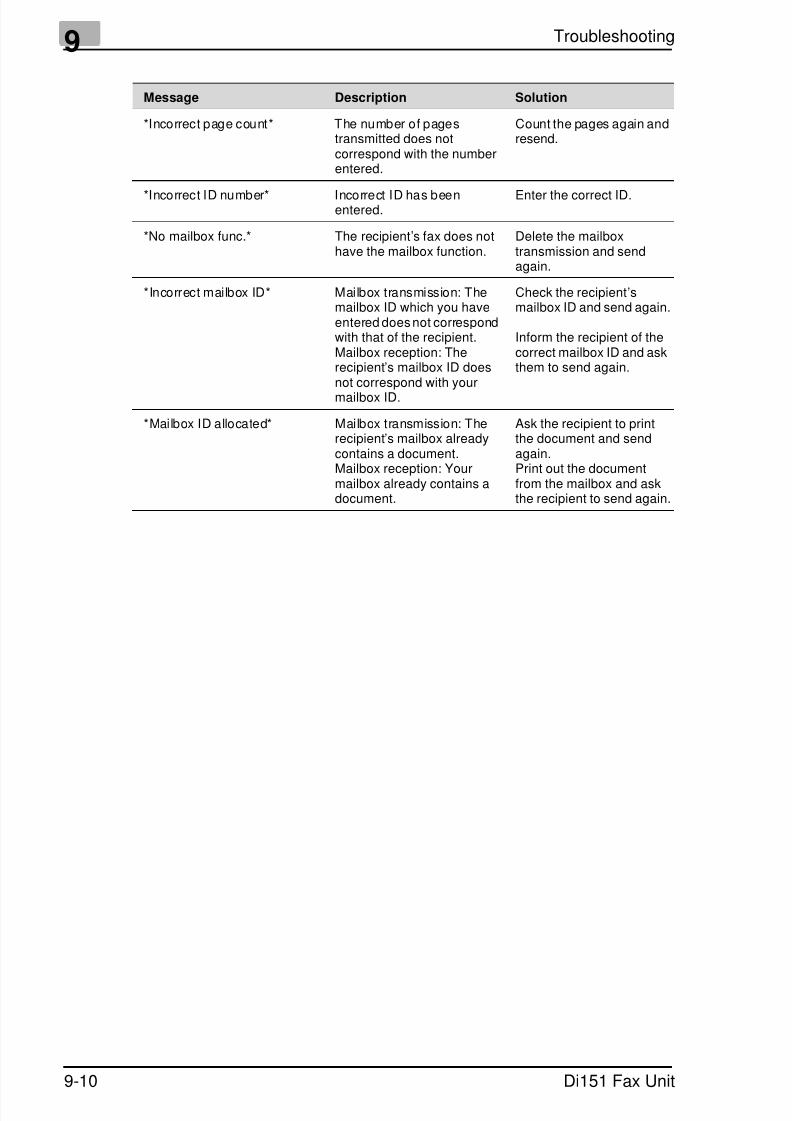
7/18/2019 Di151f_gb Users Manual Fax Unit.pdf
http://slidepdf.com/reader/full/di151fgb-users-manual-fax-unitpdf 144/170
9 Troubleshooting
9-10 Di151 Fax Unit
*Incorrect page count* The number of pagestransmitted does notcorrespond with the numberentered.
Count the pages again andresend.
*Incorrect ID number* Incorrect ID has beenentered.
Enter the correct ID.
*No mailbox func.* The recipient’s fax does nothave the mailbox function.
Delete the mailboxtransmission and sendagain.
*Incorrect mailbox ID* Mailbox transmission: Themailbox ID which you haveentered does not correspondwith that of the recipient.Mailbox reception: Therecipient’s mailbox ID doesnot correspond with yourmailbox ID.
Check the recipient’smailbox ID and send again.
Inform the recipient of thecorrect mailbox ID and askthem to send again.
*Mailbox ID allocated* Mailbox transmission: Therecipient’s mailbox alreadycontains a document.Mailbox reception: Yourmailbox already contains adocument.
Ask the recipient to printthe document and sendagain.Print out the documentfrom the mailbox and askthe recipient to send again.
Message Description Solution

7/18/2019 Di151f_gb Users Manual Fax Unit.pdf
http://slidepdf.com/reader/full/di151fgb-users-manual-fax-unitpdf 145/170
Troubleshooting 9
Di151 Fax Unit 9-11
9.4 Poor Print Quality
Low Contrast
Grey Background
Possible cause Solution
Faulty development Replace toner.Adjust print density.Adjust contrast.
Paper Check paper is suitable and not damp.Change paper.
Possible cause Solution
Print density too dark
Not cleaned properly
Adjust print density.
Clean scanner.Clean document glass.
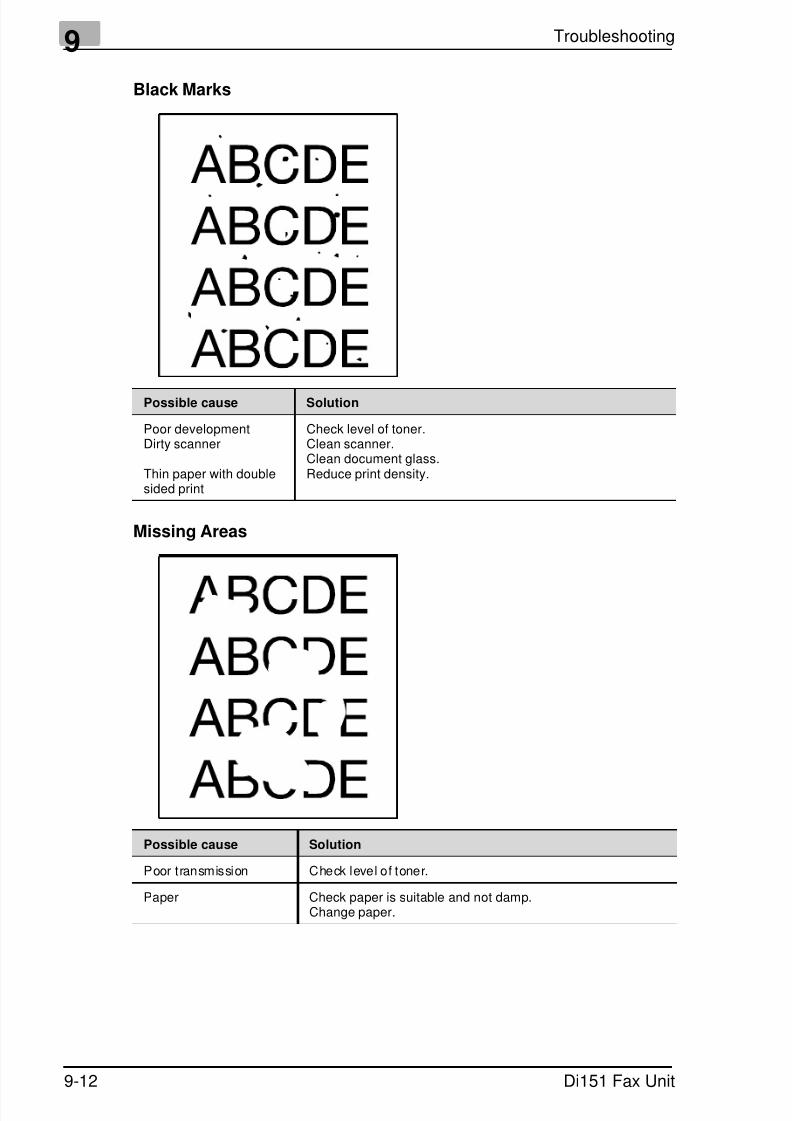
7/18/2019 Di151f_gb Users Manual Fax Unit.pdf
http://slidepdf.com/reader/full/di151fgb-users-manual-fax-unitpdf 146/170
9 Troubleshooting
9-12 Di151 Fax Unit
Black Marks
Missing Areas
Possible cause Solution
Poor developmentDirty scanner
Thin paper with doublesided print
Check level of toner.Clean scanner.Clean document glass.Reduce print density.
Possible cause Solution
Poor transmission Check level of toner.
Paper Check paper is suitable and not damp.Change paper.

7/18/2019 Di151f_gb Users Manual Fax Unit.pdf
http://slidepdf.com/reader/full/di151fgb-users-manual-fax-unitpdf 147/170
Appendix 10
Di151 Fax Unit 10-13
10 Appendix
10.1 Specifications
General
Compatibility G 3
Max. modem speed 33.600 bps (automatic fallback)
Coding MR, MH, MMR, JBIG
ECM error correction yes
Multi tasking operationinterface
yes
Printing resolution 600 dpi
Memory capacity 2 MB
RTC backup 2,5 years
Optional accessories memory upgrade 4 MB; 6 MB
SendTransmission speed 2,5 seconds (ITU test document No.1)
Broadcasting 143 recipients
Memory transmit yes
High-speed memorytransmissions
yes
Manual/ADF transmission yes
Timer transmission yes
Polling transmission yes, up to 50 files
Mailbox transmission yes
Closed network yes
Closed user group yes
Relay transmission yes
Batch send yes
Transmission resolution 203 x 98 dpi203 x 196 dpi203 x 392 dpi

7/18/2019 Di151f_gb Users Manual Fax Unit.pdf
http://slidepdf.com/reader/full/di151fgb-users-manual-fax-unitpdf 148/170
10 Appendix
10-14 Di151 Fax Unit
Reception
Mailbox reception yes
Polling reception yes
Closed user group yes
Memory reception yes
Reduction yes
Reception mode automatic/m anual
Print mode 100 %cutautomatic reduction(70%-100%)
Header/footer yesReception resolution 203 x 98 dpi
203 x 196 dpi203 x 392 dpi300 x 300 dpi
Backup reception yes
Dialling
One-touch dialling 27 keys
Speed dialling 100 speed dial numbers
Program dial keys 4 keys (one-touch 24-27)
Auto. redial yes
Combination diall ing yes
Phone book yes
7/18/2019 Di151f_gb Users Manual Fax Unit.pdf
http://slidepdf.com/reader/full/di151fgb-users-manual-fax-unitpdf 149/170
Appendix 10
Di151 Fax Unit 10-15
Report
Transmission report yes
Transmission error report yes
Reception report yes
Activity report yes
Memory data list yes
Key allocation list yes
Broadcasting report yes
Relay report yes
Mailbox reception report yes
Status list yes
Consumables report yes
Power failure report yes
RAM error report yes
Service data list yes
7/18/2019 Di151f_gb Users Manual Fax Unit.pdf
http://slidepdf.com/reader/full/di151fgb-users-manual-fax-unitpdf 150/170
10 Appendix
10-16 Di151 Fax Unit
10.2 Index
AAdding paper ................................................................................... 2 - 15
Adding paper, cassette 2 ................................................................ 2 - 17
Adding paper, standard ................................................................... 2 - 15
Automatic reception .......................................................................... 5 - 2
BBatch send ...................................................................................... 4 - 26
Book TX .......................................................................................... 4 - 15
Broadcast transmission, program dialling ....................................... 4 - 19Broadcasting ................................................................................... 4 - 18
CCancel entry ...................................................................................... 3 - 1
Cartridge, changing the ................................................................... 2 - 13
Changing group dials ...................................................................... 3 - 17
Changing one-touch, speed dial ..................................................... 3 - 12
Changing the cartridge .................................................................... 2 - 13
Changing, document feeder belt ....................................................... 9 - 1
Closed network ................................................................................. 4 - 8
Closed user group ........................................................................... 5 - 13
Confidential, reception .............................................................5 - 3, 5 - 4
Connect the telephone line cable and the mains ............................ 2 - 18
Connecting the power cable ........................................................... 2 - 18
Consumables .................................................................................. 2 - 12Copy .................................................................................................. 6 - 1
Copy 2-sided documents onto one page ........................................ 6 - 13
Copying functions ........................................................................... 6 - 12
Copying, document feeder ................................................................ 6 - 1
Copying, flatbed scanner .................................................................. 6 - 1
Counter ............................................................................................. 8 - 5
7/18/2019 Di151f_gb Users Manual Fax Unit.pdf
http://slidepdf.com/reader/full/di151fgb-users-manual-fax-unitpdf 151/170
Appendix 10
Di151 Fax Unit 10-17
DDefault manual setting, brightness ..................................................6 - 10
Default setting, automatic brightness ................................................6 - 9
Default setting, brightness ...............................................................6 - 11
Default transmission setting ..............................................................4 - 9
Delayed transmission ......................................................................4 - 16
Delete mailbox ...................................................................................5 - 5
Delete, task ......................................................................................4 - 27
Dialling options ................................................................................4 - 10
Dimensions ........................................................................................2 - 2
Direct reception .................................................................................5 - 1
Direction of the paper ........................................................................1 - 5Displaying, reports .............................................................................8 - 4
Displays .............................................................................................2 - 9
EEnter special characters ....................................................................3 - 2
Enter, call group ..............................................................................3 - 15
Enter, company name .......................................................................3 - 4
Enter, date .........................................................................................3 - 5
Enter, fax number ..............................................................................3 - 3
Enter, one-touch dial .......................................................................3 - 10
Enter, speed dial ..............................................................................3 - 11
Enter, text ..........................................................................................3 - 1
Entry of data ......................................................................................3 - 1
Erasing call groups ..........................................................................3 - 18
Erasing one-touch, speed dial .........................................................3 - 14Error messages, LCD ........................................................................9 - 9
Exposure, setting .............................................................................5 - 14
FFunctions .........................................................................................1 - 11

7/18/2019 Di151f_gb Users Manual Fax Unit.pdf
http://slidepdf.com/reader/full/di151fgb-users-manual-fax-unitpdf 152/170
10 Appendix
10-18 Di151 Fax Unit
LLandscape ........................................................................................ 1 - 5
MMachine layout .................................................................................. 2 - 5
Mailbox transmission, program dialling ........................................... 4 - 25
Manual setting, image density ........................................................ 6 - 10
Manual transmission ....................................................................... 4 - 14
Maually setting default special paper format ..................................... 6 - 5
Memory back-up RX ......................................................................... 5 - 2
Multiple page print, setting .............................................................. 5 - 11
NNumber of rings, setting .................................................................. 5 - 10
OOperating the fax option .................................................................. 2 - 18
PPage counter ..................................................................................... 4 - 7
Paper cassette, setting ................................................................... 5 - 15
Paper jam, 2nd paper tray ................................................................ 9 - 4
Paper size, setting ............................................................................ 5 - 9
PC connection ................................................................................... 7 - 1
PC fax ............................................................................................... 7 - 3
PC printer .......................................................................................... 7 - 3
PC scanner ....................................................................................... 7 - 2
Placing documents ............................................................................ 4 - 2
Polling transmission ........................................................................ 4 - 23
Portrait .............................................................................................. 1 - 5
Positioning the copier ........................................................................ 2 - 2
Power supply .................................................................................... 2 - 1
Print mailbox ..................................................................................... 5 - 6
Printing, reports ................................................................................. 8 - 3PSTN or PBX .................................................................................... 3 - 7

7/18/2019 Di151f_gb Users Manual Fax Unit.pdf
http://slidepdf.com/reader/full/di151fgb-users-manual-fax-unitpdf 153/170
Appendix 10
Di151 Fax Unit 10-19
RReception, polling ..............................................................................5 - 7
Reception, polling, program dial ........................................................5 - 8
Relay transmission ..........................................................................4 - 20
Relay transmission, program dialling ...............................................4 - 22
Removing paper jam, document feeder ............................................9 - 8
Removing paper jams ........................................................................9 - 3
Removing paper jams, inside machine ..............................................9 - 5
Removing the transport protection devices .......................................2 - 3
Reports and lists ................................................................................8 - 1
RX reduction, setting .......................................................................5 - 12
SSecure transmission ........................................................................4 - 24
Selecting default reproduction ratio ...................................................6 - 6
Selecting default reproduction, increments .......................................6 - 6
Selecting default special paper format ..............................................6 - 4
Selecting the copy paper ...................................................................6 - 3
Sending a document from the memory ...........................................4 - 13
Setting mailbox ..................................................................................5 - 4
Setting, automatic reset ...................................................................3 - 27
Setting, buzzer volume ....................................................................3 - 19
Setting, contrast .................................................................................4 - 6
Setting, dialling mode ........................................................................3 - 6
Setting, footer ..................................................................................3 - 21
Setting, header ................................................................................3 - 20
Setting, image density .......................................................................6 - 9Setting, image exposure ....................................................................6 - 8
Setting, LCD contrast ......................................................................3 - 22
Setting, monitor volume ...................................................................3 - 26
Setting, phone type ............................................................................3 - 6
Setting, photo brightness .................................................................6 - 11
Setting, power save mode ...............................................................3 - 23
Setting, remote diagnosis ................................................................3 - 25
Setting, reports ..................................................................................8 - 2
Setting, resolution ..............................................................................4 - 4

7/18/2019 Di151f_gb Users Manual Fax Unit.pdf
http://slidepdf.com/reader/full/di151fgb-users-manual-fax-unitpdf 154/170
10 Appendix
10-20 Di151 Fax Unit
Setting, send ..................................................................................... 4 - 4
Single sheet feeder ........................................................................... 6 - 2
Sort copies ...................................................................................... 6 - 12
Special documents ............................................................................ 4 - 2
Specifications ....................................................................................... 13Sub addressing ................................................................................. 3 - 9
Switching off, one-touch dial ............................................................. 6 - 7
TTime .................................................................................................. 3 - 5
Timer transmission, program dialling .............................................. 4 - 17
TX ..................................................................................................... 4 - 1
UUnpacking ......................................................................................... 2 - 3
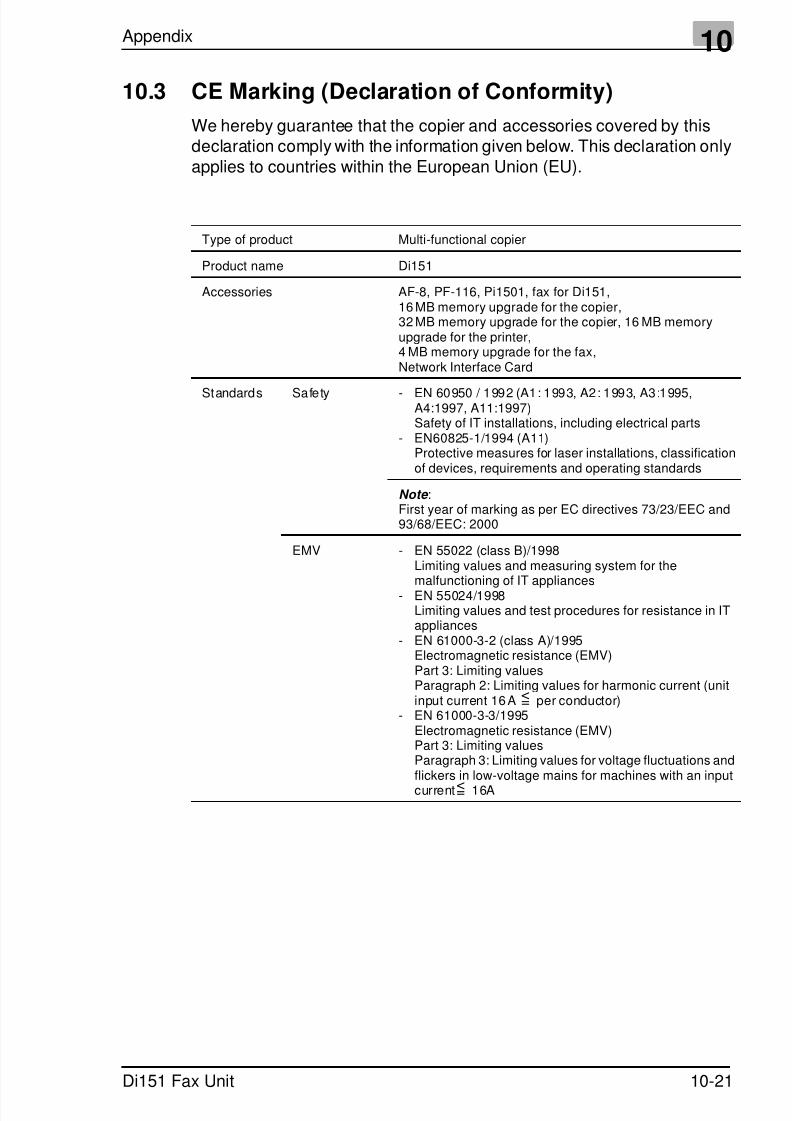
7/18/2019 Di151f_gb Users Manual Fax Unit.pdf
http://slidepdf.com/reader/full/di151fgb-users-manual-fax-unitpdf 155/170
Appendix 10
Di151 Fax Unit 10-21
10.3 CE Marking (Declaration of Conformity)
We hereby guarantee that the copier and accessories covered by thisdeclaration comply with the information given below. This declaration onlyapplies to countries within the European Union (EU).
Type of product Multi-functional copier
Product name Di151
Accessories AF-8, PF-116, Pi1501, fax for Di151,16 MB memory upgrade for the copier,32 MB memory upgrade for the copier, 16 MB memoryupgrade for the printer,4 MB memory upgrade for the fax,Network Interface Card
Standards Safety - EN 60950 / 1992 (A1: 1993, A2: 1993, A3:1995,A4:1997, A11:1997)Safety of IT installations, including electrical parts
- EN60825-1/1994 (A11)Protective measures for laser installations, classificationof devices, requirements and operating standards
Note :First year of marking as per EC directives 73/23/EEC and93/68/EEC: 2000
EMV - EN 55022 (class B)/1998Limiting values and measuring system for themalfunctioning of IT appliances
- EN 55024/1998Limiting values and test procedures for resistance in ITappliances
- EN 61000-3-2 (class A)/1995Electromagnetic resistance (EMV)Part 3: Limiting valuesParagraph 2: Limiting values for harmonic current (unitinput current 16 A per conductor)
- EN 61000-3-3/1995Electromagnetic resistance (EMV)Part 3: Limiting valuesParagraph 3: Limiting values for voltage fluctuations andflickers in low-voltage mains for machines with an inputcurrent 16A
<=
<=
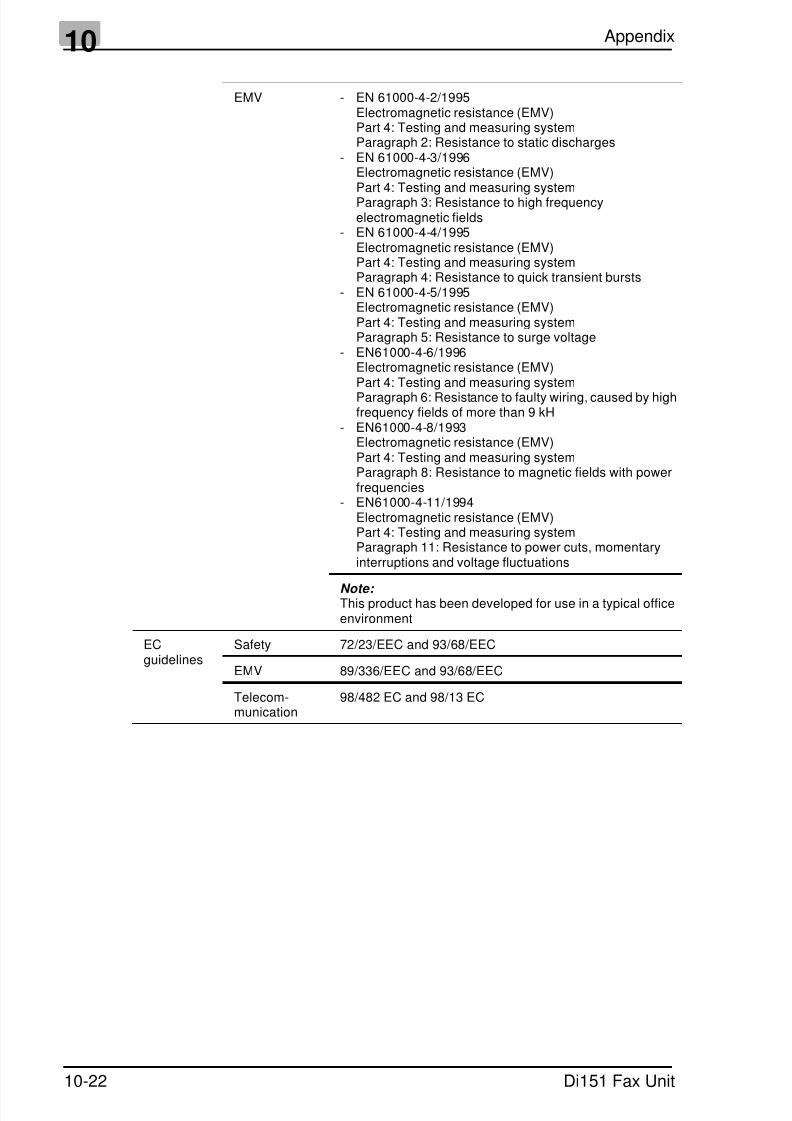
7/18/2019 Di151f_gb Users Manual Fax Unit.pdf
http://slidepdf.com/reader/full/di151fgb-users-manual-fax-unitpdf 156/170
10 Appendix
10-22 Di151 Fax Unit
EMV - EN 61000-4-2/1995Electromagnetic resistance (EMV)Part 4: Testing and measuring systemParagraph 2: Resistance to static discharges
- EN 61000-4-3/1996Electromagnetic resistance (EMV)Part 4: Testing and measuring systemParagraph 3: Resistance to high frequencyelectromagnetic fields
- EN 61000-4-4/1995Electromagnetic resistance (EMV)Part 4: Testing and measuring systemParagraph 4: Resistance to quick transient bursts
- EN 61000-4-5/1995Electromagnetic resistance (EMV)Part 4: Testing and measuring systemParagraph 5: Resistance to surge voltage
- EN61000-4-6/1996Electromagnetic resistance (EMV)Part 4: Testing and measuring systemParagraph 6: Resistance to faulty wiring, caused by highfrequency fields of more than 9 kH
- EN61000-4-8/1993Electromagnetic resistance (EMV)Part 4: Testing and measuring systemParagraph 8: Resistance to magnetic fields with powerfrequencies
- EN61000-4-11/1994Electromagnetic resistance (EMV)Part 4: Testing and measuring systemParagraph 11: Resistance to power cuts, momentaryinterruptions and voltage fluctuations
Note: This product has been developed for use in a typical officeenvironment
ECguidelines
Safety 72/23/EEC and 93/68/EEC
EMV 89/336/EEC and 93/68/EEC
Telecom-munication
98/482 EC and 98/13 EC
7/18/2019 Di151f_gb Users Manual Fax Unit.pdf
http://slidepdf.com/reader/full/di151fgb-users-manual-fax-unitpdf 157/170
Appendix 10
Di151 Fax Unit 10-23
WARNING
Interference with communication through use of incorrect cables
This device may only be used with a shielded interface cable. If othercables are used, this may lead to interference in communication.According to EC regulations, this is not permissible.
➜ Use a shielded interface cable.
7/18/2019 Di151f_gb Users Manual Fax Unit.pdf
http://slidepdf.com/reader/full/di151fgb-users-manual-fax-unitpdf 158/170
10 Appendix
10-24 Di151 Fax Unit
1 ENDVERBRAUCHER-LIZENZVERTRAG
Vor der Benutzung des beigefügten Produktes sind die nachstehendenBedingungen sorgfältig zu lesen. Mit der Benutzung des Produktes
erkennen Sie als Lizenznehmer die Bedingungen dieses Vertrages an.Wenn Sie mit den Bedingungen nicht einverstanden sind, senden Sie die
ungeöffnete Packung umgehend zurück.
Bei diesem Vertrag handelt es sich um einen Lizenzvertrag und nicht um
einen Kaufvertrag. MINOLTA ist Inhaberin der Urheberrechte an demMicrocode, den Computerprogrammen und codierten Schrifteneinschließlich der Bitmap-Schriften und Konturschriften (nachfolgendinsgesamt als "Software" bezeichnet), die sich in diesem Drucker, denDruckerzubehörteilen oder Fontprodukten befinden, oder MINOLTAbesitzt die Lizenzen an den entsprechenden Urheberrechten andererInhaber. Der Lizenznehmer erwirbt keine Rechte an der Software.
MINOLTA oder die genannten anderen Inhaber bleiben Inhaber derRechte an der in der Packung enthaltenen Kopie der Software und jedweder von ihr angefertigten Kopie. Die Verantwortung für die Wahl zurErzielung der gewünschten Ergebnisse, Installation, Benutzung und diemit der Software erzielten Ergebnisse liegt allein bei Ihnen alsLizenznehmer.
LIZENZ
Ihnen als Lizenznehmer ist es gestattet:
1. die Software auf einem Computer und einem angeschlossenen Druckerzu installieren und zu benutzen;
2. ausschließlich zu Sicherungs- oder Installationszwecken eine Kopieder Software für die normale und beabsichtigte Erstellung zu benutzen. Indiesem Fall ist der Lizenznehmer verpflichtet, auf der Kopie die sich aufder Software befindenden Vermerke über Urheberrecht undWarenzeichen entsprechend anzubringen;
3. das Eigentum an Kopien der Software an Dritte zu übertragen durch
Überlassung dieser Vertragsausfertigung und des sonstigendazugehörigen schriftlichen Materials sowie mindestens einervollständigen, unveränderten Kopie der Software, wenn folgendeBedingungen erfüllt sind: (1) Wenn gleichzeitig alle anderen Kopien derSoftware des Erstlizenznehmers dem Dritten überlassen oder diese
Kopien vernichtet werden, (2) wenn mit der Übertragung des Eigentumsder Lizenzvertrag des Erstlizenznehmers mit MINOLTA gekündigt wirdund (3) wenn der Dritte diese Lizenzbedingungen mit der erstmaligenBenutzung der Software annimmt und die entsprechenden vertraglichenVerpflichtungen eingeht;
7/18/2019 Di151f_gb Users Manual Fax Unit.pdf
http://slidepdf.com/reader/full/di151fgb-users-manual-fax-unitpdf 159/170
Appendix 10
Di151 Fax Unit 10-25
4. die auf der Software vorhandenen Warenzeichen und denentsprechenden Vermerk über den Namen des Warenzeicheninhabersausschließlich im Rahmen der anerkannten Praxis im Umgang mitWarenzeichen zu verwenden.
Dem Lizenznehmer ist nur mit schriftlicher Zustimmung von MINOLTA
erlaubt:
1. Kopien der Software zu anderen als den hier ausdrücklich genannten
Zwecken zu verwenden, anzufertigen, zu verändern, mit andererSoftware zu mischen oder zu übertragen,
2. die Software zu entassemblieren oder entkompilieren, vorbehaltlichanderslautender gesetzlicher Bestimmungen oder
3. die Software oder eine Kopie davon zu vermieten, zu verleasen, zuübertragen oder eine Unterlizenz zu erteilen.
HAFTUNGSBESCHRÄNKUNGEN
MINOLTA gewährt bei sachgerechter Benutzung eine Garantie aufMaterial und Verarbeitung der Hardware, die die Software beinhaltet. DieHaftungsbedingungen und -beschränkungen bezüglich der Hardware, diedie Software beinhaltet, sind in den Gewährleistungsbedingungenaufgeführt, die mit der Hardware ausgeliefert wurden. Neben dieserGewährleistung auf Hardware und Medien wird keine weitere Haftung fürdie Software übernommen. Die Software wird in dem Zustand geliefert, in
dem sie sich bei der Übergabe befindet.Diese Gewährleistungen gelten anstelle etwaiger anderer ausdrücklicheroder stillschweigender Gewährleistungen einschließlich - jedoch nichtbeschränkt hierauf - der gesetzlich vermuteten Gewährleistung bezüglichder Nutzung und Eignung der Software für einen bestimmten Zweck.
BESCHRÄNKUNG VON GEWÄHRLEISTUNGSANSPRÜCHEN
IN KEINEM FALL HAFTET MINOLTA FÜR ENTGANGENEN GEWINNODER VERLORENE EINSPARUNGSMÖGLICHKEIT ODER
GELEGENTLICH WEGEN DES GEBRAUCHS ENTSTANDENE ODERANDERER FOLGESCHÄDEN, SELBST WENN MINOLTA ODER DIEAUTORISIERTEN HÄNDLER ÜBER MÖGLICHE SCHÄDEN DIESERART UNTERRICHTET WURDEN. MINOLTA HAFTET AUCH NICHTFÜR ANSPRÜCHE DES LIZENZNEHMERS AUFGRUND EINES
ANSPRUCHS EINES DRITTEN.
7/18/2019 Di151f_gb Users Manual Fax Unit.pdf
http://slidepdf.com/reader/full/di151fgb-users-manual-fax-unitpdf 160/170
10 Appendix
10-26 Di151 Fax Unit
ALLGEMEINE BESTIMMUNGEN
Der Lizenznehmer kann den Lizenzvertrag jederzeit beenden, indem ersämtliche Kopien der Software vernichtet oder entsprechend
anderweitiger Bestimmungen dieses Vertrages handelt.
MINOLTA kann den Lizenzvertrag mit dem Lizenznehmer beenden, wenndieser diese Bedingungen nicht einhält. In diesem Fall erklärt sich derLizenznehmer damit einverstanden, alle Kopien der Software zu
vernichten.Jedweder Versuch, eine Kopie der Software zu anderen alsden hier ausdrücklich genannten Zwecken zu vermieten, zu verleasen, zuübertragen oder eine Unterlizenz hiervon zu erteilen, ist nichtig.DerLizenznehmer erkennt hiermit an, daß er für die sich aus diesem Vertragetwa ergebenden persönlichen Steuern haftet.Rechte aus diesem Vertragkönnen von den Parteien unabhängig von der Art der Ansprüche nurinnerhalb von zwei Jahren nach Entstehen des Anspruchs geltend
gemacht werden. Bei Verstößen gegen die Bestimmungen im Abschnittunter der Überschrift "Lizenz" gilt eine Frist von 4 Jahren.Für diesenVertrag gilt im übrigen das Recht des Landes, indem dieses Produkterworben worden ist.
LIZENZNEHMER REGIERUNG
Handelt der Lizenznehmer für eine oder im Auftrage einer Einrichtung derAmerikanischen Regierung, gelten die folgenden Bestimmungen:
Nutzung, Vervielfältigung oder Offenlegung durch die Regierung
unterliegt den Rights in Technical Data and Computer Software clause atFAR 252.227-7013, subdivision (b)(3)(ii) oder subparagraph (c)(1)(ii).
Eine Nutzung, Vervielfältigung oder Offenlegung darüberhinaus unterliegtden Bestimmungen der Restricted Rights Software in FAR 52.227-19(c)(2).
SIE ALS LIZENZNEHMER ERKLÄREN, DIESEN LIZENZVERTRAGGELESEN UND VERSTANDEN ZU HABEN. SIE ERKENNEN DIELIZENZBEDINGUNGEN AN.
WEDER SIE NOCH MINOLTA FÜHLEN SICH AN BEDINGUNGENGEBUNDEN, DIE NICHT IN DIESEM VERTRAG ENTHALTEN SIND.ETWAIGE ERGÄNZUNGEN ODER ÄNDERUNGEN ZU DIESEMVERTRAG SIND NUR RECHTSGÜLTIG, WENN SIE SCHRIFTLICHNIEDERGELEGT UND UNTERSCHRIEBEN SIND VON AUTORI-SIERTEN VERTRETERN BEIDER PARTEIEN.
MIT DEM ÖFFNEN DER VERPACKUNG ERKENNEN SIE SÄMTLICHEPUNKTE DIESES VERTRAGES AN.
7/18/2019 Di151f_gb Users Manual Fax Unit.pdf
http://slidepdf.com/reader/full/di151fgb-users-manual-fax-unitpdf 161/170
Appendix 10
Di151 Fax Unit 10-27
1 Contrat utilisateur de la licence
LISEZ ATTENTIVEMENT LE CONTRAT DE LA LICENCE CI-DESSOUSAVANT D'OUVRIR L'EMBALLAGE CONTENANT LE LOGICIEL.
L'OUVERTURE DE CET EMBALLAGE SIGNIFIE QUE VOUSACCEPTEZ LES CONDITIONS QUI SE TROUVENT CI-DESSOUS. SI
VOUS LES RÉFUTEZ, MERCI DE NOUS RETOURNER L'EMBALLAGENON DÉBALLÉ DANS LES PLUS BREFS DÉLAIS.
1. Le logiciel
'Logiciel' veut dire le programme de l'ordinateur contenu dans cetemballage (ce qui peut comprendre les décodeurs numériques, lecteurs
électroniques...) ainsi que tous les codes, les techniques, lespériphériques, les formats, les designs, les concepts, les méthodes et lesidées associés au programme de l'ordinateur et toute la documentation
qui s'y rattache.2. Le contrat de licence
Ceci est un contrat de licence et non un contrat de vente. Minolta possèdeou a obtenu une licence d'autres propriétaires, des droits de reproductiondans le domaine des logiciels. À l'exception de ce qui est indiqué dans cet
accord, vous n'avez aucun droit sur les brevets, les droits de reproduction,les noms de marque (enregistrés ou pas), ni aucun autre droit, franchiseou licence vis-à-vis de ce logiciel. Le titre de ce logiciel et toute autre copiefaite à partir de celui-ci sera gardé par Minolta ou d'autres propriétaires.
3. La licence
Par la présente Minolta vous accorde (et vous acceptez) une licencelimitée, non exclusive et non transférable, ce qui vous autorise à :
1) Installer et utiliser le logiciel sur un ordinateur relié à une imprimanteunique.
2) Utiliser le logiciel pour vos propres besoins professionnels etpersonnels.
3) Faire une copie du logiciel par mesure de sécurité ou pour des besoinsd'installation, seulement dans le cadre de l'utilisation normale et prévuedu logiciel.
4) Transférer la propriété des copies du logiciel à une tierce personne, et
en transférant une copie de cet accord et toute autre documentation, enmême temps qu'une copie au moins de ce logiciel (sans modification),étant entendu que (i) vous avez par la même occasion, soit tout transmisà cette tierce personne, soit détruit toutes vos autres copies du logiciel, (ii)un tel transfert met fin à votre propre licence auprès de Minolta et (iii) le
nouveau propriétaire accepte et s'engage aà respecter les conditions dela licence dès le début de l'utilisation du logiciel.
7/18/2019 Di151f_gb Users Manual Fax Unit.pdf
http://slidepdf.com/reader/full/di151fgb-users-manual-fax-unitpdf 162/170
10 Appendix
10-28 Di151 Fax Unit
4. Les restrictions.
1) Sans l'accord écrit de Minolta vous ne devez pas :
I. Utiliser, copier, fusionner ou transférer des copies du logiciel, sauf s'ils'agit de cas prévus dans ce contrat.
II. Déprogrammer et reprogrammer le logiciel en dehors des limitesprévues par la loi, ou
III. Distribuer, louer ou sous louer le logiciel ou sa copie.
2) Vous ne devez pas exporter ou réexporter le logiciel sous aucune
forme, sous peine de violation des restrictions exports imposées par le
gouvernement de votre pays.
5. Une garantie limitée.
Minolta garantit le support sur lequel le logiciel est enregistré contre toutdéfaut matériel ou de fabrication, dans les conditions normalesd'utilisation.
Les détails de garantie et les limites du logiciel sont décrits sur ladéclaration de la garantie limitée, fournie avec le matériel informatique. Àl'exception des garanties expresses en vigueur, applicables au matérielinformatique et audiovisuel uniquement, le logiciel n'est pas garanti et estfourni « tel-quel ».
De telles garanties existent à la place de toutes autres garanties,expresses ou tacites, y compris mais non pas limitées aux garantiestacites de ventes et bon fonctionnement dans un but bien précis.
6. Etendue des responsabilités
EN AUCUN CAS, MINOLTA NE POURRA ÊTRE DÉSIGNÉRESPONSABLE POUR PERTE DE PROFITS, PERTE DE DONNÉESOU AUTRES DOMMAGES ACCIDENTELS OU CONSÉCUTIFS,DOMMAGES QUI RÉSULTENT DE L'UTILISATION OU DE LA
MAUVAISE UTILISATION DU LOGICIEL, MÊME SI MINOLTA OU SESREVENDEURS LÉGAUX ONT ÉTÉ AVERTIS DE LA POSSIBILITÉ DETELS DOMMAGES, OU POUR UNE RÉCLAMATION FAITE PAR VOUSAU NOM D'UNE TIERCE PERSONNE.
7. Résiliation du contrat
Vous pouvez mettre un terme à votre licence à tout moment en détruisantle logiciel et toutes ses copies comme prévu dans le contrat, Minolta peutmettre fin à votre licence en cas de non-respect du contrat.
Dans ce cas, vous acceptez de détruire toutes vos copies du logiciel.
7/18/2019 Di151f_gb Users Manual Fax Unit.pdf
http://slidepdf.com/reader/full/di151fgb-users-manual-fax-unitpdf 163/170
Appendix 10
Di151 Fax Unit 10-29
8. La loi
Cet accord doit être soumis aux lois du pays où la livraison s'effectue,chez le client d'origine.
9. Contrat utilisation pour le gouvernement.
Si vous faites l'acquisition du logiciel au nom d'un service ou organismedu Gouvernement des Etats-Unis, les dispositions suivantes s'appliquent.Utilisation, duplication, ou divulgation sont sujettes aux restrictionsmentionnées dans «Rights in Technical Data and Computer Software»FAR 252.227-7013, section (b)(3)(ii) ou chapitre (c)(1)(ii), selon le cas.Toute utilisation supplémentaire, duplication ou divulgation est sujette auxrestrictions applicables aux droits restreints sur les logiciels définis dansFAR 52.227-19(c)(2).
VOUS RECONNAISSEZ AVOIR LU, COMPRIS LE PRÉSENT
CONTRAT ET ACCEPTEZ D'ÊTRE LIÉ PAR SES CONDITIONS.AUCUNE DES PARTIES NE DOIT ÊTRE LIÉE PAR UNE MESURE OUPAR UNE DISPOSITION NE FIGURANT PAS DANS CE CONTRAT.
TOUTE MODIFICATION DE CE CONTRAT NE SERA VALABLE QUE SIELLE EST ÉCRITE ET SIGNÉE PAR LES REPRÉSENTANTS
DÉSIGNÉS PAR CHAQUE PARTIE.
EN OUVRANT CET EMBALLAGE, VOUS ADHÉREZ AUX TERMES DECE CONTRAT.
7/18/2019 Di151f_gb Users Manual Fax Unit.pdf
http://slidepdf.com/reader/full/di151fgb-users-manual-fax-unitpdf 164/170
10 Appendix
10-30 Di151 Fax Unit
1 END USER LICENSE AGREEMENT
PLEASE READ CAREFULLY THE LICENSE AGREEMENT BELOWBEFORE OPENING THIS PACKAGED SOFTWARE. OPENING THIS
PACKAGE INDICATES YOUR ACCEPTANCE OF THE TERMS ANDCONDITION BELOW. IF YOU DO NOT AGREE WITH THEM, YOU
SHOULD PROMPTLY RETURN THE PACKAGE UNUSED.
1. SOFTWARE
"Software" means the computer program contained in this package (whichmay include digitally encoded, machine readable, scalable outline fontdata as encoded in a special format), together with all codes, techniques,software tools, format, design, concepts, methods and ideas associatedwith the computer program and all documentation related thereto.
2. LICENSE AGREEMENT
This is a license agreement and not an agreement for sale. Minolta owns,or has been licensed from other owners, copyrights in the Software.Except as stated in this Agreement, you are not granted any rights topatents, copyrights, trade names, trademarks (whether registered orunregistered), or any other rights, franchises or licenses in respect of the
Software. Title to the Software and any copy made from it is retained byMinolta or such other owners.
3. LICENSE
Minolta, hereby grant to you, and you agree to accept a non-exclusive,non-transferable and limited l icense and you may:
1. install and use the Software on a single computer and one associatedprinter.
2. use the Software only for your own customary business or personalpurpose.
3. make a copy of the Software for backup or installation purpose only insupport of the normal and intended use of the Software.
4. transfer possession of copies of the Software to another party bytransferring a copy of this Agreement and all other documentation alongwith at least one complete unaltered copy of the Software, provided that(i) you must, at the same time, either transfer to such other party or
destroy all your other copies of the Software. (ii) such transfer of possession terminates your license from Minolta, and (iii) such other party shall accept and be bound by these license terms by its initial use of the Software.

7/18/2019 Di151f_gb Users Manual Fax Unit.pdf
http://slidepdf.com/reader/full/di151fgb-users-manual-fax-unitpdf 165/170
Appendix 10
Di151 Fax Unit 10-31
4. RESTRICTIONS
1. You shall not without the written consent of Minolta:
I. use, copy, modify, merge or transfer copies of the Software except as provided herein.
II. reverse assemble or reverse compile the Software except as permittedby law; or
III. Sublicense, rent, lease or distribute the Software or any copy thereof.
2. You shall not export or re-export the Software in any form under
violation of export restrictions by the government of your country.
5. LIMITED WARRANTY
Minolta warrants the media on which the Software is recorded to be free
from defects in materials and workmanship under normal use. Warrantydetails and limitations for the Software are described in the Statement ofLimited Warranty which was supplied with the hardware. With theexception of the foregoing express warranties applicable to hardware andmedia only, the Software is not warranted and is provided "AS IS." SUCHWARRANTIES ARE IN LIEU OF ALL OTHER WARRANTIES, EXPRESSOR IMPLIED, INCLUDING, BUT NOT LIMITED TO, THE IMPLIEDWARRANTIES OF MERCHANTABILITY AND FITNESS FOR APARTICULAR PURPOSE.
6. LIMITATION OF REMEDIES
IN NO EVENT WILL MINOLTA BE LIABLE FOR ANY LOST PROFITS,LOST DATA, OR ANY OTHER INCIDENTAL OR CONSEQUENTIALDAMAGES THAT RESULT FROM USE OR INABILITY TO USE THESOFTWARE, EVEN IF MINOLTA OR ITS AUTHORIZEDREMARKETERS HAVE BEEN ADVISED OF THE POSSIBILITY OFSUCH DAMAGES OR FOR ANY CLAIM BY YOU BASED ON A THIRDPARTY CLAIM.
7. TERMINATIONYou may terminate your license at any time by destroying the Softwareand all your copies of it or as otherwise described in these terms. Minoltamay terminate your license if you fail to comply with these terms. Uponsuch termination, you agree to destroy all your copies of the Software.
8. GOVERNING LAW
This Agreement shall be governed by the laws of the country where thedelivery is made to the original customer.

7/18/2019 Di151f_gb Users Manual Fax Unit.pdf
http://slidepdf.com/reader/full/di151fgb-users-manual-fax-unitpdf 166/170
10 Appendix
10-32 Di151 Fax Unit
9. GOVERNMENT END USERS
If you are acquiring the Software on behalf of any unit or agency of theUnited States Government, the following provisions apply. Use,
duplication or disclosure by the Government is subject to restrictions asset forth in the Rights in Technical Data and Computer Software clause at
FAR 252.227-7013, subdivision (b)(3)(ii) or subparagraph (c)(1)(ii), asappropriate. Further use, duplication or disclosure is subject to restrictionsapplicable to restricted rights software as set forth in FAR 52.227-19(c)(2).
YOU ACKNOWLEDGE THAT YOU HAVE READ THIS AGREEMENT,UNDERSTAND IT, AND AGREE TO BE BOUND BY ITS TERMS ANDCONDITIONS. NEITHER PARTY SHALL BE BOUND BY ANYSTATEMENT OR REPRESENTATION NOT CONTAINED IN THISAGREEMENT. NO CHANGE IN THIS AGREEMENT IS EFFECTIVEUNLESS WRITTEN AND SIGNED BY PROPERLY AUTHORIZED
REPRESENTATIVES OF EACH PARTY. BY OPENING THE PACKAGE,YOU AGREE TO ACCEPT THE TERMS OF THIS AGREEMENT.

7/18/2019 Di151f_gb Users Manual Fax Unit.pdf
http://slidepdf.com/reader/full/di151fgb-users-manual-fax-unitpdf 167/170
Appendix 10
Di151 Fax Unit 10-33
1 CONTRATTO DI LICENZA D'USO
LEGGETE ATTENTAMENTE IL CONTRATTO DI LICENZA SOTTORIPORTATO PRIMA DI APRIRE IL PACCHETTO SOFTWARE.
L'APERTURA DEL PACCHETTO DA PARTE VOSTRA INDICA LAVOSTRA ACCETTAZIONE DEI TERMINI E DELLE CONDIZIONI
SOTTO RIPORTATE. IN CASO DI DISACCORDO, VI PREGHIAMO DIVOLER RESTITUIRE IMMEDIATAMENTE IL PACCHETTO ANCORASIGILLATO.
1. SOFTWARE
"Software" indica il programma per computer contenuto in questopacchetto (che potrebbe includere dati di font outline scalabili codificatidigitalmente, leggibili dalla macchina come codificati in uno specialeformato), unitamente a tutti i codici, tecniche, strumenti di software,
formato, design, concetti, metodi ed idee associate con il programma percomputer e tutta la documentazione relativa.
2. CONTRATTO DI LICENZA
Il presente è un contratto di licenza e non un contratto di vendita.MINOLTA possiede, ovvero ha avuto la licenza da parte degli altri
proprietari, i diritti di autore per il Software. Ad eccezione di quantodichiarato nel presente Contratto, non avrete alcun diritto di brevetto,copyright, nomi di marchi, marchi di fabbrica (sia registrati o nonregistrati), o qualsiasi altro diritto, mandato di rappresentanza o licenza
rispetto a questo Software.
3. LICENZA
Con il presente contratto MINOLTA conferisce licenza d'uso, nontrasferibile né sub-licenziabile, del software descritto al punto uno (1), del
presente contratto in base alla quale il licenziatario:
(1) avrà facoltà d'installare ed usare il Software su un solo computer e suuna stampante associata.
(2) avrà facoltà di usare il Software solo per la sua attività o per scopopersonale.
(3) avrà facoltà di fare una copia del Software a scopo di backup o diinstallazione solo come supporto del normale e stabilito uso del Software.
(4) avrà facoltà di trasferire il possesso di copie del Software a terzitrasferendo contestualmente il presente contratto e tutta ladocumentazione relativa con almeno una copia completa e inalterata delSoftware, a patto che: (i) trasferisca a detti terzi e ,al tempo stesso,distrugga tutte le altre copie del Software. (ii) Tale trasferimento di
possesso fa terminare la licenza da parte di Minolta con il licenziatario,mentre (iii) detti terzi dovranno accettare e saranno legati da questi terminidi licenza per quanto riguarda l'uso iniziale del Software.
7/18/2019 Di151f_gb Users Manual Fax Unit.pdf
http://slidepdf.com/reader/full/di151fgb-users-manual-fax-unitpdf 168/170
10 Appendix
10-34 Di151 Fax Unit
4. OBBLIGHI DEL LICENZIATARIO
(1) Il licenziatario, salvo consenso scritto di MINOLTA:
(2) non potrà usare, riprodurre, copiare, modificare in alcun modo,manipolare e trasferire le copie del Software al di fuori di quanto qui
previsto.(3) non potrà eseguire "reverse assembling" o "reverse compiling" sulSoftware tranne quanto consentito dalla legge; oppure
(4) non potrà sub-licenziare, cedere a terzi, noleggiare o distribuire ilSoftware o copia dello stesso, salvo quanto previsto al punto tre (3) delpresente accordo.
(5) Il licenziatario non potrà esportare o riesportare il Software in nessunaforma pena la violazione delle restrizioni di esportazione dettate dal
Governo locale.5. GARANZIA LIMITATA
MINOLTA garantisce che i mezzi su cui il Software è registrato sono prividi difetti nei materiali e nella fabbricazione secondo un normale uso. Idettagli della garanzia e le limitazioni per il Software sono descritti nella
Dichiarazione di Garanzia Limitata che viene fornita insieme all'hardware.Con l'eccezione delle summenzionate garanzie espresse applicabilisolamente all'hardware e ai mezzi, il Software non è garantito ma fornito"nello stato in cui trovasi".
TALI GARANZIE SONO IN LUOGO DI TUTTE LE ALTRE GARANZIE,ESPRESSE O IMPLICITE, INCLUSE, MA NON LIMITATE ALLEGARANZIE IMPLICITE DI COMMERCIABILITA' E DI IDONEITA' ADUNO SCOPO PARTICOLARE.
6. RESPONSABILITA' DELLA CONCEDENTE
IN NESSUN CASO MINOLTA SARA' RESPONSABILE PER QUALSIASIPERDITA DI PROFITTO, PERDITA DI RISPARMIO, O QUALSIASIDANNO ACCIDENTALE CHE RISULTI DALL'USO O
DALL'INCAPACITA' D'USO DEL SOFTWARE, ANCHE SE MINOLTA O ISUOI CONCESSIONARI AUTORIZZATI SONO STATI AVVISATI DELLAPOSSIBILITA' DI TALI DANNI O DI QUALSIASI RECLAMO DA PARTEDEL LICENZIATARIO BASATO SU UN RECLAMO DI TERZI.
7. RISOLUZIONE DEL CONTRATTO
Potete porre termine alla vostra licenza in qualsiasi momentodistruggendo il Software e tutte le vostre copie, oppure come altrimentidescritto in questi termini.
Minolta può porre termine alla vostra licenza in caso mancaste dirispettare questi termini.
7/18/2019 Di151f_gb Users Manual Fax Unit.pdf
http://slidepdf.com/reader/full/di151fgb-users-manual-fax-unitpdf 169/170
Appendix 10
Di151 Fax Unit 10-35
Resta inteso che all'atto di tale termine, voi distruggerete tutte le vostrecopie del Software.
8. FORO COMPETENTE
Il presente contratto verrà regolato dalle leggi del Paese in cui è stata
effettuata la consegna al cliente originale.9. UTENTI FINALI GOVERNATIVI
Se state acquistando il Software per conto di qualsiasi ente od agenzia delGoverno degli Stati Uniti, si applicano i seguenti provvedimenti. L'uso, laduplicazione o la divulgazione da parte del Governo sono soggetti allerestrizioni stabilite nella clausola "Rights in Technical Data" e in"Computer Software" in FAR 252.227-7013, sottodivisione (b)(3)(ii) osottoparagrafo (c)(l)(ii) rispettivamente. Ulteriore uso, duplicazione odivulgazione sono soggetti alle restrizioni applicabili ai limitati diritti di
software stabiliti nel FAR 52.227-19(c)(2).
PRENDETE ATTO CHE AVETE LETTO IL PRESENTE ACCORDO, CHELO AVETE COMPRESO, E CHE CONCORDATE DI ESSERE LEGATIDA QUESTI TERMINI E CONDIZIONI. NESSUNA DELLE PARTI SARA'LEGATA DA ALCUNA DICHIARAZIONE O RAPPRESENTAZIONE NON
CONTENUTA NEL PRESENTE CONTRATTO. NESSUNCAMBIAMENTO NEL PRESENTE CONTRATTO SARA' EFFETTIVO AMENO CHE NON VENGA SOTTOSCRITTO DAI RAPPRESENTANTIPROPRIAMENTE AUTORIZZATI DA CIASCUNA PARTE. APRENDO IL
PRESENTE PACCHETTO, CONCORDATE DI ACCETTARE I TERMINIDEL PRESENTE CONTRATTO.

7/18/2019 Di151f_gb Users Manual Fax Unit.pdf
http://slidepdf.com/reader/full/di151fgb-users-manual-fax-unitpdf 170/170
10 Appendix