DC RTS receiver EN.ES.IT.PT05-09 - Login -...
16
Somfy.com Integrated DC RTS RECEIVER DC RTS RECEIVER Operating and installation guide Guía de instalación y de uso Guida all'installazione Guia de instalação e de utilização Ref : 5056802A
Transcript of DC RTS receiver EN.ES.IT.PT05-09 - Login -...
Somfy.com
Integrated DC RTS RECEIVERDC RTS RECEIVER
Operating and installation guideGuía de instalación y de uso
Guida all'installazioneGuia de instalação e de utilização
Ref
: 50
5680
2A
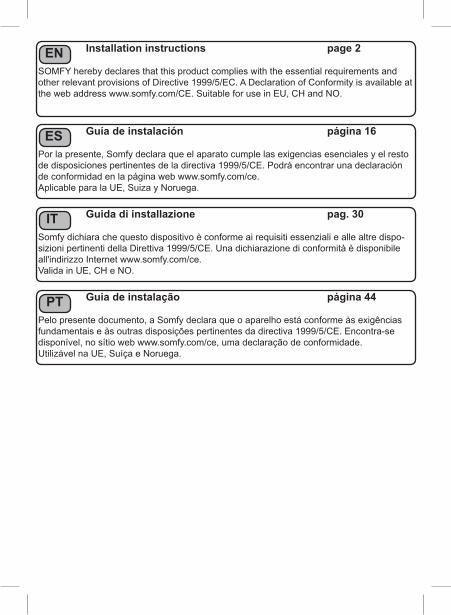
Installation instructions page 2
SOMFY hereby declares that this product complies with the essential requirements and other relevant provisions of Directive 1999/5/EC. A Declaration of Conformity is available at the web address www.somfy.com/CE. Suitable for use in EU, CH and NO.
Guía de instalación página 16
Por la presente, Somfy declara que el aparato cumple las exigencias esenciales y el resto de disposiciones pertinentes de la directiva 1999/5/CE. Podrá encontrar una declaración de conformidad en la página web www.somfy.com/ce. Aplicable para la UE, Suiza y Noruega.
Guida di installazione pag. 30
Somfy dichiara che questo dispositivo è conforme ai requisiti essenziali e alle altre dispo-sizioni pertinenti della Direttiva 1999/5/CE. Una dichiarazione di conformità è disponibile all'indirizzo Internet www.somfy.com/ce. Valida in UE, CH e NO.
Guia de instalação página 44
Pelo presente documento, a Somfy declara que o aparelho está conforme às exigências fundamentais e às outras disposições pertinentes da directiva 1999/5/CE. Encontra-se disponível, no sítio web www.somfy.com/ce, uma declaração de conformidade. Utilizável na UE, Suíça e Noruega.
EN
ES
IT
PT
2 Copyright © 2008 Somfy SAS. All rights reserved - V0 - 05/2008
SAFETY AND IMPORTANT INFORMATION
• This Somfy product must be installed by a professional motorisation and home automation installer, for whom these instructions are intended.• Before installation, check that this product is compatible with the associated equipment and accessories.• These instructions describe how to install, commission and use this product.• Moreover, the installer must comply with current standards and legislation in the country in which the product is being installed, and inform his customers of the operating and maintenance conditions for the product.• Any use outside the sphere of application specified by Somfy is not approved. Such use, or any failure to comply with the instructions given herein will invali-date the warranty, and Somfy refuses to accept liability.
PRODUCT DESCRIPTION
The DC RTS Receiver is equipped with Radio Technology Somfy (RTS).It allows 24V wire operated motors to work with the Somfy range of control points and sensors equipped with Radio Technology Somfy (RTS).
ENVIRONMENT
Damaged electric products and batteries should not be disposed of with normal household waste.Make sure to drop them in specially provided containers or at an authorized organization that will ensure they are recycled.
3Copyright © 2008 Somfy SAS. All rights reserved - V0 - 05/2008
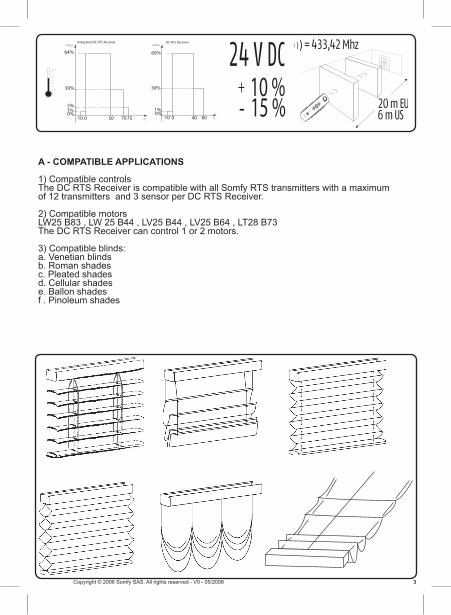
A - COMPATIBLE APPLICATIONS
1) Compatible controlsThe DC RTS Receiver is compatible with all Somfy RTS transmitters with a maximum of 12 transmitters and 3 sensor per DC RTS Receiver.
2) Compatible motorsLW25 B83 , LW 25 B44 , LV25 B44 , LV25 B64 , LT28 B73The DC RTS Receiver can control 1 or 2 motors.
3) Compatible blinds:a. Venetian blinds b. Roman shadesc. Pleated shadesd. Cellular shadese. Ballon shadesf . Pinoleum shades
CYCLES
0-10 50 7075
1%
64%
30%
CYCLES
0-10 40 60
0%0%
Integrated DC RTS Receiver DC RTS Receiver
5% 1%
30%
69%
+-
10 %15 %
= 433,42 Mhz
20 m EU6 m US

4 Copyright © 2008 Somfy SAS. All rights reserved - V0 - 05/2008
B - INSTALLATION AND WIRING
Integrated DC RTS RECEIVER
Product dedicated to be placed inside a headrail.
1) Installing the Integrated DC RTS Receiver :Snap the 2 Headrail adaptors on the Integrated DC RTS Receiver (for a complete list of adaptors, please refer to your local Somfy retailer).
2) Connecting the Integrated DC RTS Receiver:Connect the POWER (A) and MOTOR (B) cables to the Integrated DC RTS Receiver. When plugging the power, carefully respect the polarity marked on the Integrated DC RTS Receiver. When plugging the motor, there is no specific orientation.
3) Inserting the Integrated DC RTS Receiver in the headrail:Insert the Integrated DC RTS Receiver into the headrail. Make sure not to cut power ca-bles. Prevent any damage on cables during insertion. It’s mandatory to connect the power supply to the receiver after the motors are connected.
MO
TOR
INPU
T 24
V-
+
INTEGRATED DCRTS RECEIVER
1870123
1300 mA max
IP 2024V DC
PROG
To re
ad th
eU
ser g
uide
MOTOR INPU
T 24V
- +
INTEGRATED DCRTS RECEIVER
1870123
1300 mA max
IP 2024V DC
PROG
To re
ad th
eUs
er gu
ide
(1)
(2)
(3)
B A
5Copyright © 2008 Somfy SAS. All rights reserved - V0 - 05/2008
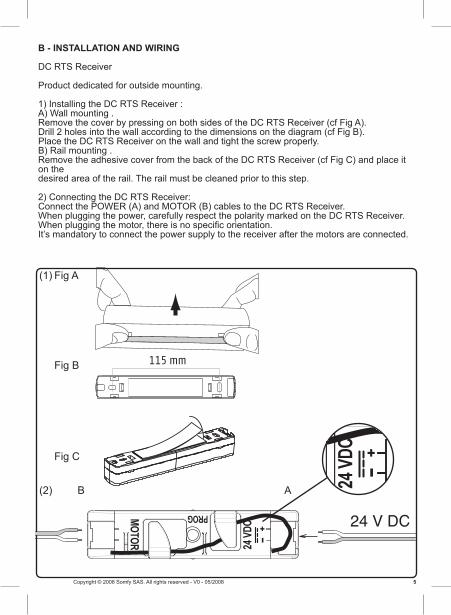
B - INSTALLATION AND WIRING
DC RTS Receiver
Product dedicated for outside mounting. 1) Installing the DC RTS Receiver :A) Wall mounting .Remove the cover by pressing on both sides of the DC RTS Receiver (cf Fig A).Drill 2 holes into the wall according to the dimensions on the diagram (cf Fig B).Place the DC RTS Receiver on the wall and tight the screw properly.B) Rail mounting .Remove the adhesive cover from the back of the DC RTS Receiver (cf Fig C) and place it on the desired area of the rail. The rail must be cleaned prior to this step.
2) Connecting the DC RTS Receiver:Connect the POWER (A) and MOTOR (B) cables to the DC RTS Receiver. When plugging the power, carefully respect the polarity marked on the DC RTS Receiver. When plugging the motor, there is no specific orientation.It’s mandatory to connect the power supply to the receiver after the motors are connected.
115 mm
(1)
(2)
Fig A
Fig B
Fig C
B A
6 Copyright © 2008 Somfy SAS. All rights reserved - V0 - 05/2008
A few definitionsChoosing the type of mode :The DC RTS Receiver is designed to work with 2 modes: Venetian blind mode or roller blind mode.The DC RTS Receiver is set by default to work in Venetian blind mode.This feature allows setting the DC RTS Receiver to be set according to the type of blind you are working with.
Motor rotation direction :It is possible, during installation or future adjusting, to change the rotation direction of the motor with the remote control. This will allow to link the upward motion of the blind with the raise button on the remote control.
Tilting using the Modulis scroll wheel :This feature can only be used with a Modulis remote control.It allows to associate the direction of the scroll wheel with the desired orientation of the slats.
Timer setting for raising and lowering of the blind :The objective is to adjust the operation time of the blind when raising and lowering. It does not replace the limit switches. This adjustment allows optimising the blind operation and to set automatically a My position. Without this, the My position can not be used.
Sun sensor operation:This feature can only be used in the roller blind mode.It is possible to use a RTS sunlight sensor to automatically operate the blind (ex: close the blinds when the sun comes out). For the sensor to operate at its best the parameters can be adjusted.
My position:The My position corresponds to the user’s favorite position of the blind in given situations: for example, adjusting the position of the blind in order to work on your computer in mid-day by lowering the blinds half-way, etc.
Setting the slat speed tilting fonction:This feature can only be used with a standard 3 buttons remote control and in the venitian blind mode.To orient the blades on a Venetian blind, you can press-and-hold the up and down buttons on the remote control.The tilting speed can be adjusted.
Adjusting the scroll wheel movement on the remote control:This feature can only be used with a Modulis remote control.To tilt the slats on a Venetian blind, you can use the scroll wheel on the Modulis remote control.This feature allows the scroll wheel sensitivity to be adjusted.
Disapearing sun position:This feature can only be used with Venetian blinds.It allows the slats to be set an horizontal position in case the sun disappears. This feature requires the use of a sun sensor.
Privacy feature:This feature allows the sun automatic operation to be activated or disactivated when the blind is closed in order to maintain your privacy. This feature requires the use of a sun sensor.
p8
p8
p9
p10
p9
p11
p12
p12
p12
p13

7Copyright © 2008 Somfy SAS. All rights reserved - V0 - 05/2008
C - ADJUSTING THE BLIND
End limits are operated by the motor and its accessories and not by the DC RTS Receiver. To use the DC RTS Receiver the product must be installed, connected and linked to a remote control. The mode can be selected (Venetian or roller) as well as the motor rotation direction. With this, the product is completely operational and remains open to numerous other features (programming the raising/lowering duration, setting a favorite position, using a sun sensor, etc…)
1) After connecting the DC RTS Receiver, switch on the power. The blind moves up and down.
2) Getting started:Two methods can be used to pair the DC RTS Receiver:
Using the receiver button to start settings :Select the DC RTS Receiver you want to adjust while keeping other DC RTS Receivers switched on (in case where several DC RTS Receivers are plugged).
Using the remote control to start settings :When controlling through a remote control, all DC RTS Receiver are adjusted at the same time if several DC RTS Receivers are connected.
Setting through the DC RTS Receiver:
Pairing:Press the programming button on the RTS module for approximately 2 seconds. The blind moves up and down.
Saving:Briefly press the programming button on the remote control. The blind moves up and down.The remote control is permanently saved.
Enter readjustment mode:To enter readjustment mode, simulta-neously press the Up and Down buttons for approximately 5 seconds until blind moves up and down.
Settings:Refer to steps:C3a: Choosing the type of blind :C3b: Motor rotation direction:C3c: Orientation using the dial: C3d: Sun sensor operation: C3e: Duration of raising and lowering of the blind
Confirm settings:To confirm settings, press the My button for approximately 5 seconds until the blind moves up and down twice.
2 X
C3a C3b C3c C3d C3e

8 Copyright © 2008 Somfy SAS. All rights reserved - V0 - 05/2008
Setting through the remote control:
Pairing:Briefly press the Up and Down buttons on the remote control. The blind moves up and down.The remote control is temporarily saved.
Settings:Refer to steps:C3a: Choosing the type of blind :C3b: Motor rotation direction :C3c: Orientation using the dial : C3d: Sun sensor operation : C3e: Duration of raising and lowering of the blind
Saving:Briefly press the programming button on the remote control. The blind moves up and down.The remote control is permanently saved.
C.3) Adjusting or readjusting the blind:
C.3.a) Choosing the type of mode:
To skip from one mode to the other, press the My and Down buttons for approximately 2 seconds until the blind moves up and down.The DC RTS Receiver in roller mode :The UP and Down movement is without stop at the down end limit.The DC RTS Receiver in Venetian mode :During the Up and Down movement, there is a stop at the down end limit.
C.3.b) Motor rotation direction:
Press the Up or Down button to verify the rotation direction. If the direction is incorrect, press the My button for approximately 2 seconds until the blind moves up and down.Verify the rotation direction using the Up and Down buttons.This operation can be repeated several times.The direction is inverted every time the My button is pressed for 2 seconds.
C3a C3b C3c C3d C3e

9Copyright © 2008 Somfy SAS. All rights reserved - V0 - 05/2008
C.3.c) Tilting using the Modulis Scroll wheel:
Use the scroll wheel to verify the slats tilting. If the direction is incorrect, press the Up and Down buttons for approximately 2 seconds until the blind moves up and down. The Scroll wheel operational position has been inverted.This operation can be repeated several times.The operational position is inverted every time the Up and Down buttons are pressed for approximately 2 seconds.
Note: The slat tilting behaviour is indepen-dent of the motor rotation direction.
C.3.d) Sun sensor operation:
The operational direction is set by default for a motor installed at the top of the blind.The operational direction can be pro-grammed for a product where the motor is installed at the bottom of the blind.
To modify the direction:
Press the My and Up buttons for approxi-mately 2 seconds until the blind moves up and down.
Press the Down button for approximately 2 seconds until the blind moves up and down to set the DC RTS Receiver in inverted sensor mode (in case motor is at the bottom of the blind).
Press the Up button for approximately 2 seconds until the blind moves up and down to set the DC RTS Receiver in normal sensor mode (in case motor is at the top of the blind).
Press the My button for approximately 2 seconds until the blind moves up and down to confirm the sensor mode selection .

10 Copyright © 2008 Somfy SAS. All rights reserved - V0 - 05/2008
C.3.e) Timer setting for raising and lowering the blind:
1) Take to upper end-stop of the blind. The blind automatically stops at the mechanical end-stop.
2) Briefly press the My and Down buttons: the end-product lowers (for 10 seconds) and stops. You can stop the blind prior to the 10 seconds by pressing the Stop button.
3) If the blind is not at its lowest position, press the Down button until the blind rea-ches the lowest position set mechanically. The blind lowers as long as the button is pressed and held for a maximum duration of 10 seconds.Nb: Only the length of time the button is held is saved. Time is not measured once the blind is stopped.
4) Once the end-product is at the lowest position release the Down button.Nb: If the Down button remains held as the mechanical stops down position is reached, time continues to be measured and the blind does not move.
5) Briefly press the My and Up buttons: The end-product rises (for 10 seconds) and stops. You can stop the blind prior to the 10 seconds by pressing the Stop button.Nb: Pressing the My and Up buttons confirms the down motion duration.
6) If the blind is not at its upper position, press the Up button until the blind reaches the upper position set mechanically. The blind rises as long as the button is pressed and held for a maximum duration of 10 seconds.Nb: Only the length of time the button is held is saved. Time is not measured once the blind is stopped.
7) Once the end-product is at the upper position release the Up button.Nb: If the Up button remains held as the mechanical stops up position is reached, time continues to be measured.
8) To finalize the setting of up and down motion duration, press the My button for approximately 2 seconds until the blind moves up and down. Durations are confir-med, saved and a favorite position (My) is automatically set.
(2)
(1)
(3)
(4)
(5)
(6)
(7)
(8)

11Copyright © 2008 Somfy SAS. All rights reserved - V0 - 05/2008
D - USE
1) My position:
The My position varies according to the type of blind.Venetian mode: After adjusting the duration of up and down motions, the My position is the following one : lower position, slats position at about 45° (for a Venetian with 25 mm slats and CTS 25).The user can readjust this position.
Rolling mode:After adjusting the duration of up and down motions, the My position is the following one : 3/4 closed.The user can readjust this position.
Readjusting the position: To readjust the My position the blind must be in any position except the current My position.
Venetian mode: Press the My button for approximatly 5 seconds.The blind goes to the existing My position. Using the Up or Down buttons, or the scroll wheel when using a Modulis remote control, to readjust the My position.Press the My button for approximately 2 seconds until the blind moves up and down.The new My position is saved.
Rolling mode:Using the Up or Down buttons select the new desired position. Press the My button for approximately 5 seconds until the blind moves up and down, the new position is saved.
Deleting the position (for venitian or roller mode):By briefly pressing the My button take the blind to the current My position.Press the My button for approximately 5 seconds until the blind moves up and down.The position has been deleted.
12 Copyright © 2008 Somfy SAS. All rights reserved - V0 - 05/2008
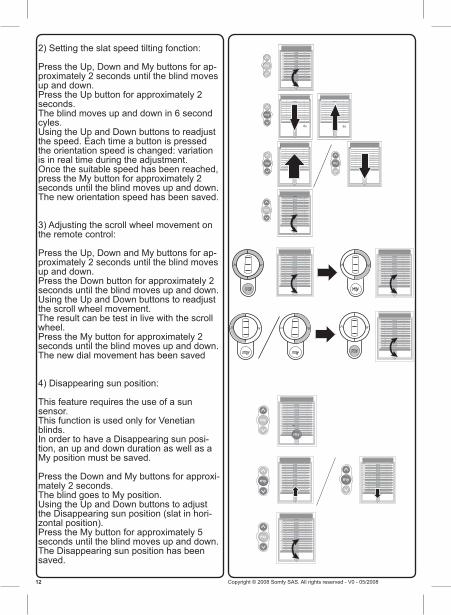
2) Setting the slat speed tilting fonction:
Press the Up, Down and My buttons for ap-proximately 2 seconds until the blind moves up and down.Press the Up button for approximately 2 seconds.The blind moves up and down in 6 second cyles.Using the Up and Down buttons to readjust the speed. Each time a button is pressed the orientation speed is changed: variation is in real time during the adjustment.Once the suitable speed has been reached, press the My button for approximately 2 seconds until the blind moves up and down. The new orientation speed has been saved.
3) Adjusting the scroll wheel movement on the remote control:
Press the Up, Down and My buttons for ap-proximately 2 seconds until the blind moves up and down.Press the Down button for approximately 2 seconds until the blind moves up and down.Using the Up and Down buttons to readjust the scroll wheel movement.The result can be test in live with the scroll wheel.Press the My button for approximately 2 seconds until the blind moves up and down.The new dial movement has been saved
4) Disappearing sun position:
This feature requires the use of a sun sensor.This function is used only for Venetian blinds.In order to have a Disappearing sun posi-tion, an up and down duration as well as a My position must be saved.
Press the Down and My buttons for approxi-mately 2 seconds.The blind goes to My position.Using the Up and Down buttons to adjust the Disappearing sun position (slat in hori-zontal position).Press the My button for approximately 5 seconds until the blind moves up and down. The Disappearing sun position has been saved.
6s 6s

13Copyright © 2008 Somfy SAS. All rights reserved - V0 - 05/2008
Readjusting the position:
To readjust the No sun position, repeat previous procedure (1st time setting).
Deleting the position:
Press the Down and My buttons for approxi-mately 2 seconds.The blind goes to My position.Press the Down and My buttons for approxi-mately 5 seconds until the blind moves up and down.The No sun position has been deleted.
Note: If the My position is deleted, the No sun position is automatically deleted also.
5) Privacy feature:
By default, the privacy feature is activated.When the user sends the blind to lower position, the automatic sun operation is deactivated.
Press the Up, Down and My buttons until the blind moves up and down.Press the My button until the blind moves up and down.Press the Up button for approximately 2 seconds until the blind moves up and down to activate the automatic sun operation (No privacy function).Press the Down button for approximately 2 seconds until the blind moves up and down to deactivate the automatic sun operation (Privacy function on).Press the My button for approximately 5 seconds until the blind moves up and down to confirm your selection.
14 Copyright © 2008 Somfy SAS. All rights reserved - V0 - 05/2008
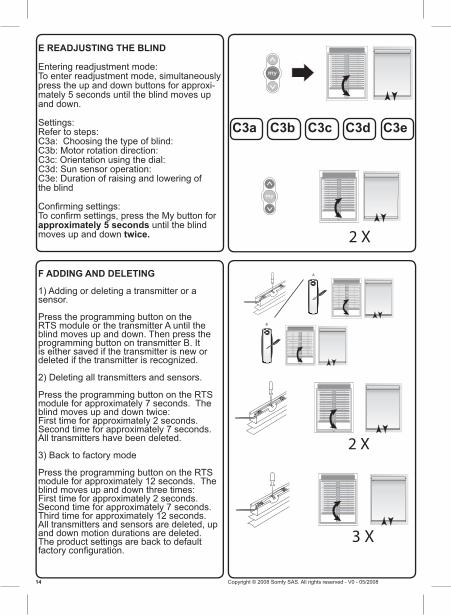
E READJUSTING THE BLIND
Entering readjustment mode:To enter readjustment mode, simultaneously press the up and down buttons for approxi-mately 5 seconds until the blind moves up and down.
Settings:Refer to steps:C3a: Choosing the type of blind:C3b: Motor rotation direction:C3c: Orientation using the dial: C3d: Sun sensor operation: C3e: Duration of raising and lowering of the blind
Confirming settings:To confirm settings, press the My button for approximately 5 seconds until the blind moves up and down twice.
F ADDING AND DELETING
1) Adding or deleting a transmitter or a sensor.
Press the programming button on the RTS module or the transmitter A until the blind moves up and down. Then press the programming button on transmitter B. It is either saved if the transmitter is new or deleted if the transmitter is recognized.
2) Deleting all transmitters and sensors.
Press the programming button on the RTS module for approximately 7 seconds. The blind moves up and down twice:First time for approximately 2 seconds.Second time for approximately 7 seconds.All transmitters have been deleted.
3) Back to factory mode
Press the programming button on the RTS module for approximately 12 seconds. The blind moves up and down three times:First time for approximately 2 seconds. Second time for approximately 7 seconds.Third time for approximately 12 seconds.All transmitters and sensors are deleted, up and down motion durations are deleted.The product settings are back to default factory configuration.
C3a C3b C3c C3d C3e
2 X
A
B
2 X
3 X
15Copyright © 2008 Somfy SAS. All rights reserved - V0 - 05/2008
G TROUBLE SHOOTING
Nothing works:
Check the wiring.Check the motor.Check the power supply.Check the battery of the transmitter.Check the compatibility of the transmitter.Check that the transmitter has been properly recorded.Check that the antenna has not been cut.
No My position:
The My position can only be programmed if the timer for raising and lowering the blind are set.
Problem with the functions :
Check you are in the right mode (Venetian or Roller).
Lost in your programming mode:
Just make a complete reset and start again.