Dawn of the Zeds Second Edition Rules v1-3 · PDF fileDawn of the Zeds Second Edition...
32
Transcript of Dawn of the Zeds Second Edition Rules v1-3 · PDF fileDawn of the Zeds Second Edition...
Dawn of the Zeds Second Edition Rules v1-3Dawn of the Zeds Second Edition Designer’s Notes v1-3
Developed by Victory Point Games
DESIGNER’S NOTES
Everyone remembers where they were on that fateful day when the zombie apocalypse broke out in March of 2008. It is, understandably, forever etched into our collective memories.Dawn of the Zeds is my attempt to capture the feelings of panic, loss, hopelessness, and, yes, salvation that permeated this period of our history.Utilizing the tried-and-true States of SiegeTM system developed by Darin Leviloff, Dawn
of the Zeds adds some of its own twists to capture the unique situation of the Battle for Farmingdale. The usual SoS-style Tracks are present, of course, and the Zeds armies conduct their march down these avenues towards the town center. However, there are many more “moving parts” in this game than just that relentless monster onslaught. Player units can elect to move forward to meet the Zeds hordes head-on or to secure a particularly important location. They can move backward towards town to escape being overwhelmed by the advancing mobs or to seek a better defensive position. Specialists can move ‘laterally’ into the Laboratory or
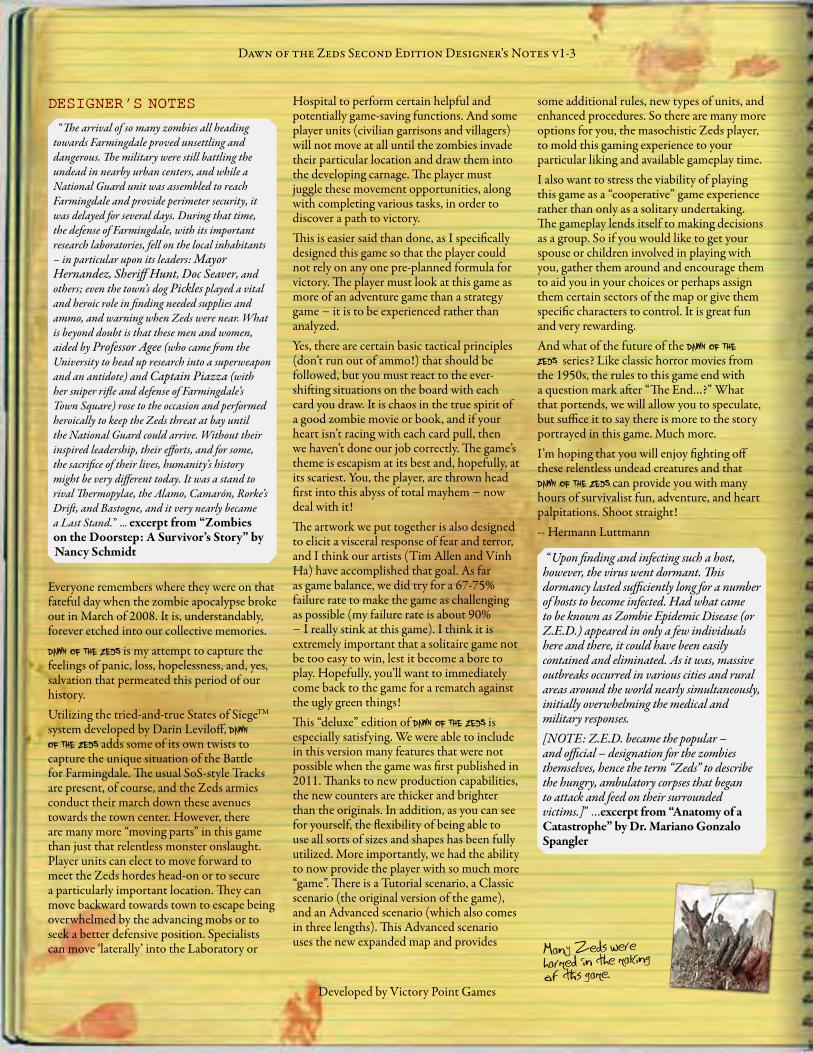
“The arrival of so many zombies all heading towards Farmingdale proved unsettling and dangerous. The military were still battling the undead in nearby urban centers, and while a National Guard unit was assembled to reach Farmingdale and provide perimeter security, it was delayed for several days. During that time, the defense of Farmingdale, with its important research laboratories, fell on the local inhabitants – in particular upon its leaders: Mayor Hernandez, Sheriff Hunt, Doc Seaver, and others; even the town’s dog Pickles played a vital and heroic role in finding needed supplies and ammo, and warning when Zeds were near. What is beyond doubt is that these men and women, aided by Professor Agee (who came from the University to head up research into a superweapon and an antidote) and Captain Piazza (with her sniper rifle and defense of Farmingdale’s Town Square) rose to the occasion and performed heroically to keep the Zeds threat at bay until the National Guard could arrive. Without their inspired leadership, their efforts, and for some, the sacrifice of their lives, humanity’s history might be very different today. It was a stand to rival Thermopylae, the Alamo, Camarón, Rorke’s Drift, and Bastogne, and it very nearly became a Last Stand.” ... excerpt from “Zombies on the Doorstep: A Survivor’s Story” by Nancy Schmidt
Hospital to perform certain helpful and potentially game-saving functions. And some player units (civilian garrisons and villagers) will not move at all until the zombies invade their particular location and draw them into the developing carnage. The player must juggle these movement opportunities, along with completing various tasks, in order to discover a path to victory. This is easier said than done, as I specifically designed this game so that the player could not rely on any one pre-planned formula for victory. The player must look at this game as more of an adventure game than a strategy game − it is to be experienced rather than analyzed.Yes, there are certain basic tactical principles (don’t run out of ammo!) that should be followed, but you must react to the ever-shifting situations on the board with each card you draw. It is chaos in the true spirit of a good zombie movie or book, and if your heart isn’t racing with each card pull, then we haven’t done our job correctly. The game’s theme is escapism at its best and, hopefully, at its scariest. You, the player, are thrown head first into this abyss of total mayhem − now deal with it! The artwork we put together is also designed to elicit a visceral response of fear and terror, and I think our artists (Tim Allen and Vinh Ha) have accomplished that goal. As far as game balance, we did try for a 67-75% failure rate to make the game as challenging as possible (my failure rate is about 90% − I really stink at this game). I think it is extremely important that a solitaire game not be too easy to win, lest it become a bore to play. Hopefully, you’ll want to immediately come back to the game for a rematch against the ugly green things!This “deluxe” edition of Dawn of the Zeds is especially satisfying. We were able to include in this version many features that were not possible when the game was first published in 2011. Thanks to new production capabilities, the new counters are thicker and brighter than the originals. In addition, as you can see for yourself, the flexibility of being able to use all sorts of sizes and shapes has been fully utilized. More importantly, we had the ability to now provide the player with so much more “game”. There is a Tutorial scenario, a Classic scenario (the original version of the game), and an Advanced scenario (which also comes in three lengths). This Advanced scenario uses the new expanded map and provides
some additional rules, new types of units, and enhanced procedures. So there are many more options for you, the masochistic Zeds player, to mold this gaming experience to your particular liking and available gameplay time.I also want to stress the viability of playing this game as a “cooperative” game experience rather than only as a solitary undertaking. The gameplay lends itself to making decisions as a group. So if you would like to get your spouse or children involved in playing with you, gather them around and encourage them to aid you in your choices or perhaps assign them certain sectors of the map or give them specific characters to control. It is great fun and very rewarding. And what of the future of the Dawn of the
Zeds series? Like classic horror movies from the 1950s, the rules to this game end with a question mark after “The End…?” What that portends, we will allow you to speculate, but suffice it to say there is more to the story portrayed in this game. Much more.I’m hoping that you will enjoy fighting off these relentless undead creatures and that Dawn of the Zeds can provide you with many hours of survivalist fun, adventure, and heart palpitations. Shoot straight!-- Hermann Luttmann
“Upon finding and infecting such a host, however, the virus went dormant. This dormancy lasted sufficiently long for a number of hosts to become infected. Had what came to be known as Zombie Epidemic Disease (or Z.E.D.) appeared in only a few individuals here and there, it could have been easily contained and eliminated. As it was, massive outbreaks occurred in various cities and rural areas around the world nearly simultaneously, initially overwhelming the medical and military responses.[NOTE: Z.E.D. became the popular – and official – designation for the zombies themselves, hence the term “Zeds” to describe the hungry, ambulatory corpses that began to attack and feed on their surrounded victims.]” …excerpt from “Anatomy of a Catastrophe” by Dr. Mariano Gonzalo Spangler
Many Zeds were harmed in the making of this game.
3
Dawn of the Zeds Second Edition Rules v1-3
©2013 Hermann Luttmann and Victory Point Games
[1.0] INTRODUCTIONDawn of the Zeds is a States of Siege™ series solitaire game of survival after the world has gone crazy – apparently some kind of virus or poison has turned ordinary people into vicious, zombie-like killers. It is not clear how the disease spreads (though it seems that physical contact is one way), but it is obvious what the illness does to its victims.
And now the undead, nicknamed “Zeds,” are converging on your corner of the world.
As best as you can tell, you have been left to your own devices to stop them while the National Guard organizes a relief column and fights its way to you – but that could take days, maybe even weeks. You must coordinate the defense of the town of Farmingdale and its surrounding villages, utilizing the good citizens and emerging
heroes of these communities to halt the Zeds’ advances by (re)killing them, discovering and implementing a cure to this vile scourge, and preserving as much of the area and as many of its inhabitants as possible.
[2.0] GAME EQUIPMENT• One 11” x 17” Game Map• One 8.5” x 11” Player Mat• One 8.5” x 11” Player Aid• One 8.5” x 11” Quick Play guide and
one Quick Play Set Up sheet• 19 regular Zeds and 5 Super Zeds units*• 12 Heroes, 7 Civilians, 5 Villagers/
Refugees, 1 Raiders, 1 Bubba’s Band, 1 Dr. Marteuse, 1 VIP Survivors, 1 Rangers, and 2 Green Diamond Security Guards units*
• 1 Supplies, 1 Ammo, 1 Infection Level, 1 Super Weapon, 1 Research, 1 Final Component, 1 Ferry/Collapsed Bridge, 1 Premonition, 1 Player Actions, 1 Noelle, 1 Minefield, 1 Artifact, 11 Casualties, 8 Dead Zeds, 18 Chaos, 1 Infected Vermin, 1 1st Player, 1 Loaded, 1 Secret Entrance, 6 Zeds status (Toxic, Zeds Stench, etc.), 1st Player, and 3 Civilians status (Well-Armed, Explosive, and Civilian Leader) markers*
• 5 Barricades and 1 Strongpoint (minor assembly required)*
• 59 Event, 29 Fate and 12 Hero cards• 2 six-sided dice (boxed edition only)• This Rulebook
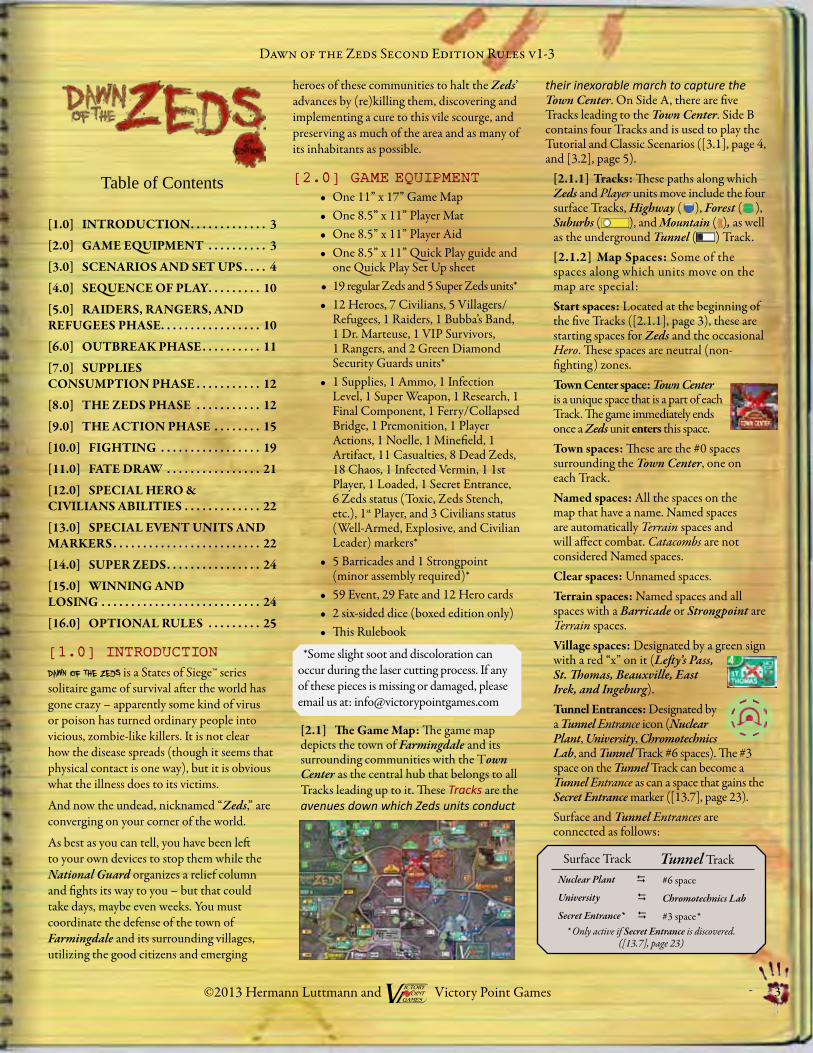
[2.1] The Game Map: The game map depicts the town of Farmingdale and its surrounding communities with the Town Center as the central hub that belongs to all Tracks leading up to it. These Tracks are the avenues down which Zeds units conduct
their inexorable march to capture the Town Center. On Side A, there are five Tracks leading to the Town Center. Side B contains four Tracks and is used to play the Tutorial and Classic Scenarios ([3.1], page 4, and [3.2], page 5).
[2.1.1] Tracks: These paths along which Zeds and Player units move include the four surface Tracks, Highway ( ), Forest ( ), Suburbs ( ), and Mountain ( ), as well as the underground Tunnel ( ) Track.[2.1.2] Map Spaces: Some of the spaces along which units move on the map are special:Start spaces: Located at the beginning of the five Tracks ([2.1.1], page 3), these are starting spaces for Zeds and the occasional Hero. These spaces are neutral (non-fighting) zones.Town Center space: Town Center is a unique space that is a part of each Track. The game immediately ends once a Zeds unit enters this space.Town spaces: These are the #0 spaces surrounding the Town Center, one on each Track.Named spaces: All the spaces on the map that have a name. Named spaces are automatically Terrain spaces and will affect combat. Catacombs are not considered Named spaces.Clear spaces: Unnamed spaces.Terrain spaces: Named spaces and all spaces with a Barricade or Strongpoint are Terrain spaces.Village spaces: Designated by a green sign with a red “x” on it (Lefty’s Pass, St. Thomas, Beauxville, East Irek, and Ingeburg).Tunnel Entrances: Designated by a Tunnel Entrance icon (Nuclear Plant, University, Chromotechnics Lab, and Tunnel Track #6 spaces). The #3 space on the Tunnel Track can become a Tunnel Entrance as can a space that gains the Secret Entrance marker ([13.7], page 23).Surface and Tunnel Entrances are connected as follows:
*Some slight soot and discoloration can occur during the laser cutting process. If any of these pieces is missing or damaged, please email us at: [email protected]
Tunnel TrackSurface TrackNuclear Plant
University
Secret Entrance*
#6 space
Chromotechnics Lab
#3 space** Only active if Secret Entrance is discovered.
([13.7], page 23)
Table of Contents
[1.0] INTRODUCTION . . . . . . . . . . . . . 3
[2.0] GAME EQUIPMENT . . . . . . . . . . 3
[3.0] SCENARIOS AND SET UPS . . . . 4
[4.0] SEQUENCE OF PLAY. . . . . . . . . 10
[5.0] RAIDERS, RANGERS, AND REFUGEES PHASE . . . . . . . . . . . . . . . . . 10
[6.0] OUTBREAK PHASE . . . . . . . . . . 11
[7.0] SUPPLIES CONSUMPTION PHASE . . . . . . . . . . . 12
[8.0] THE ZEDS PHASE . . . . . . . . . . . 12
[9.0] THE ACTION PHASE . . . . . . . . 15
[10.0] FIGHTING . . . . . . . . . . . . . . . . . 19
[11.0] FATE DRAW . . . . . . . . . . . . . . . . 21
[12.0] SPECIAL HERO & CIVILIANS ABILITIES . . . . . . . . . . . . . 22
[13.0] SPECIAL EVENT UNITS AND MARKERS . . . . . . . . . . . . . . . . . . . . . . . . . 22
[14.0] SUPER ZEDS . . . . . . . . . . . . . . . . 24
[15.0] WINNING AND LOSING . . . . . . . . . . . . . . . . . . . . . . . . . . . 24
[16.0] OPTIONAL RULES . . . . . . . . . 25
4
Dawn of the Zeds Second Edition Rules v1-3
Developed by Victory Point Games
Dawn of the Zeds Second Edition Rules v1-3
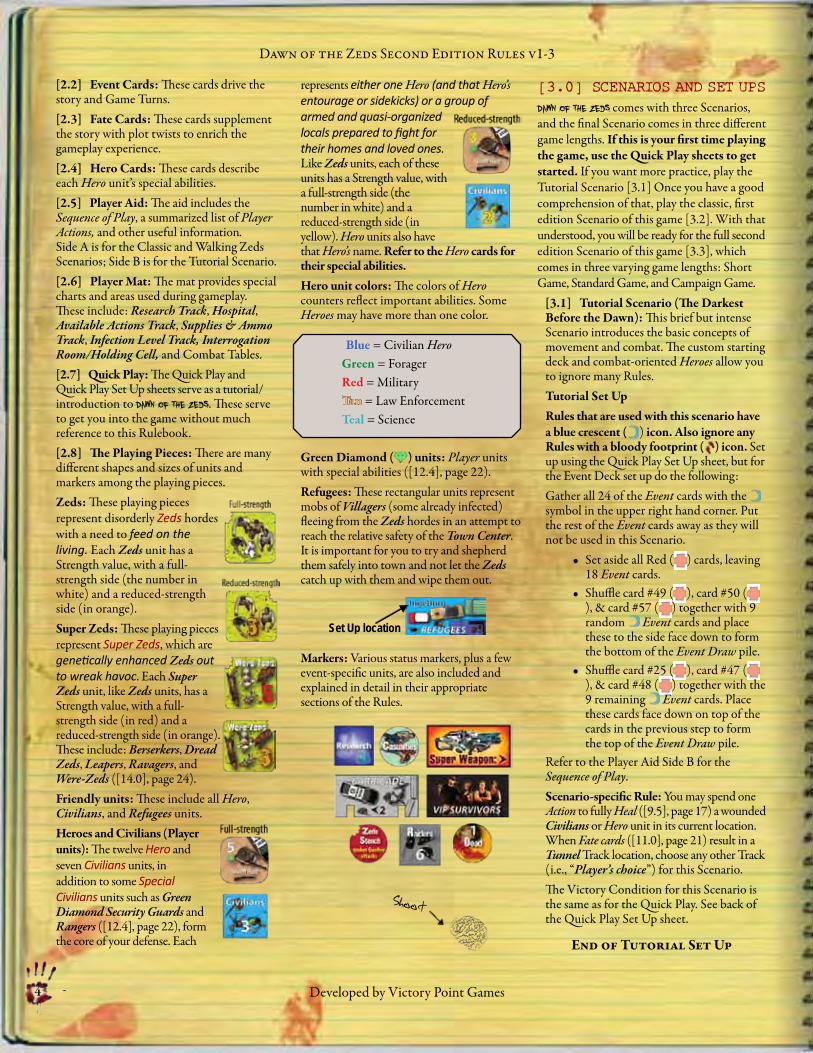
[2.2] Event Cards: These cards drive the story and Game Turns.[2.3] Fate Cards: These cards supplement the story with plot twists to enrich the gameplay experience.[2.4] Hero Cards: These cards describe each Hero unit’s special abilities.[2.5] Player Aid: The aid includes the Sequence of Play, a summarized list of Player Actions, and other useful information. Side A is for the Classic and Walking Zeds Scenarios; Side B is for the Tutorial Scenario.[2.6] Player Mat: The mat provides special charts and areas used during gameplay. These include: Research Track, Hospital, Available Actions Track, Supplies & Ammo Track, Infection Level Track, Interrogation Room/Holding Cell, and Combat Tables.[2.7] Quick Play: The Quick Play and Quick Play Set Up sheets serve as a tutorial/introduction to Dawn of the Zeds. These serve to get you into the game without much reference to this Rulebook.[2.8] The Playing Pieces: There are many different shapes and sizes of units and markers among the playing pieces.Zeds: These playing pieces represent disorderly Zeds hordes with a need to feed on the living. Each Zeds unit has a Strength value, with a full-strength side (the number in white) and a reduced-strength side (in orange).Super Zeds: These playing pieces represent Super Zeds, which are genetically enhanced Zeds out to wreak havoc. Each Super Zeds unit, like Zeds units, has a Strength value, with a full-strength side (in red) and a reduced-strength side (in orange). These include: Berserkers, Dread Zeds, Leapers, Ravagers, and Were-Zeds ([14.0], page 24).Friendly units: These include all Hero, Civilians, and Refugees units.Heroes and Civilians (Player units): The twelve Hero and seven Civilians units, in addition to some Special Civilians units such as Green Diamond Security Guards and Rangers ([12.4], page 22), form the core of your defense. Each
represents either one Hero (and that Hero’s entourage or sidekicks) or a group of armed and quasi-organized locals prepared to fight for their homes and loved ones. Like Zeds units, each of these units has a Strength value, with a full-strength side (the number in white) and a reduced-strength side (in yellow). Hero units also have that Hero’s name. Refer to the Hero cards for their special abilities.Hero unit colors: The colors of Hero counters reflect important abilities. Some Heroes may have more than one color.
Green Diamond ( ) units: Player units with special abilities ([12.4], page 22).Refugees: These rectangular units represent mobs of Villagers (some already infected) fleeing from the Zeds hordes in an attempt to reach the relative safety of the Town Center. It is important for you to try and shepherd them safely into town and not let the Zeds catch up with them and wipe them out.
Markers: Various status markers, plus a few event-specific units, are also included and explained in detail in their appropriate sections of the Rules.
[3.0] SCENARIOS AND SET UPSDawn of the Zeds comes with three Scenarios, and the final Scenario comes in three different game lengths. If this is your first time playing the game, use the Quick Play sheets to get started. If you want more practice, play the Tutorial Scenario [3.1] Once you have a good comprehension of that, play the classic, first edition Scenario of this game [3.2]. With that understood, you will be ready for the full second edition Scenario of this game [3.3], which comes in three varying game lengths: Short Game, Standard Game, and Campaign Game.
[3.1] Tutorial Scenario (The Darkest Before the Dawn): This brief but intense Scenario introduces the basic concepts of movement and combat. The custom starting deck and combat-oriented Heroes allow you to ignore many Rules.Tutorial Set UpRules that are used with this scenario have a blue crescent ( ) icon. Also ignore any Rules with a bloody footprint ( ) icon. Set up using the Quick Play Set Up sheet, but for the Event Deck set up do the following:Gather all 24 of the Event cards with the symbol in the upper right hand corner. Put the rest of the Event cards away as they will not be used in this Scenario.
• Set aside all Red ( ) cards, leaving 18 Event cards.
• Shuffle card #49 ( ), card #50 (), & card #57 ( ) together with 9 random Event cards and place these to the side face down to form the bottom of the Event Draw pile.
• Shuffle card #25 ( ), card #47 (), & card #48 ( ) together with the 9 remaining Event cards. Place these cards face down on top of the cards in the previous step to form the top of the Event Draw pile.
Refer to the Player Aid Side B for the Sequence of Play.Scenario-specific Rule: You may spend one Action to fully Heal ([9.5], page 17) a wounded Civilians or Hero unit in its current location. When Fate cards ([11.0], page 21) result in a Tunnel Track location, choose any other Track (i.e., “Player’s choice”) for this Scenario.The Victory Condition for this Scenario is the same as for the Quick Play. See back of the Quick Play Set Up sheet.
End of Tutorial Set Up
Blue = Civilian Hero Green = Forager Red = Military Tan = Law Enforcement Teal = Science
Set Up location
Dawn of the Zeds Second Edition Rules v1-3
Developed by Victory Point Games 5
Dawn of the Zeds Second Edition Rules v1-3
©2013 Hermann Luttmann and Victory Point Games
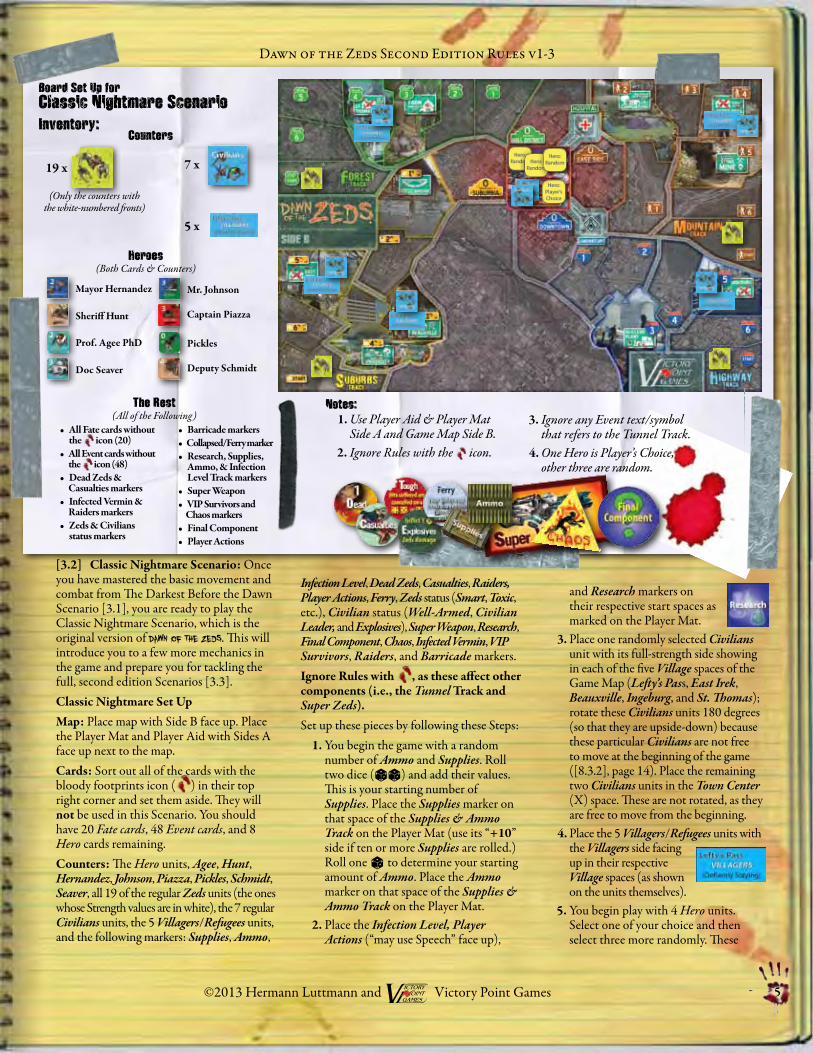
[3.2] Classic Nightmare Scenario: Once you have mastered the basic movement and combat from The Darkest Before the Dawn Scenario [3.1], you are ready to play the Classic Nightmare Scenario, which is the original version of Dawn of the Zeds. This will introduce you to a few more mechanics in the game and prepare you for tackling the full, second edition Scenarios [3.3].Classic Nightmare Set UpMap: Place map with Side B face up. Place the Player Mat and Player Aid with Sides A face up next to the map.Cards: Sort out all of the cards with the bloody footprints icon ( ) in their top right corner and set them aside. They will not be used in this Scenario. You should have 20 Fate cards, 48 Event cards, and 8 Hero cards remaining.Counters: The Hero units, Agee, Hunt, Hernandez, Johnson, Piazza, Pickles, Schmidt, Seaver, all 19 of the regular Zeds units (the ones whose Strength values are in white), the 7 regular Civilians units, the 5 Villagers/Refugees units, and the following markers: Supplies, Ammo,
Infection Level, Dead Zeds, Casualties, Raiders, Player Actions, Ferry, Zeds status (Smart, Toxic, etc.), Civilian status (Well-Armed, Civilian Leader, and Explosives), Super Weapon, Research, Final Component, Chaos, Infected Vermin, VIP Survivors, Raiders, and Barricade markers.Ignore Rules with , as these affect other components (i.e., the Tunnel Track and Super Zeds).Set up these pieces by following these Steps:
1. You begin the game with a random number of Ammo and Supplies. Roll two dice (zz) and add their values. This is your starting number of Supplies. Place the Supplies marker on that space of the Supplies & Ammo Track on the Player Mat (use its “+10” side if ten or more Supplies are rolled.) Roll one z to determine your starting amount of Ammo. Place the Ammo marker on that space of the Supplies & Ammo Track on the Player Mat.
2. Place the Infection Level, Player Actions (“may use Speech” face up),
and Research markers on their respective start spaces as marked on the Player Mat.
3. Place one randomly selected Civilians unit with its full-strength side showing in each of the five Village spaces of the Game Map (Lefty’s Pass, East Irek, Beauxville, Ingeburg, and St. Thomas); rotate these Civilians units 180 degrees (so that they are upside-down) because these particular Civilians are not free to move at the beginning of the game ([8.3.2], page 14). Place the remaining two Civilians units in the Town Center (X) space. These are not rotated, as they are free to move from the beginning.
4. Place the 5 Villagers/Refugees units with the Villagers side facing up in their respective Village spaces (as shown on the units themselves).
5. You begin play with 4 Hero units. Select one of your choice and then select three more randomly. These
Board Set Up forClassic Nightmare Scenario Inventory:
19 x
Heroes(Both Cards & Counters)
The Rest(All of the Following)
Mayor Hernandez
Prof. Agee PhD
Sheriff Hunt
Doc Seaver
Mr. Johnson
Pickles
Captain Piazza
Deputy Schmidt
Counters
7 x
5 x
(Only the counters with the white-numbered fronts)
Notes:1. Use Player Aid & Player Mat
Side A and Game Map Side B.2. Ignore Rules with the icon.
3. Ignore any Event text/symbol that refers to the Tunnel Track.
4. One Hero is Player’s Choice, other three are random.
• All Fate cards without the icon (20)
• All Event cards without the icon (48)
• Dead Zeds & Casualties markers• Infected Vermin & Raiders markers• Zeds & Civilians
status markers
• Barricade markers• Collapsed/Ferry marker• Research, Supplies,
Ammo, & Infection Level Track markers
• Super Weapon• VIP Survivors and Chaos markers• Final Component• Player Actions
6
Dawn of the Zeds Second Edition Rules v1-3
Developed by Victory Point Games
Dawn of the Zeds Second Edition Rules v1-3
four Hero units are placed in the Town Center (X) space. Take the Hero cards for your four starting Heroes and place them where you can easily reference their information. Set the remaining four Hero cards and units off to one side for now. Some of them may come into play later during the game.
6. Place the 19 regular Zeds units in an opaque container (e.g., a coffee mug or empty skull), called the Zeds Cup, and draw four Zeds units. Place them randomly, one in the Start space on each of the four Tracks (Forest, Mountain, Highway, and Suburbs), with their full-strength (white) sides showing. The Zeds Cup is used throughout the game to place new randomly drawn Zeds units.
7. Shuffle the 20 Fate cards and place them face down to one side of the map, forming the Fate Draw pile.
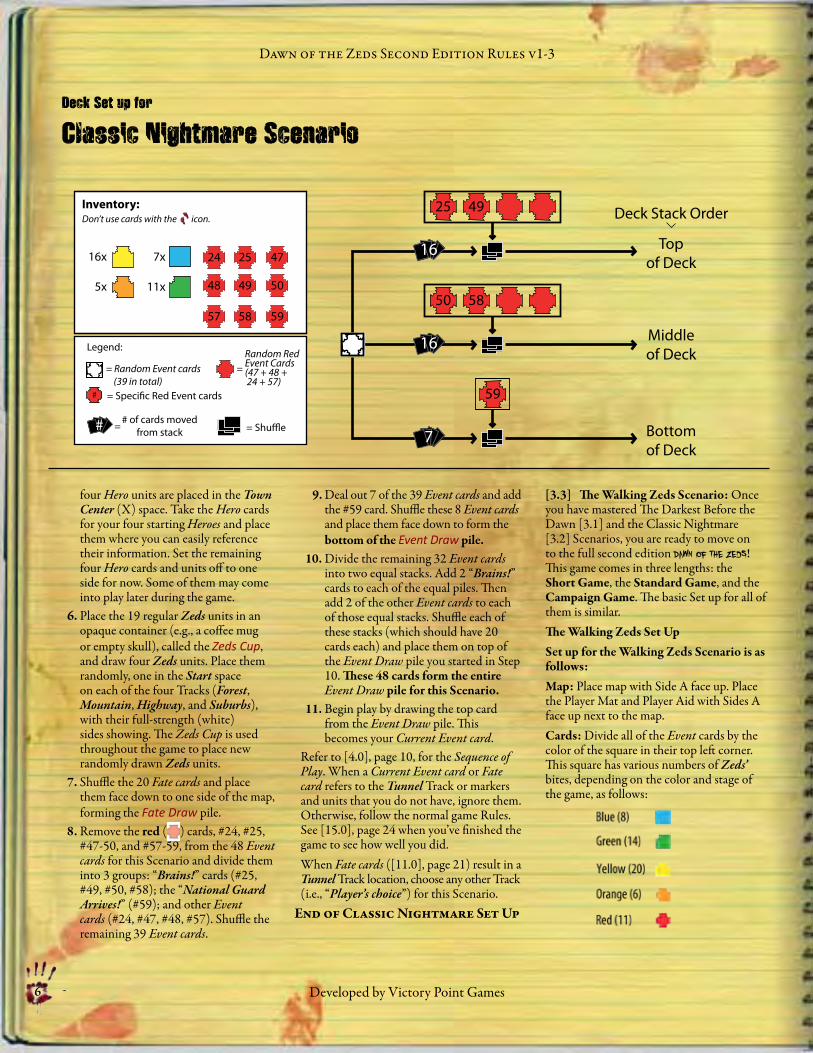
8. Remove the red ( ) cards, #24, #25, #47-50, and #57-59, from the 48 Event cards for this Scenario and divide them into 3 groups: “Brains!” cards (#25, #49, #50, #58); the “National Guard Arrives!” (#59); and other Event cards (#24, #47, #48, #57). Shuffle the remaining 39 Event cards.
9. Deal out 7 of the 39 Event cards and add the #59 card. Shuffle these 8 Event cards and place them face down to form the bottom of the Event Draw pile.
10. Divide the remaining 32 Event cards into two equal stacks. Add 2 “Brains!” cards to each of the equal piles. Then add 2 of the other Event cards to each of those equal stacks. Shuffle each of these stacks (which should have 20 cards each) and place them on top of the Event Draw pile you started in Step 10. These 48 cards form the entire Event Draw pile for this Scenario.
11. Begin play by drawing the top card from the Event Draw pile. This becomes your Current Event card.
Refer to [4.0], page 10, for the Sequence of Play. When a Current Event card or Fate card refers to the Tunnel Track or markers and units that you do not have, ignore them. Otherwise, follow the normal game Rules. See [15.0], page 24 when you’ve finished the game to see how well you did. When Fate cards ([11.0], page 21) result in a Tunnel Track location, choose any other Track (i.e., “Player’s choice”) for this Scenario.
End of Classic Nightmare Set Up
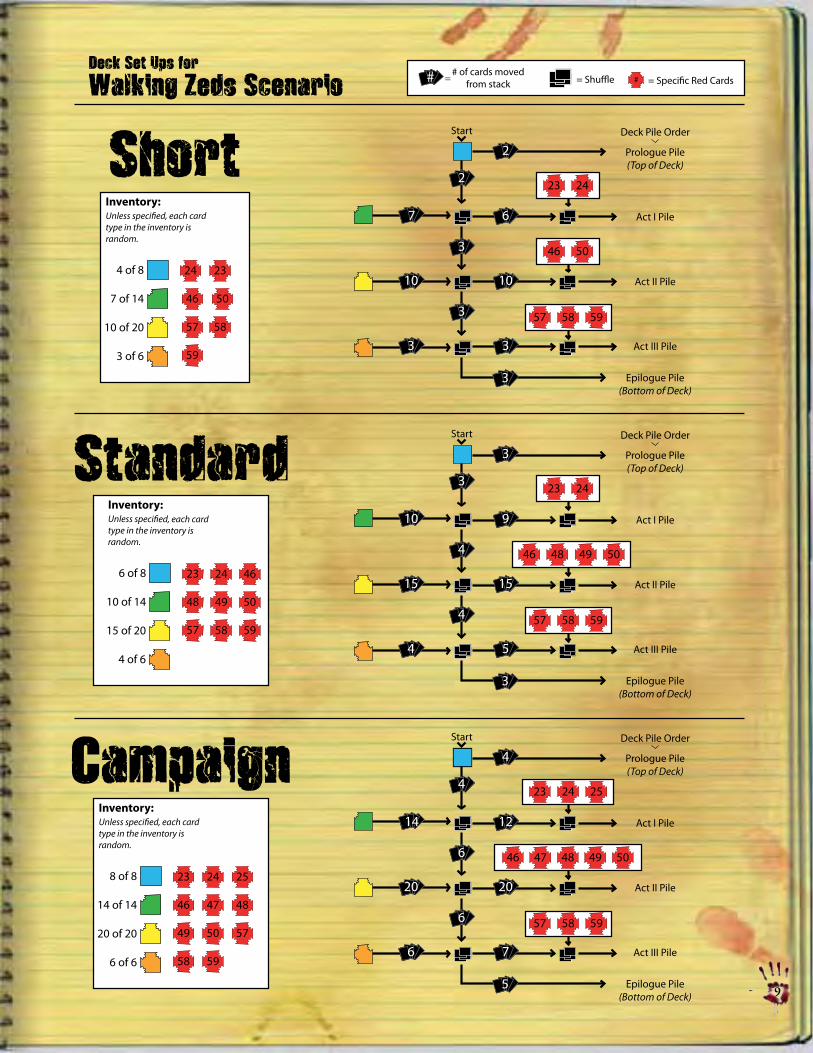
[3.3] The Walking Zeds Scenario: Once you have mastered The Darkest Before the Dawn [3.1] and the Classic Nightmare [3.2] Scenarios, you are ready to move on to the full second edition Dawn of the Zeds! This game comes in three lengths: the Short Game, the Standard Game, and the Campaign Game. The basic Set up for all of them is similar.The Walking Zeds Set UpSet up for the Walking Zeds Scenario is as follows:Map: Place map with Side A face up. Place the Player Mat and Player Aid with Sides A face up next to the map.Cards: Divide all of the Event cards by the color of the square in their top left corner. This square has various numbers of Zeds’ bites, depending on the color and stage of the game, as follows:
59
Bottomof Deck
Deck Stack Order
7
50 58
25 49
16
Topof Deck
Middleof Deck
16
= Shu�e# of cards moved
from stack=
# = Speci�c Red Event cards
= Random Event cards (39 in total)
Legend:
=
2524 47
48 49 50
57 58 59
Don’t use cards with the icon.
7x
11x
Inventory:
16x
5x
Random Red Event Cards (47 + 48 + 24 + 57)
Deck Set up for
Classic Nightmare Scenario

Dawn of the Zeds Second Edition Rules v1-3
Developed by Victory Point Games 7
Dawn of the Zeds Second Edition Rules v1-3
©2013 Hermann Luttmann and Victory Point Games
Counters: You will be using all of the units and markers in the game. Set up the pieces by following these Steps:
1. You begin the game with a random number of Ammo and Supplies. Roll two dice (z z) and add their values. This is your starting number of Supplies. Place the Supplies marker on that space of the Supplies & Ammo Track on the Player Mat (use its “+10” side if ten or more Supplies are rolled.) Roll one z to determine your starting amount of Ammo. Place the Ammo marker on that space of the Supplies & Ammo Track on the Player Mat.
2. Place the Infection Level, Player Actions (“may use Speech” face up), and Research markers on their respective start spaces as marked on the Player Mat.
3. Place one randomly selected Civilians unit with its full-strength side showing in each of the five Village spaces of the Game Map (Lefty’s Pass, East Irek, Beauxville, Ingeburg, and St. Thomas); rotate these Civilians units 180 degrees
(so that they are upside-down) because these particular Civilians are not free to move at the beginning of the game ([8.3.2], page 14). Place the remaining two Civilians units in the Town Center (X) space. These are not rotated, as they are free to move from the beginning.
4. Place the 5 Villagers/Refugees units with the Villagers side facing up in their respective Village spaces (as shown on the units themselves).
5. You begin play with 4 Hero units. Select one of your choice and then select three more randomly. These four Hero units are placed in the Town Center (X) space. Take the Hero cards for your four starting Heroes and place them where you can easily reference their information. Set the remaining Hero cards and units off to one side for now. Some of them may come into play later during the game.
6. Place one randomly selected Green Diamond Security Guards unit on the Town Center Basement (#0) space of the
Tunnel Track and the other one on the Security Guard Post (#2) space of that Track. These are the only Player units that begin on this Track.
7. Place the 19 regular Zeds units in an opaque container (e.g., a coffee mug or empty skull), called the Zeds Cup, and draw five Zeds units. Place them randomly, one in the Start space on each of the five Tracks (Forest, Highway, Mountain, Suburbs, and Tunnel), with their full-strength (white) sides showing. The Zeds Cup is used throughout the game to place new Zeds units.
8. Shuffle all Fate cards and place them face down to one side of the map, forming the Fate Draw pile.
9. Build the Event Draw pile, depending upon your chosen game length (see next pages).
End of The Walking Zeds Set Up
Board Set Up forWalking Zeds Scenario Inventory:
19 x
The Rest(All of the counters & markers are used)
Heroes(All Hero Cards & Counters)
Mayor Hernandez
Prof. Agee PhD
Kingman
Sheriff Hunt
Doc Seaver
Wilson
Mr. Johnson
Pickles
Carter
Captain Piazza
Schmidt
Wright
Counters
7 x
5 x
2 x
(Only the counters with the white-numbered fronts)
• All Fate cards• All Event cards • Dead Zeds markers• Casualties markers• Zeds & Civilians
status markers• Infected Vermin
• Barricade, Strongpoint, & Minefield markers• Collapsed/Ferry
marker• Research, Infection
Level, Ammo, & Supplies markers
• Super Weapon• Chaos markers• Final Component• All Super Zeds• Dr. Marteuse & Noelle• VIP Survivors
• Secret Entrance• Minefield• Rangers, Raiders & Bubba’s Band markers• Artifact, Loaded & Premonition markers
Notes:1. Use Player Aid, Player Mat, and Game
Board Side A.2. One Hero is Player’s Choice. The other three
are random.
8
Dawn of the Zeds Second Edition Rules v1-3
Developed by Victory Point Games
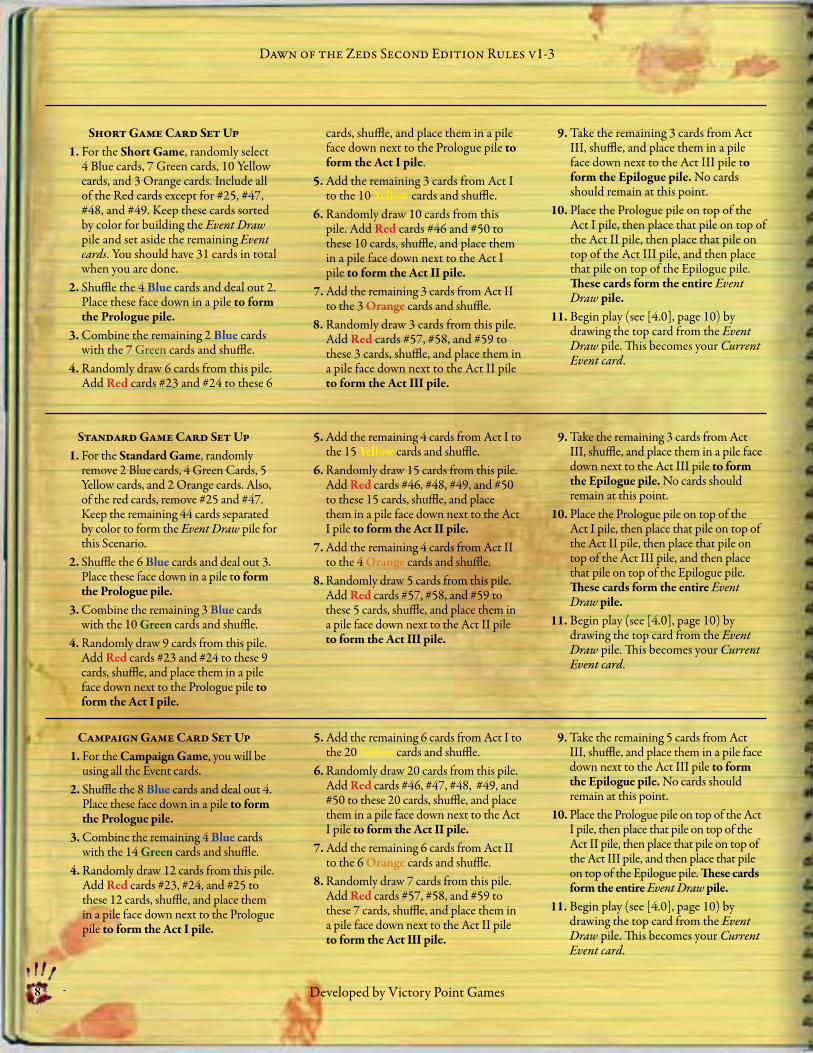
Campaign Game Card Set Up1. For the Campaign Game, you will be
using all the Event cards. 2. Shuffle the 8 Blue cards and deal out 4.
Place these face down in a pile to form the Prologue pile.
3. Combine the remaining 4 Blue cards with the 14 Green cards and shuffle.
4. Randomly draw 12 cards from this pile. Add Red cards #23, #24, and #25 to these 12 cards, shuffle, and place them in a pile face down next to the Prologue pile to form the Act I pile.
5. Add the remaining 6 cards from Act I to the 20 Yellow cards and shuffle.
6. Randomly draw 20 cards from this pile. Add Red cards #46, #47, #48, #49, and #50 to these 20 cards, shuffle, and place them in a pile face down next to the Act I pile to form the Act II pile.
7. Add the remaining 6 cards from Act II to the 6 Orange cards and shuffle.
8. Randomly draw 7 cards from this pile. Add Red cards #57, #58, and #59 to these 7 cards, shuffle, and place them in a pile face down next to the Act II pile to form the Act III pile.
9. Take the remaining 5 cards from Act III, shuffle, and place them in a pile face down next to the Act III pile to form the Epilogue pile. No cards should remain at this point.
10. Place the Prologue pile on top of the Act I pile, then place that pile on top of the Act II pile, then place that pile on top of the Act III pile, and then place that pile on top of the Epilogue pile. These cards form the entire Event Draw pile.
11. Begin play (see [4.0], page 10) by drawing the top card from the Event Draw pile. This becomes your Current Event card.
Standard Game Card Set Up 1. For the Standard Game, randomly
remove 2 Blue cards, 4 Green Cards, 5 Yellow cards, and 2 Orange cards. Also, of the red cards, remove #25 and #47. Keep the remaining 44 cards separated by color to form the Event Draw pile for this Scenario.
2. Shuffle the 6 Blue cards and deal out 3. Place these face down in a pile to form the Prologue pile.
3. Combine the remaining 3 Blue cards with the 10 Green cards and shuffle.
4. Randomly draw 9 cards from this pile. Add Red cards #23 and #24 to these 9 cards, shuffle, and place them in a pile face down next to the Prologue pile to form the Act I pile.
5. Add the remaining 4 cards from Act I to the 15 Yellow cards and shuffle.
6. Randomly draw 15 cards from this pile. Add Red cards #46, #48, #49, and #50 to these 15 cards, shuffle, and place them in a pile face down next to the Act I pile to form the Act II pile.
7. Add the remaining 4 cards from Act II to the 4 Orange cards and shuffle.
8. Randomly draw 5 cards from this pile. Add Red cards #57, #58, and #59 to these 5 cards, shuffle, and place them in a pile face down next to the Act II pile to form the Act III pile.
9. Take the remaining 3 cards from Act III, shuffle, and place them in a pile face down next to the Act III pile to form the Epilogue pile. No cards should remain at this point.
10. Place the Prologue pile on top of the Act I pile, then place that pile on top of the Act II pile, then place that pile on top of the Act III pile, and then place that pile on top of the Epilogue pile. These cards form the entire Event Draw pile.
11. Begin play (see [4.0], page 10) by drawing the top card from the Event Draw pile. This becomes your Current Event card.
Short Game Card Set Up 1. For the Short Game, randomly select
4 Blue cards, 7 Green cards, 10 Yellow cards, and 3 Orange cards. Include all of the Red cards except for #25, #47, #48, and #49. Keep these cards sorted by color for building the Event Draw pile and set aside the remaining Event cards. You should have 31 cards in total when you are done.
2. Shuffle the 4 Blue cards and deal out 2. Place these face down in a pile to form the Prologue pile.
3. Combine the remaining 2 Blue cards with the 7 Green cards and shuffle.
4. Randomly draw 6 cards from this pile. Add Red cards #23 and #24 to these 6
cards, shuffle, and place them in a pile face down next to the Prologue pile to form the Act I pile.
5. Add the remaining 3 cards from Act I to the 10 Yellow cards and shuffle.
6. Randomly draw 10 cards from this pile. Add Red cards #46 and #50 to these 10 cards, shuffle, and place them in a pile face down next to the Act I pile to form the Act II pile.
7. Add the remaining 3 cards from Act II to the 3 Orange cards and shuffle.
8. Randomly draw 3 cards from this pile. Add Red cards #57, #58, and #59 to these 3 cards, shuffle, and place them in a pile face down next to the Act II pile to form the Act III pile.
9. Take the remaining 3 cards from Act III, shuffle, and place them in a pile face down next to the Act III pile to form the Epilogue pile. No cards should remain at this point.
10. Place the Prologue pile on top of the Act I pile, then place that pile on top of the Act II pile, then place that pile on top of the Act III pile, and then place that pile on top of the Epilogue pile. These cards form the entire Event Draw pile.
11. Begin play (see [4.0], page 10) by drawing the top card from the Event Draw pile. This becomes your Current Event card.
Dawn of the Zeds Second Edition Rules v1-3
Developed by Victory Point Games 9
= Shu�e # = Speci�c Red Cards# of cards moved
from stack=
23 24
46 50
57 58 59
Prologue Pile(Top of Deck)
Act I Pile
Act II Pile
Act III Pile
Epilogue Pile(Bottom of Deck)
Start Deck Pile Order
3
3
3
2
3 3
10 10
7 6
2
23 24
46 48 49 50
57 58 59
Prologue Pile(Top of Deck)
Act I Pile
Act II Pile
Act III Pile
Epilogue Pile(Bottom of Deck)
Start Deck Pile Order
3
4
4
3
4 5
15 15
10 9
3
23 24
57 58 59
25
Prologue Pile(Top of Deck)
Act I Pile
Act II Pile
Act III Pile
Epilogue Pile(Bottom of Deck)
Start Deck Pile Order
5
6
6
4
6 7
20 20
14 12
4
46 47 48 49 50
2324
46 50
57 58
59
Unless speci�ed, each cardtype in the inventory israndom.
4 of 8
7 of 14
10 of 20
3 of 6
Inventory:
2423
46 47
49 50
25
48
57
58 59
Unless speci�ed, each cardtype in the inventory israndom.
8 of 8
14 of 14
20 of 20
6 of 6
Inventory:
2423
48 49
46
50
57 58 59
Unless speci�ed, each cardtype in the inventory israndom.
6 of 8
10 of 14
15 of 20
4 of 6
Inventory:
Deck Set Ups forWalking Zeds Scenario
Short
Standard
Campaign
10
Dawn of the Zeds Second Edition Rules v1-3
Developed by Victory Point Games
Dawn of the Zeds Second Edition Rules v1-3
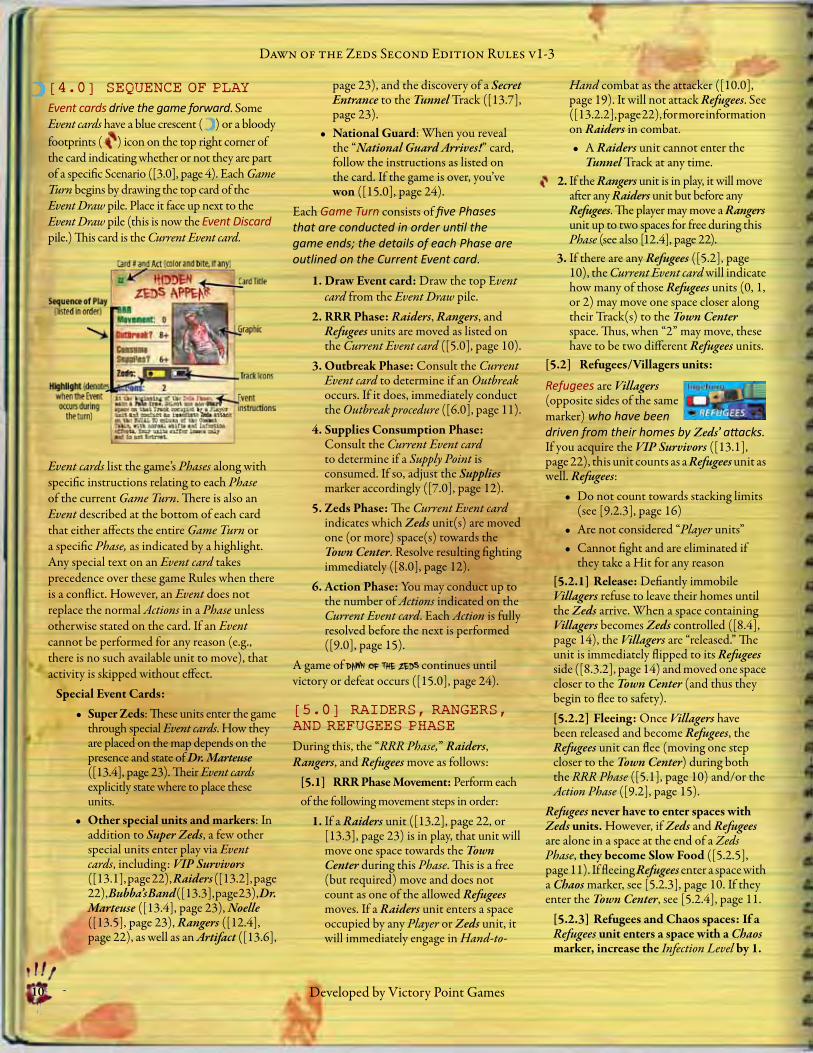
[4.0] SEQUENCE OF PLAYEvent cards drive the game forward. Some Event cards have a blue crescent ( ) or a bloody footprints ( ) icon on the top right corner of the card indicating whether or not they are part of a specific Scenario ([3.0], page 4). Each Game Turn begins by drawing the top card of the Event Draw pile. Place it face up next to the Event Draw pile (this is now the Event Discard pile.) This card is the Current Event card.
Event cards list the game’s Phases along with specific instructions relating to each Phase of the current Game Turn. There is also an Event described at the bottom of each card that either affects the entire Game Turn or a specific Phase, as indicated by a highlight. Any special text on an Event card takes precedence over these game Rules when there is a conflict. However, an Event does not replace the normal Actions in a Phase unless otherwise stated on the card. If an Event cannot be performed for any reason (e.g., there is no such available unit to move), that activity is skipped without effect.
Special Event Cards:• Super Zeds: These units enter the game
through special Event cards. How they are placed on the map depends on the presence and state of Dr. Marteuse ([13.4], page 23). Their Event cards explicitly state where to place these units.
• Other special units and markers: In addition to Super Zeds, a few other special units enter play via Event cards, including: VIP Survivors ([13.1], page 22), Raiders ([13.2], page 22), Bubba’s Band ([13.3], page 23), Dr. Marteuse ([13.4], page 23), Noelle ([13.5], page 23), Rangers ([12.4], page 22), as well as an Artifact ([13.6],
page 23), and the discovery of a Secret Entrance to the Tunnel Track ([13.7], page 23).
• National Guard: When you reveal the “National Guard Arrives!” card, follow the instructions as listed on the card. If the game is over, you’ve won ([15.0], page 24).
Each Game Turn consists of five Phases that are conducted in order until the game ends; the details of each Phase are outlined on the Current Event card.
1. Draw Event card: Draw the top Event card from the Event Draw pile.
2. RRR Phase: Raiders, Rangers, and Refugees units are moved as listed on the Current Event card ([5.0], page 10).
3. Outbreak Phase: Consult the Current Event card to determine if an Outbreak occurs. If it does, immediately conduct the Outbreak procedure ([6.0], page 11).
4. Supplies Consumption Phase: Consult the Current Event card to determine if a Supply Point is consumed. If so, adjust the Supplies marker accordingly ([7.0], page 12).
5. Zeds Phase: The Current Event card indicates which Zeds unit(s) are moved one (or more) space(s) towards the Town Center. Resolve resulting fighting immediately ([8.0], page 12).
6. Action Phase: You may conduct up to the number of Actions indicated on the Current Event card. Each Action is fully resolved before the next is performed ([9.0], page 15).
A game of Dawn of the Zeds continues until victory or defeat occurs ([15.0], page 24).
[5.0] RAIDERS, RANGERS, AND REFUGEES PHASEDuring this, the “RRR Phase,” Raiders, Rangers, and Refugees move as follows:
[5.1] RRR Phase Movement: Perform each of the following movement steps in order:
1. If a Raiders unit ([13.2], page 22, or [13.3], page 23) is in play, that unit will move one space towards the Town Center during this Phase. This is a free (but required) move and does not count as one of the allowed Refugees moves. If a Raiders unit enters a space occupied by any Player or Zeds unit, it will immediately engage in Hand-to-
Hand combat as the attacker ([10.0], page 19). It will not attack Refugees. See ([13.2.2], page 22), for more information on Raiders in combat.• A Raiders unit cannot enter the
Tunnel Track at any time.2. If the Rangers unit is in play, it will move
after any Raiders unit but before any Refugees. The player may move a Rangers unit up to two spaces for free during this Phase (see also [12.4], page 22).
3. If there are any Refugees ([5.2], page 10), the Current Event card will indicate how many of those Refugees units (0, 1, or 2) may move one space closer along their Track(s) to the Town Center space. Thus, when “2” may move, these have to be two different Refugees units.
[5.2] Refugees/Villagers units:
Refugees are Villagers (opposite sides of the same marker) who have been driven from their homes by Zeds’ attacks. If you acquire the VIP Survivors ([13.1], page 22), this unit counts as a Refugees unit as well. Refugees:
• Do not count towards stacking limits (see [9.2.3], page 16)
• Are not considered “Player units”• Cannot fight and are eliminated if
they take a Hit for any reason[5.2.1] Release: Defiantly immobile Villagers refuse to leave their homes until the Zeds arrive. When a space containing Villagers becomes Zeds controlled ([8.4], page 14), the Villagers are “released.” The unit is immediately flipped to its Refugees side ([8.3.2], page 14) and moved one space closer to the Town Center (and thus they begin to flee to safety).[5.2.2] Fleeing: Once Villagers have been released and become Refugees, the Refugees unit can flee (moving one step closer to the Town Center) during both the RRR Phase ([5.1], page 10) and/or the Action Phase ([9.2], page 15).
Refugees never have to enter spaces with Zeds units. However, if Zeds and Refugees are alone in a space at the end of a Zeds Phase, they become Slow Food ([5.2.5], page 11). If fleeing Refugees enter a space with a Chaos marker, see [5.2.3], page 10. If they enter the Town Center, see [5.2.4], page 11.
[5.2.3] Refugees and Chaos spaces: If a Refugees unit enters a space with a Chaos marker, increase the Infection Level by 1.

Dawn of the Zeds Second Edition Rules v1-3
Developed by Victory Point Games 11
Dawn of the Zeds Second Edition Rules v1-3
©2013 Hermann Luttmann and Victory Point Games
Hand combat as the attacker ([10.0], page 19). It will not attack Refugees. See ([13.2.2], page 22), for more information on Raiders in combat.• A Raiders unit cannot enter the
Tunnel Track at any time.2. If the Rangers unit is in play, it will move
after any Raiders unit but before any Refugees. The player may move a Rangers unit up to two spaces for free during this Phase (see also [12.4], page 22).
3. If there are any Refugees ([5.2], page 10), the Current Event card will indicate how many of those Refugees units (0, 1, or 2) may move one space closer along their Track(s) to the Town Center space. Thus, when “2” may move, these have to be two different Refugees units.
[5.2] Refugees/Villagers units:
Refugees are Villagers (opposite sides of the same marker) who have been driven from their homes by Zeds’ attacks. If you acquire the VIP Survivors ([13.1], page 22), this unit counts as a Refugees unit as well. Refugees:
• Do not count towards stacking limits (see [9.2.3], page 16)
• Are not considered “Player units”• Cannot fight and are eliminated if
they take a Hit for any reason[5.2.1] Release: Defiantly immobile Villagers refuse to leave their homes until the Zeds arrive. When a space containing Villagers becomes Zeds controlled ([8.4], page 14), the Villagers are “released.” The unit is immediately flipped to its Refugees side ([8.3.2], page 14) and moved one space closer to the Town Center (and thus they begin to flee to safety).[5.2.2] Fleeing: Once Villagers have been released and become Refugees, the Refugees unit can flee (moving one step closer to the Town Center) during both the RRR Phase ([5.1], page 10) and/or the Action Phase ([9.2], page 15).
Refugees never have to enter spaces with Zeds units. However, if Zeds and Refugees are alone in a space at the end of a Zeds Phase, they become Slow Food ([5.2.5], page 11). If fleeing Refugees enter a space with a Chaos marker, see [5.2.3], page 10. If they enter the Town Center, see [5.2.4], page 11.
[5.2.3] Refugees and Chaos spaces: If a Refugees unit enters a space with a Chaos marker, increase the Infection Level by 1.
Refugees units do not remove the Chaos marker (see also [9.2.4], page 16).[5.2.4] We Made It!: When a Refugees unit reaches the Town Center space, the Infection Level is increased by 1. The player must then decide what to do with these people, either A or B below:A) Equip them and send them back out to
fight. Remove the Refugees unit from the map. You may then replenish up to two regular Civilians units (only) by either:• Flipping a Civilians unit located
anywhere except the Hospital from its reduced-strength side to its full-strength side (keeping any Casualties marker on it) or;
• Transferring a Civilians unit from the Hospital to the Town Center on its reduced-strength side.
Note: You may spend both of these “Equip them” points on the same Civilians unit, first moving it from the Hospital to the Town Center and then increasing it to full strength.
B) Protect them and save humanity. Move the Refugees unit to the Refugees Camp area on the Player Mat. If you win the game, this will enhance your victory. Later, if you’re desperate, at the start of an Action Phase, you may take a Refugees unit from the Camp and Equip it (as above) at no Action cost ([9.0], page 15).Note: When the VIP Survivors make it to the Town Center, they must be placed in the Refugee Camp, and they can never be equipped. In addition, they provide a bonus ([13.1], page 22).
[5.2.5] Slow Food: If a Zeds unit completes its move (and any resulting fighting) and finds itself alone in the same non-Start space with one or more Refugees unit (e.g., any protecting Hero or Civilians unit has Retreated or been eliminated, abandoning these poor fleeing Refugees to their fate), then each Refugees unit there is devoured. When devoured, that Refugees unit is removed from play, and the Infection Level is increased by 2 (+2). Note that this is not Hand-to-Hand Combat and therefore does not qualify as combat for either Berserkers ([14.1], page 24) or “Brains!” card purposes. Also note that Villagers left alone with a Zeds unit
will become Refugees and flee ([5.2.2], page 10). It is only once they are fleeing that Refugees can become Slow Food.
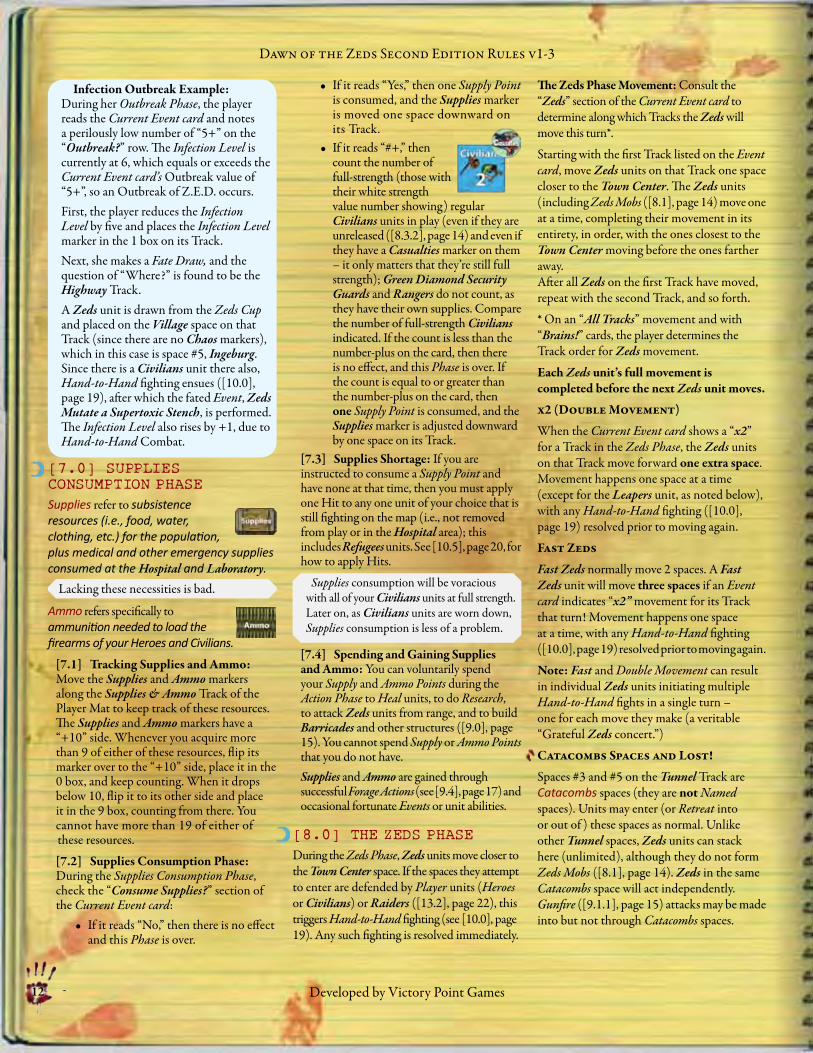
[6.0] OUTBREAK PHASEDuring the Outbreak Phase, you determine whether the Infection Level is high enough to cause an Outbreak (which results in new Zeds). The Infection Level is tracked on the Player Mat and represents numbers of living people in your community poisoned (through bites, scratches, etc.) and the resulting threat that those affected will morph into dangerous, fully-fledged Zeds.Note: If the Noelle marker ([13.5], page 23) is in play, raise the Infection Level by one (+1) at the beginning of each Outbreak Phase. After this, determine if an Outbreak has occurred.
[6.1] During Outbreak Phase: If the “Outbreak?” section of the Current Event card indicates a number-plus (e.g., “5+” or “9+”), compare that to the current Infection Level (the box number where the Infection Level marker resides on the Infection Track):
• If the Infection Level is less than the Outbreak? number on the Event card, there are no Outbreaks of Zombie Epidemic Disease (Z.E.D.) that turn, meaning there is no effect. Proceed to the next game Phase ([7.0], page 12).
• If the Infection Level is equal to or greater than the Outbreak? number, an Outbreak of Z.E.D. immediately occurs as described below.
[6.2] Z.E.D. Outbreak Procedure:1. Decrease Infection Level by 5.
2. Make a Fate Draw ([11.0], page 21) to determine on which Track the Outbreak occurs. If playing the Tutorial or Classic Nightmare Scenario, when Fate cards result in a Tunnel Track location, choose any other Track. Note: If Agent Wright is in the Town Center, the player chooses where the Outbreak occurs. However, you will still need to make a Fate Draw.
3. Draw a Zeds unit from the Zeds Cup and place it with its full-strength side up on that Track as follows:
i) Place the Zeds unit on the closest (to the Town Center) Chaos space ([8.4], page 14) on that Track.
ii) If there are no Chaos spaces, place the Zeds unit on any Village space on that Track ([2.1.2], page 3).
iii) If there is no Village space, place it on that Track’s Start space instead.
iv) If the resulting (non-Start) space already has two Zeds units on it, place the new Zeds unit on the next higher-numbered space.
v) If that space is occupied by a Player unit, an immediate Hand-to-Hand Fight ensues (see ([10.0], page 19).
vi) If occupied by a lone Refugees unit, the Refugees are eliminated.
4. Perform the Fate card’s Event after placing the Zeds unit and before proceeding to the next Phase.
Refugees Movement Example: During the RRR Phase, after having moved the Raiders and Rangers units, the Current Event card indicates “1” Refugees move. The player selects a Refugees (i.e., fleeing Villagers) unit on its #2 Suburbs space and advances it to its #1 space just outside of Town.Needing replacements badly for the myriad wounded Civilians units still fighting, during her Action Phase the player decides to spend 1 Action to move that Refugees unit once again, this time to its #0 space in Town. Since Mayor Hernandez is there “directing traffic” (see “Traffic Control” on his Hero card), the Town Center space can be entered for free, and so the Refugees unit is placed there. She then increases the Infection Level by 1.The player quickly opts to “Equip them” to replenish her depleted Civilians units, in this case flipping one reduced-strength unit on the Forest Track back to its full-strength side (using 1 of her Equip Actions to do so) and transferring a second Civilians unit from the Hospital and placing it in the Town Center (using her second Equip Action to do so).
This decrease in the Infection Level represents previously infected people becoming active Zeds. Consequently, there are fewer infected people around.
12
Dawn of the Zeds Second Edition Rules v1-3
Developed by Victory Point Games
Dawn of the Zeds Second Edition Rules v1-3
[7.0] SUPPLIES CONSUMPTION PHASESupplies refer to subsistence resources (i.e., food, water, clothing, etc.) for the population, plus medical and other emergency supplies consumed at the Hospital and Laboratory.
Ammo refers specifically to ammunition needed to load the firearms of your Heroes and Civilians.
[7.1] Tracking Supplies and Ammo: Move the Supplies and Ammo markers along the Supplies & Ammo Track of the Player Mat to keep track of these resources. The Supplies and Ammo markers have a “+10” side. Whenever you acquire more than 9 of either of these resources, flip its marker over to the “+10” side, place it in the 0 box, and keep counting. When it drops below 10, flip it to its other side and place it in the 9 box, counting from there. You cannot have more than 19 of either of these resources.
[7.2] Supplies Consumption Phase: During the Supplies Consumption Phase, check the “Consume Supplies?” section of the Current Event card:
• If it reads “No,” then there is no effect and this Phase is over.
• If it reads “Yes,” then one Supply Point is consumed, and the Supplies marker is moved one space downward on its Track.
• If it reads “#+,” then count the number of full-strength (those with their white strength value number showing) regular Civilians units in play (even if they are unreleased ([8.3.2], page 14) and even if they have a Casualties marker on them – it only matters that they’re still full strength); Green Diamond Security Guards and Rangers do not count, as they have their own supplies. Compare the number of full-strength Civilians indicated. If the count is less than the number-plus on the card, then there is no effect, and this Phase is over. If the count is equal to or greater than the number-plus on the card, then one Supply Point is consumed, and the Supplies marker is adjusted downward by one space on its Track.
[7.3] Supplies Shortage: If you are instructed to consume a Supply Point and have none at that time, then you must apply one Hit to any one unit of your choice that is still fighting on the map (i.e., not removed from play or in the Hospital area); this includes Refugees units. See [10.5], page 20, for how to apply Hits.
[7.4] Spending and Gaining Supplies and Ammo: You can voluntarily spend your Supply and Ammo Points during the Action Phase to Heal units, to do Research, to attack Zeds units from range, and to build Barricades and other structures ([9.0], page 15). You cannot spend Supply or Ammo Points that you do not have.Supplies and Ammo are gained through successful Forage Actions (see [9.4], page 17) and occasional fortunate Events or unit abilities.
[8.0] THE ZEDS PHASEDuring the Zeds Phase, Zeds units move closer to the Town Center space. If the spaces they attempt to enter are defended by Player units (Heroes or Civilians) or Raiders ([13.2], page 22), this triggers Hand-to-Hand fighting (see [10.0], page 19). Any such fighting is resolved immediately.
The Zeds Phase Movement: Consult the “Zeds” section of the Current Event card to determine along which Tracks the Zeds will move this turn*.
Starting with the first Track listed on the Event card, move Zeds units on that Track one space closer to the Town Center. The Zeds units (including Zeds Mobs ([8.1], page 14) move one at a time, completing their movement in its entirety, in order, with the ones closest to the Town Center moving before the ones farther away. After all Zeds on the first Track have moved, repeat with the second Track, and so forth.
* On an “All Tracks” movement and with “Brains!” cards, the player determines the Track order for Zeds movement.
Each Zeds unit’s full movement is completed before the next Zeds unit moves.
x2 (Double Movement)
When the Current Event card shows a “x2” for a Track in the Zeds Phase, the Zeds units on that Track move forward one extra space. Movement happens one space at a time (except for the Leapers unit, as noted below), with any Hand-to-Hand fighting ([10.0], page 19) resolved prior to moving again.
Fast Zeds
Fast Zeds normally move 2 spaces. A Fast Zeds unit will move three spaces if an Event card indicates “x2” movement for its Track that turn! Movement happens one space at a time, with any Hand-to-Hand fighting ([10.0], page 19) resolved prior to moving again.
Note: Fast and Double Movement can result in individual Zeds units initiating multiple Hand-to-Hand fights in a single turn – one for each move they make (a veritable “Grateful Zeds concert.”)
Catacombs Spaces and Lost!
Spaces #3 and #5 on the Tunnel Track are Catacombs spaces (they are not Named spaces). Units may enter (or Retreat into or out of ) these spaces as normal. Unlike other Tunnel spaces, Zeds units can stack here (unlimited), although they do not form Zeds Mobs ([8.1], page 14). Zeds in the same Catacombs space will act independently. Gunfire ([9.1.1], page 15) attacks may be made into but not through Catacombs spaces.
Lacking these necessities is bad. Supplies consumption will be voracious with all of your Civilians units at full strength. Later on, as Civilians units are worn down, Supplies consumption is less of a problem.
Infection Outbreak Example: During her Outbreak Phase, the player reads the Current Event card and notes a perilously low number of “5+” on the “Outbreak?” row. The Infection Level is currently at 6, which equals or exceeds the Current Event card’s Outbreak value of “5+”, so an Outbreak of Z.E.D. occurs.First, the player reduces the Infection Level by five and places the Infection Level marker in the 1 box on its Track.Next, she makes a Fate Draw, and the question of “Where?” is found to be the Highway Track.A Zeds unit is drawn from the Zeds Cup and placed on the Village space on that Track (since there are no Chaos markers), which in this case is space #5, Ingeburg. Since there is a Civilians unit there also, Hand-to-Hand fighting ensues ([10.0], page 19), after which the fated Event, Zeds Mutate a Supertoxic Stench, is performed. The Infection Level also rises by +1, due to Hand-to-Hand Combat.

Dawn of the Zeds Second Edition Rules v1-3
Developed by Victory Point Games 13
Dawn of the Zeds Second Edition Rules v1-3
©2013 Hermann Luttmann and Victory Point Games
Leaving Catacombs spaces requires a z roll:
On a 1, 2, or 3, that unit may move forward as normal. On a 4 or 5, that unit stays. On a 6, a Lost! roll is made (see below).
Each attempt, whether successful or not, counts as one Movement. Therefore, a unit that may move two spaces can make a second attempt to leave if the first z roll is unsuccessful.
Lost! roll procedure:
1. Roll a z.2. Move that unit to the numbered space
of the Tunnel Track equal to the roll. If your z roll is the same space as that currently occupied by the unit, that unit is immediately eliminated and removed from play. If you are moving the Dr. Marteuse unit, (see ([13.4], page 23).
3. If this move causes too many Zeds to occupy the same space, the randomly moving Zeds unit must move back to the closest higher-numbered available space ([8.1], page 14).
Entrance Spaces
Entrance spaces link Tunnel and surface Tracks. Zeds units that are on an active Entrance space ([2.1.2], page 3) during the Zeds Phase, have the opportunity to switch Tracks ([8.0], page 12) if their Track is listed on the Current Event card.Any Zeds or Super Zeds unit on an Entrance space ([2.1.2], page 3) will move along its current Track unless the other Track has at least 2 fewer Zeds than its current Track. In this case, it will move to the other Track.A Zeds unit on an Entrance space that must move cannot enter the connected Entrance space if that space cannot hold any more Zeds. In this case, the moving Zeds unit will move along its current Track.
If a Zeds Mob is required to move and is on an Entrance space, only the stronger of the two units will move to the connected Entrance space. Because it is possible for a Zeds unit to move through an Entrance space and switch Tracks, it is also possible that the unit will move twice during a Zeds Phase if the second Track is also listed on the Current Event card.Super Zeds MovementSome Super Zeds ([2.8], page 4, and [14.0], page 24) units move in special ways:
• Were-Zeds: The Were-Zeds is a Fast Super Zeds unit that moves two spaces with any move (treated as a x2 Move result).
• Leapers: Leapers is a Super Zeds unit that jumps forward two spaces when moving. When this unit moves, pick up the Leapers unit and move it two spaces towards the Town Center. It “jumps over” the first space; it will not fight there, destroy Barricades, or leave Chaos markers. It lands in the second space. If this space is already occupied by two Zeds units (surface Tracks) or any Zeds unit (all non-Catacombs Tunnel spaces), the Leapers unit
Order of Movement Example: On the Highway Track, there is a Zeds Mob currently on the Nuclear Plant space (consisting of a 2-Strength Zeds unit and a full-strength Leapers unit). On the Tunnel Track, there is a 4-Strength Zeds unit on the #3 space, a 6-Strength Zeds unit on the Chromotechnics Lab space, and a Green Diamond Security Guards unit is on the Security Guard Post space.The player draws the “The Doctor Is ‘In’” Event card. At the beginning of the Outbreak Phase, the player follows the instructions on the card and
rolls a z to place the Dr. Marteuse unit ([13.4], page 23) and the full-strength Ravagers ([14.4], page 24) unit. She rolls a 2 and places them on the Dr. Marteuse’s Office space of the Tunnel Track, making Dr. Marteuse Active.During the Zeds Phase, the player follows the Steps for the exact order of Zeds movement ([8.0], page 12). First, she moves any Zeds units that are on the Highway. She notices that the Zeds Mob on the Highway is on an Entrance space and that the connected Entrance is free of other Zeds units. However, the number of Zeds units currently on the Highway is less than the number on the Tunnel Track, and so the Zeds Mob moves normally along its current Track instead of going through that Entrance. The Leapers
unit, per their normal movement ability, leap to the #1 space of the Highway Track, leaving the other Zeds unit behind.There are no Zeds units currently on the Mountain Track, so the player moves on to the Tunnel Track. She moves each Zeds unit on the Tunnel Track normally, starting with the units closest to the Town Center. The 4-Strength Zeds unit on the #3 space must move first but it is in a Catacombs space ([8.0], page 12). She rolls a z to see if it moves, remains, or gets Lost! The player rolls a 2, and so that Zeds unit moves to the Security Guard Post space and immediately conducts Hand-to-Hand fighting with the Green Diamond Security Guards unit there. That Zeds unit loses, is flipped to its reduced-strength side, and Retreats normally back to the #3 space. Next, the player moves the Ravagers unit from Dr. Marteuse’s Office space to the #3 space of the Tunnel Track. The Ravagers unit may move into this space, as Catacombs allow unlimited Zeds units to stack there ([8.0], page 12). Note that Dr. Marteuse does not count as a Zeds unit and does not move independently, so his marker remains in the Dr. Marteuse’s Office space. Finally, the player has to move the 6-Strength Zeds unit on the Chromotechnics Lab space. However, that space is an Entrance space, and so she must check to see if that unit will move to the Suburbs Track instead. Seeing that the Suburbs Track has no Zeds units on it (as opposed to the three currently on the Tunnel), that means that the Suburbs Track has at least 2 fewer Zeds on it than the current Track (i.e., the Tunnel). She moves the 6-Strength Zeds unit through the Entrance and onto the University space of the Suburbs Track.There are no more Zeds units that can move, and so the player is done with Zeds’ Movement, and the Zeds Phase is over.
Catacombs and Lost! Example: On the Tunnel Track, there is a regular Zeds unit on the #3 space. The player, during the Zeds Movement Phase, must make a z roll to move that Zeds unit. She rolls a 6 and now must make a Lost! roll procedure. She rolls another z and rolls a 4. The player moves the (confused) Zeds unit to the Dr. Marteuse’s Office space.
14
Dawn of the Zeds Second Edition Rules v1-3
Developed by Victory Point Games
Dawn of the Zeds Second Edition Rules v1-3
conducts a normal move instead (i.e., its jump is canceled). Note: A Brains! Event card alters Leapers movement see ([14.3], page 24), for details. On a x2 Move result, Leapers will jump over (no combat and no Chaos) two spaces and land on the third one (but they only get one combat).
[8.1] Stacking Limits (Zeds Mobs): • Start Spaces: Unlimited stacking.• Tunnel Spaces: One. Zeds can
only stack in the Tunnel Track on Catacombs spaces (unlimited) and the Start space (unlimited).
• Surface Spaces: Two. A maximum of two Zeds units (a “Zeds Mob”) can occupy all non-Start spaces on surface Tracks. A Zeds Mob is treated as one large Zeds unit in Hand-to-Hand fighting ([10.0], page 19).
When There Is No Room For More Zeds: Except for Start and Catacombs spaces, where the stacking is unlimited, if a newly placed Zeds unit or Retreating Zeds unit enters a space already occupied by two Zeds units (on the surface) or one Zeds unit (in the Tunnel), it is placed in the closest higher-numbered space with available room for another Zeds unit.No Zeds unit may enter a space already fully occupied by other Zeds.Super Zeds In Mobs: The whole stack gains the Super Zeds’ special abilities, except:
Leapers: When Leapers jump, they leave the other unit behind. They do not “carry” the other unit with them.
Were-Zeds: When this unit moves into a space with any other Zeds unit (or vice versa), the Were-Zeds unit will immediately inflict one (+1) Hit on each (different) Zeds unit that it shares a space with.
[8.2] When a Zeds unit Exits its Current Space: At any time, except during Retreating, any Barricade marker in that space is removed from the map. Zeds units cannot remove a Strongpoint ([9.2.5], page 17).Special Cases: At any time, when a Zeds unit or Zeds Mob exits a space with a Minefield, it is attacked with a Gunfire attack by the Minefield ([9.2.6], page 17).At any time, if a Zeds unit or Zeds Mob sharing a space with Pickles attempts to exit the space, roll a z. On a 4, 5, or 6, that move attempt is canceled.If a Zeds unit or Zeds Mob is trying to enter a space adjacent to Kingman, roll a z. On a 4, 5, or 6, that move attempt is canceled. This effect does not apply to Retreats.If a Zeds unit attempts to leave a Catacombs space, it must make a z roll.[8.3] After a Zeds unit Enters a Space (Resolution of the Zeds Phase Movement):At any time, when a Zeds unit or Zeds Mob enters a space with an Explosives marker, roll a z. That Zeds unit suffers a number of Hits equal to the z roll result.
[8.3.1] Player Defeat: If a Zeds unit enters the Town Center space, the game immediately ends. No final combat takes place – the Zeds win if they just move in!
[8.3.2] Village Space: When a Zeds unit makes its first attack on a Village space, the Civilians unit there is released (rotated back 180 degrees so that it faces the player, thus symbolizing it is free to move; see ([9.2], page 15). If the Civilians unit is killed or retreats from the Village space, the Villagers unit is flipped to the Refugees side and flees one space closer to the Town Center ([5.2.2], page 10).[8.3.3] Fighting: If any Zeds units enter spaces with Player units (Hero or Civilians, not Refugees) or Raiders, Hand-to-Hand fighting takes place immediately. Note that a just-released Civilians unit will have to fight.Exceptions: Pickles gets a Stealth roll to determine whether he is attacked or not ([12.2], page 22). When a Zeds unit enters a space with Piazza, roll a z. On a 4, 5, or 6, the Zeds unit suffers 1 Hit, and the Hero Retreats. On all other results, conduct normal Hand-to-Hand fighting. Note: If a Berserkers unit ([14.1], page 24) wins its fight and is next to a Friendly unit ([2.8], page 4), it will immediately move into that unit’s space and fight again.[8.3.4] Overrun Refugees: At any time, if only Refugees units are in a space with a Zeds unit, except for when a Village is first placed under Zeds control ([8.3.2], page 14), the Refugees unit(s) are immediately eliminated, and the Infection Level is increased by 2 for each one removed.
[8.4] Zeds Control: Zeds Control all Chaos spaces (see below) as well as any space that a Zeds unit occupies at the end of any
Zeds Movement Example: It is the Zeds Phase early in the game, and the Current Event card reads “Highway x2.” There is a Zeds unit in the #6 space, and it moves to the Village space of Ingeburg. The Civilians unit that set up there is now released ([8.3.2], page 14), and the player turns that unit in place to face her, indicating that it is now free to move ([9.2], page 15).In the fighting that ensues, the Civilians unit is eliminated, and now the Zeds control the Village. A Chaos marker is placed in this Named space, and the Villagers unit there is flipped to its Refugees unit side and is immediately Retreated back to Clear space #4 ([8.3.2], page 14).Unfortunately for the player, the Zeds units on this Track gets to move a second space this turn (due to the “x2” on the card). It enters space #4 with the lone Refugees unit, eliminates it, and the player increases the Infection Level by 2 ([5.2.5], page 11). Those poor people never had a chance.Super Zeds Movement Example: A Civilians unit is on the #5 space on the Highway Track. It is adjacent to a Zeds Mob which consists of Were-Zeds ([14.5], page 24) and Leapers ([14.3], page 24) units on the #6 space. During the Zeds Phase, the Leapers unit moves two spaces forward on the Track per its normal movement ability, “jumping” over the space with the Civilians unit instead of moving through that space (and thus not attacking the Civilians), landing on the #4 space. The Were-Zeds unit then moves one space forward, immediately conducting Hand-to-Hand Combat with the Civilians unit and increasing the Infection Level by 2.The Civilians lose the fight and lose two Steps ([10.5.1], page 20). First, the unit is flipped over to its reduced-strength side and then moves back one space (towards the Town Center). Now on the same space with the Leapers unit, another Hand-to-Hand Combat is initiated, and the Infection Level is immediately increased by 1. The Civilians unit is defeated again, and the player places a Casualties marker on that unit and moves the Civilians unit again, to the #3 space.The Were-Zeds unit moves once again (per its special ability), entering into the #4 space with the Leapers unit and inflicting 1 Hit on it. The Leapers unit is immediately reduced by one Step.
Dawn of the Zeds Second Edition Rules v1-3
Developed by Victory Point Games 15
Dawn of the Zeds Second Edition Rules v1-3
©2013 Hermann Luttmann and Victory Point Games
Phase and after any Hand-to-Hand fighting ([10.0], page 19) is resolved. All other spaces are Player controlled.Chaos: Whenever a Zeds unit moves through or gains control over a Named space ([2.1.2], page 3), immediately place a Chaos marker there (if one is not already present). Chaos markers are not placed in Clear spaces ([2.1.2], page 3).Note: While Player units may be Retreated into a Chaos space, they may not voluntarily enter such a space except to fight a Zeds unit, to perform a Manhunt Action ([9.7], page 18), and/or to Restore Order ([9.2.4], page 16).Refugees units may enter a Chaos space, but this increases the Infection Level by 1. They cannot Restore Order.Player units may not exit a Chaos space except when forced to Retreat. Refugees may exit Chaos spaces as normal.
[9.0] THE ACTION PHASEDuring the Action Phase at the end of each turn, you get your chance to help ensure the survival of Farmingdale and its local inhabitants by spending precious Actions to accomplish vital tasks.
Determine Your Action Allowance
You receive a number of Actions each turn as shown on the “Actions” section of the Current Event card. You may place the Player Actions marker on that numbered space on the Actions Available Track so that you can count Actions down as they are spent. When you have no
more Actions remaining, that turn is over, and the next Event card is revealed.
Spending Actions
Actions are spent to make Gunfire attacks, move your units, search for supplies and a cure to this plague of Zeds, treat the sick, etc. Unfortunately, much needs to be done, and Actions are scarce. Units can be tasked with multiple Actions each turn, and in many cases, the same Action may be performed more than once per turn. You may spend your Actions in any order and combination you desire as long as each Action is completed before the next is commenced and the total number of Actions available that turn is not exceeded.
End of Action Phase
Remove Chaos markers from all Chaos spaces with a Player unit or Raiders unit currently on them.
Free Actions!• At the beginning of the Action Phase,
you may take a Refugees unit from the Refugees Camp on the Player Mat (but not the VIP Survivors) and Equip it ([5.2.4], page 11) at no Action cost.
• Hunt can direct any regular Civilians unit on or adjacent to his space to perform one free Action during the Action Phase. He can only do this once during each Action Phase. This does not apply to special Civilians units (i.e., Green Diamond Security Guards and Rangers).
• Wilson may perform a Premonition Action twice per game. This free Action allows you to look at the very next Event card in the Event Draw pile. After you are done examining the card, place it back on top of the Event Draw pile or place it beneath the current top card (making it the second Event card to be drawn). Use the Premonition marker to keep track of how many Premonition Actions you have left (see Hero card).
• Player units in the Town Center (only) who have been inspired by a Speech ([9.8], page 19) get a free Action during the same turn in which the Speech is given.
[9.1] Fight the Zeds: You can spend Actions to fight the Zeds. Attacks made from a distance are called Gunfire attacks. Hand-to-Hand fighting can occur when you move a Player unit into a Zeds-occupied space.
[9.1.1] Gunfire Attack: Gunfire attacks allow you to damage Zeds units “at range” without risking loss or infection. To conduct a Gunfire attack:• Spend an Action and reduce your
Ammo Points by one (-1) each time you initiate a Gunfire attack. When you have no more Ammo Points, you cannot initiate Gunfire attacks.Player units (including unreleased Civilians but not including Pickles) can make a Gunfire attack against a Zeds unit in any adjacent space on the same Track. Connected Entrance spaces on separate Tracks are not adjacent for Gunfire attack purposes ([2.1.2], page 3). Zeds units in Start spaces cannot be attacked.Some Player units may make Long Range Gunfire attacks from two spaces away, as indicated on their counter by a gun ( ) icon. Long Range Gunfire attacks cannot be issued through the Town Center (e.g.: Downtown to Suburbia) nor through Catacombs spaces. One Hero, Piazza, can fire from 3 spaces away.Note: Hunt and the Rangers unit have a 1 penalty when making Long Range attacks, but Piazza, a sniper, does not.
• Follow the Fight Rules in [10.0], page 19.When fighting is resolved, you may make another Gunfire attack if you have more Actions and Ammo Points.
[9.1.2] Hand-to-Hand fighting: To attack a Zeds unit in Hand-to-Hand fighting, you must move a Player unit into a Zeds-occupied space. Movement costs an Action and is addressed in [9.2], page 15. Fighting is resolved according to the Fight Rules in [10.0], page 19. Fighting that occurs due to spending an Action to move into a Zeds-occupied space does not cost any additional Actions.
[9.2] Move: Spending one Action allows one Friendly unit ([2.8], page 4) to conduct one type of movement.
Chaos spaces represent hostile areas full of wandering Zeds, looting, and fires. This sort of anarchy is very dangerous.
List of Actions• Free Actions (if available)• [9.1] Fight the Zeds, page 15• [9.2] Move, page 15• Building a Barricade, page 16• [9.3] Search & Retrieval Move, page 17• [9.4] Forage Action, page 17• [9.5] Healing the Wounded (Healing Action), page 17• [9.6] Research Action (Find a Cure!), page 18• [9.7] Manhunt Action, page 18• [9.8] Special Unit and Hero Actions, page 19
16
Dawn of the Zeds Second Edition Rules v1-3
Developed by Victory Point Games
Dawn of the Zeds Second Edition Rules v1-3
Important: Each Friendly unit ([2.8], page 4) may conduct a maximum of one Movement Action type per turn.Movement Action Types: Map Movement ([9.2.1], page 16), Barricading (, page 16), and Search & Retrieval ([9.3], page 17).
[9.2.1] Map Movement: Pay one Action for one Friendly unit ([2.8], page 4) to move. The Friendly unit may do a Map Move (from space to space) spending up to its Movement Allowance ([9.2.2], page 16) for that turn.[9.2.2] Movement Allowances: The number of spaces a unit can move per Map Movement:Refugees unit: 1 spaceCivilians unit: up to 2 spaces (Civilians starting in Village spaces ([2.1.2], page 3) may only move once they have been released by a Zeds attack ([8.3.2], page 14)Hero unit: up to 4 spacesFast Hero unit: up to 5 spaces
How to Move: A unit moves from its current space to an adjacent, connected space on the map. Each such space moved consumes one from that unit’s Movement Allowance for the turn. It also costs one space of movement for a unit to go from the Town Center space to the Hospital or Laboratory and vice versa or to move between the Hospital and Laboratory.• When Mayor Hernandez occupies
the Town Center, moving into this space does not cost a Friendly unit any of its Movement Allowance.
• It costs one of a unit’s Movement Allowance to move from one Entrance on the Tunnel Track to the connected Entrance on the surface and vice versa (see [2.1.2], page 3).
• Wilson may take shortcuts by moving from any space to the same numbered space on an adjacent surface Track (e.g.: Forest to Suburbs or Suburbs to Highway) for instead of making a normal Map Move. He cannot use this ability to take shortcuts to or from the Tunnel Track.
Note: Wounded Player units may move to the Hospital via the Town Center so that they can get Healed ([9.5], page 17).[9.2.3] Movement Restrictions:• Villages: Civilians units in Villages
may not move until they have been released by the arrival of Zeds units in their Village space ([8.3.2], page 14). Civilians units rotate 180 degrees to reflect that they are now free to move. Villagers may not move until their Village space is controlled by a Zeds unit ([8.4], page 14). When Villagers are released, they become Refugees and immediately move one space closer to the Town Center.
• Start Spaces: Heroes and Civilians units cannot enter a Zeds’ Start space. Those forced to do so are eliminated (the only exception is Carter ([13.8], page 23).
• Zeds: A Player unit that enters a Zeds-occupied space ceases its movement for the turn and must conduct an immediate Hand-to-Hand fight ([10.0], page 19). Note that Refugees units may not move into a Zeds-occupied space.
• At the conclusion of each Move Action, there can be no more than one Player unit ([2.8], page 4) in each space except:• Town Center has unlimited stacking.
However, units there always act independently.
• Villagers and Refugees do not count against the stacking limit. As many of these units as desired can stack with other Player units without penalty.
• Chaos Spaces: A Player unit that enters a Chaos space ([8.4], page 14) during any kind of Move (or Retreat) must stop and remove that marker at the end of the Action Phase. This is called Restoring Order ([9.2.4], page 16). Pickles is an exception; he is unaffected by Chaos spaces. He can move through them, although he cannot Restore Order ([12.2], page 22).Refugees units entering a Chaos marker space do not remove that marker at the end of the Action Phase ([5.2.3], page 10). When they enter the space, however, increase the Infection Level by one (+1).
• Tunnel Track: Carter may not enter the Tunnel Track at any time.
• Catacombs: Player units can enter Catacombs spaces normally. Leaving requires a z roll:
On a 1, 2, or 3, that unit may move forward as normal. On a 4 or 5, that unit stays. On a 6, a Lost! roll is made (see below).Each attempt to leave a Catacombs space, whether successful or not, counts as one Movement Allowance. Therefore, a unit that may move four spaces can make up to four attempts to leave.Only Special Civilians ([12.4], page 22) and Heroes with a icon may exit Catacombs as if they were normal spaces (i.e., they do not make the z roll to leave).
Lost! roll procedure:
1. Roll a z.2. Move that unit to the numbered space
on the Tunnel Track equal to the roll. If your z roll is the same space as that currently occupied by the unit, that unit is immediately eliminated and removed from play.
[9.2.4] Restoring Order: To reduce Chaos, a Player unit (other than Pickles, who cannot Restore Order) may conduct a Map Move (or Retreat) into a Chaos marker space. Once it enters such a space, the unit must:1. Stop moving.2. Remove the Chaos marker at the end of
the Action Phase.3. Increase the Infection Level by one (+1).
Exceptions:• A Raiders unit on a Chaos space
will Restore Order at the end of the Refugees Phase. Increase the Infection Level by one.
• Pickles can’t Restore Order but can move through Chaos spaces without effect.
• Seaver, instead of increasing the Infection Level, can choose to spend 1 Supply Point OR 1 Ammo Point to decrease the Infection Level by two (-2).
• Agee reduces the Infection Level by two (-2) if the Super Weapon ([9.6.1], page 18) has been discovered and by three (-3) if the Antidote ([9.6.2], page 18) has been discovered.
Building a Barricade: Any Player unit (including unreleased Civilians but not including Pickles) can use its one allowed Move Action that turn to place a
Note that you can move Rangers and Refugees units as Actions even if they have already moved during the RRR Movement Phase ([5.0], page 10).
Dawn of the Zeds Second Edition Rules v1-3
Developed by Victory Point Games 17
Dawn of the Zeds Second Edition Rules v1-3
©2013 Hermann Luttmann and Victory Point Games
Barricade terrain marker in that space. This Action also costs 2 Supply Points and cannot be conducted if there are not enough Supply Points available. A Barricade turns the space into a Terrain space ([2.1.2], page 3) and improves fighting results for defending Player units by shifting the Final Fighting Column by 2 ([10.3], page 20).
Restrictions: • Only one Barricade or Strongpoint
marker (of either type) is allowed per Track.
• Once placed, a Barricade marker cannot be removed except by a Zeds unit exiting that space ([8.2], page 14).
[9.2.5] Building a Strongpoint: This is a specialized, one-time Barricade Move Action that only Kingman can perform. By performing this Action, Kingman can choose to build a Strongpoint (a heavily fortified position) instead of a Barricade. Building a Strongpoint costs three Supply Points. Only one Strongpoint can exist in the game. Once placed, it remains there for the rest of the game. It cannot be destroyed by Zeds units. A Strongpoint improves fighting results for defending Player units by shifting the Final Fighting Column by 3 ([10.3], page 20).[9.2.6] Building a Minefield: This is a specialized Barricade Move Action that only Kingman can perform. This Action represents the deployment of a field of explosive anti-personnel mines. By performing this Action, Kingman can choose to build a Minefield instead of a Barricade. Building a Minefield costs two Supply Points and one Ammo Point. When first built, deploy (place) the Minefield marker on that space on its full-strength side.Minefields act when a Zeds unit or Zeds Mob is leaving the Minefield’s space. This can be during the Zeds Phase ([8.2], page 14), during Retreat Actions ([10.6], page 21), or any other time that Zeds leave the space. When a Zeds unit moves out of the Minefield space, it is attacked by a Gunfire
attack ([10.0], page 19) with FV equal to the current strength shown on the Minefield marker. You can distribute the resulting damage for Zeds Mobs. After the Gunfire attack is resolved, flip the Minefield over to its reduced side – OR – if already on its reduced side, it is removed for the rest of the game.
[9.3] Search & Retrieval Move: When the Antidote is discovered ([9.6.2], page 18), the Final Component marker is placed on the map and must be picked up and brought back to the Town Center.Any Player unit located in the space with the Final Component marker can use its one allowed Move Action that turn to pick up the Final Component marker. This is implemented by placing it under that unit. Note that Pickles may do this even when the Final Component is in a Chaos space.That unit can then “carry” the Final Component marker with it as part of future Map Movement Actions in an effort to bring the Final Component to the Town Center space and receive its benefits (see [9.6.2], page 18).If the Artifact ([13.6], page 23) has been similarly retrieved, or if Dr. Marteuse has been arrested ([13.4], page 23), the relevant marker is carried back to the Town Center in the same manner as the Final Component.When Carter begins his turn on a surface Start space, you may use his one allowed Move Action that turn to place the Loaded ([13.8], page 23) marker on his Hero counter. It is carried back to the Town Center in the same manner as the Final Component.A unit can only carry one thing at a time [i.e., the Final Component, the Artifact ([13.6], page 23), the Loaded marker ([13.8], page 23), or the Dr. Marteuse unit ([13.4], page 23)].
[9.4] Forage Action: Forage Actions are used to increase available Supply and Ammo. This is important because Supplies are used to build Barricades, feed Civilians, Heal wounded units, and conduct Research for better weapons and the Antidote. Ammo is necessary for Gunfire attacks.Any Player unit (including unreleased Civilians) located in a Named space ([2.1.2], page 3) can conduct a Forage Action to search for more Supplies and/or Ammo, unless that space has a Chaos marker on it.Procedure: Spend one Action and designate the Foraging unit. Roll one z and consult the Forage Table on the Player Aid for the
result. Move the Supplies and Ammo markers on their Track as indicated when successful.
• The green Hero units (also noted on their Hero cards) can roll two dice (z z) to perform this Action ([12.0], page 22).• If Mayor Hernandez is in the Town Center and performs no Actions during a Turn, any Forage Action z rolls made in any Town or Town Center space (only) add one (+1) to the z roll result for that turn ([9.8], page 19).
[9.5] Healing the Wounded (Healing Action): A Healing Action is used to tend exhausted and wounded fighters, thus putting units in the Hospital area back into play.
You can only Heal wounded units when a teal Science Hero is located on the Hospital space. Science Heroes can be moved to the Hospital space for this purpose by moving them from the Town Center to the Hospital as part of a Map Move ([9.2], page 15).Map Movement is also used to move wounded units to the Hospital (reached by going through the Town Center). Place any such wounded units in the Hospital area of the Player Mat.Procedure: For each Healing Action, spend one Action. Then spend one Supply Point if the Research marker is currently on space 3 or higher of the Research Track (spaces 0, 1, and 2 are free of Supply cost.) Roll one z and consult the Research Track. If the result is one of the green dice numbers (e.g., 5+) showing for the current Research Level, then you may take any one Civilians unit (with its reduced-strength side up) or Hero unit (with its full-strength side up) from the Hospital and place it in the Town Center space. Any other z roll result has no effect
So, there is no point in building a Barricade in a Town or the Town Center space, since Town spaces already get a 2 shift ([10.3], page 20) and the Town Center is lost when any Zeds unit enters.
Two-Dice AbilitiesAny “two-dice” (z z) abilities or modifiers allow you to roll two z z when performing the check. You can choose either result (the best one, obviously), except if you roll “doubles” (e.g.: 5 5), in which case you receive the outcome of both z (i.e.: For Foraging, if you roll double 4s at the Mine, you would receive 2 Ammo instead of 1).
For the Tutorial Scenario only ([3.1], page 4), Player units can be Healed anywhere on the map to full strength by spending one Action.
18
Dawn of the Zeds Second Edition Rules v1-3
Developed by Victory Point Games
Dawn of the Zeds Second Edition Rules v1-3
(i.e., it is a wasted Action). Note that some Hero units (as noted on their Hero cards) can roll two dice (z z) to perform this Action ([9.4], page 17).[9.6] Research Action (Find a Cure!): You can only research a cure when a teal Science Hero is located on the Laboratory space. Teal Science Heroes can be moved to the Laboratory space from either the Town Center or Hospital spaces as part of a Map Move ([9.2], page 15).Procedure: For each Research Action, spend one Action. Then spend one Supply Point if the Research marker is currently on space 3 or higher of the Research Track (spaces 0, 1, and 2 are free of Supply cost.) Roll one z and consult the Research Track. If the result is one of the blue dice numbers (e.g., 6+) shown for the current Research Level, advance the Research marker by one space to the next higher space. Any other z roll result has no effect (i.e., it is a wasted Action). Some Hero units (as noted on their Hero cards) can roll two dice (z z) to perform this Action ([9.4], page 17).If you have a Player unit on the Chromotechnics Lab space, add one (+1) to the result of any Research z roll and then consult the Research Track.Note: Advancing to the 7 space on the Research Track allows for the placement of the Final Component (see [9.6.2], page 18), while discovering the Antidote can only occur if the Final Component marker has already been brought back to the Laboratory ([9.3], page 17).As research improves for the cure of Z.E.D., success at Healing Actions ([9.5], page 17), becomes more likely. There are also other benefits:
[9.6.1] Super Weapon (When Research is 6 or higher): While the Research marker is on the 6 or higher space of the Research Track, a weaponized anti-ZED drug exists. Place the Super Weapon marker in its assigned space on the Player Mat as a reminder. While the Super Weapon is available, you receive the following fighting benefits to all attacks:
If at any time the Research marker moves backward to the 5 or lower space on the Research Track, the Super Weapon is lost, and its marker is removed from the map. It can be rediscovered and returned when the Research marker once again is on the 6 space or higher.
If you currently have the Super Weapon and are conducting a Manhunt Action ([9.7], page 18) on Noelle (only − see [13.5], page 23), you receive z z instead of the normal one z ([12.1], page 22).
[9.6.2] The Antidote (When Research is 7): Obtaining the Antidote to Z.E.D. won’t be easy. Just as you’re getting close (i.e., have discovered how to weaponize the vaccine), you must deduce what the Final Component is and fetch it from its location on the map, returning it safely to the Town Center.Procedure: When the Research marker reaches the 7 space of the Research Track, make a Fate Draw ([11.0], page 21) to determine on which Track the Final Component is located, then place the Final Component marker on that Track as follows:
• Highway Track: Nuclear Plant space• Forest Track: Farm space• Suburbs Track: University space• Mountain Track: Mine space• Tunnel Track: Dr. Marteuse’s
Office spaceThen perform that Fate card’s Event as usual.
Retrieving the Final Component: To “pick up” the Final Component marker, a Player unit must begin the Action phase in the same space with the marker and conduct a Search & Retrieval Move (see [9.3], page 17).If the unit is eliminated on its way to the Town Center, the Final Component marker is left in the space in which the unit was eliminated, and from there it must be picked up again. A unit can only carry one thing at a time ([9.3], page 17).If that unit carries the Final Component marker to the Town Center space, place the marker underneath the Research marker on the Research Track. This allows you to conduct the last Research Action needed to finally discover the Antidote. Once discovered, flip the Research marker to its “Eureka!” side and place it in the final space of the Research Track. If the Research marker moves forward to the Eureka! space before the Final Component is retrieved (due to an Event, “doubles” die roll, etc.), the Final Component still needs to be brought to the Town Center normally. Once the retrieval is completed, the Antidote is discovered automatically (no die roll is needed as the marker is already in the Eureka! space.)If at any time the Research marker moves backward on the Research Track, the Antidote is lost and the marker is flipped back to its “Research” side. You then must retrieve a new Final Component.If you discover the Antidote, this affects your end-game results (see Epilogues on the back cover of this Rulebook).
[9.7] Manhunt Action: Manhunt Actions are used to arrest Dr. Marteuse ([13.4], page 23) and to eliminate the Noelle marker ([13.5], page 23). If Dr. Marteuse is successfully arrested, he may be taken back to the Town Center ([9.3], page 17).A Player unit must be in the same space as Dr. Marteuse to arrest him or in any Chaos space to eliminate the Noelle marker.Spend one Action. Roll one z (or two z z if you have the Super Weapon and are trying to eliminate the Noelle marker, [9.6.1], page 18, & [13.5], page 23; or if a tan Law Enforcement unit is attempting to arrest Dr. Marteuse, [12.3], page 22, & [13.4], page 23).
Gunfire Attacks1: When conducting Gunfire attacks
([10.3], page 20)
Zeds units (except for Dread Zeds) must Retreat ([10.6], page 21) when they receive 2 or more Hits.
Hand-to-Hand Attacks1: When Player units attack Zeds units
during the Action Phase.
Research Antidote Example:
With Seaver assigned to the Laboratory and the Research marker on the 5 space of the Research Track, the player uses one Action that Turn for Research. One Supply Point is spent, then the player rolls the z. She rolls a 6 and advances the Research marker to the 6 space on the Track. This means that the Super Weapon marker is deployed on the Player Mat.
The player uses an Action to move Seaver to the Hospital space and uses the now-improved range of Healing Action outcomes in hopes of recovering an eliminated Civilians unit (or two). Using a third Action and another Supply Point, she rolls two z z for Seaver and receives a 2 and a 3 for the Healing Action, just failing to recover one of her lost units.
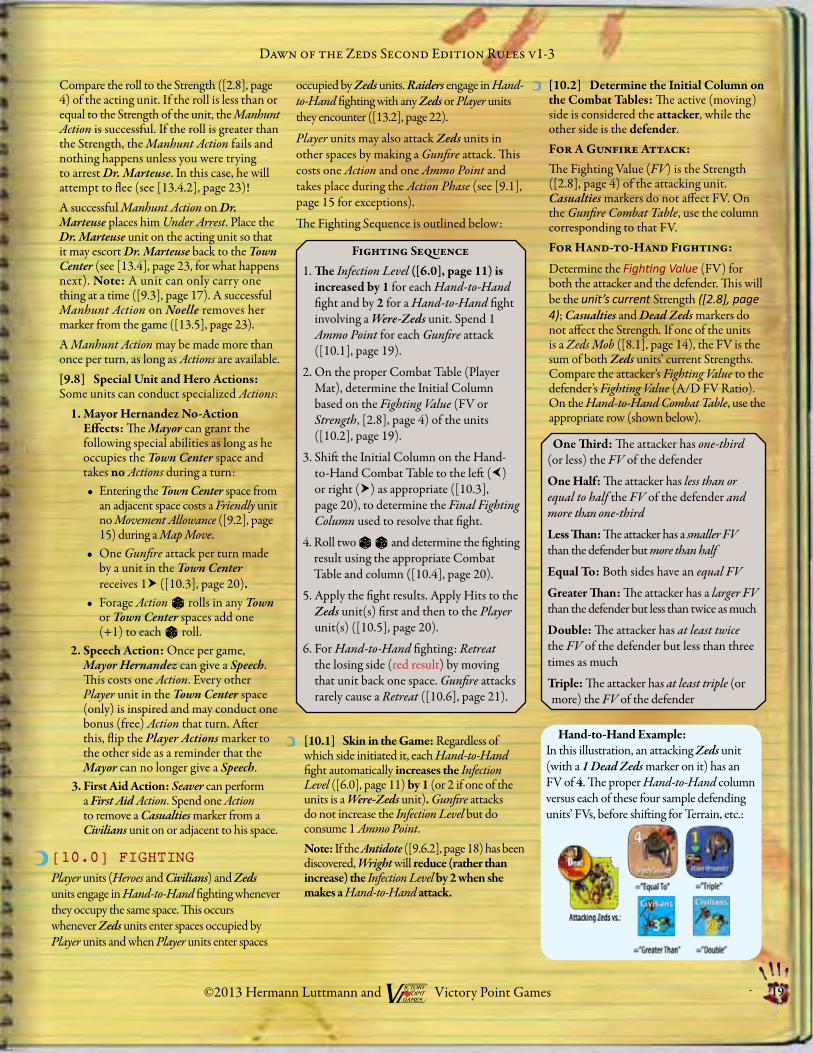
Dawn of the Zeds Second Edition Rules v1-3
Developed by Victory Point Games 19
Dawn of the Zeds Second Edition Rules v1-3
©2013 Hermann Luttmann and Victory Point Games
Compare the roll to the Strength ([2.8], page 4) of the acting unit. If the roll is less than or equal to the Strength of the unit, the Manhunt Action is successful. If the roll is greater than the Strength, the Manhunt Action fails and nothing happens unless you were trying to arrest Dr. Marteuse. In this case, he will attempt to flee (see [13.4.2], page 23)!A successful Manhunt Action on Dr. Marteuse places him Under Arrest. Place the Dr. Marteuse unit on the acting unit so that it may escort Dr. Marteuse back to the Town Center (see [13.4], page 23, for what happens next). Note: A unit can only carry one thing at a time ([9.3], page 17). A successful Manhunt Action on Noelle removes her marker from the game ([13.5], page 23).A Manhunt Action may be made more than once per turn, as long as Actions are available.[9.8] Special Unit and Hero Actions: Some units can conduct specialized Actions:
1. Mayor Hernandez No-Action Effects: The Mayor can grant the following special abilities as long as he occupies the Town Center space and takes no Actions during a turn:• Entering the Town Center space from
an adjacent space costs a Friendly unit no Movement Allowance ([9.2], page 15) during a Map Move.
• One Gunfire attack per turn made by a unit in the Town Center receives 1 ([10.3], page 20).
• Forage Action z rolls in any Town or Town Center spaces add one (+1) to each z roll.
2. Speech Action: Once per game, Mayor Hernandez can give a Speech. This costs one Action. Every other Player unit in the Town Center space (only) is inspired and may conduct one bonus (free) Action that turn. After this, flip the Player Actions marker to the other side as a reminder that the Mayor can no longer give a Speech.
3. First Aid Action: Seaver can perform a First Aid Action. Spend one Action to remove a Casualties marker from a Civilians unit on or adjacent to his space.
[10.0] FIGHTINGPlayer units (Heroes and Civilians) and Zeds units engage in Hand-to-Hand fighting whenever they occupy the same space. This occurs whenever Zeds units enter spaces occupied by Player units and when Player units enter spaces
occupied by Zeds units. Raiders engage in Hand-to-Hand fighting with any Zeds or Player units they encounter ([13.2], page 22).
Player units may also attack Zeds units in other spaces by making a Gunfire attack. This costs one Action and one Ammo Point and takes place during the Action Phase (see [9.1], page 15 for exceptions).
The Fighting Sequence is outlined below:
[10.1] Skin in the Game: Regardless of which side initiated it, each Hand-to-Hand fight automatically increases the Infection Level ([6.0], page 11) by 1 (or 2 if one of the units is a Were-Zeds unit). Gunfire attacks do not increase the Infection Level but do consume 1 Ammo Point. Note: If the Antidote ([9.6.2], page 18) has been discovered, Wright will reduce (rather than increase) the Infection Level by 2 when she makes a Hand-to-Hand attack.
[10.2] Determine the Initial Column on the Combat Tables: The active (moving) side is considered the attacker, while the other side is the defender.For A Gunfire Attack:The Fighting Value (FV) is the Strength ([2.8], page 4) of the attacking unit. Casualties markers do not affect FV. On the Gunfire Combat Table, use the column corresponding to that FV. For Hand-to-Hand Fighting:
Determine the Fighting Value (FV) for both the attacker and the defender. This will be the unit’s current Strength ([2.8], page 4); Casualties and Dead Zeds markers do not affect the Strength. If one of the units is a Zeds Mob ([8.1], page 14), the FV is the sum of both Zeds units’ current Strengths. Compare the attacker’s Fighting Value to the defender’s Fighting Value (A/D FV Ratio).On the Hand-to-Hand Combat Table, use the appropriate row (shown below).
Fighting Sequence1. The Infection Level ([6.0], page 11) is
increased by 1 for each Hand-to-Hand fight and by 2 for a Hand-to-Hand fight involving a Were-Zeds unit. Spend 1 Ammo Point for each Gunfire attack ([10.1], page 19).
2. On the proper Combat Table (Player Mat), determine the Initial Column based on the Fighting Value (FV or Strength, [2.8], page 4) of the units ([10.2], page 19).
3. Shift the Initial Column on the Hand-to-Hand Combat Table to the left () or right () as appropriate ([10.3], page 20), to determine the Final Fighting Column used to resolve that fight.
4. Roll two z z and determine the fighting result using the appropriate Combat Table and column ([10.4], page 20).
5. Apply the fight results. Apply Hits to the Zeds unit(s) first and then to the Player unit(s) ([10.5], page 20).
6. For Hand-to-Hand fighting: Retreat the losing side (red result) by moving that unit back one space. Gunfire attacks rarely cause a Retreat ([10.6], page 21).
One Third: The attacker has one-third (or less) the FV of the defender
One Half: The attacker has less than or equal to half the FV of the defender and more than one-thirdLess Than: The attacker has a smaller FV than the defender but more than halfEqual To: Both sides have an equal FVGreater Than: The attacker has a larger FV than the defender but less than twice as much
Double: The attacker has at least twice the FV of the defender but less than three times as much
Triple: The attacker has at least triple (or more) the FV of the defender
Hand-to-Hand Example: In this illustration, an attacking Zeds unit (with a 1 Dead Zeds marker on it) has an FV of 4. The proper Hand-to-Hand column versus each of these four sample defending units’ FVs, before shifting for Terrain, etc.:
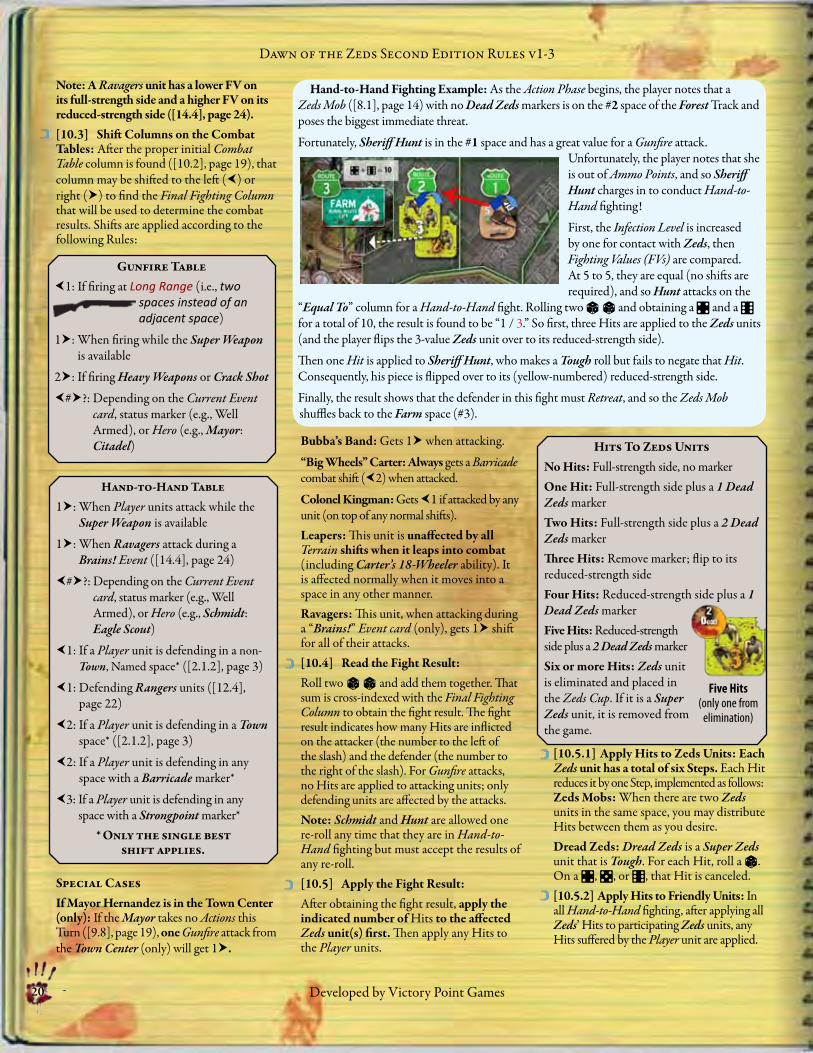
20
Dawn of the Zeds Second Edition Rules v1-3
Developed by Victory Point Games
Dawn of the Zeds Second Edition Rules v1-3
Note: A Ravagers unit has a lower FV on its full-strength side and a higher FV on its reduced-strength side ([14.4], page 24).[10.3] Shift Columns on the Combat Tables: After the proper initial Combat Table column is found ([10.2], page 19), that column may be shifted to the left () or right () to find the Final Fighting Column that will be used to determine the combat results. Shifts are applied according to the following Rules:
Special CasesIf Mayor Hernandez is in the Town Center (only): If the Mayor takes no Actions this Turn ([9.8], page 19), one Gunfire attack from the Town Center (only) will get 1.
Bubba’s Band: Gets 1 when attacking.
“Big Wheels” Carter: Always gets a Barricade combat shift (2) when attacked.
Colonel Kingman: Gets 1 if attacked by any unit (on top of any normal shifts).Leapers: This unit is unaffected by all Terrain shifts when it leaps into combat (including Carter’s 18-Wheeler ability). It is affected normally when it moves into a space in any other manner.Ravagers: This unit, when attacking during a “Brains!” Event card (only), gets 1 shift for all of their attacks.[10.4] Read the Fight Result:Roll two z z and add them together. That sum is cross-indexed with the Final Fighting Column to obtain the fight result. The fight result indicates how many Hits are inflicted on the attacker (the number to the left of the slash) and the defender (the number to the right of the slash). For Gunfire attacks, no Hits are applied to attacking units; only defending units are affected by the attacks. Note: Schmidt and Hunt are allowed one re-roll any time that they are in Hand-to-Hand fighting but must accept the results of any re-roll.[10.5] Apply the Fight Result:After obtaining the fight result, apply the indicated number of Hits to the affected Zeds unit(s) first. Then apply any Hits to the Player units.
[10.5.1] Apply Hits to Zeds Units: Each Zeds unit has a total of six Steps. Each Hit reduces it by one Step, implemented as follows:Zeds Mobs: When there are two Zeds units in the same space, you may distribute Hits between them as you desire.Dread Zeds: Dread Zeds is a Super Zeds unit that is Tough. For each Hit, roll a z. On a 4, 5, or 6, that Hit is canceled.[10.5.2] Apply Hits to Friendly Units: In all Hand-to-Hand fighting, after applying all Zeds’ Hits to participating Zeds units, any Hits suffered by the Player unit are applied.
Gunfire Table1: If firing at Long Range (i.e., two
spaces instead of an adjacent space)
1: When firing while the Super Weapon is available
2: If firing Heavy Weapons or Crack Shot#?: Depending on the Current Event
card, status marker (e.g., Well Armed), or Hero (e.g., Mayor: Citadel) Hits To Zeds Units
No Hits: Full-strength side, no markerOne Hit: Full-strength side plus a 1 Dead Zeds markerTwo Hits: Full-strength side plus a 2 Dead Zeds markerThree Hits: Remove marker; flip to its reduced-strength sideFour Hits: Reduced-strength side plus a 1 Dead Zeds markerFive Hits: Reduced-strength side plus a 2 Dead Zeds markerSix or more Hits: Zeds unit is eliminated and placed in the Zeds Cup. If it is a Super Zeds unit, it is removed from the game.
Five Hits(only one from
elimination)
Hand-to-Hand Table
1: When Player units attack while the Super Weapon is available
1: When Ravagers attack during a Brains! Event ([14.4], page 24)
#?: Depending on the Current Event card, status marker (e.g., Well Armed), or Hero (e.g., Schmidt: Eagle Scout)
1: If a Player unit is defending in a non-Town, Named space* ([2.1.2], page 3)
1: Defending Rangers units ([12.4], page 22)
2: If a Player unit is defending in a Town space* ([2.1.2], page 3)
2: If a Player unit is defending in any space with a Barricade marker*
3: If a Player unit is defending in any space with a Strongpoint marker*
* Only the single best shift applies.
Hand-to-Hand Fighting Example: As the Action Phase begins, the player notes that a Zeds Mob ([8.1], page 14) with no Dead Zeds markers is on the #2 space of the Forest Track and poses the biggest immediate threat.
Fortunately, Sheriff Hunt is in the #1 space and has a great value for a Gunfire attack. Unfortunately, the player notes that she is out of Ammo Points, and so Sheriff Hunt charges in to conduct Hand-to-Hand fighting!
First, the Infection Level is increased by one for contact with Zeds, then Fighting Values (FVs) are compared. At 5 to 5, they are equal (no shifts are required), and so Hunt attacks on the
“Equal To” column for a Hand-to-Hand fight. Rolling two z z and obtaining a 4 and a 6 for a total of 10, the result is found to be “1 / 3.” So first, three Hits are applied to the Zeds units (and the player flips the 3-value Zeds unit over to its reduced-strength side).
Then one Hit is applied to Sheriff Hunt, who makes a Tough roll but fails to negate that Hit. Consequently, his piece is flipped over to its (yellow-numbered) reduced-strength side.
Finally, the result shows that the defender in this fight must Retreat, and so the Zeds Mob shuffles back to the Farm space (#3).
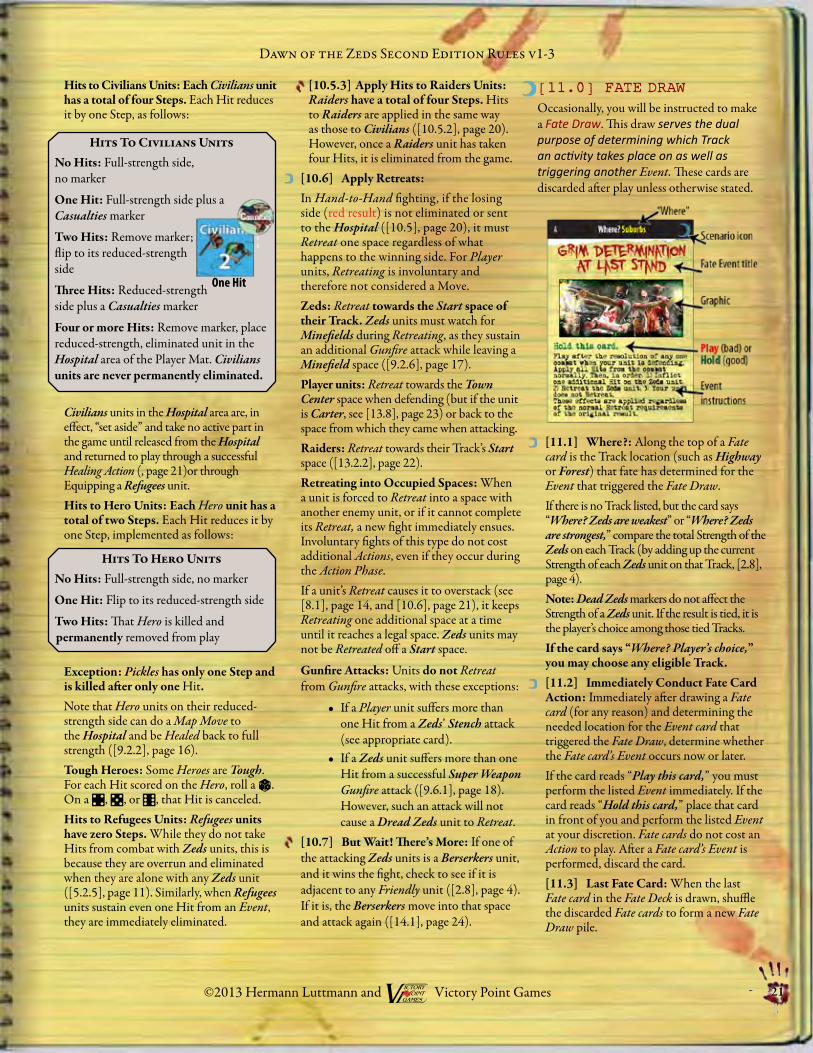
Dawn of the Zeds Second Edition Rules v1-3
Developed by Victory Point Games 21
Dawn of the Zeds Second Edition Rules v1-3
©2013 Hermann Luttmann and Victory Point Games
Hits to Civilians Units: Each Civilians unit has a total of four Steps. Each Hit reduces it by one Step, as follows:
Civilians units in the Hospital area are, in effect, “set aside” and take no active part in the game until released from the Hospital and returned to play through a successful Healing Action (, page 21)or through Equipping a Refugees unit.Hits to Hero Units: Each Hero unit has a total of two Steps. Each Hit reduces it by one Step, implemented as follows:
Exception: Pickles has only one Step and is killed after only one Hit.Note that Hero units on their reduced-strength side can do a Map Move to the Hospital and be Healed back to full strength ([9.2.2], page 16).Tough Heroes: Some Heroes are Tough. For each Hit scored on the Hero, roll a z. On a 4, 5, or 6, that Hit is canceled.Hits to Refugees Units: Refugees units have zero Steps. While they do not take Hits from combat with Zeds units, this is because they are overrun and eliminated when they are alone with any Zeds unit ([5.2.5], page 11). Similarly, when Refugees units sustain even one Hit from an Event, they are immediately eliminated.
[10.5.3] Apply Hits to Raiders Units: Raiders have a total of four Steps. Hits to Raiders are applied in the same way as those to Civilians ([10.5.2], page 20). However, once a Raiders unit has taken four Hits, it is eliminated from the game.
[10.6] Apply Retreats:In Hand-to-Hand fighting, if the losing side (red result) is not eliminated or sent to the Hospital ([10.5], page 20), it must Retreat one space regardless of what happens to the winning side. For Player units, Retreating is involuntary and therefore not considered a Move.Zeds: Retreat towards the Start space of their Track. Zeds units must watch for Minefields during Retreating, as they sustain an additional Gunfire attack while leaving a Minefield space ([9.2.6], page 17).Player units: Retreat towards the Town Center space when defending (but if the unit is Carter, see [13.8], page 23) or back to the space from which they came when attacking. Raiders: Retreat towards their Track’s Start space ([13.2.2], page 22).Retreating into Occupied Spaces: When a unit is forced to Retreat into a space with another enemy unit, or if it cannot complete its Retreat, a new fight immediately ensues. Involuntary fights of this type do not cost additional Actions, even if they occur during the Action Phase. If a unit’s Retreat causes it to overstack (see [8.1], page 14, and [10.6], page 21), it keeps Retreating one additional space at a time until it reaches a legal space. Zeds units may not be Retreated off a Start space.
Gunfire Attacks: Units do not Retreat from Gunfire attacks, with these exceptions:
• If a Player unit suffers more than one Hit from a Zeds’ Stench attack (see appropriate card).
• If a Zeds unit suffers more than one Hit from a successful Super Weapon Gunfire attack ([9.6.1], page 18). However, such an attack will not cause a Dread Zeds unit to Retreat.
[10.7] But Wait! There’s More: If one of the attacking Zeds units is a Berserkers unit, and it wins the fight, check to see if it is adjacent to any Friendly unit ([2.8], page 4). If it is, the Berserkers move into that space and attack again ([14.1], page 24).
[11.0] FATE DRAWOccasionally, you will be instructed to make a Fate Draw. This draw serves the dual purpose of determining which Track an activity takes place on as well as triggering another Event. These cards are discarded after play unless otherwise stated.
[11.1] Where?: Along the top of a Fate card is the Track location (such as Highway or Forest) that fate has determined for the Event that triggered the Fate Draw.If there is no Track listed, but the card says “Where? Zeds are weakest” or “Where? Zeds are strongest,” compare the total Strength of the Zeds on each Track (by adding up the current Strength of each Zeds unit on that Track, [2.8], page 4).Note: Dead Zeds markers do not affect the Strength of a Zeds unit. If the result is tied, it is the player’s choice among those tied Tracks.If the card says “Where? Player’s choice,” you may choose any eligible Track. [11.2] Immediately Conduct Fate Card Action: Immediately after drawing a Fate card (for any reason) and determining the needed location for the Event card that triggered the Fate Draw, determine whether the Fate card’s Event occurs now or later.If the card reads “Play this card,” you must perform the listed Event immediately. If the card reads “Hold this card,” place that card in front of you and perform the listed Event at your discretion. Fate cards do not cost an Action to play. After a Fate card’s Event is performed, discard the card.[11.3] Last Fate Card: When the last Fate card in the Fate Deck is drawn, shuffle the discarded Fate cards to form a new Fate Draw pile.
Hits To Civilians UnitsNo Hits: Full-strength side,no marker
One Hit: Full-strength side plus a Casualties marker
Two Hits: Remove marker; flip to its reduced-strength side
Three Hits: Reduced-strength side plus a Casualties marker
Four or more Hits: Remove marker, place reduced-strength, eliminated unit in the Hospital area of the Player Mat. Civilians units are never permanently eliminated.
One Hit
Hits To Hero UnitsNo Hits: Full-strength side, no marker
One Hit: Flip to its reduced-strength side
Two Hits: That Hero is killed and permanently removed from play
22
Dawn of the Zeds Second Edition Rules v1-3
Developed by Victory Point Games
Dawn of the Zeds Second Edition Rules v1-3
[12.0] SPECIAL HERO & CIVILIANS ABILITIESIn addition to their Strength ([2.8], page 4), Heroes have their own special abilities. These abilities are explained on their respective Hero cards.
[12.1] Two-dice Abilities: Heroes with “two-dice” (z z) abilities are especially adept at those tasks and roll two z z when performing them ([9.4], page 17). [12.2] Pickles: Pickles is a unique Hero in that he may move into, out of, and through Chaos spaces without effect. Additionally, Pickles’ Stealth ability allows him a strong chance to both enter a Zeds-occupied space and to remain undetected by Zeds units in the same space (see Hero card).Pickles cannot Restore Order and cannot Forage in a Chaos space. Pickles may, however, pick up the Final Component (as well as the Artifact and Dr. Marteuse), even in a Chaos space.[12.3] Military and Law Enforcement Skills: Some Player units have Military or Law Enforcement skill classifications. These skills allow such units to resolve some Events encountered through Event and Fate cards. These skill classifications are noted by a tan or red color found on certain Hero cards and unit counters ([2.8], page 4).Law Enforcement units may use two z z when attempting to arrest Dr. Marteuse ([9.7], page 18, & [13.4], page 23).
[12.4] Special Civilians: Green Diamond Security Guards and Rangers are Special Civilians units. They are treated as normal Civilians units, except:
Green Diamond Security Guards• These units are not
included in the Consume Supplies calculation ([7.2], page 12). They have their own dedicated supply locker.
• These are Law Enforcement units ([12.3], page 22).
• These units have a symbol, preventing them from ever getting Lost! ([9.2.3], page 16).
Rangers• When this unit enters
play, you immediately receive 4 Ammo Points.
• This unit is not included in the Consume Supplies calculation ([7.2], page 12). Rangers are assumed to have their own MREs (Meals Ready to Eat).
• This unit is a Military unit ([12.3], page 22).
• May issue Long Range Gunfire attacks ([9.1.1], page 15).
• 1 shift when attacked ([10.3], page 20).• May move up to two spaces for free
during each RRR Phase ([5.1], page 10).
[13.0] SPECIAL EVENT UNITS AND MARKERSMost Events are explained on their cards. Some, however, bring special markers and units into the game, such as:
The round (green or red) status markers (Well Armed, Civilian Leader, Zeds Stench, Toxic, etc.) may be used via card instructions. These markers are placed on top of the selected unit (i.e., Civilians or Zeds) until that unit is killed or removed. There is no limit to how many status markers can be placed on one unit.
In addition to such markers, a number of other units and markers require more extensive elaboration:
[13.1] VIP Survivors: The VIP Survivors unit that might enter play via the Unidentified Mob Appears Event represents a group of highly valued individuals who have escaped from nearby communities. This unit is treated as a normal Refugees unit in all ways except when it reaches the Town Center:
1. It must be placed in the Refugee Camp and can never be Equipped - AND -
2. You may choose one immediate bonus: • CDC Lab Technician: Increase the
Research Level by one space - OR - Reduce the Infection Level by three
• EMT Expert: Heal any two units in the Hospital at no Supply cost ([9.5], page 17)
• Resourceful Gatherer: Add four Supply Points and two Ammo Points
[13.2] Raiders: The Raiders unit enters play via the Raiders Appear! Event card and represents a gang of Mad Max-like anarchists bent on pillaging and killing their way across the landscape. The Raiders unit operates as follows:
[13.2.1] Movement: It automatically moves one space closer to the Town Center each RRR Phase only ([5.1], page 10). This does not count as a Refugees unit moved. You cannot move this unit during your Action Phase. Raiders have minds and an agenda of their own.A Raiders unit cannot enter the Tunnel Track at any time.[13.2.2] Fighting: Raiders engage in Hand-to-Hand fighting with any unit (Zeds or Player) whose space they enter or when another unit enters their space (in the Zeds or Action Phases).When fighting Zeds, treat combat the same way as a Player unit fighting a Zeds unit (including Infection Level increase).When fighting Player units, the defending unit gets Terrain benefits (if any). There is no Infection Level increase, and Raiders are not affected by the Super Weapon.When in a space with Refugees, there is no effect – they peacefully coexist. The Raiders want “stuff ” and will leave the poor Refugees alone.When Retreating, the Raiders unit moves towards their Track’s Start space.[13.2.3] Hit Application: The Raiders unit has Hits applied to it as a Civilians unit does ([10.5.2], page 20). However, it is removed from play after suffering its fourth Hit.[13.2.4] Chaos: Raiders do not create Chaos when entering a Named space. They do Restore Order ([9.2.4], page 16) just like Player units ([2.8], page 4), at the end of your Action Phase. Increase the Infection Level by one.
Law Enforcement (Tan)Heroes: Hunt, Schmidt, and WrightCivilians: Green Diamond Security Guards units (see also [12.4], page 22)
Military (Red)Heroes: Piazza and KingmanCivilians: Rangers unit (see also [12.4], page 22)
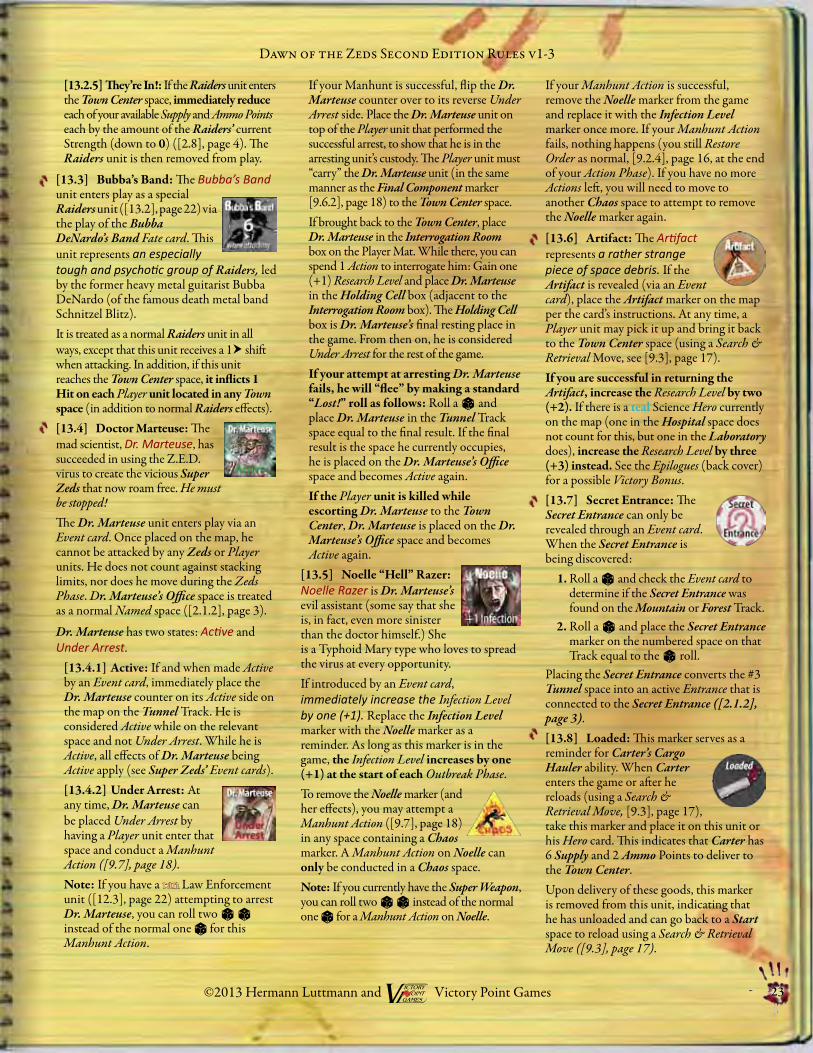
Dawn of the Zeds Second Edition Rules v1-3
Developed by Victory Point Games 23
Dawn of the Zeds Second Edition Rules v1-3
©2013 Hermann Luttmann and Victory Point Games
[13.2.5] They’re In!: If the Raiders unit enters the Town Center space, immediately reduce each of your available Supply and Ammo Points each by the amount of the Raiders’ current Strength (down to 0) ([2.8], page 4). The Raiders unit is then removed from play.
[13.3] Bubba’s Band: The Bubba’s Band unit enters play as a special Raiders unit ([13.2], page 22) via the play of the Bubba DeNardo’s Band Fate card. This unit represents an especially tough and psychotic group of Raiders, led by the former heavy metal guitarist Bubba DeNardo (of the famous death metal band Schnitzel Blitz).It is treated as a normal Raiders unit in all ways, except that this unit receives a 1 shift when attacking. In addition, if this unit reaches the Town Center space, it inflicts 1 Hit on each Player unit located in any Town space (in addition to normal Raiders effects).[13.4] Doctor Marteuse: The mad scientist, Dr. Marteuse, has succeeded in using the Z.E.D. virus to create the vicious Super Zeds that now roam free. He must be stopped!The Dr. Marteuse unit enters play via an Event card. Once placed on the map, he cannot be attacked by any Zeds or Player units. He does not count against stacking limits, nor does he move during the Zeds Phase. Dr. Marteuse’s Office space is treated as a normal Named space ([2.1.2], page 3).
Dr. Marteuse has two states: Active and Under Arrest.
[13.4.1] Active: If and when made Active by an Event card, immediately place the Dr. Marteuse counter on its Active side on the map on the Tunnel Track. He is considered Active while on the relevant space and not Under Arrest. While he is Active, all effects of Dr. Marteuse being Active apply (see Super Zeds’ Event cards).[13.4.2] Under Arrest: At any time, Dr. Marteuse can be placed Under Arrest by having a Player unit enter that space and conduct a Manhunt Action ([9.7], page 18).Note: If you have a tan Law Enforcement unit ([12.3], page 22) attempting to arrest Dr. Marteuse, you can roll two z z instead of the normal one z for this Manhunt Action.
If your Manhunt is successful, flip the Dr. Marteuse counter over to its reverse Under Arrest side. Place the Dr. Marteuse unit on top of the Player unit that performed the successful arrest, to show that he is in the arresting unit’s custody. The Player unit must “carry” the Dr. Marteuse unit (in the same manner as the Final Component marker [9.6.2], page 18) to the Town Center space.If brought back to the Town Center, place Dr. Marteuse in the Interrogation Room box on the Player Mat. While there, you can spend 1 Action to interrogate him: Gain one (+1) Research Level and place Dr. Marteuse in the Holding Cell box (adjacent to the Interrogation Room box). The Holding Cell box is Dr. Marteuse’s final resting place in the game. From then on, he is considered Under Arrest for the rest of the game.If your attempt at arresting Dr. Marteuse fails, he will “flee” by making a standard “Lost!” roll as follows: Roll a z and place Dr. Marteuse in the Tunnel Track space equal to the final result. If the final result is the space he currently occupies, he is placed on the Dr. Marteuse’s Office space and becomes Active again.If the Player unit is killed while escorting Dr. Marteuse to the Town Center, Dr. Marteuse is placed on the Dr. Marteuse’s Office space and becomes Active again.
[13.5] Noelle “Hell” Razer: Noelle Razer is Dr. Marteuse’s evil assistant (some say that she is, in fact, even more sinister than the doctor himself.) She is a Typhoid Mary type who loves to spread the virus at every opportunity.If introduced by an Event card, immediately increase the Infection Level by one (+1). Replace the Infection Level marker with the Noelle marker as a reminder. As long as this marker is in the game, the Infection Level increases by one (+1) at the start of each Outbreak Phase. To remove the Noelle marker (and her effects), you may attempt a Manhunt Action ([9.7], page 18) in any space containing a Chaos marker. A Manhunt Action on Noelle can only be conducted in a Chaos space.Note: If you currently have the Super Weapon, you can roll two z z instead of the normal one z for a Manhunt Action on Noelle.
If your Manhunt Action is successful, remove the Noelle marker from the game and replace it with the Infection Level marker once more. If your Manhunt Action fails, nothing happens (you still Restore Order as normal, [9.2.4], page 16, at the end of your Action Phase). If you have no more Actions left, you will need to move to another Chaos space to attempt to remove the Noelle marker again.
[13.6] Artifact: The Artifact represents a rather strange piece of space debris. If the Artifact is revealed (via an Event card), place the Artifact marker on the map per the card’s instructions. At any time, a Player unit may pick it up and bring it back to the Town Center space (using a Search & Retrieval Move, see [9.3], page 17).If you are successful in returning the Artifact, increase the Research Level by two (+2). If there is a teal Science Hero currently on the map (one in the Hospital space does not count for this, but one in the Laboratory does), increase the Research Level by three (+3) instead. See the Epilogues (back cover) for a possible Victory Bonus.[13.7] Secret Entrance: The Secret Entrance can only be revealed through an Event card. When the Secret Entrance is being discovered:
1. Roll a z and check the Event card to determine if the Secret Entrance was found on the Mountain or Forest Track.
2. Roll a z and place the Secret Entrance marker on the numbered space on that Track equal to the z roll.
Placing the Secret Entrance converts the #3 Tunnel space into an active Entrance that is connected to the Secret Entrance ([2.1.2], page 3).[13.8] Loaded: This marker serves as a reminder for Carter’s Cargo Hauler ability. When Carter enters the game or after he reloads (using a Search & Retrieval Move, [9.3], page 17), take this marker and place it on this unit or his Hero card. This indicates that Carter has 6 Supply and 2 Ammo Points to deliver to the Town Center.Upon delivery of these goods, this marker is removed from this unit, indicating that he has unloaded and can go back to a Start space to reload using a Search & Retrieval Move ([9.3], page 17).

24
Dawn of the Zeds Second Edition Rules v1-3
Developed by Victory Point Games
Dawn of the Zeds Second Edition Rules v1-3
If Carter Retreats while he has the Loaded marker, he will Retreat towards his current Track’s Start space. Otherwise, he Retreats as normal Player units do ([10.6], page 21).
[14.0] SUPER ZEDSSuper Zeds units enter the game if and when their corresponding Event cards are drawn. Super Zeds are removed from the game if eliminated.
The Ravagers unit ([14.4], page 24) arrives with the Dr. Marteuse unit ([13.4], page 23). Placement of all other Super Zeds units is dependent on the status of Dr. Marteuse and is detailed on their respective Event cards.There are 5 types of Super Zeds units (so far...), each with their own special abilities, as follows:
[14.1] Berserkers: Berserkers are relentless, wild-eyed, totally unpredictable Super Zeds. If Berserkers win a fight while attacking and are adjacent to any Friendly ([2.8], page 4) unit, they will move into that space and attack again (in the same manner as with a “Brains!” card).
[14.2] Dread Zeds: Dread Zeds is a Super Zeds unit that is considered to be Tough (i.e., Hits are canceled with a roll of 4, 5, or 6, [10.5.1], page 20). In addition, a successful Super Weapon Gunfire attack will not force them to Retreat ([10.6], page 21).
[14.3] Leapers: Leapers is a Super Zeds unit that can jump two spaces forward when moving.
When this unit moves, pick up the Leapers unit and move it two spaces forward (towards the Town Center). It “jumps over” the adjacent space (it does not move through that space and thus will not attack any units in that space.)If the space it jumps into is occupied by a Player unit, resolve any fight immediately. If the space it jumps into is the Town Center, the game immediately ends (see [8.3.1], page 14). If a space it jumps into is already occupied by a Zeds Mob (on the surface) or by any Zeds unit (in the Tunnel Track on non-Catacombs spaces), the Leapers conduct a normal Move instead (i.e, their jump is canceled).Note: A Leapers unit only moves once per turn (except with a “Brains!” Event card), no matter how many spaces it has jumped over.
If this unit is a part of a Zeds Mob, it will leave the other unit behind when jumping. Leapers do not “carry” the other Zeds unit with them.Leapers are unaffected by Terrain modifiers but only if they jump directly into combat.Frenzied JumpThis special Leapers move ability only occurs when a “Brains!” Event card is drawn. Instead of its normal Movement, it will jump onto an adjacent surface Track on the same-numbered space. If this unit is currently on the Tunnel Track, it does not perform this special move.When a Leapers unit performs this ability, check the Card Number of the newly drawn “Brains!” card. If it is an even number, the Leapers unit will jump clockwise to the adjacent surface Track (e.g.: Highway space #3 to Suburbs space #3). If it is an odd number, the unit will jump counter-clockwise to the adjacent surface Track (e.g.: Highway space #3 to Mountain space #3). This jump counts as one space moved. A Leapers unit can continue moving and fighting an unlimited number of times on its current Track until it loses a Hand-to-Hand fight or eliminates a Refugees unit (as per the card’s instructions).
[14.4] Ravagers: Ravagers are Super Zeds units that accompany Dr. Marteuse in his office and serve as a bodyguard. They are innocent looking and almost human in their near-dormant form. But once they become bloodied in combat, they begin a slow transition into maniacal killing machines. Consequently, Ravagers have a lower FV on their full-strength side and a higher FV on their reduced-strength side. In addition, when attacking during a “Brains!” Event card (only), Ravagers receive a 1 shift for all of their attacks.
[14.5] Were-Zeds: Also referred to as K-10s because they are one level smarter and more vicious than a canine. The Were-Zeds is a Super Zeds unit that can move two spaces with any move (treated as a x2 Move result), and it increases the Infection Level by two (+2) with each Hand-to-Hand fight it participates in.
Additionally, if this unit moves into a space with any other Zeds unit (or vice versa), the Were-Zeds unit will immediately inflict one (+1) Hit on each (different) Zeds unit that it shares a space with.
[15.0] WINNING AND LOSINGEnding the Game: If any Zeds unit moves into the Town Center, you immediately lose the game. However, if the National Guard Arrives! Event card is drawn, follow the instructions as listed on it. If the game is over, you’ve won.
In either case, the game is over, and you should immediately determine your level of Victory by consulting the proper Epilogues (located on the back cover of this book).
Player Performance Level
While history as a hero determines your success or failure, how you did as a player in the game can be determined separately.
Total the remaining Event cards in the Draw deck (see next column):
10 or less = “Zedhead” (bloodied in combat but ready for more, people flock to you if they want to survive)
11-15 = Elite (you’re very well prepared, have excellent aim, and know the ins and outs of Farmingdale)
16-24 = Expert (you know how to handle yourself pretty well)
25-35 = Average (there are times when you’re at your best and other times when you’re...not)
36-45 = Poor (“brave” attempts earn you scolding glances from your group)
46+ = Abysmal (you most likely attempted something brave yet brainless and got bitten as a result)
Dawn of the Zeds Second Edition Rules v1-3
Developed by Victory Point Games 25
Dawn of the Zeds Second Edition Rules v1-3
©2013 Hermann Luttmann and Victory Point Games
[16.0] OPTIONAL RULESThese Optional Rules can be used in any combination. Decide which are to be used before setting up the game.
[16.1] Pro-Player Options: The following options benefit the player and make the situation (slightly) more manageable and less stressful:
A) Heroes are not killed when they receive their second Hit. Instead, they are moved to the Hospital and may be Healed back to full strength using normal procedures. However, receiving a third Hit does eliminate a Hero permanently.
B) All newly arriving Zeds units from Infection Outbreaks are placed in their Track’s Start space.
C) If the modified Foraging die roll is a 7 (due to the Mayor’s Keys to the City ability), you may elect to receive two Ammo, OR two Supply, OR one of each.
D) If the VIP Survivors unit reaches the Town Center space, you receive a new Hero unit during the next Action Phase. This is in addition to the normal benefits for bringing the VIP Survivors unit in.
E) Ignore the table on the National Guard Arrives! card. When drawn, the game is automatically over and you win.
F) Any Fate card that says “Hold this card” may be discarded (i.e., not played) for one additional (+1) Action.
[16.2] Pro-Zeds Options: The following options benefit the Zeds and make the situation (slightly) less manageable and more stressful:
A) Start the game with only three Heroes, one player-selected Hero and two other randomly selected Heroes.
B) Have all Research and Healing Actions cost one Supply Point regardless of the current Research Level.
C) If an Infection Outbreak occurs from an Event card that reads, “Outbreak? 10+,” randomly select two Zeds units, drawing a separate Fate card for each, and place both of them into the game.
D) During Set Up ([3.3], page 6), instead of placing the National Guard Arrives! Event card in the Act III pile, shuffle it instead into the Epilogue pile.
[16.3] “Historical” Set Up: As per the U.S. government’s Top Secret Green Diamond report documenting this “incident,” if you wish to play the game as matters actually started, you would begin with the following Heroes: Hernandez, Hunt, Pickles, and Seaver. Your initial stockpiles would be 10 Supply and 5 Ammo. Perform the rest of Set Up ([3.3], page 6), as normal.[16.4] Cooperative Play: Randomly determine who the first player is and give that person the 1st Player marker. When you have this marker, you are the first player and take the first Action on the Current Event card. Clockwise, to the left around the table, each player takes an Action until no more Actions are available. Some players may not be able to take Actions if there are more players than available Actions on the Current Event card.After all Actions are used, the 1st Player marker is passed to the player on the left, and play continues normally.
CREDITSGame Design: Hermann Luttmann
Development: Victory Point Games
Additional Documentation: Petra Schlunk
Series Developer: John Welch
Art & Graphics: Tim Allen & Vinh Ha
Writing: David Spangler (fiction)
Graphic Design: Josh Neiman &Barry Pike III
Playtesting: John Angelo Mark Fanning Frank Gallagher Noelle Le Bienvenu Robert Miller Sr. Jaret Morgan Josh Neiman Barry Pike III Aaron Rohrer Petra Schlunk Thomas Sobczak
Proofreading: Bill Barrett Mark Fanning Rick Partin Aaron Rohrer Petra Schlunk Leigh Toms Ian Wakeham
The End?
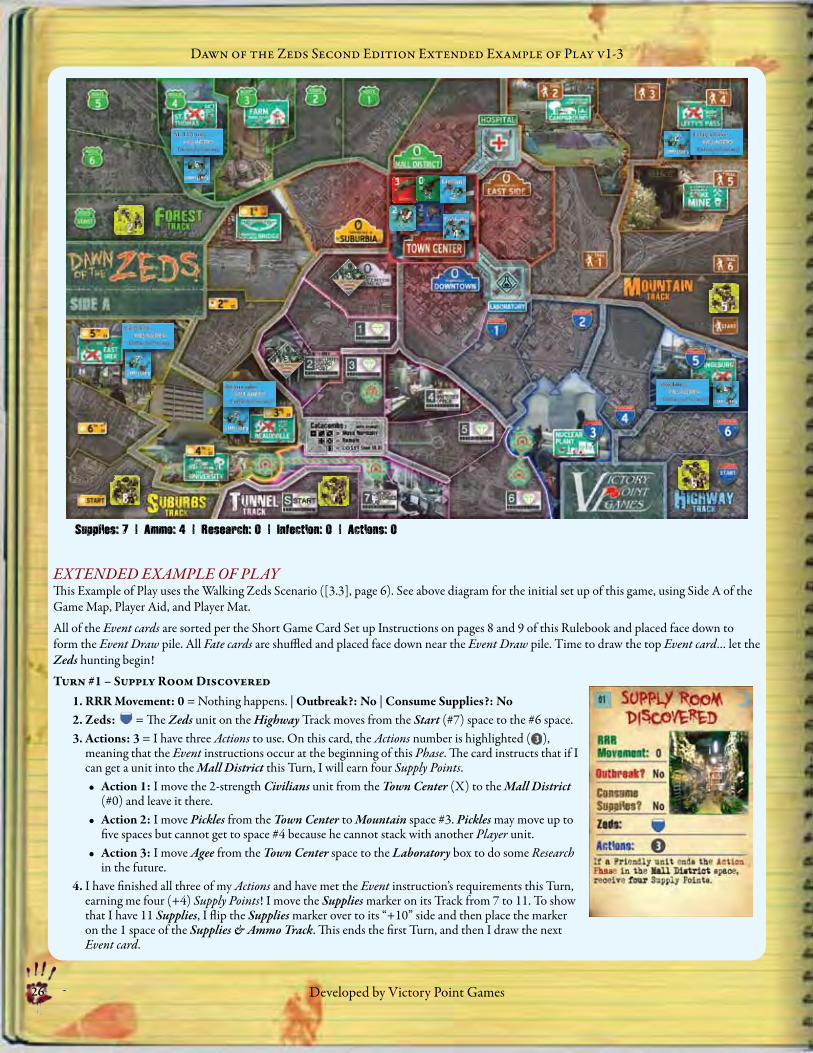
26
Dawn of the Zeds Second Edition Extended Example of Play v1-3
Developed by Victory Point Games
EXTENDED EXAMPLE OF PLAYThis Example of Play uses the Walking Zeds Scenario ([3.3], page 6). See above diagram for the initial set up of this game, using Side A of the Game Map, Player Aid, and Player Mat.
All of the Event cards are sorted per the Short Game Card Set up Instructions on pages 8 and 9 of this Rulebook and placed face down to form the Event Draw pile. All Fate cards are shuffled and placed face down near the Event Draw pile. Time to draw the top Event card… let the Zeds hunting begin!
Turn #1 – Supply Room Discovered1. RRR Movement: 0 = Nothing happens. | Outbreak?: No | Consume Supplies?: No2. Zeds: = The Zeds unit on the Highway Track moves from the Start (#7) space to the #6 space.3. Actions: 3 = I have three Actions to use. On this card, the Actions number is highlighted ( ),
meaning that the Event instructions occur at the beginning of this Phase. The card instructs that if I can get a unit into the Mall District this Turn, I will earn four Supply Points. • Action 1: I move the 2-strength Civilians unit from the Town Center (X) to the Mall District
(#0) and leave it there.• Action 2: I move Pickles from the Town Center to Mountain space #3. Pickles may move up to
five spaces but cannot get to space #4 because he cannot stack with another Player unit. • Action 3: I move Agee from the Town Center space to the Laboratory box to do some Research
in the future. 4. I have finished all three of my Actions and have met the Event instruction’s requirements this Turn,
earning me four (+4) Supply Points! I move the Supplies marker on its Track from 7 to 11. To show that I have 11 Supplies, I flip the Supplies marker over to its “+10” side and then place the marker on the 1 space of the Supplies & Ammo Track. This ends the first Turn, and then I draw the next Event card.
Supplies: 7 | Ammo: 4 | Research: 0 | Infection: 0 | Actions: 0

27
Dawn of the Zeds Second Edition Extended Example of Play v1-3
©2013 Hermann Luttmann and Victory Point Games
Turn #2 – A Secret Hatch Is Discovered1. RRR Movement: 0 = Nothing happens. | Outbreak?: 9+ = Nothing happens.2. Consume Supplies?: Yes = I move the Supplies marker (still on the “+10” side) from 1 to 0. I have
10 Supplies remaining.3. Zeds: x 2 and = The Zeds unit on the Suburbs Track moves first, as it is listed first on the card:
• : The Zeds unit moves from the Start space to space #6 and then moves again (per the “x2” on the Current Event card) to the East Irek space. As East Irek is occupied by a Player unit, Hand-to-Hand combat begins. First, the Infection Level goes up from 0 to 1. Then, the 2-strength Civilians unit there is “released,” as it has been attacked. The Civilians unit is rotated to face me, showing that it can now move freely.
• The attacking Zeds unit has an FV of 8, and the Civilians unit has an FV of 2, and the Final Fighting Column is at Double after all shifts are applied. I roll a 4 and a 3, totaling 7, which is a “1/3” result. The Zeds unit receives 1 Hit, so I place a 1 Dead Zeds marker on that Zeds unit. The Civilians unit receives 3 Hits, so that Civilians unit is flipped over to its reduced-strength side, and, additionally, a Casualties marker is placed on that unit (one more Hit and it is gone!)
• The now-1-strength Civilians unit Retreats back to the University (#4) space, leaving East Irek to become Zeds controlled. The Villagers unit on the East Irek space is flipped over to its Refugees side (deciding that protecting the Village isn’t worth it), and it “flees,” immediately moving to the University space and stacking with the Civilians unit there. Finally, a Chaos marker is placed in the East Irek space (to denote the Zeds’ control of that space).
• : The Zeds unit on this Track moves from the Start space to the Chromotechnics Lab (#7) space. Since this Named space is now under Zeds’ control, a Chaos marker is placed on it.
4. Actions: 1 = I first need to find out where the Secret Entrance is located before I take my Action. I roll a z and get a 2, which means it will be on the Forest Track. Then, I roll another z for the exact space number on that Track. Rolling a 5, I find and place the Secret Entrance marker on the #5 space of the Forest Track. Now, a new Entrance has been created between the #5 space of the Forest Track and the Catacombs (#3) space on the Tunnel Track.• Action 1: I want to save the Refugees on the Suburbs Track, so I move the Refugees from the University space to the Beauxville space.
Turn #3 – Suburbs Night Assault 1. RRR Movement: 0 = Nothing happens (darn). | Outbreak: 10+ = Nothing happens. | Consume
Supplies?: No 2. Zeds: x 2 = During this Turn, each Hand-to-Hand combat causes a the Infection Level to go
up by 2, and no Terrain shifts apply to any such attacks on the Suburbs Track! • I move the Zeds unit on this Track (with a 1 Dead Zeds marker) from space #5 to #4, causing
a Hand-to-Hand fight against the 1-strength Civilians unit (with a Casualties marker) in that space. The Infection Level goes up from 1 to 3.
• The combat is 8 vs. 1, which is on the Triple column (no shifts this time). I roll for a total of 8, which is “0/3.” The Zeds unit receives 0 Hits. The Civilians unit − only able to absorb one more Hit − receives three Hits from this fight and is eliminated. That Civilians unit is placed in the Hospital area on the Player Mat with its reduced-strength side facing up. Then, a Chaos marker is placed on the University space.
• That 8-strength Zeds unit now moves a second space, so it will move to the Beauxville space. However, before it performs its movement, I note that the University space is an Entrance space, and so I have to check to see if that Zeds unit will switch Tracks. Currently, there is one Zeds unit on the Suburbs Track and one on the Tunnel Track, so no switch occurs. That Zeds unit moves into Beauxville safely, where a 2-strength Civilians awaits, so that Civilians unit is released and rotated. Then, the Infection Level goes up by two, to 5. The Hand-to-Hand fight is 8 vs. 2, and the Final Fighting Column is at Triple. Fortunately, I roll for a total of 2, which is a “2/2” result! That Zeds unit receives two Hits. Since it already has one Hit, the total of three Hits on it causes the unit to flip over to its reduced, 6-strength side. This should be a goal in all your combat efforts – get those Zeds to at least flip over. The 2-strength Civilians unit receives two Hits as well, is flipped over to its reduced side, and is now a 1-strength unit. Then, the Zeds unit Retreats back to the University space.
3. Actions: 3• Action 1: Pickles moves to the Mine (#5) space of the Mountain Track (I want him to Forage for some Ammo soon!)• Action 2: Agee performs a Research Action. I roll two z z (as per her special Bioengineering PhD ability), and I roll a 1 and a 5.
Seeing that I rolled one successful number, I move the Research marker from the 0 space to the 1 space on the Player Mat. • Action 3: Kingman moves from the Town Center to the Suburbs Track space #2.
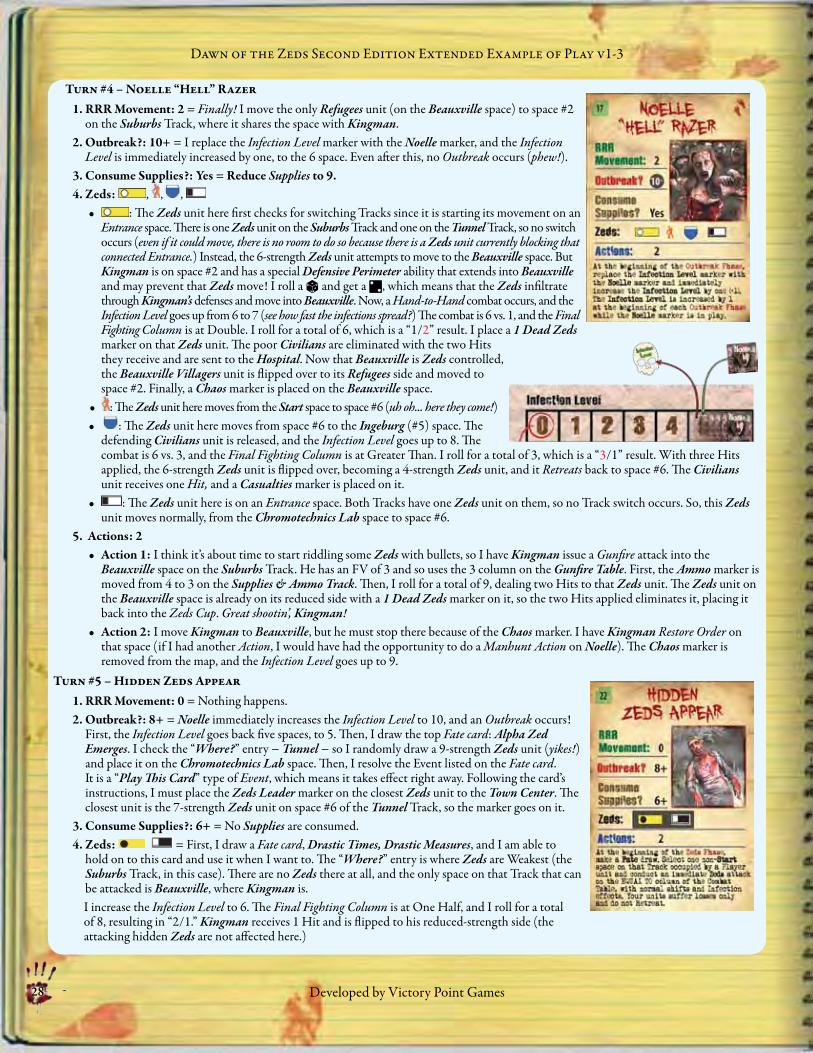
28
Dawn of the Zeds Second Edition Extended Example of Play v1-3
Developed by Victory Point Games
Turn #4 – Noelle “Hell” Razer1. RRR Movement: 2 = Finally! I move the only Refugees unit (on the Beauxville space) to space #2
on the Suburbs Track, where it shares the space with Kingman. 2. Outbreak?: 10+ = I replace the Infection Level marker with the Noelle marker, and the Infection
Level is immediately increased by one, to the 6 space. Even after this, no Outbreak occurs (phew!). 3. Consume Supplies?: Yes = Reduce Supplies to 9.4. Zeds: , , ,
• : The Zeds unit here first checks for switching Tracks since it is starting its movement on an Entrance space. There is one Zeds unit on the Suburbs Track and one on the Tunnel Track, so no switch occurs (even if it could move, there is no room to do so because there is a Zeds unit currently blocking that connected Entrance.) Instead, the 6-strength Zeds unit attempts to move to the Beauxville space. But Kingman is on space #2 and has a special Defensive Perimeter ability that extends into Beauxville and may prevent that Zeds move! I roll a z and get a 2, which means that the Zeds infiltrate through Kingman’s defenses and move into Beauxville. Now, a Hand-to-Hand combat occurs, and the Infection Level goes up from 6 to 7 (see how fast the infections spread?) The combat is 6 vs. 1, and the Final Fighting Column is at Double. I roll for a total of 6, which is a “1/2” result. I place a 1 Dead Zeds marker on that Zeds unit. The poor Civilians are eliminated with the two Hits they receive and are sent to the Hospital. Now that Beauxville is Zeds controlled, the Beauxville Villagers unit is flipped over to its Refugees side and moved to space #2. Finally, a Chaos marker is placed on the Beauxville space.
• : The Zeds unit here moves from the Start space to space #6 (uh oh... here they come!)• : The Zeds unit here moves from space #6 to the Ingeburg (#5) space. The
defending Civilians unit is released, and the Infection Level goes up to 8. The combat is 6 vs. 3, and the Final Fighting Column is at Greater Than. I roll for a total of 3, which is a “3/1” result. With three Hits applied, the 6-strength Zeds unit is flipped over, becoming a 4-strength Zeds unit, and it Retreats back to space #6. The Civilians unit receives one Hit, and a Casualties marker is placed on it.
• : The Zeds unit here is on an Entrance space. Both Tracks have one Zeds unit on them, so no Track switch occurs. So, this Zeds unit moves normally, from the Chromotechnics Lab space to space #6.
5. Actions: 2• Action 1: I think it’s about time to start riddling some Zeds with bullets, so I have Kingman issue a Gunfire attack into the
Beauxville space on the Suburbs Track. He has an FV of 3 and so uses the 3 column on the Gunfire Table. First, the Ammo marker is moved from 4 to 3 on the Supplies & Ammo Track. Then, I roll for a total of 9, dealing two Hits to that Zeds unit. The Zeds unit on the Beauxville space is already on its reduced side with a 1 Dead Zeds marker on it, so the two Hits applied eliminates it, placing it back into the Zeds Cup. Great shootin’, Kingman!
• Action 2: I move Kingman to Beauxville, but he must stop there because of the Chaos marker. I have Kingman Restore Order on that space (if I had another Action, I would have had the opportunity to do a Manhunt Action on Noelle). The Chaos marker is removed from the map, and the Infection Level goes up to 9.
Turn #5 – Hidden Zeds Appear1. RRR Movement: 0 = Nothing happens. 2. Outbreak?: 8+ = Noelle immediately increases the Infection Level to 10, and an Outbreak occurs!
First, the Infection Level goes back five spaces, to 5. Then, I draw the top Fate card: Alpha Zed Emerges. I check the “Where?” entry − Tunnel − so I randomly draw a 9-strength Zeds unit (yikes!) and place it on the Chromotechnics Lab space. Then, I resolve the Event listed on the Fate card. It is a “Play This Card” type of Event, which means it takes effect right away. Following the card’s instructions, I must place the Zeds Leader marker on the closest Zeds unit to the Town Center. The closest unit is the 7-strength Zeds unit on space #6 of the Tunnel Track, so the marker goes on it.
3. Consume Supplies?: 6+ = No Supplies are consumed.4. Zeds: = First, I draw a Fate card, Drastic Times, Drastic Measures, and I am able to
hold on to this card and use it when I want to. The “Where?” entry is where Zeds are Weakest (the Suburbs Track, in this case). There are no Zeds there at all, and the only space on that Track that can be attacked is Beauxville, where Kingman is.I increase the Infection Level to 6. The Final Fighting Column is at One Half, and I roll for a total of 8, resulting in “2/1.” Kingman receives 1 Hit and is flipped to his reduced-strength side (the attacking hidden Zeds are not affected here.)
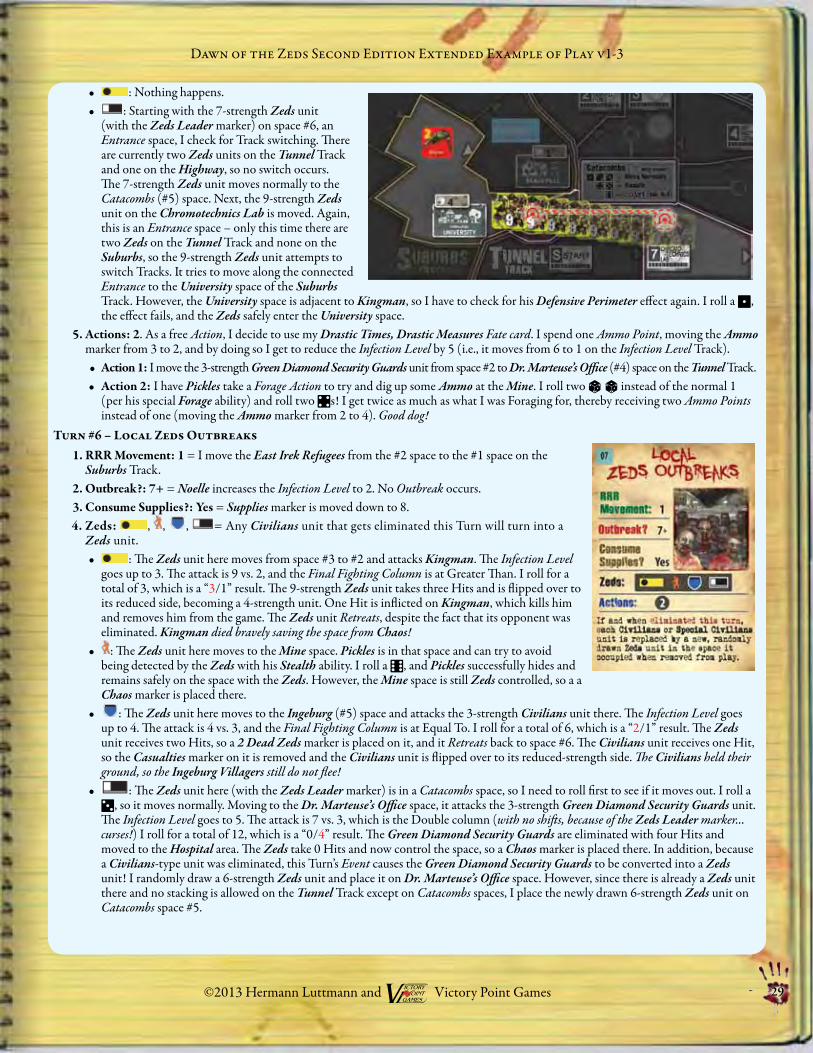
29
Dawn of the Zeds Second Edition Extended Example of Play v1-3
©2013 Hermann Luttmann and Victory Point Games
• : Nothing happens. • : Starting with the 7-strength Zeds unit
(with the Zeds Leader marker) on space #6, an Entrance space, I check for Track switching. There are currently two Zeds units on the Tunnel Track and one on the Highway, so no switch occurs. The 7-strength Zeds unit moves normally to the Catacombs (#5) space. Next, the 9-strength Zeds unit on the Chromotechnics Lab is moved. Again, this is an Entrance space – only this time there are two Zeds on the Tunnel Track and none on the Suburbs, so the 9-strength Zeds unit attempts to switch Tracks. It tries to move along the connected Entrance to the University space of the Suburbs Track. However, the University space is adjacent to Kingman, so I have to check for his Defensive Perimeter effect again. I roll a 1, the effect fails, and the Zeds safely enter the University space.
5. Actions: 2. As a free Action, I decide to use my Drastic Times, Drastic Measures Fate card. I spend one Ammo Point, moving the Ammo marker from 3 to 2, and by doing so I get to reduce the Infection Level by 5 (i.e., it moves from 6 to 1 on the Infection Level Track).• Action 1: I move the 3-strength Green Diamond Security Guards unit from space #2 to Dr. Marteuse’s Office (#4) space on the Tunnel Track.• Action 2: I have Pickles take a Forage Action to try and dig up some Ammo at the Mine. I roll two z z instead of the normal 1
(per his special Forage ability) and roll two 4s! I get twice as much as what I was Foraging for, thereby receiving two Ammo Points instead of one (moving the Ammo marker from 2 to 4). Good dog!
Turn #6 – Local Zeds Outbreaks1. RRR Movement: 1 = I move the East Irek Refugees from the #2 space to the #1 space on the
Suburbs Track.2. Outbreak?: 7+ = Noelle increases the Infection Level to 2. No Outbreak occurs.3. Consume Supplies?: Yes = Supplies marker is moved down to 8. 4. Zeds: , , , = Any Civilians unit that gets eliminated this Turn will turn into a
Zeds unit. • : The Zeds unit here moves from space #3 to #2 and attacks Kingman. The Infection Level
goes up to 3. The attack is 9 vs. 2, and the Final Fighting Column is at Greater Than. I roll for a total of 3, which is a “3/1” result. The 9-strength Zeds unit takes three Hits and is flipped over to its reduced side, becoming a 4-strength unit. One Hit is inflicted on Kingman, which kills him and removes him from the game. The Zeds unit Retreats, despite the fact that its opponent was eliminated. Kingman died bravely saving the space from Chaos!
• : The Zeds unit here moves to the Mine space. Pickles is in that space and can try to avoid being detected by the Zeds with his Stealth ability. I roll a 6, and Pickles successfully hides and remains safely on the space with the Zeds. However, the Mine space is still Zeds controlled, so a a Chaos marker is placed there.
• : The Zeds unit here moves to the Ingeburg (#5) space and attacks the 3-strength Civilians unit there. The Infection Level goes up to 4. The attack is 4 vs. 3, and the Final Fighting Column is at Equal To. I roll for a total of 6, which is a “2/1” result. The Zeds unit receives two Hits, so a 2 Dead Zeds marker is placed on it, and it Retreats back to space #6. The Civilians unit receives one Hit, so the Casualties marker on it is removed and the Civilians unit is flipped over to its reduced-strength side. The Civilians held their ground, so the Ingeburg Villagers still do not flee!
• : The Zeds unit here (with the Zeds Leader marker) is in a Catacombs space, so I need to roll first to see if it moves out. I roll a 3, so it moves normally. Moving to the Dr. Marteuse’s Office space, it attacks the 3-strength Green Diamond Security Guards unit. The Infection Level goes to 5. The attack is 7 vs. 3, which is the Double column (with no shifts, because of the Zeds Leader marker... curses!) I roll for a total of 12, which is a “0/4” result. The Green Diamond Security Guards are eliminated with four Hits and moved to the Hospital area. The Zeds take 0 Hits and now control the space, so a Chaos marker is placed there. In addition, because a Civilians-type unit was eliminated, this Turn’s Event causes the Green Diamond Security Guards to be converted into a Zeds unit! I randomly draw a 6-strength Zeds unit and place it on Dr. Marteuse’s Office space. However, since there is already a Zeds unit there and no stacking is allowed on the Tunnel Track except on Catacombs spaces, I place the newly drawn 6-strength Zeds unit on Catacombs space #5.
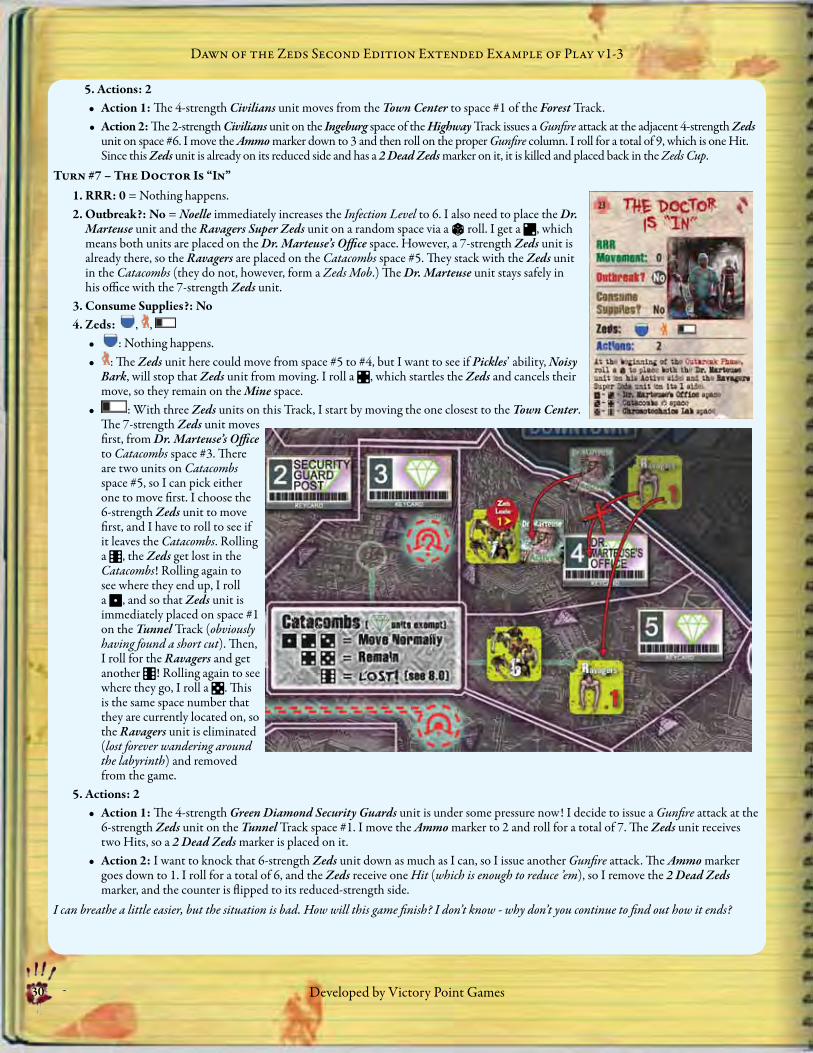
30
Dawn of the Zeds Second Edition Extended Example of Play v1-3
Developed by Victory Point Games
5. Actions: 2• Action 1: The 4-strength Civilians unit moves from the Town Center to space #1 of the Forest Track.• Action 2: The 2-strength Civilians unit on the Ingeburg space of the Highway Track issues a Gunfire attack at the adjacent 4-strength Zeds
unit on space #6. I move the Ammo marker down to 3 and then roll on the proper Gunfire column. I roll for a total of 9, which is one Hit. Since this Zeds unit is already on its reduced side and has a 2 Dead Zeds marker on it, it is killed and placed back in the Zeds Cup.
Turn #7 – The Doctor Is “In”1. RRR: 0 = Nothing happens. 2. Outbreak?: No = Noelle immediately increases the Infection Level to 6. I also need to place the Dr.
Marteuse unit and the Ravagers Super Zeds unit on a random space via a z roll. I get a 2, which means both units are placed on the Dr. Marteuse’s Office space. However, a 7-strength Zeds unit is already there, so the Ravagers are placed on the Catacombs space #5. They stack with the Zeds unit in the Catacombs (they do not, however, form a Zeds Mob.) The Dr. Marteuse unit stays safely in his office with the 7-strength Zeds unit.
3. Consume Supplies?: No 4. Zeds: , ,
• : Nothing happens.• : The Zeds unit here could move from space #5 to #4, but I want to see if Pickles’ ability, Noisy
Bark, will stop that Zeds unit from moving. I roll a 4, which startles the Zeds and cancels their move, so they remain on the Mine space.
• : With three Zeds units on this Track, I start by moving the one closest to the Town Center. The 7-strength Zeds unit moves first, from Dr. Marteuse’s Office to Catacombs space #3. There are two units on Catacombs space #5, so I can pick either one to move first. I choose the 6-strength Zeds unit to move first, and I have to roll to see if it leaves the Catacombs. Rolling a 6, the Zeds get lost in the Catacombs! Rolling again to see where they end up, I roll a 1, and so that Zeds unit is immediately placed on space #1 on the Tunnel Track (obviously having found a short cut). Then, I roll for the Ravagers and get another 6! Rolling again to see where they go, I roll a 5. This is the same space number that they are currently located on, so the Ravagers unit is eliminated (lost forever wandering around the labyrinth) and removed from the game.
5. Actions: 2• Action 1: The 4-strength Green Diamond Security Guards unit is under some pressure now! I decide to issue a Gunfire attack at the
6-strength Zeds unit on the Tunnel Track space #1. I move the Ammo marker to 2 and roll for a total of 7. The Zeds unit receives two Hits, so a 2 Dead Zeds marker is placed on it.
• Action 2: I want to knock that 6-strength Zeds unit down as much as I can, so I issue another Gunfire attack. The Ammo marker goes down to 1. I roll for a total of 6, and the Zeds receive one Hit (which is enough to reduce ’em), so I remove the 2 Dead Zeds marker, and the counter is flipped to its reduced-strength side.
I can breathe a little easier, but the situation is bad. How will this game finish? I don’t know - why don’t you continue to find out how it ends?
©2013 Hermann Luttmann and Victory Point Games
Dawn of the Zeds Second Edition Fiction
Dawn of the Zeds FictionShe looked at the crumpled heap of a man clutching her legs and sobbing. “I tell…tell you…” he whispered between his sobs. “It’s eating my…my… brain!” He let go of her legs and gripped his head in his hands, letting loose with an unearthly wail.She heard more gunfire and glanced away from the pathetic figure, looking around the town square. Across the fountain from her, she could see the trucker Brian Carter unloading supplies from his eighteen-wheeler while nearby, Mayor Hernandez and the army engineer, Colonel Kingman, directed the placement of barricades. The gunshots, she realized, were coming from the clock tower where Captain Piazza was carefully aiming and firing her sniper rifle. If we can’t stop the Zeds here, she thought, all our brains will be food. She turned her attention back to the man in front of her and knelt down.“There’re no Zeds here, Wilson,” she said, kneeling and then pulling his hands away from his face, forcing him to look at her. His eyes were crazed with fear and pain. “No,” he sobbed. “Not…not here, you fool.” He jerked his hands away, slapping the ground with one of them. “Down there! Under us. The Zeds are under us, and they’re eating my brain!”She stared at him. How did he know of the secret tunnels under the city? That was strictly Top Secret Green Diamond business. This crazy hermit who’d wandered in from the woods couldn’t know. “What are you saying?” she said sharply, again gripping his head and turning his eyes towards hers. “How do you know what’s down there?”He laughed maniacally. “Don’t you know who I am, Special Agent Cheyenne Wright?” She hid her surprise. How did he know her name? “I’m crazy Wilson, the hermit. The psychic hermit!” He barked a sound, half-sob, half-laugh. “I get visions, don’t ya know? I know all about….Green Diamond… Marteuse…he’s madder than I am!” He poked her chest with a bony finger. “Let me tell you, FBI Special Agent Wright, you don’t know what’s down there, what Marteuse has done. I’ve seen it! In here!” He tapped his skull with the same finger. “And it’s coming for us…from below….now!” He screamed and gripped his head. “My mind…Zeds…in my mind…get it out of my mind!” He slumped unconscious at her feet.She stood up. It was true. She had no idea how Wilson had found out. Psychic? Maybe. But however he knew, he was right. She’d been on the Green Diamond research team long enough to know something wasn’t right. The locked labs. The screams. Dr. Marteuse’s evasiveness. She’d reported to her superiors. They’d seen fit to ignore her, preferring to believe the good doctor’s reports. But she’d continued her investigation on her own.What little she’d found had chilled her. She might not know all of it, as Wilson had said, but she knew enough to scare her. Dr. Marteuse was trying to create super-soldiers from the Z.E.D. virus found in the Artifact. Maybe that was why his superiors had ignored her reports of what he’d been doing because as so often in Washington, the ends justified the means. What they didn’t know was that he had created new kinds of Zeds instead, Super Zeds. They’d gotten loose—or he’d set them free, she didn’t know—and even now they were threatening Farmingdale. She thought the secret underground lab and tunnel complex had been cleared out in the attempt to find and arrest Marteuse. Was he still under there, hiding? Had he created something even more fearsome than the Leapers or the Ravagers or even the Were-Zeds? There’d been rumors…She heard running footsteps. From around the side of a building came Sheriff Hunt and the dog Pickles, which was itself a product of Marteuse’s early experiments. He was obviously heading towards the Mayor. “Hunt!” She called out. “Over here!” The Sheriff stopped, saw her and ran over.“What is it, Wright? I haven’t much time.”“You need to make time.” She pointed at the unconscious figure of Wilson lying at her feet. “Do you know this man?”“Crazy Wilson? Sure. What happened to him?”“He claimed it was some kind of psychic attack. Who knows? I’ve heard of stranger things in the Bureau…the point is, he had information he shouldn’t have had, and I need to investigate right now. You need to help me.”
“What? Wait a minute…” He glanced over towards the Mayor.She grabbed Hunt’s arm. “If what I suspect is true, we need to do more than make barricades, Sheriff.” She was breaking all kinds of rules of secrecy and protocol taking the Sheriff into her confidence, but if she was right…if Wilson was right… death was about to rise up from under their feet. “I need you to grab a couple of soldiers and come with me. I…” she looked down at Wilson and shook her head as if surprised she was even believing the bearded crazy man, or revealing what she was about to reveal. “There are secret government labs under Farmingdale. Tunnels built into the old caverns.”“What? I…”“No time to explain right now, Sheriff. I think there’s something loose in the labs below us. Zeds. Powerful ones. We need to check it out. We don’t need surprises coming up from underneath the town itself.”To her relief, Hunt didn’t argue any further. He simply nodded. He called out to a couple of men running towards the barricades with rifles and told them to follow him. “All right, Agent Wright. You’ve got my attention. Lead the way.” Wright knew that the main entrance to the underground tunnels was in the basement of the National Laboratory building, but that was some blocks away. The Town Center, where she had her office, was on the town square and thus much closer. She led the three men and Pickles to a small storage room in the basement where she revealed a secret entrance that led underground.“Good God,” said Hunt. “How long has this been here?”“It was installed during the recent historical restoration project for this building.”“Which was paid for with a government grant,” said the Sheriff. “That was just a cover, wasn’t it?”Rapidly descending the stairs ahead of him, she was only a dark shadow in the beams of their flashlights, but he could see her nod her head. “The Powers that Be felt it would be good to have a secondary entrance from this building.”“Where, conveniently, you have an office.”“You got it.”Hunt whistled. “I always wondered why the FBI had a Special Agent assigned to Farmingdale.”“Well, now you know. It was to ride herd on the scientists and their work down below.”“And what was this work…?”“Quiet!” She drew her Glock 23 semi-automatic from its holster as they entered a tunnel at the bottom of the stairs. She knew there were surveillance cameras in the ceilings here and a guard post lay a few yards ahead, but all was dark and silent. Whenever Wright had been down here in the past, all the halls had been lit, and there had been technicians and white coated scientists busily walking here and there. But now…she shivered.Their footsteps echoed, and their flashlights threw crazy, dancing shadows on the walls from equipment lining the corridor. It seemed as if the tunnel itself was listening, waiting.They came to the guard station. Where are the guards? she wondered. Suddenly Pickles barked, the sound like a gunshot. In spite of herself, she jumped. “Oh my God,” breathed Hunt beside her, the beam of his flashlight a highway of illumination through the dark. And at its destination was….horror….The two security guards, or what was left of them, lay in pools of dark blood on the tiled floor. Crouching beside one of them, its glowing eyes turned towards them, was a Zed, its mouth dripping with brain matter and fluids. And towering over it, like a monstrous shadow in the dark, was…something else. She felt a cold dread fill her bones as she raised her pistol in its direction, her nose assaulted by the rancid odor coming from it. It was a Zed, and it was….huge! Easily seven feet or more in height.It looked at her and Hunt, its eyes gleaming, and smiled. “More brainssss….” it growled and stepped towards them….
− Fiction by David Spangler
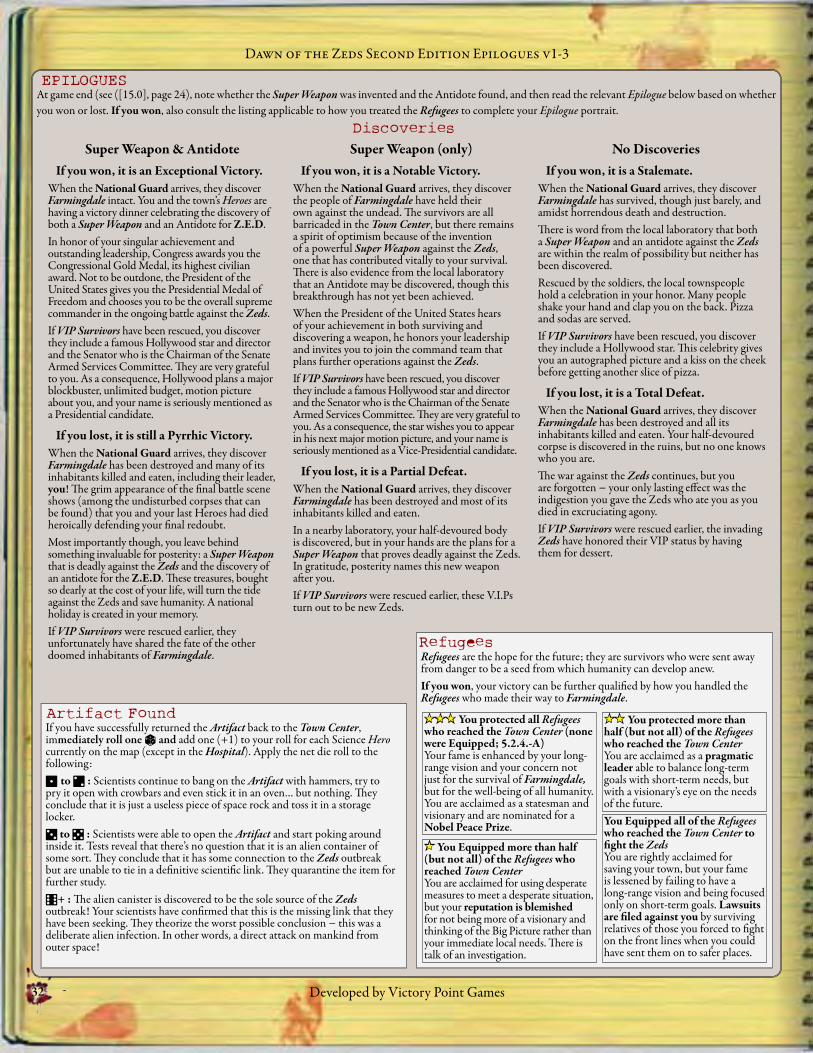
32
Dawn of the Zeds Second Edition Epilogues v1-3
Developed by Victory Point Games
At game end (see ([15.0], page 24), note whether the Super Weapon was invented and the Antidote found, and then read the relevant Epilogue below based on whether you won or lost. If you won, also consult the listing applicable to how you treated the Refugees to complete your Epilogue portrait.
Refugees are the hope for the future; they are survivors who were sent away from danger to be a seed from which humanity can develop anew.If you won, your victory can be further qualified by how you handled the Refugees who made their way to Farmingdale.
You protected all Refugees who reached the Town Center (none were Equipped; 5.2.4.-A)Your fame is enhanced by your long-range vision and your concern not just for the survival of Farmingdale, but for the well-being of all humanity. You are acclaimed as a statesman and visionary and are nominated for a Nobel Peace Prize.
You protected more than half (but not all) of the Refugees who reached the Town CenterYou are acclaimed as a pragmatic leader able to balance long-term goals with short-term needs, but with a visionary’s eye on the needs of the future.
You Equipped more than half (but not all) of the Refugees who reached Town CenterYou are acclaimed for using desperate measures to meet a desperate situation, but your reputation is blemished for not being more of a visionary and thinking of the Big Picture rather than your immediate local needs. There is talk of an investigation.
You Equipped all of the Refugees who reached the Town Center to fight the ZedsYou are rightly acclaimed for saving your town, but your fame is lessened by failing to have a long-range vision and being focused only on short-term goals. Lawsuits are filed against you by surviving relatives of those you forced to fight on the front lines when you could have sent them on to safer places.
Super Weapon & AntidoteIf you won, it is an Exceptional Victory.
When the National Guard arrives, they discover Farmingdale intact. You and the town’s Heroes are having a victory dinner celebrating the discovery of both a Super Weapon and an Antidote for Z.E.D.In honor of your singular achievement and outstanding leadership, Congress awards you the Congressional Gold Medal, its highest civilian award. Not to be outdone, the President of the United States gives you the Presidential Medal of Freedom and chooses you to be the overall supreme commander in the ongoing battle against the Zeds.If VIP Survivors have been rescued, you discover they include a famous Hollywood star and director and the Senator who is the Chairman of the Senate Armed Services Committee. They are very grateful to you. As a consequence, Hollywood plans a major blockbuster, unlimited budget, motion picture about you, and your name is seriously mentioned as a Presidential candidate.
If you lost, it is still a Pyrrhic Victory.When the National Guard arrives, they discover Farmingdale has been destroyed and many of its inhabitants killed and eaten, including their leader, you! The grim appearance of the final battle scene shows (among the undisturbed corpses that can be found) that you and your last Heroes had died heroically defending your final redoubt.Most importantly though, you leave behind something invaluable for posterity: a Super Weapon that is deadly against the Zeds and the discovery of an antidote for the Z.E.D. These treasures, bought so dearly at the cost of your life, will turn the tide against the Zeds and save humanity. A national holiday is created in your memory.If VIP Survivors were rescued earlier, they unfortunately have shared the fate of the other doomed inhabitants of Farmingdale.
Super Weapon (only)If you won, it is a Notable Victory.
When the National Guard arrives, they discover the people of Farmingdale have held their own against the undead. The survivors are all barricaded in the Town Center, but there remains a spirit of optimism because of the invention of a powerful Super Weapon against the Zeds, one that has contributed vitally to your survival. There is also evidence from the local laboratory that an Antidote may be discovered, though this breakthrough has not yet been achieved.When the President of the United States hears of your achievement in both surviving and discovering a weapon, he honors your leadership and invites you to join the command team that plans further operations against the Zeds.If VIP Survivors have been rescued, you discover they include a famous Hollywood star and director and the Senator who is the Chairman of the Senate Armed Services Committee. They are very grateful to you. As a consequence, the star wishes you to appear in his next major motion picture, and your name is seriously mentioned as a Vice-Presidential candidate.
If you lost, it is a Partial Defeat.When the National Guard arrives, they discover Farmingdale has been destroyed and most of its inhabitants killed and eaten. In a nearby laboratory, your half-devoured body is discovered, but in your hands are the plans for a Super Weapon that proves deadly against the Zeds. In gratitude, posterity names this new weapon after you.If VIP Survivors were rescued earlier, these V.I.Ps turn out to be new Zeds.
No DiscoveriesIf you won, it is a Stalemate.
When the National Guard arrives, they discover Farmingdale has survived, though just barely, and amidst horrendous death and destruction.There is word from the local laboratory that both a Super Weapon and an antidote against the Zeds are within the realm of possibility but neither has been discovered.Rescued by the soldiers, the local townspeople hold a celebration in your honor. Many people shake your hand and clap you on the back. Pizza and sodas are served.If VIP Survivors have been rescued, you discover they include a Hollywood star. This celebrity gives you an autographed picture and a kiss on the cheek before getting another slice of pizza.
If you lost, it is a Total Defeat.When the National Guard arrives, they discover Farmingdale has been destroyed and all its inhabitants killed and eaten. Your half-devoured corpse is discovered in the ruins, but no one knows who you are.The war against the Zeds continues, but you are forgotten − your only lasting effect was the indigestion you gave the Zeds who ate you as you died in excruciating agony.If VIP Survivors were rescued earlier, the invading Zeds have honored their VIP status by having them for dessert.
If you have successfully returned the Artifact back to the Town Center, immediately roll one z and add one (+1) to your roll for each Science Hero currently on the map (except in the Hospital). Apply the net die roll to the following:1 to 2 : Scientists continue to bang on the Artifact with hammers, try to pry it open with crowbars and even stick it in an oven… but nothing. They conclude that it is just a useless piece of space rock and toss it in a storage locker.3 to 5 : Scientists were able to open the Artifact and start poking around inside it. Tests reveal that there’s no question that it is an alien container of some sort. They conclude that it has some connection to the Zeds outbreak but are unable to tie in a definitive scientific link. They quarantine the item for further study.6+ : The alien canister is discovered to be the sole source of the Zeds outbreak! Your scientists have confirmed that this is the missing link that they have been seeking. They theorize the worst possible conclusion − this was a deliberate alien infection. In other words, a direct attack on mankind from outer space!
EPILOGUES
Discoveries
Artifact Found
Refugees