Data Extraction Guide - education.vic.gov.au · built around a pre-set Seamless Views request that...
49
Data Extraction Guide Student Mapping Tool (including CHESS schools) Version 3.1 | September 2012
Transcript of Data Extraction Guide - education.vic.gov.au · built around a pre-set Seamless Views request that...

Data Extraction Guide Student Mapping Tool (including CHESS schools)
Version 3.1 | September 2012

Published by the Information Technology Division
Department of Education and
Early Childhood Development
Melbourne
September 2012
© State of Victoria (Department of Education
and Early Childhood Development) 2012
The copyright in this document is owned by the
State of Victoria (Department of Education and Early Childhood
Development), or in the case of some materials, by third parties
(third party materials). No part may be reproduced by any process
except in accordance with the provisions of the Copyright Act 1968
the National Education Access Licence for Schools (NEALS)
(see below) or with permission.
NEALS is an educational institution situated in Australia which is
not conducted for profit, or a body responsible for administering
such an institution may copy and communicate the materials, other
than third party materials, for the educational purposes of the
institution.
Authorised by the Department of Education
and Early Childhood Development,
2 Treasury Place, East Melbourne, Victoria, 3002.
This document is also available on the internet at
www.education.vic.gov.au/studentmappingtool

Contents
1. Code of Conduct and Privacy ...................................................... 3
2. Introduction ................................................................................... 4
Overview ........................................................................................... 4
About the Student Mapping Tool ....................................................... 4
Important – Before you start .............................................................. 5
3. Seamless Views ............................................................................ 6
4. Establishing Seamless Views on the Workstation ..................... 8
5. Check Microsoft Excel Security Settings .................................. 14
6. Create a folder for the Student Mapping Tool, NAPLAN, VASS and CHESS data files ......................................................................... 16
7. How to download and extract NAPLAN Data ............................ 17
8. How to download VASS files ...................................................... 23
VASS Student Mapping Tool Report ............................................... 23
9. CHESS Schools ONLY ................................................................ 27
Locate and copy the CHESS excel data file .................................... 27
10. How to download and use the Student Mapping Tool ............ 30
Microsoft Excel 2010 and the Student Mapping Tool ....................... 31
Next time you open or refresh the Student Mapping Tool ................ 33
11. Getting help ............................................................................... 35
12. Data categories that appear in the Student Mapping Tool spreadsheet ................................................................................ 36
Mapping Individual Support Programs ............................................. 39
VASS .............................................................................................. 39
NAPLAN worksheets ....................................................................... 40
13. Printing Your Spreadsheet ....................................................... 41
Appendix A: Creating a Folder ...................................................... 43
Appendix B: Transferring interventions into a new version of the Student Mapping Tool ................................................................ 46
Appendix C: Multi-campus schools and extracting NAPLAN data47

Data Extraction Guide v3.1 | September 2012 3
1. Code of Conduct and Privacy
The school CASES21 database contains personal and health information about students,
family members and staff. When database queries, data extractions and disclosures are
undertaken they must only be carried out by authorised officers and must comply with the
Department’s Information Privacy Policy and ICT Security Policy, and the Code of Conduct for
the Victorian Public Sector.
Also view the Privacy Guide for Student Mapping Tool on the Student Mapping Tool website.
The relevant information privacy principles which need to be considered are:
− Collection
− Use and Disclosure
− Data Quality
− Data Security and Unique Identifiers
− Anonymity
− Transborder Data Flow.
For more information about these principles go to:
https://www.eduweb.vic.gov.au/edulibrary/Schools/Privacy/Bulletins/
4 Data Extraction Guide v3.1 | September 2012
2. Introduction
Overview
This guide provides a step-by-step process for:
• creating a seamless view connection
• checking Microsoft Excel security settings
• extracting NAPLAN information and creating files for NAPLAN and VASS results
• collecting the data file for CHESS Schools
• creating a folder for storing and using the Student Mapping Tool
• downloading the Student Mapping Tool.
About the Student Mapping Tool
The Student Mapping Tool (formerly the Students At Risk Mapping Tool) has been developed
to assist schools to identify students at risk of early school leaving. The Tool displays data
about each student’s exposure to known risk factors associated with early school leaving, e.g.
poor attendance, low literacy, etc.
Under Wannik, all Victorian government schools with Koorie student enrolments are required
to use the Student Mapping Tool.
The Student Mapping Tool will not provide a definitive answer to the question, “Which of our
students are at risk of early school leaving?” Schools should review the data and consider its
implications in their school context. Teacher insights and other factors should also be
considered. The Tool should start the conversation about who is at risk of early school leaving,
rather than finish it.
This Data Extraction Guide will enable you to extract the relevant data about your school’s
students from CASES21. Using this Tool only extracts data – it cannot change any of the data
on the CASES21 database.
For information about the most effective way to use the data once you have it, please read
Using the Student Mapping Tool and Getting the Most Out of the Student Mapping Tool from
the Student Mapping Tool home page at http://www.education.vic.gov.au/studentmappingtool

Data Extraction Guide v3.1 | September 2012 5
Important – Before you start
The task of extracting the data should be undertaken by a Business Manager, Education Support Officer or any other user with authority to enter and view data on CASES21.
If you encounter any difficulty in using the Tool, the Department of Education & Early Childhood Development Service Desk will only deal with someone with this authority.
Password
The Student Mapping Tool will require a password which is available from the DEECD Service Desk. Important Note: The Principal / Business Manager must email the DEECD Service Desk using the school’s email account and request the Student Mapping Tool password.
Seamless Views
The Student Mapping Tool will only work if Seamless Views is installed on the workstation you are using. Seamless Views software can create a read-only copy of selected CASES21 tables and present them in MS Word, Excel or Access format. The Student Mapping Tool is built around a pre-set Seamless Views request that presents data in a pre-set Excel spreadsheet format.
CHESS schools do not need to complete steps 3 and 4 in relation to Seamless Views.
CHESS schools need to complete step 9 instead. Step 9 does not need to be completed by non CHESS schools.

6 Data Extraction Guide v3.1 | September 2012
3. Seamless Views
Seamless Views set up on the Virtual Server (except CHESS schools)
The CASES Technical Refresh 2012 project may have the Seamless Views \ Student Mapping Tool connection activated on the school’s virtual server. (Workstations will be set up following the steps later in this document.)
Should the virtual server connection not be set up or be lost at a later stage, the connection can be established \ re-established by running the Seamless application on the Virtual Server.
CHESS schools do not need to run this process.
To activate Seamless Views on the Virtual Server:
(Note – this process can be run from your workstation.)
From your workstation:
• Click Start then Computer
• Click on the DSE (Y:) drive
• Click on the SQL folder
• Click on the EXE folder
• Click on Seamless.exe to run the application
• If you see an Open File - Security Warning message, click on Run
• Close out of the screen
Wait a couple of minutes for the application to run before setting up the workstation (steps later in this document). If your workstation has already been setup and you are re-establishing the Seamless application, wait a couple of minutes before refreshing your Student Mapping Tool data.
Note: It is important that you use the run as Administrator option to open Excel prior to opening the Student Mapping Tool and refreshing the data. See the steps on Microsoft Excel 2010 and the Student Mapping Tool on page 31.

Data Extraction Guide v3.1 | September 2012 7
Alternatively, to activate Seamless Views from your Server:
• Log onto the school’s XXXXADB01 Virtual Server (where XXXX is your school number) - (Note – the authorised person would use their Record No. and Password to log in.)
• Click on Start then Run
• Click on the Browse button and navigate to the Y:\ DSE drive, the SQL folder, the EXE folder and select the application Seamless - click on Open
• Click on OK to run the application.
• Wait a couple of minutes for the process run on the Virtual Server.
• Log out of the server.
• Once your Workstation has been setup (steps for workstation setup are later in the guide), check to see if your connection is now active on the Workstation when running the Student Mapping Tool refresh process.

8 Data Extraction Guide v3.1 | September 2012
4. Establishing Seamless Views on the Workstation
This step should only need to be done once on a workstation. When you are sure you have
Seamless Views on your workstation, always proceed directly to downloading your schools
data.
CHESS schools do not need to run this process.
How to set up the Data Source connection on your workstation (except CHESS schools)
• Select Start.
• Select Control Panel.
• Select View by: Category – Large icons from the right hand side.
• Select Administrative Tools.
• Select Data Source (ODBC).
• Click on the System DSN tab.
• Select Add.
On the following screen:

Data Extraction Guide v3.1 | September 2012 9
• Move the right scroll bar to the bottom.
• Select SQL Server.
• Click Finish.
You will see the following screen:

10 Data Extraction Guide v3.1 | September 2012
• Enter the Name: Seamless View Connection as shown in the screen below.
• Select the Server you wish to connect to by clicking on the down arrow. You will see a number of connections – select XXXXADB01 (where XXXX is your school number).
(Note: If the XXXXADB01 server is not showing when clicking on the down arrow, you will need to re-establish the Seamless Views connection in Section 3 above.)
• Click Next.
• You will see the following screen.
• Select the radio button With SQL Server authentication using a Login ID and password entered by the user.
• You will need to type the Login ID: Viewer01 and the Student Mapping Tool password.
(If you do not have the password, the Principal / Business Manager will need to email the
DEECD Service Desk using the school’s email account and request the Student Mapping
Tool password.)
• Click on Next.

Data Extraction Guide v3.1 | September 2012 11
• Ensure there is a tick in the box beside – “Change the default database to:”
• Move the right scroll bar to the bottom and select V2101XXXX (where XXXX is your school number).
• Click on Next.
• Leave the default settings shown below.
• Click on Finish.

12 Data Extraction Guide v3.1 | September 2012
The following screen will appear:
• Select Test Data Source to confirm the data is connecting correctly.
The following screen will appear saying Tests Completed Successfully!
• Click OK, then OK again.

Data Extraction Guide v3.1 | September 2012 13
• Your connection should now be displayed in the ODBC Data Source Administrator on the System DSN tab.
• Click OK to exit.
Note: If your system does not connect correctly the first time, repeat all the steps above before requesting assistance.
You have now successfully established Seamless Views on your workstation!
Note: The above process – ‘Establishing Seamless Views on the Workstation’ can be run on additional Administration workstations as required.

14 Data Extraction Guide v3.1 | September 2012
5. Check Microsoft Excel Security Settings
This Guide assumes that you are using MS Excel 2010 (as supplied on the new Dell
equipment for schools – late 2012).
To download the data, you will be using an Excel spreadsheet that has been pre-programmed
and formatted for you.
Before data is downloaded, you must check that the Security level in Microsoft Excel will
permit the Macros in the spreadsheet to operate.
How to check your workstation’s Excel settings will allow the Student Mapping Tool to work.
Open Excel on your workstation. You will see a blank worksheet.
• Select the File tab from the top left hand corner.
• Click on the Options button.
You will see the following screen:
• On the Excel Options screen, click on the Trust Center option on the left hand side.
• On the Trust Center screen above, click on the Trust Center Settings… button on the right hand side.

Data Extraction Guide v3.1 | September 2012 15
• In the Trust Center, click on Macro Settings on the left hand side.
• Ensure that the Enable all macros radio button is checked as shown below.
• Ensure that the Trust access to the VBA project object model box is ticked
• Click OK
• Click OK again to close all security screens.
• Close the blank worksheet.

16 Data Extraction Guide v3.1 | September 2012
6. Create a folder for the Student Mapping Tool, NAPLAN, VASS and CHESS data files
A folder needs to be created on your school’s administration Users drive (U:) to use the Student Mapping Tool, NAPLAN, VASS and CHESS (CHESS Schools only) Data files.
This folder will also store the Student Mapping Tool backup files.
Create a new folder called Student Mapping Tool to store the Student Mapping Tool, NAPLAN files, VASS files, CHESS (CHESS Schools only) file and subsequent backup files.
To create a folder read the instructions in Appendix A of this guide.
It is very important that you save all data files and the Student Mapping Tool to the U:
drive, because by doing this files will be in the same location and by having files on the
U: drive, these files will be included on the normal automated backup preformed
overnight and the NAPLAN & CHESS Data will also import correctly into the tool.
Additionally, if you have problems with the Tool, Help Desk staff (with permission) can
come and help you directly.
Helpful Hint: Create Archive sub folders inside the newly created Student Mapping Tool folder. This allows you to save past copies of the Student Mapping Tool for reference, (a snapshot in time copy). Leave only the most recent (working) copy of the SMT visible in the main folder to ensure you refresh only the most recent Student Mapping Tool.

Data Extraction Guide v3.1 | September 2012 17
7. How to download and extract NAPLAN Data
Schools have be able to add NAPLAN Data to the Student Mapping Tool since February 2010.
The NAPLAN Data sheet needs to conform to the following formats to be able to work with the Student Mapping Tool:
• Schools will have to download their NAPLAN data from the NAPLAN website, as per the following step-by-step instructions
• Schools will have to extract a file for each year level required and save these files into the same folder on the U: drive as the Student Mapping Tool. With the new NAPLAN extraction process, all year level tests can be downloaded from the website in one step.
• If you are from a multi-campus school, please refer to the instructions in Appendix C.
• If you have saved NAPLAN files for previous years, you may wish to create an archive file eg: NAPLAN 2011 and move the NAPLANY3, NAPLANY5 etc files prior to downloading the current year files.
To download the data
• Log into the NAPLAN website https://naplands.vcaa.vic.edu.au/appstartup.aspx
• Click on NAPLAN Data Service System Login as shown below.
• If the Login screen does not appear you may need to check for a Pop-ups blocked message. You will need to always allow Pop-ups from this site.

18 Data Extraction Guide v3.1 | September 2012
• Enter your School User ID and Password.
• Select Login.
• Select Extract from the Report Parameters screen.
• Note: All Test data for Year 3, Year 5, Year 7 and Year 9 students (or as appropriate for your school) can now be downloaded together in one process.
If you have queries about your User ID or password, please contact the NAPLAN Helpdesk on 1800 648 637
OR

Data Extraction Guide v3.1 | September 2012 19
From the Extract Parameters screen, select the following:
– Year: NAPLAN reporting year (select the latest data)
– Test: Select All. Note: schools can now download the appropriate year levels for their setting by using the select all option. This removes the need to run the extraction process for each year level separately.
– Study: Select All
– Groups: Select Outcome Level Data
– Outcome level data: Ensure that all data has been selected by ticking the Select All box at the bottom of the list. (Once selected this option will change to Deselect All).
Everything else should be grey.
– Select the Extract button on the bottom left corner of the screen once all your selections have been made.
• Select the link Click to download compressed ZIP file
• At the File Download screen – Select Save

20 Data Extraction Guide v3.1 | September 2012
• The Save As screen will open.
• Navigate to your User drive then to the Student Mapping Tool folder - at this point select
New Folder from the top bar. Name the folder Naplan – (You will be saving the Naplan zip file into the newly created Naplan folder)
• Note: - Leave the file name and save as type with the default name and type.
• Select Save
• Close out of the NAPLAN website when finished extracting the required data.
Extract the NAPLAN data from the file created above.
• Locate and open the NAPLAN zip files located in Student Mapping Tool folder – then Naplan folder on the Users (U:) drive.
• To extract the NAPLAN data right click on the zipped file name,
• Select Extract All…
• The destination should default to the Student Mapping Tool\NAPLAN\90e5a ......... folder:
• Select Extract.
• In the Naplan folder, you will now see two items, the original zip file and a folder 90e5a05...........
• Double click on the folder.
The csv file will be extracted to the selected folder and will be displayed as shown below with the Excel icon.
Data Extraction Guide v3.1 | September 2012 21
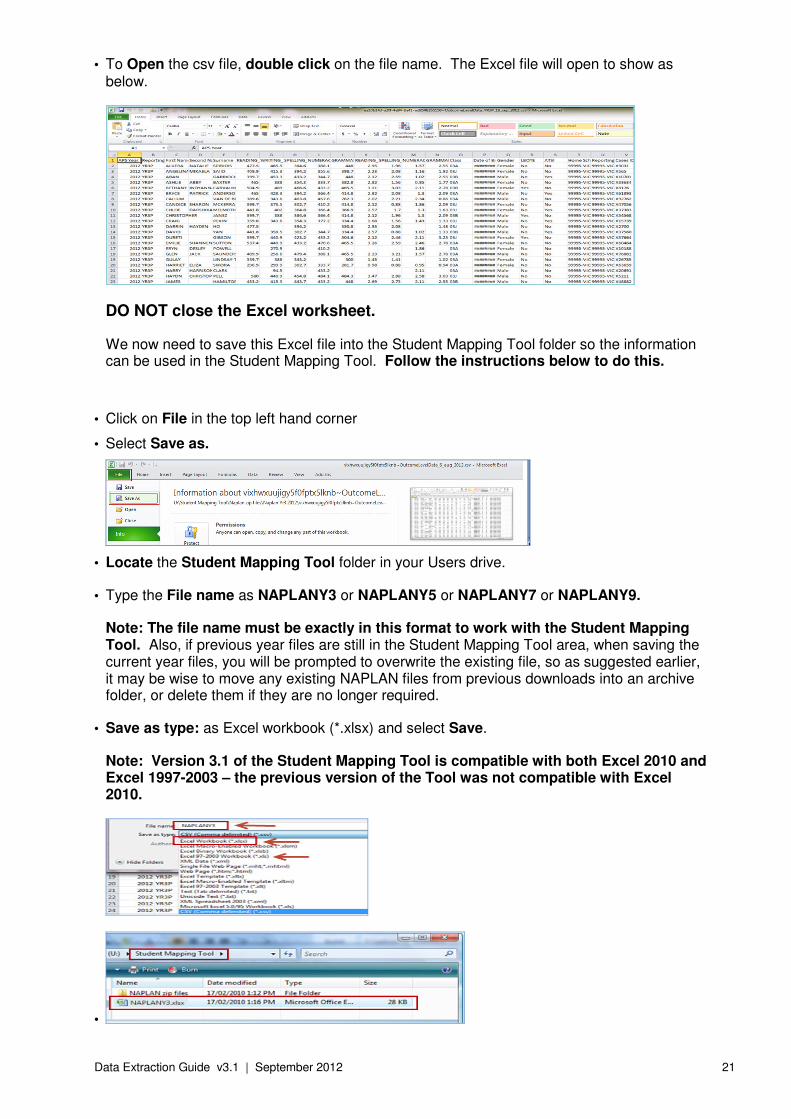
• To Open the csv file, double click on the file name. The Excel file will open to show as below.
DO NOT close the Excel worksheet.
We now need to save this Excel file into the Student Mapping Tool folder so the information can be used in the Student Mapping Tool. Follow the instructions below to do this.
• Click on File in the top left hand corner
• Select Save as.
• Locate the Student Mapping Tool folder in your Users drive.
• Type the File name as NAPLANY3 or NAPLANY5 or NAPLANY7 or NAPLANY9.
Note: The file name must be exactly in this format to work with the Student Mapping Tool. Also, if previous year files are still in the Student Mapping Tool area, when saving the current year files, you will be prompted to overwrite the existing file, so as suggested earlier, it may be wise to move any existing NAPLAN files from previous downloads into an archive folder, or delete them if they are no longer required.
• Save as type: as Excel workbook (*.xlsx) and select Save.
Note: Version 3.1 of the Student Mapping Tool is compatible with both Excel 2010 and Excel 1997-2003 – the previous version of the Tool was not compatible with Excel 2010.
•

22 Data Extraction Guide v3.1 | September 2012
• Close Excel
• Return to the NAPLAN unzipped files and repeat the steps above for other Year levels and save into the Student Mapping Tool folder. Once completed you should see the Excel files in the Student Mapping Tool folder eg:
You don’t need to do anything further with these files. When you refresh the data into the Student Mapping Tool, the NAPLAN information should appear.
Note: Now the Naplan files have been saved into the Student Mapping Tool folder, it is a good idea to delete the zip file and folder from the Naplan folder as these will no longer be required.
Right click on the folder, select Delete from the sub menu to delete the folder.
Repeat the steps above to delete the zip file.

Data Extraction Guide v3.1 | September 2012 23
8. How to download VASS files
Please note that this section applies only to secondary and
P-12 schools with VCE, VET or VCAL students
VASS Student Mapping Tool Report
• VASS now contains functionality to generate a Student Mapping Tool Report, which shows students at risk of not completing their courses.
• The VASS administrator and the members of the schools’ VASS School Statistics and Results Group (SSRG) (usually includes the Principal) will have access to this functionality. If the Principal wants anyone else to be able to access it, they need to speak to their VASS administrator.
Schools must include the CASES ID when registering students on VASS. Data cannot be transferred from the VASS file into the Tool unless the student’s CASES ID
numbers are entered in to VASS.
It is recommended that the school’s VASS Administrator download the
VASS Student Mapping Tool Report
• To download the file, the VASS Administrator should log in to VASS (www.vass.vic.edu.au)
• Go to the Student Admin menu.
• Select Other Student Reports.
• Select Student Mapping Tool.
• Ensure the radio button is clicked to Export List.
• Export the file.
• The exported file will be named StudentMappingTool.vass
• If possible, the VASS Administrator should save the file in to the Student Mapping Tool folder on the school’s U: drive as the file type “all files”.
• If this is not possible, the VASS Administrator can use a memory stick or similar to give the file to the Student Mapping Tool operator, to save into the Student Mapping Tool folder on the U drive.
Note: All schools have a VASS Administrator who has a secure User ID and password.
If you have any queries about the VASS system User ID or password,
please contact the VASS Helpdesk on 1800 827 721 or
Once the VASS file has been saved into the Student Mapping Tool folder on the U drive, please follow the steps below.

24 Data Extraction Guide v3.1 | September 2012
• Locate and open the Student Mapping Tool Folder on the U drive.
• Open a blank Excel worksheet.
• Click on File (in the top left hand corner).
• The box now displays Recent Documents
• Select and Open the StudentMappingTool.vass file by double clicking on it.
• The following Text Import Wizard screen will appear.
• Click Next (leave the default setting).
• Select Other by placing a tick in the checkbox.
• Enter the pipe symbol | as delimiters. The pipe symbol can be found on the keyboard above the back slash symbols usually above enter.
• Click Next. Select Finish.

Data Extraction Guide v3.1 | September 2012 25
• Select Finish.
• The file will be opened into an Excel format as shown below.
• Save the file in the Student Mapping Tool folder. The Save as type can be: Excel 97-2003 Workbook (*.xls) or as Excel workbook (*.xlsx). Saving as an Excel Workbook (*.xls or *.xlsx) will auto add .xls or xlsx to the File name.
• Note: Version 3.1 of the Student Mapping Tool is compatible with both Excel 2010 and Excel 1997-2003 – the previous version was not compatible with Excel 2010.

26 Data Extraction Guide v3.1 | September 2012
• Type File name as VASS, and select Save.
The file location must be the same location as Student Mapping Tool on the U: drive
Note: Each time a school performs a new download to update their VASS data; they must follow the instructions outlined above, delete the old files and replace the old files with the new one.
Data Extraction Guide v3.1 | September 2012 27
9. CHESS Schools ONLY
Student Mapping Tool data for CHESS schools is refreshed every Saturday and is stored in a
temporary file called SMT_VRisk_Data.xls, which is kept in the CHESS P:\Student-Mapping
folder.
You must copy the file SMT_VRisk_Data.xls from your P:\ drive and paste it into the same
folder as your Student Mapping Tool. This will allow the Student Mapping Tool to read the new
data (Note: this is the same process used for NAPLAN and VASS data). When you’ve copied
the SMT_VRisk_Data.xls file into the same folder as your Student Mapping Tool, you can
populate the Student Mapping Tool with the refreshed data.
The instructions are below on how to complete this.
IMPORTANT NOTE: only CHESS Schools need to complete this step. You would only need
to complete the steps below when you are going to use the Student Mapping Tool.
Locate and copy the CHESS excel data file
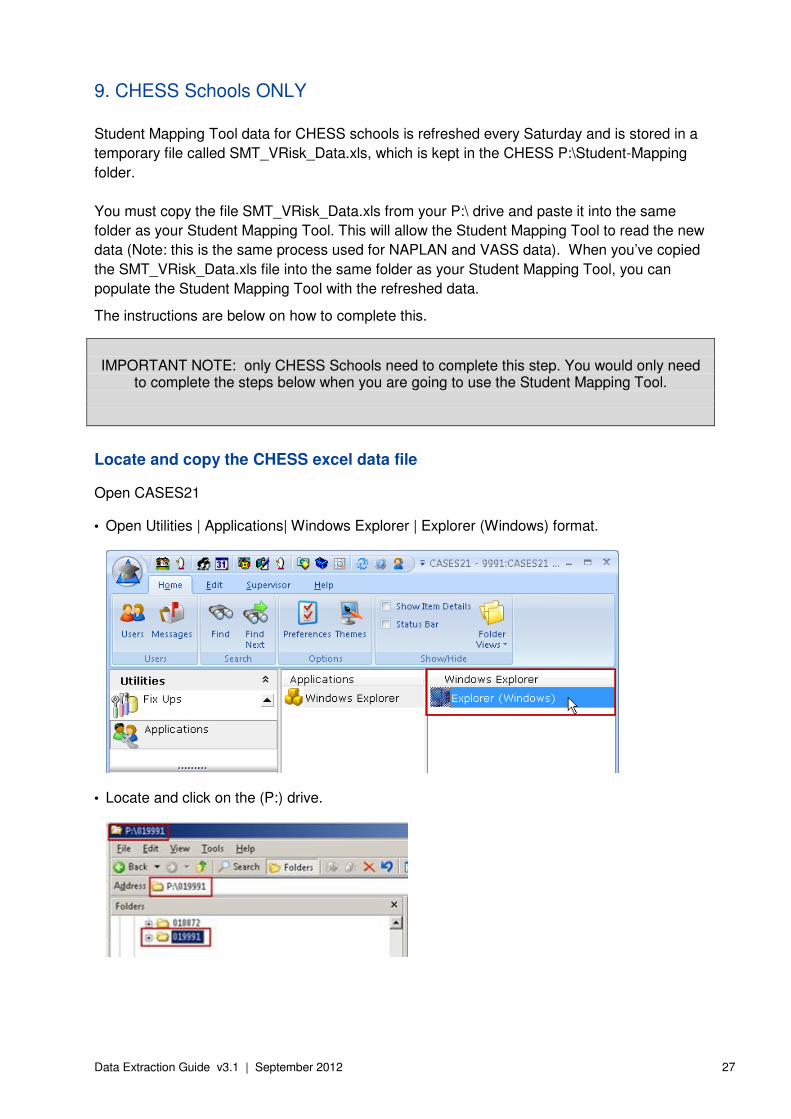
Open CASES21
• Open Utilities | Applications| Windows Explorer | Explorer (Windows) format.
• Locate and click on the (P:) drive.

28 Data Extraction Guide v3.1 | September 2012
• You should see a folder called Student Mapping Tool that has been created on the (P:) drive.
• Open the folder and highlight the Excel file SMT_VRisk_Data.
• Right click on the file and select Copy.
• Navigate to the Student Mapping Tool Folder on the schools U$ on’ Client’ (U:) Drive.

Data Extraction Guide v3.1 | September 2012 29
• Select the Student Mapping Tool folder. Right click and select Paste. Note: Check the SMT_VRisk_Data file is inside the Student Mapping Tool Folder.
• Once you have pasted the file into the Student Mapping Tool folder on the U$ on’ Client’ (U:) Drive, close out of CASES21 and the Citrix Server.
Now continue following the instructions from
Step 10: How to download and use the Student Mapping Tool.
30 Data Extraction Guide v3.1 | September 2012
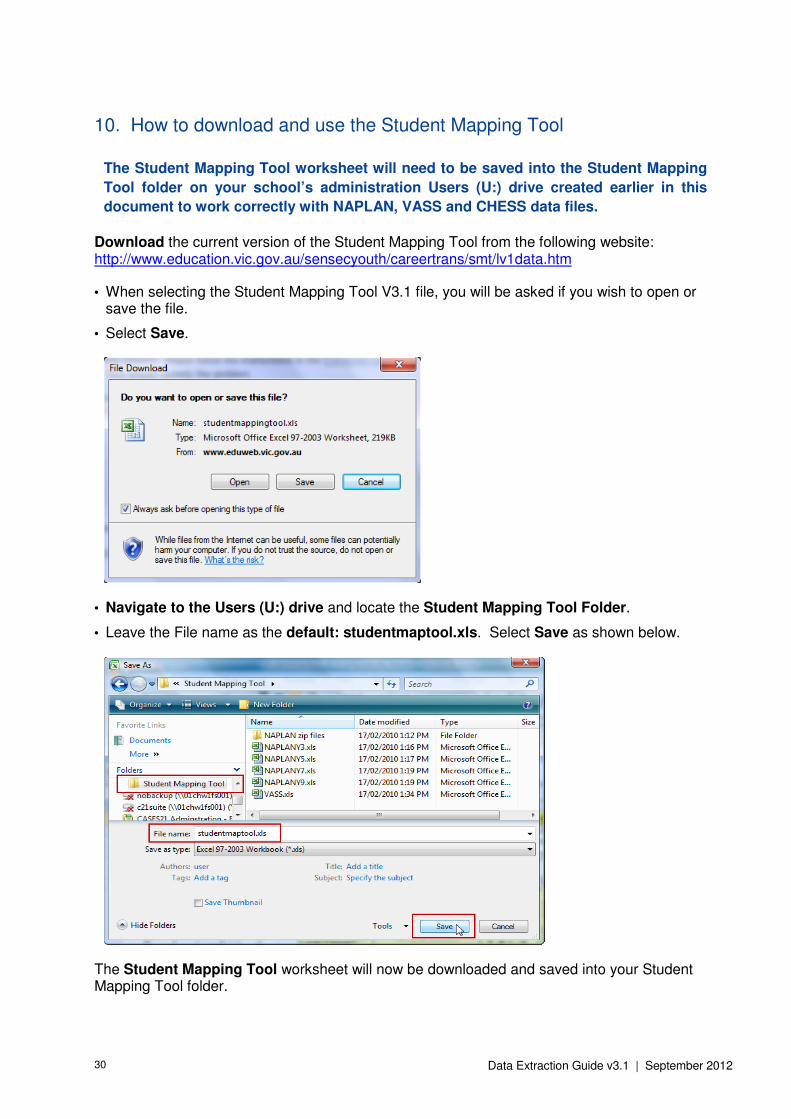
10. How to download and use the Student Mapping Tool
The Student Mapping Tool worksheet will need to be saved into the Student Mapping
Tool folder on your school’s administration Users (U:) drive created earlier in this
document to work correctly with NAPLAN, VASS and CHESS data files.
Download the current version of the Student Mapping Tool from the following website: http://www.education.vic.gov.au/sensecyouth/careertrans/smt/lv1data.htm
• When selecting the Student Mapping Tool V3.1 file, you will be asked if you wish to open or save the file.
• Select Save.
• Navigate to the Users (U:) drive and locate the Student Mapping Tool Folder.
• Leave the File name as the default: studentmaptool.xls. Select Save as shown below.
The Student Mapping Tool worksheet will now be downloaded and saved into your Student Mapping Tool folder.

Data Extraction Guide v3.1 | September 2012 31
Microsoft Excel 2010 and the Student Mapping Tool
With the CASES Technical Refresh 2012, The CASES workstations will have Microsoft Excel 2010 installed. You will find there is an added level of security when updating the Student Mapping Tool data from CASES21 and you will need to open Microsoft Excel as an administrator prior to opening the Student Mapping Tool. You will be prompted to enter a user name and password when opening the Student Mapping Tool – see steps below.
Opening Microsoft Excel 2010 as an Administrator, in preparation for opening the Student Mapping Tool.
• Click on the Start button
• Select All Programs
• Select Microsoft Office
• When you can see Microsoft Excel 2010 on the menu
– Hold the Shift key, right click on Excel 2010 and select the option:
Run as administrator
• Excel 2010 will now open
• Select File > Open
• Navigate to your Student Mapping Tool folder and select your Student Mapping Tool file to open.
The Mapping Tool will open as shown below with no student information in the worksheet if you have followed the correct process in setting up Seamless Views on the previous pages (except CHESS schools).
CHESS schools need to make sure they have copied the SMT_VRisk_Data.xls file to the Student Mapping Tool Folder.

32 Data Extraction Guide v3.1 | September 2012
Note: a Security Warning may appear as shown below, particularly if you haven’t completed the ‘Check Microsoft Excel Security Settings’ step earlier in this document.
• Click on Options…
• Select the radio button Enable this content.
• Click on the large green box in the top left corner Click to: Refresh Data from CASES21.
• Before downloading your school’s data, you will be asked if you want to backup the file.
• If this is the first time you have used the tool, click – No
• If you have used the Tool before and data is visible in the spreadsheet, click – Yes

Data Extraction Guide v3.1 | September 2012 33
The Tool will be automatically named, dated and saved to the folder that the spreadsheet is in. This will enable you to compare students’ progress over time, and keep a record of the support your school has provided to students.
The next screen asks for your password (CHESS schools do not need to enter a Login ID or Password).
• You will need to check the login ID says Viewer01
• Type the password (this is the same password you used if you set up Seamless Views on your workstation).
• If you do not already have the password, you’re Principal / Business Manager needs to email the DEECD Service Desk using the school’s email account and request the Student Mapping Tool password.
• Click OK
Your data should now appear. For an explanation of what this data represents, see the Data Categories That Appear in the Spreadsheet further in the chapter.
Next time you open or refresh the Student Mapping Tool
In future, unless you are informed that another version of the Student Mapping Tool has been released, you should simply go straight to the folder on your Users drive and open the latest backup copy of the Tool.
CHESS schools will need to copy the SMT_VRisk_Data.xls file from the P:\ drive to the Student Mapping Tool folder on the U:\ drive and then refresh.
Whenever you refresh the data in future you will have an opportunity to automatically save a backup copy to this folder. The title of the backup copy will automatically include the date on which it is saved.

34 Data Extraction Guide v3.1 | September 2012
Your school’s data will appear as it appears in CASES21.
Note: Some schools that took part in the trial of the Tool found that their data was not comprehensive or correct, and needed to review and re-enter data into CASES21 in order to use the Tool most effectively. Schools may need to follow up information not received on Student Enrolment Forms regarding Parent Occupations.
You are now ready to sort, analyse and add to the data to make it really useful. See Using the Student Mapping Tool (accessible from the Student Mapping Tool home page) for great ideas about how to use the data.
Please refer to Appendix B when saving and transferring data to a new, blank version of the Student Mapping Tool.
When you refresh the data, you will not lose any information in the Mapping Individual Support Programs columns for particular students that you have inserted in the right-hand side of the master spreadsheet (example columns shown below).
Note: It is NOT recommended to create separate worksheets as the data on those worksheets will not be refreshed automatically.
All students at the school will appear in your refreshed master spreadsheet, even if you had deleted them previously. This is important as some students may have begun to display or experience risk factors since you last downloaded the data.
If you wish to rapidly find or sort those students you had already identified as being at risk of early school leaving, you should use the Risk Level column to mark these students before refreshing the data.

Data Extraction Guide v3.1 | September 2012 35
11. Getting help
Before seeking help, please go back to the start of this Guide and go through the process once more.
If you have carefully followed the instructions through twice and have not successfully downloaded the data, you can call or email the DEECD Service Desk. This should be done by a Business Manager, Education Support Officer or any other person with authority to enter and view data on CASES21.
Prior to logging a call, please ensure you have the school location number, and other information such as:
• your staff record number
• relevant passwords
• a copy of this Guide in front of you, and
• a clear way to describe the nature of the problem.
Your contact details
When you log a service call on the Service Gateway your contact information comes from the Edumail Global Address List, so it’s very important that you ensure your school / campus, phone number and job title details are correct.
You can update your details through the EduMail Support webpage at https://www.edumail.vic.gov.au/edumailonline/. Click My Tools (located on the left-hand menu), then click the Update My Details button. If you have problems with this, contact your school’s EduMail administrator or specialist technician.
Instructions for logging a Service Call are available from the CASES21 page under Links to Support & Assistance on eduGate at https://edugate.eduweb.vic.gov.au/sbp/sys_case21/default.aspx
For support please contact the relevant area below:
Service Desk for CASES21 and the Student Mapping Tool phone 1800 641 943 OR Log a service call on the Service Gateway at http://servicedesk.education.vic.gov.au.
For assistance with NAPLAN passwords and website access please call 1800 648 637 or email [email protected]
For assistance with VASS passwords and website access please call 1800 827 721 or email [email protected]

36 Data Extraction Guide v3.1 | September 2012
12. Data categories that appear in the Student Mapping Tool spreadsheet
Field Data that appears in the left-hand side of your spreadsheet is as follows:
Registration No. Registration number automatically allocated to student upon enrolment
ST Key - CASES21 CASES21 student file location number
Date of last refresh of data Date of last time data was refreshed
Year Level The current year level
Home Group The current home group
M/F Male or Female
Name of student Surname followed by First Name
Attendance
Unapproved absences (flag if skipping classes)
The number of days lost through unapproved absences (codes 208, 300 and 500)
Attendance Rate % The percentage attendance rate. This is derived from the number of days for which attendance has been recorded for this student and the number of days for which the student has been absent for any reason excluding curriculum absences for things like excursions.

Data Extraction Guide v3.1 | September 2012 37
Literacy English
Reading NAP- most recent Data is taken from the appropriate NAPLAN file eg. NAPLANY3.xls in the Student Mapping Tool folder on U: drive
Reading ENG REA – most recent
The student's most recent VELS result for the dimension English Reading = ENGRE
Numeracy Maths
Maths -NAP- most recent Data is taken from the appropriate NAPLAN file eg. NAPLANY3.xls in the Student Mapping Tool folder on U: drive
Number MAT – most recent The student's most recent VELS result for the dimension Mathematics Number = MATNU
Yr 11/12 Risk
Progress 'at risk' summary Data is taken from the VASS.xls file in the Student Mapping Tool folder on U: drive
Relationships Suspensions
Number of days -Internal The number of times that the student has been suspended within the school, e.g. removed from class but not sent home. Data uses absence code 400.
Number of days- External The number of days the student has been absent with code 401 = Suspension
SFO Parents
Occupation code – Alert to N and D, and query U
The prime family occupation code. If there are two adults then the higher ranking is used.

38 Data Extraction Guide v3.1 | September 2012
Special Alerts: A sequence of flags indicating various one character status values. In order they show the status for:
Living arrangements B: at home with BOTH parents
O: at home with ONE parent/guardian
A: arranged by the state
H: homeless
I: independent living
Koorie K: K, T, B, N
Refugee A student must meet two criteria: belong to the ESL cohort and has either a visa subclass or specific designated country of birth. This covers a much wider range of refugees than in the previous version.
Disability Y or N
Integration Y or N
Youth allowance Y or N
Access Y or N
Risk Y or N
Medical Y or N
MIPs Tracking Section
Date of Exit Y or N
Destination on Exit – at 0 months
As recorded in CASES21

Data Extraction Guide v3.1 | September 2012 39
Mapping Individual Support Programs
These columns are designed to encourage schools to enter intervention/support programs
VASS
Once the VASS Data has been extracted, the file created and the Student Mapping Tool refreshed your schools data should appear in the data categories under Yr 11/12 Risk - Progress 'at risk' summary column.

40 Data Extraction Guide v3.1 | September 2012
NAPLAN worksheets
Once the NAPLAN Data has been extracted, the file created and the Student Mapping Tool refreshed your schools data should appear in the data categories under Reading NAP and Maths –NAP.
A guide to your NAPLAN scores
Each student is given a score between 1 - 1000 based on a set standard. To simplify interpretation the scores are grouped into bands (as measurement cannot be so precise). Our example below is from the NAPLAN-Y3 worksheet.
It is expected that a student's score will increase over time at school.
Each school's report shows a report for each year level, and at each level students are shown in 5 bands in relation to the level of expected performance at that year level.
KEY: Colour coding (see below) is used to show where a student ranks in relation to the performance expected at his/her year level. well below the expected level below the level expected
. performing at the expected level
above the expected level well above the expected level
.NAPLAN Score range Year 3 Year 5 Year 7 Year 9Band 10 686 >
Band 9 634 - 685.9Band 8 582 - 633.9
Band 7 530 - 581.9Band 6 478 - 529.9Band 5 426 - 477.9
Band 4 374 - 425.9Band 3 322 - 373.9Band 2 270 - 321.9
Band 1 < 270SCHOOL NAPLAN DATA

Data Extraction Guide v3.1 | September 2012 41
13. Printing Your Spreadsheet
• With the Student Mapping tool open.
• Select the Page Layout tab.
• On the Page Layout tab click on the arrow in the bottom right hand corner. The Page Setup box will appear.
• Select the Page tab.
• Check the Orientation is set to Landscape.
• Select Fit to: 1 page(s) wide by (0) pages tall depending on how many students there are on your list.
• Select A4 or A3 in the Paper size field. The spreadsheet is most easily viewed when printed onto A3 paper, or printed onto A4 paper and photocopied up to A3 size.

42 Data Extraction Guide v3.1 | September 2012
• Select the Sheet tab
• In the Print area field: currently the default on the worksheet is D:AJ. You may need to update this to reflect the number of records (rows) you wish to print.
• In Print titles leave the Rows to repeat at top: as the default.
• In the Print area, a tick has been placed in the Gridlines box. Light grey lines will print between columns and rows on your worksheet.
• Click on Print Preview: it is recommended you use Print Preview to ensure your data is a good fit on the page before you print. If the print does not use the full width of the page, increase the number of ‘pages tall’ until it does. The spreadsheet is most easily viewed when printed onto A3 paper, or printed onto A4 paper and photocopied up to A3 size.
• When finished select OK.
• Now that you are back in the spreadsheet, please hide any columns that you do not want to print.
• Select the print area: the easiest way is to do this is to click and hold in the bottom right-hand cell of your data and drag up to the top left-hand cell.
• Select Office Button.
• Click on Print.
• Click on Print Preview again to check the print area selected is correct.
• Click on Print to print the Student Mapping Tool.

Data Extraction Guide v3.1 | September 2012 43
Appendix A: Creating a Folder
A folder must be created on the U: drive (Users drive) to store the Student Mapping Tool worksheet, NAPLAN files, VASS files, CHESS data and subsequent backup files. This means that all files will be in the same location. By having the files on U: drive, these files will be included on the normal automated tape backup performed overnight and will be accessible from all CASES21 workstations.
Note: The U:\ on a workstation maps to the G:\ on the file server.
How to create a folder
• On a workstation’s desktop, LEFT mouse click on the VISTA Orb (Start button) in the bottom left hand corner.
• Select Computer from the right hand side of the menu as shown in the diagram below.
• Folders will be displayed on the left hand side of the screen under computer.
• Highlight the users (U :) drive as shown in the diagram below.

44 Data Extraction Guide v3.1 | September 2012
• Right mouse click on the users (U :) drive as shown in the diagram below.
• Select New, then Folder.
• A New Folder will be created on the left hand side of the screen as shown below under the users (U :) drive.
• Rename the New Folder Student Mapping Tool as shown in the diagram below. Note: You may need to RIGHT click on the New Folder icon and select Rename from the options available if the box is not available to type into.

Data Extraction Guide v3.1 | September 2012 45
A folder called Student Mapping Tool has now been created on the left hand side of the screen under the users (U:) drive as shown in the diagram below.
You have now successfully created a folder in Users (U :) drive to store your Student Mapping Tool and associated files.

46 Data Extraction Guide v3.1 | September 2012
Appendix B: Transferring interventions into a new version of the Student Mapping Tool
When copying from an existing Student Mapping Tool into the New Student Mapping Tool, care
should be taken to ensure the data is pasted into the correct columns, i.e. if a school has created
an additional program in their current Student Mapping Tool, it should also be added to the New
Student Mapping Tool.
• Open the existing version of the Student Mapping Tool
Highlight ALL entries in the Tool (from column A, row 8 across the page) for ALL students. You will have to unprotect the worksheet to do this. Then use the shortcut (Ctrl + Shift + down arrow key) and, after ensuring ALL data has been highlighted.
• Copy (Ctrl + C).
• Open a new, blank copy of the Student Mapping Tool. Reminder: make sure any columns added to the existing version are added to the new version. You will have to unprotect the worksheet to do this.
• Paste (Ctrl + V) copied information into cell A8. All the old data should now be in the new copy or version of the Student Mapping Tool.
To update the data, add new students and delete exited students if in a new calendar year, click on
the large green box in the top left corner of the Student Mapping Tool to refresh data from
CASES21 into the Student Mapping Tool.

Data Extraction Guide v3.1 | September 2012 47
Appendix C: Multi-campus schools and extracting NAPLAN data
• NAPLAN data should be kept in one file only in the Student Mapping Tool folder on U: drive
• This one file should contain the relevant NAPLAN data from all campuses of the school (e.g. NAPLANY3.xls = Year 3 data from campus A + Year 3 data from campus B
• The information in each downloaded campus file needs to be copied and pasted into the NAPLANY3.xls file