

Data collection tools for Shelter tagging & Items distribution
46
[email protected] | www.cartong.org Page 1 | 46 DATA COLLECTION TOOLS FOR SHELTER TAGGING & ITEMS DISTRIBUTION Collector for ArcGIS & Survey123 for ArcGIS vs. OpenMapKit & ODK This publication has been produced with the assistance of the Office of the United Nations High Commissioner for Refugees (UNHCR). The content of this publication is the sole responsibility of CartONG and is not reflecting the views of UNHCR in any way.
Transcript of Data collection tools for Shelter tagging & Items distribution
[email protected] | www.cartong.org Page 1 | 46
DATA COLLECTION TOOLS FOR SHELTER TAGGING &
ITEMS DISTRIBUTION
Collector for ArcGIS & Survey123 for ArcGIS vs. OpenMapKit & ODK
This publication has been produced with the assistance of the Office of the United Nations High Commissioner for
Refugees (UNHCR). The content of this publication is the sole responsibility of CartONG and is not reflecting the
views of UNHCR in any way.

[email protected] | www.cartong.org Page 2 | 46
Table of Contents
I. Introduction ............................................................................................................ 3
II. Mobile Data Collection tools .................................................................................. 4
II.1. Key aspects of Collector for ArcGIS used with Survey123 for ArcGIS .............. 4
II.1.A. General presentation ..................................................................................... 4
II.1.B. Implementing and testing the tools: what were the conclusions? ......................... 6
II.2. Key aspects of OpenMapKit used with ODK Collect .......................................... 8
II.2.A. General presentation ..................................................................................... 8
II.2.B. Implementing and testing the tools: what were the conclusions? ......................... 9
III. Integration with DB systems ............................................................................. 11
III.1. With ArcGIS ................................................................................................. 11
III.2. With OSM ..................................................................................................... 11
IV. Conclusion .......................................................................................................... 13
V. Appendices ........................................................................................................... 15
V.1. List of figures ................................................................................................. 15
V.2. List of tables ................................................................................................... 15
V.3. Latest releases of tools .................................................................................. 16
V.3.A. Latest release: Collector for ArcGIS ................................................................ 16
V.3.B. Latest release: Survey123 for ArcGIS ............................................................. 18
V.3.C. Latest release: OpenMapKit .......................................................................... 18
V.3.D. Latest release: ODK Collect ........................................................................... 18
V.4. Collector and Survey123 for ArcGIS: Step-by-step instructions ..................... 20
V.4.A. Required set-up for Collector and Survey123 ................................................... 20
V.4.B. How to use Collector and Survey123 for ArcGIS............................................... 24
V.5. OpenMapKit and ODK: Step-by-step instructions............................................ 25
V.5.A. Required set-up for OpenMapKit and ODK ....................................................... 25
V.5.B. How to use OpenMapKit and ODK .................................................................. 36
V.6. XLSForm for OpenMapKit ............................................................................... 42
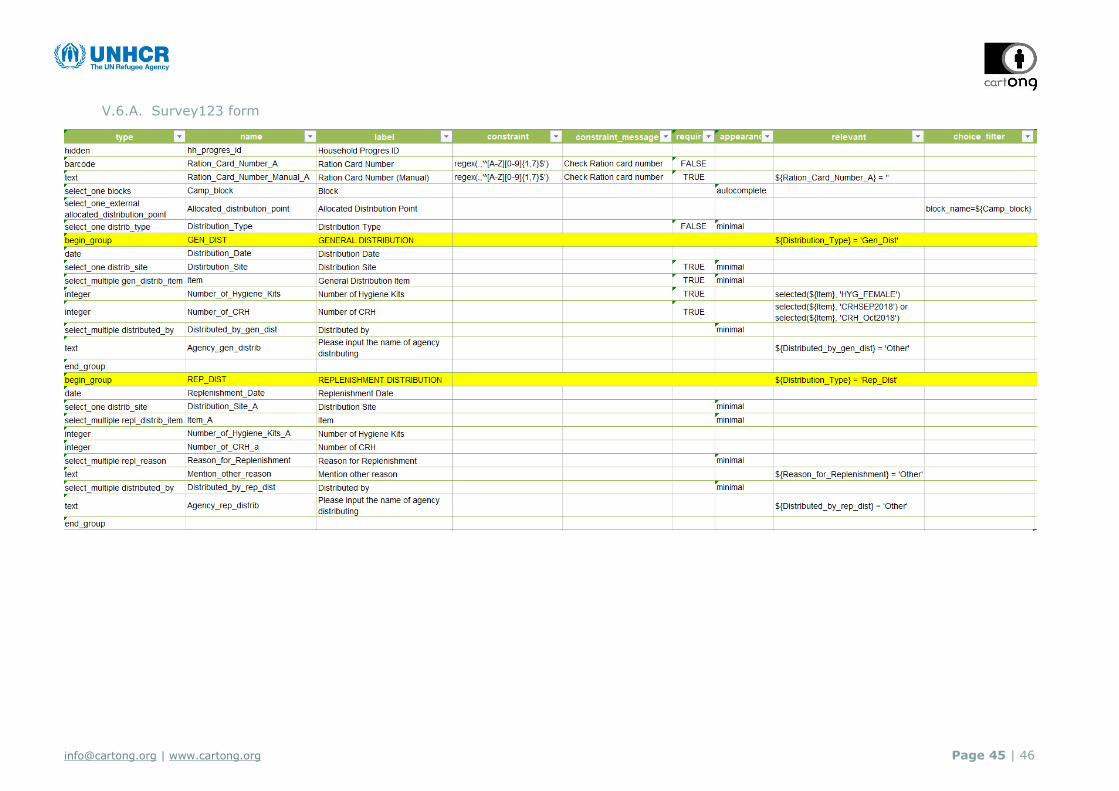
V.6.A. Survey123 form........................................................................................... 45
V.6.B. ODK-OMK form ............................................................................................ 46

[email protected] | www.cartong.org Page 3 | 46
I. Introduction
The aim of this study is to present and compare two sets of proprietary and open source data
collection tools:
Map-centric
Form-centric
Proprietary Collector for ArcGIS Survey123 for ArcGIS
Open source OpenMapKits ODK
In order to better understand how they work together and how they could be used in the field,
the tools have been tested against a specific scenario.
UNHCR’s data collection for Rohingya refugees’ camps in Bangladesh:
UNHCR has deployed a site planner for the Rohingya refugees’ camps in Bangladesh. Two of the
data collection activities conducted in the field are:
1. Shelter tagging: the enumerators go to the camps, they take the location point of the
shelter and they list all the families that live in that shelter (FCN and RCN)1
2. Items distribution: the enumerators go to the camps, they select an existing location
point of the shelter and for each family they assess if any NFI’s2 have been distributed as
part of the General Distribution or Replenishment Distribution.
The tools used for the data collection should allow adding new data but also to update the
existing one (existing geometries; submitted forms).
The data collected could be exported in various formats and could feed various data visualization
tools.
For each tool there is a general presentation of the functionalities and the updates of the latest
release. Then there is a general description of the interaction between the tools and the required
set-up. The full workflow is then tested for the given scenario in order to reveal the Pro’s and
Con’s for each tool. And at last, the study presents the interaction of these group of tools with
two database systems: ArcGIS – currently in use by UNHCR, and OSM.
The main idea of the study is that in addition to the general presentation of the tools, the user
gains a better understanding of these tools by seeing them tested against a given scenario, with
their pro’s and con’s, and also a review of how the data collected in the field could be integrated
with existing database systems.
Most mobile data collection solutions evolve fast, new versions are often released
several times a year. This report is based on tests conducted in the last quarter of
2018. It includes instructions and some analysis that can be considered as a good
basis for potential users to start testing these tools in their own specific field context.
However, this report mainly serves to give a general overview and a comparison based
on a snapshot in time, and readers are strongly advised to verify features and
functions of newer releases when interested in a particular tool.
1 FCN = Family Counting Number; RCN = Ration Card Number 2 Nonfood items

[email protected] | www.cartong.org Page 4 | 46
II. Mobile Data Collection tools
II.1. Key aspects of Collector for ArcGIS used with Survey123 for ArcGIS
II.1.A. General presentation
Collector for ArcGIS
Version Collector for ArcGIS – Version: 18.0.3
Platform Android, Windows, iOS
Website & Forum Main site: https://www.esri.com/en-us/arcgis/products/collector-for-
arcgis/overview
Forum: https://community.esri.com/community/gis/applications/collector-
for-arcgis
Provider / Developer ESRI
Requirements Device:
Android
Android 4.2 (Jelly Bean) or later
Processor: ARMv7 or later, or x86
OpenGLES 2.0 support
Precise location (GPS and network-based) support
iOS
iOS 8 or later
iPhone, iPad, iPod touch
Windows 10 (tablet and PC)
Version 1511 or later
Long-Term Servicing Branch (LTSB) version 1607 or later
ArcGIS account requirements:
ArcGIS organizational account (ArcGIS Online OR ArcGIS Enterprise)
– level 2 member
Portal 10.3.1 and 10.4.1 are also supported
Pricing No additional charge for the app but for the ArcGIS organizational account
(Field Worker user type)
Components - Mobile App + ArcGIS Online OR
- Mobile App + ArcGIS Enterprise
Main strengths - Update of existing data
- Adding points, polygons, lines
- Automatic sync with DB
Main weakness - No complex form logic/ XLSForm
- Pricing > if using one account per enumerator
Standard Use Case Collecting and updating geographic data and attribute table information using
a mobile device
Table 01. Overview of Collector for ArcGIS key aspects
Main characteristics:
Map-centric data collection app
Works with web maps
Possibility to use custom base maps
Enables disconnected workflows
Supports high-accuracy GPS
Possibility to use new geometries and edit the existing ones

[email protected] | www.cartong.org Page 5 | 46
Geometries: point, line, polygon
Data export formats: .csv, .xls, .shp, .gdb, .kml, geoJSON, Feature Collection
Storage: Data collected is stored in a feature layer
ArcGIS Online: Hosted feature layer OR from an Enterprise geodatabase
ArcGIS Enterprise: Portal for ArcGIS feature layer (Hosted data in ArcGIS Data Store) OR
ArcGIS Server feature service (from an enterprise geodatabase)
Getting started:
Create feature layers to collect data (ArcGIS
Online and/or ArcGIS Enterprise)
Add to a webmap
Access in Collector for ArcGIS
Survey123 for ArcGIS
Version Survey123 for ArcGIS – Version: 3.1.159
Platform Android, Windows, iOS
Website & Forum Main site: https://www.esri.com/en-us/arcgis/products/survey123/resources
Forum: https://community.esri.com/groups/survey123/blog
Provider / Developer ESRI
Requirements Device:
Android
4.4 (Kitkat) or later
Ios
10 or later (64 bit)
Windows
Windows 10 Pro and Windows 10 Enterprise (32 bit and 64 bit
[EM64T])
Windows 8.1, Windows 8.1 Pro, and Windows 8.1 Enterprise (32 bit
and 64 bit [EM64T])
Windows 7 Ultimate, Enterprise, Professional, and Home Premium (32
bit and 64 bit [EM64T]) SP1
Windows Server 2012 Standard and Datacenter (64 bit [EM64T])
ArcGIS account requirements:
ArcGIS organizational account (ArcGIS Online OR ArcGIS Enterprise)
– level 2 member
ArcGIS Online and ArcGIS Enterprise 10.5 and later are supported
Portal 10.4 is also supported
Pricing No additional charge for the app but for the ArcGIS organizational account
(Field Worker user type)
Components - Mobile App + ArcGIS Online OR
- Mobile App + ArcGIS Enterprise
Main strengths - Based on .xls form
- Automatic sync with DB
Main weakness - No Polygons/Lines or path tracking
- Pricing > if using one account per enumerator
Standard Use Case Creating a survey with complex logic that can be integrated into and managed through an existing ArcGIS architecture
Table 02. Overview of Survey123 for ArcGIS key aspects

[email protected] | www.cartong.org Page 6 | 46
Main characteristics:
Form-centric data collection app: skip logic, cascade choices
Based on the standard .xls form
Enables disconnected workflows
Create new forms and edit the existing ones
Retrieve forms collected by other users
Search among the forms by a specific value
Geometry: point
Data export formats: .csv, .shp, .gdb
Desktop interface for configuring the forms
Web interface to visualize the results
Storage: Data collected is stored in a hosted feature layer in ArcGIS Online or Portal for ArcGIS.
Getting started:
Configure the form in Survey123 Connect for
ArcGIS Desktop app
Publish the form
Access in Survey123 for ArcGIS
For additional information about the latest release and potential upgrades for both of
these tools, see appendix V.3 Latest release of tools.
II.1.B. Implementing and testing the tools: what were the conclusions?
a. Interaction between Collector for ArcGIS and Survey123 for ArcGIS
Collector for ArcGIS works with its own feature service: a Survey123 feature service cannot be
added in a Collector Map and then be able to download the map for using it offline.
However, Survey123 can be used against a feature layer from Collector
It is possible to launch Survey123 from Collector and indicate what form should be opened, and
even passing parameters to the app to prepopulate fields
Collector for ArcGIS can be used to collect features and Survey123 to add new information about
these features through forms. The Survey123 form becomes a related table for the features in
Collector. The Feature ID in Collector is sent to the form as a unique key between features and
forms.
b. How to use the tools?
The workflows of both tools have been tested on some of UNHCRs’ data collection activities
conducted in the Rohingya refugees’ camps in Bangladesh. You will find in the appendix,
information on how to set up your devices in order to use these tools (see appendix V.4.A
Required set-up for Collector and Survey123 for ArcGIS) and instructions on how to use the tools
in the particular context of UNHCR’s activities (see appendix V.4.B How to use ArcGIS and
Survey123 for ArcGIS).

[email protected] | www.cartong.org Page 7 | 46
c. Pro’s and Con’s
The main advantage of using Collector and Survey123 is that they are integrated into
the ArcGIS Platform:
The data can reside in a centralized database / stored in the cloud
The same data can be accessed in the desktop app (ArcGIS Pro), on the mobile devices
(Collector & Survey123) and on the web browser (ArcGIS Online / Portal for ArcGIS) – in
order to interact with it and configure data visualization tools (webapps, dashboards, etc.)
Once the device is synced, the updates are available in the three environments: desktop,
mobile & web.
Another advantage is that the two apps are complementary and they can be used with
the same feature service: Collector can collect all types of geometries (points, lines, polygons)
and Survey123 can assess the attributes of these geometries on a form-logic basis, acting as a
related table for the features in Collector.
Both apps can be used in a disconnected environment.
Both apps have the following edit options: add, delete, update.
Both apps export in various formats, so that data can also be used outside the ArcGIS
environment: Collector (.csv, .xls, .shp, .gdb, .kml, geoJSON, Feature Collection); Survey123
(.csv, .shp, .gdb).
If in maintenance, the bugs or sync issues can be sent to the ESRI Technical Support
service.
The configuration of the two apps to be used against the same feature service is
not really straight forward; however, the whole process is well documented online.
Both apps are proprietary solutions, so in order to configure the apps and benefit from
different sharing capabilities within an organization, an ArcGIS Organization subscription is
required. However, a Survey123 form made publically available doesn’t need an account to be
filled in.
There are a series of best practices specific to the usage of both apps in order to
avoid sync issues. Without appropriate capacity building, the configuration of the apps and
their usage might seem difficult for the end user.

[email protected] | www.cartong.org Page 8 | 46
II.2. Key aspects of OpenMapKit used with ODK Collect
II.2.A. General presentation
OpenMapKit presentation
Version Open Map Kit – Version: 1.2
Platform Android
Website & Forum Main site for OMK: http://openmapkit.org/
Main site for POSM: http://posm.io/
Provider / Developer American Red Cross
Requirements ODK Collect on phone and a POSM server instance (cloud or local)
Pricing App for free but cost of a POSM server instance
(either fully offline or set up on a cloud instance)
Components App + Server
Main strengths - Update of existing geo-data
- Automatic sync with POSM server
- Very easy integration with OSM
Main weakness - No polygon/line drawing
- Little documentation on server setup, maintenance, debugging
- Not intended for collection of Non-OSM geo-data
Standard Use Case Filling in an ODK survey in the field, including questions which will update
and add information to be made available in OSM
Table 03. Overview of OpenMapKit key aspects
Open Map Kit (OMK) is an extension of Open Data Kit (ODK) and was developed by the
American Red Cross
OMK is designed to allow the humanitarian actors to collect field survey information while
seamlessly contributing to Open Street Map by selecting OSM features and creating and/or
editing tags within the survey collection workflow.
Geometries: point
Supports the use of an offline base map on the phone, providing the user with the available
OSM vector data and base map for the area of interest, using the POSM Export Tool.
OMK is not a stand-alone mobile data application,
but an extension launched automatically from within
ODK Collect when an OSM question type is included
in a standard survey (fig. 13).
Once the OSM tag questions have been answered,
the tags are saved to ODK Collect and the user will
automatically return to ODK Collect to answer the
remaining questions of the survey (fig. 14).
Fig 13 (left). OpenMapKit automatic launch from within ODK Collect for an OSM question-type
Fig 14 (right). Automatic save of OSM tags to ODK Collect

[email protected] | www.cartong.org Page 9 | 46
ODK Collect presentation
Version ODK Collect – Version: 1.18.2
Platform Android
Website & Forum https://docs.opendatakit.org/collect-intro/
Provider / Developer Open development
Requirements ODK, KoBo or similar server
Pricing Free
Components App + backend server
Main strengths - Complex form logic
- Tracking available
Main weakness - No editing of features once sent to the server
Standard Use Case Filling in an ODK survey including geoshape and geotrace questions
Table 04. Overview of ODK Collect key aspects
ODK Collect is an open source Android app for survey-based data collection
Supports a wide range of question and answer types and complex form logic
Support offline data collection
Can collect location, audio, images, video, barcodes, signatures, multiple-choice, free text,
and numeric answers
Can accept answers from other apps, such as OpenMapKit with OSM question types as
described above
Geometries: geopoint, geoshape and geotrace
Use of a base map (offline MBTiles files can be stored directly on the device to be used as an
offline base map layer for location questions)
Answers are stored as text in the survey with latitude, longitude and elevation coordinates
For additional information about the latest release and potential upgrades for both of these
tools, see appendix V.5 Latest release of tools.
II.2.B. Implementing and testing the tools: what were the conclusions?
a. Interaction between ODK Collect and OpenMapKit
The enumerator would usually begin the data collection in the field using ODK Collect and only
for the geographic features he/she will, move to OpenMapKit launching it from within ODK
Collect.
To allow for the collection of OSM features, the standard survey form created for ODK Collect
has to be slightly adapted in order to incorporate the OSM tagging scheme (see appendix V.6
XLSForm for OpenMapKit for more details).
b. Testing the workflow
The workflows of both tools have been tested on some of UNHCRs’ data collection activities
conducted in the Rohingya refugees’ camps in Bangladesh. You will find in the appendix,
information on how to set up your devices in order to use these tools (see appendix V.5.A
Required set-up for ODK Collect and OpenMapKit) and instructions on how to use the tools in
the particular context of UNHCR’s activities (see appendix V.5.B How to use ODK Collect and
OpenMapKit).
[email protected] | www.cartong.org Page 10 | 46
c. Pro’s and Con’s
OMK has the great advantage of allowing users:
to easily collect OSM data in the field in low (to no) connectivity environments, and
to seamlessly integrate this data to OpenStreetMap while collecting private survey data
that won’t be pushed to OSM.
However, throughout the tested data collection workflow, we experienced many bugs
and limitations that makes the app hardly recommendable (for the moment) for this specific
scenario.
We encountered many difficulties with the POSM server from the set-up to the
maintenance and little documentation is available for troubleshooting. In addition,
most of the available documentation focuses on the hardware set-up while we would also be
interested to learn how to manage the cloud server that we used for the testing.
For instance, there is no easy option for the users to delete old deployments or
forms from the POSM server, while it is recommended by the American Red Cross to
keep it “clean” by deleting old deployments no longer needed, as multiple deployments can
generate bugs. Moreover, the option to submit local OSM data to OpenStreetMap – the main
(and only) added–value of OMK – wasn’t available on our POSM instance. We also encountered
difficulties with FieldPaper atlas and deployments for which the link didn’t work on POSM
and made the app OMK crash every time we tried to visualize the deployment. Also, the server
doesn’t allow for visualizing and managing the results unlike Kobotoolbox for instance.
Data has to be downloaded and opened in QGIS (or another GIS software) for analysis and
visualization.
Having two separate datasets with ODK-survey data in a CSV file and OMK-OSM
data in an OSM file represents a strong limitation. We would expect having an
integrated dataset at the end, as the standard workflow for which OMK was designed for, is to
be used from within an existing survey done on ODK Collect. For this specific scenario where we
would need to have the shelter points data integrated together with the item distribution data,
the geopoint question type in ODK Collect seems to be more appropriate than the OSM question
type. The geographic coordinates of each shelter would be stored directly in the CSV file and an
offline MBTiles file for the AOI could be loaded on ODK Collect to provide visualization. However,
with a geopoint question, OSM tags or attributes for the shelters wouldn’t be collected
and pushed to OpenStreetMap unlike using OMK.
Another aspect to consider is how long it takes for OSM edits to be made available online
to anyone. For instance, it would be useful to see which shelter points have been created
and surveyed to follow up on the data collection advancement. If edits validation takes several
weeks or more to be approved and made available online, then it can be a strong limitation to
the use of OMK. For this benchmarking, we couldn’t find an indication regarding how long
the validation time process can take.
Despite all these limitations, OMK still has the advantage of:
being easy to use,
to provide the option to go entirely offline in the field with a portable POSM and
to easily contribute to OSM.
For a simple data collection workflow focused only on editing OSM tags, OMK would
be a recommendable tool to deploy in the field.

[email protected] | www.cartong.org Page 11 | 46
III. Integration with DB systems
III.1. With ArcGIS
a. Collector for ArcGIS and Survey123 for ArcGIS
Both apps are fully integrated with the ArcGIS Platform, being able to update a central database
or a feature layer hosted in the cloud.
No additional steps are required: once the devices have access to an internet connection and
the sync process is launched, the data is synced back to the original data source, and the updates
are applied based on the edits that have done on the devices: new records can be added, and
the existing ones can be deleted or updated.
The same data source can be used in a desktop app (like ArcGIS Pro) to create and print maps,
or in a web app (like those configured with Web App Builder, or Operations Dashboard) to
configure and visualize different infographics.
b. ODK and OpenMapKit
There is no possible seamless integration of ODK/OMK data into ArcGIS. This would require
developing ETL processes which could be investigated in another project but falls outside the
scope of the current benchmarking.
III.2. With OSM
a. Collector for ArcGIS and Survey123 for ArcGIS
It is not possible to use Collector or Survey123 for data collection and then directly sync it to
OSM. Both apps are configured to work with Esri data storage formats. Manual import following
the OSM import process can however be done, and various organizations are currently
investigating the possibilities to partially automatize this process with ETL tools.
b. ODK and OpenMapKit
As a final stage, edits completed on the local OSM (see section IV.3.D) must be pushed to the
online OpenStreetMap. Prior to this, the local OSM file has to go through a conflict detection
process in order to reconcile the data with potential modifications made by online users during
the offline data collection on the AOI. To handle this process, the American Red Cross developed
a tool called “POSM replay tool” (this workflow hasn’t been tested during our benchmarking).
The POSM replay tool requires some command line knowledge and familiarity with GitHub.
Complete instruction can be found here: https://github.com/posm/posm-replay-tool
Main steps of the replay process:
a. Obtain an AOI extract (PBF or XML) corresponding to the point where the local OSM API
branched from. It corresponds to the PBF file created through the AOI export and used to set
up the POSM deployment.
b. Gather local change sets.
c. Initialize a git repository containing locally-modified entities present in the AOI extract.
d. Obtain an AOI extract containing current data from your upstream. Use the POSM Export Tool
and follow the same steps as for the POSM deployment in the first place, but using the current
data.
e. Extract and apply changes to locally-modified entities from the current AOI extract.
f. Create a branch representing the local history by applying all local changesets to a branch
containing the starting AOI extract.

[email protected] | www.cartong.org Page 12 | 46
g. Apply each local changeset to the branch containing the current AOI extract.
h. Manually resolve merge conflicts between local and upstream edits.
i. Submit resolved changesets to your upstream API, renumbering references to locally-created
entities as necessary.
OSM has developed a guideline available online on the OpenStreetMap Wiki to help users
importing data into the OpenStreetMap database3. It contains all the steps of the workflow as
well as key considerations to bear in mind.
The POSM cloud instance used for this benchmarking didn’t have the option to submit local
OSM data to the OSM API as it should be (fig. 54 & 55). This is one among several bugs
that we experienced with POSM during this project.
Fig 54. Example of a POSM server with the option to submit OSM data to the OSM API
Fig 55. Our POSM server instance with the missing option to submit OSM data for the shelter tagging form
3 OSM Import guideline: https://wiki.openstreetmap.org/wiki/Import/Guidelines#See_also

[email protected] | www.cartong.org Page 13 | 46
IV. Conclusion
Proprietary tools Collector and Survey123 for ArcGIS
Survey123 for
ArcGIS
Survey123 for ArcGIS is Esri’s form-centric data collection app.
It is based on standard .xls form, enables disconnected workflows,
collects points geometries and allows adding new forms and edit the
existing ones.
The latest release includes improvements for user interface and form
logic as well as various bug fixes.
Collector for ArcGIS Collector for ArcGIS is Esri’s map-centric data collection app.
It is based on web maps, enables disconnected workflows, collects
all types of geometries and allows adding new features and edit the
existing ones.
The Aurora Project will replace the actual version of Collector with a
new improved one (2019).
Interaction between
both tools
Collector can be used together with Survey123:
with Collector, new features are collected, and
with Survey123 new information about these features is added
through forms.
The Survey123 form becomes a related table for the features in
Collector.
The Feature ID in Collector is sent to the form as a unique key
between features and forms.
Main advantages The main advantage of using Collector and Survey123 is that
they are integrated into the ArcGIS Platform.
Also, the two apps are complementary, they can be used against
the same feature service.
Main weaknesses The configuration process might not seem straight forward at the
first sight.
The two apps are proprietary solutions, which means an ArcGIS
Organization subscription is required.
Neither Collector or Survey123 can sync directly to OSM: an
additional ETL tool is needed.

[email protected] | www.cartong.org Page 14 | 46
Open source tools OpenMapKit and ODK
ODK ODK Collect is an open source form-centric data collection app.
It works on Android platforms, enables disconnected workflows and
collects all types of geometries.
The latest release includes improvements for user interface and form
logic as well as various bug fixes.
OpenMapKit OpenMapKit is an extension of ODK and was developed by American
Red Cross.
It enables disconnected workflows, collects point geometries and the
data collected can be directly sync to OSM Db, by selecting OSM
features and creating/editing tags.
The latest release includes a constraint functionality for OSM tag
questions.
Interaction between
both tools
ODK Collect can be used together with OpenMapKit:
the data collection starts with ODK Collect, and
only for the geographic features the enumerator moves to
OpenMapKit launching it from within ODK Collect.
To allow for the collection of OSM features, the standard survey form
created for ODK Collect has to be slightly adapted in order to
incorporate the OSM tagging scheme.
Main advantages The main advantage of OMK is that allows users to easily collect
OSM data in the field in low/no connectivity environments, and
to integrate this data to OSM while collecting private survey data
that won’t be pushed to OSM.
Also, it is an open source app.
Main weaknesses However, for this specific scenario, we experienced many bugs
and limitations that makes the app hardly recommendable (for
the moment):
o the set-up of the POSM server,
o no easy options for the users to delete old deployments
or forms from the POSM server,
o the server doesn’t allow for visualizing and managing the
results, having two separate datasets with ODK-survey
data in a .CSV file and OMK-OSM data in an .osm.
There is no possible seamless integration of ODK/OMK data into
ArcGIS: an additional ETL is needed.
[email protected] | www.cartong.org Page 15 | 46
V. Appendices
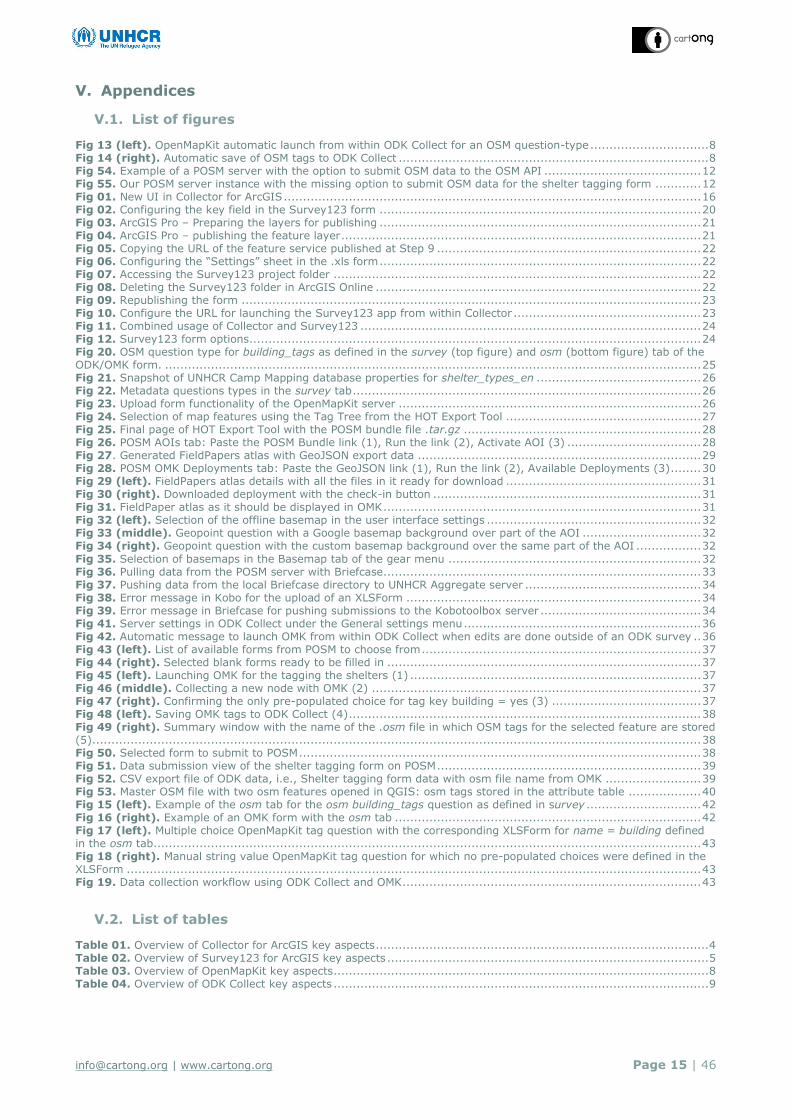
V.1. List of figures
Fig 13 (left). OpenMapKit automatic launch from within ODK Collect for an OSM question-type ............................... 8 Fig 14 (right). Automatic save of OSM tags to ODK Collect ................................................................................. 8 Fig 54. Example of a POSM server with the option to submit OSM data to the OSM API ......................................... 12 Fig 55. Our POSM server instance with the missing option to submit OSM data for the shelter tagging form ............ 12 Fig 01. New UI in Collector for ArcGIS ............................................................................................................. 16 Fig 02. Configuring the key field in the Survey123 form .................................................................................... 20 Fig 03. ArcGIS Pro – Preparing the layers for publishing .................................................................................... 21 Fig 04. ArcGIS Pro – publishing the feature layer .............................................................................................. 21 Fig 05. Copying the URL of the feature service published at Step 9 ..................................................................... 22 Fig 06. Configuring the “Settings” sheet in the .xls form .................................................................................... 22 Fig 07. Accessing the Survey123 project folder ................................................................................................ 22 Fig 08. Deleting the Survey123 folder in ArcGIS Online ..................................................................................... 22 Fig 09. Republishing the form ........................................................................................................................ 23 Fig 10. Configure the URL for launching the Survey123 app from within Collector ................................................. 23 Fig 11. Combined usage of Collector and Survey123 ......................................................................................... 24 Fig 12. Survey123 form options...................................................................................................................... 24 Fig 20. OSM question type for building_tags as defined in the survey (top figure) and osm (bottom figure) tab of the ODK/OMK form. ............................................................................................................................................ 25 Fig 21. Snapshot of UNHCR Camp Mapping database properties for shelter_types_en ........................................... 26 Fig 22. Metadata questions types in the survey tab ........................................................................................... 26 Fig 23. Upload form functionality of the OpenMapKit server ............................................................................... 26 Fig 24. Selection of map features using the Tag Tree from the HOT Export Tool ................................................... 27 Fig 25. Final page of HOT Export Tool with the POSM bundle file .tar.gz .............................................................. 28 Fig 26. POSM AOIs tab: Paste the POSM Bundle link (1), Run the link (2), Activate AOI (3) ................................... 28 Fig 27. Generated FieldPapers atlas with GeoJSON export data .......................................................................... 29 Fig 28. POSM OMK Deployments tab: Paste the GeoJSON link (1), Run the link (2), Available Deployments (3) ........ 30 Fig 29 (left). FieldPapers atlas details with all the files in it ready for download ................................................... 31 Fig 30 (right). Downloaded deployment with the check-in button ...................................................................... 31 Fig 31. FieldPaper atlas as it should be displayed in OMK ................................................................................... 31 Fig 32 (left). Selection of the offline basemap in the user interface settings ........................................................ 32 Fig 33 (middle). Geopoint question with a Google basemap background over part of the AOI ............................... 32 Fig 34 (right). Geopoint question with the custom basemap background over the same part of the AOI ................. 32
Fig 35. Selection of basemaps in the Basemap tab of the gear menu .................................................................. 32 Fig 36. Pulling data from the POSM server with Briefcase ................................................................................... 33 Fig 37. Pushing data from the local Briefcase directory to UNHCR Aggregate server .............................................. 34 Fig 38. Error message in Kobo for the upload of an XLSForm ............................................................................. 34 Fig 39. Error message in Briefcase for pushing submissions to the Kobotoolbox server .......................................... 34 Fig 41. Server settings in ODK Collect under the General settings menu .............................................................. 36 Fig 42. Automatic message to launch OMK from within ODK Collect when edits are done outside of an ODK survey .. 36 Fig 43 (left). List of available forms from POSM to choose from ......................................................................... 37 Fig 44 (right). Selected blank forms ready to be filled in .................................................................................. 37 Fig 45 (left). Launching OMK for the tagging the shelters (1) ............................................................................ 37 Fig 46 (middle). Collecting a new node with OMK (2) ...................................................................................... 37 Fig 47 (right). Confirming the only pre-populated choice for tag key building = yes (3) ....................................... 37 Fig 48 (left). Saving OMK tags to ODK Collect (4) ............................................................................................ 38 Fig 49 (right). Summary window with the name of the .osm file in which OSM tags for the selected feature are stored (5) ............................................................................................................................................................... 38 Fig 50. Selected form to submit to POSM ......................................................................................................... 38 Fig 51. Data submission view of the shelter tagging form on POSM ..................................................................... 39 Fig 52. CSV export file of ODK data, i.e., Shelter tagging form data with osm file name from OMK ......................... 39 Fig 53. Master OSM file with two osm features opened in QGIS: osm tags stored in the attribute table ................... 40 Fig 15 (left). Example of the osm tab for the osm building_tags question as defined in survey .............................. 42 Fig 16 (right). Example of an OMK form with the osm tab ................................................................................ 42 Fig 17 (left). Multiple choice OpenMapKit tag question with the corresponding XLSForm for name = building defined in the osm tab ............................................................................................................................................... 43 Fig 18 (right). Manual string value OpenMapKit tag question for which no pre-populated choices were defined in the XLSForm ...................................................................................................................................................... 43 Fig 19. Data collection workflow using ODK Collect and OMK .............................................................................. 43
V.2. List of tables
Table 01. Overview of Collector for ArcGIS key aspects ....................................................................................... 4 Table 02. Overview of Survey123 for ArcGIS key aspects .................................................................................... 5 Table 03. Overview of OpenMapKit key aspects .................................................................................................. 8 Table 04. Overview of ODK Collect key aspects .................................................................................................. 9
[email protected] | www.cartong.org
Page 16 | 46
V.3. Latest releases of tools
V.3.A. Latest release: Collector for ArcGIS
Launched in the Apple App Store and Google Play in January 2013, followed by the Windows
Store in December 2015. Since its initial release Collector has evolved considerably and its
capabilities have grown over the time.
In autumn 2018, Esri has announced a major new development with Collector, called the Aurora
Project. It has been released on the iOS platform, and planned to be released in 2019 for
Android (beta in Q1 2019) and Windows 10 platform (beta in Q4
2019).
The Collector app currently in use on the device will rename itself to
Classic and in the store will be called “Collector Classic”. At the same
time Esri will release the Aurora Project as a new listing in the store
and call it “Collector for ArcGIS”. When download onto the device, the app will be named
Collector.
The improvements of Collector through the Aurora project are:
Better maps
Labels and advanced symbology
o Arcade expressions
o Symbol effects and symbol properties (heat maps)
Vector basemaps
o Enhanced in comparison to the old ones
Improved user experience
Focused on usability
More intuitive UX
New sliding panel (you can keep the map view besides)
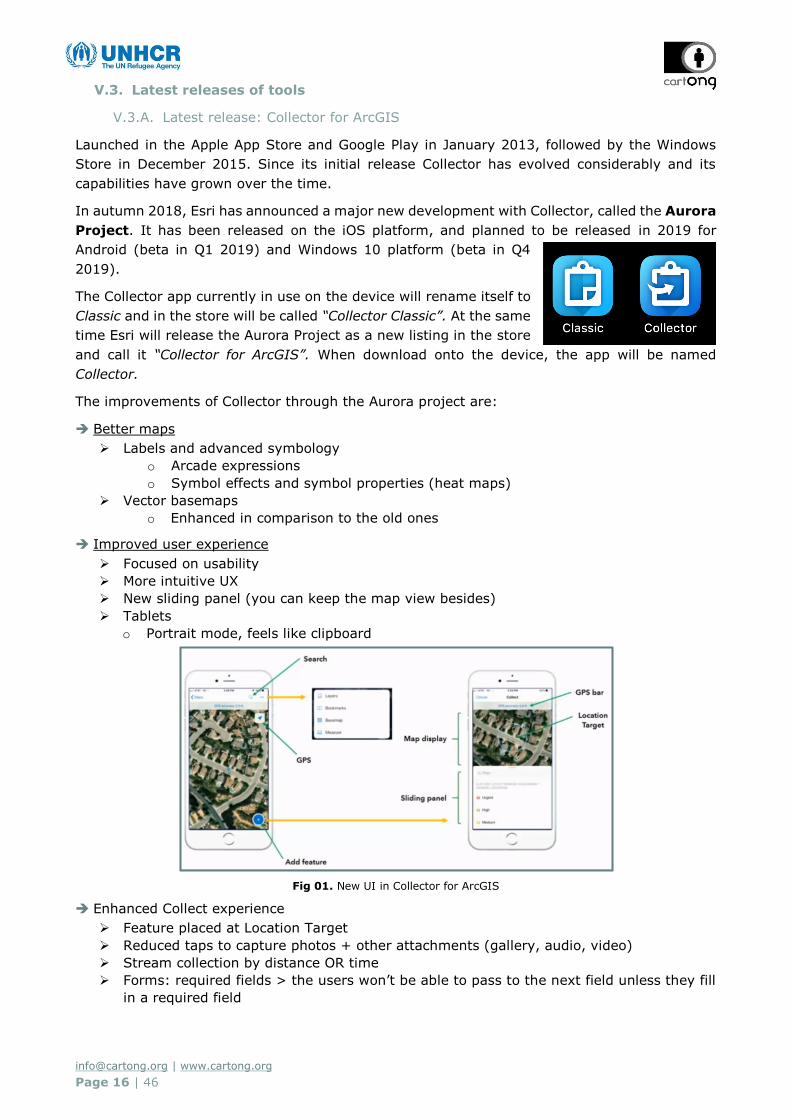
Tablets
o Portrait mode, feels like clipboard
Fig 01. New UI in Collector for ArcGIS
Enhanced Collect experience
Feature placed at Location Target
Reduced taps to capture photos + other attachments (gallery, audio, video)
Stream collection by distance OR time
Forms: required fields > the users won’t be able to pass to the next field unless they fill
in a required field

[email protected] | www.cartong.org Page 17 | 46
Several new capabilities
Barcode scanner
o Scan barcodes to auto-populate fields
Input additional metadata
Compass tool
o Shows direction north
Legend
o Switch between layer/legend view to identify what you see on the map
Layers
o Share layers’ load errors
App settings
o Collection properties
Accuracy
GPS Averaging
Streaming
Photo size
o Location
Configure provider
o General
Units and direction
Offline properties
Data collection with high accuracy
Use Collector with GPS/GNSS device
Set a location provider
Define a location profile
Attach accuracy info to your data
Receive alerts and notifications
GPS averaging
Support for z-values
o Store orthometric heights
Offline field collection
Field workers can take their maps offline
o View and interact with map
o Measure distances and areas
o View pop-ups and media
o Search for features
o Collect and update features
o Synchronize changes between field and office
Two-approaches
o On-demand workflow
Map author enables and configures maps for
offline use
Fieldworker defines the area and level of
detail
Server processes data for download
o Pre-planned workflow (NEW)
Map author defines the map areas for offline
use
Fieldworker selects the area to work offline
Server processes data once

[email protected] | www.cartong.org Page 18 | 46
Data synchronization
o More options: Sync in Map, Auto-Sync
o Sync panel shows pending edits, sync failures
o App profile settings:
General > Download & Sync
V.3.B. Latest release: Survey123 for ArcGIS
The Settings page has been redesigned
The app's font can be changed in the Settings page
The app will alert the user when it fails to capture a location
The Settings page contains a Location tab, providing options to change when the app
attempts to capture a location or to configure the alert when location capture fails
Improved handling of repeat counts when editing existing surveys with repeats
The Survey123 URL scheme supports altitude in geopoint questions
Geosearch can search all available geocoders
Text questions display a character count
A confirmation message displays when emptying the Sent box
Calculations within repeats will no longer create related records by themselves
A default value applied to a cascading select will apply the appropriate choice filter to later
questions
A time field with a calculation applied will not cause other time fields to ignore defaults
Selecting an image from an Android device can search subfolders within the DCIM folder
Predictive text is disabled by default for text input questions on Android
Various bug fixes
V.3.C. Latest release: OpenMapKit
With OpenMapKit Android v1.1, a new feature was developed focused on constraint functionality
for OSM tag questions. Via JSON configuration files, the user now has the possibility to add
special functionality to the tagging of OSM data. The following constraint functionalities are
available4:
Multiple Values Per Key
Required Tags Force User To Answer
Implicit Tag Recorded Without UI
Default Value for a Tag
Typeahead Based off of Tag Index
Skip Logic
Numeric Input
Enable / Disable Custom Value Input
Constraints JSON
V.3.D. Latest release: ODK Collect
ODK Collect is updated on a regular basis and each release is well documented on Github5 and
on the forum6. Since version 1.18.0, the following features and bug fixes have been
implemented:
Targets API 26 to benefit from new Android features and continue publishing in Play Store
Adds Bikram Sambat (Nepali) date widget with appearance bikram-sambat
4 More details available on Github: https://github.com/posm/OpenMapKitAndroid/releases/tag/v1.1 5 Github: ODK Collect v 1.18.0: https://github.com/opendatakit/collect/releases/tag/v1.18.0 6 ODK Collect forum: https://forum.opendatakit.org/t/odk-collect-v1-18/15982

[email protected] | www.cartong.org Page 19 | 46
Improves auto send and auto form updates
Improves zooming on Open Street Map
Hides buttons if a question is readonly
Fixes current() used in choice filters to provide support for cascading selects in repeats
Fixes reported issue with form styling
Fixes issues with randomizing selects and rank widget

[email protected] | www.cartong.org Page 20 | 46
V.4. Collector and Survey123 for ArcGIS: Step-by-step instructions
V.4.A. Required set-up for Collector and Survey123
An ArcGIS organizational account level 2 is required in order to configure Survey123 &
Collector
1. Download and install the Survey123 for ArcGIS Connect desktop app:
https://www.esri.com/en-us/arcgis/products/survey123/resources
2. Open Survey123 for ArcGIS Connect and log in with the ArcGIS Online user
account
3. Create a new Survey123 project in Survey123 Connect; add the key field that will
link the feature in Collector to the form in Survey123 ( in the given scenario the key
field is the Shelter ID {hh_progres_id}
Fig 02. Configuring the key field in the Survey123 form
4. Publish the survey to ArcGIS Online
5. Download the feature service that was created at step 4 to a file geodatabase
Very important not to choose another format, because choice lists will be lost if you choose
another format
6. In the file geodatabase that was downloaded, create your primary feature class (
in the given scenario the shelters feature class). Ensure it has a common ID with the
Survey123 feature class ( in the given scenario the key field is the Shelter ID
{hh_progres_id}
7. Create a geodatabase relationship between the primary feature class (Shelters) and
the Survey123 feature class using the common ID
8. In ArcGIS Pro, add both layers with the Survey123 feature as the first item in the
table of contents

[email protected] | www.cartong.org Page 21 | 46
Fig 03. ArcGIS Pro – Preparing the layers for publishing
9. Publish as a new feature service in ArcGIS Online (The Survery123 feature class
should be ~/FeatureServer/0)
Fig 04. ArcGIS Pro – publishing the feature layer
The Survey123
feature layer
[email protected] | www.cartong.org Page 22 | 46
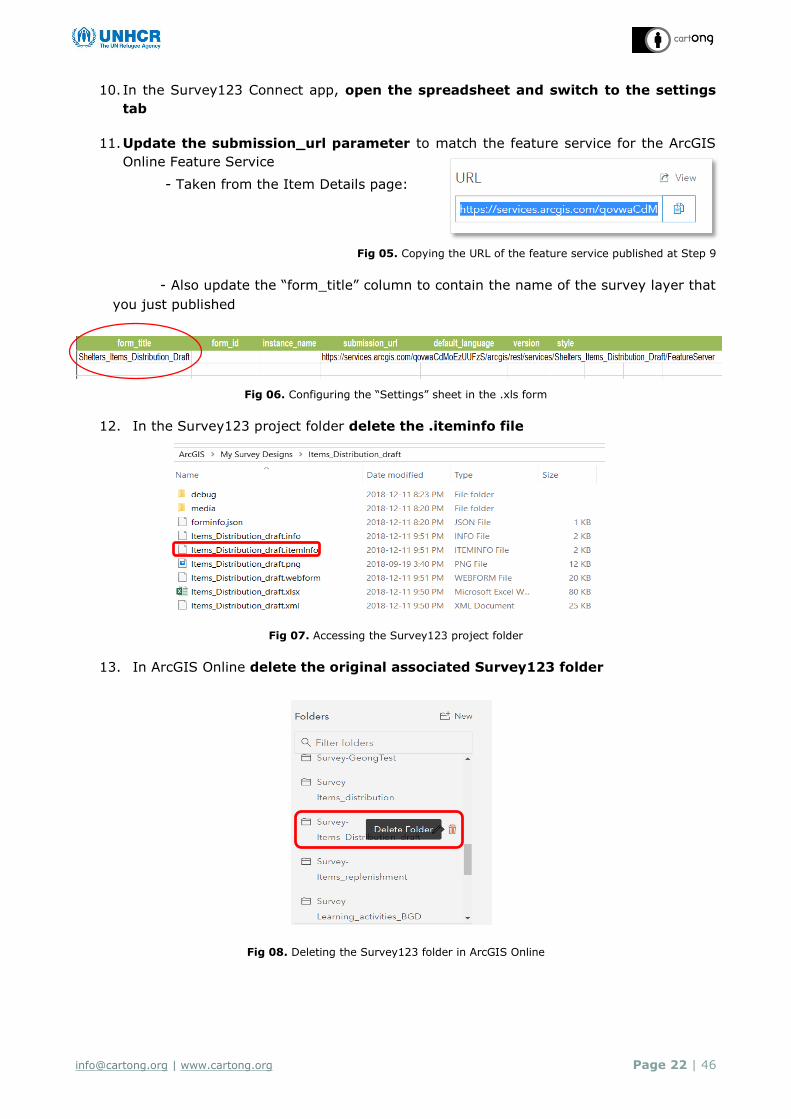
10. In the Survey123 Connect app, open the spreadsheet and switch to the settings
tab
11. Update the submission_url parameter to match the feature service for the ArcGIS
Online Feature Service
- Taken from the Item Details page:
Fig 05. Copying the URL of the feature service published at Step 9
- Also update the “form_title” column to contain the name of the survey layer that
you just published
Fig 06. Configuring the “Settings” sheet in the .xls form
12. In the Survey123 project folder delete the .iteminfo file
Fig 07. Accessing the Survey123 project folder
13. In ArcGIS Online delete the original associated Survey123 folder
Fig 08. Deleting the Survey123 folder in ArcGIS Online

[email protected] | www.cartong.org Page 23 | 46
14. Republish the Survey123 project and it should associate with the specified feature
service
Fig 09. Republishing the form
15. In AGOL create a new map for Collector
16. In the pop-up window of the Shelter layer, configure the URL to launch Survey
17. Within the URL call the feature ID from Collector so that the same field in Survey gets
pre-populated
Fig 10. Configure the URL for launching the Survey123 app from within Collector

[email protected] | www.cartong.org Page 24 | 46
V.4.B. How to use Collector and Survey123 for ArcGIS
1. Install Collector for ArcGIS & Survey123 for ArcGIS on the device
2. Download the survey form on the device
3. In Collector, add a new feature
4. In the “Details” window click on “Launch Survey” – the Survey123 app opens with
the “Items Distribution” form
5. Fill the information in the form and then submit the form by clicking on the
Fig 11. Combined usage of Collector and Survey123
6. Once in Survey123 app you have the possibility to search among all the surveys
available (the “Inbox” option) if there it access to an internet connection, or to search
among the survey submitted from the device (the “Sent” option)
Fig 12. Survey123 form options

[email protected] | www.cartong.org Page 25 | 46
V.5. OpenMapKit and ODK: Step-by-step instructions
V.5.A. Required set-up for OpenMapKit and ODK
I) Setting-up the OpenStreetMap server - POSM
It can be set-up as:
- a hardware device loaded with offline version of the software (supports full offline
autonomy in the field for the data collection)
- run directly in the cloud (more adapted to a semi-connected environment)
Full documentation for POSM installation can be found on the POSM website:
Hardware set-up: http://posm.io/getting-a-posm/
Cloud set-up: http://posm.io/cloud/
For this project, the benchmarking of OpenMapKit was conducted on a cloud POSM instance.
Although some documentation is available, it does require a little bit of “Do it yourself”
skills to set up the POSM hardware and some IT skills for the cloud instance since it requires
command line and Linux environment knowledge.
II) Adapting the existing UNHCR form to include OSM tags
Starting from the XLSForm designed for Survey123, the item distribution form has to be adapted
in order to include OSM tags for the shelters:
1. Include an OSM question type in the survey tab for the buildings (fig. 20) to
match with UNHCR current data model
Fig 20. OSM question type for building_tags as defined in the survey (top figure) and osm (bottom figure) tab of the ODK/OMK form.
Currently there are no available OSM tags for shelter types as used in the current UNHCR
domain shelter_types_en (fig. 21).
For the purpose of this benchmarking, the only OSM tag key used for the shelter is building
= yes. Once OSM tags for shelters are developed and validated by the OSM community,
they can be included in the ODK/OMK form in the osm tab.
Single field to answer in OMK for the OSM question on buildings
Single pre-populated choice for building tag key

[email protected] | www.cartong.org Page 26 | 46
Fig 21. Snapshot of UNHCR Camp Mapping database properties for shelter_types_en
2. Remove all Esri's custom columns from the survey tab. These columns provide
additional functionalities for Survey123 users only.
3. Adapt the cascade select for the allocated distribution point list (as subsequent
choice from camp block) to XLSForm standards. This implies to delete the
external_choices tab and to copy-paste the cascade select within the choices tab.
4. Add metadata question types (fig. 22) at the beginning of the survey tab.
Fig 22. Metadata questions types in the survey tab
While testing, we found out that without these metadata question types in the form, the
submitted form could not be visualized on POSM. The “view submission” page would freeze
and not open.
Once ready, the XLSForm can be uploaded on the POSM server (fig. 23), to be then deployed on
the mobile device used for the data collection and filled-in with ODK Collect and OMK.
Fig 23. Upload form functionality of the OpenMapKit server
During the upload, a message error will pop-up if the form doesn’t respect XLSForm
standards, but it won’t specify where the errors come from. Therefore, we would
recommend to regularly test your form every time you implement some modifications, in
order to easily identify where the bugs (if any) come from.

[email protected] | www.cartong.org Page 27 | 46
III) Creating an AOI deployment
While in a connected environment, a “deployment” must be created > downloading all available
OSM related-data for the area of interest (AOI)
1. Extract OSM-related data for the AOI using the POSM Export Tool7
Extracted data is used to produce offline maps for Field Papers and OpenMapKit.
Steps to follow on the POSM Export Tool:
a. Log in with your OpenStreetMap credentials or register a new account
b. Define your AOI for the extract using one of the four options available (Search bar,
Bounding box, Draw polygon, Current view, or Upload)
The export is limited to a maximum of 10,000,000 OSM nodes. For larger exports, they
can be executed with alternative resources such as Geofabrik or Mapzen.
c. Name and describe your export
d. Choose the export format. For OMK, the only requirement is OSM.pbf – the core OSM
data package.
e. Choose map features using either the Tag Tree or the YAML tool to select some parts
of OSM data of interest for your project (fig. 24). You must select:
A Tag Filter: a subset of OSM features of interest for the data collection.
For our scenario, we can limit the export to the relation tagged building = true.
A Key Selection: a subset of OSM keys of interest for the data collection.
For our scenario, we can limit the export to OSM keys name and building. For this
benchmarking, all OSM keys related to Building features have been downloaded.
Fig 24. Selection of map features using the Tag Tree from the HOT Export Tool
To learn how to define YAML to create an export or to save YAML as a configuration for
future exports, the documentation is available here:
https://export.hotosm.org/en/v3/learn/feature_selections
7 POSM Export Tool: https://export.hotosm.org/en/v3/exports/new/describe
The infobox displays the detailed
information about the tags and
filters specified (when hovering the
checkbox).

[email protected] | www.cartong.org Page 28 | 46
f. Download your files. You can download each file format individually or the whole
bundle at once. The easiest way to upload the export onto POSM in the next step, is to
download your files as “Bundle for POSM”. Once your export is ready you will receive a
notification email (at your email address registered in your OSM account).
2. Import your AOI onto POSM
In order to upload your AOI onto your POSM server, you have to copy paste the link of your
POSM Bundle export (.tar.gz) (fig. 25) and pasting it in the Active AOI box of your POSM
(fig. 26). This steps allows POSM to download the OSM data and setting it up for use. This
step can take some time.
Fig 25. Final page of HOT Export Tool with the POSM bundle file .tar.gz
Fig 26. POSM AOIs tab: Paste the POSM Bundle link (1), Run the link (2), Activate AOI (3)
2
1
3

[email protected] | www.cartong.org Page 29 | 46
With a hardware POSM set-up, you'll have to plug the POSM into an ethernet connection and
power it up. POSM will broadcast a local wifi network named “POSM”. The password is
“Awesomeposm”. The workflow to upload your AOI is similar to the above description.
3. Create a FieldPapers atlas for your AOI
The final step to set up your POSM is to generate a FieldPaper atlas (MB tiles) for your
surveyed area. FieldPapers are zoomable map tiles in the background of OpenMapKit. The
OSM data (OSM.pbf) will sit on top of the tiles as interactive buildings, roads, etc. (in our
case buildings). This step can take some times, but it can run in the background as long as
POSM is plugged in and powered up (for the hardware set-up).
This step is necessary even if you have downloaded MBTiles for your AOI in the previous
step.
To generate your atlas, click on the FieldPapers link of you POSM home page and generate
your atlas (fig. 27). Then copy-paste the FieldPapers atlas GeoJSON URL in the OMK
Deployments tab of your POSM (fig. 28).
Fig 27. Generated FieldPapers atlas with GeoJSON export data
With the cloud POSM instance used for this benchmarking we encountered some bugs with
the field papers. The link from the POSM homepage (i.e., the local field paper instance) never
worked. We found a way around it by generating field papers from the public field paper web
site: http://fieldpapers.org/ but the OMK deployment generated from the GeoJSON link

[email protected] | www.cartong.org Page 30 | 46
doesn’t work properly. It makes OMK crash every time the deployment is selected as the
basemap and the deployment link from POSM OMK Deployments tab doesn’t work neither.
Fig 28. POSM OMK Deployments tab: Paste the GeoJSON link (1), Run the link (2), Available Deployments (3)
If you are doing a monitoring (editing of OSM data) in a constantly changing environment, it
would be wise to re-run your FieldPapers atlas regularly prior to each monitoring campaign
in order to create updated MB tiles for your area. Thus your monitoring will build off previous
changes.
4. Deploy your AOI on the phone
The final step consists of deploying your AOI (i.e., MBTiles and OSM.PBF) on the phone by
connecting OMK to POSM. For this step, you will have to launch OMK and enter the POSM
server URL in the deployments tab of the top-right gear menu. You can also scan the QR
code of your FieldPapers atlas and it will automatically point to your POSM server.
For a POSM hardware instance, you’ll have to connect the phone to the POSM Wi-Fi network,
by clicking on the top-right icon of the deployments tab.
To load your FieldPapers atlas as the basemap for OMK, you’ll have to tap on the specific
deployment file, then on the download button on the bottom-right to install all the files in it
(i.e., MBTiles and OSM.PBF) (fig. 29). Once your download is completed, there will be a new
button in the bottom left to visualize your deployment. This will turn on the POSM Carto
MBTiles and OSM XML data on the map (fig. 30).
2
1
3

[email protected] | www.cartong.org Page 31 | 46
Fig 29 (left). FieldPapers atlas details with all the files in it ready for download
Fig 30 (right). Downloaded deployment with the check-in button
OMK should display the footprint of your FieldPapers atlas
as shown on the figure (fig. 31). However, during our
testing, due to the bugs with the FieldPaper link (as
mentioned above), we couldn’t visualize the deployment on
OMK. It would crash the app every time we tried to open it
after being downloaded. For the testing, we used the Online
Humanitarian OpenStreetMap as an alternative basemap
instead, but it requires an internet connection unlike
MBTiles.
Althought MBTiles didn’t work during the tests, OSM XML
files from the AOI deployment could sometimes be
downloaded onto OMK (but with frequent errors) using the
“OSM XML Downloaded” tab of the gear menu. Downloaded
OSM data could then be used for taking or editing OSM
features.
Fig 31. FieldPaper atlas as it should be displayed in OMK
If everything were to run without bugs, with the AOI deployment downloaded on OMK, the
collection and edition of OSM data can be run in a completely offline environment (once ODK
Collect is linked to POSM server as described below). Only for the sync at the end of the data
collection would an internet connection be necessary. If POSM is run on a hardware instance,
then the phone will have to be connected to the POSM Wi-Fi network for the sync.
5. Offline MBtiles
In order to bypass the issue with the download of MBTiles on OMK, offline MBTiles can be
used directly on ODK Collect as a base map for questions requiring a map display (i.e.,
location widget), such as OMK questions.

[email protected] | www.cartong.org Page 32 | 46
For this, a MBTiles file have to be created with a compatible application such as Open Map
Tiles, TileMill or QGIS8 and manually transferred to the device in a subfolder (not at the root)
in /phone/odk/layers. In addition, Mapping SDK settings (in the user interface setting of ODK
Collect) has to be switched to “Google Maps SDK”. Once done, the offline custom basemap
can be activated in the user interface (fig. 32).
While we could load and activate an offline custom basemap on ODK Collect, we haven’t
managed to display it for the OSM question type on OMK. It might be due to the bugs
happening with the AOI deployment that makes OMK crash.
However, the offline custom basemap did work on ODK Collect for a geopoint question type.
It would display on top of the default google basemap completely offline within the defined
zoom limit of the MBTiles file (fig. 33 & 34).
Fig 32 (left). Selection of the offline basemap in the user interface settings
Fig 33 (middle). Geopoint question with a Google basemap background over part of the AOI
Fig 34 (right). Geopoint question with the custom basemap background over the same part of the AOI
Another option is to manually transfer the same MBTiles file in the
device at the root of the openmapkit mbtiles folder in
/Phone/openmapkit/mbtiles (similar process to ODK Collect offline
basemap). The custom basemap can then be selected and displayed
offline in OMK within the defined zoom limit (fig. 34). However, this
manipulation doesn’t solve the regular bugs that we experienced with
the download of OSM XML data.
Fig 35. Selection of basemaps in the Basemap tab of the gear menu
8 For the testing, we created a MBTiles with POSM Export Tool

[email protected] | www.cartong.org Page 33 | 46
6. Testing OMK with another server than POSM
OpenMapKit was designed to work with POSM as the server offers the possibility to directly
contribute to the OpenStreetMap database by submitting OSM tags collected in the field through
the OSM API.
However, OMK XLSForms are also supported by other servers such as Aggregate and ONA, which
offers the possibility to first submit collected data on POSM (to benefit from the OSM API) and
then resubmit the same collected data either with Briefcase (fig. 36-37) or directly from ODK
Collect on the phone (from the menu tab “Send finalized forms”) to the Aggregate or ONA server
(assuming that the blank form is already uploaded there).
Fig 36. Pulling data from the POSM server with Briefcase
Pulling submissions and blank form
from POSM with Briefcase
Briefcase directory with the submissions
pulled from POSM saved separately in
individual files in the “instances” folder and the
XML blank form
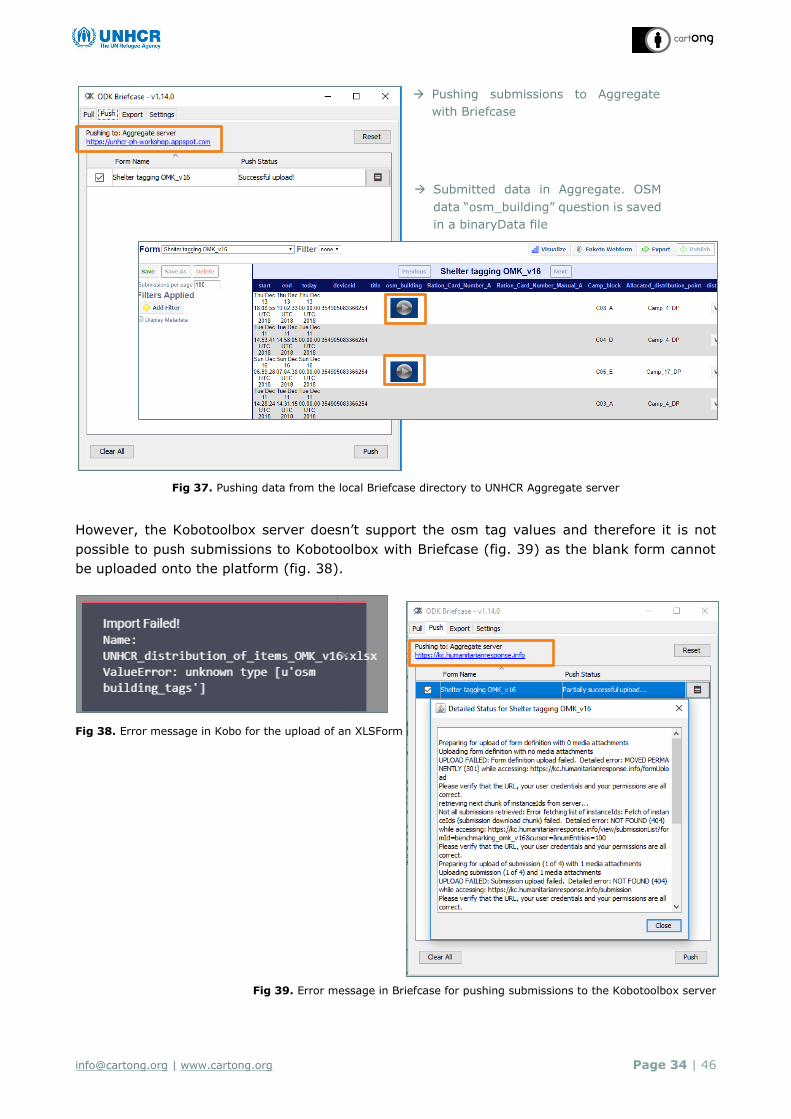
[email protected] | www.cartong.org Page 34 | 46
Fig 37. Pushing data from the local Briefcase directory to UNHCR Aggregate server
However, the Kobotoolbox server doesn’t support the osm tag values and therefore it is not
possible to push submissions to Kobotoolbox with Briefcase (fig. 39) as the blank form cannot
be uploaded onto the platform (fig. 38).
Fig 38. Error message in Kobo for the upload of an XLSForm
Fig 39. Error message in Briefcase for pushing submissions to the Kobotoolbox server
Pushing submissions to Aggregate
with Briefcase
Submitted data in Aggregate. OSM
data “osm_building” question is saved
in a binaryData file

[email protected] | www.cartong.org Page 35 | 46
Illustration of the workflow between POSM and Aggregate server:
Fig 40. Possible workflow from the data collection on ODK Collect/OpenMapKit and the data submissions to the POSM
and Aggregate server

[email protected] | www.cartong.org Page 36 | 46
V.5.B. How to use OpenMapKit and ODK
1. Connect ODK to POSM server
Prior to disconnecting your phone completely from the internet, you’ll have to link ODK
Collect to your POSM by entering the POSM URL into the app server settings. This step will
allow you to download the ODK/OMK form from the server (fig. 41).
Fig 41. Server settings in ODK Collect under the General settings menu
2. Open and fill the form
The data collection start from within ODK Collect, even if the first
question relates to OSM features. If you still start from OMK to take
or edit a geographic feature, the app will ask you to launch ODK
Collect to fill in the survey (fig. 42).
Fig 42. Automatic message to launch OMK from within ODK Collect when edits are done outside of an ODK survey
To start the shelter tagging (including item distribution) or family survey with ODK Collect, you
have to select the corresponding forms (you can select several forms at once) in the tab “Get
Blank Form” on the ODK Collect home page (fig. 43).
Once this is done, everything else can run offline from now on until finalized forms have to
be sent to the server
POSM server URL
Blocking message asking you to switch to ODK Collector to edit OSM
tags

[email protected] | www.cartong.org Page 37 | 46
To start filling in the form, go to “Fill Blank Form” and select the survey you need (shelter tagging
form or family form) and start answering the survey (fig. 44).
Fig 43 (left). List of available forms from POSM to choose from
Fig 44 (right). Selected blank forms ready to be filled in
Filling in a survey with ODK Collect is rather straight forward, the questions appear in the order
of the survey form and with the defined constraint. The only difference from a standard ODK
form is the OSM question type (included only in the shelter tagging form) that launches OMK
from within ODK Collect allowing the data collector to collect a new OSM feature (point feature)
or to edit existing OSM data (see the general workflow in section IV.1.B).
For the OSM building question, ODK will ask the data collector to launch OMK (1), once in OMK,
new OSM data (node) can be taken (or existing one selected) (2) and tags can be filled in (or
edited) for this feature (3) and saved to ODK Collect (4). The OSM data will be stored in a
separate .osm file (5) and the .osm file name will be saved in the ODK form (same as a media
question type). For this last step, OMK will ask your OpenStreetMap user name (only for the first
time). Then, the remaining questions of the survey can be answered in ODK Collect in a standard
way.
Fig 45 (left). Launching OMK for the tagging the shelters (1)
Fig 46 (middle). Collecting a new node with OMK (2)
Fig 47 (right). Confirming the only pre-populated choice for tag key building = yes (3)

[email protected] | www.cartong.org Page 38 | 46
Fig 48 (left). Saving OMK tags to ODK Collect (4)
Fig 49 (right). Summary window with the name of the .osm file in which OSM tags for the selected feature are
stored (5)
3. Save and submit the form
Finalized forms can be submitted from the “Send finalized form” tab of ODK Collect9.
For this last step, you will need to have an internet
connection or to connect your phone to the POSM wifi
network (for the POSM hardware instance).
Fig 50. Selected form to submit to POSM
Submitted data is stored in the dataset of the corresponding form on POSM. OSM data is
stored in separate .osm files (one file per feature) and the name of the file is recorded in the
ODK dataset in a separate column (named after the name of the OSM question type defined
in the form).
9 Finalized form can be submitted automatically if the settings in ”General settings” > “Form management” allows for Auto send with wifi and/or cellular
the .osm file name will be stored
in the ODK survey in a separate
column named after the osm
question type name (here
osm_building).

[email protected] | www.cartong.org Page 39 | 46
Therefore, data submitted for the shelter tagging form is stored in two datasets: a csv file
with the survey questions related to item distribution and an osm file with the tags of the
shelter points. These two datasets can be joined based on the name of each osm file.
ODK data can be downloaded as csv or json file while OSM data can be downloaded into one
.osm file compiling all features or into separate .osm file (fig. 51).
Fig 51. Data submission view of the shelter tagging form on POSM
A major limitation to using OMK for collecting OSM tags within a survey is that submitted
data aren’t integrated together in a common dataset. In this scenario, we would need to
have the shelter points’ coordinates and tags for each item distribution survey integrated
together. To do this, you’ll have to open each osm file separately in QGIS, add xy
coordinates, add a new text field to encode the name of the corresponding osm file (for the
join) and finally export the attribute table as CSV.
Each exported CSV file can then be joined to the shelter tagging form based on the osm file
name column, here osm_building (fix.52). This is time consuming as the osm file name of
each feature isn’t stored as attribute in the master OSM file. The only way to retrieve this
information is to open each single osm file individually and encode its name in the attribute
table, taking the risk for errors (considering the length of the osm file.name).
Fig 52. CSV export file of ODK data, i.e., Shelter tagging form data with osm file name from OMK
All OSM data in a single file
(master file)
CSV or JSON download
Separate OSM
file per
Metadata questions
Item distribution survey
questions

[email protected] | www.cartong.org Page 40 | 46
Fig 53. Master OSM file with two osm features opened in QGIS: osm tags stored in the attribute table
4. Check and submit OSM data
The added value of OMK is the easy data integration to OpenStreetMap. In order to submit as
clean OSM data as possible, the American Red Cross documented a data cleaning workflow useful
when dealing with large amounts of data (this workflow hasn’t been tested during our
benchmarking). The full documentation based on one of their project in West Africa can be found
here:
https://github.com/AmericanRedCross/workflows/blob/master/west-africa_data-cleaning.md
Major steps to follow:
i. Retrieve the osm file from OMK server and open it in JOSM. Enable the ToDoList and OpenData
plug-ins for JOSM.
ii. Purge non-relevant features (features that don’t need to be cleaned or features outside of the
AOI) using CTRL+Shift+P.
iii. Save the points and polygons as separate files.
iv. For point data: Clean any free-form text inputs. When entering data for features like hospital
names, town names, etc, enumerators sometimes use different spellings or include a typo.
Use Open Refine to clean these columns individually. Open Refine looks for responses that
are close but not exactly the same, and allows you to group these and change them to a
consistent spelling.
v. Once done, export the data as a CSV file and re-open it in JOSM (File > Open, accept the
coordinate system as WGS84). Make sure the points appear to be in the correct place.
vi. Add a source tag to all your new features and push the changes to the local OSM (POSM).
vii. Save the .osm file for future reference.
These steps will push the modifications to the OSM data saved locally on your POSM. This
data can be reused to generate new Field Papers which will incorporate these modifications
for future rounds of mapping.

[email protected] | www.cartong.org Page 41 | 46
At this stage, the local OSM copy is still separate from OpenStreetMap online version. It has to
be reconciled and synched once connected to the internet to contribute to OpenStreetMap (see
section VI.2).

[email protected] | www.cartong.org Page 42 | 46
V.6. XLSForm10 for OpenMapKit
The main change to a standard XLSForm (as it would be used in ODK Collect alone) is the
introduction of OSM question types. Instead of taking a geographic GPS point or shape directly
in the form, the OSM question refers to an OSM file (.osm) that gets created in OpenMapKit.
This modification is justified by two reasons:
A survey about a specific, identifiable feature on a map is more useful than a GPS point.
The survey can directly enrich OpenStreetMap by adding tags to OSM features. Thus, the user
can easily create accessible public information for OpenStreetMap, while collecting its own
private specific ODK survey data (that won’t be pushed into OSM).
To define the tagging parameters that will be pushed to OSM for each OSM question, the
XLSForm needs to have an extra osm tab (fig. 15) that contains three columns: list name, name,
and label (fig. 16).
Fig 15 (left). Example of the osm tab for the osm building_tags question as defined in survey
Fig 16 (right). Example of an OMK form with the osm tab
list name: defines the set of OSM tags the user will have to answer in OMK for a specific OSM
question.
Optional: list name can also define the set of tag values selectable for a given OSM tag (a
set of pre-populated choices) (fig. 17). If the set of tag values is not provided, the user will
have to manually type in a value for a given question in OMK (fig. 18).
name: tag keys that are recognized in OSM
label: labels that will appear in OpenMapKit to the user
10 XLSForm is a “popular open form standard, that allows you to author a form with complex functionality like skip logic in a consistent way across a number of web and mobile data collection platforms” (XLSForm.org, http://xlsform.org/en/#what-is-an-xlsform)

[email protected] | www.cartong.org Page 43 | 46
Fig 17 (left). Multiple choice OpenMapKit tag question with the corresponding XLSForm for name = building defined in the osm tab
Fig 18 (right). Manual string value OpenMapKit tag question for which no pre-populated choices were defined in the
XLSForm
Fig 19. Data collection workflow using ODK Collect and OMK
Two XLSForm were designed to test the data collection workflow for shelter tagging and item
distribution for UNHCR in the context of Bangladesh refugee camps. These forms were adapted
to be used with ODK Collect and OpenMapKit and are uploaded on a POSM server. The two forms
have a common question – Ration Card Number (RCN) – to allow for joining the two datasets at
the end.
The forms for this workflow are:
Shelter tagging form:
This form includes an OSM question type for tagging shelters and questions on item
distribution (general & replenishment distribution). Questions on item distribution come
from the existing UNHCR item distribution form used with Kobo. The osm question type
name will be used for joining the osm file to the CSV table.

[email protected] | www.cartong.org Page 44 | 46
For consistency with the Collector workflow, the data collector should take a new node (or
edit an existing one) on OMK for the shelters instead of editing the “building” polygons of
the OSM XML data (from the AOI deployment, see section IV.3.C). This will allow to have
point features for shelters with both Collector and OMK at the end.
Family form:
This form only includes questions on the Family Count Number (FCN) and the Ration Card
Number (RCN), the latter is used as common field to join with the shelter tagging dataset.
This form doesn’t include osm question type and therefore can run entirely with ODK Collect
alone, even if the form is uploaded on a POSM server.