
DAD User Manual
246
ENCO SYSTEMS www.enco.com +1 (248) 827-4440 UPDATED 6/29/2016 DAD User Manual
Transcript of DAD User Manual
ENCO DAD User Manual 1
Contents Presenter ........................................................................................................................ 8
Playback Slots ............................................................................................................. 8
Active Playback Slot ................................................................................................. 9 Manual and Auto Modes ........................................................................................... 9 Using Auto Mode .................................................................................................... 10 Using Manual Mode ................................................................................................ 11 Slot Swapping and Moving ..................................................................................... 12 Loading Cuts from the Playlist ................................................................................ 12 Removal of a Selected Cut ..................................................................................... 12 Slot Audition ........................................................................................................... 13 Setting a Unique Cue Position ................................................................................ 13
Library ........................................................................................................................ 14
Modify Screen ......................................................................................................... 15 Editor ...................................................................................................................... 16 Column Editor ......................................................................................................... 16
Searching ................................................................................................................... 17 Multiplay Mode ........................................................................................................... 18
Hardware Control .................................................................................................... 18 Configuring Multiplay Mode .................................................................................... 18
Arrays ........................................................................................................................ 19
Assigning Cuts to an Array ..................................................................................... 19 Assigning Cuts to an Array in Full Height Mode...................................................... 20 Playing from the Array ............................................................................................ 20 Changing Array Pages ............................................................................................ 20 Right Click, LOOP and Hook Mode ........................................................................ 21
Playlists ...................................................................................................................... 22
Loading a Playlist .................................................................................................... 22 The Playlist ............................................................................................................. 23 Playlist Hour Selection ............................................................................................ 23 Playlist Buttons ....................................................................................................... 24 Tracker ................................................................................................................... 25
User Favorites ............................................................................................................ 25 History ........................................................................................................................ 27
AsPlay .................................................................................................................... 27 Skipped ................................................................................................................... 27 Play History ............................................................................................................ 28
ENCO DAD User Manual 2
Recording ................................................................................................................... 30 Scripts ........................................................................................................................ 31 Configuration and Customization ............................................................................... 32
Full Height Display Mode ........................................................................................ 32 Priority Play Buttons ............................................................................................... 32 Channel Assignments ............................................................................................. 32 Customizations ....................................................................................................... 34 Changing Text ........................................................................................................ 35 Button and Functionality Colors .............................................................................. 36 Changing Icons ....................................................................................................... 37 Duplicating Settings ................................................................................................ 37 Advanced Play Slot Configurations ......................................................................... 38 Common DCL Commands used with Presenter ..................................................... 39 CFI Options ............................................................................................................ 39
Recording .................................................................................................................... 40
Record Machines ....................................................................................................... 40
Record Deck Button Functions ............................................................................... 40 Entering New Cut Information ................................................................................. 41
Using the Record Deck .............................................................................................. 42
Recording a New Cut .............................................................................................. 42 Recording over an Existing Cut .............................................................................. 43 Appending to an existing audio file ......................................................................... 44
Playing or Editing While Recording ............................................................................ 44 Record Machine Setup .............................................................................................. 44 Other Record Machine Configuration Options ........................................................... 49
Keyboard Shortcuts ................................................................................................ 50 Setting Levels ......................................................................................................... 50
Timed Recording ........................................................................................................ 52
Timed Recording Button Functions ......................................................................... 53 Record Parameters Button Functions ..................................................................... 54 Building a Timed Record List .................................................................................. 55 Saving, Loading and Deleting Timed Record Lists ................................................. 57
Editing in DAD ............................................................................................................. 58
Editing Overview ........................................................................................................ 58
The EDIT Screen .................................................................................................... 58 EDIT Screen buttons and functions ........................................................................ 59 Using the Editor ...................................................................................................... 62 Insta-Trim ............................................................................................................... 63 Mouse Rubberband ................................................................................................ 63
ENCO DAD User Manual 3
START and END buttons ........................................................................................ 64 Scrubbing ............................................................................................................... 64 Direct time entry ...................................................................................................... 64 Keyboard Shortcuts ................................................................................................ 64
Saving an Edited Cut ................................................................................................. 65
SAVE ...................................................................................................................... 65 REWRITE ............................................................................................................... 66
Selecting and Using Different Edit Markers................................................................ 68
Setting HEAD and TAIL Markers ............................................................................ 69 Using CUT/PASTE Editing Mode ............................................................................ 69 An Edited cut .......................................................................................................... 71 The Cut/Paste List .................................................................................................. 71 Cut/Paste List button functions ............................................................................... 71 Using the CUT/PASTE List ..................................................................................... 72 Adding Secondary and Tertiary Cue Points ............................................................ 72 Advanced use of Slate Markers .............................................................................. 73 Setting Fade Markers ............................................................................................. 74 Setting TALK TIME Points ...................................................................................... 74 Setting Segue Points .............................................................................................. 74 Setting Hook Markers ............................................................................................. 75 Configuring the Editor ............................................................................................. 75
The DAD Library .......................................................................................................... 76
Library Concepts and Practices ................................................................................. 76
Library Groups and Group Management ................................................................ 77 Adding a new Group ............................................................................................... 77 Editing an existing Group ........................................................................................ 77 Using Group Filtering .............................................................................................. 78 Using Groups for Ensemble .................................................................................... 79 Selecting and Displaying Groups ............................................................................ 79 Using Search, Quick Search and Phonetica ........................................................... 79 Configuring Quick Search ....................................................................................... 81
Library Buttons and Functions ................................................................................... 83
DAD Library Icons ................................................................................................... 85
Using the Library ........................................................................................................ 85
Locating a Cut in the Library ................................................................................... 85 Direct Cut number entry .......................................................................................... 85 Sort ......................................................................................................................... 86 Group ...................................................................................................................... 86 Search .................................................................................................................... 86
ENCO DAD User Manual 4
Playing and Editing cuts in the Library .................................................................... 86 Deleting Cuts from the Library ................................................................................ 88 In Use Check .......................................................................................................... 89 Start/Kill Date and Active/Kill Time Management ................................................... 89
Customizing the Library Display ................................................................................. 91
Column Display....................................................................................................... 91 Grid Lines and colors .............................................................................................. 92
Adding Cuts ............................................................................................................... 93
Normal .................................................................................................................... 93 Rotate ..................................................................................................................... 93 Creating a Rotate Cut ............................................................................................. 94 Other Rotate Cut Information .................................................................................. 94 Command ............................................................................................................... 95 Creating a Command Cut ....................................................................................... 95 Creating a Switcher Command Cut ........................................................................ 96 Playlist .................................................................................................................... 96 Creating a Playlist Cut ............................................................................................ 97 CD Ripper ............................................................................................................... 97 CD Ripper Buttons and Functions .......................................................................... 98 Using the CD Ripper ............................................................................................... 99 Configuring the CD Ripper .................................................................................... 100
Other Methods of Adding Audio Cuts ....................................................................... 101
Drag and Drop ...................................................................................................... 101 DropBox ................................................................................................................ 101 AudioCvt ............................................................................................................... 101
Modifying Library cuts .............................................................................................. 101
Modify Screen Button Functions and Field Information ........................................ 101 Copying Cuts and Changing Cut Numbers ........................................................... 106 Copying Existing Cuts ........................................................................................... 106 Changing Cut Numbers ........................................................................................ 107 Changing the audio format ................................................................................... 108
Generating Reports .................................................................................................. 108
Standard Library Reports ...................................................................................... 108 Playlist Report ...................................................................................................... 108 Groups Report ...................................................................................................... 108 Asplay Logs .......................................................................................................... 109 Custom Asplay...................................................................................................... 109 Record List Report ................................................................................................ 110 Exception Reports ................................................................................................ 110
ENCO DAD User Manual 5
Send To Location ..................................................................................................... 111
The LibSend.ini ..................................................................................................... 112
Multiple Libraries ...................................................................................................... 112
Multi-Library Maintenance screen buttons and functions ...................................... 113 Adding, Importing and Removing Libraries ........................................................... 114 To Update or Delete a Library .............................................................................. 115 Loading and Viewing Libraries .............................................................................. 115 Copying or Moving cuts to different Libraries ........................................................ 115
Playlists ...................................................................................................................... 116
Configuring Playlist Defaults .................................................................................... 116
Setting Segue Defaults ......................................................................................... 116 Controlling Fades .................................................................................................. 117 SEC and TER Cue Switches ................................................................................ 118
Examples of Playlists ............................................................................................... 119
Example for Satellite Programming ...................................................................... 119 Example for Live Assist programming .................................................................. 120 Example for Fully Automated programming .......................................................... 120
The Playlist Modify Screen ....................................................................................... 120
LEFT Side Functions ............................................................................................ 121 RIGHT Side Functions .......................................................................................... 123 The ADD / INSERT Menu ..................................................................................... 126 Automating Audio Cuts and Other Control Elements ............................................ 127 Setting Transition (TRANS) Status ....................................................................... 127 SEGUE EDITOR ................................................................................................... 129 Quick review of PLAYLIST MODIFY window ........................................................ 131
The Mini Playlist Modify Machine ............................................................................. 131
Playlist Modify Machine Functions ........................................................................ 132
Automating using Control Events ............................................................................. 133
Timed Events ........................................................................................................ 133 Branch Events ...................................................................................................... 134 Chain Events ........................................................................................................ 137 AUTO Fill .............................................................................................................. 139 Fill Cuts ................................................................................................................. 142 Backtime Marker ................................................................................................... 142 Playlist Cuts .......................................................................................................... 143 Spot Rotations ...................................................................................................... 143 Delay Events ........................................................................................................ 144 Comments ............................................................................................................ 144

ENCO DAD User Manual 6
Other control functions available within the Playlist Modify window ...................... 144 Modifying Control Events ...................................................................................... 145
LiveList ..................................................................................................................... 145
Setting up CutServer and LiveList Server ............................................................. 146 LiveList Application Overview ............................................................................... 148 Configuring DAD for use with LiveList Server ....................................................... 149 Configuring Playback Machines in DAD ............................................................... 150 Configuring a Playlist for LiveList .......................................................................... 152 Overview of usage ................................................................................................ 153
Shared Playlist Editing ............................................................................................. 153
Using Shared Playlist Editing ................................................................................ 153
Importing Playlists from 3rd Party Scheduling Systems or from other ENCO Software packages .................................................................................................................. 155
Importing an ASCII file from within DAD ............................................................... 155 Merging two existing playlists within DAD ............................................................. 157 Importing an ASCII file into DAD using another program ...................................... 158
Voice Tracking ........................................................................................................... 160
Tracker ..................................................................................................................... 161
Tracker Overview and Button Functions ............................................................... 161 The Display and Colors within Tracker ................................................................. 164 Using Tracker ....................................................................................................... 165 FastTrak ............................................................................................................... 169 Configuring Tracker .............................................................................................. 170
Segue Editor ............................................................................................................ 173
Segue Editor Overview and Button Functions ...................................................... 173 Using Segue Editor To Record Voiceovers .......................................................... 174 Configuring Segue Editor ...................................................................................... 175
Over Editor ............................................................................................................... 176
Setting a cut as an Over ....................................................................................... 176 Using the Over Editor ........................................................................................... 176
Dedicated Cuts ........................................................................................................ 179
Playback Machines ................................................................................................... 180
Loading a Playlist ..................................................................................................... 180 A Loaded Playback Machine .................................................................................... 183
Playback Function Buttons ................................................................................... 184 Playing an Audio Cut ............................................................................................ 187 Moving Cuts and Altering the Playback Order ...................................................... 188
ENCO DAD User Manual 7
The CUES Machine .............................................................................................. 190 Right-Click menus ................................................................................................. 190
Configuring the Playback Machines ......................................................................... 192 The AirPLAY Machine .............................................................................................. 199
A Loaded AirPLAY Machine and Button Functions .............................................. 199 Loading a Playlist .................................................................................................. 203 Using the AirPLAY Machine ................................................................................. 205 Other General AirPLAY items ............................................................................... 210
Configuring the AirPLAY Machine ............................................................................ 211 MASTERLOG Machine ............................................................................................ 216
Loading a Playlist .................................................................................................. 216 A Loaded MASTERLOG ....................................................................................... 217 MASTERLOG Button Functions ........................................................................... 218 Using the MasterLog Machine .............................................................................. 220
Configuring MasterLog ............................................................................................. 223 The ARRAY Screen ................................................................................................. 226
Using the ARRAY screen ..................................................................................... 226 Using Remote Play and Preset Mode ................................................................... 230 Using Stack Play ................................................................................................... 231
The GROUPS ARRAY Screen ................................................................................. 231
USING GROUPS ARRAY .................................................................................... 232
The Mini-Array Machines ......................................................................................... 233 Configuring the ARRAY ........................................................................................... 233 The Priority Play buttons .......................................................................................... 235 The 4PLAY Machine ................................................................................................ 236
Loading 4PLAY Machine Slots ............................................................................. 237 Configuring 4PLAY ............................................................................................... 237
The QUAD Machine ................................................................................................. 239
Loading the Quad Machine ................................................................................... 239 Playing the Quad Machine and button functions .................................................. 240 Right Click menu ................................................................................................... 240 Configuring the QUAD Machine ........................................................................... 240
The SCRIPT Machine .............................................................................................. 241
Loading and using the SCRIPT Machine .............................................................. 241 Configuring the SCRIPT Machine ......................................................................... 242
ENCO DAD User Manual 8
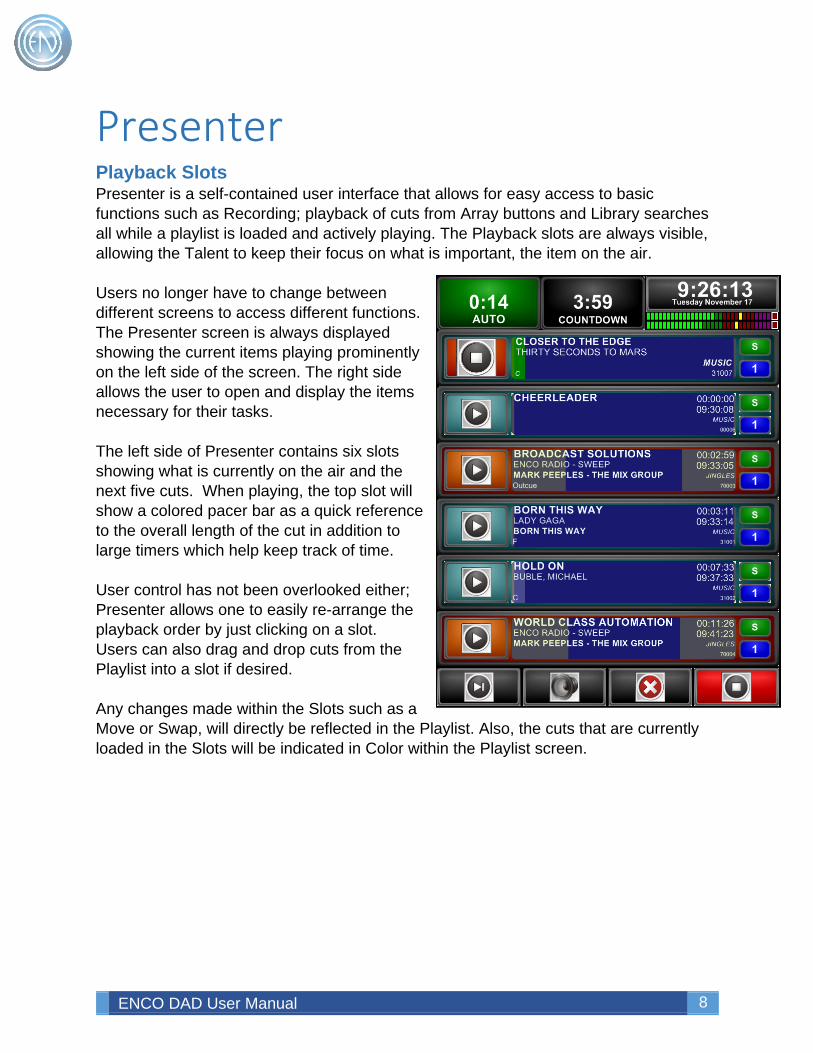
Presenter Playback Slots Presenter is a self-contained user interface that allows for easy access to basic functions such as Recording; playback of cuts from Array buttons and Library searches all while a playlist is loaded and actively playing. The Playback slots are always visible, allowing the Talent to keep their focus on what is important, the item on the air. Users no longer have to change between different screens to access different functions. The Presenter screen is always displayed showing the current items playing prominently on the left side of the screen. The right side allows the user to open and display the items necessary for their tasks. The left side of Presenter contains six slots showing what is currently on the air and the next five cuts. When playing, the top slot will show a colored pacer bar as a quick reference to the overall length of the cut in addition to large timers which help keep track of time. User control has not been overlooked either; Presenter allows one to easily re-arrange the playback order by just clicking on a slot. Users can also drag and drop cuts from the Playlist into a slot if desired. Any changes made within the Slots such as a Move or Swap, will directly be reflected in the Playlist. Also, the cuts that are currently loaded in the Slots will be indicated in Color within the Playlist screen.
ENCO DAD User Manual 9
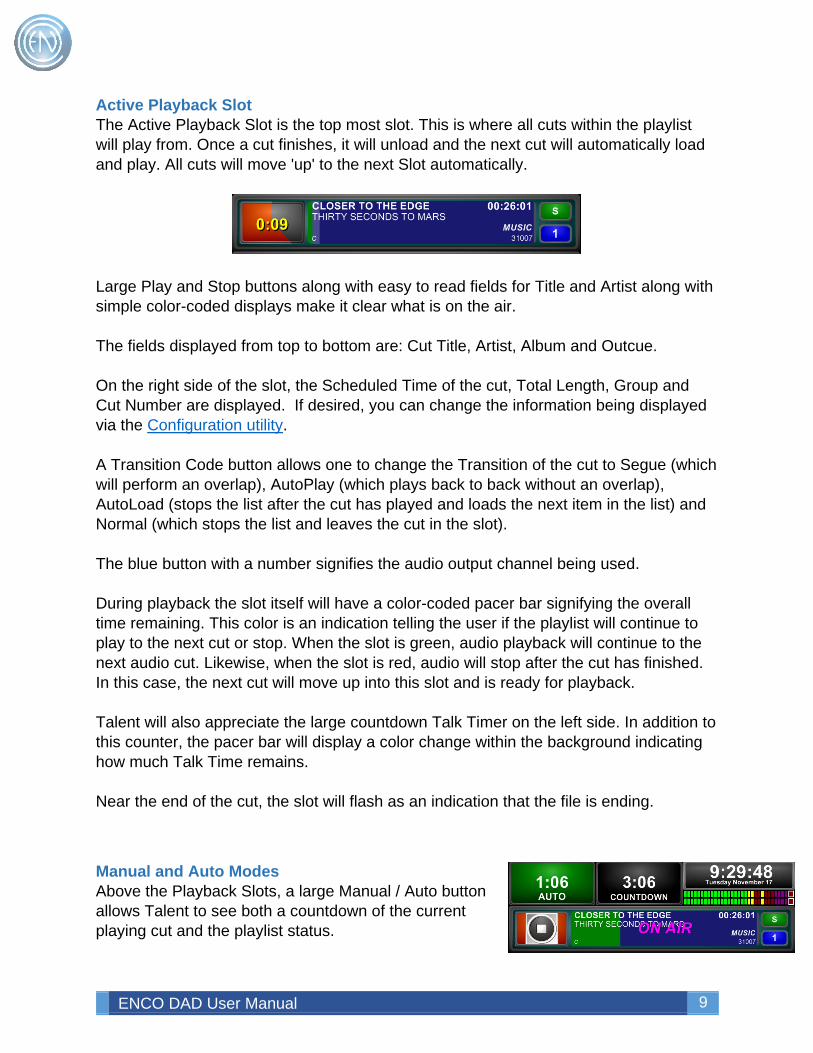
Active Playback Slot The Active Playback Slot is the top most slot. This is where all cuts within the playlist will play from. Once a cut finishes, it will unload and the next cut will automatically load and play. All cuts will move 'up' to the next Slot automatically.
Large Play and Stop buttons along with easy to read fields for Title and Artist along with simple color-coded displays make it clear what is on the air. The fields displayed from top to bottom are: Cut Title, Artist, Album and Outcue. On the right side of the slot, the Scheduled Time of the cut, Total Length, Group and Cut Number are displayed. If desired, you can change the information being displayed via the Configuration utility. A Transition Code button allows one to change the Transition of the cut to Segue (which will perform an overlap), AutoPlay (which plays back to back without an overlap), AutoLoad (stops the list after the cut has played and loads the next item in the list) and Normal (which stops the list and leaves the cut in the slot). The blue button with a number signifies the audio output channel being used. During playback the slot itself will have a color-coded pacer bar signifying the overall time remaining. This color is an indication telling the user if the playlist will continue to play to the next cut or stop. When the slot is green, audio playback will continue to the next audio cut. Likewise, when the slot is red, audio will stop after the cut has finished. In this case, the next cut will move up into this slot and is ready for playback. Talent will also appreciate the large countdown Talk Timer on the left side. In addition to this counter, the pacer bar will display a color change within the background indicating how much Talk Time remains. Near the end of the cut, the slot will flash as an indication that the file is ending.
Manual and Auto Modes Above the Playback Slots, a large Manual / Auto button allows Talent to see both a countdown of the current playing cut and the playlist status.
ENCO DAD User Manual 10
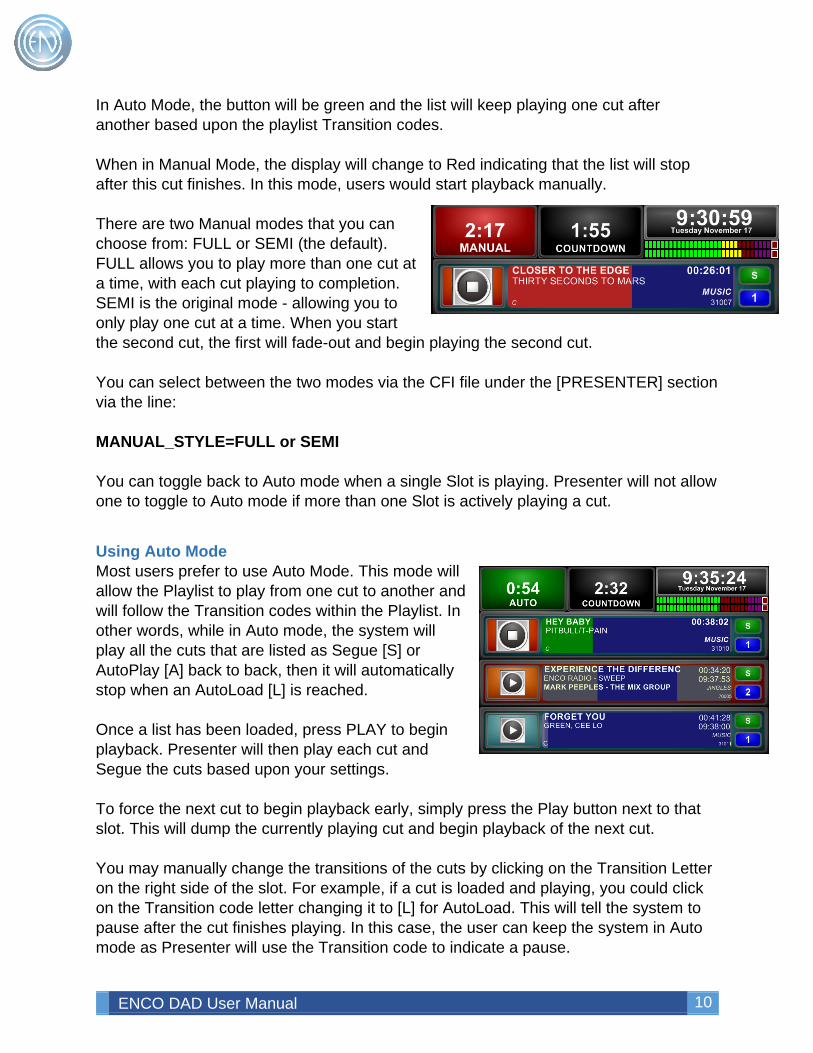
In Auto Mode, the button will be green and the list will keep playing one cut after another based upon the playlist Transition codes. When in Manual Mode, the display will change to Red indicating that the list will stop after this cut finishes. In this mode, users would start playback manually. There are two Manual modes that you can choose from: FULL or SEMI (the default). FULL allows you to play more than one cut at a time, with each cut playing to completion. SEMI is the original mode - allowing you to only play one cut at a time. When you start the second cut, the first will fade-out and begin playing the second cut. You can select between the two modes via the CFI file under the [PRESENTER] section via the line: MANUAL_STYLE=FULL or SEMI You can toggle back to Auto mode when a single Slot is playing. Presenter will not allow one to toggle to Auto mode if more than one Slot is actively playing a cut.
Using Auto Mode Most users prefer to use Auto Mode. This mode will allow the Playlist to play from one cut to another and will follow the Transition codes within the Playlist. In other words, while in Auto mode, the system will play all the cuts that are listed as Segue [S] or AutoPlay [A] back to back, then it will automatically stop when an AutoLoad [L] is reached. Once a list has been loaded, press PLAY to begin playback. Presenter will then play each cut and Segue the cuts based upon your settings. To force the next cut to begin playback early, simply press the Play button next to that slot. This will dump the currently playing cut and begin playback of the next cut. You may manually change the transitions of the cuts by clicking on the Transition Letter on the right side of the slot. For example, if a cut is loaded and playing, you could click on the Transition code letter changing it to [L] for AutoLoad. This will tell the system to pause after the cut finishes playing. In this case, the user can keep the system in Auto mode as Presenter will use the Transition code to indicate a pause.

ENCO DAD User Manual 11
Using Manual Mode When you toggle to Manual Mode, the slots will change color and you are instantly in control of all slots. When in FULL mode: This mode allows you to select and play individual slots with each slot playing the cut in its entirety. Once the slot has finished playing, that slot will empty out leaving that slot blank. When in Full Manual Mode, the slots will not automatically fill with the next cut to play. You may select a cut from the Playlist and load it into the slot if desired by pressing the Arrow button. This will load the selected cut into that Slot. All cuts that are currently loaded will retain their 'color' and position within the Playlist Tool display. In Full Manual Mode, when the cut is finished playing, the cut is replaced or deleted, it will be repositioned in the Playlist directly above the currently loaded cuts. When in SEMI mode: This mode will allow you to select and play a cut as normal. When you play the second cut, the first will fade and stop while the second will move up to the top slot and begin playing. Once the slot has finished playing, that slot will automatically fill with the next cut. All cuts that are currently loaded will retain their 'color' and position within the Playlist Tool display. To toggle back to Auto Mode, wait until there is only one cut playing and press the MANUAL button to toggle back to Auto Mode. When you switch back to Auto Mode, Presenter will automatically move the currently playing cut to the Top slot, move any remaining cuts in the slots up and will fill any empty slots with the next items from the Playlist.
ENCO DAD User Manual 12
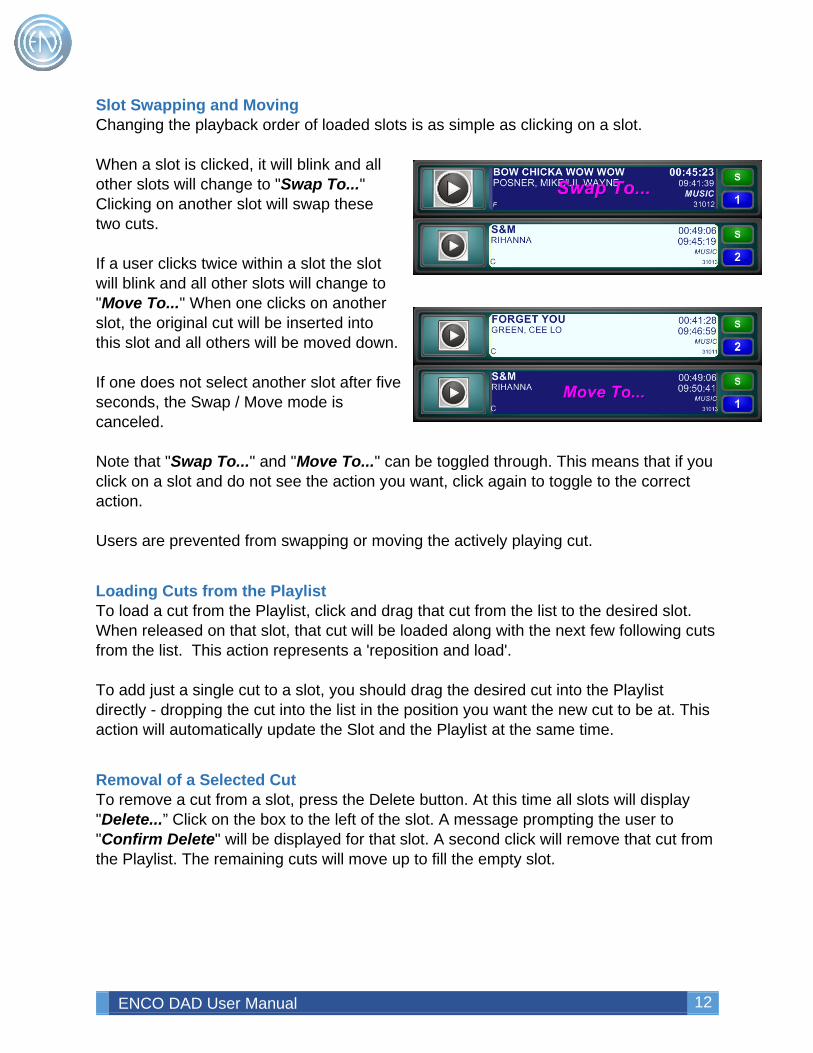
Slot Swapping and Moving Changing the playback order of loaded slots is as simple as clicking on a slot. When a slot is clicked, it will blink and all other slots will change to "Swap To..." Clicking on another slot will swap these two cuts. If a user clicks twice within a slot the slot will blink and all other slots will change to "Move To..." When one clicks on another slot, the original cut will be inserted into this slot and all others will be moved down. If one does not select another slot after five seconds, the Swap / Move mode is canceled. Note that "Swap To..." and "Move To..." can be toggled through. This means that if you click on a slot and do not see the action you want, click again to toggle to the correct action. Users are prevented from swapping or moving the actively playing cut.
Loading Cuts from the Playlist To load a cut from the Playlist, click and drag that cut from the list to the desired slot. When released on that slot, that cut will be loaded along with the next few following cuts from the list. This action represents a 'reposition and load'. To add just a single cut to a slot, you should drag the desired cut into the Playlist directly - dropping the cut into the list in the position you want the new cut to be at. This action will automatically update the Slot and the Playlist at the same time.
Removal of a Selected Cut To remove a cut from a slot, press the Delete button. At this time all slots will display "Delete...” Click on the box to the left of the slot. A message prompting the user to "Confirm Delete" will be displayed for that slot. A second click will remove that cut from the Playlist. The remaining cuts will move up to fill the empty slot.
ENCO DAD User Manual 13
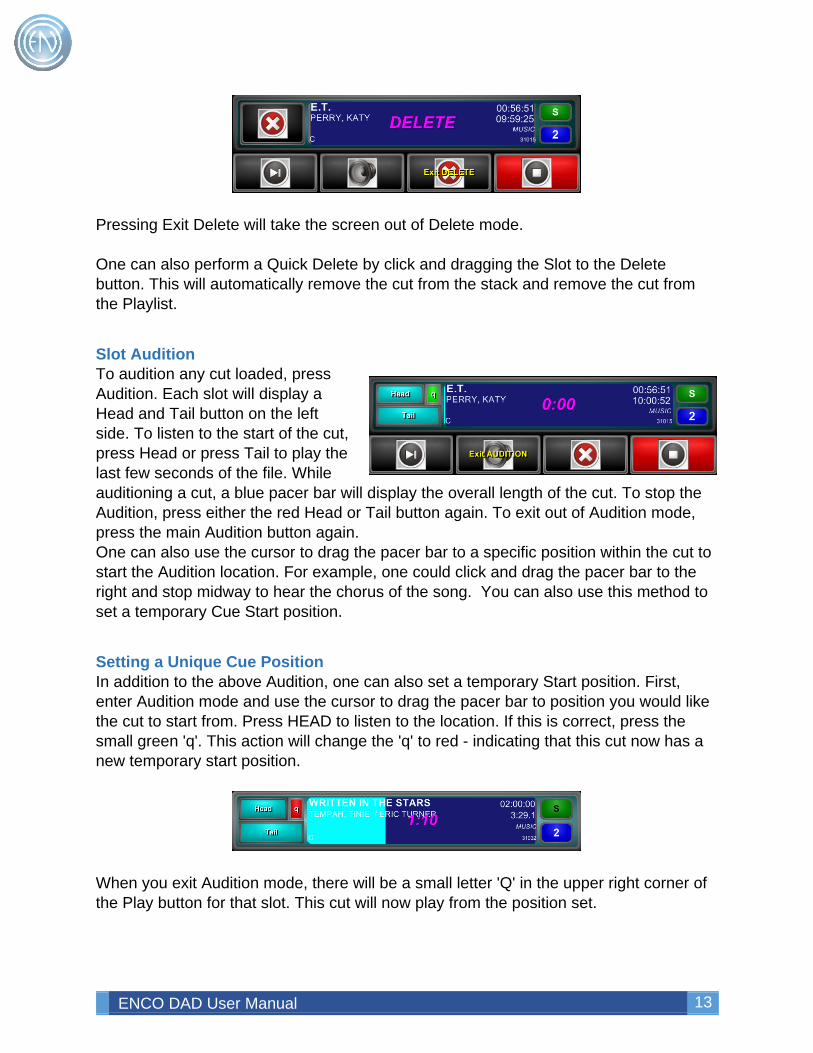
Pressing Exit Delete will take the screen out of Delete mode. One can also perform a Quick Delete by click and dragging the Slot to the Delete button. This will automatically remove the cut from the stack and remove the cut from the Playlist.
Slot Audition To audition any cut loaded, press Audition. Each slot will display a Head and Tail button on the left side. To listen to the start of the cut, press Head or press Tail to play the last few seconds of the file. While auditioning a cut, a blue pacer bar will display the overall length of the cut. To stop the Audition, press either the red Head or Tail button again. To exit out of Audition mode, press the main Audition button again. One can also use the cursor to drag the pacer bar to a specific position within the cut to start the Audition location. For example, one could click and drag the pacer bar to the right and stop midway to hear the chorus of the song. You can also use this method to set a temporary Cue Start position.
Setting a Unique Cue Position In addition to the above Audition, one can also set a temporary Start position. First, enter Audition mode and use the cursor to drag the pacer bar to position you would like the cut to start from. Press HEAD to listen to the location. If this is correct, press the small green 'q'. This action will change the 'q' to red - indicating that this cut now has a new temporary start position.
When you exit Audition mode, there will be a small letter 'Q' in the upper right corner of the Play button for that slot. This cut will now play from the position set.
ENCO DAD User Manual 14
Library The Library screen allows one to view all files available for playback. Any cut entered into the system from any workstation will be displayed in this screen.
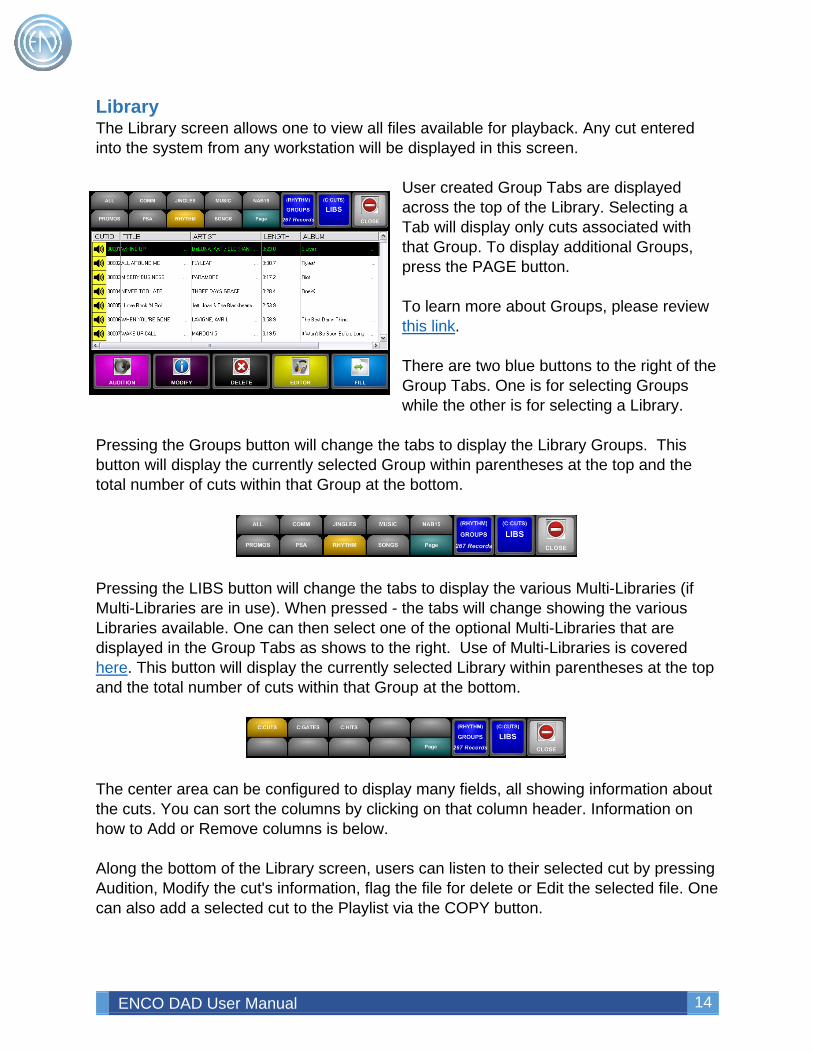
User created Group Tabs are displayed across the top of the Library. Selecting a Tab will display only cuts associated with that Group. To display additional Groups, press the PAGE button. To learn more about Groups, please review this link. There are two blue buttons to the right of the Group Tabs. One is for selecting Groups while the other is for selecting a Library.
Pressing the Groups button will change the tabs to display the Library Groups. This button will display the currently selected Group within parentheses at the top and the total number of cuts within that Group at the bottom.
Pressing the LIBS button will change the tabs to display the various Multi-Libraries (if Multi-Libraries are in use). When pressed - the tabs will change showing the various Libraries available. One can then select one of the optional Multi-Libraries that are displayed in the Group Tabs as shows to the right. Use of Multi-Libraries is covered here. This button will display the currently selected Library within parentheses at the top and the total number of cuts within that Group at the bottom.
The center area can be configured to display many fields, all showing information about the cuts. You can sort the columns by clicking on that column header. Information on how to Add or Remove columns is below. Along the bottom of the Library screen, users can listen to their selected cut by pressing Audition, Modify the cut's information, flag the file for delete or Edit the selected file. One can also add a selected cut to the Playlist via the COPY button.
ENCO DAD User Manual 15
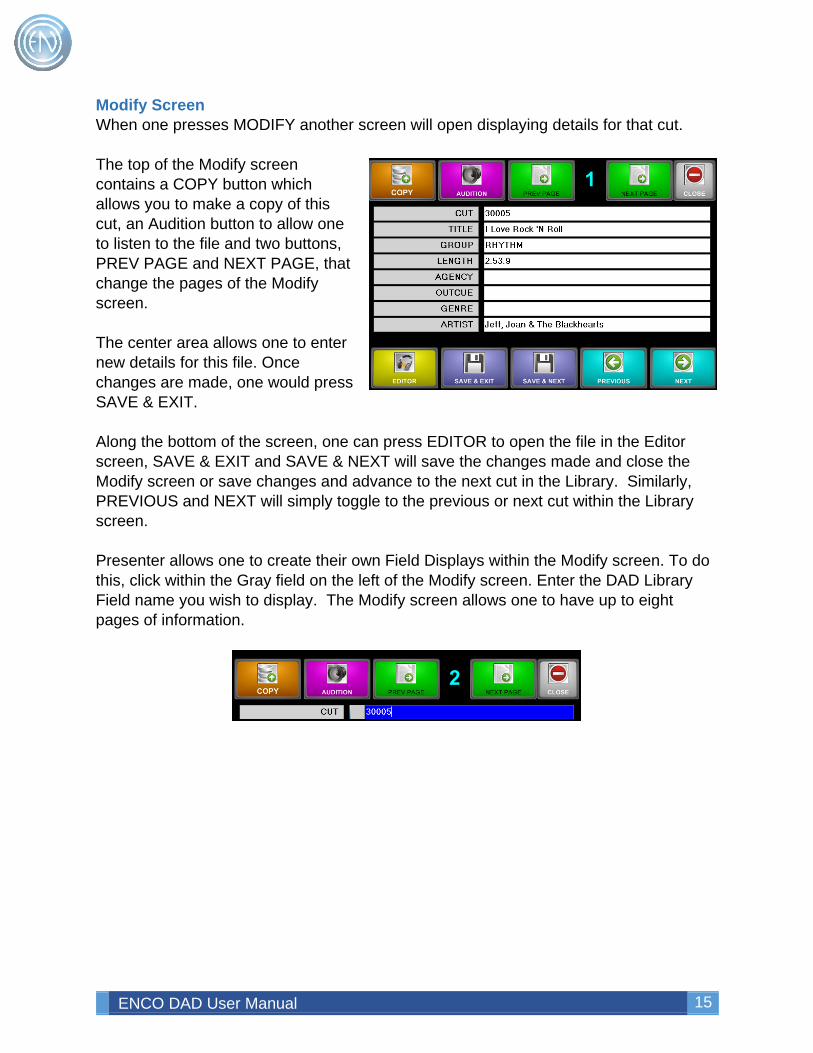
Modify Screen When one presses MODIFY another screen will open displaying details for that cut. The top of the Modify screen contains a COPY button which allows you to make a copy of this cut, an Audition button to allow one to listen to the file and two buttons, PREV PAGE and NEXT PAGE, that change the pages of the Modify screen. The center area allows one to enter new details for this file. Once changes are made, one would press SAVE & EXIT. Along the bottom of the screen, one can press EDITOR to open the file in the Editor screen, SAVE & EXIT and SAVE & NEXT will save the changes made and close the Modify screen or save changes and advance to the next cut in the Library. Similarly, PREVIOUS and NEXT will simply toggle to the previous or next cut within the Library screen. Presenter allows one to create their own Field Displays within the Modify screen. To do this, click within the Gray field on the left of the Modify screen. Enter the DAD Library Field name you wish to display. The Modify screen allows one to have up to eight pages of information.
ENCO DAD User Manual 16
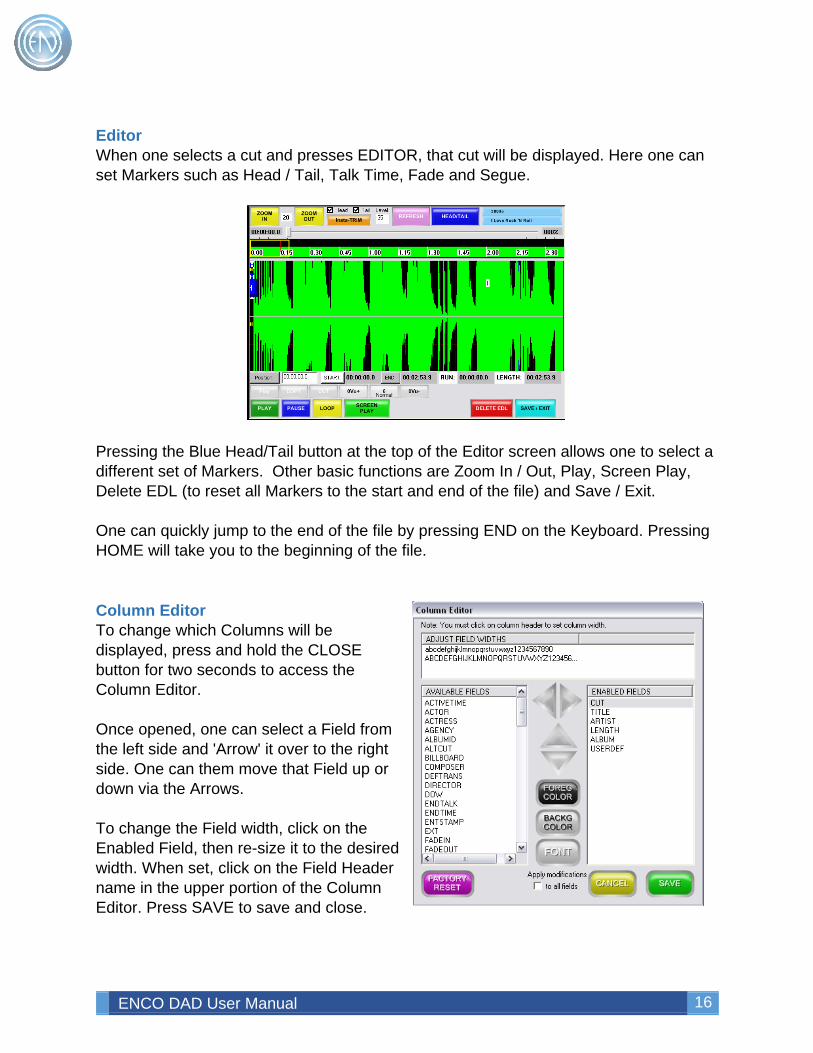
Editor When one selects a cut and presses EDITOR, that cut will be displayed. Here one can set Markers such as Head / Tail, Talk Time, Fade and Segue.
Pressing the Blue Head/Tail button at the top of the Editor screen allows one to select a different set of Markers. Other basic functions are Zoom In / Out, Play, Screen Play, Delete EDL (to reset all Markers to the start and end of the file) and Save / Exit. One can quickly jump to the end of the file by pressing END on the Keyboard. Pressing HOME will take you to the beginning of the file.
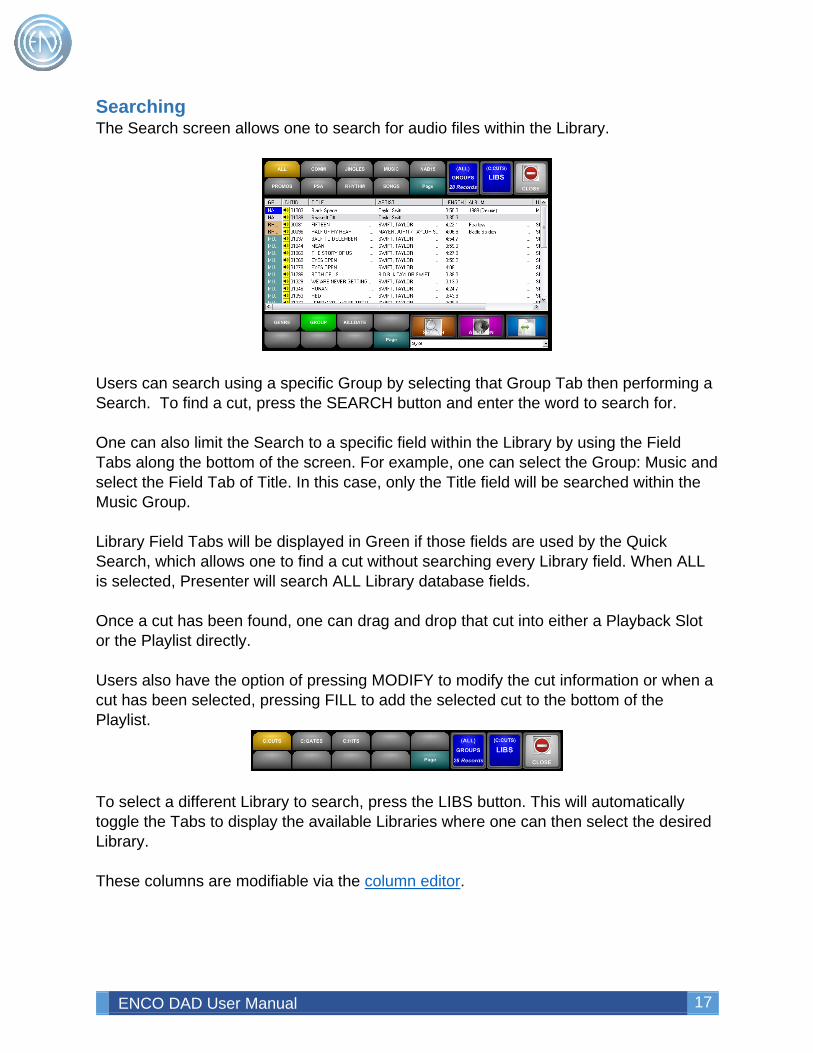
Column Editor To change which Columns will be displayed, press and hold the CLOSE button for two seconds to access the Column Editor. Once opened, one can select a Field from the left side and 'Arrow' it over to the right side. One can them move that Field up or down via the Arrows. To change the Field width, click on the Enabled Field, then re-size it to the desired width. When set, click on the Field Header name in the upper portion of the Column Editor. Press SAVE to save and close.
ENCO DAD User Manual 17
Searching The Search screen allows one to search for audio files within the Library.
Users can search using a specific Group by selecting that Group Tab then performing a Search. To find a cut, press the SEARCH button and enter the word to search for. One can also limit the Search to a specific field within the Library by using the Field Tabs along the bottom of the screen. For example, one can select the Group: Music and select the Field Tab of Title. In this case, only the Title field will be searched within the Music Group. Library Field Tabs will be displayed in Green if those fields are used by the Quick Search, which allows one to find a cut without searching every Library field. When ALL is selected, Presenter will search ALL Library database fields. Once a cut has been found, one can drag and drop that cut into either a Playback Slot or the Playlist directly. Users also have the option of pressing MODIFY to modify the cut information or when a cut has been selected, pressing FILL to add the selected cut to the bottom of the Playlist.
To select a different Library to search, press the LIBS button. This will automatically toggle the Tabs to display the available Libraries where one can then select the desired Library. These columns are modifiable via the column editor.
ENCO DAD User Manual 18
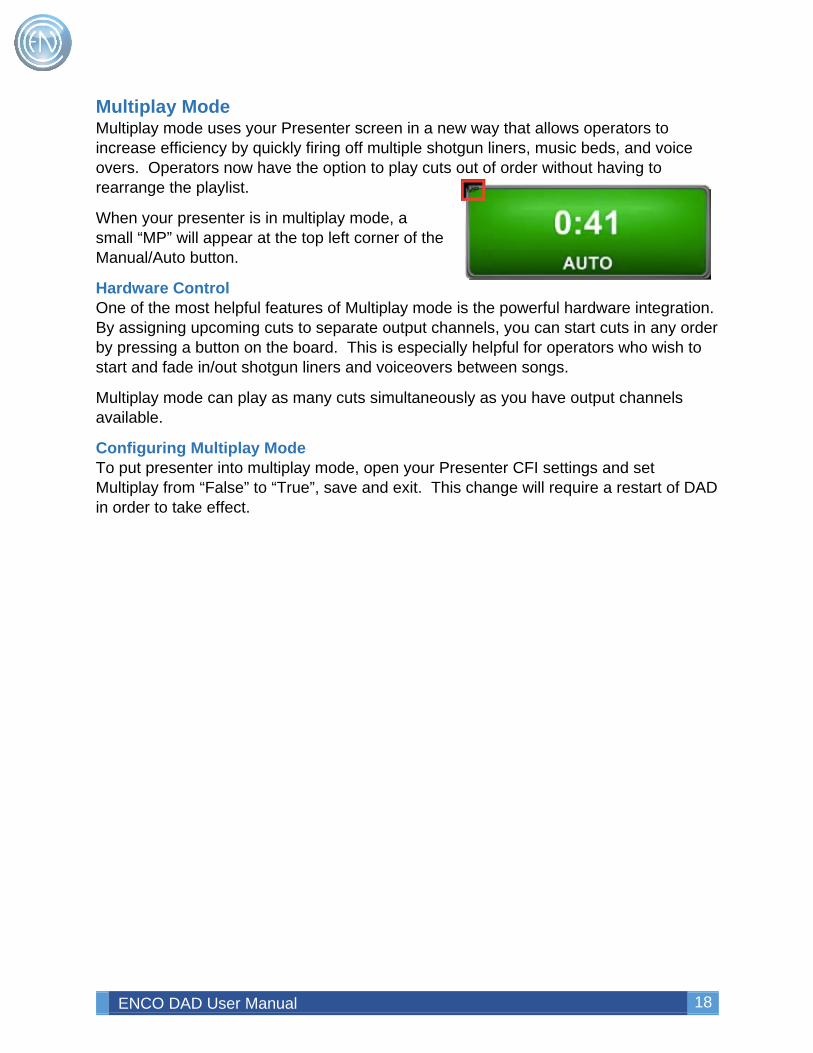
Multiplay Mode Multiplay mode uses your Presenter screen in a new way that allows operators to increase efficiency by quickly firing off multiple shotgun liners, music beds, and voice overs. Operators now have the option to play cuts out of order without having to rearrange the playlist.
When your presenter is in multiplay mode, a small “MP” will appear at the top left corner of the Manual/Auto button.
Hardware Control One of the most helpful features of Multiplay mode is the powerful hardware integration. By assigning upcoming cuts to separate output channels, you can start cuts in any order by pressing a button on the board. This is especially helpful for operators who wish to start and fade in/out shotgun liners and voiceovers between songs.
Multiplay mode can play as many cuts simultaneously as you have output channels available.
Configuring Multiplay Mode To put presenter into multiplay mode, open your Presenter CFI settings and set Multiplay from “False” to “True”, save and exit. This change will require a restart of DAD in order to take effect.
ENCO DAD User Manual 19
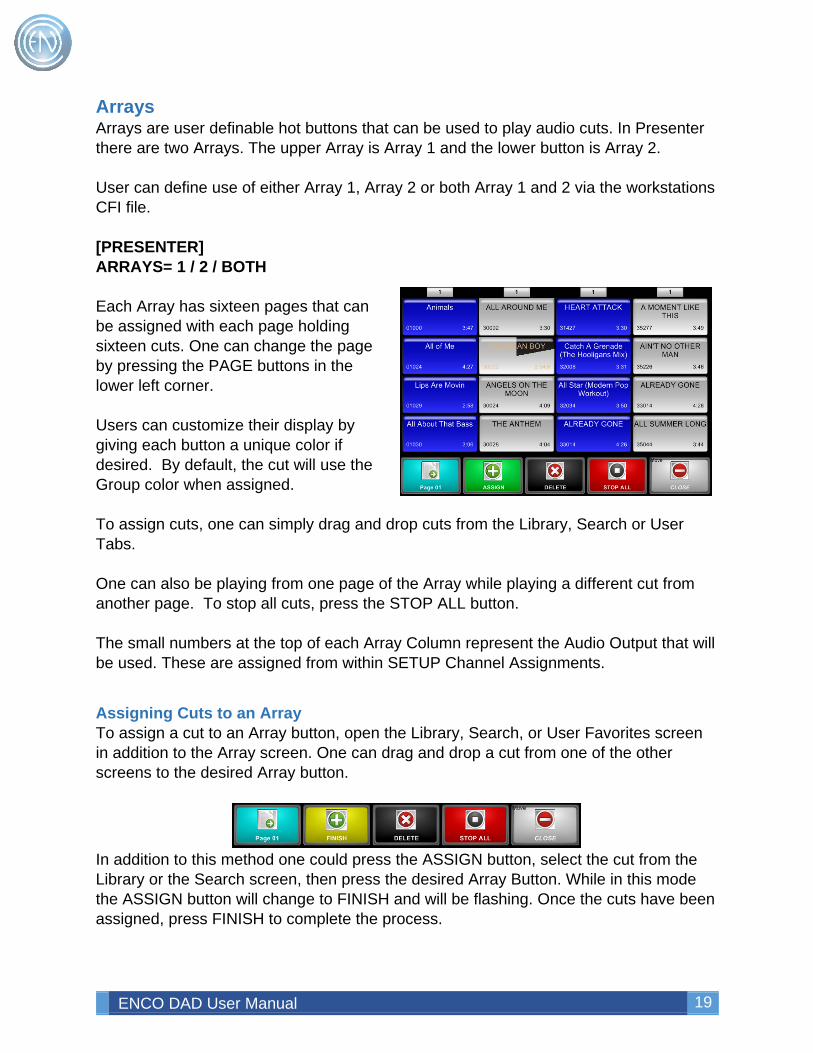
Arrays Arrays are user definable hot buttons that can be used to play audio cuts. In Presenter there are two Arrays. The upper Array is Array 1 and the lower button is Array 2. User can define use of either Array 1, Array 2 or both Array 1 and 2 via the workstations CFI file. [PRESENTER] ARRAYS= 1 / 2 / BOTH Each Array has sixteen pages that can be assigned with each page holding sixteen cuts. One can change the page by pressing the PAGE buttons in the lower left corner. Users can customize their display by giving each button a unique color if desired. By default, the cut will use the Group color when assigned. To assign cuts, one can simply drag and drop cuts from the Library, Search or User Tabs. One can also be playing from one page of the Array while playing a different cut from another page. To stop all cuts, press the STOP ALL button. The small numbers at the top of each Array Column represent the Audio Output that will be used. These are assigned from within SETUP Channel Assignments.
Assigning Cuts to an Array To assign a cut to an Array button, open the Library, Search, or User Favorites screen in addition to the Array screen. One can drag and drop a cut from one of the other screens to the desired Array button.
In addition to this method one could press the ASSIGN button, select the cut from the Library or the Search screen, then press the desired Array Button. While in this mode the ASSIGN button will change to FINISH and will be flashing. Once the cuts have been assigned, press FINISH to complete the process.
ENCO DAD User Manual 20
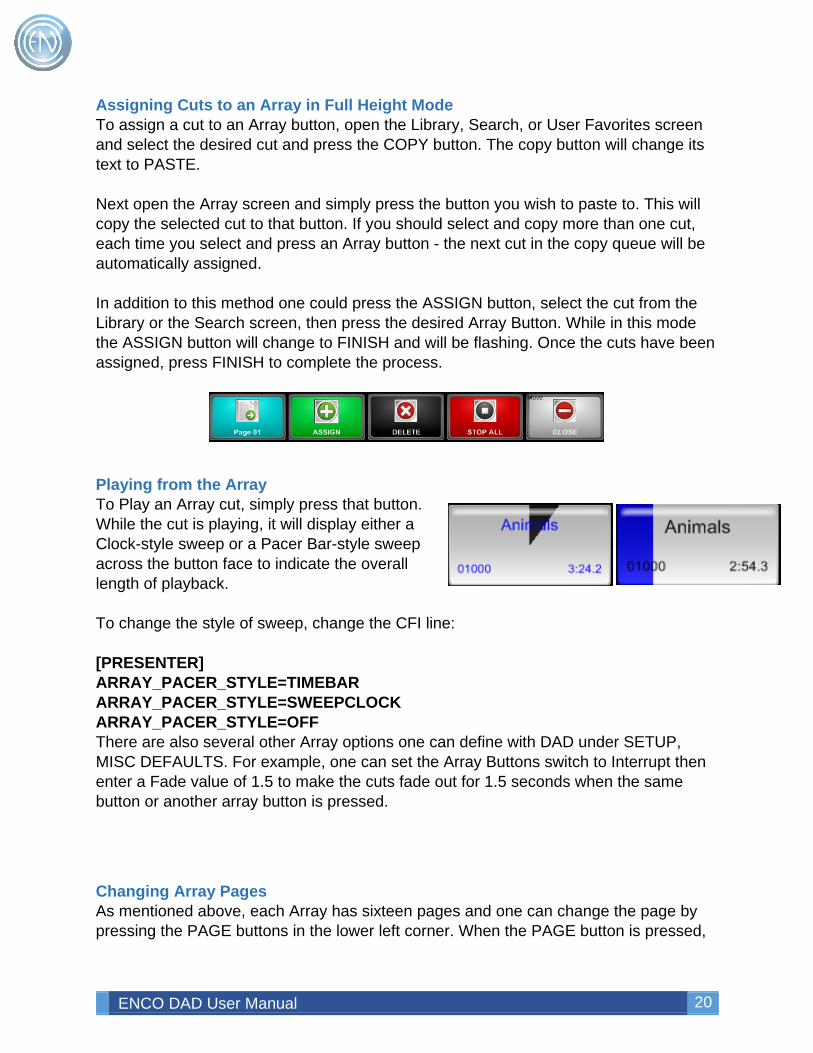
Assigning Cuts to an Array in Full Height Mode To assign a cut to an Array button, open the Library, Search, or User Favorites screen and select the desired cut and press the COPY button. The copy button will change its text to PASTE. Next open the Array screen and simply press the button you wish to paste to. This will copy the selected cut to that button. If you should select and copy more than one cut, each time you select and press an Array button - the next cut in the copy queue will be automatically assigned. In addition to this method one could press the ASSIGN button, select the cut from the Library or the Search screen, then press the desired Array Button. While in this mode the ASSIGN button will change to FINISH and will be flashing. Once the cuts have been assigned, press FINISH to complete the process.
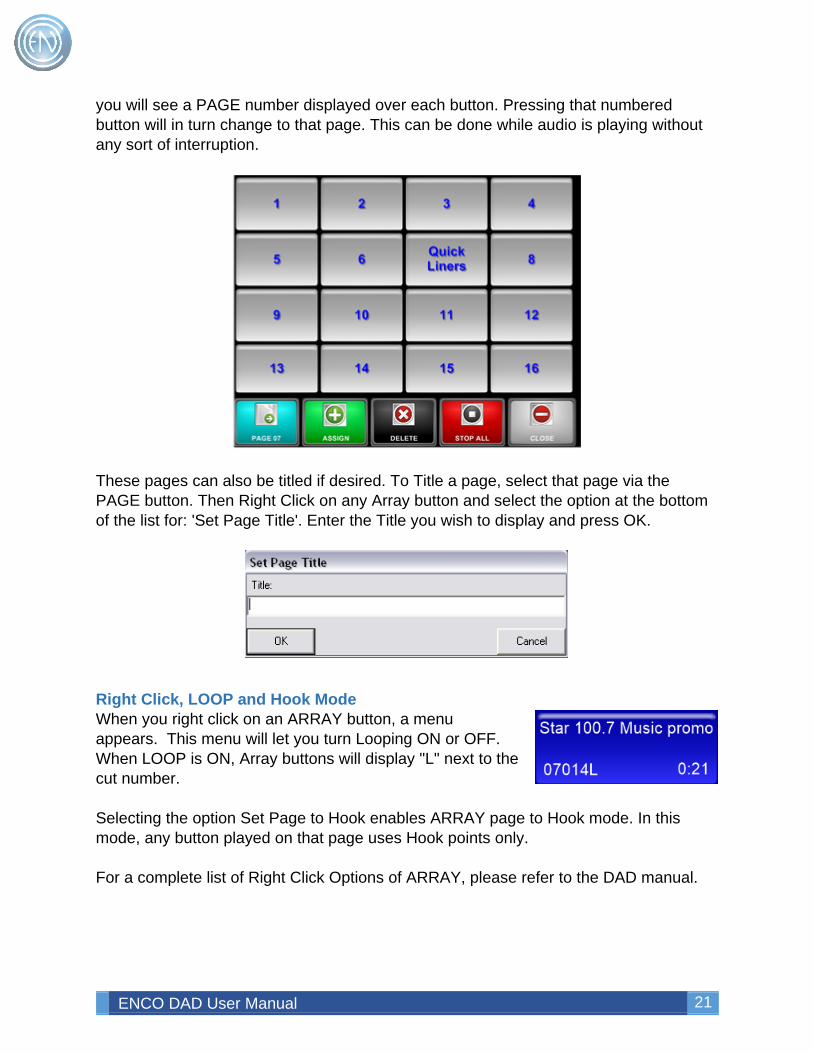
Playing from the Array To Play an Array cut, simply press that button. While the cut is playing, it will display either a Clock-style sweep or a Pacer Bar-style sweep across the button face to indicate the overall length of playback. To change the style of sweep, change the CFI line: [PRESENTER] ARRAY_PACER_STYLE=TIMEBAR ARRAY_PACER_STYLE=SWEEPCLOCK ARRAY_PACER_STYLE=OFF There are also several other Array options one can define with DAD under SETUP, MISC DEFAULTS. For example, one can set the Array Buttons switch to Interrupt then enter a Fade value of 1.5 to make the cuts fade out for 1.5 seconds when the same button or another array button is pressed.
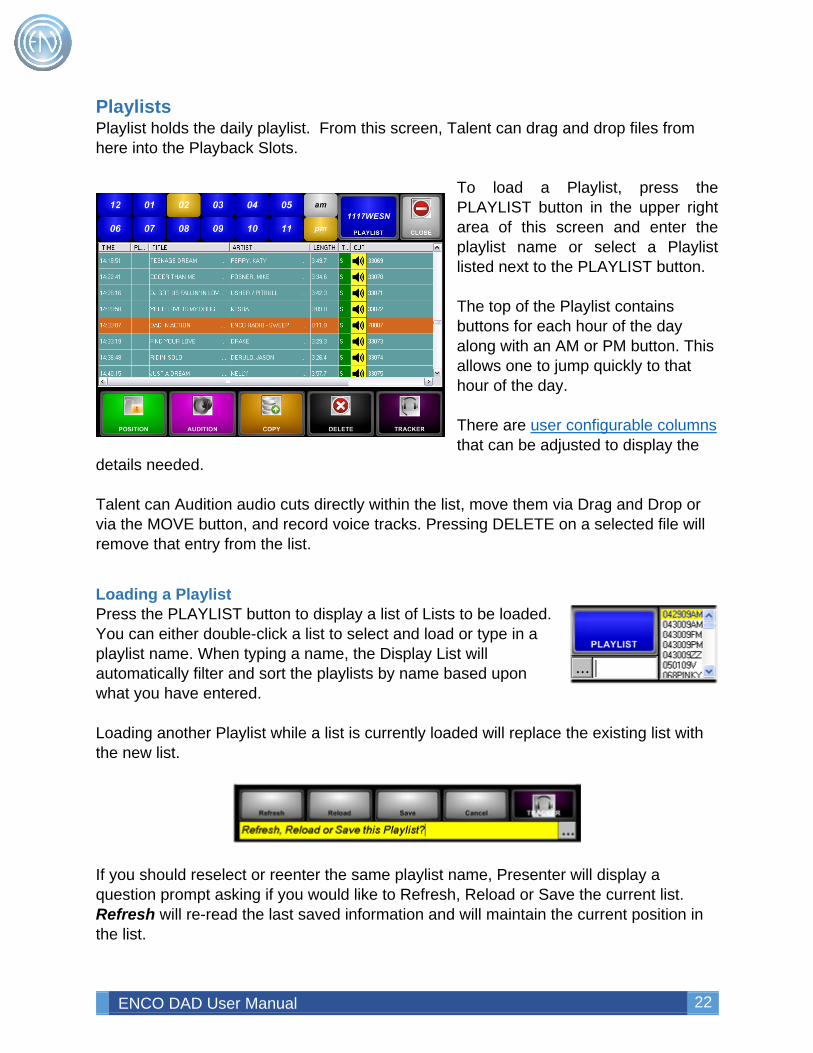
Changing Array Pages As mentioned above, each Array has sixteen pages and one can change the page by pressing the PAGE buttons in the lower left corner. When the PAGE button is pressed,
ENCO DAD User Manual 21
you will see a PAGE number displayed over each button. Pressing that numbered button will in turn change to that page. This can be done while audio is playing without any sort of interruption.
These pages can also be titled if desired. To Title a page, select that page via the PAGE button. Then Right Click on any Array button and select the option at the bottom of the list for: 'Set Page Title'. Enter the Title you wish to display and press OK.
Right Click, LOOP and Hook Mode When you right click on an ARRAY button, a menu appears. This menu will let you turn Looping ON or OFF. When LOOP is ON, Array buttons will display "L" next to the cut number. Selecting the option Set Page to Hook enables ARRAY page to Hook mode. In this mode, any button played on that page uses Hook points only. For a complete list of Right Click Options of ARRAY, please refer to the DAD manual.
ENCO DAD User Manual 22
Playlists Playlist holds the daily playlist. From this screen, Talent can drag and drop files from here into the Playback Slots.
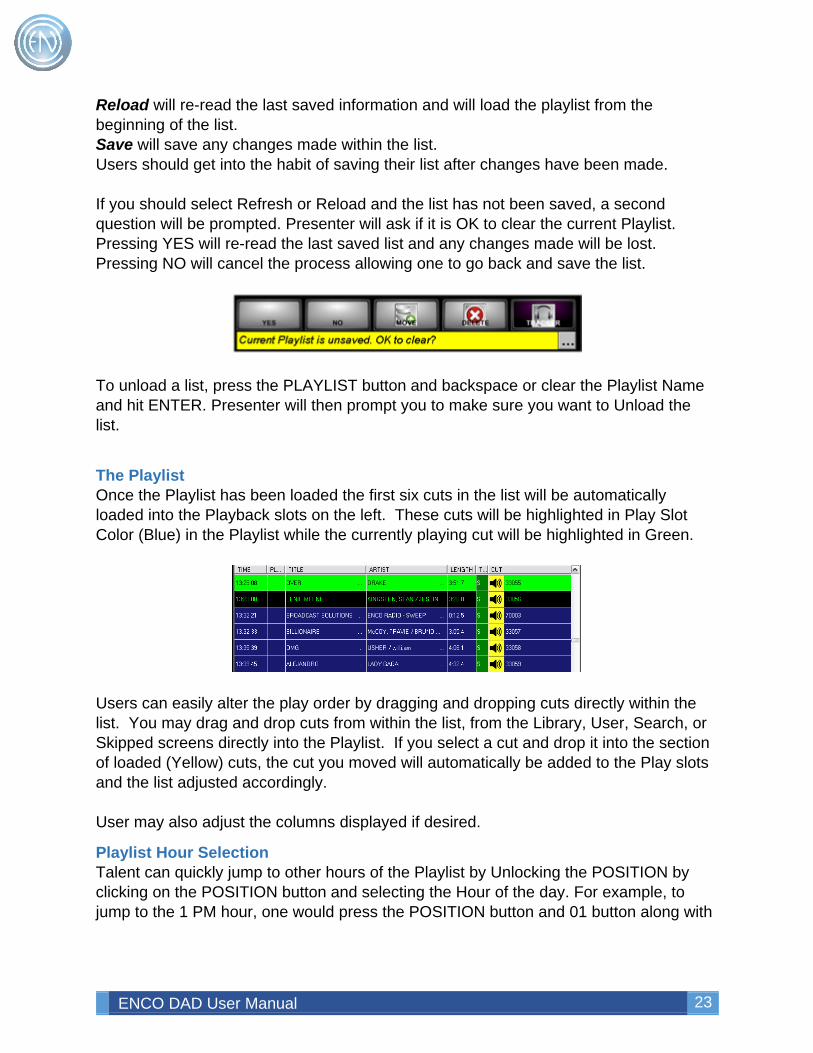
To load a Playlist, press the PLAYLIST button in the upper right area of this screen and enter the playlist name or select a Playlist listed next to the PLAYLIST button. The top of the Playlist contains buttons for each hour of the day along with an AM or PM button. This allows one to jump quickly to that hour of the day. There are user configurable columns that can be adjusted to display the
details needed. Talent can Audition audio cuts directly within the list, move them via Drag and Drop or via the MOVE button, and record voice tracks. Pressing DELETE on a selected file will remove that entry from the list.
Loading a Playlist Press the PLAYLIST button to display a list of Lists to be loaded. You can either double-click a list to select and load or type in a playlist name. When typing a name, the Display List will automatically filter and sort the playlists by name based upon what you have entered. Loading another Playlist while a list is currently loaded will replace the existing list with the new list.
If you should reselect or reenter the same playlist name, Presenter will display a question prompt asking if you would like to Refresh, Reload or Save the current list. Refresh will re-read the last saved information and will maintain the current position in the list.
ENCO DAD User Manual 23
Reload will re-read the last saved information and will load the playlist from the beginning of the list. Save will save any changes made within the list. Users should get into the habit of saving their list after changes have been made. If you should select Refresh or Reload and the list has not been saved, a second question will be prompted. Presenter will ask if it is OK to clear the current Playlist. Pressing YES will re-read the last saved list and any changes made will be lost. Pressing NO will cancel the process allowing one to go back and save the list.
To unload a list, press the PLAYLIST button and backspace or clear the Playlist Name and hit ENTER. Presenter will then prompt you to make sure you want to Unload the list.
The Playlist Once the Playlist has been loaded the first six cuts in the list will be automatically loaded into the Playback slots on the left. These cuts will be highlighted in Play Slot Color (Blue) in the Playlist while the currently playing cut will be highlighted in Green.
Users can easily alter the play order by dragging and dropping cuts directly within the list. You may drag and drop cuts from within the list, from the Library, User, Search, or Skipped screens directly into the Playlist. If you select a cut and drop it into the section of loaded (Yellow) cuts, the cut you moved will automatically be added to the Play slots and the list adjusted accordingly. User may also adjust the columns displayed if desired.
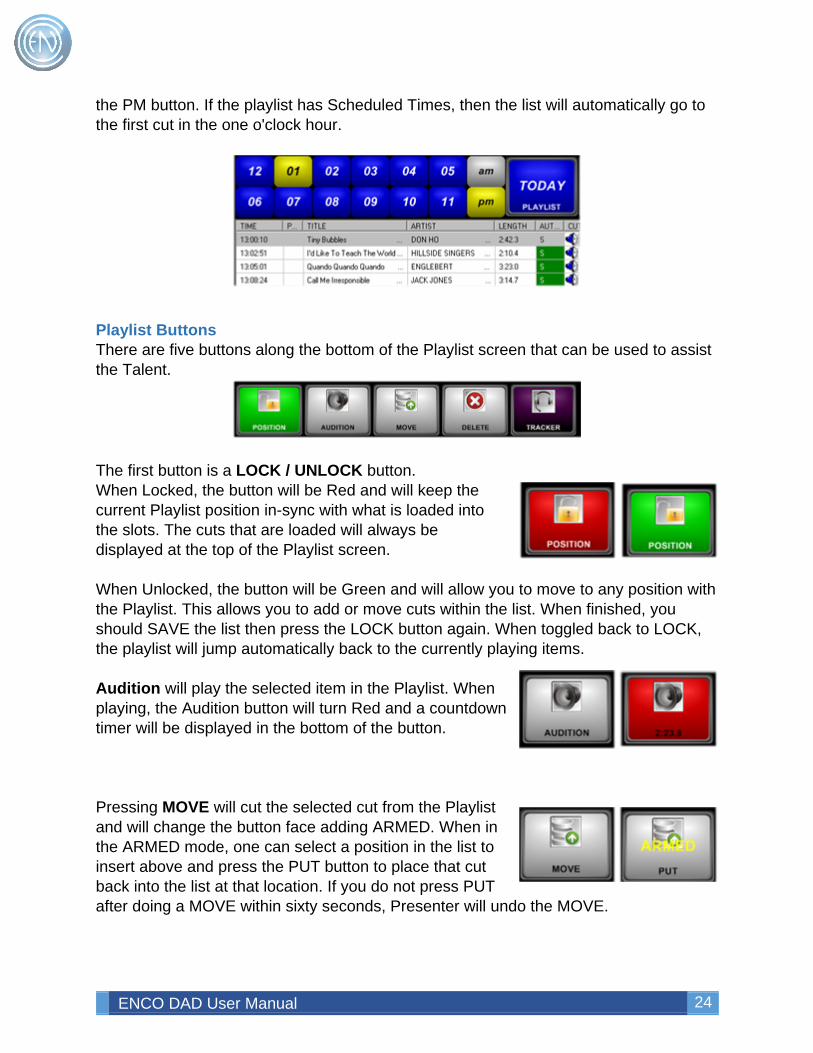
Playlist Hour Selection Talent can quickly jump to other hours of the Playlist by Unlocking the POSITION by clicking on the POSITION button and selecting the Hour of the day. For example, to jump to the 1 PM hour, one would press the POSITION button and 01 button along with
ENCO DAD User Manual 24
the PM button. If the playlist has Scheduled Times, then the list will automatically go to the first cut in the one o'clock hour.
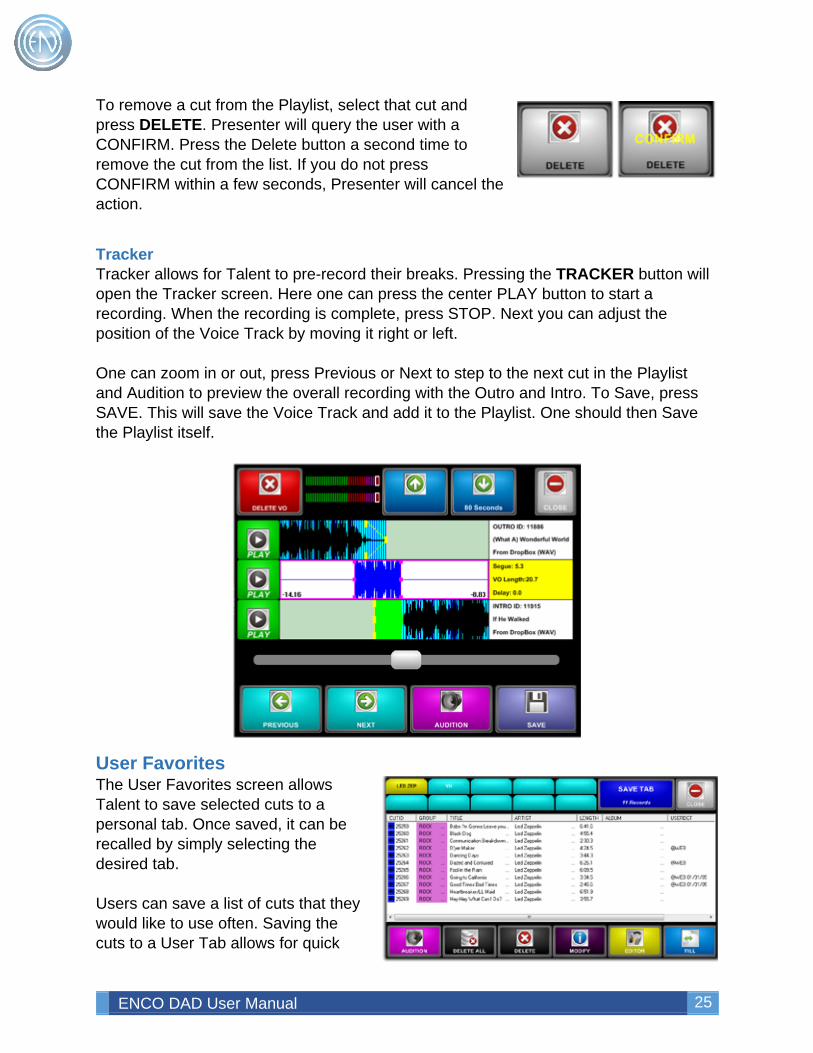
Playlist Buttons There are five buttons along the bottom of the Playlist screen that can be used to assist the Talent.
The first button is a LOCK / UNLOCK button. When Locked, the button will be Red and will keep the current Playlist position in-sync with what is loaded into the slots. The cuts that are loaded will always be displayed at the top of the Playlist screen. When Unlocked, the button will be Green and will allow you to move to any position with the Playlist. This allows you to add or move cuts within the list. When finished, you should SAVE the list then press the LOCK button again. When toggled back to LOCK, the playlist will jump automatically back to the currently playing items. Audition will play the selected item in the Playlist. When playing, the Audition button will turn Red and a countdown timer will be displayed in the bottom of the button. Pressing MOVE will cut the selected cut from the Playlist and will change the button face adding ARMED. When in the ARMED mode, one can select a position in the list to insert above and press the PUT button to place that cut back into the list at that location. If you do not press PUT after doing a MOVE within sixty seconds, Presenter will undo the MOVE.
ENCO DAD User Manual 25
To remove a cut from the Playlist, select that cut and press DELETE. Presenter will query the user with a CONFIRM. Press the Delete button a second time to remove the cut from the list. If you do not press CONFIRM within a few seconds, Presenter will cancel the action.
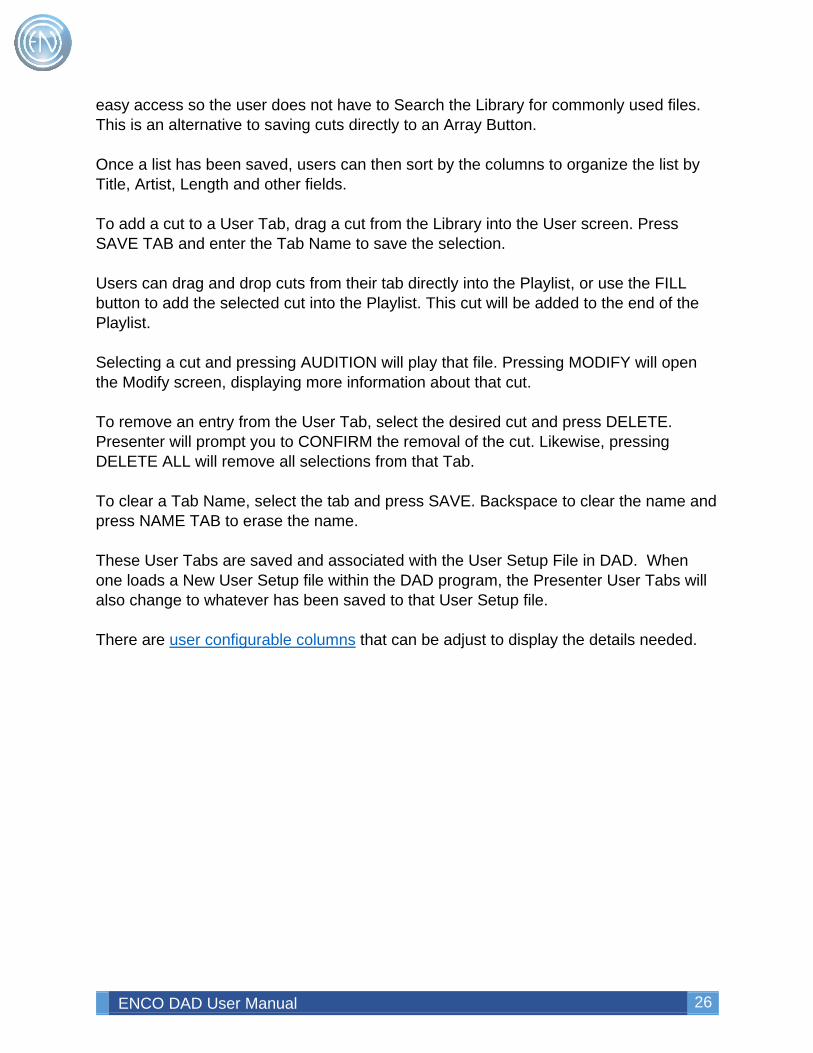
Tracker Tracker allows for Talent to pre-record their breaks. Pressing the TRACKER button will open the Tracker screen. Here one can press the center PLAY button to start a recording. When the recording is complete, press STOP. Next you can adjust the position of the Voice Track by moving it right or left. One can zoom in or out, press Previous or Next to step to the next cut in the Playlist and Audition to preview the overall recording with the Outro and Intro. To Save, press SAVE. This will save the Voice Track and add it to the Playlist. One should then Save the Playlist itself.
User Favorites The User Favorites screen allows Talent to save selected cuts to a personal tab. Once saved, it can be recalled by simply selecting the desired tab. Users can save a list of cuts that they would like to use often. Saving the cuts to a User Tab allows for quick
ENCO DAD User Manual 26
easy access so the user does not have to Search the Library for commonly used files. This is an alternative to saving cuts directly to an Array Button. Once a list has been saved, users can then sort by the columns to organize the list by Title, Artist, Length and other fields. To add a cut to a User Tab, drag a cut from the Library into the User screen. Press SAVE TAB and enter the Tab Name to save the selection. Users can drag and drop cuts from their tab directly into the Playlist, or use the FILL button to add the selected cut into the Playlist. This cut will be added to the end of the Playlist. Selecting a cut and pressing AUDITION will play that file. Pressing MODIFY will open the Modify screen, displaying more information about that cut. To remove an entry from the User Tab, select the desired cut and press DELETE. Presenter will prompt you to CONFIRM the removal of the cut. Likewise, pressing DELETE ALL will remove all selections from that Tab. To clear a Tab Name, select the tab and press SAVE. Backspace to clear the name and press NAME TAB to erase the name. These User Tabs are saved and associated with the User Setup File in DAD. When one loads a New User Setup file within the DAD program, the Presenter User Tabs will also change to whatever has been saved to that User Setup file. There are user configurable columns that can be adjust to display the details needed.
ENCO DAD User Manual 27
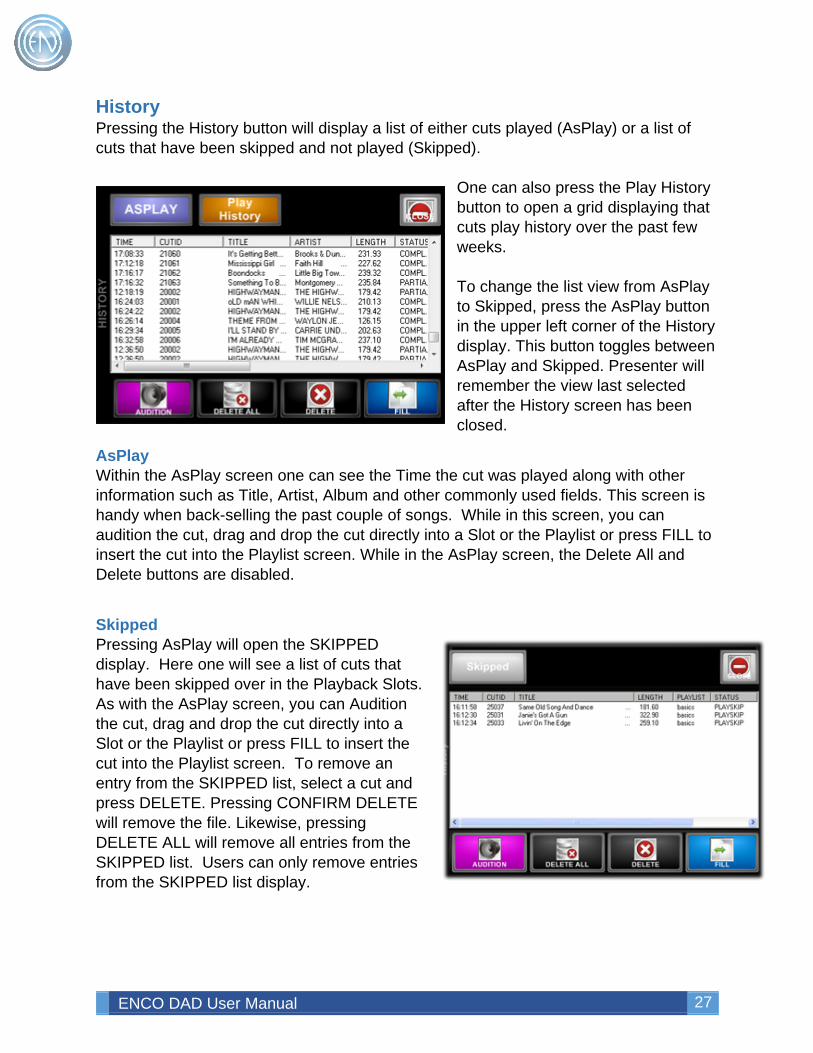
History Pressing the History button will display a list of either cuts played (AsPlay) or a list of cuts that have been skipped and not played (Skipped).
One can also press the Play History button to open a grid displaying that cuts play history over the past few weeks. To change the list view from AsPlay to Skipped, press the AsPlay button in the upper left corner of the History display. This button toggles between AsPlay and Skipped. Presenter will remember the view last selected after the History screen has been closed.
AsPlay Within the AsPlay screen one can see the Time the cut was played along with other information such as Title, Artist, Album and other commonly used fields. This screen is handy when back-selling the past couple of songs. While in this screen, you can audition the cut, drag and drop the cut directly into a Slot or the Playlist or press FILL to insert the cut into the Playlist screen. While in the AsPlay screen, the Delete All and Delete buttons are disabled.
Skipped Pressing AsPlay will open the SKIPPED display. Here one will see a list of cuts that have been skipped over in the Playback Slots. As with the AsPlay screen, you can Audition the cut, drag and drop the cut directly into a Slot or the Playlist or press FILL to insert the cut into the Playlist screen. To remove an entry from the SKIPPED list, select a cut and press DELETE. Pressing CONFIRM DELETE will remove the file. Likewise, pressing DELETE ALL will remove all entries from the SKIPPED list. Users can only remove entries from the SKIPPED list display.
ENCO DAD User Manual 28
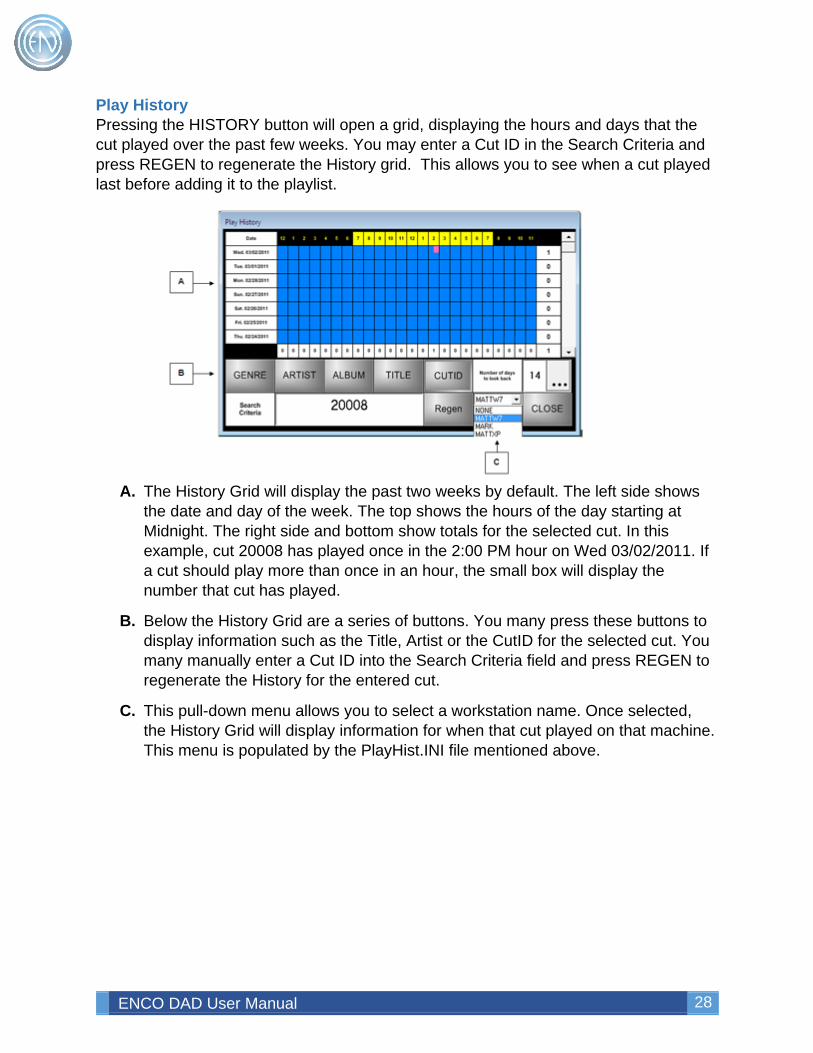
Play History Pressing the HISTORY button will open a grid, displaying the hours and days that the cut played over the past few weeks. You may enter a Cut ID in the Search Criteria and press REGEN to regenerate the History grid. This allows you to see when a cut played last before adding it to the playlist.
A. The History Grid will display the past two weeks by default. The left side shows the date and day of the week. The top shows the hours of the day starting at Midnight. The right side and bottom show totals for the selected cut. In this example, cut 20008 has played once in the 2:00 PM hour on Wed 03/02/2011. If a cut should play more than once in an hour, the small box will display the number that cut has played.
B. Below the History Grid are a series of buttons. You many press these buttons to display information such as the Title, Artist or the CutID for the selected cut. You many manually enter a Cut ID into the Search Criteria field and press REGEN to regenerate the History for the entered cut.
C. This pull-down menu allows you to select a workstation name. Once selected, the History Grid will display information for when that cut played on that machine. This menu is populated by the PlayHist.INI file mentioned above.
ENCO DAD User Manual 29
Setting up Play History
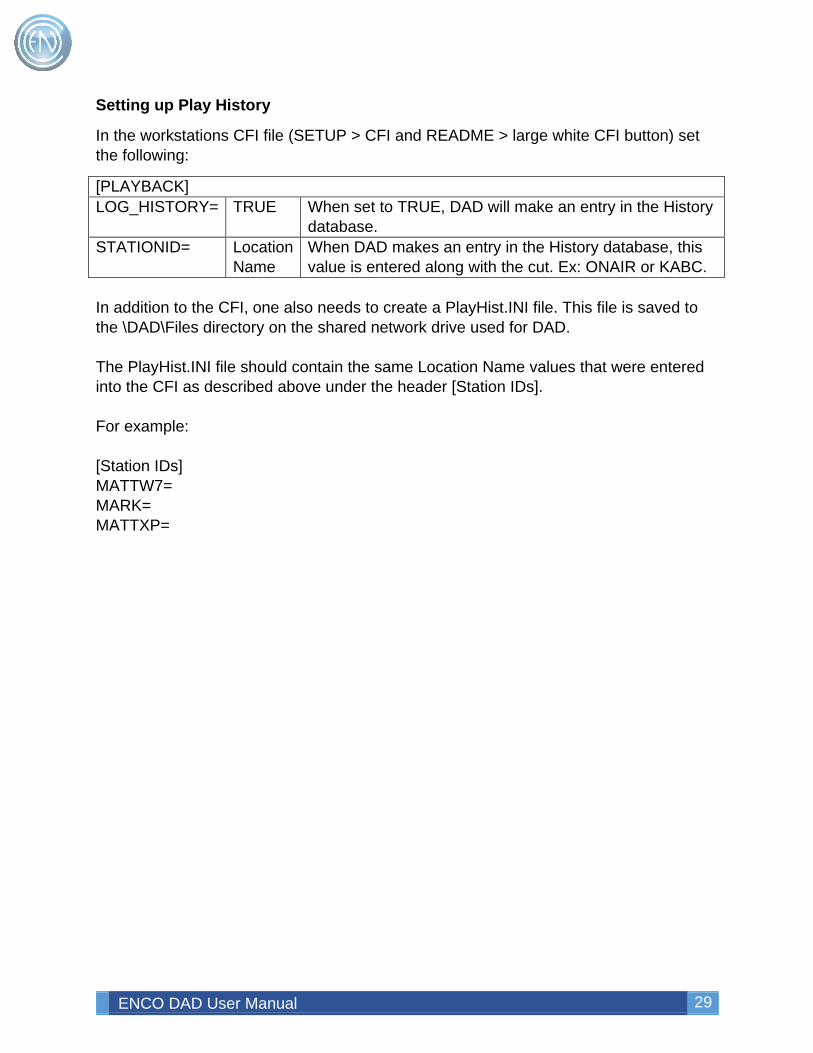
In the workstations CFI file (SETUP > CFI and README > large white CFI button) set the following:
[PLAYBACK] LOG_HISTORY= TRUE When set to TRUE, DAD will make an entry in the History
database. STATIONID= Location
Name When DAD makes an entry in the History database, this value is entered along with the cut. Ex: ONAIR or KABC.
In addition to the CFI, one also needs to create a PlayHist.INI file. This file is saved to the \DAD\Files directory on the shared network drive used for DAD. The PlayHist.INI file should contain the same Location Name values that were entered into the CFI as described above under the header [Station IDs]. For example: [Station IDs] MATTW7= MARK= MATTXP=
ENCO DAD User Manual 30
Recording Users can also record directly into Presenter. The Record screen allows one to create new files, record over existing cuts or Append audio to the end of existing files. Operation of this screen is straight forward.
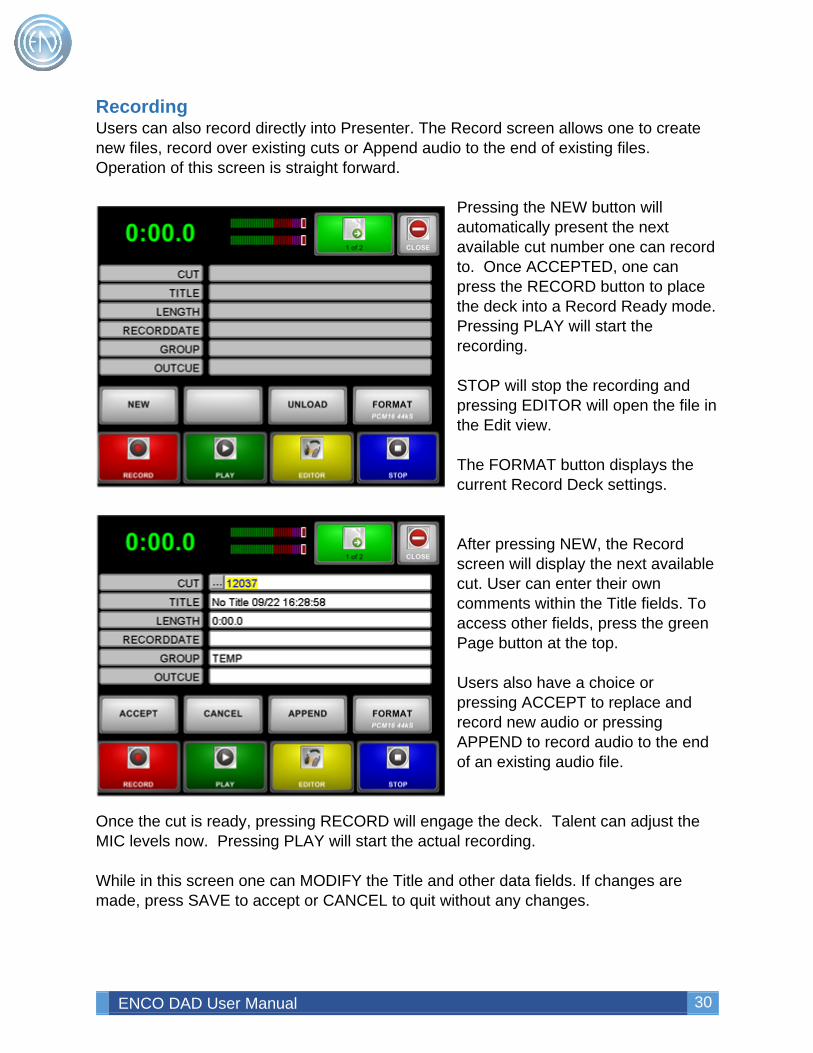
Pressing the NEW button will automatically present the next available cut number one can record to. Once ACCEPTED, one can press the RECORD button to place the deck into a Record Ready mode. Pressing PLAY will start the recording. STOP will stop the recording and pressing EDITOR will open the file in the Edit view. The FORMAT button displays the current Record Deck settings.
After pressing NEW, the Record screen will display the next available cut. User can enter their own comments within the Title fields. To access other fields, press the green Page button at the top. Users also have a choice or pressing ACCEPT to replace and record new audio or pressing APPEND to record audio to the end of an existing audio file.
Once the cut is ready, pressing RECORD will engage the deck. Talent can adjust the MIC levels now. Pressing PLAY will start the actual recording. While in this screen one can MODIFY the Title and other data fields. If changes are made, press SAVE to accept or CANCEL to quit without any changes.
ENCO DAD User Manual 31
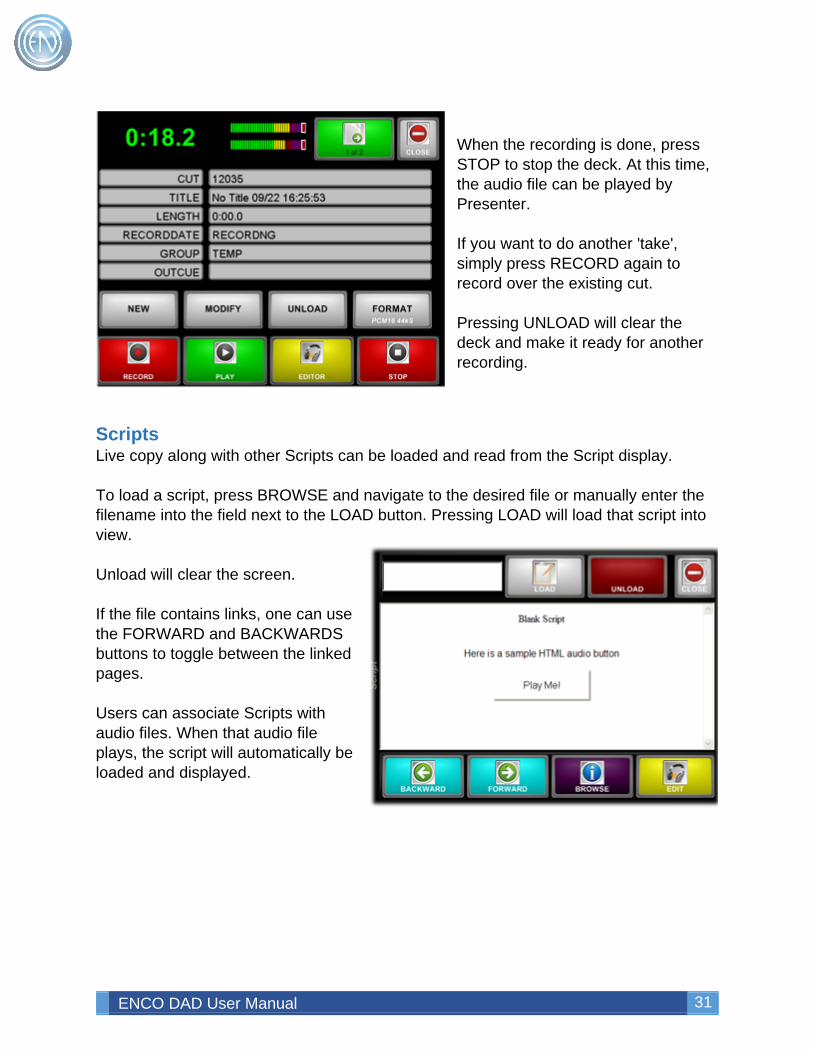
When the recording is done, press STOP to stop the deck. At this time, the audio file can be played by Presenter. If you want to do another 'take', simply press RECORD again to record over the existing cut. Pressing UNLOAD will clear the deck and make it ready for another recording.
Scripts Live copy along with other Scripts can be loaded and read from the Script display. To load a script, press BROWSE and navigate to the desired file or manually enter the filename into the field next to the LOAD button. Pressing LOAD will load that script into view. Unload will clear the screen. If the file contains links, one can use the FORWARD and BACKWARDS buttons to toggle between the linked pages. Users can associate Scripts with audio files. When that audio file plays, the script will automatically be loaded and displayed.
ENCO DAD User Manual 32
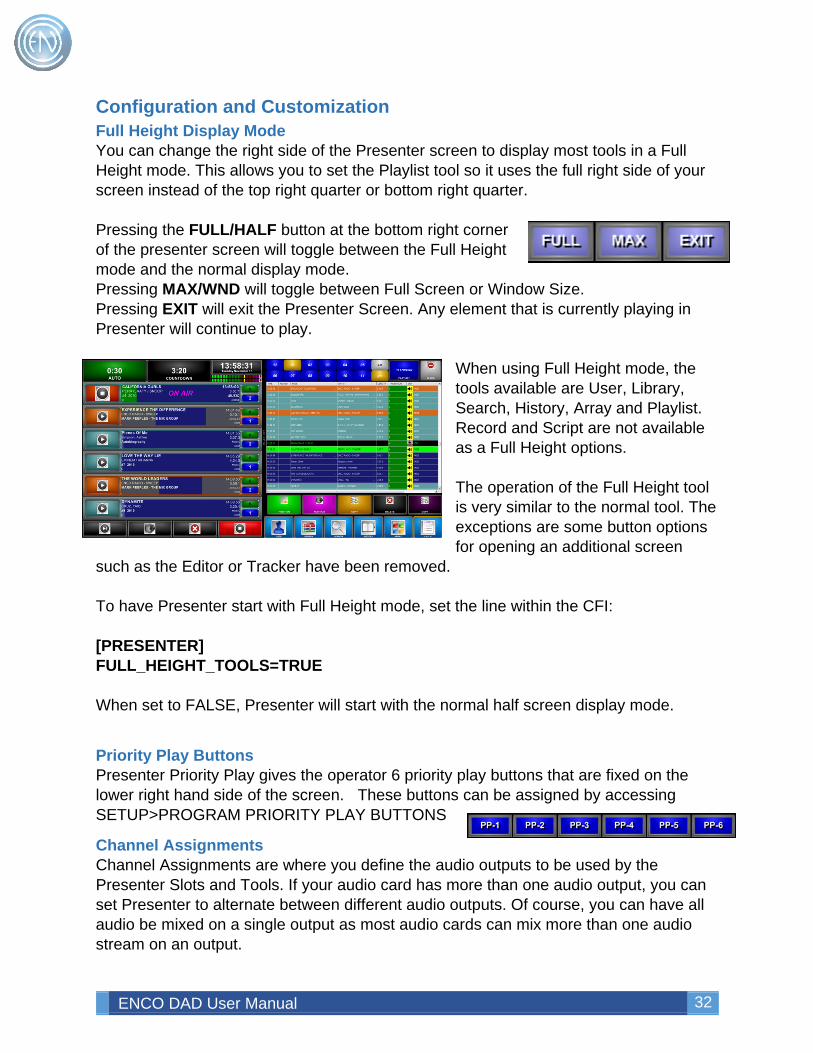
Configuration and Customization Full Height Display Mode You can change the right side of the Presenter screen to display most tools in a Full Height mode. This allows you to set the Playlist tool so it uses the full right side of your screen instead of the top right quarter or bottom right quarter. Pressing the FULL/HALF button at the bottom right corner of the presenter screen will toggle between the Full Height mode and the normal display mode. Pressing MAX/WND will toggle between Full Screen or Window Size. Pressing EXIT will exit the Presenter Screen. Any element that is currently playing in Presenter will continue to play.
When using Full Height mode, the tools available are User, Library, Search, History, Array and Playlist. Record and Script are not available as a Full Height options. The operation of the Full Height tool is very similar to the normal tool. The exceptions are some button options for opening an additional screen
such as the Editor or Tracker have been removed. To have Presenter start with Full Height mode, set the line within the CFI: [PRESENTER] FULL_HEIGHT_TOOLS=TRUE When set to FALSE, Presenter will start with the normal half screen display mode.
Priority Play Buttons Presenter Priority Play gives the operator 6 priority play buttons that are fixed on the lower right hand side of the screen. These buttons can be assigned by accessing SETUP>PROGRAM PRIORITY PLAY BUTTONS
Channel Assignments Channel Assignments are where you define the audio outputs to be used by the Presenter Slots and Tools. If your audio card has more than one audio output, you can set Presenter to alternate between different audio outputs. Of course, you can have all audio be mixed on a single output as most audio cards can mix more than one audio stream on an output.
ENCO DAD User Manual 33
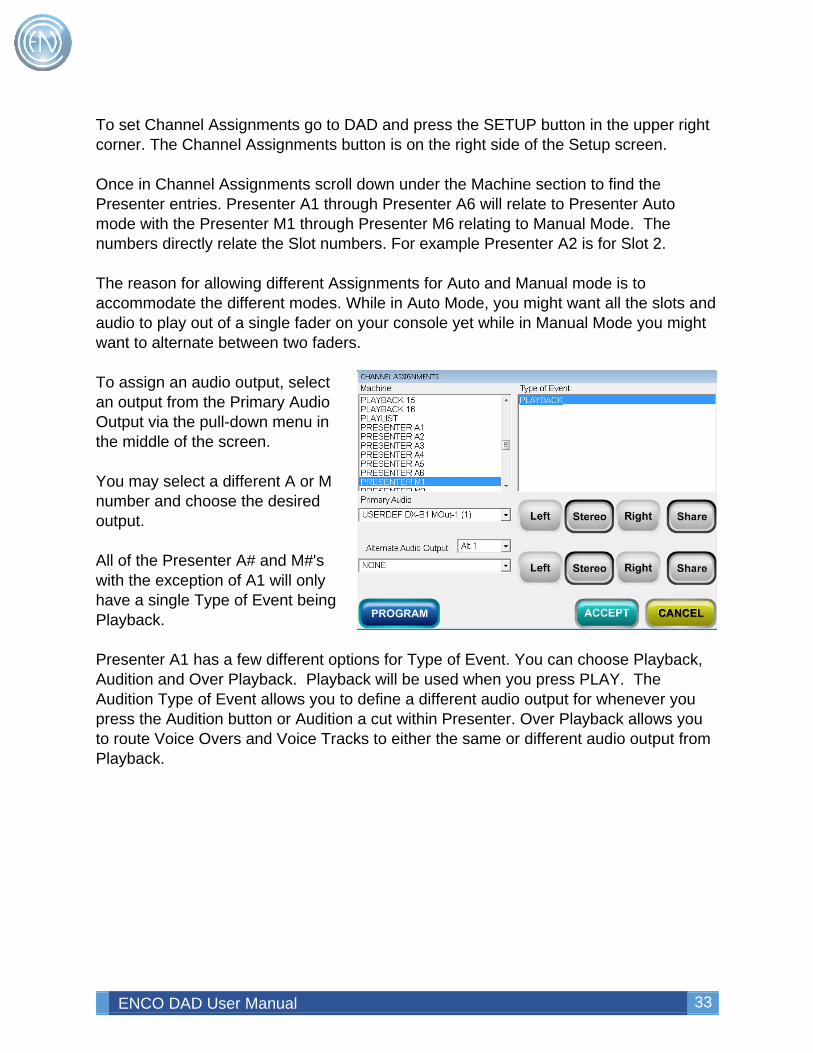
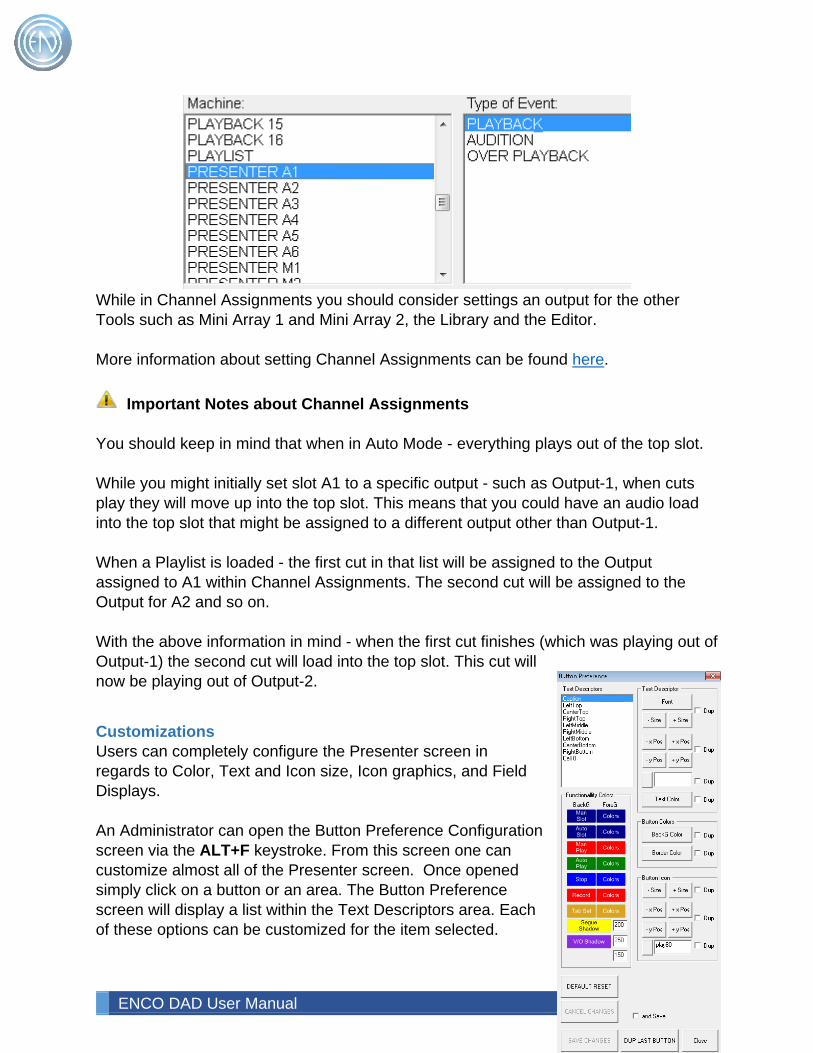
To set Channel Assignments go to DAD and press the SETUP button in the upper right corner. The Channel Assignments button is on the right side of the Setup screen. Once in Channel Assignments scroll down under the Machine section to find the Presenter entries. Presenter A1 through Presenter A6 will relate to Presenter Auto mode with the Presenter M1 through Presenter M6 relating to Manual Mode. The numbers directly relate the Slot numbers. For example Presenter A2 is for Slot 2. The reason for allowing different Assignments for Auto and Manual mode is to accommodate the different modes. While in Auto Mode, you might want all the slots and audio to play out of a single fader on your console yet while in Manual Mode you might want to alternate between two faders. To assign an audio output, select an output from the Primary Audio Output via the pull-down menu in the middle of the screen. You may select a different A or M number and choose the desired output. All of the Presenter A# and M#'s with the exception of A1 will only have a single Type of Event being Playback. Presenter A1 has a few different options for Type of Event. You can choose Playback, Audition and Over Playback. Playback will be used when you press PLAY. The Audition Type of Event allows you to define a different audio output for whenever you press the Audition button or Audition a cut within Presenter. Over Playback allows you to route Voice Overs and Voice Tracks to either the same or different audio output from Playback.
ENCO DAD User Manual 34
While in Channel Assignments you should consider settings an output for the other Tools such as Mini Array 1 and Mini Array 2, the Library and the Editor. More information about setting Channel Assignments can be found here.
Important Notes about Channel Assignments You should keep in mind that when in Auto Mode - everything plays out of the top slot. While you might initially set slot A1 to a specific output - such as Output-1, when cuts play they will move up into the top slot. This means that you could have an audio load into the top slot that might be assigned to a different output other than Output-1. When a Playlist is loaded - the first cut in that list will be assigned to the Output assigned to A1 within Channel Assignments. The second cut will be assigned to the Output for A2 and so on. With the above information in mind - when the first cut finishes (which was playing out of Output-1) the second cut will load into the top slot. This cut will now be playing out of Output-2.
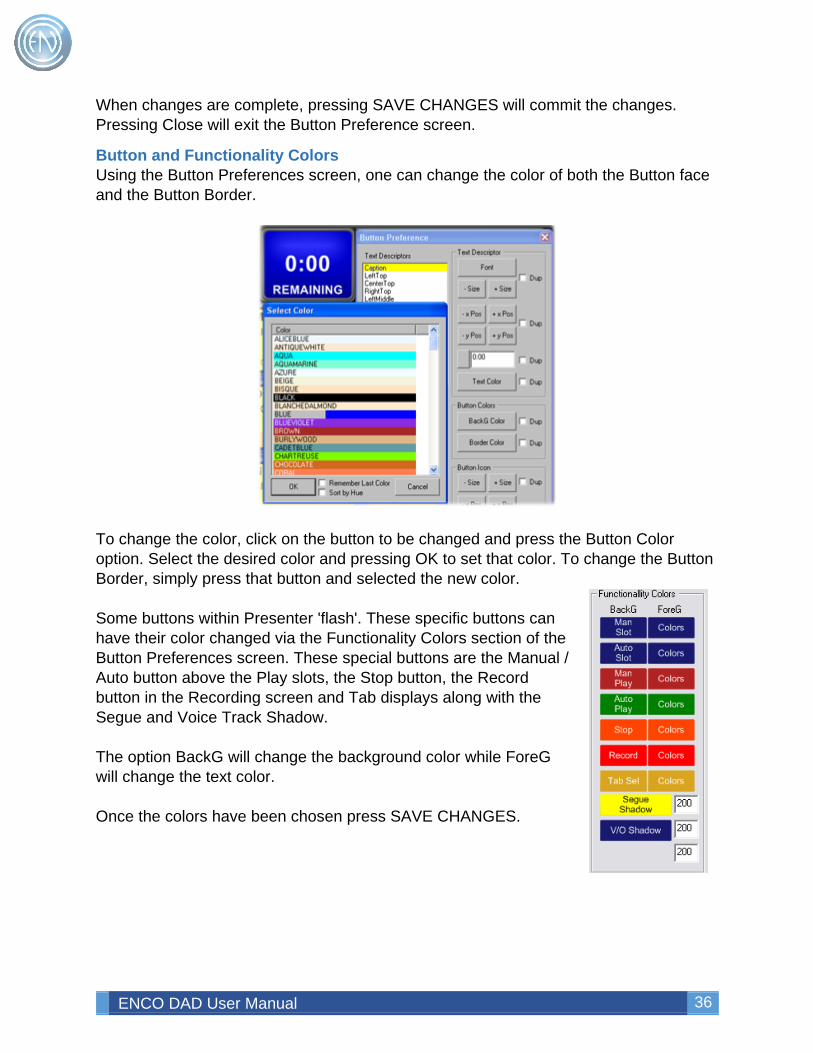
Customizations Users can completely configure the Presenter screen in regards to Color, Text and Icon size, Icon graphics, and Field Displays. An Administrator can open the Button Preference Configuration screen via the ALT+F keystroke. From this screen one can customize almost all of the Presenter screen. Once opened simply click on a button or an area. The Button Preference screen will display a list within the Text Descriptors area. Each of these options can be customized for the item selected.
ENCO DAD User Manual 35
In general, there are two main items used within this list. These two items are Caption and CenterBottom. By selecting one of these items, one can change the Font Size along with the relative position of the Text within the display area. One can also alter the colors of buttons and field displays in addition to changing the current Icon. If desired, an Administrator can create their own Icons. The changes made are saved to 'Presenter%Location%.INI' file on the network data drive in the \DAD\Files folder. One can also define a specific INI file to use with Presenter via the CFI line option: [PRESENTER] PREFERENCE_INI_FILE= At any point, one can restore the original Default settings by selecting the desired button and pressing Default Reset. This will restore the button to its original default color, icon and font.
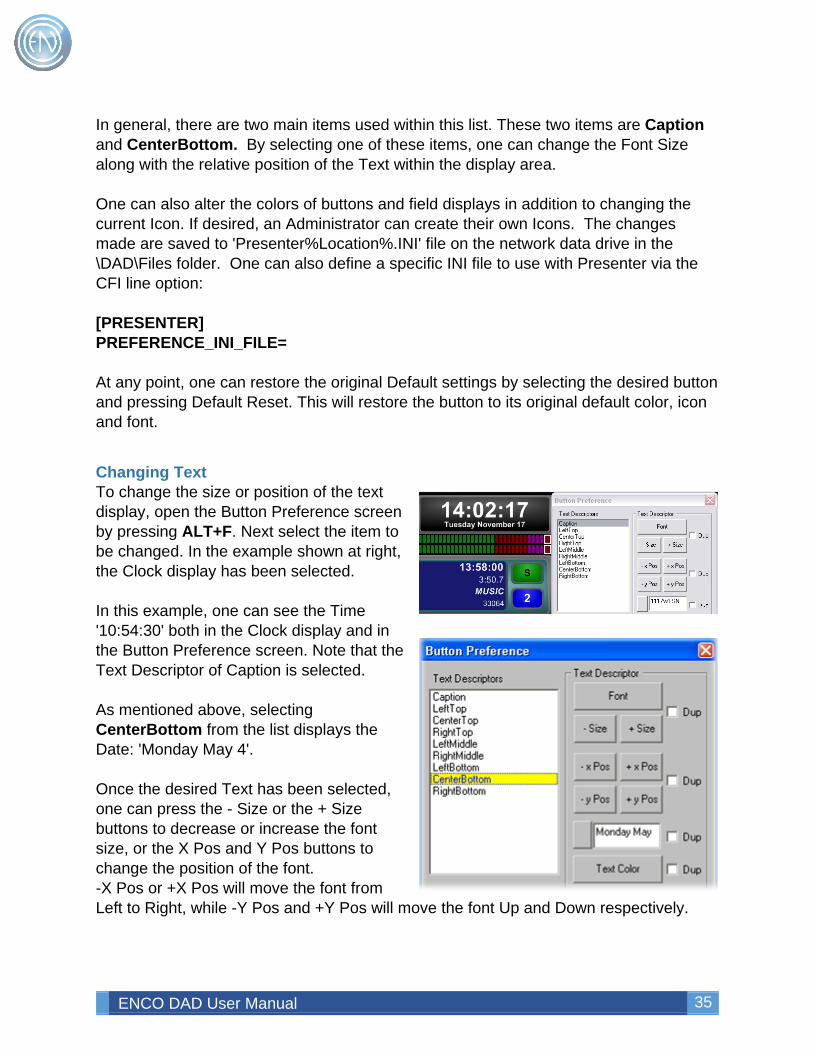
Changing Text To change the size or position of the text display, open the Button Preference screen by pressing ALT+F. Next select the item to be changed. In the example shown at right, the Clock display has been selected. In this example, one can see the Time '10:54:30' both in the Clock display and in the Button Preference screen. Note that the Text Descriptor of Caption is selected. As mentioned above, selecting CenterBottom from the list displays the Date: 'Monday May 4'. Once the desired Text has been selected, one can press the - Size or the + Size buttons to decrease or increase the font size, or the X Pos and Y Pos buttons to change the position of the font. -X Pos or +X Pos will move the font from Left to Right, while -Y Pos and +Y Pos will move the font Up and Down respectively.
ENCO DAD User Manual 36
When changes are complete, pressing SAVE CHANGES will commit the changes. Pressing Close will exit the Button Preference screen.
Button and Functionality Colors Using the Button Preferences screen, one can change the color of both the Button face and the Button Border.
To change the color, click on the button to be changed and press the Button Color option. Select the desired color and pressing OK to set that color. To change the Button Border, simply press that button and selected the new color. Some buttons within Presenter 'flash'. These specific buttons can have their color changed via the Functionality Colors section of the Button Preferences screen. These special buttons are the Manual / Auto button above the Play slots, the Stop button, the Record button in the Recording screen and Tab displays along with the Segue and Voice Track Shadow. The option BackG will change the background color while ForeG will change the text color. Once the colors have been chosen press SAVE CHANGES.
ENCO DAD User Manual 37
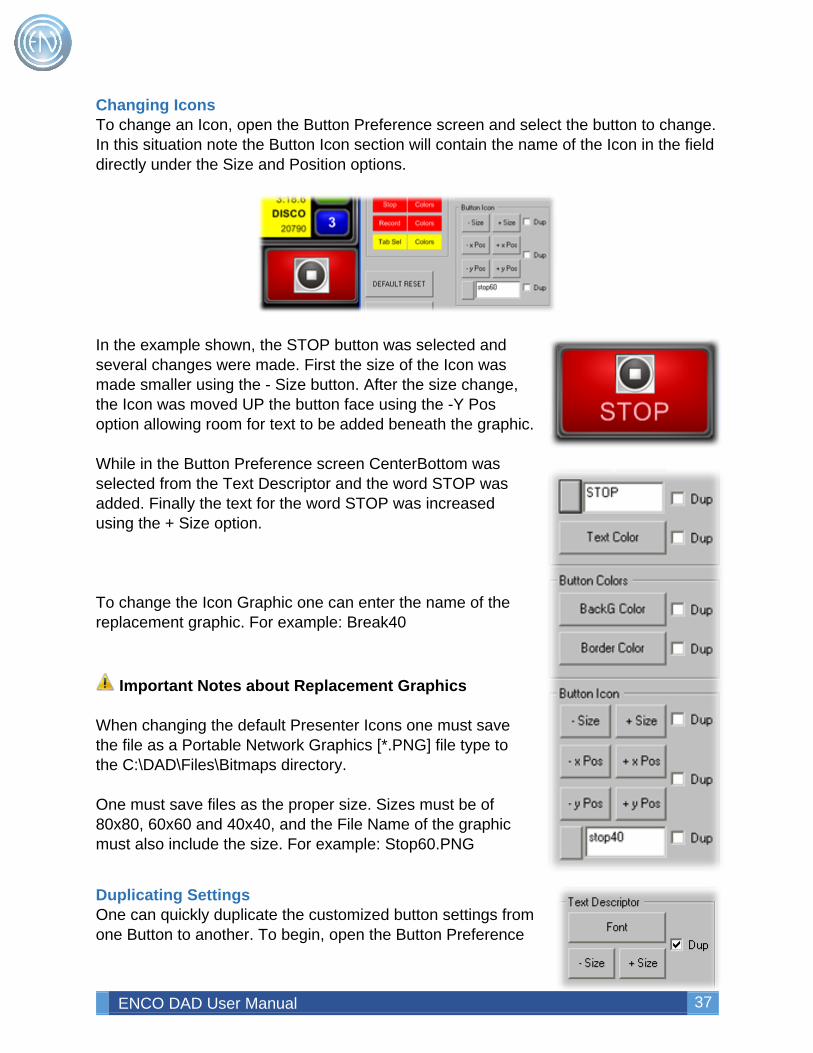
Changing Icons To change an Icon, open the Button Preference screen and select the button to change. In this situation note the Button Icon section will contain the name of the Icon in the field directly under the Size and Position options.
In the example shown, the STOP button was selected and several changes were made. First the size of the Icon was made smaller using the - Size button. After the size change, the Icon was moved UP the button face using the -Y Pos option allowing room for text to be added beneath the graphic. While in the Button Preference screen CenterBottom was selected from the Text Descriptor and the word STOP was added. Finally the text for the word STOP was increased using the + Size option. To change the Icon Graphic one can enter the name of the replacement graphic. For example: Break40
Important Notes about Replacement Graphics When changing the default Presenter Icons one must save the file as a Portable Network Graphics [*.PNG] file type to the C:\DAD\Files\Bitmaps directory. One must save files as the proper size. Sizes must be of 80x80, 60x60 and 40x40, and the File Name of the graphic must also include the size. For example: Stop60.PNG
Duplicating Settings One can quickly duplicate the customized button settings from one Button to another. To begin, open the Button Preference
ENCO DAD User Manual 38
screen and select a button to change. Once the changes have been saved, select the DUP checkbox option and select a different button. Pressing the DUP LAST BUTTON will duplicate the settings of the last button to the currently selected button. One might want to choose the 'and Save' checkbox option. Selecting this will automatically save the changes made to any button.
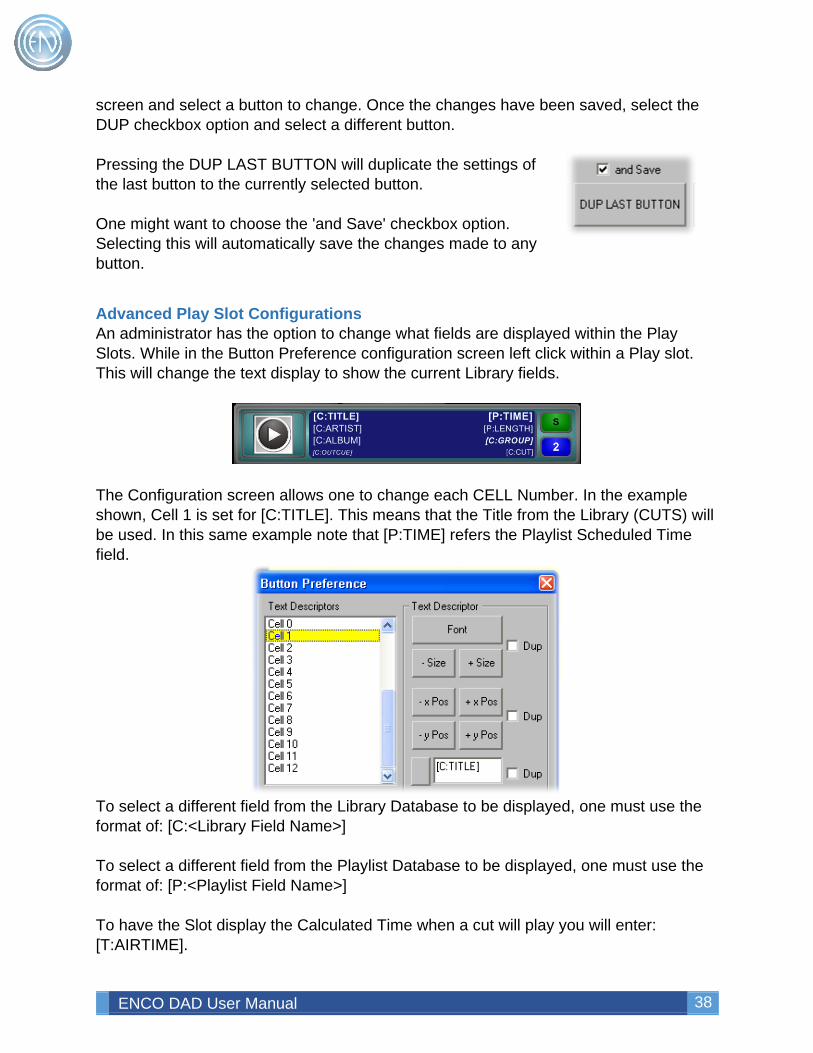
Advanced Play Slot Configurations An administrator has the option to change what fields are displayed within the Play Slots. While in the Button Preference configuration screen left click within a Play slot. This will change the text display to show the current Library fields.
The Configuration screen allows one to change each CELL Number. In the example shown, Cell 1 is set for [C:TITLE]. This means that the Title from the Library (CUTS) will be used. In this same example note that [P:TIME] refers the Playlist Scheduled Time field.
To select a different field from the Library Database to be displayed, one must use the format of: [C:<Library Field Name>] To select a different field from the Playlist Database to be displayed, one must use the format of: [P:<Playlist Field Name>] To have the Slot display the Calculated Time when a cut will play you will enter: [T:AIRTIME].
ENCO DAD User Manual 39
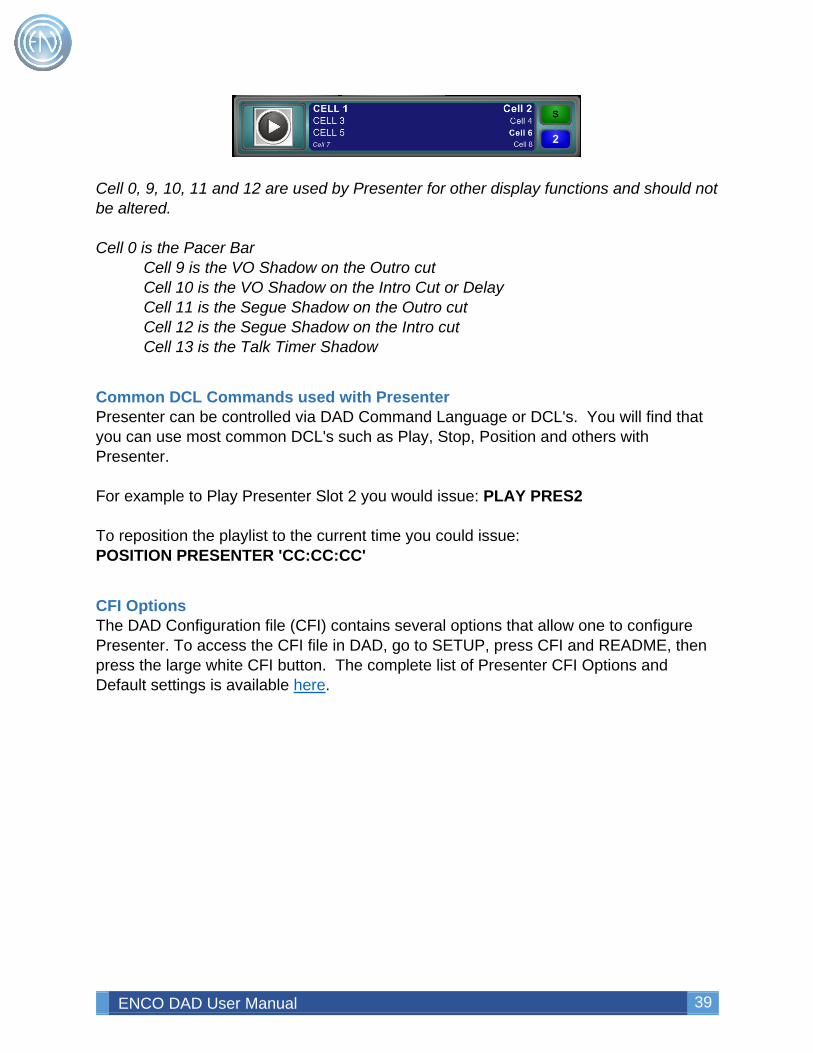
Cell 0, 9, 10, 11 and 12 are used by Presenter for other display functions and should not be altered. Cell 0 is the Pacer Bar
Cell 9 is the VO Shadow on the Outro cut Cell 10 is the VO Shadow on the Intro Cut or Delay Cell 11 is the Segue Shadow on the Outro cut Cell 12 is the Segue Shadow on the Intro cut Cell 13 is the Talk Timer Shadow
Common DCL Commands used with Presenter Presenter can be controlled via DAD Command Language or DCL's. You will find that you can use most common DCL's such as Play, Stop, Position and others with Presenter. For example to Play Presenter Slot 2 you would issue: PLAY PRES2 To reposition the playlist to the current time you could issue: POSITION PRESENTER 'CC:CC:CC'
CFI Options The DAD Configuration file (CFI) contains several options that allow one to configure Presenter. To access the CFI file in DAD, go to SETUP, press CFI and README, then press the large white CFI button. The complete list of Presenter CFI Options and Default settings is available here.
ENCO DAD User Manual 40
Recording Record Machines
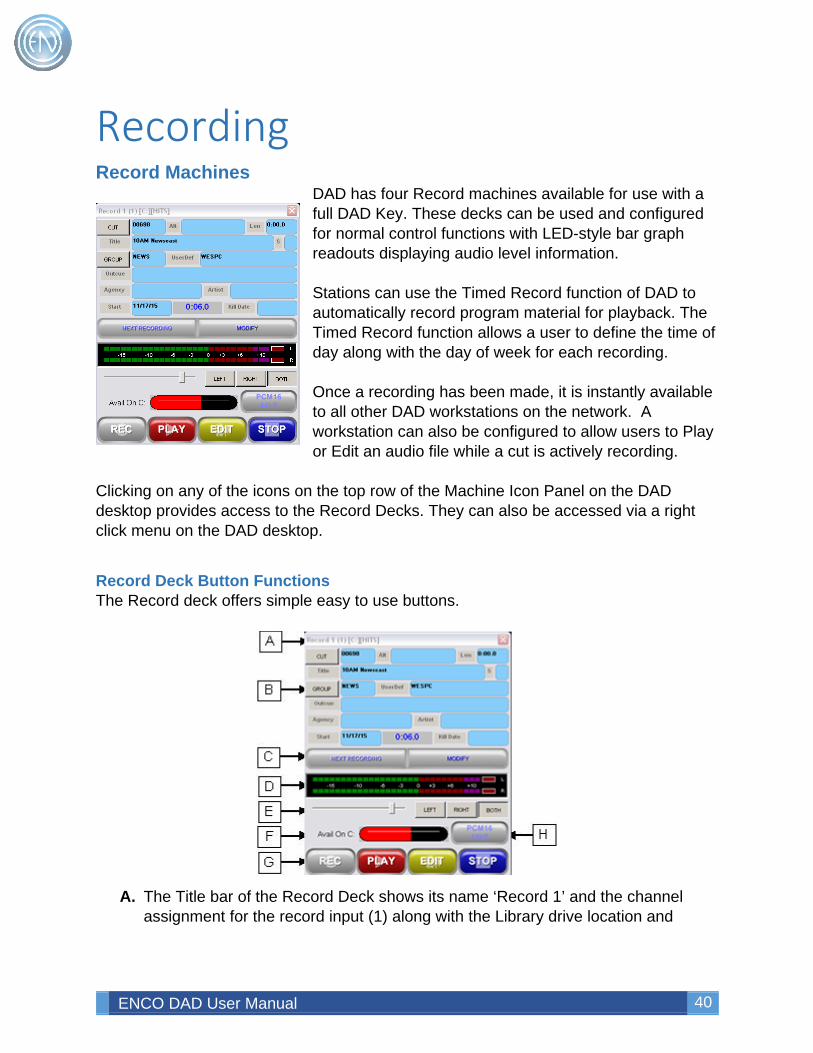
DAD has four Record machines available for use with a full DAD Key. These decks can be used and configured for normal control functions with LED-style bar graph readouts displaying audio level information. Stations can use the Timed Record function of DAD to automatically record program material for playback. The Timed Record function allows a user to define the time of day along with the day of week for each recording. Once a recording has been made, it is instantly available to all other DAD workstations on the network. A workstation can also be configured to allow users to Play or Edit an audio file while a cut is actively recording.
Clicking on any of the icons on the top row of the Machine Icon Panel on the DAD desktop provides access to the Record Decks. They can also be accessed via a right click menu on the DAD desktop.
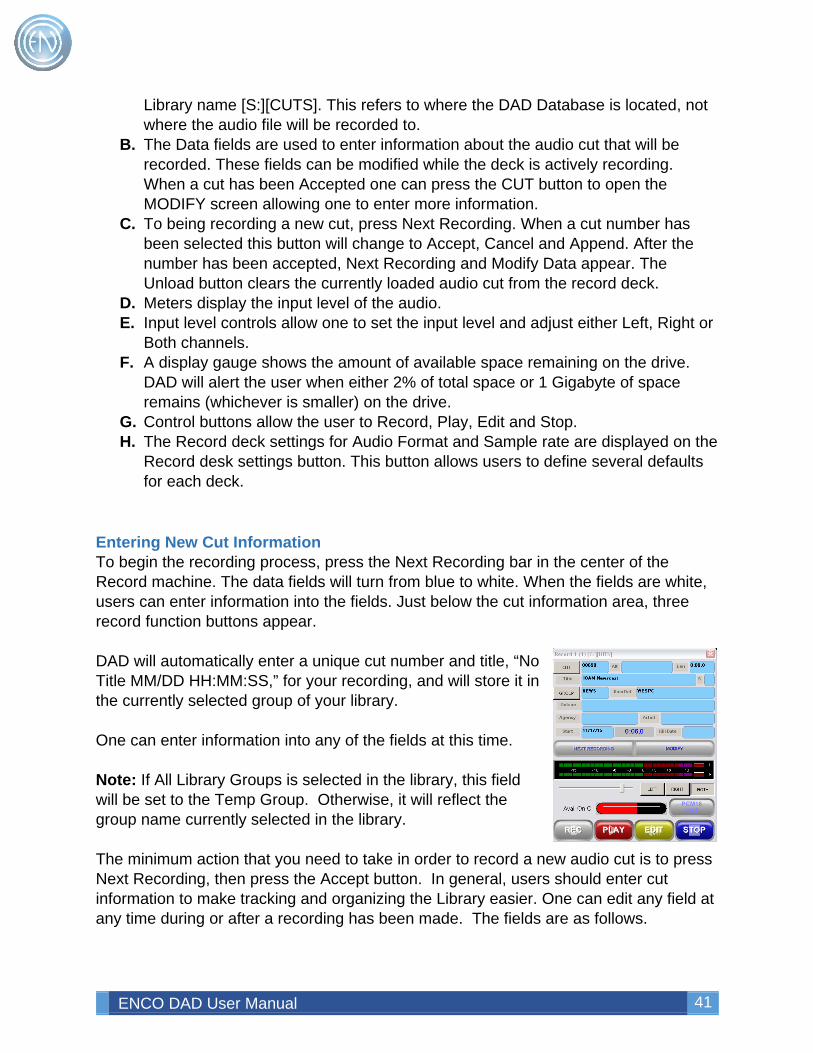
Record Deck Button Functions The Record deck offers simple easy to use buttons.
A. The Title bar of the Record Deck shows its name ‘Record 1’ and the channel
assignment for the record input (1) along with the Library drive location and
ENCO DAD User Manual 41
Library name [S:][CUTS]. This refers to where the DAD Database is located, not where the audio file will be recorded to.
B. The Data fields are used to enter information about the audio cut that will be recorded. These fields can be modified while the deck is actively recording. When a cut has been Accepted one can press the CUT button to open the MODIFY screen allowing one to enter more information.
C. To being recording a new cut, press Next Recording. When a cut number has been selected this button will change to Accept, Cancel and Append. After the number has been accepted, Next Recording and Modify Data appear. The Unload button clears the currently loaded audio cut from the record deck.
D. Meters display the input level of the audio. E. Input level controls allow one to set the input level and adjust either Left, Right or
Both channels. F. A display gauge shows the amount of available space remaining on the drive.
DAD will alert the user when either 2% of total space or 1 Gigabyte of space remains (whichever is smaller) on the drive.
G. Control buttons allow the user to Record, Play, Edit and Stop. H. The Record deck settings for Audio Format and Sample rate are displayed on the
Record desk settings button. This button allows users to define several defaults for each deck.
Entering New Cut Information To begin the recording process, press the Next Recording bar in the center of the Record machine. The data fields will turn from blue to white. When the fields are white, users can enter information into the fields. Just below the cut information area, three record function buttons appear. DAD will automatically enter a unique cut number and title, “No Title MM/DD HH:MM:SS,” for your recording, and will store it in the currently selected group of your library. One can enter information into any of the fields at this time. Note: If All Library Groups is selected in the library, this field will be set to the Temp Group. Otherwise, it will reflect the group name currently selected in the library. The minimum action that you need to take in order to record a new audio cut is to press Next Recording, then press the Accept button. In general, users should enter cut information to make tracking and organizing the Library easier. One can edit any field at any time during or after a recording has been made. The fields are as follows.
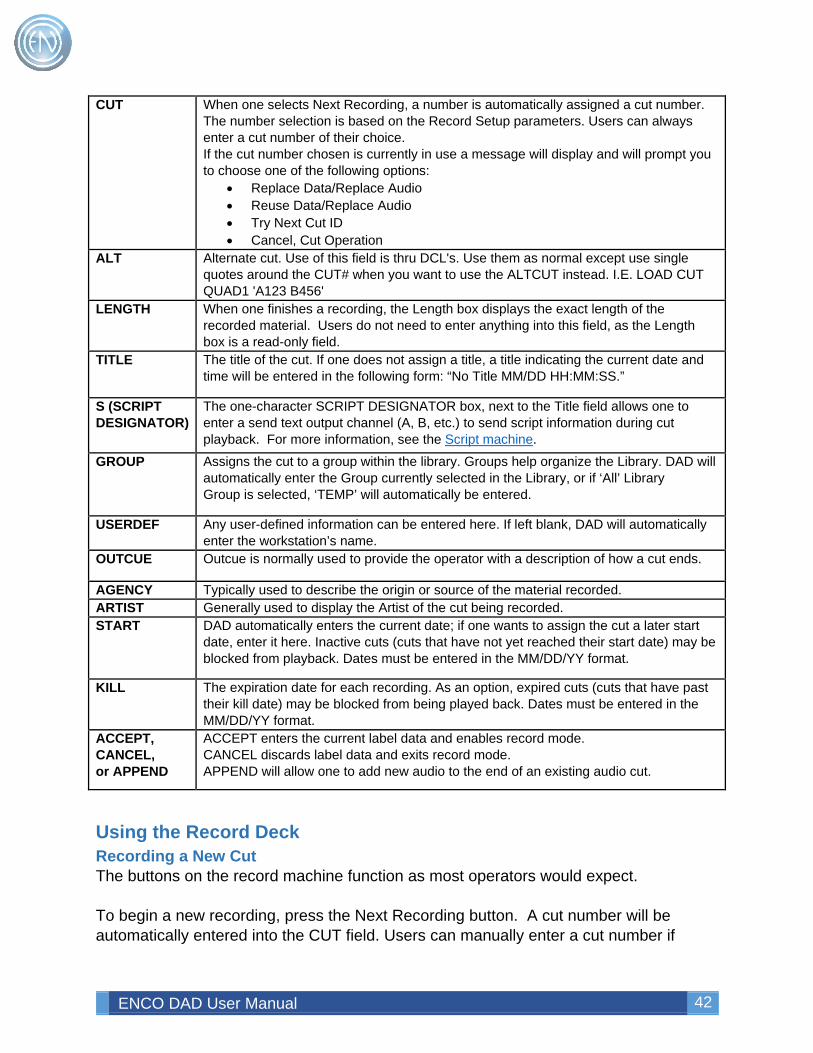
ENCO DAD User Manual 42
CUT When one selects Next Recording, a number is automatically assigned a cut number. The number selection is based on the Record Setup parameters. Users can always enter a cut number of their choice. If the cut number chosen is currently in use a message will display and will prompt you to choose one of the following options:
• Replace Data/Replace Audio • Reuse Data/Replace Audio • Try Next Cut ID • Cancel, Cut Operation
ALT Alternate cut. Use of this field is thru DCL's. Use them as normal except use single quotes around the CUT# when you want to use the ALTCUT instead. I.E. LOAD CUT QUAD1 'A123 B456'
LENGTH When one finishes a recording, the Length box displays the exact length of the recorded material. Users do not need to enter anything into this field, as the Length box is a read-only field.
TITLE The title of the cut. If one does not assign a title, a title indicating the current date and time will be entered in the following form: “No Title MM/DD HH:MM:SS.”
S (SCRIPT DESIGNATOR)
The one-character SCRIPT DESIGNATOR box, next to the Title field allows one to enter a send text output channel (A, B, etc.) to send script information during cut playback. For more information, see the Script machine.
GROUP Assigns the cut to a group within the library. Groups help organize the Library. DAD will automatically enter the Group currently selected in the Library, or if ‘All’ Library Group is selected, ‘TEMP’ will automatically be entered.
USERDEF Any user-defined information can be entered here. If left blank, DAD will automatically enter the workstation’s name.
OUTCUE Outcue is normally used to provide the operator with a description of how a cut ends.
AGENCY Typically used to describe the origin or source of the material recorded. ARTIST Generally used to display the Artist of the cut being recorded. START DAD automatically enters the current date; if one wants to assign the cut a later start
date, enter it here. Inactive cuts (cuts that have not yet reached their start date) may be blocked from playback. Dates must be entered in the MM/DD/YY format.
KILL The expiration date for each recording. As an option, expired cuts (cuts that have past their kill date) may be blocked from being played back. Dates must be entered in the MM/DD/YY format.
ACCEPT, CANCEL, or APPEND
ACCEPT enters the current label data and enables record mode. CANCEL discards label data and exits record mode. APPEND will allow one to add new audio to the end of an existing audio cut.
Using the Record Deck Recording a New Cut The buttons on the record machine function as most operators would expect. To begin a new recording, press the Next Recording button. A cut number will be automatically entered into the CUT field. Users can manually enter a cut number if
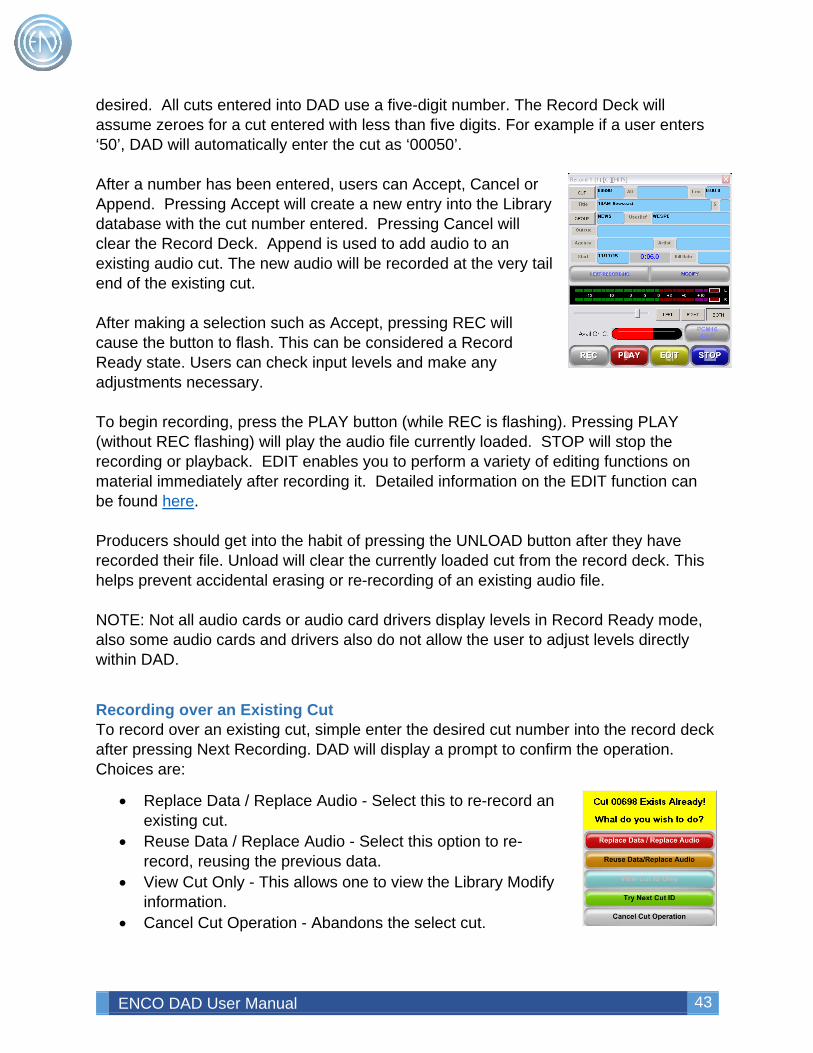
ENCO DAD User Manual 43
desired. All cuts entered into DAD use a five-digit number. The Record Deck will assume zeroes for a cut entered with less than five digits. For example if a user enters ‘50’, DAD will automatically enter the cut as ‘00050’. After a number has been entered, users can Accept, Cancel or Append. Pressing Accept will create a new entry into the Library database with the cut number entered. Pressing Cancel will clear the Record Deck. Append is used to add audio to an existing audio cut. The new audio will be recorded at the very tail end of the existing cut. After making a selection such as Accept, pressing REC will cause the button to flash. This can be considered a Record Ready state. Users can check input levels and make any adjustments necessary. To begin recording, press the PLAY button (while REC is flashing). Pressing PLAY (without REC flashing) will play the audio file currently loaded. STOP will stop the recording or playback. EDIT enables you to perform a variety of editing functions on material immediately after recording it. Detailed information on the EDIT function can be found here. Producers should get into the habit of pressing the UNLOAD button after they have recorded their file. Unload will clear the currently loaded cut from the record deck. This helps prevent accidental erasing or re-recording of an existing audio file. NOTE: Not all audio cards or audio card drivers display levels in Record Ready mode, also some audio cards and drivers also do not allow the user to adjust levels directly within DAD.
Recording over an Existing Cut To record over an existing cut, simple enter the desired cut number into the record deck after pressing Next Recording. DAD will display a prompt to confirm the operation. Choices are:
• Replace Data / Replace Audio - Select this to re-record an existing cut.
• Reuse Data / Replace Audio - Select this option to re-record, reusing the previous data.
• View Cut Only - This allows one to view the Library Modify information.
• Cancel Cut Operation - Abandons the select cut.
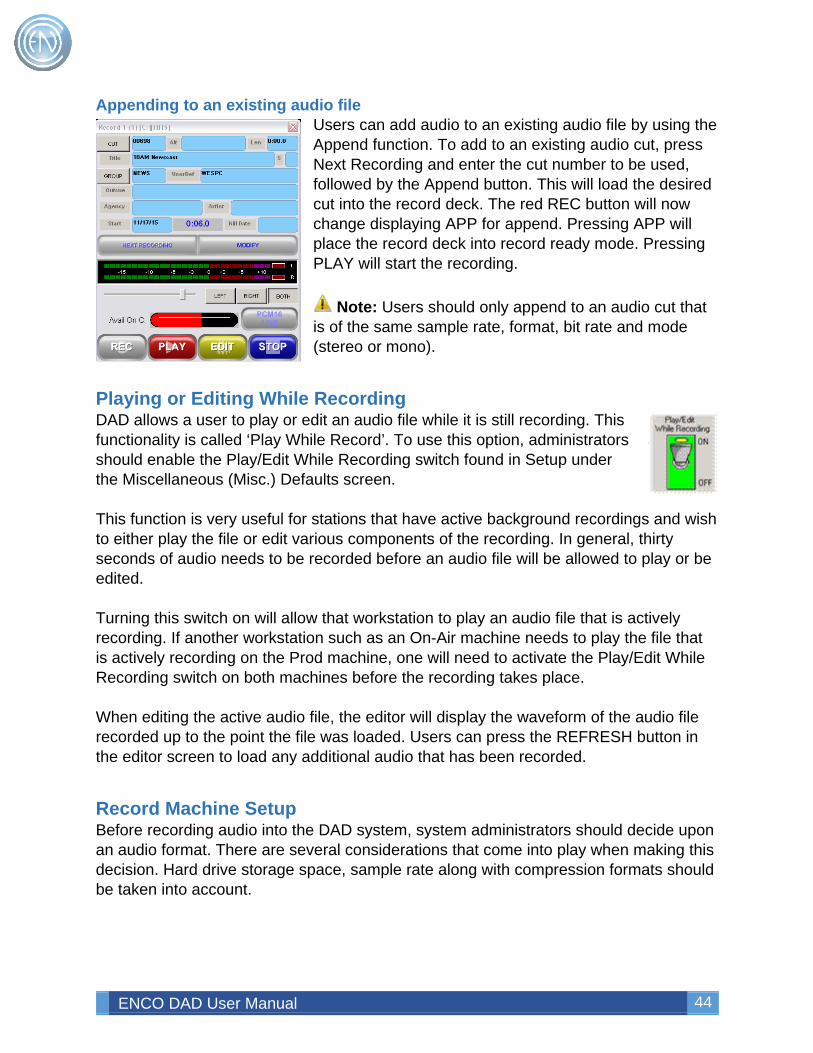
ENCO DAD User Manual 44
Appending to an existing audio file Users can add audio to an existing audio file by using the Append function. To add to an existing audio cut, press Next Recording and enter the cut number to be used, followed by the Append button. This will load the desired cut into the record deck. The red REC button will now change displaying APP for append. Pressing APP will place the record deck into record ready mode. Pressing PLAY will start the recording.
Note: Users should only append to an audio cut that is of the same sample rate, format, bit rate and mode (stereo or mono).
Playing or Editing While Recording DAD allows a user to play or edit an audio file while it is still recording. This functionality is called ‘Play While Record’. To use this option, administrators should enable the Play/Edit While Recording switch found in Setup under the Miscellaneous (Misc.) Defaults screen. This function is very useful for stations that have active background recordings and wish to either play the file or edit various components of the recording. In general, thirty seconds of audio needs to be recorded before an audio file will be allowed to play or be edited. Turning this switch on will allow that workstation to play an audio file that is actively recording. If another workstation such as an On-Air machine needs to play the file that is actively recording on the Prod machine, one will need to activate the Play/Edit While Recording switch on both machines before the recording takes place. When editing the active audio file, the editor will display the waveform of the audio file recorded up to the point the file was loaded. Users can press the REFRESH button in the editor screen to load any additional audio that has been recorded.
Record Machine Setup Before recording audio into the DAD system, system administrators should decide upon an audio format. There are several considerations that come into play when making this decision. Hard drive storage space, sample rate along with compression formats should be taken into account.
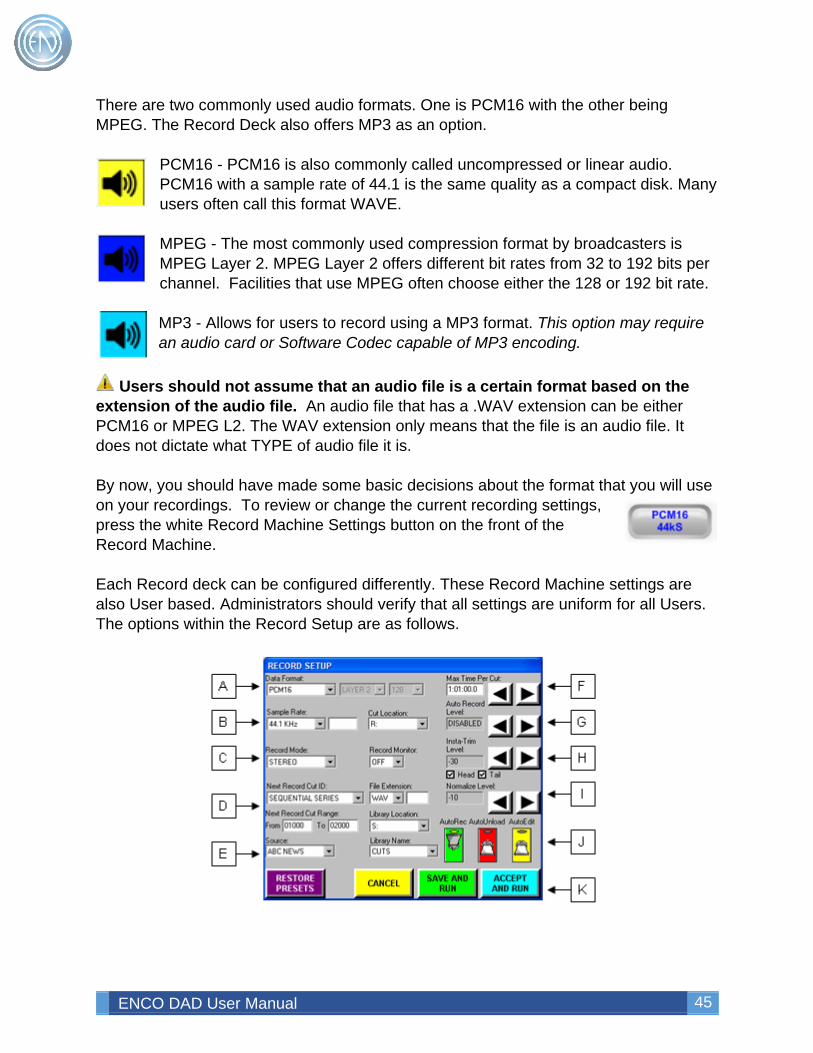
ENCO DAD User Manual 45
There are two commonly used audio formats. One is PCM16 with the other being MPEG. The Record Deck also offers MP3 as an option.
PCM16 - PCM16 is also commonly called uncompressed or linear audio. PCM16 with a sample rate of 44.1 is the same quality as a compact disk. Many users often call this format WAVE. MPEG - The most commonly used compression format by broadcasters is MPEG Layer 2. MPEG Layer 2 offers different bit rates from 32 to 192 bits per channel. Facilities that use MPEG often choose either the 128 or 192 bit rate. MP3 - Allows for users to record using a MP3 format. This option may require an audio card or Software Codec capable of MP3 encoding.
Users should not assume that an audio file is a certain format based on the extension of the audio file. An audio file that has a .WAV extension can be either PCM16 or MPEG L2. The WAV extension only means that the file is an audio file. It does not dictate what TYPE of audio file it is. By now, you should have made some basic decisions about the format that you will use on your recordings. To review or change the current recording settings, press the white Record Machine Settings button on the front of the Record Machine. Each Record deck can be configured differently. These Record Machine settings are also User based. Administrators should verify that all settings are uniform for all Users. The options within the Record Setup are as follows.
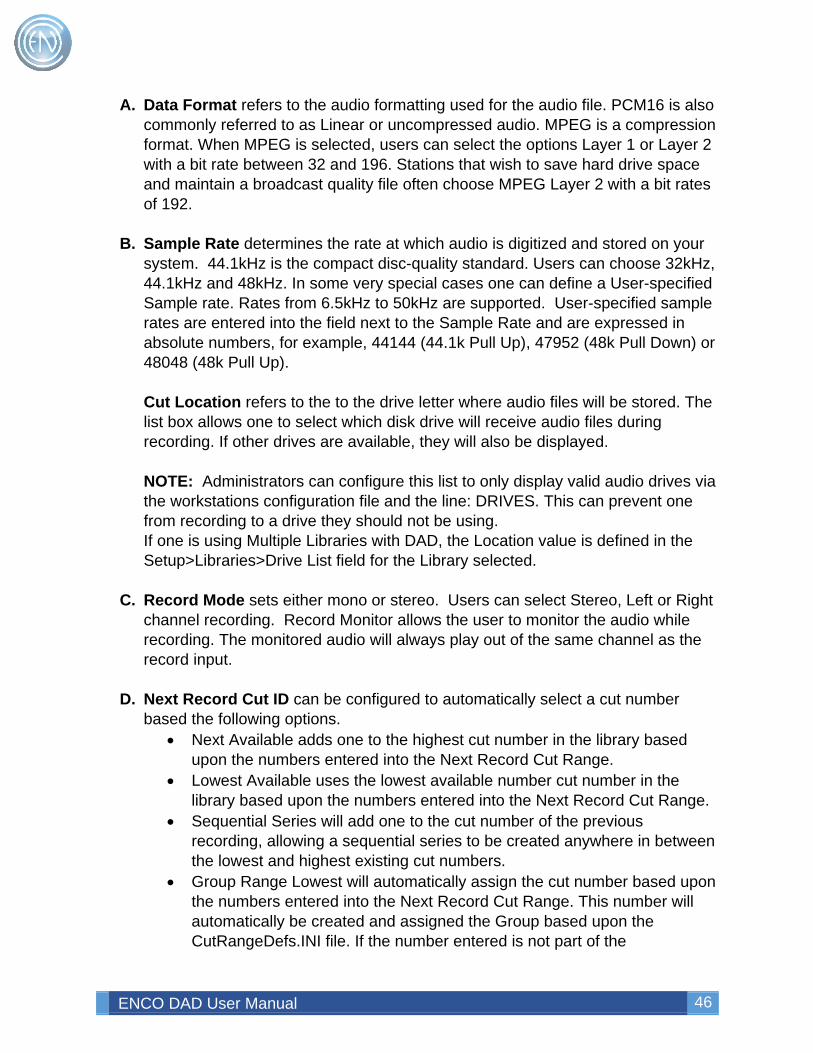
ENCO DAD User Manual 46
A. Data Format refers to the audio formatting used for the audio file. PCM16 is also commonly referred to as Linear or uncompressed audio. MPEG is a compression format. When MPEG is selected, users can select the options Layer 1 or Layer 2 with a bit rate between 32 and 196. Stations that wish to save hard drive space and maintain a broadcast quality file often choose MPEG Layer 2 with a bit rates of 192.
B. Sample Rate determines the rate at which audio is digitized and stored on your system. 44.1kHz is the compact disc-quality standard. Users can choose 32kHz, 44.1kHz and 48kHz. In some very special cases one can define a User-specified Sample rate. Rates from 6.5kHz to 50kHz are supported. User-specified sample rates are entered into the field next to the Sample Rate and are expressed in absolute numbers, for example, 44144 (44.1k Pull Up), 47952 (48k Pull Down) or 48048 (48k Pull Up). Cut Location refers to the to the drive letter where audio files will be stored. The list box allows one to select which disk drive will receive audio files during recording. If other drives are available, they will also be displayed. NOTE: Administrators can configure this list to only display valid audio drives via the workstations configuration file and the line: DRIVES. This can prevent one from recording to a drive they should not be using. If one is using Multiple Libraries with DAD, the Location value is defined in the Setup>Libraries>Drive List field for the Library selected.
C. Record Mode sets either mono or stereo. Users can select Stereo, Left or Right channel recording. Record Monitor allows the user to monitor the audio while recording. The monitored audio will always play out of the same channel as the record input.
D. Next Record Cut ID can be configured to automatically select a cut number based the following options.
• Next Available adds one to the highest cut number in the library based upon the numbers entered into the Next Record Cut Range.
• Lowest Available uses the lowest available number cut number in the library based upon the numbers entered into the Next Record Cut Range.
• Sequential Series will add one to the cut number of the previous recording, allowing a sequential series to be created anywhere in between the lowest and highest existing cut numbers.
• Group Range Lowest will automatically assign the cut number based upon the numbers entered into the Next Record Cut Range. This number will automatically be created and assigned the Group based upon the CutRangeDefs.INI file. If the number entered is not part of the
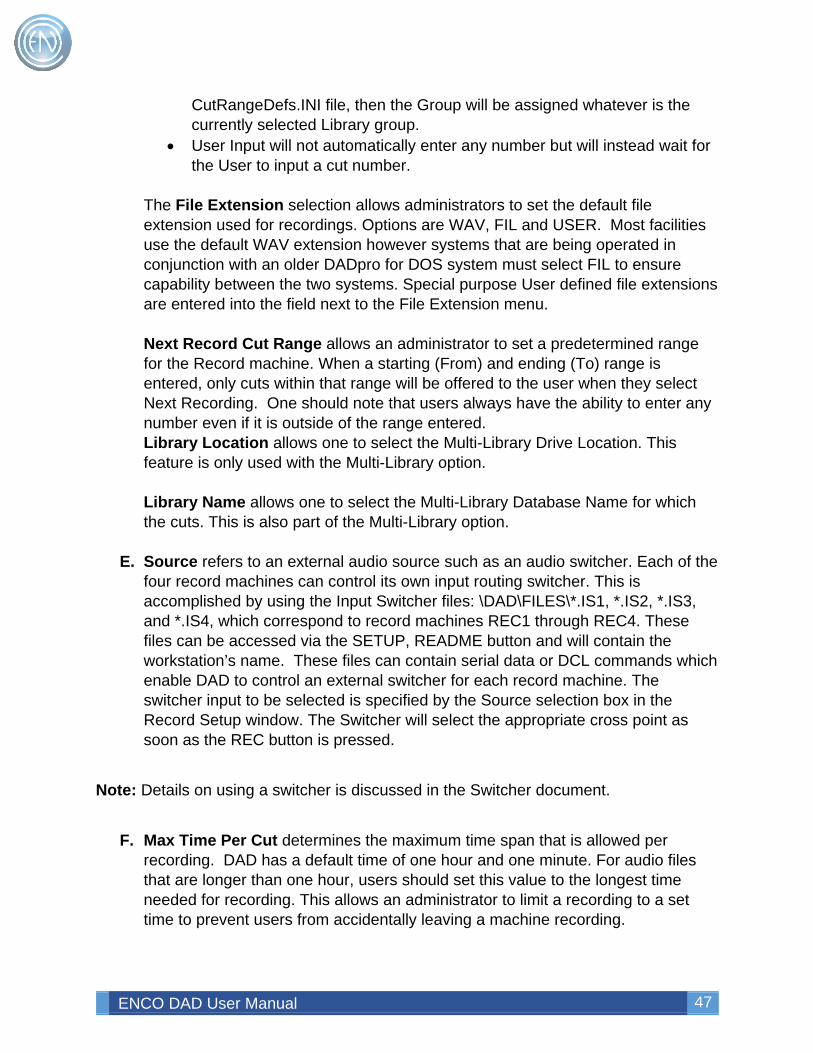
ENCO DAD User Manual 47
CutRangeDefs.INI file, then the Group will be assigned whatever is the currently selected Library group.
• User Input will not automatically enter any number but will instead wait for the User to input a cut number.
The File Extension selection allows administrators to set the default file extension used for recordings. Options are WAV, FIL and USER. Most facilities use the default WAV extension however systems that are being operated in conjunction with an older DADpro for DOS system must select FIL to ensure capability between the two systems. Special purpose User defined file extensions are entered into the field next to the File Extension menu. Next Record Cut Range allows an administrator to set a predetermined range for the Record machine. When a starting (From) and ending (To) range is entered, only cuts within that range will be offered to the user when they select Next Recording. One should note that users always have the ability to enter any number even if it is outside of the range entered. Library Location allows one to select the Multi-Library Drive Location. This feature is only used with the Multi-Library option. Library Name allows one to select the Multi-Library Database Name for which the cuts. This is also part of the Multi-Library option.
E. Source refers to an external audio source such as an audio switcher. Each of the four record machines can control its own input routing switcher. This is accomplished by using the Input Switcher files: \DAD\FILES\*.IS1, *.IS2, *.IS3, and *.IS4, which correspond to record machines REC1 through REC4. These files can be accessed via the SETUP, README button and will contain the workstation’s name. These files can contain serial data or DCL commands which enable DAD to control an external switcher for each record machine. The switcher input to be selected is specified by the Source selection box in the Record Setup window. The Switcher will select the appropriate cross point as soon as the REC button is pressed.
Note: Details on using a switcher is discussed in the Switcher document.
F. Max Time Per Cut determines the maximum time span that is allowed per
recording. DAD has a default time of one hour and one minute. For audio files that are longer than one hour, users should set this value to the longest time needed for recording. This allows an administrator to limit a recording to a set time to prevent users from accidentally leaving a machine recording.
ENCO DAD User Manual 48
Note: Record Machines will stop recording if the audio files reaches WAV header limits based on format / sample rate/mode. Limit is generally 2GB which is approximately three hours and twenty minutes for PCM16/44.1/Stereo.
G. Auto Record Level sets an input threshold level for automatic recording. This value can be set to automatically begin recording when the record deck is set into ‘Record ready’ and audio passes the threshold. Users can set the threshold in 1 dB increments from -60 dB to +16 dB. Auto Record will be disabled if this value is set the level above +16 dB.
H. Insta-Trim Level can automatically set the Head and Tail markers for the audio file based on an audio threshold level. Upon completion of a recording, Insta-Trim will move the Head and Tail markers to the point where audio crosses the defined threshold. Users can set the threshold in 1 dB increments from -60 dB to +16 dB. Conversely, raising the threshold setting for such sources may cause some audio to be clipped at the Head or Tail. If this occurs, simply go to the editor and reset the Head or Tail marker. Setting the threshold above +16 dB disables Insta-Trim. Checkbox options are available allowing one to have just the Head, Tail or both markers set automatically.
I. Normalize - Setting a value here will automatically normalize the cut after recording to the level set. Normalization will ONLY process PCM16 audio files. Normalization will NOT process MPEG cuts.
J. AutoRec - When enabled, DAD will automatically engage and start the recording as soon as one presses the Next Recording button. The cut number will be determined upon the setting of the Next Record Cut ID and the Next Record Cut Range. AutoUnload - When set ON, the Record Deck will automatically unload the cut from the Record deck when the recording has stopped. AutoEdit - When enabled, DAD will automatically open the cut in the DAD Editor when the cut is stopped. Note: AutoRec will be disabled if the Recorder has been configured to use the Next Record Cut ID option of User Input. The options of AutoUnload and AutoEdit will be disabled if the Recorder has been set for Normalization.
K. Pressing Restore Presets will automatically restore the last saved settings. This allows a user to make changes within the Record Setup screen, press Accept and Run, record a file then re-open the Record Setup screen and Restore the settings.
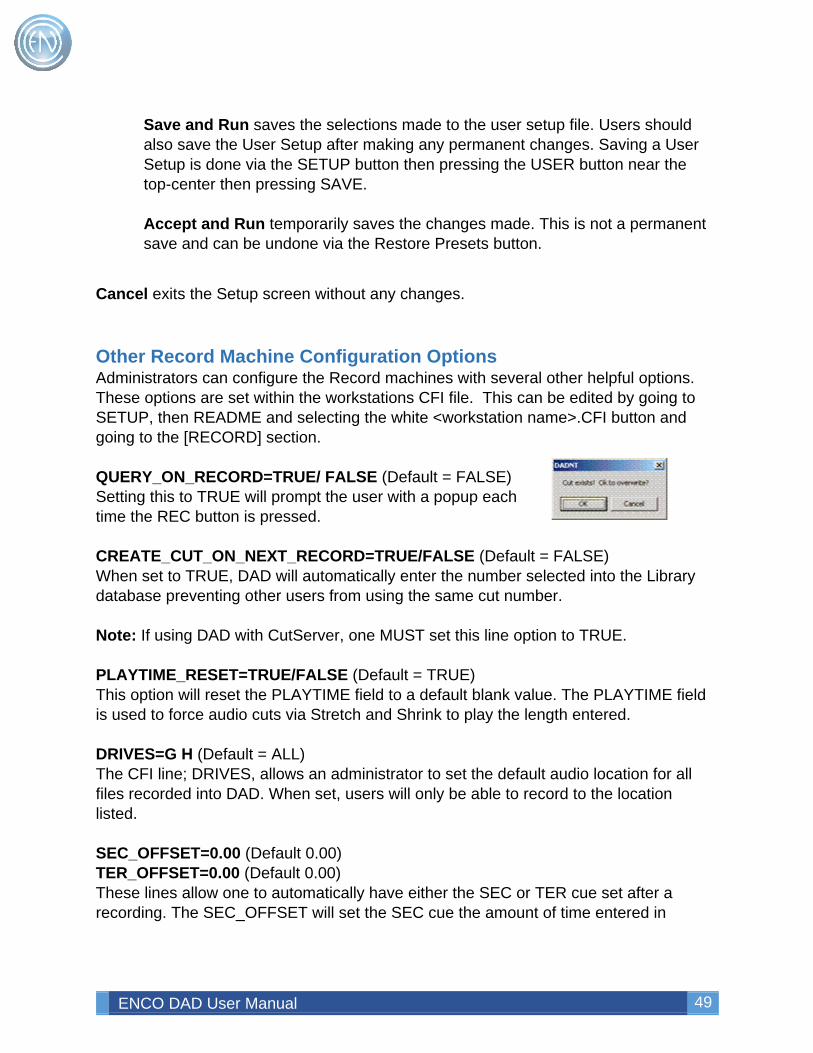
ENCO DAD User Manual 49
Save and Run saves the selections made to the user setup file. Users should also save the User Setup after making any permanent changes. Saving a User Setup is done via the SETUP button then pressing the USER button near the top-center then pressing SAVE. Accept and Run temporarily saves the changes made. This is not a permanent save and can be undone via the Restore Presets button.
Cancel exits the Setup screen without any changes.
Other Record Machine Configuration Options Administrators can configure the Record machines with several other helpful options. These options are set within the workstations CFI file. This can be edited by going to SETUP, then README and selecting the white <workstation name>.CFI button and going to the [RECORD] section. QUERY_ON_RECORD=TRUE/ FALSE (Default = FALSE) Setting this to TRUE will prompt the user with a popup each time the REC button is pressed. CREATE_CUT_ON_NEXT_RECORD=TRUE/FALSE (Default = FALSE) When set to TRUE, DAD will automatically enter the number selected into the Library database preventing other users from using the same cut number. Note: If using DAD with CutServer, one MUST set this line option to TRUE. PLAYTIME_RESET=TRUE/FALSE (Default = TRUE) This option will reset the PLAYTIME field to a default blank value. The PLAYTIME field is used to force audio cuts via Stretch and Shrink to play the length entered. DRIVES=G H (Default = ALL) The CFI line; DRIVES, allows an administrator to set the default audio location for all files recorded into DAD. When set, users will only be able to record to the location listed. SEC_OFFSET=0.00 (Default 0.00) TER_OFFSET=0.00 (Default 0.00) These lines allow one to automatically have either the SEC or TER cue set after a recording. The SEC_OFFSET will set the SEC cue the amount of time entered in
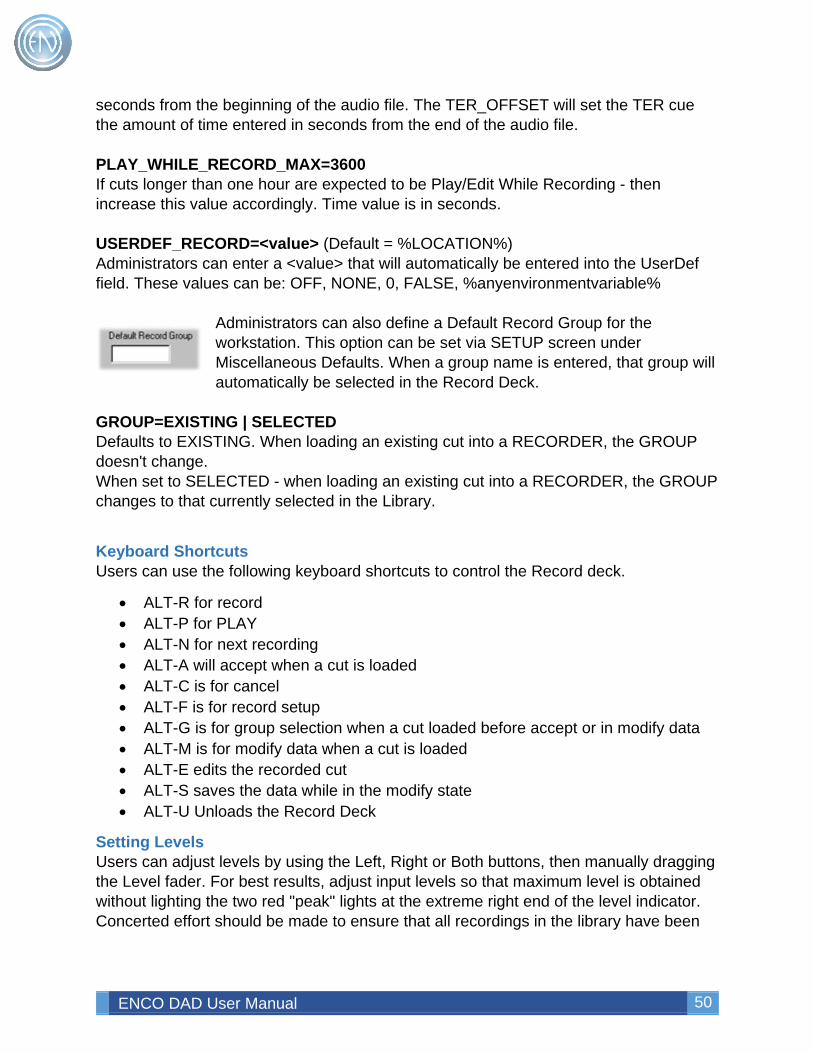
ENCO DAD User Manual 50
seconds from the beginning of the audio file. The TER_OFFSET will set the TER cue the amount of time entered in seconds from the end of the audio file. PLAY_WHILE_RECORD_MAX=3600 If cuts longer than one hour are expected to be Play/Edit While Recording - then increase this value accordingly. Time value is in seconds. USERDEF_RECORD=<value> (Default = %LOCATION%) Administrators can enter a <value> that will automatically be entered into the UserDef field. These values can be: OFF, NONE, 0, FALSE, %anyenvironmentvariable%
Administrators can also define a Default Record Group for the workstation. This option can be set via SETUP screen under Miscellaneous Defaults. When a group name is entered, that group will automatically be selected in the Record Deck.
GROUP=EXISTING | SELECTED Defaults to EXISTING. When loading an existing cut into a RECORDER, the GROUP doesn't change. When set to SELECTED - when loading an existing cut into a RECORDER, the GROUP changes to that currently selected in the Library.
Keyboard Shortcuts Users can use the following keyboard shortcuts to control the Record deck.
• ALT-R for record • ALT-P for PLAY • ALT-N for next recording • ALT-A will accept when a cut is loaded • ALT-C is for cancel • ALT-F is for record setup • ALT-G is for group selection when a cut loaded before accept or in modify data • ALT-M is for modify data when a cut is loaded • ALT-E edits the recorded cut • ALT-S saves the data while in the modify state • ALT-U Unloads the Record Deck
Setting Levels Users can adjust levels by using the Left, Right or Both buttons, then manually dragging the Level fader. For best results, adjust input levels so that maximum level is obtained without lighting the two red "peak" lights at the extreme right end of the level indicator. Concerted effort should be made to ensure that all recordings in the library have been

ENCO DAD User Manual 51
made to the same reference level, as DAD does not offer any dynamic output level control from the playback machines. The "0" on the level indicators of DAD represent -16dB FS. This means 16 dB below Full Scale (all 1's) in the digital domain. This was chosen to provide 16 dB of headroom from the "nominal" operating level to the digital "ceiling". The DAD meter operates in the digital domain; meaning after the analog signal has been converted to digital samples. The “Reference Level” setting in SETUP/CONFIGURE AUDIO BOARDS determines how this “0” in the digital domain relates to the analog audio level. This number determines the gain of the analog section before the A to D converter AND the gain of the analog section after the D to A converter. By changing these gains, one can set this "0" on the DAD meter to correspond to any analog level. The number entered is the analog level (in dBu) one wants to correspond to 0dB FS (digital clip). Knowing that "0" on the DAD meter = -16dB FS, one gets the formula: Reference Level = Nominal Level (dBu) + 16 So if a facility uses +4dBu as the nominal reference level corresponding to 0 VU on the console, one would set the DAD reference level to (+4 + 16) = 20. This setting only applies to audio cards that have such an adjustable gain structure. Also please note that the level indicator on DAD is NOT a "VU" meter. It does not have the 300 mS integration period of a VU meter and therefore responds to peaks that a VU meter would smooth out. "DAD 0" will only correspond to a console "0 VU" when the audio is a pure sinusoidal tone. Most real program material will have a peak to average ratio (crest factor) of 8dB or more, so it is quite proper for a normal recording to average in the "yellow" zone of a DAD meter, with peaks into the red (+9dB) now and then. The overload lights flash yellow when level reaches +15dB (-1dBFS), and will turn red and stay on when the signal has clipped at +16dB (0dBFS). If viewed in the editor, any clip points are also marked with red vertical lines in the waveform display.
NOTE: Some audio cards and audio card drivers do not allow levels to be set directly from within DAD. In general these cards use a ‘Mixer’ application that allow levels to be set within their own external program.
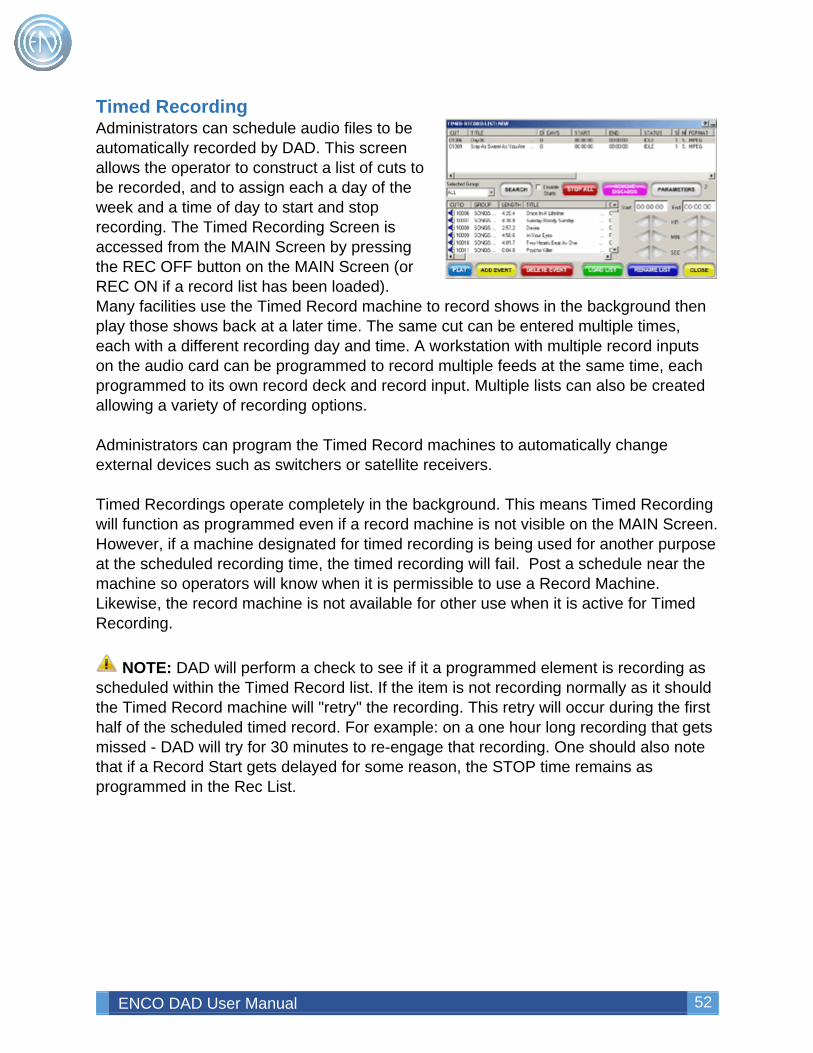
ENCO DAD User Manual 52
Timed Recording Administrators can schedule audio files to be automatically recorded by DAD. This screen allows the operator to construct a list of cuts to be recorded, and to assign each a day of the week and a time of day to start and stop recording. The Timed Recording Screen is accessed from the MAIN Screen by pressing the REC OFF button on the MAIN Screen (or REC ON if a record list has been loaded). Many facilities use the Timed Record machine to record shows in the background then play those shows back at a later time. The same cut can be entered multiple times, each with a different recording day and time. A workstation with multiple record inputs on the audio card can be programmed to record multiple feeds at the same time, each programmed to its own record deck and record input. Multiple lists can also be created allowing a variety of recording options. Administrators can program the Timed Record machines to automatically change external devices such as switchers or satellite receivers. Timed Recordings operate completely in the background. This means Timed Recording will function as programmed even if a record machine is not visible on the MAIN Screen. However, if a machine designated for timed recording is being used for another purpose at the scheduled recording time, the timed recording will fail. Post a schedule near the machine so operators will know when it is permissible to use a Record Machine. Likewise, the record machine is not available for other use when it is active for Timed Recording.
NOTE: DAD will perform a check to see if it a programmed element is recording as scheduled within the Timed Record list. If the item is not recording normally as it should the Timed Record machine will "retry" the recording. This retry will occur during the first half of the scheduled timed record. For example: on a one hour long recording that gets missed - DAD will try for 30 minutes to re-engage that recording. One should also note that if a Record Start gets delayed for some reason, the STOP time remains as programmed in the Rec List.
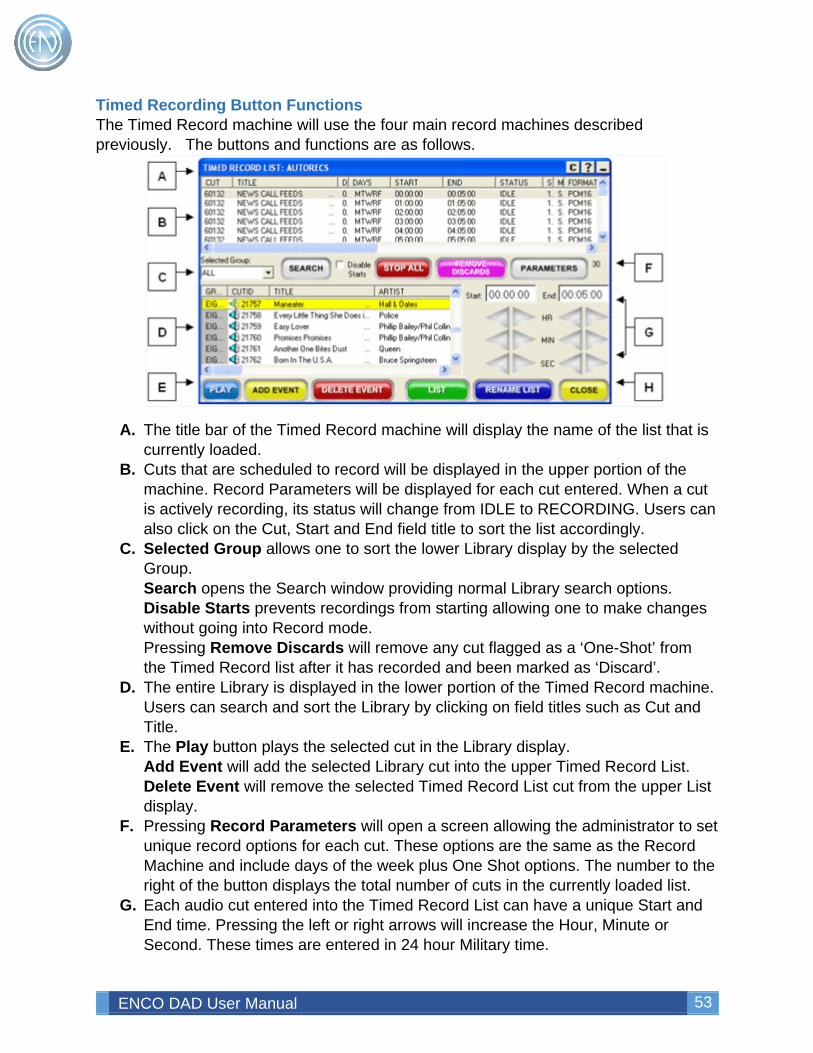
ENCO DAD User Manual 53
Timed Recording Button Functions The Timed Record machine will use the four main record machines described previously. The buttons and functions are as follows.
A. The title bar of the Timed Record machine will display the name of the list that is
currently loaded. B. Cuts that are scheduled to record will be displayed in the upper portion of the
machine. Record Parameters will be displayed for each cut entered. When a cut is actively recording, its status will change from IDLE to RECORDING. Users can also click on the Cut, Start and End field title to sort the list accordingly.
C. Selected Group allows one to sort the lower Library display by the selected Group. Search opens the Search window providing normal Library search options. Disable Starts prevents recordings from starting allowing one to make changes without going into Record mode. Pressing Remove Discards will remove any cut flagged as a ‘One-Shot’ from the Timed Record list after it has recorded and been marked as ‘Discard’.
D. The entire Library is displayed in the lower portion of the Timed Record machine. Users can search and sort the Library by clicking on field titles such as Cut and Title.
E. The Play button plays the selected cut in the Library display. Add Event will add the selected Library cut into the upper Timed Record List. Delete Event will remove the selected Timed Record List cut from the upper List display.
F. Pressing Record Parameters will open a screen allowing the administrator to set unique record options for each cut. These options are the same as the Record Machine and include days of the week plus One Shot options. The number to the right of the button displays the total number of cuts in the currently loaded list.
G. Each audio cut entered into the Timed Record List can have a unique Start and End time. Pressing the left or right arrows will increase the Hour, Minute or Second. These times are entered in 24 hour Military time.
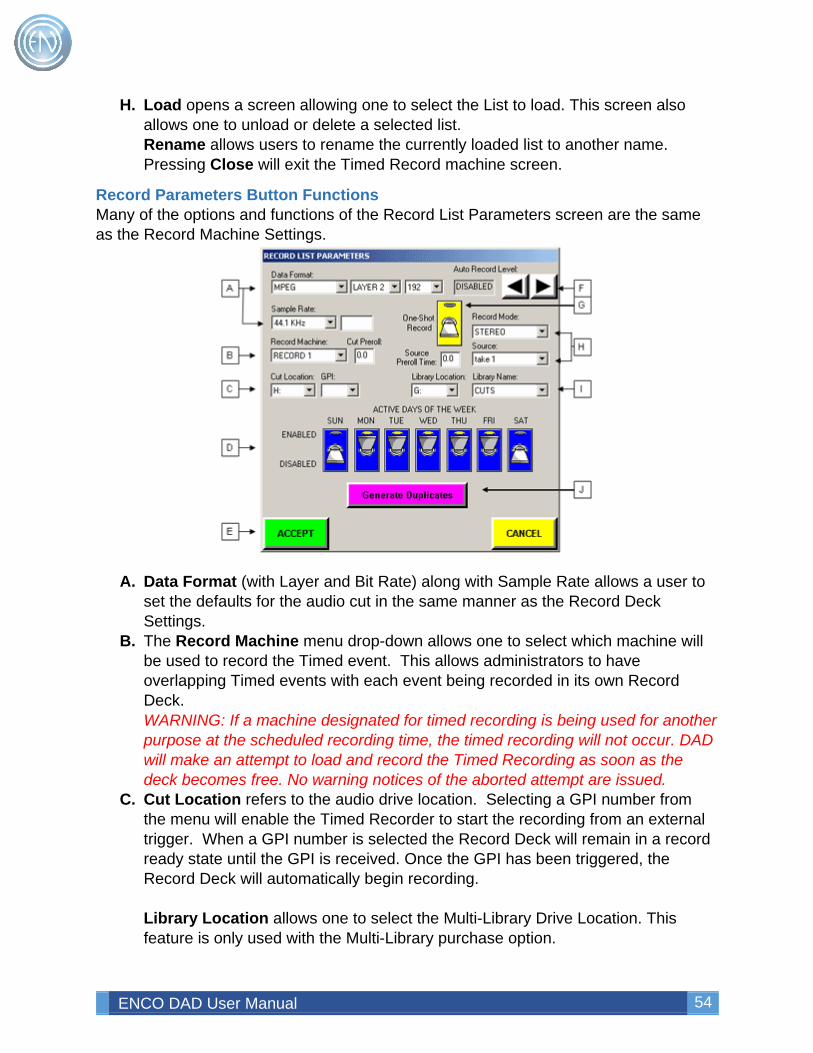
ENCO DAD User Manual 54
H. Load opens a screen allowing one to select the List to load. This screen also allows one to unload or delete a selected list. Rename allows users to rename the currently loaded list to another name. Pressing Close will exit the Timed Record machine screen.
Record Parameters Button Functions Many of the options and functions of the Record List Parameters screen are the same as the Record Machine Settings.
A. Data Format (with Layer and Bit Rate) along with Sample Rate allows a user to
set the defaults for the audio cut in the same manner as the Record Deck Settings.
B. The Record Machine menu drop-down allows one to select which machine will be used to record the Timed event. This allows administrators to have overlapping Timed events with each event being recorded in its own Record Deck. WARNING: If a machine designated for timed recording is being used for another purpose at the scheduled recording time, the timed recording will not occur. DAD will make an attempt to load and record the Timed Recording as soon as the deck becomes free. No warning notices of the aborted attempt are issued.
C. Cut Location refers to the audio drive location. Selecting a GPI number from the menu will enable the Timed Recorder to start the recording from an external trigger. When a GPI number is selected the Record Deck will remain in a record ready state until the GPI is received. Once the GPI has been triggered, the Record Deck will automatically begin recording. Library Location allows one to select the Multi-Library Drive Location. This feature is only used with the Multi-Library purchase option.
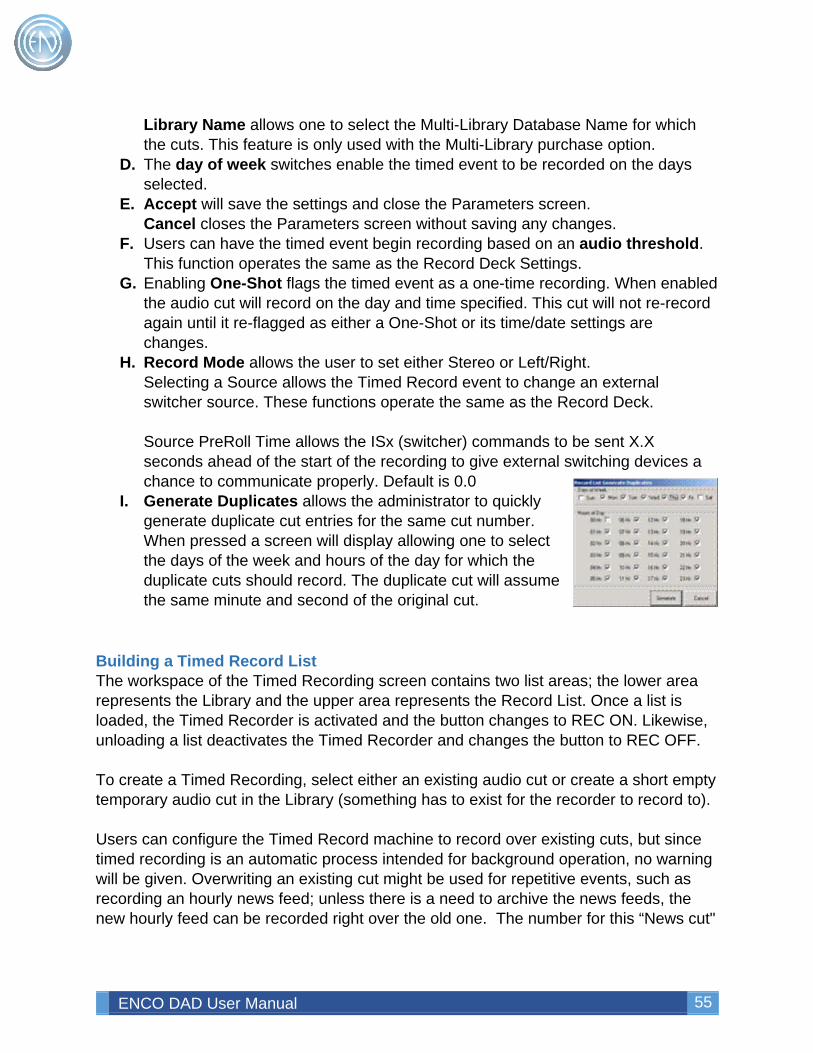
ENCO DAD User Manual 55
Library Name allows one to select the Multi-Library Database Name for which the cuts. This feature is only used with the Multi-Library purchase option.
D. The day of week switches enable the timed event to be recorded on the days selected.
E. Accept will save the settings and close the Parameters screen. Cancel closes the Parameters screen without saving any changes.
F. Users can have the timed event begin recording based on an audio threshold. This function operates the same as the Record Deck Settings.
G. Enabling One-Shot flags the timed event as a one-time recording. When enabled the audio cut will record on the day and time specified. This cut will not re-record again until it re-flagged as either a One-Shot or its time/date settings are changes.
H. Record Mode allows the user to set either Stereo or Left/Right. Selecting a Source allows the Timed Record event to change an external switcher source. These functions operate the same as the Record Deck. Source PreRoll Time allows the ISx (switcher) commands to be sent X.X seconds ahead of the start of the recording to give external switching devices a chance to communicate properly. Default is 0.0
I. Generate Duplicates allows the administrator to quickly generate duplicate cut entries for the same cut number. When pressed a screen will display allowing one to select the days of the week and hours of the day for which the duplicate cuts should record. The duplicate cut will assume the same minute and second of the original cut.
Building a Timed Record List The workspace of the Timed Recording screen contains two list areas; the lower area represents the Library and the upper area represents the Record List. Once a list is loaded, the Timed Recorder is activated and the button changes to REC ON. Likewise, unloading a list deactivates the Timed Recorder and changes the button to REC OFF. To create a Timed Recording, select either an existing audio cut or create a short empty temporary audio cut in the Library (something has to exist for the recorder to record to). Users can configure the Timed Record machine to record over existing cuts, but since timed recording is an automatic process intended for background operation, no warning will be given. Overwriting an existing cut might be used for repetitive events, such as recording an hourly news feed; unless there is a need to archive the news feeds, the new hourly feed can be recorded right over the old one. The number for this “News cut"
ENCO DAD User Manual 56
would always stay the same. Stations that wish to archive these feeds should create a range of cuts that can be recorded to.
Once an audio cut has been created in the Library, users can either double click or select a cut and press Add Event from within the Timed Recording screen. If no other event presently exists in the list, a new list will be created. Upon adding the first cut to a new list, a pop-up will display prompting the user to name the list that is being created.
IMPORTANT: Timed Record lists should not be saved with a name that is the same as the name of the workstation.
After the list has been named, the cut added will be displayed. Selecting this cut will allow one to set the Start and End times. To set the recording Start and End time, users can press the arrow buttons increasing or decreasing the time accordingly. Users can also manually enter the time directly into the desired field in 24-hour military time format.
Pressing the Record Parameters button will display further settings such as days of the week and audio format options. Here one sets the days of the week for the timed recording event. Users can also select advanced options such as Source selection and GPI triggers.
Workstations with the Serial option enabled can be configured to select a specific audio source to record from. Selecting a source entry will program the highlighted cut to switch to that input before starting the associated recording. Each Record Deck can have its own unique switcher file (*.IS1 - *.IS4) allowing for a variety of recording options. The GPI menu allows one to activate timed recording on the command of an external signal. For example, a closure from a satellite network can be used to activate timed recording of a network feed. This feature requires installation of optional GPI hardware. Setting the GPI selection to input zero (0) deactivates GPI operation. To use the GPI start feature, a start and end time must first be entered for the cut on the Timed Recording screen. Once this is done, the appropriate GPI input can be selected in the GPI menu. At the designated start time, the recorder will go into record ready mode, and will wait for the GPI command on the designated input to begin recording. Therefore, if an event is to be recorded by GPI input at 12:00:00, users should set the start time to 11:59:58; this would alert the recorder to be ready for the start command two seconds before it is expected. This provides some cushion in the event the local
ENCO DAD User Manual 57
clock is not synchronized with the remote clock sending the GPI command. To end a GPI-initiated recording use the End Time setting on the Timed Recording screen. Once the proper settings have been set, the timed event is ready to record. The list will display the Cut Number, Title, Active Days of the week, Start and End times along with the cuts status and other record information. Users can sort the Timed Record list by clicking on the column headers for Cut, Start and End. When a cut becomes active, its status will change to RECORD. After the cut has finished recording, it will return to IDLE. If the cut was flagged as a One-Shot recording, it will change to DISCARD after completion. Users can add, remove or modify any cut within the list at any time. Only cuts that are actively recording cannot be changed.
Saving, Loading and Deleting Timed Record Lists Administrators can create and save several Timed Record lists. Each list can contain cuts with unique start and end times. These lists can be automatically loaded via DAD Command Language (DCL), which allows one to schedule a list to be loaded. For example: LOAD RECLIST NETNEWS. Only one list can be loaded on a single workstation at a time and only one instance of a list can be loaded at a time. To save or rename a Timed Record list, press the Rename List button. Entering a name within the dialogue window renames or saves the list that is presently loaded. To load an existing Timed Record list, press the Load List button. This opens a window allowing one to select the desired list and press Load. Unload will unload the list currently loaded and disable the Timed Record machine (REC OFF). Selecting a list and pressing Delete will permanently delete the desired list.
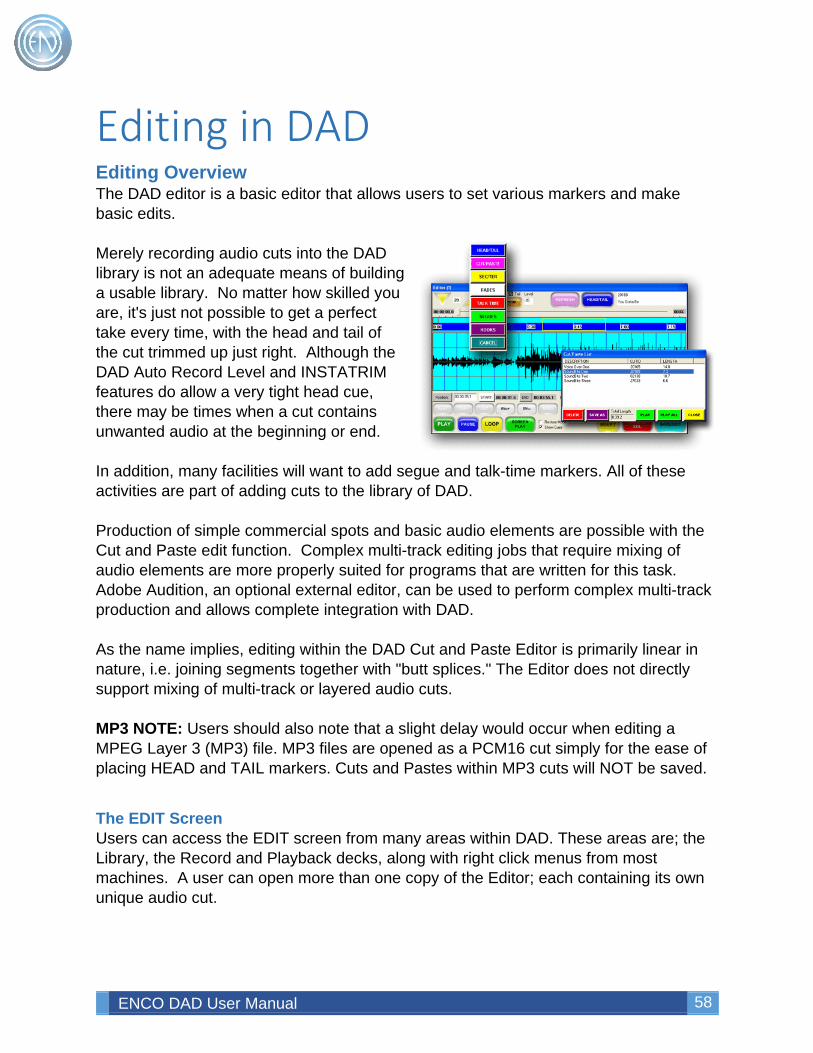
ENCO DAD User Manual 58
Editing in DAD Editing Overview The DAD editor is a basic editor that allows users to set various markers and make basic edits. Merely recording audio cuts into the DAD library is not an adequate means of building a usable library. No matter how skilled you are, it's just not possible to get a perfect take every time, with the head and tail of the cut trimmed up just right. Although the DAD Auto Record Level and INSTATRIM features do allow a very tight head cue, there may be times when a cut contains unwanted audio at the beginning or end. In addition, many facilities will want to add segue and talk-time markers. All of these activities are part of adding cuts to the library of DAD. Production of simple commercial spots and basic audio elements are possible with the Cut and Paste edit function. Complex multi-track editing jobs that require mixing of audio elements are more properly suited for programs that are written for this task. Adobe Audition, an optional external editor, can be used to perform complex multi-track production and allows complete integration with DAD. As the name implies, editing within the DAD Cut and Paste Editor is primarily linear in nature, i.e. joining segments together with "butt splices." The Editor does not directly support mixing of multi-track or layered audio cuts. MP3 NOTE: Users should also note that a slight delay would occur when editing a MPEG Layer 3 (MP3) file. MP3 files are opened as a PCM16 cut simply for the ease of placing HEAD and TAIL markers. Cuts and Pastes within MP3 cuts will NOT be saved.
The EDIT Screen Users can access the EDIT screen from many areas within DAD. These areas are; the Library, the Record and Playback decks, along with right click menus from most machines. A user can open more than one copy of the Editor; each containing its own unique audio cut.
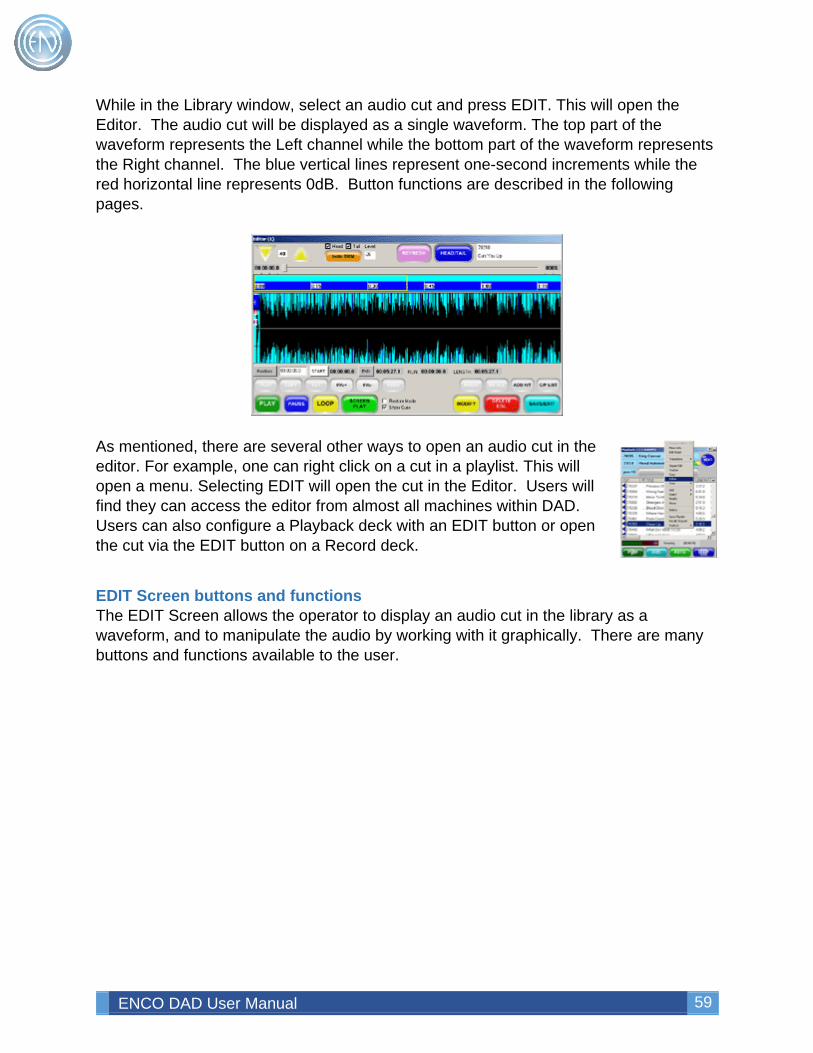
ENCO DAD User Manual 59
While in the Library window, select an audio cut and press EDIT. This will open the Editor. The audio cut will be displayed as a single waveform. The top part of the waveform represents the Left channel while the bottom part of the waveform represents the Right channel. The blue vertical lines represent one-second increments while the red horizontal line represents 0dB. Button functions are described in the following pages.
As mentioned, there are several other ways to open an audio cut in the editor. For example, one can right click on a cut in a playlist. This will open a menu. Selecting EDIT will open the cut in the Editor. Users will find they can access the editor from almost all machines within DAD. Users can also configure a Playback deck with an EDIT button or open the cut via the EDIT button on a Record deck.
EDIT Screen buttons and functions The EDIT Screen allows the operator to display an audio cut in the library as a waveform, and to manipulate the audio by working with it graphically. There are many buttons and functions available to the user.
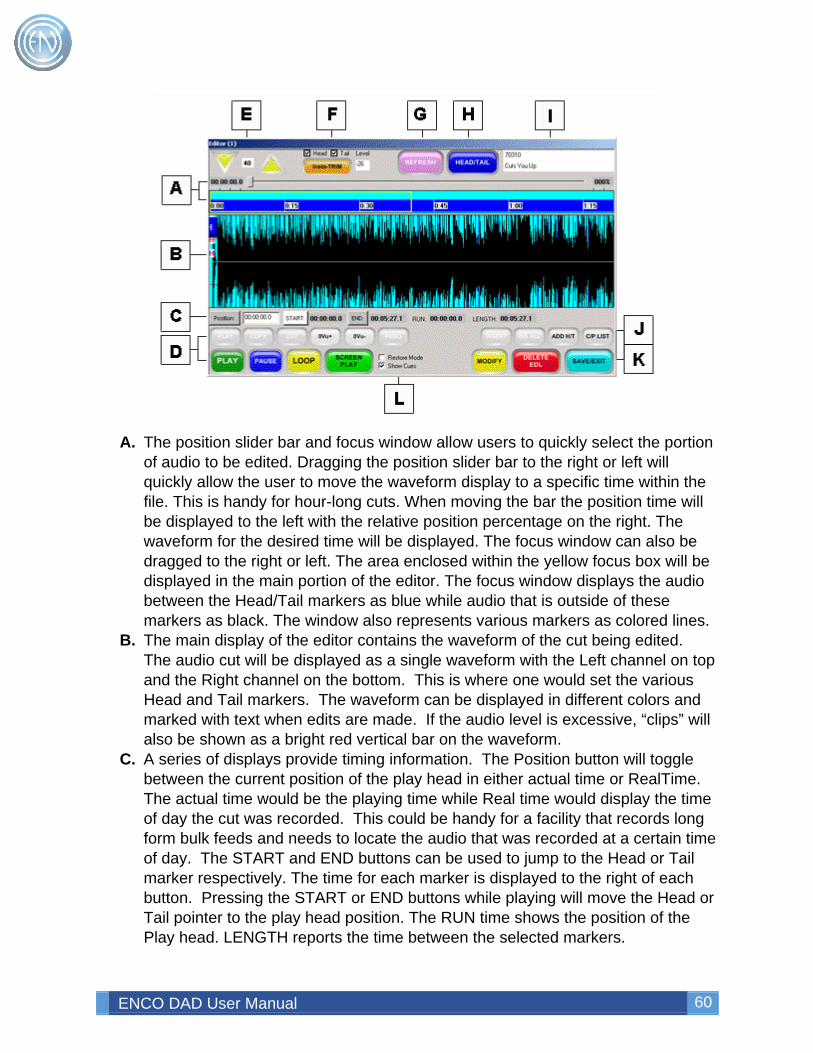
ENCO DAD User Manual 60
A. The position slider bar and focus window allow users to quickly select the portion
of audio to be edited. Dragging the position slider bar to the right or left will quickly allow the user to move the waveform display to a specific time within the file. This is handy for hour-long cuts. When moving the bar the position time will be displayed to the left with the relative position percentage on the right. The waveform for the desired time will be displayed. The focus window can also be dragged to the right or left. The area enclosed within the yellow focus box will be displayed in the main portion of the editor. The focus window displays the audio between the Head/Tail markers as blue while audio that is outside of these markers as black. The window also represents various markers as colored lines.
B. The main display of the editor contains the waveform of the cut being edited. The audio cut will be displayed as a single waveform with the Left channel on top and the Right channel on the bottom. This is where one would set the various Head and Tail markers. The waveform can be displayed in different colors and marked with text when edits are made. If the audio level is excessive, “clips” will also be shown as a bright red vertical bar on the waveform.
C. A series of displays provide timing information. The Position button will toggle between the current position of the play head in either actual time or RealTime. The actual time would be the playing time while Real time would display the time of day the cut was recorded. This could be handy for a facility that records long form bulk feeds and needs to locate the audio that was recorded at a certain time of day. The START and END buttons can be used to jump to the Head or Tail marker respectively. The time for each marker is displayed to the right of each button. Pressing the START or END buttons while playing will move the Head or Tail pointer to the play head position. The RUN time shows the position of the Play head. LENGTH reports the time between the selected markers.
ENCO DAD User Manual 61
D. These buttons allow users to control the playback of the editor and also provide editing functions. The grayed out buttons are only active when in CUT/PASTE mode. The two white buttons displaying 0Vu+ and 0Vu- will change the visual scale of the editor allowing one to see more or less of the waveform (this does not change the actual 'loudness' of the cut). PLAY/STOP will play the audio from the Head marker to the Tail marker. PAUSE will pause the playback. LOOP will repeat the audio between the Head and Tail marker. SCREEN PLAY will play the audio that is displayed within the main editor display.
E. Users can ZOOM IN or ZOOM OUT allowing them to see more or less of the audio. The editor remembers the level of zoom after closing.
F. INSTA-TRIM will set the Head and Tail markers to a threshold value defined by the user. By default, the value of 17 disables Insta-Trim. The value entered should be slightly above the noise floor for the recording. If the noise floor is –28 or below, one would enter the value of –27 in the Level field to the right of the button. When pressed, the markers will automatically be placed at the point where audio becomes greater than –27. Check boxes for Head and Tail allow a user to set both the Head and Tail together or just one of the markers.
G. The REFRESH button is only active when editing an actively recording cut. When Play-While-Record is enabled, users can edit the actively recording cut. The refresh button will be active allowing the user to update the editor display with the latest audio data.
H. This multi-function button allows users to select the different markers to be placed within the audio file. HEAD/TAIL is used to mark the beginning and end of an audio cut. CUT/PASTE allows users to edit the waveform. SEC/TER markers can be used for controlling external components. FADES define points for fade in and fade out. TALK TIME markers will inform talent of the amount of time before the cut’s post. SEGUES trigger the next cut to play and HOOKS can be used to define specific regions within the song. More details about using Markers can be found here.
I. The Cut information window displays the Cut number and the Title of the cut that is loaded in the editor. This display also supports a mouse-over pop-up. When a user places the mouse over this display for a few seconds, a pop-up will appear showing the record date and time along with any data in the UserDef field.
J. Users can store clips of audio in a list allowing them to preview, paste or save them within other audio cuts and editing sessions. Pressing ADD H/T can add audio between Head/Tail markers to the CUT/PASTE LIST. Items currently selected and stored within the CUT/PASTE LIST can be displayed by pressing the C/P LIST button. When the list contains an audio segment, other buttons like INSERT and INS ALL (insert all) become active.
K. SAVE/EXIT will open a window allowing the user to SAVE the changes, REWRITE the audio cut, CANCEL or QUIT without saving any changes. DELETE EDLS will restore the audio cut to its default unedited state and will reset all markers to the beginning and end of the audio cut.
ENCO DAD User Manual 62
NOTE: If the audio cut has been REWRITTEN to itself then any edits made cannot be undone. MODIFY will open the Cut Modify Screen for the cut being edited.
L. These two checkboxes allow users to set display preferences. Restore Mode will remember the last state of the editor. For example, if the user closed the editor with SEGUES marker selected, when they re-open the editor, SEGUES will be displayed again. Show Cues will display the large markers for Head and Tails. When unchecked, only the white line and small colored letter representing the marker will be displayed.
Using the Editor When the EDIT screen opens users will see the waveform for the audio cut. They will also see a vertical line with a blue H marker on the left side of the display. This is the Head marker. This marker will define the beginning of the audio cut. An audio cut will play from the Head marker to the Tail marker. Any audio or silence outside of these markers will be ignored. This means if there are a few seconds of silence before the actual audio starts, the user can simple set the Head marker at the position were audio begins and move on with editing. Users do not have to cut the silence from the file. The same can be said for the Tail of the audio. Audio will only play up to the Tail position of the file. If the user does not stop the record deck right away and a few seconds of silence are recorded or a clip of the next song, simply place the Tail marker at the appropriate time to prevent the remaining audio from playing. Of course one can remove the unwanted information if desired by Rewriting the audio file during the SAVE process. All audio cuts entered into the system should have Head and Tail markers set. The majority of broadcast facilities also set SEGUE and TALK TIME markers for all necessary audio cuts like music and commercial elements. To place a Head marker, click on the far left side of the waveform display. This will place the Head marker at that point. The position can be adjusted further by clicking-and-dragging the pointer to the desired position. The Tail marker is set in a similar manner. Clicking on the far right portion of the waveform display will place a Tail marker. All markers can be set with this method. Other methods of setting the Head and Tail markers are Insta-Trim, using the mouse and utilizing the START and END buttons. Note: No matter where a pointer may be with respect to the waveform area, it can always be brought into the current display. The left (Head) pointer may be brought on screen by clicking on the leftmost end of the waveform area. The right (Tail) pointer may be brought on screen by clicking the right-most end of the waveform area. Once visible, the pointers may be dragged anywhere.
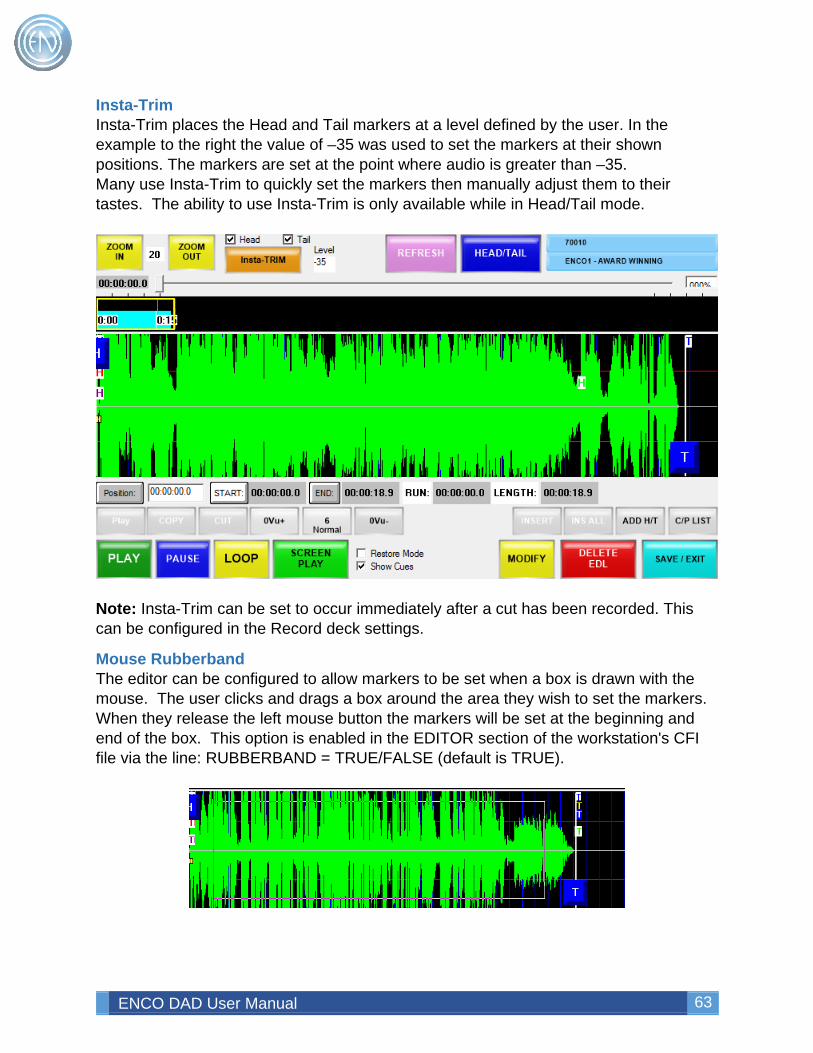
ENCO DAD User Manual 63
Insta-Trim Insta-Trim places the Head and Tail markers at a level defined by the user. In the example to the right the value of –35 was used to set the markers at their shown positions. The markers are set at the point where audio is greater than –35. Many use Insta-Trim to quickly set the markers then manually adjust them to their tastes. The ability to use Insta-Trim is only available while in Head/Tail mode.
Note: Insta-Trim can be set to occur immediately after a cut has been recorded. This can be configured in the Record deck settings.
Mouse Rubberband The editor can be configured to allow markers to be set when a box is drawn with the mouse. The user clicks and drags a box around the area they wish to set the markers. When they release the left mouse button the markers will be set at the beginning and end of the box. This option is enabled in the EDITOR section of the workstation's CFI file via the line: RUBBERBAND = TRUE/FALSE (default is TRUE).
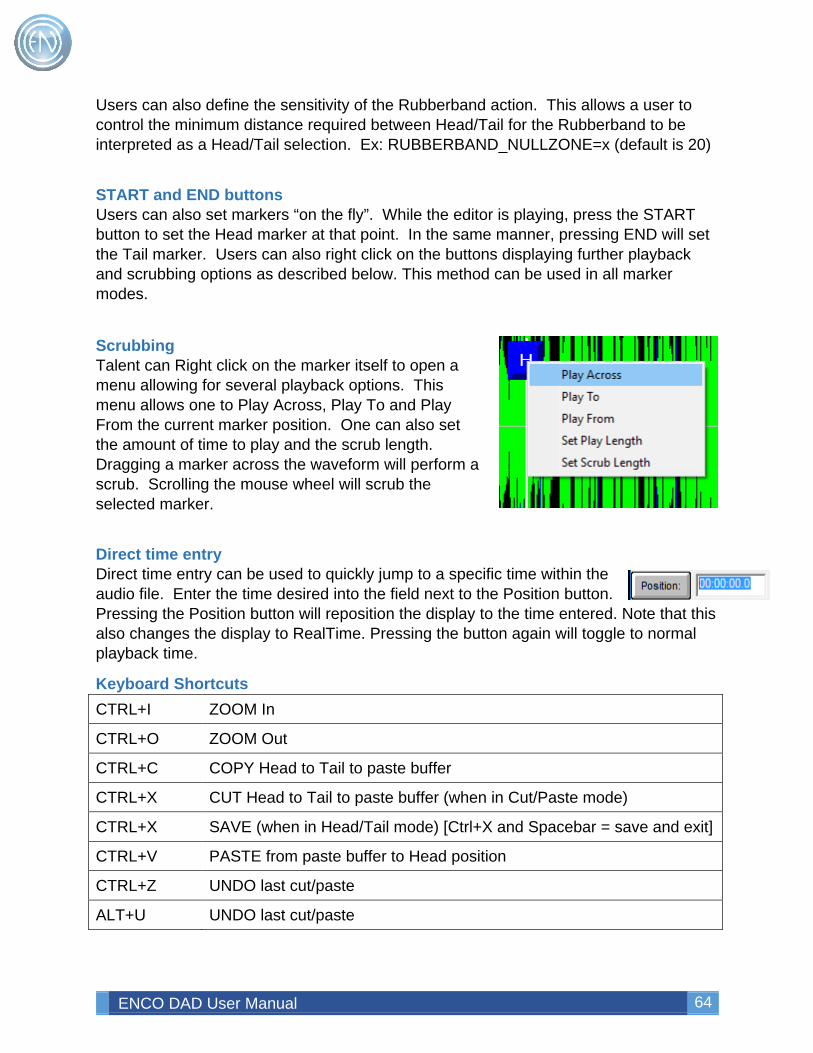
ENCO DAD User Manual 64
Users can also define the sensitivity of the Rubberband action. This allows a user to control the minimum distance required between Head/Tail for the Rubberband to be interpreted as a Head/Tail selection. Ex: RUBBERBAND_NULLZONE=x (default is 20)
START and END buttons Users can also set markers “on the fly”. While the editor is playing, press the START button to set the Head marker at that point. In the same manner, pressing END will set the Tail marker. Users can also right click on the buttons displaying further playback and scrubbing options as described below. This method can be used in all marker modes.
Scrubbing Talent can Right click on the marker itself to open a menu allowing for several playback options. This menu allows one to Play Across, Play To and Play From the current marker position. One can also set the amount of time to play and the scrub length. Dragging a marker across the waveform will perform a scrub. Scrolling the mouse wheel will scrub the selected marker.
Direct time entry Direct time entry can be used to quickly jump to a specific time within the audio file. Enter the time desired into the field next to the Position button. Pressing the Position button will reposition the display to the time entered. Note that this also changes the display to RealTime. Pressing the button again will toggle to normal playback time.
Keyboard Shortcuts CTRL+I ZOOM In
CTRL+O ZOOM Out
CTRL+C COPY Head to Tail to paste buffer
CTRL+X CUT Head to Tail to paste buffer (when in Cut/Paste mode)
CTRL+X SAVE (when in Head/Tail mode) [Ctrl+X and Spacebar = save and exit]
CTRL+V PASTE from paste buffer to Head position
CTRL+Z UNDO last cut/paste
ALT+U UNDO last cut/paste
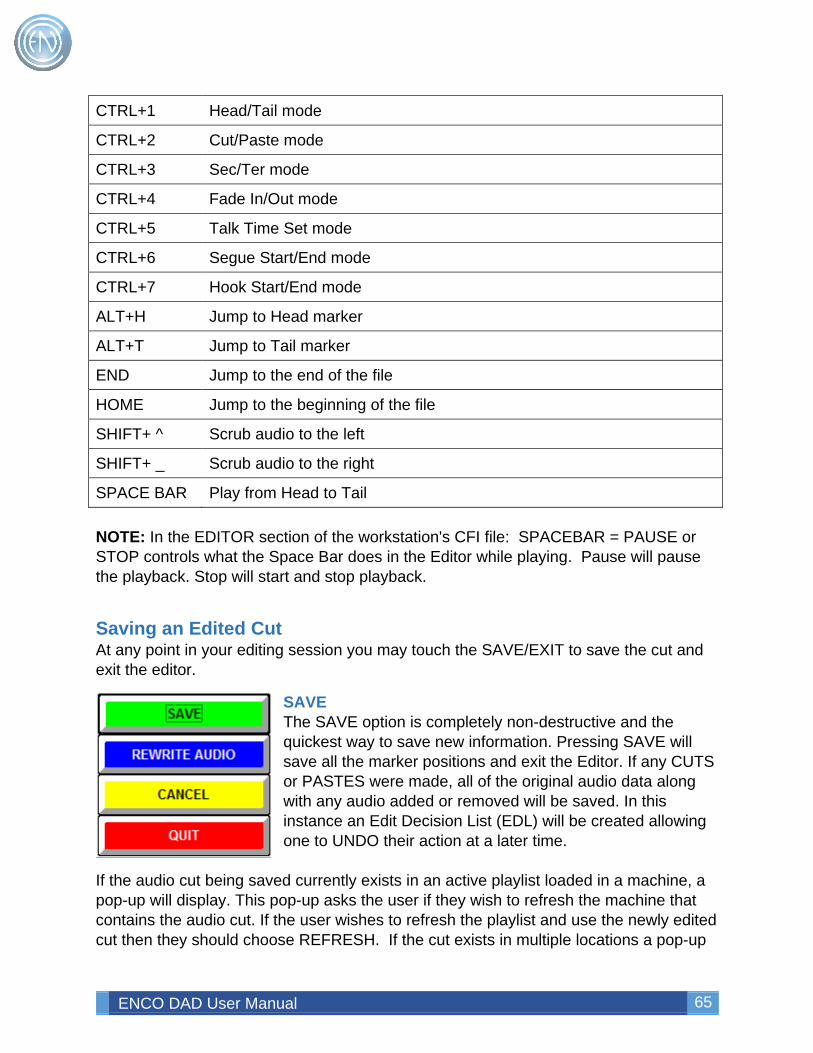
ENCO DAD User Manual 65
CTRL+1 Head/Tail mode
CTRL+2 Cut/Paste mode
CTRL+3 Sec/Ter mode
CTRL+4 Fade In/Out mode
CTRL+5 Talk Time Set mode
CTRL+6 Segue Start/End mode
CTRL+7 Hook Start/End mode
ALT+H Jump to Head marker
ALT+T Jump to Tail marker
END Jump to the end of the file
HOME Jump to the beginning of the file
SHIFT+ ^ Scrub audio to the left
SHIFT+ _ Scrub audio to the right
SPACE BAR Play from Head to Tail NOTE: In the EDITOR section of the workstation's CFI file: SPACEBAR = PAUSE or STOP controls what the Space Bar does in the Editor while playing. Pause will pause the playback. Stop will start and stop playback.
Saving an Edited Cut At any point in your editing session you may touch the SAVE/EXIT to save the cut and exit the editor.
SAVE The SAVE option is completely non-destructive and the quickest way to save new information. Pressing SAVE will save all the marker positions and exit the Editor. If any CUTS or PASTES were made, all of the original audio data along with any audio added or removed will be saved. In this instance an Edit Decision List (EDL) will be created allowing one to UNDO their action at a later time.
If the audio cut being saved currently exists in an active playlist loaded in a machine, a pop-up will display. This pop-up asks the user if they wish to refresh the machine that contains the audio cut. If the user wishes to refresh the playlist and use the newly edited cut then they should choose REFRESH. If the cut exists in multiple locations a pop-up
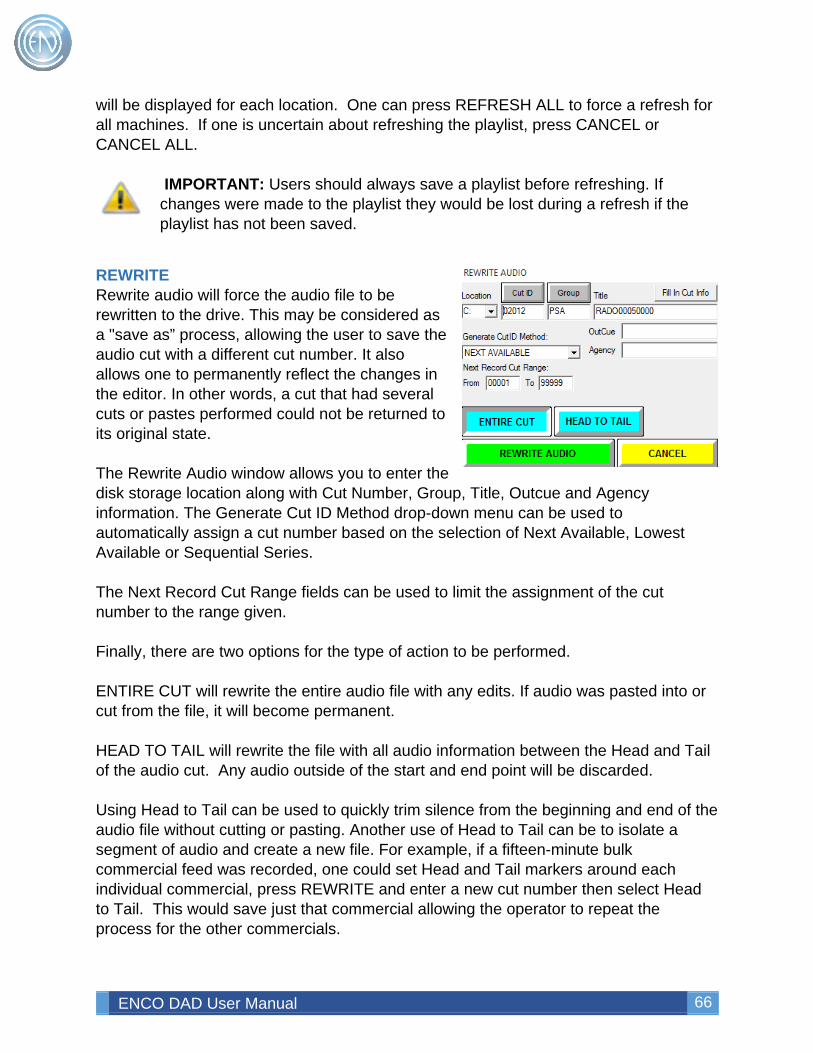
ENCO DAD User Manual 66
will be displayed for each location. One can press REFRESH ALL to force a refresh for all machines. If one is uncertain about refreshing the playlist, press CANCEL or CANCEL ALL.
IMPORTANT: Users should always save a playlist before refreshing. If changes were made to the playlist they would be lost during a refresh if the playlist has not been saved.
REWRITE Rewrite audio will force the audio file to be rewritten to the drive. This may be considered as a "save as” process, allowing the user to save the audio cut with a different cut number. It also allows one to permanently reflect the changes in the editor. In other words, a cut that had several cuts or pastes performed could not be returned to its original state. The Rewrite Audio window allows you to enter the disk storage location along with Cut Number, Group, Title, Outcue and Agency information. The Generate Cut ID Method drop-down menu can be used to automatically assign a cut number based on the selection of Next Available, Lowest Available or Sequential Series. The Next Record Cut Range fields can be used to limit the assignment of the cut number to the range given. Finally, there are two options for the type of action to be performed. ENTIRE CUT will rewrite the entire audio file with any edits. If audio was pasted into or cut from the file, it will become permanent. HEAD TO TAIL will rewrite the file with all audio information between the Head and Tail of the audio cut. Any audio outside of the start and end point will be discarded. Using Head to Tail can be used to quickly trim silence from the beginning and end of the audio file without cutting or pasting. Another use of Head to Tail can be to isolate a segment of audio and create a new file. For example, if a fifteen-minute bulk commercial feed was recorded, one could set Head and Tail markers around each individual commercial, press REWRITE and enter a new cut number then select Head to Tail. This would save just that commercial allowing the operator to repeat the process for the other commercials.

ENCO DAD User Manual 67
NOTE: The Rewrite Audio process is not instantaneous and depending on the size of the audio cut being saved, some processing time will be necessary. A “System processing - please wait” prompt will be displayed during the rewrite, and screen control options will be locked out for the duration of the rewrite. Please do not CANCEL the Please Wait message.
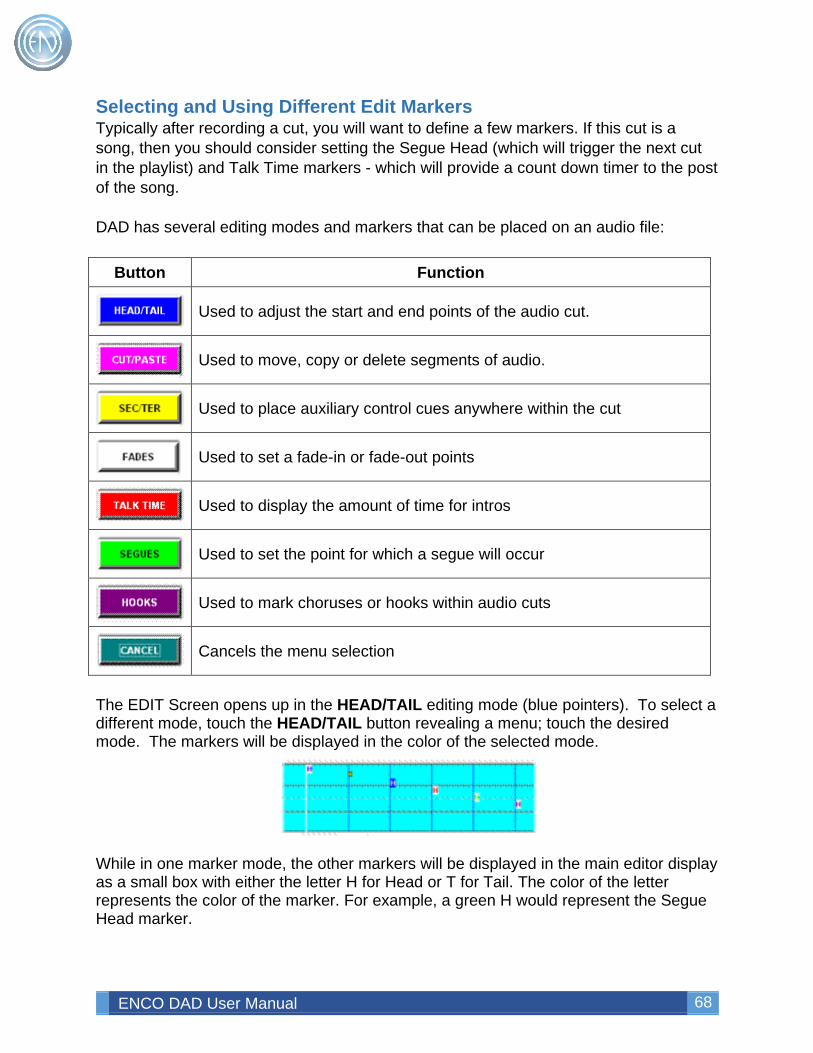
ENCO DAD User Manual 68
Selecting and Using Different Edit Markers Typically after recording a cut, you will want to define a few markers. If this cut is a song, then you should consider setting the Segue Head (which will trigger the next cut in the playlist) and Talk Time markers - which will provide a count down timer to the post of the song. DAD has several editing modes and markers that can be placed on an audio file:
Button Function
Used to adjust the start and end points of the audio cut.
Used to move, copy or delete segments of audio.
Used to place auxiliary control cues anywhere within the cut
Used to set a fade-in or fade-out points
Used to display the amount of time for intros
Used to set the point for which a segue will occur
Used to mark choruses or hooks within audio cuts
Cancels the menu selection
The EDIT Screen opens up in the HEAD/TAIL editing mode (blue pointers). To select a different mode, touch the HEAD/TAIL button revealing a menu; touch the desired mode. The markers will be displayed in the color of the selected mode.
While in one marker mode, the other markers will be displayed in the main editor display as a small box with either the letter H for Head or T for Tail. The color of the letter represents the color of the marker. For example, a green H would represent the Segue Head marker.
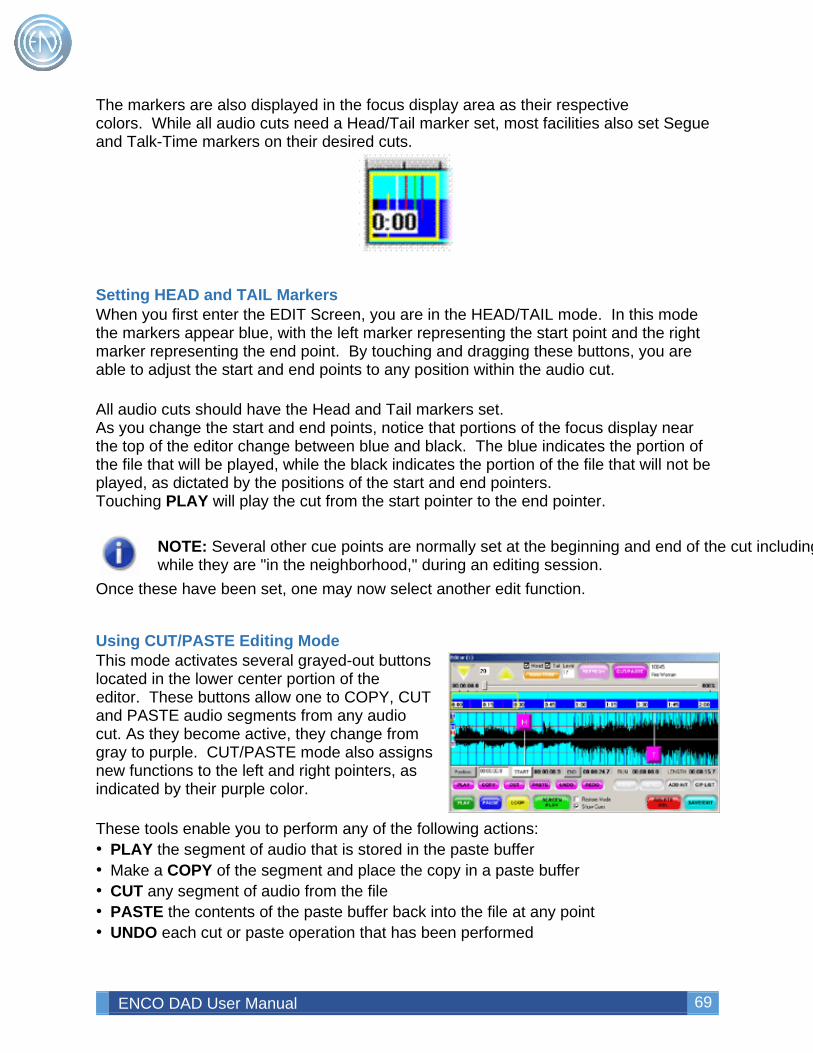
ENCO DAD User Manual 69
The markers are also displayed in the focus display area as their respective colors. While all audio cuts need a Head/Tail marker set, most facilities also set Segue and Talk-Time markers on their desired cuts.
Setting HEAD and TAIL Markers When you first enter the EDIT Screen, you are in the HEAD/TAIL mode. In this mode the markers appear blue, with the left marker representing the start point and the right marker representing the end point. By touching and dragging these buttons, you are able to adjust the start and end points to any position within the audio cut. All audio cuts should have the Head and Tail markers set. As you change the start and end points, notice that portions of the focus display near the top of the editor change between blue and black. The blue indicates the portion of the file that will be played, while the black indicates the portion of the file that will not be played, as dictated by the positions of the start and end pointers. Touching PLAY will play the cut from the start pointer to the end pointer.
NOTE: Several other cue points are normally set at the beginning and end of the cut including while they are "in the neighborhood," during an editing session.
Once these have been set, one may now select another edit function.
Using CUT/PASTE Editing Mode This mode activates several grayed-out buttons located in the lower center portion of the editor. These buttons allow one to COPY, CUT and PASTE audio segments from any audio cut. As they become active, they change from gray to purple. CUT/PASTE mode also assigns new functions to the left and right pointers, as indicated by their purple color. These tools enable you to perform any of the following actions: • PLAY the segment of audio that is stored in the paste buffer • Make a COPY of the segment and place the copy in a paste buffer • CUT any segment of audio from the file • PASTE the contents of the paste buffer back into the file at any point • UNDO each cut or paste operation that has been performed
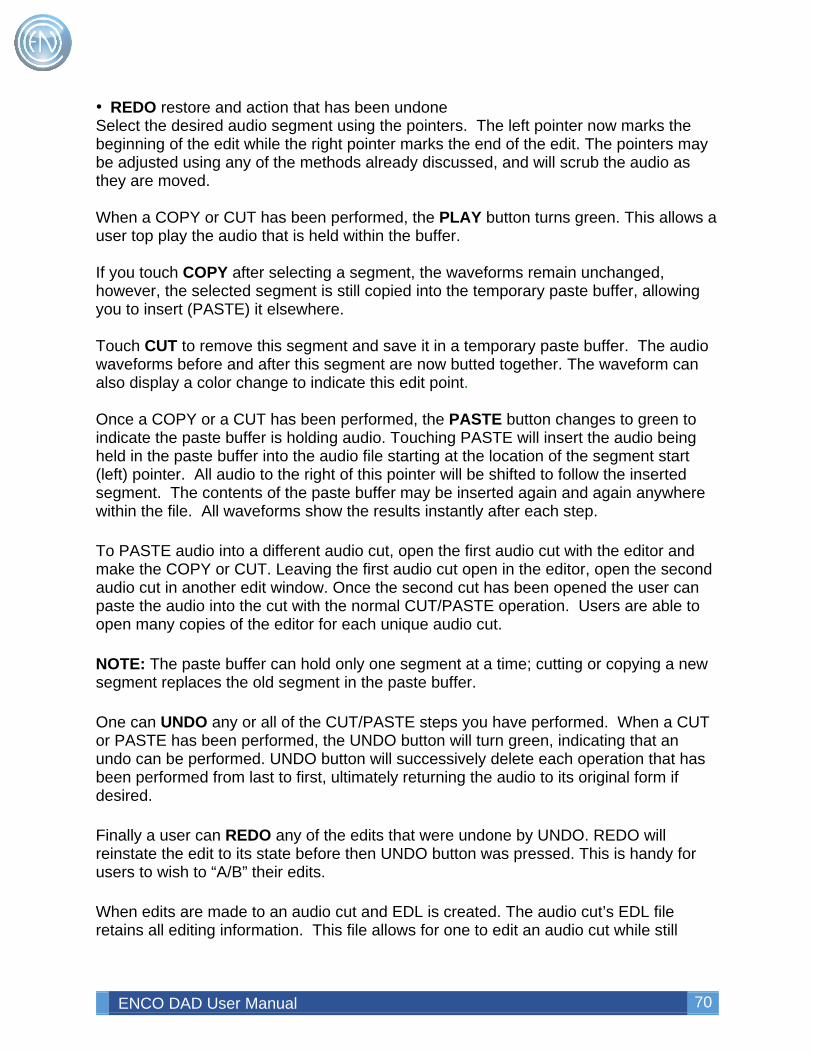
ENCO DAD User Manual 70
• REDO restore and action that has been undone Select the desired audio segment using the pointers. The left pointer now marks the beginning of the edit while the right pointer marks the end of the edit. The pointers may be adjusted using any of the methods already discussed, and will scrub the audio as they are moved. When a COPY or CUT has been performed, the PLAY button turns green. This allows a user top play the audio that is held within the buffer. If you touch COPY after selecting a segment, the waveforms remain unchanged, however, the selected segment is still copied into the temporary paste buffer, allowing you to insert (PASTE) it elsewhere. Touch CUT to remove this segment and save it in a temporary paste buffer. The audio waveforms before and after this segment are now butted together. The waveform can also display a color change to indicate this edit point. Once a COPY or a CUT has been performed, the PASTE button changes to green to indicate the paste buffer is holding audio. Touching PASTE will insert the audio being held in the paste buffer into the audio file starting at the location of the segment start (left) pointer. All audio to the right of this pointer will be shifted to follow the inserted segment. The contents of the paste buffer may be inserted again and again anywhere within the file. All waveforms show the results instantly after each step. To PASTE audio into a different audio cut, open the first audio cut with the editor and make the COPY or CUT. Leaving the first audio cut open in the editor, open the second audio cut in another edit window. Once the second cut has been opened the user can paste the audio into the cut with the normal CUT/PASTE operation. Users are able to open many copies of the editor for each unique audio cut. NOTE: The paste buffer can hold only one segment at a time; cutting or copying a new segment replaces the old segment in the paste buffer. One can UNDO any or all of the CUT/PASTE steps you have performed. When a CUT or PASTE has been performed, the UNDO button will turn green, indicating that an undo can be performed. UNDO button will successively delete each operation that has been performed from last to first, ultimately returning the audio to its original form if desired. Finally a user can REDO any of the edits that were undone by UNDO. REDO will reinstate the edit to its state before then UNDO button was pressed. This is handy for users to wish to “A/B” their edits. When edits are made to an audio cut and EDL is created. The audio cut’s EDL file retains all editing information. This file allows for one to edit an audio cut while still
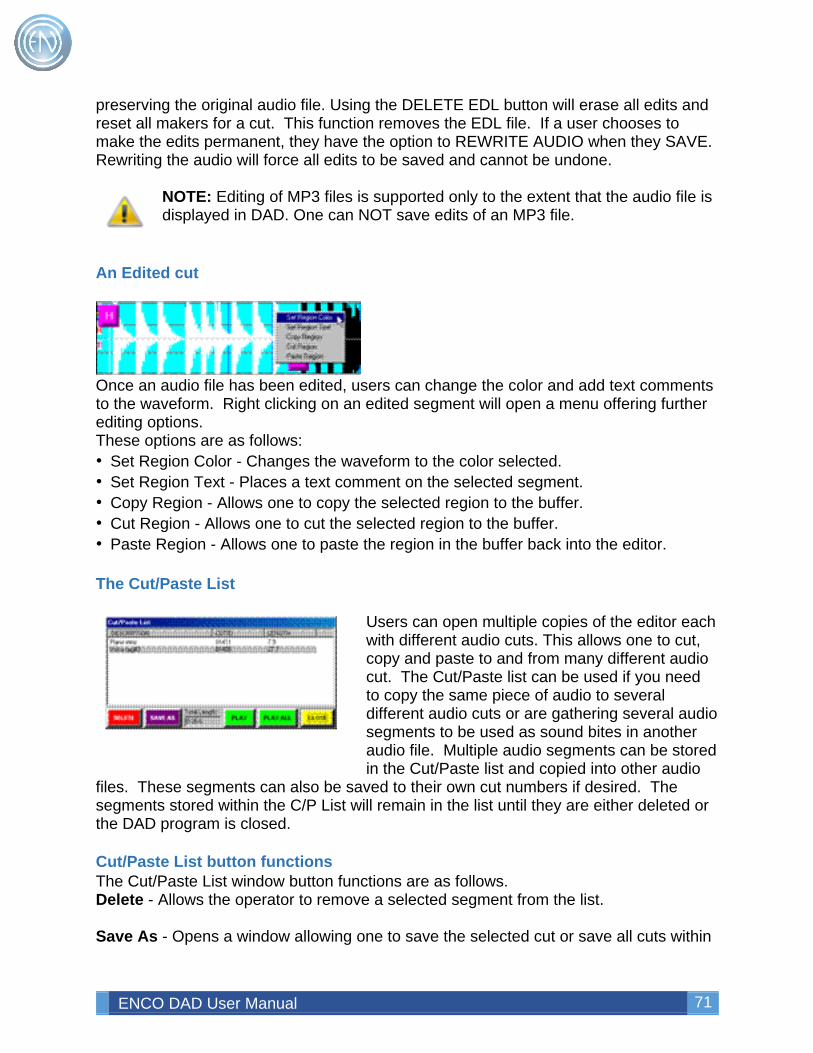
ENCO DAD User Manual 71
preserving the original audio file. Using the DELETE EDL button will erase all edits and reset all makers for a cut. This function removes the EDL file. If a user chooses to make the edits permanent, they have the option to REWRITE AUDIO when they SAVE. Rewriting the audio will force all edits to be saved and cannot be undone.
NOTE: Editing of MP3 files is supported only to the extent that the audio file is displayed in DAD. One can NOT save edits of an MP3 file.
An Edited cut
Once an audio file has been edited, users can change the color and add text comments to the waveform. Right clicking on an edited segment will open a menu offering further editing options. These options are as follows: • Set Region Color - Changes the waveform to the color selected. • Set Region Text - Places a text comment on the selected segment. • Copy Region - Allows one to copy the selected region to the buffer. • Cut Region - Allows one to cut the selected region to the buffer. • Paste Region - Allows one to paste the region in the buffer back into the editor. The Cut/Paste List
Users can open multiple copies of the editor each with different audio cuts. This allows one to cut, copy and paste to and from many different audio cut. The Cut/Paste list can be used if you need to copy the same piece of audio to several different audio cuts or are gathering several audio segments to be used as sound bites in another audio file. Multiple audio segments can be stored in the Cut/Paste list and copied into other audio
files. These segments can also be saved to their own cut numbers if desired. The segments stored within the C/P List will remain in the list until they are either deleted or the DAD program is closed. Cut/Paste List button functions The Cut/Paste List window button functions are as follows. Delete - Allows the operator to remove a selected segment from the list. Save As - Opens a window allowing one to save the selected cut or save all cuts within

ENCO DAD User Manual 72
the list. Save all will save the list from top to bottom to a single cut. Save Selected will save the selected cut to a single cut. Simply enter a cut number and associated information then press Save As. The list or segment will be written to the desired cut number and will close the Save As window. Play - Plays the selected cut. Play All - Plays all of the cuts within the list starting from top to bottom. Close - Exits the C/P List window. Using the CUT/PASTE List You can add any segment of audio between any of the marker modes. While users do not have to be in the CUT/PASTE mode to add audio segments to the list, they must be in the CUT/PASTE mode to insert the segment into an audio cut. Once the segment has been defined with a Head and Tail marker, touch the white ADD H/T button. This will open a pop-up allowing you to enter a description for the audio cut. The segment of audio will be placed into the CUT/PASTE List.
When an audio segment is added to the list two buttons become active. They are INSERT and INS ALL (Insert All). To copy a segment from the C/P List into another audio cut a user would first open the audio file that the segment will be inserted into. Select the CUT/PASTE mode and set the Head marker to the point at where the audio should be inserted. Press the white C/P List button. This opens the list allowing one to select the segment they wish to insert. Pressing the white INSERT button will insert that segment into the editor.
Adding Secondary and Tertiary Cue Points
SEC/TER mode allows the operator to position both secondary and tertiary cue points anywhere within the edited cut. These cue points can be used to control external devices through the optional General Purpose Interface (GPO) outputs. An example of this would be to trigger a warning light in the studio letting the talent know that the end of the song is near.
Setting the markers for this mode is essentially the same as in the normal HEAD/TAIL mode with the exception that the pointers assume different roles, and the COPY/CUT/PASTE/UNDO buttons change to ADD/DELETE/NEXT/PREV. The left pointer (Head) sets secondary cue points with the right pointer (Tail) marking the tertiary cue point. You can set multiple secondary cue points, and position these cue points anywhere within the audio file. When multiple secondary cues are set, they are called Slate
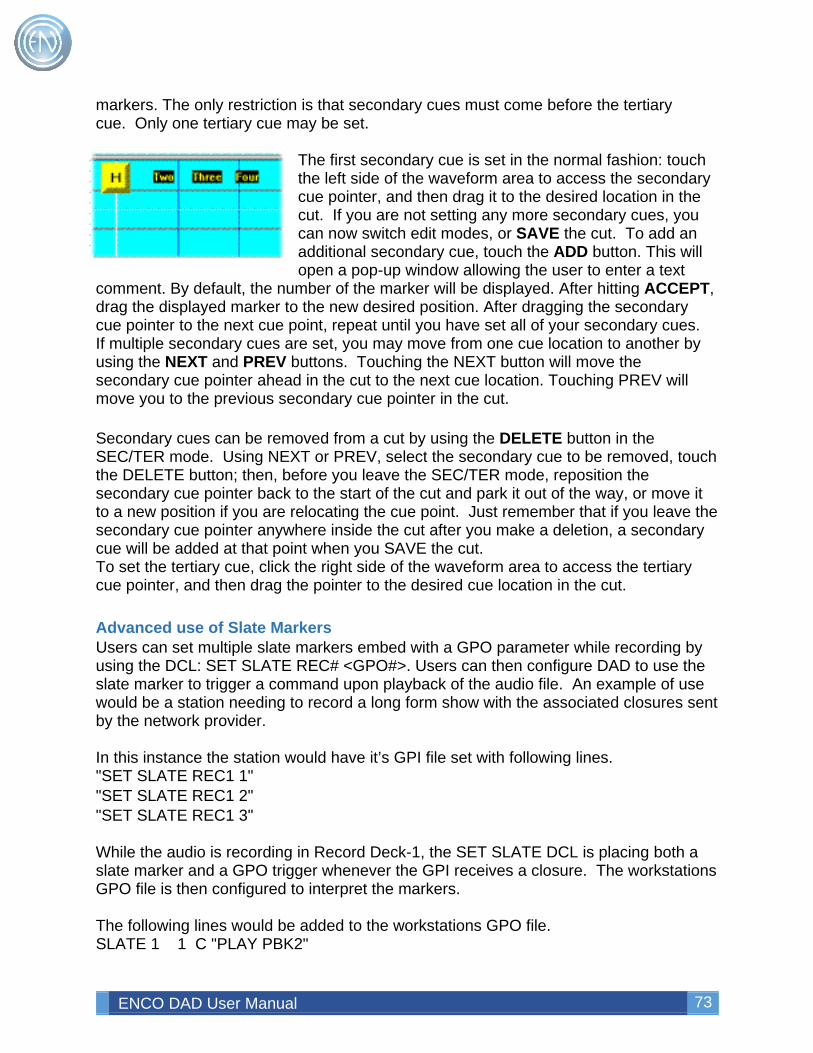
ENCO DAD User Manual 73
markers. The only restriction is that secondary cues must come before the tertiary cue. Only one tertiary cue may be set.
The first secondary cue is set in the normal fashion: touch the left side of the waveform area to access the secondary cue pointer, and then drag it to the desired location in the cut. If you are not setting any more secondary cues, you can now switch edit modes, or SAVE the cut. To add an additional secondary cue, touch the ADD button. This will open a pop-up window allowing the user to enter a text
comment. By default, the number of the marker will be displayed. After hitting ACCEPT, drag the displayed marker to the new desired position. After dragging the secondary cue pointer to the next cue point, repeat until you have set all of your secondary cues. If multiple secondary cues are set, you may move from one cue location to another by using the NEXT and PREV buttons. Touching the NEXT button will move the secondary cue pointer ahead in the cut to the next cue location. Touching PREV will move you to the previous secondary cue pointer in the cut. Secondary cues can be removed from a cut by using the DELETE button in the SEC/TER mode. Using NEXT or PREV, select the secondary cue to be removed, touch the DELETE button; then, before you leave the SEC/TER mode, reposition the secondary cue pointer back to the start of the cut and park it out of the way, or move it to a new position if you are relocating the cue point. Just remember that if you leave the secondary cue pointer anywhere inside the cut after you make a deletion, a secondary cue will be added at that point when you SAVE the cut. To set the tertiary cue, click the right side of the waveform area to access the tertiary cue pointer, and then drag the pointer to the desired cue location in the cut. Advanced use of Slate Markers Users can set multiple slate markers embed with a GPO parameter while recording by using the DCL: SET SLATE REC# <GPO#>. Users can then configure DAD to use the slate marker to trigger a command upon playback of the audio file. An example of use would be a station needing to record a long form show with the associated closures sent by the network provider. In this instance the station would have it’s GPI file set with following lines. "SET SLATE REC1 1" "SET SLATE REC1 2" "SET SLATE REC1 3" While the audio is recording in Record Deck-1, the SET SLATE DCL is placing both a slate marker and a GPO trigger whenever the GPI receives a closure. The workstations GPO file is then configured to interpret the markers. The following lines would be added to the workstations GPO file. SLATE 1 1 C "PLAY PBK2"

ENCO DAD User Manual 74
SLATE 2 1 C "PULSE GPO 1 500" SLATE 3 1 C "PLAY QUAD1" Whereas: SLATE <slate#> <outputID> C "command" When a slate marker plays with the embedded GPO trigger of ‘1’ the result will be action defined via the SLATE 1 line in the GPO file. In the example above, a slate 1 marker would play another playback deck. Setting Fade Markers This mode allows the operator to place fade-in or fade-out points within a cut. In this mode the markers operate slightly different than the others. The Fade Head marker position is the point at which audio will fade into. The Fade Tail marker position is the point at which audio will begin to fade out. To force the audio cut to fade in, one sets the Fade Head at the point at which the audio should begin playing at full volume. The audio level will fade-in from the beginning of the cut to the Fade Head marker. In the same respect, to force the audio cut to fade out, the user will set the Fade Tail at the point, which the audio level should begin to fade. The audio level will fade-out from the Fade Tail to the end of the audio cut. Normally these markers are not necessary. If the operator wishes to set an ending of an audio cut before the actual ending, they may wish to also set a Fade Tail. An example would be a “live” recording with an extended amount of applause at the end of the cut. Setting the normal Tail would just cause the applause to end abruptly. Setting the Fade Tail a few seconds before the Tail will force the cut to fade-out properly. Setting TALK TIME Points This mode uses the two pointers to start and stop a countdown timer. This allows the operator to configure a timer to back-time the intro, the outro or a "doughnut" within the audio cut. The left pointer (Talk Head) sets the point at which the timer will begins counting. The right pointer (Talk Tail) sets the point at which the count will end. The difference between the pointers is the time from which it counts. The Talk Head and Talk Tail pointers automatically default to the beginning and end of a newly recorded cut until they are adjusted and saved. By default the talk timer would back‑time the entire cut. Setting Segue Points This mode lets you place a segue point at the end of a cut. The left pointer (Head) indicates the start of a segue to the following cut and is known as the segue start point. The right pointer marks the end of the segue. Typically the Segue Tail is at the end of the audio; setting the Segue Tail too far from end of audio can make an audio cut sound like it abruptly stops. The time between the Segue Head and Segue Tail is known as the segue length. Users should be aware that overall segue lengths of less then .25 seconds will be ignored. When playing a cut with a valid segue start point, the playback machine will play at full level until the segue start point is reached; it will then start the next cut and perform the
ENCO DAD User Manual 75
segue mix programmed in the associated playlist. NOTE: The Segue markers are completely independent from segues set using the Segue Editor or Tracker screens. The segue points set on the EDIT screen are saved and stored with each individual cut in the library. If the Segue Editor or Tracker has been used to establish a segue, then that segue setting will be used and the EDIT Screen segue markers will be ignored. The Segue Editor transition will only be used only for that instance within that playlist and will not affect other instances of the cut. COOL ITEM: Administrators can configure DAD to allow one to preview the Segue within the Editor directly. When one configures DAD for this option, when in the Editor, pressing SCREEN PLAY while viewing the Segue Head, one will hear what the Segue would sound like. In the DAD CFI file under the [EDITOR] section one can define the lines: Line Entry Definition SEGUE_SAMPLE_CUT SAME - The editor will use the same cut
being edited for the segue sample <cut number> One can enter a cut number that will always be used for segue sample. For example: 00007
SEGUE_SAMPLE_LIBLOC One would enter the Library Location. Most commonly this is: F:
SEGUE_SAMPLE_LIBNAME One would enter the Library Name. Most commonly this is: CUTS
Administrators can choose where the Segue cut will play via Channel Assignments, allowing one to control what audio device to use for this segue sample. Setting Hook Markers Hooks mode lets you mark choruses or other musical "hooks" within audio cuts. The left pointer (Head) indicates the beginning of a hook with the right pointer (Tail) marking the end of a hook. In order for these markers to be used, you must set a machine in Hook Play mode. Once turned on, the machine will turn light blue to indicate that it is in Hook Play mode. While the machine is in this mode, only audio between the Hook Head and Hook Tail will be played. Configuring the Editor The DAD Configuration file (CFI) contains several options that allow on to configure the Editor. To access the CFI file in DAD go to SETUP in the upper right corner and press CFI and README then press the large white CFI button. The complete list of CFI Options and Default settings is available here.
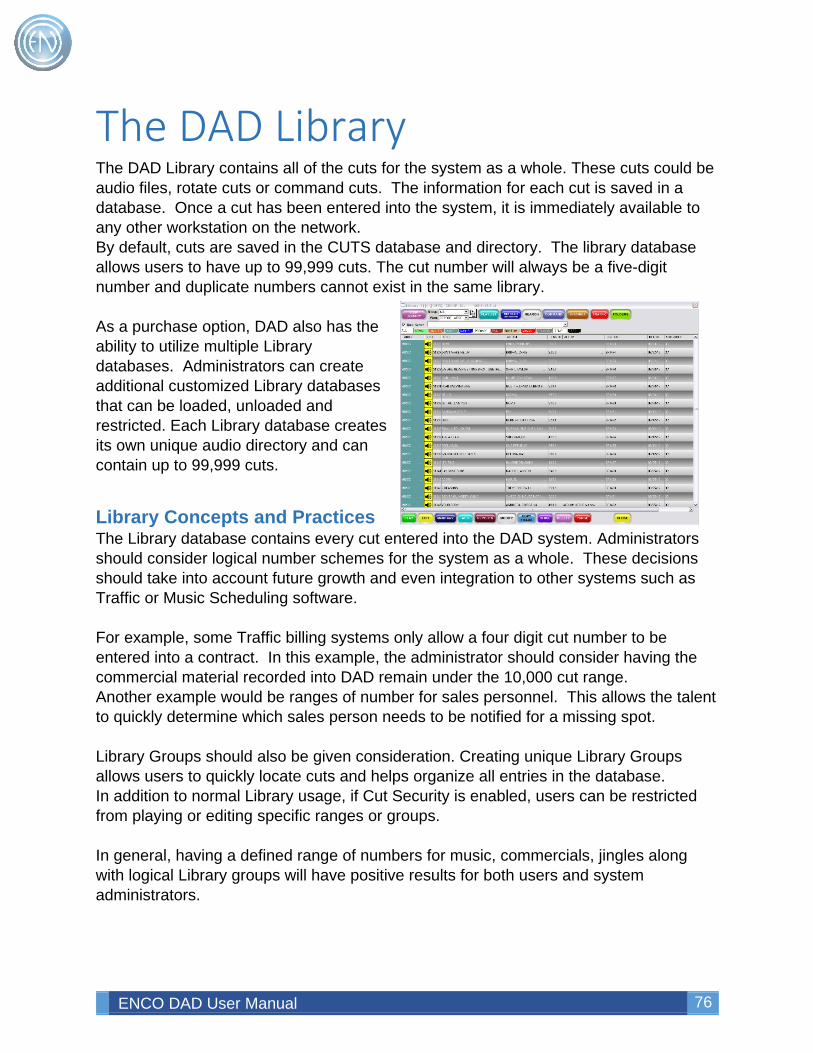
ENCO DAD User Manual 76
The DAD Library The DAD Library contains all of the cuts for the system as a whole. These cuts could be audio files, rotate cuts or command cuts. The information for each cut is saved in a database. Once a cut has been entered into the system, it is immediately available to any other workstation on the network. By default, cuts are saved in the CUTS database and directory. The library database allows users to have up to 99,999 cuts. The cut number will always be a five-digit number and duplicate numbers cannot exist in the same library. As a purchase option, DAD also has the ability to utilize multiple Library databases. Administrators can create additional customized Library databases that can be loaded, unloaded and restricted. Each Library database creates its own unique audio directory and can contain up to 99,999 cuts.
Library Concepts and Practices The Library database contains every cut entered into the DAD system. Administrators should consider logical number schemes for the system as a whole. These decisions should take into account future growth and even integration to other systems such as Traffic or Music Scheduling software. For example, some Traffic billing systems only allow a four digit cut number to be entered into a contract. In this example, the administrator should consider having the commercial material recorded into DAD remain under the 10,000 cut range. Another example would be ranges of number for sales personnel. This allows the talent to quickly determine which sales person needs to be notified for a missing spot. Library Groups should also be given consideration. Creating unique Library Groups allows users to quickly locate cuts and helps organize all entries in the database. In addition to normal Library usage, if Cut Security is enabled, users can be restricted from playing or editing specific ranges or groups. In general, having a defined range of numbers for music, commercials, jingles along with logical Library groups will have positive results for both users and system administrators.
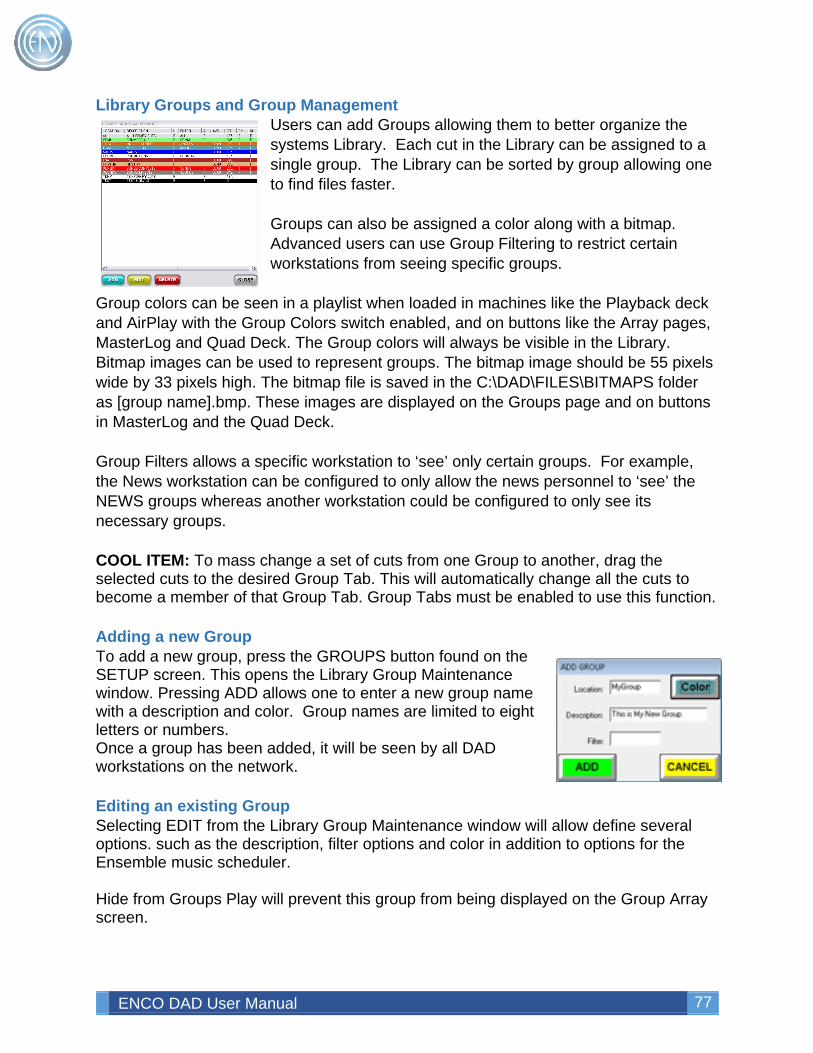
ENCO DAD User Manual 77
Library Groups and Group Management Users can add Groups allowing them to better organize the systems Library. Each cut in the Library can be assigned to a single group. The Library can be sorted by group allowing one to find files faster. Groups can also be assigned a color along with a bitmap. Advanced users can use Group Filtering to restrict certain workstations from seeing specific groups.
Group colors can be seen in a playlist when loaded in machines like the Playback deck and AirPlay with the Group Colors switch enabled, and on buttons like the Array pages, MasterLog and Quad Deck. The Group colors will always be visible in the Library. Bitmap images can be used to represent groups. The bitmap image should be 55 pixels wide by 33 pixels high. The bitmap file is saved in the C:\DAD\FILES\BITMAPS folder as [group name].bmp. These images are displayed on the Groups page and on buttons in MasterLog and the Quad Deck. Group Filters allows a specific workstation to ‘see’ only certain groups. For example, the News workstation can be configured to only allow the news personnel to ‘see’ the NEWS groups whereas another workstation could be configured to only see its necessary groups. COOL ITEM: To mass change a set of cuts from one Group to another, drag the selected cuts to the desired Group Tab. This will automatically change all the cuts to become a member of that Group Tab. Group Tabs must be enabled to use this function. Adding a new Group To add a new group, press the GROUPS button found on the SETUP screen. This opens the Library Group Maintenance window. Pressing ADD allows one to enter a new group name with a description and color. Group names are limited to eight letters or numbers. Once a group has been added, it will be seen by all DAD workstations on the network. Editing an existing Group Selecting EDIT from the Library Group Maintenance window will allow define several options. such as the description, filter options and color in addition to options for the Ensemble music scheduler. Hide from Groups Play will prevent this group from being displayed on the Group Array screen.
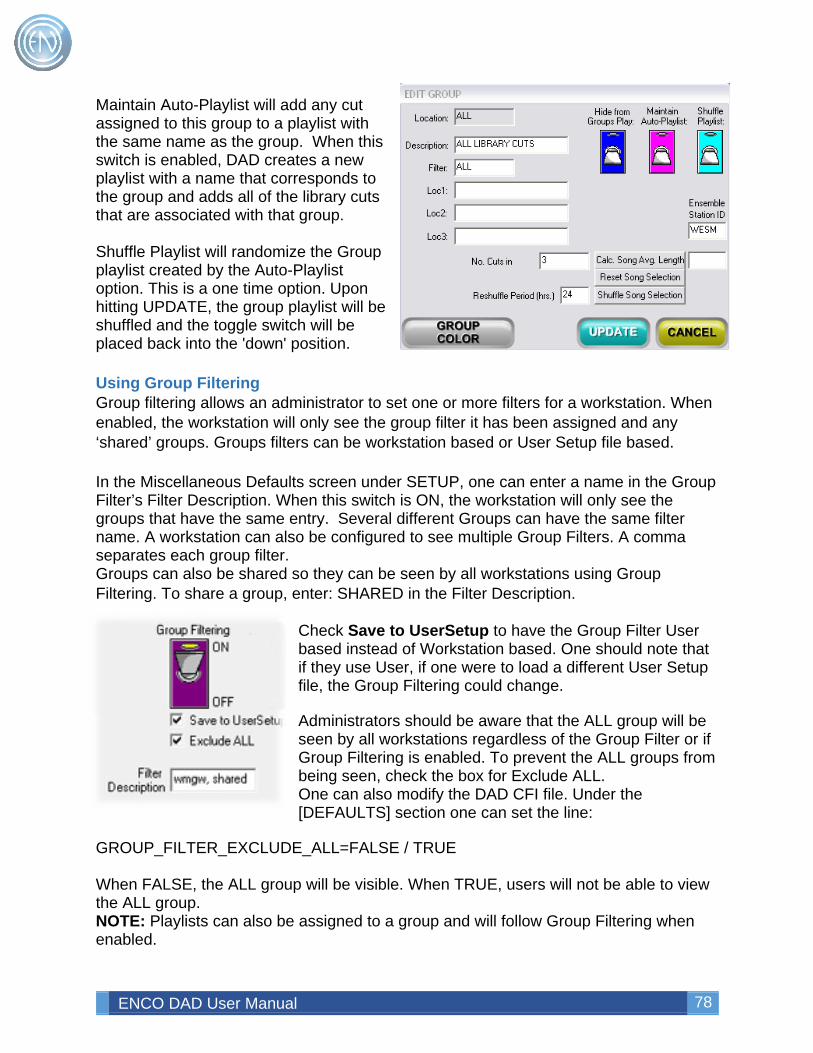
ENCO DAD User Manual 78
Maintain Auto-Playlist will add any cut assigned to this group to a playlist with the same name as the group. When this switch is enabled, DAD creates a new playlist with a name that corresponds to the group and adds all of the library cuts that are associated with that group. Shuffle Playlist will randomize the Group playlist created by the Auto-Playlist option. This is a one time option. Upon hitting UPDATE, the group playlist will be shuffled and the toggle switch will be placed back into the 'down' position. Using Group Filtering Group filtering allows an administrator to set one or more filters for a workstation. When enabled, the workstation will only see the group filter it has been assigned and any ‘shared’ groups. Groups filters can be workstation based or User Setup file based. In the Miscellaneous Defaults screen under SETUP, one can enter a name in the Group Filter’s Filter Description. When this switch is ON, the workstation will only see the groups that have the same entry. Several different Groups can have the same filter name. A workstation can also be configured to see multiple Group Filters. A comma separates each group filter. Groups can also be shared so they can be seen by all workstations using Group Filtering. To share a group, enter: SHARED in the Filter Description.
Check Save to UserSetup to have the Group Filter User based instead of Workstation based. One should note that if they use User, if one were to load a different User Setup file, the Group Filtering could change. Administrators should be aware that the ALL group will be seen by all workstations regardless of the Group Filter or if Group Filtering is enabled. To prevent the ALL groups from being seen, check the box for Exclude ALL. One can also modify the DAD CFI file. Under the [DEFAULTS] section one can set the line:
GROUP_FILTER_EXCLUDE_ALL=FALSE / TRUE When FALSE, the ALL group will be visible. When TRUE, users will not be able to view the ALL group. NOTE: Playlists can also be assigned to a group and will follow Group Filtering when enabled.
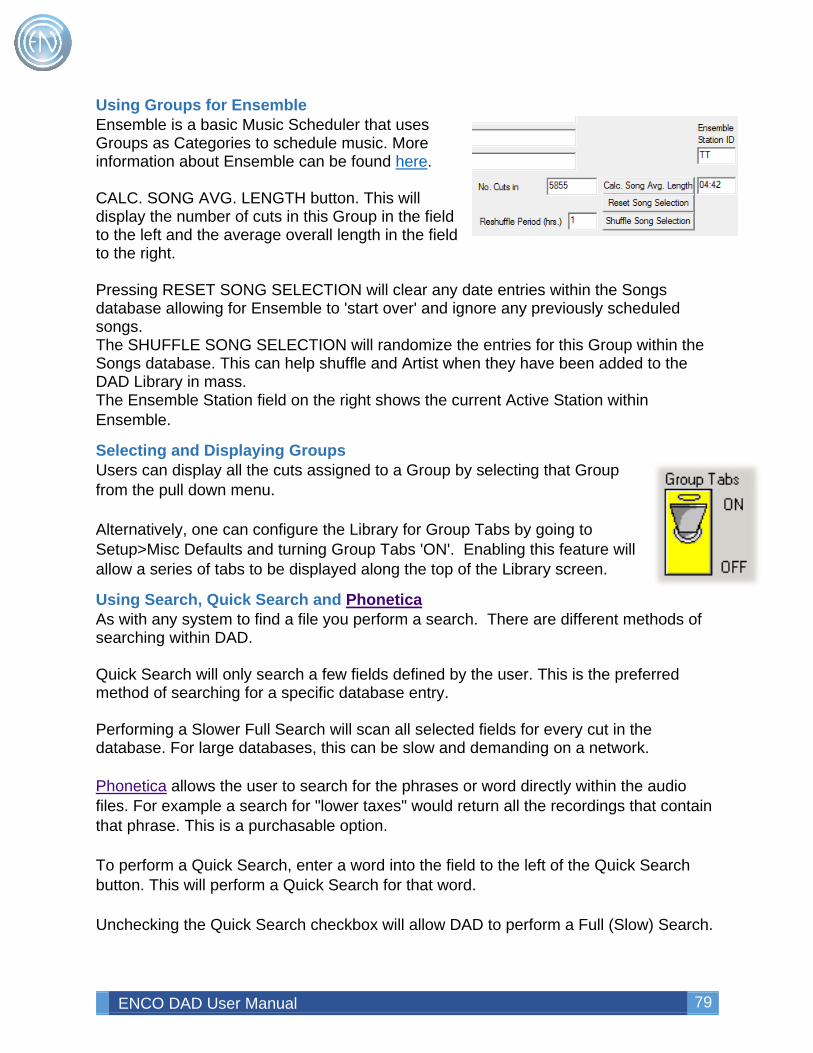
ENCO DAD User Manual 79
Using Groups for Ensemble Ensemble is a basic Music Scheduler that uses Groups as Categories to schedule music. More information about Ensemble can be found here. CALC. SONG AVG. LENGTH button. This will display the number of cuts in this Group in the field to the left and the average overall length in the field to the right. Pressing RESET SONG SELECTION will clear any date entries within the Songs database allowing for Ensemble to 'start over' and ignore any previously scheduled songs. The SHUFFLE SONG SELECTION will randomize the entries for this Group within the Songs database. This can help shuffle and Artist when they have been added to the DAD Library in mass. The Ensemble Station field on the right shows the current Active Station within Ensemble.
Selecting and Displaying Groups Users can display all the cuts assigned to a Group by selecting that Group from the pull down menu. Alternatively, one can configure the Library for Group Tabs by going to Setup>Misc Defaults and turning Group Tabs 'ON'. Enabling this feature will allow a series of tabs to be displayed along the top of the Library screen.
Using Search, Quick Search and Phonetica As with any system to find a file you perform a search. There are different methods of searching within DAD. Quick Search will only search a few fields defined by the user. This is the preferred method of searching for a specific database entry. Performing a Slower Full Search will scan all selected fields for every cut in the database. For large databases, this can be slow and demanding on a network. Phonetica allows the user to search for the phrases or word directly within the audio files. For example a search for "lower taxes" would return all the recordings that contain that phrase. This is a purchasable option. To perform a Quick Search, enter a word into the field to the left of the Quick Search button. This will perform a Quick Search for that word. Unchecking the Quick Search checkbox will allow DAD to perform a Full (Slow) Search.
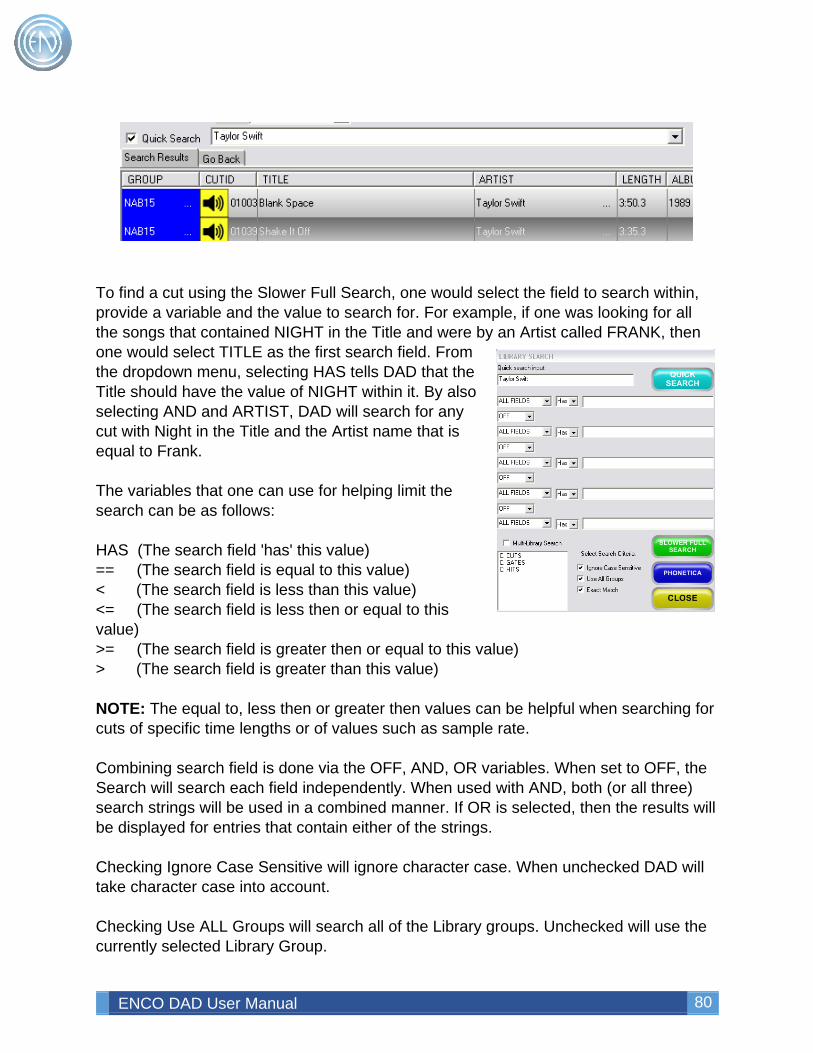
ENCO DAD User Manual 80
To find a cut using the Slower Full Search, one would select the field to search within, provide a variable and the value to search for. For example, if one was looking for all the songs that contained NIGHT in the Title and were by an Artist called FRANK, then one would select TITLE as the first search field. From the dropdown menu, selecting HAS tells DAD that the Title should have the value of NIGHT within it. By also selecting AND and ARTIST, DAD will search for any cut with Night in the Title and the Artist name that is equal to Frank. The variables that one can use for helping limit the search can be as follows: HAS (The search field 'has' this value) == (The search field is equal to this value) < (The search field is less than this value) <= (The search field is less then or equal to this value) >= (The search field is greater then or equal to this value) > (The search field is greater than this value) NOTE: The equal to, less then or greater then values can be helpful when searching for cuts of specific time lengths or of values such as sample rate. Combining search field is done via the OFF, AND, OR variables. When set to OFF, the Search will search each field independently. When used with AND, both (or all three) search strings will be used in a combined manner. If OR is selected, then the results will be displayed for entries that contain either of the strings. Checking Ignore Case Sensitive will ignore character case. When unchecked DAD will take character case into account. Checking Use ALL Groups will search all of the Library groups. Unchecked will use the currently selected Library Group.
ENCO DAD User Manual 81
One can also use the Use Exact Match checkbox option. When unchecked DAD will use "Use Sounds Like" options to expand a search. To return to the complete library or to a group listing after performing a search, select ALL from the GROUP menu for the complete library or the desired group. Search can be a powerful tool for building a playlist, especially in large libraries. This is one reason why Library information should be carefully pre-planned. By default, DAD will utilize the Quick Search option when ENTER is pressed on the keyboard while in the Search window. This option is defined in the LIBRARY section of the workstations CFI file by the line: DEFAULT_SEARCH=QUICK To change the default Library search utilize to a normal search, set the CFI option to NORMAL.
Configuring Quick Search IMPORTANT: As part of normal database maintenance, administrators should rebuild the Quick Search database when they are performing the Unique Rebuild. This means that all workstations are out of all ENCO
applications and only one workstation starts DAD. After DAD has finished loading completely, go to SETUP and GEN QUICK SEARCH. This will rebuild the Quick Search database. One should also do this immediately after modifying the SCONTROL.DAT file is changes are made. Quick Search lets you specify search parameters in the SCONTROL.DAT file. All facilities should configure their SCONTROL.DAT file to increase the performance of their search. This file is kept in the \DAD\FILES\ directory of the network data drive. If a Quick Search has not been configured, press the ‘Generate Quick Search’ button in the SETUP screen. This will create the SCONTROL.DAT file. Pressing the 'Edit QSearch Fields' button under setup or by using a text editor, one can modify the search parameters in the SCONTROL.DAT file.
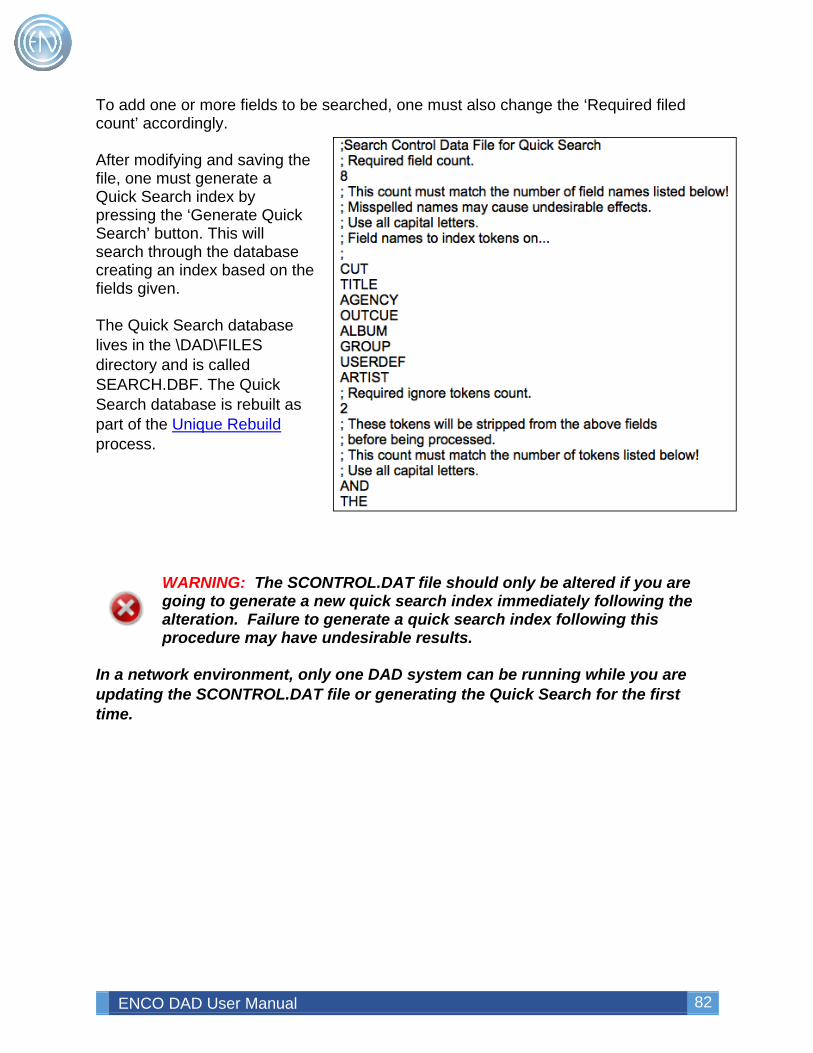
ENCO DAD User Manual 82
To add one or more fields to be searched, one must also change the ‘Required filed count’ accordingly. After modifying and saving the file, one must generate a Quick Search index by pressing the ‘Generate Quick Search’ button. This will search through the database creating an index based on the fields given. The Quick Search database lives in the \DAD\FILES directory and is called SEARCH.DBF. The Quick Search database is rebuilt as part of the Unique Rebuild process.
WARNING: The SCONTROL.DAT file should only be altered if you are going to generate a new quick search index immediately following the alteration. Failure to generate a quick search index following this procedure may have undesirable results.
In a network environment, only one DAD system can be running while you are updating the SCONTROL.DAT file or generating the Quick Search for the first time.
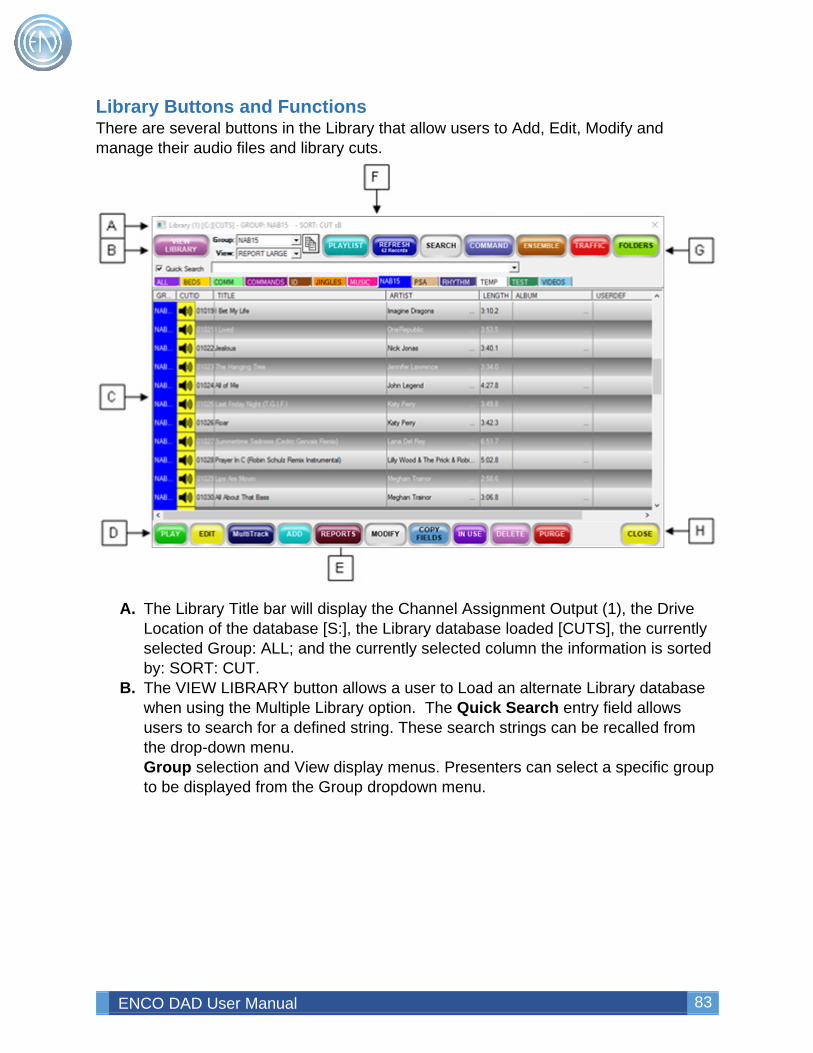
ENCO DAD User Manual 83
Library Buttons and Functions There are several buttons in the Library that allow users to Add, Edit, Modify and manage their audio files and library cuts.
A. The Library Title bar will display the Channel Assignment Output (1), the Drive
Location of the database [S:], the Library database loaded [CUTS], the currently selected Group: ALL; and the currently selected column the information is sorted by: SORT: CUT.
B. The VIEW LIBRARY button allows a user to Load an alternate Library database when using the Multiple Library option. The Quick Search entry field allows users to search for a defined string. These search strings can be recalled from the drop-down menu. Group selection and View display menus. Presenters can select a specific group to be displayed from the Group dropdown menu.
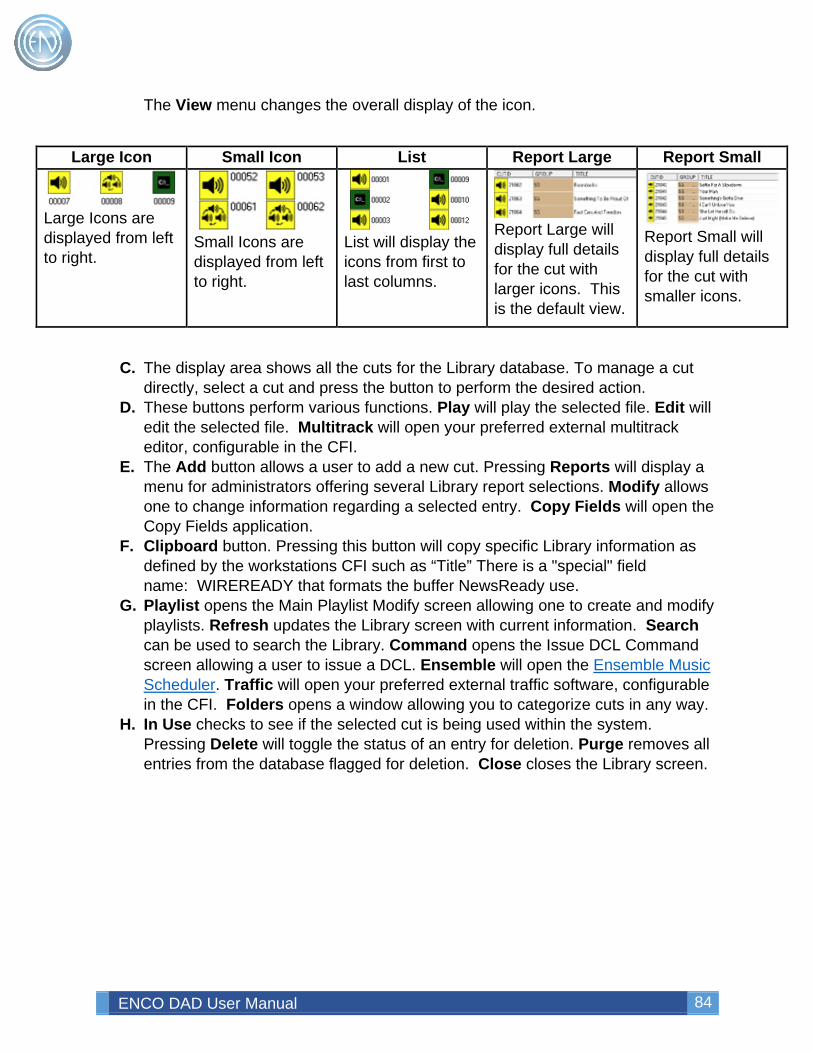
ENCO DAD User Manual 84
The View menu changes the overall display of the icon.
Large Icon Small Icon List Report Large Report Small
Large Icons are displayed from left to right.
Small Icons are displayed from left to right.
List will display the icons from first to last columns.
Report Large will display full details for the cut with larger icons. This is the default view.
Report Small will display full details for the cut with smaller icons.
C. The display area shows all the cuts for the Library database. To manage a cut directly, select a cut and press the button to perform the desired action.
D. These buttons perform various functions. Play will play the selected file. Edit will edit the selected file. Multitrack will open your preferred external multitrack editor, configurable in the CFI.
E. The Add button allows a user to add a new cut. Pressing Reports will display a menu for administrators offering several Library report selections. Modify allows one to change information regarding a selected entry. Copy Fields will open the Copy Fields application.
F. Clipboard button. Pressing this button will copy specific Library information as defined by the workstations CFI such as “Title” There is a "special" field name: WIREREADY that formats the buffer NewsReady use.
G. Playlist opens the Main Playlist Modify screen allowing one to create and modify playlists. Refresh updates the Library screen with current information. Search can be used to search the Library. Command opens the Issue DCL Command screen allowing a user to issue a DCL. Ensemble will open the Ensemble Music Scheduler. Traffic will open your preferred external traffic software, configurable in the CFI. Folders opens a window allowing you to categorize cuts in any way.
H. In Use checks to see if the selected cut is being used within the system. Pressing Delete will toggle the status of an entry for deletion. Purge removes all entries from the database flagged for deletion. Close closes the Library screen.
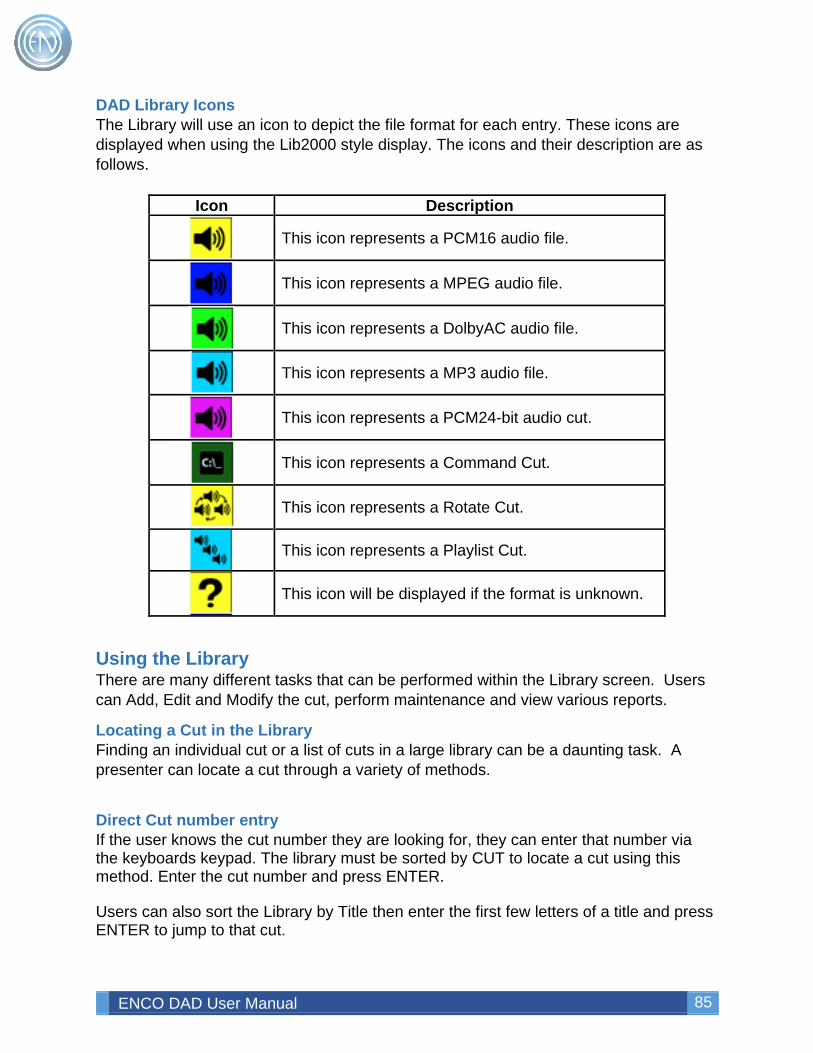
ENCO DAD User Manual 85
DAD Library Icons The Library will use an icon to depict the file format for each entry. These icons are displayed when using the Lib2000 style display. The icons and their description are as follows.
Icon Description
This icon represents a PCM16 audio file.
This icon represents a MPEG audio file.
This icon represents a DolbyAC audio file.
This icon represents a MP3 audio file.
This icon represents a PCM24-bit audio cut.
This icon represents a Command Cut.
This icon represents a Rotate Cut.
This icon represents a Playlist Cut.
This icon will be displayed if the format is unknown.
Using the Library There are many different tasks that can be performed within the Library screen. Users can Add, Edit and Modify the cut, perform maintenance and view various reports.
Locating a Cut in the Library Finding an individual cut or a list of cuts in a large library can be a daunting task. A presenter can locate a cut through a variety of methods.
Direct Cut number entry If the user knows the cut number they are looking for, they can enter that number via the keyboards keypad. The library must be sorted by CUT to locate a cut using this method. Enter the cut number and press ENTER. Users can also sort the Library by Title then enter the first few letters of a title and press ENTER to jump to that cut.
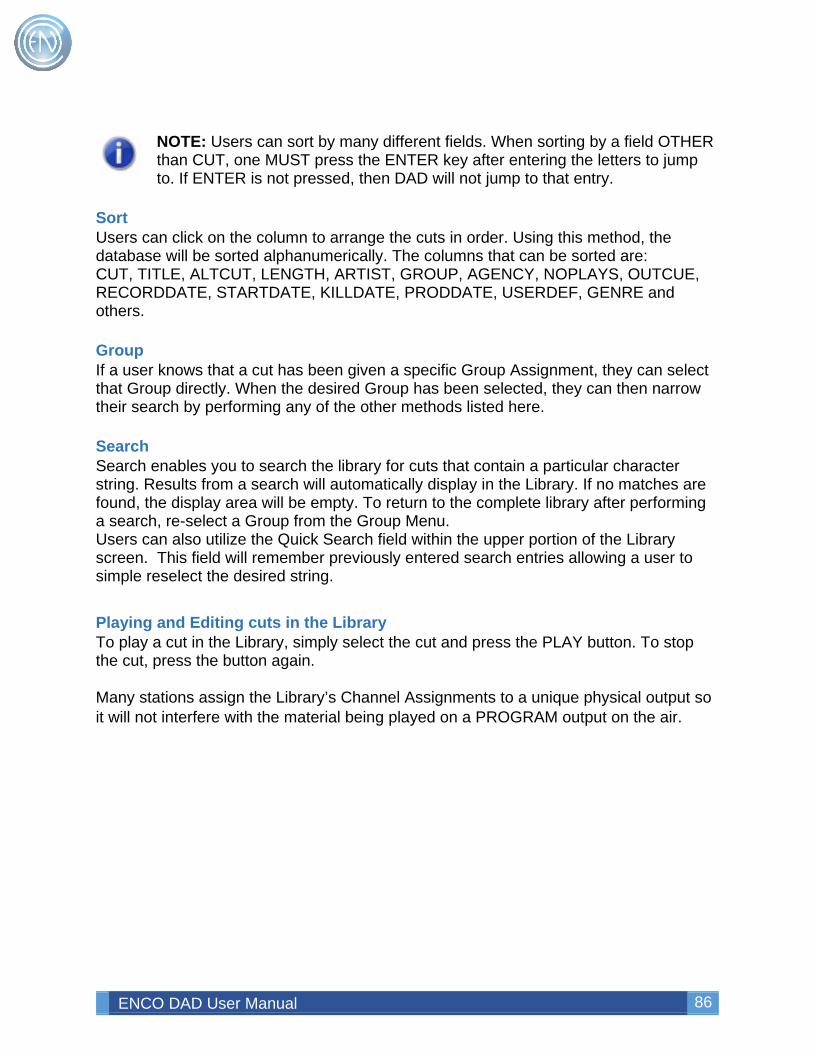
ENCO DAD User Manual 86
NOTE: Users can sort by many different fields. When sorting by a field OTHER than CUT, one MUST press the ENTER key after entering the letters to jump to. If ENTER is not pressed, then DAD will not jump to that entry.
Sort Users can click on the column to arrange the cuts in order. Using this method, the database will be sorted alphanumerically. The columns that can be sorted are: CUT, TITLE, ALTCUT, LENGTH, ARTIST, GROUP, AGENCY, NOPLAYS, OUTCUE, RECORDDATE, STARTDATE, KILLDATE, PRODDATE, USERDEF, GENRE and others. Group If a user knows that a cut has been given a specific Group Assignment, they can select that Group directly. When the desired Group has been selected, they can then narrow their search by performing any of the other methods listed here. Search Search enables you to search the library for cuts that contain a particular character string. Results from a search will automatically display in the Library. If no matches are found, the display area will be empty. To return to the complete library after performing a search, re-select a Group from the Group Menu. Users can also utilize the Quick Search field within the upper portion of the Library screen. This field will remember previously entered search entries allowing a user to simple reselect the desired string.
Playing and Editing cuts in the Library To play a cut in the Library, simply select the cut and press the PLAY button. To stop the cut, press the button again. Many stations assign the Library’s Channel Assignments to a unique physical output so it will not interfere with the material being played on a PROGRAM output on the air.
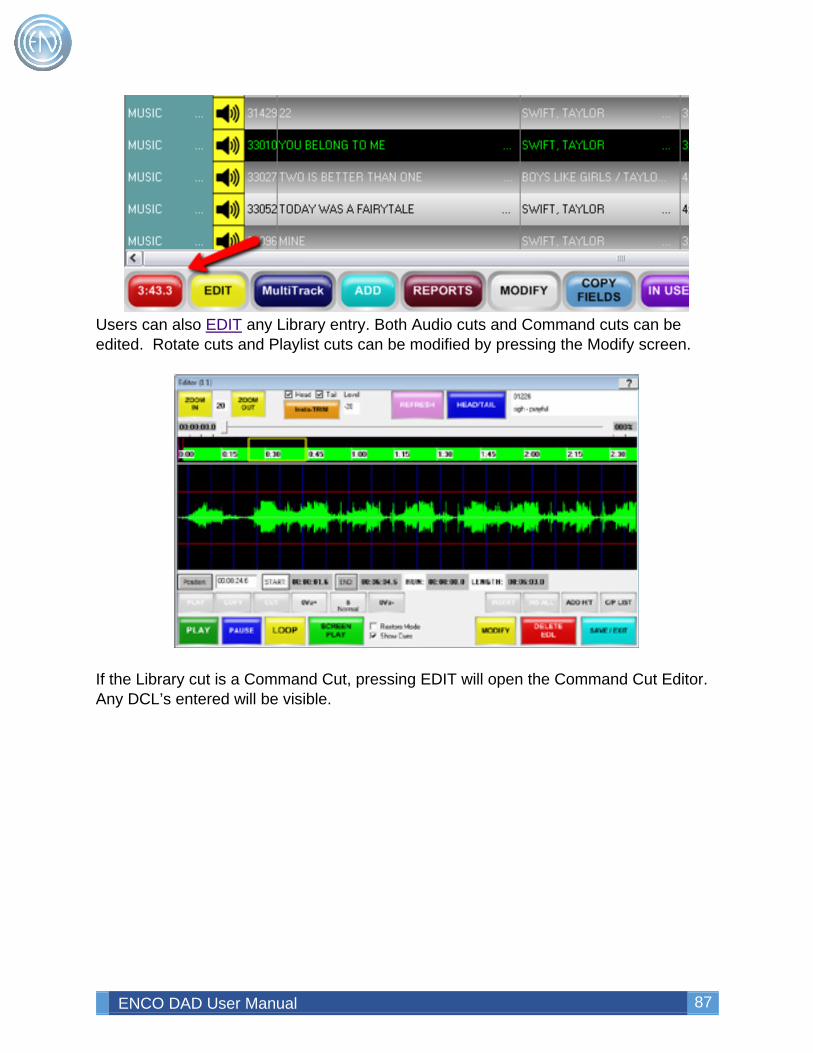
ENCO DAD User Manual 87
Users can also EDIT any Library entry. Both Audio cuts and Command cuts can be edited. Rotate cuts and Playlist cuts can be modified by pressing the Modify screen.
If the Library cut is a Command Cut, pressing EDIT will open the Command Cut Editor. Any DCL’s entered will be visible.
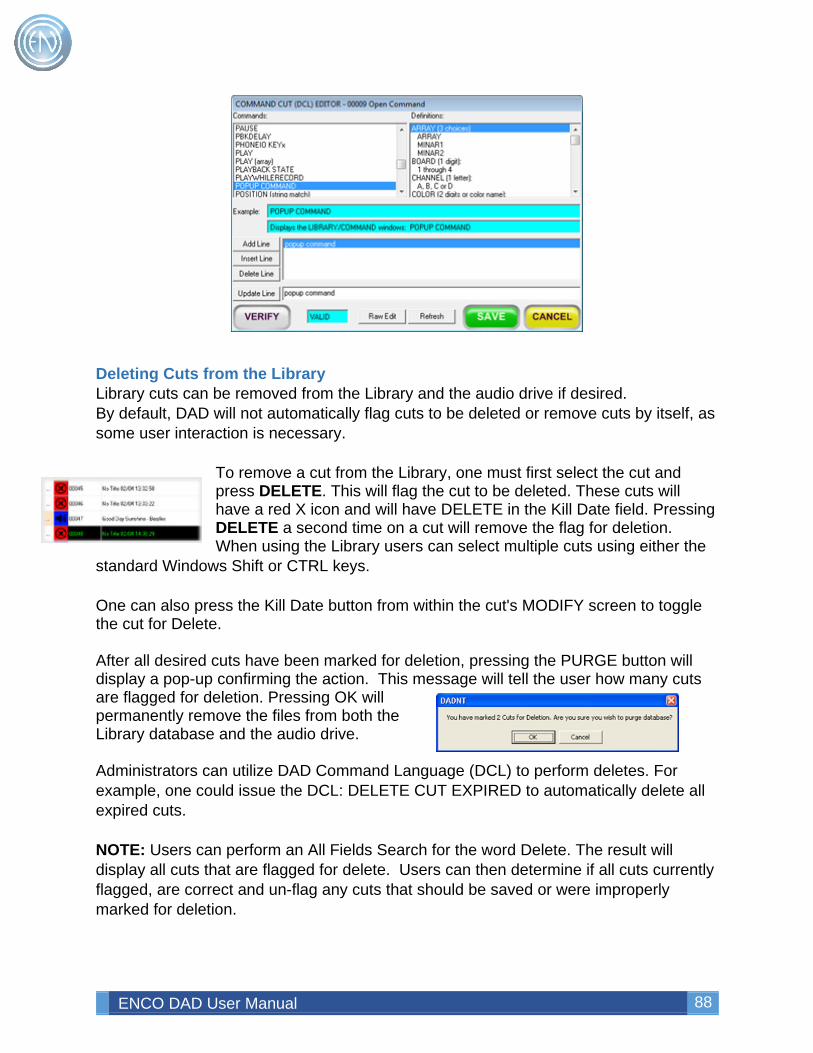
ENCO DAD User Manual 88
Deleting Cuts from the Library Library cuts can be removed from the Library and the audio drive if desired. By default, DAD will not automatically flag cuts to be deleted or remove cuts by itself, as some user interaction is necessary.
To remove a cut from the Library, one must first select the cut and press DELETE. This will flag the cut to be deleted. These cuts will have a red X icon and will have DELETE in the Kill Date field. Pressing DELETE a second time on a cut will remove the flag for deletion. When using the Library users can select multiple cuts using either the
standard Windows Shift or CTRL keys. One can also press the Kill Date button from within the cut's MODIFY screen to toggle the cut for Delete. After all desired cuts have been marked for deletion, pressing the PURGE button will display a pop-up confirming the action. This message will tell the user how many cuts are flagged for deletion. Pressing OK will permanently remove the files from both the Library database and the audio drive. Administrators can utilize DAD Command Language (DCL) to perform deletes. For example, one could issue the DCL: DELETE CUT EXPIRED to automatically delete all expired cuts. NOTE: Users can perform an All Fields Search for the word Delete. The result will display all cuts that are flagged for delete. Users can then determine if all cuts currently flagged, are correct and un-flag any cuts that should be saved or were improperly marked for deletion.
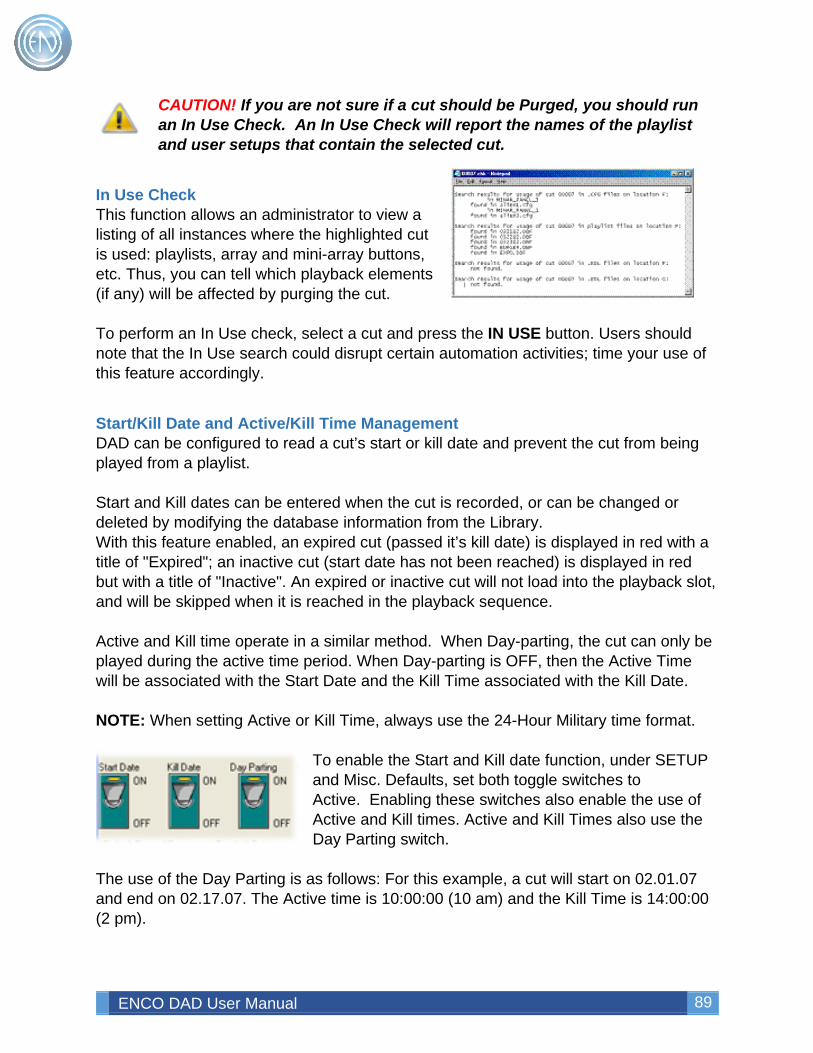
ENCO DAD User Manual 89
CAUTION! If you are not sure if a cut should be Purged, you should run an In Use Check. An In Use Check will report the names of the playlist and user setups that contain the selected cut.
In Use Check This function allows an administrator to view a listing of all instances where the highlighted cut is used: playlists, array and mini-array buttons, etc. Thus, you can tell which playback elements (if any) will be affected by purging the cut. To perform an In Use check, select a cut and press the IN USE button. Users should note that the In Use search could disrupt certain automation activities; time your use of this feature accordingly.
Start/Kill Date and Active/Kill Time Management DAD can be configured to read a cut’s start or kill date and prevent the cut from being played from a playlist. Start and Kill dates can be entered when the cut is recorded, or can be changed or deleted by modifying the database information from the Library. With this feature enabled, an expired cut (passed it’s kill date) is displayed in red with a title of "Expired"; an inactive cut (start date has not been reached) is displayed in red but with a title of "Inactive". An expired or inactive cut will not load into the playback slot, and will be skipped when it is reached in the playback sequence. Active and Kill time operate in a similar method. When Day-parting, the cut can only be played during the active time period. When Day-parting is OFF, then the Active Time will be associated with the Start Date and the Kill Time associated with the Kill Date. NOTE: When setting Active or Kill Time, always use the 24-Hour Military time format.
To enable the Start and Kill date function, under SETUP and Misc. Defaults, set both toggle switches to Active. Enabling these switches also enable the use of Active and Kill times. Active and Kill Times also use the Day Parting switch.
The use of the Day Parting is as follows: For this example, a cut will start on 02.01.07 and end on 02.17.07. The Active time is 10:00:00 (10 am) and the Kill Time is 14:00:00 (2 pm).
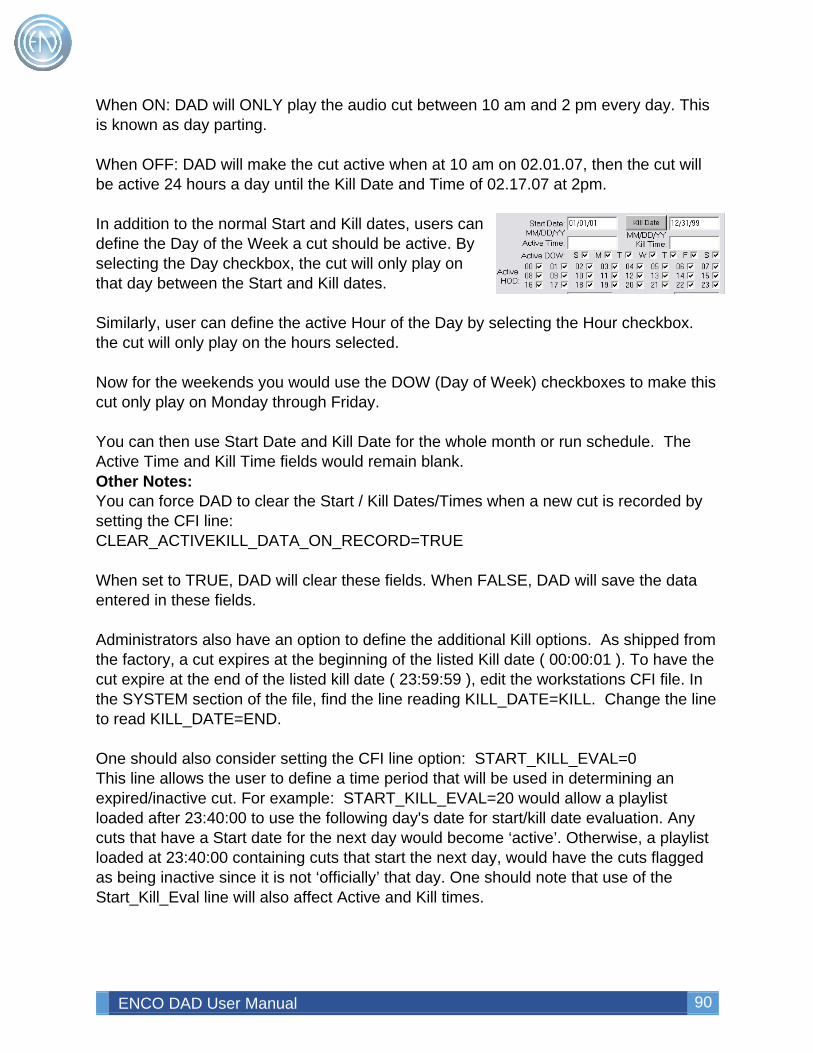
ENCO DAD User Manual 90
When ON: DAD will ONLY play the audio cut between 10 am and 2 pm every day. This is known as day parting. When OFF: DAD will make the cut active when at 10 am on 02.01.07, then the cut will be active 24 hours a day until the Kill Date and Time of 02.17.07 at 2pm. In addition to the normal Start and Kill dates, users can define the Day of the Week a cut should be active. By selecting the Day checkbox, the cut will only play on that day between the Start and Kill dates. Similarly, user can define the active Hour of the Day by selecting the Hour checkbox. the cut will only play on the hours selected. Now for the weekends you would use the DOW (Day of Week) checkboxes to make this cut only play on Monday through Friday. You can then use Start Date and Kill Date for the whole month or run schedule. The Active Time and Kill Time fields would remain blank. Other Notes: You can force DAD to clear the Start / Kill Dates/Times when a new cut is recorded by setting the CFI line: CLEAR_ACTIVEKILL_DATA_ON_RECORD=TRUE When set to TRUE, DAD will clear these fields. When FALSE, DAD will save the data entered in these fields. Administrators also have an option to define the additional Kill options. As shipped from the factory, a cut expires at the beginning of the listed Kill date ( 00:00:01 ). To have the cut expire at the end of the listed kill date ( 23:59:59 ), edit the workstations CFI file. In the SYSTEM section of the file, find the line reading KILL_DATE=KILL. Change the line to read KILL_DATE=END. One should also consider setting the CFI line option: START_KILL_EVAL=0 This line allows the user to define a time period that will be used in determining an expired/inactive cut. For example: START_KILL_EVAL=20 would allow a playlist loaded after 23:40:00 to use the following day's date for start/kill date evaluation. Any cuts that have a Start date for the next day would become ‘active’. Otherwise, a playlist loaded at 23:40:00 containing cuts that start the next day, would have the cuts flagged as being inactive since it is not ‘officially’ that day. One should note that use of the Start_Kill_Eval line will also affect Active and Kill times.
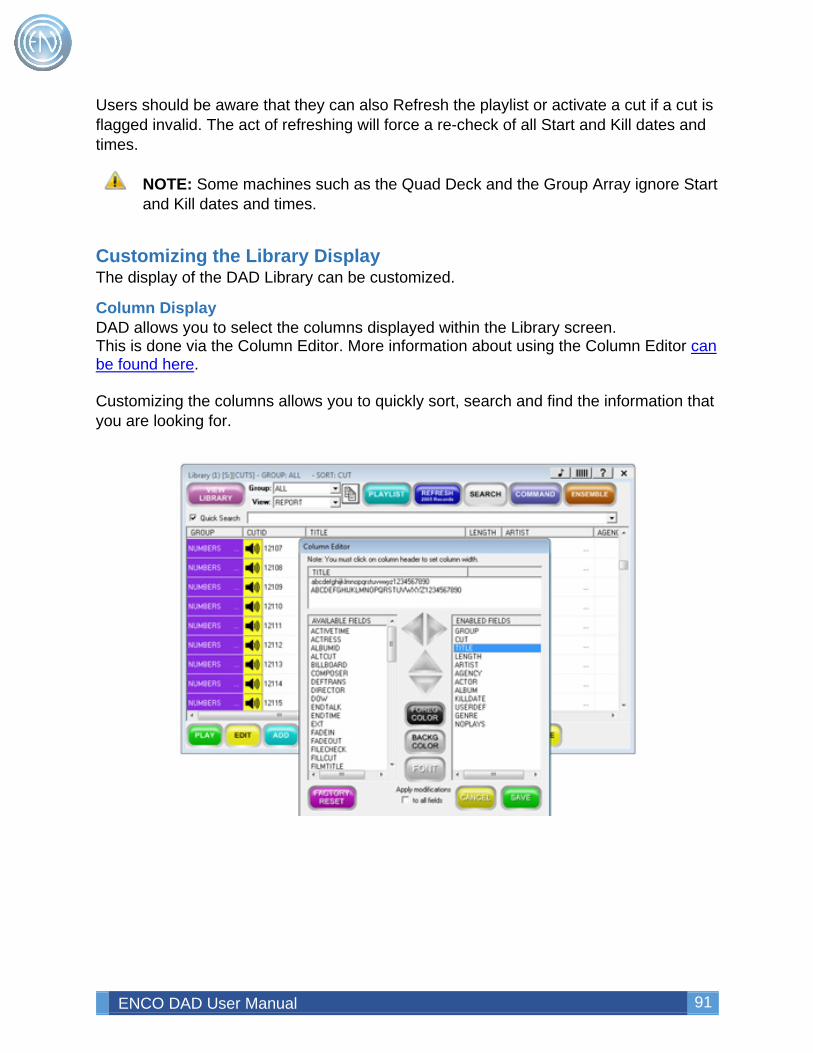
ENCO DAD User Manual 91
Users should be aware that they can also Refresh the playlist or activate a cut if a cut is flagged invalid. The act of refreshing will force a re-check of all Start and Kill dates and times.
NOTE: Some machines such as the Quad Deck and the Group Array ignore Start and Kill dates and times.
Customizing the Library Display The display of the DAD Library can be customized.
Column Display DAD allows you to select the columns displayed within the Library screen. This is done via the Column Editor. More information about using the Column Editor can be found here. Customizing the columns allows you to quickly sort, search and find the information that you are looking for.

ENCO DAD User Manual 92
Grid Lines and colors You can also customize the colors and look of the Library. You can use the CFI options: [DEFAULTS]GRADIENT_LIST=TRUEGRID_LINES=TRUE To enable or display the alternating colors of the lines along with a grid line separator. DAD will use the GRADIENT_LIST line in conjunction with a customizable INI file called: LibGradient.INI
When the CFI line is set to TRUE - then the Library will use the shaded gradient line coloring settings found in the INI file. Changes can be seen immediately after changing this file with Lib->Refresh. The INI file can be found in the C:\DAD\Files directory and can be copied to your shared network drive when you are running in 'Network Mode'. The LibGradient.INI file contains the following: [gradient] odd_rows=.4 even_rows=.2 [text_color] selected=WHITE even_rows=RGB(255,255,255) odd_rows=BLACK [back_color] selected=GOLD even_rows=BLUE odd_rows=LIGHTBLUE
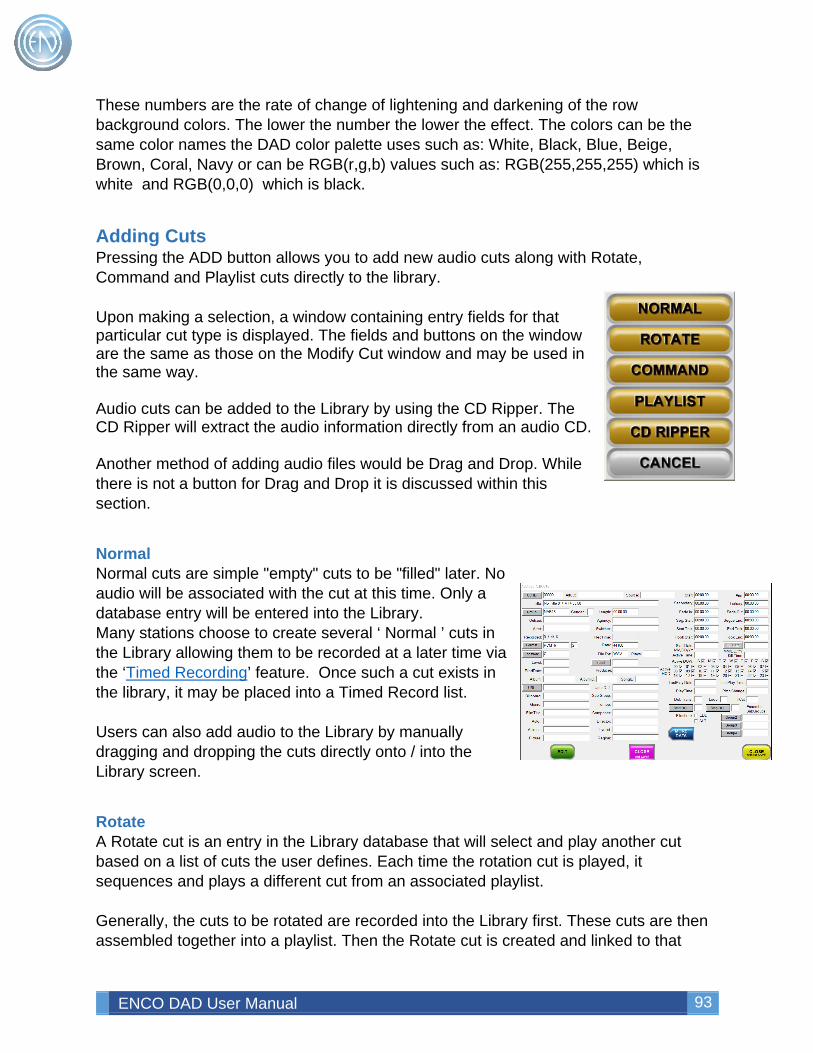
ENCO DAD User Manual 93
These numbers are the rate of change of lightening and darkening of the row background colors. The lower the number the lower the effect. The colors can be the same color names the DAD color palette uses such as: White, Black, Blue, Beige, Brown, Coral, Navy or can be RGB(r,g,b) values such as: RGB(255,255,255) which is white and RGB(0,0,0) which is black.
Adding Cuts Pressing the ADD button allows you to add new audio cuts along with Rotate, Command and Playlist cuts directly to the library. Upon making a selection, a window containing entry fields for that particular cut type is displayed. The fields and buttons on the window are the same as those on the Modify Cut window and may be used in the same way. Audio cuts can be added to the Library by using the CD Ripper. The CD Ripper will extract the audio information directly from an audio CD. Another method of adding audio files would be Drag and Drop. While there is not a button for Drag and Drop it is discussed within this section.
Normal Normal cuts are simple "empty" cuts to be "filled" later. No audio will be associated with the cut at this time. Only a database entry will be entered into the Library. Many stations choose to create several ‘ Normal ’ cuts in the Library allowing them to be recorded at a later time via the ‘Timed Recording’ feature. Once such a cut exists in the library, it may be placed into a Timed Record list. Users can also add audio to the Library by manually dragging and dropping the cuts directly onto / into the Library screen.
Rotate A Rotate cut is an entry in the Library database that will select and play another cut based on a list of cuts the user defines. Each time the rotation cut is played, it sequences and plays a different cut from an associated playlist. Generally, the cuts to be rotated are recorded into the Library first. These cuts are then assembled together into a playlist. Then the Rotate cut is created and linked to that
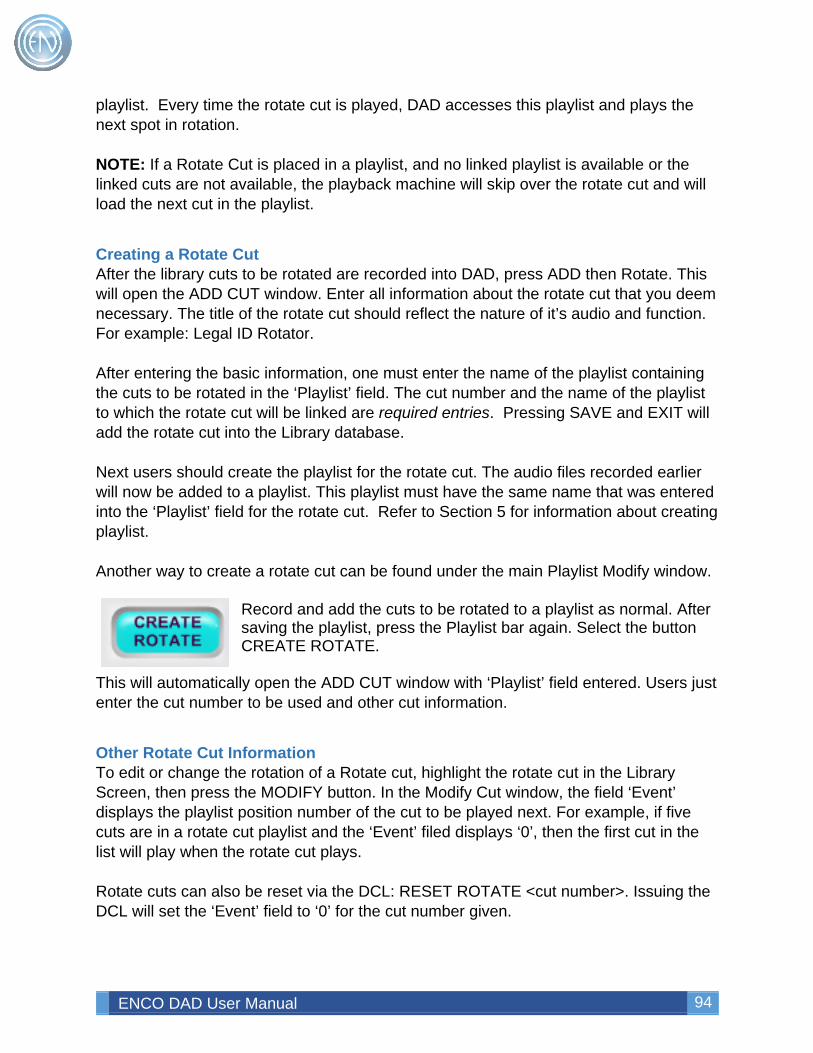
ENCO DAD User Manual 94
playlist. Every time the rotate cut is played, DAD accesses this playlist and plays the next spot in rotation. NOTE: If a Rotate Cut is placed in a playlist, and no linked playlist is available or the linked cuts are not available, the playback machine will skip over the rotate cut and will load the next cut in the playlist.
Creating a Rotate Cut After the library cuts to be rotated are recorded into DAD, press ADD then Rotate. This will open the ADD CUT window. Enter all information about the rotate cut that you deem necessary. The title of the rotate cut should reflect the nature of it’s audio and function. For example: Legal ID Rotator. After entering the basic information, one must enter the name of the playlist containing the cuts to be rotated in the ‘Playlist’ field. The cut number and the name of the playlist to which the rotate cut will be linked are required entries. Pressing SAVE and EXIT will add the rotate cut into the Library database. Next users should create the playlist for the rotate cut. The audio files recorded earlier will now be added to a playlist. This playlist must have the same name that was entered into the ‘Playlist’ field for the rotate cut. Refer to Section 5 for information about creating playlist. Another way to create a rotate cut can be found under the main Playlist Modify window.
Record and add the cuts to be rotated to a playlist as normal. After saving the playlist, press the Playlist bar again. Select the button CREATE ROTATE.
This will automatically open the ADD CUT window with ‘Playlist’ field entered. Users just enter the cut number to be used and other cut information.
Other Rotate Cut Information To edit or change the rotation of a Rotate cut, highlight the rotate cut in the Library Screen, then press the MODIFY button. In the Modify Cut window, the field ‘Event’ displays the playlist position number of the cut to be played next. For example, if five cuts are in a rotate cut playlist and the ‘Event’ filed displays ‘0’, then the first cut in the list will play when the rotate cut plays. Rotate cuts can also be reset via the DCL: RESET ROTATE <cut number>. Issuing the DCL will set the ‘Event’ field to ‘0’ for the cut number given.
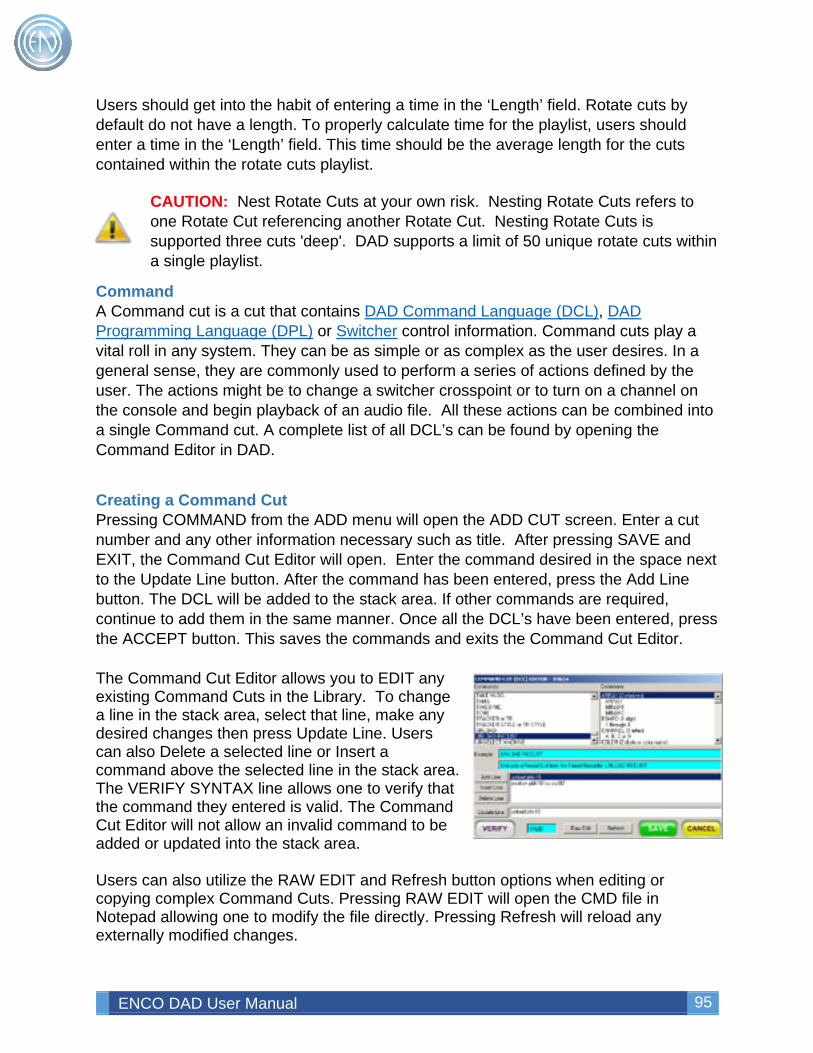
ENCO DAD User Manual 95
Users should get into the habit of entering a time in the ‘Length’ field. Rotate cuts by default do not have a length. To properly calculate time for the playlist, users should enter a time in the ‘Length’ field. This time should be the average length for the cuts contained within the rotate cuts playlist.
CAUTION: Nest Rotate Cuts at your own risk. Nesting Rotate Cuts refers to one Rotate Cut referencing another Rotate Cut. Nesting Rotate Cuts is supported three cuts 'deep'. DAD supports a limit of 50 unique rotate cuts within a single playlist.
Command A Command cut is a cut that contains DAD Command Language (DCL), DAD Programming Language (DPL) or Switcher control information. Command cuts play a vital roll in any system. They can be as simple or as complex as the user desires. In a general sense, they are commonly used to perform a series of actions defined by the user. The actions might be to change a switcher crosspoint or to turn on a channel on the console and begin playback of an audio file. All these actions can be combined into a single Command cut. A complete list of all DCL’s can be found by opening the Command Editor in DAD.
Creating a Command Cut Pressing COMMAND from the ADD menu will open the ADD CUT screen. Enter a cut number and any other information necessary such as title. After pressing SAVE and EXIT, the Command Cut Editor will open. Enter the command desired in the space next to the Update Line button. After the command has been entered, press the Add Line button. The DCL will be added to the stack area. If other commands are required, continue to add them in the same manner. Once all the DCL’s have been entered, press the ACCEPT button. This saves the commands and exits the Command Cut Editor. The Command Cut Editor allows you to EDIT any existing Command Cuts in the Library. To change a line in the stack area, select that line, make any desired changes then press Update Line. Users can also Delete a selected line or Insert a command above the selected line in the stack area. The VERIFY SYNTAX line allows one to verify that the command they entered is valid. The Command Cut Editor will not allow an invalid command to be added or updated into the stack area. Users can also utilize the RAW EDIT and Refresh button options when editing or copying complex Command Cuts. Pressing RAW EDIT will open the CMD file in Notepad allowing one to modify the file directly. Pressing Refresh will reload any externally modified changes.
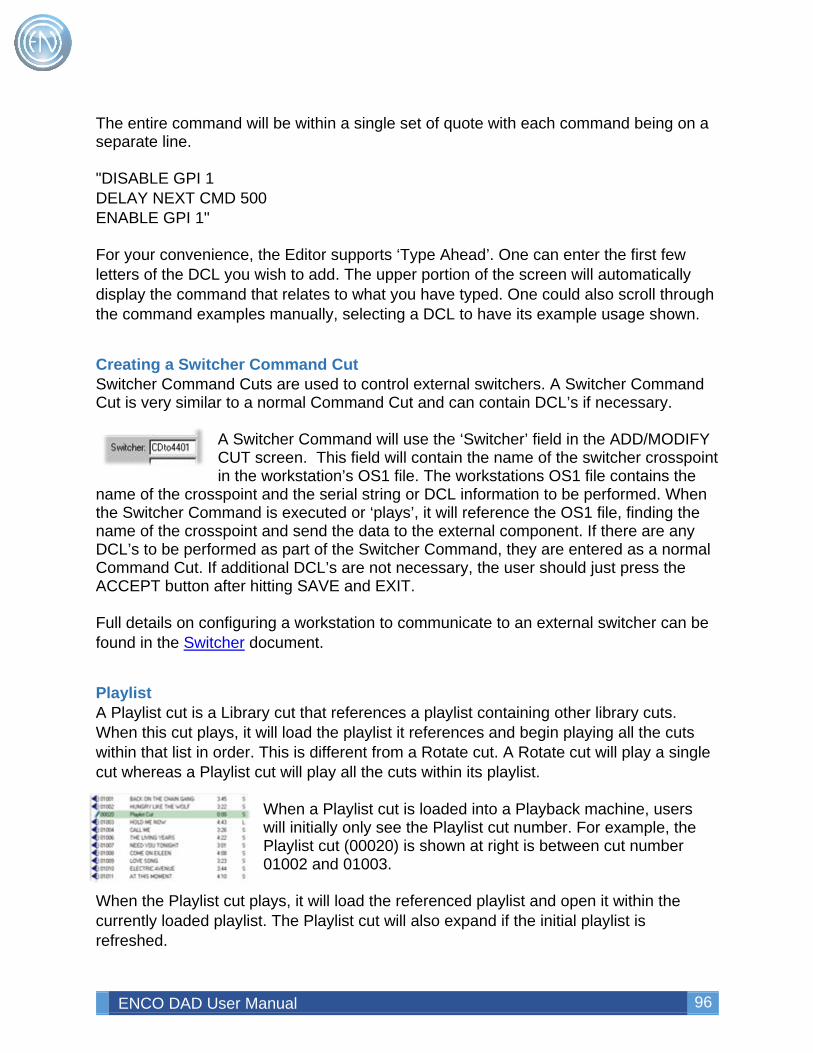
ENCO DAD User Manual 96
The entire command will be within a single set of quote with each command being on a separate line. "DISABLE GPI 1 DELAY NEXT CMD 500 ENABLE GPI 1" For your convenience, the Editor supports ‘Type Ahead’. One can enter the first few letters of the DCL you wish to add. The upper portion of the screen will automatically display the command that relates to what you have typed. One could also scroll through the command examples manually, selecting a DCL to have its example usage shown.
Creating a Switcher Command Cut Switcher Command Cuts are used to control external switchers. A Switcher Command Cut is very similar to a normal Command Cut and can contain DCL’s if necessary.
A Switcher Command will use the ‘Switcher’ field in the ADD/MODIFY CUT screen. This field will contain the name of the switcher crosspoint in the workstation’s OS1 file. The workstations OS1 file contains the
name of the crosspoint and the serial string or DCL information to be performed. When the Switcher Command is executed or ‘plays’, it will reference the OS1 file, finding the name of the crosspoint and send the data to the external component. If there are any DCL’s to be performed as part of the Switcher Command, they are entered as a normal Command Cut. If additional DCL’s are not necessary, the user should just press the ACCEPT button after hitting SAVE and EXIT. Full details on configuring a workstation to communicate to an external switcher can be found in the Switcher document.
Playlist A Playlist cut is a Library cut that references a playlist containing other library cuts. When this cut plays, it will load the playlist it references and begin playing all the cuts within that list in order. This is different from a Rotate cut. A Rotate cut will play a single cut whereas a Playlist cut will play all the cuts within its playlist.
When a Playlist cut is loaded into a Playback machine, users will initially only see the Playlist cut number. For example, the Playlist cut (00020) is shown at right is between cut number 01002 and 01003.
When the Playlist cut plays, it will load the referenced playlist and open it within the currently loaded playlist. The Playlist cut will also expand if the initial playlist is refreshed.
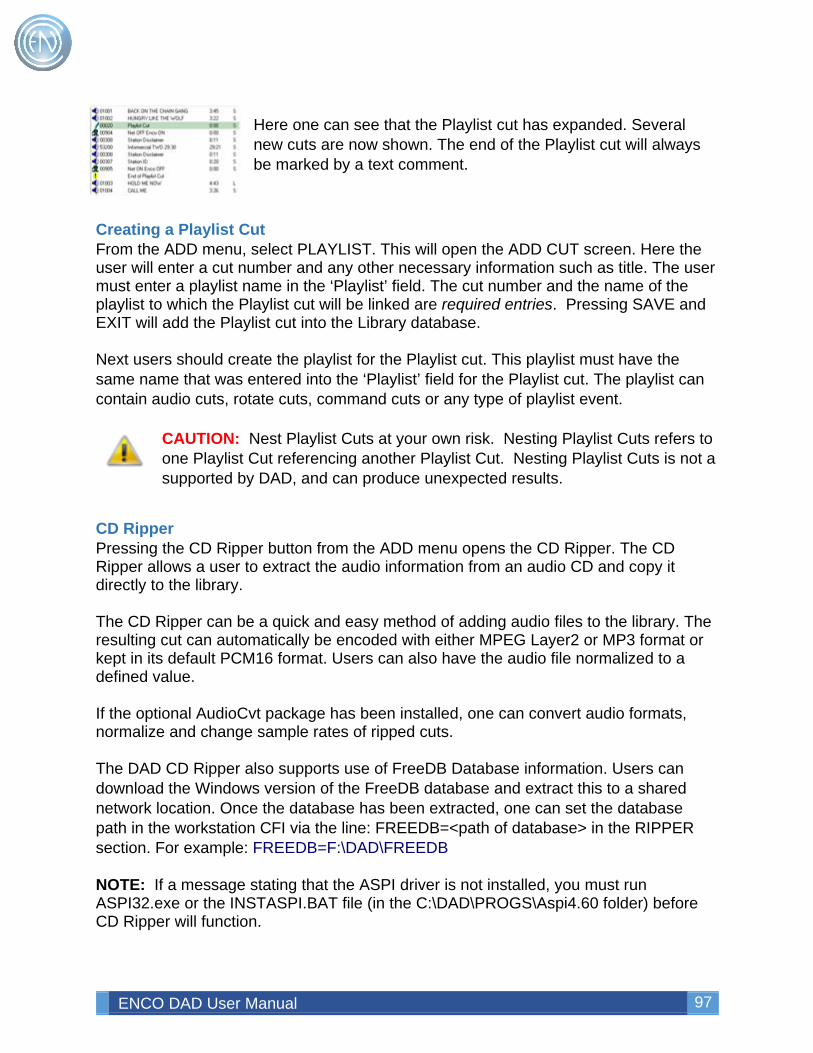
ENCO DAD User Manual 97
Here one can see that the Playlist cut has expanded. Several new cuts are now shown. The end of the Playlist cut will always be marked by a text comment.
Creating a Playlist Cut From the ADD menu, select PLAYLIST. This will open the ADD CUT screen. Here the user will enter a cut number and any other necessary information such as title. The user must enter a playlist name in the ‘Playlist’ field. The cut number and the name of the playlist to which the Playlist cut will be linked are required entries. Pressing SAVE and EXIT will add the Playlist cut into the Library database. Next users should create the playlist for the Playlist cut. This playlist must have the same name that was entered into the ‘Playlist’ field for the Playlist cut. The playlist can contain audio cuts, rotate cuts, command cuts or any type of playlist event.
CAUTION: Nest Playlist Cuts at your own risk. Nesting Playlist Cuts refers to one Playlist Cut referencing another Playlist Cut. Nesting Playlist Cuts is not a supported by DAD, and can produce unexpected results.
CD Ripper Pressing the CD Ripper button from the ADD menu opens the CD Ripper. The CD Ripper allows a user to extract the audio information from an audio CD and copy it directly to the library. The CD Ripper can be a quick and easy method of adding audio files to the library. The resulting cut can automatically be encoded with either MPEG Layer2 or MP3 format or kept in its default PCM16 format. Users can also have the audio file normalized to a defined value. If the optional AudioCvt package has been installed, one can convert audio formats, normalize and change sample rates of ripped cuts. The DAD CD Ripper also supports use of FreeDB Database information. Users can download the Windows version of the FreeDB database and extract this to a shared network location. Once the database has been extracted, one can set the database path in the workstation CFI via the line: FREEDB=<path of database> in the RIPPER section. For example: FREEDB=F:\DAD\FREEDB NOTE: If a message stating that the ASPI driver is not installed, you must run ASPI32.exe or the INSTASPI.BAT file (in the C:\DAD\PROGS\Aspi4.60 folder) before CD Ripper will function.
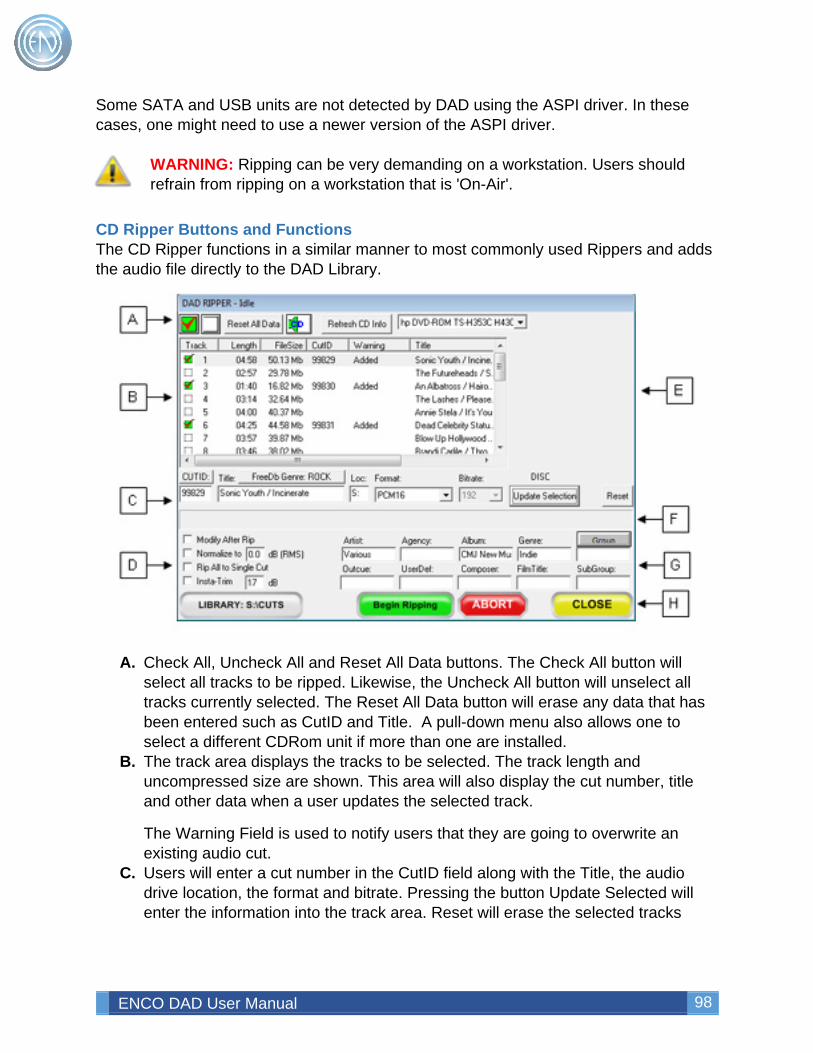
ENCO DAD User Manual 98
Some SATA and USB units are not detected by DAD using the ASPI driver. In these cases, one might need to use a newer version of the ASPI driver.
WARNING: Ripping can be very demanding on a workstation. Users should refrain from ripping on a workstation that is 'On-Air'.
CD Ripper Buttons and Functions The CD Ripper functions in a similar manner to most commonly used Rippers and adds the audio file directly to the DAD Library.
A. Check All, Uncheck All and Reset All Data buttons. The Check All button will select all tracks to be ripped. Likewise, the Uncheck All button will unselect all tracks currently selected. The Reset All Data button will erase any data that has been entered such as CutID and Title. A pull-down menu also allows one to select a different CDRom unit if more than one are installed.
B. The track area displays the tracks to be selected. The track length and uncompressed size are shown. This area will also display the cut number, title and other data when a user updates the selected track.
The Warning Field is used to notify users that they are going to overwrite an existing audio cut.
C. Users will enter a cut number in the CutID field along with the Title, the audio drive location, the format and bitrate. Pressing the button Update Selected will enter the information into the track area. Reset will erase the selected tracks
ENCO DAD User Manual 99
data. One can press the CUTID button and select from the menu to help find the lowest available cut numbers.
D. Checking ‘Modify After Rip’ will force the Modify Cut window to open after the track has completed ripping. Checking the ‘Normalize to’ option will force the ripper to normalize all the selected tracks to the value entered into the level field directly to the right. To lower overall level of the cut, enter a ‘-<value>’ such as -8. Rip All to a Single Cut allows for users to rip the entire audio CD to a single cut number. Insta-Trim allows for one to have DAD automatically set the Head and Tail markers at the start and end of the audio file. Enter a dB value where these markers should be set.
E. If there is an album graphic for the disk loaded - it will be shown here. F. The progress display will show the overall status of the ripping process. G. Several Library data fields are provided allowing the user to enter Artist, Agency,
Album, Genre, Group (with a Group button) Outcue, UserDef, Composer, FilmTitle and SubGroup. Information entered will be applied to all of the cuts selected for ripping.
H. Begin Ripping will start the ripping process. Abort will cancel the ripping process and Close will exit the ripper. On the far left the Library button allows one to select the Library to rip to. This is used when one wants to rip to another Library and is used with the Multi-Library option.
Using the CD Ripper A user will first insert an audio CD into the CD-ROM drive of the machine. When the CD Ripper is opened, the tracks will be displayed with the length and current file size shown. Select the individual tracks desired by clicking with the box to the left of the track number. If you wish to select all of the tracks, select the Check All button. Users at any point can select a track and enter the Cut Number, Title data along with Drive location and audio format information. Pressing the button Update Selected enters the data information for that cut. Note that the cut number will automatically be assigned to unused cut numbers in order for other cuts selected. If the user manually enters a cut number that exists, a message of: Overwrite! will be displayed in the Warning field. Users can enter items into the database fields such as Artist, Groups and Composer. Pressing the Group button will open the Groups selection window. To enter additional information for the cut, select the check-box option ‘Modify After Rip’. This will open the Library Modify screen after the cut has finished ripping. After entering any data press Save And Exit to enter the cut into the Library database.
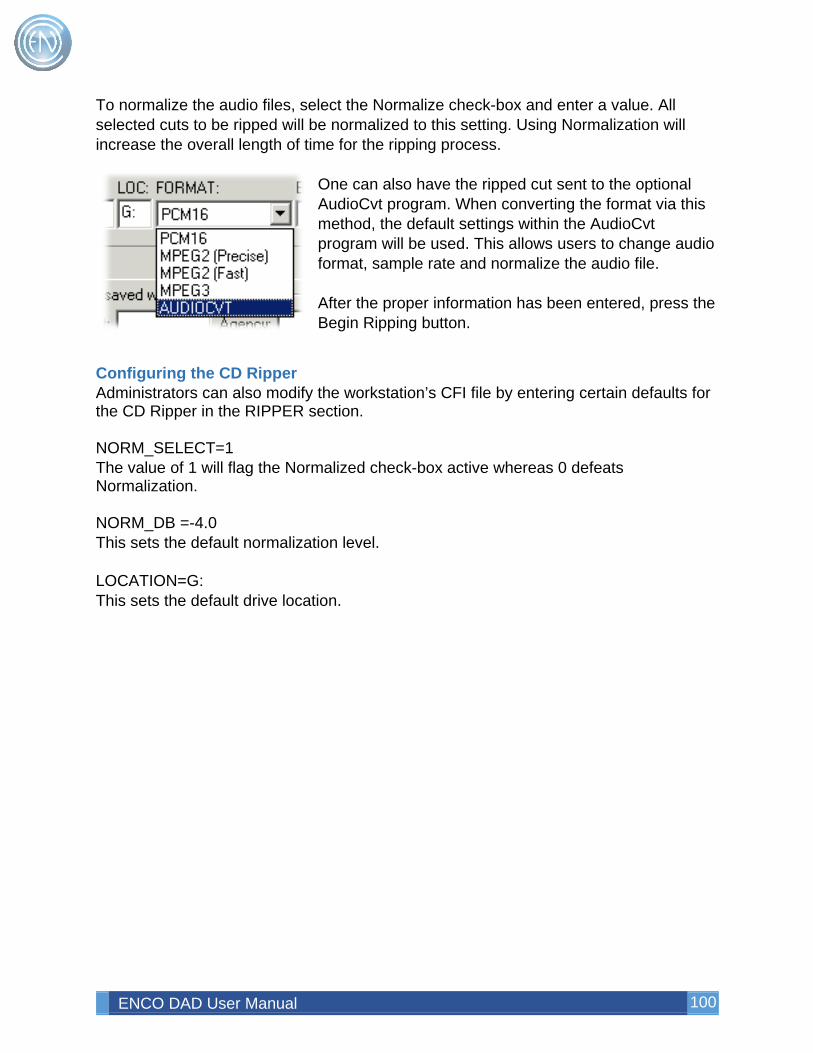
ENCO DAD User Manual 100
To normalize the audio files, select the Normalize check-box and enter a value. All selected cuts to be ripped will be normalized to this setting. Using Normalization will increase the overall length of time for the ripping process.
One can also have the ripped cut sent to the optional AudioCvt program. When converting the format via this method, the default settings within the AudioCvt program will be used. This allows users to change audio format, sample rate and normalize the audio file. After the proper information has been entered, press the Begin Ripping button.
Configuring the CD Ripper
Administrators can also modify the workstation’s CFI file by entering certain defaults for the CD Ripper in the RIPPER section. NORM_SELECT=1 The value of 1 will flag the Normalized check-box active whereas 0 defeats Normalization. NORM_DB =-4.0 This sets the default normalization level. LOCATION=G: This sets the default drive location.
ENCO DAD User Manual 101
Other Methods of Adding Audio Cuts Drag and Drop Users can Drag and Drop an audio file directly into the DAD Library screen. If the audio file is valid then the ADD CUT screen will open. Here users can enter the cut number and drive location along with any other information necessary. If the ADD CUT screen does not appear, the cut should be converted so it can be added.
DropBox DropBox is an external program running in the background that will automatically convert audio files placed in a directory and inject them into the DAD Library. DropBox can be customized to satisfy the users needs and is an additional purchase option.
AudioCvt Audio Convert is also an external program that allows the user to convert audio files and inject them into the DAD Library or convert existing Library cuts to another audio format. Audio Convert is also an additional purchase option.
Modifying Library cuts Pressing the Modify button will open the Modify screen. Here users can enter additional information about the cut. Additionally, users can create or edit Scripts associated with the audio file, copy the file to another cut number or flag the cut for deletion.
Modify Screen Button Functions and Field Information There are several fields within the Modify screen. Some fields display basic cut information such as Title or Artist, while other fields display information for various cue positions such as Segue Start.

ENCO DAD User Manual 102
A. Cut ID. Each library entry will have a unique five-digit number. In addition to the
Cut Number an alternate cut field can be used for special purposes. ALTCUT can support up to 30 unique alphanumeric characters. The AltCut cut can also be set to reference an alternate cut. For example: C:\MATT\MattsAudioFile.wav. This is a feature of the CFI option: CUT_LOCATION. Enter the Title in the Title field.
Pressing the Cut ID button will display the Copy Cut screen, allowing one to make a duplicate copy of the Library cut. Enter the cut number for the duplicate cut in the Cut ID field next to the Destination Path.
B. Each entry can be assigned a Group. Pressing the Group button will open the Select Group window. An entry can only be assigned to a single group. Using Groups can help organize the Library. Gender is a single character filed can be used for Ensemble Rules to identify Gender or other characteristics such as the letter 'I' for Instrumental or 'B' for Boy Band.
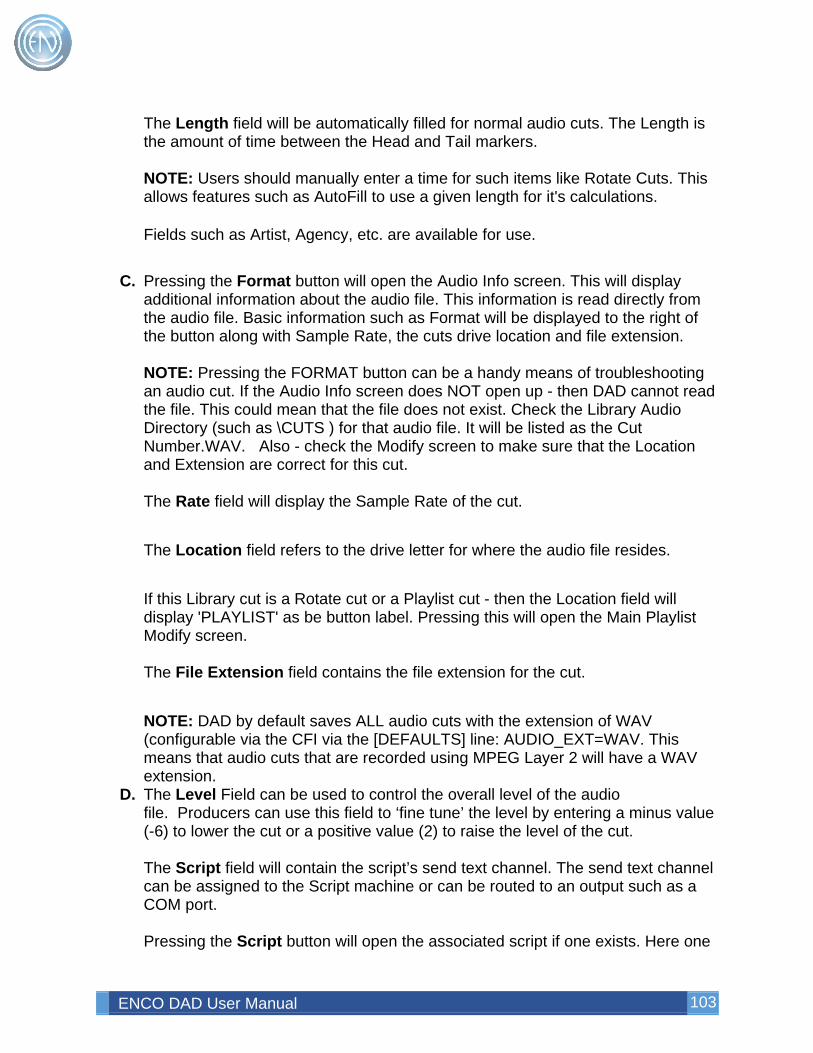
ENCO DAD User Manual 103
The Length field will be automatically filled for normal audio cuts. The Length is the amount of time between the Head and Tail markers. NOTE: Users should manually enter a time for such items like Rotate Cuts. This allows features such as AutoFill to use a given length for it's calculations. Fields such as Artist, Agency, etc. are available for use.
C. Pressing the Format button will open the Audio Info screen. This will display
additional information about the audio file. This information is read directly from the audio file. Basic information such as Format will be displayed to the right of the button along with Sample Rate, the cuts drive location and file extension. NOTE: Pressing the FORMAT button can be a handy means of troubleshooting an audio cut. If the Audio Info screen does NOT open up - then DAD cannot read the file. This could mean that the file does not exist. Check the Library Audio Directory (such as \CUTS ) for that audio file. It will be listed as the Cut Number.WAV. Also - check the Modify screen to make sure that the Location and Extension are correct for this cut. The Rate field will display the Sample Rate of the cut.
The Location field refers to the drive letter for where the audio file resides.
If this Library cut is a Rotate cut or a Playlist cut - then the Location field will display 'PLAYLIST' as be button label. Pressing this will open the Main Playlist Modify screen.
The File Extension field contains the file extension for the cut.
NOTE: DAD by default saves ALL audio cuts with the extension of WAV (configurable via the CFI via the [DEFAULTS] line: AUDIO_EXT=WAV. This means that audio cuts that are recorded using MPEG Layer 2 will have a WAV extension.
D. The Level Field can be used to control the overall level of the audio file. Producers can use this field to ‘fine tune’ the level by entering a minus value (-6) to lower the cut or a positive value (2) to raise the level of the cut. The Script field will contain the script’s send text channel. The send text channel can be assigned to the Script machine or can be routed to an output such as a COM port. Pressing the Script button will open the associated script if one exists. Here one
ENCO DAD User Manual 104
can modify the script. For more details on using Scripts, please review the Script Machine.
E. The URL field allows for one to enter a URL for an external link. Pressing the
URL button will open the link in the default browser. F. All of the marker positions are saved and displayed within these fields. These
values are set directly in the Editor. G. Producers wishing to utilize Start and Kill dates can enter them here. Dates are
entered using the MM/DD/YY format. The machine playing the file back must have the Start and Kill Date switches set to Active. These switches are found in Setup under Misc. Defaults. Pressing the Kill Date button will toggle the cut for Delete. Pressing Kill Date a second time will un-flag the cut for deletion. Users can perform an ALL Fields Search with the word Delete or sort by Kill Date to display all cuts flagged for Deletion. A file can also be day-parted by using the Active and Kill time fields. Times are entered in 24-hour military format [hh:mm:ss]. In addition to the Start Kill dates, one can select the day of the week the cut should run using the Active DOW fields. When selected, the file will only be active on that day. If used with Start and Kill dates then the cut will be active on those days between the dates entered. Active HOD is for the hour of day. Click the appropriate check boxes to activate the hours.
H. Play Time allows one to Stretch or Shrink the audio cut to the desired length. For example if an audio file is 0:32.5 seconds long, one could enter a time of 0:30 seconds. For stations that choose to ‘pitch-up’ their audio, users can enter a % value such as 97% to have the audio file play 3% faster. Entering 105% will stretch the cut by 5%. Users must make sure that Stretch and Shrink is enabled in the CFI file via the [Playlist] line: STRETCH_AND_SHRINK=TRUE. Also, users should verify that their audio device supports this function. Pitch Change is used in conjunction with the Play Time. By default pitch change is disabled. To have a cut play with pitch change, enter ‘T‘ for True. The Default Transition field can be used to force the cut to a specific transition when added to a Playlist. Users should enter the transition code of A for Autoplay, L for autoLoad, S for Segue and N for Normal. Entering either a T or F in the Loop field will force DAD to use the Head / Tail markers and loop the cut when played. Stop and Start DCL buttons allow the user to issue a DCL command when the file begins playing or when the cut ends playing. Users can either enter a letter (A
ENCO DAD User Manual 105
- Z) for a user defined pre-determined Command or create a command Command for just this cut. When using a pre-determined Command, one would manually create a command cut with the desired DCL's and save it in the \CUTS directory as A.CMD or Z.DCL. Users then enter the letter of the Command in the Start or Stop fields. If one were to press the Start or Stop button, the Command Cut Editor will open. Users can then enter the desired DCL. This method will save the Command as the original cut number with a CMD extension. FileCheck will instruct DAD to 'look' for and process either an EDL (Edit Decision List created by Cuts and Pastes) or a SLT (Slate or multiple SEC cues) file created for the audio cut. Ensemble Sub Groups: Users can now place a cut in more than one Group.
I. The EDIT button will open the cut directly into the Editor. The STAY and Save and CLOSE and save buttons will save any changes made and either stay in the Modify cut screen or return back to the Library screen. PREV and SAVE and NEXT and SAVE buttons will save any changes made and either move to Previous Cut or to the Next Cut Play will play the audio file. Prev and Next arrows will select either the previous or next entry in the Library. CLOSE without SAVE closes the Modify cut screen without saving any changes.
J. More Data: There are 10 User configurable DAD Fields: USER01 through USER10. User can specify the characteristics of these fields with %datadir%\dad\files\UserFields.ini using these settings: Label Must not be an existing DAD field Validation types: blank = allows anything alpha = characters only alphanumeric = characters and numbers numberic = numbers only (with - and .) list = allows the List01 thru List02 values only Width values 0 = maximum width (100) non-zero = limits width to this value Allow Blank = t or f (true or false)
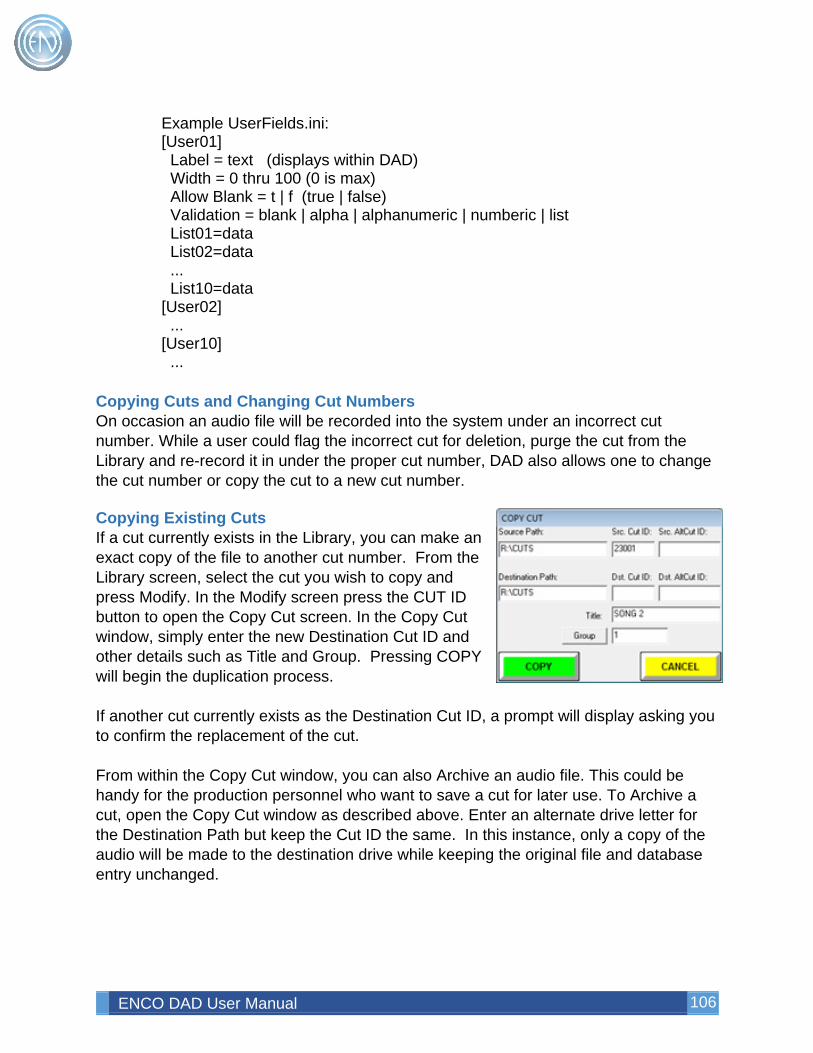
ENCO DAD User Manual 106
Example UserFields.ini: [User01] Label = text (displays within DAD) Width = 0 thru 100 (0 is max) Allow Blank = t | f (true | false) Validation = blank | alpha | alphanumeric | numberic | list List01=data List02=data ... List10=data [User02] ... [User10] ...
Copying Cuts and Changing Cut Numbers On occasion an audio file will be recorded into the system under an incorrect cut number. While a user could flag the incorrect cut for deletion, purge the cut from the Library and re-record it in under the proper cut number, DAD also allows one to change the cut number or copy the cut to a new cut number.
Copying Existing Cuts If a cut currently exists in the Library, you can make an exact copy of the file to another cut number. From the Library screen, select the cut you wish to copy and press Modify. In the Modify screen press the CUT ID button to open the Copy Cut screen. In the Copy Cut window, simply enter the new Destination Cut ID and other details such as Title and Group. Pressing COPY will begin the duplication process. If another cut currently exists as the Destination Cut ID, a prompt will display asking you to confirm the replacement of the cut. From within the Copy Cut window, you can also Archive an audio file. This could be handy for the production personnel who want to save a cut for later use. To Archive a cut, open the Copy Cut window as described above. Enter an alternate drive letter for the Destination Path but keep the Cut ID the same. In this instance, only a copy of the audio will be made to the destination drive while keeping the original file and database entry unchanged.
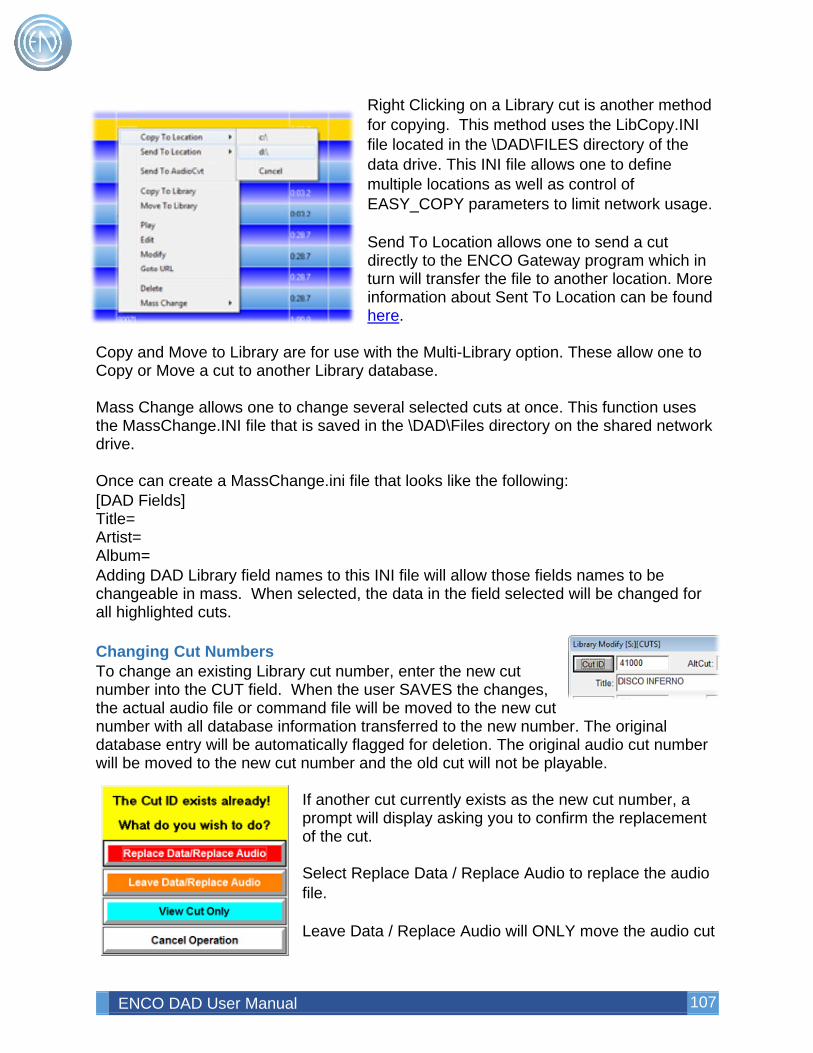
ENCO DAD User Manual 107
Right Clicking on a Library cut is another method for copying. This method uses the LibCopy.INI file located in the \DAD\FILES directory of the data drive. This INI file allows one to define multiple locations as well as control of EASY_COPY parameters to limit network usage. Send To Location allows one to send a cut directly to the ENCO Gateway program which in turn will transfer the file to another location. More information about Sent To Location can be found here.
Copy and Move to Library are for use with the Multi-Library option. These allow one to Copy or Move a cut to another Library database. Mass Change allows one to change several selected cuts at once. This function uses the MassChange.INI file that is saved in the \DAD\Files directory on the shared network drive. Once can create a MassChange.ini file that looks like the following: [DAD Fields] Title= Artist= Album= Adding DAD Library field names to this INI file will allow those fields names to be changeable in mass. When selected, the data in the field selected will be changed for all highlighted cuts. Changing Cut Numbers To change an existing Library cut number, enter the new cut number into the CUT field. When the user SAVES the changes, the actual audio file or command file will be moved to the new cut number with all database information transferred to the new number. The original database entry will be automatically flagged for deletion. The original audio cut number will be moved to the new cut number and the old cut will not be playable.
If another cut currently exists as the new cut number, a prompt will display asking you to confirm the replacement of the cut. Select Replace Data / Replace Audio to replace the audio file. Leave Data / Replace Audio will ONLY move the audio cut
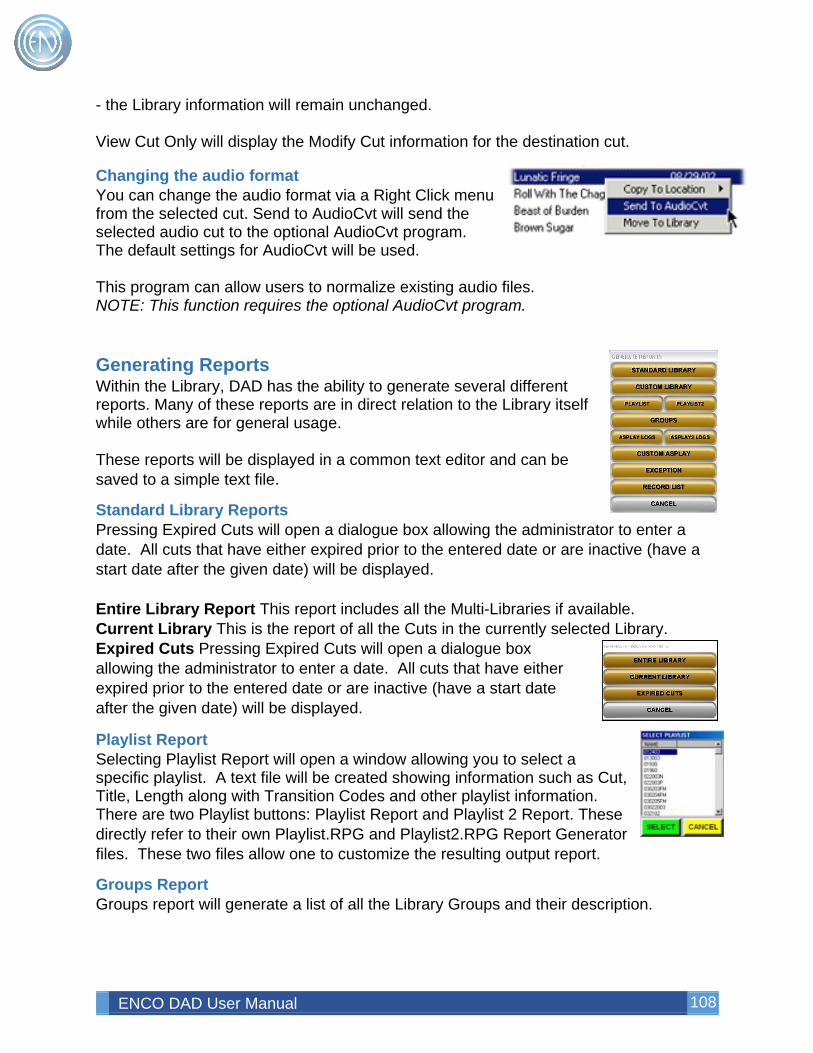
ENCO DAD User Manual 108
- the Library information will remain unchanged. View Cut Only will display the Modify Cut information for the destination cut.
Changing the audio format You can change the audio format via a Right Click menu from the selected cut. Send to AudioCvt will send the selected audio cut to the optional AudioCvt program. The default settings for AudioCvt will be used. This program can allow users to normalize existing audio files. NOTE: This function requires the optional AudioCvt program. Generating Reports Within the Library, DAD has the ability to generate several different reports. Many of these reports are in direct relation to the Library itself while others are for general usage. These reports will be displayed in a common text editor and can be saved to a simple text file.
Standard Library Reports Pressing Expired Cuts will open a dialogue box allowing the administrator to enter a date. All cuts that have either expired prior to the entered date or are inactive (have a start date after the given date) will be displayed. Entire Library Report This report includes all the Multi-Libraries if available. Current Library This is the report of all the Cuts in the currently selected Library. Expired Cuts Pressing Expired Cuts will open a dialogue box allowing the administrator to enter a date. All cuts that have either expired prior to the entered date or are inactive (have a start date after the given date) will be displayed.
Playlist Report Selecting Playlist Report will open a window allowing you to select a specific playlist. A text file will be created showing information such as Cut, Title, Length along with Transition Codes and other playlist information. There are two Playlist buttons: Playlist Report and Playlist 2 Report. These directly refer to their own Playlist.RPG and Playlist2.RPG Report Generator files. These two files allow one to customize the resulting output report.
Groups Report Groups report will generate a list of all the Library Groups and their description.
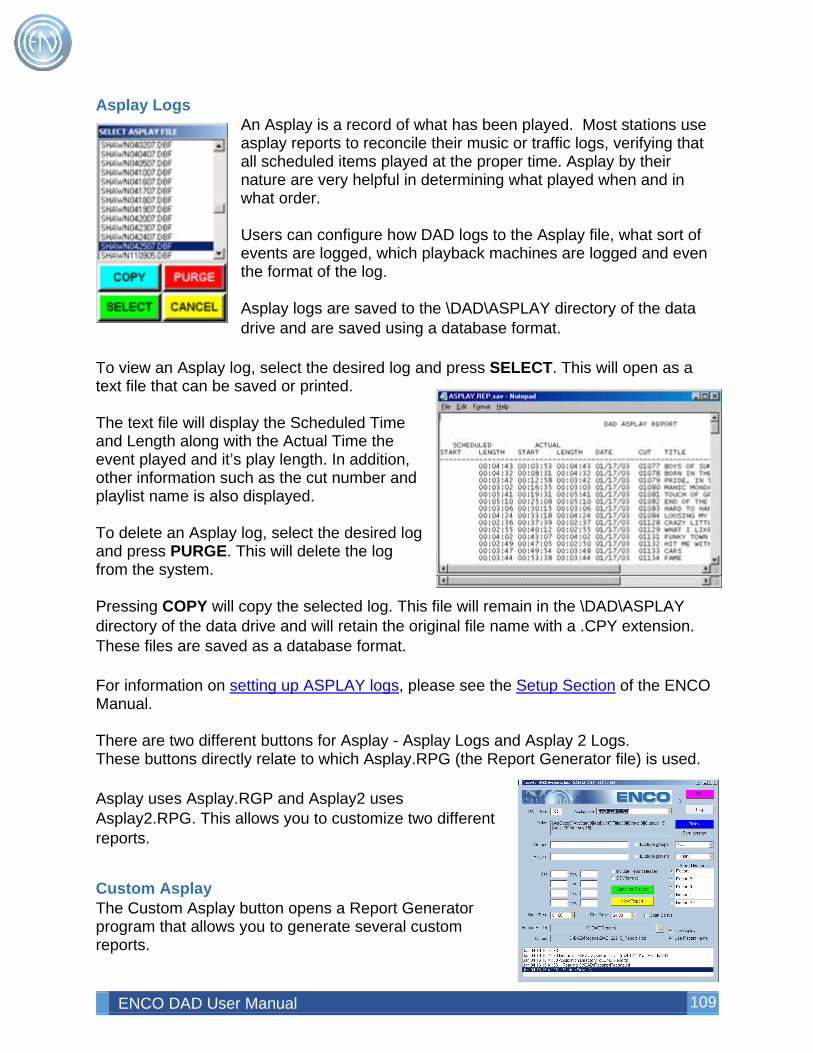
ENCO DAD User Manual 109
Asplay Logs An Asplay is a record of what has been played. Most stations use asplay reports to reconcile their music or traffic logs, verifying that all scheduled items played at the proper time. Asplay by their nature are very helpful in determining what played when and in what order. Users can configure how DAD logs to the Asplay file, what sort of events are logged, which playback machines are logged and even the format of the log. Asplay logs are saved to the \DAD\ASPLAY directory of the data drive and are saved using a database format.
To view an Asplay log, select the desired log and press SELECT. This will open as a text file that can be saved or printed. The text file will display the Scheduled Time and Length along with the Actual Time the event played and it’s play length. In addition, other information such as the cut number and playlist name is also displayed. To delete an Asplay log, select the desired log and press PURGE. This will delete the log from the system. Pressing COPY will copy the selected log. This file will remain in the \DAD\ASPLAY directory of the data drive and will retain the original file name with a .CPY extension. These files are saved as a database format. For information on setting up ASPLAY logs, please see the Setup Section of the ENCO Manual. There are two different buttons for Asplay - Asplay Logs and Asplay 2 Logs. These buttons directly relate to which Asplay.RPG (the Report Generator file) is used. Asplay uses Asplay.RGP and Asplay2 uses Asplay2.RPG. This allows you to customize two different reports.
Custom Asplay The Custom Asplay button opens a Report Generator program that allows you to generate several custom reports.
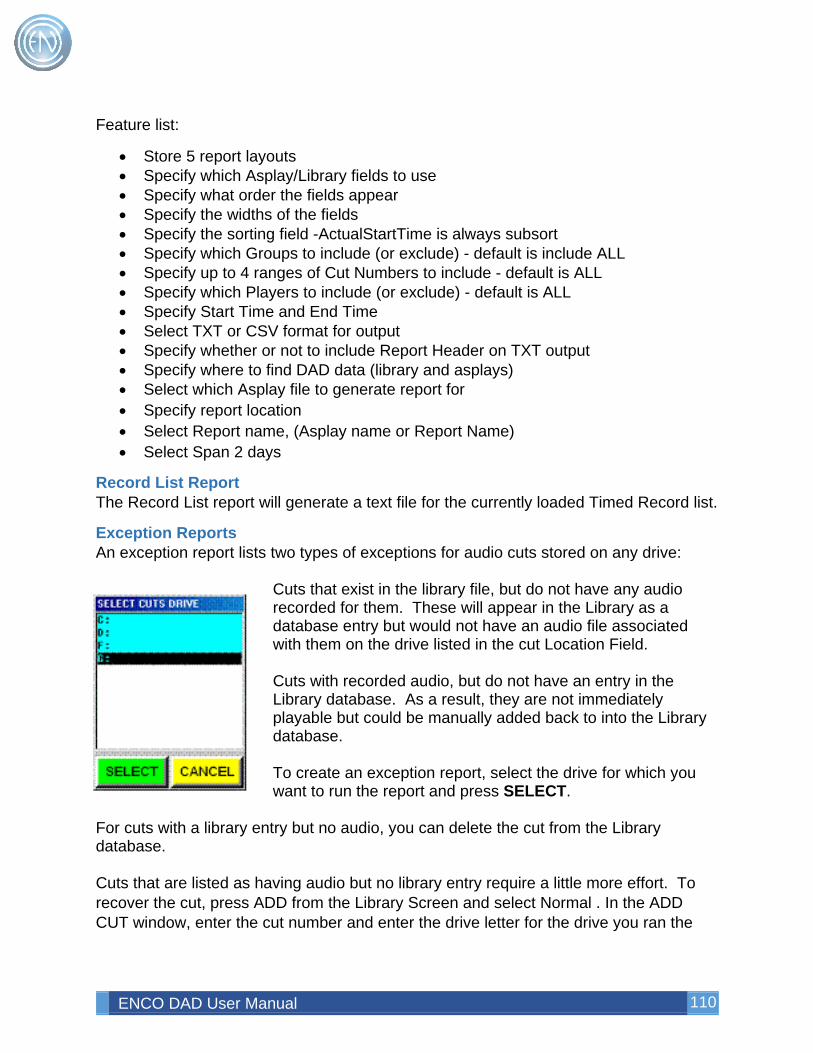
ENCO DAD User Manual 110
Feature list:
• Store 5 report layouts • Specify which Asplay/Library fields to use • Specify what order the fields appear • Specify the widths of the fields • Specify the sorting field -ActualStartTime is always subsort • Specify which Groups to include (or exclude) - default is include ALL • Specify up to 4 ranges of Cut Numbers to include - default is ALL • Specify which Players to include (or exclude) - default is ALL • Specify Start Time and End Time • Select TXT or CSV format for output • Specify whether or not to include Report Header on TXT output • Specify where to find DAD data (library and asplays) • Select which Asplay file to generate report for • Specify report location • Select Report name, (Asplay name or Report Name) • Select Span 2 days
Record List Report The Record List report will generate a text file for the currently loaded Timed Record list.
Exception Reports An exception report lists two types of exceptions for audio cuts stored on any drive:
Cuts that exist in the library file, but do not have any audio recorded for them. These will appear in the Library as a database entry but would not have an audio file associated with them on the drive listed in the cut Location Field. Cuts with recorded audio, but do not have an entry in the Library database. As a result, they are not immediately playable but could be manually added back to into the Library database. To create an exception report, select the drive for which you want to run the report and press SELECT.
For cuts with a library entry but no audio, you can delete the cut from the Library database. Cuts that are listed as having audio but no library entry require a little more effort. To recover the cut, press ADD from the Library Screen and select Normal . In the ADD CUT window, enter the cut number and enter the drive letter for the drive you ran the
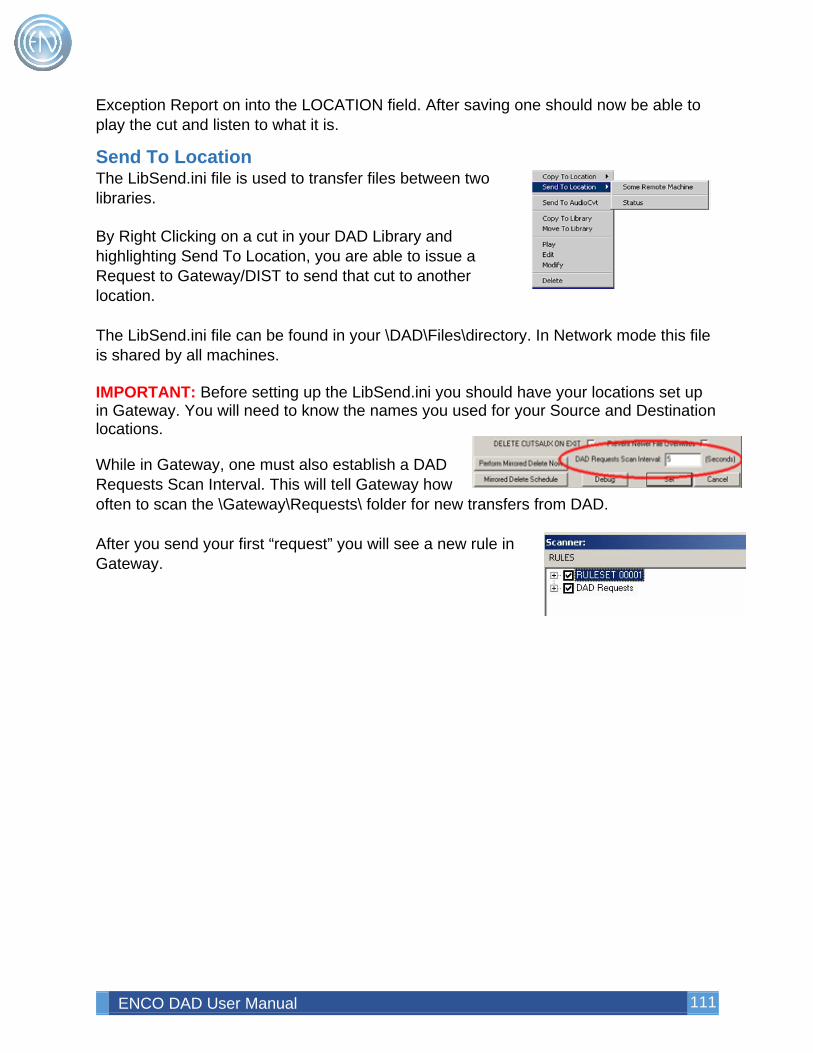
ENCO DAD User Manual 111
Exception Report on into the LOCATION field. After saving one should now be able to play the cut and listen to what it is.
Send To Location The LibSend.ini file is used to transfer files between two libraries. By Right Clicking on a cut in your DAD Library and highlighting Send To Location, you are able to issue a Request to Gateway/DIST to send that cut to another location. The LibSend.ini file can be found in your \DAD\Files\directory. In Network mode this file is shared by all machines. IMPORTANT: Before setting up the LibSend.ini you should have your locations set up in Gateway. You will need to know the names you used for your Source and Destination locations. While in Gateway, one must also establish a DAD Requests Scan Interval. This will tell Gateway how often to scan the \Gateway\Requests\ folder for new transfers from DAD.
After you send your first “request” you will see a new rule in Gateway.

ENCO DAD User Manual 112
The LibSend.ini [config] Request_Path = C:\gateway\DADrequests The DADrequests folder is a special folder
in your Gateway directory. It is through this folder that DAD and Gateway are able to “talk” to each other to transfer files in this way.
Loc1_Dst_Description = Some Remote Machine
The name of the destination machine. This is a descriptive name that will be displayed in your Right Click menu.
Loc1_Src_Description = Came from Here The name of the source machine Loc1_Src_DB = NetF Source Location Name as listed in
Gateway Loc1_Src_Lib = CUTS Library Name (will be CUTS unless using
Multiple Libraries) ; Loc1_Dst_DB = LocalC Destination Location Name as listed in
Gateway Loc1_Dst_Lib = CUTS Library Name (will be CUTS unless using
Multiple Libraries) Loc1_Aud_Map1_Src = NetF Source Audio Mapping 1 Loc1_Aud_Map1_Dst = LocalC Destination Audio Mapping 1 Loc1_Aud_Map2_Src = NetG Source Audio Mapping 2 Loc1_Aud_Map2_Dst = LocalC Destination Audio Mapping 2 ; Loc1_Dst_TargetLow=80000 Cut range NOTE: Lines are remarked out by default. You will need to restart DAD in order for changes to the LibSend.ini to take effect.
Multiple Libraries By default, DAD uses a single library database. This database is CUTS.DBF with the audio files being saved in the \CUTS directory. DAD also has Multiple Library support, allowing it to use many different libraries, each with their own database and audio directory. One could even use Multi-Library to set a different default library within DAD.
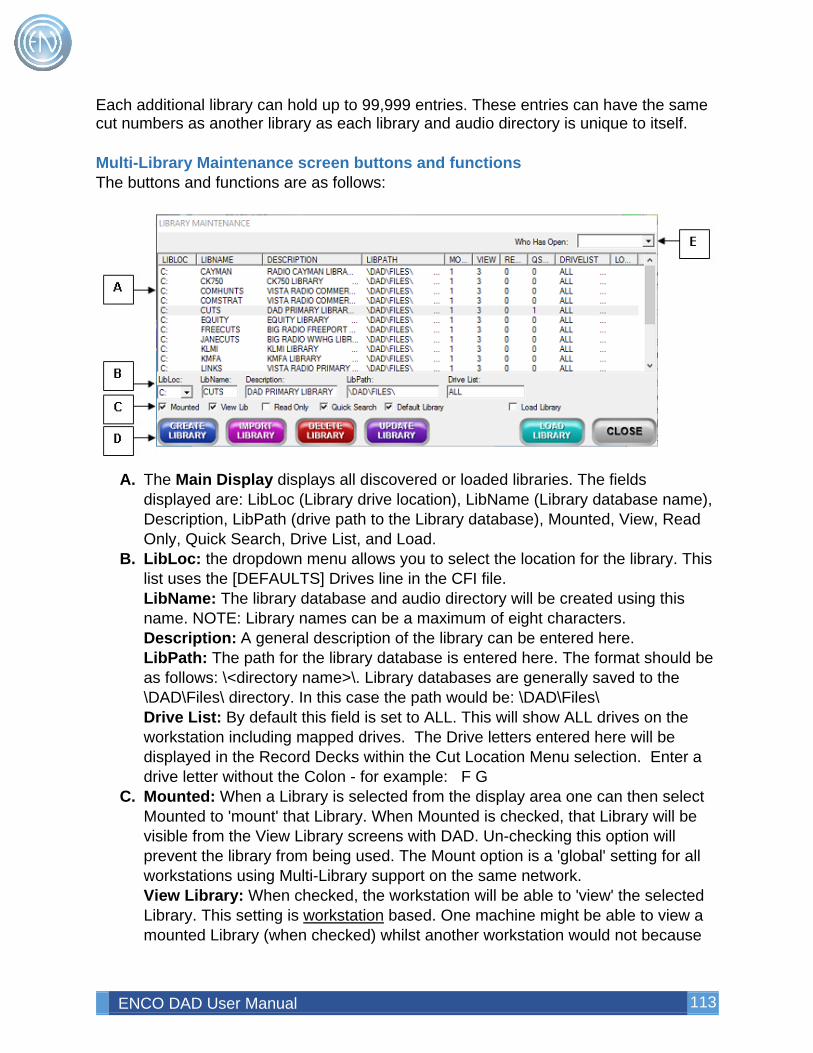
ENCO DAD User Manual 113
Each additional library can hold up to 99,999 entries. These entries can have the same cut numbers as another library as each library and audio directory is unique to itself. Multi-Library Maintenance screen buttons and functions The buttons and functions are as follows:
A. The Main Display displays all discovered or loaded libraries. The fields
displayed are: LibLoc (Library drive location), LibName (Library database name), Description, LibPath (drive path to the Library database), Mounted, View, Read Only, Quick Search, Drive List, and Load.
B. LibLoc: the dropdown menu allows you to select the location for the library. This list uses the [DEFAULTS] Drives line in the CFI file. LibName: The library database and audio directory will be created using this name. NOTE: Library names can be a maximum of eight characters. Description: A general description of the library can be entered here. LibPath: The path for the library database is entered here. The format should be as follows: \<directory name>\. Library databases are generally saved to the \DAD\Files\ directory. In this case the path would be: \DAD\Files\ Drive List: By default this field is set to ALL. This will show ALL drives on the workstation including mapped drives. The Drive letters entered here will be displayed in the Record Decks within the Cut Location Menu selection. Enter a drive letter without the Colon - for example: F G
C. Mounted: When a Library is selected from the display area one can then select Mounted to 'mount' that Library. When Mounted is checked, that Library will be visible from the View Library screens with DAD. Un-checking this option will prevent the library from being used. The Mount option is a 'global' setting for all workstations using Multi-Library support on the same network. View Library: When checked, the workstation will be able to 'view' the selected Library. This setting is workstation based. One machine might be able to view a mounted Library (when checked) whilst another workstation would not because
ENCO DAD User Manual 114
that machines 'View Library' option was NOT checked. This allows one to see the additional Library in the View Library screens. When unchecked, users will NOT be able to see and view that Library. Read Only: This is a global setting that flags the selected Library as Read Only. When flagged as Read Only users will be able to view and play from the Library but can not Add cuts. Quick Search: When checked any changes or additions to the Library selected will also be updated in the Quick Search database. Default Library: Selecting a single Library and checking this will make that Library the default Library in DAD. When DAD starts, it will load this Library. Load Library: Flags library to be loaded when DAD starts.
D. Create Library: When one enters information into the LibLoc, LibName, Description and LibPath they can create a new Library by pressing this button. Details about creating Libraries is below Import Library: When one enters information into the LibLoc, LibName, Description and LibPath they can create a new Library by pressing this button. Details about creating Libraries is below Delete Library: Selecting a Library from the display area and pressing Delete will remove the Library database along with any associated audio. NOTE: Please do this with caution. Update Library: When one changes any information pressing this button will update the selected Library. Details about Updating Libraries is below Load Library: When one enters information into the LibLoc, LibName, Description and LibPath they can Load an existing Library by pressing this button. Details about loading Libraries is below Close: Pressing this will Close the Library Maintenance screen.
E. Who Has Open: This field will display the name of the workstation that has the selected Library open and in use.
Adding, Importing and Removing Libraries Users can create new Libraries, import existing Libraries and even delete Libraries from this screen. To Add or Import a new Library one would first select the drive letter from the LibLoc field. Enter the Library name in the LibName field along with a Description. A folder will be created on the drive letter chosen with the LibName entered. Audio files will reside here. The path to the Library database file is entered into the LibPath. This can be the same name/location as the LibName or a different location if desired. At this point if this is a NEW library then one can press Create Library. DAD will present a screen asking for confirmation to create the Library. When OK is pressed, the Library will be created using the data given. If the Library was an existing Library, pressing Import Library would add the Library to DAD.
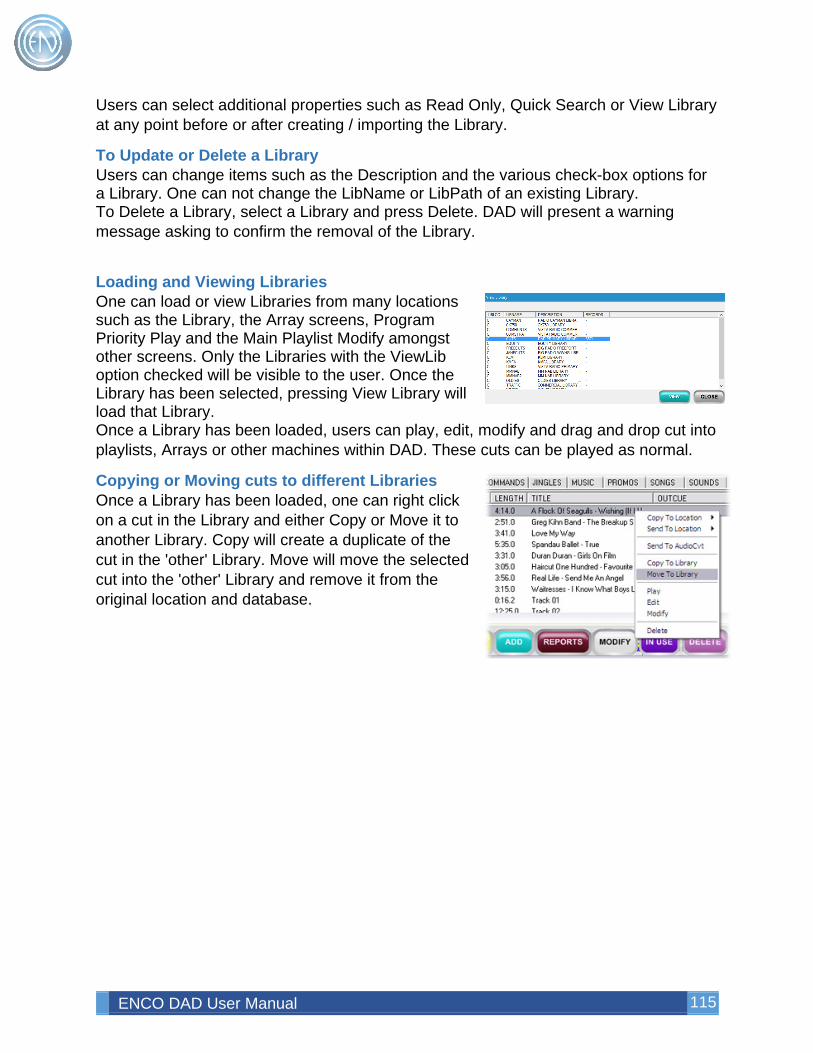
ENCO DAD User Manual 115
Users can select additional properties such as Read Only, Quick Search or View Library at any point before or after creating / importing the Library.
To Update or Delete a Library Users can change items such as the Description and the various check-box options for a Library. One can not change the LibName or LibPath of an existing Library. To Delete a Library, select a Library and press Delete. DAD will present a warning message asking to confirm the removal of the Library.
Loading and Viewing Libraries One can load or view Libraries from many locations such as the Library, the Array screens, Program Priority Play and the Main Playlist Modify amongst other screens. Only the Libraries with the ViewLib option checked will be visible to the user. Once the Library has been selected, pressing View Library will load that Library. Once a Library has been loaded, users can play, edit, modify and drag and drop cut into playlists, Arrays or other machines within DAD. These cuts can be played as normal.
Copying or Moving cuts to different Libraries Once a Library has been loaded, one can right click on a cut in the Library and either Copy or Move it to another Library. Copy will create a duplicate of the cut in the 'other' Library. Move will move the selected cut into the 'other' Library and remove it from the original location and database.
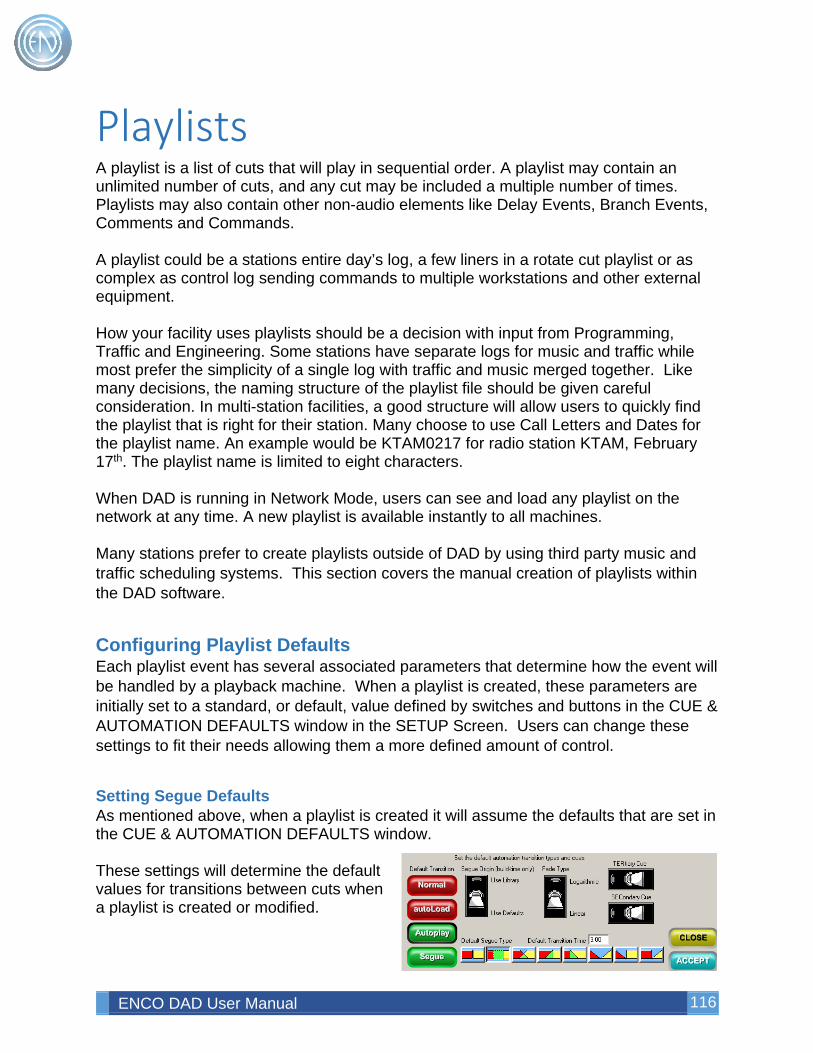
ENCO DAD User Manual 116
Playlists A playlist is a list of cuts that will play in sequential order. A playlist may contain an unlimited number of cuts, and any cut may be included a multiple number of times. Playlists may also contain other non-audio elements like Delay Events, Branch Events, Comments and Commands. A playlist could be a stations entire day’s log, a few liners in a rotate cut playlist or as complex as control log sending commands to multiple workstations and other external equipment. How your facility uses playlists should be a decision with input from Programming, Traffic and Engineering. Some stations have separate logs for music and traffic while most prefer the simplicity of a single log with traffic and music merged together. Like many decisions, the naming structure of the playlist file should be given careful consideration. In multi-station facilities, a good structure will allow users to quickly find the playlist that is right for their station. Many choose to use Call Letters and Dates for the playlist name. An example would be KTAM0217 for radio station KTAM, February 17th. The playlist name is limited to eight characters. When DAD is running in Network Mode, users can see and load any playlist on the network at any time. A new playlist is available instantly to all machines. Many stations prefer to create playlists outside of DAD by using third party music and traffic scheduling systems. This section covers the manual creation of playlists within the DAD software.
Configuring Playlist Defaults Each playlist event has several associated parameters that determine how the event will be handled by a playback machine. When a playlist is created, these parameters are initially set to a standard, or default, value defined by switches and buttons in the CUE & AUTOMATION DEFAULTS window in the SETUP Screen. Users can change these settings to fit their needs allowing them a more defined amount of control.
Setting Segue Defaults As mentioned above, when a playlist is created it will assume the defaults that are set in the CUE & AUTOMATION DEFAULTS window. These settings will determine the default values for transitions between cuts when a playlist is created or modified.
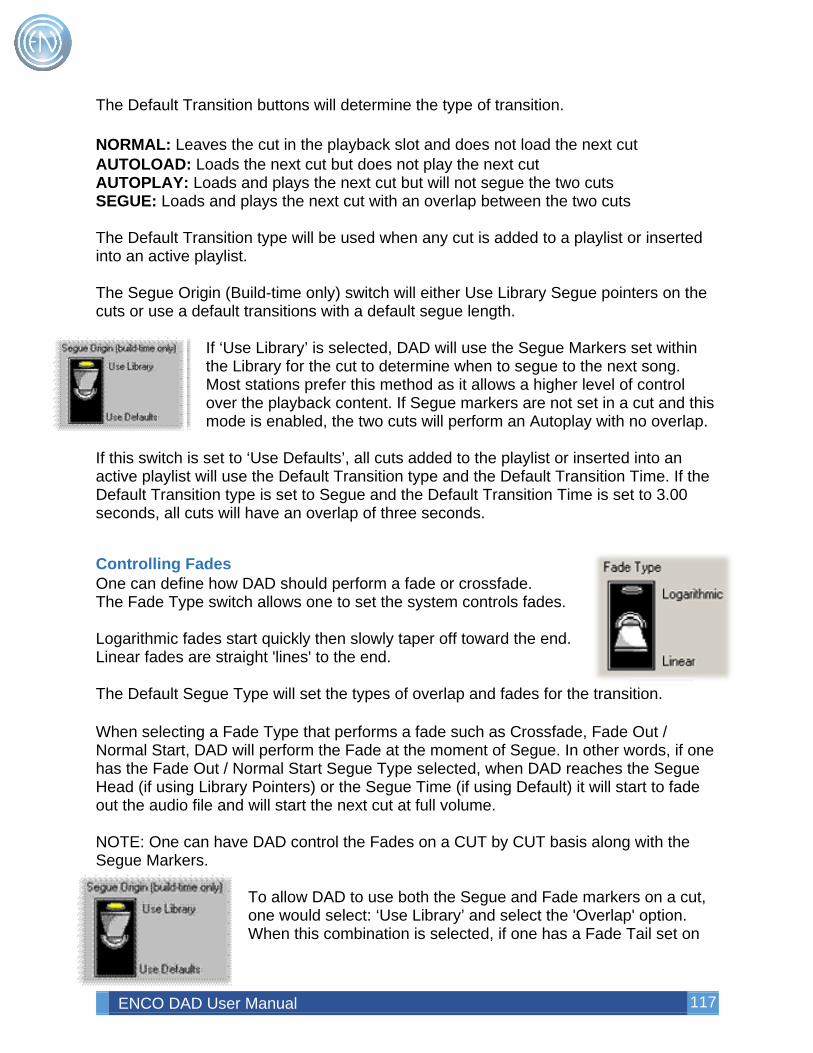
ENCO DAD User Manual 117
The Default Transition buttons will determine the type of transition. NORMAL: Leaves the cut in the playback slot and does not load the next cut AUTOLOAD: Loads the next cut but does not play the next cut AUTOPLAY: Loads and plays the next cut but will not segue the two cuts SEGUE: Loads and plays the next cut with an overlap between the two cuts The Default Transition type will be used when any cut is added to a playlist or inserted into an active playlist. The Segue Origin (Build-time only) switch will either Use Library Segue pointers on the cuts or use a default transitions with a default segue length.
If ‘Use Library’ is selected, DAD will use the Segue Markers set within the Library for the cut to determine when to segue to the next song. Most stations prefer this method as it allows a higher level of control over the playback content. If Segue markers are not set in a cut and this mode is enabled, the two cuts will perform an Autoplay with no overlap.
If this switch is set to ‘Use Defaults’, all cuts added to the playlist or inserted into an active playlist will use the Default Transition type and the Default Transition Time. If the Default Transition type is set to Segue and the Default Transition Time is set to 3.00 seconds, all cuts will have an overlap of three seconds.
Controlling Fades One can define how DAD should perform a fade or crossfade. The Fade Type switch allows one to set the system controls fades. Logarithmic fades start quickly then slowly taper off toward the end. Linear fades are straight 'lines' to the end. The Default Segue Type will set the types of overlap and fades for the transition. When selecting a Fade Type that performs a fade such as Crossfade, Fade Out / Normal Start, DAD will perform the Fade at the moment of Segue. In other words, if one has the Fade Out / Normal Start Segue Type selected, when DAD reaches the Segue Head (if using Library Pointers) or the Segue Time (if using Default) it will start to fade out the audio file and will start the next cut at full volume. NOTE: One can have DAD control the Fades on a CUT by CUT basis along with the Segue Markers.
To allow DAD to use both the Segue and Fade markers on a cut, one would select: ‘Use Library’ and select the 'Overlap' option. When this combination is selected, if one has a Fade Tail set on
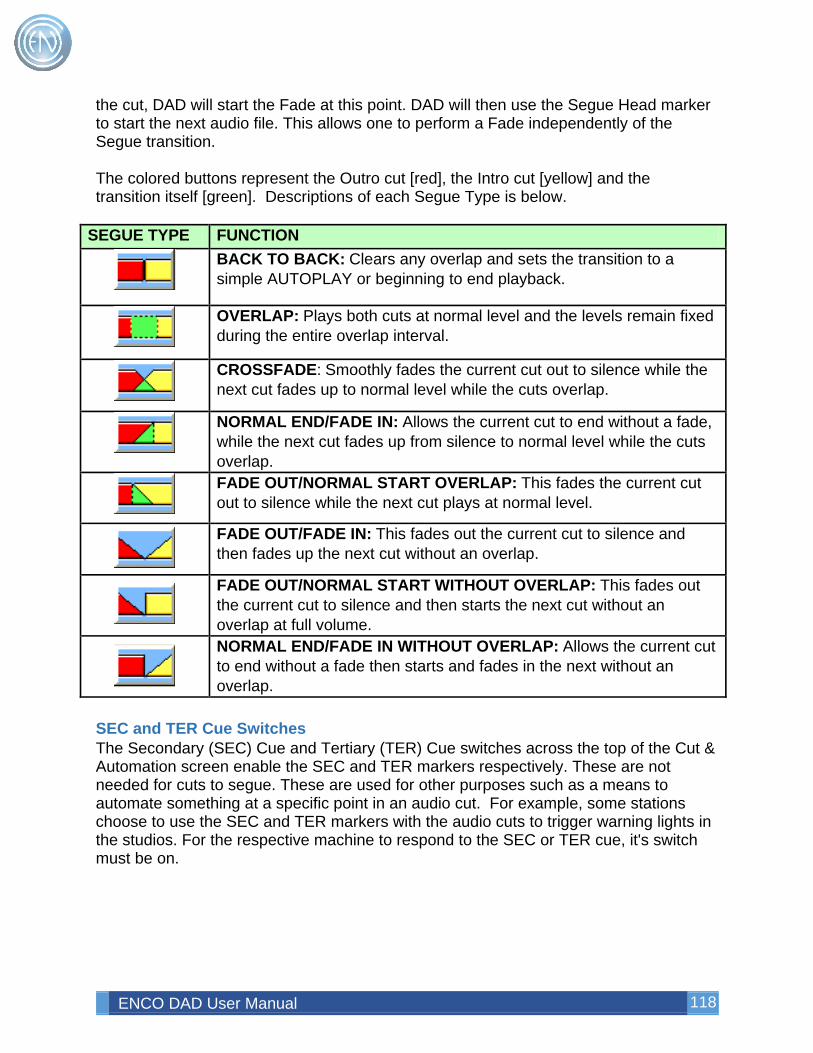
ENCO DAD User Manual 118
the cut, DAD will start the Fade at this point. DAD will then use the Segue Head marker to start the next audio file. This allows one to perform a Fade independently of the Segue transition. The colored buttons represent the Outro cut [red], the Intro cut [yellow] and the transition itself [green]. Descriptions of each Segue Type is below.
SEGUE TYPE FUNCTION
BACK TO BACK: Clears any overlap and sets the transition to a simple AUTOPLAY or beginning to end playback.
OVERLAP: Plays both cuts at normal level and the levels remain fixed during the entire overlap interval.
CROSSFADE: Smoothly fades the current cut out to silence while the next cut fades up to normal level while the cuts overlap.
NORMAL END/FADE IN: Allows the current cut to end without a fade, while the next cut fades up from silence to normal level while the cuts overlap.
FADE OUT/NORMAL START OVERLAP: This fades the current cut out to silence while the next cut plays at normal level.
FADE OUT/FADE IN: This fades out the current cut to silence and then fades up the next cut without an overlap.
FADE OUT/NORMAL START WITHOUT OVERLAP: This fades out the current cut to silence and then starts the next cut without an overlap at full volume.
NORMAL END/FADE IN WITHOUT OVERLAP: Allows the current cut to end without a fade then starts and fades in the next without an overlap.
SEC and TER Cue Switches The Secondary (SEC) Cue and Tertiary (TER) Cue switches across the top of the Cut & Automation screen enable the SEC and TER markers respectively. These are not needed for cuts to segue. These are used for other purposes such as a means to automate something at a specific point in an audio cut. For example, some stations choose to use the SEC and TER markers with the audio cuts to trigger warning lights in the studios. For the respective machine to respond to the SEC or TER cue, it's switch must be on.
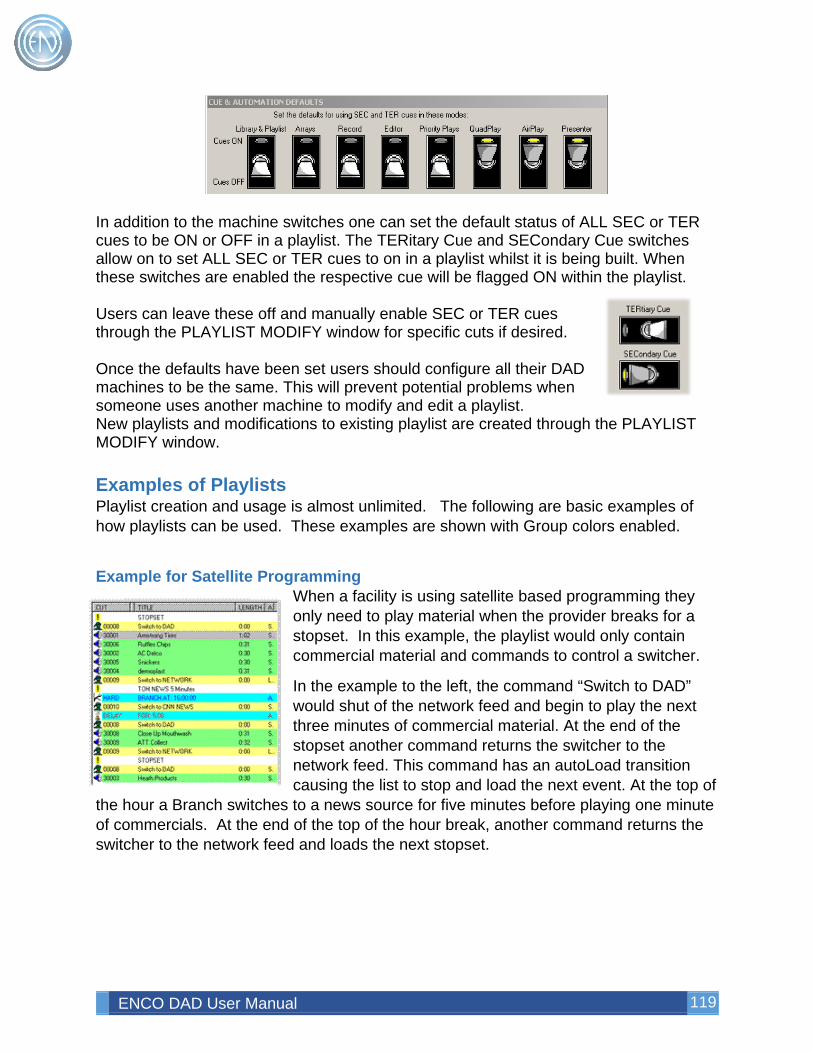
ENCO DAD User Manual 119
In addition to the machine switches one can set the default status of ALL SEC or TER cues to be ON or OFF in a playlist. The TERitary Cue and SECondary Cue switches allow on to set ALL SEC or TER cues to on in a playlist whilst it is being built. When these switches are enabled the respective cue will be flagged ON within the playlist. Users can leave these off and manually enable SEC or TER cues through the PLAYLIST MODIFY window for specific cuts if desired. Once the defaults have been set users should configure all their DAD machines to be the same. This will prevent potential problems when someone uses another machine to modify and edit a playlist. New playlists and modifications to existing playlist are created through the PLAYLIST MODIFY window. Examples of Playlists Playlist creation and usage is almost unlimited. The following are basic examples of how playlists can be used. These examples are shown with Group colors enabled.
Example for Satellite Programming When a facility is using satellite based programming they only need to play material when the provider breaks for a stopset. In this example, the playlist would only contain commercial material and commands to control a switcher.
In the example to the left, the command “Switch to DAD” would shut of the network feed and begin to play the next three minutes of commercial material. At the end of the stopset another command returns the switcher to the network feed. This command has an autoLoad transition causing the list to stop and load the next event. At the top of
the hour a Branch switches to a news source for five minutes before playing one minute of commercials. At the end of the top of the hour break, another command returns the switcher to the network feed and loads the next stopset.
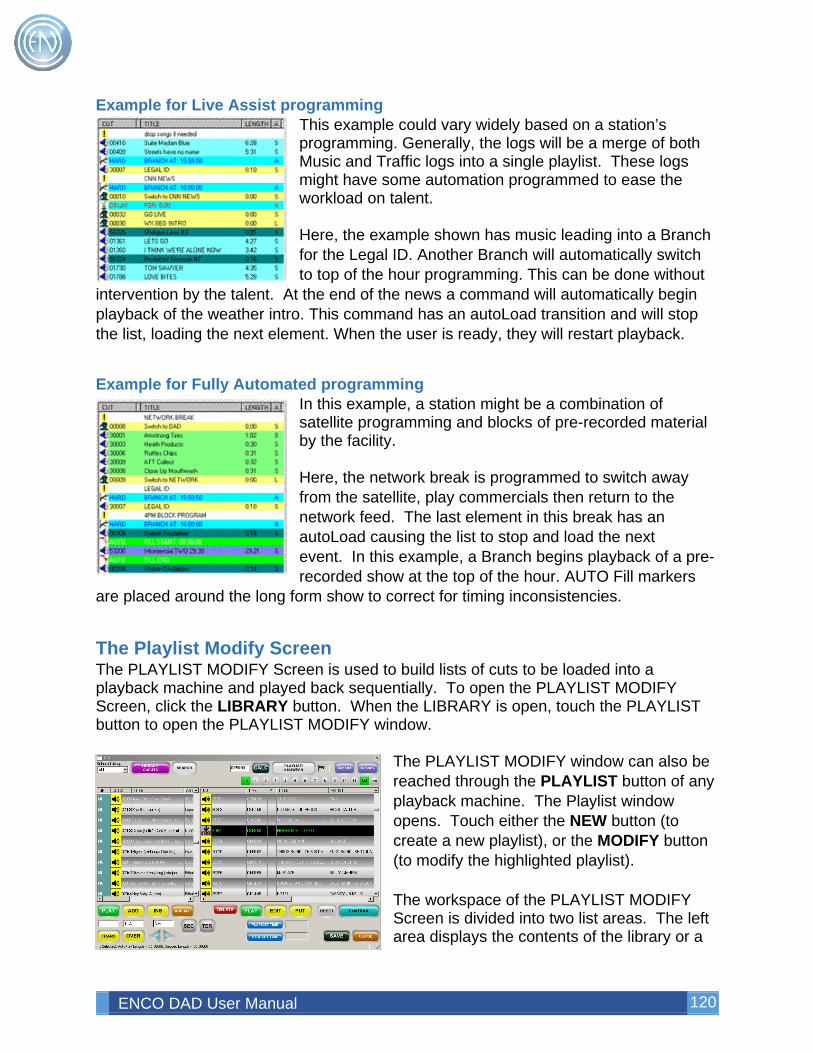
ENCO DAD User Manual 120
Example for Live Assist programming This example could vary widely based on a station’s programming. Generally, the logs will be a merge of both Music and Traffic logs into a single playlist. These logs might have some automation programmed to ease the workload on talent. Here, the example shown has music leading into a Branch for the Legal ID. Another Branch will automatically switch to top of the hour programming. This can be done without
intervention by the talent. At the end of the news a command will automatically begin playback of the weather intro. This command has an autoLoad transition and will stop the list, loading the next element. When the user is ready, they will restart playback.
Example for Fully Automated programming In this example, a station might be a combination of satellite programming and blocks of pre-recorded material by the facility. Here, the network break is programmed to switch away from the satellite, play commercials then return to the network feed. The last element in this break has an autoLoad causing the list to stop and load the next event. In this example, a Branch begins playback of a pre-recorded show at the top of the hour. AUTO Fill markers
are placed around the long form show to correct for timing inconsistencies.
The Playlist Modify Screen The PLAYLIST MODIFY Screen is used to build lists of cuts to be loaded into a playback machine and played back sequentially. To open the PLAYLIST MODIFY Screen, click the LIBRARY button. When the LIBRARY is open, touch the PLAYLIST button to open the PLAYLIST MODIFY window.
The PLAYLIST MODIFY window can also be reached through the PLAYLIST button of any playback machine. The Playlist window opens. Touch either the NEW button (to create a new playlist), or the MODIFY button (to modify the highlighted playlist). The workspace of the PLAYLIST MODIFY Screen is divided into two list areas. The left area displays the contents of the library or a
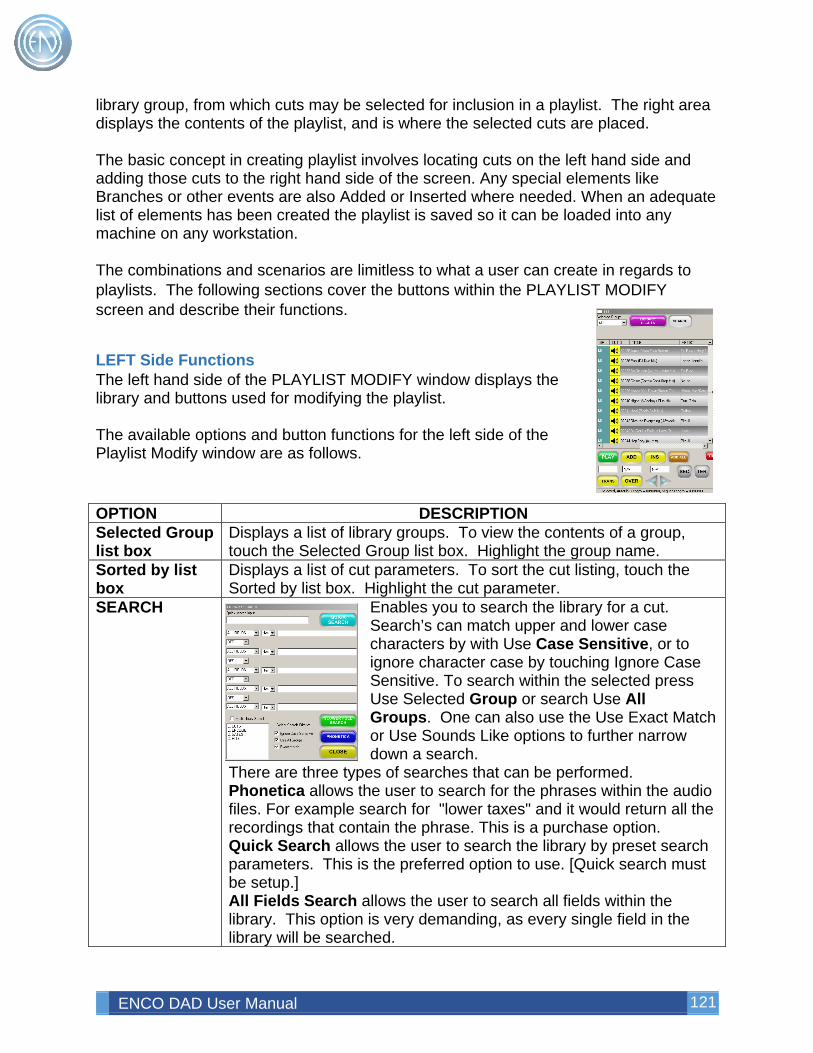
ENCO DAD User Manual 121
library group, from which cuts may be selected for inclusion in a playlist. The right area displays the contents of the playlist, and is where the selected cuts are placed. The basic concept in creating playlist involves locating cuts on the left hand side and adding those cuts to the right hand side of the screen. Any special elements like Branches or other events are also Added or Inserted where needed. When an adequate list of elements has been created the playlist is saved so it can be loaded into any machine on any workstation. The combinations and scenarios are limitless to what a user can create in regards to playlists. The following sections cover the buttons within the PLAYLIST MODIFY screen and describe their functions.
LEFT Side Functions The left hand side of the PLAYLIST MODIFY window displays the library and buttons used for modifying the playlist. The available options and button functions for the left side of the Playlist Modify window are as follows. OPTION DESCRIPTION Selected Group list box
Displays a list of library groups. To view the contents of a group, touch the Selected Group list box. Highlight the group name.
Sorted by list box
Displays a list of cut parameters. To sort the cut listing, touch the Sorted by list box. Highlight the cut parameter.
SEARCH Enables you to search the library for a cut. Search’s can match upper and lower case characters by with Use Case Sensitive, or to ignore character case by touching Ignore Case Sensitive. To search within the selected press Use Selected Group or search Use All Groups. One can also use the Use Exact Match or Use Sounds Like options to further narrow down a search.
There are three types of searches that can be performed. Phonetica allows the user to search for the phrases within the audio files. For example search for "lower taxes" and it would return all the recordings that contain the phrase. This is a purchase option. Quick Search allows the user to search the library by preset search parameters. This is the preferred option to use. [Quick search must be setup.] All Fields Search allows the user to search all fields within the library. This option is very demanding, as every single field in the library will be searched.
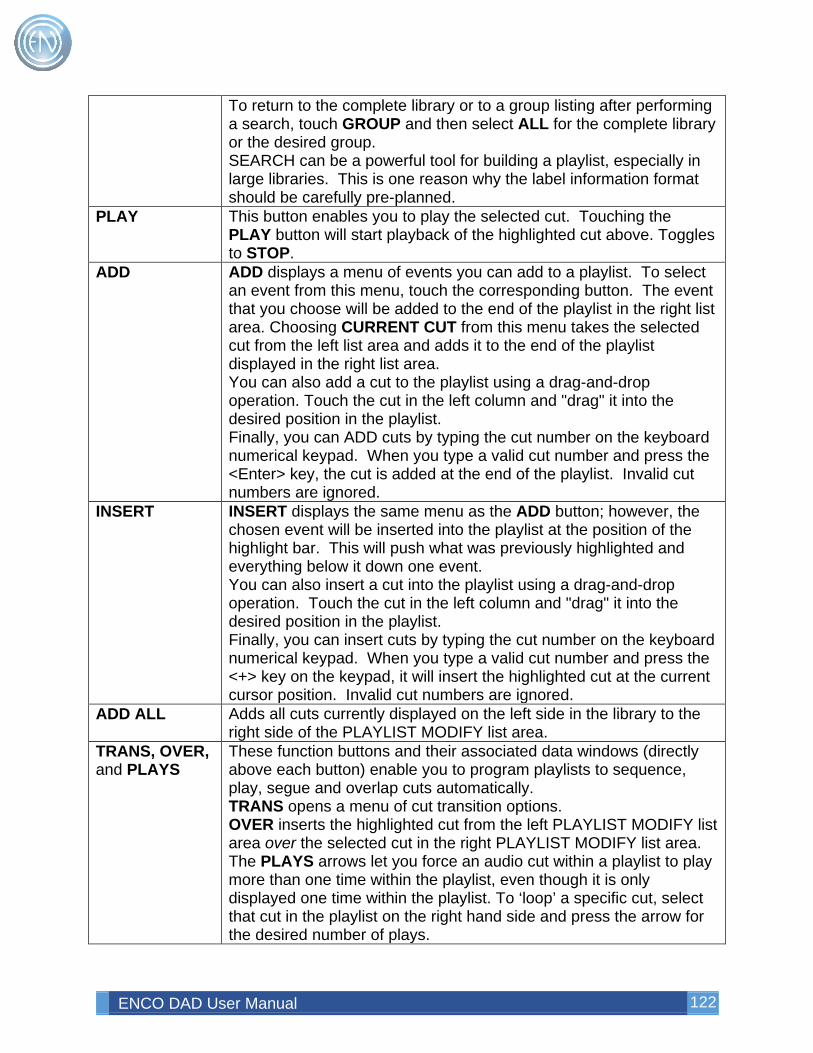
ENCO DAD User Manual 122
To return to the complete library or to a group listing after performing a search, touch GROUP and then select ALL for the complete library or the desired group. SEARCH can be a powerful tool for building a playlist, especially in large libraries. This is one reason why the label information format should be carefully pre-planned.
PLAY This button enables you to play the selected cut. Touching the PLAY button will start playback of the highlighted cut above. Toggles to STOP.
ADD ADD displays a menu of events you can add to a playlist. To select an event from this menu, touch the corresponding button. The event that you choose will be added to the end of the playlist in the right list area. Choosing CURRENT CUT from this menu takes the selected cut from the left list area and adds it to the end of the playlist displayed in the right list area. You can also add a cut to the playlist using a drag-and-drop operation. Touch the cut in the left column and "drag" it into the desired position in the playlist. Finally, you can ADD cuts by typing the cut number on the keyboard numerical keypad. When you type a valid cut number and press the <Enter> key, the cut is added at the end of the playlist. Invalid cut numbers are ignored.
INSERT INSERT displays the same menu as the ADD button; however, the chosen event will be inserted into the playlist at the position of the highlight bar. This will push what was previously highlighted and everything below it down one event. You can also insert a cut into the playlist using a drag-and-drop operation. Touch the cut in the left column and "drag" it into the desired position in the playlist. Finally, you can insert cuts by typing the cut number on the keyboard numerical keypad. When you type a valid cut number and press the <+> key on the keypad, it will insert the highlighted cut at the current cursor position. Invalid cut numbers are ignored.
ADD ALL Adds all cuts currently displayed on the left side in the library to the right side of the PLAYLIST MODIFY list area.
TRANS, OVER, and PLAYS
These function buttons and their associated data windows (directly above each button) enable you to program playlists to sequence, play, segue and overlap cuts automatically. TRANS opens a menu of cut transition options. OVER inserts the highlighted cut from the left PLAYLIST MODIFY list area over the selected cut in the right PLAYLIST MODIFY list area. The PLAYS arrows let you force an audio cut within a playlist to play more than one time within the playlist, even though it is only displayed one time within the playlist. To ‘loop’ a specific cut, select that cut in the playlist on the right hand side and press the arrow for the desired number of plays.
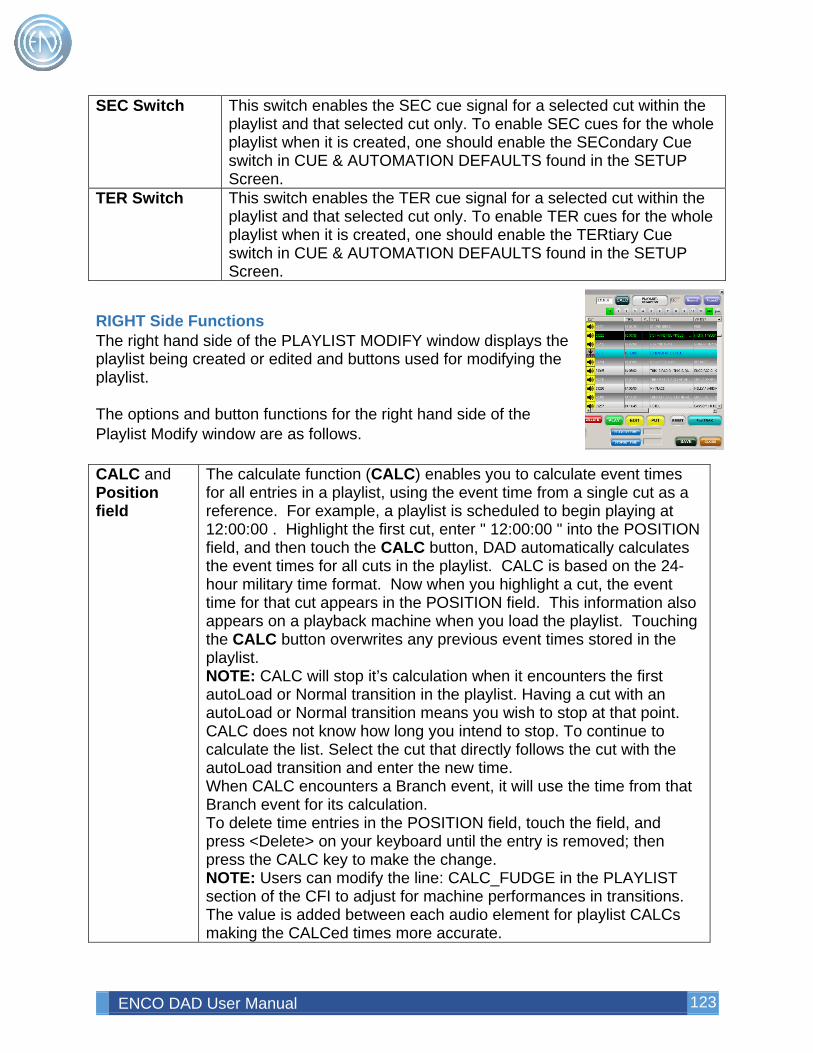
ENCO DAD User Manual 123
SEC Switch This switch enables the SEC cue signal for a selected cut within the playlist and that selected cut only. To enable SEC cues for the whole playlist when it is created, one should enable the SECondary Cue switch in CUE & AUTOMATION DEFAULTS found in the SETUP Screen.
TER Switch This switch enables the TER cue signal for a selected cut within the playlist and that selected cut only. To enable TER cues for the whole playlist when it is created, one should enable the TERtiary Cue switch in CUE & AUTOMATION DEFAULTS found in the SETUP Screen.
RIGHT Side Functions The right hand side of the PLAYLIST MODIFY window displays the playlist being created or edited and buttons used for modifying the playlist. The options and button functions for the right hand side of the Playlist Modify window are as follows. CALC and Position field
The calculate function (CALC) enables you to calculate event times for all entries in a playlist, using the event time from a single cut as a reference. For example, a playlist is scheduled to begin playing at 12:00:00 . Highlight the first cut, enter " 12:00:00 " into the POSITION field, and then touch the CALC button, DAD automatically calculates the event times for all cuts in the playlist. CALC is based on the 24-hour military time format. Now when you highlight a cut, the event time for that cut appears in the POSITION field. This information also appears on a playback machine when you load the playlist. Touching the CALC button overwrites any previous event times stored in the playlist. NOTE: CALC will stop it’s calculation when it encounters the first autoLoad or Normal transition in the playlist. Having a cut with an autoLoad or Normal transition means you wish to stop at that point. CALC does not know how long you intend to stop. To continue to calculate the list. Select the cut that directly follows the cut with the autoLoad transition and enter the new time. When CALC encounters a Branch event, it will use the time from that Branch event for its calculation. To delete time entries in the POSITION field, touch the field, and press <Delete> on your keyboard until the entry is removed; then press the CALC key to make the change. NOTE: Users can modify the line: CALC_FUDGE in the PLAYLIST section of the CFI to adjust for machine performances in transitions. The value is added between each audio element for playlist CALCs making the CALCed times more accurate.
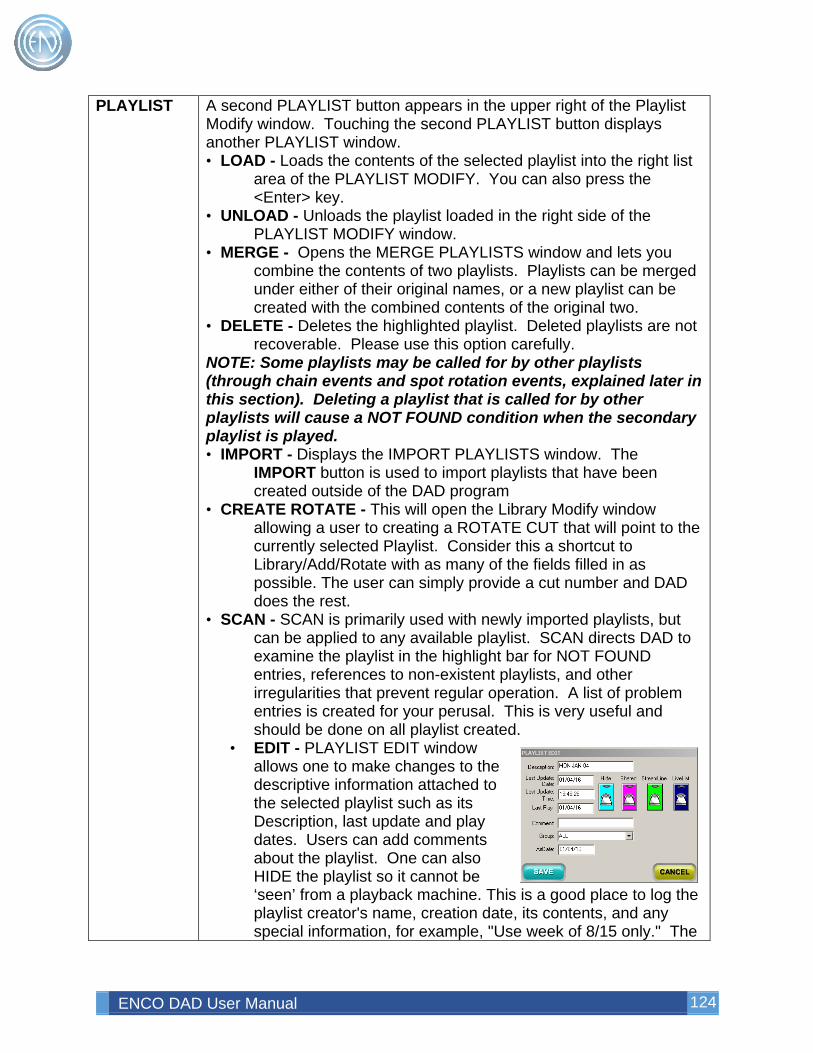
ENCO DAD User Manual 124
PLAYLIST A second PLAYLIST button appears in the upper right of the Playlist Modify window. Touching the second PLAYLIST button displays another PLAYLIST window. • LOAD - Loads the contents of the selected playlist into the right list
area of the PLAYLIST MODIFY. You can also press the <Enter> key.
• UNLOAD - Unloads the playlist loaded in the right side of the PLAYLIST MODIFY window.
• MERGE - Opens the MERGE PLAYLISTS window and lets you combine the contents of two playlists. Playlists can be merged under either of their original names, or a new playlist can be created with the combined contents of the original two.
• DELETE - Deletes the highlighted playlist. Deleted playlists are not recoverable. Please use this option carefully.
NOTE: Some playlists may be called for by other playlists (through chain events and spot rotation events, explained later in this section). Deleting a playlist that is called for by other playlists will cause a NOT FOUND condition when the secondary playlist is played. • IMPORT - Displays the IMPORT PLAYLISTS window. The
IMPORT button is used to import playlists that have been created outside of the DAD program
• CREATE ROTATE - This will open the Library Modify window allowing a user to creating a ROTATE CUT that will point to the currently selected Playlist. Consider this a shortcut to Library/Add/Rotate with as many of the fields filled in as possible. The user can simply provide a cut number and DAD does the rest.
• SCAN - SCAN is primarily used with newly imported playlists, but can be applied to any available playlist. SCAN directs DAD to examine the playlist in the highlight bar for NOT FOUND entries, references to non-existent playlists, and other irregularities that prevent regular operation. A list of problem entries is created for your perusal. This is very useful and should be done on all playlist created.
• EDIT - PLAYLIST EDIT window allows one to make changes to the descriptive information attached to the selected playlist such as its Description, last update and play dates. Users can add comments about the playlist. One can also HIDE the playlist so it cannot be ‘seen’ from a playback machine. This is a good place to log the playlist creator's name, creation date, its contents, and any special information, for example, "Use week of 8/15 only." The
ENCO DAD User Manual 125
playlist name cannot be edited, as this would, in effect, create a new playlist. The Group selection will allow a user to associate the playlist with a specific group. This is useful when utilizing the Group Filtering function. Maintaining Library Groups is discussed in Library Groups and Group Management.
• ENSEMBLE - Opens the ENCO Ensemble Scheduling System. • CANCEL - Exits the PLAYLIST window and displays the PLAYLIST
MODIFY Screen. HOD Allows the operator to easily select the hour of the day while
navigating in the playlist.
PLAY This button enables you to play the selected cut. Touching the PLAY button will start playback of the highlighted cut above. Toggles to STOP.
EDIT When a cut is selected in the playlist, touching the EDIT button will open the Editor. If the cut is a command cut, the command cut editor will open.
MOVE MOVE is an editing operation allowing the user to temporally remove the cut from the list. The MOVE button toggles to a PUT button. Touch PUT to insert the cut into the playlist at the position of the highlight bar. The PUT button toggles back to MOVE.
DELETE DELETE removes the highlighted cut from the playlist in the right list area but does not remove it from the library.
SAVE SAVES the playlist. A window displays with an entry box for the name of the playlist. The name may be up to eight alphanumeric characters long. The entry box will always contain a default name allowing the user to save the list without needing the keyboard. This default name will be in one of two forms: If an existing playlist is being worked on, its name will appear in the entry box. Continuing with SAVE without changing this name will replace the previous version with the new version. A window will prompt you to confirm the overwrite. If a new playlist was begun, the entry box will contain a default name that contains three digits representing the elapsed day number within the year, followed by the first five characters from the current USER SETUP file name. A DESCRIPTION field may also be filled in with up to 20 characters and spaces. The DESCRIPTION can be changed later using the EDIT function. The HIDE Switch will prevent users from loading the playlist from a playback machine. The playlist will always be visible from the PLAYLIST MODIFY window.
PLAYLIST TIME and STOPSET
At any time during playlist construction or modification, you can display the total length of all events in the playlist by touching the PLAYLIST TIME button. In addition, the length of individual stopsets
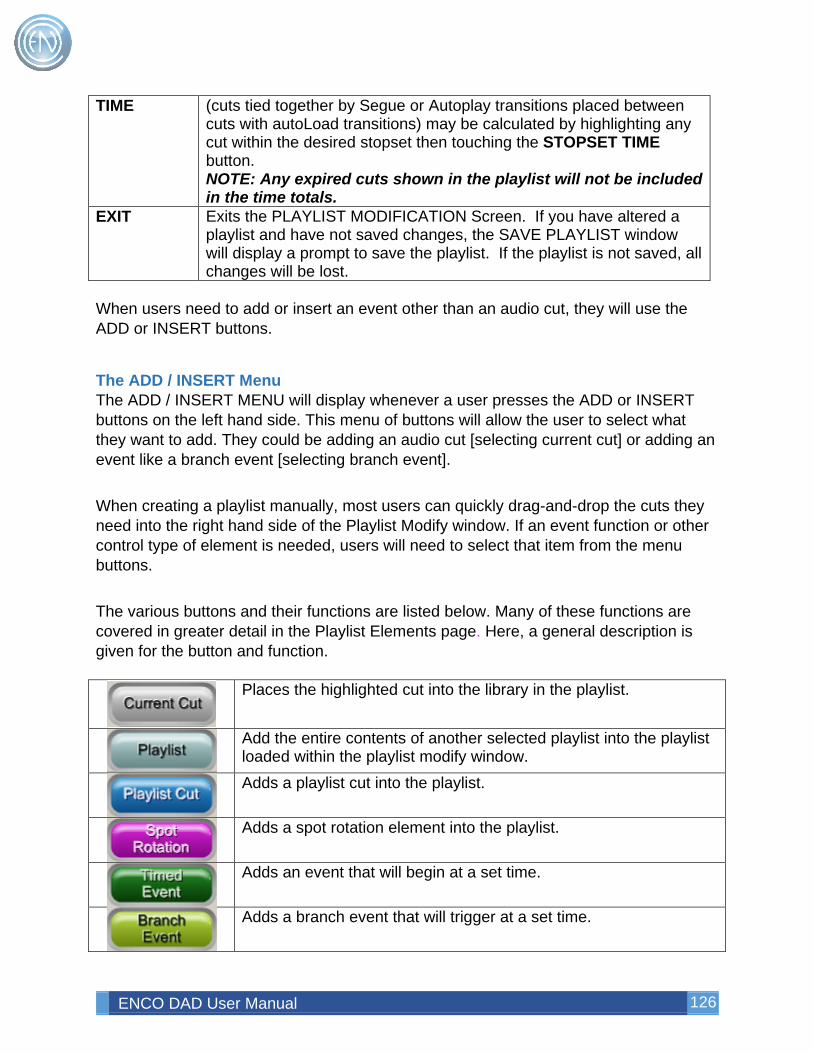
ENCO DAD User Manual 126
TIME (cuts tied together by Segue or Autoplay transitions placed between cuts with autoLoad transitions) may be calculated by highlighting any cut within the desired stopset then touching the STOPSET TIME button. NOTE: Any expired cuts shown in the playlist will not be included in the time totals.
EXIT Exits the PLAYLIST MODIFICATION Screen. If you have altered a playlist and have not saved changes, the SAVE PLAYLIST window will display a prompt to save the playlist. If the playlist is not saved, all changes will be lost.
When users need to add or insert an event other than an audio cut, they will use the ADD or INSERT buttons.
The ADD / INSERT Menu The ADD / INSERT MENU will display whenever a user presses the ADD or INSERT buttons on the left hand side. This menu of buttons will allow the user to select what they want to add. They could be adding an audio cut [selecting current cut] or adding an event like a branch event [selecting branch event]. When creating a playlist manually, most users can quickly drag-and-drop the cuts they need into the right hand side of the Playlist Modify window. If an event function or other control type of element is needed, users will need to select that item from the menu buttons. The various buttons and their functions are listed below. Many of these functions are covered in greater detail in the Playlist Elements page. Here, a general description is given for the button and function.
Places the highlighted cut into the library in the playlist.
Add the entire contents of another selected playlist into the playlist loaded within the playlist modify window.
Adds a playlist cut into the playlist.
Adds a spot rotation element into the playlist.
Adds an event that will begin at a set time.
Adds a branch event that will trigger at a set time.
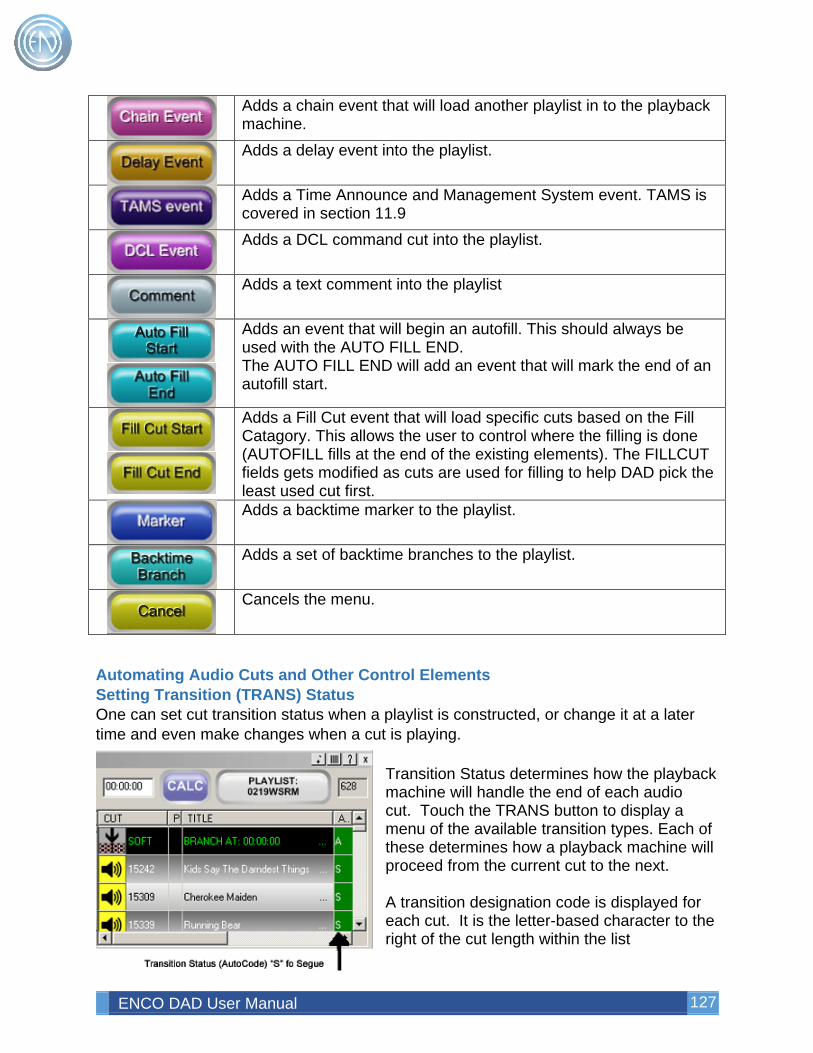
ENCO DAD User Manual 127
Adds a chain event that will load another playlist in to the playback machine.
Adds a delay event into the playlist.
Adds a Time Announce and Management System event. TAMS is covered in section 11.9
Adds a DCL command cut into the playlist.
Adds a text comment into the playlist
Adds an event that will begin an autofill. This should always be used with the AUTO FILL END. The AUTO FILL END will add an event that will mark the end of an autofill start.
Adds a Fill Cut event that will load specific cuts based on the Fill Catagory. This allows the user to control where the filling is done (AUTOFILL fills at the end of the existing elements). The FILLCUT fields gets modified as cuts are used for filling to help DAD pick the least used cut first.
Adds a backtime marker to the playlist.
Adds a set of backtime branches to the playlist.
Cancels the menu.
Automating Audio Cuts and Other Control Elements Setting Transition (TRANS) Status One can set cut transition status when a playlist is constructed, or change it at a later time and even make changes when a cut is playing.
Transition Status determines how the playback machine will handle the end of each audio cut. Touch the TRANS button to display a menu of the available transition types. Each of these determines how a playback machine will proceed from the current cut to the next. A transition designation code is displayed for each cut. It is the letter-based character to the right of the cut length within the list
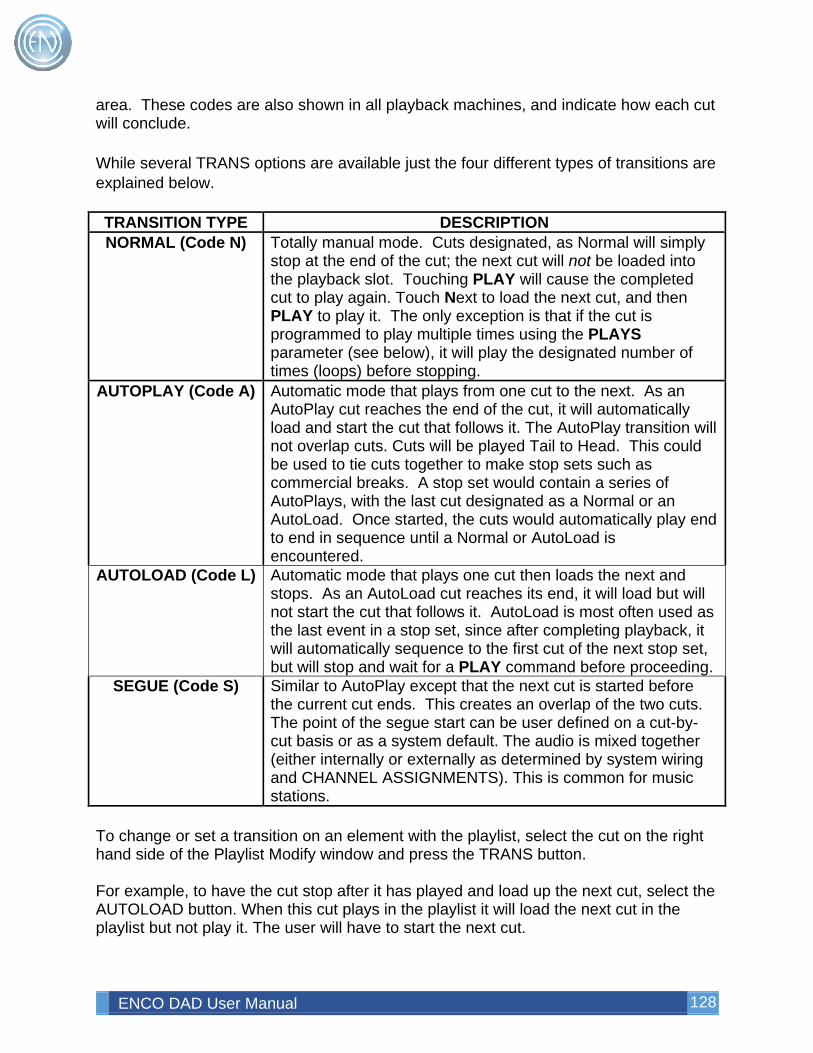
ENCO DAD User Manual 128
area. These codes are also shown in all playback machines, and indicate how each cut will conclude. While several TRANS options are available just the four different types of transitions are explained below. TRANSITION TYPE DESCRIPTION NORMAL (Code N) Totally manual mode. Cuts designated, as Normal will simply
stop at the end of the cut; the next cut will not be loaded into the playback slot. Touching PLAY will cause the completed cut to play again. Touch Next to load the next cut, and then PLAY to play it. The only exception is that if the cut is programmed to play multiple times using the PLAYS parameter (see below), it will play the designated number of times (loops) before stopping.
AUTOPLAY (Code A) Automatic mode that plays from one cut to the next. As an AutoPlay cut reaches the end of the cut, it will automatically load and start the cut that follows it. The AutoPlay transition will not overlap cuts. Cuts will be played Tail to Head. This could be used to tie cuts together to make stop sets such as commercial breaks. A stop set would contain a series of AutoPlays, with the last cut designated as a Normal or an AutoLoad. Once started, the cuts would automatically play end to end in sequence until a Normal or AutoLoad is encountered.
AUTOLOAD (Code L) Automatic mode that plays one cut then loads the next and stops. As an AutoLoad cut reaches its end, it will load but will not start the cut that follows it. AutoLoad is most often used as the last event in a stop set, since after completing playback, it will automatically sequence to the first cut of the next stop set, but will stop and wait for a PLAY command before proceeding.
SEGUE (Code S) Similar to AutoPlay except that the next cut is started before the current cut ends. This creates an overlap of the two cuts. The point of the segue start can be user defined on a cut-by-cut basis or as a system default. The audio is mixed together (either internally or externally as determined by system wiring and CHANNEL ASSIGNMENTS). This is common for music stations.
To change or set a transition on an element with the playlist, select the cut on the right hand side of the Playlist Modify window and press the TRANS button. For example, to have the cut stop after it has played and load up the next cut, select the AUTOLOAD button. When this cut plays in the playlist it will load the next cut in the playlist but not play it. The user will have to start the next cut.
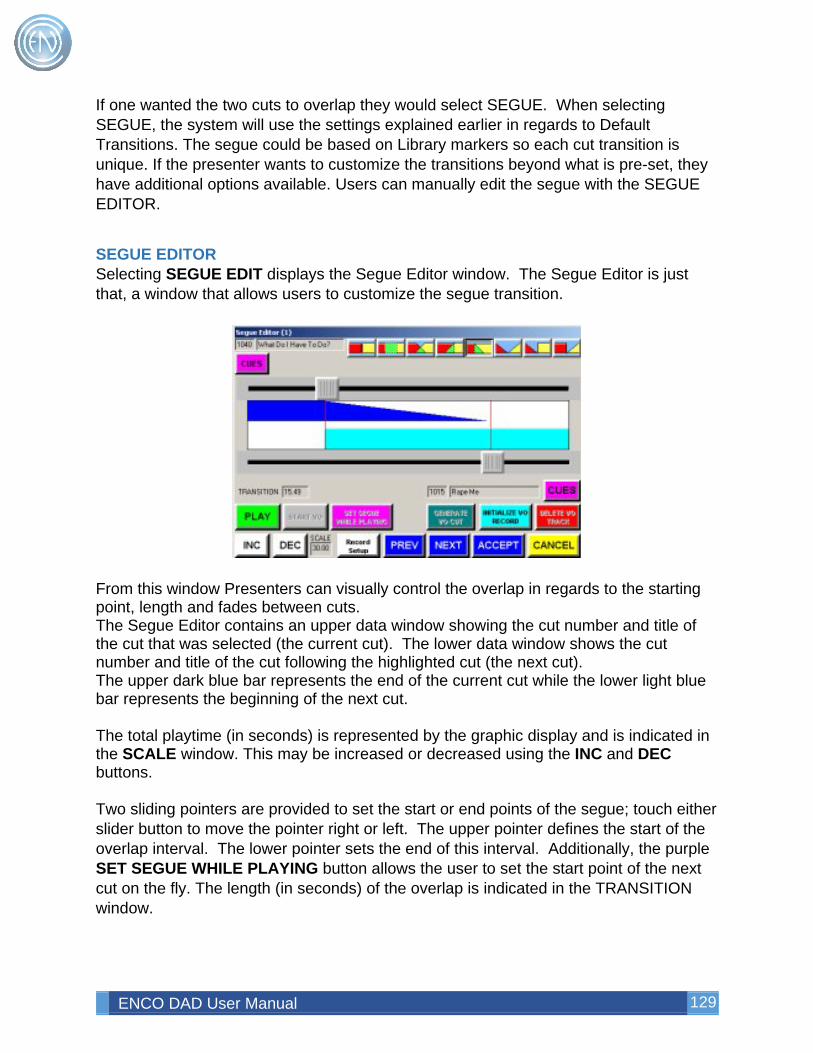
ENCO DAD User Manual 129
If one wanted the two cuts to overlap they would select SEGUE. When selecting SEGUE, the system will use the settings explained earlier in regards to Default Transitions. The segue could be based on Library markers so each cut transition is unique. If the presenter wants to customize the transitions beyond what is pre-set, they have additional options available. Users can manually edit the segue with the SEGUE EDITOR.
SEGUE EDITOR Selecting SEGUE EDIT displays the Segue Editor window. The Segue Editor is just that, a window that allows users to customize the segue transition.
From this window Presenters can visually control the overlap in regards to the starting point, length and fades between cuts. The Segue Editor contains an upper data window showing the cut number and title of the cut that was selected (the current cut). The lower data window shows the cut number and title of the cut following the highlighted cut (the next cut). The upper dark blue bar represents the end of the current cut while the lower light blue bar represents the beginning of the next cut. The total playtime (in seconds) is represented by the graphic display and is indicated in the SCALE window. This may be increased or decreased using the INC and DEC buttons. Two sliding pointers are provided to set the start or end points of the segue; touch either slider button to move the pointer right or left. The upper pointer defines the start of the overlap interval. The lower pointer sets the end of this interval. Additionally, the purple SET SEGUE WHILE PLAYING button allows the user to set the start point of the next cut on the fly. The length (in seconds) of the overlap is indicated in the TRANSITION window.
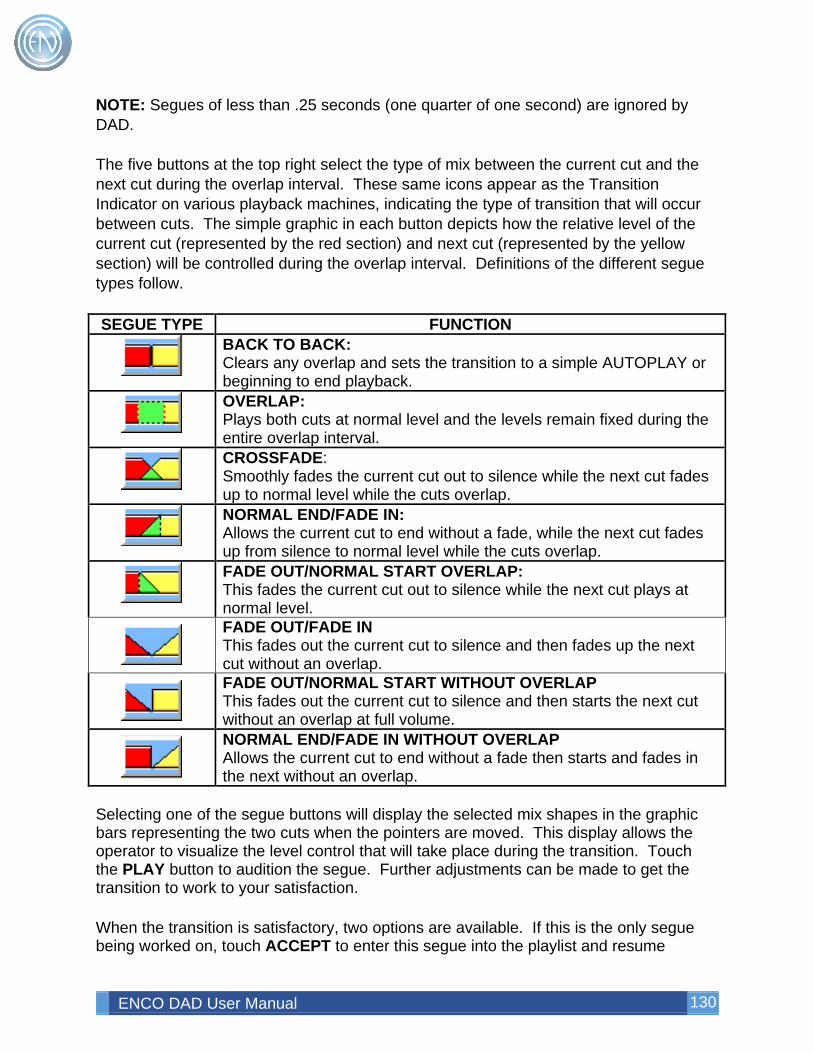
ENCO DAD User Manual 130
NOTE: Segues of less than .25 seconds (one quarter of one second) are ignored by DAD. The five buttons at the top right select the type of mix between the current cut and the next cut during the overlap interval. These same icons appear as the Transition Indicator on various playback machines, indicating the type of transition that will occur between cuts. The simple graphic in each button depicts how the relative level of the current cut (represented by the red section) and next cut (represented by the yellow section) will be controlled during the overlap interval. Definitions of the different segue types follow. SEGUE TYPE FUNCTION
BACK TO BACK: Clears any overlap and sets the transition to a simple AUTOPLAY or beginning to end playback.
OVERLAP: Plays both cuts at normal level and the levels remain fixed during the entire overlap interval.
CROSSFADE: Smoothly fades the current cut out to silence while the next cut fades up to normal level while the cuts overlap.
NORMAL END/FADE IN: Allows the current cut to end without a fade, while the next cut fades up from silence to normal level while the cuts overlap.
FADE OUT/NORMAL START OVERLAP: This fades the current cut out to silence while the next cut plays at normal level.
FADE OUT/FADE IN This fades out the current cut to silence and then fades up the next cut without an overlap.
FADE OUT/NORMAL START WITHOUT OVERLAP This fades out the current cut to silence and then starts the next cut without an overlap at full volume.
NORMAL END/FADE IN WITHOUT OVERLAP Allows the current cut to end without a fade then starts and fades in the next without an overlap.
Selecting one of the segue buttons will display the selected mix shapes in the graphic bars representing the two cuts when the pointers are moved. This display allows the operator to visualize the level control that will take place during the transition. Touch the PLAY button to audition the segue. Further adjustments can be made to get the transition to work to your satisfaction. When the transition is satisfactory, two options are available. If this is the only segue being worked on, touch ACCEPT to enter this segue into the playlist and resume
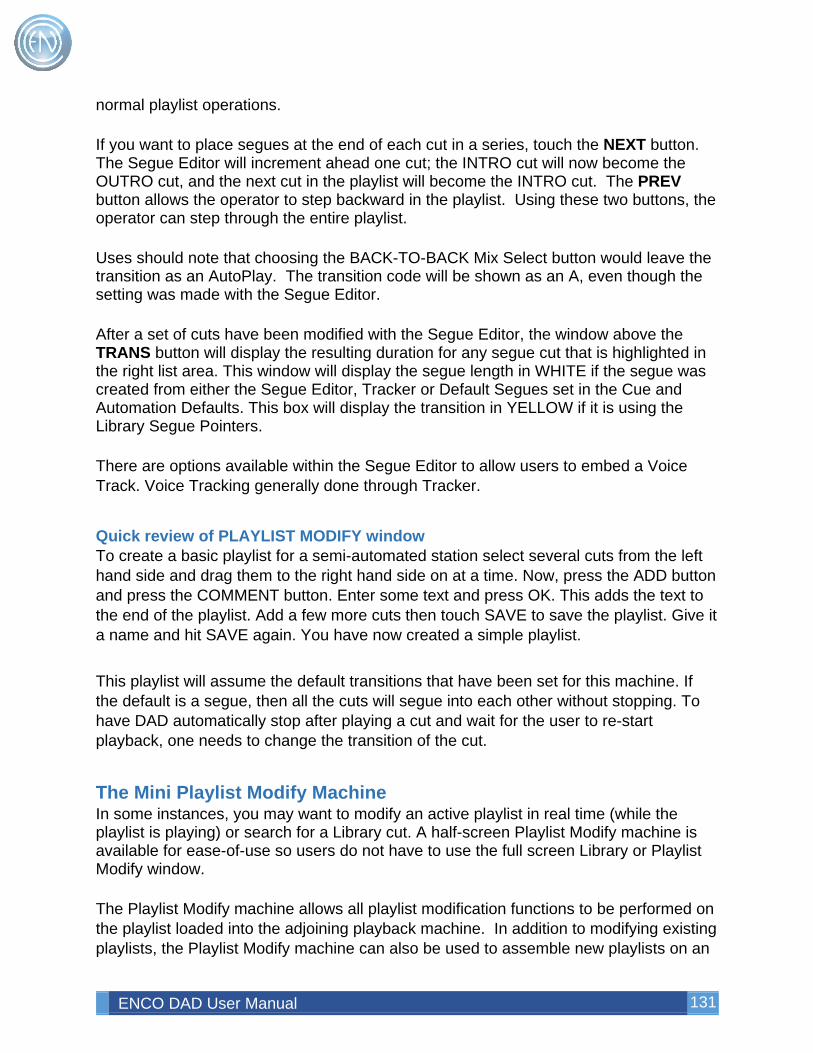
ENCO DAD User Manual 131
normal playlist operations. If you want to place segues at the end of each cut in a series, touch the NEXT button. The Segue Editor will increment ahead one cut; the INTRO cut will now become the OUTRO cut, and the next cut in the playlist will become the INTRO cut. The PREV button allows the operator to step backward in the playlist. Using these two buttons, the operator can step through the entire playlist. Uses should note that choosing the BACK-TO-BACK Mix Select button would leave the transition as an AutoPlay. The transition code will be shown as an A, even though the setting was made with the Segue Editor. After a set of cuts have been modified with the Segue Editor, the window above the TRANS button will display the resulting duration for any segue cut that is highlighted in the right list area. This window will display the segue length in WHITE if the segue was created from either the Segue Editor, Tracker or Default Segues set in the Cue and Automation Defaults. This box will display the transition in YELLOW if it is using the Library Segue Pointers. There are options available within the Segue Editor to allow users to embed a Voice Track. Voice Tracking generally done through Tracker.
Quick review of PLAYLIST MODIFY window To create a basic playlist for a semi-automated station select several cuts from the left hand side and drag them to the right hand side on at a time. Now, press the ADD button and press the COMMENT button. Enter some text and press OK. This adds the text to the end of the playlist. Add a few more cuts then touch SAVE to save the playlist. Give it a name and hit SAVE again. You have now created a simple playlist. This playlist will assume the default transitions that have been set for this machine. If the default is a segue, then all the cuts will segue into each other without stopping. To have DAD automatically stop after playing a cut and wait for the user to re-start playback, one needs to change the transition of the cut.
The Mini Playlist Modify Machine In some instances, you may want to modify an active playlist in real time (while the playlist is playing) or search for a Library cut. A half-screen Playlist Modify machine is available for ease-of-use so users do not have to use the full screen Library or Playlist Modify window. The Playlist Modify machine allows all playlist modification functions to be performed on the playlist loaded into the adjoining playback machine. In addition to modifying existing playlists, the Playlist Modify machine can also be used to assemble new playlists on an
ENCO DAD User Manual 132
empty playback machine. To open the mini playlist modify machine, right click the DAD Desktop and select Mini Playlist Modify.
Playlist Modify Machine Functions The functions represented on the Playlist Modify machine operate exactly as those on the main PLAYLIST MODIFICATION Screen, described earlier in this section. Omitted functions include setting the number of PLAYS, setting SEC and TER signals, and calculating PLAYLIST TIME and STOPSET TIME, all of which must still be done from the PLAYLIST MODIFICATION Screen. The Playback Modify machine may be used to modify a playlist loaded in a playback machine at any time, whether the playback machine is playing, stopped or paused. As with many areas within DAD, users can drag-and-drop cuts from the Modify Playlist Library directly into a Playback machine or any playback slot. When revising an existing playlist, changes are shown immediately in the stack area of the playback machine, and will be effective as the playlist is played. To make the changes permanent, touch the SAVE button to save the changes made to the current playlist; overwrite confirmation will be requested. If the changes are not saved, they will be discarded when a new playlist is loaded into the playback machine, or whenever the playback machine is refreshed.
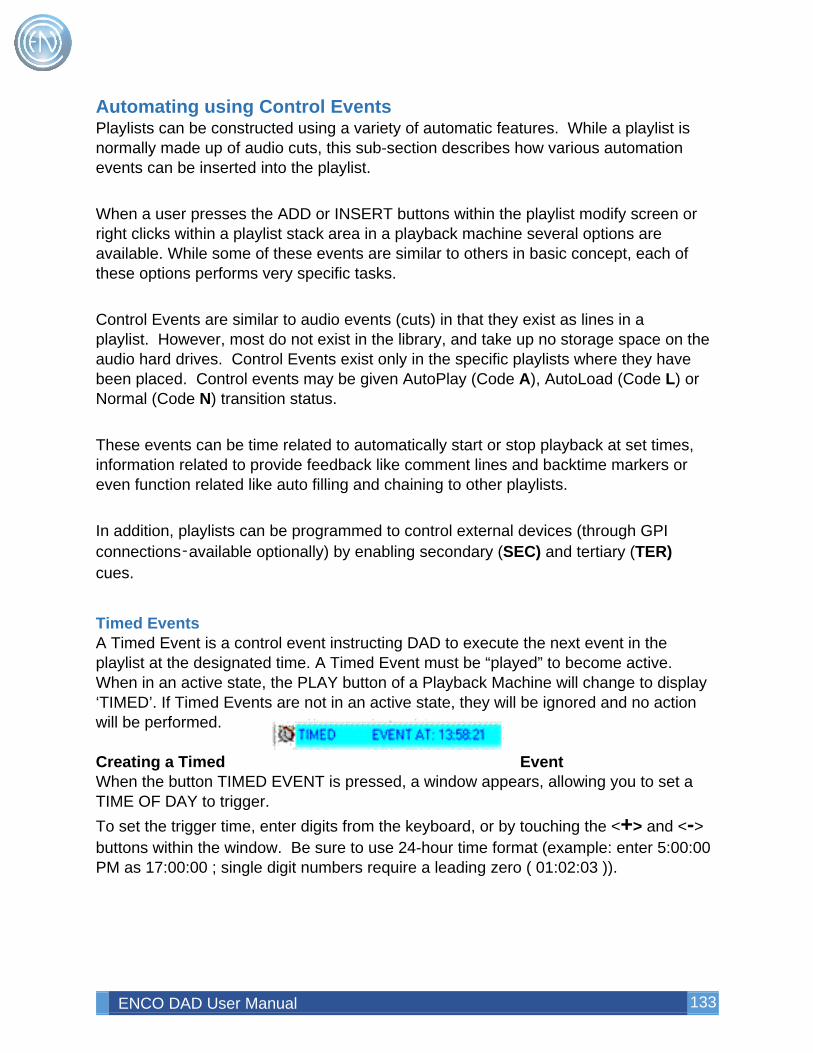
ENCO DAD User Manual 133
Automating using Control Events Playlists can be constructed using a variety of automatic features. While a playlist is normally made up of audio cuts, this sub-section describes how various automation events can be inserted into the playlist. When a user presses the ADD or INSERT buttons within the playlist modify screen or right clicks within a playlist stack area in a playback machine several options are available. While some of these events are similar to others in basic concept, each of these options performs very specific tasks. Control Events are similar to audio events (cuts) in that they exist as lines in a playlist. However, most do not exist in the library, and take up no storage space on the audio hard drives. Control Events exist only in the specific playlists where they have been placed. Control events may be given AutoPlay (Code A), AutoLoad (Code L) or Normal (Code N) transition status. These events can be time related to automatically start or stop playback at set times, information related to provide feedback like comment lines and backtime markers or even function related like auto filling and chaining to other playlists. In addition, playlists can be programmed to control external devices (through GPI connections‑available optionally) by enabling secondary (SEC) and tertiary (TER) cues.
Timed Events A Timed Event is a control event instructing DAD to execute the next event in the playlist at the designated time. A Timed Event must be “played” to become active. When in an active state, the PLAY button of a Playback Machine will change to display ‘TIMED’. If Timed Events are not in an active state, they will be ignored and no action will be performed. Creating a Timed Event When the button TIMED EVENT is pressed, a window appears, allowing you to set a TIME OF DAY to trigger. To set the trigger time, enter digits from the keyboard, or by touching the <+> and <-> buttons within the window. Be sure to use 24-hour time format (example: enter 5:00:00 PM as 17:00:00 ; single digit numbers require a leading zero ( 01:02:03 )).
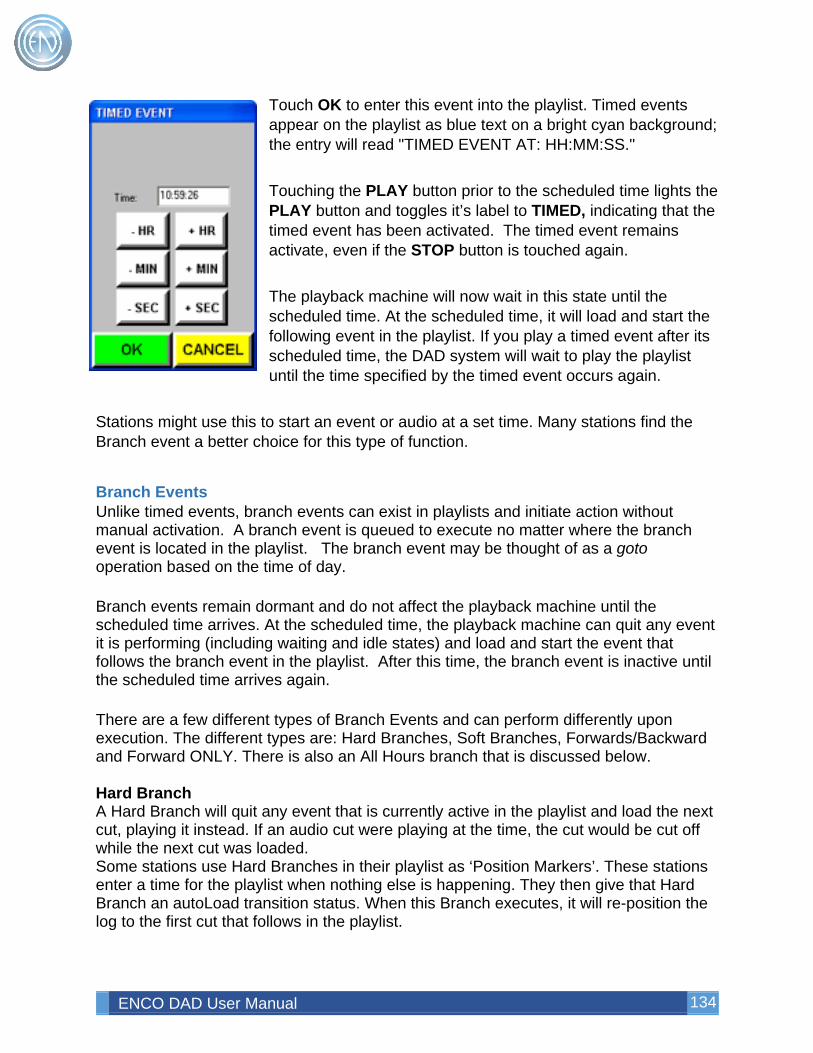
ENCO DAD User Manual 134
Touch OK to enter this event into the playlist. Timed events appear on the playlist as blue text on a bright cyan background; the entry will read "TIMED EVENT AT: HH:MM:SS." Touching the PLAY button prior to the scheduled time lights the PLAY button and toggles it’s label to TIMED, indicating that the timed event has been activated. The timed event remains activate, even if the STOP button is touched again. The playback machine will now wait in this state until the scheduled time. At the scheduled time, it will load and start the following event in the playlist. If you play a timed event after its scheduled time, the DAD system will wait to play the playlist until the time specified by the timed event occurs again.
Stations might use this to start an event or audio at a set time. Many stations find the Branch event a better choice for this type of function.
Branch Events Unlike timed events, branch events can exist in playlists and initiate action without manual activation. A branch event is queued to execute no matter where the branch event is located in the playlist. The branch event may be thought of as a goto operation based on the time of day. Branch events remain dormant and do not affect the playback machine until the scheduled time arrives. At the scheduled time, the playback machine can quit any event it is performing (including waiting and idle states) and load and start the event that follows the branch event in the playlist. After this time, the branch event is inactive until the scheduled time arrives again. There are a few different types of Branch Events and can perform differently upon execution. The different types are: Hard Branches, Soft Branches, Forwards/Backward and Forward ONLY. There is also an All Hours branch that is discussed below. Hard Branch A Hard Branch will quit any event that is currently active in the playlist and load the next cut, playing it instead. If an audio cut were playing at the time, the cut would be cut off while the next cut was loaded. Some stations use Hard Branches in their playlist as ‘Position Markers’. These stations enter a time for the playlist when nothing else is happening. They then give that Hard Branch an autoLoad transition status. When this Branch executes, it will re-position the log to the first cut that follows in the playlist.
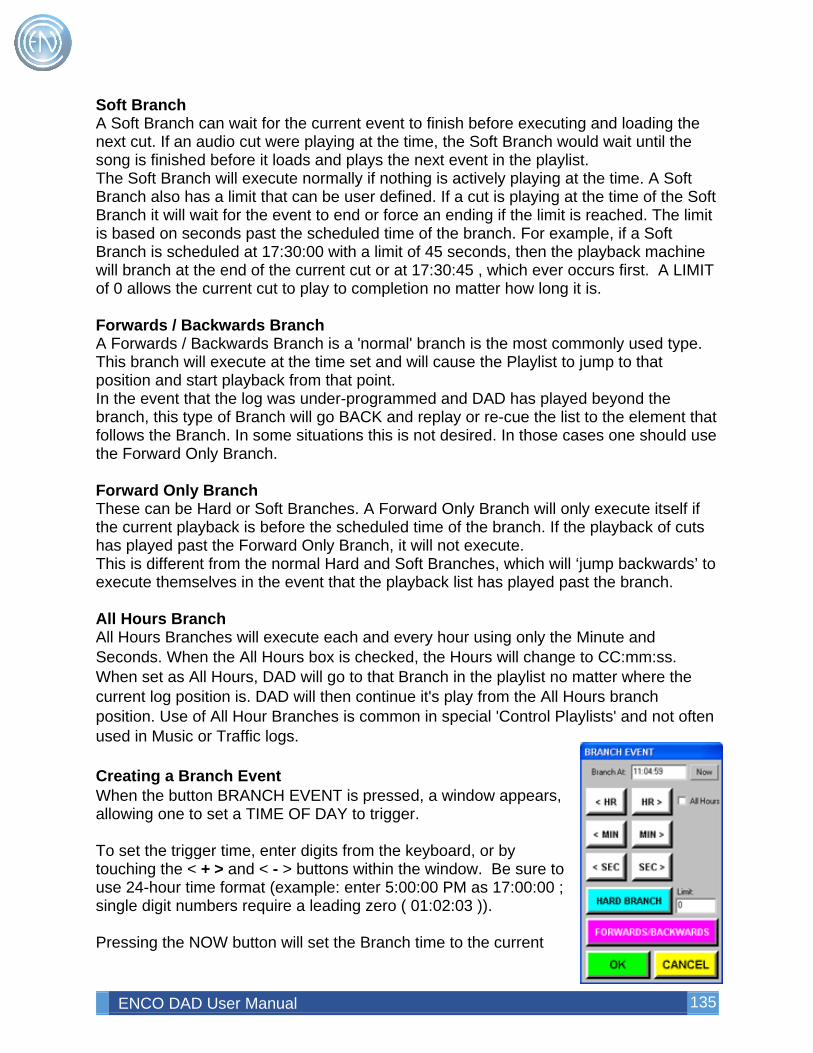
ENCO DAD User Manual 135
Soft Branch A Soft Branch can wait for the current event to finish before executing and loading the next cut. If an audio cut were playing at the time, the Soft Branch would wait until the song is finished before it loads and plays the next event in the playlist. The Soft Branch will execute normally if nothing is actively playing at the time. A Soft Branch also has a limit that can be user defined. If a cut is playing at the time of the Soft Branch it will wait for the event to end or force an ending if the limit is reached. The limit is based on seconds past the scheduled time of the branch. For example, if a Soft Branch is scheduled at 17:30:00 with a limit of 45 seconds, then the playback machine will branch at the end of the current cut or at 17:30:45 , which ever occurs first. A LIMIT of 0 allows the current cut to play to completion no matter how long it is. Forwards / Backwards Branch A Forwards / Backwards Branch is a 'normal' branch is the most commonly used type. This branch will execute at the time set and will cause the Playlist to jump to that position and start playback from that point. In the event that the log was under-programmed and DAD has played beyond the branch, this type of Branch will go BACK and replay or re-cue the list to the element that follows the Branch. In some situations this is not desired. In those cases one should use the Forward Only Branch. Forward Only Branch These can be Hard or Soft Branches. A Forward Only Branch will only execute itself if the current playback is before the scheduled time of the branch. If the playback of cuts has played past the Forward Only Branch, it will not execute. This is different from the normal Hard and Soft Branches, which will ‘jump backwards’ to execute themselves in the event that the playback list has played past the branch. All Hours Branch All Hours Branches will execute each and every hour using only the Minute and Seconds. When the All Hours box is checked, the Hours will change to CC:mm:ss. When set as All Hours, DAD will go to that Branch in the playlist no matter where the current log position is. DAD will then continue it's play from the All Hours branch position. Use of All Hour Branches is common in special 'Control Playlists' and not often used in Music or Traffic logs. Creating a Branch Event When the button BRANCH EVENT is pressed, a window appears, allowing one to set a TIME OF DAY to trigger. To set the trigger time, enter digits from the keyboard, or by touching the < + > and < - > buttons within the window. Be sure to use 24-hour time format (example: enter 5:00:00 PM as 17:00:00 ; single digit numbers require a leading zero ( 01:02:03 )). Pressing the NOW button will set the Branch time to the current
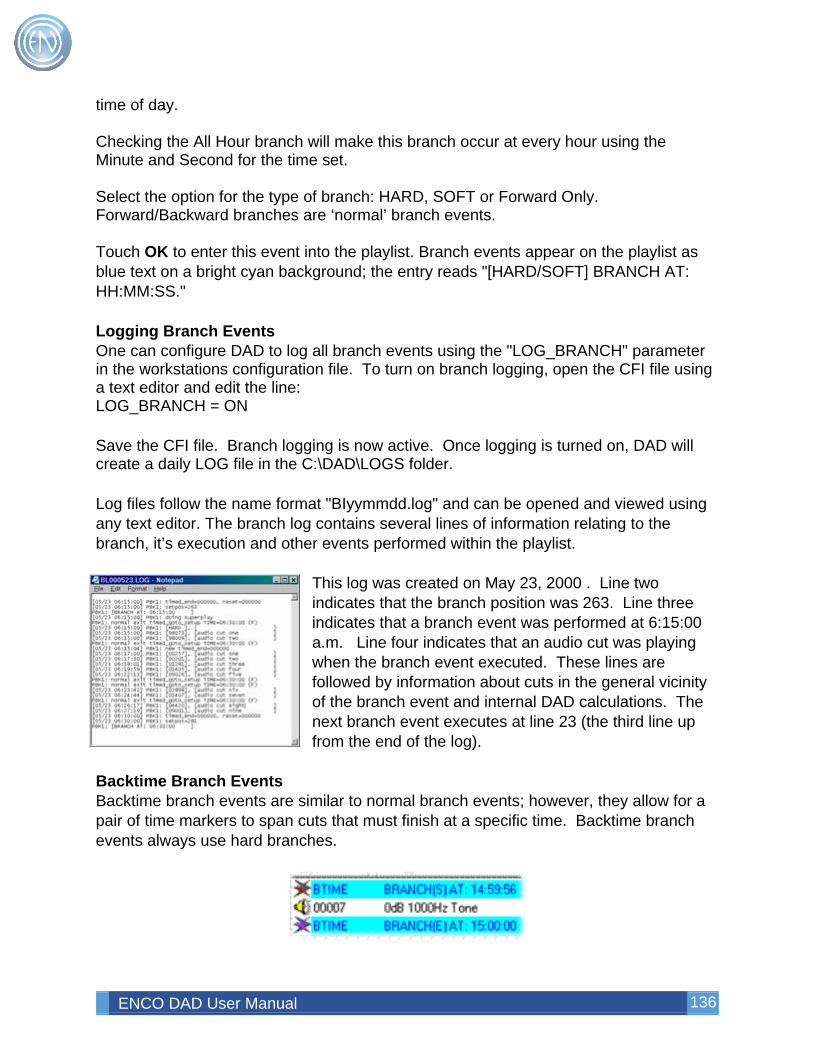
ENCO DAD User Manual 136
time of day. Checking the All Hour branch will make this branch occur at every hour using the Minute and Second for the time set. Select the option for the type of branch: HARD, SOFT or Forward Only. Forward/Backward branches are ‘normal’ branch events. Touch OK to enter this event into the playlist. Branch events appear on the playlist as blue text on a bright cyan background; the entry reads "[HARD/SOFT] BRANCH AT: HH:MM:SS." Logging Branch Events One can configure DAD to log all branch events using the "LOG_BRANCH" parameter in the workstations configuration file. To turn on branch logging, open the CFI file using a text editor and edit the line: LOG_BRANCH = ON Save the CFI file. Branch logging is now active. Once logging is turned on, DAD will create a daily LOG file in the C:\DAD\LOGS folder. Log files follow the name format "BIyymmdd.log" and can be opened and viewed using any text editor. The branch log contains several lines of information relating to the branch, it’s execution and other events performed within the playlist.
This log was created on May 23, 2000 . Line two indicates that the branch position was 263. Line three indicates that a branch event was performed at 6:15:00 a.m. Line four indicates that an audio cut was playing when the branch event executed. These lines are followed by information about cuts in the general vicinity of the branch event and internal DAD calculations. The next branch event executes at line 23 (the third line up from the end of the log).
Backtime Branch Events Backtime branch events are similar to normal branch events; however, they allow for a pair of time markers to span cuts that must finish at a specific time. Backtime branch events always use hard branches.
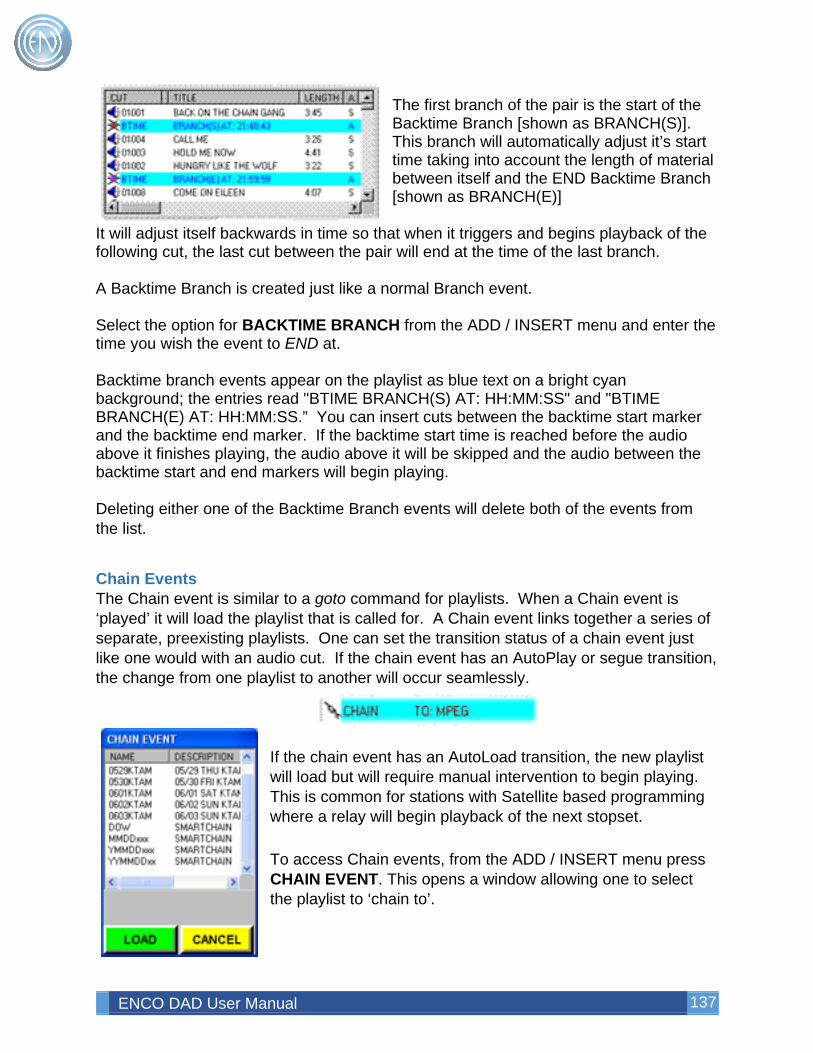
ENCO DAD User Manual 137
The first branch of the pair is the start of the Backtime Branch [shown as BRANCH(S)]. This branch will automatically adjust it’s start time taking into account the length of material between itself and the END Backtime Branch [shown as BRANCH(E)]
It will adjust itself backwards in time so that when it triggers and begins playback of the following cut, the last cut between the pair will end at the time of the last branch. A Backtime Branch is created just like a normal Branch event. Select the option for BACKTIME BRANCH from the ADD / INSERT menu and enter the time you wish the event to END at. Backtime branch events appear on the playlist as blue text on a bright cyan background; the entries read "BTIME BRANCH(S) AT: HH:MM:SS" and "BTIME BRANCH(E) AT: HH:MM:SS.” You can insert cuts between the backtime start marker and the backtime end marker. If the backtime start time is reached before the audio above it finishes playing, the audio above it will be skipped and the audio between the backtime start and end markers will begin playing. Deleting either one of the Backtime Branch events will delete both of the events from the list.
Chain Events The Chain event is similar to a goto command for playlists. When a Chain event is ‘played’ it will load the playlist that is called for. A Chain event links together a series of separate, preexisting playlists. One can set the transition status of a chain event just like one would with an audio cut. If the chain event has an AutoPlay or segue transition, the change from one playlist to another will occur seamlessly.
If the chain event has an AutoLoad transition, the new playlist will load but will require manual intervention to begin playing. This is common for stations with Satellite based programming where a relay will begin playback of the next stopset. To access Chain events, from the ADD / INSERT menu press CHAIN EVENT. This opens a window allowing one to select the playlist to ‘chain to’.
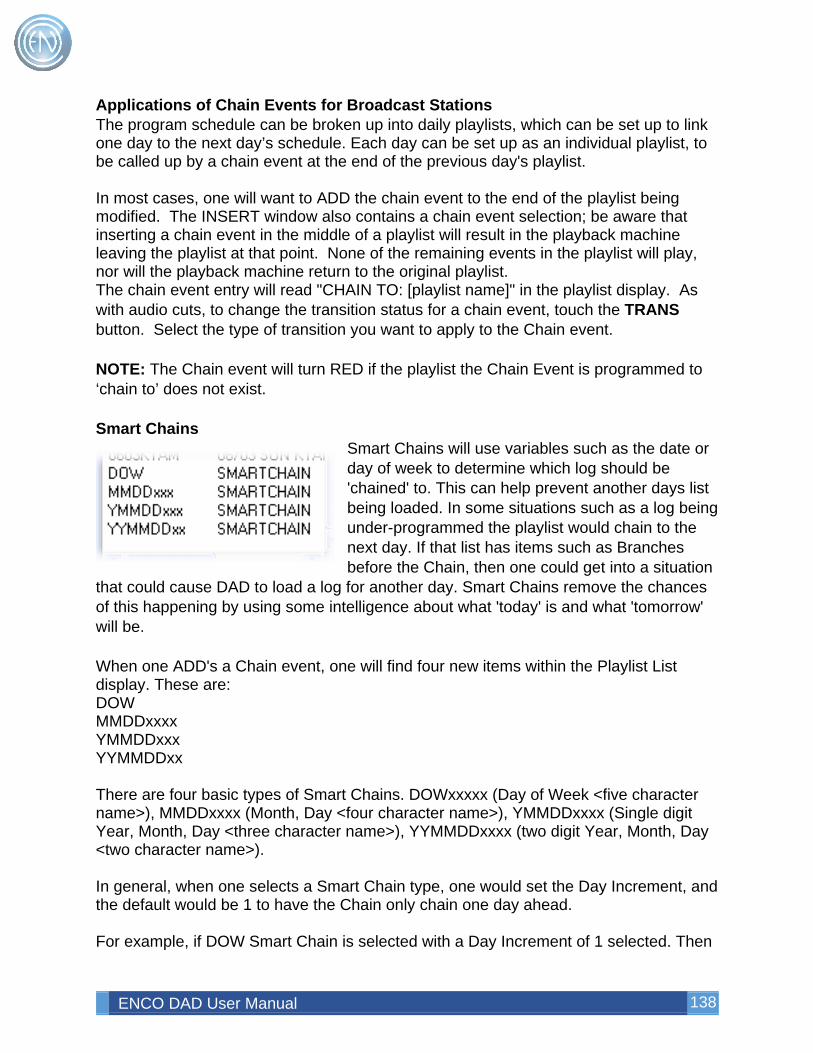
ENCO DAD User Manual 138
Applications of Chain Events for Broadcast Stations The program schedule can be broken up into daily playlists, which can be set up to link one day to the next day’s schedule. Each day can be set up as an individual playlist, to be called up by a chain event at the end of the previous day's playlist. In most cases, one will want to ADD the chain event to the end of the playlist being modified. The INSERT window also contains a chain event selection; be aware that inserting a chain event in the middle of a playlist will result in the playback machine leaving the playlist at that point. None of the remaining events in the playlist will play, nor will the playback machine return to the original playlist. The chain event entry will read "CHAIN TO: [playlist name]" in the playlist display. As with audio cuts, to change the transition status for a chain event, touch the TRANS button. Select the type of transition you want to apply to the Chain event. NOTE: The Chain event will turn RED if the playlist the Chain Event is programmed to ‘chain to’ does not exist. Smart Chains
Smart Chains will use variables such as the date or day of week to determine which log should be 'chained' to. This can help prevent another days list being loaded. In some situations such as a log being under-programmed the playlist would chain to the next day. If that list has items such as Branches before the Chain, then one could get into a situation
that could cause DAD to load a log for another day. Smart Chains remove the chances of this happening by using some intelligence about what 'today' is and what 'tomorrow' will be. When one ADD's a Chain event, one will find four new items within the Playlist List display. These are: DOW MMDDxxxx YMMDDxxx YYMMDDxx There are four basic types of Smart Chains. DOWxxxxx (Day of Week <five character name>), MMDDxxxx (Month, Day <four character name>), YMMDDxxxx (Single digit Year, Month, Day <three character name>), YYMMDDxxxx (two digit Year, Month, Day <two character name>). In general, when one selects a Smart Chain type, one would set the Day Increment, and the default would be 1 to have the Chain only chain one day ahead. For example, if DOW Smart Chain is selected with a Day Increment of 1 selected. Then
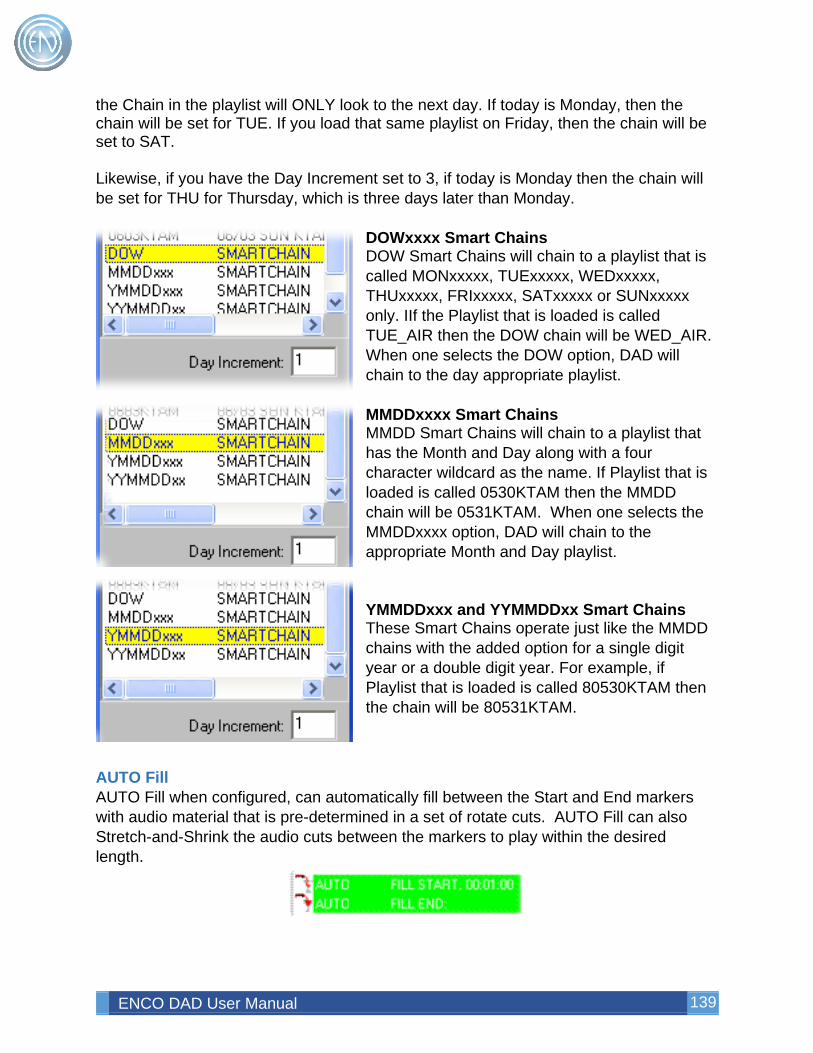
ENCO DAD User Manual 139
the Chain in the playlist will ONLY look to the next day. If today is Monday, then the chain will be set for TUE. If you load that same playlist on Friday, then the chain will be set to SAT. Likewise, if you have the Day Increment set to 3, if today is Monday then the chain will be set for THU for Thursday, which is three days later than Monday.
DOWxxxx Smart Chains DOW Smart Chains will chain to a playlist that is called MONxxxxx, TUExxxxx, WEDxxxxx, THUxxxxx, FRIxxxxx, SATxxxxx or SUNxxxxx only. IIf the Playlist that is loaded is called TUE_AIR then the DOW chain will be WED_AIR. When one selects the DOW option, DAD will chain to the day appropriate playlist. MMDDxxxx Smart Chains MMDD Smart Chains will chain to a playlist that has the Month and Day along with a four character wildcard as the name. If Playlist that is loaded is called 0530KTAM then the MMDD chain will be 0531KTAM. When one selects the MMDDxxxx option, DAD will chain to the appropriate Month and Day playlist. YMMDDxxx and YYMMDDxx Smart Chains These Smart Chains operate just like the MMDD chains with the added option for a single digit year or a double digit year. For example, if Playlist that is loaded is called 80530KTAM then the chain will be 80531KTAM.
AUTO Fill AUTO Fill when configured, can automatically fill between the Start and End markers with audio material that is pre-determined in a set of rotate cuts. AUTO Fill can also Stretch-and-Shrink the audio cuts between the markers to play within the desired length.
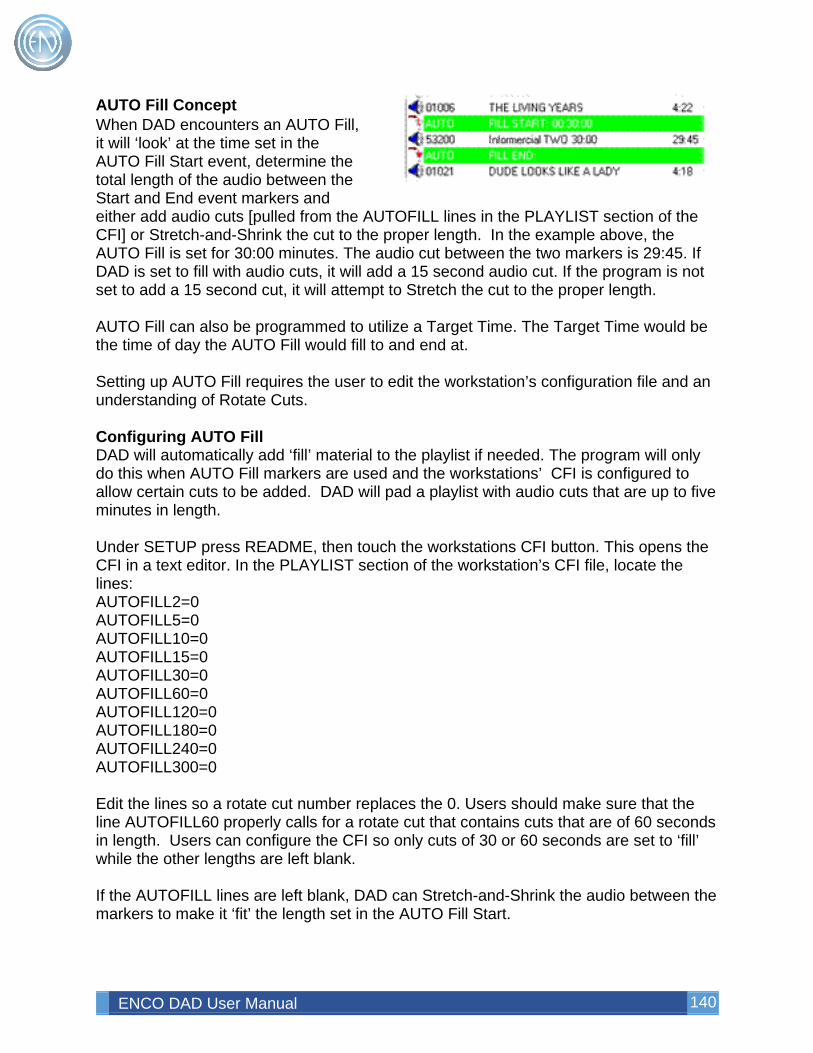
ENCO DAD User Manual 140
AUTO Fill Concept When DAD encounters an AUTO Fill, it will ‘look’ at the time set in the AUTO Fill Start event, determine the total length of the audio between the Start and End event markers and either add audio cuts [pulled from the AUTOFILL lines in the PLAYLIST section of the CFI] or Stretch-and-Shrink the cut to the proper length. In the example above, the AUTO Fill is set for 30:00 minutes. The audio cut between the two markers is 29:45. If DAD is set to fill with audio cuts, it will add a 15 second audio cut. If the program is not set to add a 15 second cut, it will attempt to Stretch the cut to the proper length. AUTO Fill can also be programmed to utilize a Target Time. The Target Time would be the time of day the AUTO Fill would fill to and end at. Setting up AUTO Fill requires the user to edit the workstation’s configuration file and an understanding of Rotate Cuts. Configuring AUTO Fill DAD will automatically add ‘fill’ material to the playlist if needed. The program will only do this when AUTO Fill markers are used and the workstations’ CFI is configured to allow certain cuts to be added. DAD will pad a playlist with audio cuts that are up to five minutes in length. Under SETUP press README, then touch the workstations CFI button. This opens the CFI in a text editor. In the PLAYLIST section of the workstation’s CFI file, locate the lines: AUTOFILL2=0 AUTOFILL5=0 AUTOFILL10=0 AUTOFILL15=0 AUTOFILL30=0 AUTOFILL60=0 AUTOFILL120=0 AUTOFILL180=0 AUTOFILL240=0 AUTOFILL300=0 Edit the lines so a rotate cut number replaces the 0. Users should make sure that the line AUTOFILL60 properly calls for a rotate cut that contains cuts that are of 60 seconds in length. Users can configure the CFI so only cuts of 30 or 60 seconds are set to ‘fill’ while the other lengths are left blank. If the AUTOFILL lines are left blank, DAD can Stretch-and-Shrink the audio between the markers to make it ‘fit’ the length set in the AUTO Fill Start.
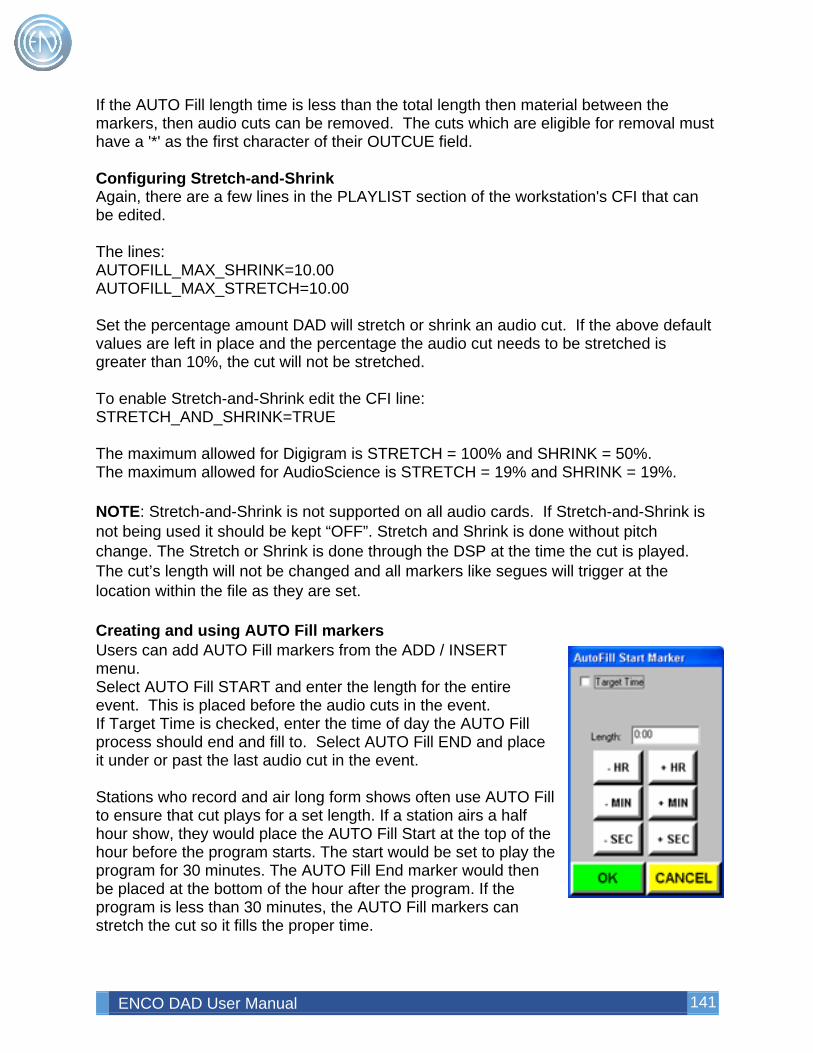
ENCO DAD User Manual 141
If the AUTO Fill length time is less than the total length then material between the markers, then audio cuts can be removed. The cuts which are eligible for removal must have a '*' as the first character of their OUTCUE field. Configuring Stretch-and-Shrink Again, there are a few lines in the PLAYLIST section of the workstation's CFI that can be edited. The lines: AUTOFILL_MAX_SHRINK=10.00 AUTOFILL_MAX_STRETCH=10.00 Set the percentage amount DAD will stretch or shrink an audio cut. If the above default values are left in place and the percentage the audio cut needs to be stretched is greater than 10%, the cut will not be stretched. To enable Stretch-and-Shrink edit the CFI line: STRETCH_AND_SHRINK=TRUE The maximum allowed for Digigram is STRETCH = 100% and SHRINK = 50%. The maximum allowed for AudioScience is STRETCH = 19% and SHRINK = 19%. NOTE: Stretch-and-Shrink is not supported on all audio cards. If Stretch-and-Shrink is not being used it should be kept “OFF”. Stretch and Shrink is done without pitch change. The Stretch or Shrink is done through the DSP at the time the cut is played. The cut’s length will not be changed and all markers like segues will trigger at the location within the file as they are set. Creating and using AUTO Fill markers Users can add AUTO Fill markers from the ADD / INSERT menu. Select AUTO Fill START and enter the length for the entire event. This is placed before the audio cuts in the event. If Target Time is checked, enter the time of day the AUTO Fill process should end and fill to. Select AUTO Fill END and place it under or past the last audio cut in the event. Stations who record and air long form shows often use AUTO Fill to ensure that cut plays for a set length. If a station airs a half hour show, they would place the AUTO Fill Start at the top of the hour before the program starts. The start would be set to play the program for 30 minutes. The AUTO Fill End marker would then be placed at the bottom of the hour after the program. If the program is less than 30 minutes, the AUTO Fill markers can stretch the cut so it fills the proper time.
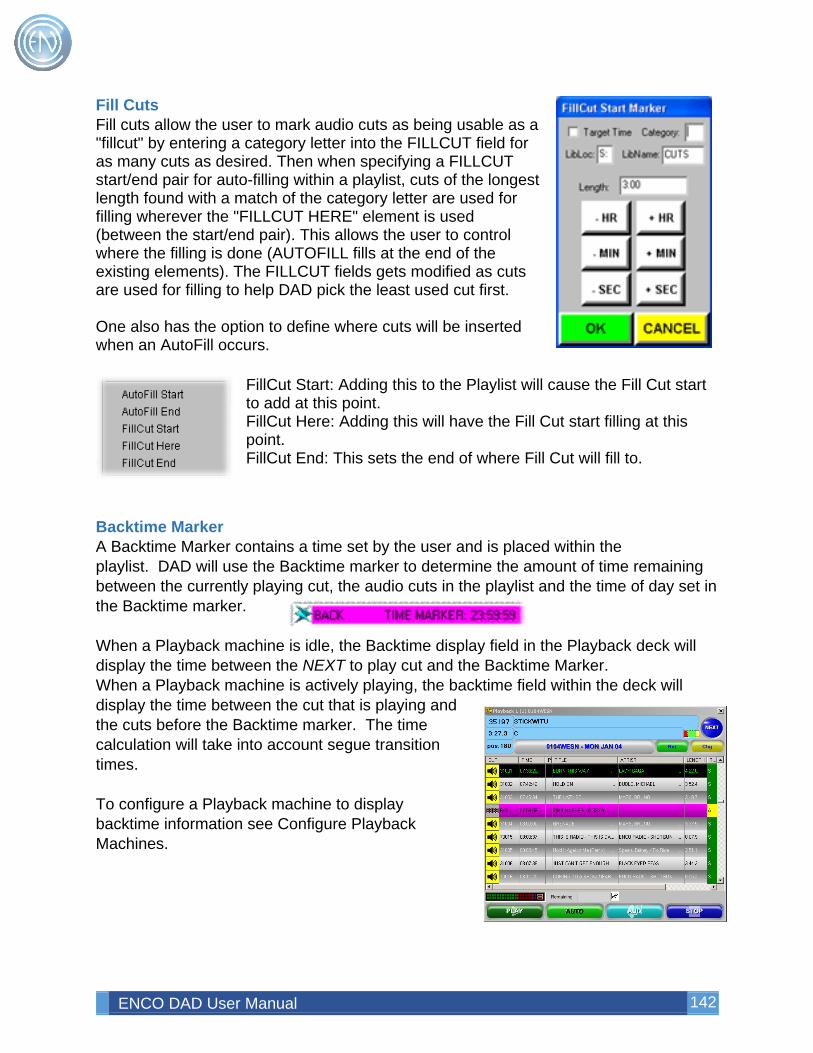
ENCO DAD User Manual 142
Fill Cuts Fill cuts allow the user to mark audio cuts as being usable as a "fillcut" by entering a category letter into the FILLCUT field for as many cuts as desired. Then when specifying a FILLCUT start/end pair for auto-filling within a playlist, cuts of the longest length found with a match of the category letter are used for filling wherever the "FILLCUT HERE" element is used (between the start/end pair). This allows the user to control where the filling is done (AUTOFILL fills at the end of the existing elements). The FILLCUT fields gets modified as cuts are used for filling to help DAD pick the least used cut first. One also has the option to define where cuts will be inserted when an AutoFill occurs.
FillCut Start: Adding this to the Playlist will cause the Fill Cut start to add at this point. FillCut Here: Adding this will have the Fill Cut start filling at this point. FillCut End: This sets the end of where Fill Cut will fill to.
Backtime Marker A Backtime Marker contains a time set by the user and is placed within the playlist. DAD will use the Backtime marker to determine the amount of time remaining between the currently playing cut, the audio cuts in the playlist and the time of day set in the Backtime marker.
When a Playback machine is idle, the Backtime display field in the Playback deck will display the time between the NEXT to play cut and the Backtime Marker. When a Playback machine is actively playing, the backtime field within the deck will display the time between the cut that is playing and the cuts before the Backtime marker. The time calculation will take into account segue transition times. To configure a Playback machine to display backtime information see Configure Playback Machines.
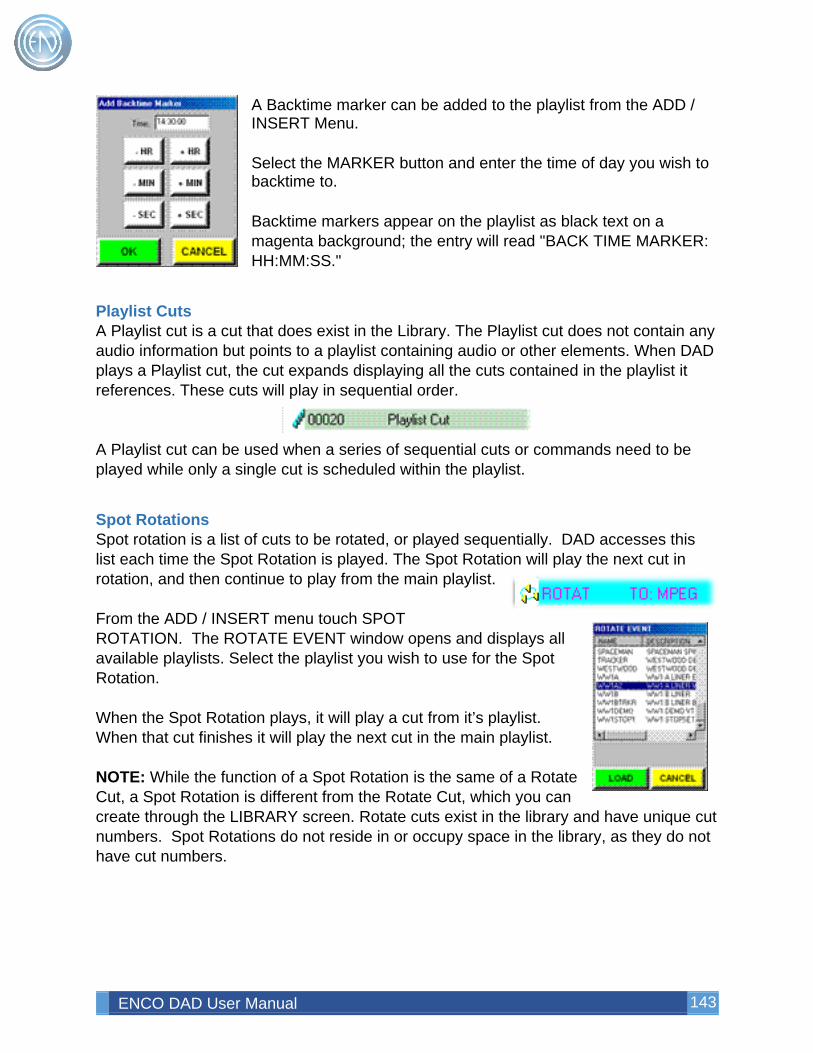
ENCO DAD User Manual 143
A Backtime marker can be added to the playlist from the ADD / INSERT Menu. Select the MARKER button and enter the time of day you wish to backtime to. Backtime markers appear on the playlist as black text on a magenta background; the entry will read "BACK TIME MARKER: HH:MM:SS."
Playlist Cuts A Playlist cut is a cut that does exist in the Library. The Playlist cut does not contain any audio information but points to a playlist containing audio or other elements. When DAD plays a Playlist cut, the cut expands displaying all the cuts contained in the playlist it references. These cuts will play in sequential order.
A Playlist cut can be used when a series of sequential cuts or commands need to be played while only a single cut is scheduled within the playlist.
Spot Rotations Spot rotation is a list of cuts to be rotated, or played sequentially. DAD accesses this list each time the Spot Rotation is played. The Spot Rotation will play the next cut in rotation, and then continue to play from the main playlist.
From the ADD / INSERT menu touch SPOT ROTATION. The ROTATE EVENT window opens and displays all available playlists. Select the playlist you wish to use for the Spot Rotation. When the Spot Rotation plays, it will play a cut from it’s playlist. When that cut finishes it will play the next cut in the main playlist. NOTE: While the function of a Spot Rotation is the same of a Rotate Cut, a Spot Rotation is different from the Rotate Cut, which you can create through the LIBRARY screen. Rotate cuts exist in the library and have unique cut numbers. Spot Rotations do not reside in or occupy space in the library, as they do not have cut numbers.
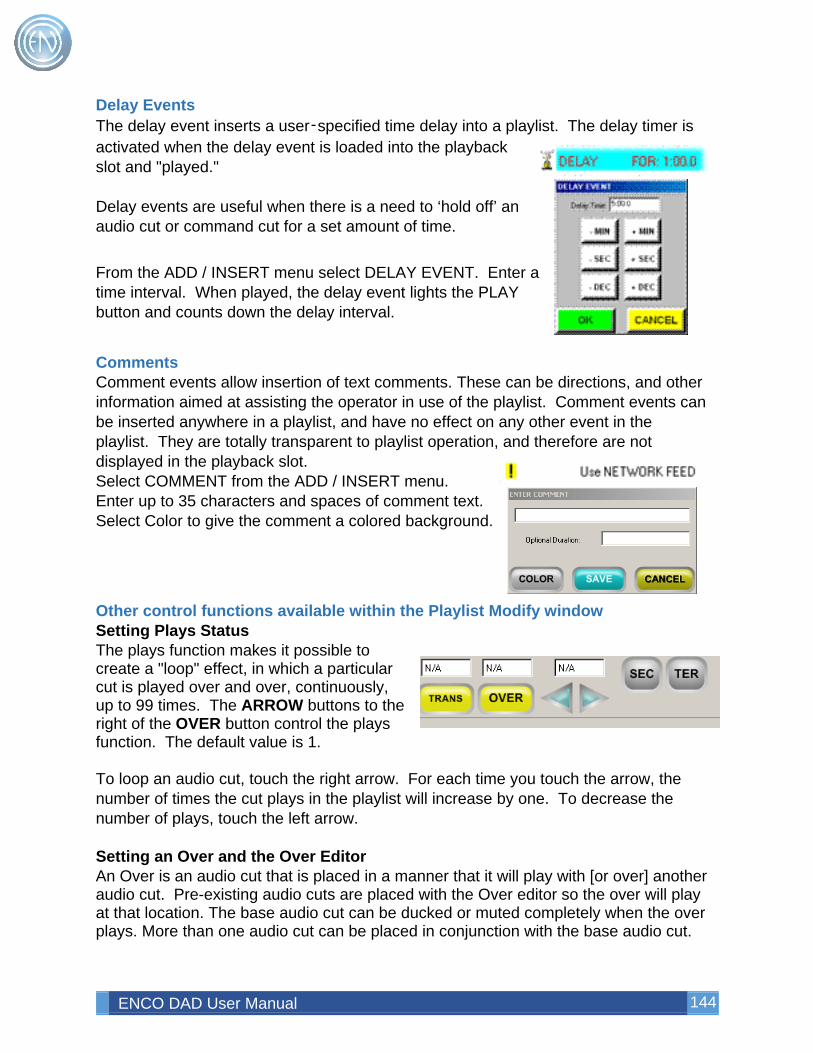
ENCO DAD User Manual 144
Delay Events The delay event inserts a user‑specified time delay into a playlist. The delay timer is activated when the delay event is loaded into the playback slot and "played." Delay events are useful when there is a need to ‘hold off’ an audio cut or command cut for a set amount of time. From the ADD / INSERT menu select DELAY EVENT. Enter a time interval. When played, the delay event lights the PLAY button and counts down the delay interval.
Comments Comment events allow insertion of text comments. These can be directions, and other information aimed at assisting the operator in use of the playlist. Comment events can be inserted anywhere in a playlist, and have no effect on any other event in the playlist. They are totally transparent to playlist operation, and therefore are not displayed in the playback slot. Select COMMENT from the ADD / INSERT menu. Enter up to 35 characters and spaces of comment text. Select Color to give the comment a colored background.
Other control functions available within the Playlist Modify window Setting Plays Status The plays function makes it possible to create a "loop" effect, in which a particular cut is played over and over, continuously, up to 99 times. The ARROW buttons to the right of the OVER button control the plays function. The default value is 1. To loop an audio cut, touch the right arrow. For each time you touch the arrow, the number of times the cut plays in the playlist will increase by one. To decrease the number of plays, touch the left arrow. Setting an Over and the Over Editor An Over is an audio cut that is placed in a manner that it will play with [or over] another audio cut. Pre-existing audio cuts are placed with the Over editor so the over will play at that location. The base audio cut can be ducked or muted completely when the over plays. More than one audio cut can be placed in conjunction with the base audio cut.
ENCO DAD User Manual 145
Some stations might record a long for show from a satellite provider. They will air this show later in the day and wish to cover the network spot avails with their own local content. These stations can use the Over Editor to manually place their spots in the location of the network avails and have the audio muted so only their audio plays. Click here for more information about the Over Editor.
Modifying Control Events All of the control event may be added, moved, edited or deleted at any time. If the Control Event is being modified from the Main Playlist Modify window, the existing control event must be deleted and a new event inserted in its place. Most of the Control Event’s can be directly modified and edited from the right click menus from a Playback Machine.
LiveList LiveList allows an administrator to configure DAD so that a Playlist loaded in one workstation can be viewed, modified and even controlled from another workstation; all while actively playing. One can select a player in DAD such as PBK1 and set it as the Master. Another DAD workstation would have its Playback machine set as either Apprentice or Observer. Apprentice will allow the remote workstation the ability for machine control such as Play, Stop, Next and modify the active list loaded in the Master machine. An Observer does not have the ability for machine control of the Master machine but can modify the active list. Release does not follow along nor control the active list, but can modify it. This allows a Music or Program director to directly monitor what is happening in the studio on the actively playing playback machine. One can make changes in the remote workstation and have those changes directly appear in the Playlist that is loaded in the Master. These changes could be moves of cuts to addition or removal of selected cuts. Air Talent can use LiveList to record Voice Tracks in another studio on the Playlist that is loaded on the air. When doing this, these Voice Tracks will 'appear' in the OnAir studios Playlist without any need for Refreshing. Engineering or Operations might set one DAD workstation up to monitor several other DAD workstations. This would be using the Master / Observer mode. In this example, one might have multiple on-air workstations. Each of the decks would be set as a Master. Then one workstation that is central to Engineering would have various Playback decks set as Observers. These decks would have the lists loaded and would track in real time the audio playing in each of the Main on-air workstations.
ENCO DAD User Manual 146
Many other uses such as Talk show studios and backup studio or workstations configurations can be integrated into uses for LiveList. Note: When using LiveList, the actual audio output will be from the workstation with the LiveList loaded and the deck set to MASTER. Observer and Apprentice modes are strictly visual and will not have an audio output. There are several components to setting up and using LiveList. The components necessary are LiveList Server, DAD and Playback Machines and a Playlist that has been flagged as a LiveList. A general overview of usage with example is at the end of the document.
Setting up CutServer and LiveList Server CutServer and LiveList Server are two closely related programs. ListServer was at one point a part of CutServer, but now is its own application. As such it still resides with CutServer in the C:\CutServer directory. One must install the LiveList Server on a Windows based machine. Typically this would be the File Server for which the DAD Data and Audio is stored. One can download the setupENCO package which includes the ListServer application via the ENCO web site. Once the install has completed. Users should go to the C:\CutServer directory and modify the ListServer.INI file. ListServer.INI definitions:
Line Entry Default Value
Definitions and Options
[Config] Enable Scanning
TRUE TRUE/FALSE Toggles from Enable Scanning check box within the ListServer program.
Enable Connections
TRUE TRUE/FALSE Toggles from Enable Connections check box within the ListServer program.
IP Port 8502 IP Port used to talk to ListServer. Port 8502 is used by default by both DAD and the LiveList application. If changed, one also needs to change the value in DAD's CFI file.
Max Heartbeat Timeout
0 Legacy setting to determine number of heartbeats counted before timing out. No longer used as of 14.0c
Event Processing Rate
20 Length of delay the Event Processing window will wait before processing another event.
Event Consumption Rate
20 Number of events processed at a time during Event Processing window.
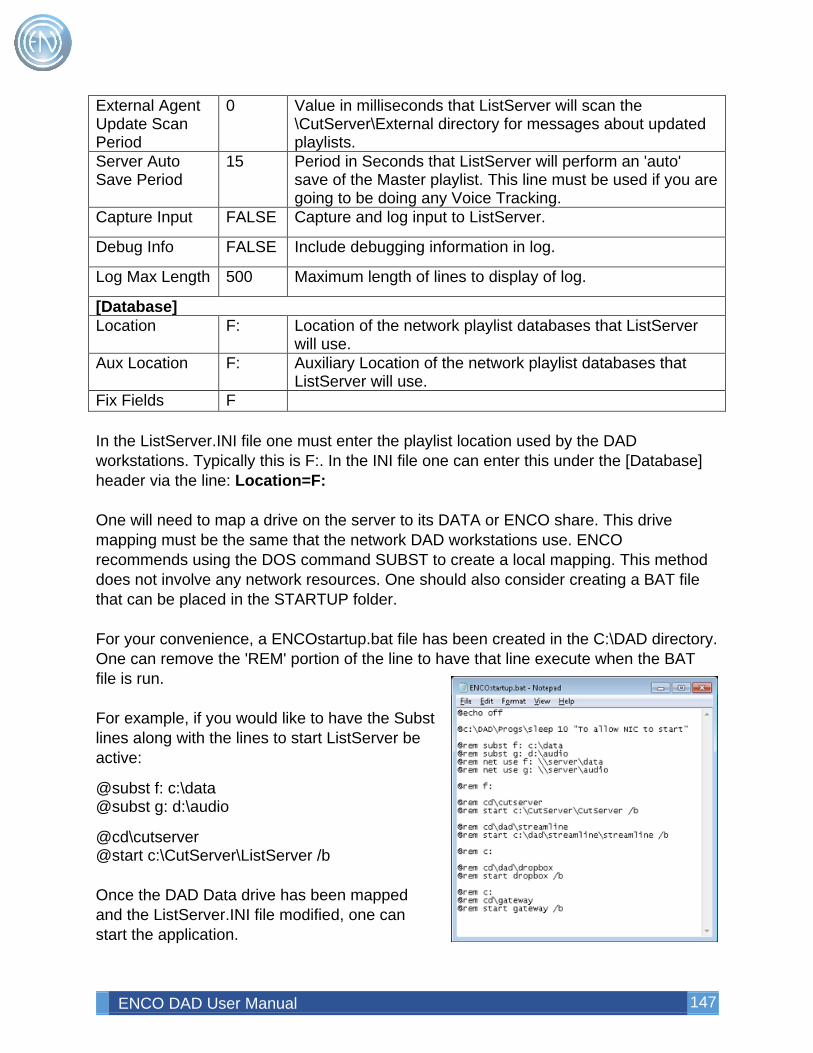
ENCO DAD User Manual 147
External Agent Update Scan Period
0 Value in milliseconds that ListServer will scan the \CutServer\External directory for messages about updated playlists.
Server Auto Save Period
15 Period in Seconds that ListServer will perform an 'auto' save of the Master playlist. This line must be used if you are going to be doing any Voice Tracking.
Capture Input FALSE Capture and log input to ListServer.
Debug Info FALSE Include debugging information in log.
Log Max Length 500 Maximum length of lines to display of log.
[Database] Location F: Location of the network playlist databases that ListServer
will use. Aux Location F: Auxiliary Location of the network playlist databases that
ListServer will use. Fix Fields F In the ListServer.INI file one must enter the playlist location used by the DAD workstations. Typically this is F:. In the INI file one can enter this under the [Database] header via the line: Location=F: One will need to map a drive on the server to its DATA or ENCO share. This drive mapping must be the same that the network DAD workstations use. ENCO recommends using the DOS command SUBST to create a local mapping. This method does not involve any network resources. One should also consider creating a BAT file that can be placed in the STARTUP folder. For your convenience, a ENCOstartup.bat file has been created in the C:\DAD directory. One can remove the 'REM' portion of the line to have that line execute when the BAT file is run. For example, if you would like to have the Subst lines along with the lines to start ListServer be active:
@subst f: c:\data @subst g: d:\audio
@cd\cutserver @start c:\CutServer\ListServer /b Once the DAD Data drive has been mapped and the ListServer.INI file modified, one can start the application.

ENCO DAD User Manual 148
LiveList Application Overview
A. Enable Connections: This checkbox allows workstations to connect to the
application. When unchecked, DAD will NOT connect. This box should remain checked Enable Scanning: In LiveList, this option and field is grayed out. This function is used with CutServer and DAD CutServer Client operations.
B. Active Stream Details: This screen displays the workstations connected to the application. One can select a stream and send DCL Commands via the Send DCL to Client button. Disable Client prevents that client it from receiving updates from other workstations. Pressing Disconnect Client on a selected stream will prevent that workstation from accepting or sending LiveList messages. After being disconnected, DAD will automatically reconnect roughly one minute later. Here one will see the LiveList message sent between Active Steams. There are some List controls available. The Incoming Events checkbox should remain checked in order for the application to display the events processed. Max Events sets the number of events to be displayed. One can Flush the display to a text file. Checking Debug will provide more details regarding communications and events. The Disable List checkbox has no effect in LiveList operation. Reset List will clear the list screen.
C. Incoming Event Details: Below this area is another display which will contain the active incoming events. Incoming events are processed as soon as they arrive depending upon INI file settings. Most events will simply flash by and will be seen in the Incoming Event Details screen.

ENCO DAD User Manual 149
The Pending Events value will display a number for events still to be processed. Enable Processing should always be checked. This allows the program to process incoming events. If unchecked, other workstations receiving data will not be updated. The Delete Event button can be used to remove any Event in the Pending display area. The Disable List checkbox should always remain checked. If unchecked, incoming events will be queued and not processed. Active Libraries: This portion of the program will display the DAD Library database that is in use by the workstations. If one has DAD Multiple Libraries in use, the will also be displayed. The number value next to the Library name relates to the number of Users who have this Library open and in use. This portion of the program will display the DAD LiveList Playlist Names that are in use by the workstations. The number value next to the Playlist name relates to the number of Users who have this LiveList open and in use.
D. Active LiveList: One can select a list from the Active LiveLists display and have the associated machines display in the Incoming Event Detail display. The display will shot the Stream, Location of the workstation, which deck is in use and it's mode. Database Drive Letter: The field in the upper right corner of the application displays the Library Database drive letter currently in use.
Configuring DAD for use with LiveList Server Administrators must configure each DAD workstation that they want to play the LiveList game. Three lines must be checked in each workstations CFI file. One should go to SETUP > CFI and README then select that workstations CFI file. Under the OPTIONS header locate the following lines: Important: When editing the CFI file, there are no spaces before or after the equals sign and there are no quotes around any Values.
[OPTIONS] Value Example
Definition
LISTSERVER_IP_ADDRESS 10.66.66.41 One should enter the IP Address of the Server that is running the LiveList application.
LISTSERVER_IP_PORT 8502 LiveList uses port 8502 by default. If one changes this value, then one must
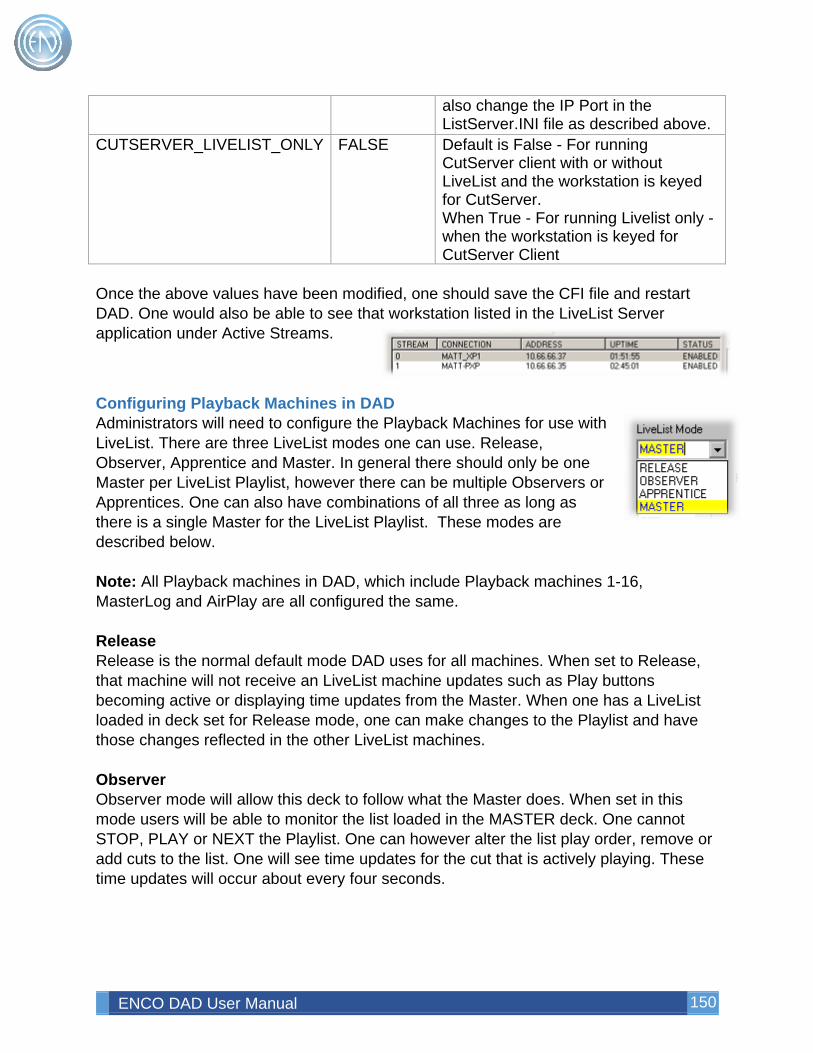
ENCO DAD User Manual 150
also change the IP Port in the ListServer.INI file as described above.
CUTSERVER_LIVELIST_ONLY FALSE Default is False - For running CutServer client with or without LiveList and the workstation is keyed for CutServer. When True - For running Livelist only - when the workstation is keyed for CutServer Client
Once the above values have been modified, one should save the CFI file and restart DAD. One would also be able to see that workstation listed in the LiveList Server application under Active Streams.
Configuring Playback Machines in DAD Administrators will need to configure the Playback Machines for use with LiveList. There are three LiveList modes one can use. Release, Observer, Apprentice and Master. In general there should only be one Master per LiveList Playlist, however there can be multiple Observers or Apprentices. One can also have combinations of all three as long as there is a single Master for the LiveList Playlist. These modes are described below. Note: All Playback machines in DAD, which include Playback machines 1-16, MasterLog and AirPlay are all configured the same. Release Release is the normal default mode DAD uses for all machines. When set to Release, that machine will not receive an LiveList machine updates such as Play buttons becoming active or displaying time updates from the Master. When one has a LiveList loaded in deck set for Release mode, one can make changes to the Playlist and have those changes reflected in the other LiveList machines. Observer Observer mode will allow this deck to follow what the Master does. When set in this mode users will be able to monitor the list loaded in the MASTER deck. One cannot STOP, PLAY or NEXT the Playlist. One can however alter the list play order, remove or add cuts to the list. One will see time updates for the cut that is actively playing. These time updates will occur about every four seconds.
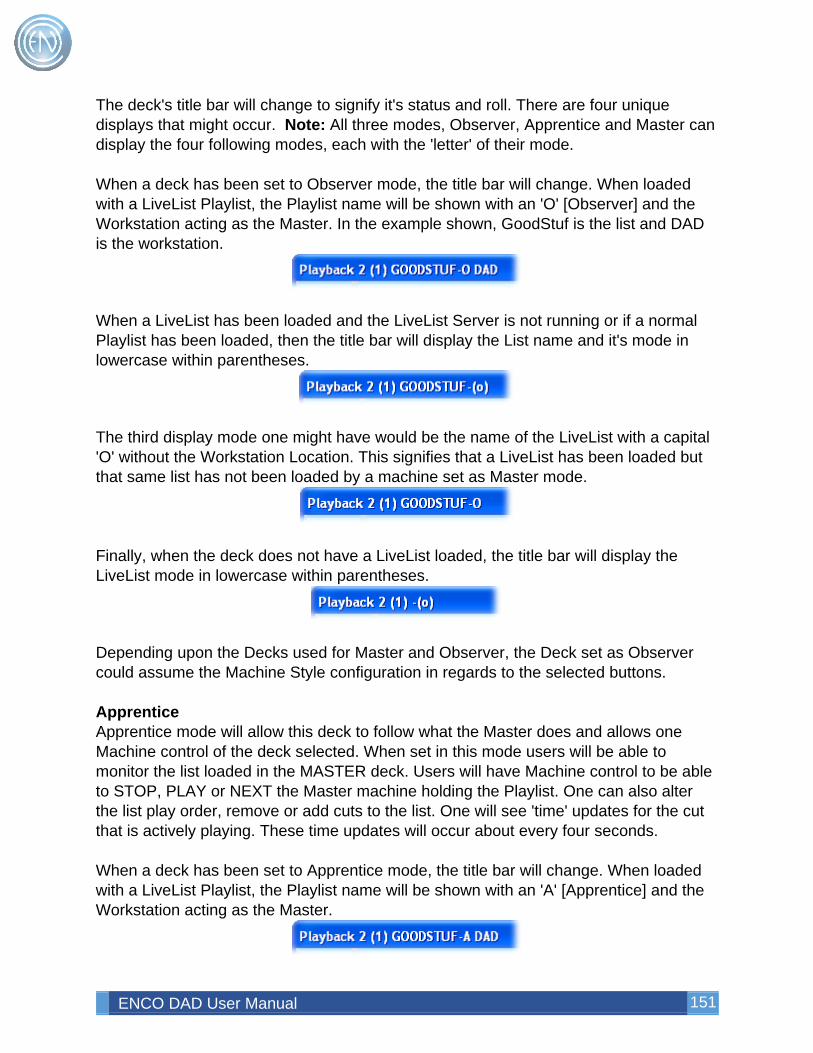
ENCO DAD User Manual 151
The deck's title bar will change to signify it's status and roll. There are four unique displays that might occur. Note: All three modes, Observer, Apprentice and Master can display the four following modes, each with the 'letter' of their mode. When a deck has been set to Observer mode, the title bar will change. When loaded with a LiveList Playlist, the Playlist name will be shown with an 'O' [Observer] and the Workstation acting as the Master. In the example shown, GoodStuf is the list and DAD is the workstation.
When a LiveList has been loaded and the LiveList Server is not running or if a normal Playlist has been loaded, then the title bar will display the List name and it's mode in lowercase within parentheses.
The third display mode one might have would be the name of the LiveList with a capital 'O' without the Workstation Location. This signifies that a LiveList has been loaded but that same list has not been loaded by a machine set as Master mode.
Finally, when the deck does not have a LiveList loaded, the title bar will display the LiveList mode in lowercase within parentheses.
Depending upon the Decks used for Master and Observer, the Deck set as Observer could assume the Machine Style configuration in regards to the selected buttons. Apprentice Apprentice mode will allow this deck to follow what the Master does and allows one Machine control of the deck selected. When set in this mode users will be able to monitor the list loaded in the MASTER deck. Users will have Machine control to be able to STOP, PLAY or NEXT the Master machine holding the Playlist. One can also alter the list play order, remove or add cuts to the list. One will see 'time' updates for the cut that is actively playing. These time updates will occur about every four seconds. When a deck has been set to Apprentice mode, the title bar will change. When loaded with a LiveList Playlist, the Playlist name will be shown with an 'A' [Apprentice] and the Workstation acting as the Master.
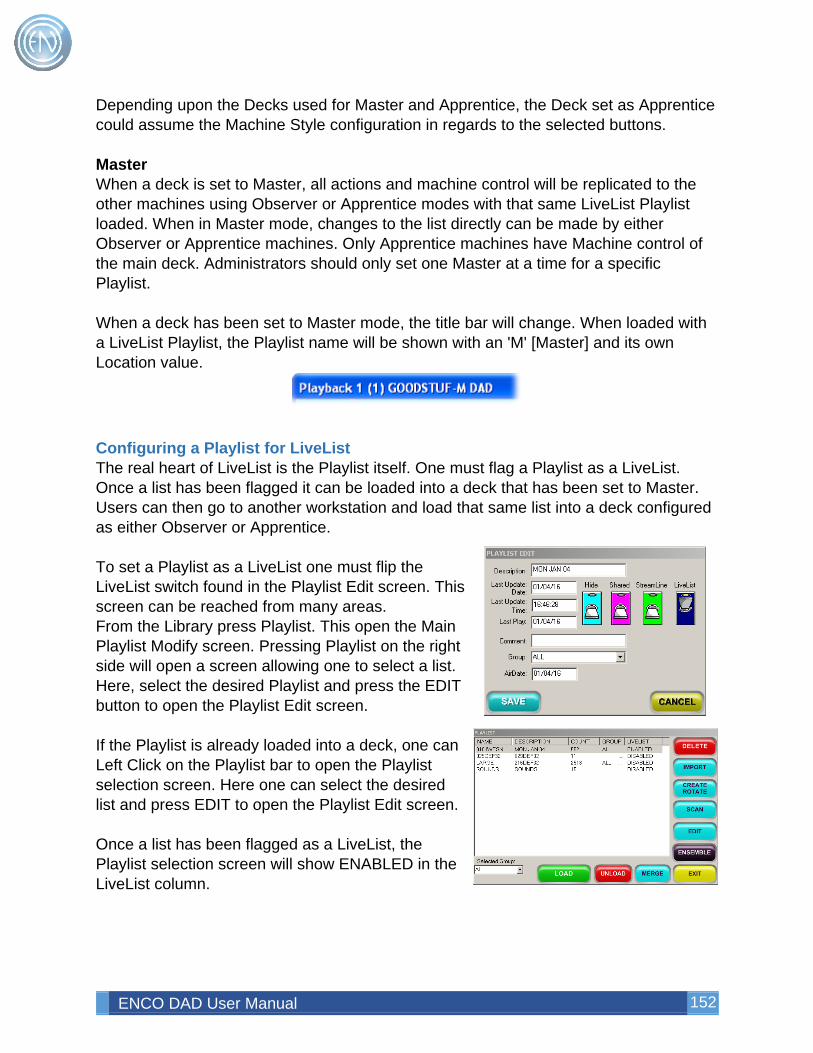
ENCO DAD User Manual 152
Depending upon the Decks used for Master and Apprentice, the Deck set as Apprentice could assume the Machine Style configuration in regards to the selected buttons. Master When a deck is set to Master, all actions and machine control will be replicated to the other machines using Observer or Apprentice modes with that same LiveList Playlist loaded. When in Master mode, changes to the list directly can be made by either Observer or Apprentice machines. Only Apprentice machines have Machine control of the main deck. Administrators should only set one Master at a time for a specific Playlist. When a deck has been set to Master mode, the title bar will change. When loaded with a LiveList Playlist, the Playlist name will be shown with an 'M' [Master] and its own Location value.
Configuring a Playlist for LiveList The real heart of LiveList is the Playlist itself. One must flag a Playlist as a LiveList. Once a list has been flagged it can be loaded into a deck that has been set to Master. Users can then go to another workstation and load that same list into a deck configured as either Observer or Apprentice. To set a Playlist as a LiveList one must flip the LiveList switch found in the Playlist Edit screen. This screen can be reached from many areas. From the Library press Playlist. This open the Main Playlist Modify screen. Pressing Playlist on the right side will open a screen allowing one to select a list. Here, select the desired Playlist and press the EDIT button to open the Playlist Edit screen. If the Playlist is already loaded into a deck, one can Left Click on the Playlist bar to open the Playlist selection screen. Here one can select the desired list and press EDIT to open the Playlist Edit screen. Once a list has been flagged as a LiveList, the Playlist selection screen will show ENABLED in the LiveList column.

ENCO DAD User Manual 153
Overview of usage The following are some example of how one might use LiveList. Voice Tracking When using Master / Observer modes, one can load an 'in use' playlist and Voice Track directly into the list. A talent could load the Studios playlist into a Production Room that has been set to Release mode. This would prevent any accidental Starts, Stops or Nexts of the On Air list. The talent could directly create Voice Tracks into that list. The Voice Tracks that are created will be updated and displayed in real time on the Master machine. This can help eliminate issues such as refreshing and accidental overwrites by someone saving the list, overwriting another's work. Talent / Producer control Air Talent can be in the studio while the Producer minds the board in the Control Room. When used in an Apprentice mode, the Talent could start, modify and control their own breaks. By using Master / Apprentice mode, both users are controlling the same list in real time. This allows for more flexibility and control by both parties. Remote Monitoring A facility has several stations that are spread throughout the building. Engineering or Programming could have a single DAD workstation configured to 'monitor' each of the OnAir units. One could have each Playback machine set as the Master in each Studio. The monitoring workstation can be configured as an Observer or Apprentice. This would allow a user a single point of concentration for all stations. One could make adjustments to a log, stop and start elements and interact with the system from a single workstation.
Shared Playlist Editing One of the issues with using a shared file system is a problem of 'Who saves last wins'. In other words, if two people were editing the same playlist at the same time in two different machines, the person who saves their changes last will overwrite the other persons changes. This also poses problems with basic personnel scheduling. Typically, only one person could be modifying a playlist or Voice Tracking on a playlist at a time. With Shared Playlist editing, this limitation is removed. Users can select a portion of the playlist to 'check out' and edit. Another person can be using that same playlist at the same time and 'check out' a different portion of the playlist.
Using Shared Playlist Editing To allow shared editing one must first flag the desired playlist for sharing. This can be done in the in the Playlist Edit window. From the Library press Playlist then Playlist again. Select the desired log and press EDIT. This opens the Playlist Edit screen. Here enable the Shared switch.
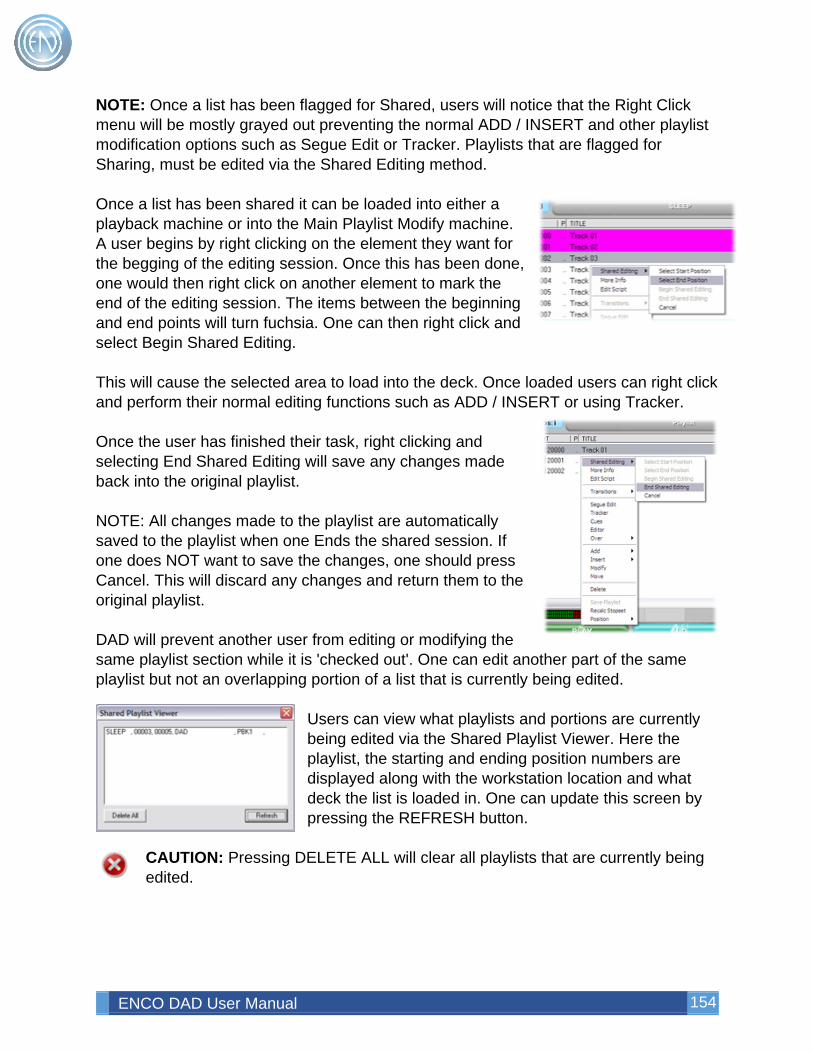
ENCO DAD User Manual 154
NOTE: Once a list has been flagged for Shared, users will notice that the Right Click menu will be mostly grayed out preventing the normal ADD / INSERT and other playlist modification options such as Segue Edit or Tracker. Playlists that are flagged for Sharing, must be edited via the Shared Editing method. Once a list has been shared it can be loaded into either a playback machine or into the Main Playlist Modify machine. A user begins by right clicking on the element they want for the begging of the editing session. Once this has been done, one would then right click on another element to mark the end of the editing session. The items between the beginning and end points will turn fuchsia. One can then right click and select Begin Shared Editing. This will cause the selected area to load into the deck. Once loaded users can right click and perform their normal editing functions such as ADD / INSERT or using Tracker. Once the user has finished their task, right clicking and selecting End Shared Editing will save any changes made back into the original playlist. NOTE: All changes made to the playlist are automatically saved to the playlist when one Ends the shared session. If one does NOT want to save the changes, one should press Cancel. This will discard any changes and return them to the original playlist. DAD will prevent another user from editing or modifying the same playlist section while it is 'checked out'. One can edit another part of the same playlist but not an overlapping portion of a list that is currently being edited.
Users can view what playlists and portions are currently being edited via the Shared Playlist Viewer. Here the playlist, the starting and ending position numbers are displayed along with the workstation location and what deck the list is loaded in. One can update this screen by pressing the REFRESH button.
CAUTION: Pressing DELETE ALL will clear all playlists that are currently being edited.
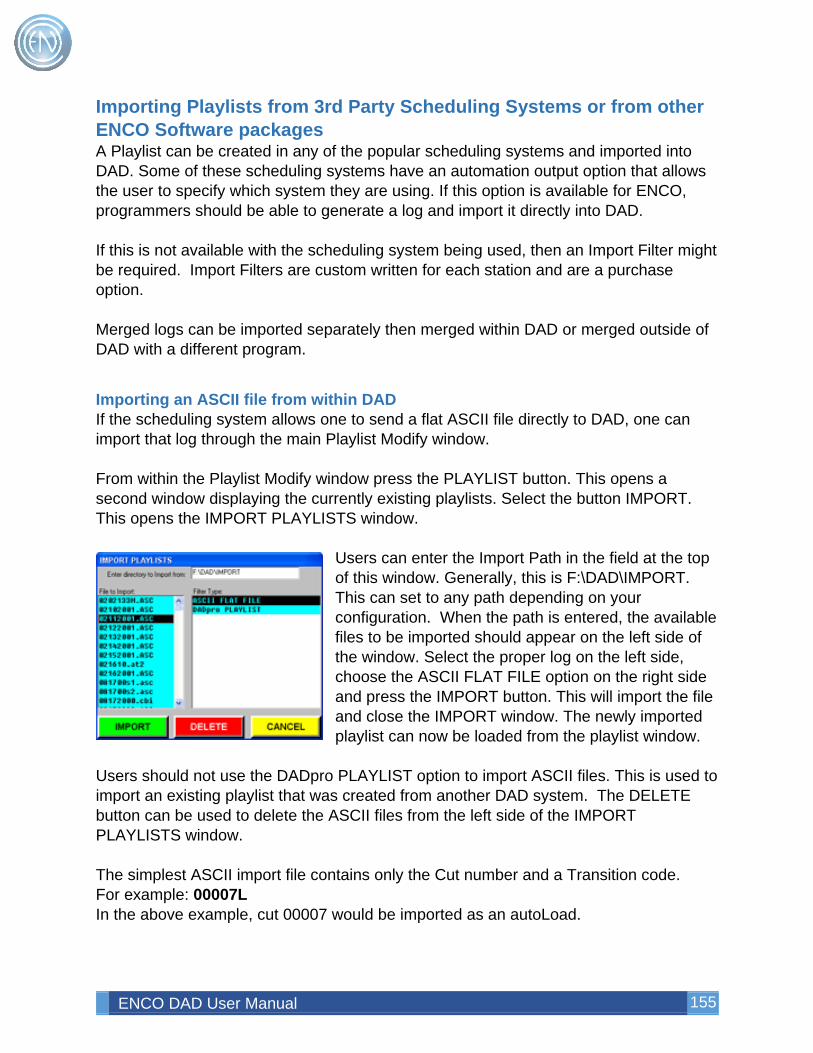
ENCO DAD User Manual 155
Importing Playlists from 3rd Party Scheduling Systems or from other ENCO Software packages A Playlist can be created in any of the popular scheduling systems and imported into DAD. Some of these scheduling systems have an automation output option that allows the user to specify which system they are using. If this option is available for ENCO, programmers should be able to generate a log and import it directly into DAD. If this is not available with the scheduling system being used, then an Import Filter might be required. Import Filters are custom written for each station and are a purchase option. Merged logs can be imported separately then merged within DAD or merged outside of DAD with a different program.
Importing an ASCII file from within DAD If the scheduling system allows one to send a flat ASCII file directly to DAD, one can import that log through the main Playlist Modify window. From within the Playlist Modify window press the PLAYLIST button. This opens a second window displaying the currently existing playlists. Select the button IMPORT. This opens the IMPORT PLAYLISTS window.
Users can enter the Import Path in the field at the top of this window. Generally, this is F:\DAD\IMPORT. This can set to any path depending on your configuration. When the path is entered, the available files to be imported should appear on the left side of the window. Select the proper log on the left side, choose the ASCII FLAT FILE option on the right side and press the IMPORT button. This will import the file and close the IMPORT window. The newly imported playlist can now be loaded from the playlist window.
Users should not use the DADpro PLAYLIST option to import ASCII files. This is used to import an existing playlist that was created from another DAD system. The DELETE button can be used to delete the ASCII files from the left side of the IMPORT PLAYLISTS window. The simplest ASCII import file contains only the Cut number and a Transition code. For example: 00007L In the above example, cut 00007 would be imported as an autoLoad.
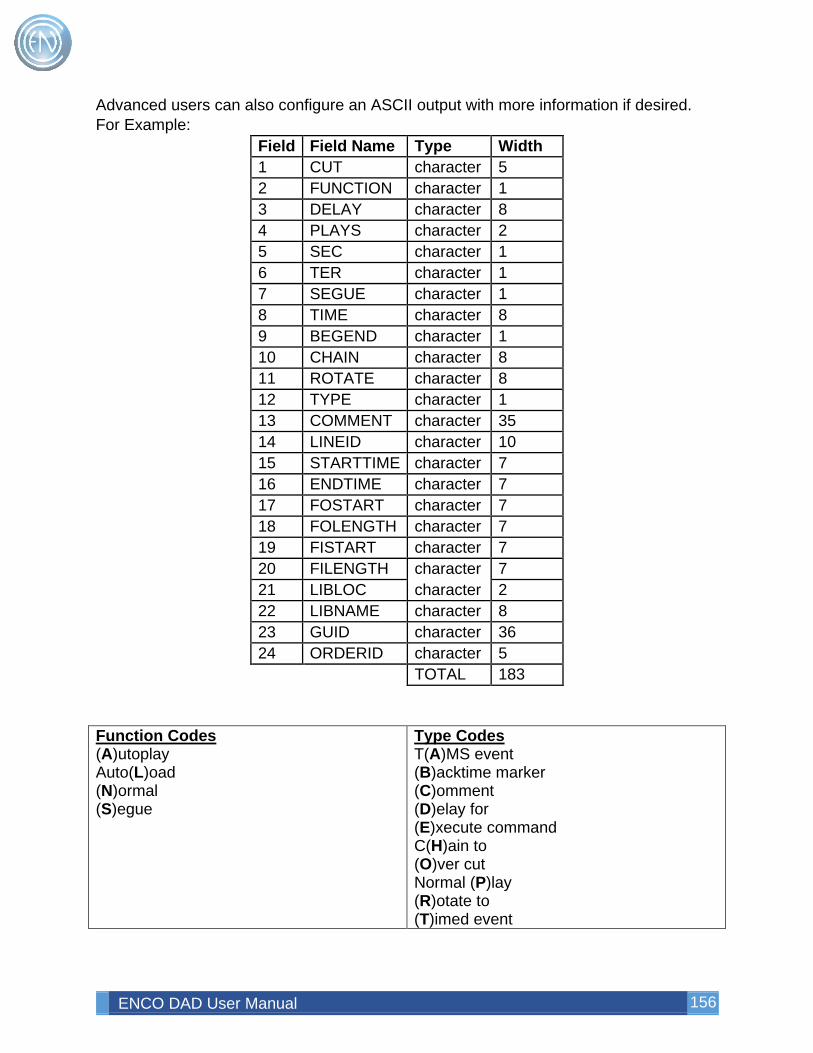
ENCO DAD User Manual 156
Advanced users can also configure an ASCII output with more information if desired. For Example:
Field Field Name Type Width 1 CUT character 5 2 FUNCTION character 1 3 DELAY character 8 4 PLAYS character 2 5 SEC character 1 6 TER character 1 7 SEGUE character 1 8 TIME character 8 9 BEGEND character 1 10 CHAIN character 8 11 ROTATE character 8 12 TYPE character 1 13 COMMENT character 35 14 LINEID character 10 15 STARTTIME character 7 16 ENDTIME character 7 17 FOSTART character 7 18 FOLENGTH character 7 19 FISTART character 7 20 FILENGTH character 7 21 LIBLOC character 2 22 LIBNAME character 8 23 GUID character 36 24 ORDERID character 5 TOTAL 183
Function Codes (A)utoplay Auto(L)oad (N)ormal (S)egue
Type Codes T(A)MS event (B)acktime marker (C)omment (D)elay for (E)xecute command C(H)ain to (O)ver cut Normal (P)lay (R)otate to (T)imed event
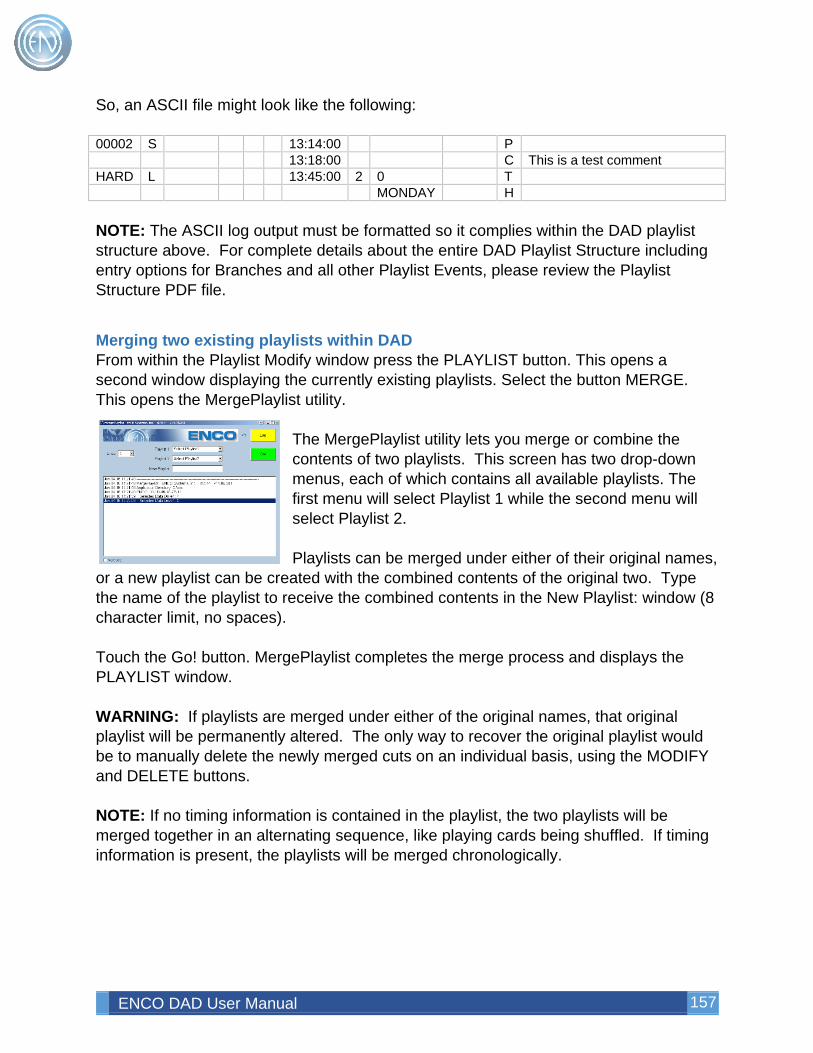
ENCO DAD User Manual 157
So, an ASCII file might look like the following: 00002 S 13:14:00 P 13:18:00 C This is a test comment HARD L 13:45:00 2 0 T MONDAY H NOTE: The ASCII log output must be formatted so it complies within the DAD playlist structure above. For complete details about the entire DAD Playlist Structure including entry options for Branches and all other Playlist Events, please review the Playlist Structure PDF file.
Merging two existing playlists within DAD From within the Playlist Modify window press the PLAYLIST button. This opens a second window displaying the currently existing playlists. Select the button MERGE. This opens the MergePlaylist utility.
The MergePlaylist utility lets you merge or combine the contents of two playlists. This screen has two drop-down menus, each of which contains all available playlists. The first menu will select Playlist 1 while the second menu will select Playlist 2. Playlists can be merged under either of their original names,
or a new playlist can be created with the combined contents of the original two. Type the name of the playlist to receive the combined contents in the New Playlist: window (8 character limit, no spaces). Touch the Go! button. MergePlaylist completes the merge process and displays the PLAYLIST window. WARNING: If playlists are merged under either of the original names, that original playlist will be permanently altered. The only way to recover the original playlist would be to manually delete the newly merged cuts on an individual basis, using the MODIFY and DELETE buttons. NOTE: If no timing information is contained in the playlist, the two playlists will be merged together in an alternating sequence, like playing cards being shuffled. If timing information is present, the playlists will be merged chronologically.
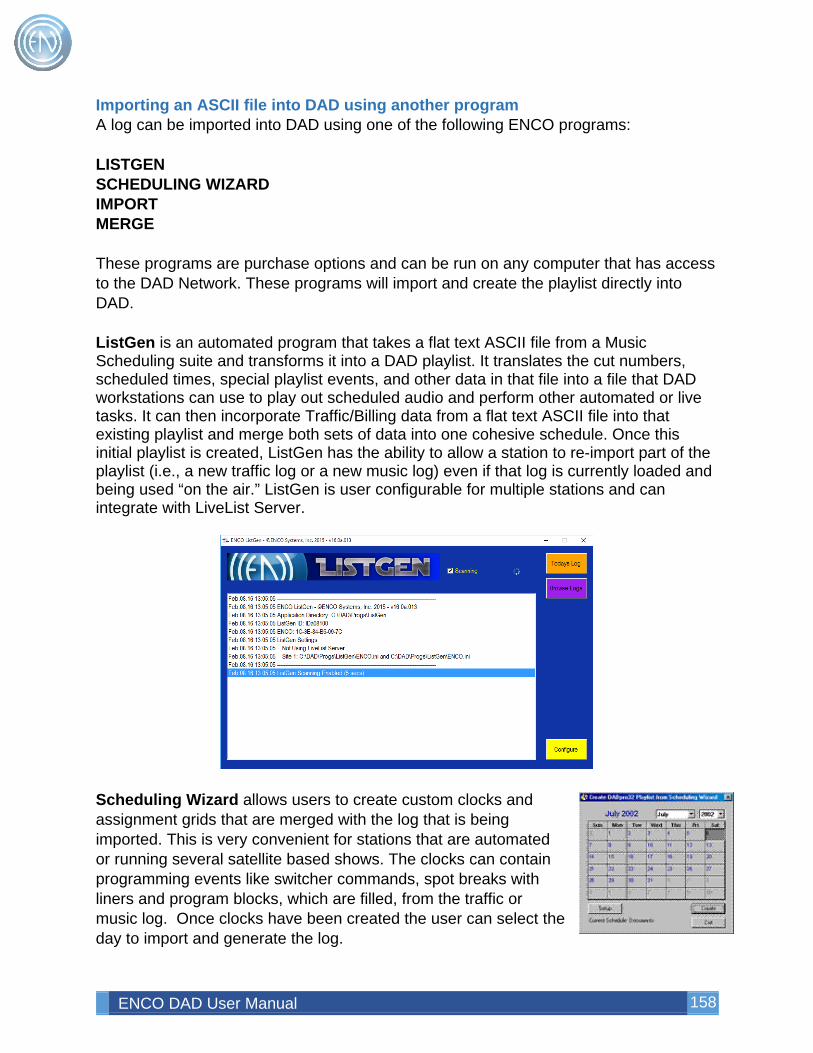
ENCO DAD User Manual 158
Importing an ASCII file into DAD using another program A log can be imported into DAD using one of the following ENCO programs: LISTGEN SCHEDULING WIZARD IMPORT MERGE These programs are purchase options and can be run on any computer that has access to the DAD Network. These programs will import and create the playlist directly into DAD. ListGen is an automated program that takes a flat text ASCII file from a Music Scheduling suite and transforms it into a DAD playlist. It translates the cut numbers, scheduled times, special playlist events, and other data in that file into a file that DAD workstations can use to play out scheduled audio and perform other automated or live tasks. It can then incorporate Traffic/Billing data from a flat text ASCII file into that existing playlist and merge both sets of data into one cohesive schedule. Once this initial playlist is created, ListGen has the ability to allow a station to re-import part of the playlist (i.e., a new traffic log or a new music log) even if that log is currently loaded and being used “on the air.” ListGen is user configurable for multiple stations and can integrate with LiveList Server.
Scheduling Wizard allows users to create custom clocks and assignment grids that are merged with the log that is being imported. This is very convenient for stations that are automated or running several satellite based shows. The clocks can contain programming events like switcher commands, spot breaks with liners and program blocks, which are filled, from the traffic or music log. Once clocks have been created the user can select the day to import and generate the log.
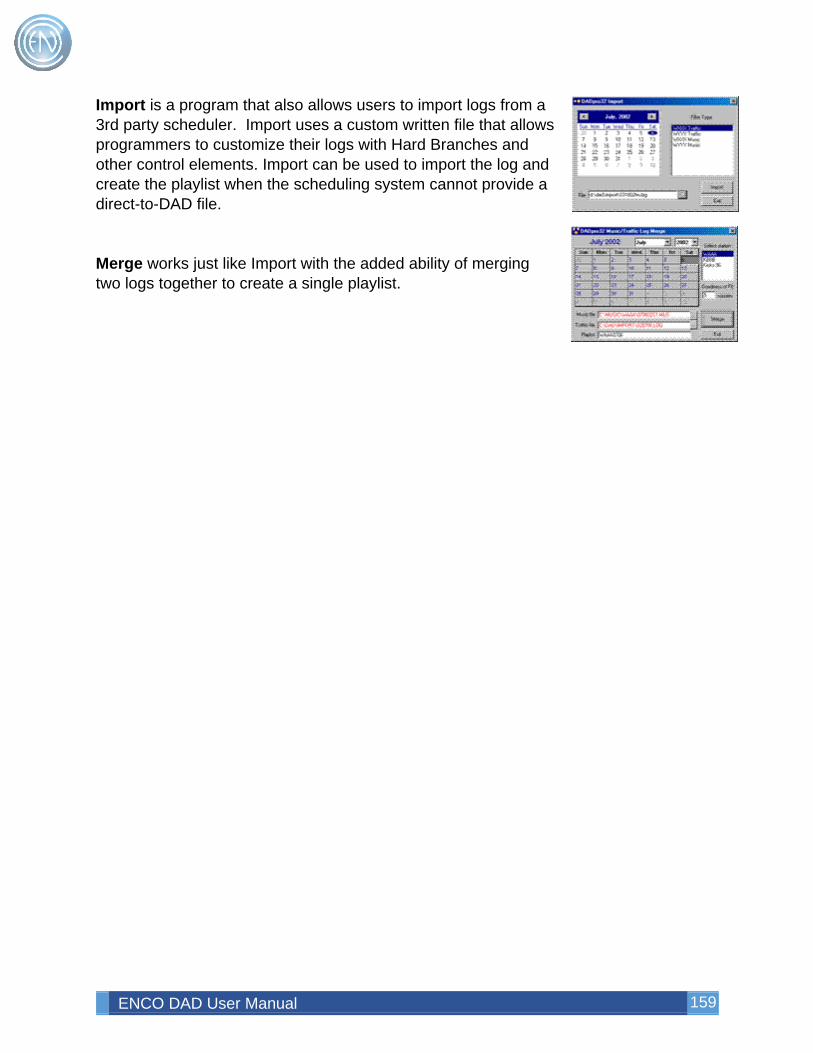
ENCO DAD User Manual 159
Import is a program that also allows users to import logs from a 3rd party scheduler. Import uses a custom written file that allows programmers to customize their logs with Hard Branches and other control elements. Import can be used to import the log and create the playlist when the scheduling system cannot provide a direct-to-DAD file. Merge works just like Import with the added ability of merging two logs together to create a single playlist.
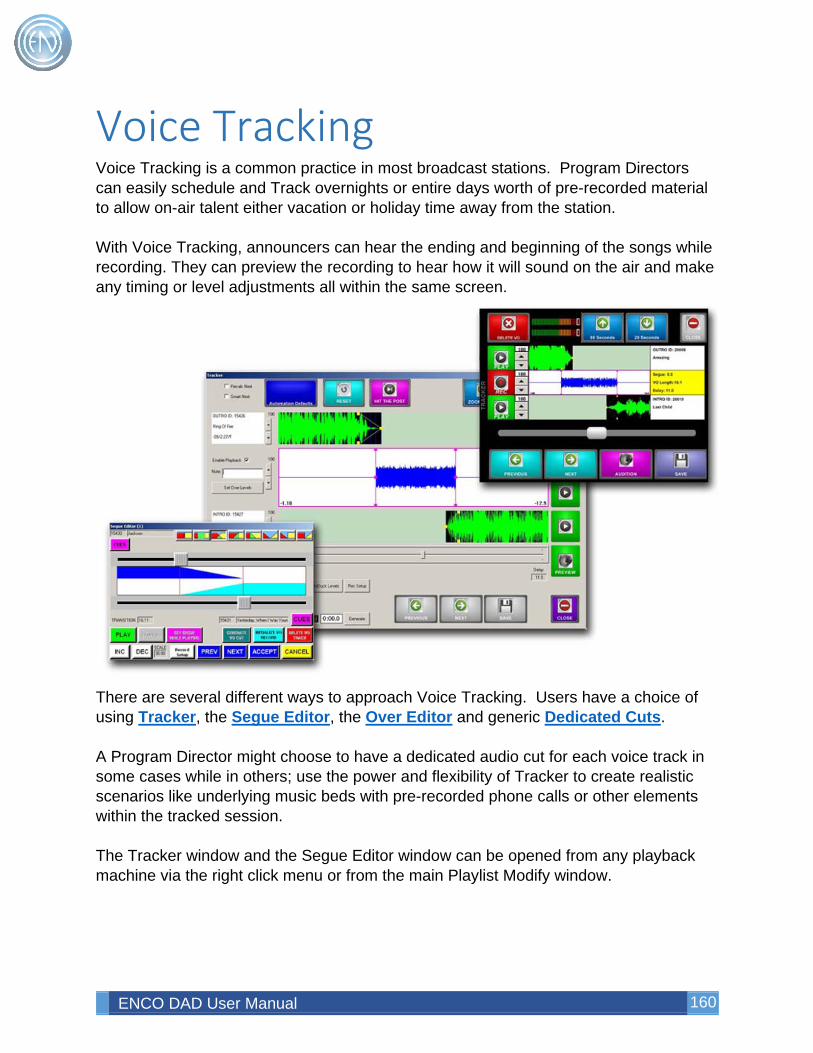
ENCO DAD User Manual 160
Voice Tracking Voice Tracking is a common practice in most broadcast stations. Program Directors can easily schedule and Track overnights or entire days worth of pre-recorded material to allow on-air talent either vacation or holiday time away from the station. With Voice Tracking, announcers can hear the ending and beginning of the songs while recording. They can preview the recording to hear how it will sound on the air and make any timing or level adjustments all within the same screen.
There are several different ways to approach Voice Tracking. Users have a choice of using Tracker, the Segue Editor, the Over Editor and generic Dedicated Cuts. A Program Director might choose to have a dedicated audio cut for each voice track in some cases while in others; use the power and flexibility of Tracker to create realistic scenarios like underlying music beds with pre-recorded phone calls or other elements within the tracked session. The Tracker window and the Segue Editor window can be opened from any playback machine via the right click menu or from the main Playlist Modify window.
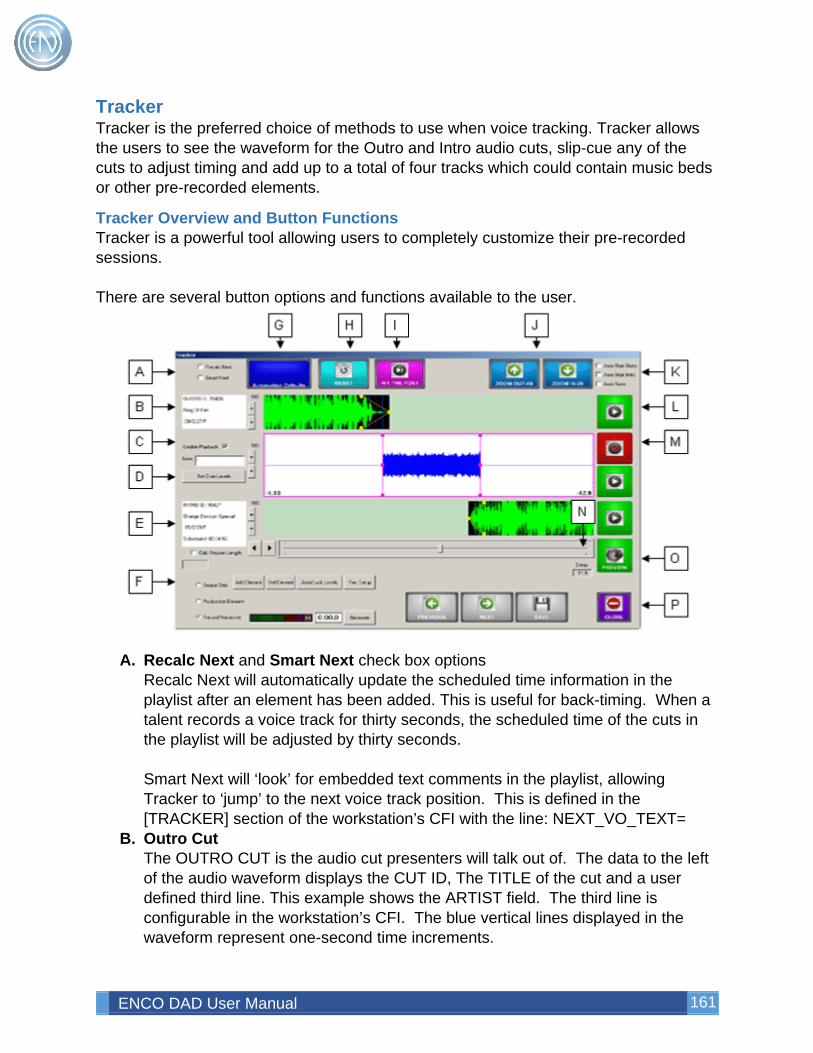
ENCO DAD User Manual 161
Tracker Tracker is the preferred choice of methods to use when voice tracking. Tracker allows the users to see the waveform for the Outro and Intro audio cuts, slip-cue any of the cuts to adjust timing and add up to a total of four tracks which could contain music beds or other pre-recorded elements.
Tracker Overview and Button Functions Tracker is a powerful tool allowing users to completely customize their pre-recorded sessions. There are several button options and functions available to the user.
A. Recalc Next and Smart Next check box options
Recalc Next will automatically update the scheduled time information in the playlist after an element has been added. This is useful for back-timing. When a talent records a voice track for thirty seconds, the scheduled time of the cuts in the playlist will be adjusted by thirty seconds. Smart Next will ‘look’ for embedded text comments in the playlist, allowing Tracker to ‘jump’ to the next voice track position. This is defined in the [TRACKER] section of the workstation’s CFI with the line: NEXT_VO_TEXT=
B. Outro Cut The OUTRO CUT is the audio cut presenters will talk out of. The data to the left of the audio waveform displays the CUT ID, The TITLE of the cut and a user defined third line. This example shows the ARTIST field. The third line is configurable in the workstation’s CFI. The blue vertical lines displayed in the waveform represent one-second time increments.
ENCO DAD User Manual 162
C. Enable Playback check box and NOTE field The Enable Playback check box option will allow the playback of the tracker element when checked. When unchecked, the middle element will not play when the user presses PREVIEW. The NOTE data field allows the user to associate a generic text note as the title of the tracker element. This note will be displayed as the title in a playlist when loaded in a Playback machine.
D. Set Over Levels and Invoke Editor buttons Pressing Set Over Levels allows the user to ‘duck’ the audio levels under the voice track or production element. The Invoke Editor button will open the normal Library Editor. Only pre-recorded production elements can be opened in the editor.
E. Intro Cut The INTRO CUT is the audio cut presenters will talk into. The data to the left of the audio waveform displays the CUT ID, The TITLE of the cut and a user defined third line. The INTRO CUT also displays the Scheduled time of the audio cut. This is helpful in determining the time of day the cut and voice track will play. The INTRO cut will display the amount of Talk Time in green if the markers are set. Calc Stopset Length will calculate the length of all the elements between autoLoads.
F. TRACKER STYLE options These check options automatically configure Tracker for the option selected. Segue Only is the default setting for Tracker. In this mode, users can adjust the segue transition of the INTRO and OUTRO cuts only. Production Element allows the user to place pre-recorded audio cuts or command cuts in the Tracker session. When selected: Add Element, Del Element and Select Cut appear. Record Voiceover allows the user to record voice-over cuts into the Tracker Session. When selected: Add Element, Del Element, Rec Setup and Generate buttons appear along with a small recording timer window to the right of the audio meters.
G. Library Defaults / Automation Defaults button This button will toggle its display depending on the Segue Origin switch setting in the CUE & AUTOMATION DEFAULTS window. When the Segue Origin switch is set to Use Library, Tracker will display this button as Library Defaults as an indication that Library pointers are being used. When the Segue Origin switch is
ENCO DAD User Manual 163
set to Use Defaults, Tracker will display this button as Automation Defaults indicating that generic default transitions are being used. In either mode, pressing this button will reset the OUTRO and INTRO fade markers and the segue overlap to the default values.
H. Reset The RESET button will reset the Tracker window to the last saved setting. This can be used like an undo button allowing a user to make adjustments then test the segue. If user wants to return to the last saved setting, they can undo the changes by pressing RESET.
I. Hit The Post Hit The Post will automatically adjust the production or voice over element so the end of the element is in line with the end of the Talk Time.
J. Zoom Out and Zoom In buttons The ZOOM OUT and ZOOM IN buttons control the amount of information displayed within the Tracker window. The buttons will display a numerical number representing the scale of the zoom.
K. Auto Start Outro, Auto Start Intro and Auto Save check box options These check box options will allow the associated cut to automatically start when the user begins the recording of a voice track. For example, if the Auto Start Outro box is check and the user selects Record Voiceover, the Outro cut will automatically play when the talent presses START to begin the recording. Auto Save will automatically save any changes made within Tracker.
L. Outro Start button This button will begin playback of the OUTRO CUT.
M. Rec and Start buttons When the Tracker Style option of Production Element is selected only a START button will be displayed. In this mode the START button will play the middle element. When the Tracker Style option of Record Voiceover is selected both the REC (record) and START button will be displayed. Pressing the REC button initializes the recording and the button will flash. Pressing START button will begin the recording. The START buttons toggle to STOP when in use.
N. Delay field and Display Scroll Bar The Delay field displays the amount of time between the end of the OUTRO cut and the beginning of the INTRO cut. The Display Scroll Bar allows the user to move the display.
O. PREVIEW button
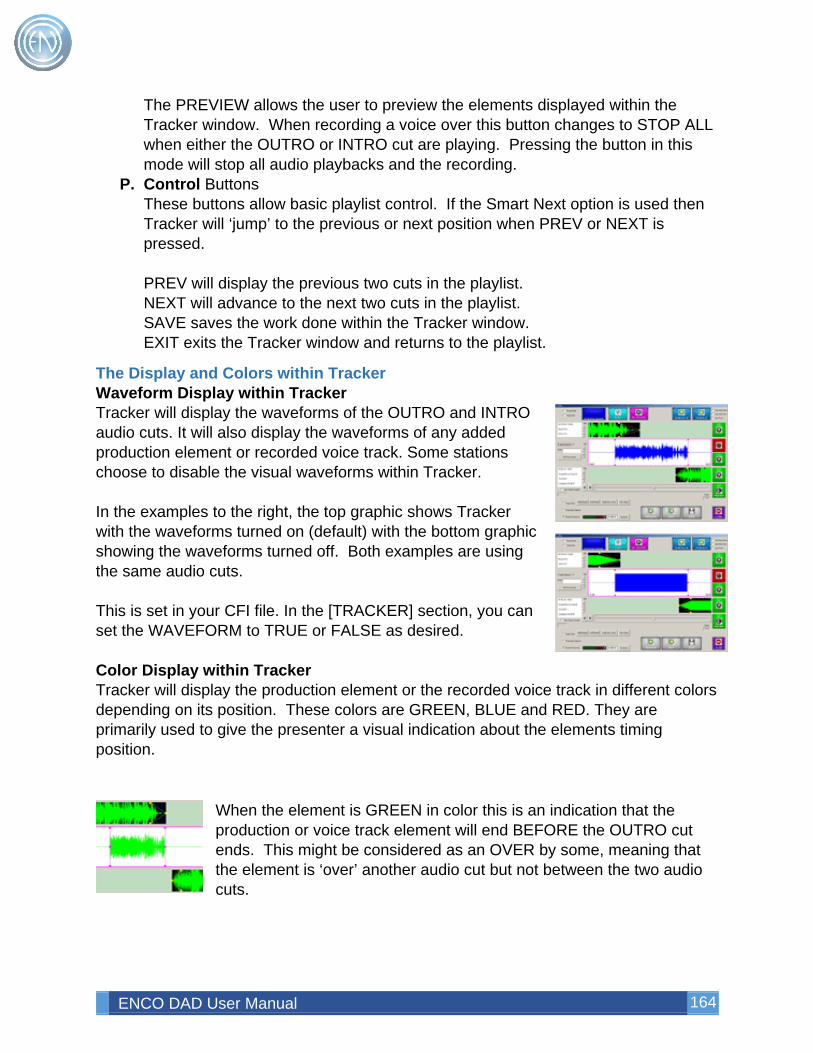
ENCO DAD User Manual 164
The PREVIEW allows the user to preview the elements displayed within the Tracker window. When recording a voice over this button changes to STOP ALL when either the OUTRO or INTRO cut are playing. Pressing the button in this mode will stop all audio playbacks and the recording.
P. Control Buttons These buttons allow basic playlist control. If the Smart Next option is used then Tracker will ‘jump’ to the previous or next position when PREV or NEXT is pressed. PREV will display the previous two cuts in the playlist. NEXT will advance to the next two cuts in the playlist. SAVE saves the work done within the Tracker window. EXIT exits the Tracker window and returns to the playlist.
The Display and Colors within Tracker Waveform Display within Tracker Tracker will display the waveforms of the OUTRO and INTRO audio cuts. It will also display the waveforms of any added production element or recorded voice track. Some stations choose to disable the visual waveforms within Tracker. In the examples to the right, the top graphic shows Tracker with the waveforms turned on (default) with the bottom graphic showing the waveforms turned off. Both examples are using the same audio cuts. This is set in your CFI file. In the [TRACKER] section, you can set the WAVEFORM to TRUE or FALSE as desired. Color Display within Tracker Tracker will display the production element or the recorded voice track in different colors depending on its position. These colors are GREEN, BLUE and RED. They are primarily used to give the presenter a visual indication about the elements timing position.
When the element is GREEN in color this is an indication that the production or voice track element will end BEFORE the OUTRO cut ends. This might be considered as an OVER by some, meaning that the element is ‘over’ another audio cut but not between the two audio cuts.
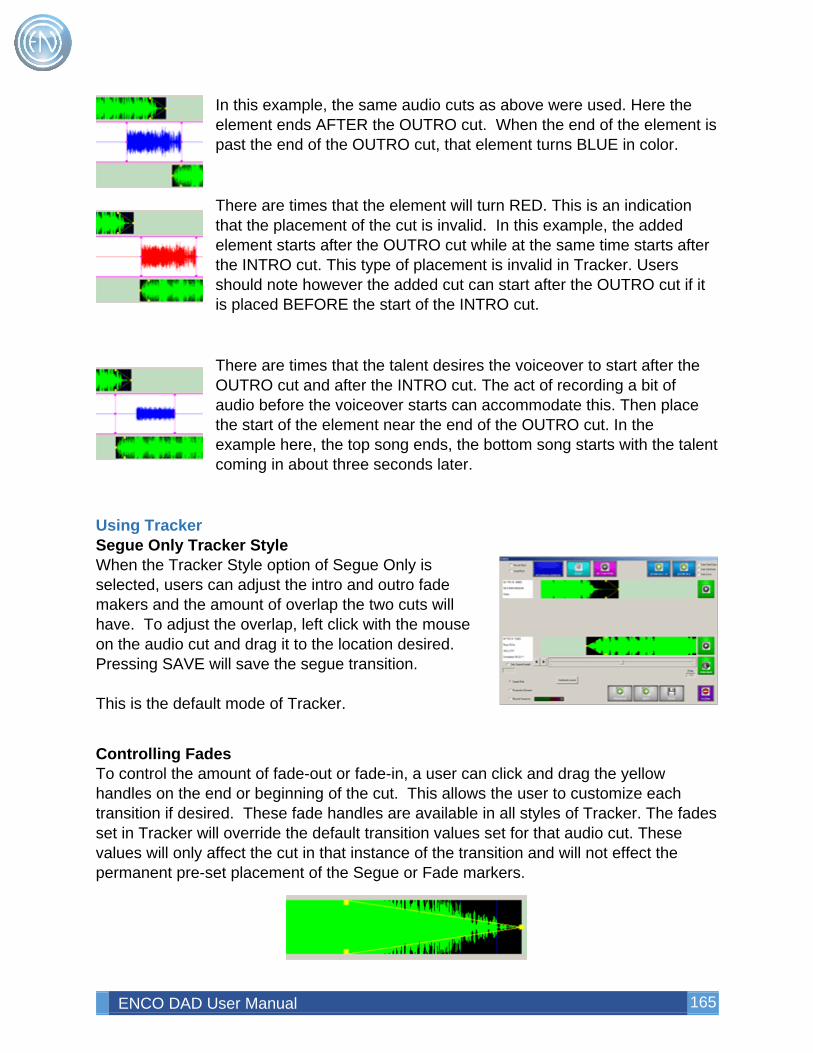
ENCO DAD User Manual 165
In this example, the same audio cuts as above were used. Here the element ends AFTER the OUTRO cut. When the end of the element is past the end of the OUTRO cut, that element turns BLUE in color.
There are times that the element will turn RED. This is an indication that the placement of the cut is invalid. In this example, the added element starts after the OUTRO cut while at the same time starts after the INTRO cut. This type of placement is invalid in Tracker. Users should note however the added cut can start after the OUTRO cut if it is placed BEFORE the start of the INTRO cut.
There are times that the talent desires the voiceover to start after the OUTRO cut and after the INTRO cut. The act of recording a bit of audio before the voiceover starts can accommodate this. Then place the start of the element near the end of the OUTRO cut. In the example here, the top song ends, the bottom song starts with the talent coming in about three seconds later.
Using Tracker Segue Only Tracker Style When the Tracker Style option of Segue Only is selected, users can adjust the intro and outro fade makers and the amount of overlap the two cuts will have. To adjust the overlap, left click with the mouse on the audio cut and drag it to the location desired. Pressing SAVE will save the segue transition. This is the default mode of Tracker.
Controlling Fades To control the amount of fade-out or fade-in, a user can click and drag the yellow handles on the end or beginning of the cut. This allows the user to customize each transition if desired. These fade handles are available in all styles of Tracker. The fades set in Tracker will override the default transition values set for that audio cut. These values will only affect the cut in that instance of the transition and will not effect the permanent pre-set placement of the Segue or Fade markers.
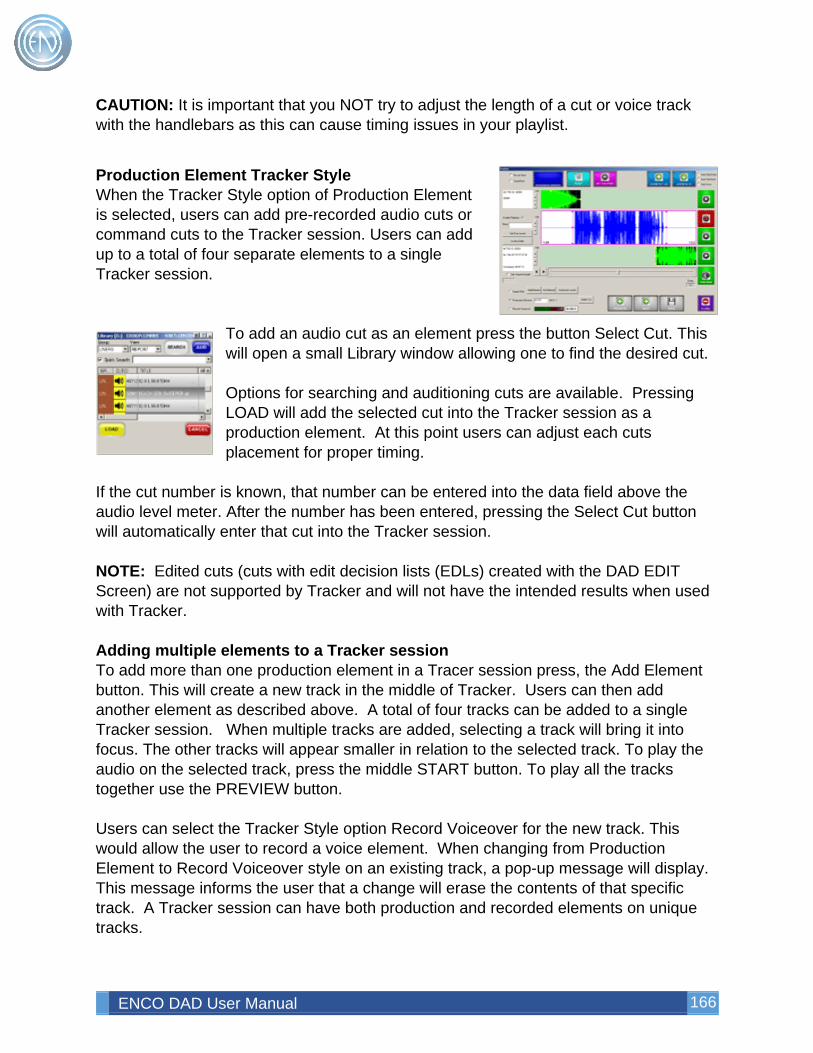
ENCO DAD User Manual 166
CAUTION: It is important that you NOT try to adjust the length of a cut or voice track with the handlebars as this can cause timing issues in your playlist.
Production Element Tracker Style When the Tracker Style option of Production Element is selected, users can add pre-recorded audio cuts or command cuts to the Tracker session. Users can add up to a total of four separate elements to a single Tracker session.
To add an audio cut as an element press the button Select Cut. This will open a small Library window allowing one to find the desired cut. Options for searching and auditioning cuts are available. Pressing LOAD will add the selected cut into the Tracker session as a production element. At this point users can adjust each cuts placement for proper timing.
If the cut number is known, that number can be entered into the data field above the audio level meter. After the number has been entered, pressing the Select Cut button will automatically enter that cut into the Tracker session. NOTE: Edited cuts (cuts with edit decision lists (EDLs) created with the DAD EDIT Screen) are not supported by Tracker and will not have the intended results when used with Tracker. Adding multiple elements to a Tracker session To add more than one production element in a Tracer session press, the Add Element button. This will create a new track in the middle of Tracker. Users can then add another element as described above. A total of four tracks can be added to a single Tracker session. When multiple tracks are added, selecting a track will bring it into focus. The other tracks will appear smaller in relation to the selected track. To play the audio on the selected track, press the middle START button. To play all the tracks together use the PREVIEW button. Users can select the Tracker Style option Record Voiceover for the new track. This would allow the user to record a voice element. When changing from Production Element to Record Voiceover style on an existing track, a pop-up message will display. This message informs the user that a change will erase the contents of that specific track. A Tracker session can have both production and recorded elements on unique tracks.
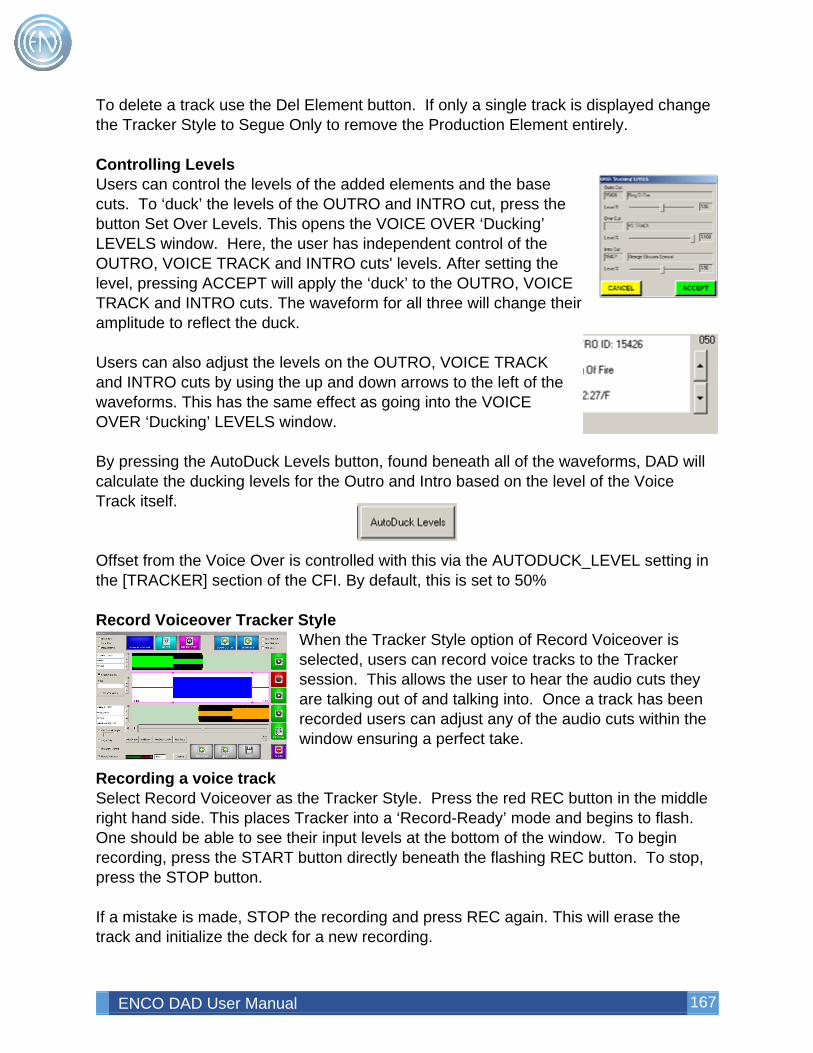
ENCO DAD User Manual 167
To delete a track use the Del Element button. If only a single track is displayed change the Tracker Style to Segue Only to remove the Production Element entirely. Controlling Levels Users can control the levels of the added elements and the base cuts. To ‘duck’ the levels of the OUTRO and INTRO cut, press the button Set Over Levels. This opens the VOICE OVER ‘Ducking’ LEVELS window. Here, the user has independent control of the OUTRO, VOICE TRACK and INTRO cuts' levels. After setting the level, pressing ACCEPT will apply the ‘duck’ to the OUTRO, VOICE TRACK and INTRO cuts. The waveform for all three will change their amplitude to reflect the duck. Users can also adjust the levels on the OUTRO, VOICE TRACK and INTRO cuts by using the up and down arrows to the left of the waveforms. This has the same effect as going into the VOICE OVER ‘Ducking’ LEVELS window. By pressing the AutoDuck Levels button, found beneath all of the waveforms, DAD will calculate the ducking levels for the Outro and Intro based on the level of the Voice Track itself. Offset from the Voice Over is controlled with this via the AUTODUCK_LEVEL setting in the [TRACKER] section of the CFI. By default, this is set to 50% Record Voiceover Tracker Style
When the Tracker Style option of Record Voiceover is selected, users can record voice tracks to the Tracker session. This allows the user to hear the audio cuts they are talking out of and talking into. Once a track has been recorded users can adjust any of the audio cuts within the window ensuring a perfect take.
Recording a voice track Select Record Voiceover as the Tracker Style. Press the red REC button in the middle right hand side. This places Tracker into a ‘Record-Ready’ mode and begins to flash. One should be able to see their input levels at the bottom of the window. To begin recording, press the START button directly beneath the flashing REC button. To stop, press the STOP button. If a mistake is made, STOP the recording and press REC again. This will erase the track and initialize the deck for a new recording.
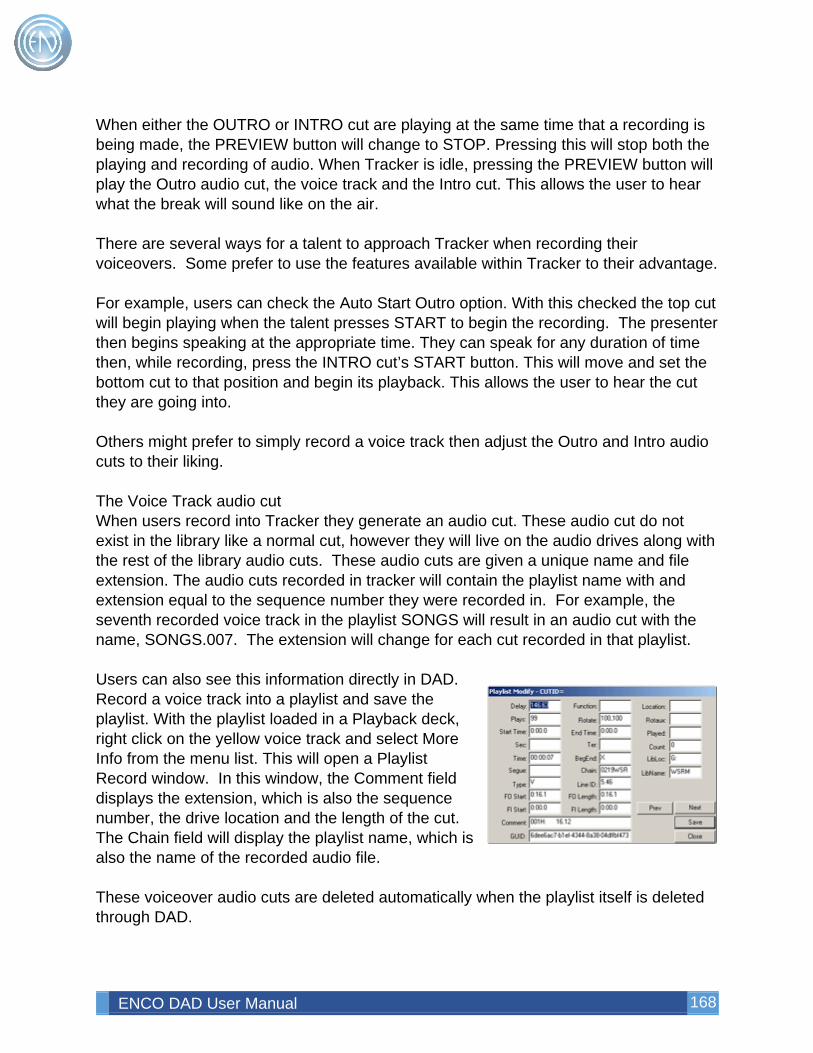
ENCO DAD User Manual 168
When either the OUTRO or INTRO cut are playing at the same time that a recording is being made, the PREVIEW button will change to STOP. Pressing this will stop both the playing and recording of audio. When Tracker is idle, pressing the PREVIEW button will play the Outro audio cut, the voice track and the Intro cut. This allows the user to hear what the break will sound like on the air. There are several ways for a talent to approach Tracker when recording their voiceovers. Some prefer to use the features available within Tracker to their advantage. For example, users can check the Auto Start Outro option. With this checked the top cut will begin playing when the talent presses START to begin the recording. The presenter then begins speaking at the appropriate time. They can speak for any duration of time then, while recording, press the INTRO cut’s START button. This will move and set the bottom cut to that position and begin its playback. This allows the user to hear the cut they are going into. Others might prefer to simply record a voice track then adjust the Outro and Intro audio cuts to their liking. The Voice Track audio cut When users record into Tracker they generate an audio cut. These audio cut do not exist in the library like a normal cut, however they will live on the audio drives along with the rest of the library audio cuts. These audio cuts are given a unique name and file extension. The audio cuts recorded in tracker will contain the playlist name with and extension equal to the sequence number they were recorded in. For example, the seventh recorded voice track in the playlist SONGS will result in an audio cut with the name, SONGS.007. The extension will change for each cut recorded in that playlist. Users can also see this information directly in DAD. Record a voice track into a playlist and save the playlist. With the playlist loaded in a Playback deck, right click on the yellow voice track and select More Info from the menu list. This will open a Playlist Record window. In this window, the Comment field displays the extension, which is also the sequence number, the drive location and the length of the cut. The Chain field will display the playlist name, which is also the name of the recorded audio file. These voiceover audio cuts are deleted automatically when the playlist itself is deleted through DAD.
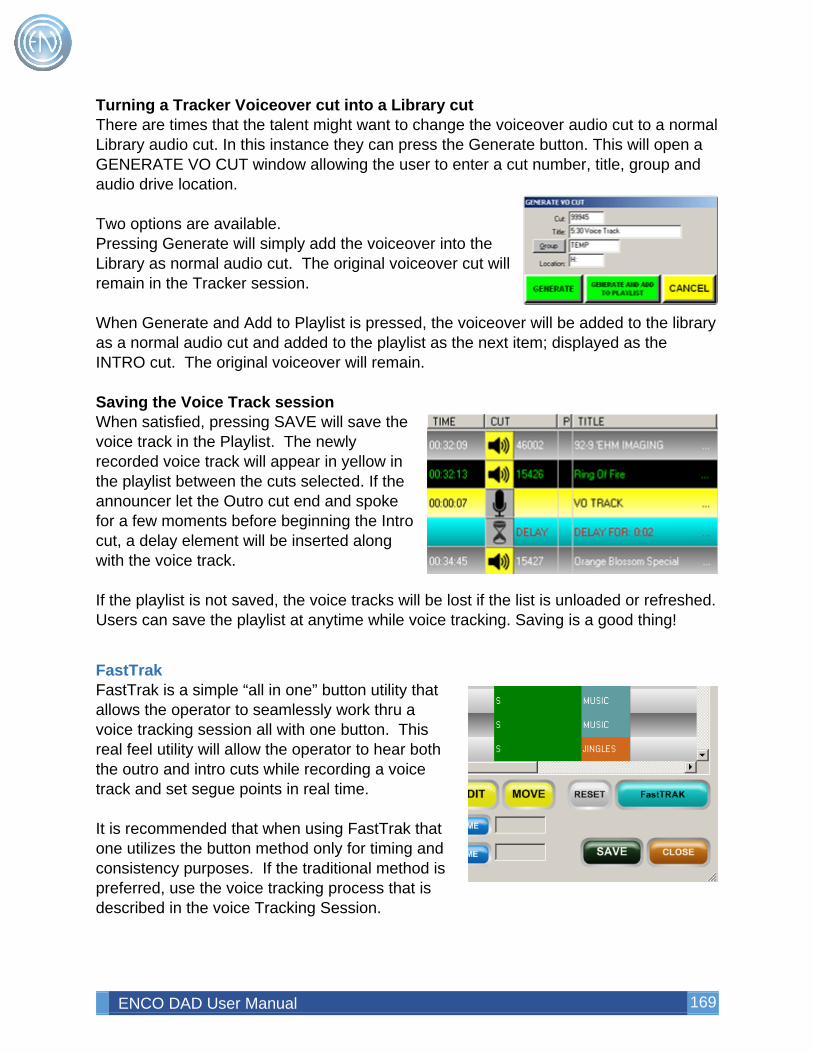
ENCO DAD User Manual 169
Turning a Tracker Voiceover cut into a Library cut There are times that the talent might want to change the voiceover audio cut to a normal Library audio cut. In this instance they can press the Generate button. This will open a GENERATE VO CUT window allowing the user to enter a cut number, title, group and audio drive location. Two options are available. Pressing Generate will simply add the voiceover into the Library as normal audio cut. The original voiceover cut will remain in the Tracker session. When Generate and Add to Playlist is pressed, the voiceover will be added to the library as a normal audio cut and added to the playlist as the next item; displayed as the INTRO cut. The original voiceover will remain. Saving the Voice Track session When satisfied, pressing SAVE will save the voice track in the Playlist. The newly recorded voice track will appear in yellow in the playlist between the cuts selected. If the announcer let the Outro cut end and spoke for a few moments before beginning the Intro cut, a delay element will be inserted along with the voice track. If the playlist is not saved, the voice tracks will be lost if the list is unloaded or refreshed. Users can save the playlist at anytime while voice tracking. Saving is a good thing!
FastTrak FastTrak is a simple “all in one” button utility that allows the operator to seamlessly work thru a voice tracking session all with one button. This real feel utility will allow the operator to hear both the outro and intro cuts while recording a voice track and set segue points in real time. It is recommended that when using FastTrak that one utilizes the button method only for timing and consistency purposes. If the traditional method is preferred, use the voice tracking process that is described in the voice Tracking Session.
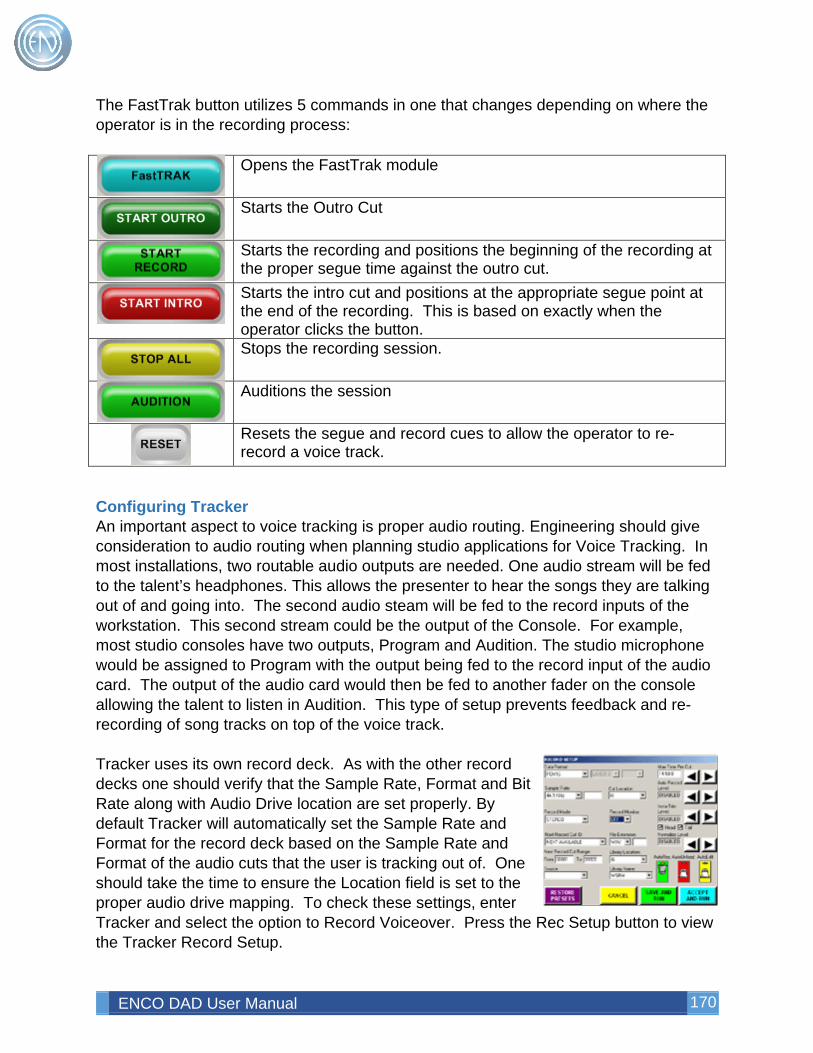
ENCO DAD User Manual 170
The FastTrak button utilizes 5 commands in one that changes depending on where the operator is in the recording process:
Opens the FastTrak module
Starts the Outro Cut
Starts the recording and positions the beginning of the recording at the proper segue time against the outro cut.
Starts the intro cut and positions at the appropriate segue point at the end of the recording. This is based on exactly when the operator clicks the button.
Stops the recording session.
Auditions the session
Resets the segue and record cues to allow the operator to re-record a voice track.
Configuring Tracker An important aspect to voice tracking is proper audio routing. Engineering should give consideration to audio routing when planning studio applications for Voice Tracking. In most installations, two routable audio outputs are needed. One audio stream will be fed to the talent’s headphones. This allows the presenter to hear the songs they are talking out of and going into. The second audio steam will be fed to the record inputs of the workstation. This second stream could be the output of the Console. For example, most studio consoles have two outputs, Program and Audition. The studio microphone would be assigned to Program with the output being fed to the record input of the audio card. The output of the audio card would then be fed to another fader on the console allowing the talent to listen in Audition. This type of setup prevents feedback and re-recording of song tracks on top of the voice track. Tracker uses its own record deck. As with the other record decks one should verify that the Sample Rate, Format and Bit Rate along with Audio Drive location are set properly. By default Tracker will automatically set the Sample Rate and Format for the record deck based on the Sample Rate and Format of the audio cuts that the user is tracking out of. One should take the time to ensure the Location field is set to the proper audio drive mapping. To check these settings, enter Tracker and select the option to Record Voiceover. Press the Rec Setup button to view the Tracker Record Setup.
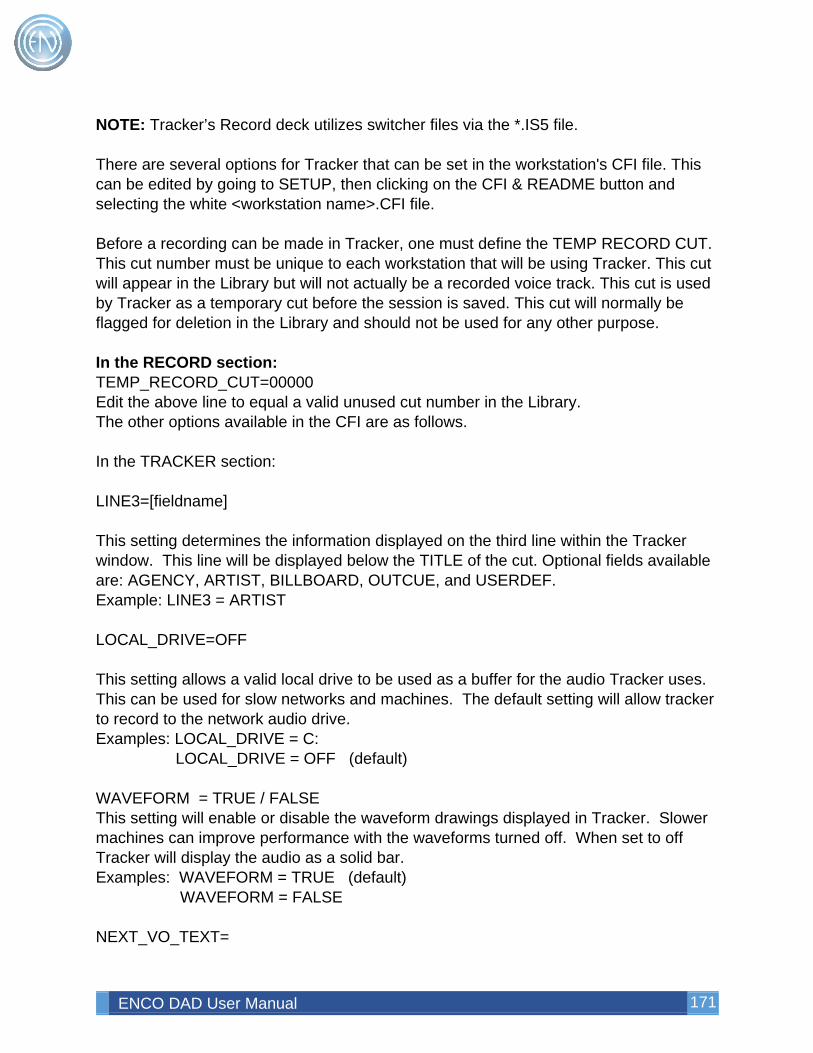
ENCO DAD User Manual 171
NOTE: Tracker’s Record deck utilizes switcher files via the *.IS5 file. There are several options for Tracker that can be set in the workstation's CFI file. This can be edited by going to SETUP, then clicking on the CFI & README button and selecting the white <workstation name>.CFI file. Before a recording can be made in Tracker, one must define the TEMP RECORD CUT. This cut number must be unique to each workstation that will be using Tracker. This cut will appear in the Library but will not actually be a recorded voice track. This cut is used by Tracker as a temporary cut before the session is saved. This cut will normally be flagged for deletion in the Library and should not be used for any other purpose. In the RECORD section: TEMP_RECORD_CUT=00000 Edit the above line to equal a valid unused cut number in the Library. The other options available in the CFI are as follows. In the TRACKER section: LINE3=[fieldname] This setting determines the information displayed on the third line within the Tracker window. This line will be displayed below the TITLE of the cut. Optional fields available are: AGENCY, ARTIST, BILLBOARD, OUTCUE, and USERDEF. Example: LINE3 = ARTIST LOCAL_DRIVE=OFF This setting allows a valid local drive to be used as a buffer for the audio Tracker uses. This can be used for slow networks and machines. The default setting will allow tracker to record to the network audio drive. Examples: LOCAL_DRIVE = C: LOCAL_DRIVE = OFF (default) WAVEFORM = TRUE / FALSE This setting will enable or disable the waveform drawings displayed in Tracker. Slower machines can improve performance with the waveforms turned off. When set to off Tracker will display the audio as a solid bar. Examples: WAVEFORM = TRUE (default) WAVEFORM = FALSE NEXT_VO_TEXT=
ENCO DAD User Manual 172
This option works in conjunction with the Tracker check box option “SMART NEXT”. When this box is checked and the user hits the NEXT button in Tracker, Tracker will automatically move to the next instance of the COMMENT line, which contains the text specified in the NEXT_VO_TEXT line in the CFI. Example: NEXT_VO_TEXT = VOICE TRACK DIPDOWN_FADE_LEN=1.00 This value in second’s sets the duration of the fade-in and fade-out when ‘Ducking’ levels set. DEFAULT_OUTRO_OVER_LEVEL=75 DEFAULT_INTRO_OVER_LEVEL=75 DEFAULT_VO_OVER_LEVEL=100 These values allow for independent level control of the outro, voice over and intro cuts. The values are percentages. In the PLAYLIST section: LOADED_WARNING=TRUE / FALSE When set to TRUE, this will display a warning message on all other machines that also have this line enabled. DAD will allow any user to load and manipulate any playlist at any time. If more than two people have the same playlist loaded on two separate workstations, the person who saves LAST will overwrite the others work. This means if a talent in one room is voice tracking on a playlist and another talent loads that same playlist in another room at the same time, they could overwrite each other’s voice tracks. Setting the CFI line to TRUE on both workstations will cause DAD to display a warning message that the loaded playlist is in use by another workstation. The message will display the name of the other workstation along with the machine that list is loaded into.
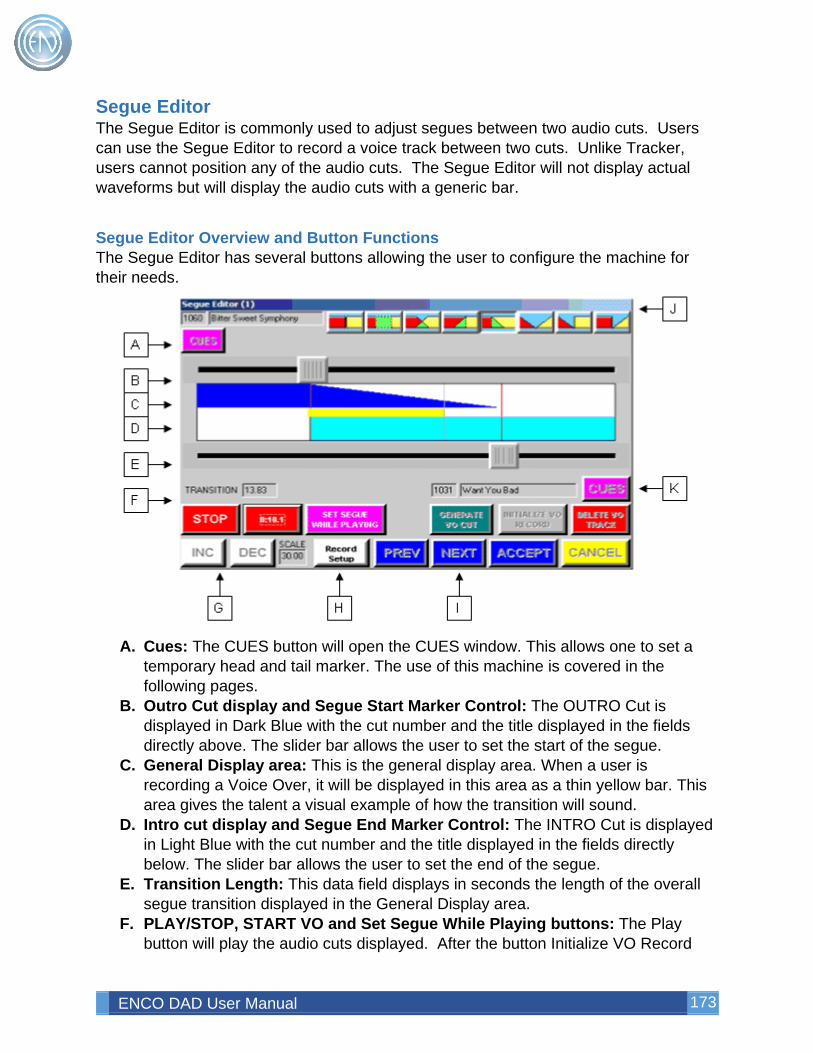
ENCO DAD User Manual 173
Segue Editor The Segue Editor is commonly used to adjust segues between two audio cuts. Users can use the Segue Editor to record a voice track between two cuts. Unlike Tracker, users cannot position any of the audio cuts. The Segue Editor will not display actual waveforms but will display the audio cuts with a generic bar.
Segue Editor Overview and Button Functions The Segue Editor has several buttons allowing the user to configure the machine for their needs.
A. Cues: The CUES button will open the CUES window. This allows one to set a
temporary head and tail marker. The use of this machine is covered in the following pages.
B. Outro Cut display and Segue Start Marker Control: The OUTRO Cut is displayed in Dark Blue with the cut number and the title displayed in the fields directly above. The slider bar allows the user to set the start of the segue.
C. General Display area: This is the general display area. When a user is recording a Voice Over, it will be displayed in this area as a thin yellow bar. This area gives the talent a visual example of how the transition will sound.
D. Intro cut display and Segue End Marker Control: The INTRO Cut is displayed in Light Blue with the cut number and the title displayed in the fields directly below. The slider bar allows the user to set the end of the segue.
E. Transition Length: This data field displays in seconds the length of the overall segue transition displayed in the General Display area.
F. PLAY/STOP, START VO and Set Segue While Playing buttons: The Play button will play the audio cuts displayed. After the button Initialize VO Record
ENCO DAD User Manual 174
has been pressed, the user can begin recording by touching the START VO button. This button will change to a recording timer. The Set Segue While Playing button will set the segue start marker at the point the button is pressed while playing.
G. INC and DEC buttons with time scale: The Increase (INC) and Decrease (DEC) buttons will set the display and audio sample size. The smallest scale is five seconds increasing in ten second steps. The amount of audio is displayed in the scale field.
H. Record Setup: Opens the record setup. This allows the user to set the audio format, sample and bit rates along with the location of the audio drive.
I. PREV, NEXT, ACCEPT and CANCEL buttons: These buttons allow the user to move up and down in the playlist. PREV will move back in the playlist by one cut with NEXT moving down the playlist by a single cut. ACCEPT will save the work done and return to the playlist. CANCEL will exit and return to the playlist without making any changes.
J. Segue transition buttons: These buttons set the type of transition, fade-out and fade-in for both the OUTRO and INTRO cuts. The red bar represents the OUTRO cut with yellow bar representing the INTRO cut. The green display shows the type of fade and overlap for the two cuts.
K. Generate VO, Initialize recording and Delete VO Track buttons: Generate VO will open a display allowing one to add the voice over to the library or add it as a cut to the Playlist. To record a voice over the user must first press Initialize Recording. This places the Segue Editor into a record ready mode. The user then presses START VO to begin the recording. Delete VO Track will delete the voice over track.
Using Segue Editor To Record Voiceovers The Segue Editor allows users to customize the segue transition. It also allows users to record a voice over directly between the two audio cuts. Before recording a voiceover in the Segue Editor, the user should set the basic segue between the two cuts. Once the segue has been set, press INITIALIZE VO RECORD. This sets the Segue Editor into a record ready mode. Press PLAY to being the playback of the OUTRO cut. While the OUTRO cut is playing the user can press START VO to begin the recording. A yellow bar appears between the OUTRO and INTRO cuts. This is the voiceover. Once an acceptable ‘take’ has been recorded, the user can press ACCEPT to save return to the playlist. If the talent would like to continue recording another voiceover for another cut, they can press NEXT to advance the playlist. If a voiceover has been recorded and there is a need to re-record the take, pressing DELETE VO TRACK will delete the voiceover allowing the user to repeat the steps above.
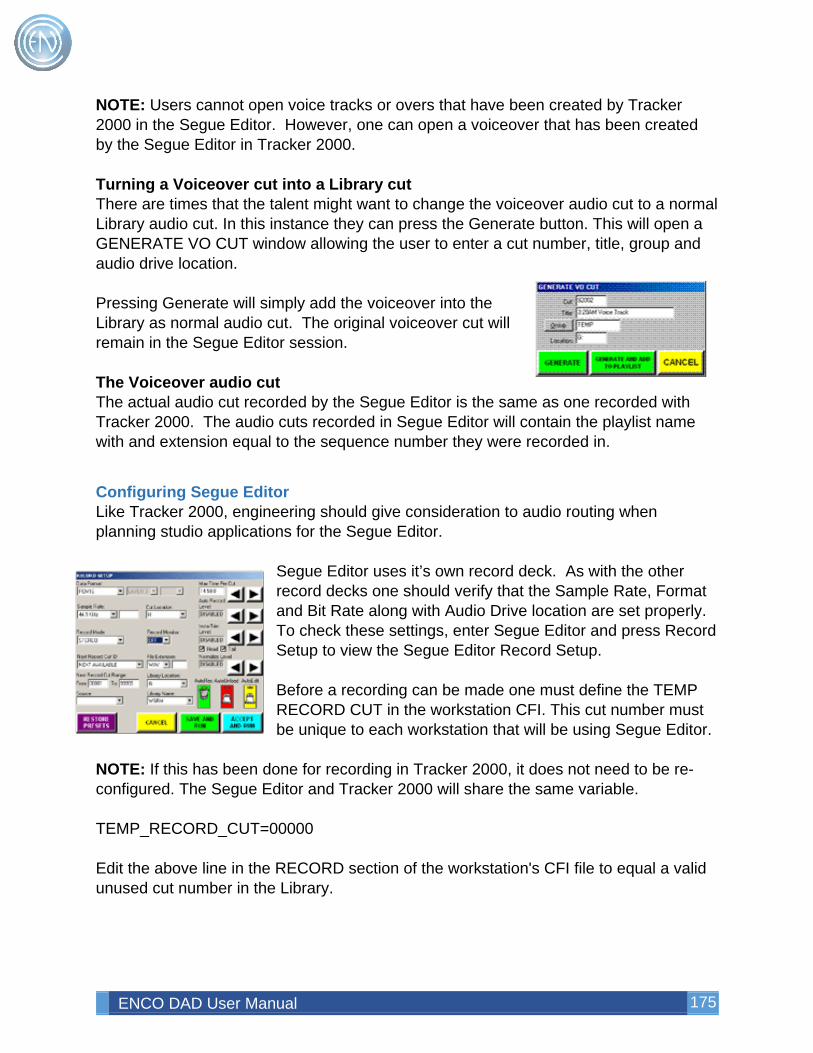
ENCO DAD User Manual 175
NOTE: Users cannot open voice tracks or overs that have been created by Tracker 2000 in the Segue Editor. However, one can open a voiceover that has been created by the Segue Editor in Tracker 2000. Turning a Voiceover cut into a Library cut There are times that the talent might want to change the voiceover audio cut to a normal Library audio cut. In this instance they can press the Generate button. This will open a GENERATE VO CUT window allowing the user to enter a cut number, title, group and audio drive location. Pressing Generate will simply add the voiceover into the Library as normal audio cut. The original voiceover cut will remain in the Segue Editor session. The Voiceover audio cut The actual audio cut recorded by the Segue Editor is the same as one recorded with Tracker 2000. The audio cuts recorded in Segue Editor will contain the playlist name with and extension equal to the sequence number they were recorded in.
Configuring Segue Editor Like Tracker 2000, engineering should give consideration to audio routing when planning studio applications for the Segue Editor.
Segue Editor uses it’s own record deck. As with the other record decks one should verify that the Sample Rate, Format and Bit Rate along with Audio Drive location are set properly. To check these settings, enter Segue Editor and press Record Setup to view the Segue Editor Record Setup. Before a recording can be made one must define the TEMP RECORD CUT in the workstation CFI. This cut number must be unique to each workstation that will be using Segue Editor.
NOTE: If this has been done for recording in Tracker 2000, it does not need to be re-configured. The Segue Editor and Tracker 2000 will share the same variable. TEMP_RECORD_CUT=00000 Edit the above line in the RECORD section of the workstation's CFI file to equal a valid unused cut number in the Library.
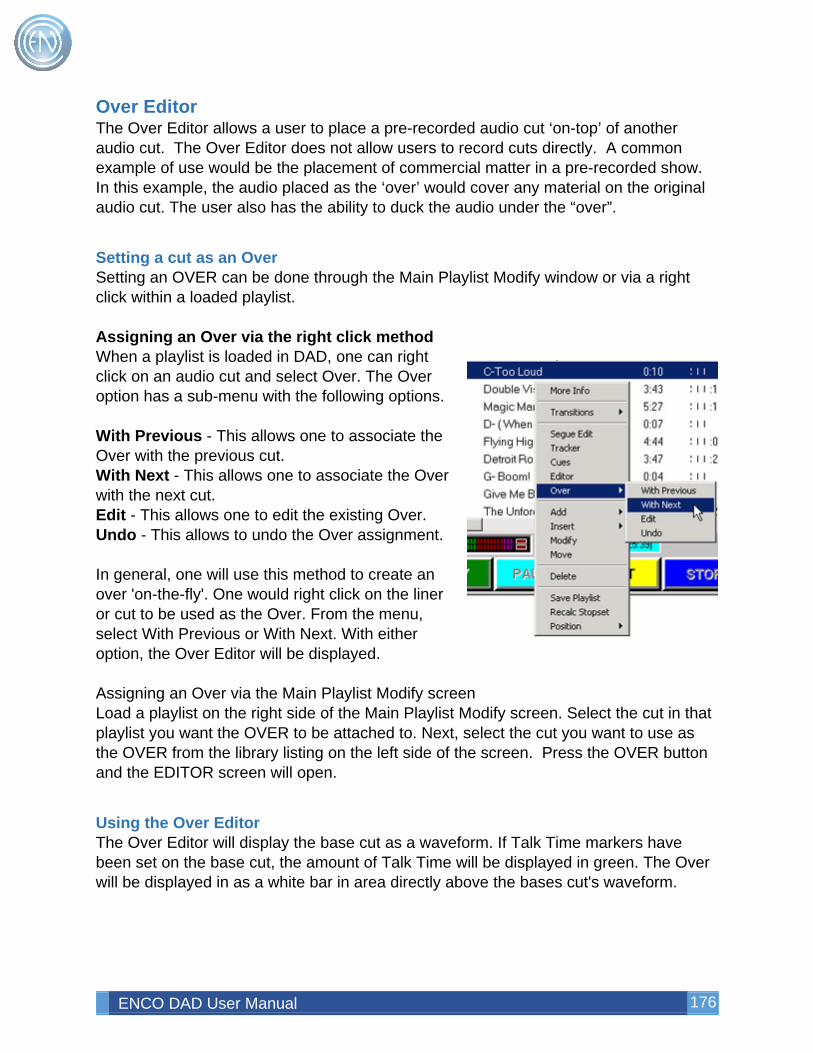
ENCO DAD User Manual 176
Over Editor The Over Editor allows a user to place a pre-recorded audio cut ‘on-top’ of another audio cut. The Over Editor does not allow users to record cuts directly. A common example of use would be the placement of commercial matter in a pre-recorded show. In this example, the audio placed as the ‘over’ would cover any material on the original audio cut. The user also has the ability to duck the audio under the “over”.
Setting a cut as an Over Setting an OVER can be done through the Main Playlist Modify window or via a right click within a loaded playlist. Assigning an Over via the right click method When a playlist is loaded in DAD, one can right click on an audio cut and select Over. The Over option has a sub-menu with the following options. With Previous - This allows one to associate the Over with the previous cut. With Next - This allows one to associate the Over with the next cut. Edit - This allows one to edit the existing Over. Undo - This allows to undo the Over assignment. In general, one will use this method to create an over 'on-the-fly'. One would right click on the liner or cut to be used as the Over. From the menu, select With Previous or With Next. With either option, the Over Editor will be displayed. Assigning an Over via the Main Playlist Modify screen Load a playlist on the right side of the Main Playlist Modify screen. Select the cut in that playlist you want the OVER to be attached to. Next, select the cut you want to use as the OVER from the library listing on the left side of the screen. Press the OVER button and the EDITOR screen will open.
Using the Over Editor The Over Editor will display the base cut as a waveform. If Talk Time markers have been set on the base cut, the amount of Talk Time will be displayed in green. The Over will be displayed in as a white bar in area directly above the bases cut's waveform.
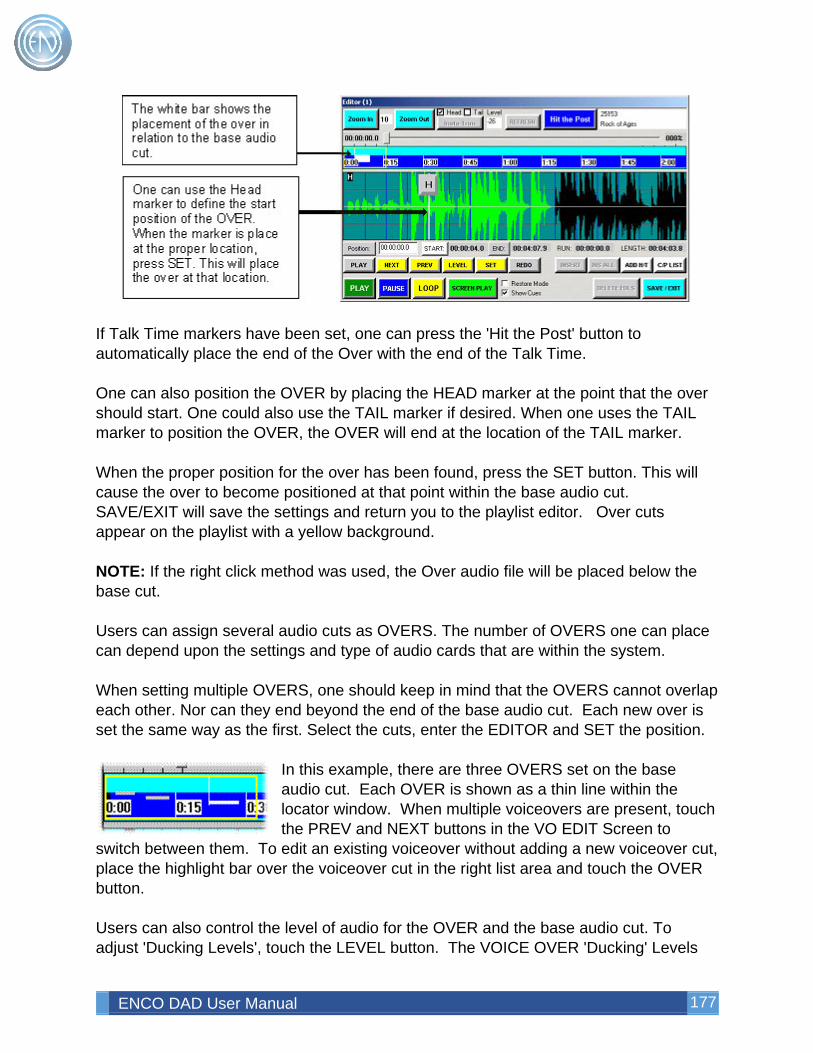
ENCO DAD User Manual 177
If Talk Time markers have been set, one can press the 'Hit the Post' button to automatically place the end of the Over with the end of the Talk Time. One can also position the OVER by placing the HEAD marker at the point that the over should start. One could also use the TAIL marker if desired. When one uses the TAIL marker to position the OVER, the OVER will end at the location of the TAIL marker. When the proper position for the over has been found, press the SET button. This will cause the over to become positioned at that point within the base audio cut. SAVE/EXIT will save the settings and return you to the playlist editor. Over cuts appear on the playlist with a yellow background. NOTE: If the right click method was used, the Over audio file will be placed below the base cut. Users can assign several audio cuts as OVERS. The number of OVERS one can place can depend upon the settings and type of audio cards that are within the system. When setting multiple OVERS, one should keep in mind that the OVERS cannot overlap each other. Nor can they end beyond the end of the base audio cut. Each new over is set the same way as the first. Select the cuts, enter the EDITOR and SET the position.
In this example, there are three OVERS set on the base audio cut. Each OVER is shown as a thin line within the locator window. When multiple voiceovers are present, touch the PREV and NEXT buttons in the VO EDIT Screen to
switch between them. To edit an existing voiceover without adding a new voiceover cut, place the highlight bar over the voiceover cut in the right list area and touch the OVER button. Users can also control the level of audio for the OVER and the base audio cut. To adjust 'Ducking Levels', touch the LEVEL button. The VOICE OVER 'Ducking' Levels
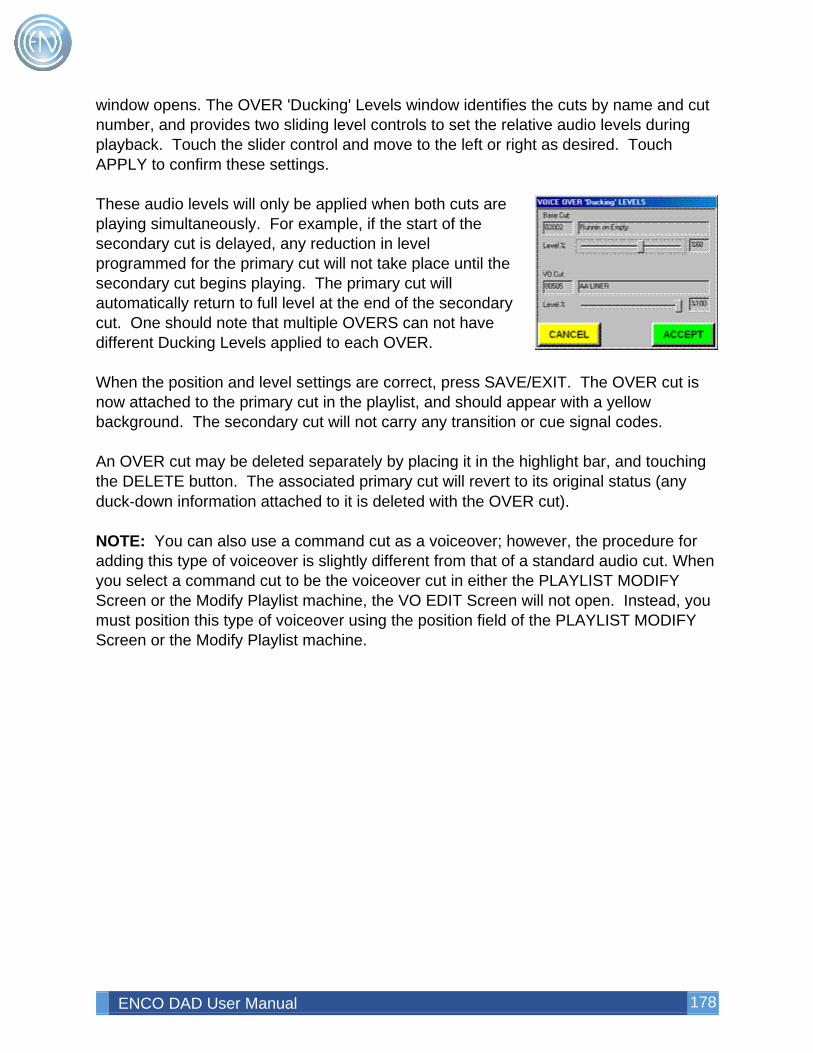
ENCO DAD User Manual 178
window opens. The OVER 'Ducking' Levels window identifies the cuts by name and cut number, and provides two sliding level controls to set the relative audio levels during playback. Touch the slider control and move to the left or right as desired. Touch APPLY to confirm these settings. These audio levels will only be applied when both cuts are playing simultaneously. For example, if the start of the secondary cut is delayed, any reduction in level programmed for the primary cut will not take place until the secondary cut begins playing. The primary cut will automatically return to full level at the end of the secondary cut. One should note that multiple OVERS can not have different Ducking Levels applied to each OVER. When the position and level settings are correct, press SAVE/EXIT. The OVER cut is now attached to the primary cut in the playlist, and should appear with a yellow background. The secondary cut will not carry any transition or cue signal codes. An OVER cut may be deleted separately by placing it in the highlight bar, and touching the DELETE button. The associated primary cut will revert to its original status (any duck‑down information attached to it is deleted with the OVER cut). NOTE: You can also use a command cut as a voiceover; however, the procedure for adding this type of voiceover is slightly different from that of a standard audio cut. When you select a command cut to be the voiceover cut in either the PLAYLIST MODIFY Screen or the Modify Playlist machine, the VO EDIT Screen will not open. Instead, you must position this type of voiceover using the position field of the PLAYLIST MODIFY Screen or the Modify Playlist machine.
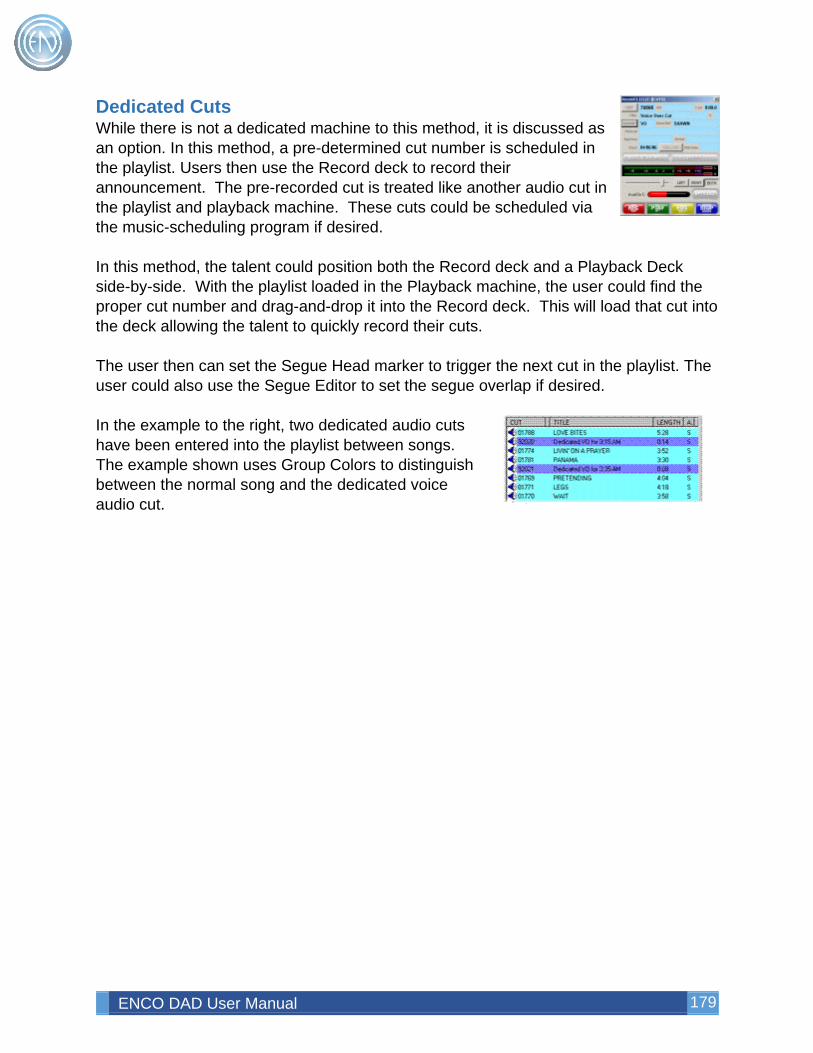
ENCO DAD User Manual 179
Dedicated Cuts While there is not a dedicated machine to this method, it is discussed as an option. In this method, a pre-determined cut number is scheduled in the playlist. Users then use the Record deck to record their announcement. The pre-recorded cut is treated like another audio cut in the playlist and playback machine. These cuts could be scheduled via the music-scheduling program if desired. In this method, the talent could position both the Record deck and a Playback Deck side-by-side. With the playlist loaded in the Playback machine, the user could find the proper cut number and drag-and-drop it into the Record deck. This will load that cut into the deck allowing the talent to quickly record their cuts. The user then can set the Segue Head marker to trigger the next cut in the playlist. The user could also use the Segue Editor to set the segue overlap if desired. In the example to the right, two dedicated audio cuts have been entered into the playlist between songs. The example shown uses Group Colors to distinguish between the normal song and the dedicated voice audio cut.
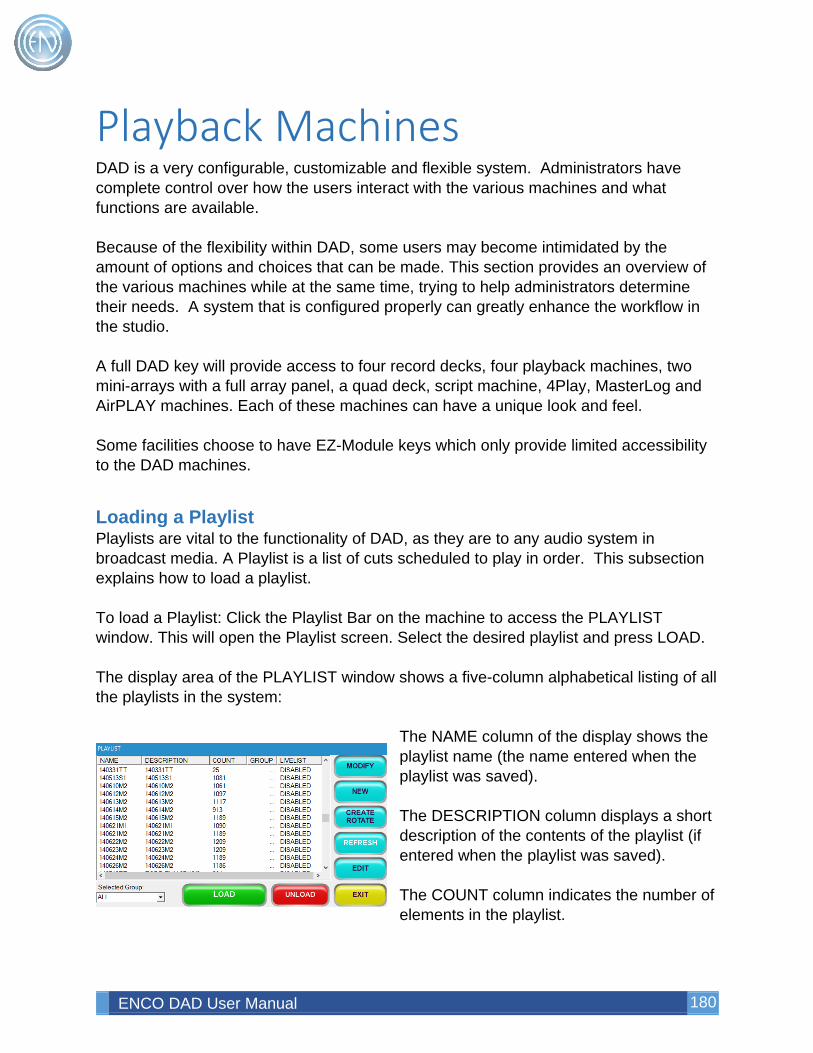
ENCO DAD User Manual 180
Playback Machines DAD is a very configurable, customizable and flexible system. Administrators have complete control over how the users interact with the various machines and what functions are available. Because of the flexibility within DAD, some users may become intimidated by the amount of options and choices that can be made. This section provides an overview of the various machines while at the same time, trying to help administrators determine their needs. A system that is configured properly can greatly enhance the workflow in the studio. A full DAD key will provide access to four record decks, four playback machines, two mini-arrays with a full array panel, a quad deck, script machine, 4Play, MasterLog and AirPLAY machines. Each of these machines can have a unique look and feel. Some facilities choose to have EZ-Module keys which only provide limited accessibility to the DAD machines.
Loading a Playlist Playlists are vital to the functionality of DAD, as they are to any audio system in broadcast media. A Playlist is a list of cuts scheduled to play in order. This subsection explains how to load a playlist. To load a Playlist: Click the Playlist Bar on the machine to access the PLAYLIST window. This will open the Playlist screen. Select the desired playlist and press LOAD. The display area of the PLAYLIST window shows a five-column alphabetical listing of all the playlists in the system:
The NAME column of the display shows the playlist name (the name entered when the playlist was saved). The DESCRIPTION column displays a short description of the contents of the playlist (if entered when the playlist was saved). The COUNT column indicates the number of elements in the playlist.
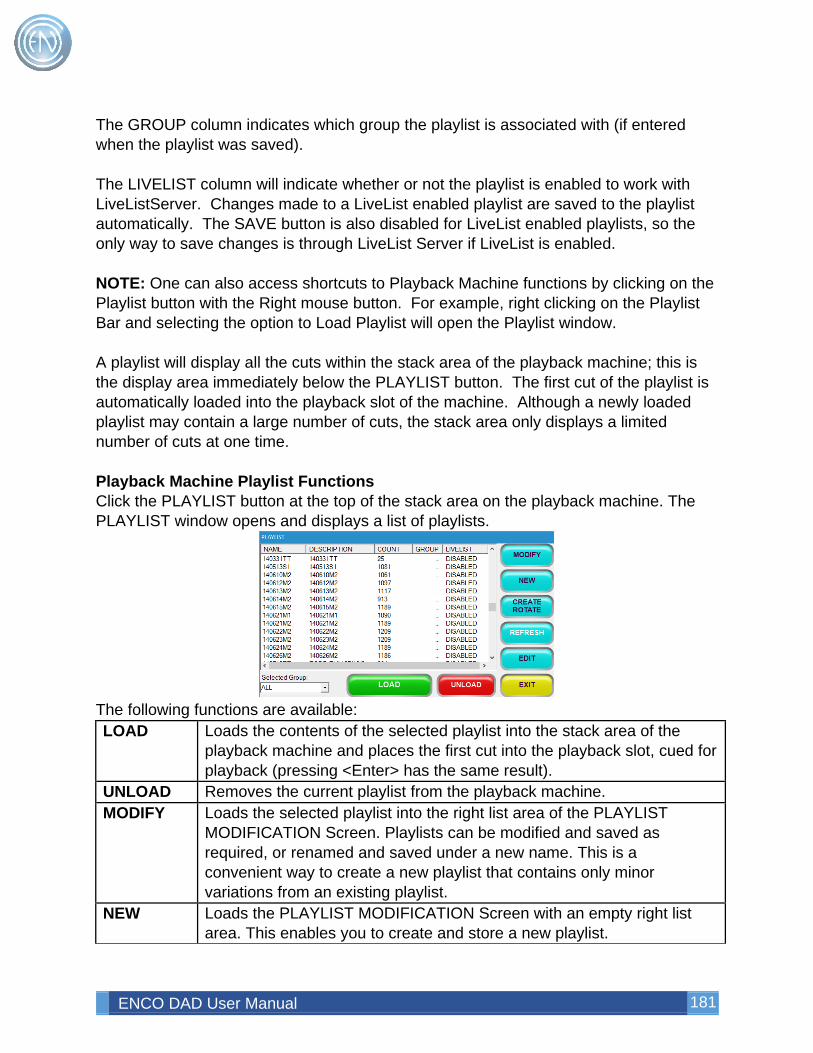
ENCO DAD User Manual 181
The GROUP column indicates which group the playlist is associated with (if entered when the playlist was saved). The LIVELIST column will indicate whether or not the playlist is enabled to work with LiveListServer. Changes made to a LiveList enabled playlist are saved to the playlist automatically. The SAVE button is also disabled for LiveList enabled playlists, so the only way to save changes is through LiveList Server if LiveList is enabled. NOTE: One can also access shortcuts to Playback Machine functions by clicking on the Playlist button with the Right mouse button. For example, right clicking on the Playlist Bar and selecting the option to Load Playlist will open the Playlist window. A playlist will display all the cuts within the stack area of the playback machine; this is the display area immediately below the PLAYLIST button. The first cut of the playlist is automatically loaded into the playback slot of the machine. Although a newly loaded playlist may contain a large number of cuts, the stack area only displays a limited number of cuts at one time. Playback Machine Playlist Functions Click the PLAYLIST button at the top of the stack area on the playback machine. The PLAYLIST window opens and displays a list of playlists.
The following functions are available: LOAD Loads the contents of the selected playlist into the stack area of the
playback machine and places the first cut into the playback slot, cued for playback (pressing <Enter> has the same result).
UNLOAD Removes the current playlist from the playback machine. MODIFY Loads the selected playlist into the right list area of the PLAYLIST
MODIFICATION Screen. Playlists can be modified and saved as required, or renamed and saved under a new name. This is a convenient way to create a new playlist that contains only minor variations from an existing playlist.
NEW Loads the PLAYLIST MODIFICATION Screen with an empty right list area. This enables you to create and store a new playlist.
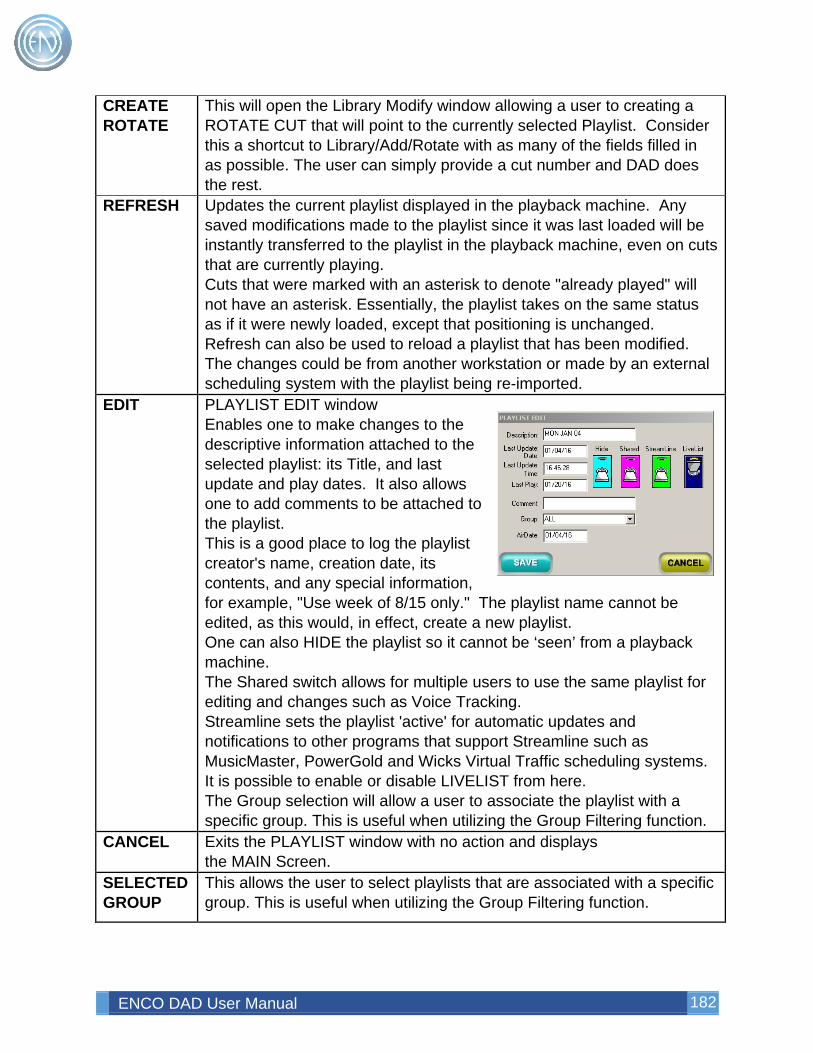
ENCO DAD User Manual 182
CREATE ROTATE
This will open the Library Modify window allowing a user to creating a ROTATE CUT that will point to the currently selected Playlist. Consider this a shortcut to Library/Add/Rotate with as many of the fields filled in as possible. The user can simply provide a cut number and DAD does the rest.
REFRESH Updates the current playlist displayed in the playback machine. Any saved modifications made to the playlist since it was last loaded will be instantly transferred to the playlist in the playback machine, even on cuts that are currently playing. Cuts that were marked with an asterisk to denote "already played" will not have an asterisk. Essentially, the playlist takes on the same status as if it were newly loaded, except that positioning is unchanged. Refresh can also be used to reload a playlist that has been modified. The changes could be from another workstation or made by an external scheduling system with the playlist being re-imported.
EDIT PLAYLIST EDIT window Enables one to make changes to the descriptive information attached to the selected playlist: its Title, and last update and play dates. It also allows one to add comments to be attached to the playlist. This is a good place to log the playlist creator's name, creation date, its contents, and any special information, for example, "Use week of 8/15 only." The playlist name cannot be edited, as this would, in effect, create a new playlist. One can also HIDE the playlist so it cannot be ‘seen’ from a playback machine. The Shared switch allows for multiple users to use the same playlist for editing and changes such as Voice Tracking. Streamline sets the playlist 'active' for automatic updates and notifications to other programs that support Streamline such as MusicMaster, PowerGold and Wicks Virtual Traffic scheduling systems. It is possible to enable or disable LIVELIST from here. The Group selection will allow a user to associate the playlist with a specific group. This is useful when utilizing the Group Filtering function.
CANCEL Exits the PLAYLIST window with no action and displays the MAIN Screen.
SELECTED GROUP
This allows the user to select playlists that are associated with a specific group. This is useful when utilizing the Group Filtering function.

ENCO DAD User Manual 183
A Loaded Playback Machine Once a playlist has been loaded, the Playback Machine now displays several items of information including the playlist itself.
A. The TITLE Bar of the Playback machine will display the Playback Deck number
[Playback 1] followed by the Channel Assignment Output for the machine [(1)] and the name of the playlist that is loaded [0219WSRM] NOTE: The channel assignment display will always display the active channel. If channel assignments have been configured to change between audio outputs, the active output will always be displayed in the title bar.
B. The Play Slot displays information about the currently loaded cut. The fields displayed are Cut Number, Title of the cut, Length of the cut, a user-definable field (displaying either Outcue, Artist, Agency or UserDef fields) and the Transition Status of the loaded cut as a graphic representation of the transition. One can change this to a letter for the transition if desired. (S for Segue). The transition graphics are shown below.
NormalAutoLoad Autoplay Segue Crossfade Fade-In Fade-Out
Fade-Out
Fade-In
Fade-Out
Start-Full
End-Full
Fade-In
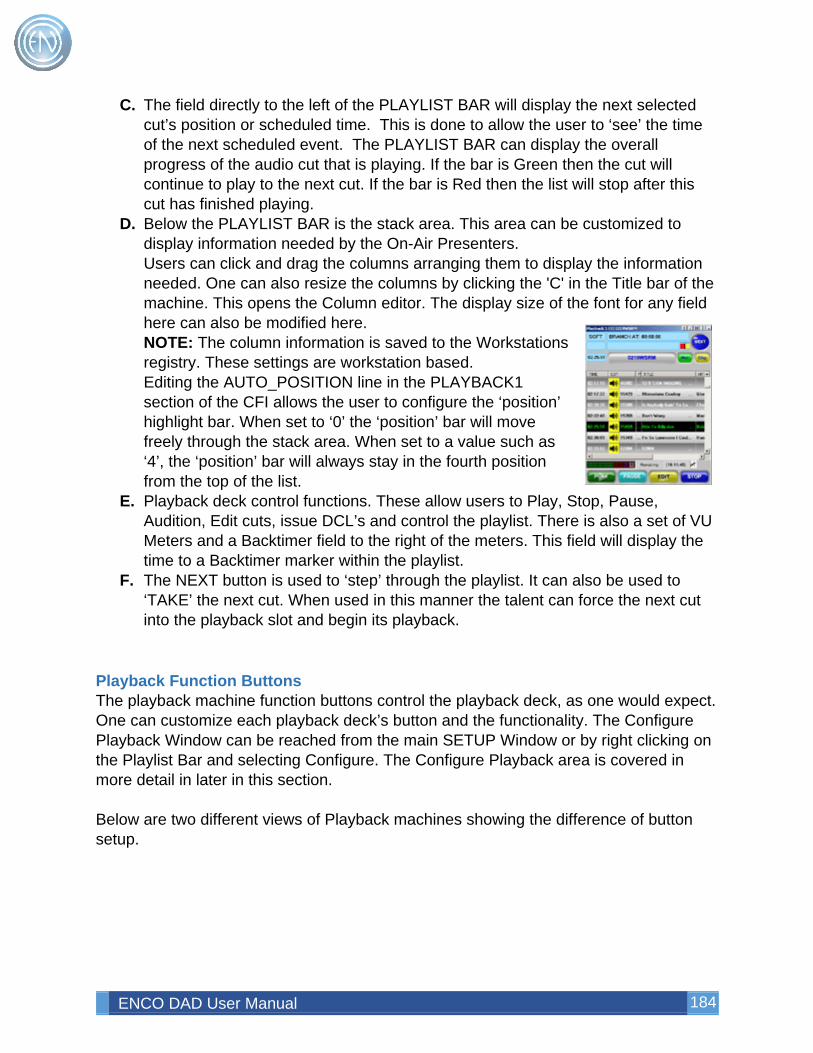
ENCO DAD User Manual 184
C. The field directly to the left of the PLAYLIST BAR will display the next selected cut’s position or scheduled time. This is done to allow the user to ‘see’ the time of the next scheduled event. The PLAYLIST BAR can display the overall progress of the audio cut that is playing. If the bar is Green then the cut will continue to play to the next cut. If the bar is Red then the list will stop after this cut has finished playing.
D. Below the PLAYLIST BAR is the stack area. This area can be customized to display information needed by the On-Air Presenters. Users can click and drag the columns arranging them to display the information needed. One can also resize the columns by clicking the 'C' in the Title bar of the machine. This opens the Column editor. The display size of the font for any field here can also be modified here. NOTE: The column information is saved to the Workstations registry. These settings are workstation based. Editing the AUTO_POSITION line in the PLAYBACK1 section of the CFI allows the user to configure the ‘position’ highlight bar. When set to ‘0’ the ‘position’ bar will move freely through the stack area. When set to a value such as ‘4’, the ‘position’ bar will always stay in the fourth position from the top of the list.
E. Playback deck control functions. These allow users to Play, Stop, Pause, Audition, Edit cuts, issue DCL’s and control the playlist. There is also a set of VU Meters and a Backtimer field to the right of the meters. This field will display the time to a Backtimer marker within the playlist.
F. The NEXT button is used to ‘step’ through the playlist. It can also be used to ‘TAKE’ the next cut. When used in this manner the talent can force the next cut into the playback slot and begin its playback.
Playback Function Buttons The playback machine function buttons control the playback deck, as one would expect. One can customize each playback deck’s button and the functionality. The Configure Playback Window can be reached from the main SETUP Window or by right clicking on the Playlist Bar and selecting Configure. The Configure Playback area is covered in more detail in later in this section. Below are two different views of Playback machines showing the difference of button setup.
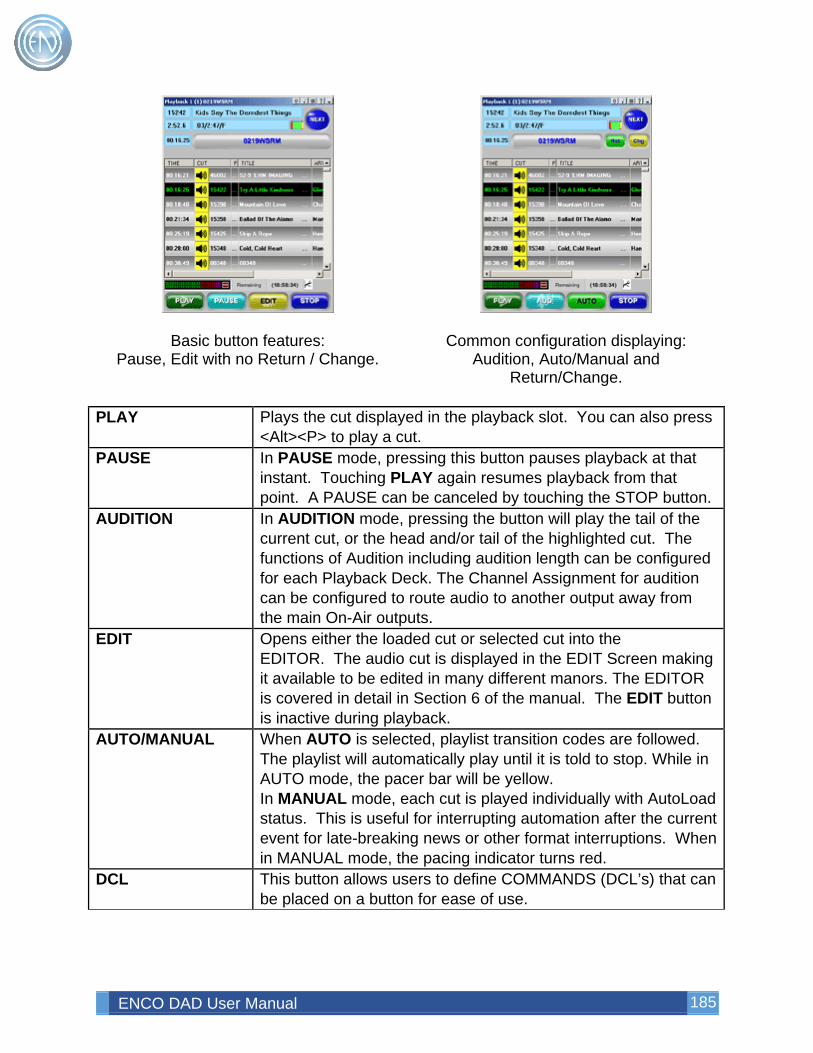
ENCO DAD User Manual 185
Basic button features: Pause, Edit with no Return / Change.
Common configuration displaying:
Audition, Auto/Manual and Return/Change.
PLAY Plays the cut displayed in the playback slot. You can also press
<Alt><P> to play a cut. PAUSE In PAUSE mode, pressing this button pauses playback at that
instant. Touching PLAY again resumes playback from that point. A PAUSE can be canceled by touching the STOP button.
AUDITION In AUDITION mode, pressing the button will play the tail of the current cut, or the head and/or tail of the highlighted cut. The functions of Audition including audition length can be configured for each Playback Deck. The Channel Assignment for audition can be configured to route audio to another output away from the main On-Air outputs.
EDIT
Opens either the loaded cut or selected cut into the EDITOR. The audio cut is displayed in the EDIT Screen making it available to be edited in many different manors. The EDITOR is covered in detail in Section 6 of the manual. The EDIT button is inactive during playback.
AUTO/MANUAL When AUTO is selected, playlist transition codes are followed. The playlist will automatically play until it is told to stop. While in AUTO mode, the pacer bar will be yellow. In MANUAL mode, each cut is played individually with AutoLoad status. This is useful for interrupting automation after the current event for late-breaking news or other format interruptions. When in MANUAL mode, the pacing indicator turns red.
DCL This button allows users to define COMMANDS (DCL’s) that can be placed on a button for ease of use.
ENCO DAD User Manual 186
STOP Ends playback, cancels a PAUSE if active, and recues to the start of the cut. Similar results can be obtained by pressing <Alt><S>. One can resume playback if stop was pressed by mistake by right clicking on the PLAYLIST BAR and selecting the option RESUME PLAYBACK. Holding the CTRL key down while pressing PLAY will also resume playback from a premature stop.
NEXT NEXT Load the next cut within the stack area into the playback slot. When a cut is playing NEXT will execute a superplay, stopping the currently playing cut and begin playing the next cut. The keyboard shortcut <ALT+N> also performs a NEXT.
CHANGE or CHANGE/RETURN
The four main playback machines can be configured to display an optional CHG (change) button. When scrolling through a playlist displayed in the stack area, the CHG button enables you to choose from two playlist functionalities: you can view any portion of the playlist without disturbing the playback sequence, or you can select a new point in the playlist as the next cut to be played. The CHG feature is active whether the playback machine is playing, paused or stopped. In addition, two operational versions of the CHG button are available: CHANGE In this mode, the initial background color of the CHG button is white. If you select another cut title, the CHGbutton changes to yellow, indicating that the cut in the highlight bar is not the next cut to be played. To make the selected cut the next cut to be played, press the CHG button. If the CHG button is not pressed, the playback machine will sequence to the original next cut in the playlist. The stack area display will automatically revert to the proper playlist sequence, and the CHG button background will return to white. To move forward or back in the playlist (manually change the order of the playlist) during playback, select any cut and touch the CHG button to designate that cut as the next cut to be played. The CHG will turn white and playback will continue normally from the new playlist location. CHANGE/RETURN Operation in this mode is similar to the change mode, except that CHG and RET buttons are to the right of the Playlist Bar. Touching the CHANGE button will initiate a change in playlist order, as described above; touching RETURN will automatically return the stack area display to the current playback sequence, with no changes made.
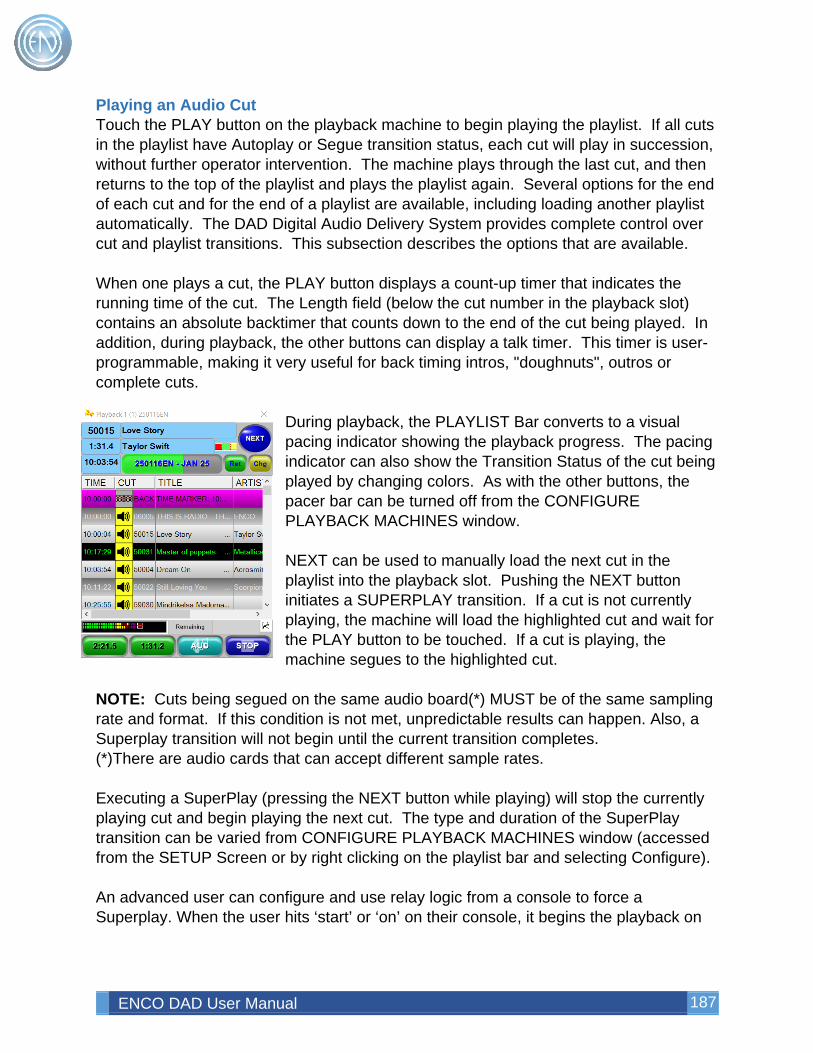
ENCO DAD User Manual 187
Playing an Audio Cut Touch the PLAY button on the playback machine to begin playing the playlist. If all cuts in the playlist have Autoplay or Segue transition status, each cut will play in succession, without further operator intervention. The machine plays through the last cut, and then returns to the top of the playlist and plays the playlist again. Several options for the end of each cut and for the end of a playlist are available, including loading another playlist automatically. The DAD Digital Audio Delivery System provides complete control over cut and playlist transitions. This subsection describes the options that are available. When one plays a cut, the PLAY button displays a count-up timer that indicates the running time of the cut. The Length field (below the cut number in the playback slot) contains an absolute backtimer that counts down to the end of the cut being played. In addition, during playback, the other buttons can display a talk timer. This timer is user-programmable, making it very useful for back timing intros, "doughnuts", outros or complete cuts.
During playback, the PLAYLIST Bar converts to a visual pacing indicator showing the playback progress. The pacing indicator can also show the Transition Status of the cut being played by changing colors. As with the other buttons, the pacer bar can be turned off from the CONFIGURE PLAYBACK MACHINES window. NEXT can be used to manually load the next cut in the playlist into the playback slot. Pushing the NEXT button initiates a SUPERPLAY transition. If a cut is not currently playing, the machine will load the highlighted cut and wait for the PLAY button to be touched. If a cut is playing, the machine segues to the highlighted cut.
NOTE: Cuts being segued on the same audio board(*) MUST be of the same sampling rate and format. If this condition is not met, unpredictable results can happen. Also, a Superplay transition will not begin until the current transition completes. (*)There are audio cards that can accept different sample rates. Executing a SuperPlay (pressing the NEXT button while playing) will stop the currently playing cut and begin playing the next cut. The type and duration of the SuperPlay transition can be varied from CONFIGURE PLAYBACK MACHINES window (accessed from the SETUP Screen or by right clicking on the playlist bar and selecting Configure). An advanced user can configure and use relay logic from a console to force a Superplay. When the user hits ‘start’ or ‘on’ on their console, it begins the playback on
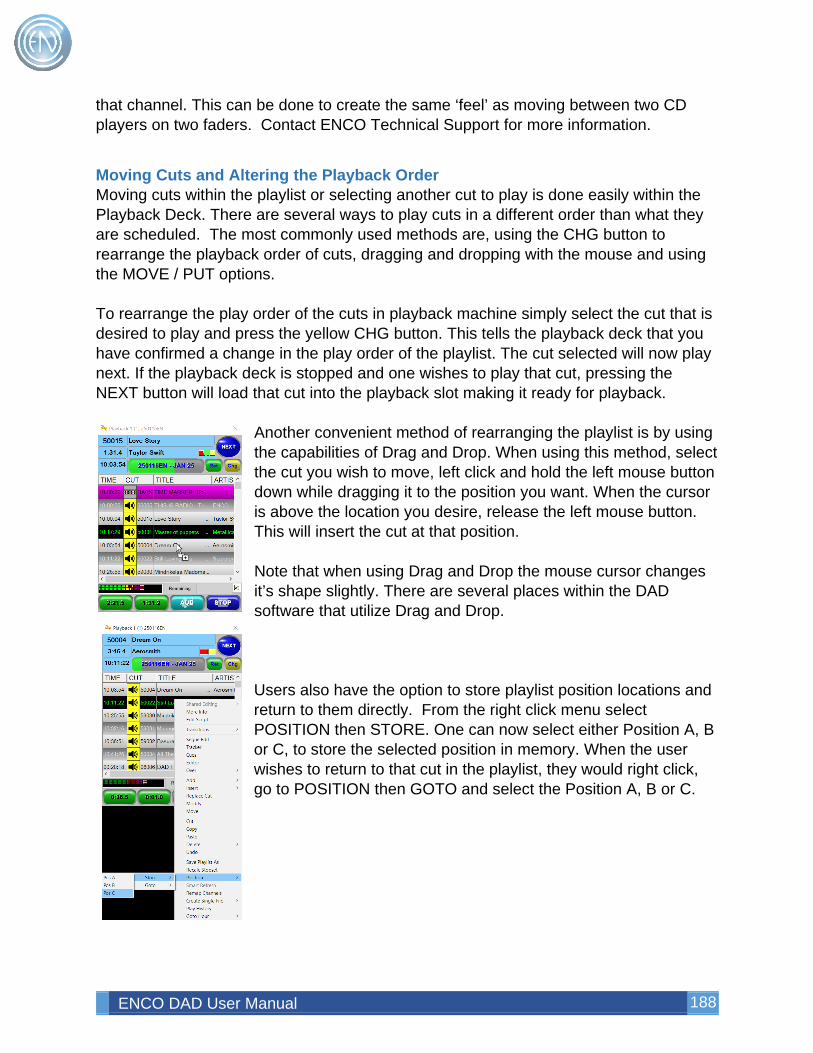
ENCO DAD User Manual 188
that channel. This can be done to create the same ‘feel’ as moving between two CD players on two faders. Contact ENCO Technical Support for more information.
Moving Cuts and Altering the Playback Order Moving cuts within the playlist or selecting another cut to play is done easily within the Playback Deck. There are several ways to play cuts in a different order than what they are scheduled. The most commonly used methods are, using the CHG button to rearrange the playback order of cuts, dragging and dropping with the mouse and using the MOVE / PUT options. To rearrange the play order of the cuts in playback machine simply select the cut that is desired to play and press the yellow CHG button. This tells the playback deck that you have confirmed a change in the play order of the playlist. The cut selected will now play next. If the playback deck is stopped and one wishes to play that cut, pressing the NEXT button will load that cut into the playback slot making it ready for playback.
Another convenient method of rearranging the playlist is by using the capabilities of Drag and Drop. When using this method, select the cut you wish to move, left click and hold the left mouse button down while dragging it to the position you want. When the cursor is above the location you desire, release the left mouse button. This will insert the cut at that position. Note that when using Drag and Drop the mouse cursor changes it’s shape slightly. There are several places within the DAD software that utilize Drag and Drop. Users also have the option to store playlist position locations and return to them directly. From the right click menu select POSITION then STORE. One can now select either Position A, B or C, to store the selected position in memory. When the user wishes to return to that cut in the playlist, they would right click, go to POSITION then GOTO and select the Position A, B or C.
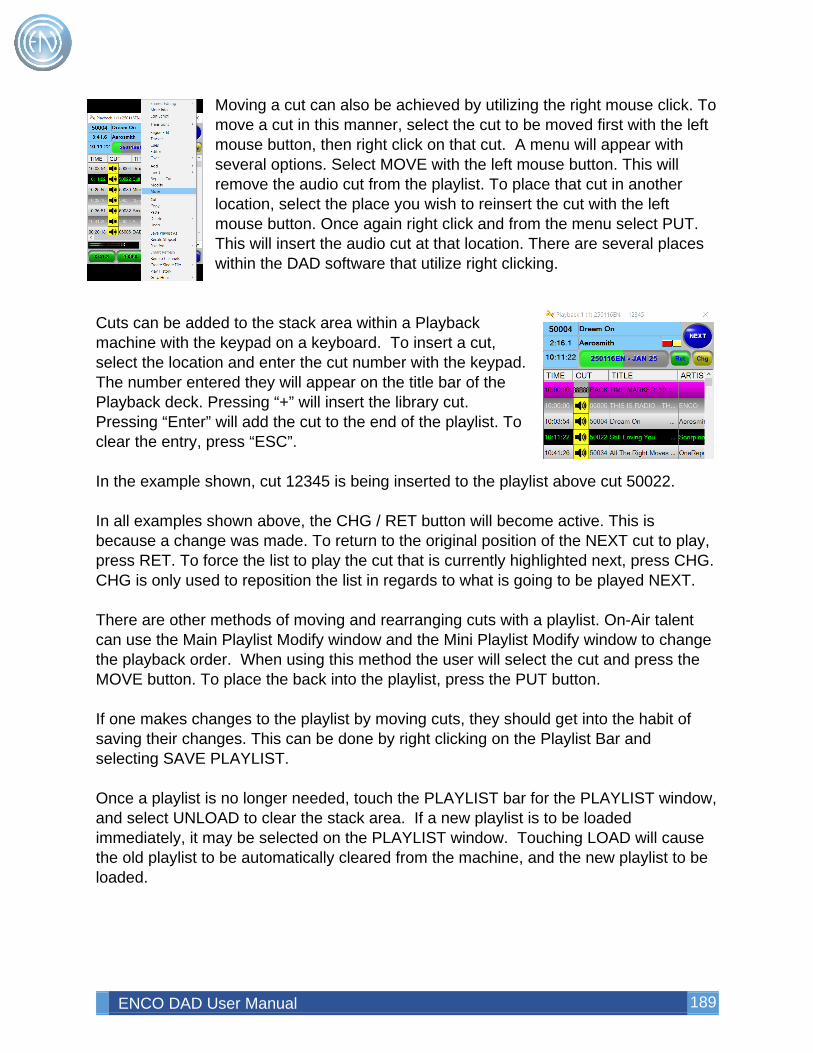
ENCO DAD User Manual 189
Moving a cut can also be achieved by utilizing the right mouse click. To move a cut in this manner, select the cut to be moved first with the left mouse button, then right click on that cut. A menu will appear with several options. Select MOVE with the left mouse button. This will remove the audio cut from the playlist. To place that cut in another location, select the place you wish to reinsert the cut with the left mouse button. Once again right click and from the menu select PUT. This will insert the audio cut at that location. There are several places within the DAD software that utilize right clicking.
Cuts can be added to the stack area within a Playback machine with the keypad on a keyboard. To insert a cut, select the location and enter the cut number with the keypad. The number entered they will appear on the title bar of the Playback deck. Pressing “+” will insert the library cut. Pressing “Enter” will add the cut to the end of the playlist. To clear the entry, press “ESC”. In the example shown, cut 12345 is being inserted to the playlist above cut 50022. In all examples shown above, the CHG / RET button will become active. This is because a change was made. To return to the original position of the NEXT cut to play, press RET. To force the list to play the cut that is currently highlighted next, press CHG. CHG is only used to reposition the list in regards to what is going to be played NEXT. There are other methods of moving and rearranging cuts with a playlist. On-Air talent can use the Main Playlist Modify window and the Mini Playlist Modify window to change the playback order. When using this method the user will select the cut and press the MOVE button. To place the back into the playlist, press the PUT button. If one makes changes to the playlist by moving cuts, they should get into the habit of saving their changes. This can be done by right clicking on the Playlist Bar and selecting SAVE PLAYLIST. Once a playlist is no longer needed, touch the PLAYLIST bar for the PLAYLIST window, and select UNLOAD to clear the stack area. If a new playlist is to be loaded immediately, it may be selected on the PLAYLIST window. Touching LOAD will cause the old playlist to be automatically cleared from the machine, and the new playlist to be loaded.
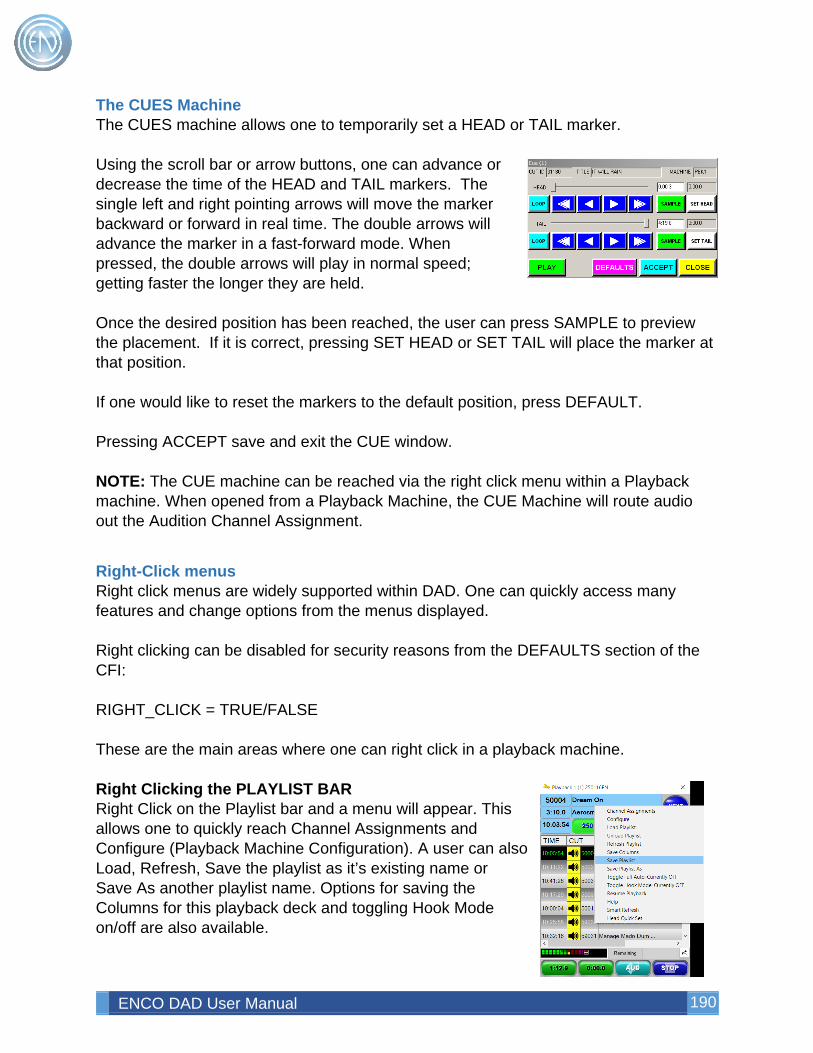
ENCO DAD User Manual 190
The CUES Machine The CUES machine allows one to temporarily set a HEAD or TAIL marker. Using the scroll bar or arrow buttons, one can advance or decrease the time of the HEAD and TAIL markers. The single left and right pointing arrows will move the marker backward or forward in real time. The double arrows will advance the marker in a fast-forward mode. When pressed, the double arrows will play in normal speed; getting faster the longer they are held. Once the desired position has been reached, the user can press SAMPLE to preview the placement. If it is correct, pressing SET HEAD or SET TAIL will place the marker at that position. If one would like to reset the markers to the default position, press DEFAULT. Pressing ACCEPT save and exit the CUE window. NOTE: The CUE machine can be reached via the right click menu within a Playback machine. When opened from a Playback Machine, the CUE Machine will route audio out the Audition Channel Assignment.
Right-Click menus Right click menus are widely supported within DAD. One can quickly access many features and change options from the menus displayed. Right clicking can be disabled for security reasons from the DEFAULTS section of the CFI: RIGHT_CLICK = TRUE/FALSE These are the main areas where one can right click in a playback machine. Right Clicking the PLAYLIST BAR Right Click on the Playlist bar and a menu will appear. This allows one to quickly reach Channel Assignments and Configure (Playback Machine Configuration). A user can also Load, Refresh, Save the playlist as it’s existing name or Save As another playlist name. Options for saving the Columns for this playback deck and toggling Hook Mode on/off are also available.
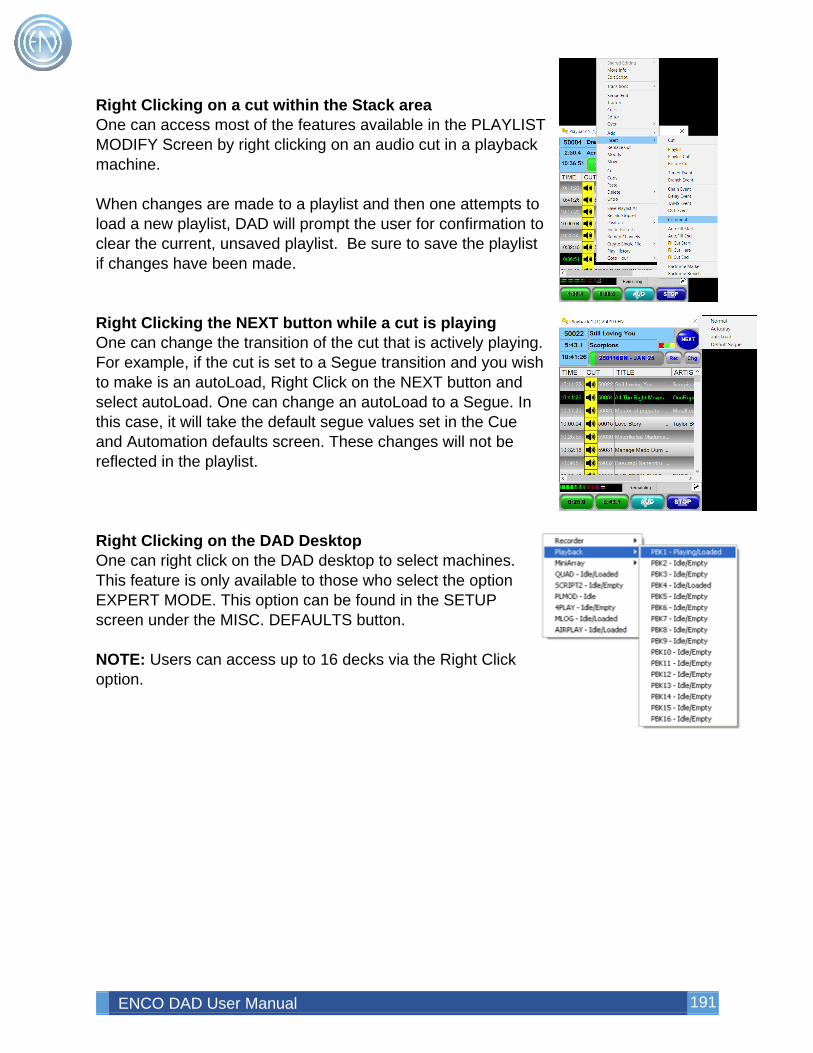
ENCO DAD User Manual 191
Right Clicking on a cut within the Stack area One can access most of the features available in the PLAYLIST MODIFY Screen by right clicking on an audio cut in a playback machine. When changes are made to a playlist and then one attempts to load a new playlist, DAD will prompt the user for confirmation to clear the current, unsaved playlist. Be sure to save the playlist if changes have been made. Right Clicking the NEXT button while a cut is playing One can change the transition of the cut that is actively playing. For example, if the cut is set to a Segue transition and you wish to make is an autoLoad, Right Click on the NEXT button and select autoLoad. One can change an autoLoad to a Segue. In this case, it will take the default segue values set in the Cue and Automation defaults screen. These changes will not be reflected in the playlist. Right Clicking on the DAD Desktop One can right click on the DAD desktop to select machines. This feature is only available to those who select the option EXPERT MODE. This option can be found in the SETUP screen under the MISC. DEFAULTS button. NOTE: Users can access up to 16 decks via the Right Click option.
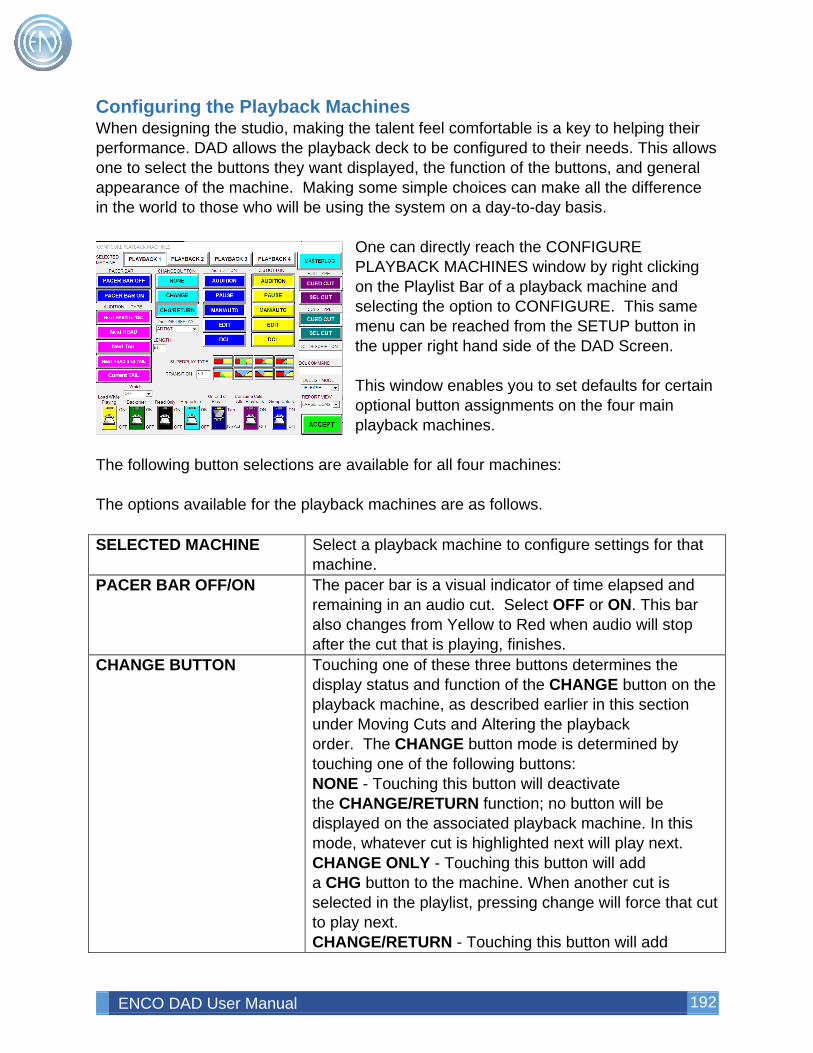
ENCO DAD User Manual 192
Configuring the Playback Machines When designing the studio, making the talent feel comfortable is a key to helping their performance. DAD allows the playback deck to be configured to their needs. This allows one to select the buttons they want displayed, the function of the buttons, and general appearance of the machine. Making some simple choices can make all the difference in the world to those who will be using the system on a day-to-day basis.
One can directly reach the CONFIGURE PLAYBACK MACHINES window by right clicking on the Playlist Bar of a playback machine and selecting the option to CONFIGURE. This same menu can be reached from the SETUP button in the upper right hand side of the DAD Screen. This window enables you to set defaults for certain optional button assignments on the four main playback machines.
The following button selections are available for all four machines: The options available for the playback machines are as follows. SELECTED MACHINE Select a playback machine to configure settings for that
machine. PACER BAR OFF/ON The pacer bar is a visual indicator of time elapsed and
remaining in an audio cut. Select OFF or ON. This bar also changes from Yellow to Red when audio will stop after the cut that is playing, finishes.
CHANGE BUTTON Touching one of these three buttons determines the display status and function of the CHANGE button on the playback machine, as described earlier in this section under Moving Cuts and Altering the playback order. The CHANGE button mode is determined by touching one of the following buttons: NONE - Touching this button will deactivate the CHANGE/RETURN function; no button will be displayed on the associated playback machine. In this mode, whatever cut is highlighted next will play next. CHANGE ONLY - Touching this button will add a CHG button to the machine. When another cut is selected in the playlist, pressing change will force that cut to play next. CHANGE/RETURN - Touching this button will add
ENCO DAD User Manual 193
a CHG and a RET button to the associated playback machine. This is the most common option. This allows the user to either return to the original position in the list or change the position of the list. When selected, the CHG button appears at the right hand side of the PACING INDICATOR on the associated playback machine.
2nd and 3rd BUTTON This button lets you choose the function of the 2nd and 3rd button from the left on the associated playback machine: AUDITION - This will assign the AUDITION function to the 2nd button from the left on the playback machine. AUDITION will play the cut that is in the HIGHLIGHT BAR located in the STACK AREA. This can be configured to play several different Outro and Intro options. The AUDITION output can be assigned to any of the audio outputs using the CHANNEL ASSIGNMENT functions. Normally, this output would be routed to cue or audition speakers fed separately from the main or program output. During AUDITION PLAY, the AUDITION button will change to a red STOP button. NOTE: The cut being auditioned can be played simultaneously with a cut being played from the PLAYBACK SLOT on the air. Verify your channel assignments PAUSE - This will assign the PAUSE function to the 2nd button from the left. Touching the PAUSE button on the playback machine will pause the machine's playback at that instant; touching PLAY again resumes playback from that point. The PAUSE button is active only during playback. Pressing STOP will cancel the PAUSE. One can resume playback if stop was pressed by mistake by right clicking on the PLAYLIST BAR and selecting the option RESUME PLAYBACK. The action of holding the CTRL key down while pressing PLAY will also resume playback from a premature stop. MAN/AUTO - This assigns the manual/automation function. If chosen, the button will display AUTO in its label area. Touching the button will toggle into the MAN (Manual) mode; a repeat touch will switch the machine back to AUTO. In AUTO mode, playlist operation continues with transitions between consecutive cuts
ENCO DAD User Manual 194
determined by the TRANSITION STATUS assigned to the cut within the playlist. In other words, playlist operation will be fully automatic, to the extent allowed by the individual transition codes. In the MANUAL mode, the playlist transition codes are ignored. Each cut will be treated as an AutoLoad transition; the next cut in the playlist will automatically load into the PLAYBACK SLOT at the conclusion of the preceding cut. No further activity will take place until you manually start playback by touching the PLAY button. EDIT - Touching this button assigns the edit function to the selected button. This button works in conjunction with the EDIT TYPE button CUED CUT and SEL (selected cut). EDIT will load the cut either currently in the playback slot or the highlighted cut into the EDITScreen where the audio is displayed graphically and you can manipulate several of the cut's parameters. The EDIT button is inactive during playback. DCL – Selecting this allows the user to define a Command Cut using the DAD Command Language directly with a button. To use this option, use a short (less than 6 characters) name for the function in the DCL Description field on the right hand side of this screen. Then enter the DCL Command of your choice. An example could be the Description of FADE with the DCL Command of STOP PBK1 2.2. This will immediately cause Playback Deck 1 to fade out for two point two seconds and stop.
AUDITION TYPE These determine what will be played when the AUDITION button is pressed. Next HEAD to TAIL: play from the head to tail of the next cut Next HEAD: will play the next cut’s head. Next TAIL: will play the next cut’s tail. Next HEAD and TAIL: plays the next cut’s head then plays the tail. Current TAIL: plays the tail of the cut loaded in the playback slot.
LENGTH One can set the length for Audition cuts. The time value is entered in Seconds.
EDIT TYPE These buttons determine whether the EDIT button will act upon the cued cut (the cut in the playback slot) or the
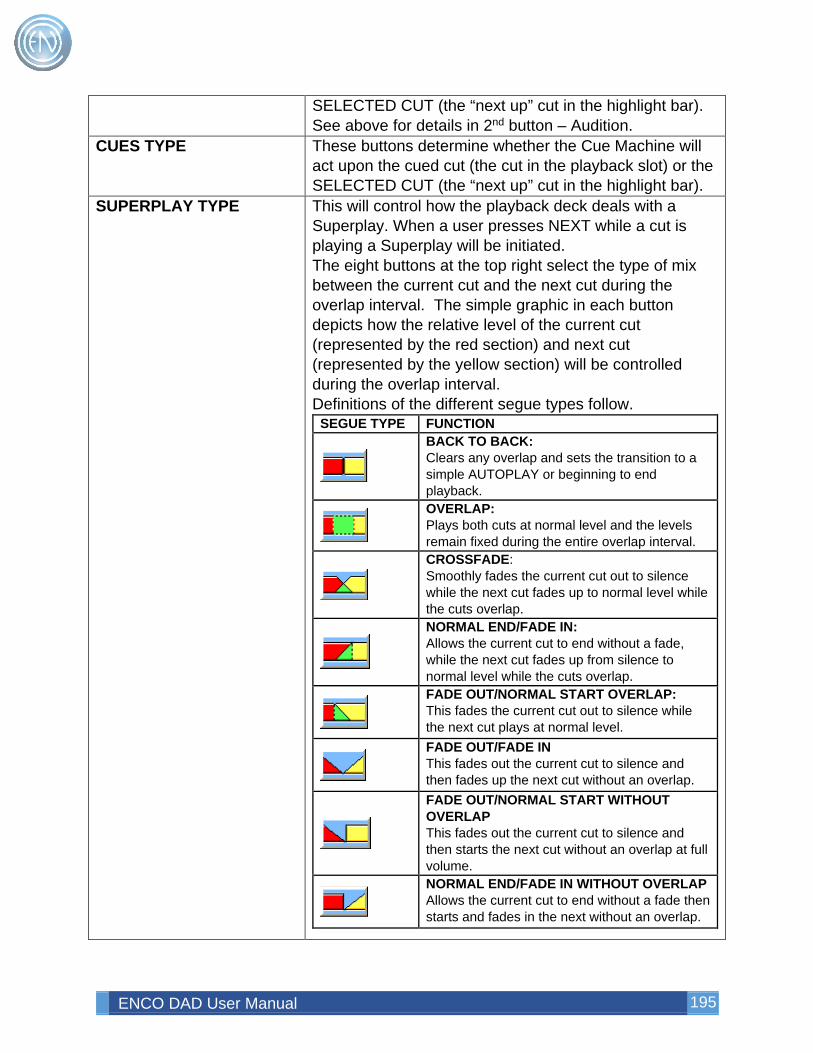
ENCO DAD User Manual 195
SELECTED CUT (the “next up” cut in the highlight bar). See above for details in 2nd button – Audition.
CUES TYPE These buttons determine whether the Cue Machine will act upon the cued cut (the cut in the playback slot) or the SELECTED CUT (the “next up” cut in the highlight bar).
SUPERPLAY TYPE This will control how the playback deck deals with a Superplay. When a user presses NEXT while a cut is playing a Superplay will be initiated. The eight buttons at the top right select the type of mix between the current cut and the next cut during the overlap interval. The simple graphic in each button depicts how the relative level of the current cut (represented by the red section) and next cut (represented by the yellow section) will be controlled during the overlap interval. Definitions of the different segue types follow.
SEGUE TYPE FUNCTION
BACK TO BACK: Clears any overlap and sets the transition to a simple AUTOPLAY or beginning to end playback.
OVERLAP: Plays both cuts at normal level and the levels remain fixed during the entire overlap interval.
CROSSFADE: Smoothly fades the current cut out to silence while the next cut fades up to normal level while the cuts overlap.
NORMAL END/FADE IN: Allows the current cut to end without a fade, while the next cut fades up from silence to normal level while the cuts overlap.
FADE OUT/NORMAL START OVERLAP: This fades the current cut out to silence while the next cut plays at normal level.
FADE OUT/FADE IN This fades out the current cut to silence and then fades up the next cut without an overlap.
FADE OUT/NORMAL START WITHOUT OVERLAP This fades out the current cut to silence and then starts the next cut without an overlap at full volume.
NORMAL END/FADE IN WITHOUT OVERLAP Allows the current cut to end without a fade then starts and fades in the next without an overlap.
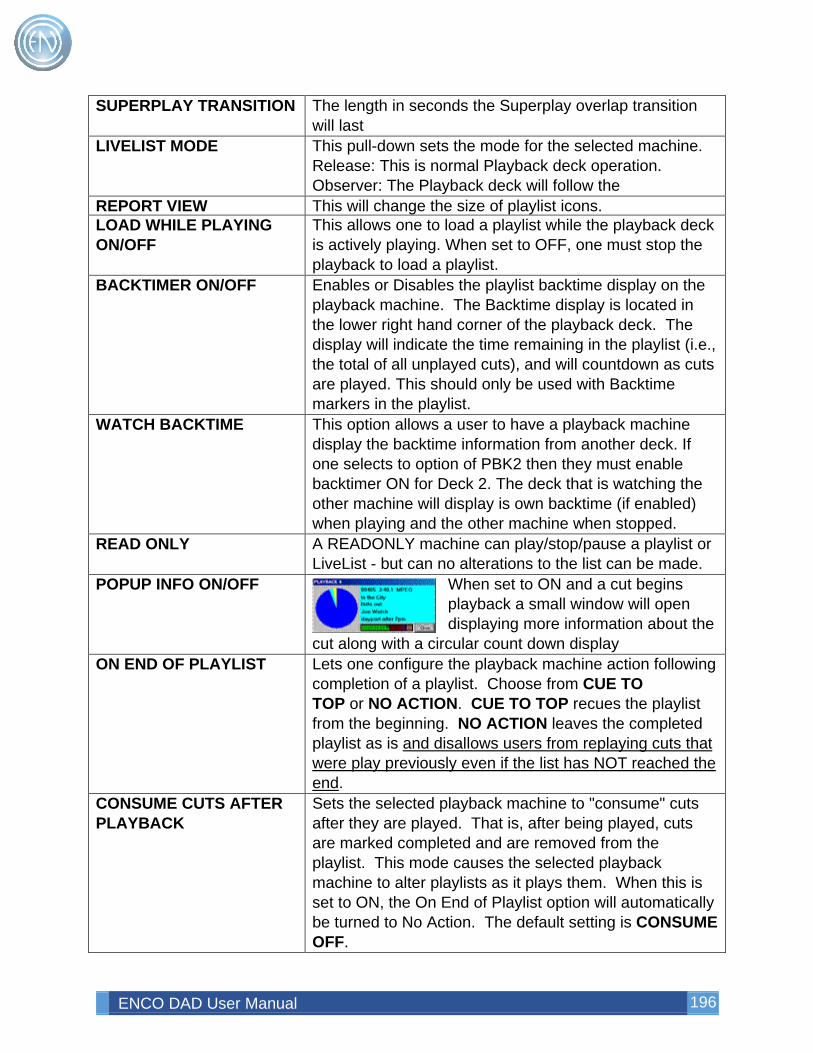
ENCO DAD User Manual 196
SUPERPLAY TRANSITION The length in seconds the Superplay overlap transition will last
LIVELIST MODE This pull-down sets the mode for the selected machine. Release: This is normal Playback deck operation. Observer: The Playback deck will follow the
REPORT VIEW This will change the size of playlist icons. LOAD WHILE PLAYING ON/OFF
This allows one to load a playlist while the playback deck is actively playing. When set to OFF, one must stop the playback to load a playlist.
BACKTIMER ON/OFF Enables or Disables the playlist backtime display on the playback machine. The Backtime display is located in the lower right hand corner of the playback deck. The display will indicate the time remaining in the playlist (i.e., the total of all unplayed cuts), and will countdown as cuts are played. This should only be used with Backtime markers in the playlist.
WATCH BACKTIME This option allows a user to have a playback machine display the backtime information from another deck. If one selects to option of PBK2 then they must enable backtimer ON for Deck 2. The deck that is watching the other machine will display is own backtime (if enabled) when playing and the other machine when stopped.
READ ONLY A READONLY machine can play/stop/pause a playlist or LiveList - but can no alterations to the list can be made.
POPUP INFO ON/OFF When set to ON and a cut begins playback a small window will open displaying more information about the
cut along with a circular count down display ON END OF PLAYLIST Lets one configure the playback machine action following
completion of a playlist. Choose from CUE TO TOP or NO ACTION. CUE TO TOP recues the playlist from the beginning. NO ACTION leaves the completed playlist as is and disallows users from replaying cuts that were play previously even if the list has NOT reached the end.
CONSUME CUTS AFTER PLAYBACK
Sets the selected playback machine to "consume" cuts after they are played. That is, after being played, cuts are marked completed and are removed from the playlist. This mode causes the selected playback machine to alter playlists as it plays them. When this is set to ON, the On End of Playlist option will automatically be turned to No Action. The default setting is CONSUME OFF.
ENCO DAD User Manual 197
GROUP COLORS ON/OFF This allows one to have the playback deck use the colors
assigned to the audio cut group displayed. Users must be using the 2000 style option for this to be active. If the commercial group is Light Green then all spots in the Com group will be Light Green in color.
CONFIGURE MASTERLOG Opens the Configure MasterLog window and lets you set separate configuration options for the MasterLog machine. This feature is explained in more detail in the section covering MasterLog.
After making your selections, touch ACCEPT to return to the SETUP Screen. Touch SAVE AND RUN then save again. One should note that the changes made to the playback machine configuration are machine specific. These changes are not made or saved in the user setup. However hitting SAVE and RUN will help ensure these setting are written to the workstations CFI file. CFI Configuration Options The following are options administrators can use to customize the look and operation of the Playback machines. AUTO_POSITION = 0 (default) This line in each playback deck's section of the CFI file allows one to set the location of the ‘position’ highlight bar. A value of ‘0’ allows the ‘position’ bar to move freely thought the stack area. When set to a value such as ‘4’, the ‘position’ bar will remain at the fourth line from the top of the list. Each Playback machine can be set uniquely. In the PLAYBACK section of the CFI: LIST_STYLE = 1 (default) Selects between the two different Playback display modes. A value of ‘1’ sets the display to the 2000 Style while a value of ‘0’ sets the display to Classic Style. MENU_DELETE_STYLE = 1 (default) When set to a value of ‘1’ users can right click on a cut within the stack area and select Delete. When set to ‘0’ users must select Delete then Selected Item. This is done to help prevent accidental deletes via a right click. SLIST_TEXT_HEIGHT = 16 (default)
ENCO DAD User Manual 198
This value controls the size of the text in the Classic Style display of the Playback machines and the Library. SLIST_FONT_SIZE = 12 (default) This value controls the size of the text in the 2000 Style display of the Playback machines. In the PLAYLIST section of the CFI: LOADED_WARNING = FALSE (default) Setting this line to TRUE will display a popup notification stating that the Playlist is currently loaded on another workstation. Only workstations set to TRUE will generate the notifications. REFRESH_PATTERN_MATCHING = FALSE This value is no longer used as playlists now contain a GUID to keep track or the current position during s refresh. If set to TRUE the playlist might not return to the proper location when refreshed.
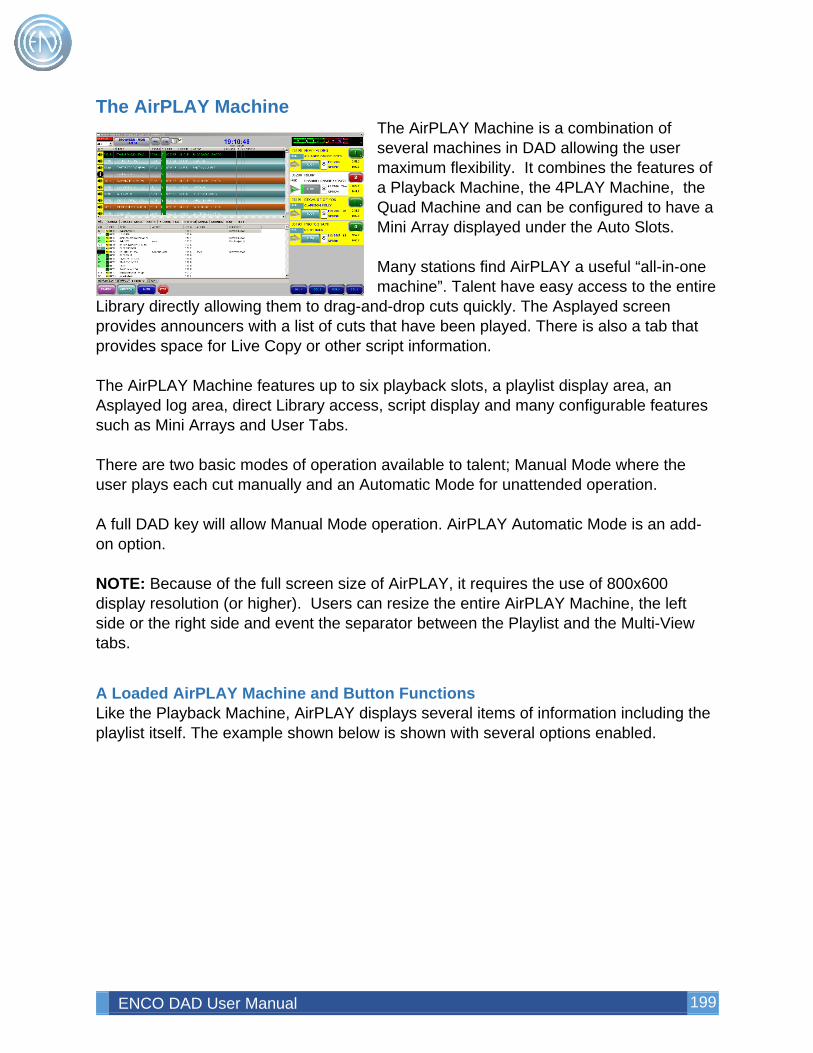
ENCO DAD User Manual 199
The AirPLAY Machine The AirPLAY Machine is a combination of several machines in DAD allowing the user maximum flexibility. It combines the features of a Playback Machine, the 4PLAY Machine, the Quad Machine and can be configured to have a Mini Array displayed under the Auto Slots. Many stations find AirPLAY a useful “all-in-one machine”. Talent have easy access to the entire
Library directly allowing them to drag-and-drop cuts quickly. The Asplayed screen provides announcers with a list of cuts that have been played. There is also a tab that provides space for Live Copy or other script information. The AirPLAY Machine features up to six playback slots, a playlist display area, an Asplayed log area, direct Library access, script display and many configurable features such as Mini Arrays and User Tabs. There are two basic modes of operation available to talent; Manual Mode where the user plays each cut manually and an Automatic Mode for unattended operation. A full DAD key will allow Manual Mode operation. AirPLAY Automatic Mode is an add-on option. NOTE: Because of the full screen size of AirPLAY, it requires the use of 800x600 display resolution (or higher). Users can resize the entire AirPLAY Machine, the left side or the right side and event the separator between the Playlist and the Multi-View tabs.
A Loaded AirPLAY Machine and Button Functions Like the Playback Machine, AirPLAY displays several items of information including the playlist itself. The example shown below is shown with several options enabled.
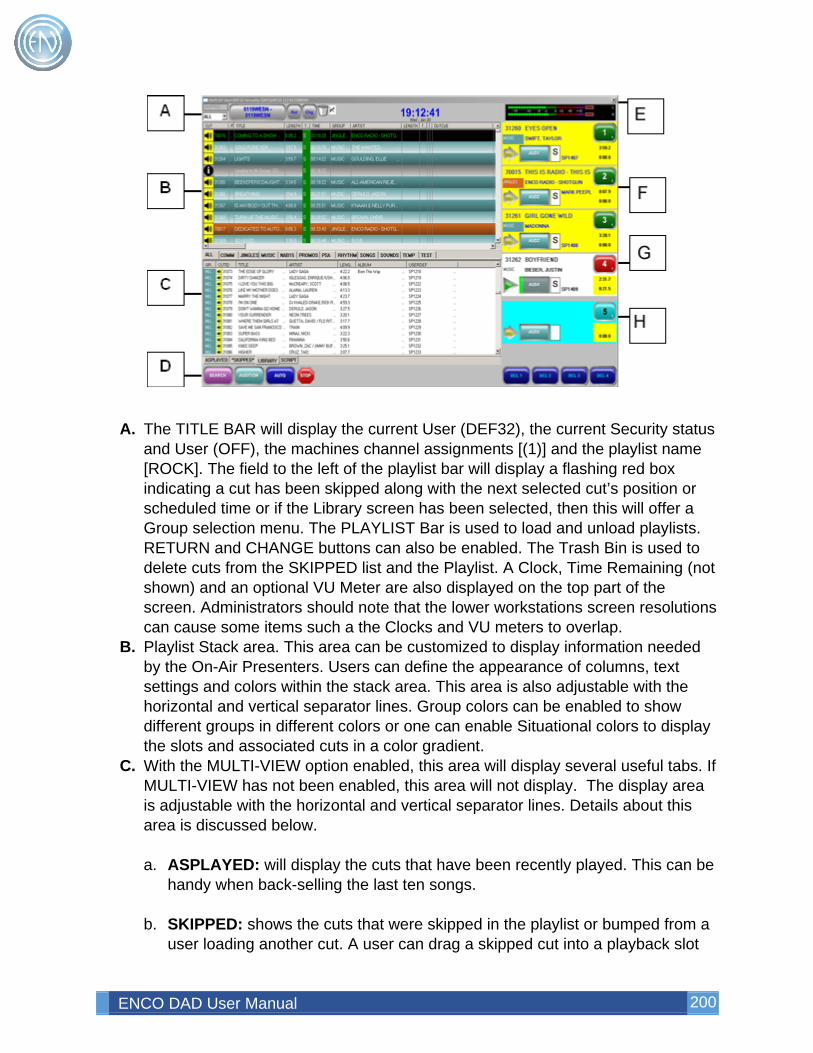
ENCO DAD User Manual 200
A. The TITLE BAR will display the current User (DEF32), the current Security status and User (OFF), the machines channel assignments [(1)] and the playlist name [ROCK]. The field to the left of the playlist bar will display a flashing red box indicating a cut has been skipped along with the next selected cut’s position or scheduled time or if the Library screen has been selected, then this will offer a Group selection menu. The PLAYLIST Bar is used to load and unload playlists. RETURN and CHANGE buttons can also be enabled. The Trash Bin is used to delete cuts from the SKIPPED list and the Playlist. A Clock, Time Remaining (not shown) and an optional VU Meter are also displayed on the top part of the screen. Administrators should note that the lower workstations screen resolutions can cause some items such a the Clocks and VU meters to overlap.
B. Playlist Stack area. This area can be customized to display information needed by the On-Air Presenters. Users can define the appearance of columns, text settings and colors within the stack area. This area is also adjustable with the horizontal and vertical separator lines. Group colors can be enabled to show different groups in different colors or one can enable Situational colors to display the slots and associated cuts in a color gradient.
C. With the MULTI-VIEW option enabled, this area will display several useful tabs. If MULTI-VIEW has not been enabled, this area will not display. The display area is adjustable with the horizontal and vertical separator lines. Details about this area is discussed below. a. ASPLAYED: will display the cuts that have been recently played. This can be
handy when back-selling the last ten songs. b. SKIPPED: shows the cuts that were skipped in the playlist or bumped from a
user loading another cut. A user can drag a skipped cut into a playback slot
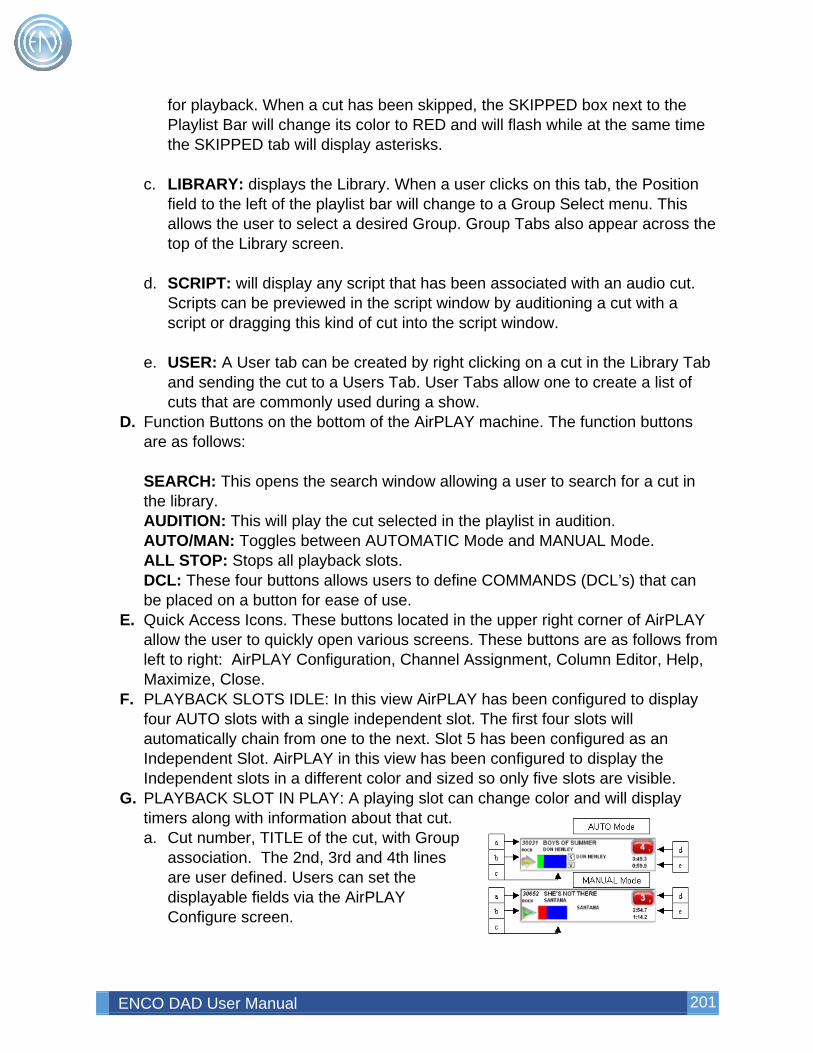
ENCO DAD User Manual 201
for playback. When a cut has been skipped, the SKIPPED box next to the Playlist Bar will change its color to RED and will flash while at the same time the SKIPPED tab will display asterisks.
c. LIBRARY: displays the Library. When a user clicks on this tab, the Position
field to the left of the playlist bar will change to a Group Select menu. This allows the user to select a desired Group. Group Tabs also appear across the top of the Library screen.
d. SCRIPT: will display any script that has been associated with an audio cut.
Scripts can be previewed in the script window by auditioning a cut with a script or dragging this kind of cut into the script window.
e. USER: A User tab can be created by right clicking on a cut in the Library Tab
and sending the cut to a Users Tab. User Tabs allow one to create a list of cuts that are commonly used during a show.
D. Function Buttons on the bottom of the AirPLAY machine. The function buttons are as follows: SEARCH: This opens the search window allowing a user to search for a cut in the library. AUDITION: This will play the cut selected in the playlist in audition. AUTO/MAN: Toggles between AUTOMATIC Mode and MANUAL Mode. ALL STOP: Stops all playback slots. DCL: These four buttons allows users to define COMMANDS (DCL’s) that can be placed on a button for ease of use.
E. Quick Access Icons. These buttons located in the upper right corner of AirPLAY allow the user to quickly open various screens. These buttons are as follows from left to right: AirPLAY Configuration, Channel Assignment, Column Editor, Help, Maximize, Close.
F. PLAYBACK SLOTS IDLE: In this view AirPLAY has been configured to display four AUTO slots with a single independent slot. The first four slots will automatically chain from one to the next. Slot 5 has been configured as an Independent Slot. AirPLAY in this view has been configured to display the Independent slots in a different color and sized so only five slots are visible.
G. PLAYBACK SLOT IN PLAY: A playing slot can change color and will display timers along with information about that cut. a. Cut number, TITLE of the cut, with Group
association. The 2nd, 3rd and 4th lines are user defined. Users can set the displayable fields via the AirPLAY Configure screen.
ENCO DAD User Manual 202
b. Load button allows the user to manually load a cut into the slot. When playing in MANUAL Mode this button will change to a different arrow button. In MANUAL Mode (and when in LIVE mode) a user can press this button to fade and stop the cut that is playing. The length of the fade is user definable via the Segue Length field.
c. The Audition button will change to a pacer display showing the overall
progress of the cut that is playing. Users can audition a cut while playing. When playing, the pacer bar will be Green for AUTO mode and Red for MANUAL mode. This can also change to Yellow if one enters LIVE mode and Purple for FULL-AUTO Mode. LIVE and FULL-AUTO modes are special modes that an Administrator can enable and are discussed in the Using Airplay section. To the right of the Audition button are two small boxes. The upper box will display the Transition code for the cut. Presenters can change the transition of the actively playing cut by clicking on this box. These transitions are defined in the Configure AirPLAY screen. The lower box will display a [V] if there is a Voice Track or an [O] if there is an Over associated with the cut.
d. PLAY/STOP button. Users can right click this button to access other menu
functions like: Load, Unload, Next Play, Modify, Edit, Audition and Pause. The small number in the lower right corner of the button signifies the Channel Assignment Output for that slot.
e. Two timers are displayed beneath the Play button. Both of these timers are
user configurable. Administrators can select between OFF, PlayTime Count Up and Down, Talk Time Count Down, Scheduled Air Time and Actual Calculated Air Time.
H. INDEPENDENT DECKS and MANUAL SLOTS operate in a very similar manner
as an AUTO SLOT but are started manually. One difference is that Administrators can configure an Independent slot to act as a semi-auto slot. If one configures the Independent slot for SEMI mode, when the user plays the Independent slot the actively playing AUTO slot will turn into LIVE mode. This means that the AUTO slot will NOT automatically advance to the next AUTO slot. For more details please review LIVE mode below. An Admin can also use the NO-REPLAY Configuration option to prevent a cut that has been dragged into an Independent slot from getting loaded into an Auto Slot automatically.
ENCO DAD User Manual 203
Loading a Playlist Many of the functions and controls of the playlist within AirPLAY are the same as those for a Playback Machine. One should consider reviewing the section on Playback Machines to become familiar with these functions as they are discussed in greater detail. Clicking on the PLAYLIST Bar button on the machine will display the PLAYLIST window showing all available playlists. Select the desired playlist and press the LOAD button to load the playlist into AirPLAY Users should note that loading a playlist is prevented while the machine is actively playing in AUTO mode. Users can load a playlist when AirPLAY is idle in AUTO mode or when MANUAL mode is in use. One can also access shortcuts to Playlist window functions by clicking on the Playlist Bar with the right mouse button. For example, right clicking on the Playlist Bar and selecting the option to Load Playlist will open the Playlist window. There are a few minor differences between loading a playlist in AUTO mode verses MANUAL mode. In AUTO mode, when the playlist is loaded, all slots are cleared and first few elements are loaded automatically into the slots for playback. If one has AirPLAY in Manual Mode the configuration of AirPLAY will allow one to control how AirPLAY loads the slots. Under AirPLAY configuration one can select: No Action, Fill ALL, Fill Empties. If No Action is selected, the slots will not be filled. Fill ALL will fill all slots with the first elements in the list. Fill Empties will only fill the empty slots, keeping the currently loaded cut in its respective slot. In general, AirPLAY is designed to run with a playlist. Running in AUTO mode allows AirPlay to automatically fill a slot that empties. The next cut is pulled from the playlist and loaded. The loading of cuts in MANUAL operation is dependent upon the AirPLAY On Finish configuration menu options. When On Finish if No Action is selected, when the file finishes playing, it will remain in the slot. Fill Next will load the next to play cut from the playlist. Empty slot will unload the cut after playing. NOTE: AirPLAY can be run without a Playlist, however some functions regarding the loading of cuts manually are disabled.
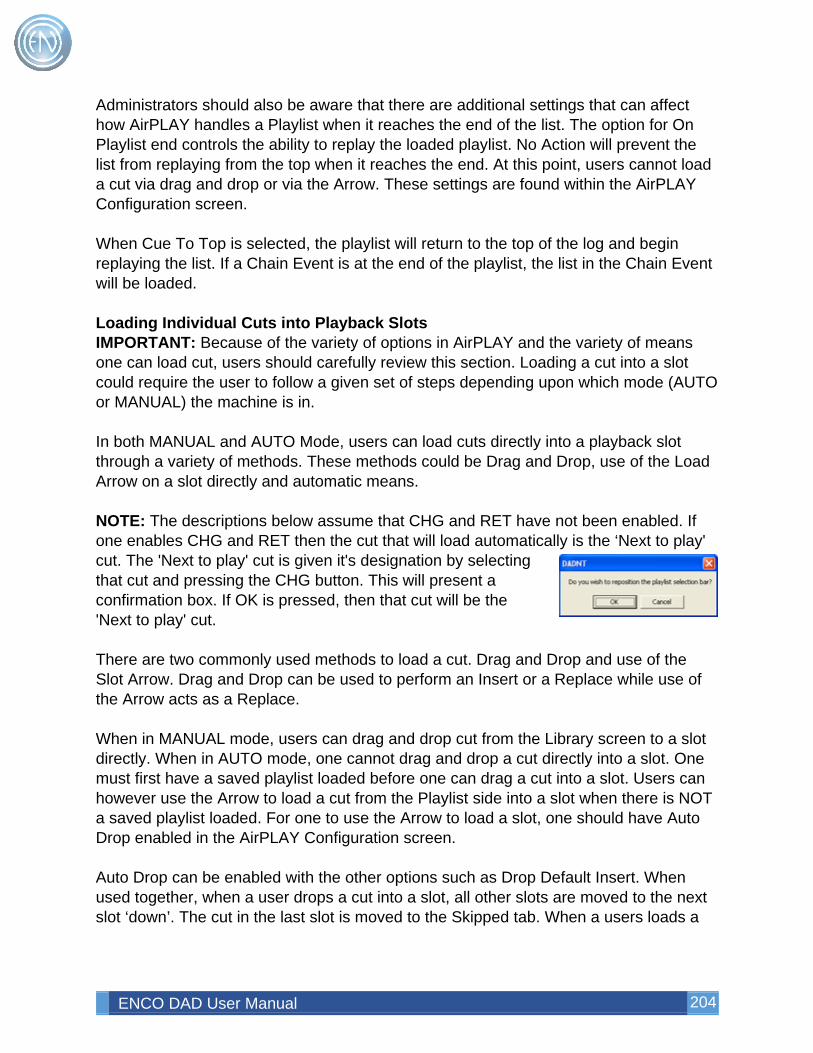
ENCO DAD User Manual 204
Administrators should also be aware that there are additional settings that can affect how AirPLAY handles a Playlist when it reaches the end of the list. The option for On Playlist end controls the ability to replay the loaded playlist. No Action will prevent the list from replaying from the top when it reaches the end. At this point, users cannot load a cut via drag and drop or via the Arrow. These settings are found within the AirPLAY Configuration screen. When Cue To Top is selected, the playlist will return to the top of the log and begin replaying the list. If a Chain Event is at the end of the playlist, the list in the Chain Event will be loaded. Loading Individual Cuts into Playback Slots IMPORTANT: Because of the variety of options in AirPLAY and the variety of means one can load cut, users should carefully review this section. Loading a cut into a slot could require the user to follow a given set of steps depending upon which mode (AUTO or MANUAL) the machine is in. In both MANUAL and AUTO Mode, users can load cuts directly into a playback slot through a variety of methods. These methods could be Drag and Drop, use of the Load Arrow on a slot directly and automatic means. NOTE: The descriptions below assume that CHG and RET have not been enabled. If one enables CHG and RET then the cut that will load automatically is the ‘Next to play' cut. The 'Next to play' cut is given it's designation by selecting that cut and pressing the CHG button. This will present a confirmation box. If OK is pressed, then that cut will be the 'Next to play' cut. There are two commonly used methods to load a cut. Drag and Drop and use of the Slot Arrow. Drag and Drop can be used to perform an Insert or a Replace while use of the Arrow acts as a Replace. When in MANUAL mode, users can drag and drop cut from the Library screen to a slot directly. When in AUTO mode, one cannot drag and drop a cut directly into a slot. One must first have a saved playlist loaded before one can drag a cut into a slot. Users can however use the Arrow to load a cut from the Playlist side into a slot when there is NOT a saved playlist loaded. For one to use the Arrow to load a slot, one should have Auto Drop enabled in the AirPLAY Configuration screen. Auto Drop can be enabled with the other options such as Drop Default Insert. When used together, when a user drops a cut into a slot, all other slots are moved to the next slot ‘down’. The cut in the last slot is moved to the Skipped tab. When a users loads a
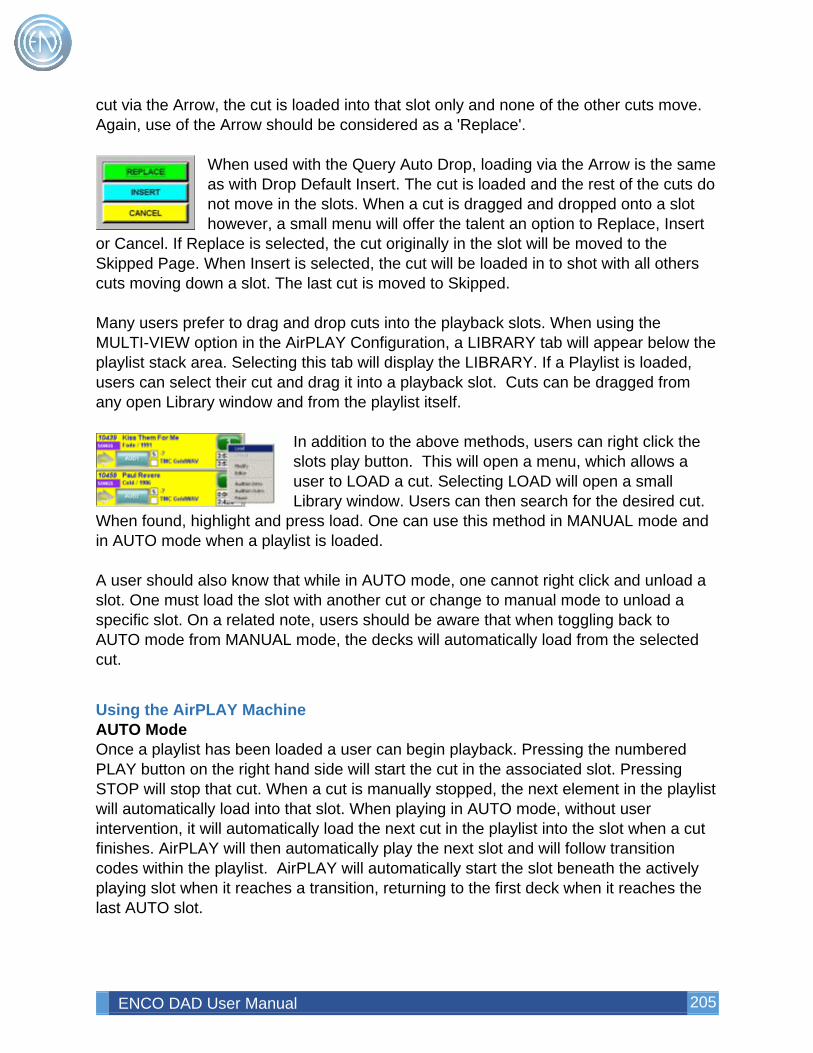
ENCO DAD User Manual 205
cut via the Arrow, the cut is loaded into that slot only and none of the other cuts move. Again, use of the Arrow should be considered as a 'Replace'.
When used with the Query Auto Drop, loading via the Arrow is the same as with Drop Default Insert. The cut is loaded and the rest of the cuts do not move in the slots. When a cut is dragged and dropped onto a slot however, a small menu will offer the talent an option to Replace, Insert
or Cancel. If Replace is selected, the cut originally in the slot will be moved to the Skipped Page. When Insert is selected, the cut will be loaded in to shot with all others cuts moving down a slot. The last cut is moved to Skipped. Many users prefer to drag and drop cuts into the playback slots. When using the MULTI-VIEW option in the AirPLAY Configuration, a LIBRARY tab will appear below the playlist stack area. Selecting this tab will display the LIBRARY. If a Playlist is loaded, users can select their cut and drag it into a playback slot. Cuts can be dragged from any open Library window and from the playlist itself.
In addition to the above methods, users can right click the slots play button. This will open a menu, which allows a user to LOAD a cut. Selecting LOAD will open a small Library window. Users can then search for the desired cut.
When found, highlight and press load. One can use this method in MANUAL mode and in AUTO mode when a playlist is loaded. A user should also know that while in AUTO mode, one cannot right click and unload a slot. One must load the slot with another cut or change to manual mode to unload a specific slot. On a related note, users should be aware that when toggling back to AUTO mode from MANUAL mode, the decks will automatically load from the selected cut.
Using the AirPLAY Machine AUTO Mode Once a playlist has been loaded a user can begin playback. Pressing the numbered PLAY button on the right hand side will start the cut in the associated slot. Pressing STOP will stop that cut. When a cut is manually stopped, the next element in the playlist will automatically load into that slot. When playing in AUTO mode, without user intervention, it will automatically load the next cut in the playlist into the slot when a cut finishes. AirPLAY will then automatically play the next slot and will follow transition codes within the playlist. AirPLAY will automatically start the slot beneath the actively playing slot when it reaches a transition, returning to the first deck when it reaches the last AUTO slot.

ENCO DAD User Manual 206
This means AirPLAY in AUTO mode can be used for unassisted operation as it will load the cuts and play the cuts. When a user wants to ‘take-over’ and assume control, they simple need to toggle the AUTO button to MANUAL. When the cut that is playing ends, it will stop and load the next cut. Users can toggle between AUTO and MANUAL at any time. Presenters can ‘take’ the next cut to play by pressing that slot’s PLAY button. When a user does this, the cut that is playing will fade out and stop creating an overlap of the two cuts. The length of the fade is definable in the AirPLAY configuration as Segue Length. Administrators should take note that there are some options that can be used in conjunction with AUTO mode. These options are LIVE and FULL-AUTO mode. Both of these options are discussed below. When used with LIVE mode when the user starts the playback of another cut the previously playing cut will not fadeout automatically but will continue playing until it reaches the end of the cut. When in FULL-AUTO mode AirPLAY will continue to transition from cut to cut ignoring all transition codes. To swap a loaded cut from one slot to another, left click the Playback slot once. The slot will begin to flash. While the slot is flashing, left click again on the other Playback slot you wish to swap with. When the second slot has been clicked, the two cuts will swap positions. Moving and altering the playback order of cuts within the playlist can be done in the same manner as covered in the section discussing the PLAYBACK Machine. Again, users should review the AirPLAY section “Loading Individual Cuts Into Slots”. Users will also find the same right click options for the playlist stack area and the playlist bar as in the Playback Machine. One should note that there are some right click menu options that are grayed out. These items are currently not supported within AirPLAY. As part of the configuration the playback slots can change color when a cut is playing and be set to flash when it nears the end of the cut. MANUAL Mode Manual mode operates much like AUTO mode with the exception being that the cuts will not automatically play themselves. The presenter must manually start each cut. When in Manual mode a user can press the Arrow button to fade and stop the cut that is playing or just press the STOP button. As in AUTO mode, presenters can ‘take’ the next cut to play by pressing that slot’s PLAY button. When a user does this, both cut’s that are playing will continue to play as normal. One should press the Fade button to fade and stop. The length of the fade is definable in the AirPLAY configuration as Segue Length. When in MANUAL mode, other modes such as LIVE mode and FULL-AUTO mode are overridden.
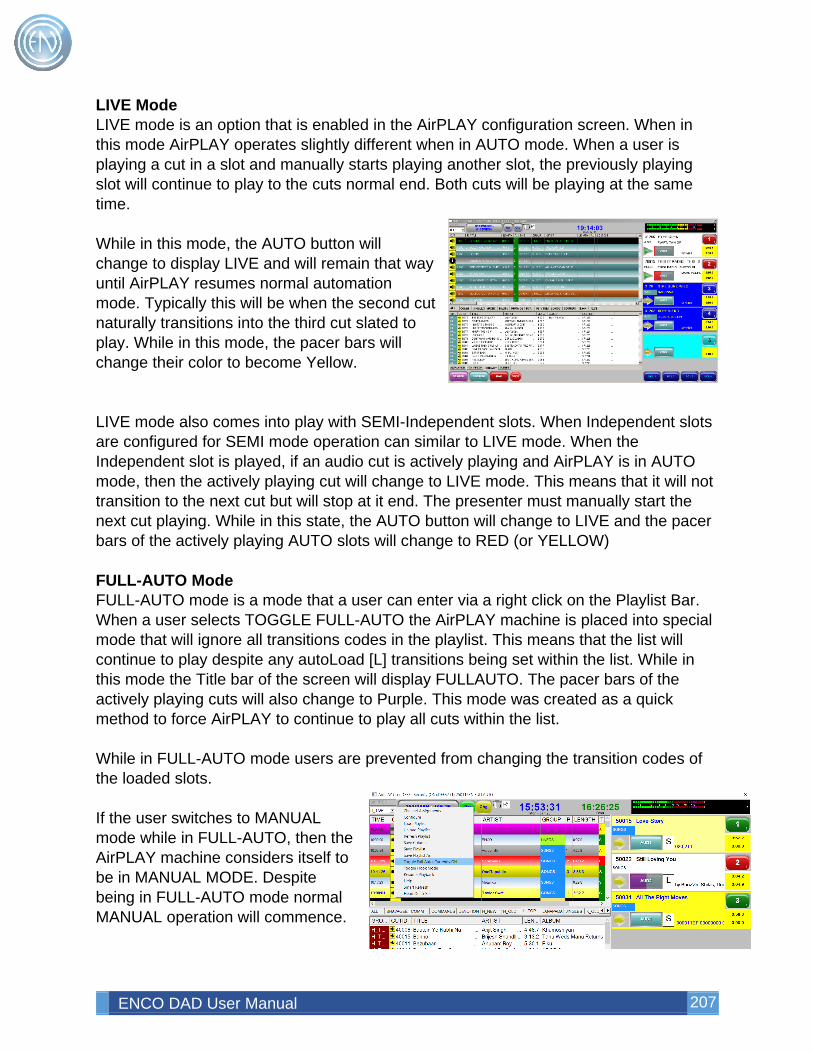
ENCO DAD User Manual 207
LIVE Mode LIVE mode is an option that is enabled in the AirPLAY configuration screen. When in this mode AirPLAY operates slightly different when in AUTO mode. When a user is playing a cut in a slot and manually starts playing another slot, the previously playing slot will continue to play to the cuts normal end. Both cuts will be playing at the same time. While in this mode, the AUTO button will change to display LIVE and will remain that way until AirPLAY resumes normal automation mode. Typically this will be when the second cut naturally transitions into the third cut slated to play. While in this mode, the pacer bars will change their color to become Yellow. LIVE mode also comes into play with SEMI-Independent slots. When Independent slots are configured for SEMI mode operation can similar to LIVE mode. When the Independent slot is played, if an audio cut is actively playing and AirPLAY is in AUTO mode, then the actively playing cut will change to LIVE mode. This means that it will not transition to the next cut but will stop at it end. The presenter must manually start the next cut playing. While in this state, the AUTO button will change to LIVE and the pacer bars of the actively playing AUTO slots will change to RED (or YELLOW) FULL-AUTO Mode FULL-AUTO mode is a mode that a user can enter via a right click on the Playlist Bar. When a user selects TOGGLE FULL-AUTO the AirPLAY machine is placed into special mode that will ignore all transitions codes in the playlist. This means that the list will continue to play despite any autoLoad [L] transitions being set within the list. While in this mode the Title bar of the screen will display FULLAUTO. The pacer bars of the actively playing cuts will also change to Purple. This mode was created as a quick method to force AirPLAY to continue to play all cuts within the list. While in FULL-AUTO mode users are prevented from changing the transition codes of the loaded slots. If the user switches to MANUAL mode while in FULL-AUTO, then the AirPLAY machine considers itself to be in MANUAL MODE. Despite being in FULL-AUTO mode normal MANUAL operation will commence.
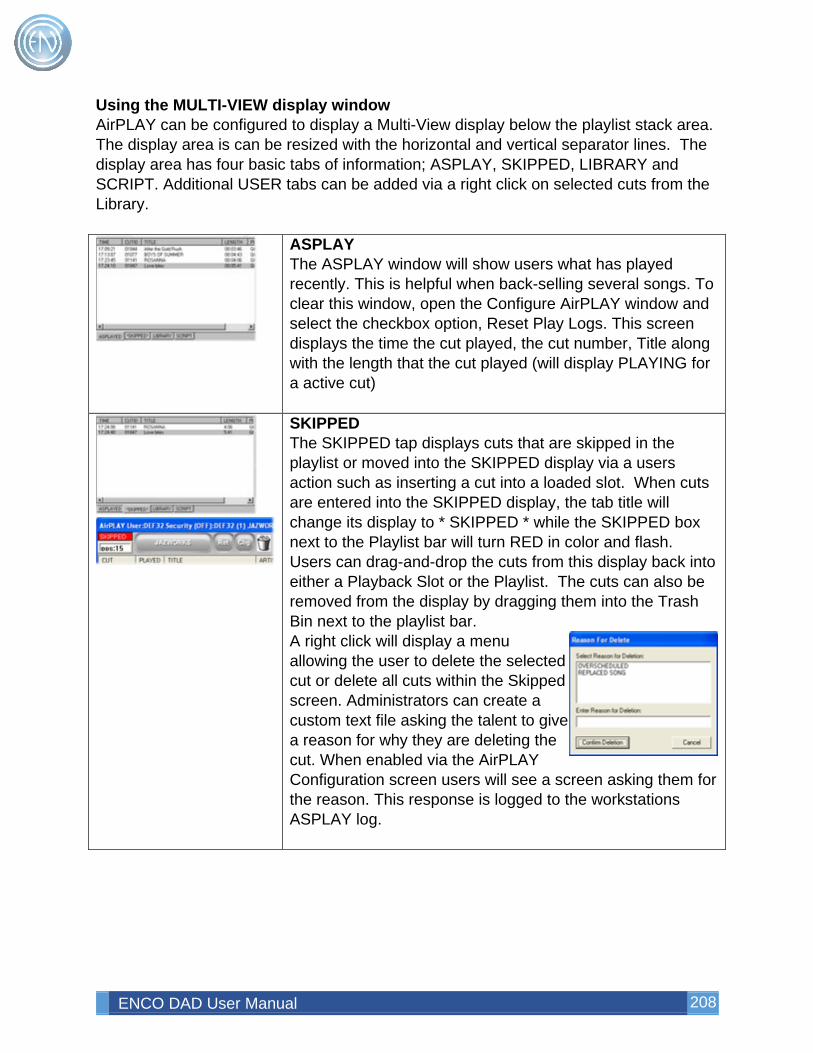
ENCO DAD User Manual 208
Using the MULTI-VIEW display window AirPLAY can be configured to display a Multi-View display below the playlist stack area. The display area is can be resized with the horizontal and vertical separator lines. The display area has four basic tabs of information; ASPLAY, SKIPPED, LIBRARY and SCRIPT. Additional USER tabs can be added via a right click on selected cuts from the Library.
ASPLAY The ASPLAY window will show users what has played recently. This is helpful when back-selling several songs. To clear this window, open the Configure AirPLAY window and select the checkbox option, Reset Play Logs. This screen displays the time the cut played, the cut number, Title along with the length that the cut played (will display PLAYING for a active cut)
SKIPPED The SKIPPED tap displays cuts that are skipped in the playlist or moved into the SKIPPED display via a users action such as inserting a cut into a loaded slot. When cuts are entered into the SKIPPED display, the tab title will change its display to * SKIPPED * while the SKIPPED box next to the Playlist bar will turn RED in color and flash. Users can drag-and-drop the cuts from this display back into either a Playback Slot or the Playlist. The cuts can also be removed from the display by dragging them into the Trash Bin next to the playlist bar. A right click will display a menu allowing the user to delete the selected cut or delete all cuts within the Skipped screen. Administrators can create a custom text file asking the talent to give a reason for why they are deleting the cut. When enabled via the AirPLAY Configuration screen users will see a screen asking them for the reason. This response is logged to the workstations ASPLAY log.
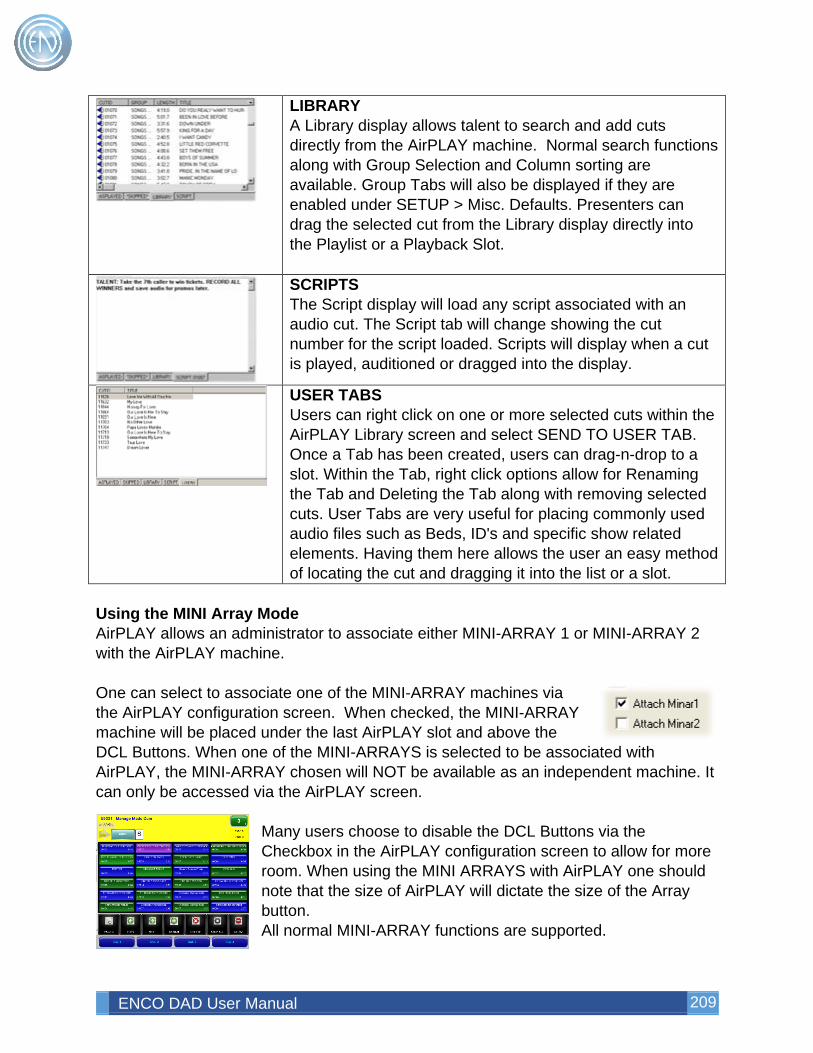
ENCO DAD User Manual 209
LIBRARY A Library display allows talent to search and add cuts directly from the AirPLAY machine. Normal search functions along with Group Selection and Column sorting are available. Group Tabs will also be displayed if they are enabled under SETUP > Misc. Defaults. Presenters can drag the selected cut from the Library display directly into the Playlist or a Playback Slot.
SCRIPTS The Script display will load any script associated with an audio cut. The Script tab will change showing the cut number for the script loaded. Scripts will display when a cut is played, auditioned or dragged into the display.
USER TABS Users can right click on one or more selected cuts within the AirPLAY Library screen and select SEND TO USER TAB. Once a Tab has been created, users can drag-n-drop to a slot. Within the Tab, right click options allow for Renaming the Tab and Deleting the Tab along with removing selected cuts. User Tabs are very useful for placing commonly used audio files such as Beds, ID's and specific show related elements. Having them here allows the user an easy method of locating the cut and dragging it into the list or a slot.
Using the MINI Array Mode AirPLAY allows an administrator to associate either MINI-ARRAY 1 or MINI-ARRAY 2 with the AirPLAY machine. One can select to associate one of the MINI-ARRAY machines via the AirPLAY configuration screen. When checked, the MINI-ARRAY machine will be placed under the last AirPLAY slot and above the DCL Buttons. When one of the MINI-ARRAYS is selected to be associated with AirPLAY, the MINI-ARRAY chosen will NOT be available as an independent machine. It can only be accessed via the AirPLAY screen.
Many users choose to disable the DCL Buttons via the Checkbox in the AirPLAY configuration screen to allow for more room. When using the MINI ARRAYS with AirPLAY one should note that the size of AirPLAY will dictate the size of the Array button. All normal MINI-ARRAY functions are supported.
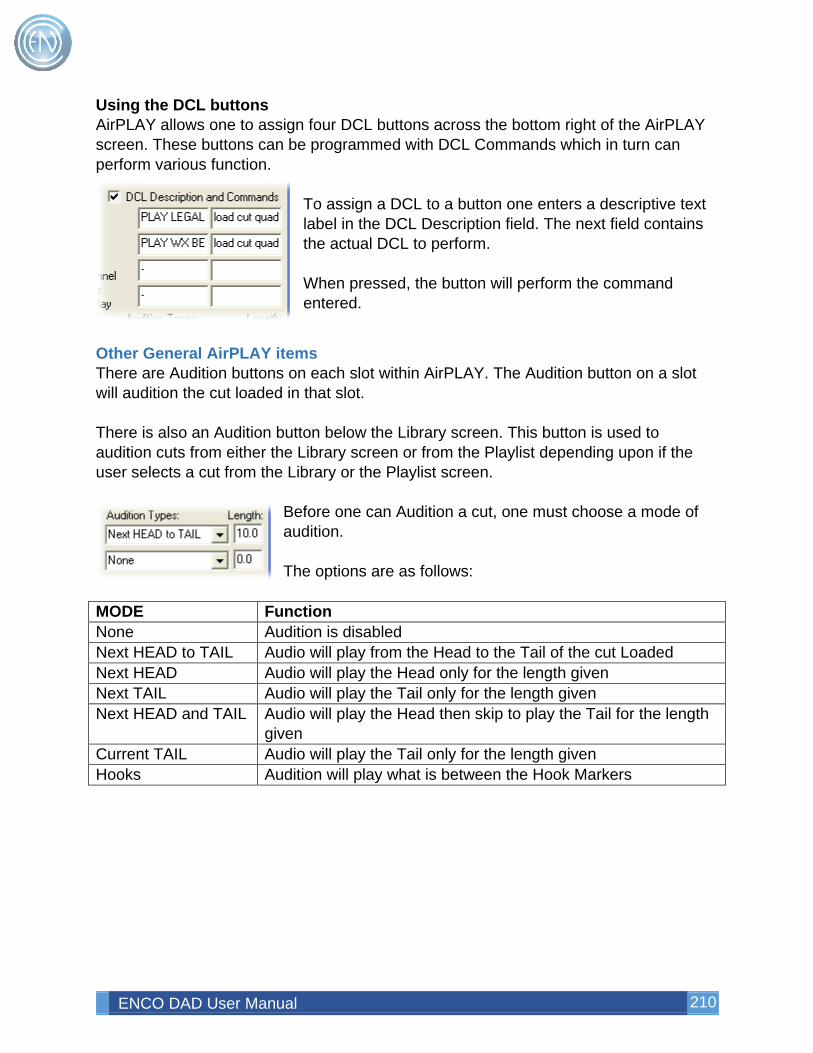
ENCO DAD User Manual 210
Using the DCL buttons AirPLAY allows one to assign four DCL buttons across the bottom right of the AirPLAY screen. These buttons can be programmed with DCL Commands which in turn can perform various function.
To assign a DCL to a button one enters a descriptive text label in the DCL Description field. The next field contains the actual DCL to perform. When pressed, the button will perform the command entered.
Other General AirPLAY items There are Audition buttons on each slot within AirPLAY. The Audition button on a slot will audition the cut loaded in that slot. There is also an Audition button below the Library screen. This button is used to audition cuts from either the Library screen or from the Playlist depending upon if the user selects a cut from the Library or the Playlist screen.
Before one can Audition a cut, one must choose a mode of audition. The options are as follows:
MODE Function None Audition is disabled Next HEAD to TAIL Audio will play from the Head to the Tail of the cut Loaded Next HEAD Audio will play the Head only for the length given Next TAIL Audio will play the Tail only for the length given Next HEAD and TAIL Audio will play the Head then skip to play the Tail for the length
given Current TAIL Audio will play the Tail only for the length given Hooks Audition will play what is between the Hook Markers

ENCO DAD User Manual 211
Configuring the AirPLAY Machine To configure the AirPLAY Machine, right click on the playlist bar and select CONFIGURE from the menu. The Configure AirPLAY window opens. Users can also access this window from the main SETUP screen. Configurable features are listed below.
Feature Description PLAYERS menu dropdown
Select the number of AUTO MODE playback slots from this list. Remaining players can be assigned as independent slots. AirPLAY must be unloaded to change the number of playback slots.
INDEPENDENTS menu dropdown
Select the number of INDEPENDENT playback slots from the list. The amount of INDEPENDENT slots depends on the amount of PLAYERS selected.
SEMI Checkbox When Independent slots are configured for SEMI mode operation can similar to LIVE mode. When the Independent slot is played, if an audio cut is actively playing and AirPLAY is in AUTO mode, then the actively playing cut will change to LIVE mode. This means that it will not transition to the next cut but will stop at it end. The presenter must manually start the next cut playing.
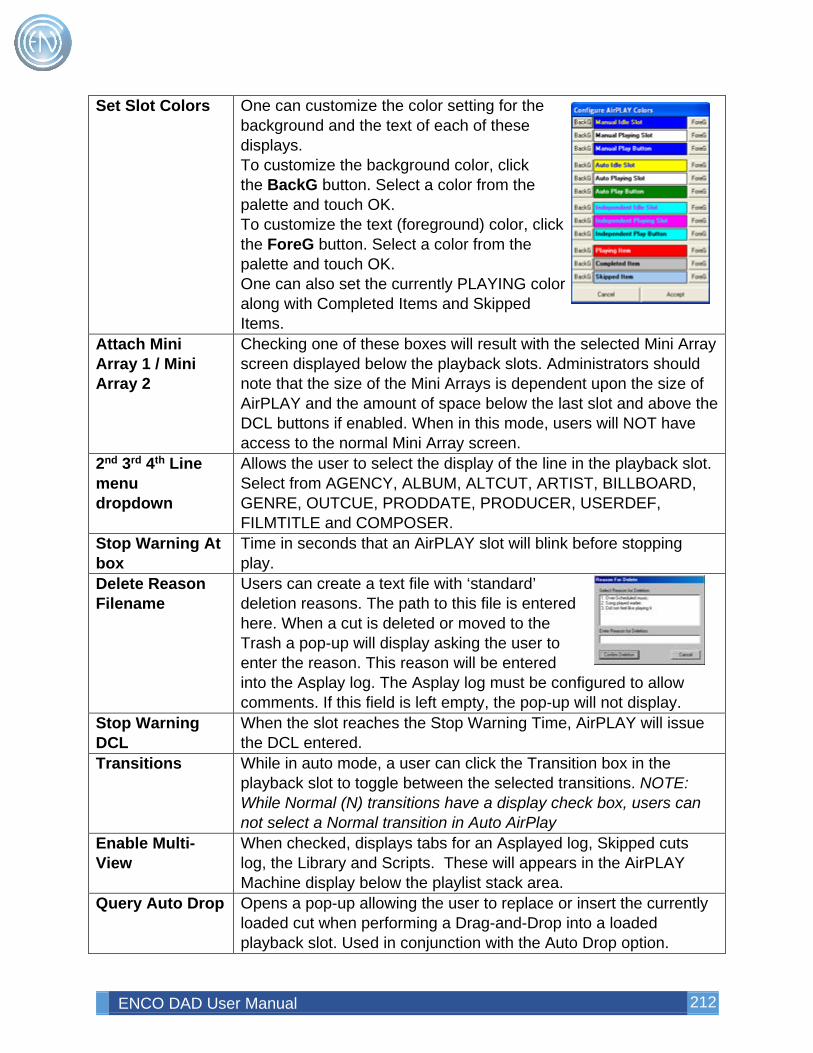
ENCO DAD User Manual 212
Set Slot Colors
One can customize the color setting for the background and the text of each of these displays. To customize the background color, click the BackG button. Select a color from the palette and touch OK. To customize the text (foreground) color, click the ForeG button. Select a color from the palette and touch OK. One can also set the currently PLAYING color along with Completed Items and Skipped Items.
Attach Mini Array 1 / Mini Array 2
Checking one of these boxes will result with the selected Mini Array screen displayed below the playback slots. Administrators should note that the size of the Mini Arrays is dependent upon the size of AirPLAY and the amount of space below the last slot and above the DCL buttons if enabled. When in this mode, users will NOT have access to the normal Mini Array screen.
2nd 3rd 4th Line menu dropdown
Allows the user to select the display of the line in the playback slot. Select from AGENCY, ALBUM, ALTCUT, ARTIST, BILLBOARD, GENRE, OUTCUE, PRODDATE, PRODUCER, USERDEF, FILMTITLE and COMPOSER.
Stop Warning At box
Time in seconds that an AirPLAY slot will blink before stopping play.
Delete Reason Filename
Users can create a text file with ‘standard’ deletion reasons. The path to this file is entered here. When a cut is deleted or moved to the Trash a pop-up will display asking the user to enter the reason. This reason will be entered into the Asplay log. The Asplay log must be configured to allow comments. If this field is left empty, the pop-up will not display.
Stop Warning DCL
When the slot reaches the Stop Warning Time, AirPLAY will issue the DCL entered.
Transitions While in auto mode, a user can click the Transition box in the playback slot to toggle between the selected transitions. NOTE: While Normal (N) transitions have a display check box, users can not select a Normal transition in Auto AirPlay
Enable Multi-View
When checked, displays tabs for an Asplayed log, Skipped cuts log, the Library and Scripts. These will appears in the AirPLAY Machine display below the playlist stack area.
Query Auto Drop Opens a pop-up allowing the user to replace or insert the currently loaded cut when performing a Drag-and-Drop into a loaded playback slot. Used in conjunction with the Auto Drop option.
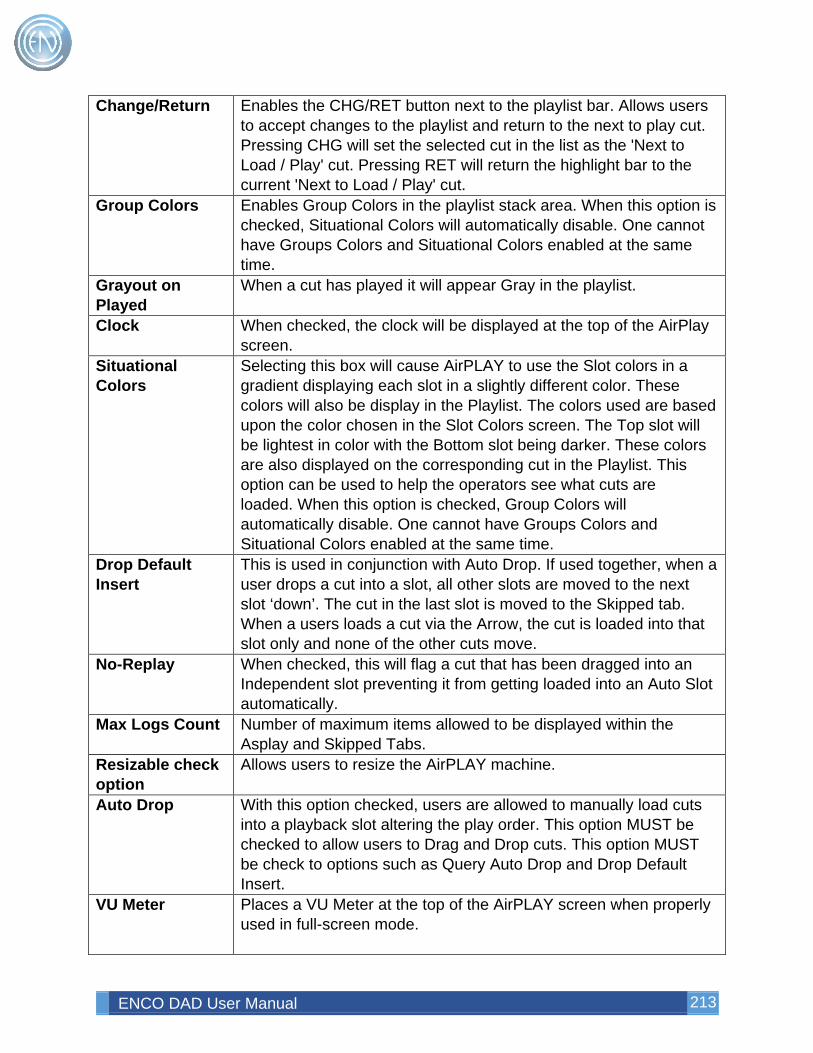
ENCO DAD User Manual 213
Change/Return Enables the CHG/RET button next to the playlist bar. Allows users to accept changes to the playlist and return to the next to play cut. Pressing CHG will set the selected cut in the list as the 'Next to Load / Play' cut. Pressing RET will return the highlight bar to the current 'Next to Load / Play' cut.
Group Colors Enables Group Colors in the playlist stack area. When this option is checked, Situational Colors will automatically disable. One cannot have Groups Colors and Situational Colors enabled at the same time.
Grayout on Played
When a cut has played it will appear Gray in the playlist.
Clock When checked, the clock will be displayed at the top of the AirPlay screen.
Situational Colors
Selecting this box will cause AirPLAY to use the Slot colors in a gradient displaying each slot in a slightly different color. These colors will also be display in the Playlist. The colors used are based upon the color chosen in the Slot Colors screen. The Top slot will be lightest in color with the Bottom slot being darker. These colors are also displayed on the corresponding cut in the Playlist. This option can be used to help the operators see what cuts are loaded. When this option is checked, Group Colors will automatically disable. One cannot have Groups Colors and Situational Colors enabled at the same time.
Drop Default Insert
This is used in conjunction with Auto Drop. If used together, when a user drops a cut into a slot, all other slots are moved to the next slot ‘down’. The cut in the last slot is moved to the Skipped tab. When a users loads a cut via the Arrow, the cut is loaded into that slot only and none of the other cuts move.
No-Replay When checked, this will flag a cut that has been dragged into an Independent slot preventing it from getting loaded into an Auto Slot automatically.
Max Logs Count Number of maximum items allowed to be displayed within the Asplay and Skipped Tabs.
Resizable check option
Allows users to resize the AirPLAY machine.
Auto Drop With this option checked, users are allowed to manually load cuts into a playback slot altering the play order. This option MUST be checked to allow users to Drag and Drop cuts. This option MUST be check to options such as Query Auto Drop and Drop Default Insert.
VU Meter Places a VU Meter at the top of the AirPLAY screen when properly used in full-screen mode.
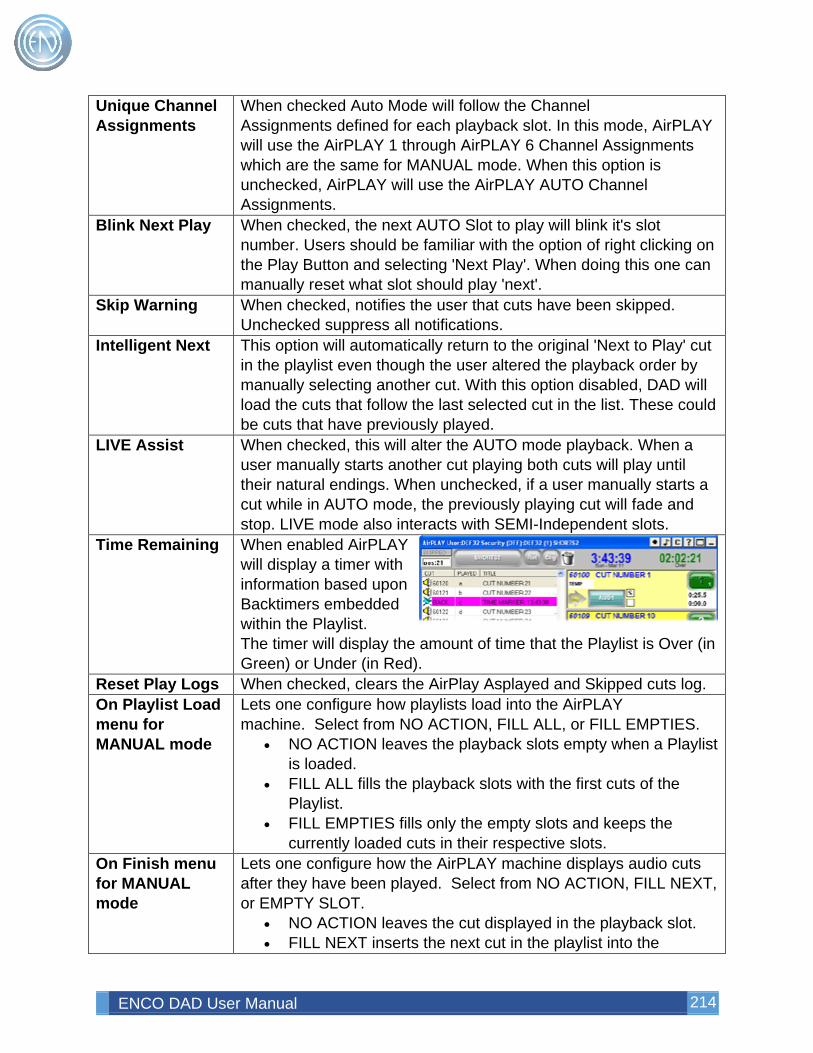
ENCO DAD User Manual 214
Unique Channel Assignments
When checked Auto Mode will follow the Channel Assignments defined for each playback slot. In this mode, AirPLAY will use the AirPLAY 1 through AirPLAY 6 Channel Assignments which are the same for MANUAL mode. When this option is unchecked, AirPLAY will use the AirPLAY AUTO Channel Assignments.
Blink Next Play When checked, the next AUTO Slot to play will blink it's slot number. Users should be familiar with the option of right clicking on the Play Button and selecting 'Next Play'. When doing this one can manually reset what slot should play 'next'.
Skip Warning When checked, notifies the user that cuts have been skipped. Unchecked suppress all notifications.
Intelligent Next This option will automatically return to the original 'Next to Play' cut in the playlist even though the user altered the playback order by manually selecting another cut. With this option disabled, DAD will load the cuts that follow the last selected cut in the list. These could be cuts that have previously played.
LIVE Assist When checked, this will alter the AUTO mode playback. When a user manually starts another cut playing both cuts will play until their natural endings. When unchecked, if a user manually starts a cut while in AUTO mode, the previously playing cut will fade and stop. LIVE mode also interacts with SEMI-Independent slots.
Time Remaining When enabled AirPLAY will display a timer with information based upon Backtimers embedded within the Playlist. The timer will display the amount of time that the Playlist is Over (in Green) or Under (in Red).
Reset Play Logs When checked, clears the AirPlay Asplayed and Skipped cuts log. On Playlist Load menu for MANUAL mode
Lets one configure how playlists load into the AirPLAY machine. Select from NO ACTION, FILL ALL, or FILL EMPTIES.
• NO ACTION leaves the playback slots empty when a Playlist is loaded.
• FILL ALL fills the playback slots with the first cuts of the Playlist.
• FILL EMPTIES fills only the empty slots and keeps the currently loaded cuts in their respective slots.
On Finish menu for MANUAL mode
Lets one configure how the AirPLAY machine displays audio cuts after they have been played. Select from NO ACTION, FILL NEXT, or EMPTY SLOT.
• NO ACTION leaves the cut displayed in the playback slot. • FILL NEXT inserts the next cut in the playlist into the
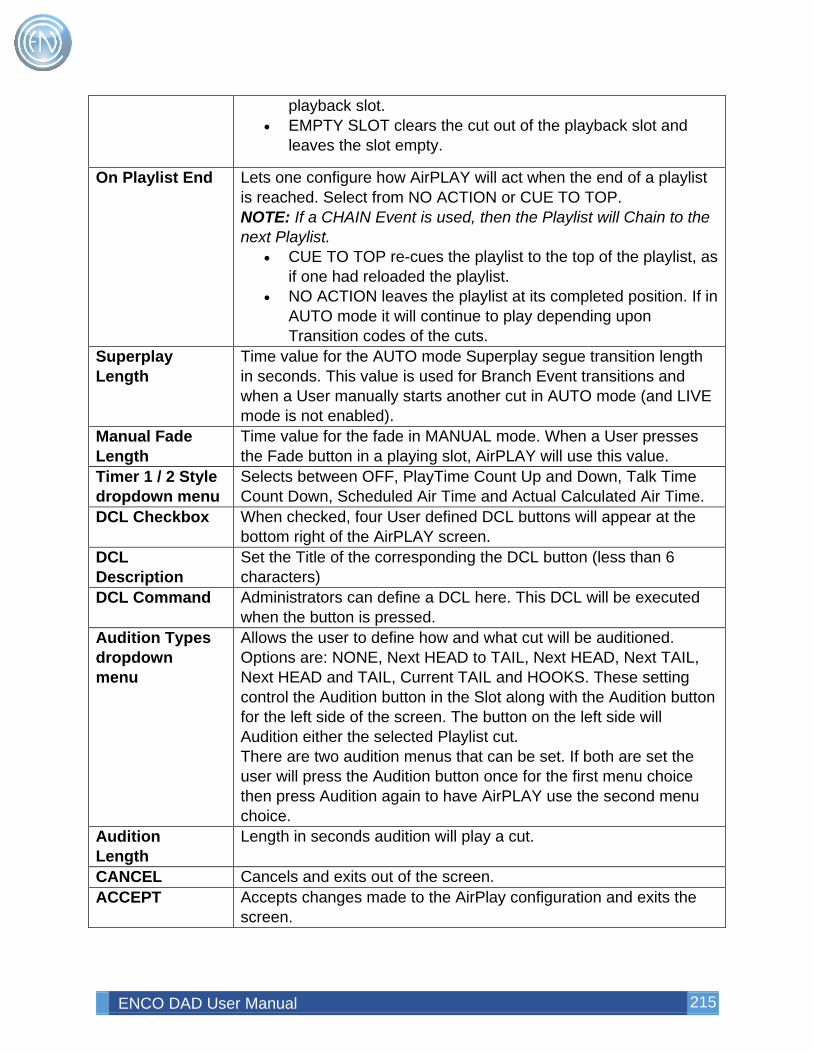
ENCO DAD User Manual 215
playback slot. • EMPTY SLOT clears the cut out of the playback slot and
leaves the slot empty.
On Playlist End Lets one configure how AirPLAY will act when the end of a playlist is reached. Select from NO ACTION or CUE TO TOP. NOTE: If a CHAIN Event is used, then the Playlist will Chain to the next Playlist.
• CUE TO TOP re-cues the playlist to the top of the playlist, as if one had reloaded the playlist.
• NO ACTION leaves the playlist at its completed position. If in AUTO mode it will continue to play depending upon Transition codes of the cuts.
Superplay Length
Time value for the AUTO mode Superplay segue transition length in seconds. This value is used for Branch Event transitions and when a User manually starts another cut in AUTO mode (and LIVE mode is not enabled).
Manual Fade Length
Time value for the fade in MANUAL mode. When a User presses the Fade button in a playing slot, AirPLAY will use this value.
Timer 1 / 2 Style dropdown menu
Selects between OFF, PlayTime Count Up and Down, Talk Time Count Down, Scheduled Air Time and Actual Calculated Air Time.
DCL Checkbox When checked, four User defined DCL buttons will appear at the bottom right of the AirPLAY screen.
DCL Description
Set the Title of the corresponding the DCL button (less than 6 characters)
DCL Command Administrators can define a DCL here. This DCL will be executed when the button is pressed.
Audition Types dropdown menu
Allows the user to define how and what cut will be auditioned. Options are: NONE, Next HEAD to TAIL, Next HEAD, Next TAIL, Next HEAD and TAIL, Current TAIL and HOOKS. These setting control the Audition button in the Slot along with the Audition button for the left side of the screen. The button on the left side will Audition either the selected Playlist cut. There are two audition menus that can be set. If both are set the user will press the Audition button once for the first menu choice then press Audition again to have AirPLAY use the second menu choice.
Audition Length
Length in seconds audition will play a cut.
CANCEL Cancels and exits out of the screen. ACCEPT Accepts changes made to the AirPlay configuration and exits the
screen.
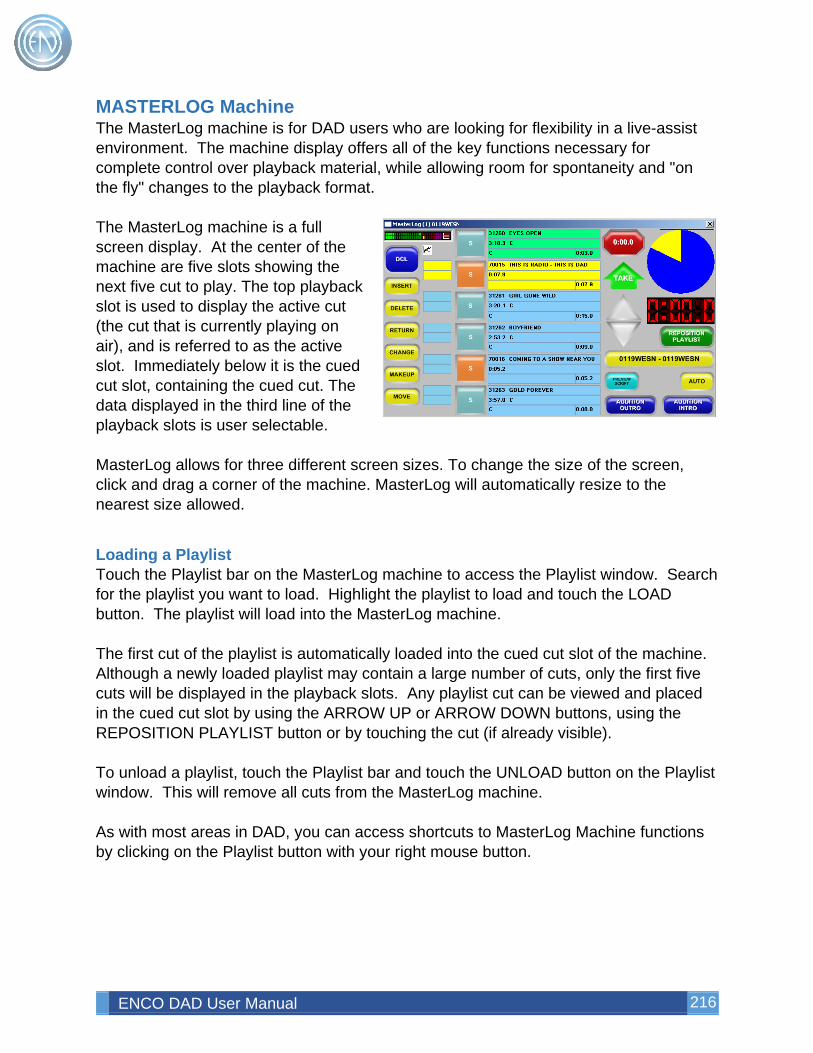
ENCO DAD User Manual 216
MASTERLOG Machine The MasterLog machine is for DAD users who are looking for flexibility in a live-assist environment. The machine display offers all of the key functions necessary for complete control over playback material, while allowing room for spontaneity and "on the fly" changes to the playback format. The MasterLog machine is a full screen display. At the center of the machine are five slots showing the next five cut to play. The top playback slot is used to display the active cut (the cut that is currently playing on air), and is referred to as the active slot. Immediately below it is the cued cut slot, containing the cued cut. The data displayed in the third line of the playback slots is user selectable. MasterLog allows for three different screen sizes. To change the size of the screen, click and drag a corner of the machine. MasterLog will automatically resize to the nearest size allowed.
Loading a Playlist Touch the Playlist bar on the MasterLog machine to access the Playlist window. Search for the playlist you want to load. Highlight the playlist to load and touch the LOAD button. The playlist will load into the MasterLog machine. The first cut of the playlist is automatically loaded into the cued cut slot of the machine. Although a newly loaded playlist may contain a large number of cuts, only the first five cuts will be displayed in the playback slots. Any playlist cut can be viewed and placed in the cued cut slot by using the ARROW UP or ARROW DOWN buttons, using the REPOSITION PLAYLIST button or by touching the cut (if already visible). To unload a playlist, touch the Playlist bar and touch the UNLOAD button on the Playlist window. This will remove all cuts from the MasterLog machine. As with most areas in DAD, you can access shortcuts to MasterLog Machine functions by clicking on the Playlist button with your right mouse button.
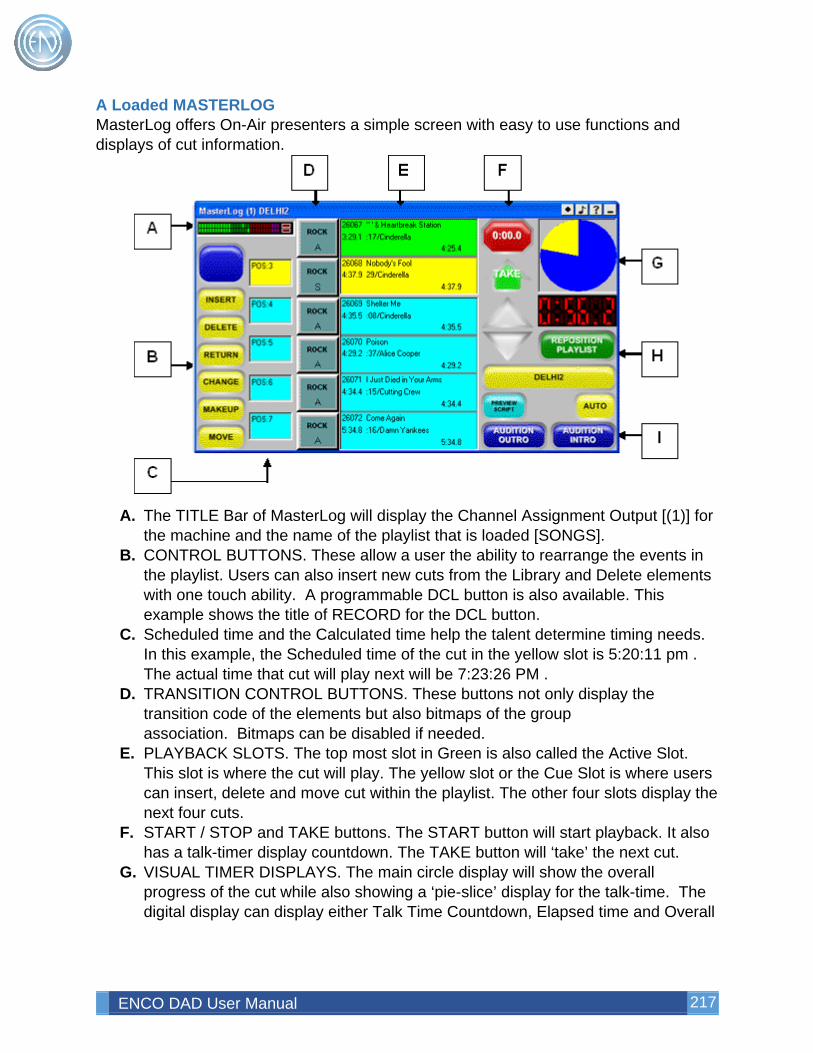
ENCO DAD User Manual 217
A Loaded MASTERLOG MasterLog offers On-Air presenters a simple screen with easy to use functions and displays of cut information.
A. The TITLE Bar of MasterLog will display the Channel Assignment Output [(1)] for
the machine and the name of the playlist that is loaded [SONGS]. B. CONTROL BUTTONS. These allow a user the ability to rearrange the events in
the playlist. Users can also insert new cuts from the Library and Delete elements with one touch ability. A programmable DCL button is also available. This example shows the title of RECORD for the DCL button.
C. Scheduled time and the Calculated time help the talent determine timing needs. In this example, the Scheduled time of the cut in the yellow slot is 5:20:11 pm . The actual time that cut will play next will be 7:23:26 PM .
D. TRANSITION CONTROL BUTTONS. These buttons not only display the transition code of the elements but also bitmaps of the group association. Bitmaps can be disabled if needed.
E. PLAYBACK SLOTS. The top most slot in Green is also called the Active Slot. This slot is where the cut will play. The yellow slot or the Cue Slot is where users can insert, delete and move cut within the playlist. The other four slots display the next four cuts.
F. START / STOP and TAKE buttons. The START button will start playback. It also has a talk-timer display countdown. The TAKE button will ‘take’ the next cut.
G. VISUAL TIMER DISPLAYS. The main circle display will show the overall progress of the cut while also showing a ‘pie-slice’ display for the talk-time. The digital display can display either Talk Time Countdown, Elapsed time and Overall
ENCO DAD User Manual 218
time remaining. This can be toggled through the different displays simple by touching the display.
H. PLAYLIST CONTROL BUTTONS. The UP and DOWN arrows will step the playlist up or down a single cut at a time. REPOSITION PLAYLIST opens a window allowing the user to quickly reposition the playlist if needed. The PLAYLIST bar allows users to load or unload playlists.
I. PREVIEW SCRIPT, AUTO / MANUAL and AUDITION BUTTONS. The PREVIEW SCRIPT will display a script in the SCRIPT MACHINE. AUTO / MANUAL allows talent to let MasterLog run in Automatic Mode playing one cut after another or in MANUAL Mode where the user starts the playback of the cut. AUDITION OUTRO and INTRO buttons will audition for five seconds.
MASTERLOG Button Functions The MasterLog machine features the following buttons: DCL This allows a user to define COMMANDS (DCL’s) that can be
placed on a button for ease of use. INSERT Opens a library window and inserts the cut you select into the
yellow slot of the playlist that's currently loaded into the MasterLog Machine. This button also has aSAVE buttons that allows users to quickly save the playlist that is loaded.
DELETE Deletes the cut in the yellow slot (CUE). RETURN If the order of the playlist is changed in any way, touching
the RETURN button will return the playlist to its original position. This is convenient if you have scrolled elsewhere in the playlist to search for something; when doing so the CHANGEbutton will flash, indicating that the cut in the cued cut slot is not the cut that will actually be played next. When you have finished scrolling through the playlist, touch the RETURN button to go back to the cued cut in the playlist.
CHANGE Accepts the change from the user that the NEXT CUT to play has been changed. Touching any cut in the playlist will temporarily place the cut in the yellow cued cut slot. Doing so will cause the CHANGE button to flash. This indicates that the displayed cut in the cued cut slot is not the cut that will play next. To cancel, touch the RETURN button (see above); to make the change, touch the CHANGE button. The cut in the cued cut slot will now be next for the active slot.
MAKEUP In a live assist situation, it is possible for an operator to move around and play other songs in the playlist. Touching MAKEUP will automatically reposition the playlist to the first un-played cut in the list. If this is the cut the user wishes to play, the user can MOVE the cut, then RETURN to the current position in the list and
ENCO DAD User Manual 219
PUT that cut as the next cut to play. The user can also accept the CHANGE and play that cut in it’s original position then press MAKEUP again to continue to play skipped songs.
MOVE / PUT Users can move the cut in the yellow CUE slot to another position if desired. When one touches MOVE, the cut in the CUE slot will be removed from the playlist. All elements that followed this cut will move up by one space. The user can then move through the playlist with the UP or DOWN arrows finding the location they wish to PUT that cut. Pressing PUT will insert the song into the CUE slot. The song will now be inserted into the list ahead of the position they chose. Once the cut has been moved, the CHANGE button will be flashing, since the moved cut is not the cut that will be played next. If you want to play the moved cut next, touch the CHANGE button; otherwise, touch the RETURN button to go back to the actual cued cut.
TRANSITION CONTROL
These buttons allow presenters to change the Transition codes for the events. When pressed a menu opens with options of: Normal , Autoplay, autoLoad, Segue, Segue Edit, Tracker, Cues and Cancel. Users can change the transition code of any cut at any time even while playing.
START / STOP Begins playback of the cut loaded into the green Active Slot. When playing, the START button will change to STOP.
TAKE Pressing this loads the cued cut into the active slot and plays the cut. If a cut is playing, this will begin a Superplay where the first cut will fade and stop.
ARROW UP and ARROW DOWN
Lets you scroll through the playlist.
DIGITAL DISPLAY counter
The digital display can display either Talk Time Countdown, Elapsed time and Overall time remaining. This can be toggled through the different displays simple by touching the display.
Reposition Playlist
Opens a window that lets you select a cut from the playlist. If you select a cut and touch the REPOSITION TO button, the cut you selected appears in the yellow cue slot. You can then select CHANGE or RETURN (see above).
PLAYLIST This opens the PLAYLIST window and allows users to Load and Unload Playlists among other functions.
AUTO / MANUAL When AUTO is selected, playlist transition codes are followed. The playlist will automatically play until it is told to stop. While in AUTO mode, the pacer display will be yellow. In MANUAL mode, each cut is played individually with AutoLoad status. The user must start each cut. When in MANUAL mode, the pacing display turns red.
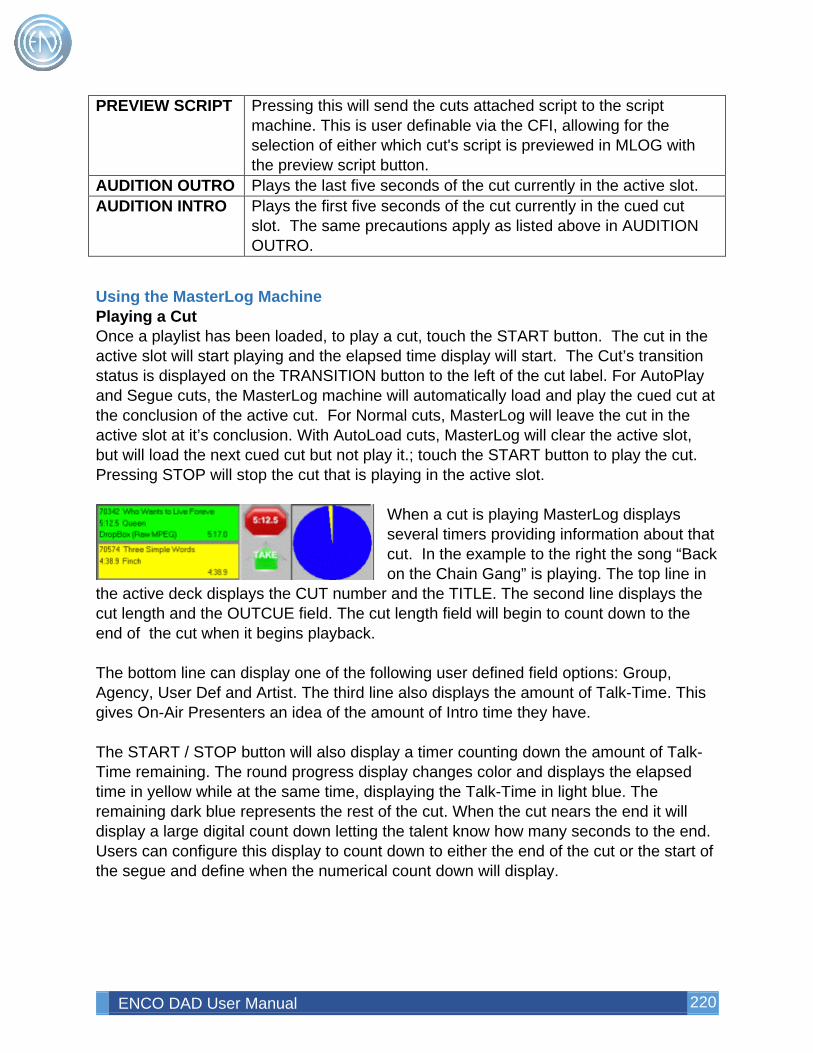
ENCO DAD User Manual 220
PREVIEW SCRIPT Pressing this will send the cuts attached script to the script machine. This is user definable via the CFI, allowing for the selection of either which cut's script is previewed in MLOG with the preview script button.
AUDITION OUTRO Plays the last five seconds of the cut currently in the active slot. AUDITION INTRO Plays the first five seconds of the cut currently in the cued cut
slot. The same precautions apply as listed above in AUDITION OUTRO.
Using the MasterLog Machine Playing a Cut Once a playlist has been loaded, to play a cut, touch the START button. The cut in the active slot will start playing and the elapsed time display will start. The Cut’s transition status is displayed on the TRANSITION button to the left of the cut label. For AutoPlay and Segue cuts, the MasterLog machine will automatically load and play the cued cut at the conclusion of the active cut. For Normal cuts, MasterLog will leave the cut in the active slot at it’s conclusion. With AutoLoad cuts, MasterLog will clear the active slot, but will load the next cued cut but not play it.; touch the START button to play the cut. Pressing STOP will stop the cut that is playing in the active slot.
When a cut is playing MasterLog displays several timers providing information about that cut. In the example to the right the song “Back on the Chain Gang” is playing. The top line in
the active deck displays the CUT number and the TITLE. The second line displays the cut length and the OUTCUE field. The cut length field will begin to count down to the end of the cut when it begins playback. The bottom line can display one of the following user defined field options: Group, Agency, User Def and Artist. The third line also displays the amount of Talk-Time. This gives On-Air Presenters an idea of the amount of Intro time they have. The START / STOP button will also display a timer counting down the amount of Talk-Time remaining. The round progress display changes color and displays the elapsed time in yellow while at the same time, displaying the Talk-Time in light blue. The remaining dark blue represents the rest of the cut. When the cut nears the end it will display a large digital count down letting the talent know how many seconds to the end. Users can configure this display to count down to either the end of the cut or the start of the segue and define when the numerical count down will display.
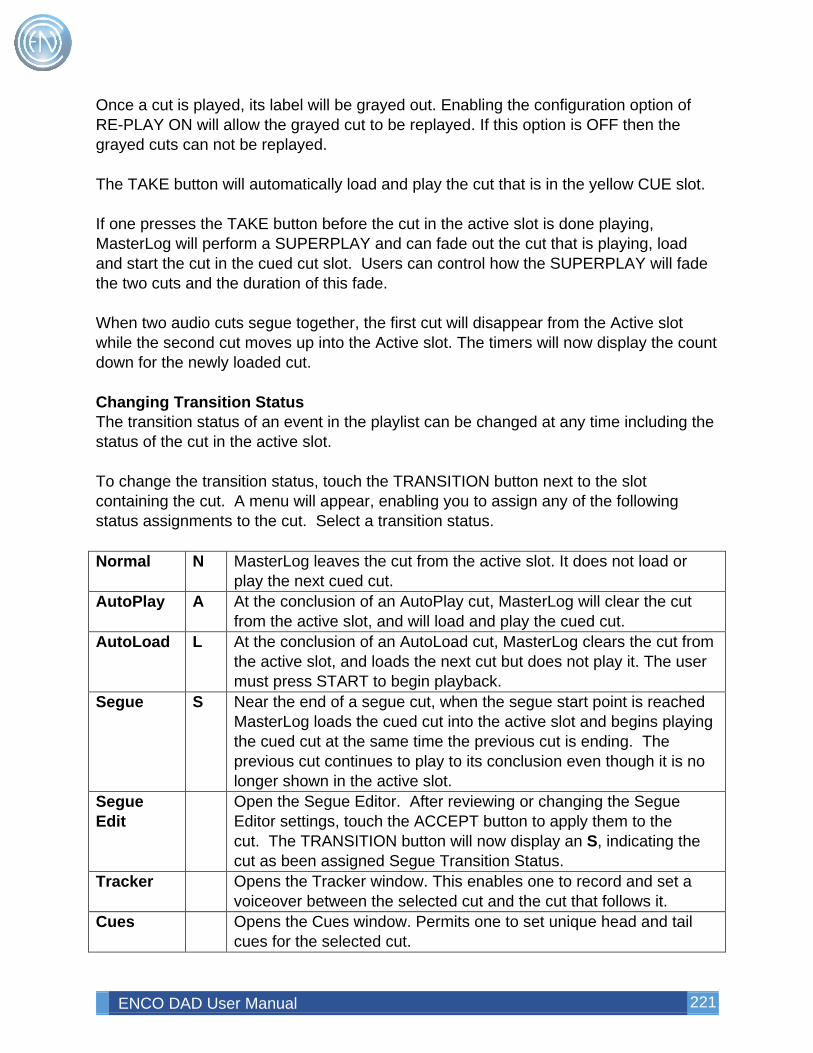
ENCO DAD User Manual 221
Once a cut is played, its label will be grayed out. Enabling the configuration option of RE-PLAY ON will allow the grayed cut to be replayed. If this option is OFF then the grayed cuts can not be replayed. The TAKE button will automatically load and play the cut that is in the yellow CUE slot. If one presses the TAKE button before the cut in the active slot is done playing, MasterLog will perform a SUPERPLAY and can fade out the cut that is playing, load and start the cut in the cued cut slot. Users can control how the SUPERPLAY will fade the two cuts and the duration of this fade. When two audio cuts segue together, the first cut will disappear from the Active slot while the second cut moves up into the Active slot. The timers will now display the count down for the newly loaded cut. Changing Transition Status The transition status of an event in the playlist can be changed at any time including the status of the cut in the active slot. To change the transition status, touch the TRANSITION button next to the slot containing the cut. A menu will appear, enabling you to assign any of the following status assignments to the cut. Select a transition status. Normal N MasterLog leaves the cut from the active slot. It does not load or
play the next cued cut. AutoPlay A At the conclusion of an AutoPlay cut, MasterLog will clear the cut
from the active slot, and will load and play the cued cut. AutoLoad L At the conclusion of an AutoLoad cut, MasterLog clears the cut from
the active slot, and loads the next cut but does not play it. The user must press START to begin playback.
Segue S Near the end of a segue cut, when the segue start point is reached MasterLog loads the cued cut into the active slot and begins playing the cued cut at the same time the previous cut is ending. The previous cut continues to play to its conclusion even though it is no longer shown in the active slot.
Segue Edit
Open the Segue Editor. After reviewing or changing the Segue Editor settings, touch the ACCEPT button to apply them to the cut. The TRANSITION button will now display an S, indicating the cut as been assigned Segue Transition Status.
Tracker Opens the Tracker window. This enables one to record and set a voiceover between the selected cut and the cut that follows it.
Cues Opens the Cues window. Permits one to set unique head and tail cues for the selected cut.

ENCO DAD User Manual 222
If a user changes the transition of the cut in the Active slot to a Segue, the Segue transition will use the Default Segue settings set in the CUE & AUTOMATION DEFAULTS screen. This can be found in the SETUP Screen. In this instance MasterLog will not use the Library Pointer, only the Default Transition and Default Transition Time. Moving cuts and altering the playlist order Moving cuts within MasterLog can be accomplished though different methods. All methods will use the yellow CUE slot as the ‘work’ slot. When one touches any of the elements in the four blue slots displayed in MasterLog, the cut that was touched will automatically be placed in the CUE slot. Users can also Right Click within the CUE slot to access a full range of playlist modify options. Move / Put Talent can use the MOVE / PUT function button to rearrange the play order. When one touches MOVE, the cut in the CUE slot will be removed from the playlist. All elements that followed this cut will move up by one space. The user can then move through the playlist with the UP or DOWN arrows finding the location they wish to PUT that cut. Pressing PUT will insert the song into the CUE slot. The song will now be inserted into the list ahead of the position they chose. Once the cut has been moved, the CHANGE button will be flashing, since the moved cut is not the cut that will be played next. If you want to play the moved cut next, touch the CHANGE button; otherwise, touch the RETURN button to go back to the actual cued cut. Users can also Right Click in the CUE slot and select MOVE from the menu and PUT that cut in a different location via the Right Click menu. Reposition Playlist
If a user needs to rearrange elements that are beyond the cuts shown in the MasterLog slots, they can use the Reposition Playlist button. This opens a window that lets you select a cut from the playlist. If you select a cut and touch the REPOSITION TO button, the cut you selected appears in the yellow cue slot. You can then select CHANGE or RETURN (see above).
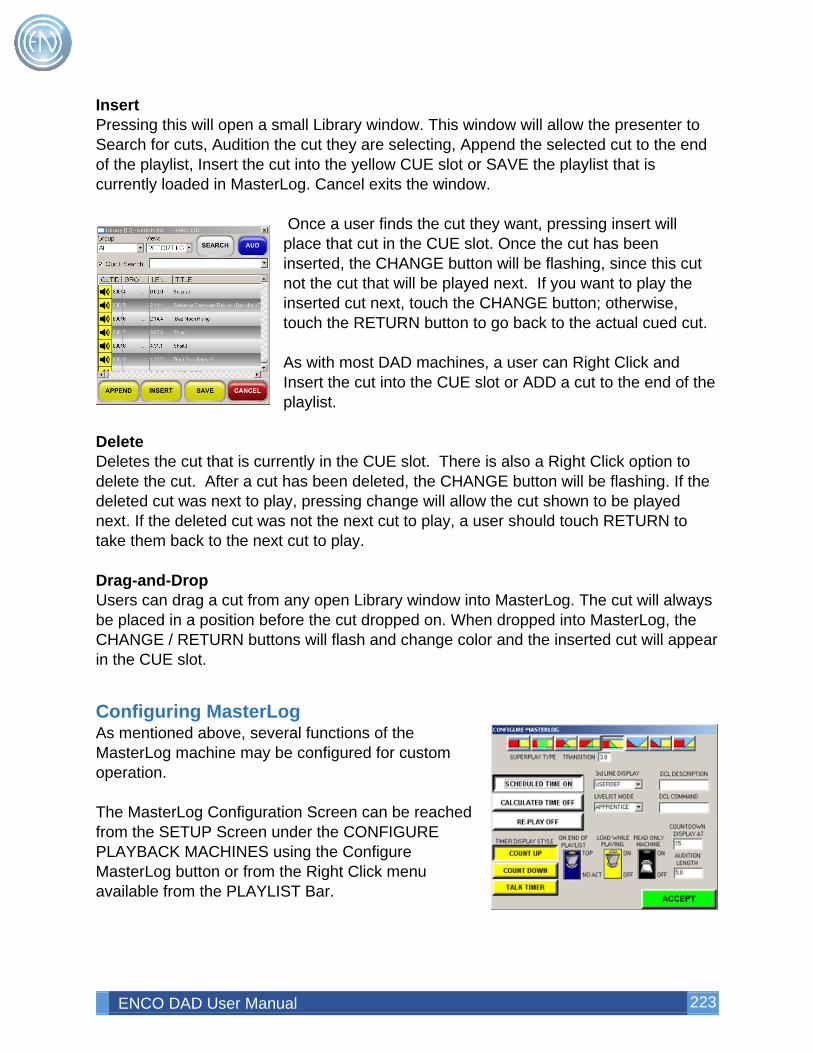
ENCO DAD User Manual 223
Insert Pressing this will open a small Library window. This window will allow the presenter to Search for cuts, Audition the cut they are selecting, Append the selected cut to the end of the playlist, Insert the cut into the yellow CUE slot or SAVE the playlist that is currently loaded in MasterLog. Cancel exits the window.
Once a user finds the cut they want, pressing insert will place that cut in the CUE slot. Once the cut has been inserted, the CHANGE button will be flashing, since this cut not the cut that will be played next. If you want to play the inserted cut next, touch the CHANGE button; otherwise, touch the RETURN button to go back to the actual cued cut. As with most DAD machines, a user can Right Click and Insert the cut into the CUE slot or ADD a cut to the end of the playlist.
Delete Deletes the cut that is currently in the CUE slot. There is also a Right Click option to delete the cut. After a cut has been deleted, the CHANGE button will be flashing. If the deleted cut was next to play, pressing change will allow the cut shown to be played next. If the deleted cut was not the next cut to play, a user should touch RETURN to take them back to the next cut to play. Drag-and-Drop Users can drag a cut from any open Library window into MasterLog. The cut will always be placed in a position before the cut dropped on. When dropped into MasterLog, the CHANGE / RETURN buttons will flash and change color and the inserted cut will appear in the CUE slot.
Configuring MasterLog As mentioned above, several functions of the MasterLog machine may be configured for custom operation. The MasterLog Configuration Screen can be reached from the SETUP Screen under the CONFIGURE PLAYBACK MACHINES using the Configure MasterLog button or from the Right Click menu available from the PLAYLIST Bar.
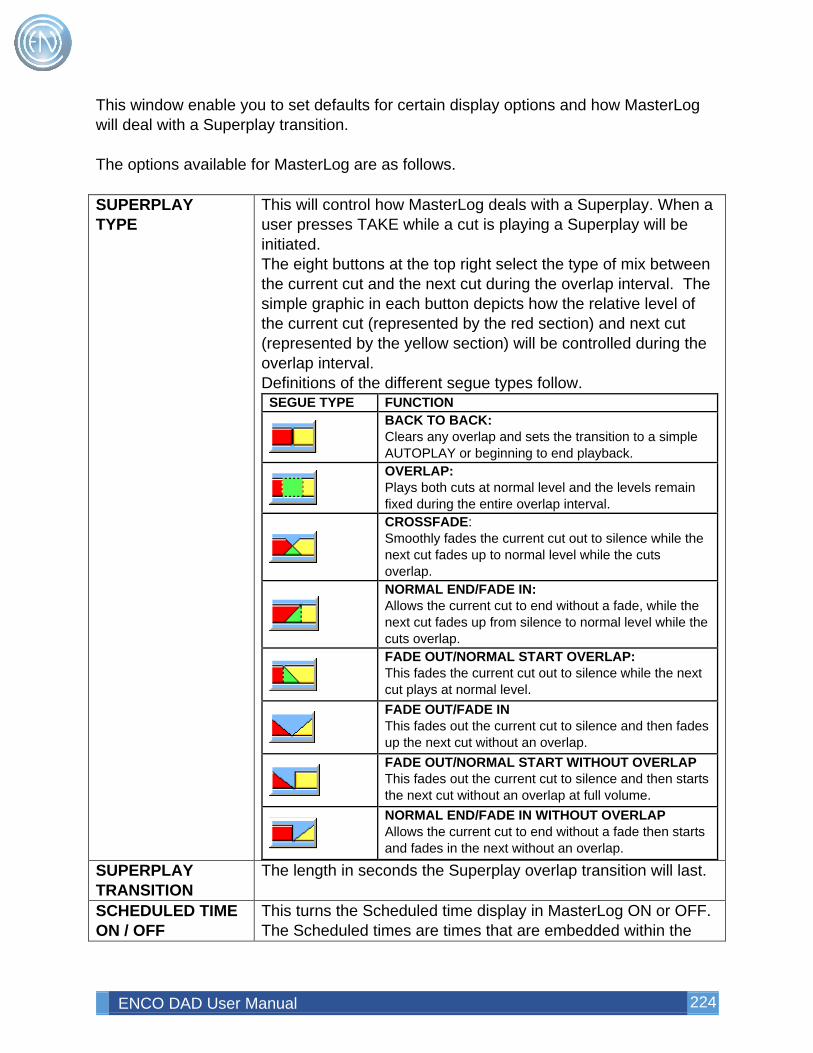
ENCO DAD User Manual 224
This window enable you to set defaults for certain display options and how MasterLog will deal with a Superplay transition. The options available for MasterLog are as follows. SUPERPLAY TYPE
This will control how MasterLog deals with a Superplay. When a user presses TAKE while a cut is playing a Superplay will be initiated. The eight buttons at the top right select the type of mix between the current cut and the next cut during the overlap interval. The simple graphic in each button depicts how the relative level of the current cut (represented by the red section) and next cut (represented by the yellow section) will be controlled during the overlap interval. Definitions of the different segue types follow.
SEGUE TYPE FUNCTION
BACK TO BACK: Clears any overlap and sets the transition to a simple AUTOPLAY or beginning to end playback.
OVERLAP: Plays both cuts at normal level and the levels remain fixed during the entire overlap interval.
CROSSFADE: Smoothly fades the current cut out to silence while the next cut fades up to normal level while the cuts overlap.
NORMAL END/FADE IN: Allows the current cut to end without a fade, while the next cut fades up from silence to normal level while the cuts overlap.
FADE OUT/NORMAL START OVERLAP: This fades the current cut out to silence while the next cut plays at normal level.
FADE OUT/FADE IN This fades out the current cut to silence and then fades up the next cut without an overlap.
FADE OUT/NORMAL START WITHOUT OVERLAP This fades out the current cut to silence and then starts the next cut without an overlap at full volume.
NORMAL END/FADE IN WITHOUT OVERLAP Allows the current cut to end without a fade then starts and fades in the next without an overlap.
SUPERPLAY TRANSITION
The length in seconds the Superplay overlap transition will last.
SCHEDULED TIME ON / OFF
This turns the Scheduled time display in MasterLog ON or OFF. The Scheduled times are times that are embedded within the
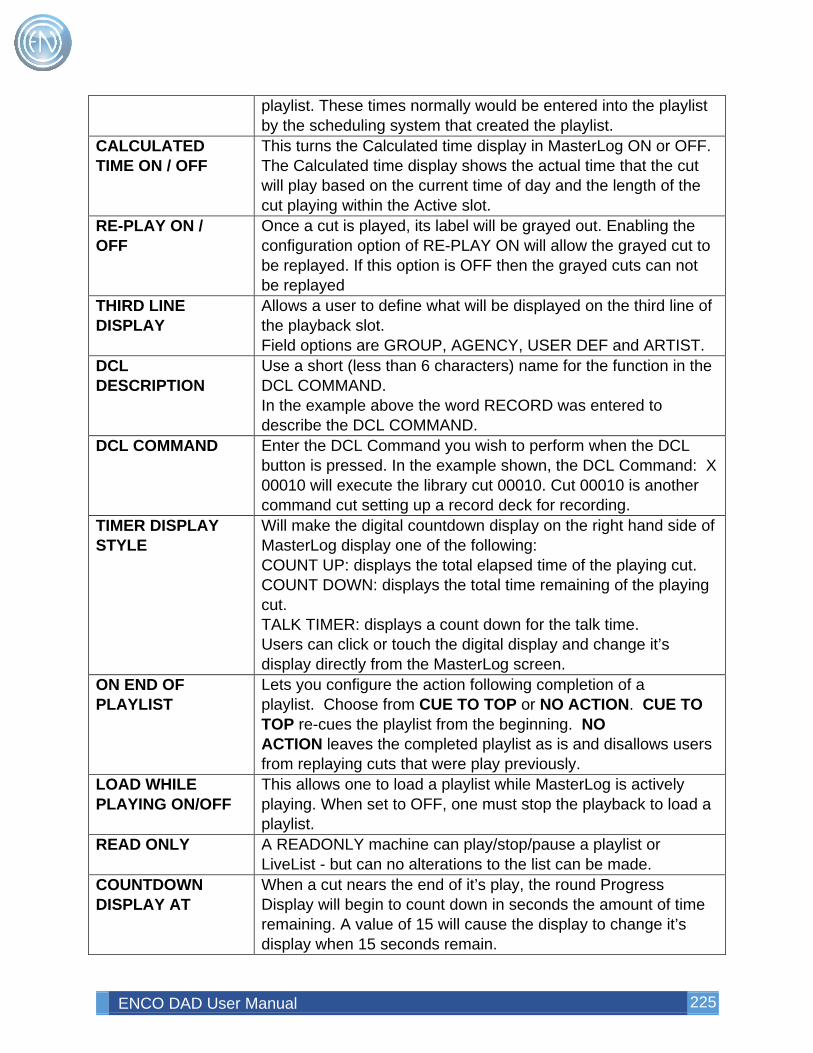
ENCO DAD User Manual 225
playlist. These times normally would be entered into the playlist by the scheduling system that created the playlist.
CALCULATED TIME ON / OFF
This turns the Calculated time display in MasterLog ON or OFF. The Calculated time display shows the actual time that the cut will play based on the current time of day and the length of the cut playing within the Active slot.
RE-PLAY ON / OFF
Once a cut is played, its label will be grayed out. Enabling the configuration option of RE-PLAY ON will allow the grayed cut to be replayed. If this option is OFF then the grayed cuts can not be replayed
THIRD LINE DISPLAY
Allows a user to define what will be displayed on the third line of the playback slot. Field options are GROUP, AGENCY, USER DEF and ARTIST.
DCL DESCRIPTION
Use a short (less than 6 characters) name for the function in the DCL COMMAND. In the example above the word RECORD was entered to describe the DCL COMMAND.
DCL COMMAND Enter the DCL Command you wish to perform when the DCL button is pressed. In the example shown, the DCL Command: X 00010 will execute the library cut 00010. Cut 00010 is another command cut setting up a record deck for recording.
TIMER DISPLAY STYLE
Will make the digital countdown display on the right hand side of MasterLog display one of the following: COUNT UP: displays the total elapsed time of the playing cut. COUNT DOWN: displays the total time remaining of the playing cut. TALK TIMER: displays a count down for the talk time. Users can click or touch the digital display and change it’s display directly from the MasterLog screen.
ON END OF PLAYLIST
Lets you configure the action following completion of a playlist. Choose from CUE TO TOP or NO ACTION. CUE TO TOP re-cues the playlist from the beginning. NO ACTION leaves the completed playlist as is and disallows users from replaying cuts that were play previously.
LOAD WHILE PLAYING ON/OFF
This allows one to load a playlist while MasterLog is actively playing. When set to OFF, one must stop the playback to load a playlist.
READ ONLY A READONLY machine can play/stop/pause a playlist or LiveList - but can no alterations to the list can be made.
COUNTDOWN DISPLAY AT
When a cut nears the end of it’s play, the round Progress Display will begin to count down in seconds the amount of time remaining. A value of 15 will cause the display to change it’s display when 15 seconds remain.
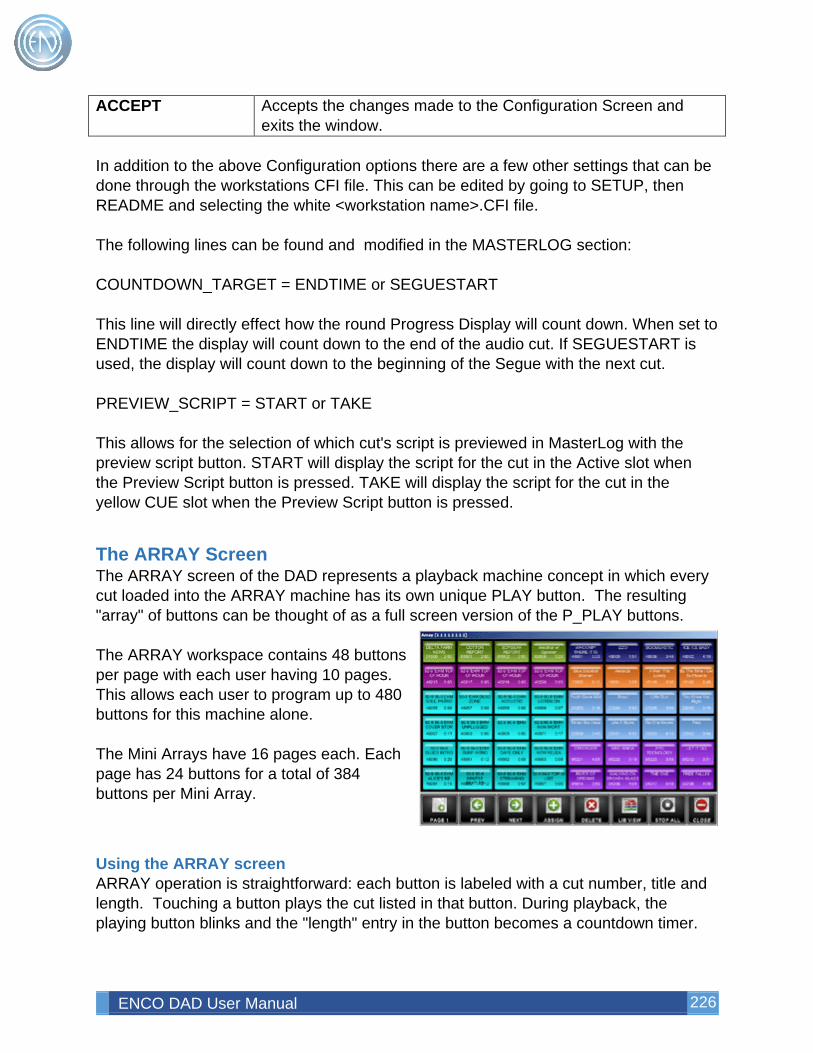
ENCO DAD User Manual 226
ACCEPT Accepts the changes made to the Configuration Screen and exits the window.
In addition to the above Configuration options there are a few other settings that can be done through the workstations CFI file. This can be edited by going to SETUP, then README and selecting the white <workstation name>.CFI file. The following lines can be found and modified in the MASTERLOG section: COUNTDOWN_TARGET = ENDTIME or SEGUESTART This line will directly effect how the round Progress Display will count down. When set to ENDTIME the display will count down to the end of the audio cut. If SEGUESTART is used, the display will count down to the beginning of the Segue with the next cut. PREVIEW_SCRIPT = START or TAKE This allows for the selection of which cut's script is previewed in MasterLog with the preview script button. START will display the script for the cut in the Active slot when the Preview Script button is pressed. TAKE will display the script for the cut in the yellow CUE slot when the Preview Script button is pressed.
The ARRAY Screen The ARRAY screen of the DAD represents a playback machine concept in which every cut loaded into the ARRAY machine has its own unique PLAY button. The resulting "array" of buttons can be thought of as a full screen version of the P_PLAY buttons. The ARRAY workspace contains 48 buttons per page with each user having 10 pages. This allows each user to program up to 480 buttons for this machine alone. The Mini Arrays have 16 pages each. Each page has 24 buttons for a total of 384 buttons per Mini Array.
Using the ARRAY screen ARRAY operation is straightforward: each button is labeled with a cut number, title and length. Touching a button plays the cut listed in that button. During playback, the playing button blinks and the "length" entry in the button becomes a countdown timer.
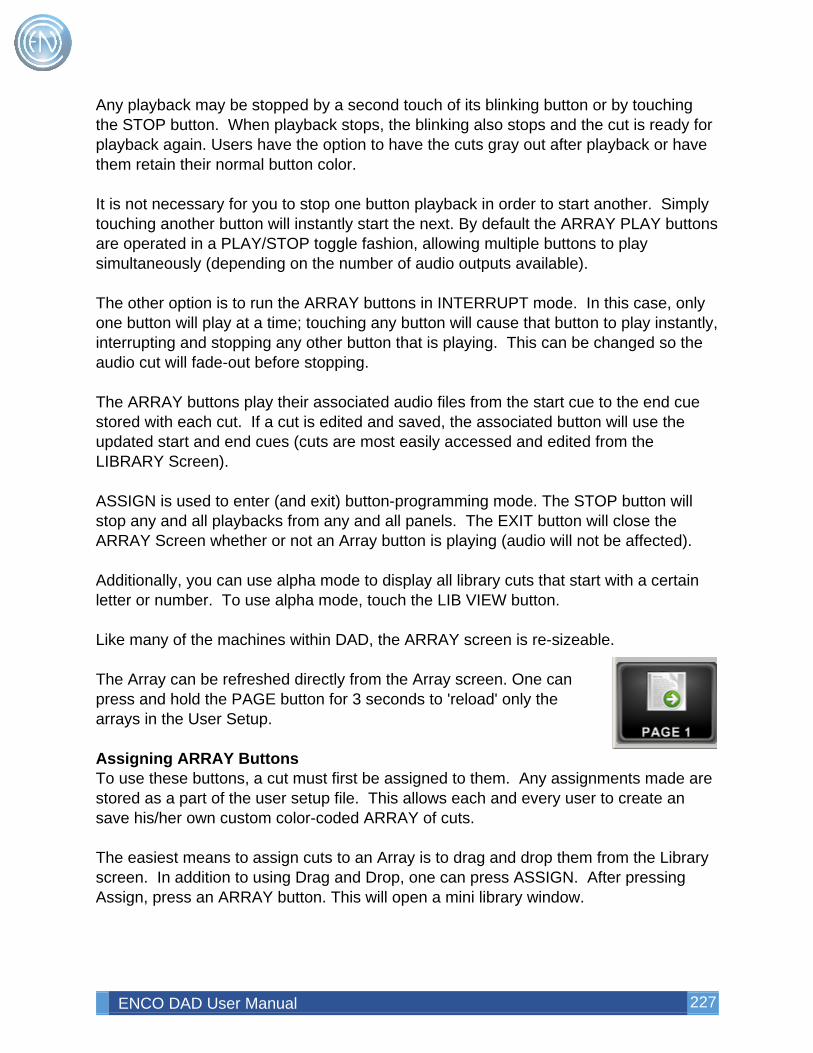
ENCO DAD User Manual 227
Any playback may be stopped by a second touch of its blinking button or by touching the STOP button. When playback stops, the blinking also stops and the cut is ready for playback again. Users have the option to have the cuts gray out after playback or have them retain their normal button color. It is not necessary for you to stop one button playback in order to start another. Simply touching another button will instantly start the next. By default the ARRAY PLAY buttons are operated in a PLAY/STOP toggle fashion, allowing multiple buttons to play simultaneously (depending on the number of audio outputs available). The other option is to run the ARRAY buttons in INTERRUPT mode. In this case, only one button will play at a time; touching any button will cause that button to play instantly, interrupting and stopping any other button that is playing. This can be changed so the audio cut will fade-out before stopping. The ARRAY buttons play their associated audio files from the start cue to the end cue stored with each cut. If a cut is edited and saved, the associated button will use the updated start and end cues (cuts are most easily accessed and edited from the LIBRARY Screen). ASSIGN is used to enter (and exit) button-programming mode. The STOP button will stop any and all playbacks from any and all panels. The EXIT button will close the ARRAY Screen whether or not an Array button is playing (audio will not be affected). Additionally, you can use alpha mode to display all library cuts that start with a certain letter or number. To use alpha mode, touch the LIB VIEW button. Like many of the machines within DAD, the ARRAY screen is re-sizeable. The Array can be refreshed directly from the Array screen. One can press and hold the PAGE button for 3 seconds to 'reload' only the arrays in the User Setup. Assigning ARRAY Buttons To use these buttons, a cut must first be assigned to them. Any assignments made are stored as a part of the user setup file. This allows each and every user to create an save his/her own custom color-coded ARRAY of cuts. The easiest means to assign cuts to an Array is to drag and drop them from the Library screen. In addition to using Drag and Drop, one can press ASSIGN. After pressing Assign, press an ARRAY button. This will open a mini library window.
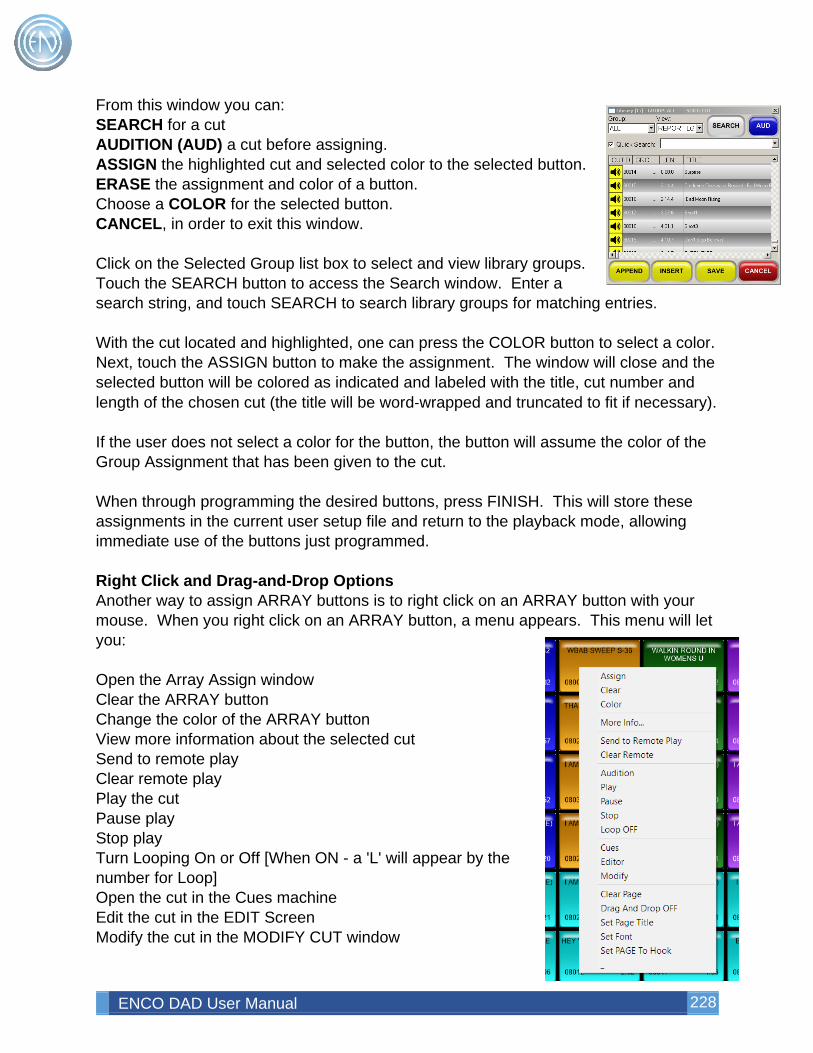
ENCO DAD User Manual 228
From this window you can: SEARCH for a cut AUDITION (AUD) a cut before assigning. ASSIGN the highlighted cut and selected color to the selected button. ERASE the assignment and color of a button. Choose a COLOR for the selected button. CANCEL, in order to exit this window. Click on the Selected Group list box to select and view library groups. Touch the SEARCH button to access the Search window. Enter a search string, and touch SEARCH to search library groups for matching entries. With the cut located and highlighted, one can press the COLOR button to select a color. Next, touch the ASSIGN button to make the assignment. The window will close and the selected button will be colored as indicated and labeled with the title, cut number and length of the chosen cut (the title will be word‑wrapped and truncated to fit if necessary). If the user does not select a color for the button, the button will assume the color of the Group Assignment that has been given to the cut. When through programming the desired buttons, press FINISH. This will store these assignments in the current user setup file and return to the playback mode, allowing immediate use of the buttons just programmed. Right Click and Drag-and-Drop Options Another way to assign ARRAY buttons is to right click on an ARRAY button with your mouse. When you right click on an ARRAY button, a menu appears. This menu will let you: Open the Array Assign window Clear the ARRAY button Change the color of the ARRAY button View more information about the selected cut Send to remote play Clear remote play Play the cut Pause play Stop play Turn Looping On or Off [When ON - a 'L' will appear by the number for Loop] Open the cut in the Cues machine Edit the cut in the EDIT Screen Modify the cut in the MODIFY CUT window
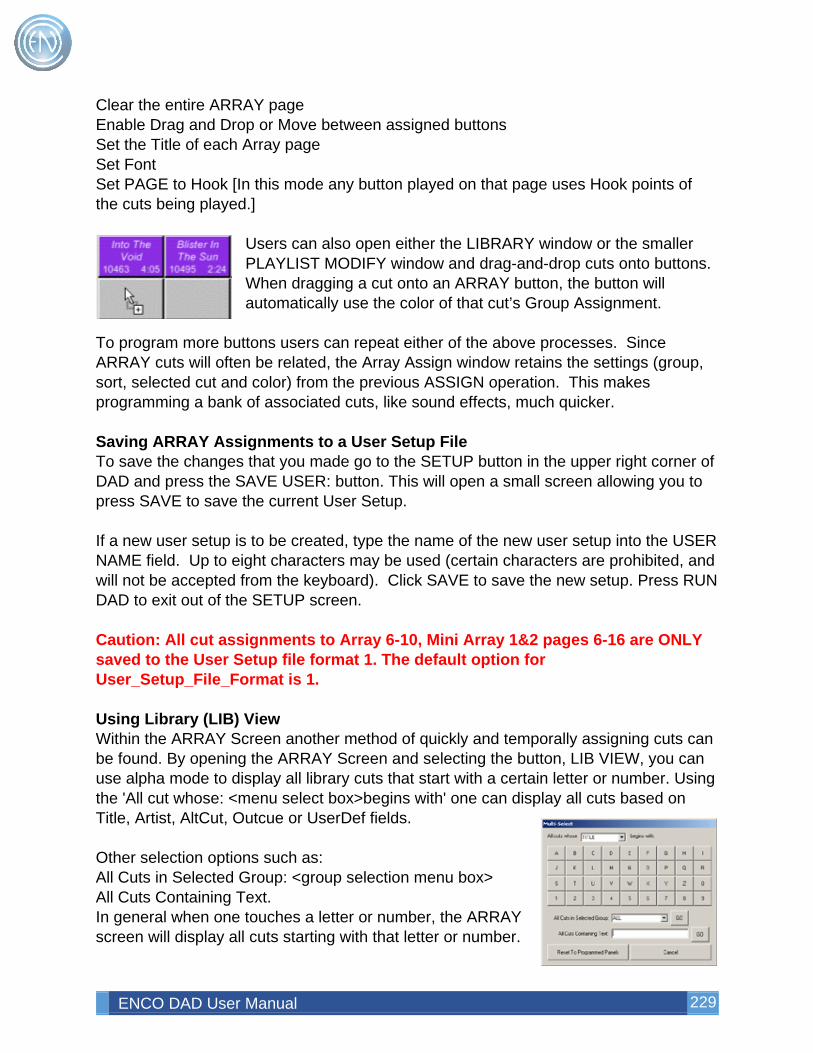
ENCO DAD User Manual 229
Clear the entire ARRAY page Enable Drag and Drop or Move between assigned buttons Set the Title of each Array page Set Font Set PAGE to Hook [In this mode any button played on that page uses Hook points of the cuts being played.]
Users can also open either the LIBRARY window or the smaller PLAYLIST MODIFY window and drag-and-drop cuts onto buttons. When dragging a cut onto an ARRAY button, the button will automatically use the color of that cut’s Group Assignment.
To program more buttons users can repeat either of the above processes. Since ARRAY cuts will often be related, the Array Assign window retains the settings (group, sort, selected cut and color) from the previous ASSIGN operation. This makes programming a bank of associated cuts, like sound effects, much quicker. Saving ARRAY Assignments to a User Setup File To save the changes that you made go to the SETUP button in the upper right corner of DAD and press the SAVE USER: button. This will open a small screen allowing you to press SAVE to save the current User Setup. If a new user setup is to be created, type the name of the new user setup into the USER NAME field. Up to eight characters may be used (certain characters are prohibited, and will not be accepted from the keyboard). Click SAVE to save the new setup. Press RUN DAD to exit out of the SETUP screen. Caution: All cut assignments to Array 6-10, Mini Array 1&2 pages 6-16 are ONLY saved to the User Setup file format 1. The default option for User_Setup_File_Format is 1. Using Library (LIB) View Within the ARRAY Screen another method of quickly and temporally assigning cuts can be found. By opening the ARRAY Screen and selecting the button, LIB VIEW, you can use alpha mode to display all library cuts that start with a certain letter or number. Using the 'All cut whose: <menu select box>begins with' one can display all cuts based on Title, Artist, AltCut, Outcue or UserDef fields. Other selection options such as: All Cuts in Selected Group: <group selection menu box> All Cuts Containing Text. In general when one touches a letter or number, the ARRAY screen will display all cuts starting with that letter or number.
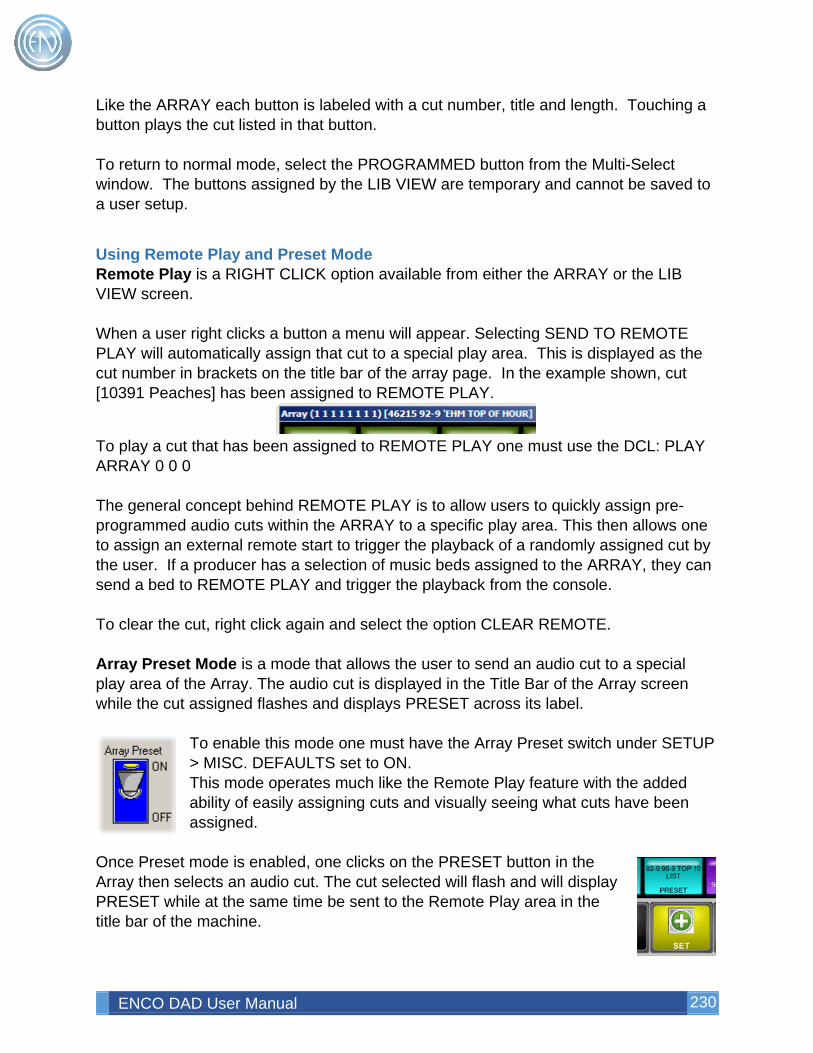
ENCO DAD User Manual 230
Like the ARRAY each button is labeled with a cut number, title and length. Touching a button plays the cut listed in that button. To return to normal mode, select the PROGRAMMED button from the Multi-Select window. The buttons assigned by the LIB VIEW are temporary and cannot be saved to a user setup.
Using Remote Play and Preset Mode Remote Play is a RIGHT CLICK option available from either the ARRAY or the LIB VIEW screen. When a user right clicks a button a menu will appear. Selecting SEND TO REMOTE PLAY will automatically assign that cut to a special play area. This is displayed as the cut number in brackets on the title bar of the array page. In the example shown, cut [10391 Peaches] has been assigned to REMOTE PLAY.
To play a cut that has been assigned to REMOTE PLAY one must use the DCL: PLAY ARRAY 0 0 0 The general concept behind REMOTE PLAY is to allow users to quickly assign pre-programmed audio cuts within the ARRAY to a specific play area. This then allows one to assign an external remote start to trigger the playback of a randomly assigned cut by the user. If a producer has a selection of music beds assigned to the ARRAY, they can send a bed to REMOTE PLAY and trigger the playback from the console. To clear the cut, right click again and select the option CLEAR REMOTE. Array Preset Mode is a mode that allows the user to send an audio cut to a special play area of the Array. The audio cut is displayed in the Title Bar of the Array screen while the cut assigned flashes and displays PRESET across its label.
To enable this mode one must have the Array Preset switch under SETUP > MISC. DEFAULTS set to ON. This mode operates much like the Remote Play feature with the added ability of easily assigning cuts and visually seeing what cuts have been assigned.
Once Preset mode is enabled, one clicks on the PRESET button in the Array then selects an audio cut. The cut selected will flash and will display PRESET while at the same time be sent to the Remote Play area in the title bar of the machine.
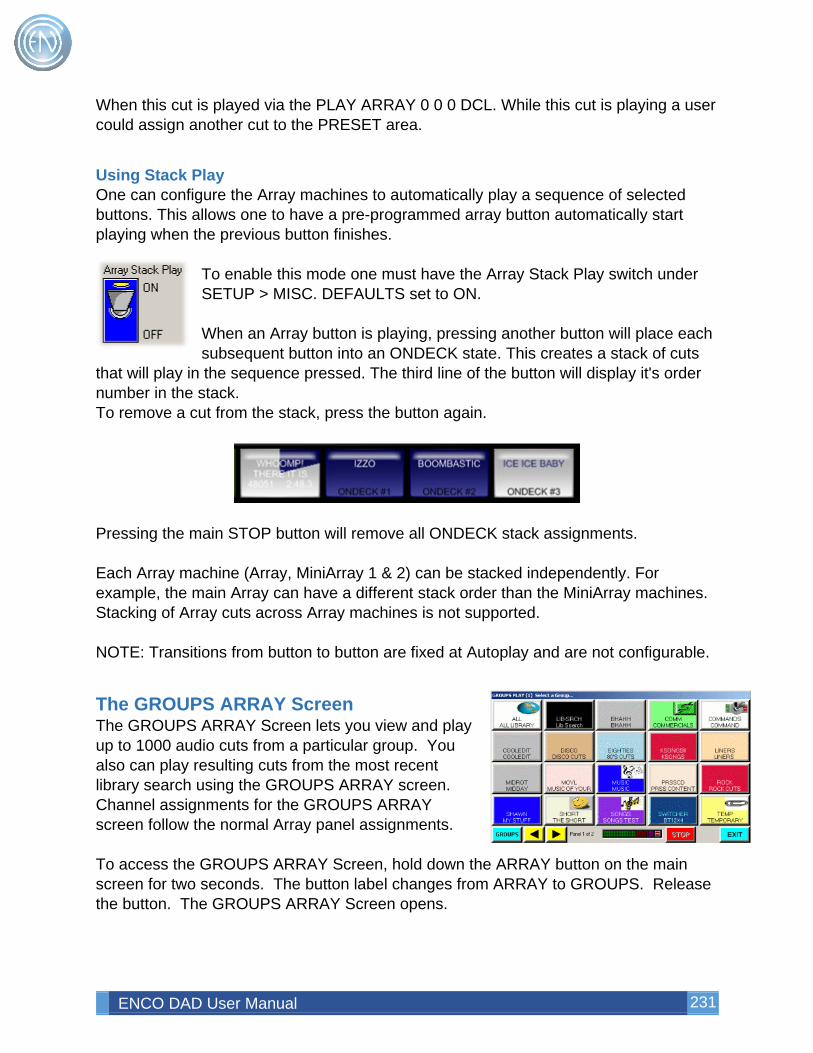
ENCO DAD User Manual 231
When this cut is played via the PLAY ARRAY 0 0 0 DCL. While this cut is playing a user could assign another cut to the PRESET area.
Using Stack Play One can configure the Array machines to automatically play a sequence of selected buttons. This allows one to have a pre-programmed array button automatically start playing when the previous button finishes.
To enable this mode one must have the Array Stack Play switch under SETUP > MISC. DEFAULTS set to ON. When an Array button is playing, pressing another button will place each subsequent button into an ONDECK state. This creates a stack of cuts
that will play in the sequence pressed. The third line of the button will display it's order number in the stack. To remove a cut from the stack, press the button again.
Pressing the main STOP button will remove all ONDECK stack assignments. Each Array machine (Array, MiniArray 1 & 2) can be stacked independently. For example, the main Array can have a different stack order than the MiniArray machines. Stacking of Array cuts across Array machines is not supported. NOTE: Transitions from button to button are fixed at Autoplay and are not configurable.
The GROUPS ARRAY Screen The GROUPS ARRAY Screen lets you view and play up to 1000 audio cuts from a particular group. You also can play resulting cuts from the most recent library search using the GROUPS ARRAY screen. Channel assignments for the GROUPS ARRAY screen follow the normal Array panel assignments. To access the GROUPS ARRAY Screen, hold down the ARRAY button on the main screen for two seconds. The button label changes from ARRAY to GROUPS. Release the button. The GROUPS ARRAY Screen opens.
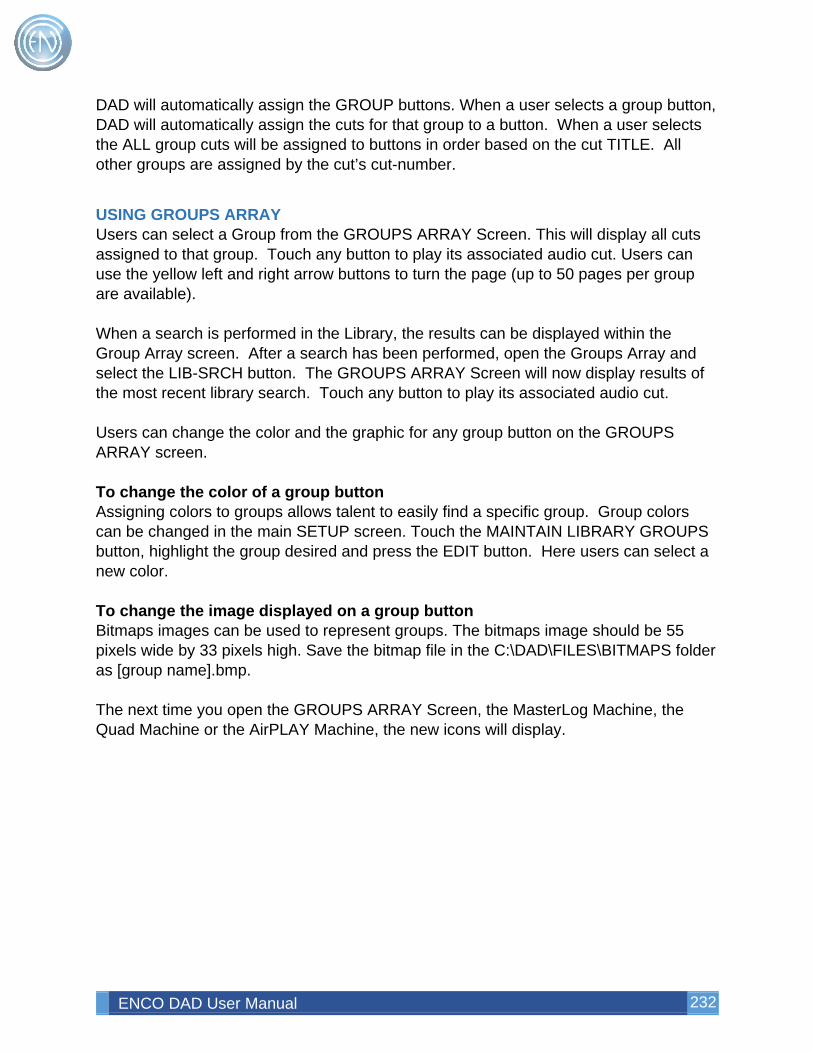
ENCO DAD User Manual 232
DAD will automatically assign the GROUP buttons. When a user selects a group button, DAD will automatically assign the cuts for that group to a button. When a user selects the ALL group cuts will be assigned to buttons in order based on the cut TITLE. All other groups are assigned by the cut’s cut-number.
USING GROUPS ARRAY Users can select a Group from the GROUPS ARRAY Screen. This will display all cuts assigned to that group. Touch any button to play its associated audio cut. Users can use the yellow left and right arrow buttons to turn the page (up to 50 pages per group are available). When a search is performed in the Library, the results can be displayed within the Group Array screen. After a search has been performed, open the Groups Array and select the LIB-SRCH button. The GROUPS ARRAY Screen will now display results of the most recent library search. Touch any button to play its associated audio cut. Users can change the color and the graphic for any group button on the GROUPS ARRAY screen. To change the color of a group button Assigning colors to groups allows talent to easily find a specific group. Group colors can be changed in the main SETUP screen. Touch the MAINTAIN LIBRARY GROUPS button, highlight the group desired and press the EDIT button. Here users can select a new color. To change the image displayed on a group button Bitmaps images can be used to represent groups. The bitmaps image should be 55 pixels wide by 33 pixels high. Save the bitmap file in the C:\DAD\FILES\BITMAPS folder as [group name].bmp. The next time you open the GROUPS ARRAY Screen, the MasterLog Machine, the Quad Machine or the AirPLAY Machine, the new icons will display.
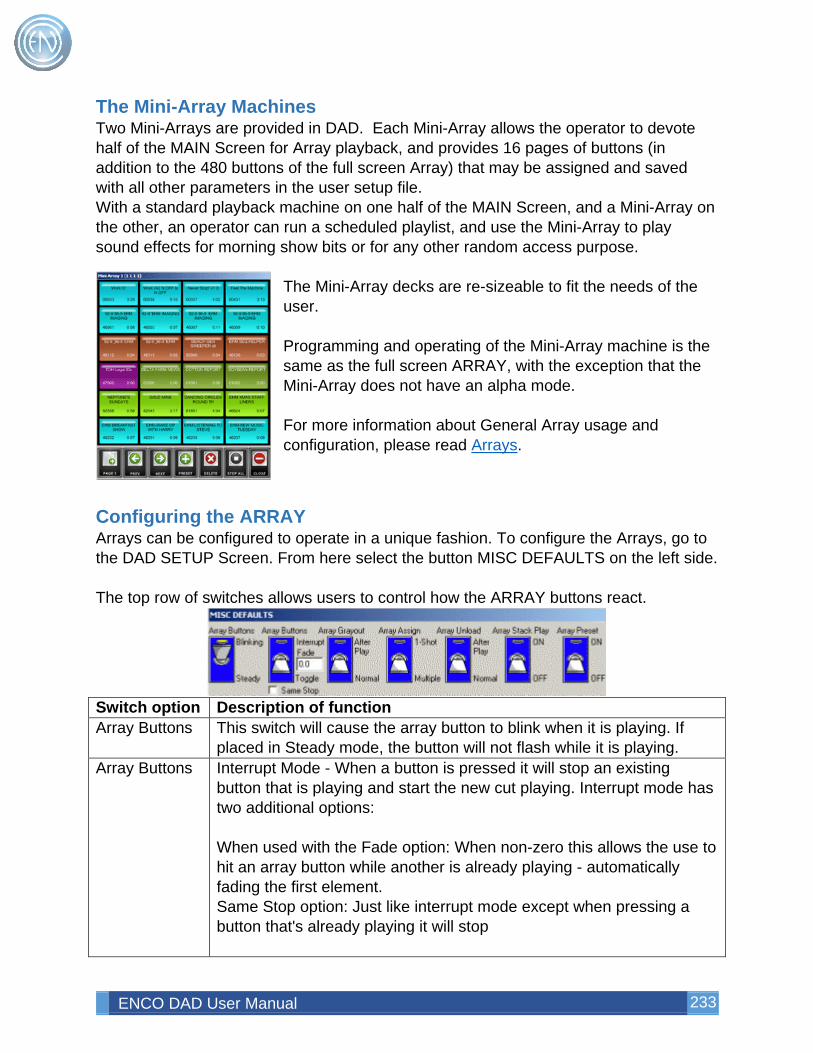
ENCO DAD User Manual 233
The Mini-Array Machines Two Mini-Arrays are provided in DAD. Each Mini-Array allows the operator to devote half of the MAIN Screen for Array playback, and provides 16 pages of buttons (in addition to the 480 buttons of the full screen Array) that may be assigned and saved with all other parameters in the user setup file. With a standard playback machine on one half of the MAIN Screen, and a Mini-Array on the other, an operator can run a scheduled playlist, and use the Mini-Array to play sound effects for morning show bits or for any other random access purpose.
The Mini-Array decks are re-sizeable to fit the needs of the user. Programming and operating of the Mini-Array machine is the same as the full screen ARRAY, with the exception that the Mini-Array does not have an alpha mode. For more information about General Array usage and configuration, please read Arrays.
Configuring the ARRAY Arrays can be configured to operate in a unique fashion. To configure the Arrays, go to the DAD SETUP Screen. From here select the button MISC DEFAULTS on the left side. The top row of switches allows users to control how the ARRAY buttons react.
Switch option Description of function Array Buttons This switch will cause the array button to blink when it is playing. If
placed in Steady mode, the button will not flash while it is playing. Array Buttons Interrupt Mode - When a button is pressed it will stop an existing
button that is playing and start the new cut playing. Interrupt mode has two additional options: When used with the Fade option: When non-zero this allows the use to hit an array button while another is already playing - automatically fading the first element. Same Stop option: Just like interrupt mode except when pressing a button that's already playing it will stop
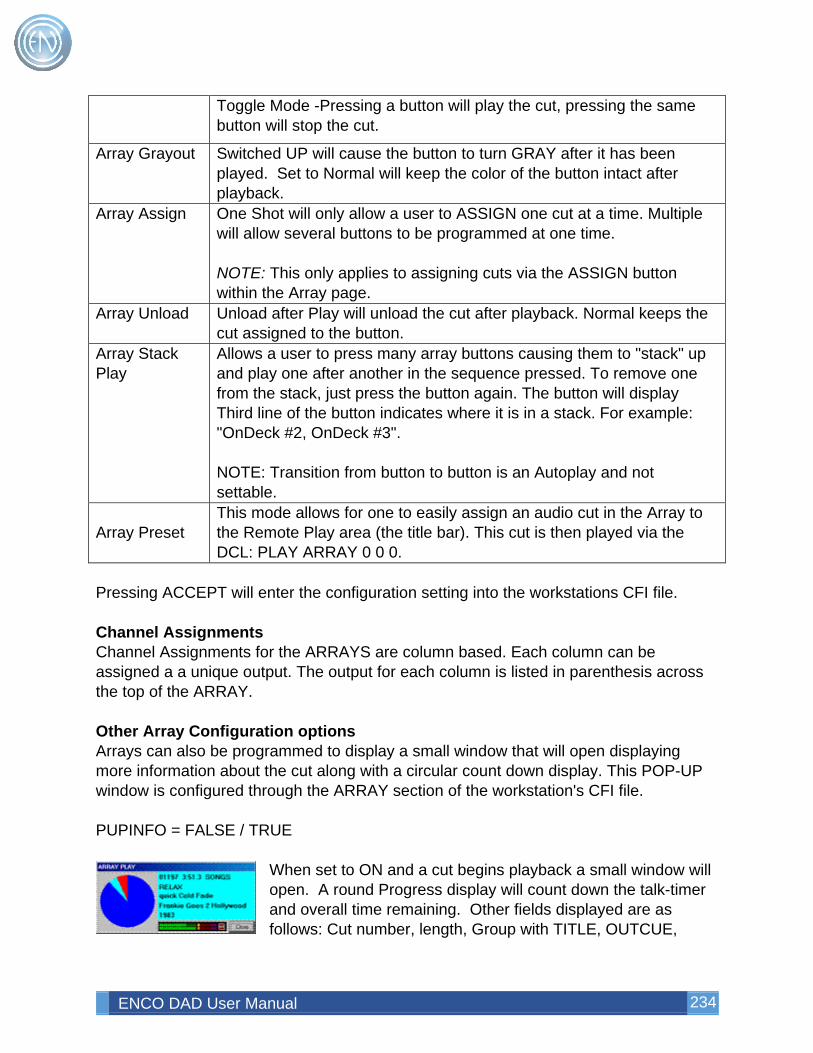
ENCO DAD User Manual 234
Toggle Mode -Pressing a button will play the cut, pressing the same button will stop the cut.
Array Grayout Switched UP will cause the button to turn GRAY after it has been played. Set to Normal will keep the color of the button intact after playback.
Array Assign One Shot will only allow a user to ASSIGN one cut at a time. Multiple will allow several buttons to be programmed at one time. NOTE: This only applies to assigning cuts via the ASSIGN button within the Array page.
Array Unload Unload after Play will unload the cut after playback. Normal keeps the cut assigned to the button.
Array Stack Play
Allows a user to press many array buttons causing them to "stack" up and play one after another in the sequence pressed. To remove one from the stack, just press the button again. The button will display Third line of the button indicates where it is in a stack. For example: "OnDeck #2, OnDeck #3". NOTE: Transition from button to button is an Autoplay and not settable.
Array Preset
This mode allows for one to easily assign an audio cut in the Array to the Remote Play area (the title bar). This cut is then played via the DCL: PLAY ARRAY 0 0 0.
Pressing ACCEPT will enter the configuration setting into the workstations CFI file. Channel Assignments Channel Assignments for the ARRAYS are column based. Each column can be assigned a a unique output. The output for each column is listed in parenthesis across the top of the ARRAY. Other Array Configuration options Arrays can also be programmed to display a small window that will open displaying more information about the cut along with a circular count down display. This POP-UP window is configured through the ARRAY section of the workstation's CFI file. PUPINFO = FALSE / TRUE
When set to ON and a cut begins playback a small window will open. A round Progress display will count down the talk-timer and overall time remaining. Other fields displayed are as follows: Cut number, length, Group with TITLE, OUTCUE,
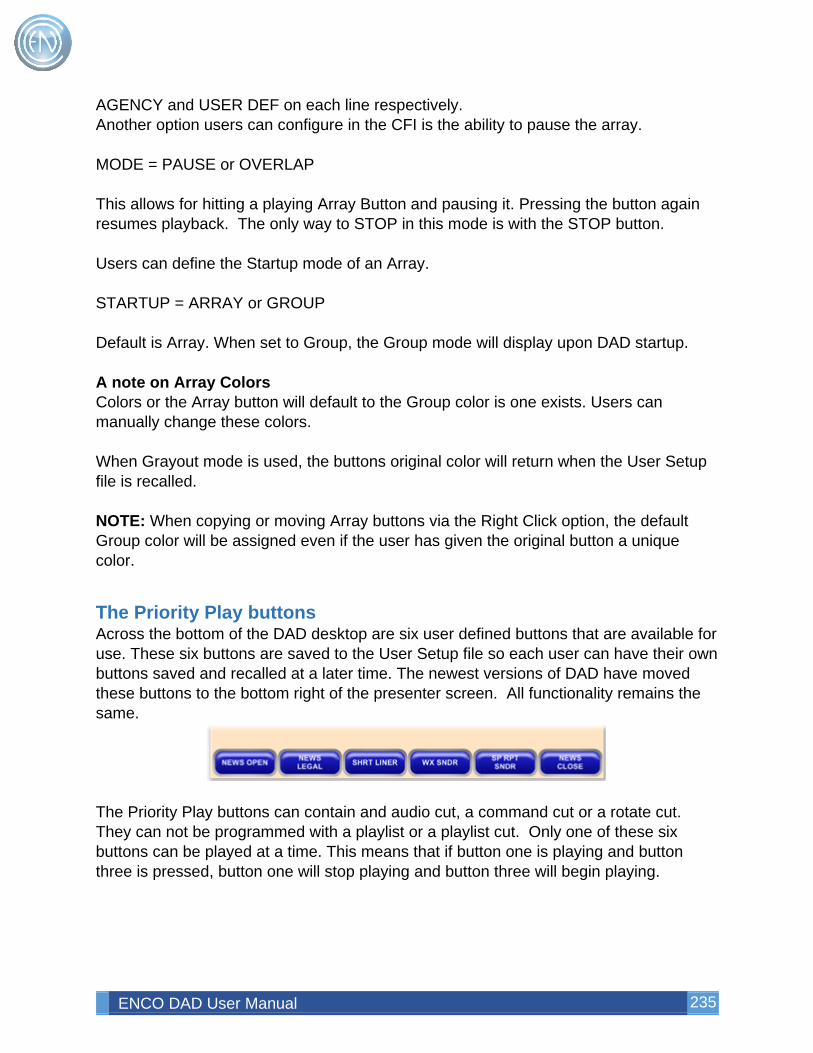
ENCO DAD User Manual 235
AGENCY and USER DEF on each line respectively. Another option users can configure in the CFI is the ability to pause the array. MODE = PAUSE or OVERLAP This allows for hitting a playing Array Button and pausing it. Pressing the button again resumes playback. The only way to STOP in this mode is with the STOP button. Users can define the Startup mode of an Array. STARTUP = ARRAY or GROUP Default is Array. When set to Group, the Group mode will display upon DAD startup. A note on Array Colors Colors or the Array button will default to the Group color is one exists. Users can manually change these colors. When Grayout mode is used, the buttons original color will return when the User Setup file is recalled. NOTE: When copying or moving Array buttons via the Right Click option, the default Group color will be assigned even if the user has given the original button a unique color.
The Priority Play buttons Across the bottom of the DAD desktop are six user defined buttons that are available for use. These six buttons are saved to the User Setup file so each user can have their own buttons saved and recalled at a later time. The newest versions of DAD have moved these buttons to the bottom right of the presenter screen. All functionality remains the same.
The Priority Play buttons can contain and audio cut, a command cut or a rotate cut. They can not be programmed with a playlist or a playlist cut. Only one of these six buttons can be played at a time. This means that if button one is playing and button three is pressed, button one will stop playing and button three will begin playing.
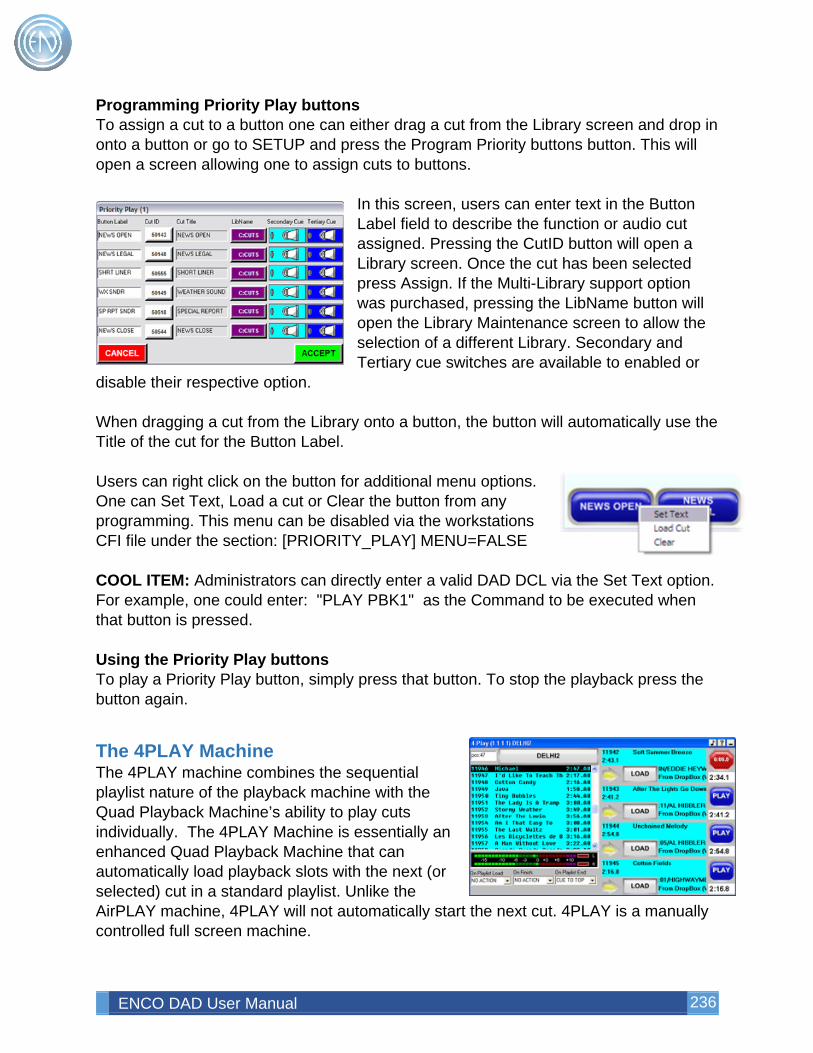
ENCO DAD User Manual 236
Programming Priority Play buttons To assign a cut to a button one can either drag a cut from the Library screen and drop in onto a button or go to SETUP and press the Program Priority buttons button. This will open a screen allowing one to assign cuts to buttons.
In this screen, users can enter text in the Button Label field to describe the function or audio cut assigned. Pressing the CutID button will open a Library screen. Once the cut has been selected press Assign. If the Multi-Library support option was purchased, pressing the LibName button will open the Library Maintenance screen to allow the selection of a different Library. Secondary and Tertiary cue switches are available to enabled or
disable their respective option. When dragging a cut from the Library onto a button, the button will automatically use the Title of the cut for the Button Label. Users can right click on the button for additional menu options. One can Set Text, Load a cut or Clear the button from any programming. This menu can be disabled via the workstations CFI file under the section: [PRIORITY_PLAY] MENU=FALSE COOL ITEM: Administrators can directly enter a valid DAD DCL via the Set Text option. For example, one could enter: "PLAY PBK1" as the Command to be executed when that button is pressed. Using the Priority Play buttons To play a Priority Play button, simply press that button. To stop the playback press the button again.
The 4PLAY Machine The 4PLAY machine combines the sequential playlist nature of the playback machine with the Quad Playback Machine’s ability to play cuts individually. The 4PLAY Machine is essentially an enhanced Quad Playback Machine that can automatically load playback slots with the next (or selected) cut in a standard playlist. Unlike the AirPLAY machine, 4PLAY will not automatically start the next cut. 4PLAY is a manually controlled full screen machine.
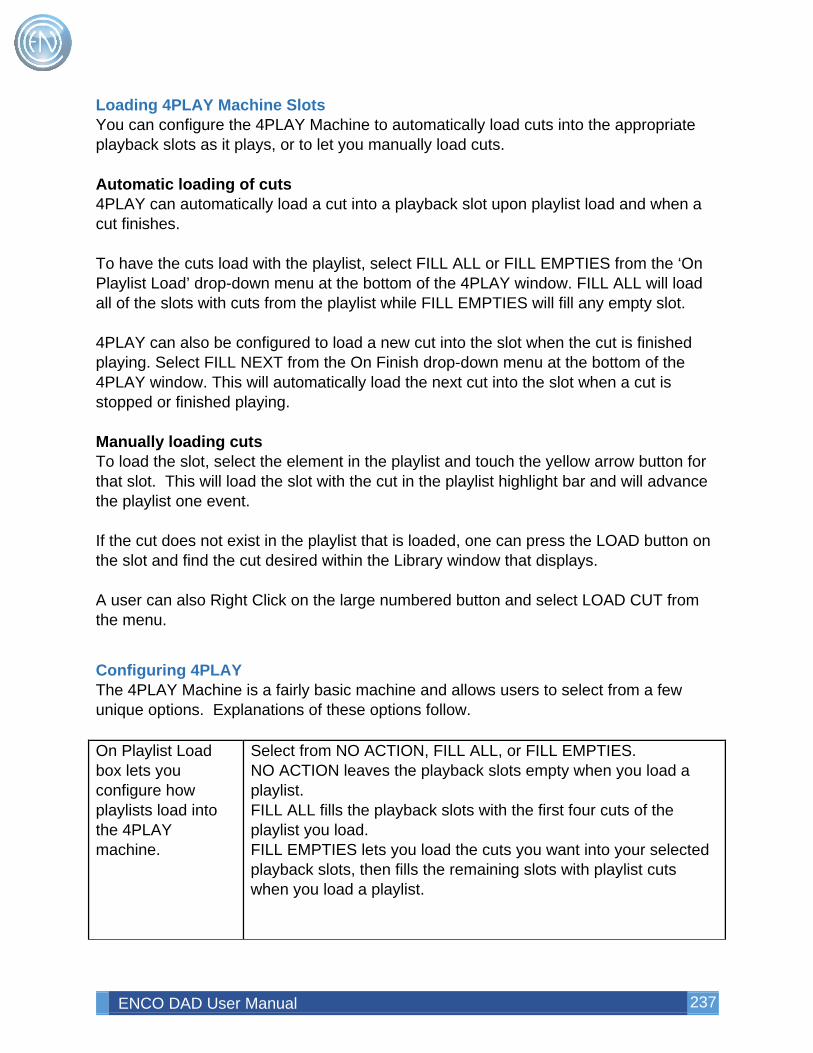
ENCO DAD User Manual 237
Loading 4PLAY Machine Slots You can configure the 4PLAY Machine to automatically load cuts into the appropriate playback slots as it plays, or to let you manually load cuts. Automatic loading of cuts 4PLAY can automatically load a cut into a playback slot upon playlist load and when a cut finishes. To have the cuts load with the playlist, select FILL ALL or FILL EMPTIES from the ‘On Playlist Load’ drop-down menu at the bottom of the 4PLAY window. FILL ALL will load all of the slots with cuts from the playlist while FILL EMPTIES will fill any empty slot. 4PLAY can also be configured to load a new cut into the slot when the cut is finished playing. Select FILL NEXT from the On Finish drop-down menu at the bottom of the 4PLAY window. This will automatically load the next cut into the slot when a cut is stopped or finished playing. Manually loading cuts To load the slot, select the element in the playlist and touch the yellow arrow button for that slot. This will load the slot with the cut in the playlist highlight bar and will advance the playlist one event. If the cut does not exist in the playlist that is loaded, one can press the LOAD button on the slot and find the cut desired within the Library window that displays. A user can also Right Click on the large numbered button and select LOAD CUT from the menu.
Configuring 4PLAY The 4PLAY Machine is a fairly basic machine and allows users to select from a few unique options. Explanations of these options follow. On Playlist Load box lets you configure how playlists load into the 4PLAY machine.
Select from NO ACTION, FILL ALL, or FILL EMPTIES. NO ACTION leaves the playback slots empty when you load a playlist. FILL ALL fills the playback slots with the first four cuts of the playlist you load. FILL EMPTIES lets you load the cuts you want into your selected playback slots, then fills the remaining slots with playlist cuts when you load a playlist.
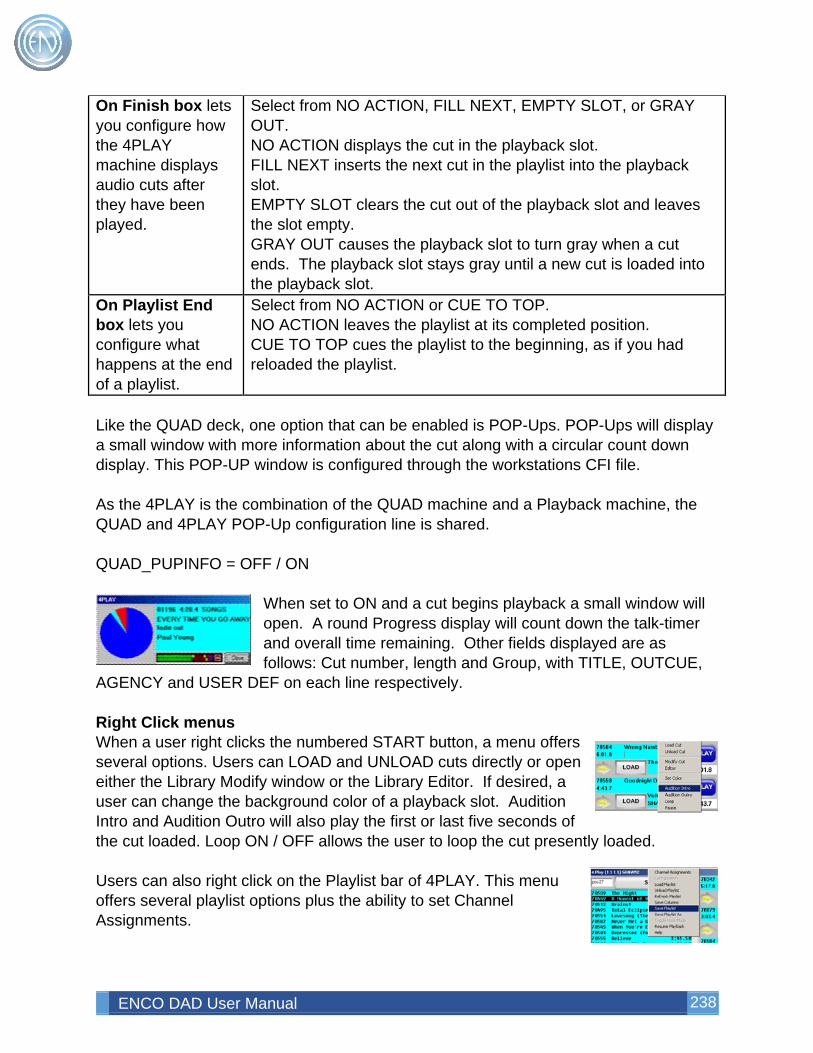
ENCO DAD User Manual 238
On Finish box lets you configure how the 4PLAY machine displays audio cuts after they have been played.
Select from NO ACTION, FILL NEXT, EMPTY SLOT, or GRAY OUT. NO ACTION displays the cut in the playback slot. FILL NEXT inserts the next cut in the playlist into the playback slot. EMPTY SLOT clears the cut out of the playback slot and leaves the slot empty. GRAY OUT causes the playback slot to turn gray when a cut ends. The playback slot stays gray until a new cut is loaded into the playback slot.
On Playlist End box lets you configure what happens at the end of a playlist.
Select from NO ACTION or CUE TO TOP. NO ACTION leaves the playlist at its completed position. CUE TO TOP cues the playlist to the beginning, as if you had reloaded the playlist.
Like the QUAD deck, one option that can be enabled is POP-Ups. POP-Ups will display a small window with more information about the cut along with a circular count down display. This POP-UP window is configured through the workstations CFI file. As the 4PLAY is the combination of the QUAD machine and a Playback machine, the QUAD and 4PLAY POP-Up configuration line is shared. QUAD_PUPINFO = OFF / ON
When set to ON and a cut begins playback a small window will open. A round Progress display will count down the talk-timer and overall time remaining. Other fields displayed are as follows: Cut number, length and Group, with TITLE, OUTCUE,
AGENCY and USER DEF on each line respectively. Right Click menus When a user right clicks the numbered START button, a menu offers several options. Users can LOAD and UNLOAD cuts directly or open either the Library Modify window or the Library Editor. If desired, a user can change the background color of a playback slot. Audition Intro and Audition Outro will also play the first or last five seconds of the cut loaded. Loop ON / OFF allows the user to loop the cut presently loaded. Users can also right click on the Playlist bar of 4PLAY. This menu offers several playlist options plus the ability to set Channel Assignments.
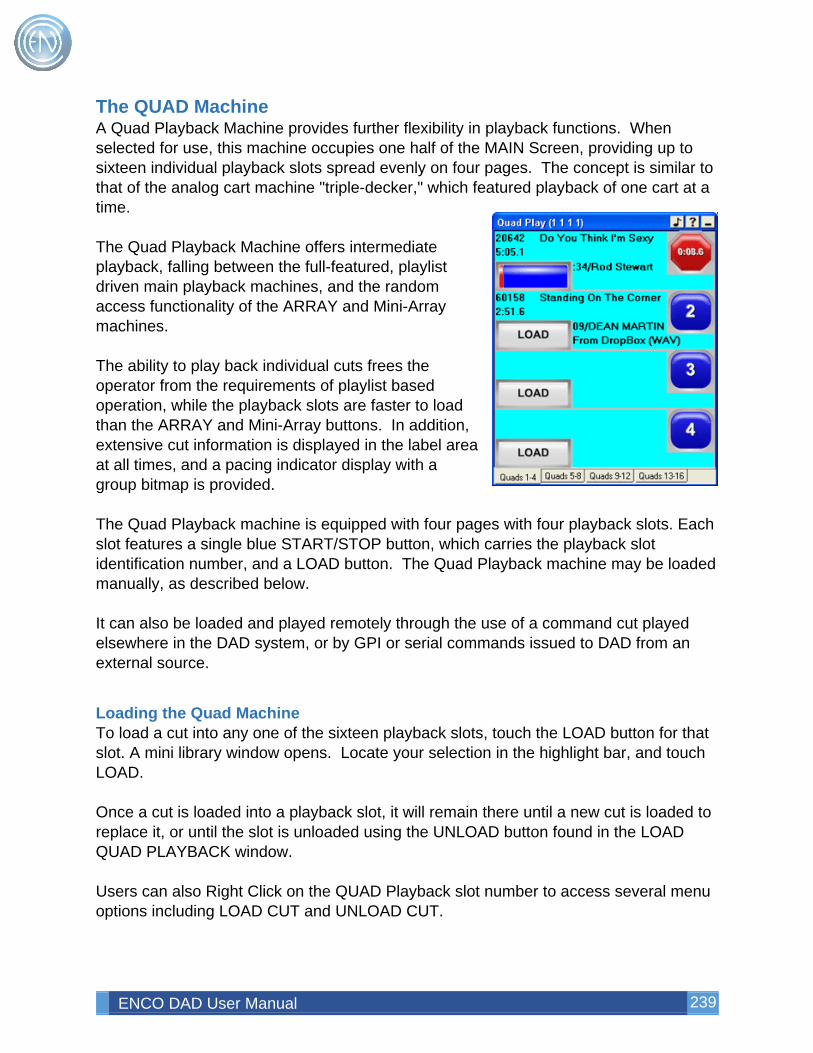
ENCO DAD User Manual 239
The QUAD Machine A Quad Playback Machine provides further flexibility in playback functions. When selected for use, this machine occupies one half of the MAIN Screen, providing up to sixteen individual playback slots spread evenly on four pages. The concept is similar to that of the analog cart machine "triple-decker," which featured playback of one cart at a time. The Quad Playback Machine offers intermediate playback, falling between the full-featured, playlist driven main playback machines, and the random access functionality of the ARRAY and Mini-Array machines. The ability to play back individual cuts frees the operator from the requirements of playlist based operation, while the playback slots are faster to load than the ARRAY and Mini-Array buttons. In addition, extensive cut information is displayed in the label area at all times, and a pacing indicator display with a group bitmap is provided. The Quad Playback machine is equipped with four pages with four playback slots. Each slot features a single blue START/STOP button, which carries the playback slot identification number, and a LOAD button. The Quad Playback machine may be loaded manually, as described below. It can also be loaded and played remotely through the use of a command cut played elsewhere in the DAD system, or by GPI or serial commands issued to DAD from an external source.
Loading the Quad Machine To load a cut into any one of the sixteen playback slots, touch the LOAD button for that slot. A mini library window opens. Locate your selection in the highlight bar, and touch LOAD. Once a cut is loaded into a playback slot, it will remain there until a new cut is loaded to replace it, or until the slot is unloaded using the UNLOAD button found in the LOAD QUAD PLAYBACK window. Users can also Right Click on the QUAD Playback slot number to access several menu options including LOAD CUT and UNLOAD CUT.
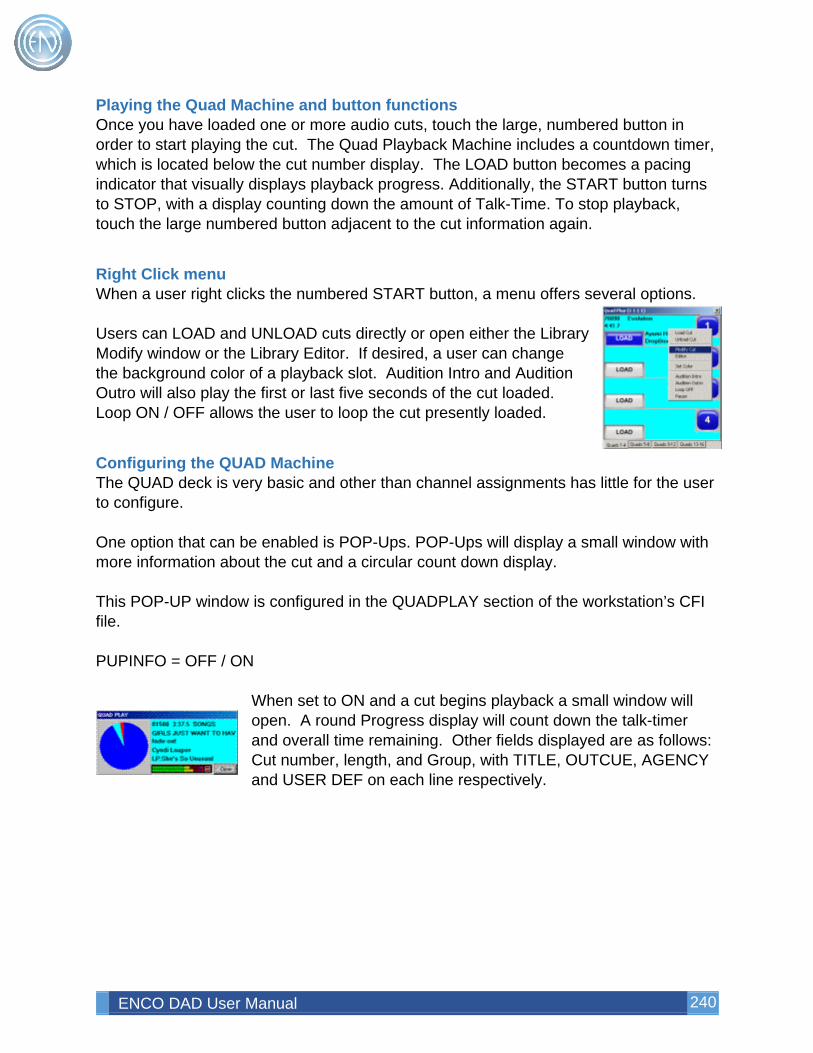
ENCO DAD User Manual 240
Playing the Quad Machine and button functions Once you have loaded one or more audio cuts, touch the large, numbered button in order to start playing the cut. The Quad Playback Machine includes a countdown timer, which is located below the cut number display. The LOAD button becomes a pacing indicator that visually displays playback progress. Additionally, the START button turns to STOP, with a display counting down the amount of Talk-Time. To stop playback, touch the large numbered button adjacent to the cut information again.
Right Click menu When a user right clicks the numbered START button, a menu offers several options. Users can LOAD and UNLOAD cuts directly or open either the Library Modify window or the Library Editor. If desired, a user can change the background color of a playback slot. Audition Intro and Audition Outro will also play the first or last five seconds of the cut loaded. Loop ON / OFF allows the user to loop the cut presently loaded.
Configuring the QUAD Machine The QUAD deck is very basic and other than channel assignments has little for the user to configure. One option that can be enabled is POP-Ups. POP-Ups will display a small window with more information about the cut and a circular count down display. This POP-UP window is configured in the QUADPLAY section of the workstation’s CFI file. PUPINFO = OFF / ON
When set to ON and a cut begins playback a small window will open. A round Progress display will count down the talk-timer and overall time remaining. Other fields displayed are as follows: Cut number, length, and Group, with TITLE, OUTCUE, AGENCY and USER DEF on each line respectively.
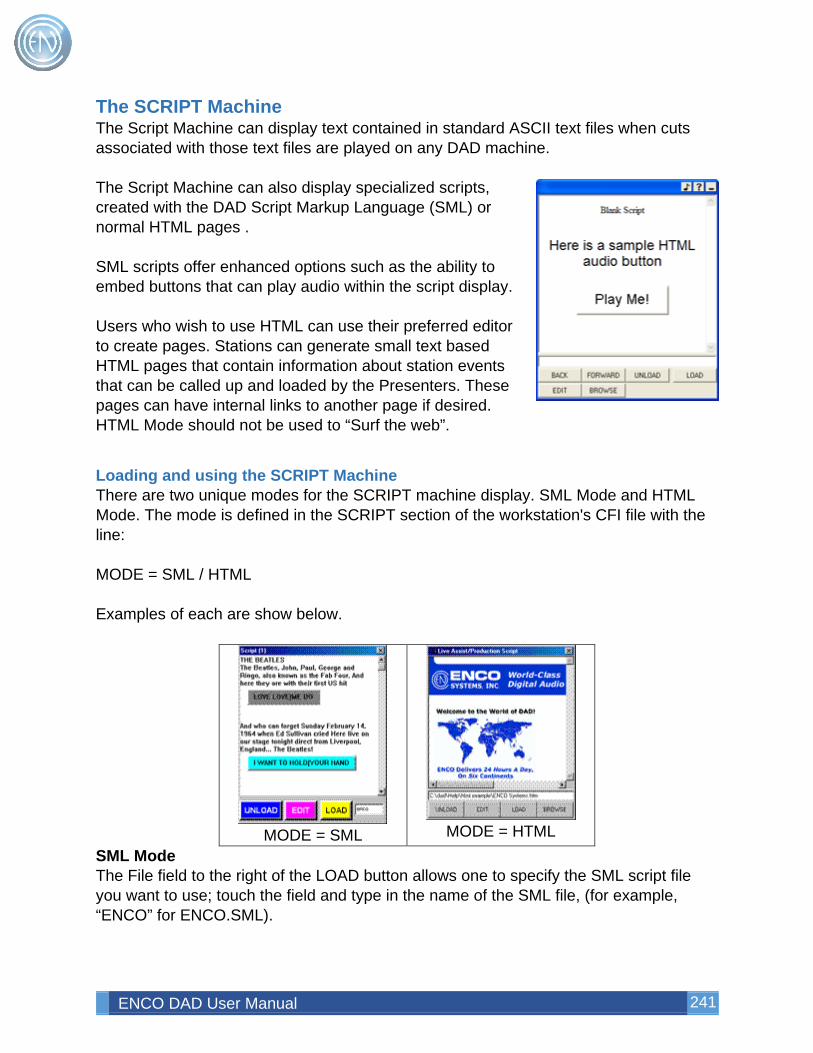
ENCO DAD User Manual 241
The SCRIPT Machine The Script Machine can display text contained in standard ASCII text files when cuts associated with those text files are played on any DAD machine. The Script Machine can also display specialized scripts, created with the DAD Script Markup Language (SML) or normal HTML pages . SML scripts offer enhanced options such as the ability to embed buttons that can play audio within the script display. Users who wish to use HTML can use their preferred editor to create pages. Stations can generate small text based HTML pages that contain information about station events that can be called up and loaded by the Presenters. These pages can have internal links to another page if desired. HTML Mode should not be used to “Surf the web”.
Loading and using the SCRIPT Machine There are two unique modes for the SCRIPT machine display. SML Mode and HTML Mode. The mode is defined in the SCRIPT section of the workstation's CFI file with the line: MODE = SML / HTML Examples of each are show below.
MODE = SML
MODE = HTML
SML Mode The File field to the right of the LOAD button allows one to specify the SML script file you want to use; touch the field and type in the name of the SML file, (for example, “ENCO” for ENCO.SML).
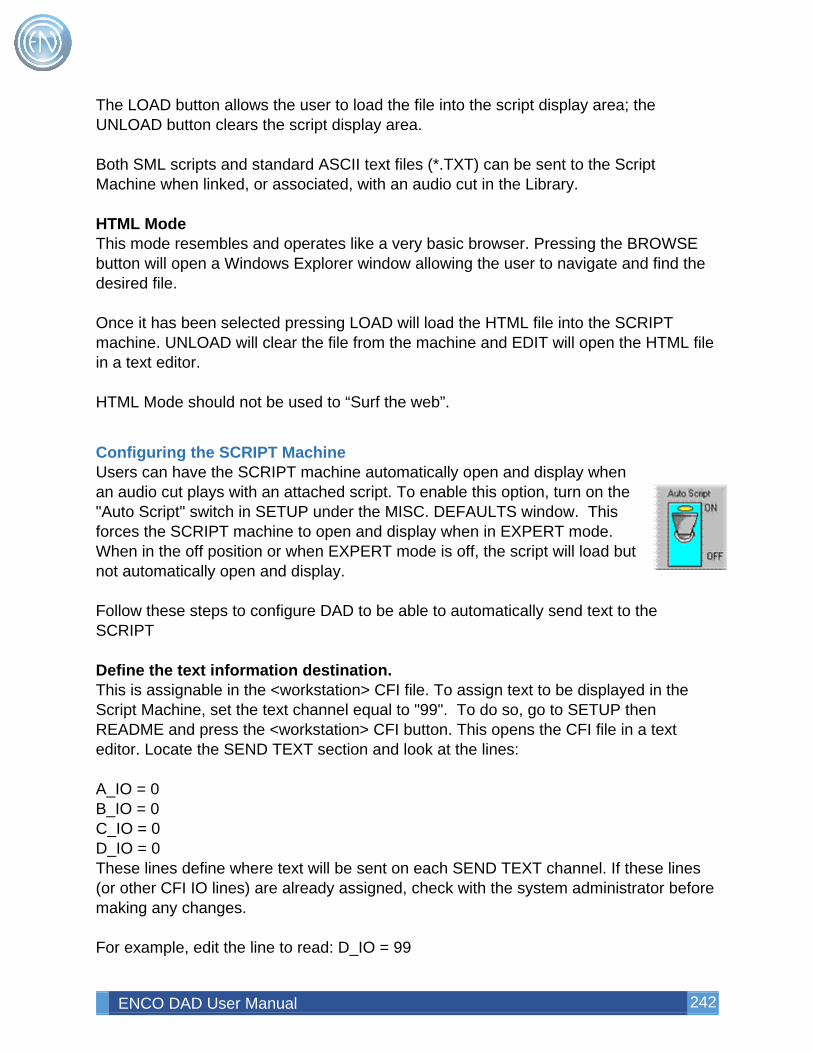
ENCO DAD User Manual 242
The LOAD button allows the user to load the file into the script display area; the UNLOAD button clears the script display area. Both SML scripts and standard ASCII text files (*.TXT) can be sent to the Script Machine when linked, or associated, with an audio cut in the Library. HTML Mode This mode resembles and operates like a very basic browser. Pressing the BROWSE button will open a Windows Explorer window allowing the user to navigate and find the desired file. Once it has been selected pressing LOAD will load the HTML file into the SCRIPT machine. UNLOAD will clear the file from the machine and EDIT will open the HTML file in a text editor. HTML Mode should not be used to “Surf the web”.
Configuring the SCRIPT Machine Users can have the SCRIPT machine automatically open and display when an audio cut plays with an attached script. To enable this option, turn on the "Auto Script" switch in SETUP under the MISC. DEFAULTS window. This forces the SCRIPT machine to open and display when in EXPERT mode. When in the off position or when EXPERT mode is off, the script will load but not automatically open and display. Follow these steps to configure DAD to be able to automatically send text to the SCRIPT Define the text information destination. This is assignable in the <workstation> CFI file. To assign text to be displayed in the Script Machine, set the text channel equal to "99". To do so, go to SETUP then README and press the <workstation> CFI button. This opens the CFI file in a text editor. Locate the SEND TEXT section and look at the lines: A_IO = 0 B_IO = 0 C_IO = 0 D_IO = 0 These lines define where text will be sent on each SEND TEXT channel. If these lines (or other CFI IO lines) are already assigned, check with the system administrator before making any changes. For example, edit the line to read: D_IO = 99
ENCO DAD User Manual 243
In this case, text sent to channel D would appear on the internal Script Machine. Create a text file to associate with an audio cut. The text file must be named [cut number].TXT and must reside in the same \CUTS directory as the [cut number].WAV audio file. For instance, if the cut 87001 was recorded to location G: and you wanted a text file to be associated with it, create the text file with a text editor and save it as G:\CUTS\87001.TXT. If the cut exists in the Library, pressing MODIFY on that cut then pressing the button EDIT SCRIPT will open a text editor and prompt you to create the script. NOTE: An SML script can be associated with an audio cut by copying or renaming it in the \CUTS directory as [cut number].TXT Next, define where you want to send the text file (that is, which text channel you want to use). Use the SCRIPT field of the audio to do this. If you are creating a text file for a cut that has already been recorded, use the Modify Cut window in the library screen to modify the audio cut information; fill in the SCRIPT field with the desired text channel (A, B, C, or D). If you created the .TXT file first and are recording a new audio cut, fill in the SCRIPT field (the single-character field below the Length field in the Record Machine label area) with the appropriate text channel (A, B, C, or D). NOTE: Users can define the default extension of the file sent to the Script machine. EXT = XXX (default: txt) Playing a cut that has no audio, but has a script cut (TXT), will also load the script into the SCRIPT machine. When all of the above steps have been taken, DAD will send the associated text file to the specified destination each time the audio cut is played from any playback source within DAD. Creating Scripts with the Script Markup Language When using the DAD Script Markup Language (SML), users can create SML scripts, which are different from ASCII text files. SML scripts are designed to be displayed within the Script Machine. SML supports enhanced layout and embedded buttons, which the operator can use to play library cuts directly from the Script Machine. SML scripts can be viewed on other ASCII compatible devices, but the special formatting and button tags will be inactive and will appear as additional ASCII text. Saving Scripts SML scripts to be used with the Script Machine may be prepared with any text editor.
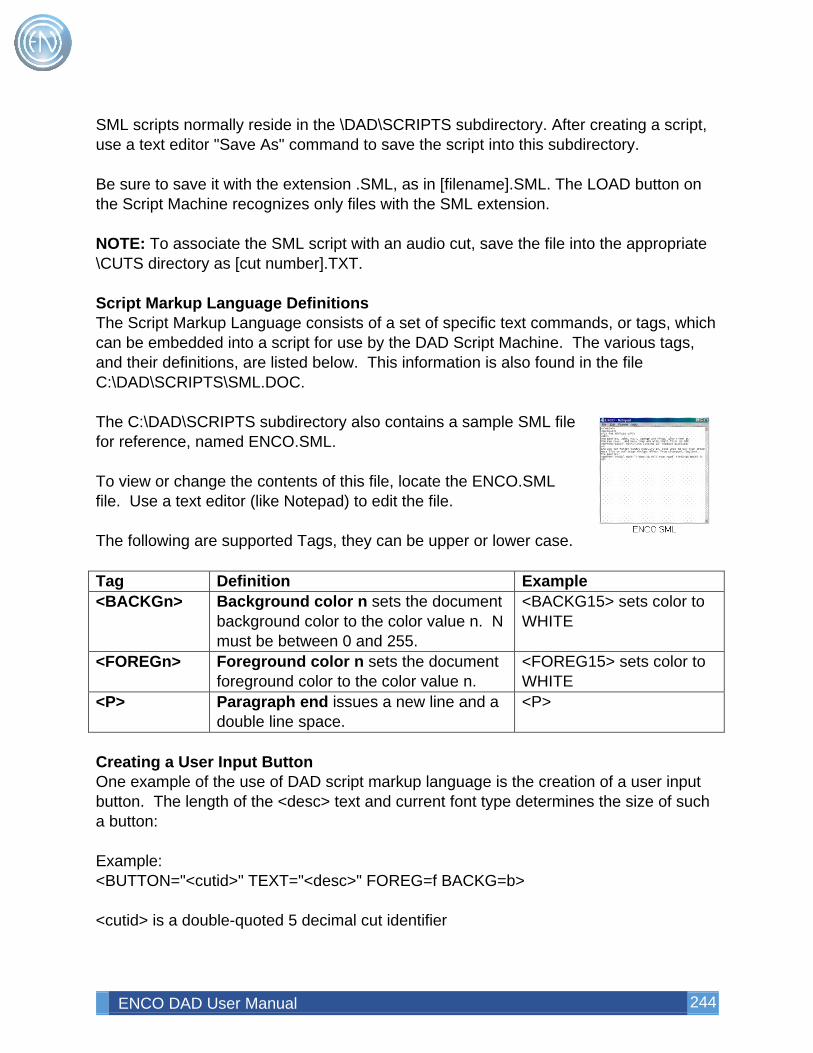
ENCO DAD User Manual 244
SML scripts normally reside in the \DAD\SCRIPTS subdirectory. After creating a script, use a text editor "Save As" command to save the script into this subdirectory. Be sure to save it with the extension .SML, as in [filename].SML. The LOAD button on the Script Machine recognizes only files with the SML extension. NOTE: To associate the SML script with an audio cut, save the file into the appropriate \CUTS directory as [cut number].TXT. Script Markup Language Definitions The Script Markup Language consists of a set of specific text commands, or tags, which can be embedded into a script for use by the DAD Script Machine. The various tags, and their definitions, are listed below. This information is also found in the file C:\DAD\SCRIPTS\SML.DOC. The C:\DAD\SCRIPTS subdirectory also contains a sample SML file for reference, named ENCO.SML. To view or change the contents of this file, locate the ENCO.SML file. Use a text editor (like Notepad) to edit the file. The following are supported Tags, they can be upper or lower case. Tag Definition Example <BACKGn> Background color n sets the document
background color to the color value n. N must be between 0 and 255.
<BACKG15> sets color to WHITE
<FOREGn> Foreground color n sets the document foreground color to the color value n.
<FOREG15> sets color to WHITE
<P> Paragraph end issues a new line and a double line space.
<P>
Creating a User Input Button One example of the use of DAD script markup language is the creation of a user input button. The length of the <desc> text and current font type determines the size of such a button: Example: <BUTTON="<cutid>" TEXT="<desc>" FOREG=f BACKG=b> <cutid> is a double-quoted 5 decimal cut identifier
ENCO DAD User Manual 245
<desc> is a double-quoted button description F and b are numerical color values that designate the foreground and background colors (respectively) of the button. Example: <button="00123" text="Back In The USA" foreg=15 backg=4>