Creating Special Provision - Wisconsin Department of...
52
July 2010 1 of 52 CREATING SPECIAL PROVISIONS
Transcript of Creating Special Provision - Wisconsin Department of...

July 2010 1 of 52
CREATING SPECIAL PROVISIONS
July 2010 2 of 52
............................................................................................................ 19
TroubleShooting the Table of Contents ........................................................................................................... 19
CREATING SPECIAL PROVISIONS
TABLE OF CONTENTS Creating Special Provisions ............................................................................................................................................. 5
What is a PS&E? .................................... .................................................................................................................................. 5
Standardized Sp ecial Provisions .................................................................................................................................. 5
STSP Updates .................................. .................................................................................................................................... 6
The Special Provisions Website .................................................................................................................................... 6
Creating The Special Provisions .......................................... ......................................................................................... 6
File Names for the Special Provis ions Documents ........................................................................................ 7
Prosecution and Progress STSPs ............................................................................................................................. 8
The STSP Index Spreadsheet ................ .......................................................................................................................... 8
Using the STSP Index Spreadsh eet ......................................................................................................................... 9
The Special Provisions Template .......................................... ..................................................................................... 10
Opening the Special Provisions with the Template .................................................................................... 10
The Prosecution and Prog ress Article .................................................................................................................... 11
Working Day Contracts ............................................................................................................................................... 11
Calendar Day Contracts ....... ....................................................................................................................................... 12
Completion Date Contracts ....................................................... ................................................................................ 13
Adding STSP Building Blocks to the Special Provisions ................................................................................ 14
Searching for Fields ............................................ .......................................................................................................... 14
Inserting Nonstandard Bid Item Articles .......................................................................................................... 15
Saving the Special Provisions D ocument .......................................................................................................... 15
Modifying The Special Provisions ..................................... ......................................................................................... 16
Adding a New STSP in the Middle of a Docum ent ......................................................................................... 16
Copying an Article from Anot her Document ................................................................................................... 16
Moving and Deleting Articles ....... ........................................................................................................................... 17
Completing The Sp ecial Provisions .......................................................................................................................... 17
Spell Checking ............ ...................................................................................................................................................... 17
Updating the Footer ................................................................... ................................................................................... 18
Check the Styles, Headings, and Paragraph Spacing .................................................................................. 18
Updating the Table of Contents ..................

July 2010 3 of 52
t and Paragraph Settings ................................................................................................. 37
Tips and Shortcuts ......................................................................................................................................................... 38
Correcting Common Errors ................. ..................................................................................................................... 20
Writing Articles for Special SPV Items ..... ............................................................................................................... 22
Writing Longer Articles for .SPV Items .......................... .................................................................................... 23
ESubmitting the Special Provisions to Central Office ...... ............................................................................. 25
Making Revisions After ESubmitting Spe cial Provisions ............................................................................ 25
Other Resources and Training Materials ........................................... ................................................................... 25
Appendix A: Using Word 2007 to Prepare Special Provisions .................................................................. 26
Saving the Special Provisions Templat e............................................................................................................ 26
Using the Special Provisions Template .............................................................................................................. 26
Secur ity Warning............................................................................................................................................................ 26
Styles ........................................................................................................... .......................................................................... 27
Adding and Usi ng Buttons on the Quick Access Toolbar ......................................................................... 28
Track Changes .. ................................................................................................................................................................ 29
Building Blocks............................................... ................................................................................................................. 29
Building Blo cks for Common Phrases ................................................................................................................ 30
Find a Fiel d ........................................................................................................................................................................ 30
Draft View..... ...................................................................................................................................................................... 30
Outline View ..... ................................................................................................................................................................. 31
Forma t Painter ................................................................................................................................................................ 32
Ta bles ................................................................................................................................................................................... 32
Creating tables .............................................................................................................................................................. 32
Resizing tables .............................................................................................................................................................. 33
Deleting and Inserting a Row or Column ........................................................................................................... 33
Adjusting the Column Width or Row Height .................................................................................................... 33
Merging a cell ................................................................................................................................................................. 34
Splitting a cell ................................................................................................................................................................ 34
Text alignment .............................................................................................................................................................. 35
Borders ............................................................................................................................................................................. 35
Converting text to table / table to text. ............................................................................................................... 36
Table headers ................................................................................................................................................................ 36
Formatting Tables in Special Provisions ............................................................................................................ 36
Useful Keystroke Combinations When Workin g in Tables ......................................................................... 37
Change Default Fon

July 2010 4 of 52
Appendix B: Tips for Typing, Formatting, and Using Numbers in Technical Documents .......... 40
Technical Tips ... ............................................................................................................................................................... 40
Formatting Tips .............................................................................................................................................................. 41
Other Tips ................................................................ ........................................................................................................... 41
Using Numbers in Technical Docum ents .......................................................................................................... 42
Using Units in Technical Documents ................. .................................................................................................. 43
Appendix C: Special Provisions…Quick & Easy! ............................ ..................................................................... 44
Appendix D: Completing The Highway W ork Proposal Form .................................................................... 46
Appendix E: Inse rt Guidelines and Form .............................................................................................................. 47
Insert G uidelines ................................................................................................................................................................. 47
Remov e ..................................................................................................................................................................................... 47
Revise ........................................................................................................................................................................................ 47
Add ing ....................................................................................................................................................................................... 49
Add ........ ...................................................................................................................................................................................... 49
STSP(s) ................................................................................................................................................ ...................................... 50
ppendix F: Word Processing Skills Needed to Prepare Special Provisions ..................................... 52 A

July 2010 5 of 52
CREATING SPECIAL PROVISIONS This manual explains how to create the special provisions documents that are part of the contract documents for the department’s highway construction projects.
WHAT IS A PS&E? PS&E is an acronym for Plans, Specifications, and Estimates, which are created by engineering staff in the department’s regional transportation offices, municipalities, or consultant offices. A PS&E includes the plans, special provisions, engineer estimate, plan letter, and all other exhibits necessary to let a contract for a highway project. The Special Provisions of a contract includes special directions or project specific requirements that are not otherwise stated explicitly in the department’s Standard Specifications for Highway and Structure Construction. The special provisions follow a common format consisting of a series of numbered articles.
STANDARDIZED SPECIAL PROVISIONS The Bureau of Project Development maintains many articles, called the STandardized Special Provisions (STSPs), that are commonly used in special provisions. In Microsoft Word 2007, all of the STSPs are building blocks, instead of separate files, and are included within the special provisions template.
There are several reasons for using STSPs in the special provisions including:
• ied that bid item or STSPs are written by department experts or committees that have stud
• contractual concern. Contractors are familiar with the bid items and contents of the STSPs.
• STSPs are formatted correctly, and are written in active‐voice English.
The numbers assigned to STSPs are coordinated with the numbering system used in the Standard Specifications for Highway and Structure Construction. The first three digits refer to the section in the standard specifications where similar information or bid items are located. The last three digits are numbers used to identify each STSP.
Some STSPs require the preparer to provide and key in additional information. Others are complete and require no additional keying. In some situations, no STSP exists to address a particular bid item or condition. In those cases, a special provisions article must be written to describe conditions or requirements specific to a particular project.
If necessary, an existing, numbered STSP can be revised. However, if revisions are made to an STSP, remove the date and STSP number at the end of the STSP, and note what revisions were made to that STSP in the plan letter. If the PS&E preparer fails to note the revisions in the plan letter, the Proposals Management Section may inadvertently replace that article with the most current version of that STSP. If revisions are made, and the date is not removed, contractors may not realize that the STSP has been changed, and may not prepare their bids accordingly.

July 2010 6 of 52
If additions are needed to an existing STSP, place the additions after the date if possible. In these cases, do not remove the date at the end of the STSP, but still note the revisions in the plan letter.
STSP UPDATES The Bureau of Project Development typically updates the STSPs twice each year. The revision date is placed at the top of the stsp‐tmplt.dotm template and at the end of each affected article. Always use the most recent version of the STSPs when creating special provisions. All STSPs are maintained in the stsp‐tmplt.dotm; therefore, the current template contains all of the updated STSPs.
When the STSPs are updated, the Bureau of Project Development writes a log that lists all STSPs added, revised, or deleted. Engineering staff is notified by email when changes are made. After the Bureau of Project Development releases an STSP update, delete the stsp‐tmplt.dotm that was stored in the folder containing your PS&E documents and replace it with the updated special provisions template (refer to Saving the Special Provisions Template in APPENDIX A).
THE SPECIAL PROVISIONS WEBSITE The documents needed to compile Special Provisions are kept at the following location: http://on.dot.wi.gov/consultants/stsp.shtm. This site contains:
• The template (stsp‐tmplt.dotm), which contains all of the STSP building blocks; • An Excel spreadsheet (Index.xlsx), a listing of all STSPs, from which a designer can choose
the appropriate STSPs for a project, filter the listing so that only the appropriate STSPs t to compile the special provisions (for more information, refer remain, and then use the lis
• to The STSP Index Spreadsheet); The most recent STSP Log;
• l cover sheet; Form DT1502, the Highway Work ProposaThe Plan Letter Template; and
• Training materials, including this manual Creating Special Provisions. •
• Insert Form and Guidelines
CREATING THE SPECIAL PROVISIONS To create a special provisions document, use the STSP Index Spreadsheet to determine which STSPs are needed, use the Special Provisions Template to insert STSP building blocks, fill in fields as necessary with project specific information, and update the footer and table of contents. Then, double‐check the information entered, run a spell check, save the document, and submit the special provisions document electronically using the e‐submit process to the Bureau of Project Development on the proper PS&E submittal date for your project.
As previously stated, each STSP is now a building block within the Special Provisions template, stsp‐tmplt.dotm. A building block contains text and special formatting that is used over and over again when creating documents. When the Special Provisions template is opened, all of the STSPs are accessible as building blocks that can be added to a proposal’s special provisions.

July 2010 7 of 52
FILE NAMES FOR THE SPECIAL PROVISIONS DOCUMENTS Follow these naming conventions when naming special provisions files (also refer to the Facilities Develop ‐1, paragraphs 2.1 and 2.2): ment Manual (FDM) Procedure 19‐10
• For the special provisions document:
o Use the project ID without hyphens;
If two or more projects are tied in one proposal, use the lowest numerical project ID.
o Follow the project ID with an underbar and the abbreviation for the transportation regional office in lower case letters.
o For example, if you are submitting the special provisions document for Project 1234‐00‐70, which is a project designed by or for the Madison regional office, name the special provisions document 12340070_mad.docx. The e‐submittal process will
e file name. add “PSE,” the date, and a time stamp to th
o Abbreviations fo ces ar the regional offi Office
re: AbbreviationRegional
Eau Claire eauGreen Bay greLa Crosse laxMadison madRhinelander rhiSuperior supWaukesha wkeWisconsin Rapids wis
• For the proposal cover sheet (Form DT1502), use the project ID followed by “pro”; for
example, 12340070_pro.docx.
• An “insert” document contains any changes that need to be made after the initial PS&E submittal. When naming an insert, use the project ID followed by “ins”; for example, 12340070_ins.docx. Use the Insert form to create the insert. For directions on how to use this form see the Insert Guidelines Appendix E.
• Do NOT submit new or revised special provisions unless you have spoken with, and have received permission from, the plan checker, the special provisions editor, or the special provisions coordinator.

July 201 8 of 52 0
PROSECUTION AND PROGRESS STSPS There are three special tabs within the Special Provisions template, one for each type of contract used by the department: Working Day, Calendar Day, and Completion Date. Most of the language commonly used in the Prosecution and Progress (P&P) article is now included in various buttons found on one of these three contract tabs. In Column B of the STSP Index Spreadsheet, the words “Use P&P Tab” have been added to remind the user preparing the Special Provisions document to use one of these three tabs in the general template.
Some of the formerly used P&P STSPs, and their former STSP numbers, are provided in the STSP Index Spreadsheet. The former STSP numbers are provided at the end of the Technical Notes (Column F). In Column C of the spreadsheet, directions are provided on which tab, group, and button to use to enter P&P language using the new template.
For specific information about preparing a P&P article for one of the three contract types, refer to The Prosecution and Progress Article.
THE STSP INDEX SPREADSHEET Use the STSP Index Excel spreadsheet to select which STSP building blocks to include in the special provisions, and to determine what information is needed to complete each STSP. The STSP Index Spreadsheet contains seven columns. They are:
Column Num er b
Column Heading Column Contents
A Check This column is used to select which STSPs are required for the project.
B STSP # to Enter The number of the STSP’s building block, or instructions on . which tab to use to access that STSP
C Description The title of the STSP building block.
D Directions and Fields
Project‐specific information that needs to be entered when preparing the Special Provisions document. Bolded text is direction on how to use the STSP.
If the designer needs to choose between various pre‐established options, it contains the phrase DD – Select followed by choices available in a dropdown list found within that STSP. In some cases, additional information will be needed such as the name of the municipality where the work is located.
E Information to enter
This column is used to enter the project‐specific information needed to complete the fields, or to choose the appropriate option in a dropdown box, for that STSP. The information in this column can be transferred to the appropriate fields in the special provisions document.
F Technical Notes
Information that helps a designer decide if the STSP is appropriate for a particular project. This information was
STSP header. previously provided to engineering staff in the
G Date last updated
The date on which the STSP was last updated.

U NSI G THE STSP INDEX SPREADSHEET 1. Open the spreadsheet and save it under the project’s ID.
2. Scan the list of available STSPs, and determine which STSPs are required for the project. Place select those STSPs. an X in the Check column (Column A) to
3. The fourth column of the spreadsheet, Directions and Fields, lists what information is needed to complete each STSP. Enter the information needed to complete the STSP in Column E, Information to enter.
4. After all of the STSPs have been selected, filter the spreadsheet so that only the sele d are shcte STSPs own.
Editin n the arrow for Sort & Filter and choose a. On the Home tab, in the group g, click o
CFilter, which will place arrows next to the column names.
b. Click on the arrow next to the heck column. c. Click on the checkbox (Blanks) and then OK. This hides all
the rows without an X in the Check column d. Scan down the list, if more STSPs are required, then simply
click on the arrow next to Check column and click on Select All and OK. This brings back all rows. When the missing STSPs are added, repeat steps b and c above.
5. After the spreadsheet has been filtered, print the generated list and
use w ocument. To p : it hile creating the Special Provisions d rint a copy
a. Preview how the list will print using Print Preview (click on the MS Office Button, hover over Print, and then click Print Preview). Make sure that the printed list will include the column Information to Enter.
b. Press Ctrl+P to open the print window (or click on the MS Office button, and click on Print).
c. Use the printed list to begin creating the Special Provisions document in Word, or provide the list to the person preparing the Special Provisions document for that project.
July 2010 9 of 52
THE SPECIAL PROVISIONS TEMPLATE The formatting specifications for special provisions are contained in the template stsp‐tmplt.dotm. Use this t. The formatting specifications are: template for creating every special provisions documen
• t, right, top and bottom) 1” All margins (lef• Tabs every ½”
Type style (1Heading 1, Normal, STSP, and List Paragraph)• Justification (Left for headin•
gs and full for all others)
Do NOT delete or change any of these format specifications in any way.
As STSPs building blocks are added to the special provisions, each new article is automatically numbered. The numbering format has been preset to number the articles with Arabic numbers.
Use the outline view to easily rearrange articles and navigate through the large document (refer to Outline View in APPENDIX A).
To see the actual formatting of a document while working in outline view, split the document window (select the View tab, select Split in the group Windows, and then click on the document). Work in outline view in one pane, and print layout view in the other pane. Any changes that are made to the document in one view are visible in the second pane.
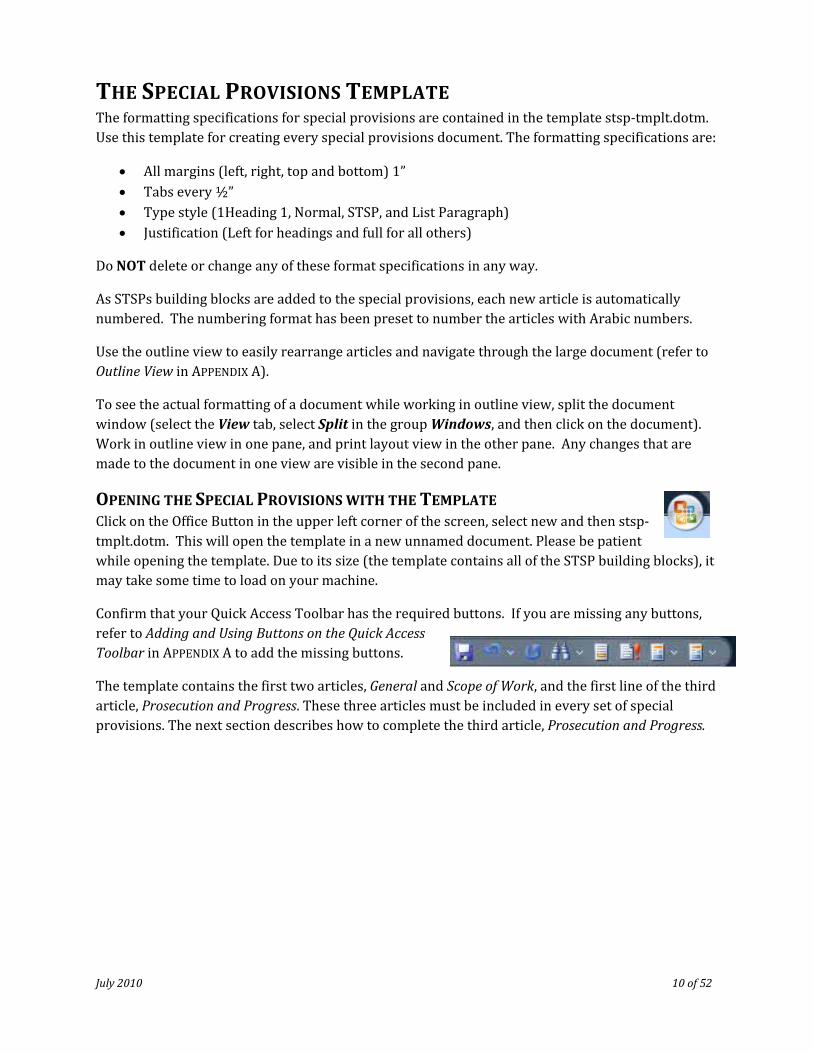
OPENING THE SPECIAL PROVISIONS WITH THE TEMPLATE Click on the Office Button in the upper left corner of the screen, select new and then stsp‐tmplt.dotm. This will open the template in a new unnamed document. Please be patient while opening the template. Due to its size (the template contains all of the STSP building blocks), it may take some time to load on your machine.
Confirm that your Quick Access Toolbar has the required buttons. If you are missing any buttons, refer to Adding and Using Buttons on the Quick Access
tons. Toolbar in APPENDIX A to add the missing but
The template contains the first two articles, General and Scope of Work, and the first line of the third article, Prosecution and Progress. These three articles must be included in every set of special provisions. The next section describes how to complete the third article, Prosecution and Progress.
July 2010 10 of 52

THE PROSECUTION AND PROGRESS ARTICLE The Prosecution and Progress articles have been changed from numeric STSPs to building blocks that have descriptive names. Building blocks contain words or phrases commonly used when writing Prosecution and Progress articles, and contain a section name, and the date that it was last revised, at its end. If any changes are made in a section, remove the date and section name at the end of it.
To begin working on the Prosecution and Progress article, select the contract type for that project: Working Day, Calendar Day, or Completion Date, each of which has a tab in the template stsp‐tmplt.dotm. Once the appropriate tab is selected for a particular project, do NOT use any articles or buttons from the other two tabs.
To begin, open the template, and place the cursor at the end of the template beneath the Prosecution and Progress article (see below); follow the directions provided below for the contract type tab that is appropriate for the project. See the FDM for further guidance on contract types
WORKING DAY CONTRACTS If you choose the Working Day tab, use buttons ONLY from this tab; do not use buttons from the Calendar Day or the Completion Date tabs. The Working Day tab looks like this:
There are three groups within the Working Day tab. Directions for using each button in the three groups are provided below:
1. In the group Schedule:
the button Timeframe. a. If contractor is to provide a time frame for work, click onb. If a fall suspension is required; click on the button Fall S
edited schedule is required; cli on the button Expedited Schedule.
uspension.
c. If an exp ck
2. In the group Interim Liquidated Damages:
If the project e r quires interim liquidated damages; click on the button Working Day.
NOTE: In a working day contract, interim liquidated damages can only be assessed by the working day.
3. In the group Environmental:
a. If there are fish spawning windows, click on the button Fish. b. If there are migratory birds present and the contractor must provide bridge netting,
July 2010
click on the button Birds.
4. Make sure you fill in any necessary fields or choose from any drop down boxes. 11 of 52
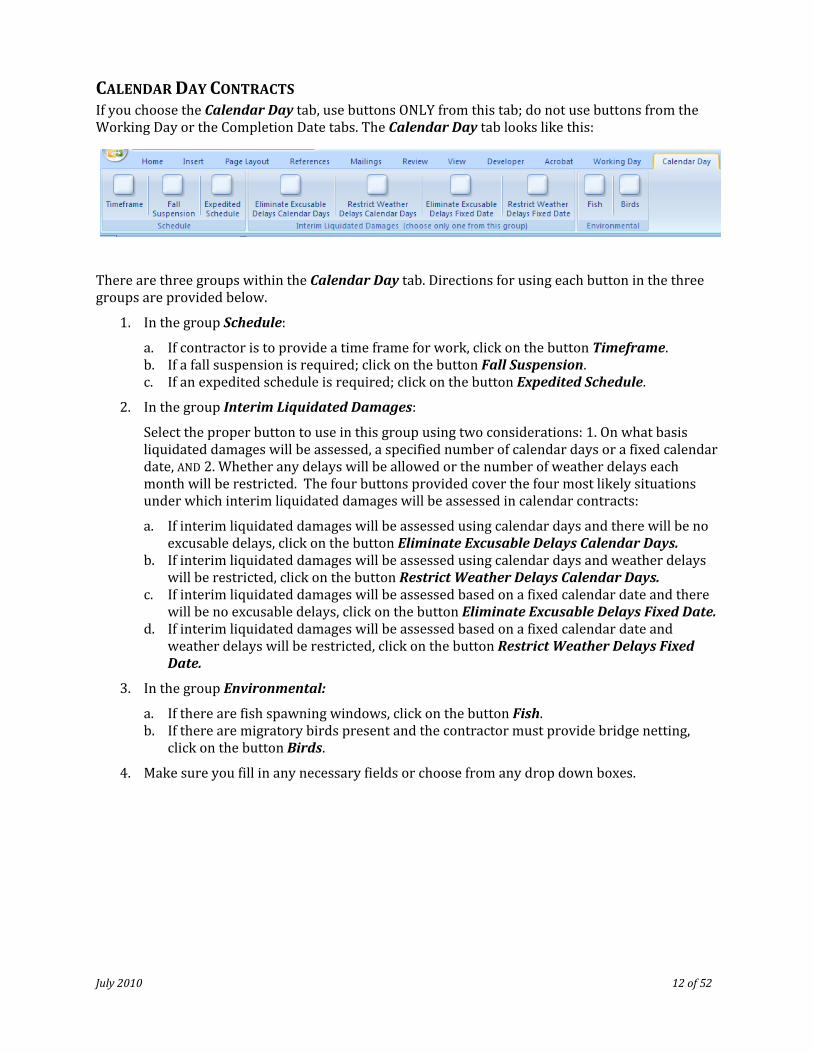
CALENDAR DAY CONTRACTS If you choose the Calendar Day tab, use buttons ONLY from this tab; do not use buttons from the Working Day or the Completion Date tabs. The Calendar Day tab looks like this:
There are three groups within the Calendar Day tab. Directions for using each button in the three groups are provided below.
1. In the group Schedule:
the button Timeframe. a. If contractor is to provide a time frame for work, click onb. If a fall suspension is required; click on the button Fall S
dited schedule is required; cli on the button Expedited Schedule.
uspension.
c. If an expe ck
2. In the group Interim Liquidated Damages:
Select the proper button to use in this group using two considerations: 1. On what basis liquidated damages will be assessed, a specified number of calendar days or a fixed calendar date, AND 2. Whether any delays will be allowed or the number of weather delays each month will be restricted. The four buttons provided cover the four most likely situations under which interim liquidated damages will be assessed in calendar contracts:
a. If interim liquidated damages will be assessed using calendar days and there will be no excusable delays, click on the button Eliminate Excusable Delays Calendar Days.
b. If interim liquidated damages will be assessed using calendar days and weather delays will be restricted, click on the button Restrict Weather Delays Calendar Days.
there Date.
c. If interim liquidated damages will be assessed based on a fixed calendar date and will be no excusable delays, click on the button Eliminate Excusable Delays Fixed
d. If interim liquidated damages will be assessed based on a fixed calendar date and weather delays will be restricted, click on the button Restrict Weather Delays Fixed Date.
3. In the group Environmental:
a. If there are fish spawning windows, click on the button Fish. b. If there are migratory birds present and the contractor must provide bridge netting,
click on the button Birds.
4. Make sure you fill in any necessary fields or choose from any drop down boxes.
July 2010 12 of 52

July 2010 13 of 52
COMPLETION D S If you choose the Completion Date tab, use buttons ONLY from this tab; do not use buttons from the Working Day or the Calendar Day tabs. The Completion Date tab looks like this:
ATE CONTRACT
There are three groups within the Completion Date tab. Directions for using each button in the thre gr vided bel w. e oups are pro o
1. In the group Schedule:
the button Timeframe. a. If contractor is to provide a time frame for work, click ondited schedule is required, click on the button Expedited Schedule. b. If an expe
2. In the group Interim Liquidated Damages:
Select the proper button to use in this group using three considerations: 1. On what basis liquidated damages will be assessed, a specified number of calendar days or a fixed calendar date; 2. Whether any delays will be allowed or the number of weather delays each month will be restricted; AND 3. The number of projects in the proposal. The five buttons provided cover the most likely situations under which interim liquidated damages will be assessed in completion date contracts:
a. If interim liquidated damages will be assessed using calendar days and there will be no excusable delays, click on the button Eliminate Excusable Delays Calendar Days.
b. If interim liquidated damages will be assessed using calendar days and weather delays will be restricted, click on the button Restrict Weather Delays Calendar Days.
there Date.
c. If interim liquidated damages will be assessed based on a fixed calendar date and will be no excusable delays, click on the button Eliminate Excusable Delays Fixed
d. If interim liquidated damages will be assessed based on a fixed calendar date and weather delays will be restricted, click on the button Restrict Weather Delays Fixed Date.
e. If you have multiple projects, and there will be no excusable delays, click on the button Eliminate Excusable Delays Multiple projects. If there are more projects than the space provided by the article, place the cursor at the end of the section, type MP and
to add more paragraphs for additional projects. press F3
3. In the group Environmental: a. If there are fish spawning windows, click on the button Fish. b. If there are migratory birds present and the contractor must provide bridge netting,
click on the button Birds.
4. Make sure you fill in any necessary fields or choose from any drop down boxes.
July 2010 14 of 52
AD ID NG STSP BUILDING BLOCKS TO THE SPECIAL PROVISIONS 1. Refer to the filtered STSP Index (see above), and insert the STSP building blocks needed
Blocks in APPENDIX A). Before inserting a new STSP building block, make (refer to Buildingsure he
2. To a d a t cursor is at the end of the document. d n STSP:
ter). a. Place the cursor where the STSP needs to be inserted.
o en
b. Type the STSP number (from the Index.xlsx column STSP # tc. With the cursor placed immediately after the number, press F3.
3. If an STSP needs to be added in the middle of the document, refer to Modifying the Special Provisions.
SEARCHING FOR FIELDS Some articles require that additional information be provided. Where possible, the information needed to complete the STSP is located in fields. Fields appear in the template as words with gray shading. Directions for these fields are in the field if possible.
There are two ways for entering information in fields. The first method is to place all of the STSP building blocks in the document, and then search the entire document for the fields that require information. The second method is to complete the fields for each STSP immediately after adding the SP ation: ST to the special provisions. Follow these steps to find the fields and enter the inform
1. If searching the entire document, place cursor directly after the table of contents. If searching for fields in a single article, place the cursor on the first letter of the article’s title. Press F11, or press the Find Field button on the Quick Access Toolbar, to move to the first field.
NOTE: To add the Find Field button to the Quick Access Toolbar, refer to Adding and Using Buttons on the Quick Access Toolbar in APPENDIX A).
2. The first blank field will be highlighted. With the field highlighted begin typing the required information; this information is found in Column E Information to enter of the STSP Index Spreadsheet. This removes the field and makes a seamless document. By removing the field the information can be easily edited. Also when fields need to be skipped because
by information isn’t available yet, you can go back directly to the previously skipped fieldspressing F11.
3. When done typing the information for the first field, press F11 (or press the Find Field button on the Quick Access Toolbar) to find the next field.
4. Some articles contain drop‐down boxes; pressing F11 does not find the drop down boxes. Drop down boxes appear in bluish gray text that says “Choose an item.” STSPs that have drop down boxes are noted in the Directions and Fields column in the STSP Index spreadsheet. When a drop down is used, select an option by clicking on the arrow on the right side of the drop down box.

INSERTING NONSTANDARD BID ITEM ARTICLES Nonstandard bid items are identified by SPV‐series numbers. Refer to Attachment 1 in FDM Procedure 19‐5‐25 (http://roadwaystandards.dot.wi.gov/standards/fdm/19‐05‐025.pdf) for a list of special provision bid item numbers, their corresponding units of measure, and information on how to use them. Include articles in the special provisions document for ALL nonstandard bid items; a nonstandard bid item is an item that is not listed in the schedule of bid items in the Standard Specifications for Highway and Structure Construction or is not a .S item covered by one of the STSPs. Examples of nonstandard bid items include items for sanitary sewer work, special lighting needs, special seed mixes and landscaping plants, or special architectural treatments to structures.
The Bureau of Structures maintains many articles, which are not STSPs, on their web page for nonstandard structure items. Some of the regions also maintain articles, which are not STSPs, for special items that are unique to their particular area. Articles for other nonstandard bid items must be written and typed specifically for that particular bid item and project. To insert an article for a non anst dard bid item:
m. 1. Place the cursor at the appropriate location within the special provisions for that SPV ite2. Then type in 000‐000, and press F3. A building block template will be added at that
c item. location; use it to write the SPV article for the project‐specifi
For guidance on writing articles for nonstandard bid items, refer to Writing Articles for Special SPV Items and to APPENDIX B: Tips for Typing, Formatting, and Using Numbers in Technical Documents.
SAVING THE SPECIAL PROVISIONS DOCUMENT Save the special provisions frequently while working on it. Make sure to save the document as a Word Macro‐Enabled Document (.docm) so when it is reopened the building blocks and macros work. When all of the articles have been inserted and the fields completed, delete any extra hard returns at the end of the document and save the document again.
When saving the special provisions document, ensure that the document properties feature is on. Click on the Office Button , select Prepare, and then select Properties. The following box appears.
Comple information: te the fields with the following
• Author: The preparer’s name. ct
• • , use the lowest numerical project ID. Title: The project ID; if more than one proje
• Subject: Additional project IDs, if applicable.
• for the regional transportation office. Keywords: The words “Special Provisions.” Company: Consultant’s firm, or abbreviation
• Comments: The letting date of the proposal.
July 2010 15 of 52

MODIFYING THE SPECIAL PROVISIONS Prior to e‐submitting the special provisions, it may be necessary to add an article to an existing document. To do this, open the special provisions document and follow these procedures.
ADDING A NEW STSP IN THE MIDDLE OF A DOCUMENT Working in Outline View is an easy way to move around a large document (refer to Outline View in APP DI
July 2010 16 of 52
EN X A) when adding a new article to an existing document. To add an article:
select Outline in PENDIX A).
1. Open the special provisions and switch to Outline View (under the View tab, cument Views; for in AP
the group Do more information, refer to Outline View
2. Place the cursor on the first letter of the title that will follow the new article. 3. Click on the Close Outline View button to go back to Page Layout view. 4. Press enter once to move the current title down a row. Go back to the empty
er to line and follow the directions for adding an STSP Building Block. (RefAdding STSP Building Blocks to the Special Provisions.)
ess F11 (or the Find Field button on re information.
5. Place the cursor at the beginning of the article, and prthe Quick Access Toolbar) to find any fields that requi
6. Delete all ext fter tra lines before and a he new article.
NOTE: After making ANY changes in the document, update the table of contents and save the document.
COPYING AN ARTICLE FROM ANOTHER DOCUMENT It is better to select text, copy it to a clipboard, and then paste the text to the new document than to insert a file that contains the desired text. Inserting the entire file may inadvertently insert unnecessary text or improper formatting into the new special provisions document. If you need to insert an STSP article, it’s best to simply insert the STSP building block where needed. Do not copy
ave been changed, or it may be outdated. an STSP from another document; the STSP may h
Wh inen serting an article, which is not an STSP:
1. Place the cursor to the left of the title that is to be copied. y click ing y r by holdin down the 2. Highlight the desired text (b ing and dragg our mouse o g
shift key and scrolling through the document to the end of the article).
3. Press Ctrl C (or, click on the Home tab, click on Copy in the group Clipboard). r. Paste the4. Place the cursor in the document where you want the article to appea copied document using Ctrl V (or click on the Paste button in the group Clipboard).
5. Once the article is in its proper location, highlight the title and select 1Heading 1 font style from the Home tab. If there are tables in the document, highlight the table and select STSP
ted list, and select List Paragraph style. ont style from the Home tab.
style. If there is a bulleted list, highlight the bulleFor all other text, highlight it and select Normal f
6. Delete all ext fter tra lines before and a he article.
NOTE: After making ANY changes in the document, update the table of contents and save the document.

July 2010
d. In theIgnor
e. Click OK. 17 of 52
MOVING AND DELETING ARTICLES It is easiest to move and delete articles in Outline View. Switch to Outline View (refer to Outline View n i APPENDIX A) and follow these steps:
1. Save the document first so that if mistakes are inadvertently made, the original documentcan be easily restored.
re that both the title 2. In the left margin of the document, select the title of the article (ensuo be moved or deleted.
le will be and the ¶ symbol is highlighted) that needs t
removed. tline View in APPENDIX A.
3. If deleting, press the delete key; the entire artic4. If moving an article, follow the directions in Ou5. Delete all extra lines present in the document.
NOTE: After making ANY changes in the document, update the table of contents and save the document.
6. Pressing Ctrl+Z will un‐do the last action completed. If an article is inadvertently deleted, press Ctrl+Z to restore it.
COMPLETING THE SPECIAL PROVISIONS After assembling the special provisions document, complete the following steps:
1. Check spelling.
2. Update footer.
3. Check styles and headings.
4. Update Table of Contents. 5. Print the special provisions document and proofread it. 6. Send the electronic file to the Bureau of Project Development using the e‐submit process.
SPELL CHECKING By default, when a file is opened or inserted in Word 2007, the program runs a spell check and flags all possible errors. Word finds any word not in its dictionary and words that are spelled incorrectly, as well as consecutive repeated words, apparent errors in capitalization, and consecutive words that have an incorrect number of spaces between them. It also highlights potential errors in ba iphrases that do not n e
s c grammar. Word is not always correct, and sometimes it flags names or e d changing.
NOTE: Word underlines words that are possibly misspelled in red, underlines words in blue if there is a usage issue, and underlines possible grammatical errors in green.
To ensu W mbers, follow these steps: re ord che pper case and words that include nu bottom f the box).
cks words in ua. Click on the MS Office Button.
Options (located on the omn of window, click on Proofing.
b. Click on Wordc. In the left colu
section When Correcting Spelling in MS Office programs, uncheck the boxes e words in UPPERCASE and Ignore words that contain numbers.

To spell check the document, press F7 or click on the Review tab. In the group Proofing, click on the button Spelling & Grammar. On the status bar there is an icon of a book with a red x on it, click on this to do a spell check. The computer will stop at the first error it sees and a window will pop up. Select the appropriate action.
UPDATING THE FOOTER Afte sp the sp ocument, update er: r ell checking ecial provisions d the foot
a. Click on the Insert tab; in the group Header & Footer, select Footer. At the bottom of the menu window, select Edit Footer. (If the Edit Footer button is already on the Quick Access
r in Toolbar, simply click on it – refer to Adding and Using Buttons on the Quick Access ToolbaAPPENDIX A.)
b. Type in all of the project numbers for that proposal. Separate multiple project numbers OT using a comma, and list the project numbers from the lowest to highest number. Do N
include the words “Project ID” in the footer. Do NOT bold the project IDs. c. If there are fewer than four projects, all of the project numbers and the page numbers
should be on the same line. Otherwise separate the project numbers into as even as possible groups and put one set on the first line and the second set on the second line. Place the page numbers at the right margin; if there is more than one line of project IDs in the footer, the number of pages should always be on the bottom‐most line.
July 18 2010 of 52
CHECK THE STYLES, EADINGS, AND PARAGRAPH SPACING In Draft View (refer to Draft View in APPENDIX A), scroll down and watch the Styles on the left to verify that only the acceptable styles are used – 1 Heading 1, Normal, STSP, and List Paragraph. If a different style appears, use the format painter (refer to Format Painter in APPENDIX A) to change the
f the f able one
H
style to one o our accept s.
TIP: On the Home tab, in the Styles group there is an arrow at the lower right. If you click on this it will show all the different styles in the document. If you go to the right side of the styles listed an arrow appears. You can then choose to select all instances (and it says the number of instances) of this style and make the change to Normal style by then clicking on Normal in the style list. CAUTIONS: If you do this be careful with larger number of selections it can include things you don’t want to change in a mass change. Also it does NOT always show all the styles. So you still need to scroll down through the document.
When done with the above check, switch to Outline View to confirm that each heading is left justified and has a period at the end.
When all of the special provision articles have been entered, select Ctrl+A to select all text. On the Home tab, in the group Paragraph, click on the arrow in the lower right‐hand corner of Paragraph (Alt H, PG). This opens the Paragraph window. Click on Line and Page Breaks tab (Alt P). Under Pagination, check the Widow / Orphan Control and uncheck the other three boxes. Checking this box ensures that at least two lines of a paragraph always stay together across a page break. For

example, if the paragraph that begins at the bottom of a page has a total 10 lines, but only 9 lines fit, Widow/Orphan Control will place 8 lines of the paragraph at the bottom of the page and 2 lines at the top of the next page (instead of a single line).
July 2010 19 of 52
UPD TA ING THE ABLE OF ONTENTSa. Press Ctrl+Home to move the cursor to the begb. Arrow down until the cursor is in the table of
uter screen
T C inning of the document.
contents; on the comp , each article within the table of contents will be in a gray box.
c. Press F9, or go to the References tab; in the group Table of Contents, click on the button Update Table (if this button is already located on the Quick Access Toolbar simply click on it – refer to Adding and Using Buttons on the Quick Access Toolbar in APPENDIX A). A window may appear asking if it should Update Page Numbers only or Update Entire Table. Select Update entire table. This will ensure that all changes to headings appear in the table of contents.
TROUBLESHOOTING THE TABLE OF CONTENTS When an article does not appear in the table of contents, place the cursor on the title of the article in the document. Check the style designation; in the Home tab, in the group Styles, the style assigned to the title will have a highlighted box around it. The style designation for the article’s title should be 1 Heading 1. To apply the appropriate style, highlight the title of the article with the cursor, go to the Home tab, and in the group Styles click on 1 Heading 1. Then, update the table of contents.
When an article is not properly aligned in the table of contents, place the cursor at the beginning of the article’s title. Click on the Home tab; in the group Paragraph, click on the arrow in the lower right corner to open the Paragraph window. Check these options:
• the Ind SpaClick on tab.
•
ent and cing• Under General, choose Left from the dropdown box for Alignment.
Choose Level 1 from the dropdown box for Outline Level. • Under Indentation, enter the value 0” next to Left and enter the value 0” next to Right.
Under Special, select Hanging from the dropdown box, and enter the value 0.5” under the word By.

July 2010 20 of 52
CORRECTING COMMON ERRORS The special provisions document is not finished until a copy is printed AND thoroughly checked for formatting and content errors. Print the entire special provision by clicking on the MS Office
trl+P. Button, click on Print, and then click OK; or, print by pressing C
Here ar nd in the special provisions: e some common errors fou
• Incorrect order of articles.
NO s an example of how to properly order the articles in a special ns document. Move articles accordingly:
TE: Below iprovisio
Description Article 1 General* 2 Scope of Work* 3 Prosecution and Progress* 4 Traffic 5 Holiday and Other Work Restrictions 6 Utilities 7 Municipality Acceptance of Water Main and Sanitary Sewer Construction8 Other Contracts / Work by Others9 Railroads – any article involving railroads in the title except SPV items 10 Environmental Articles
Army Corps of Engineers Section 40n
Information to Bidders US 4 Permit Notice to Contractor, Notification of Demolition / Renovatio
ontrol Environmental Protection
n – Aquatic Exotic Species Cacent to Navigable Waters
Environmental ProtectioConstruction Over or Adj
es Archaeological ArticlErosion Control Articles
11 Hauling Restrictions12 Public Convenience and Safety13 Coordination with Business1 Standard Specifications (.S items) are arranged in numerical order 4 1 Non‐Standard bid items (SPV items) are arranged in numerical order 5 *NOT : the general template, and in EVERY set of special E These three articles are in
provisions. NOTE: Articles 1‐6 are standard
• Improperly aligned and formatted text. Non‐functioning hyperlinks.
• s two lines. To fix, replace the hyphens with hard •
Project ID numbers that are split acrosen).
• n the footer. hyphens (Ctrl+Shift+HyphIncorrect page numbers i
• Misaligned text in tables.

July 2010 21 of 52
• Incorrect spacing between paragraphs: icle and its first paragraph
. o Delete spaces between the title of an arto Delete spaces between the first paragraph in E Payment and the payment tableo Delete spaces at the end of each article.
• Article titles that do not match the bid item name. Likewise, the bid item names in the s Measurement and Payment sections that do not match the bid item names in the article’
title. • Bid item numbers and names that do not match the bid item numbers and names in the
engineer’s estimate. • Periods keyed in between the letters of acronyms. For example, the acronym for the
America iety for Testing and Materials is ASTM, not A.S.T.M. • Abbrev for words that should be typed in full. For example, do NOT abbreviate:
n Sociatio
o ns
o road street
o o right‐of‐way
o reference line department
o specifications o ound westbound, eastbound, northbound, and southbo through o southwest, southeast, northwest, and northeast
• Improper capitalization. The first letter in each word of bid item names is capitalized; little else is capitalized in the special provisions. For example, do NOT capitalize any of the following words: standard specifications, section, subsection, engineer, contractor, special provisions, city (unless followed by the name of a city, such as “City of Superior”), plans, contract, work, owner, or department.
• In the five part format for D Measurement use “The department will measure ‘name of item’, as” The paragraph always starts with the department will measure. (See Writing Articles
for Special SPV Items) • In the five part format for E Payment, make sure to follow the format outlined in Writing
Article for Special SPV Items.

July 2010 22 of 52
WRITING ARTICLES FOR SPECIAL SPV ITEMS 1. Use a five part format, this is building block 000‐000, when writing articles for special SPV
items:
o A Descripti l provision ‐ Begin the first paragraph with the phrase: “This specia on describes (brief description of the work).”
o B Materials ‐ The first paragraph may begin with the words “Furnish (material) that is in accordance to section (number of applicable section in the standard specifications) of the standard specifications.”
o C Construction – Whenever possible, use active voice, imperative mood style, or direct commands to direood, see #4 belo
ct the contractor’s actions (for examples of the active voice, imperative m w).
o D Measurement ‐ Begin the first paragraph with the words: “The department will measure (SPV Bid Ite Also:
m Name) by…”
• Cap• Use
italize the first letter of each word in the SPV bid item name.
o the following standard language after the bid item name: For the unit each: Item Name by each unit, acceptably completed.
o t and For the unit LS: Item Name, completed in accordance to the contracaccepted, as a single complete unit of work.
o For the unit LF: Item Name in length by the linear foot, acceptably bly completed. OR Item Name in length by the linear feet of work, accepta
completed. o E Payment ‐ Begin the first paragraph with the phrase “The department will pay for
measured quantities at the contract unit price under the following bid item:” Follow this phrase with the Item Payment Table. The paragraph after the payment table begins with the phrase “Payment is full compensation for.” After this phrase is a list of the key materials and work elements required under the subsections B Materials and C Construction. Separate each action with a semi‐colon and begin each item with the gerund, i.e., ‐ing form of the verb ot specify work that the contractor must complete that has not been stated earlier in th cl
. Do ne arti
Also: e.
• Do not use bold font in the table. • nly The titles ITEM NUMBER, DESCRIPTION, and UNIT should be on one line o
• and in all caps. In the payment table, if possible, keep the description to one line per item.
• Use the following for unit: Each, CY, SF, SY, LS, Ton, Days, etc. Note that wordsare not in all caps and abbreviations are in all caps.
• Do not repeat the bid item name in the paragraph following the Item Payment Table (unless there are multiple items being paid for and they are each being p dai differently).
NOTE: If a particular section is not needed, then type the letter followed by “(Vacant)”; for example, if a contractor is furnishing a bid item, but will not be installing it, C (Vacant) may be appropriate.

July 2010 23 of 52
2. Ensure that there are two spaces between the letter and the section title; bold the letter and title; no extra line between the title and first line of the next paragraph; and begin the text on the next line down from the title. Example: A Description
3. Full justify the article and don’t indent the first line of each paragraph.
4. Use active voice whenever possible. When using active voice, do not use the words “the contractor shall”, instead specify actions needed by the contractor to complete the work (for example, clean the pavement surface, assemble the sections, or replace the fuse). Often the sentence will begin with a verb. Do not use active voice if it may be confusing as to who is actually responsible for completing the work.
5. Avoid using “should”; instead tell the contractor what has to be done. The word should is only a kind suggestion and cannot be enforced.
6. Use English units of measure in the measurement and payment sections.
7. It may not be necessary to use the five‐part format for all SPV items. For example if the SPV item is a special curb type that is shown in the plan’s Construction Details, it may be sufficient to write: “Perform all work in accordance to section 601 of the standard specifications and the plan details.”
For additional information on writing articles for SPV bid items, refer to FDM Procedure 19‐15‐80.
WRITING LONGER ARTICLES FOR .SPV ITEMS As with shorter articles, use a five‐part format: A Description; B Materials; C Construction; D Measurement; and E Payment. As with shorter articles, if a particular section is not needed, eplace the title with (Vacant). For example if the B Materials section is not needed for a particular rbid item, type “B (Vacant)” to retain the five‐part format. To add subsections, use subsection numbers to retain the five‐part format instead of adding alpha numeric subsections, such as F, G, and H. For example, suppose that a bid item for a special seed mix specified the inclusion of several different types of seeds, grasses, forbs, and cover crops. It may be appropriate to use the following four subsections under B Materials: B Materials B(.1 General Specify general requirements of all seed types, such as local genotype and germination requirements.) .2 Grasses Specify general requirements of grass seed types, such as local genotype and germination requirements.) B( .3 Forbs Specify general requirements of forb seed types, such as local genotype and germination requirements.) B( B.4 Cover Crop Specify general requirements of cover crop seed types, such as local genotype and germination (requirements.) Here is another more‐detailed example of using subsection numbers to maintain the 5‐part format, et describe in detail the construction methods to apply a hypothetical epoxy overlay that also equires the contractor to perform specific tests. yr

July 2010 24 of 52
C Construction C(
.1 General Specify general information about the system, and how the materials may be stored.)
C.2 Deck Preparation C.2.1 Deck Repair Specify how unsound or disintegrated areas of the deck will be repaired before applying the verlay.) (o C.2.2 Surface Preparation Specify how to prepare the entire surface, after damaged areas have been repaired, before pplying the overlay.) (a C.3 Overlay Application (Specify how to handle and mix the overlay, under what weather conditions it may be applied, and ow to apply the material. Subsections may be included to specify application rates and minimum uring periods.) hc C.4 Overlay Testing C.4.1 General (Suppose that the contractor is required to perform two non‐destructive tests of the deck after the overlay has been applied. Use this section to specify what two tests are required. Then use ubsequent numbered subsections to describe each test procedure and how the results will be nterpreted and/or presented.) si C.4.2 Test 1 .4.2.1 Test Procedures Describe the test procedures that the contractor must follow for Test 1.) C( C.4.2.2 Test Results Specify what acceptable test results are, how the contractor will remedy the overlay if the test esults are not acceptable, and how the test results shall be presented to the engineer.) (r C.4.3 Test 2 C.4.3.1 Test Procedures (Describe the test procedures that the contractor must follow for Test 2.) C.4.3.2 Test Results Specify what acceptable test results are, how the contractor will remedy the overlay if the test esults are not acceptable, and how the test results shall be presented to the engineer.) (r .5 Acceptance of Overlay Specify under what conditions the engineer will accept the finished overlay.) C(

July 2010 25 of 52
ESUBMITTING THE SPECIAL PROVISIONS TO CENTRAL OFFUse the e‐submit process to electronically submit the Special Provisions to the Proposal Management Section, located in the Bureau of Project Development, on specified PS&E dates (refer to FDM Procedure 19‐1‐1,
ICE
http://roadwaystandards.dot.wi.gov/standards/fdm/19‐01‐001a002.pdf.)
When the Proposal Management Section has completed editing all of the special provisions for a particular letting, the special provisions are placed on a shared DOT network drive (N4Public on mad00fph) in the following folder: N:\Bhc\Special Provisions Word.
MAKING REVISIONS AFTER ESUBMITTING SPECIAL PROVISIONS It may be necessary to make changes to special provisions after they have been e‐submitted to the Bureau of Project Development. Do not submit all new plans or proposals. Once the documents are e‐submitted work on them can begin by central office personnel almost immediately. It is preferred that all changes are submitted as an insert. Use the Insert Form and follow the Guidelines.
When submitting an insert, follow the guidelines and use the Insert Form to submit changes. See App den ix E Insert Guidelines and Insert Form.
1. Submit the insert form electronically to the Bureau of Project Development using the e‐submit process, and send an email to the special provisions editor and coordinator.
OTHER RESOURCES AND TRAINING MATERIALS APPENDIX A: Word 2007 Manual for Creating Special Provisions
sing Numbers in Technical Documents APPENDIX B: Tips for Typing, Formatting, and U
APPENDIX C: Special Provisions…Quick & Easy!
rk Proposal Form APPENDIX D: Completing the Highway Wo
APPENDIX E: INSERT GUIDELINES AND FORM
APPENDIX F: Word‐Processing Skills Needed to Prepare Special Provisions

APPENDIX A: USING WORD 2007 TO PREPARE SPECIAL For additional training or assistance with Word 2007, WisDOT employees can go to
PROVISIONS
http://dotnet/msoffice/products/word/index.htm; and consultants can go to http://office.microsoft.com/en‐us/word/default.aspx.
SAVING THE SPECIAL PROVISIONS TEMPLATE To s r network, follow thes st
ave the Special Provisions template (stsp‐tmplt.dotm) onto your hard drive oe eps: 1. Go to the following location: http://on.dot.wi.gov/consultants/stsp.shtm, and download the
special provisions template, stsp‐tmplt.dotm. 2. Click on the MS Office Button at the upper left of your screen.
July 2010 26 of 52
3. Clic onk Save As and select Word Template.
save this as a late it tells Word that it is safe toa. If you trusted temp open even if it contains macros.
rwis , b. In the Save as Type field, select Word Macro Enabled Template.dotm; othe e
the macros will not be saved.
4. Click on the trusted template folder (or location specific to your office) and click on Save. 5. When you click on the Office Button, there is a list of recent documents. If you repeatedly
use a document like the stsp‐tmplt.dotm you can pin it in place so it always is on the list. Simply click on the push pin to the right of the name.
USING THE SPECIAL PROVISIONS TEMPLATE In o er ich was saved above, follow thes st
rd to use the Special Provisions template (stsp‐tmplt.dotm), wh
the MS Office Button at the upper left of your screen. e eps:
1. Click on
2. Click on New.
3. Click on My templates. 4. Select the stsp‐tmplt.dotm template. The template then opens a Word document. 5. Save the Word document using an appropriate name for the project (refer to File Names for
the Special Provisions Documents) and the .docm file extension so the macros continue to work.
SECURITY WARNING The Special Provisions template contains macros for the new Prosecution and Progress tabs. The security settings on your computer may initially shut off the macros. If a security warning appears on your screen when you first open the template, follow these steps to add the template to the rusted material: t
1. Click on the MS Office button. f the window, click on he b
e next window, click on Trust Center. 2. utOn the bottom bar o t
of th n Trust Center Sett ngs.
ton Word Options. 3. In the left column
tto i ct Trusted Locations.
4. Click on the buft, sele
e box Allow Truste Locations on My Network. 5. On the le6. Check th d7. Click on Add New Location.

July 2010 27 of 52
8. cation Browse for the correct losubfolders are included i
9. Click on OK three times.
of where the document is stored and check that the f necessary.
STYLES A style is a set of formatting characteristics applied to text in a document to quickly change its ppearance. Only four styles are allowed in creating special provisions documents. The
ed are: acharacteristics of the four styles allow 1. e icle titles. 1H ading
s
1 –Use for art New Roman a) Time
b) 14 pt
c) Bold d) Indent; hanging 0.5” ) Left justified e f) 12 pt before and after
2. r ‐heading text, except text in tables and lists of items.
sNo mal –U
e for all nonan a) Times New Rom
b) 12 pt ” aragraph
c) Indent left 0.5d) Full justified pe) Single spaced
3. S . ST P –Use
for all tablesa) Times New Roman b) 12 pt
c) No indent – This setting can be adjusted in each table as needed. d) Left justified – This setting can be adjusted in each table as needed.
ch table as needed. e) Single spaced – This setting can be adjusted in ea 4. t r bulleted and numeric lists. Lis Parag
raph –Used foman a) Times New Ro
b) 12 pt c) Full justified
d) Le indent at 0.75” and hanging indent 0.25” e) Single spaced Note: Typically with numbers a blank line is inserted between each paragraph; with bullets no
ft
blank line is inserted.
o NOT use any other styles in the Special Provisions document. D
July 2010 28 of 52
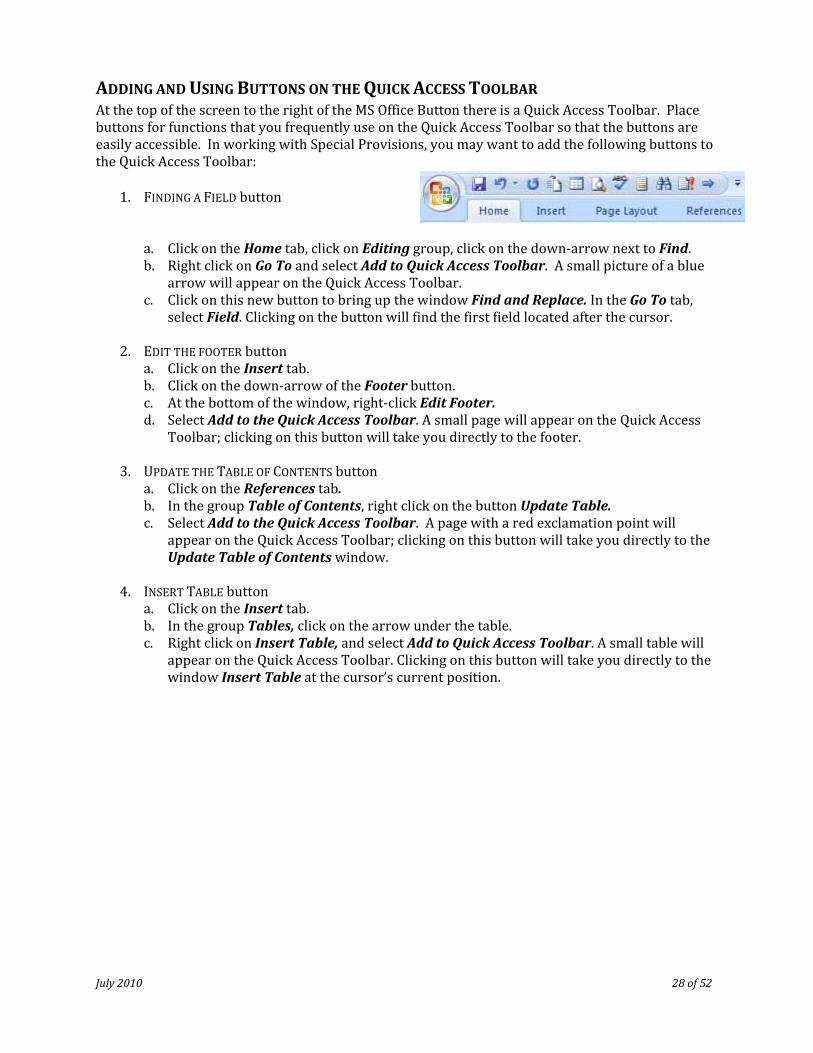
ADDING AND USING BUTTONS ON THE QUICK ACCESS TOOLBAR At the top of the screen to the right of the MS Office Button there is a Quick Access Toolbar. Place buttons for functions that you frequently use on the Quick Access Toolbar so that the buttons are asily accessible. In working with Special Provisions, you may want to add the following buttons to he icet
Qu k Access Toolbar:
1. FINDING A FIELD button
a. Click on th Fe
e Home tab, click on Editing group, click on the down‐arrow next to ind. b. Right click on Go To and select Add to Quick Access Toolbar. A small picture of a blu
arrow will appear on the Quick Access Toolbar. tton to bring up the window Find and Replace. In the Go To tab,
the button will find the first field located after the cursor. c. Click on this new bu
Clickin
2. IT
select Field. g on E OD THE FOa. Click ob. Click on the down‐arrow of the Footer button.
At the bottom of the window, right‐click Edit Footer. lbar. A small page will appear on the Quick Access ll take you directly to the footer.
TER button n the Insert tab.
c.d. Select Add to the Quick Access Too
king on this button wi
3. D
Toolbar; clic PU ATE THE ABLE OF ONTENTS
a. Click on the References tab. b. In the group Table of Contents, right click on the button Update Table. . Select Add to the Quick Access Toolbar. A page with a red exclamation point will
ick Access Toolbar; clicking on this button will take you directly to the Contents window.
T C button
cappear on the Qu
le of
4.
Update Tab INSERT TABLE buttoa. Click on the Insert tab. b. In the group Tables, click on the arrow under the table. c. Right click on Insert Table, and select Add to Quick Access Toolbar. A small table will
appear on the Quick Access Toolbar. Clicking on this button will take you directly to the window Insert Table at the cursor’s current position.
n

TRACK CHANGES Track Changes is a feature which allows you to track any changes made in a document. When Track Changes is turned on, each insertion, deletion, or formatting change is tracked and marked within the document with comments. Special Provisions will not be accepted with the Track Changes feature turned on. If you choose to use this feature while preparing the special provisions, ccept or decline each change and turn this feature OFF efo eab
re ‐submitting the special provisions.
1. aTo dd Track Changes to the status bar: a. Right click on the status bar (see arrow
below) and click on Track Changes. When there is a check mark next to it, it will appear on the status bar.
2. t ack Ch re:
aTo urn off the Tr ges featua. Click on the Review tab. b. In the group Tracking, click on Track
Changes, and watch the status bar to see if
n
Track Changes is on or off.
3. Accept/Reject changes: If you use the track changes feature when preparing the special eject any changes in the document prior to provisions document, you will need to accept / r
: e‐submitting the document. To do so
a. Click on the Review tab, and go to the group Changes. b. To f d t. c. Dete m o be kept or i carded.
in the first change, click on Nex dr ine whether the change needs t s
1. To keep the change, click on Accept Image. 2. To discard the change, click on Reject Image.
d. Continue this process until all the changes have been accepted or rejected.
BUILDING BLOCKS Building Blocks are an automated copy and paste feature. Commonly used pieces of content or other document parts are stored within the template and can be accessed and reused at any time. Instead of separate Word documents, all of the STSPs are now building blocks. Most articles have become a single building block. However, due to the complexity of some articles, they have been made into multiple building blocks.
To i these steps:
lnsert an STSP building block into the stsp‐tmplt.dotm template, fol
ow 1. Open the template following the instructions previously provided.
2. Place the cursor at the location where the STSP is to be added. 3. Type in the STSP number. All STSP numbers are located on the STSP Index Spreadsheet
he STSP Index Spreadsheet in CREATING SPECIAL PROVISIONS, for further (refer to T
information).
4. Press F3. 5. Once the information is inserted, modify it as necessary, just as you would any text in a
document.
July 2010 29 of 52
6. Follow the directions listed in the STSP Index Spreadsheet to complete the fields found in the STSP (refer to The STSP Index Spreadsheet in CREATING SPECIAL PROVISIONS, for further information).
BUILDING BLOCKS FOR COMMON PHRASES In creating special provisions, there are some phrases which are used repeatedly. In an effort to help the person creating the special provisions be more efficient, certain common phrases have
din s. Below is the list: been made into buil
ding Block code
g block
Bul Phrase pp and for furnishing all labor, tools, equipment, and incidentals necessary to
complete the contract work. pt The department will pay for m
e following bid item: e payment table)
easured quantities at the contract unit price under th(includes th
sec section sub subsection ss of the standard specificationstdwm The department will measuretspd This special provision describes
FIND A FIELD Sev al formation musSTSP. T
er STSPs contain fields; additional in t be added to the fields to complete the o find fields within the STSPs:
1. Press F11 or press on the button Finding a Field, located on the Quick Access Tool bar). Thecursor will move to the first field, going forward from the present cursor location.
2. Note that the table of contents is also a field. If highlighted, press F11 again to go forward to the next field.
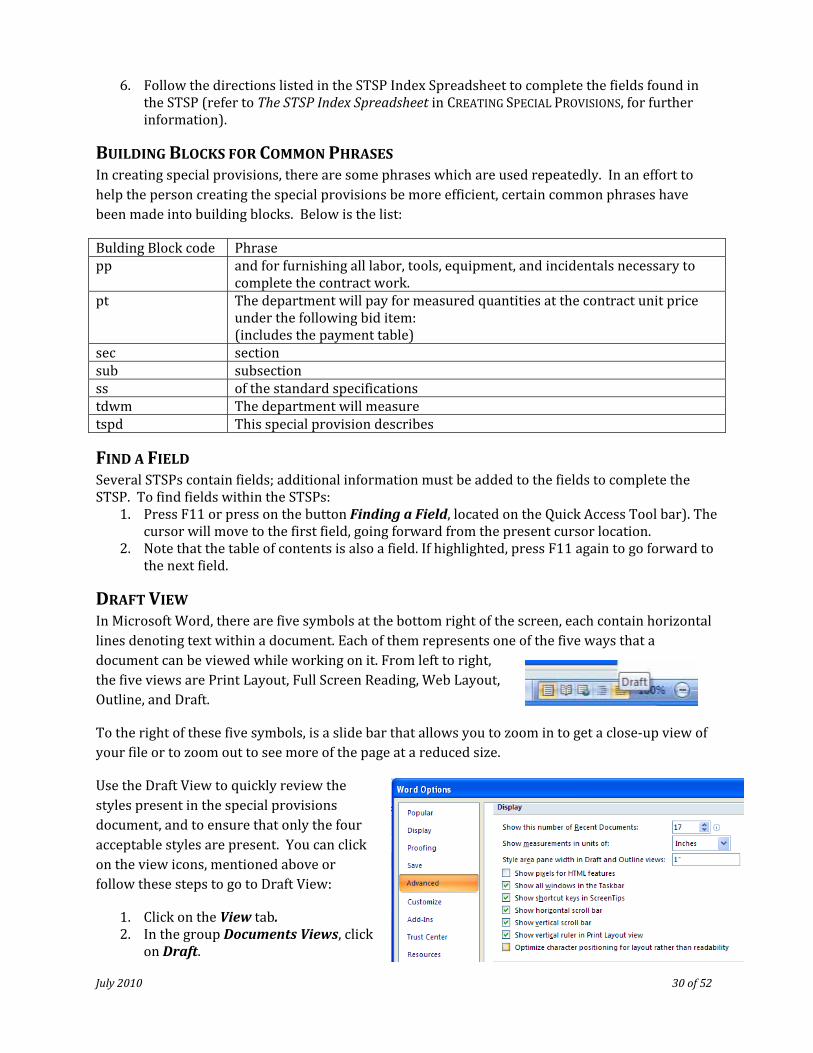
DRAFT VIEW In Microsoft Word, there are five symbols at the bottom right of the screen, each contain horizontal lines denoting text within a document. Each of them represents one of the five ways that a document can be viewed while working on it. From left to right, the five views are Print Layout, Full Screen Reading, Web Layout, Outline, and Draft.
To the right of these five symbols, is a slide bar that allows you to zoom in to get a close‐up view of e page at a reduced size. your file or to zoom out to see more of th
Use the Draft View to quickly review the styles present in the special provisions document, and to ensure that only the four acceptable styles are present. You can click on the view icons, mentioned above or follo t go t ft View: w hese steps to o Dra
iew tab.
July 2010 30 of 52
1. Click on the V2. In the group Documents Views, click
on Draft.

3. ollow these steps: If the style names do not show on the left marg d Opt ons
in of the document, fer of the screen. a. Click on MS Office Button in the upper left cornr . n Advanced.
b. On the bottom bar of the window, click on Wo ic. In the left column of the next window, click o
d. Scroll down until the blue bar with the word Displayappears.
e. Find the third line below the blue bar with the word idth in Draft Display. This line reads: Style area pane w
ut Views 1” the box to the right of this line.
and O linef. Type ing. Click OK.
OUTLINE VIEW Using Outline View is the easiest way to view just the article titles and to rearrange the order of the rticles, if needed. In this view you can also check to ensure that no other headings were used in athe document and that each title ends with a period. To c n o Ou View click on the icons men oned above or follo se step
ha ge the view t tlinew the
ti s:
1. Click on the View tab. 2. In the group Document Views, select Outline. 3. This changes the view to look like the picture to
the right. Note there a new tab, Outlining, opened on top of the document to the left of the Home tab. Also the text has been compacted. Don’t get concerned; the original format will reappear when Print Layout in the View tab is selected.
To move articles around using Outline View: 1. In the box next to Show Level, select Level 1. Only
the headings in the document will be displayed.
2. To rearrange the location of an article, simply put the cursor over the plus sign in front of the article title, and wait for the cursor to turn into a four way arrow. Then, click and drag the article to a new location. A line will appear to indicate the new location for the article will be placed. When you switch to the Print Layout view by clicking the button Close Outline View, the entire article will be in its new location.
NOTE: To return to Print Layout view, you can also click on the leftmost symbol of the five view buttons on the bottom right of the screen or on the Close Outline View button.
3. If the order of the articles is changed, remember to update the Table of Contents.
July 2010 31 of 52
To s n d, select Level 9 in the box adjacent to the field h cument, follow these steps:
ca the document to see if other headings were usee do
S ow Level. If other headings are present in th
1. Place the cursor where the different heading is. 2. Switch back to Draft or Print Layout view. 3. Use the format painter (see below) to copy the correct format
and paste only the format to the text. This process does not change the text.
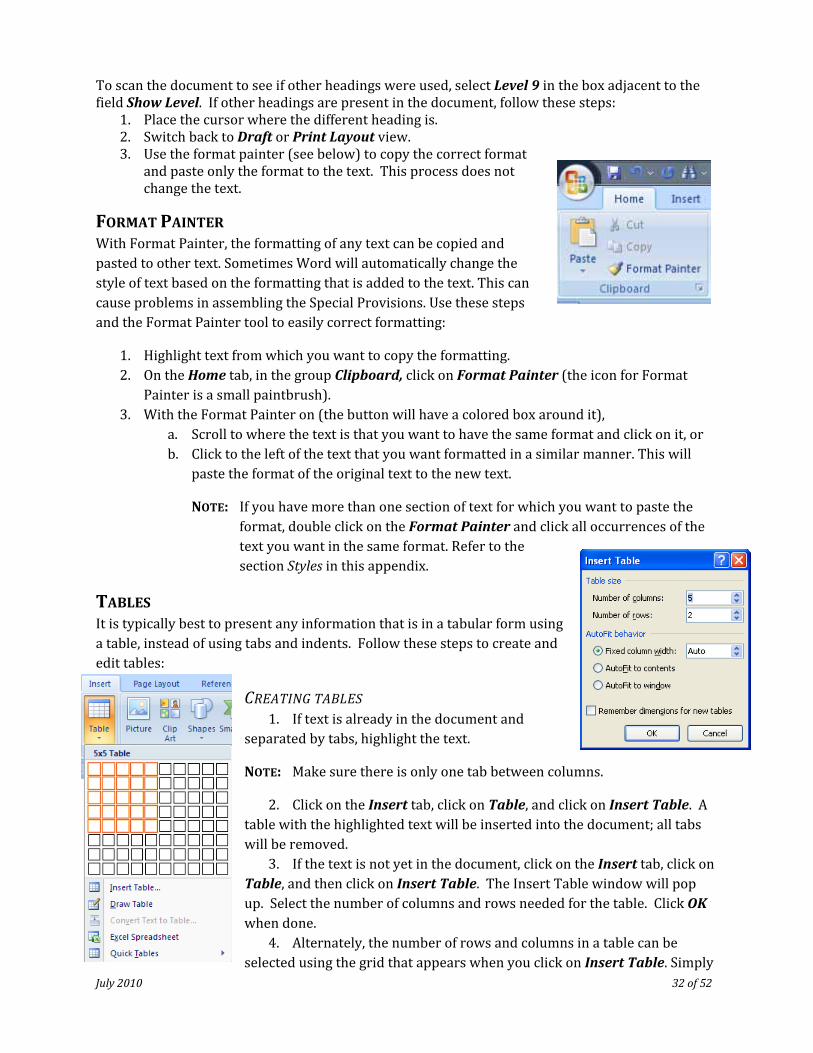
FORMAT PAINTER With Format Painter, the formatting of any text can be copied and pasted to other text. Sometimes Word will automatically change the style of text based on the formatting that is added to the text. This can cause problems in assembling the Special Provisions. Use these steps and the Format Painter tool to easily correct formatting:
to cop matting. 1. Highlight text from which you want y the for for Format 2. On the Home tab, in the group Clipboard, click on Format Painter (the iconPainter
3. With his a small paintbrush).
r t e Format Painter on (the button will have a colored box around it), a. Scroll to where the text is that you want to have the same format and click on it, ob. Click to the left of the text that you want formatted in a similar manner. This will
paste ht e format of the original text to the new text.
NOTE: If you have more than one section of text for which you want to paste the format, double click on the Format Painter and click all occurrences of the text you want in the same format. Refer to the section Styles in this appendix.
TABLES It is typically best to present any information that is in a tabular form using a table, instead of using tabs and indents. Follow these steps to create and edit tables:
CREATING TABLES 1. If text is already in the document and
separated by tabs, highlight the text.
NOT ere is betweE: Make sure th only one tab en columns.
2. Click on the Insert tab, click on Table, and click on Insert Table. A tabl cumewill
e with the highlighted text will be inserted into the do nt; all tabs be removed. 3. If the text is not yet in the document, click on the Insert tab, click on
Table, and then click on Insert Table. The Insert Table window will pop up. le OK
July 2010 32 of 52
Se ct the number of columns and rows needed for the table. Clickwhen done.
4. Alternately, the number of rows and columns in a table can be selected using the grid that appears when you click on Insert Table. Simply

July 2010 33 of 52
click and drag the mouse over the grid until the appropriate number of rows and columns are highlighted in orange. Along the top of the grid, a numeric accounting of columns by rows will be provided.
RESIZING TABLES In the lower right‐hand corner of the table, hover the cursor. When the cursor switches to a double arrow, click and drag the table’s perimeter to adjust its size and to keep the cells proportionate.
DEL W OR COLUMN ETING AND INSERTING A ROTo select the column or row:
the ta eld Ta1. Click in ble. At the top of the Word window, the fi ble Tools will appear, as well as the tabs Design and Layout.
2. In the Layout tab, on the left, in the group Table, go to Select, and click on the arrow to s the right of the word. Click on Select Row or Select Column from the list, whichever i
desired. 3. Or, hover the cursor over the top of a column until a thick black arrow appears. Click
once to select the column. Or, hover the cursor to the left of a row until it turns into an nted arrow. Click once to select the row. upward pointing sla
To d e orel te a column row:
lete and cho row or 1. In the Layout tab, in the group Rows & Columns, click on De osecolumn.
2. Or, right click while the row or column is highlighted. Select Delete Rows or Delete Column.
To insert a column or row:
1. In the Layout tab, in the group Rows & Columns, click on Insert Right or Insert Left to insert a column. To insert a new row, click on the Layout tab, click on the group Rows & Columns, and then click on either Insert Above or Insert Below, whichever is appropriate.
2. Or, select the column or row adjacent to the row or column that needs to be inserted, and right‐click. Highlight Insert, and choose the appropriate action – Insert Columns to the Left, Insert Columns to the Right, Insert Rows Above, or Insert Rows Below.
ADJUSTING THE COLUMN WIDTH OR ROW HEIGHT 1. To adjust column width, hover the cursor over any line separating columns within the
table; it will change to a double vertical line with right and left‐pointing arrows. When the double line appears, click and drag the line to the right or left to adjust the width of the column.
NOTE: If you have just one cell selected it will adjust only that cell and not the entire column.

2. To adjust the height of a row, hover the cursor over any line separating rows within the table; it will change to a double horizontal line with an up‐ and down‐pointing arrows. When the double line appears, click and drag the line up or down to adjust the height of the row.
3. Another way to adjust column width or row height is to go to the Layout tab, and the group Cell Size. Click on the arrow in the bottom right corner to bring up the Table Properties window. Click on either the Column tab or the Row tab. You can type a specific measurement to adjust the height and width of any column or row.
4. One other way is to go to the Layout tab, in the Cell Size group, and adjust the size in the two fields Table Column Width and Table Row Height.
MERGING A CELL To add a title to a table that fits across all of the columns:
Merge1. Highlight the cells you wish to merge. Right click. Select Cells.
2. Or, highlight the cells that need to be merged. Go to the Layout tab, and select Merge Cells from the group Merge. After the cells are merged, adjust the text within the cell as needed to get it to look the way you want.
SPLITTING A CELL Cell as c n also be split. To do so:
1. With the cursor, highlight the cell that needs to be split into more than one cell. Go to the Layout tab, and select Split Cells in the group Merge. The Split Cells window will appear; type in the number of columns or rows desired.
July 2010 34 of 52

2. Or, highlight the cell that needs splitting, and right click. Select Split Cells. The Split Cells window will appear; type in the number of columns or rows desired.
TEXT ALIGNMENT Handle text and paragraph alignment in tables in the same manner it is handled within a document. To c nha ge a text’s alignment:
1. Highlight the text that needs alignment. Click on the Home tab. In the group Paragraph, click on e Indents & Spacing tab, under General, click on lowing alignments:
the arrow in the lower right corner. In th
• the drop‐down box, and select one of the fol
• Left align – Lines begin at the left margin.
. Right align – Lines align at the right margin.
July 2010 35 of 52
• Justified –Words are spread equally across the page/cell• Center – Lines are centered across the page/cell.
2. Or, highlight the text that needs to be aligned. Right click. Select Cell Alignment. Several buttons will appear providing nine choices for aligning the text. (Horizontally, the text can
ht justif r centered. Vertically, the text can appear at the top of the cell, in f the cell.) Choose the desired alignment.
be left or rig ied, oits middle, or at the bottom o
3. Or go to the Layout tab, Alignment group to select from the nine choices.
BORDERS To r le: emove or add borders around or within a tab
1. Highlight the entire table, or the group of cells, from which you want to add or remove the borders. Click on the Design tab, and then click on the down arrow next to the button Borders in the group Table Styles. Select the desired optio fn rom the drop down box.
NOTE: To select or highlight an entire table, click somewhere in the table. Then, place the cursor at the upper left‐hand corner of the table. A box with four arrows will appear. Click the box to highlight the entire table.
2. Another method is to highlight the entire table, or the group of cells, from which you want to add or remove the borders. Right click. In the menu that pops up, select Borders and Shading. In the Borders tab, select the desired borders and border type.
3. You can also choose add shading to cells using the Shading tab in the Borders and Shading window. It is preferred that shading is NOT used in the special provisions document.

CON RVE TING TEXT TO TABLE / TABLE TO TEXT. text t y tabs t e, select the t1. If converting hat is separated b o a tabl ext.
2. Click on the Insert tab; in the group Tables, select Insert Table. The text should be converted to a table. If not, go to the Insert tab; in the group Tables, select Convert Text to Table to brin u
July 2010 of 52 36
g p the Convert Text to Table window.
NOTE: Make sure there are no extra tabs between the columns. Additionally make sure a space is left for a column if the column is needed in the table.
t a table t3. To conver to text, highlight the able.
4. Select the Layout tab; in the group Data, select Convert to Text. Then, press OK.
TABLE HEADERS 1. If the table is large enough to cover more than one page, repeat
the header row(s) (the top row(s) with the column descriptions) on subsequent pages. To do this:
row(s to bea. Highlight the ) that need repeated. b. Click on the Layout tab; in the Data group, select Repeat Header Rows.
FOR AM TTING TABLES IN SPECIAL PROVISIONS 1. To format Payment Table, i.e., the tables in E Payment, follow
these guidelines and refer to the sample below:
a. Left justify all cells with NO special formatting. ord “UNIT” is at the
. b. Adjust the column widths so that the w
right margin. Do not make this right justifiedc. Do NOT a dd. Do NOT h
d any tabs within the table. ave any borders within the table.
borders so that you can see how the rs in these payment tables.
NOTE: The sample below shows the table’s up; do NOT include bordetable is set
e. Do NOT adjust the margins within the columns. f. Do NOT bold any text.
for ould be in all capital letters and on one line. g. The titles
each column sh
ITEM NUMBER DESCRIPTION UNIT203.0210.S.01 Abatement of Asbestos Containing Material Structure B‐28‐49 LS 2. To format other tables, follow these guidelines:
a. Center the title above the table. b. Center the table across the page. c. Do not put tabs within the table. d. Borders within the table are not necessary. If using a border, use a single line border.
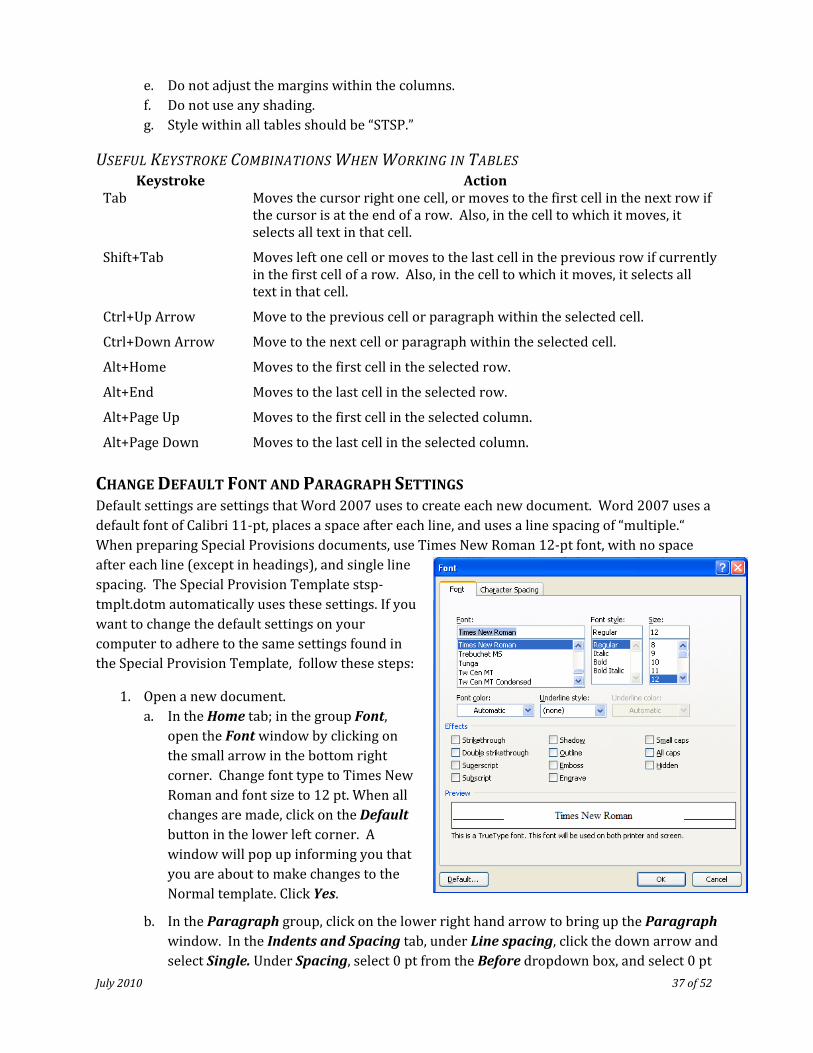
e. Do not adjust the margins within the colf. Do not use any shading. g. Style within all tables should be “STSP.”
umns.
U UL KEYSTROKE COMSEF BINATIONS WHEN WORKING IN TABLES Keystroke Action
Tab Moves the cursor right one cell, or moves to the first cell in the next row if the cursor is at the end of a row. Also, in the cell to which it moves, it selects all text in that cell.
Moves left one cell or moves to the last cell in the previous row if currently in the first cell of a row. Also, in the cell to which it moves, it selects all
Shift+Tab
text in that cell.
cell. Ctrl+Up Arrow
Arrow
Move to the previous cell or paragraph within the selected
the selected cell. Ctrl+Down Move to the next cell or paragraph within
Alt+Home Moves to the first cell in the selected row.
Alt+End Moves to the last cell in the selected row.
Alt+Page Up Moves to the first cell in the selected column.
Alt+Page Down Moves to the last cell in the selected column.
CHANGE DEFAULT FONT AND PARAGRAPH SETTINGS Default settings are settings that Word 2007 uses to create each new document. Word 2007 uses a default font of Calibri 11‐pt, places a space after each line, and uses a line spacing of “multiple.“ When preparing Special Provisions documents, use Times New Roman 12‐pt font, with no space after each line (except in headings), and single line spacing. The Special Provision Template stsp‐tmplt.dotm automatically uses these settings. If you want to change the default settings on your computer to adhere to the same settings found in the ec , follow these steps: Sp ial Provision Template
1. ocuOpen a new d ment. a. In the Home tab; in the group Font,
open the Font window by clicking on the small arrow in the bottom right corner. Change font type to Times New Roman and font size to 12 pt. When all changes are made, click on the Default button in the lower left corner. A window will pop up informing you that you are about to make changes to the
July of 52 2010 37
Normal template. Click Yes.
b. In the Paragraph group, click on the lower right hand arrow to bring up the Paragraph window. In the Indents and Spacing tab, under Line spacing, click the down arrow and select Single. Under Spacing, select 0 pt from the Before dropdown box, and select 0 pt

from the After dropdown box. When all changes are made, click on the Default button. A window will pop up informing you that you are about to make changes to the Normal template. Click Yes.
TIPS AND SHORTCUTS A. Use F7 to perform a grammar and spell check.
B. Use F11 to find blank fields, but not dropdown boxes, within the document. When the document is compiled, use F11 to find any fields that require information by placing the cursor after the table of contents and pressing F11.
C. Place the cursor in the Table of Contents and press F9 to update the Table of Contents.
D. Utilize the Quick Access Toolbar to add any functions that are used on a regular basis. Generally, right‐click on the button or function that needs to be added to the Quick Access Toolbar. On the menu that appears, select the option: Add to Quick Access Toolbar.
E. If there are many tools on the Quick Access Toolbar, move the Quick Access Toolbar to below the tabs. Right click anywhere in the area above the document, and choose Show Quick Access Toolbar Below the Ribbon.
F. Pressing the Alt key activates KeyTips, shortcut letters or numbers that directly takes you to any of the tabs, buttons, or to the Quick Access Toolbar. Key the letter or number that appears by the tab or button you want to use. If you go to a new tab, new letters will appear showing KeyTips for that new tab. If there is an arrow next to the feature you are activating, you will see
e letters shown by the arrow. the menu that is activated by keying in th
G. Additional common keyboard shortcuts:
o Ctrl+A – Selects all text, pictures, and objects in a document. o Ctrl+B – Bolds the highlighted font. This is a toggle shortcut, so if Ctrl+B is keyed
again, the text will no longer be bolded. o Ctrl+I – Italicizes the highlighted font. This is a toggle shortcut, so if Ctrl+I is keyed
o n. again, the text will no longer be in italics.
o Ctrl+Z – Undoes the last action. Press multiple times to undo more than one actioCtrl+Y – Re‐does the last action; this key combination is the opposite of Ctrl+Z.
o This scrolls through Shift+F3 – Changes the case of the word or highlighted text.
o two or three options – all small, title case, all caps.
h). o
Ctrl+J – Full‐justifies the text (applies to entire paragrap
o Ctrl+L – Left‐justifies the text (applies to entire paragraph).
o Ctrl+E – Centers the text (applies to entire paragraph). Ctrl+R – Right‐justifies the text (applies to entire paragraph).
o Ctrl+ any arrow key moves you one word or paragraph in the direction the arrow key is pointing.
July 2010 38 of 52

o raph in the Ctrl+Shift+ any arrow key will highlight the text by word or parag
o direction you are moving. Ctrl+Home – Places the cursor at the beginning of the document. Ctrl+End –Places the cursor at the end of the document.
o o
July 2010 39 of 52
Ctrl+F – Activates the Find and Replace window. When in the Find window alt G changes to the Go To window.
o Ctrl+G – Activates the Go to window. When in the Go To window alt D changes to the Find window.
H. Copy and Paste. To copy, highlight the text that needs to be copied, and press Ctrl+C. To paste, place cursor where you want the information placed, and press Ctrl+V.
If you are using the same text throughout the document, but accessing different text in between, it may be useful to open the clip o do board. T so:
o On the Home tab, click on the arrow in the bottom right corner of the group Clipboard.
The picture on the right is a clipboard. Note the different text that has been copied and is now stored on the clipboard. Once the clipboard is open, click on the text that you want copied, and paste it to a new location.
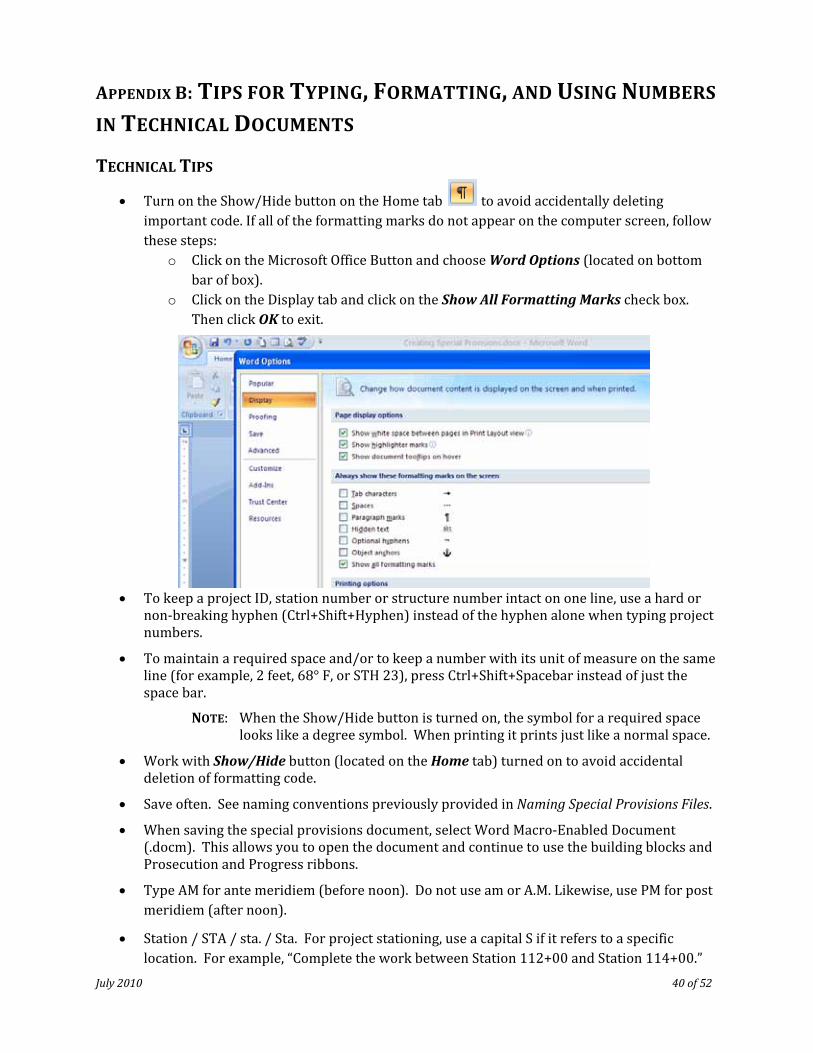
APPENDIX B: TIPS FOR TYPING, FORMATTING, AND USING NUMBERS IN TECHNICAL DOCUMENTS
TECHNICAL TIPS
• Turn on the Show/Hide button on the Home tab to avoid accidentally deleting importa ear on the com these st
nt code. If all of the formatting marks do not app puter screen, followeps:
o choose Word Options (locat Click on the Microsoft Office Button and ed on bottombar of box).
o Click on the Display tab and click on the Show All Formatting Marks check box. Then click OK to exit.
• To keep a project ID, station number or structure number intact on one line, use a hard or non‐breaking hyphen (Ctrl+Shift+Hyphen) instead of the hyphen alone when typing project numbers.
• To maintain a required space and/or to keep a number with its unit of measure on the same line (for example, 2 feet, 68° F, or STH 23), press Ctrl+Shift+Spacebar instead of just the space bar.
NOTE: When the Show/Hide button is turned on, the symbol for a required space looks li en pr ace. ke a degree symbol. Wh inting it prints just like a normal sp
• Work with Show/Hide button (located on the Home tab) turned on to avoid accidental deletion of formatting code.
• Files. Save often. See naming conventions previously provided in Naming Special Provisions
• When saving the special provisions document, select Word Macro‐Enabled Document (.docm). This allows you to open the document and continue to use the building blocks and Prosecution and Progress ribbons.
• Type AM for ante meridiem (before noon). Do not use am or A.M. Likewise, use PM for post
July 2010 40 of 52
meridiem (after noon).
• Station / STA / sta. / Sta. For project stationing, use a capital S if it refers to a specific location. For example, “Complete the work between Station 112+00 and Station 114+00.”

July 2010 41 of 52
Do not use the abbreviations STA, sta., Sta. If not referring to a specific location, use a small “s”; for example, “Set 4 construction stakes per station.”
FORMATTING TIPS • Special provisions do NOT use subheadings, do not create subheadings. Do not use any
styles other than the following four: 1 Heading 1; Normal; STSP; List Paragraph
• The style 1 Heading 1 is used to create and update the table of contents. All STSP article titles need to be this style, including articles written for SPV items that were created using building block 000‐000.
• If you modify an STSP article (for example, change the title or the wording in a paragraph), delete the date and STSP number that appears at the end of the article. This is the date that the STSP article was last modified by the Bureau of Project Development. If you add one or more paragraphs at the very end of the article, but do not otherwise change the article, leave the date and STSP number and add the new material after the date. Note the revisions in the plan letter that accompanies the PS&E.
• Use bold instead of underlines to emphasize titles. It is not necessary to bold or underline text within the articles; it is the contractor’s responsibility to complete all work specified within an article, whether or not the text is in bold letters.
• Do not use a hyphen for the words preconstruction and subsection.
• To keep a project number intact on one line, use a hard or non‐breaking hyphen (Ctrl+Shift+Hyphen) instead of hyphen alone when typing project numbers.
• To keep two words together on the same line, press Ctrl+Shift+Spacebar.
• Do not use a hard return within a paragraph. Word 2007 automatically wraps the text to the next line when the right margin is reached.
• pecial provisions document. Delete extra hard returns at the end of the s
• Delete extra lines before or after a heading.
OTHER TIPS • When entering a date, do not abbreviate the month’s name. For example, type January or
August, not Jan. or Aug.
• de the year. If specifying a date, such as in the article for Holiday Work Restrictions, inclu
• The foll re compound, and should not be split into two words: owing words a
o water ground
o o cannot
o within eastbound
o o westbound
d o d
southbounnorthboun
o southeast

July 2010 42 of 52
o southwest
o
o northwest
northeast o switchover (When used as a noun, switchover is one word; for example “Construct a
traffic switchover in the median.” When used as a verb, use two words; for example, “After constructing the bypass structure, the traffic will switch over to the eastbound lanes.”)
• Cross References. Standard detail drawing numbers are frequently updated. Bid numbers are sometimes changed, and the order of the articles within the special provisions is often rearranged during the PS&E review process. Therefore,
o If referring to another article within the special provisions, refer to the article’s title, not its number. For example, when referring to the Prosecution and Progress article, refer to “the article Prosecution and Progress,” not article 3. Do not use
o quotes around the name of the article. If referring to another bid item, refer to the name of the bid item, not its number.
o If referring to a standard detail drawing, refer to the name of the standard detail drawing, not its number.
• Engineer/Project Manager/Project Engineer/DOT’s representative: When referring to one of these people in the special provisions, use the term engineer. Do NOT capitalize engineer.
• Lineal vs Linear Feet. When measuring length, use the word linear, instead of lineal. Lineal means belonging to or being in direct line of descent from an ancestor.
• is a contraction Its vs it’s. The word its is the possessive form of the noun it. The word it’sof it is.
• WisDOT and DOT are frequently replaced with the department.
USING NUMBERS IN TECHNICAL DOCUMENTS In general, spell out the numbers zero through ten and use figures for larger numbers. There are many exceptions though:
• Always spell out a number that is at the beginning of a sentence regardless of what the number is. For example, 40 is typically written in numerals but at the beginning of a sentence it would be written as a word, i.e., Forty pounds of …
• Always use numerals when a unit of measurement follows. Example 3‐feet, 240 pounds, 16‐inches.
• Use numerals for all numbers when there are two or more numbers for related quantities inthe same sentence, such as 5 of 34 engineers recommend.
• Always spell out approximate values, such as about four years, or approximately two times larger.
• Do not spell out and use figures for numbers. For example, do not write “five (5) engineers” or “five (5) inches”; instead, write “five engineers” and “5 inches.”
• Within one sentence use all the same style for numbers, i.e. “Supply 3 portable changeable signs over the 12 mile construction area.
July 2010 43 of 52
USING UNITS IN TECHNICAL DOCUMENTS All num are: erical values that have dimensions must have their units specified. General guidelines
• If there are two numbers with the same unit in the same phrase, put the unit after the second number; for example, “between 4 and 5 inches.”
• All units that are named after a person have a lower‐case first letter when written out, but an upper‐case first letter when abbreviated. Hence, the proper abbreviation for volt is V,
proper abbreviation for megahertz is and the proper abbreviation for kilovolt is kV. The
• MHz; M denotes mega, m can denote either meter or the prefix milli. The proper abbreviation for second is s, not sec.
• There should be one blank space between a number and a unit. If necessary, use a hard space (Ctrl+Shift+Spacebar) to keep the number and its unit on the same line.
• If the number is used as an adjective or descriptor, add a hyphen between the number and the unit. For example, 6‐inch pipe; 13‐foot pole.
• Temperature has the unit of degree. Place one blank space between the degree symbol and the degree type, e.g. 68° F or 20° C (or write out the word degrees; for example, 68 degrees F).

July 2010 44 of 52
APPENDIX C: SPECIAL PROVISIONS…QUICK SY! & EA
B.2 PROSECUTION & PROGRESS ARTICLE: Using the printout from the STSP Index Spreadsheet, place the cursor at the end of the document, and select the appropriate Prosecution and Progress (P&P) tab for the project(s). There are three tabs—Working Day, Calendar Day, and Completion Date; use only ONE of these tabs to complete the article. Complete the P&P article using the buttons found in the appropriate
tab. See The Prosecution and Progress Article for m
SPECIAL PROVISIONSQUICK & EASY! If you are already familiar with preparing special provisions, but haven’t prepared any lately, use this guide to quickly refresh your memory.
PRE
A.1 REFERENCE MATERIALS: Refer to the manual Creating Special Provisions for detailed instructions on how to prepare special provisions.
PARATORY TASKS
A.2 STSP INDEX SPREADSHEET: Open the STSP Index Spreadsheet, Index.xlsx.
a. Save under a file name appropriate for the project.
b. Select the STSPs required and enter necessary information in Information to Enter column for fields.
c. Filter the spreadsheet so that only the checked STSPs are visible.
. Print for use in creating the special provisions document.
d
CRE OVISIONS
B.1 OPEN THE TEMPLATE: Click on the Office Button in the upper left corner of the screen, select new and then stsp‐tmplt.dotm. Save the file with an appropriate file name and extension of .docm.
ATING SPECIAL PR
ore information.
B.3 ADD STSPS: After the Prosecution and Pr gro ess article is completed,
a. Type in the first number listed in the STSP# to Enter column, of the STSP Index Worksheet. Press F3. This inserts the STSP building block.
b. Continue entering the numbers of the required STSPs, and pressing F3, until all of the STSPs needed have been inserted into the document.
B.4 COMPLETE FIELDS WITHIN STSPS: Place the cursor at the beginning of the document immediately after the table of contents, and press F11 to find the first field. Enter the information provided on the STSP Index spreadsheet. Press F11 again to find the next field, which requires information. Continue until all fields have been filled in.
B.5 LOCATE DROPDOWN BOXES: Pressing F11 does not locate dropdown boxes. Check the spreadsheet for which STSPs contain dropdown boxes; the spreadsheet also provides the contents of each dropdown box. Locate each dropdown box, and choose the appropriate selection from each.
B.6 ADD ARTICLES FOR SPV ITEMS: To insert an rt bid item: a icle for a non‐standard
a. Place the cursor at the .
press F3. appropriate location
b. Type in 000‐000, andc. Complete the fields.
B.7 MODIFY THE SPECIAL PROVISIONS, as ne esc sary.
a. To add an STSP, place cursor as appropriate. Type in STSP number, and press F3.

July 2010 45 of 52
b. To move an article, click Outline View on the View tab. In Show Level dropdown box, select Level 1. Highlight title of article, and drag to new location.
c. To delete an article, click Outline View on the View tab. In Show Level dropdown box, select Level 1. Highlight title of article, and delete.
B.8 CHECK STYLES AND HEADINGS: In Draft View, ensure that only the 4 acceptable styles have been used.
SPELLCHECK the B.9 document.
B.10 UPDATE FOOTER: On the Insert tab, in the Header & Footer group, use the Footer button to edit the footer. Enter all project IDs.
B.11 UPDATE THE TABLE OF CONTENTS: Press F9, and select Update Entire Table.
SAVING & SUBMITTING SPECIAL VISIONS PRO
PRINT AND PROOFREAD the doC.1 cument.
C.2 SAVE THE SPECIAL PROVISIONS: Click on th Ofe fice Button; select Save.
name is a. The first 8 digits of the file
the lowest project ID number.
b. Add an underbar after ID. c. Add three alpha characters for the
region responsible for the design of that project, or the region for which the consultant prepared the project.
Abbreviatio he reg re: ns for t ional offices a
AbbreviationRegionEau Claire eau Green Bay gre La Crosse lax Madison mad Rhinelander rhi Superior sup Waukesha wke WI Rapids wis
C.3 ESUBMIT THE SPECIAL PROVISIONS on or before the appropriate PS&E submittal date.
C.4 ESUBMIT INSERTS, if needed. Always submit changes as an “ins” document with directions. Do NOT submit completely new special provisions without permission from Special Provisions Editor or Special Provisions Coordinator.
GENERAL TIPS
• oSAVE FREQUENTLY to avoid l
•
sing information, work, and time. Work with Show/Hide on.
• Use non‐breaking hyphen to keep a er, project or structure number togeth
Ctrl+Shift+Hyphen. • se To maintain a required space, u
• Ctrl+Shift+Spacebar. Do NOT abbreviate the month.
• Avoid using hard returns (the enter key) when typing; allow the word wrap feature to space text.
• If modifying an STSP, remove the date and STSP number from the end of it.
• r If necessary, use bold (not underline) foemphasis.
• Use format painter to copy only format from one paragraph to another.
• Refer to the manual Creating Special Provisions for more tips and directions!

APPENDIX D: COMPLETING THE HIGHWAY WORK PROPOSAL FORIn addition to the special provisions document, e‐submit a completed Highway Work Proposal, Form DT1502, with the other PS&E documents. On the DT1502 Highway Work Proposal form, fill in the following fields:
M
County, State Project ID, and Project Description, as they appear on the title sheet of the plan and in FIIPS.
Proposal Guaranty Required. Type the dollar amount of the guaranty in Arial 9‐point font. Include a comma and two decimal places; for example $75,000.00.
Date and Time of when bids must be submitted for that proposal. Write out the month; for example, January 8, 2010.
Contract Completion Time. If specifying a number of days, spell out the number, and then place the number in parentheses for a working day or calendar day contract; for example, Forty‐Five (45) Working Days. If a contract has a completion date, spell out the month that the contract is to be completed. For example, September 15, 2010. Do not use the words “completion date” or “completion date contract.”
Type of Work. This information is usually found in the Scope of Work article. List the principal items only; a complete sentence is not needed. For example, Grading, joint and crack repair, HMA pavement, culvert replacement, pavement marking, Structure B‐05‐16, and incidentals.
July 2010 46 of 52

APPENDIX E: INSERT GUIDELINES AND FORM
INSERT GUIDELINES REMOVE
On the Special Provisions Insert form, use the Remove section to list the name(s) of the article(s) to e removed. Do not use an article number to indicate the article, since the articles may have been brearranged during the review process. f replacing an article with a new one, list the name of the article to be removed under the Remove ection of this form, and add the new article under the Add section of this form. Is
REVISE n the Special Provisions Insert form, use the Revise section to provide ALL changes needed to any O
article. Do NOT provide completely new articles; only provide the changes. When a longer section of text within an article needs revising, follow these guidelines:
• t Do not send in large blocks of article text unless there are significant changes to it (at leas
• r sentences, refer to Example 1 below. 75%). If replacing, adding, or deleting only a few words o
e text as directed in the manual Creating Special Provisions. • Properly format th
ere are some examples: H Exa rases or words mple 1 – Changing a few ph
TitleMak
of Article: General e the following change: In the first sentence, replace “Project 1223‐12‐71” with “Projects 1223‐12‐71 and 1223‐12‐72”
Exa rticle mple 2 – Making multiple
TitlMak
changes in one ae of Article: Prosecution and Progress e the following change: n the first sentence under Freeway Work Restrictions, replace “Holiday Work Restrictions” Iwith “Holiday and Weekend Work Restrictions”
Mak“Ke
e the following change: Insert the following after the 4th paragraph, which begins with ep IH 43 open to traffic”: The contract time for completion assumes working on both the IH 43 northbound off ramp and southbound on ramp at the same time. Due to potential for inclement weather or other unexpected delays during construction, an expedited work schedule using extraordinary
t. forces or equipment may be required to ensure that the contract completion date is me
MakFre
e the following change: Replace the last sentence in the paragraph before the section eway Work Restrictions with the following: If contract time expires before completing all work on all contract projects, liquidated damages will be affixed in accordance to 108.11 of the standard specifications.
July 2010 47 of 52

Example 3 – Longer selections Title of Article: Utilities Make the following change: Add the following after AT &T Telecommunications:
isconsin Power & Light Company – Electric has facilities within the project area that
Wwill require relocation. isconsin Power & Light Company maintains an overhead electric line along the south W
right of way of Rowe Road and crosses over IH 43. Wisconsin Power & Light Company will adjust these facilities prior to construction. They ill relocate poles along Rowe Road horizontally to be outside of the proposed slope w
intercepts and adjust the lines vertically to increase the clearance at Ramp B.
he field contact is Randy Marco, 4421 Towe i 6 T r Dr ve, Sheboygan, WI 53081, 920‐94 ‐3667. DS Metrocom (TDS) – Communications has facilities within the project area that will T
require relocation. TDS maintains an underground telephone line along the south right of way of Rowe Road and crosses beneath IH 43, with local service to the residence in the northeast quadrant of he interchange. TDS will relocate the line to the north side of Rowe Road and abandon the texisting line. TDS will adjust these facilities prior to construction. The field contact is Jeremiah Luben, 1130 Hillcrest Lane, Seymour, WI 54165, 920‐655‐8748.
Exa word, sentence, or paragraph) mple 4 – Delete, add, or change information (phrase/Deleting Information
Title of article: Signs Refacing Type II, Item SPV.0165.01 Make the following change: In A Description, first paragraph, the first sentence, delete the following: “, complete with Type H reflective s ce and legend,” ign fa
‐O
R‐
Make the following change: In C Constructio ete the entire fifth paragraph. (Begins with the words “Space the application…”)
n del
‐OR‐
Make the following change: In C Construction, 2nd paragraph beginning with “Construct the panels with”, delete the first sentence (Completely remove the existing extruded aluminum Type II sign legend, leaving no rivets protruding for the surface of the panel).
July 2010 48 of 52

ADDING Title of Article: QMP Concrete Ancillary Mak nge Conform to stan d the
e the following cha : Under A.1 General, paragraph 1 beginning with “dard spec 390”, ad following to the list of items: tem SPV.0090.01 Concrete Curb and Gutter 31‐Inch Type D Special tem SPV.0105.01 Overhead Sign Sup lack Finish Structure S‐05‐200 II
port B
‐OR‐
Title of Article: Utilities MakWis
e the following change: Add the following contact information at the end of the section onsin Power & Light Company: he field contact is Randy Marco, 4421 To rive, Sheboygan, WI 53081, 920‐946‐3667. cT
wer D
‐OR‐
Title of Article: Utilities Makpara
e the following change: In the section Wisconsin Power & Light, add the following graph after the 2nd paragraph, which begins with “WP&L has facilities along STH 27”: Wisconsin Power & Light Company will adjust these facilities prior to construction. They ill relocate poles along Rowe Road horizontally to be outside of the proposed slope ntercepts and adjust the lines vertically to increase the clearance at Ramp B. wi
Changing itle of Article: Holiday and Weekend Work Restrictions ake the following change: in the last two sen es change “8:00 PM” to “6:00 PM”
TM
tenc
‐OR‐
TitlMak
e of Article: Holiday and Weekend Work Restrictions e the following change: Add the following to the list of restrictions: rom noon, Friday July 2, 2010 until 6:00 uesday, July 6, 2010; F
AM T
‐OR‐
Title of Article: Traffic Mak d in e
e the following change: replace second paragraph beginning with “Reduce IH northbounach” with the following: IH 43 northbound may be reduced to one lane in each direction each weekday, Monday, Tuesday, Wednesday, Thursday, and Friday, from 6:00 AM to 12:00 PM. IH‐43 southbound ay be reduced to one lane in each direction each weekday, Monday, Tuesday, Wednesday, hursday, and Friday, from 6:00 AM to 2:00 PM. mT
ADD On the Special Provisions Insert form, use this section to submit completely new articles. Do not send us articles which are already contained in the special provisions and for which there are hanges (use the Revise section above to make these changes). Follow the directions below for dding an article to the special provisions.
July 2010 49 of 52
ca

STSP(S) On the Special Provisions Insert form below “STSP(s)”, list all STSPs, by number, that need to be added. Do NOT include the entire article*. Central Office will insert the most current version of the STSP into the special provisions. Provide all information that is needed to complete the STSP.
*NOTE: If the STSP contains many fields that require information from the designer, such as 107120, fill in all of the fields and include the entire article.
Exa ding an STSP mple 5 – Ad
07STSP(s) 1 ‐054 Name of Contact ‐ Chris Jones Phone Number – 262‐555‐1234
Other Articles On the Special Provisions Insert form, provide any additional SPV or other (non‐STSP) articles which need to be added to the special provisions. When preparing the article(s), follow the formatting guidelines specified in the manual Creating Special Provisions.
July 2010 50 of 52

Special Provisi ert ons Ins
Project ID: Let Date:
n: Phone Number: Contact Perso
Submit Date:
Remove
ist the articles that need to be removed from the special provisions. Use only the article names. L
Revise
Provide a list of revisions needed starting with the article name and then a description of the change needed.
Title of Article:
ake the following change: M
Add
STSP(s)
List the STSP(s) by their number(s) to be added to the special provisions. Provide all information eeded to complete the fields in the STSP. n
Add
Other Articles
Provide only ALL new articles.
July 2010 51 of 52
July 2010 52 of 52
APPENDIX F: WORD PROCESSING SKILLS NEEDED TO PREPARE SPECIAL PROVISIONS
nd software needed to produce special provisions documents are detailed below. The skills a
SOFTWARE
• MS Office Word and Excel 2007
FILE MANAGEMENT SKILLS
• folder Creating a new• Copying a file • o ting the t mplate folder L ca e
BASIC MS WORD SKILLS
• es, lines, paragraphs, all Selecting words, sentenc
• • Copying and pasting
Inserting / deleting text • ext Working with tabbe
Running a spell che•
d t• ck
Saving a document
• • d printing a document Using print preview an
Opening a document • Working with footers
INTERMEDIATE MS WORD SKILLS
• SP, List Paragraph) Applying the four approved styles (1 Heading 1, Normal, ST• anual) Using a predefined template (refer to Word 2007 M
ocument screen • 7 Manual) • Opening templates in a new d
• Working with tables (refer to Word 200
• tyles Updating a table of contents
• Working in Draft View to review sMoving text in Outline view
• Movin rou d a large document g a n
ADVANCED MS WORD SKILLS
• Using Building Blocks Working with fill‐in information
• Working with drop down boxes •