
Creating Reports using Report Designer – Part 1 · 8 Dayforce HCM – Creating Reports using...
46
Creating Reports using Report Designer – Part 1 Training Guide
Transcript of Creating Reports using Report Designer – Part 1 · 8 Dayforce HCM – Creating Reports using...

Creating Reports using Report Designer – Part 1
Training Guide

2 Dayforce HCM – Creating Reports using Report Designer – Part 1
Dayforce | HCM Copyright © Ceridian 2017. Not for Redistribution.
Contributors We would like to thank the following individual who contributed to this course as a product Subject Matter Expert and content approver.
Nancy Giang
Product Management
17A1v2

Dayforce HCM – Creating Reports using Report Designer – Part 1 3
Dayforce | HCM Copyright © Ceridian 2017. Not for Redistribution
Contents Contributors .................................................................................................................... 2
Training Guide Icons................................................................................................................... 5
Introduction ............................................................................................................................... 6 Prerequisites ........................................................................................................................ 6 Course Overview .................................................................................................................. 6 Learning Objectives .............................................................................................................. 7 Available Support ................................................................................................................. 7 Our Training Scenario ........................................................................................................... 7
Introduction to Reporting in Dayforce HCM ............................................................................... 8 Fixed Format Reports ........................................................................................................... 8 Report Templates ................................................................................................................. 8 Report Card .......................................................................................................................... 9 Dayforce Feature ................................................................................................................ 10 Create Reports Overview .................................................................................................... 10
Conceive ....................................................................................................................... 10 Review .......................................................................................................................... 10 Create ........................................................................................................................... 11
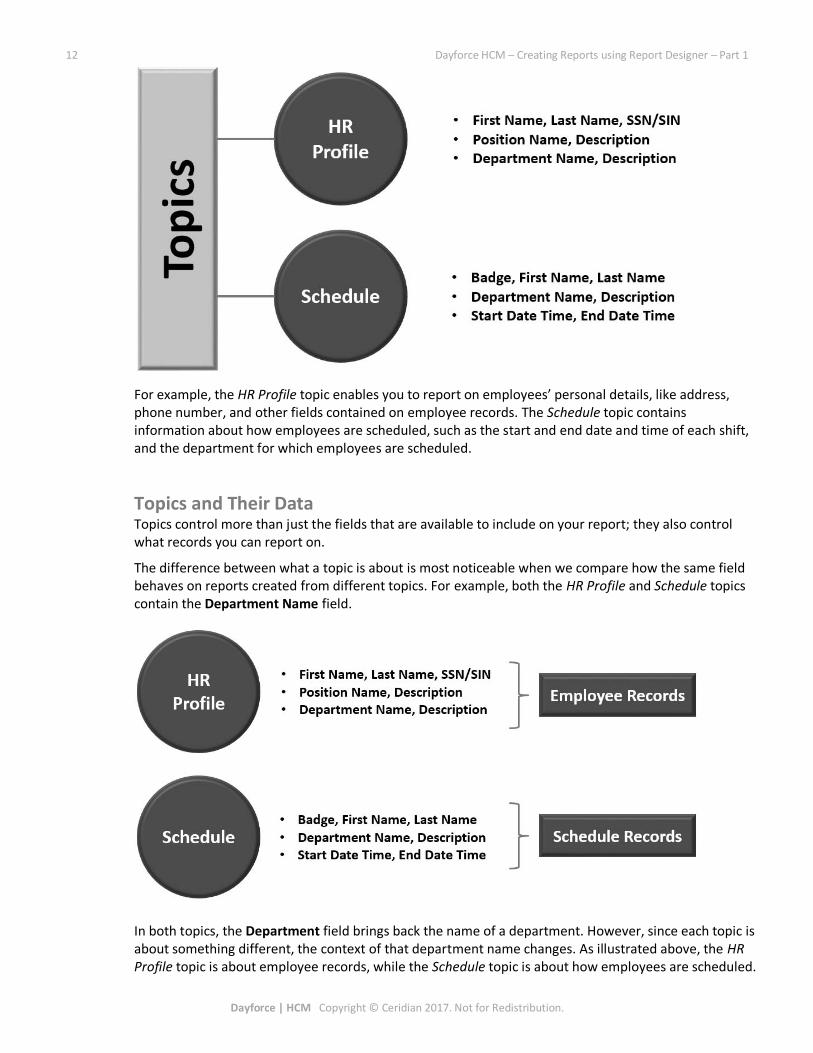
Report Topics ..................................................................................................................... 11 Topics and Their Data .................................................................................................... 12
Configure Reporting Security ................................................................................................... 14 Enable Reporting Features.................................................................................................. 14 Review Authorizations ........................................................................................................ 15 Review Organizational and Management Structure ............................................................ 16
Create Reports ......................................................................................................................... 17 Define the Report ............................................................................................................... 17 Add Fields to the Report ..................................................................................................... 20
Search for Fields ............................................................................................................ 23 Change Field Order ........................................................................................................ 23 Define Field Titles .......................................................................................................... 23 Set Report Properties .................................................................................................... 24
Preview and Validate .......................................................................................................... 25 Preview the Report ........................................................................................................ 25 Validate ......................................................................................................................... 25
Save the Report .................................................................................................................. 27
Work with Reports ................................................................................................................... 30 Filter the Report List ........................................................................................................... 30 Preview .............................................................................................................................. 30 Run Existing Reports ........................................................................................................... 31 Edit Reports........................................................................................................................ 33

4 Dayforce HCM – Creating Reports using Report Designer – Part 1
Dayforce | HCM Copyright © Ceridian 2017. Not for Redistribution.
Delete Reports ................................................................................................................... 34 Creating a New Version of an Existing Report (Copy) .......................................................... 34 Layout Parameters ............................................................................................................. 35
Output Options ............................................................................................................. 35 Page and Format Options .............................................................................................. 36
Report Categories ............................................................................................................... 37 Managing Report Categories ......................................................................................... 37 Categories and Features ................................................................................................ 40
Use Templates to Create Reports ............................................................................................. 41 Template Selection ............................................................................................................. 41
Template Selection using the Reporting Window ........................................................... 41 Template Selection using the Ad Hoc Reporting Guide................................................... 45
Edit the Template ............................................................................................................... 46 Access Report Designer ................................................................................................. 46 Edit in Report Designer .................................................................................................. 46

Dayforce HCM – Creating Reports using Report Designer – Part 1 5
Dayforce | HCM Copyright © Ceridian 2017. Not for Redistribution
Training Guide Icons

6 Dayforce HCM – Creating Reports using Report Designer – Part 1
Dayforce | HCM Copyright © Ceridian 2017. Not for Redistribution.
Introduction This course teaches you how to create reports based on predefined topics or report templates to meet your unique reporting requirements. You will learn how to configure report security and how to work with custom reports.
Prerequisites There are certain Dayforce HCM courses that are either required or recommended as prerequisites prior to attending this course. The following courses will provide the foundational knowledge you need to understand the key Dayforce HCM features discussed in this course.
Required
Using Fixed Format Reports in Dayforce – Explains how to use Fixed Format Reports found within several features in Dayforce HCM.
Any Dayforce instructor-led class or hands-on experience with Dayforce HCM – Provides a basic understanding Dayforce HCM navigation.
Course Overview This course consists of the following modules that describe reporting in Dayforce HCM.
Module Description
Introduction to Reporting in Dayforce HCM
Introduces you to reporting in Dayforce HCM, including a brief overview of the types of fixed format reports already defined in Dayforce. In addition, this module provides a high level overview of the process of creating reports and explains the significance of report topics and report templates.
Configure Reporting Security
Describes how to provide appropriate system level access to users who create, run, or schedule reports, as well as how to control what data people have access to.
Create Reports Explains how to create a new report from one of the system topics. This involves selecting which fields you want on the report from the groups of related fields in the topic you selected and assigning access to appropriate roles.
Work with Reports Describes how to run and edit, copy, and delete reports. Explains how to work with categories.
Use Templates to Create a Report
Explains how to use templates to simplify the report creation process.
Throughout this course, you will complete a number of hands-on activities, participate in discussions, and view product demonstrations.

Dayforce HCM – Creating Reports using Report Designer – Part 1 7
Dayforce | HCM Copyright © Ceridian 2017. Not for Redistribution
Learning Objectives By completing this course, you will be able to:
Enable access to reporting functionality Explain the purpose of creating new reports Identify the appropriate topic to use for a new report Create reports using the Report Designer Create reports based on a template Edit reports
Available Support A variety of supporting guides are available through support.dayforce.com. Talk to your organization’s support user or Implementation Consultant for help with obtaining these guides, depending on if you are in implementation or live.
Support Downloads > Admin & User Guides:
Admin and User Guides o Reporting Guide o Ad Hoc Reporting Guide o Reporting Reference Guide
Our Training Scenario The best way to learn how to create reports in Dayforce HCM Reporting is to practice using it. The following training scenario will be used throughout the class to reinforce conceptual discussions.
XYZ Company is a multinational company using Dayforce HCM for Time and Attendance, Payroll, and Benefits. XYZ Company has found a need for additional reporting. Today you will act as a Power User as you create and run the required reports.
In this class, you will create the following reports:
� Seniority List Report � Employee Roster

8 Dayforce HCM – Creating Reports using Report Designer – Part 1
Dayforce | HCM Copyright © Ceridian 2017. Not for Redistribution.
Introduction to Reporting in Dayforce HCM Within Dayforce HCM, there are many fixed format reports available to meet reporting needs on the most common views of your data. These reports are also commonly referred to as standard reports. They are embedded in various modules throughout the application. Since organizations have diverse reporting requirements, however, no set of predefined reports can cover every reporting need. To meet these unique reporting requirements, you can use the Reporting feature to create your own reports.
Before you create a report, it is recommended that you review the fix format reports that come with Dayforce HCM. It’s always faster and easier to run an existing report to retrieve the data you’re looking for than it is to create a new report.
Within Reporting, you can create reports from a variety of predefined topics, including topics on employees, payroll data, and benefit data. Each topic contains a large number of related fields that you pick and choose from. As part of building a report, you need to define what fields to include. Dayforce also provides report templates that you can use to quickly build a report modified to your needs.
This module introduces the reporting functionality in Dayforce, including:
The fixed format reports available The report templates available The employee card An overview of the tasks you need to perform when creating new reports How report topics build the foundation of the reports you create
Fixed Format Reports It is beneficial to become familiar with the fixed format reports that are available in Dayforce HCM. These reports are predefined, with a set of included fields and usually several parameters you can use to filter the data included in the report.
For more information or to view the full list of reports available, see the Reporting Guide.
Report Templates Path: Reporting > Reports
Within Reporting there are several report templates that you can use as the starting point for reports that you create to meet your specific requirements.
Report templates are displayed in gray. For each report template, a brief description of the template is provided. This information can help you determine if the report template can be used as a starting point for your report.

Dayforce HCM – Creating Reports using Report Designer – Part 1 9
Dayforce | HCM Copyright © Ceridian 2017. Not for Redistribution
In the report icon column, reports have a gear in the icon, and templates show just a table graphic.
Report templates will be discussed in more detail in a later module of this course.
Report Card To find reports or templates outside of Reporting, use the Dayforce Global Search feature. You can scroll through the list of available reports by clicking Reports under the Global Search, or you can type key words into the search box to narrow down the list.
For example, if you want to find the Employee Details report or template, you can type “Employee Det” in the global search window. Reports and templates with “Employee Det” in the title will be returned.
You can decide to preview and run the report from the report card. You can also choose to edit the report to more closely match your requirements if your role has permission to Report Designer.
Note: To access the report card, your role must have permission to Report Card in the Application Container, which is discussed in the Configuring Reports Security section of this course.

10 Dayforce HCM – Creating Reports using Report Designer – Part 1
Dayforce | HCM Copyright © Ceridian 2017. Not for Redistribution.
Dayforce Feature Fixed format and custom reports are available in Dayforce features. This allows the users to run reports outside of Report Designer if they have access rights to the report.
Create Reports Overview You can run, edit, or schedule reports in the Reporting feature providing that you have permission to access the report. This is also where you can create new reports.
Creating a new report allows you to cover a unique reporting requirement. These reports are based off of predefined topics (groups of related fields focusing on a particular type of record).
When you need to create a new report, there are three overall steps for you to consider. Each is illustrated and described below.
Conceive Discover a Reporting Need The reporting process always starts with an idea or a need – the conception of a report that needs to contain specific data grouped and arranged in a precise way. Some examples are:
Your employees’ year-to-date values for specific earnings or deductions, such as how much employees have contributed to their 401(k) or RRSP accounts so far this year.
A summary of what performance ratings your employees received.
Review Review Fixed Format Reports Once you determine a reporting need, you should review the fixed format reports to see if any of them meet your reporting requirement. The fixed format reports have a variety of parameters to fine tune what details are included when you run them, so you can pick and choose what data to report on.

Dayforce HCM – Creating Reports using Report Designer – Part 1 11
Dayforce | HCM Copyright © Ceridian 2017. Not for Redistribution
For example, when you run the Earning History Report you can decide to report on all employees within one or several pay runs, or just a specific employee, or you could filter the employees’ earnings based on an employee’s employment status or where they work.
The fixed format reports are flexible and cover a wide range of content, so you may find that they meet many of your reporting needs.
Review Report Templates If you find that your reporting need is not covered by a fixed format report, review the list of report templates that is included with Dayforce HCM. You might find that using a report template as a starting point for a report and making the necessary modifications to it is the fastest way to meet your reporting requirement.
Review Report Topics If you find that your reporting requirements are not covered by a fixed format report or a report template, you will need to examine the different topics available within Reporting. You can create a new report based on any of the predefined report topics available.
Each topic focuses on a set of related data and provides access to many fields. The reports you create can contain any (or all) of a topic’s fields, arranged and grouped according to your specifications. The data in these fields can be further filtered according to parameters you define when configuring the new report.
Create Create a New Report from the Chosen Topic After choosing an appropriate topic, you create a new report in the Reporting feature using the Report Designer. There are several steps involved in creating the report, including selecting a topic and defining what fields are included.
Report Topics Understanding report topics, which topics are available, and how they form the foundation of the reports you create is key to successfully creating reports. This section describes the concept of reporting topics and how they are used to build new reports.
Dayforce comes with several report topics that focus on a set of related fields and records. In general, topics represent the report definition. In other words, the topic is the subject of the report. For each report you create, you can only pick one topic. The topic that you choose determines the database fields that you can include as columns in your report.
When you need to create a report, think about which fields you want on the report. Let’s take a closer look at a few topics to better illustrate the types of fields that would be available in each topic.
12 Dayforce HCM – Creating Reports using Report Designer – Part 1
Dayforce | HCM Copyright © Ceridian 2017. Not for Redistribution.
For example, the HR Profile topic enables you to report on employees’ personal details, like address, phone number, and other fields contained on employee records. The Schedule topic contains information about how employees are scheduled, such as the start and end date and time of each shift, and the department for which employees are scheduled.
Topics and Their Data Topics control more than just the fields that are available to include on your report; they also control what records you can report on.
The difference between what a topic is about is most noticeable when we compare how the same field behaves on reports created from different topics. For example, both the HR Profile and Schedule topics contain the Department Name field.
In both topics, the Department field brings back the name of a department. However, since each topic is about something different, the context of that department name changes. As illustrated above, the HR Profile topic is about employee records, while the Schedule topic is about how employees are scheduled.

Dayforce HCM – Creating Reports using Report Designer – Part 1 13
Dayforce | HCM Copyright © Ceridian 2017. Not for Redistribution
Continuing with this example, let’s look at what a simple report would look like for each of these topics.
In the above sample reports, you can see that each topic contains different types of records, so the Department field is related to the topic in slightly different ways.
For example, the HR Profile topic contains a single record for each employee, with his or her current information. If you create a report based on the HR Profile topic and list Employee Display Name and Department, the report lists each employee once and the department of the employee’s primary work assignment.
On the other hand, the Schedule topic contains a record for each scheduled shift, including that shift’s associated department. A report using the Schedule topic would list each shift for each employee, so if you are looking at a typical work week, an employee and the department could be listed five times. In addition, if employees have multiple work assignments and can be scheduled to work in multiple departments, the department that appears beside the employee’s name is not always going to be the same.
For more information on the fields associated with each topic, see the Ad Hoc Reporting Guide.

14 Dayforce HCM – Creating Reports using Report Designer – Part 1
Dayforce | HCM Copyright © Ceridian 2017. Not for Redistribution.
Configure Reporting Security It is important that you configure your organization’s reporting security to ensure that users have the appropriate visibility to information listed on reports. This also involves providing the correct access to users who should have the ability to create, edit, schedule, and run reports. There are three measures that need to be reviewed in Dayforce HCM to configure reporting security:
Enable Reporting Features – Determines who can create, edit, run, and schedule reports Review Authorizations – Determines visibility to certain fields in reports Review Organizational and Management Structure – Determines which employees’ data is
visible on reports that you run
Each of these three items is discussed in more detail during this module.
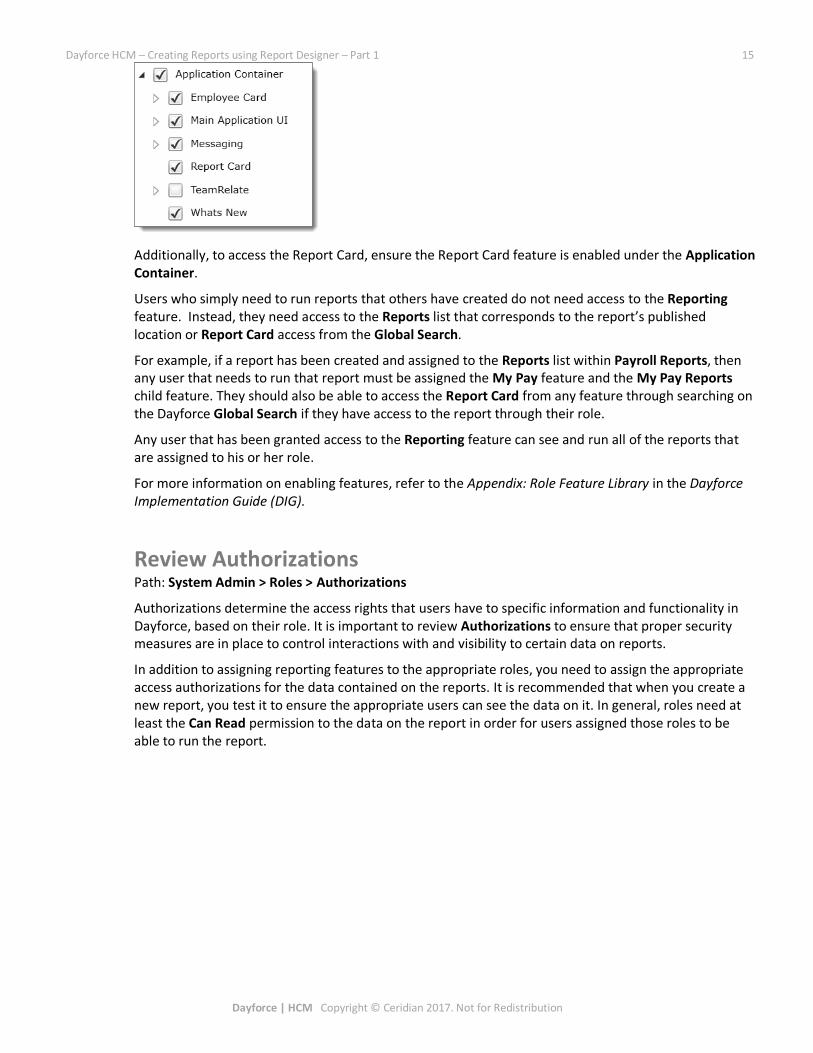
Enable Reporting Features Path: System Admin > Roles > Features
Features refer to functionality within Dayforce HCM that a role can access. The Features tab in System Admin is where all features and child features for a role are enabled, disabled, and organized. For each role within your organization, select the check boxes of the features and child features that should be assigned.
To enable reporting features, you need to determine which roles need to create reports and which roles need to run reports. In addition, determine where the reports you create are going to be made available, such as in My HR, My Pay, or My Day, and then ensure the appropriate roles have those features and their Reports child feature assigned to them.
Any user who needs to create, edit, or schedule reports must have access to the Reporting feature and one or more of its child features. To perform all the steps and processes covered in this class, the user’s role needs access to the following features in Dayforce HCM:
Reporting > Report Designer – Allows access to Report Designer Reporting > Reports – Allows access to the Reports feature Reporting > Report Library – Allows access to Report Library, child features of Report Library,
specific templates, and custom reports Reporting > Scheduled Reports – Allows access the report’s scheduling function
Dayforce HCM – Creating Reports using Report Designer – Part 1 15
Dayforce | HCM Copyright © Ceridian 2017. Not for Redistribution
Additionally, to access the Report Card, ensure the Report Card feature is enabled under the Application Container.
Users who simply need to run reports that others have created do not need access to the Reporting feature. Instead, they need access to the Reports list that corresponds to the report’s published location or Report Card access from the Global Search.
For example, if a report has been created and assigned to the Reports list within Payroll Reports, then any user that needs to run that report must be assigned the My Pay feature and the My Pay Reports child feature. They should also be able to access the Report Card from any feature through searching on the Dayforce Global Search if they have access to the report through their role.
Any user that has been granted access to the Reporting feature can see and run all of the reports that are assigned to his or her role.
For more information on enabling features, refer to the Appendix: Role Feature Library in the Dayforce Implementation Guide (DIG).
Review Authorizations Path: System Admin > Roles > Authorizations
Authorizations determine the access rights that users have to specific information and functionality in Dayforce, based on their role. It is important to review Authorizations to ensure that proper security measures are in place to control interactions with and visibility to certain data on reports.
In addition to assigning reporting features to the appropriate roles, you need to assign the appropriate access authorizations for the data contained on the reports. It is recommended that when you create a new report, you test it to ensure the appropriate users can see the data on it. In general, roles need at least the Can Read permission to the data on the report in order for users assigned those roles to be able to run the report.

16 Dayforce HCM – Creating Reports using Report Designer – Part 1
Dayforce | HCM Copyright © Ceridian 2017. Not for Redistribution.
For example, users running a report on employee personal details need the Can Read permission to the corresponding employee information.
Note: Authorizations are important to reporting because if a user runs a report that contains data they do not have the Can Read permission for, that data will display as “****” on the report. For a description of each access authorization, refer to Appendix: Access Authorizations in the Dayforce Implementation Guide.
Review Organizational and Management Structure Users can only view information based on your company’s existing organizational and management structure used throughout Dayforce. As a result, when you run a report, the report will only display information about people whose records you can view. For example, when managers of two different stores run a report that lists employees, each manager will have a different list of employees in their report. In addition, a regional manager running the same report would have more employees show up on the report.
It is recommended that you confirm that your organization’s structure is accurate in order to ensure that the proper users have visibility to the appropriate employees’ information listed on reports.

Dayforce HCM – Creating Reports using Report Designer – Part 1 17
Dayforce | HCM Copyright © Ceridian 2017. Not for Redistribution
Create Reports Path: Reporting > Reports > New
If there are no fixed format reports or templates that meet the reporting requirements, it is time to go into the Report Designer to create the report.
The primary steps involved in creating a report in the Report Designer are described below.
Step Description
1. Define the Report Provide a name of your new report Review the topic Select what topic to base the report on
2. Add Fields to the Report Choose the fields you wish to report on
3. Preview the Report Preview the report to validate the content and layout
4. Save the Report Save the report to make it available to other users
Throughout this module, we will discuss each of these steps in more detail.
Define the Report To create a new report, click New on the toolbar to launch the Report Designer.
First, define the report in the Create New Report window of the Report Designer.
Enter a Name of the report. It is recommended that you include your company name or another identifier in the name of all reports that you create to ensure a distinction between them and the fixed format reports and templates.

18 Dayforce HCM – Creating Reports using Report Designer – Part 1
Dayforce | HCM Copyright © Ceridian 2017. Not for Redistribution.
Next, select the Topic that contains the fields that you want to include in your report. Each Topic has a list of related fields that can be included in the report and is distinguished by subject or focus. The hierarchy for the Topic is as follows:
There are two methods for determining the topic for the report. Within the Create New Report window, you can search through the topics by searching for the entities and fields. Another option is to review the Ad Hoc Reporting Guide and the Reporting Reference Guide.
Within the Create New Report window, you can review the topics and descriptions to ensure that they include the required data.
For example, if you want to include the employee’s departments in the report, you can type “department” in the search window above the Topic list. This narrows down the list of Topics to only include those that have “department” as a field or topic name. Review the Topic names and descriptions, and then click on ones that appear relevant for more information.

Dayforce HCM – Creating Reports using Report Designer – Part 1 19
Dayforce | HCM Copyright © Ceridian 2017. Not for Redistribution
After you click on a topic, you can review the list of Entities in the second pane. Each topic’s fields are grouped into Entities to help you navigate through the list. To browse and find the fields you want to include on your report, expand the Entity to view the fields within the Entity.
You can type in the field name into the search bar in the Entity pane or drill down within the Entity. In this example, the “Department Reference Code” field was found in the Department Entity. When the field, “Department Reference Code,” is clicked, more information is displayed in the third pane describing that field. This includes the Data Type, Field Name, Description and a sample of the data.
Another alternative for choosing a topic is to review the Ad Hoc Reporting Guide and the Reporting Reference Guide.
The Ad Hoc Reporting Guide provides a description and the primary fields that are available in each topic. It does not provide a complete list of fields for the topic but is a great starting point to identify which topics meet your requirements.
In this example, the description and the key fields are included under the Benefit Enrollment Status topic.

20 Dayforce HCM – Creating Reports using Report Designer – Part 1
Dayforce | HCM Copyright © Ceridian 2017. Not for Redistribution.
The Reporting Reference Guide displays all the fields for each topic so you can do more complete analysis.
When you are satisfied that the fields you desire are present in the Topic, click Create Report from Topic in the Create New Report screen. You are now ready to start building your report.
Add Fields to the Report Path: Reporting > Reports > New
When a new report is created, Report Designer loads and you will see the fly out with the new report’s name at the top.

Dayforce HCM – Creating Reports using Report Designer – Part 1 21
Dayforce | HCM Copyright © Ceridian 2017. Not for Redistribution
You are now ready to add fields to the report. Select the specific fields that you want to include on your report. The fields correspond to the columns of data in the completed report. The Topic you selected on the Create New Report screen determines which fields are available to choose from. Keep in mind that each field selected in the Report Designer will represent a column of data in your report results.
Each topic’s fields are grouped into Entities to help you navigate through the list. To browse and find the fields you want to include on your report, expand the Entity to see the fields within the entity.
For example, there are three fields related to department information: Department Name, Department Description, and Department Reference Code. Each of these fields is contained in the Department entity, as pictured above.
You can drag columns into the Report Designer. This allows you to determine the placement of the column within the report. The column has the correct placement when the green arrow enables.

22 Dayforce HCM – Creating Reports using Report Designer – Part 1
Dayforce | HCM Copyright © Ceridian 2017. Not for Redistribution.
Alternately, you can check the box to the left of the field in Field Selection and click Insert. You can also just double-click the field. These methods will place the field in the last column of the report.
In the example above, the report will have columns for the employee’s last name, first name, department, and home phone number.
To remove a column from the report, click on the Field Name on the Column Heading. This brings up a window with the field data.
Click Remove Column to delete the column from the report. Click Preview to validate which columns are on the report.

Dayforce HCM – Creating Reports using Report Designer – Part 1 23
Dayforce | HCM Copyright © Ceridian 2017. Not for Redistribution
Search for Fields To make it easier to find the necessary fields for your report, use the search feature.
To search for a field, type the text into the search text box. As you type the search term, the list of entities narrows down to those that contain a field whose name contains the search term. In the example above, after entering “hire” as the search term, only two entities appear: Employee and Employee Employment Status. The fields within those entities are displayed.
Keep in mind that the search terms function as wildcards. In the above example, any field that contains the letters “hire” anywhere in its name is found.
Hover over the field name to get a description of the field.
Change Field Order Fields can be dragged and dropped to change the field order. Click the ellipsis and drag the field to the desired placement.
In this example, the field, Home Phone, is being dragged to follow Employee.
Define Field Titles A field’s Display Name will be the column heading in the completed report. To change the Display Name, click the field name in Report Designer and update the Display Name.
In this example, the field Home Phone is updated to read Home Phone Number as the heading of the report column.

24 Dayforce HCM – Creating Reports using Report Designer – Part 1
Dayforce | HCM Copyright © Ceridian 2017. Not for Redistribution.
Set Report Properties Path: Reporting > Reports> New > (Report Name) > Properties
The Properties window allows you to define information about the report. You will define the Report Name, Description, Category, and Roles that have access to the report.
Fields on the Properties window are as follows:
1. Report Name – Displays the name that will appear in Reporting and other modules in Dayforce and can be up to 125 characters
2. Category – Allows you to organize reports and define where this report will be available other than the Reporting feature (i.e. Payroll, Human Resources, Benefits, etc.)
3. Description - Provides more information and can be up to 5132 characters 4. Topic – Displays which topic the report uses (cannot be changed) 5. Security – Allows you to delegate which security role(s) have access to the report.
Note: Users who have been assigned any of the SELECTED role(s) will have the ability to run the report, provided they have access to the Reporting feature, Dayforce feature, or Report Card.

Dayforce HCM – Creating Reports using Report Designer – Part 1 25
Dayforce | HCM Copyright © Ceridian 2017. Not for Redistribution
Preview and Validate You can preview or run the report throughout the report creation process. This section describes how to both preview the report and run the report before saving it to make it available to other users.
Preview the Report Path: Reporting > Reports > (Report Name) > Preview
Click the Preview button in the toolbar to see what your report will look like. Previewing the report allows you to verify general report content. For instance, you can verify that:
The correct columns are included., Data is grouped and sorted as defined. Functions are working as expected. Filters are working as desired.
Preview options can also be set as follows:
Enable Auto-Preview – refreshes or executes the report definition every time a new change is made.
Set Filter Values for Preview – allows you to default the Filters value(s) when you preview the report.
Validate Path: Reporting > Reports > (Report Name) > Run
Previewing only allows you to see a portion of the data. To validate the report and retrieve all of the data in the report, you must run it.
To run the report, click Run on the toolbar.

26 Dayforce HCM – Creating Reports using Report Designer – Part 1
Dayforce | HCM Copyright © Ceridian 2017. Not for Redistribution.
Below is an explanation of each option:
Option Explanation
1. Filters Allows you to see and update (if editable) any optional filters available in the report
2. Report Header Display Name Provides a way to optionally define another Display Name for the report. If blank, the report name defaults to the display name.
3. Include filter criteria Includes the filter criteria in the report header
4. Only include unique records Only unique records are included in the output
5. Max Number of Records Include only the maximum number of records in the output file
6. Output Format Determines the output format, including:
PDF Excel 97-2003 (XLS) Excel 2007+ (XLSX) CSV
7. Excel Format Allows further defining of the report output when Excel is chosen in #6, including:
Suppress formatting in Excel output: o Provides you with only the field titles and records o Doesn’t include the report title, grouping and information
about filters used o Usually used if there will be more Excel analysis
Suppress formatting – Include Totals in Output – Suppresses the formatting except totals
8. PDF Format Allows further defining of the report output when PDF is chosen in #6, including:
Choosing the report orientation Choosing the output size
9. Repeat column headers on each page
Determines if the column headers are repeated on pages other than the first page
Dayforce HCM – Creating Reports using Report Designer – Part 1 27
Dayforce | HCM Copyright © Ceridian 2017. Not for Redistribution
Note: The preview retrieves the top 100 records from the database (unless you are grouping, in which case, it will retrieve more records). As a result, the data in the report preview may not be complete. To get complete results, you must run the report rather than preview it. Never base business decisions on the data displayed in a report preview.
Save the Report When you finish reviewing the newly created report, click Save. If the report is being copied from another report and you wish to save it as a separate report with another name, click Save As. Both methods save all the changes that were made and makes the report available to other users who have appropriate access. Activity: Create Two Simple Reports Time: 12 minutes
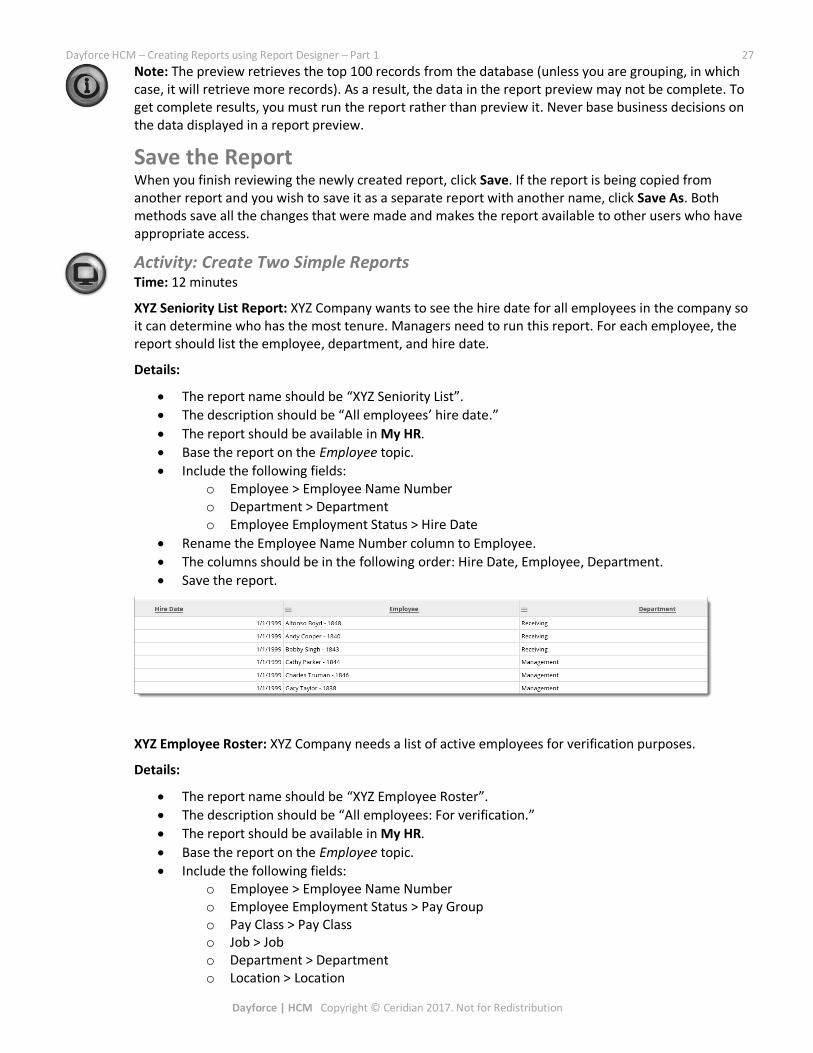
XYZ Seniority List Report: XYZ Company wants to see the hire date for all employees in the company so it can determine who has the most tenure. Managers need to run this report. For each employee, the report should list the employee, department, and hire date.
Details:
The report name should be “XYZ Seniority List”. The description should be “All employees’ hire date.” The report should be available in My HR. Base the report on the Employee topic. Include the following fields:
o Employee > Employee Name Number o Department > Department o Employee Employment Status > Hire Date
Rename the Employee Name Number column to Employee. The columns should be in the following order: Hire Date, Employee, Department. Save the report.
XYZ Employee Roster: XYZ Company needs a list of active employees for verification purposes.
Details:
The report name should be “XYZ Employee Roster”. The description should be “All employees: For verification.” The report should be available in My HR. Base the report on the Employee topic. Include the following fields:
o Employee > Employee Name Number o Employee Employment Status > Pay Group o Pay Class > Pay Class o Job > Job o Department > Department o Location > Location

28 Dayforce HCM – Creating Reports using Report Designer – Part 1
Dayforce | HCM Copyright © Ceridian 2017. Not for Redistribution.
o Employee Employment Status > Base Salary o Employee Employment Status > Base Rate
The columns should be in the order listed above. Rename the Employee Name Number column to Employee. HR administrators need to run this report. Preview the report to verify that it is configured correctly. Save the report.
Check Your Work: Create the XYZ Seniority List report: Path: Reporting > Reports > New
Define Report Properties:
1. Click New. 2. Type “XYZ Seniority List” for the Report Name. 3. Click Employee in the Topic list. 4. Click Create Report from Topic.
Add Fields to the Report:
5. Drag or Insert the following fields to the report header: o Department > Department o Employee > Employee Name Number o Employee Employment Status > Hire Date
6. Click Employee Name Number in the report header. 7. Change the Display Name to “Employee.” 8. Click Apply. 9. Use the ellipsis to drag the fields to display in this order:
o Hire Date o Employee o Department
Define Properties:
10. Click Properties. 11. Review the Report Name. 12. Click Change in Category. 13. Click Human Resources in the Select Category list. 14. Click Apply. 15. Type “All employees’ hire date.” for the Description 16. Move Manager to the SELECTED column. 17. Click Apply.
Preview, Select Layout, and Save the Report:
18. Click Preview to verify that the report is configured correctly. 19. Click Layout. 20. Select PDF under Output Format. 21. Select Portrait under PDF Format. 22. Select Letter – 8.5” x 11” under Paper Size. 23. Click Apply. 24. Click Save.

Dayforce HCM – Creating Reports using Report Designer – Part 1 29
Dayforce | HCM Copyright © Ceridian 2017. Not for Redistribution
Check Your Work: Create the XYZ Employee Roster report: Path: Reporting > Reports > New
Define Report Properties:
1. Click New. 2. Type “XYZ Employee Roster” for the Report Name. 3. Click Employee in the Topic list. 4. Click Create Report from Topic.
Add Fields to the Report:
5. Drag, double-click, or Insert the following fields to the report header: o Employee > Employee Name Number o Employee Employment Status > Pay Group o Pay Class > Pay Class o Job > Job o Department > Department o Location > Location o Employee Employment Status > Base Salary o Employee Employment Status > Base Rate
6. If necessary, drag the fields in the header to arrange them in the order listed in the previous step.
7. Change the label of Employee Name Number to Employee.
Define Properties:
8. Click Properties. 9. Click Change under Category. 10. Click Human Resources in the Select Category items list. 11. Click Apply. 12. Type “All employees: For verification.” for the Description. 13. Move HR to the SELECTED column. 14. Click Apply.
Preview, Select Layout, and Save the Report:
15. Click Preview to verify that the report is configured correctly. 16. Click Layout. 17. Choose Excel 2007+ (XLSX) from the Output Format items list. 18. Click Apply. 19. Click Save.

30 Dayforce HCM – Creating Reports using Report Designer – Part 1
Dayforce | HCM Copyright © Ceridian 2017. Not for Redistribution.
Work with Reports Path: Reporting > Reports
Reports that you create are available in the Reporting feature, the Dayforce feature, and in the Global Search. This module focuses on using the Reporting feature to work with reports. You will learn how find reports and templates in the Reports list. You will also learn about the Preview properties from the Report List. Additionally, you will learn to run existing reports, edit them, delete them, and copy them.
Filter the Report List You can filter the list of reports in order to easily find reports or templates.
You can use the search box to find the item. Type in the name of the repot, template, or the description.
If using the search box doesn’t yield results, use the Filter. Click Filter on the toolbar, enter the filter criteria into one or more of the available fields, and click Apply Filter. Click Clear Filter to display all reports again. Whether the filter is still applied or cleared, you can close the filter area by clicking the Filter button again on the toolbar.
You can also add or change the filter options that are most relevant to you by clicking Add Filter.
Preview Reporting > Reports
You can Preview a report or template to view a subset of records and report options before editing or running it. From the preview screen, you can view the Details, Fields used, Filters, and Output defaults.
In this example, you can right click on the report or template name, and click Preview. Optionally, you can also highlight the report or template and click Preview from the toolbar.

Dayforce HCM – Creating Reports using Report Designer – Part 1 31
Dayforce | HCM Copyright © Ceridian 2017. Not for Redistribution
Now, you can preview the data and view the reporting details, filters, and output parameters.
Run Existing Reports Reports can be run in Reporting, the Dayforce feature location that you defined when creating the report, or in the Report Card.
To run the report from Reporting, click Run on the toolbar or right-click the report and choose Run.
There are two methods to running custom reports from Dayforce HCM features. Some screens use the Reports dropdown, while others use the Reports icon. We will discuss both methods.

32 Dayforce HCM – Creating Reports using Report Designer – Part 1
Dayforce | HCM Copyright © Ceridian 2017. Not for Redistribution.
In the features that display the Reports dropdown, click the Reports list and select the report you want to run. In this case, the custom Emergency Contacts Report is displayed in the same list with fixed format reports. The reports description appears when you hover the mouse over the report’s name.
Some features have the Reports Icon. These features have a different format to access the report. After you click the icon, another dialog window is displayed.
Custom reports appear in the dialog window under the Report Library, along with report templates. The reports are colored black with the corresponding report icon to the left, which is the same format that is in the Report Designer. From here, you can run the report.

Dayforce HCM – Creating Reports using Report Designer – Part 1 33
Dayforce | HCM Copyright © Ceridian 2017. Not for Redistribution
In any feature, you can use the Global Search to find reports for which you have permission to view. Reports can be run from the Report Card.
Once the report has been generated, it is sent to your Message Center.
Edit Reports Path: Reporting > Reports > (Report Name) > Edit
After a report has been created and saved, you can still edit most details; however, you cannot change the topic of an existing report. Reports can only be edited from the Reporting feature using the Report Designer.
To open the Report Designer, select the appropriate report in Reporting then click Edit on the toolbar, right-click the report and choose Edit, or double-click the report name.
The fields, filters, properties, and options set when the report was created can be modified by selecting and updating the appropriate fields and options. However, the Topic is not available because it cannot be edited. You can save any changes you make using the Save button.
For more information on editing reports, see the Edit Reports section of the Ad Hoc Reporting Guide.

34 Dayforce HCM – Creating Reports using Report Designer – Part 1
Dayforce | HCM Copyright © Ceridian 2017. Not for Redistribution.
Delete Reports Path: Reporting > Reports > (Report Name) > Delete
Reports are deleted from the Report Designer. Edit the report to open the Report Designer, and then click Delete to delete the report. You will not be able to recover the report once it is deleted, so use caution.
Creating a New Version of an Existing Report (Copy) Path: Reporting > Reports > (Report Name) > Edit
To make the process of creating reports easier, you can edit an existing report so that you can base a new report off of it. This way you can modify the necessary details of the report instead of building it from scratch. Rename the report by clicking Properties and updating the new name and description. Make your changes to the report and click Save As with the new report name.
As with editing reports, you cannot change the Topic of a copied report.
Note: It is important to ensure that you click Save As during the report copy process. If you click Save, you will overwrite the report you were copying.

Dayforce HCM – Creating Reports using Report Designer – Part 1 35
Dayforce | HCM Copyright © Ceridian 2017. Not for Redistribution
Layout Parameters Path: Reporting > Reports > (Report Name) > Layout
The default format and output specifications can be set when creating the report by clicking Layout on the toolbar. The Page Options describe what will be displayed in the report. The Export Options describe the formatting of the report.
Output Options Report Header Display Name Choosing a display name allows you to create a new report name as a default and runtime. If the Report Header Display Name is left blank, the report name will default as the report header.
Include filter Selecting the Include filter criteria check box inserts a header indicating the filter values at the top of the Excel or PDF file when you run the report. The header does not appear when you preview the report.
The header includes the company name, report name, and the values of any filters in effect if Include filter criteria under heading is selected.
Only include unique records Selecting the Only include unique records check box limits the results to include only unique records. When Only include unique records is checked, any rows that have the exact same data will only appear once on the report. To display all rows retrieved from the database, clear this check box. For example, if you use the Employee History – Work Assignment topic and report only the employee number and name, each employee will only appear once, even if they have multiple work assignments. If you clear

36 Dayforce HCM – Creating Reports using Report Designer – Part 1
Dayforce | HCM Copyright © Ceridian 2017. Not for Redistribution.
the check box, there will be duplicate rows for the employees that have multiple work assignments. If you include the Position field in the report, the rows will no longer contain identical data for employees with different work assignments, and the rows will appear whether the check box is enabled or not.
Note: The Display unique results check box is disabled when one or more fields on the report are configured with a Function.
Maximum records to display In order to ensure the reporting engine can support the volume of data returned and execute the report in a timely fashion, you can configure the maximum number of records to display on the report. The default setting depends on the topic you are using. It is either 5,000 or 20,000 results.
Output Format A default output format can be set for the report. Available formats include:
PDF Excel 97-2003 (XLS) Excel 2007+ (XLSX) CSV
Page and Format Options Excel Format If the Excel Output Format is chosen, then the Excel Format options are enabled. This allows you to choose from the following:
Suppress formatting in XLS output - provides you with only the field titles and records. The report title, grouping and information about filters used are not included.
Suppress formatting – include Totals in Output – displays totals with the rest of the formatting is suppressed.
Dayforce HCM – Creating Reports using Report Designer – Part 1 37
Dayforce | HCM Copyright © Ceridian 2017. Not for Redistribution
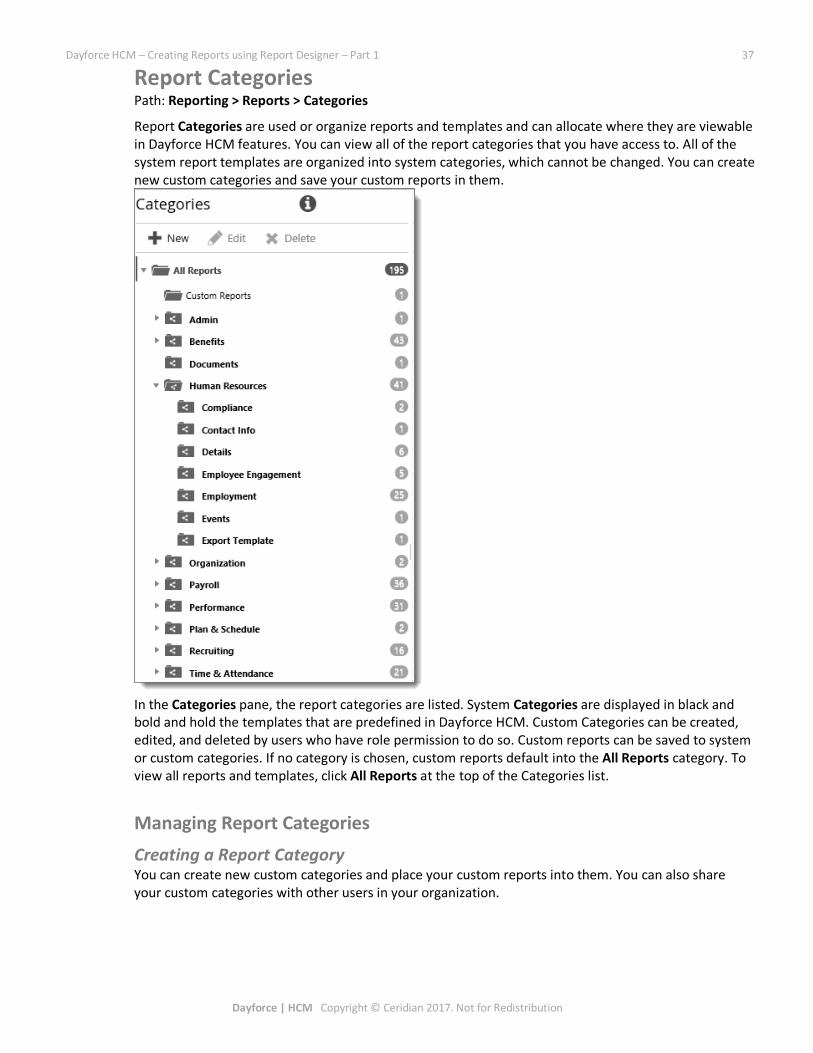
Report Categories Path: Reporting > Reports > Categories
Report Categories are used or organize reports and templates and can allocate where they are viewable in Dayforce HCM features. You can view all of the report categories that you have access to. All of the system report templates are organized into system categories, which cannot be changed. You can create new custom categories and save your custom reports in them.
In the Categories pane, the report categories are listed. System Categories are displayed in black and bold and hold the templates that are predefined in Dayforce HCM. Custom Categories can be created, edited, and deleted by users who have role permission to do so. Custom reports can be saved to system or custom categories. If no category is chosen, custom reports default into the All Reports category. To view all reports and templates, click All Reports at the top of the Categories list.
Managing Report Categories Creating a Report Category You can create new custom categories and place your custom reports into them. You can also share your custom categories with other users in your organization.

38 Dayforce HCM – Creating Reports using Report Designer – Part 1
Dayforce | HCM Copyright © Ceridian 2017. Not for Redistribution.
To create a new category, click New in the Categories pane.
Update the Add New Category dialog box to name the new category and provide more information.
Option Action
1. Category Name Enter a category name
2. Parent Category Enter the category: If left blank, the new category is saved under All Reports. You can have up to three levels of nested categories
3. Description Provide more information about the custom category
4. Security Define which roles can view the custom category
Editing a Category To edit a category, you can double-click the category or highlight the category and click Edit.
Dayforce HCM – Creating Reports using Report Designer – Part 1 39
Dayforce | HCM Copyright © Ceridian 2017. Not for Redistribution
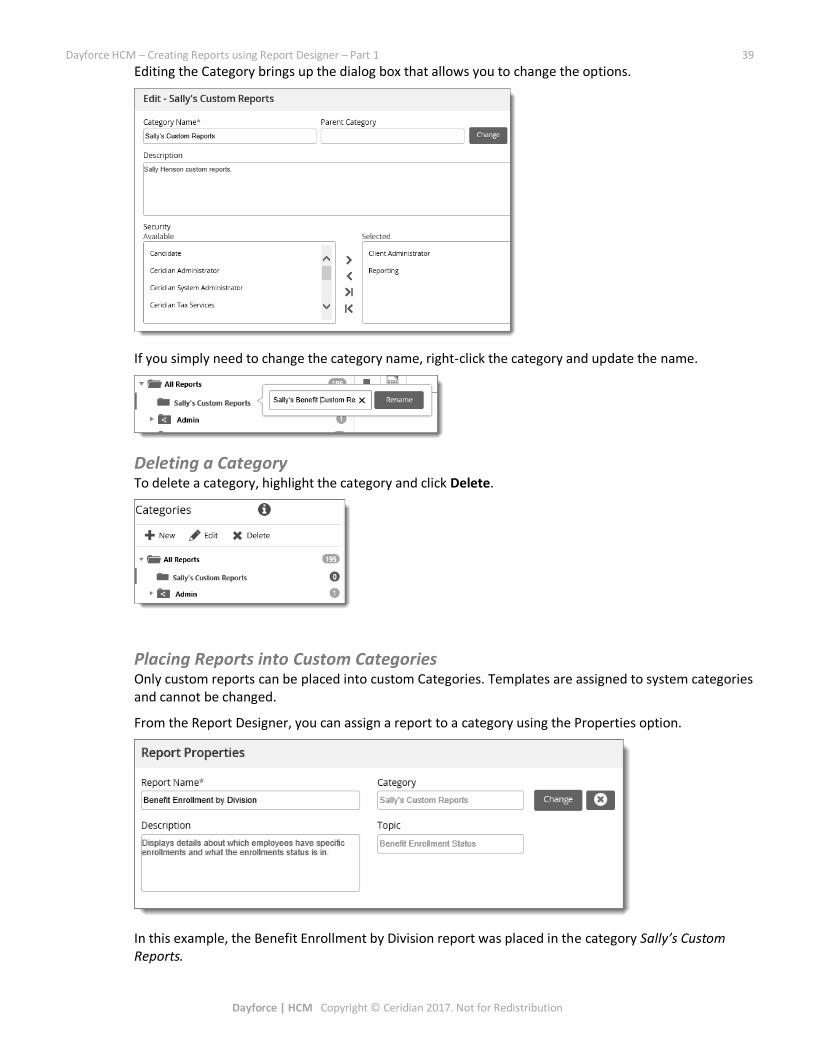
Editing the Category brings up the dialog box that allows you to change the options.
If you simply need to change the category name, right-click the category and update the name.
Deleting a Category To delete a category, highlight the category and click Delete.
Placing Reports into Custom Categories Only custom reports can be placed into custom Categories. Templates are assigned to system categories and cannot be changed.
From the Report Designer, you can assign a report to a category using the Properties option.
In this example, the Benefit Enrollment by Division report was placed in the category Sally’s Custom Reports.

40 Dayforce HCM – Creating Reports using Report Designer – Part 1
Dayforce | HCM Copyright © Ceridian 2017. Not for Redistribution.
Another option is to drag the report from the Reports pane into a category.
Categories and Features Reports can be assigned to Categories to make them available in Dayforce HCM features. This allows users who have access to run the report in the feature screens, such as My HR, My Pay and Performance. In order the understand which feature screens are mapped to each category, click the information icon.
For example, if a report was placed into the Benefits > HR Events’ category, it will be visible in the Managed Elections, COBRA and Recalculation Results feature screens within Reports. If the report was placed in the HR > Details’ category, it will be visible in the My HR feature screen in Reports. Custom categories cannot be mapped to a feature.

Dayforce HCM – Creating Reports using Report Designer – Part 1 41
Dayforce | HCM Copyright © Ceridian 2017. Not for Redistribution
Use Templates to Create Reports Path: Reporting > Reports
If there is not a fixed format report that meets the current reporting requirements, a careful review of the Report Templates is a logical next step before creating a completely customized report. Report Templates span a variety of subjects with predefined topics. You can use the template as a starting point, add or delete fields, and change reporting options.
Template Selection The first step is to find a template that fits the reporting requirements. This can be accomplished by reviewing the Categories, using the search bar, reading the descriptions, and using Preview to gather more information in the Reporting window. You can also use the Ad Hoc Reporting Guide, which list each template with the description, a list of important fields, a description of any custom fields used, and filters.
Template Selection using the Reporting Window In the list of reports and templates, report templates are gray. View the template Names and Description columns to see if a template may fit your reporting need.
For example, hover over the description for Employee Detail by Locations template to see a full description of what kind of information is included on that template.
Categories In the Categories pane, the report categories are listed. System Categories are in black and bold with the share icon. Custom Categories can be created, edited, and deleted by users whose roles have permission to do so.
Scanning the category that is most related to the report subject can be used as a starting point to find the appropriate template.

42 Dayforce HCM – Creating Reports using Report Designer – Part 1
Dayforce | HCM Copyright © Ceridian 2017. Not for Redistribution.
For example, you can find a template related to Employee Details by expanding the Human Resources category, then expanding the Details subcategory. This allows you to see all the templates related to HR Profile Details.
Alternatively, you can also type in key words in the search box to find a relevant report or template.
In this example, you can type “employee details” in the search bar, and reports with the words “employee details” in the title or description will be returned in your list.

Dayforce HCM – Creating Reports using Report Designer – Part 1 43
Dayforce | HCM Copyright © Ceridian 2017. Not for Redistribution
Preview Template After choosing a template, you can Preview it directly from the Report window to assess if it fits your needs.
In this example, clicking on the Employee Details by Location template in the Report window and clicking Preview from the options menu brings up the Preview tab with a sample of the results. If this template used a filter, you would be prompted to compete any that are editable.
The Details tab informs you of what topic the template is using.

44 Dayforce HCM – Creating Reports using Report Designer – Part 1
Dayforce | HCM Copyright © Ceridian 2017. Not for Redistribution.
The fields that the template has predefined are in the Fields tab. You can add other fields into the report from any fields included in the report’s topic and delete fields that are not needed.
The Filters tab shows you any filters that the report is using.
The default layout is presented in the Layout tab.

Dayforce HCM – Creating Reports using Report Designer – Part 1 45
Dayforce | HCM Copyright © Ceridian 2017. Not for Redistribution
Template Selection using the Ad Hoc Reporting Guide You can use the Ad Hoc Reporting Guide to plan which template you would like to use. It can be used as a supplement to find more information on the templates that you find in the Reports window.
This example shows the template, Employee Contact. The template comes defaulted with the fields listed in the document, however, many more are available. Any grouping, sorting or totals are shown along with custom field logic and a list of filters that the template uses.

46 Dayforce HCM – Creating Reports using Report Designer – Part 1
Dayforce | HCM Copyright © Ceridian 2017. Not for Redistribution.
Edit the Template Access Report Designer Once the appropriate template is determined, it’s time to edit the template and create the desired report. To start the editing process, there are three ways to access the Report Designer.
First, you can Preview the template. After previewing the template, you can click Edit from the preview screen.
You can click on the template name and click Edit from the list of options in the Report window or double-click the template name.
Edit in Report Designer The Report Designer is where you will be able to make the necessary changes to the templates to customize your report. The template will have a list of default fields and may have filters, sorting, grouping, and totals already configured. Update these using the same techniques that you learned in the Create Reports module. When you have completed your changes, click the Save As.


