
Concur Step-by-Step Guidebook - Finance and Budget
169
Step-by-Step Guidebook October 19, 2021
Transcript of Concur Step-by-Step Guidebook - Finance and Budget

Concur Step-by-Step Guidebook 1
–
Step-by-Step Guidebook
October 19, 2021

Concur Step-by-Step Guidebook 2
This page has been intentionally left blank.

Concur Step-by-Step Guidebook 3
Table of Contents
1. About Concur
Features and HighlightsHow to Use this Guidebook
2. Getting Started with Concur
Signing into ConcurExploring the Concur HomepageUpdating Your Concur ProfileVerifying Your Email AddressAdding a Personal Email AddressSetting Up Reminders and NotificationsUsing Expense Assistant
3. Using Delegates & Travel Assistants
Creating a DelegateDeleting a DelegateActing as a DelegateStopping Work as a DelegateCreating a Travel AssistantDeleting a Travel AssistantActing as a Travel AssistantStopping Work as a Travel Assistant
4. Understanding Approval Workflows
Adding a Default Approver to Your Approval Workflow
5. Understanding Expense Types
Listing of Expense TypesUsing the Documentation Only Expense Type

Concur Step-by-Step Guidebook 4
6. Creating and Submitting Travel Requests
Creating a New Travel Request Adding Personal Travel Adding Expenses to a Travel Request Adding a Travel Cash Advance Request Adding Approvers to the Workflow Viewing the Audit Trail Adding Attachments to a Travel Request
7. Creating International Travel Requests
Export Control Global Travel
8. Managing a Travel Request
Copying a Travel Request Editing a Travel Request Recalling a Submitted Travel Request Canceling a Travel Request Closing/Inactivating a Travel Request
9. Reviewing and Approving Travel Requests
Approving a Travel Request Sending a Travel Request Back to a User Adding an Additional User or Business Officer for Approval
10. Making Reservations & Booking Travel
Booking a Flight Booking a Rental Car Booking a Hotel Booking Travel as an Assistant Changing or Canceling a Trip
11. Understanding Receipts
Enabling E-Receipts Emailing Receipts Uploading Receipts to Available Receipts

Concur Step-by-Step Guidebook 5
12. Creating Expense Reports
Creating a New Expense Report without a Travel Request Creating a New Expense Report from a Travel Request Copying an Expense Report
13. Adding Expenses to an Expense Report
Adding Available Expense Transactions Adding Out-of-Pocket Expenses Adding P-Card, Purchase Order, Voucher Paid, and Third-Party Expenses Adding Personal Meal Expenses for Reimbursement Moving Expenses from One Report to Another or Back to Available Expenses Combining Expenses Attaching Receipts Missing Receipt Declarations Adding Personal Car Mileage Converting Foreign Currency Transactions Managing Cash Advances Allocating Expenses Copying an Expense
14. Itemizing Expenses and Attendees
Itemizing Nightly Lodging Expenses Itemizing Business Meal Expenses Adding Attendees to a Business Meal
15. Submitting, Printing, and Emailing Expense Reports
Submitting an Expense Report Printing or Emailing an Expense Report
16. Managing Expense Reports
Correcting and Resubmitting an Expense Report Recalling an Expense Report

Concur Step-by-Step Guidebook 6
17. Reviewing and Approving Expense Reports
Approving Expense Reports Approving and Forwarding an Expense Report (Adding an Additional Review Step) Sending an Expense Report Back to User
18. Concur Buttons and Icons
General Icons Expense Icons Booking & Trip Icons
19. Using the Concur Mobile App
Signing into the Concur Mobile App
20. TripLink –
21. Resources for Help and Support
World Travel Inc. Concur User Support Desk Training and Other Materials
22. Frequently Asked Questions
Approvers, Delegates, and Workflows Air Travel, Car Rental, and Hotel Finance and ConnectCarolina Personal Meals and Per Diems Policy, Documentation, and Forms Miscellaneous

Concur Step-by-Step Guidebook 7
1. About ConcurConcur integrates travel requests, expense reporting, travel booking, and authorization
solutions. This web-based service provides the tools you need to request and book
travel, as well as create, and submit expense reports. This system will replace former
travel request, booking, authorization, and expense systems for the University of North
Carolina at Chapel Hill (UNC-Chapel Hill).
Features and Highlights
This user-friendly system incorporates features that are unique to UNC-Chapel Hill
creating a seamless experience from request to booking to expense. The Concur
system features include:
• Single Sign-on access via ConnectCarolina or the Travel Office website.
• University policies are built directly into the system.
• Mobile access with the ability to create, submit, and approve requests and
reports via the Concur mobile app.
• And more!
How to Use this Guidebook
This guidebook provides step-by-step instructions on how to perform various functions
in the Concur system with detailed guidance. If you have questions about the content of
this guide or need additional assistance, please contact:
University Travel Office
Phone: 919-962-0210
Email: [email protected]
Webpage: finance.unc.edu/services/travel/

Concur Step-by-Step Guidebook 8
2. Getting Started with Concur
Signing into Concur
Users can log in to Concur via the Travel Services webpage, after signing into
ConnectCarolina, or directly via concursolutions.com.
Via the Travel Services Webpage
1. Go to http://finance.unc.edu/services/travel/ by entering it into your
internet browsers address bar.
2. Click the Concur link.
Result: You will be prompted to complete Single Sign-on.
3. Enter your ONYEN and Password.
4. Click the Sign in button.
Result: You will be prompted to complete Duo Authentication.
5. Complete the Duo Authentication.

Concur Step-by-Step Guidebook 9
Via ConnectCarolina
1. Go to https://connectcarolina.unc.edu/ by entering it into your internet browsers
address bar.
2. Click the Log In button.
3. Complete the Single Sign-On (SSO) by entering your ONYEN username, password,
and Duo Authentication.
4. Click the Concur link from the Admin WorkCenter, Self Service, or Faculty Portal.
Result: Your SSO credentials will automatically be verified with your Concur
Username and you will be logged into the Concur system.

Concur Step-by-Step Guidebook 10
Via Concur Directly
You can also log in to your Concur account by directly accessing their site at
concursolutions.com. After navigating to concursolutions.com, follow these steps to
login:
1. Enter your user name as your [email protected].
Note: You may also enter your UNCCH email address if it has been verified on
your Concur Profile.
2. Click the Next button.
3. Click the Sign in with UNC Single Sign-On button
Result: You will be taken to the UNCCH Single Sign-On page.
4. Enter your ONYEN and Password.

Concur Step-by-Step Guidebook 11
5. Click the Sign in button.
Result: You will be prompted to complete Duo Authentication.
6. Complete the Duo Authentication.
7. Result: You will arrive at the Concur homepage.
Note: Once signed into Concur, if you bookmark the page the link will appear as
https://concursolutions.com. When using the bookmark in the future, you will be
brought to the main Sign In page for Concur.

Concur Step-by-Step Guidebook 12
Exploring the Concur Homepage
The Concur home page provides direct access to Concur Expense, Requests, Travel,
and Approvals. To return to the Concur home page from any other page, click the SAP
Concur logo on the top left of the screen.
Section Description
Quick Task Bar This section provides Quick Task (links) so you can:
• Start a new report or request • Open reports and requests
• Manage available expenses
• Manage approvals My Tasks This section shows:
• Required Approvals – Shows listing of Travel and Expense Requests that require your approval.
• Available Expenses – Shows listing of expenses and receipts received from T&E Cards, Mobile App, and Direct Airfare billing that have not been assigned to an Expense Report.
• Open Reports - Shows listing of Expense Reports that are open and have not been submitted.
Company Notes Content is provided by UNC-Chapel Hill Travel Services.
Quick Task
Shows total number of tasks for each

Concur Step-by-Step Guidebook 13
Updating Your Profile
You can use the Profile Options page to customize your user profile. To avoid re-
entering personal and permanent information about yourself (phone number, contacts,
etc.) complete your profile after logging into Concur for the first time and update it
whenever your information changes.
Options Description
Your Information Select personal information, work address, home address, contact information, and verify email address.
Request Settings Select request information, add or remove delegates, enter email preferences, select approvers, and add or remove attendees.
Expense Settings Select expense information, add or remove delegates, enter email preferences, select approvers, setup personal car, and add or remove attendees.
Travel Settings Select Travel Preferences to select travel preferences, Accessibility needs, TSA, and passport information.
Other Settings Provides settings such as E-Receipts Activation and Concur Mobile Registration that you can set or update.
Accessing Your Profile Information
Follow these steps to access your profile information:
1. Click the Profile link.
2. Click the Profile Settings link.
Result: You will be directed to the Profile Options page.

Concur Step-by-Step Guidebook 14
3. Click the Personal Information link.
Result: The My Profile – Personal Information page appears.
4. For each section, add the appropriate information, including the required fields
that have been noted in red..

Concur Step-by-Step Guidebook 15
Important: In the TSA Secure Flight section, you must confirm the gender
designated on your government issued photo id.
5. Click the Save button.
Verifying Your Email Address
When you setup your account, you should verify your email address. This will allow you
to send and receive email receipts to your Available Receipt library. Follow these steps
to verify an email address:
1. Click the Profile link.
2. Click the Profile Settings link.
3. From the menu on the left, click the Email Addresses link in the Your Information
section.

Concur Step-by-Step Guidebook 16
4. Click the Verify link in the verify column of the email address you wish to verify.
Result: An alert message will appear.
5. Click the OK button.
Result: A verification code will be sent to the selected email address from
Concur.
6. Using the code from the email you received, enter the code in the Enter Code
field, next to the appropriate email address.
7. Click the OK button.
Result: A pop-up message will appear.
8. Click the OK button, on the pop-up message.

Concur Step-by-Step Guidebook 17
Result: Verification Status will change to Verified with a green check icon.
Adding a Personal Email Address
You also have the option to add additional email addresses, including personal email
addresses, to receive reminders and notifications. Follow these steps to add a personal
email address:
1. Click the Profile link.
2. Click the Profile Settings link.
3. From the menu on the left, click the Email Addresses link under the Your
Information section.
4. Click the Add an email address link.
5. Enter the email address you want to add.

Concur Step-by-Step Guidebook 18
Note: Select the Yes radio button if you would like this email address to receive
notifications.
6. Click the OK link.
Result: The new email address is added to the listing of email addresses.
Important: All email addresses should be verified. Follow the steps noted in the
Verifying Your Email Address section to verify additional email addresses.

Concur Step-by-Step Guidebook 19
Setting Up Reminders and Notifications
Concur will automatically send email notifications and reminders regarding Travel
Requests, Trips, Expense Reports, T&E Card Transactions, and Airfare-Direct Billing
Transactions. Reminder emails will be sent from
[email protected] and notification emails will be sent from
[email protected]. To ensure that these messages are not sent to
a spam folder, add them as a contact or as a safe sender to your email account.
Reminder email settings cannot be turned off or changed. However, some notification
settings may be managed in the Preferences section of your Profile. A list of common
notifications/reminders are included below:
Email Reminders
• Outstanding Travel Request Approvals Reminders
• T&E Card Transaction Reminders
• Expense Report Submission Reminders
• Outstanding Expense Report Approvals Reminders
Email Notifications
• Travel Request Pending Approval Notifications
• Request Recall Notifications
• Request Status Change Notifications
• New Company Card Transactions Notifications
• Expense Report Pending Approval Notifications
• Expense Report Recall Notifications
• Expense Report Status Change Notifications

Concur Step-by-Step Guidebook 20
Managing Expense Notifications
Follow these steps to define when you receive an email notification from Concur
Expense:
1. Click the Profile link.
2. Click the Profile Settings link.
3. Click the Expense Preferences link.
4. Mark the checkbox of when you want an email notification.

Concur Step-by-Step Guidebook 21
Important: It is against T&E Card Policy to disable the "New company card
transactions arrive” notification.
5. Click the Save button.
Managing Request Notifications
Follow these steps to define when you receive an email notification from Concur
Request:
1. Click the Profile link.
2. Click the Profile Settings link.
3. Click the Request Preferences link.
4. Mark the checkbox of when you want an email notification.

Concur Step-by-Step Guidebook 22
5. Click the Save button.
Using Expense Assistant Expense Assistant adds all your incoming UNC-Chapel Hill Travel & Expense (T&E) Card
transactions to an open expense report. An open report can be a user-created expense
report or an expense report that is auto-created by Expense Assistant. Expense
Assistant will continue to add all your new incoming transactions that have a post date
that matches the calendar month of the expense report. Once you enable Expense
Assistant, you can access your automatically created reports on the Expense page.
Enabling Expense Assistant
Follow these steps to enable Expense Assistant:
1. Click the Profile link.
2. Click the Profile Settings link.

Concur Step-by-Step Guidebook 23
3. Click the Expense Preferences link.
4. Select By Month or By Trip from the Sign me up for drop down menu.
5. Click the Save button.
Result: Your Expense Preferences are saved, and Expense Assistant will begin
adding transactions to a monthly expense report. On the Manage Expenses
screen, you can view your newly created reports. Transactions are added to your
reports based on their transaction post date.
Concur Step-by-Step Guidebook 24
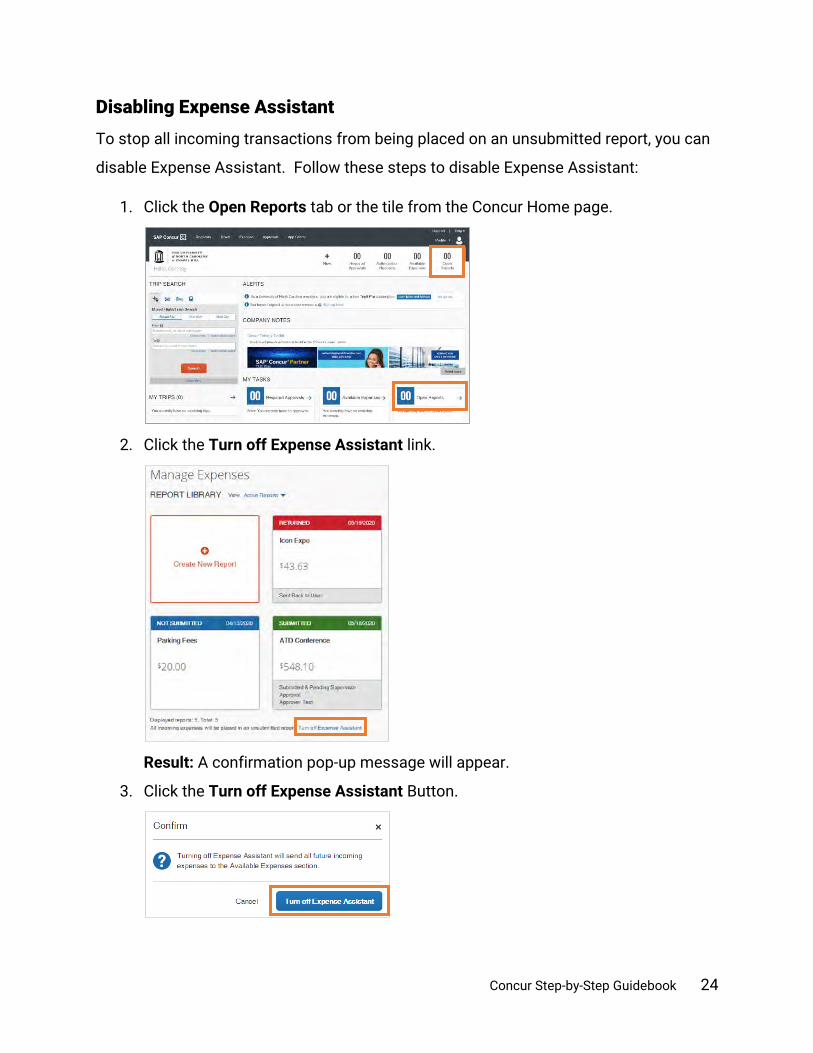
Disabling Expense Assistant
To stop all incoming transactions from being placed on an unsubmitted report, you can
disable Expense Assistant. Follow these steps to disable Expense Assistant:
1. Click the Open Reports tab or the tile from the Concur Home page.
2. Click the Turn off Expense Assistant link.
Result: A confirmation pop-up message will appear.
3. Click the Turn off Expense Assistant Button.

Concur Step-by-Step Guidebook 25
3. Using Delegates & Travel Assistants The Concur system allows you to create Delegates and Travel Assistants who can act
on your behalf. A Delegate is a user who is granted permission to act on behalf of
another user to perform tasks such as creating or approving requests and expense
reports. You can create the following types of delegates:
Approval Delegate - An Approval Delegate can assist in reviewing or approving
Requests and Expense Reports on your behalf. Approval Delegates can use the
Preview feature to send an email notification to the user when a request or report
is ready for their approval.
Personal Delegate - A personal delegate can assist in preparing Requests and
Expense Reports on your behalf. Additional permissions may include the ability
to view receipt images and/or receive copies of emails. However, Personal
Delegates cannot submit reports on your behalf. Personal Delegates can use the
Notify feature to send an email notification to the user when a request or report
is ready to be submitted.
Delegates may be managed and assigned through the Request Delegates link on the
Profile Options page or by following the steps below to access the Expense Delegates
link. Regardless of the navigation path chosen, Delegates will have the same access to
both systems.
Creating a Delegate
Follow the steps below to create a delegate:
1. Click the Profile link.
2. Click the Profile Settings link.

Concur Step-by-Step Guidebook 26
Result: You will be directed to the Profile Options page.
3. Click the Expense Delegates link.
4. Click the Add button.
5. Begin entering the name of the employee you want to assign as a delegate.
6. Click on the employee you wish to add as a delegate.
7. Select the task(s) you want to delegate or perform on your behalf and what
notifications they should receive.

Concur Step-by-Step Guidebook 27
Personal Delegate Options:
• Can Prepare – This allows the delegate to prepare requests or expenses
on your behalf.
• Can View Receipts – This allows the delegate to view receipts that are
uploaded to your account in the Concur system.
• Receives Emails – This allows the delegate to receive the same email
notifications that you receive based on your email notification settings.
Approval Delegate Options:
• Can Approve – This allows the delegate to review and approve requests or
expenses on your behalf.
• Can Approve Temporary – This allows the delegate to review and approve
requests or expenses on your behalf only during the designated time
frame.
• Can Preview for Approver – This allows the delegate to review a request
or report and then notify the Approver once it is ready for their approval.
• Receives Approval Emails – This allows the delegate to receive the same
email notifications that a user who is an approver receives.
8. Click the Save button.

Concur Step-by-Step Guidebook 28
Deleting a Delegate
Follow these steps to delete a delegate:
1. Follow steps 1 to 3, from the section Creating a Delegate.
2. Check the box beside the individual you want to remove as a delegate.
3. Click the Delete button.
Result: A pop-up message will appear verifying that you want to delete the
selected delegate.
4. Click the OK button on the pop-up message.
Result: The system will delete the delegate you selected.
Acting as a Delegate If you have been assigned to work as a delegate, your delegators will define which
task(s) you can complete, such as preparing reports or approving on their behalf.
Follow these steps to act as a delegate:
1. Click the Profile link.
2. Under the Acting as other user, begin entering the name of the employee you
want to act on behalf of. Click on the employee you wish to act on behalf of.

Concur Step-by-Step Guidebook 29
3. Click the Start Session button.
Result: The Profile menu will display “Acting as” and shows the name you
selected. You are now officially working on behalf of that person.
Note: To select a different user, follow the same steps but select a different
name.
Stopping Work as a Delegate
Follow these steps to stop working as a delegate:
1. Click the Acting as link.
2. Click Done acting for others link.

Concur Step-by-Step Guidebook 30
Creating a Travel Assistant
A Traveler can assign a Travel Assistant (Arranger) to manage their travel activities
including, booking, canceling, and changing trip information. A Traveler can choose an
arranger in the Profile section. Follow these steps to create a Travel Assistant:
1. Click the Profile link.
2. Click the Profile Settings link.
Result: You will be directed to the Profile Options page.
3. In the Travel Settings section, click the Assistants/Arrangers link.
4. Click the Add an Assistant link.
Result: The Add an Assistant pop-up window will appear.
5. In the Assistant field, enter the name of the individual(s) you would like to be your
Travel Assistant.

Concur Step-by-Step Guidebook 31
6. Mark the checkbox for Can book travel for me.
7. Mark the checkbox Is my primary assistant for travel, if applicable.
8. Click the Save button.
Result: The selected individual will be listed as a Travel Assistant/Arranger.
9. Click the Save button.

Concur Step-by-Step Guidebook 32
Deleting a Travel Assistant
A Travel Assistants is a user who can book travel on behalf of another user. Travel
Assistants, also known as Arrangers, can be assigned, and/or removed at any time.
If you are the Traveler
Follow these steps to delete a Travel Assistant or Arranger from your profile:
1. Click the Profile link.
2. Click the Profile Settings link.
Result: You will be directed to the Profile Options page.
3. In the Travel settings section, click the Assistants/Arrangers link.
4. Click the Trashcan icon beside the individual(s) you want to delete.
Result: A pop-up confirmation message will appear.

Concur Step-by-Step Guidebook 33
5. Click the OK button.
Result: The Travel Assistant is deleted from the listing.
6. Click the Save button.
If you are a Travel Assistant/Arranger
Follow these steps to delete yourself as being a Travel Assistant or Arranger for a
Traveler:
1. Click on the Travel tab.
2. Click the Arrangers tab.
3. Click the I’m Assisting tab.
4. Click the Trashcan icon beside the Traveler you want to delete yourself from as a
Travel Assistant.
Result: A pop-up message will appear.
5. Click the OK button.

Concur Step-by-Step Guidebook 34
Result: You will no longer have the ability to book travel for the selected Traveler
and their name is removed from the listing.
Acting as a Travel Assistant
A Travel Assistant (Arranger) can manage travel activities (book, cancel, change trips,
etc.) for travelers. Individuals who have been designated as a Travel Assistant can:
• Book flight, rental car, hotel, etc.
• View upcoming trips
• Manage trips actions such as change or cancel a trip for a traveler,
• View/Filter travelers by name or date of traveler
• View trip segment information without having to access the full itinerary
• Access the airline’s check-in webpage to check the Traveler in for a flight
• Access TSA wait time information
• Add another travel arranger for a traveler
• Discontinue their own arranger association with a traveler If you have been designated as a Travel Assistant or Travel Arrangers, follow these
steps to manage and administer travel for another user.
1. Click the Profile link.
2. Under the Acting as other user, begin entering the name of the employee you
want to act on their behalf.
3. Click on the employee you wish to act on their behalf.

Concur Step-by-Step Guidebook 35
4. Click the Start Session button.
Result: The Profile menu will display “Acting as” and shows the name you
selected. You are now officially working on behalf of that person.
Note: After signing in to Act as a Delegate you will need to access the Travel
Arranger View page to manage travel for other users.
5. Click the Travel tab.
6. Click the Arrangers tab.
Result: You will be brought to the Travel Arrangers View page and can begin
managing travel on behalf of another user.
Exploring the Travel Arrangers View Page
The Travelers Arranger View page is where the arranger can perform multiple functions
on the traveler’s behalf.
Section Description
Upcoming
Travelers tab
Use this tab to:
• Search for Travelers based on names or travel dates
• View Travelers contact phone number • Access Trip Actions menu to view itineraries, cancel
trips, etc.
• Access Travel Preferences link to view travel preferences
I’m Assisting tab Use this tab to: • Access a traveler’s profile
• Discontinue (delete) your travel arranger designation

Concur Step-by-Step Guidebook 36
Note: Traveler Assistants/Arrangers can set the Travel Arranger View page as the
homepage when logging into the Concur System. This can be done by following the
menu path of Profile Settings > System Settings > Other Preferences. For the Home
Page option, select Traveler Arranger View.
Stopping Working as a Travel Assistant
Follow these steps to stop working as a Travel Assistant:
1. Click the Acting as link.
2. Click Done acting for others link.

Concur Step-by-Step Guidebook 37
4. Understanding Approval Workflows When a Travel Request or Expense Report is submitted it will go through an approval
workflow. This process ensures that prior to a Travel Request or Expense Report being
processed it has been reviewed and approved by designated department approvers or
Business Officers. The default approval workflow in Concur is assigned based on the
Department approval workflow in ConnectCarolina. Changes made in ConnectCarolina
will be imported into Concur on a nightly basis. These changes will not update the
workflow of requests/reports which have already been submitted but will affect the
workflow of new submissions or re-submissions.
Adding a Default Approver to Your Approval Workflow
Default approvers can be added to a user’s approval workflows via their user profile.
Default approvers can be added:
• only in Request,
• only in Expense,
• the same in both systems,
• or be different between the two systems, if necessary.
Default approvers will always be the first to approve in the Workflow before the
request/report routes to the approvers of the assigned chartfield string(s). Follow these
steps to add a default approver to the user’s profile:
1. Click the Profile link.

Concur Step-by-Step Guidebook 38
2. Click the Profile Settings link.
Result: You will be directed to the Profile Options page.
Adding Default Request Approvers
3. Click the Request Approvers link.
4. Search for the employee you want to add as a default approver.
5. Click on the user you want to add.
6. Click the Save button.

Concur Step-by-Step Guidebook 39
Adding Default Expense Approvers
7. Click the Expense Approvers link.
8. Search for the employee you want to add as a default approver.
9. Click on the user you want to add.
10. Click the Save button.
Concur Step-by-Step Guidebook 40
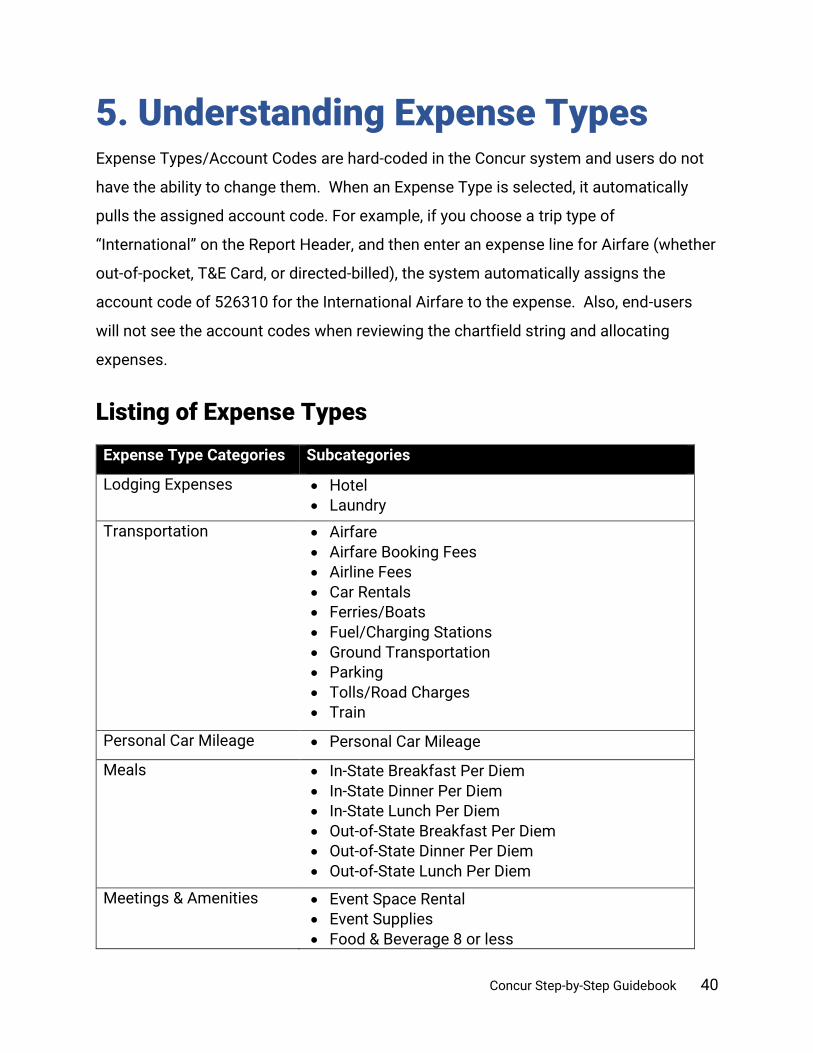
5. Understanding Expense Types Expense Types/Account Codes are hard-coded in the Concur system and users do not
have the ability to change them. When an Expense Type is selected, it automatically
pulls the assigned account code. For example, if you choose a trip type of
“International” on the Report Header, and then enter an expense line for Airfare (whether
out-of-pocket, T&E Card, or directed-billed), the system automatically assigns the
account code of 526310 for the International Airfare to the expense. Also, end-users
will not see the account codes when reviewing the chartfield string and allocating
expenses.
Listing of Expense Types
Expense Type Categories Subcategories
Lodging Expenses • Hotel • Laundry
Transportation • Airfare
• Airfare Booking Fees
• Airline Fees
• Car Rentals • Ferries/Boats
• Fuel/Charging Stations
• Ground Transportation • Parking
• Tolls/Road Charges
• Train
Personal Car Mileage • Personal Car Mileage
Meals • In-State Breakfast Per Diem
• In-State Dinner Per Diem • In-State Lunch Per Diem
• Out-of-State Breakfast Per Diem • Out-of-State Dinner Per Diem
• Out-of-State Lunch Per Diem
Meetings & Amenities • Event Space Rental • Event Supplies
• Food & Beverage 8 or less

Concur Step-by-Step Guidebook 41
• Food & Beverage 9 or more
Office Expenses • Courier/Shipping/Freight
• Equipment/Hardware • Postage
• Printing/Photocopying/Stationary • Suppliers/Software
Communications • International Mobile Phone
• Internet/Online Fees
Fees • Currency Exchange Fees • Entry/Exist Fees
• International Transaction Fee (T&E Card Only)
• Passports/Visa Fees
Other • Booth/Fair Registration • Conference/Seminar Fees
• Documentation Only • Immunization/Medical Fees
• International Travel Health Insurance • Marketing/Promotional Costs
• Miscellaneous • Non-Reimbursable/Personal Expense
Note: If a portion or all of a T&E Card charge is personal, the amount will be deducted from any out-of-pocket reimbursement first. If the expense exceeds the total out-of-pocket expenses, it will automatically create a payroll deduction.
• Professional Subscriptions/Due
• Tip/Gratuities • Tuition/Training Reimbursement
Using the Documentation Only Expense Type
The Documentation Only option from the Expense Type Category should be used only
when you need to attach additional backup documentation. Documentation submitted
with this expense type will have an expense amount of $0.00.

Concur Step-by-Step Guidebook 42
6. Creating and Submitting Travel Requests
In advance of any University business travel which includes airfare, lodging, and/or meal
per diem, you must create and submit a travel request prior to making any travel
arrangements. You can also manage travel requests and cancel any request.
If you are acting as a personal delegate and creating a Travel Request on behalf of
another user, you will not have the option to submit the travel request. Delegates may
prepare the travel request and then use the Notify feature to alert the traveler when the
request is ready to be submitted.
Creating a New Travel Request
Follow these steps to create and submit a travel request:
1. From the Concur home page, click the Requests tab.
2. Click the Create New Request tile.

Concur Step-by-Step Guidebook 43
3. Enter the required (noted by red asterisks) and necessary optional fields.
Notes:
• The Traveler Type, Business Unit, and Department ID fields will
automatically populate based on your ONYEN and user profile.
• It is considered best practice to include the main destination of the trip
and the first day of travel for the request name. For example (Nashville,
TN – 08/08/2020).
4. Click the Create button.
Result: A Request ID number will be generated, and you can add any anticipated
travel expenses. The Request ID number replaces the CABS Number when using
the Direct-Billing option in Concur Travel or booking directly with the University’s
travel agency.

Concur Step-by-Step Guidebook 44
Adding Personal Travel (if applicable)
If the travel request will include personal travel it should be documented when creating
and submitting the request.
5. Select Yes, from the Does this trip include personal travel dropdown.
6. Enter the dates of the personal travel.
Adding Expenses to a Travel Request
After creating the Travel Request you can add airfare, lodging, or other anticipated
expenses. At least one expense must be added to the request before it can be
submitted. Follow these steps to add expenses to a travel request:
7. Open the travel request and click the Add button.
8. Select the type of expense you need to add.

Concur Step-by-Step Guidebook 45
Adding Lodging Expenses to a Travel Request (if applicable)
If you selected Lodging Expenses from step 8, follow these steps to add anticipated
lodging expenses:
9. Enter the required (noted by red asterisks) and necessary optional fields.
Note: If Third Party Lodging is selected as the vendor, you must attach the Non-
Hotel Lodging Authorization Request Form for your department’s review and
approval.
10. Click the Save button.
Result: The expense is added to the listing of expected expenses.
11. If you need to add another anticipated expense, click the Add button. If you are
done adding anticipated expenses, click the Submit Request button.
Concur Step-by-Step Guidebook 46
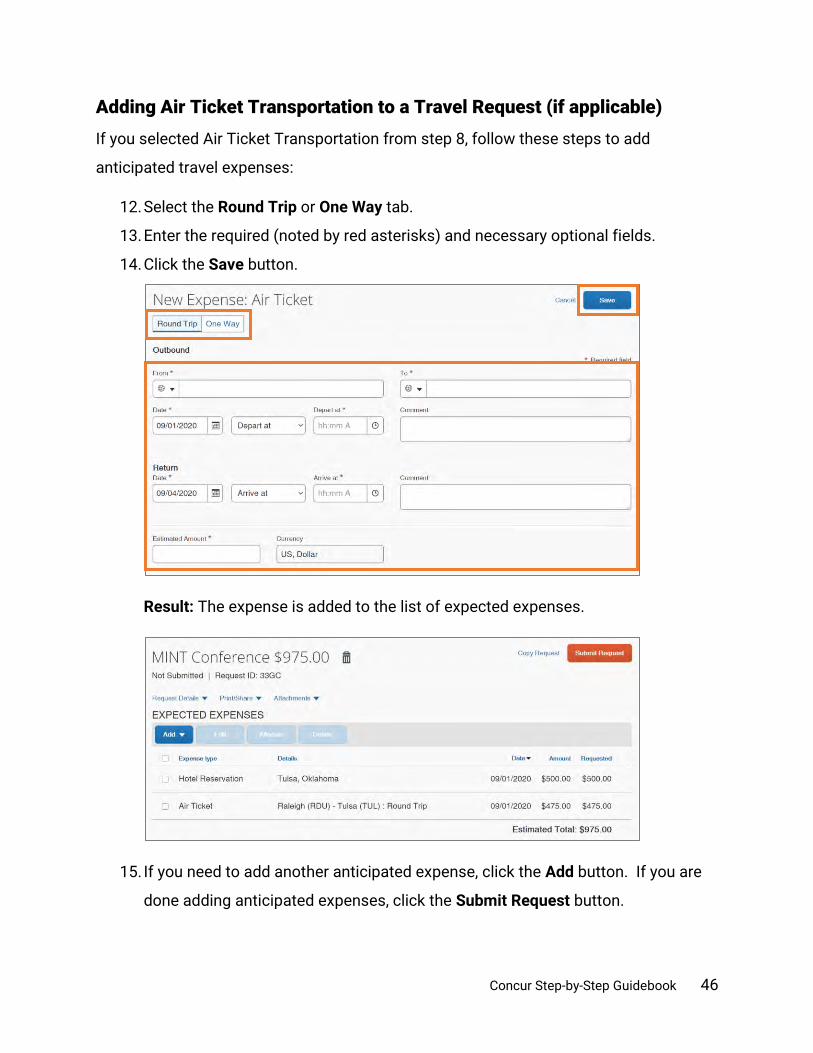
Adding Air Ticket Transportation to a Travel Request (if applicable)
If you selected Air Ticket Transportation from step 8, follow these steps to add
anticipated travel expenses:
12. Select the Round Trip or One Way tab.
13. Enter the required (noted by red asterisks) and necessary optional fields.
14. Click the Save button.
Result: The expense is added to the list of expected expenses.
15. If you need to add another anticipated expense, click the Add button. If you are
done adding anticipated expenses, click the Submit Request button.

Concur Step-by-Step Guidebook 47
Adding Daily Allowance as an Expense to a Travel Request (optional)
If you selected Daily Allowance Meals from step 8, the Travel Request must include
Federal Funding (or an approved exception). The Federal per diem rates may be utilized
in place of the North Carolina per diem Rates. To add the Federal per diem rates, follow
the steps below to add “Daily Allowance” to your Travel Request:
16. Enter the required (noted by red asterisks) and necessary optional fields.
Note: The Trip Start Date, Trip End date, and Destination City will automatically
be added based on the Request Header. Also, the Estimated Amount will
automatically calculate once you click the Save button. The Estimated Amount is
pulled in from the current GSA, Department of Defense, or Department of State
rates. This amount represents the maximum Daily Allowance which you are
eligible to request and will be updated when submitting your Expense Report for
reimbursement.
17. Click the Save button.

Concur Step-by-Step Guidebook 48
Result: The Daily Allowance is automatically calculated and added as an
Expense. The first and last day of travel are calculated at 75% of the day’s total
allowance (including incidentals) per Federal policy. The expense is added to the
listed of expected expenses.
18. If you need to add another anticipated expense, click the Add button. If you are
done adding anticipated expenses, click the Submit Request button.
Adding a Travel Cash Advance Request
To request a cash advance, you must include the request when you are creating a travel
request. This feature will not automatically be enabled and is typically only available
for international travel. Contact the UNC Travel Office if you believe you need access to
Travel Cash Advances. Follow these steps to add a cash advance to a travel request:
1. Follow steps 1 to 8 from Creating a New Travel Request.

Concur Step-by-Step Guidebook 49
2. Click the Request Details dropdown link.
3. Click Add Cash Advance from the dropdown.
Result: The New Cash Advance popup window will appear.
4. Enter the amount of the cash advance.
5. Click the Add Cash Advance button.
6. Click the to expand the Alerts section to review the notice.
7. Click the View link in the Cash Advances section.

Concur Step-by-Step Guidebook 50
8. In the Cash Advance Justification field, enter the justification for the cash
advance request. Please provide as much detail as possible in the justification
field.
Note: You may click the Quick Help icon next to the Cash Advance Justification
field for examples of allowable reasons for a cash advance.
9. Click the Save button.
Result: The cash advance has been added to the Travel Request and the alert
has been cleared.
Adding Approvers to the Workflow
1. Open the Travel Request if it is not already selected.
2. Click the Request Details drop-down link.

Concur Step-by-Step Guidebook 51
3. Select Request Timeline from the drop-down options.
4. Click the Edit link.
5. Click the Add Step link in the timeline of where you want to add an additional
approver to the workflow.
Result: A User-Added Approver lookup field will appear.
6. Search for and select the additional approver.

Concur Step-by-Step Guidebook 52
7. Click the Save button.
Result: The additional approver is added to the Approval Flow.
8. Click the x to close the window.
Viewing the Audit Trail
You can view the current status of your approval workflow and actions in the Audit Trail.
Follow these steps to view the Audit Trail:
1. Open the Travel Request if it is not already selected.
2. Click the Request Details drop-down link.

Concur Step-by-Step Guidebook 53
3. Select Audit Trail from the drop-down options.
Result: The Audit Trail will appear and show Request Level details.
4. Click the x to close the window.
Adding Attachments to a Travel Request
Some travel will require documentation to be submitted along with a travel request.
Follow these steps to add an attachment to a travel request:
1. Open the Travel Request if it is not already selected.
2. Click the Attachments drop-down link.
3. Click Attach Documents from the drop-down options.

Concur Step-by-Step Guidebook 54
Result: A pop-up window will appear for you to add the attachment.
4. Click the Upload and Attach link.

Concur Step-by-Step Guidebook 55
5. Select the file you want to attach.
Result: The attachment will upload and an attachment icon will appear.
Note: Once a document is attached, click on the Attachments drop-down link to
view, delete, or attachment more documents. If attaching multiple documents,
the files will be merged into one and cannot be separated.

Concur Step-by-Step Guidebook 56
7. Creating International Travel Requests
Export Control
When you create a travel request that includes international travel, you may need
approval from the Export Control Office. Export Control laws and regulations are
complex and carry significant criminal and civil liability for both the traveler and the
university. If you have questions as to how or when the regulations apply, please reach
out directly to the Export Control Program or visit our website.
Global Travel
UNC-Chapel Hill Global encourages safe, culturally respectful global travel by University
students, faculty, and staff. To make those travels as successful and safe as possible,
the University has established travel policies to help protect members of the UNC-
Chapel Hill community.
Requirements for international travel are outlined on the University’s Travel and Global
Operations for Travel Requirements and Policy webpage. Travel to certain countries
may be subject to additional restrictions or review. For guidance on planning your trip,
visit the University’s Travel and Global Operations Preparing for International Travel
webpage.

Concur Step-by-Step Guidebook 57
8. Managing a Travel Request You can make edits and changes to a travel request. Depending on the type of change
you are needing to make, follow these steps to manage a travel request:
1. From the Concur home page, click the Requests tab.
2. Click the travel request you want to manage.
Result: The detail of the travel request will appear.
Copying a Travel Request
Copying a Travel Request allows you to quickly create the same Travel Request for
another trip.
Note: If the original request has attachments, you must attach those documents again
to the copied Travel Request. Also, if the original request has workflow modifications,
you must adjust the workflow modification to the copied Travel Request. Follow these
steps to copy a travel request:
1. Follow steps 1 to 2 from Managing a Travel Request.

Concur Step-by-Step Guidebook 58
2. Click the Copy Request link.
Result: A Copy Request pop-up window will appear.
3. Enter a New Request Name for the Travel Request
4. Enter a Starting Date for New Request for the copied request, if applicable.
5. Unmark the Expenses checkbox if you do not want the expense(s) from the
original Travel Request added. Leave the Expenses checkbox checked, if you
want to transfer the original expense(s) to the copied Travel Request.
6. Click the Create New Request button.

Concur Step-by-Step Guidebook 59
Results:
• The new request is created from the original travel request and you can
make any necessary edits prior to submitting the request.
• When the request is saved a new Request ID number is generated. The
Request ID number can be used to look up a Request in the Concur
system.
Editing a Travel Request
You can only edit or delete travel requests that have a status of Not Submitted. Follow
these steps to edit a travel request:
Editing Expected Expenses
1. Follow steps 1 to 2 from Managing a Travel Request.
2. Select the travel expense you want to edit.
Result: Details of the expense will appear.

Concur Step-by-Step Guidebook 60
3. Make any necessary edits.
4. Click the Save button.
Editing the Request Header
1. Follow steps 1 to 2 from Managing a Travel Request.
2. Click the Request Details drop-down link.
3. Click Edit Request Header from the drop-down options.
Result: Edit Request Header page will appear.

Concur Step-by-Step Guidebook 61
4. Make any necessary edits.
5. Click the Save button.
Recalling a Submitted Travel Request If you have submitted a travel request and need to make edits, you will need to recall the
request, then make any necessary edits once the status changes to Not Submitted.
A Request can be recalled as long as it is not fully approved. Once a Request is fully
approved, Requests can only be recalled if both the start and end dates are in the future
and there is no expense report associated with the Request.
Also, if a Request is recalled during or after the approval process, it will go through the
entire workflow approval process again. Follow these steps to recall a submitted travel
request:
1. From the Concur home page, click the Requests tab.

Concur Step-by-Step Guidebook 62
2. Click the travel request you want to recall.
3. Click the Recall button.
Result: A confirmation pop-up message will appear.
4. Click the Yes button.

Concur Step-by-Step Guidebook 63
Result: The Travel Request is now recalled, can be edited, cancelled, and/or
resubmitted. Also, on the Manage Requests page the status of the request has
changed from Submitted (green header) to Returned (red header)
Canceling a Travel Request
If a travel request is not going to take place it should be cancelled.
Important: Canceling a request is a permanent action that cannot be reversed.
Follow these steps to cancel a travel request:
1. From the Concur home page, click the Requests tab.

Concur Step-by-Step Guidebook 64
2. Click the travel request you want to cancel.
3. Click the More Actions button.
4. Click the Cancel Request option from the drop-down.
Result: A confirmation pop-up window will appear.

Concur Step-by-Step Guidebook 65
5. Click the Yes button.
Result: The Travel Request is canceled and is no longer listed as an Active
Request.
Closing/Inactivating a Travel Request
A travel request can be closed and made inactive. This is different from canceling a
request. Closing or making a request inactive should be used to closeout a request
when it has been fully expensed but still has a remaining balance.
Important: Closing or making a travel request inactive is a permanent action that cannot
be reversed.
Follow these steps to close a request or make it inactive:
1. From the Concur home page, click the Requests tab.
2. Click the travel request you want to close and make inactive.

Concur Step-by-Step Guidebook 66
3. Click the More Actions drop-down button.
4. Click Close/Inactive Request from the drop-down options.
Result: A confirmation pop-up message will appear.
5. Click the OK button.
Result: The Travel Request is closed, made inactive, and is no longer listed as an
Active Request.

Concur Step-by-Step Guidebook 67
9. Reviewing and Approving Travel Requests If you are given the role of an approver in Concur, you will receive an email notification
when travel requests are submitted by a user. Approval delegates may also receive
email notifications and be able to preview or approve reports, depending on their
assigned permissions. To approve requests, you must log in to the Concur system.
Approving a Travel Request
Follow these steps to approve a travel request:
1. From the Concur home page, click the Approvals tab or one of the Required
Approvals tiles.
Result: You will be brought to the Approvals page.

Concur Step-by-Step Guidebook 68
2. Click the Requests tab if you are not immediately brought to that tab.
Result: You will see a listing of the travel requests that are pending your
approval.
3. Click on the Request Name link to review the details of the travel request.
4. Review the Travel Request.
Important: Review all elements of the Request carefully including cash advances,
third-party lodging requests, personal travel, etc. Approval of the Request
signifies your approval of all elements of the Request.
Notes:
• If you need to allocate anticipated expenses, mark the designated
checkbox by the expense, then click the Allocate button. For more details
on how to allocate an expense view the Allocating Expenses section.
Department Approvers may want to allocate anticipated expenses so that
the correct approvers are incorporated into the approval workflow.
• Allocations created on the Travel Request will copy over the
accompanying Expense Report and may be updated as needed.

Concur Step-by-Step Guidebook 69
5. Click the Approve button.
Result: The UNC-Approver Submit Agreement pop-up message appears.
6. Click the Accept & Continue button.
Result: The Travel Request is approved, and it will no longer be shown on your
list of Approvals.
Sending a Travel Request Back to a User
If you have reviewed a travel request and find that you need to send it back to the user
for further edits you can send the travel request back. Also, the submitter of the request
may ask that you send it back for edits as well. Follow these steps to send a travel
request back to a user:
1. Follow steps 1 to 3 from Approving a Travel Request.
2. Click the More Actions button.

Concur Step-by-Step Guidebook 70
3. Click Send Back to Employee from the drop-down options.
Result: A Send Back to Employee pop-up message appears.
4. Enter your comments, explaining why you are returning the request.
5. Click the Send Back button.
Result: The Travel Request is sent back to the users and it will no longer be
shown on your list of Approvals.
Adding an Additional User or Business Officer for Approval
Follow these steps to add an additional user or business officer for approval:
1. Follow steps 1 to 3 from Approving a Travel Request.
2. Click the More Actions button.

Concur Step-by-Step Guidebook 71
3. Click Edit Approval Flow from the drop-down options.
Result: The Edit Approval Flow pop-up window appears.
4. Click the Add Step link in the timeline where you want to add an additional
approver to the workflow.
Result: A User-Added Approver lookup field will appear.
5. Search for and select the additional approver in the User-Added Approver field.
6. Click the Save button.
Result: The additional approver is added to the Approval Flow.

Concur Step-by-Step Guidebook 72
10. Making Reservations & Booking Travel Booking a Trip on Concur Travel is similar to how you would book a personal trip online.
The Concur Travel element of the system allows users to book travel that can include
Flight/Train, Rental Car, and/or Hotel. Users of the system can book travel themselves
as the Traveler or utilize a designated Travel Assistant/Arranger to make the booking
and travel reservations.
Booking a Flight
If a Traveler needs to make reservations for a trip that includes a flight/train, the
booking process will always begin with booking a flight/train, regardless if lodging, and
car rental are needed as well. You will have the opportunity to specify that you need a
car and/or hotel on the Flight/Train tab. Follow these steps to book a flight/train:
1. From the Concur Homepage, click the Travel tab.
Result: by default, the Flight/Train tab option will be selected.
2. Select one of the following:
• Round Trip
• One Way
• Multi City

Concur Step-by-Step Guidebook 73
3. In the From and To fields, enter the cities for travel.
Note: When you enter a city, airport name, or airport code, the system will
automatically search for a match. You can also use the Find an airport link or
Select multiple airport links as needed.
4. In the Depart and Return fields, select the appropriate dates and times.
5. If you need a hotel and/or car rental mark the Pick-up/Drop-off car at airport
and/or Find a Hotel. Otherwise, continue to the next step.
6. Click the Search button.
Result: A pop-up window to review Basic Economy Fares information will appear
and a listing of reservations options.
7. Review the Basic Economy Fares information.
8. Click the Ok button.

Concur Step-by-Step Guidebook 74
9. Click the View Fares button next to the preferred itinerary to view available
booking options.
10. Click the blue fare button that shows the amount of the fare to proceed.
Result: The Review and Reserve Flight page will appear.
Important: Fare that is flagged as “Out-of-Policy” can be booked. When selected
the system will present the user with an Out-of-Policy pop-up window. Users

Concur Step-by-Step Guidebook 75
must then select the reason this “out-of-policy” fare is being selected.
Simultaneously, the system will maintain historical data of “in-policy” bookings
that were available at the time as well.
Result: The Review and Reserve Flight page will appear.
11. Click the Select a Seat links in the Select Seats section to select your seat for
departure and returning flights.
12. Select a Payment Method.
13. Click the Reserve flight and Continue button.
Result: The system reserves the flight and Travel Details page appears noting
that the flight has been secured.
14. Adding a Car: If you marked the box Pick-up/Drop-off car at airport from step 5
the rental car search results will appear. Review the section, Booking a Rental
Car, for instructions on how to secure a car rental.
Adding a Hotel: If you marked the box Find a Hotel from step 5, hotel search
results will appear. Review the section, Booking a Hotel, for instructions on how
to add hotel lodging.

Concur Step-by-Step Guidebook 76
15. Review the Total Estimated Cost and other itinerary information for your travel
itinerary on the Travel Details page and make any necessary changes.
16. Click the Next button at the bottom of the page.
Note: If your trip does not include a car rental or hotel reservations a pop-up
message will appear. Click the OK button.
17. Enter the Trip Name, Trip Description, and the Concur Request ID number
associated with the travel.
18. Click the Next button.
Result: The Trip Confirmation page will appear.
19. Click the Purchase Ticket button to confirm the itinerary.
Result: The Finished page will appear stating that you have successfully booked
your trip.

Concur Step-by-Step Guidebook 77
Booking a Rental Car
1. Complete one of the following:
• If your travel does not require airfare and you only need to request a car
rental, click the Car icon.
Or
• If you marked the check box Pick-up/Drop Off Car at airport from step five in
Booking a Flight continue to step 6.
2. Enter your Pick-up and Drop-off dates and times.
3. In the Pick-up car at section select one of the following:
• Select Airport Terminal and enter the City or the Airport Code.
Or
• Select Off-Airport and enter, or search for the location.
4. Mark the check box Return car to another location if the Drop-off location will be
different from the Pick-Up location and select the appropriate location.
5. Click the Search button.
Result: Search results will appear, and you have the option to filter the search
results.
6. Select the blue fare button for the car you want to rent.

Concur Step-by-Step Guidebook 78
Result: The Review and Reserve Car page will appear.
7. Provide any rental car preferences and driver information, as necessary.
Note: In the Travel Details section, you can print/email the itinerary, change, or
cancel the reservation.
8. Click the Reserve Car and Continue button.
Result: The Travel Details Page will appear.
9. Click the Next button.
Result: The Trip Booking Information page will appear.
10. Enter a Trip Name, Trip Description, and the Concur Request ID number
associated with the travel.
11. Click the Next button.

Concur Step-by-Step Guidebook 79
Result: The Trip Confirmation page will appear.
12. Review the trip details.
13. Click the Confirm Booking button.
Result: The Finished page will appear stating that you have successfully booked
your trip.
Booking a Hotel
1. Complete one of the following:
• If your travel does not require airfare and you only need to request hotel
lodging, click the Hotel icon.
Or
• If you marked the check box, Find a Hotel from step five in Booking a Flight
continue to step 4.
2. Enter the Check-in and Check-out Dates.
3. Enter the search radius.
Note: You can choose to search near an airport, an address, or near another
location.
4. Click the Search button.

Concur Step-by-Step Guidebook 80
5. If applicable, review the Hotel Per Diem Locations page. Then click the Next
button.
Result: The Search results will appear, and you have the option to filter and or
sort the search results.
6. Review the search results:
• Click the hotel picture to see more images.
• Click Hotel Details to see contact information, street address, cancellation
policy and information about the facility.
• Click View Rooms to see available room options and rates, amenities, and
rules for cancellation policy.
7. Click the View Rooms button next to the hotel you want to select.
Concur Step-by-Step Guidebook 81
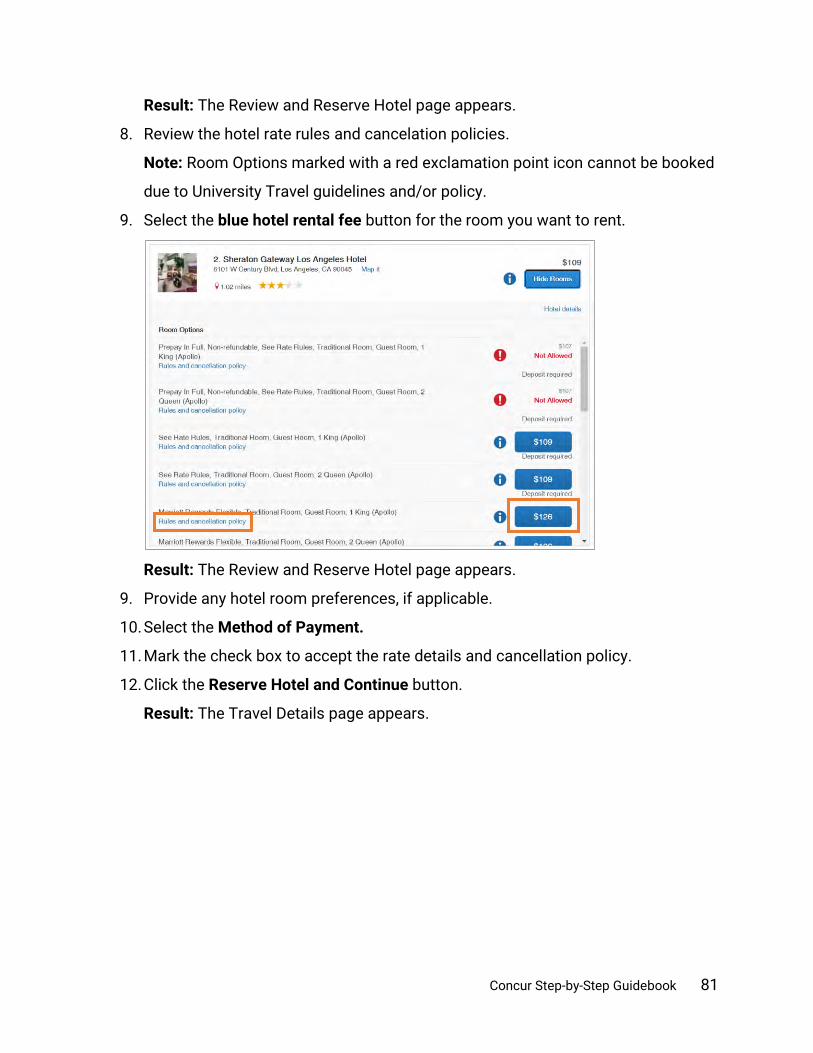
Result: The Review and Reserve Hotel page appears.
8. Review the hotel rate rules and cancelation policies.
Note: Room Options marked with a red exclamation point icon cannot be booked
due to University Travel guidelines and/or policy.
9. Select the blue hotel rental fee button for the room you want to rent.
Result: The Review and Reserve Hotel page appears.
9. Provide any hotel room preferences, if applicable.
10. Select the Method of Payment.
11. Mark the check box to accept the rate details and cancellation policy.
12. Click the Reserve Hotel and Continue button.
Result: The Travel Details page appears.

Concur Step-by-Step Guidebook 82
13. Enter a Trip Name, Trip Description, and the Concur Request Id number
associated with the travel.
14. Click the Next button.
15. Click the Confirm Booking button.
Result: The Trip Confirmation page appears.
16. Review the details of the trip and make any changes if necessary.
17. Click the Confirm Booking button.
Result: The Finished page will appear stating that you have successfully booked
your trip.
Booking Travel as an Assistant
As an Assistant the Travel Arranger View makes it easy for you to manage travel for
travelers. If you have been assigned to work as a Travel Assistant, your Traveler will
define which task(s) you can complete:

Concur Step-by-Step Guidebook 83
Follow these steps to book travel as a Travel Assistant:
1. Follow steps 1 to 5, from section Acting as a Travel Assistant.
Result: You are acting on behalf of the selected Traveler and can begin booking
trips as if you were the Traveler yourself.
2. Click the Start Session button.
3. Click on the Travel tab.
Result: Now you can begin booking travel on the Traveler’s behalf, just as if you
were booking travel for yourself.
Changing or Canceling a Trip
Flight changes may be available for Travelers that include a single carrier. Also, if the
trip has been booked or ticketed, but has not occurred, you can change the time or date
of the trip.
To cancel an entire trip, follow these steps:
1. Click the Travel tab on the Concur homepage.
2. Click the Trip Library tab.
Result: A listing of upcoming trips will appear.
3. Click the Cancel Trip link next to the trip you want to cancel.

Concur Step-by-Step Guidebook 84
Result: A Cancel Trip pop-up message will appear.
4. Click the Ok button on the pop-up message.
Result: A confirmation message will appear stating that the trip has been
successfully cancelled.
Note: If you are unable to change or cancel your Concur World Travel reservation,
contact your World Travel, Inc agent for assistance.

Concur Step-by-Step Guidebook 85
11. Understanding Receipts Most expenses will require a receipt. The Concur system will alert you when a required
receipt is missing and when a Missing Receipt Declaration is not allowed. You can
review Procedure 1501.7 on Travel Expenses and Reimbursements to learn more.
Receipts can be uploaded and attached to reports. Below are the various methods of
submitting transaction information and receipt data into the Concur System:
Method Where the receipt/transaction will appear in Concur
Airfare Direct Bill Airfare Direct Billing transactions appear in the Available Expenses section.
Concur Mobile App Receipts that are captured using the Concur Mobile App are automatically uploaded to the system and appear in the Available Receipts section.
Direct Upload Receipts that are directly uploaded to the system appear in the Available Receipts section. Note: You can also directly upload receipts when creating an expense report.
E-Receipts E-Receipts provided by TripLink appear in the Available Expenses section.
Email Receipts Emailed receipts appear in the Available Receipts section.
T&E Card T&E Card transactions appear in the Available Expenses section.

Concur Step-by-Step Guidebook 86
Enabling E-Receipts
E-receipts are an electronic version of receipt data that can be sent directly to Concur to
replace imaged paper receipts. The availability and content of e-receipts vary
depending on the vendor. Also, you must opt-in from your profile before e-receipts can
be activated. Once activated, eligible transactions will appear in the Available Expenses
section, the same way that T&E Cards transactions appear.
Important: Some vendors may require additional paperwork before they can send e-
receipt data.
Follow these steps to enable and activate e-receipts:
1. From the Concur home page complete either of the following:
a. Click the Sign up here link.
or
a. Click the Profile link.
b. Click the Profile Settings link.
Result: You will be directed to the Profile Options page.
c. Select E-Receipts Activation (in the Other Settings section on the left-side
menu).
Result: The E-Receipt Activation appears.
Concur Step-by-Step Guidebook 87
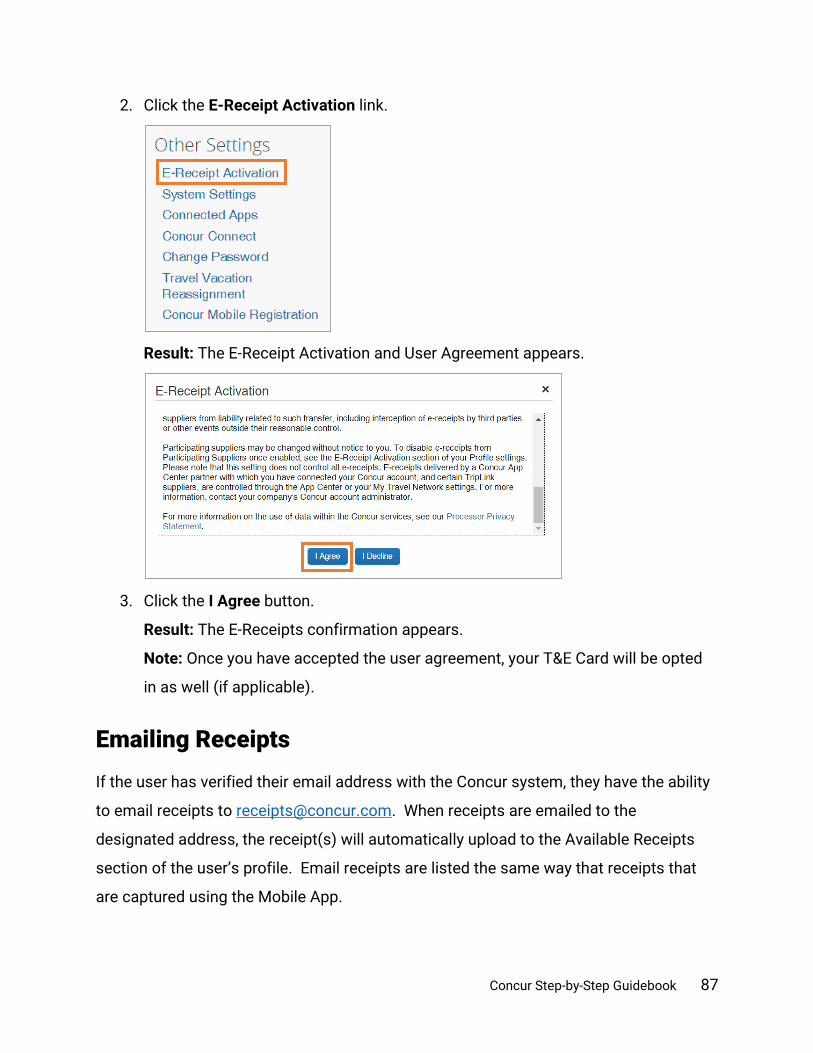
2. Click the E-Receipt Activation link.
Result: The E-Receipt Activation and User Agreement appears.
3. Click the I Agree button.
Result: The E-Receipts confirmation appears.
Note: Once you have accepted the user agreement, your T&E Card will be opted
in as well (if applicable).
Emailing Receipts
If the user has verified their email address with the Concur system, they have the ability
to email receipts to [email protected]. When receipts are emailed to the
designated address, the receipt(s) will automatically upload to the Available Receipts
section of the user’s profile. Email receipts are listed the same way that receipts that
are captured using the Mobile App.

Concur Step-by-Step Guidebook 88
Uploading Receipts to Available Receipts
Users can choose to upload receipt images directly to the system in a supported format
and view them in Available Receipts. These images are then available to that user
(only) for the purpose of attaching to expense report entries.
Users may also upload receipts using the Concur Mobile App. These receipts are
uploaded to the Concur system automatically and can be viewed in Available Receipts.
Then you can attach the receipt images at the line item expense entry level (only).
Follow these steps to upload a receipt into your available receipts:
1. Open the Manage Expense page by clicking on the Available Expenses tab or tile.
2. Click the Upload Receipt Image tile in the Available Receipts section.

Concur Step-by-Step Guidebook 89
Result: A pop-up window will appear for you to select the receipt to upload.
Note: The system accepts file attachments in PDF, JPG, HTML, TIF or TIFF
formats.
3. Select the file to be uploaded. (These steps will vary depending on your devices
operating system.)
Result: The image of the receipt will appear.

Concur Step-by-Step Guidebook 90
12. Creating Expense Reports Expense Reports are used to verify allowable transactions and expenses related to your
travel or business entertainment expenses. In addition, it is used to reconcile T&E Card
transactions, generate reimbursements, and charge correct chartfield strings.
Creating a New Expense Report without a Travel Request
Follow these steps to create a new expense report without a travel request:
1. From the Concur home page complete the following:
a. On the Concur home page, place your mouse pointer over New on the Quick
Task Bar.
b. Click the Start a Report link.
or
Click the Expense tab.
Result: The Manage Expenses page will appear.
2. Click the Create New Report tile in the Report Library section.
3. On the Create a New Report page, complete all required (noted by red asterisks)
and optional fields as needed.

Concur Step-by-Step Guidebook 91
Note: For non-overnight travel, it is considered best practice to include the
business purpose of the expense report for the Report Name. For example (July,
2020 Mileage).
4. Click the Create Report button.
5. Then continue to follow the steps noted in the Adding Expenses to an Expense
Report chapter.
Creating a New Expense Report from a Travel Request
You can create an expense report from an approved travel request. Follow these steps
to create a new expense report from a travel request:
1. Open the Active Requests page by clicking on the Requests tab.
2. Select the Travel Request you want to create an expense report for.

Concur Step-by-Step Guidebook 92
3. Click the Create Expense Report button.
Result: All Report Details of the approved Travel Request will populate on the
Expense Report.
4. Then continue to follow the steps noted in the Adding Expenses to an Expense
Report chapter.
Copying an Expense Report
You can copy an entire expense report to create a new expense report. Follow these
steps to copy an expense report as a new expense report:
1. Open the Manage Expenses page by clicking on the Expense tab.
Result: The Manage Expenses page will appear.

Concur Step-by-Step Guidebook 93
2. Click on the expense report you want to copy.
Result: The selected expense report will appear.
3. Click the Copy Report button.
Result: The Copy Report popup window will appear.
4. Enter a new name for the report in the New Report Name field.
5. Enter the starting date for the report in the Starting date for copied expenses
field.
6. Click the Create New Report button.

Concur Step-by-Step Guidebook 94
Result: The new expense report has been created. It can then be edited, saved,
or submitted.

Concur Step-by-Step Guidebook 95
13. Adding Expenses to an ExpenseReport
Adding Available Expense Transactions
On the Concur home page, you can view a list of unassigned T&E card transactions,
Airfare Direct Bill transactions, and E-Receipts in the Available Expenses section. Also,
for Available Expenses, some of the expense types may automatically populate based
on the merchant or transaction type. These transactions must be reviewed and edited
as necessary to ensure the correct account code is assigned and the correct expense
form is completed.
Note: The payment type for T&E Card transactions and Airfare Direct Bill transactions
will automatically be assigned and cannot be changed.
When using your T&E Card for purchases in a foreign currency, Bank of America will
assess an International Transaction Fee. These fees will appear as separate
transactions under Available Expenses and should be included on the same Expense
report as the T&E Card expenses which they are related to. No receipt is required when
reconciling the expense.
From an open expense report
Follow these steps to add available transactions within an open report:
1. Click the Add Expense button.

Concur Step-by-Step Guidebook 96
2. From the Available Expenses tab, select the check box(es) for the appropriate
expenses you want to assign to the current expense report.
3. Click the Add to Report button.
From the Available Expense section
Expenses listed in the Available Expense section can be added to an existing expense
report or used to create a new expense report. Follow these steps to assign
transactions to a report from the Available Expenses section:
1. Click the Available Expenses tile in the My Task section of the Home page.
2. From the Available Expenses section (you might need to scroll down) mark the
checkbox next to the Available Expense(s) you want to add to an existing
expense report or new report.
3. Click the Move to button.
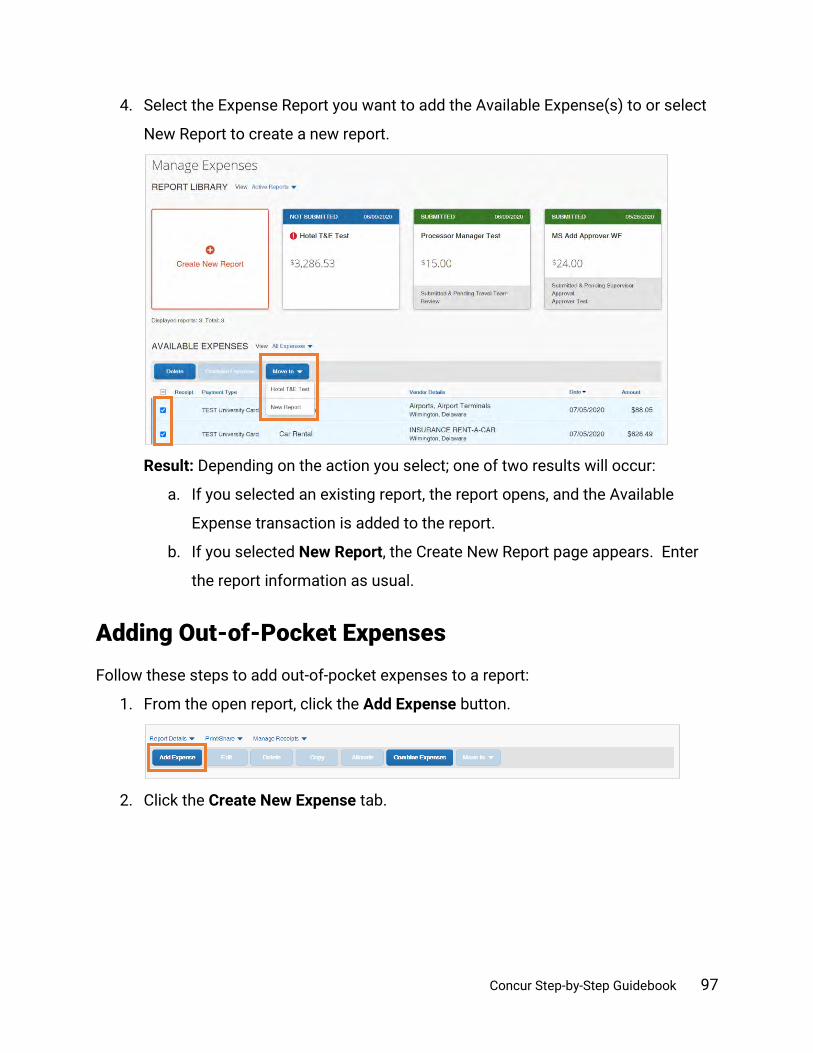
Concur Step-by-Step Guidebook 97
4. Select the Expense Report you want to add the Available Expense(s) to or select
New Report to create a new report.
Result: Depending on the action you select; one of two results will occur:
a. If you selected an existing report, the report opens, and the Available
Expense transaction is added to the report.
b. If you selected New Report, the Create New Report page appears. Enter
the report information as usual.
Adding Out-of-Pocket Expenses
Follow these steps to add out-of-pocket expenses to a report:
1. From the open report, click the Add Expense button.
2. Click the Create New Expense tab.

Concur Step-by-Step Guidebook 98
3. Search for or select the appropriate expense type from the list.
Result: The New Expense page appears displaying the required and optional
fields for the selected expense type. The Expense Type field, Traveler Type, Trip
Type, and Report/Trip Purpose are all automatically populated on the New
Expense page.
4. Complete the required (noted by red asterisks) and optional fields.
5. Select Out of Pocket, from the Payment Type dropdown menu.
6. Click the Attach Receipt Image icon to upload and/or attach the receipt.
Note: If the expense requires itemization, click the Itemization tab.
7. Click the Save Expense button.

Concur Step-by-Step Guidebook 99
Adding P-Card, Purchase Order, Voucher Paid, and Third-Party Expenses
Transactions paid by P-Card, Purchase Order, Voucher, or by a Third-Party are not
required for Expense Report processing. However, it is a recommended best-practice to
include these transactions so that your Expense Report provides a complete view of all
costs associated with a trip.
Follow these steps to add expenses paid by P-Card, Purchase Order, Voucher, or a Third-
Party to a report:
1. From the open report, click the Add Expense button.
2. Click the Create New Expense tab.
3. Search for or select the appropriate expense type from the list.
Result: The New Expense page appears displaying the required and optional
fields for the selected expense type.
4. Complete the required (noted by red asterisks) and optional fields.
5. Select one of the following, from the Payment Type dropdown menu.
• Paid by 3rd Party
• University paid by PCard
• University paid by Purchase Order
• University paid by Voucher

Concur Step-by-Step Guidebook 100
6. Click the Attach Receipt Image icon to upload and attach the receipt.
Note: If the expense requires itemization, click the Itemization tab.
7. Click the Save Expense button.
Adding Personal Meal Expenses for Reimbursement
All personal meals must be paid for out-of-pocket by the traveler. University travelers
are only eligible for reimbursement of meals when they make an overnight trip. Partial
day reimbursement is possible when the partial day is the day of departure or return for
a trip, but it must be in conjunction with an overnight trip taken. No excess
reimbursement will be allowed for meals unless there is a documented exception in
place, or the meals were for out-of-country travel.
University travelers may claim reimbursement for the following meals, if:
• Breakfast - depart duty station prior to 6 a.m.
• Lunch - depart duty station prior to Noon (day of departure) or return to duty
station after 2:00 p.m. (day of return).
• Dinner - depart duty station prior to 5:00 p.m. (day of departure) or return to duty
station after 8:00 p.m. (day of return).
Concur Step-by-Step Guidebook 101
Note: You must enter the departure and return time on the first and last day of travel,
respectively.
Adding North Carolina Per Diem Expenses
Travel that includes personal meals in accordance with the North Carolina per diem
rates does not require receipts for documentation. Follow these steps to add a
personal meal expense for travel using North Carolina per diems:
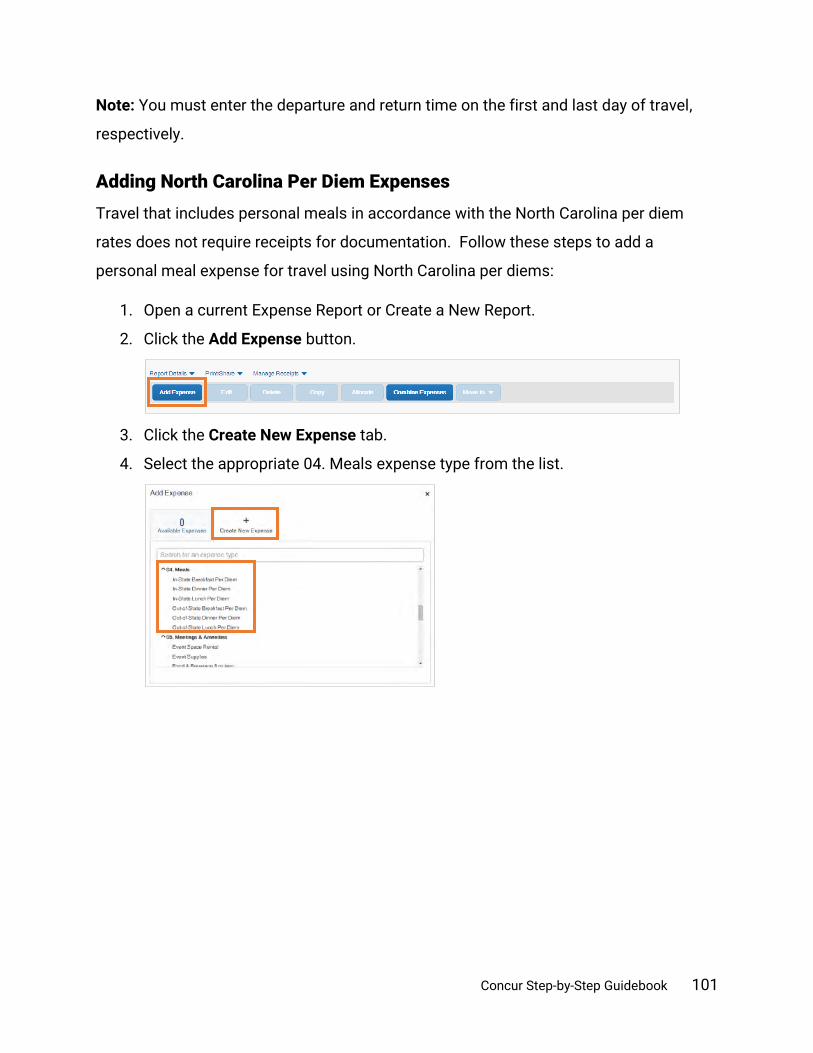
1. Open a current Expense Report or Create a New Report.
2. Click the Add Expense button.
3. Click the Create New Expense tab.
4. Select the appropriate 04. Meals expense type from the list.

Concur Step-by-Step Guidebook 102
5. Complete the required (noted by red asterisks) and necessary optional fields,
leaving the Amount field empty.
Notes:
• The Time of Departure/Return field is only required for the first and last
day of travel. Also, the Start Date and End Dates are automatically
retrieved from the Report Header.
• The amount of the per diem will automatically populate in the Amount
field based on the Expense Type selected. This amount cannot be
changed.
6. Click the Save Expense button.
Result: The expense will be saved and amount of the per diem will be populated.
Note: To copy a per diem expense, follow the steps noted in the Copying an
Expense in the Adding Expenses to Expense Reports chapter.
Adding a Daily Allowance Expense (Federal per diem rates)
When traveling and using federal funds, the Concur system can incorporate the federal
per diem rates based on the destination as well as departure and return dates of travel.
• International - When traveling Outside of the Contiguous United States
(OCONUS), Concur will utilize the rates set by the Department of State. These

Concur Step-by-Step Guidebook 103
rates can be found on the US Department of State's Foreign Per Diem
Rates webpage.
• Domestic - When traveling within the Continental United States (CONUS), Concur
will utilize the rates set by the US General Services Administration (GSA). These
rates can be found on the US GSA's Per Diem Rates webpage.
• Other - When traveling to Hawaii, Alaska, or US Territories and Possessions,
Concur will utilize the rates set by the Department of Defense. These rates can
be found on the Department of Defense Travel Management office webpage.
The maximum allowable amount will be calculated for the Daily Allowance based on the
location and dates of travel. However, the first and last day of travel of the Daily
Allowance will be calculated at 75% of the day’s total (including incidentals).
Follow these steps to add a daily allowance expense:
1. Open an expense report or create a new expense report.
2. Click the Travel Allowance dropdown link.
3. Click Manage Travel Allowance from the dropdown menu.
Result: The Available Itineraries wizard appears.

Concur Step-by-Step Guidebook 104
4. Select an itinerary from the Available Itineraries section.
5. Click the Assign button.
Note: If no itineraries exist, click the Previous button to create a new itinerary and
follow the steps below to create a new itinerary. Then continue to step 5.
Follow these steps to create a new itinerary:
a. Enter the following in the designated and required (as noted by red bars)
fields of the New Itinerary Stop section:
• departure city
• departure date and time
• arrival city
• arrival date and time
b. Click the Save button.

Concur Step-by-Step Guidebook 105
Result: The stop will be added to the list on the screen and the New Itinerary
Stop section will be refreshed to add another stop. The departure and arrival
cities will automatically be populated but reversed from what was previously
entered.
c. Enter the following in the designated fields of the New Itinerary Stop section:
• departure date and time,
• arrival city (if this needs to be updated to a different destination),
• arrival date and time.
d. Click the Save button.
e. Click the Next button.
Note: Itineraries many contain multiple destinations. Repeat steps 6 to 8 as
necessary to list the complete itinerary and ensure the proper per diem rates
are being provided based on the destination.

Concur Step-by-Step Guidebook 106
6. Click the Next button.
7. Once your itineraries appear mark the check boxes of when a meal was provided
for each day.
Note: If all meals are provided, the calculation will still reimburse the appropriate
incidental rate for that day. However, if you wish to exclude an entire day,
including incidentals, check the box to the far left under “Exclude”. If no meals
were provided do not mark any of the checkboxes.
Result: The allowance will automatically calculate the per diem for
reimbursement.

Concur Step-by-Step Guidebook 107
Note: Daily Allowance will automatically calculate the first and last day of travel
at 75% of the day’s total allowance (including incidentals) per Federal guidelines.
8. Click the Create Expenses button.
Result: The daily allowance expense(s) will be added to the expense report.

Concur Step-by-Step Guidebook 108
Moving Expenses from One Report to Another or Back to Available Expenses
The ability to move an expense from one report to another is helpful when an expense
transaction has been assigned to the wrong expense report. Follow these steps to
move an expense to another expense report:
1. Open a current Expense Report that contains the transaction you want to move.
2. Select the checkbox next to the transaction(s) you want to move.
Note: Select the uppermost check box to select all transactions.
3. Click the Move to button.
4. Select the name of the appropriate report or select a New Report from the
dropdown.
Result: Depending on the action you select; one of two results will occur:
• If you select an existing report, the report opens, and the selected
transaction(s) are moved to the report.
• If you select New Report, the Create New Report page appears. Enter the
report information to create the new report.
Combining Expenses
Transactions listed in the Available Expense section can be combined to reduce
duplicate expenses. This feature is helpful when you have a combination of T&E Card
transactions, E-Receipts, and expenses created using the Mobile app. Duplicate
T&E Card

Concur Step-by-Step Guidebook 109
expenses must be combined to prevent duplication and resolve seemingly outstanding
expenses. Follow these steps to combine expenses:
1. From the Concur homepage, click the Available Expenses tile.
2. In the Available Expenses section, mark the checkbox beside each expense that
needs to be combined.
3. Click the Combine Expenses button.
Attaching Receipts
Most expenses will require a receipt. The Concur system will alert you when a required
receipt is missing and when a Missing Receipt Declaration is not allowed. You can
review Procedure 1501.7 on Travel Expenses and Reimbursements to learn more.
Receipts can be added when creating a new expense or can be added from the main
report page by clicking the receipt “+” icon on the expense line. The steps noted in this
section provide instruction on how to attach a receipt to an expense report. Follow
these steps to attach a receipt image to an expense report:
1. Select an expense entry and open it in the Details view.
2. Click Attach Receipt Image tile.
3. Click Upload Receipt Image or the Attach link on a receipt that has been
uploaded previously.

Concur Step-by-Step Guidebook 110
Note: If selecting the Upload Receipt Image tile, follow the prompts on the
screen to select the receipt to upload. Also, the system accepts file attachments
in PDF, JPG, HTML, TIF or TIFF formats.
Result: The receipt image is attached to the expense entry and displays on the
right side of the screen.
Note: You can detach or append receipts. Only one file may be attached initially
but you may then use the Append feature to add additional files.
Missing Receipt Declaration
A Missing Receipt Declaration should be completed when a receipt is lost or misplaced,
and the expense requires a receipt. In these instances, you can digitally sign a
declaration that you can submit, instead of the actual imaged receipts. Using a receipt
declaration allows you to submit your expense report in a timely manner and comply
with Procedure 1501.7 on Travel Expenses and Reimbursements on receipt submittal.

Concur Step-by-Step Guidebook 111
Important: A delegate cannot submit a Missing Receipt Declaration on your behalf.
Also, Missing Receipt Declarations are not allowable for the following expense types:
• Lodging
• Airfare
• Car Rental
• Conference Registration
Submitting a Missing Receipt Declaration
Follow these steps to submit a missing receipt declaration:
1. Open the expense report that has the expense missing a receipt.
2. Click the Manage Receipts link dropdown arrow.
3. Select Missing Receipt Declaration.
Result: A Create Receipt Declaration pop-up window will appear.
4. Mark the checkbox for each eligible expense entry that requires the declaration.
5. Read through the declaration, scrolling down to continue.

Concur Step-by-Step Guidebook 112
6. Click the Accept and Create button.
Result: The missing receipt declaration is attached, and an icon displays on the
line item entry. If you later find the receipt (before submitting the report), you can
detach the receipt declaration, and then attach the actual receipt image.
Deleting a Missing Receipt Declaration
Follow these steps to delete a missing receipt declaration from an expense:
1. Open the expense report that has a Missing Receipt Declaration.
2. Click the Declaration icon.
Result: A pop-up window will appear.

Concur Step-by-Step Guidebook 113
3. Click the Delete button.
Result: A confirmation pop-up message will appear.
4. Click the Yes button.
Result: The receipt declaration is deleted from the expense line item. You can
now add the appropriate receipt to the expense.
Adding Personal Car Mileage
If a personal vehicle has been used for travel, the traveler can request reimbursement
based on the rates established by the State of North Carolina.
Follow these steps to enter personal car mileage as an expense:
1. Open a current Expense Report or Create a New Report.
2. Click the Add Expense button.
3. Click the Create New Expense tab.

Concur Step-by-Step Guidebook 114
4. Select Personal Car Mileage from the expense type list.
Result: The Mileage Calculator map will appear.
5. Enter your destinations in the Waypoints field.
Result: The system will automatically calculate the mileage, leveraging Google
Maps.
Note: If the travel is round trip click the Make Round Trip link to add the mileage
and final destination automatically.
6. Click the Add Mileage to Expense button.
Result: The New Expense page will appear.

Concur Step-by-Step Guidebook 115
7. Complete all the required (noted by red asterisks) and necessary optional fields.
8. Click the Save Expense button.
Converting Foreign Currency Transactions
When your travel takes you to different countries, out-of-pocket expenses will need to be
converted from the original foreign currency to US Dollars (USD). When you create a
new out-of-pocket expense in a currency other than US Dollars, you may utilize the City
of Purchase field to automatically populate the local foreign currency.
The exchange rate comes from the Oanda Corporation, a foreign exchange company.
The system will look up the Average Daily Rate from Oanda based on the date and city
of your expense, and automatically convert the transaction amount to USD. For T&E
card transactions, Bank of America will convert transactions from the foreign currency
to US Dollars. Follow these steps to convert out-of-pocket foreign currency
transactions:
1. Open a current Expense Report or Create a New Report.
2. Click the Add Expense button.
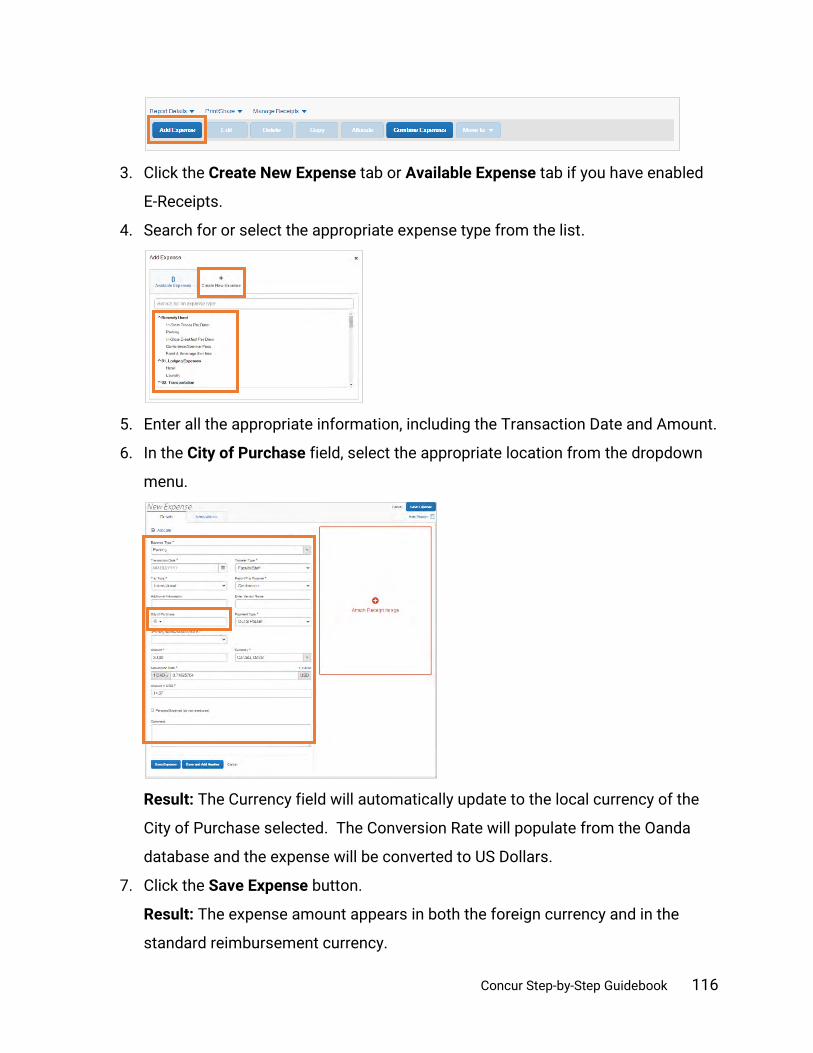
Concur Step-by-Step Guidebook 116
3. Click the Create New Expense tab or Available Expense tab if you have enabled
E-Receipts.
4. Search for or select the appropriate expense type from the list.
5. Enter all the appropriate information, including the Transaction Date and Amount.
6. In the City of Purchase field, select the appropriate location from the dropdown
menu.
Result: The Currency field will automatically update to the local currency of the
City of Purchase selected. The Conversion Rate will populate from the Oanda
database and the expense will be converted to US Dollars.
7. Click the Save Expense button.
Result: The expense amount appears in both the foreign currency and in the
standard reimbursement currency.

Concur Step-by-Step Guidebook 117
Managing Cash Advances
If a cash advance was received for a trip, it must be reconciled in full on the expense
report for that trip. If you do not have enough out-of-pocket expenses to offset the cash
advance, any unused portion must be remitted back to the Travel Services Office prior
to submitting your Expense Report. For additional information, please review Procedure
1501.2 for Travel Advances .
To ensure that a cash advance is attached to your expense report, please follow the
steps for Creating a New Expense Report from a Travel Request.
Adding a Cash Advance to an Existing Expense Report
If the cash advance is not successfully added to your Expense Report, you will receive
an alert that there are cash advances available to add to this report. Follow these steps
to add a cash advance to an existing Expense Report:
1. Open the Expense Report that contains the alert.
2. Click the View link.
Result: The Cash Advances window will appear.
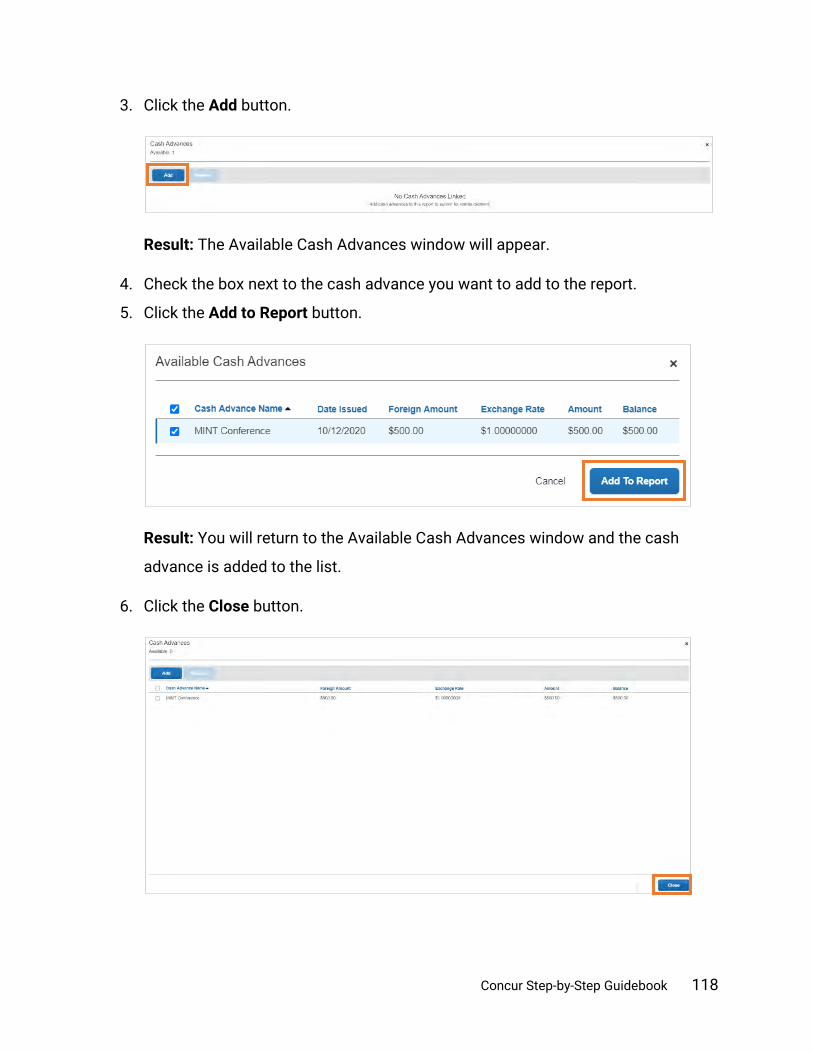
Concur Step-by-Step Guidebook 118
3. Click the Add button.
Result: The Available Cash Advances window will appear.
4. Check the box next to the cash advance you want to add to the report.
5. Click the Add to Report button.
Result: You will return to the Available Cash Advances window and the cash
advance is added to the list.
6. Click the Close button.

Concur Step-by-Step Guidebook 119
Result: The Cash Advance has been successfully been added to the Expense
Report. Out-of-Pocket expenses may now be added by following the steps for
Adding Out-of-Pocket Expenses.
Adding the Cash Advance Return Expense to an Expense Report
An Expense Report cannot be submitted which has a Remaining Cash Advance Balance.
If you did not remit the unused portion of the Cash Advance back to the Travel Services
Office, you must add a Cash Advance Return Expense to your report. This Expense will
create a Payroll deduction for the remaining amount.
When submitting an Expense Report with a remaining Cash Advance, you will receive an
alert that Cash Advances must be entirely utilized or returned. Follow these steps to
add a Cash Advance Return Expense:
1. Click the Close button to close the alert or open the Expense Report that contains
the alert.

Concur Step-by-Step Guidebook 120
2. Click the Add Expense button.
Result: The Add Expense pop-up window will appear.
3. Select Cash Advance Return from the list of expenses.
Result: You will be prompted to create a new expense.
4. In the Date field, enter the last day of travel.
5. In the Amount field, enter the remaining balance of the Cash Advance.

Concur Step-by-Step Guidebook 121
6. Click the Save Expense button.
Result: The Cash Advance Return has been added to the Expense Report and the
Cash Advance remaining balance is $0.

Concur Step-by-Step Guidebook 122
Allocating Expenses
As you create an expense report, you can allocate expenses to different projects or
departments. You can allocate one expense, multiple expenses, or an entire expense
report as needed.
Note: Allocations may adjust the approval workflow of the report, depending on the
chartfield strings used.
Allocating an Expense
Follow these steps to allocate expenses on an expense report:
1. Complete one of the following set of steps to get started:
Allocating an Existing Expense
a. Open a current Expense Report.
b. Select the checkbox for the expense(s) you want to allocate.
c. Click the Allocate button.
Result: The Allocate pop-up window will appear.
Allocating a New Expense
a. Open a current Expense Report.
b. Click the Add Expense button.
c. Complete the required and necessary fields.

Concur Step-by-Step Guidebook 123
d. Click the Allocate link.
Result: The Allocate pop-up window will appear.
2. Select the Percent or Amount tab.
3. Click the Add button.
4. Enter the appropriate chartfield string information or select an allocation from
your Favorite Allocations Tab.
5. Click Add to List button.

Concur Step-by-Step Guidebook 124
6. Modify the percent or amount for the allocation by percent or by amount.
Allocating by Percent - Enter the Percent of what you want to allocate to the
designated chartfield string.
Note: The total percentage of the lines must equal 100 percent.
Allocating by Amount - Enter the Amount of what you want to allocate to the
designated chartfield string.
Note: The total amounts of the line must equal the total amount of the
expense(s).
7. Continue to click the Add button and follow the steps to add additional
distribution lines for allocation until the amount equals the total amount of the
expense(s) or the percent total is 100.

Concur Step-by-Step Guidebook 125
8. Click the Save button.
Result: The expense will display as Allocated on the expense report page.
Continue to allocate until the total allocated percentage is 100 or the amount
balances.

Concur Step-by-Step Guidebook 126
Reviewing Allocations
Follow these steps to review how expenses on a report have been allocated:
1. Click the Report Details dropdown link.
2. Click Allocation Summary from the dropdown.
Result: The Allocation Summary pop-up window will appear showing details of
the allocations.
Editing Allocations
Follow these steps to make changes to how an expense is allocated:
1. Click the Allocated link under the Requested column of the expense you want to
edit.
2. Click the View Allocation link.
Result: The Allocate pop-up window will appear and you can make changes to
the allocation.

Concur Step-by-Step Guidebook 127
Copying an Expense
You can copy an expense and then update the expense details to quickly enter a new
expense. This is especially useful for recurring business expenses. Follow these steps
to copy an expense:
1. Open the expense report that has the expense you want to copy.
2. Select the expense you want to copy by marking the checkbox.
Note: If you are copying a NC per diem expense, the Time of Departure/Return
fields will be copied to the new expense. This field should be updated if
necessary.
3. Click the Copy button.
Result: The new expense is added to the Expense list and the original expense
date is advanced by one day. Also, all allocations, attendees, and expense-level
comments from the original expense are copied to the new expense.
Note: Credit card information, e-receipts, mobile entry information, and travel
segments from the original expense are not copied to the new expense. This
type of information is generally associated with only one expense, so it is not
copied to the new expense. If the Payment Type of the original expense is a T&E
card, then the Payment Type of the new expense is editable using the dropdown
list.

Concur Step-by-Step Guidebook 128
14. Itemizing Expenses and Attendees You should itemize expenses to account for receipts that include both business and
personal expenses or to ensure that each of your expenses is accounted for correctly.
In addition, some transactions (business meals and lodging expenses) require receipts
to be itemized. Review Procedure 1501.7 on Travel Expenses and Reimbursements to
learn what expenses require receipt itemization.
Itemizing Nightly Lodging Expenses
A hotel bill typically contains a variety of expenses including room fees, taxes, parking,
meals, valet, telephone charges, and/or personal items. You must itemize these
expenses to correctly account for all expenditures. In the lodging expense form, Concur
Expense calculates the number of nights based on the Check-in and Check-out Dates.
Follow these steps to itemize nightly lodging expenses:
1. Open a current Expense Report or Create a New Report.
2. Click the Add Expense button.
3. Click the Create New Expense tab or Available Expense tab to access T&E Card
Transactions and E-Receipts.

Concur Step-by-Step Guidebook 129
4. Select the Hotel expense type from Lodging Expenses listings.
5. Complete all the required (noted by red asterisks) and necessary optional fields.
6. Click the Itemization tab.
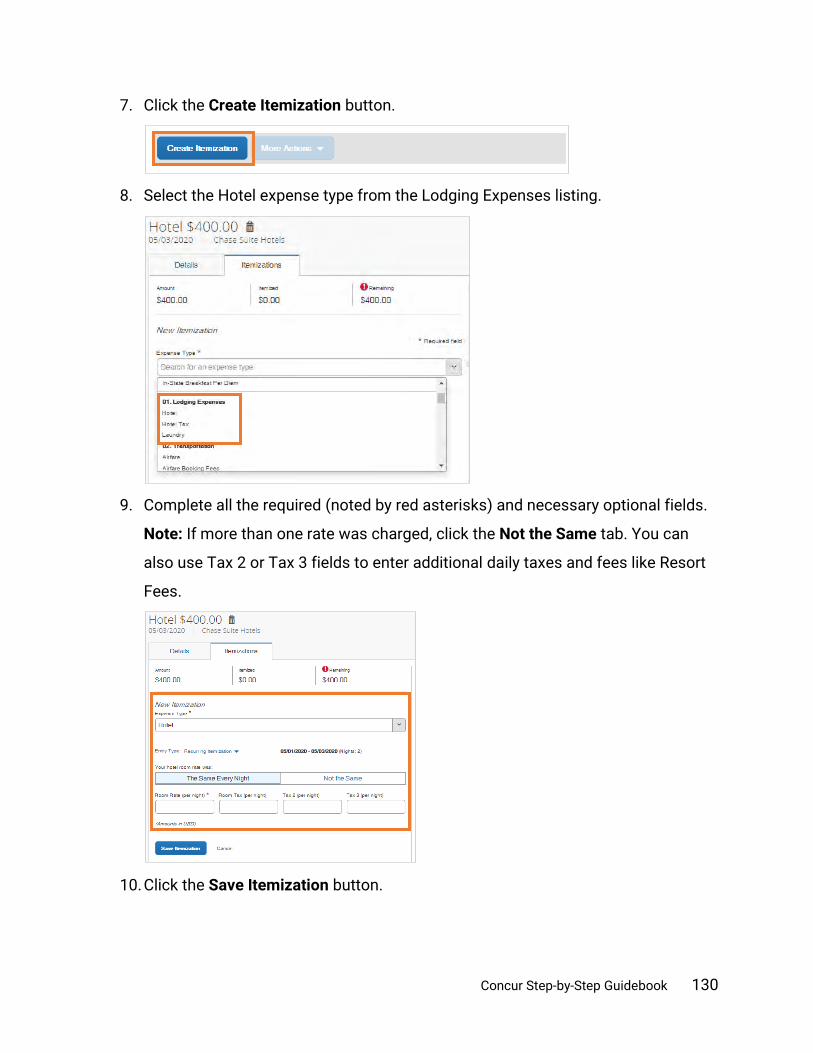
Concur Step-by-Step Guidebook 130
7. Click the Create Itemization button.
8. Select the Hotel expense type from the Lodging Expenses listing.
9. Complete all the required (noted by red asterisks) and necessary optional fields.
Note: If more than one rate was charged, click the Not the Same tab. You can
also use Tax 2 or Tax 3 fields to enter additional daily taxes and fees like Resort
Fees.
10. Click the Save Itemization button.

Concur Step-by-Step Guidebook 131
Note: You will need to continue itemizing all the line item charges that appear on
the folio/receipt using other expense types (i.e. laundry, personal expense, etc.)
until the remaining balance is $0.00.
Itemizing Business Meal Expenses
Business meals expenses must have an itemized receipt. Follow these steps to itemize
business meal expenses:
1. Open a current Expense Report or Create a New Report.
2. Click the Add Expense button to create a new expense or select an expense
listed.
3. Complete all the required (noted by red asterisks) and necessary optional fields.
4. Click the Itemizations tab.

Concur Step-by-Step Guidebook 132
5. Complete all of the necessary fields for this expense.
Note: You must itemize all items on the receipt so that the remaining balance is
$0.00.
6. Click the Attach Receipt Image icon to attach an electronic copy of the receipt if
the receipt has not been attached to the expense.
7. Click the Save Itemization button.
Adding Attendees to a Business Meal Expense
Some expenses, such as business meals and entertainment expenses require you to
add attendees to the expense. You will see the Attendees link for these types of
expenses. Depending on the number of meal attendees you will need to provide the
following information.
• Small Groups (eight or fewer individuals) - If a small group is in attendance, the
names of all persons attending is required.
• Large Groups (nine or more individuals) - If the expense includes more than
eight attendees, only the total number of attendees is required.

Concur Step-by-Step Guidebook 133
Adding Attendees to a Business Meal with 8 or less
Follow these steps to add attendees to a business meal of 8 or less people:
1. Open a current Expense Report or Create a New Report.
2. Click the Add Expense button.
3. Click the Create New Expense tab or Available Expense tab to access T&E card
transactions.
4. Select Food & Beverage 8 or less from the Meetings & Amenities listings.

Concur Step-by-Step Guidebook 134
5. Complete all the required (noted by red asterisks) and necessary optional fields.
6. Click the Attendees link.
Result: The Attendees page will appear. You will automatically be added as an
attendee. If you did not attend the business meal, delete yourself from the
listing.
7. Click the Add button.
Result: The Add Attendees pop-up window will appear.

Concur Step-by-Step Guidebook 135
8. Search for and/or select the attendees from the optional tabs. Then follow the
designated steps:
Recent Attendees Tab - This tab displays recently used attendees.
a. Mark the Checkbox beside the attendees of the business meal.
b. Click the Add to List button.
Result: The names selected will appear on the Attendees list page.

Concur Step-by-Step Guidebook 136
Attendees Tab – This tab allows you to search for attendees by first or last name
with filters (Alumni, Faculty/Staff/Student, Guest, Research Participant, Student
Athlete, Student(s), Visiting Professor). All Faculty/Staff/Students who have a
Concur profile are available to search for and select under this tab. If you cannot
find your attendee from the listing, you can create a new attendee on this tab.
a. Search for, then click on the attendee.
b. Click the Close button.
Result: The names selected will appear on the Attendees list page.
Attendees Group Tab – If you have created a group of attendees in advance, you
can add them all at once with one click.
a. Mark the Checkbox beside the Group that attended the business meal.
b. Click the Add to List button.
Result: The names selected will appear on the Attendees list page. If any
attendees need to be removed from the list, mark the check box next to
their name(s), and click the Remove button.
9. Click the Save button.

Concur Step-by-Step Guidebook 137
Adding Attendees to a Business Meal with 9 or More
Follow these steps to add attendees to a business meal of 9 or more people:
1. Open a current Expense Report or Create a New Report.
2. Click the Add Expense button.
3. Click the Create New Expense tab or Available Expense tab to access T&E card
transactions.
4. Select Food & Beverage 9 or more from the Meetings & Amenities listings.
5. Complete all the required (noted by red asterisks) and necessary optional fields.

Concur Step-by-Step Guidebook 138
6. Click the Attendees link.
7. Click the Add button.
Result: The Add Attendees pop-up window will appear.
8. Click the Attendees tab and ensure the Attendee Type Group 9+ is selected.
9. Click the Create New Attendee link.
Result: The Create New Attendee pop-up window will appear.
10. Enter the event name in the Event Name field.
Note: This can be the business purpose of the event if it does not have an actual
name.

Concur Step-by-Step Guidebook 139
11. Click the Create Attendee button.
Result: The attendee group has been created.
12. Click the Go Back link.
Result: You will return to the Add Attendees pop-up window.
13. Click the Close button.
Result: You will return to the Attendees page with the attendee group/event
name you created displayed.

Concur Step-by-Step Guidebook 140
14. Enter the number of attendees in the Attendee Count field.
15. Click the Save button at the bottom of the page.
Result: Your attendees have been added to the expense.
Creating Attendee Groups
When adding attendees to any meal you can also create groups that you can use in the
future to quickly add several individuals to a meal in just a few clicks.
Follow these steps to create a group:
1. Complete steps 1 to 8 from Adding Attendees to a Business Meal section.
2. Ensure that the individuals you want to include are identified by marking the
check box beside their name.
3. Click the Create Group button.
Result: A Create Group popup window will appear.
4. Enter a name for the Group Name.

Concur Step-by-Step Guidebook 141
5. Click the Save button.
Result: The group is created and can be used in the future to quickly add
members of that group as meal attendees.

Concur Step-by-Step Guidebook 142
15. Submitting, Printing, and Emailing Expense Reports Once you have finished completing an expense report and attached the required
documentation, it is ready to be submitted. Reports can also be printed, saved as a
PDF, or emailed for your records.
Also, once an Expense Report is created and submitted it will automatically generate a
Report ID number. The Report ID number from Concur will be included in the invoice
number field in ConnectCarolina.
Important: All hard-stop alerts (red exclamation points) must be resolved before an
Expense Report can be submitted.
Submitting an Expense Report
After reviewing your expenses and attaching your receipts, you will need to submit your
expense report. If you are acting as a personal delegate and creating an Expense Report
on behalf of another user, you will not have the option to submit the expense report.
Delegates can prepare the expense report and then use the Notify feature to alert the
traveler when the expense report is ready to be submitted. Follow these steps to submit
an expense report:
1. From the manage expenses page, open the expense report you want to submit.
2. Click the Submit Report button.
Result: A UNC-User Submit Agreement pop-up window will appear.
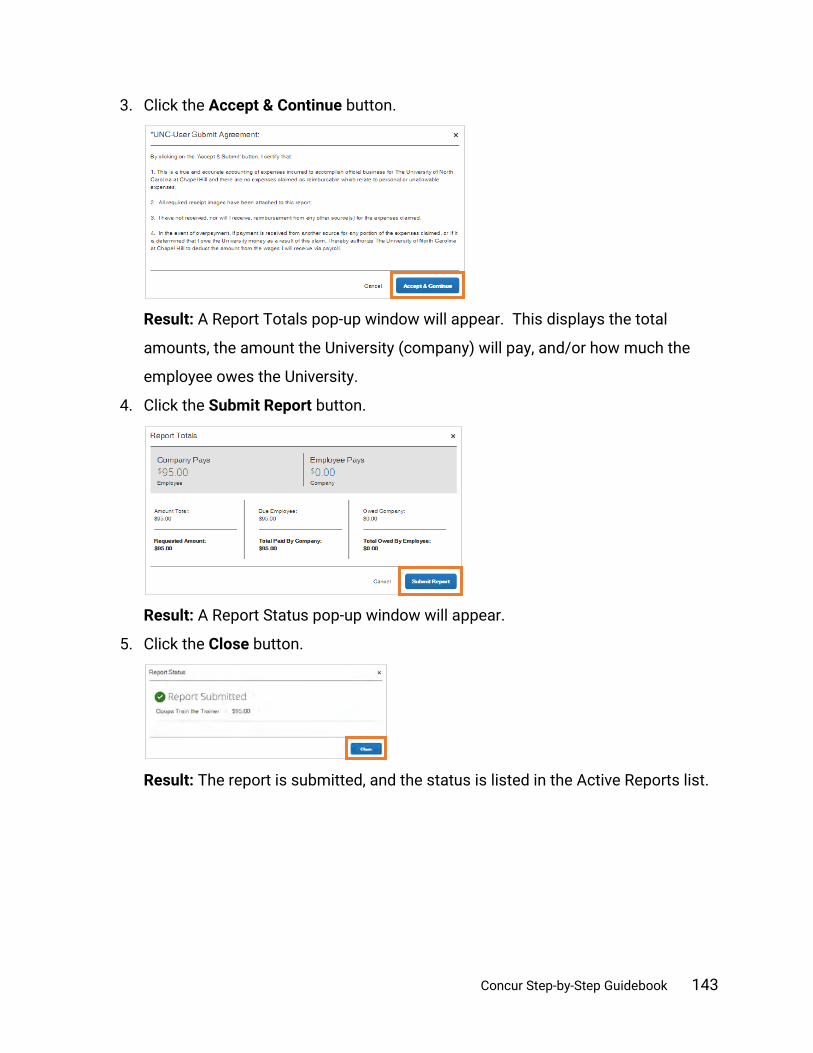
Concur Step-by-Step Guidebook 143
3. Click the Accept & Continue button.
Result: A Report Totals pop-up window will appear. This displays the total
amounts, the amount the University (company) will pay, and/or how much the
employee owes the University.
4. Click the Submit Report button.
Result: A Report Status pop-up window will appear.
5. Click the Close button.
Result: The report is submitted, and the status is listed in the Active Reports list.

Concur Step-by-Step Guidebook 144
Printing or Emailing an Expense Report
Follow these steps to print or email an expense report:
1. From the manage expenses page, open the expense report you want to print or
email.
2. Click the Print/Share dropdown arrow.
3. Select *UNC-Travel & Expense Report Detail Report.
Result: A preview of the report will appear in a pop-up window.
Note: If you want an itemized version of the report, check the Show Itemizations
box.
4. Click the Print, Save as PDF, or Email button to publish the report.

Concur Step-by-Step Guidebook 145
16. Managing Expense Reports
Correcting and Resubmitting an Expense Report
Your approver may return your expense report to you if any changes or additional
information are required. Returned reports appear on the Concur home page in the
Open Reports section. Follow these steps to correct and resubmit an expense report:
1. Click the Open Reports tile or tab.
2. Click on the Returned expense report.
Note: Returned expense reports will have a header with a status of “Returned”.

Concur Step-by-Step Guidebook 146
3. Click the View Reports Timeline link.
4. Review the approvers explanation of why the report was returned.
5. Click the Close button.
6. Click the expense that requires corrections/edits.
7. Make the required corrections/edits.
8. Click the Save Expense button.
9. Click the Submit Report button.
Result: A UNC-User Submit Agreement pop-up window will appear.

Concur Step-by-Step Guidebook 147
10. Click the Accept & Continue button.
Result: A Report Total pop-up window will appear. This displays the total
amounts, the amount the University (company) will pay, and/or how much the
employee owes the University.
11. Click the Submit Report button.
Result: A Report Status pop-up window will appear confirming that the report has
been submitted.
12. Click the Close button.
Result: The report is submitted, and the status is listed in the Active Reports list.

Concur Step-by-Step Guidebook 148
Recalling an Expense Report
If you submit an expense report and later find that you need to make changes, you can
recall the expense report. Reports can be recalled as long as they do not have a status
of “Pending Payment”. If a report is recalled during the approval process, it will restart
the entire workflow approval process. Also, once an Expense Report is fully approved it
cannot be recalled. Follow these steps to recall an expense report that you have
submitted:
1. Click the Open Reports tile or tab.
2. Click on the Submitted expense report.
Note: Expense reports that are in the process of being reviewed/approved will
have a header with a status of “Submitted”.

Concur Step-by-Step Guidebook 149
3. Click the Recall Report button.
Result: A confirmation pop-up message will appear.
4. Click the Yes button.
Result: The report will be recalled, the status changes to “Sent Back to User”, and
the report can now be edited.

Concur Step-by-Step Guidebook 150
17. Reviewing and Approving Expense Reports If you are an approver, you will need to review submitted expense reports and approve
them for reimbursement. Approval delegates can also preview or approve expense
reports, depending on their assigned permissions. You can view a list of any reports or
requests waiting your approval from the Concur home pages in the My Task section,
from the Approvals tab at the top of the screen.
Approving Expense Reports
Follow these steps to approve an expense report:
1. Click the Required Approvals tile or tab.
Result: The Approvals page will appear.
2. Click on the Report Name that you want to review for approval.

Concur Step-by-Step Guidebook 151
Result: The Summary expense report will appear.
3. Click on the following to review the expense:
a. Details – This link dropdown option will display various elements of
the expenses included in the report.
b. Receipts – This link dropdown option will allow you to review attached
receipts and add receipts if necessary.
4. Click the Approve button, to certify that you have reviewed the report and it is in
compliance with University policies.
Result: A Final Confirmation pop-up window will appear.
5. Click the Accept button.

Concur Step-by-Step Guidebook 152
Result: The Expense Report is approved and will no longer be shown on your list
of Pending Reports.
Approving and Forwarding an Expense Report (Adding an Additional Review Step)
All approvers can add additional Approvers to an approval workflow. However, not all
Approvers can Forward reports. The ability to Forward a report is dependent on the type
of Approver a user is. Depending on the type of approver you are, the Concur system
will determine the options that are available.
Important: If you need to add an additional step of approval, you must add the Approver
or Business Officers before you approve the report.
Adding an Additional Approver or Business Officer
Follow these steps to add an additional approver, before approving a report:
1. Complete steps 1 to 2 from Approving an Expense Report.
2. Click the Details link drop-down.
3. Select Approval Flow.
4. Click the + icon where you wish to insert the approver.
5. Search for and select the additional Approver or Business Officer.

Concur Step-by-Step Guidebook 153
6. Click the Save Workflow button.
Approving and Forwarding an Expense Report
Depending on the type of approver you are, the system will determine what forwarding
options are available. If you do not see the Approve & Forward button you do not have
the ability to approve and forward the report. Approve & Forward updates the Approval
Flow like the steps above, except it only gives you the option to add an additional
approver as the immediate next step in the workflow. Follow these steps to approve and
forward the expense report for additional review:
1. Complete steps 1 to 3 from Approving an Expense Report.
2. Click the Approve & Forward button to certify that you have reviewed the report
and it is in compliance with University policies.
Result: An Approve & Forward Report pop-up window will appear.
3. Enter the name of the individual who will further review and approve the report
along with any comments.
4. Click the Approve & Forward button.

Concur Step-by-Step Guidebook 154
Result: The Expense Report is approved and will no longer be shown on your
list of Pending Reports.
Sending an Expense Report Back to the User
Follow these steps to send an expense report back to the user:
1. Click the Required Approvals tile or tab.
Result: The Approvals page will appear.
2. Click on the Report Name that you want to send back to the user.
Result: The Summary expense report will appear.
3. Click the Send Back to User button.

Concur Step-by-Step Guidebook 155
4. Enter comments explaining why you are returning the report, this is a required
field.
5. Click the OK button.
Result: A pop-up confirmation message will appear. The request for approval will
be removed from your pending approval list and returned to the user.

Concur Step-by-Step Guidebook 156
18. Concur Buttons and Icons
General Icons
The following icons can be found in Expense and Request and have the same meaning
in each product.
Icon Name Description
Exception Indicates an exception must be resolved before submission.
Quick Help Indicates additional guidance or a helpful tip is available.
Information Indicates an exception that does not prevent submission.
Alert/Warning Indicates an exception that does not prevent submission.
Calendar Indicates that the user can click the icon to access the calendar popup.
View Image Indicates that the user can click the icon to view an image.
Report Sent Back
Indicates that the approver sent a report back to the submitter with comments.

Concur Step-by-Step Guidebook 157
Expense Icons
The following icons can be found in Expense:
Icon Name Description
Attendees Indicates that an expense entry has associated attendees.
Comments Indicates that the expense or report contains a comment.
Personal Expense
Indicates that an expense entry was marked as personal.
Credit Card Transaction
Indicates that an expense entry originated from a credit card transaction.
Credit Card transaction
Indicates that the credit card transaction includes additional data.
Full Allocation Indicates that the expense entry has been fully allocated.
Partial Allocation
Indicates that the expense entry has only been partially allocated.
Receipt Image Required
Indicates that an imaged receipt is required for this expense.
E-Receipt Available
Indicates that an e-receipt is available in Available Expenses.
Missing Receipt Affidavit
Indicates that a missing receipt is available in Available Expenses.
Report Ready for Review
Indicates that the expense report has been reviewed by a delegate and is ready for delegator review and submission.
Success Indicates that all required approvals have been processed.

Concur Step-by-Step Guidebook 158
Acting as Others
Indicates that the user is acting as a delegate for another user.
Acting as Other User
Indicates that the user is acting as a delegate for another user.
Profile Picture
Indicates that the user can add a profile picture to their Expense Profile.
Personal Profile
Indicates that the user can click the icon to access their personal profile.
Personal Car Mileage Calculator
Indicates that the user can click the icon to access the personal car mileage calculator.
Mileage (Calculated)
Indicates when there is not location and only distance is provided.
Mileage (Manual)
Indicates when there is not location and only distance is provided.
Mobile Expense
Indicates that the expense entry was created in Mobile.
Receipt Attached
Like other expense report entries, this entry has a receipt image attached to it.

Concur Step-by-Step Guidebook 159
Booking & Trip Icons
The following icons can be found in Travel:
Icon Name Description
Fly America Act Compliant
Indicates that the flight is compliant with the Fly America Act.
Mixed Flight/Train Search
Indicates that the user can click the icon to access the mixed flight/train search window.
Hotel Search Indicates that the user can click the icon to access the hotel search window.
Car Search Indicates that the user can click the icon to access the car search window.
Train Search Indicates that the user can click the icon to access the training search window.
Flight Status Indicates that the user can click the icon to view the statues of a flight.
Finalize Trip Indicates finalization of a trip.
Flight Itinerary Indicates flight itinerary information.
Hotel Itinerary Indicates hotel itinerary information.
Car Itinerary Indicates car itinerary information.
Add Itinerary Indicates a user can add itinerary to a trip.
Warning Exception
Indicates that travel policy will be applied after the user selects the flight.
Quiet Car Indicates that the rail car has noise restrictions.

Concur Step-by-Step Guidebook 160
19. Using the Concur Mobile App
The Concur Mobile App allows you to keep track of your expenses from your mobile
device. The application is free to download, and these instructions apply to iPhone and
Android mobile devices. With the app you can:
• upload receipts,
• review and approve expense reports,
• itemize hotel charges,
• and more!
Begin by downloading the Concur Mobile application to your device. You will use the
Single Sign On (SSO) method along with your ONYEN Username and Password to
complete the sign in process.
Important: Do not create your own account. You must access your account using your
ONYEN.
Signing into the Concur Mobile App
Follow these steps to sign into the mobile app:
1. Download the app to your device.
2. Open the Concur Mobile App.
3. Enter your [email protected] as the username.
Note: You may also enter your UNCCH email address if it has been verified on
your Concur Profile.

Concur Step-by-Step Guidebook 161
4. Tap the Next button.
5. Tap the Sign in with UNC SSO button.
6. On the UNC-CH Single-Sign On screen, enter your ONYEN and password.
7. Tap the Sign In button.
8. Complete Duo Authentication.
Result: You will see the Home screen of the app. From here you can perform
many actions that you would normally complete using a computer.

Concur Step-by-Step Guidebook 162
20. TripLink TripLink utilizes My Travel Network, and TripIt Pro app to help you organize and manage
your travel bookings and receipts. It is an extended service that the University has
purchased for all UNC-Chapel Hill Concur system users.
• My Travel Network - Leverages reward programs with Concur’s connected travel
partners to bring receipts directly into your Concur Expense profile.
• TripIt Pro - This app helps you organize your travel plans and receive real-time
alerts and helpful reminders throughout your trip. To activate your TripIt Pro
Subscription you must create a TripIt Account using your UNC-Chapel Hill email
address before using the app.
To learn more about TripLink, enroll, and/or activate My Travel Network or TripIt Pro
click the App Center on the banner in the Concur system or visit Concur’s Travel Made
Easy webpage.

Concur Step-by-Step Guidebook 163
21. Resources for Help and Support
Concur User Support Desk
The Concur User Support Desk service provides supplemental support to users with
Concur as the first point of contact. You can contact Concur regarding application
questions, service requests, or for incidents involving unexpected behavior of any
Concur software. You can also use this service to help accomplish a task in Concur. A
Concur representative will provide direct support and be familiar with UNC-Chapel Hill’s
specific system configuration and capabilities built around the University’s policies.
Follow these steps to contact the Concur User Support Desk:
1. Log into the Concur System.
2. Click the Support link.
Result: You will be redirected to the Customer Support Site.
World Travel Inc.
World Travel, Inc. is a global mid-market leader in corporate travel management and the
designated travel agency for the University. Should you need assistance with booking a
trip you can utilize their live chat feature for support within the Concur System or
contact them directly. Live chat is available from 8:00 am to 8:00 pm (Eastern Standard
Time). Also, if you need to book a trip outside of the Concur Travel System, contact your
World Travel, Inc agent.

Concur Step-by-Step Guidebook 164
Training and Other Materials
Computer-based training (CBT) and quick reference cards (QRC’s) are available to
provide additional guidance on completing various task in the Concur system.
Please visit the UNC-Chapel Hill Concur webpage to gain access to trainings and
additional reference materials.

Concur Step-by-Step Guidebook 165
22. Frequently Asked Questions
Approvers, Delegates, and Workflows
Q: How soon can a delegate receive approvals after they have been added as an
approval delegate?
A: Delegates will have immediate access to the approver que to which they have been
assigned a delegate for, and they would only receive email notifications for new
requests/reports once they have been submitted.
Q: Will approval delegates receive copies of approval emails?
A: Delegate can receive approval emails as long as the delegator has turned on the
permissions setting for them to receive approval messages.
Q: If someone from another department travels on my department’s funds, will both
departments be included in the approval workflow?
A: If the traveler has a default approver on their profile, requests/reports will always
flow to them first regardless of the funding source of travel. The additional approval
workflow will depend on the chartfield string of the request/report. When the
request/report is submitted, the request/report will route to the approvers of the
chartfield string assigned. If the chartfield string is updated during the approval
process, the workflow will update to include any other necessary approvers.
Q: If the primary approver (as designated in ConnectCarolina) travels, will their
approval and expense report be auto approved or will their delegates be able to
review/approve.
A: Department Approvers (as assigned in ConnectCarolina) must assign their
supervisor as the Default Approver on their profile to ensure proper approval and
workflow routing. If a traveler submits a report against the same department ID for
Concur Step-by-Step Guidebook 166
which they are an approver in ConnectCarolina, it will not go to them or their delegates
for approval.
Q: Will approvers and delegates be able to review actions that are submitted for
approval prior to them being added to their delegate or approval role?
A: Delegates have access to anything that is outstanding in the Approver’s queue, and
access to look at anything that has been previously approved by using search and filter
options. Approvers only have access to requests/reports that are newly submitted or
resubmitted for approval after they were added as an Approver.
Q: Can a submitter and approver be the same individual when submitting a request for
reimbursement?
A: No one can submit on behalf of another end user, and no one can approve their own
submissions. All end users must submit their own requests for reimbursement.
Q: How many people can you delegate to in Concur?
A: There is no limit to the number of delegates you can create.
Air Travel, Car Rental, and Hotel
Q: Why do I always see information about Basic Economy Fares when searching for
Airfare?
A: The low cost of Basic Economy Fares can look very appealing, but we need to ensure
that all travelers understand the restrictive nature of these fares before booking. While
the university allows for the purchase of Basic Economy Fares, we do not encourage
that travelers utilize them.
Q: What happens if I book a flight that is flagged as “out of policy?”
A: You will be able to book this flight, but will be asked to select an out of policy reason
from a dropdown. You may also provide additional details to explain the out of policy

Concur Step-by-Step Guidebook 167
selection. This information will be reviewed during the expense report process to
ensure that the traveler had an allowable exception to book out of policy.
Q: Should I purchase additional insurance for my rental vehicle?
A: If your vehicle will only be driven in the United States, you must decline the optional
insurance offered by the rental car company. Insurance is provided for all university
employees by the State of North Carolina and cannot be reimbursed. When renting a
vehicle for travel outside of the United States, you should pay for the optional
insurances offered. These expenses can be paid for on the T&E Card or submitted for
reimbursement.
Q: Why am I seeing the Hotel Per Diem Locations page?
A: Some university travel is supported by Federal Funds. When this occurs, travelers
may utilize the Federal per diems for meals and incidentals and should also stay within
the Federal lodging rate for this location. This page is for information only, and may be
ignored if it is not applicable to your travel.
Finance and ConnectCarolina
Q: If a traveler does not require CABS, what happens if a traveler takes a trip and
incurs all expenses then submits a request for reimbursement?
A: Concur Request is the process in which travelers request pre-trip authorization, the
State requires overnight travel to be pre-approved. An Expense Report must be
submitted in Concur Expense for reimbursement of business travel related expenses.
Q: Can a user add a chartfield string to Concur System?
A: No, all chartfields are automatically loaded into Concur and updated nightly.
Q: Will a budget error in Concur stop a reimbursement from being issued?

Concur Step-by-Step Guidebook 168
A: No, transactions will go to CBM then a journal entry will be created. If a budget error
occurs, the transaction will be charged to the default travel chartfield string as
designated by the department.
Personal Meals and Per Diems
Q: Can reimbursed meals be reduced to a lesser amount than the per diem?
A: Per diem reimbursement amounts are hard-coded into the system. However, if the
traveler wished to receive less than the full per diem, the individual should submit fewer
meals for reimbursement.
Q: Are we allowed meal reimbursement for day trips?
A: No, personal meal per diems is only allowed when the travel requires an overnight
stay.
Policy, Documentation, and Forms
Q: Were historical travel documents and information transferred to Concur?
A: No data or information from any travel prior to the go live date will be transferred to
Concur.
Q: Is the Travel Acknowledgment form still required?
A: No, since the traveler will be submitting their own expense reports the Travel
Acknowledgement form is no longer required.
Miscellaneous
Q: Do I have to submit a travel request in advance to travel that does not include
overnight travel?
A: No, a travel request is only required if the traveler will incur airfare, lodging, or per
diem expenses.

Concur Step-by-Step Guidebook 169
Q: Do student employees have access to use Concur?
A: Yes, all faculty, staff, and some student employees will automatically have access to
Concur. For students who are not automatically loaded a formal process for requesting
and reimbursing student travel is being developed.
Q: How early can travel requests be submitted?
A: Travel requests can be submitted as far in advance as necessary. However, expense
paid for out-of-pocket will be reimbursed after the trip is completed.
Q: Is there any required training prior to gaining access to the Concur system?
A: No, but online training and additional support is available please review the section
Resources for Help and Support.


