
CONCERT XYLOPHONE English - Yamaha Corporation · concert xylophone yx500r/yx500f...
12
CONCERT XYLOPHONE YX500R/YX500F 『安全上のご注意』および『ガススプリング取り扱いに関する注意事項』を必ずお読みください。 Carefully read the contents of this manual, especially all precautions. Lesen Sie unbedingt die „Vorsichtshinweise für die Handhabung der Gasfeder“ und die „Vorsichtsmaßregeln“. Lire attentivement les paragraphes « Précautions de manipulation du ressort à gaz » et « Précautions à observer ». Lea sin falta las “Precauciones para la manipulación del muelle de gas” y las “Precauciones”. Обязательно прочтите разделы “Предосторожности при обращении с пневматической пружиной” и “Меры предосторожности”. 务请阅读“气弹簧操作注意事项”和“注意事项”。 “가스 스프링 취급상의 주의사항” 및 “주의사항” 을 반드시 읽어 주십시오 . 取扱説明書 Owner’s Manual Bedienungsanleitung Mode d’emploi Manual de instrucciones Руководство пользователя 使用手册 사용설명서 English / 日本語 Русский / Español Français / Deutsch 한국어 / 中文
Transcript of CONCERT XYLOPHONE English - Yamaha Corporation · concert xylophone yx500r/yx500f...

CONCERT XYLOPHONEYX500R/YX500F
『安全上のご注意』および『ガススプリング取り扱いに関する注意事項』を必ずお読みください。
Carefully read the contents of this manual, especially all precautions.
Lesen Sie unbedingt die „Vorsichtshinweise für die Handhabung der Gasfeder“ und die „Vorsichtsmaßregeln“.
Lire attentivement les paragraphes « Précautions de manipulation du ressort à gaz » et « Précautions à observer ».
Lea sin falta las “Precauciones para la manipulación del muelle de gas” y las “Precauciones”.
Обязательно прочтите разделы “Предосторожности при обращении с пневматической пружиной” и “Меры предосторожности”.
务请阅读“气弹簧操作注意事项”和“注意事项”。
“가스 스프링 취급상의 주의사항” 및 “주의사항” 을 반드시 읽어 주십시오 .
取扱説明書Owner’s ManualBedienungsanleitungMode d’emploiManual de instruccionesРуководство пользователя使用手册사용설명서
En
glis
h / 日本語
Русский
/ E
spañ
olFr
ança
is /
Deu
tsch
한국
어 /
中文
yx500.indd 1 14/10/10 10:43
2
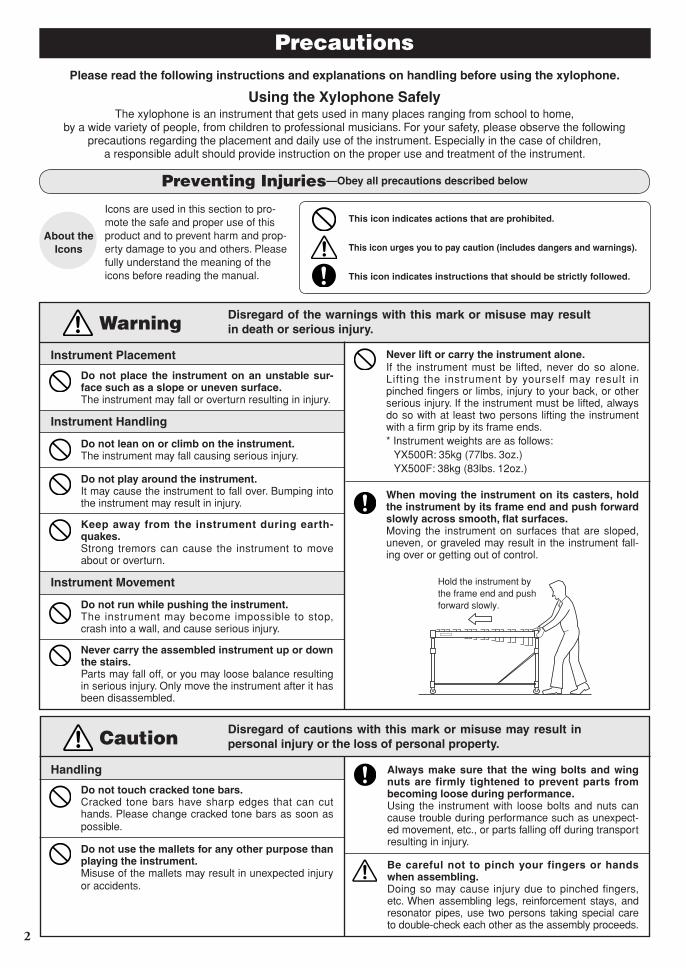
PrecautionsPlease read the following instructions and explanations on handling before using the xylophone.
Using the Xylophone SafelyThe xylophone is an instrument that gets used in many places ranging from school to home,
by a wide variety of people, from children to professional musicians. For your safety, please observe the following precautions regarding the placement and daily use of the instrument. Especially in the case of children,
a responsible adult should provide instruction on the proper use and treatment of the instrument.
Preventing Injuries—Obey all precautions described below
This icon indicates actions that are prohibited.
This icon urges you to pay caution (includes dangers and warnings).
This icon indicates instructions that should be strictly followed.
Icons are used in this section to pro-mote the safe and proper use of this product and to prevent harm and prop-erty damage to you and others. Please fully understand the meaning of the icons before reading the manual.
About the Icons
Warning Disregard of the warnings with this mark or misuse may result in death or serious injury.
Hold the instrument by the frame end and push forward slowly.
Caution Disregard of cautions with this mark or misuse may result in personal injury or the loss of personal property.
Handling
Do not touch cracked tone bars. Cracked tone bars have sharp edges that can cut hands. Please change cracked tone bars as soon as possible.
Do not use the mallets for any other purpose than playing the instrument.Misuse of the mallets may result in unexpected injury or accidents.
Always make sure that the wing bolts and wing nuts are firmly tightened to prevent parts from becoming loose during performance. Using the instrument with loose bolts and nuts can cause trouble during performance such as unexpect-ed movement, etc., or parts falling off during transport resulting in injury.
Be careful not to pinch your fingers or hands when assembling.Doing so may cause injury due to pinched fingers, etc. When assembling legs, reinforcement stays, and resonator pipes, use two persons taking special care to double-check each other as the assembly proceeds.
Never lift or carry the instrument alone. If the instrument must be lifted, never do so alone. Lifting the instrument by yourself may result in pinched fingers or limbs, injury to your back, or other serious injury. If the instrument must be lifted, always do so with at least two persons lifting the instrument with a firm grip by its frame ends.* Instrument weights are as follows: YX500R: 35kg (77lbs. 3oz.) YX500F: 38kg (83lbs. 12oz.)
When moving the instrument on its casters, hold the instrument by its frame end and push forward slowly across smooth, flat surfaces.Moving the instrument on surfaces that are sloped, uneven, or graveled may result in the instrument fall-ing over or getting out of control.
Instrument Placement
Do not place the instrument on an unstable sur-face such as a slope or uneven surface.The instrument may fall or overturn resulting in injury.
Instrument Handling
Do not lean on or climb on the instrument. The instrument may fall causing serious injury.
Do not play around the instrument.It may cause the instrument to fall over. Bumping into the instrument may result in injury.
Keep away from the instrument during earth-quakes.Strong tremors can cause the instrument to move about or overturn.
Instrument Movement
Do not run while pushing the instrument. The instrument may become impossible to stop, crash into a wall, and cause serious injury.
Never carry the assembled instrument up or down the stairs. Parts may fall off, or you may loose balance resulting in serious injury. Only move the instrument after it has been disassembled.
yx500.indd 2 14/10/10 10:43

3
Caution
Please observe the following instructions for proper handling of the gas spring when adjusting the height of the xylophone stand.
Precautions for Handling the Gas Spring
Do not lubricate. Additional oil on the gas spring will reduce the durability of the seal and cause oil leakage.
Do not hit the piston rod or cylinder. A nick in the piston rod or cylinder will shorten the service life of the seal or result in defective operation.
Do not bang on or apply pressure to the gas spring. It will cause oil leakage, malfunction or breakage.
Do not expose the gas spring to excessive tempera-ture. Use the instrument only in temperatures ranging from -4°F (-20°C) to 122°F (50°C).
Do not disassemble. High-pressure gas is sealed inside the gas spring, so any attempt to disassemble it cre-ates a high risk of bodily injury.
Do not apply an excessive force to lift the frame end, which may pull off the gas spring from the leg, causing malfunction or breakage.
Do not bend. A poorly balanced load will cause the rod to bend, resulting in defective operation.
Do not apply a high-tensile load to the gas spring as it will cause damage to the gas spring.
● In the event of a failure, stop using the instrument and contact the shop where you pur-chased it. If your dealer is unable to assist you, please contact Yamaha directly as per enclo-sure.
Precautions Regarding the Gas Spring
* Drill two holes, as shown above, to release the gas before discarding the gas spring.
q w35mm15mm
Drill Plastic bag
Fig. 1 [Caution]
Do not make a hole anywhere in the gas spring other than in the specified positions (q and w in the Fig.1).
Do not push.
Do not cut the gas spring.
Do not throw the gas spring into a fire.
[Discarding procedure]1. Put the gas spring in a plastic bag. Using a drill of 2 to
3 mm, make a hole q from outside of the plastic bag at the position as specified in the figure to release the gas and oil and then make a hole w at the position as specified. (Be sure to make holes in the order of q and w.)
2. If a vinyl bag is not used, the oil and drill chips will spread. (In such a case, wear eye protection glasses. )
CautionInstructions for Discarding the Gas Spring
Pressured nitrogen gas is sealed inside the gas spring. Be sure to release the gas before discarding it, or an explosion may occur, causing injury.
yx500.indd 3 14/10/10 10:43

4
楽器を組み立てた状態で、階段の登り降りをして運ばないでください。部品が落下したり、バランスを崩して倒れたりして大けがの原因となります。必ず分解した状態で運んでください。
持ち上げて運ぶ際は、一人で行なわないでください。一人で持ち上げると楽器に挟まれたり腰を痛めるなど大けがの原因となります。必ず2人以上で、側枠を両手で持って運んでください。※ YX500R の質量は 35kg、YX500F の質量は 38kg です。
キャスターを利用しての移動は、滑らかな平坦面で、側枠の上部をささえ、間口の方向へゆっくりと押してください。傾いた所や凸凹のある道、じゃり道での移動は、楽器が倒れたり暴走する原因となります。
側枠の上部をささえ、間口方向へゆっくりと押す
安全上のご注意ご使用の前に、必ずこの「安全上のご注意」をよくお読みください。
ここに示した注意事項は、製品を安全に正しくご使用いただき、 お客様やほかの方々への危害や財産への損害を未然に防止するためのものです。必ずお守りください。
お子様がご使用になる場合は、保護者の方が以下の内容をお子様にご徹底くださいますようお願いいたします。お読みになったあとは、使用される方がいつでも見られる所に必ず保管してください。
■ 記号表示についてこの製品や取扱説明書に表示されている記号には、下表のような意味があります。
「ご注意ください」という注意喚起を示します。
~しないでくださいという「禁止」を示します。
「必ず実行」してくださいという強制を示します。
■ 「警告」と「注意」について以下、誤った取り扱いをすると生じることが想定される内容を、危害や損害の大きさと切迫の程度を明示するために、「警告」と「注意」に区分して掲載しています。
警告 この表示の欄は、「死亡する可能性または重傷を負う可能性が想定される」内容です。
注意この表示の欄は、「傷害を負う可能性または物的損害が発生する可能性が想定される」内容です。
警告
注意
各部のネジは、位置が決まったらしっかりと締め付けて固定してください。ゆるんだ状態で使用すると演奏中に楽器がずれたり、雑音が出たり、トラブルの原因になります。またこれらのネジは時々締め直してお使いください。
組立分解 /組立の手順は、必ず本取扱説明書7~10ページの「組立手順」の通りに2人以上で行なってください。誤った手順で組み立てると、パイプが落下し、けがの原因となったり、機能が十分に働かなかったり、雑音発生の原因になったりします。
設置楽器を移動するとき以外は、必ずキャスターのストッパーを左右2ヶ所ともかけてください。楽器が移動したり倒れたりして、けがの原因となります。
楽器をぐらついた台の上や傾いた所など、不安定な場所に設置しないでください。落ちたり倒れたりして、けがの原因となります。
取り扱いキャスターや高さ調節部のすき間などの可動部分には、絶対に手や足を入れないでください。はさまれて大けがをするおそれがあります。
楽器にもたれかかったり、乗ったりしないでください。楽器が倒れて、大けがをすることがあります。
楽器のまわりで遊ばないでください。楽器の転倒の原因にもなり、身体をぶつけてけがをするおそれがあります。
地震の際は楽器に近づかないでください。地震による強い揺れにより、楽器が移動したり転倒するおそれがあります。
移動楽器を押しながら走らないでください。楽器が止まらなくなって、壁にぶつかるなどして大けがをすることがあります。
yx500.indd 4 14/10/10 10:43
5
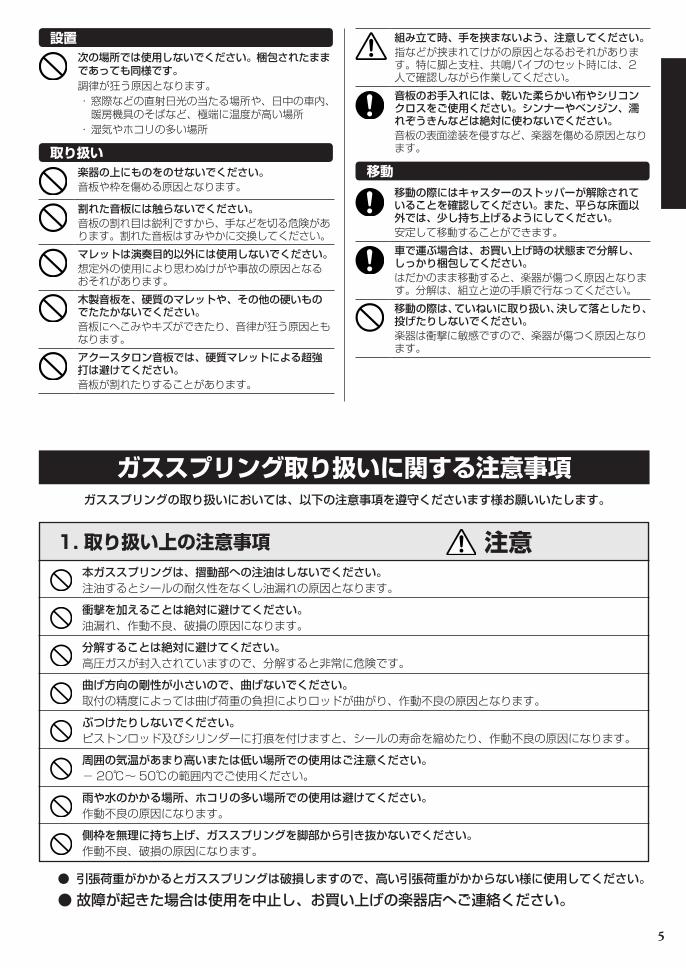
組み立て時、手を挟まないよう、注意してください。指などが挟まれてけがの原因となるおそれがあります。特に脚と支柱、共鳴パイプのセット時には、2人で確認しながら作業してください。
音板のお手入れには、乾いた柔らかい布やシリコンクロスをご使用ください。シンナーやベンジン、濡れぞうきんなどは絶対に使わないでください。音板の表面塗装を侵すなど、楽器を傷める原因となります。
移動移動の際にはキャスターのストッパーが解除されていることを確認してください。また、平らな床面以外では、少し持ち上げるようにしてください。安定して移動することができます。
車で運ぶ場合は、お買い上げ時の状態まで分解し、しっかり梱包してください。はだかのまま移動すると、楽器が傷つく原因となります。分解は、組立と逆の手順で行なってください。
移動の際は、ていねいに取り扱い、決して落としたり、投げたりしないでください。楽器は衝撃に敏感ですので、楽器が傷つく原因となります。
設置次の場所では使用しないでください。梱包されたままであっても同様です。調律が狂う原因となります。・窓際などの直射日光の当たる場所や、日中の車内、暖房機具のそばなど、極端に温度が高い場所
・湿気やホコリの多い場所
取り扱い楽器の上にものをのせないでください。音板や枠を傷める原因となります。
割れた音板には触らないでください。音板の割れ目は鋭利ですから、手などを切る危険があります。割れた音板はすみやかに交換してください。
マレットは演奏目的以外には使用しないでください。想定外の使用により思わぬけがや事故の原因となるおそれがあります。
木製音板を、硬質のマレットや、その他の硬いものでたたかないでください。音板にへこみやキズができたり、音律が狂う原因ともなります。
アクースタロン音板では、硬質マレットによる超強打は避けてください。音板が割れたりすることがあります。
ガススプリングの取り扱いにおいては、以下の注意事項を遵守くださいます様お願いいたします。
●引張荷重がかかるとガススプリングは破損しますので、高い引張荷重がかからない様に使用してください。
●故障が起きた場合は使用を中止し、お買い上げの楽器店へご連絡ください。
注意本ガススプリングは、摺動部への注油はしないでください。注油するとシールの耐久性をなくし油漏れの原因となります。
衝撃を加えることは絶対に避けてください。油漏れ、作動不良、破損の原因になります。
分解することは絶対に避けてください。高圧ガスが封入されていますので、分解すると非常に危険です。
曲げ方向の剛性が小さいので、曲げないでください。取付の精度によっては曲げ荷重の負担によりロッドが曲がり、作動不良の原因となります。
ぶつけたりしないでください。ピストンロッド及びシリンダーに打痕を付けますと、シールの寿命を縮めたり、作動不良の原因になります。
周囲の気温があまり高いまたは低い場所での使用はご注意ください。−20℃〜50℃の範囲内でご使用ください。
雨や水のかかる場所、ホコリの多い場所での使用は避けてください。作動不良の原因になります。
側枠を無理に持ち上げ、ガススプリングを脚部から引き抜かないでください。作動不良、破損の原因になります。
1. 取り扱い上の注意事項
ガススプリング取り扱いに関する注意事項
yx500.indd 5 14/10/10 10:43
6
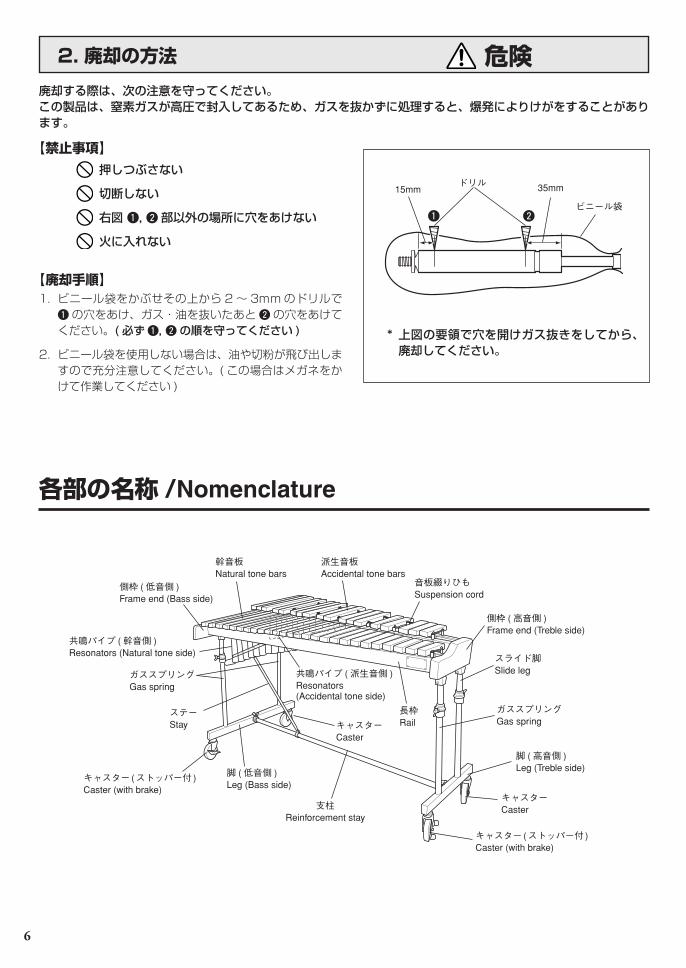
各部の名称 /Nomenclature
音板綴りひもSuspension cord
スライド脚Slide leg
脚 ( 高音側 )Leg (Treble side)
側枠 ( 低音側 )Frame end (Bass side)
キャスター ( ストッパー付 )Caster (with brake)
派生音板Accidental tone bars
幹音板Natural tone bars
脚 ( 低音側 )Leg (Bass side)
長枠Rail
共鳴パイプ ( 幹音側 )Resonators (Natural tone side)
共鳴パイプ ( 派生音側 )Resonators (Accidental tone side)
支柱Reinforcement stay
側枠 ( 高音側 )Frame end (Treble side)
ステーStay
キャスター ( ストッパー付 )Caster (with brake)
キャスターCaster
キャスターCaster
ガススプリングGas spring
ガススプリングGas spring
廃却する際は、次の注意を守ってください。この製品は、窒素ガスが高圧で封入してあるため、ガスを抜かずに処理すると、爆発によりけがをすることがあります。
危険2. 廃却の方法
【禁止事項】
押しつぶさない
切断しない
右図q,w部以外の場所に穴をあけない
火に入れない
【廃却手順】1. ビニール袋をかぶせその上から2〜 3mmのドリルで
qの穴をあけ、ガス・油を抜いたあとwの穴をあけてください。( 必ずq,wの順を守ってください )
2. ビニール袋を使用しない場合は、油や切粉が飛び出しますので充分注意してください。( この場合はメガネをかけて作業してください )
*上図の要領で穴を開けガス抜きをしてから、廃却してください。
ビニール袋q w
35mmドリル15mm
yx500.indd 6 14/10/10 10:43

7
部品の確認 /Confirmation of Packing Contents梱包箱の中には、以下の部品が入っています。組み立ての前に、すべての部品がそろっていることを確認してください。
※ 部品が不足している場合は、お買い求めになったお店へご連絡ください。
t共鳴パイプ (幹音側 )
tResonators (Natural tone side)
r支柱
rReinforcement stay
The shipping carton of your xylophone should contain the parts shown below. Before assembling the instrument, confirm that all parts are included as listed.
* In the event that a part ismissing, please contact theshopwheretheinstrumentwaspurchased.
w幹音板
wNatural tone barse派生音板
eAccidental tone barsq枠集成
qFrame Assembly
y共鳴パイプ (派生音側 )
yResonators (Accidental tone side)
u取扱説明書 (本書 )
uOwner’s Manual (This booklet)
組立手順 /Assembly
安全のために、組み立ては2人以上で、十分スペースのある場所で行なってください。床にじゅうたんや柔らかい布などを敷いておくとよいでしょう。
For safety, the instrument should be assembled and disassembled by at least two people in a loca-tion with sufficient space. For additional precau-tions, assemble the instrument on a soft rug or carpet.
組立作業上のご注意・分解 / 組立の手順は、必ず本説明書の通りに2人以上で行なってください。誤った手順で組み立てると、パイプが落下し、けがの原因となったり、機能が十分に働かなかったり、雑音発生の原因になったりします。
・脚部のネジは、位置が決まったらしっかりと締め付けて固定してください。ゆるんだ状態で使用すると演奏中に楽器がずれたり、雑音が出たり、トラブルの原因になります。またこれらのネジは時々締め直してお使いください。
Assembly Cautions• Follow these instructions carefully. Assembly in the
wrong order can cause the pipes to drop, which may result in bodily injury or impair the performance of the instrument.
• Note that after final assembly is complete, the fixing screws must be tightened securely. Loose screws or bolts may cause the instrument to shift during performance, causing noise and other problems. Retighten the screws regularly.
yx500.indd 7 14/10/10 10:43

8
1-1 布などの上に下図の向きで枠集成を置きます。
1-2 両方の脚 ( 低音側・高音側 ) を起こし、低音側の脚の連結用穴に、くぼみが下面になる向きで支柱
を差し込みます。止まるまで差し込むと蝶ネジの
先端が支柱のくぼみ部分にきますので、蝶ネジを
締め付けて固定します。
※ くぼみの近くの穴を目安にして支柱を差し込んでください。
1-3 脚 ( 高音側 ) も同様にして、支柱と接続します。
z 脚 ( 低音側 ) と脚 ( 高音側 ) を、支柱でつなぎます。
•脚を起こした状態では、脚が突然内側に倒れて指や手をはさむおそれがあります。支柱を差し込む際は、必ずもう一人が脚を支え、倒れないよう十分に注意して作業を行なってください。•脚部のネジは、位置が決まったらしっかりと締め付けて固定してください。ゆるんだ状態で使用すると演奏中に楽器がずれたり、雑音が出たり、トラブルの原因になります。 またこれらのネジは時々締め直してお使いください。
注意
x 支柱のステーを低音側の脚センター板に固定します。
2-1 ステー先端のフックを脚センター板の軸に差し込
み、蝶ナットとバネ座金、平座金 (2枚 ) でしっ
かりと締め付けます。
z Connect the treble and bass side legs with the stay.
1-1 Place the frame assembly on the rug or carpet, so that it is positioned as shown below.
1-2 Unfold both legs (bass side and treble side), then
insert the reinforcement stay with its notch fac-ing down into the joint on the bass side as far as it will go. When the stay is fully inserted into the joint where the point of the wing bolt is aligned with the notch, tighten the wing bolt securely.
* Use the hole close to the notch as a guide when inserting the stay into the joint.
1-3 Connect the reinforcement stay to the treble side in the same manner.
• Be careful when setting up the legs as they can accidentally fall over, resulting in pinched fingers or hands. For this reason, installing the stay should be done by at least two people. One person should hold the legs to prevent them from falling over while the other person inserts the stay.
• After final adjustment of the legs the fixing screws must be tightened securely to prevent loosening.
Looseness may cause the instrument to shift during performance and can also cause noise and other problems. Retighten the screws from time to time.
Caution
x Attach the diagonal stay to the leg sup-port plate.
2-1 Attach the hook on the end of the diagonal stay to the bolt on the leg support plate, then attach two (2) washers, spring washer and wing nut and tighten securely.
組立手順 /Assembly
蝶ネジWing bolt
支柱Reinforcement stay
くぼみNotch
この穴を目安にするUse this hole as a guide.
脚 ( 低音側 )Leg (Bass side)
蝶ナットWing nut
平座金Washer
ステー先端Stay end
脚 ( 高音側 )Leg (Treble side)
支柱Reinforcement stay
脚 ( 低音側 )Leg (Bass side)
枠集成Frame assembly
ステーStay
バネ座金Spring washer
脚センター板Leg support plate
yx500.indd 8 14/10/10 10:43

9
組立手順 /Assembly
図A(23℃以上:浅い溝 )Diagram A (Above 23°C: Shallow notch)
図B(23℃未満:深い溝 )Diagram B (Below 23°C: Deep notch)
c 本体を起こします。
※ 危険ですので、必ず 2 人以上で行なってください。
v 共鳴パイプを取り付けます。
※ 取り付けの際、共鳴パイプを脚などに当てないように注意してください。
4-1 長枠の下側から共鳴パイプを差し込み、高音側をパイプ受けゴムにのせます。
4-2 次に低音側をのせます。下図のようにパイプ受けゴム中央の溝を下側から通って上側に抜けた後、
パイプ受けゴムの溝にはめこみます。
•演奏する部屋の室温が23℃以上の場合
パイプ受けゴムの浅い溝に共鳴パイプをセット
します。(下図A)
•演奏する部屋の室温が23℃未満の場合
パイプ受けゴムの深い溝に共鳴パイプをセット
します。(下図B)
4-3 もう一つの共鳴パイプも同様にして取り付けます。
溝Notch
低音側Bass side
高音側Treble side
共鳴パイプ ( 幹音側 )Resonators (Natural tone side)
パイプ受けゴムResonator rest
パイプ受けゴムResonator rest
2 1
共鳴パイプ ( 派生音側 )Resonators (Accidental tone side)
c Turn the instrument upright.* This procedure is dangerous and should always be
done by at least two people.
v Install the resonators.* Do not let the resonators hit against the legs or
other part of the frame during their installation.
4-1 First pass the resonators through the frame from underneath the rail and then mount the treble end into the resonator rest.
4-2 Next, mount the bass side. Pass the end of the
resonators through the space in the center of the resonator rest as shown in the diagram, and fit it into the notch in the resonator rest.
• When room temperature is 73.4°F (23°C) and above, set the resonators into the shallow notches of the resonator rest (Diagram A).
• When room temperature is 73.4°F (23°C) and below, set the resonators into the deeper notches of the resonator rest (Diagram B).
4-3 Use the same procedure to install the other set of
resonators.
yx500.indd 9 14/10/10 10:43
10
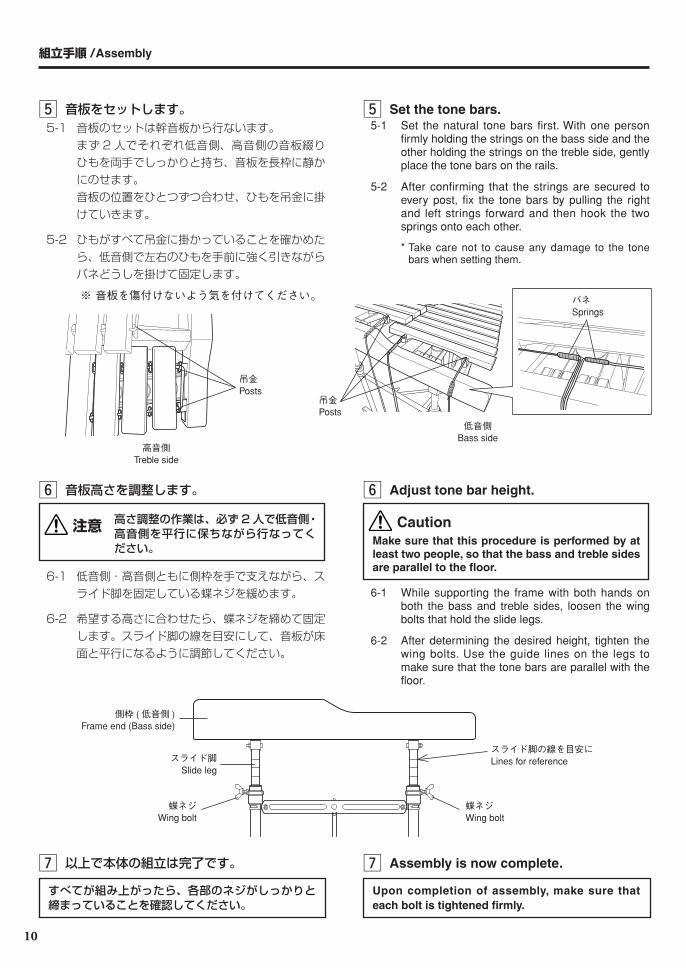
b 音板をセットします。5-1 音板のセットは幹音板から行ないます。
まず 2人でそれぞれ低音側、高音側の音板綴り
ひもを両手でしっかりと持ち、音板を長枠に静か
にのせます。
音板の位置をひとつずつ合わせ、ひもを吊金に掛
けていきます。
5-2 ひもがすべて吊金に掛かっていることを確かめたら、低音側で左右のひもを手前に強く引きながら
バネどうしを掛けて固定します。
※ 音板を傷付けないよう気を付けてください。 バネSprings
低音側Bass side
高音側Treble side
n 音板高さを調整します。
高さ調整の作業は、必ず2人で低音側・高音側を平行に保ちながら行なってください。
6-1 低音側・高音側ともに側枠を手で支えながら、ス
ライド脚を固定している蝶ネジを緩めます。
6-2 希望する高さに合わせたら、蝶ネジを締めて固定します。スライド脚の線を目安にして、音板が床
面と平行になるように調節してください。
m 以上で本体の組立は完了です。
すべてが組み上がったら、各部のネジがしっかりと締まっていることを確認してください。
側枠 ( 低音側 )Frame end (Bass side)
スライド脚Slide leg
蝶ネジWing bolt
スライド脚の線を目安にLines for reference
蝶ネジWing bolt
吊金Posts
吊金Posts
b Set the tone bars.5-1 Set the natural tone bars first. With one person
firmly holding the strings on the bass side and the other holding the strings on the treble side, gently place the tone bars on the rails.
5-2 After confirming that the strings are secured to
every post, fix the tone bars by pulling the right and left strings forward and then hook the two springs onto each other.
* Take care not to cause any damage to the tone bars when setting them.
n Adjust tone bar height.
Make sure that this procedure is performed by at least two people, so that the bass and treble sides are parallel to the floor.
6-1 While supporting the frame with both hands on both the bass and treble sides, loosen the wing bolts that hold the slide legs.
6-2 After determining the desired height, tighten the
wing bolts. Use the guide lines on the legs to make sure that the tone bars are parallel with the floor.
m Assembly is now complete.
Upon completion of assembly, make sure that each bolt is tightened firmly.
組立手順 /Assembly
Caution 注意
yx500.indd 10 14/10/10 10:43
11
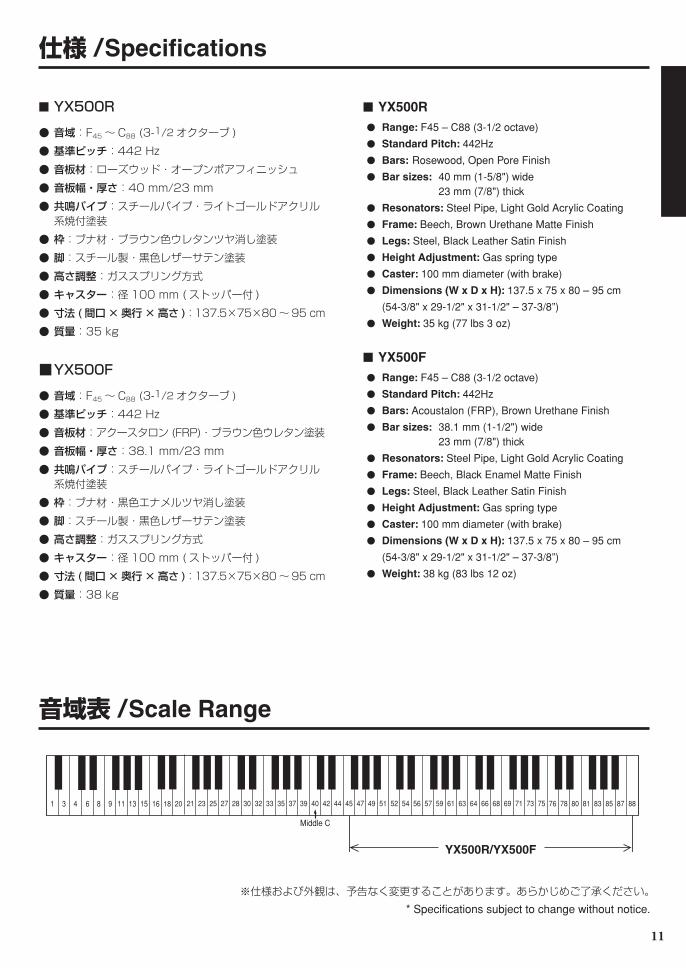
仕様 /Specifications
YX500R/YX500F
■YX500R
●音域:F45 〜 C88(3-1/2 オクターブ )
●基準ピッチ:442Hz
●音板材:ローズウッド・オープンポアフィニッシュ
●音板幅・厚さ:40mm/23mm
●共鳴パイプ:スチールパイプ・ライトゴールドアクリル系焼付塗装
●枠:ブナ材・ブラウン色ウレタンツヤ消し塗装
●脚:スチール製・黒色レザーサテン塗装
●高さ調整:ガススプリング方式
●キャスター:径100mm( ストッパー付 )
●寸法 (間口×奥行×高さ ):137.5×75×80〜95cm
●質量:35kg
■YX500F
●音域:F45 〜 C88(3-1/2 オクターブ )
●基準ピッチ:442Hz
●音板材:アクースタロン(FRP)・ブラウン色ウレタン塗装
●音板幅・厚さ:38.1mm/23mm
●共鳴パイプ:スチールパイプ・ライトゴールドアクリル系焼付塗装
●枠:ブナ材・黒色エナメルツヤ消し塗装
●脚:スチール製・黒色レザーサテン塗装
●高さ調整:ガススプリング方式
●キャスター:径100mm( ストッパー付 )
●寸法 (間口×奥行×高さ ):137.5×75×80〜95cm
●質量:38kg
※仕様および外観は、予告なく変更することがあります。あらかじめご了承ください。
■ YX500R● Range: F45 – C88 (3-1/2 octave)
● Standard Pitch: 442Hz
● Bars: Rosewood, Open Pore Finish
● Bar sizes: 40 mm (1-5/8") wide 23 mm (7/8") thick
● Resonators: Steel Pipe, Light Gold Acrylic Coating
● Frame: Beech, Brown Urethane Matte Finish
● Legs: Steel, Black Leather Satin Finish
● Height Adjustment: Gas spring type
● Caster: 100 mm diameter (with brake)
● Dimensions (W x D x H): 137.5 x 75 x 80 – 95 cm
(54-3/8" x 29-1/2" x 31-1/2" – 37-3/8”)
● Weight: 35 kg (77 lbs 3 oz)
■ YX500F● Range: F45 – C88 (3-1/2 octave)
● Standard Pitch: 442Hz
● Bars: Acoustalon (FRP), Brown Urethane Finish
● Bar sizes: 38.1 mm (1-1/2") wide 23 mm (7/8") thick
● Resonators: Steel Pipe, Light Gold Acrylic Coating
● Frame: Beech, Black Enamel Matte Finish
● Legs: Steel, Black Leather Satin Finish
● Height Adjustment: Gas spring type
● Caster: 100 mm diameter (with brake)
● Dimensions (W x D x H): 137.5 x 75 x 80 – 95 cm
(54-3/8" x 29-1/2" x 31-1/2" – 37-3/8”)
● Weight: 38 kg (83 lbs 12 oz)
* Specifications subject to change without notice.
音域表 /Scale Range
yx500.indd 11 14/10/10 10:43

WT48590 版次:1410 R1 Printed in Japan