Compass User Guide - myTobiiDynavox€¦ · · 2017-01-10Compass User’s Guide Part # 401484 - B...
96
Compass User’s Guide
Transcript of Compass User Guide - myTobiiDynavox€¦ · · 2017-01-10Compass User’s Guide Part # 401484 - B...

Compass User’s Guide

Copyright © 2014 DynaVox Systems LLC
All rights reserved. No part of this book may be reproduced, stored in a retrieval system, or transmitted in any form, by any means (electronic, photocopying, recording, or otherwise) without the prior written permission of the publisher.
Copyright protection claimed includes all forms and matters of copyrightable material and information allowed by statutory or judicial law or hereafter granted, including without limitation, material generated from the software programs which are displayed on the screen such as screen displays, menus, etc.
Although every precaution has been taken in the preparation of this book, the publisher assumes no responsibility for errors or omissions.
In North America:
For information, write to:
DynaVox Systems LLC
2100 Wharton Street, Suite 400
Pittsburgh, Pennsylvania 15203 USA
The European Authorized Representative is: DynaVox Systems Ltd.
Pure Offices Plato Close
Tachbrook Park
Leamington Spa
Warwickshire
United Kingdom
CV34 6WE
DynaVox® is a registered trademark of DynaVox Systems LLC.
DynaVoxT10™ is a registered trademark of DynaVox Systems LLC.
All other brand and product names mentioned are trademarks or registered trademarks of their respective holders.
Part Number 401484
Published September 2014
Created in the United States of America

Table of Contents
Welcome to the DynaVox Compass Software! . . . . . . . . . . . . . . . . . . . . . . . . . . . . . . . . . . . . . . . . . . . . . 1
myDynaVox . . . . . . . . . . . . . . . . . . . . . . . . . . . . . . . . . . . . . . . . . . . . . . . . . . . . . . . . . . . . . . . . . . . . . . . 2
The myDynaVox Knowledgebase . . . . . . . . . . . . . . . . . . . . . . . . . . . . . . . . . . . . . . . . . . . . . . . . . . . . . . . 3
Getting Started . . . . . . . . . . . . . . . . . . . . . . . . . . . . . . . . . . . . . . . . . . . . . . . . . . . . . . . . . . . . . . . . . . . . . 4
Opening the Compass Software For The First Time . . . . . . . . . . . . . . . . . . . . . . . . . . . . . . . . . . . . . . 4
Compass Pagesets . . . . . . . . . . . . . . . . . . . . . . . . . . . . . . . . . . . . . . . . . . . . . . . . . . . . . . . . . . . . . . 11
NavBar Pageset . . . . . . . . . . . . . . . . . . . . . . . . . . . . . . . . . . . . . . . . . . . . . . . . . . . . . . . . . . . . . . . 11
Master Page Pagesets . . . . . . . . . . . . . . . . . . . . . . . . . . . . . . . . . . . . . . . . . . . . . . . . . . . . . . . . . . 12
Text-based Pageset . . . . . . . . . . . . . . . . . . . . . . . . . . . . . . . . . . . . . . . . . . . . . . . . . . . . . . . . . . . . 12
Stroke & Brain Injury Persona Pageset . . . . . . . . . . . . . . . . . . . . . . . . . . . . . . . . . . . . . . . . . . . . . . 13
WordPower Pageset . . . . . . . . . . . . . . . . . . . . . . . . . . . . . . . . . . . . . . . . . . . . . . . . . . . . . . . . . . . . 13
All Access Pageset . . . . . . . . . . . . . . . . . . . . . . . . . . . . . . . . . . . . . . . . . . . . . . . . . . . . . . . . . . . . . 14
Navigator Pageset . . . . . . . . . . . . . . . . . . . . . . . . . . . . . . . . . . . . . . . . . . . . . . . . . . . . . . . . . . . . . . 14
Premium Pagesets . . . . . . . . . . . . . . . . . . . . . . . . . . . . . . . . . . . . . . . . . . . . . . . . . . . . . . . . . . . . . 15
The Settings Menu - Overview . . . . . . . . . . . . . . . . . . . . . . . . . . . . . . . . . . . . . . . . . . . . . . . . . . . . . . . . 16
Open the Settings Menu . . . . . . . . . . . . . . . . . . . . . . . . . . . . . . . . . . . . . . . . . . . . . . . . . . . . . . . . . . . 19
Customizing the Compass Software . . . . . . . . . . . . . . . . . . . . . . . . . . . . . . . . . . . . . . . . . . . . . . . . . . . . 20
Access Method . . . . . . . . . . . . . . . . . . . . . . . . . . . . . . . . . . . . . . . . . . . . . . . . . . . . . . . . . . . . . . . . . . 20
Simple Touch Settings . . . . . . . . . . . . . . . . . . . . . . . . . . . . . . . . . . . . . . . . . . . . . . . . . . . . . . . . . . . 21
Touch Enter Settings . . . . . . . . . . . . . . . . . . . . . . . . . . . . . . . . . . . . . . . . . . . . . . . . . . . . . . . . . . . . 22
Touch Exit Settings . . . . . . . . . . . . . . . . . . . . . . . . . . . . . . . . . . . . . . . . . . . . . . . . . . . . . . . . . . . . . 22
Scanning Settings . . . . . . . . . . . . . . . . . . . . . . . . . . . . . . . . . . . . . . . . . . . . . . . . . . . . . . . . . . . . . . 23
Eye Gaze Settings . . . . . . . . . . . . . . . . . . . . . . . . . . . . . . . . . . . . . . . . . . . . . . . . . . . . . . . . . . . . . . 29
Mouse Settings . . . . . . . . . . . . . . . . . . . . . . . . . . . . . . . . . . . . . . . . . . . . . . . . . . . . . . . . . . . . . . . . 33
Highlight Style and Color . . . . . . . . . . . . . . . . . . . . . . . . . . . . . . . . . . . . . . . . . . . . . . . . . . . . . . . . . 34
Audio Cue . . . . . . . . . . . . . . . . . . . . . . . . . . . . . . . . . . . . . . . . . . . . . . . . . . . . . . . . . . . . . . . . . . . . 35
Voice Settings . . . . . . . . . . . . . . . . . . . . . . . . . . . . . . . . . . . . . . . . . . . . . . . . . . . . . . . . . . . . . . . . . . 37
Interface Settings . . . . . . . . . . . . . . . . . . . . . . . . . . . . . . . . . . . . . . . . . . . . . . . . . . . . . . . . . . . . . . . . 42
General Settings . . . . . . . . . . . . . . . . . . . . . . . . . . . . . . . . . . . . . . . . . . . . . . . . . . . . . . . . . . . . . . . 42
Toolbar and Navigation Bar Settings . . . . . . . . . . . . . . . . . . . . . . . . . . . . . . . . . . . . . . . . . . . . . . . . 43
Message Window Settings . . . . . . . . . . . . . . . . . . . . . . . . . . . . . . . . . . . . . . . . . . . . . . . . . . . . . . . 43
Button Settings . . . . . . . . . . . . . . . . . . . . . . . . . . . . . . . . . . . . . . . . . . . . . . . . . . . . . . . . . . . . . . . . 44
Age & Ability Level Settings . . . . . . . . . . . . . . . . . . . . . . . . . . . . . . . . . . . . . . . . . . . . . . . . . . . . . . . 45
Toolbar Editor . . . . . . . . . . . . . . . . . . . . . . . . . . . . . . . . . . . . . . . . . . . . . . . . . . . . . . . . . . . . . . . . . . . 46
Rate Enhancement . . . . . . . . . . . . . . . . . . . . . . . . . . . . . . . . . . . . . . . . . . . . . . . . . . . . . . . . . . . . . . . . . 49
Abbreviation Expansions . . . . . . . . . . . . . . . . . . . . . . . . . . . . . . . . . . . . . . . . . . . . . . . . . . . . . . . . . . 49
Word Prediction . . . . . . . . . . . . . . . . . . . . . . . . . . . . . . . . . . . . . . . . . . . . . . . . . . . . . . . . . . . . . . . . . 52
Message History . . . . . . . . . . . . . . . . . . . . . . . . . . . . . . . . . . . . . . . . . . . . . . . . . . . . . . . . . . . . . . . . . 54
Vocabulary . . . . . . . . . . . . . . . . . . . . . . . . . . . . . . . . . . . . . . . . . . . . . . . . . . . . . . . . . . . . . . . . . . . . . . . 57
Ability Levels . . . . . . . . . . . . . . . . . . . . . . . . . . . . . . . . . . . . . . . . . . . . . . . . . . . . . . . . . . . . . . . . . . . . . . 60
Page Browser . . . . . . . . . . . . . . . . . . . . . . . . . . . . . . . . . . . . . . . . . . . . . . . . . . . . . . . . . . . . . . . . . . . . . 62
Modifying an Object on a Page . . . . . . . . . . . . . . . . . . . . . . . . . . . . . . . . . . . . . . . . . . . . . . . . . . . . . . . . 63
Part #401484 - B

The Compass Editor . . . . . . . . . . . . . . . . . . . . . . . . . . . . . . . . . . . . . . . . . . . . . . . . . . . . . . . . . . . . . . . . 71
Creating a Page . . . . . . . . . . . . . . . . . . . . . . . . . . . . . . . . . . . . . . . . . . . . . . . . . . . . . . . . . . . . . . . . . . . 81
The Remote Manager . . . . . . . . . . . . . . . . . . . . . . . . . . . . . . . . . . . . . . . . . . . . . . . . . . . . . . . . . . . . . . 82
Camera . . . . . . . . . . . . . . . . . . . . . . . . . . . . . . . . . . . . . . . . . . . . . . . . . . . . . . . . . . . . . . . . . . . . . . . . . . 88
Your Media Library . . . . . . . . . . . . . . . . . . . . . . . . . . . . . . . . . . . . . . . . . . . . . . . . . . . . . . . . . . . . . . . . . 89
Backing Up and Restoring . . . . . . . . . . . . . . . . . . . . . . . . . . . . . . . . . . . . . . . . . . . . . . . . . . . . . . . . . . . 90

Compass User’s Guide
Welcome to the DynaVox Compass Software!
The DynaVox Compass™ communication software is a research-based communication solution for individuals who cannot use their natural voice to fully participate in their everyday lives.
The communication pagesets included in Compass have been created and tested to specifically address the needs and strengths of individuals with Autism, Cerebral Palsy, Stroke or Traumatic Brain Injury, Apraxia, Down Syndrome, ALS and other neurological, developmental and communication challenges. A powerful Setup Wizard will guide you through the steps to choose the pageset that is most appropriate for your user’s age, condition, and ability level.
The Compass software's flexible and intuitive design enables the user to begin with simple, effective communication and advance at his or her own pace, increasing functionality as his or her skills and comfort level grow.
The Compass software gives you:
• A choice among a number of pagesets that have been designed by clinicians to meet the specific needs of a wide variety of individuals with differing communication needs and ability levels and using different selection methods.
• The ability to quickly and easily change ability levels within a pageset as your user becomes more proficient at communication.
• Powerful editing tools to make it easy to personalize your communications solution even further - modify your pages - or even create new pages!
• Direct access to myDynaVox, a cloud-based website you can use to manage account settings, upload and share pages, and access clinical, technical, and peer-to-peer support at any time and from anywhere.
• Unique, research-based Core Word Strategy that helps the user develop and use rich and creative communication.
• A full-breadth of pre-stored communication - symbols, pictures, words, and phrases - supporting everyday conversations.
• Built-in supports such as Behavior Supports and Scripts to help the user successfully navigate through daily activities and conversations.
• QuickFires and QuickPhrases that allow the user to quickly "jump" into a conversation.
• Easy access to pre-stored messages for many of the user’s favorite activities.
Part # 401484 - B 1

myDynaVox
myDynaVox.com is your personal online storage and administration website that you can use to manage your Compass software - to back up, update, and personalize Compass and share pages with your entire communication support team.
View help videos, and visit the online library to access Knowledgebase articles, research product tips, and perform custom searches, or explore the Community Q&A section.
myDynaVox.com is cloud based and available to you from anywhere via the web!
MYDYNAVOX
Go to www.myDynaVox.com to register for an account.
Your myDynaVox account integrates you with a community of clinicians, technical experts, and your peers and provides you with a responsive community of help and support.
After you set up your account, you can access it from anywhere on the web to:
• Upload, download, and share communication pages
• Download voices
• Receive software updates and new communication content
• Manage your user profile
• Backup and restore pagesets
• Access implementation and therapy supports and tools
• View and participate in discussion forums
• Find technical support and documentation resources
• Search the Knowledgebase
• View help videos
SHORTCUT
Quickly access the Help videos and Knowledgebase on myDynaVox.com through the Help menu in your Compass software. Open the Settings menu, and select Help.
2

Compass User’s Guide
The myDynaVox Knowledgebase
This Compass User’s Guide is only a brief, introductory reference to the DynaVox Compass software. The myDynaVox Community offers a large and steadily increasing library of over 250 Knowledgebase articles that cover all aspects of the Compass software.
To illustrate the diversity of articles that can be found in the Knowledgebase, following is a list of a selection of articles:
• Can I Adjust the Number of Rows and Columns Inside a Topic Without Changing Levels?
• Can I add a Core Words button to the Toolbar?
• How to Clear the Message Window After Speaking
• Editing a Topic Collage
• NavBar Pageset - Adding a New Grid Topic
• How Do I Hide Hotspots on a Visual Scene Page?
• How do I Open the Whiteboard from a Button?
• How Do I Edit Quick Phrases?
• How Do I Create a New Phoneme Exception?
• How Do I Add an Action to the Favorites Category?
• How to Link a Button to a Page
• How to Arrange Buttons on a Page or Popup
• How Do I Import a Page or Package of Pages Into a Pageset?
• How to Assign Actions
• How to Change the Onscreen Keyboard
• How Can I Order the Way Buttons are Scanned?
• NavBar Pageset - How to Create a Photo Story
Simply log in to the myDynaVox Community to access the Knowledgebase - and to get answers to your questions, discuss topics of interest, and join a user group whose interests match yours.
Part # 401484 - B 3

Getting Started
When you open the Compass software, a Pageset Wizard will guide you through selecting the pageset that is most appropriate for your user’s age, condition, and ability level. (An overview of each pageset is presented below - see Compass Pagesets.)
Opening the Compass Software For The First Time
1. Select the DynaVox icon on your desktop.
DYNAVOX ICON ON DESKTOP
NOTE
You may be prompted to log into myDynaVox.
The Setup Wizard screen will open.
SETUP WIZARD SCREEN
2. Select the blue Start Setup Wizard button.
4

Compass User’s Guide
The Pageset Setup screen will open.
PAGESET SETUP SCREEN
3. Select the Go to New Pageset Wizard button.The Pageset Wizard will step you through selecting, setting up, and customizing an appropriate pageset.
NOTE
The steps involved in the Pageset Wizard will vary depending on your pageset selection.
NEW PAGESET WIZARD
4. Select an Age, Gender, and Condition from the drop-down menus.
Part # 401484 - B 5

Based on your selections, the Pageset Wizard will present two recommended pageset options.
NOTE
Select the blue Compare button to see a more detailed description of each pageset recommendation. Select the View More button to view all available pagesets.
5. Choose a pageset by selecting its thumbnail on your screen.
SELECT A PAGESET
An "about" screen will open providing more specific information on the pageset you have selected.
"ABOUT" PAGESET SCREEN
6. If you decide you want to use this pageset, select the green Select This Pageset button.
6

Compass User’s Guide
NOTE
At any point during the setup process, you can select the Back button at the top left corner of the page to go back and change your selections.
Your pageset will be installed. (The length of time it takes to install is dependent on the pageset you chose.)
When the pageset has completed installation, the Wizard Questionnaire will open, presenting you with questions specific to the user:
• Understanding of the use of symbols
• Need for help to communicate
• Desire to communicate
• Ability to understand conversations
• Literacy skills
• Need for page organization
• Answer the questions on the Wizard Questionnaire to the best of your ability.
Your answers to these questions will enable the wizard to suggest an appropriate communication ability level at which your user should begin.
NOTE
IMPORTANT! Remember, you can easily change levels at any time - move up as the user becomes more proficient at communicating - move down if the user seems challenged. Select Levels in the Settings menu to quickly move between levels.
The Customize Content screen will open. The customization options on this screen will vary depending on the pageset you have selected. Below, as examples of the different options on each pageset, we show the Customize Content screens for the Master Page, NavBar, and All Access pagesets.
Part # 401484 - B 7

CUSTOMIZE CONTENT SCREEN - MASTER PAGE PAGESET
CUSTOMIZE CONTENT SCREEN - NAVBAR PAGESET
8

Compass User’s Guide
CUSTOMIZE CONTENT SCREEN - ALL ACCESS PAGESET
7. Continue to customize your content, making a selection from the choices presented, and then selecting the green Next button at the bottom right of the screen to open the next tab on the Customize Content screens.
NOTE
The All Access and Navigator pagesets enable you to choose an access method during the customization process. You can then select the Try it out button to access games that allow you to test the selected access method.
When setup is complete, a Congratulations! screen will open.
CONGRATULATIONS SCREEN WITH PLAY BUTTON CIRCLED
Part # 401484 - B 9

From the Congratulations screen, you can:
• View orientation videos. (The Orientation tab will, by default, be open. Select the play button to launch the orientation videos.)
• Select the myDynaVox tab for information on the myDynaVox.com website. (See myDynaVox.)
• Select the Resources tab for a list of resources available on the myDynaVox.com website to support your use of the Compass software.
When you have viewed the videos and learned about the myDynaVox.com website, select the Start Communicating button. You are now ready to start communicating using your Compass software!
It is important to back up your pageset on a regular basis. See Backing Up and Restoring.
10

Compass User’s Guide
Compass Pagesets
The Compass software offers a variety of pagesets to provide the best fit for your user’s unique strengths and needs.
NavBar Pageset
The NavBar pageset offers access to communication topics on a scrolling Navigation Bar (NavBar) and additional tools on a static Toolbar. Both the NavBar and Toolbar are always visible and always accessible. The user does not have to go to a “home page” to switch between communication topics - simply swipe through a customized list of topics. The NavBar pageset utilizes either a visual scene layout with hotspots or a more traditional grid layout. Content in the NavBar Pageset is adjusted based on ability level. The NavBar pageset provides each communicator with a host of integrated communication tools, all of which can be customized for all ages and ability levels.
The NavBar pageset is recommended for children and adults, individuals who have good visual organization skills and would benefit from having access to their communication topics at all times, and individuals who are able to access a dedicated communication device or personal tablet computer with their finger or stylus and who do not need a keyguard.
Part # 401484 - B 11

Master Page Pagesets
The Master Page pagesets feature a traditional “master" or "main” page with links to topics and communication tools. The Master Page pagesets can utilize either visual scenes or a grid layout. These pagesets are of a similar design and organization as compared to previous DynaVox devices. The Master Page pagesets can be customized for all ages and ability levels and are appropriate for keyguard users.
The Master Page pagesets are recommended for children and adults, individuals who have had success with more traditional "grid" based organization and would benefit from having their communication topics organized around a "master page," and individuals who need a keyguard to improve accuracy with direct selections. Alternative access methods such as scanning are also available.
Text-based Pageset
The Text-based pageset offers communication pages with single words and complete messages organized as Topics, QuickFires, Keyboards, and other communication tools. The Text-based pageset is designed for literate teenagers and adults, individuals who have minimal to no difficulty reading from an array of pre-programmed words and phrases, and individuals who need a keyguard to improve accuracy with direct selections. Alternative access methods such as scanning are also available.
12

Compass User’s Guide
Stroke & Brain Injury Persona Pageset
The Stroke & Brain Injury Persona pageset is the first comprehensive communication pageset designed to address the unique language needs of individuals with aphasia. Designed through extensive research, field-testing, and customer insight, it provides an unmatched solution for those who have had a stroke, brain injury, or other condition resulting in aphasia or other language impairment. The Stroke & Brain Injury Persona pageset provides access to a
scrolling navigation bar and additional tools on a static Toolbar. Both are always visible and always accessible. The user needn't go to a “home page” to switch between communication topics. Simply swipe through a customized list of topics. The Stroke & Brain Injury Persona provides each communicator with a host of integrated communication tools.
The Stroke and Brain Injury Persona pageset is recommended for adults, individuals who have communication challenges (e.g., aphasia) as a result of stroke or traumatic brain injury, and individuals who are able to access a dedicated communication device or personal tablet computer with their finger or stylus, and who do not need a keyguard.
WordPower Pageset
WordPower is a well-known core word strategy pageset combining the features of core vocabulary, spelling, and word prediction to create novel messages. Developed by Nancy Inman, MS, CCC-SLP as an alternative to traditional keyboards, it is recommended for children through adults with a wide range of ability levels. The WordPower pageset is recommended for children and adults who can benefit from core vocabulary and/or spelling with word prediction. Multiple alternative access methods are available. Communication displays are text based and available with or without symbol support. Individuals with a wide range of communication abilities have utilized this pageset. Access is available with a keyguard or through direct selection or alternative access including scanning.
Part # 401484 - B 13

All Access Pageset
The All Access pageset is primarily designed to support the communicative needs of individuals who use scanning, a head mouse, or other alternatives to touching the screen with a finger. This one-of-a-kind pageset includes a comprehensive vocabulary that can be separately adjusted based on communicative ability and the number of buttons available at one time. In addition, the All Access
pageset allows individuals to move quickly from page to page, access volume and other controls, and completely change settings and layouts by selecting one button. Other innovative features support easy storage of messages on a page, efficient retrieval and editing of messages previously spoken, and a wizard to walk individuals through selecting an access method. While not the primary audience, individuals who can successfully touch the buttons on the screen may also find the organization of the All Access pageset useful.
Navigator Pageset
The Navigator pageset is designed to support the needs of individuals who are literate and primarily want to use a keyboard to communicate. To support efficient and effective communication, however, the Navigator pageset provides a structure to store topic-specific messages, efficiently access and edit previously spoken messages, and communicate pre-programmed phrases that can be used in a variety of settings. The pageset uses a series of levels to introduce new communication tools and other features in a way that promotes easier learning and more successful use. The Navigator pageset can be accessed in a wide variety of ways, including touching the screen, scanning, and using a head mouse.
14

Compass User’s Guide
Premium Pagesets
In addition to the pagesets offered with the Compass software, two premium pagesets are also available - the Gateway and PODD pagesets.
Gateway Pageset
Created by Dr. Joan Bruno, Ph.D., CCC-SLP, Gateway is comprised of single words that can be joined together to create longer messages. Gateway has evolved over the years to reflect a variety of developmental levels, types of communicators, and changes in technology.
PODD Pageset
PODD, created by speech pathologist Gayle Porter, is a way of organizing whole word and symbol vocabulary to provide immersion and modeling as well as a means to express a range of messages in a variety of environments. There are PODD Pagesets to provide multiple options to suit the communication and language requirements of different individuals.
The PODD pageset is available in both U.S. English and Australian English versions.
For more information on these premium pagesets, including pricing and ordering information, visit myDynaVox.com.
Part # 401484 - B 15

The Settings Menu - Overview
The DynaVox Compass software is easily customizable and includes powerful editing tools. Customization options and page editing and page creation tools are accessed through the Settings menu.
The Settings menu gives the user access to the Page Browser, Editor, Page Creator, Vocabulary, Interface and Toolbar settings, Voice Settings, Rate Enhancement components, ability level settings, the camera and media library, the Remote Manager, access method settings, and backup and restore functions, as well as links to help documentation and videos.
SETTINGS MENU
The table below provides an overview of the options available on the Settings menu. Detailed information on each of these options is provided as noted.
16

Compass User’s Guide
THE SETTINGS MENU
Page Browser Quickly opens a page in your pageset. Search for a specific page by name, manage your pages, create, delete, and navigate through the layers of folders and see preview images of pages before opening them. (See Page Browser.)
Editor Opens the Editing Toolbar, which enables you to edit (and create) pages. (See The Compass Editor.)
Page Creator Create an entirely new page - either from a template or based on the layout of an existing page. After you select a template or layout, the Editing Toolbar will open, and you can customize your new page with your own content. (See Creating a Page.)
Vocabulary Your vocabulary (your talk topic choices, word lists, and phrases) was selected when you used the Setup Wizard to select a pageset and is based on your input regarding your age, gender, condition, and communication level. You can edit, copy, delete, change the order of appearance onscreen, and add new vocabulary items. (See Vocabulary.)
Interface Adjust or define how certain objects are presented onscreen. The Interface menu is organized by tab, with each tab pane presenting a different group of controls and options, including general settings, message window settings, button settings, and age and ability level settings. (See Interface Settings.)
Access Method Select and customize a selection method. (See Access Method.)
Toolbar Editor Personalize the Toolbar - add a new button or folder, edit or delete buttons or folders, hide, or rearrange Toolbar items. (See Toolbar Editor.)
Voice Settings Select and customize a speaking voice for the Compass software, download new voices, and manage pronunciation exceptions. (See Voice Settings.)
Rate Enhancement Compile a personalized list of abbreviation expansions and activate or deactivate word predication features, and select message history options. (See Abbreviation Expansions, Word Prediction, and Message History.)
Camera On devices with an integrated camera, snap images that are saved to the media library. (The Camera menu will be grayed out if the device does not have an integrated camera.) (See Camera.)
Media Library Use the Media Library to store and view your photos and videos. (See Your Media Library.)
Backup/Restore Create a backup file that saves your customized settings. Restore the backup files you created. Backup and restore either locally or to/from myDynaVox. (See Backing Up and Restoring.)
Help Opens the Help menu with links to access documentation, help videos, and the Knowledgebase.
Part # 401484 - B 17
NOTE
When running on open Windows devices, there is an additional option on the Settings men - Exit. This closes the Compass software and returns you to the desktop.
Levels Depending on the pageset you are using, a Levels button (ability level settings) may be present on the Settings menu. Quickly change the ability level to find the most appropriate tools and content and grid size to fit your user’s current needs. (See Ability Levels.)
Remote Manager The Compass software has the capability on selected devices of remotely controlling electronic equipment. (See The Remote Manager.)
18

Compass User’s Guide
Open the Settings Menu
There are two methods of opening the Settings menu, depending on whether or not the Toolbar is visible onscreen:
Open the Settings Menu if the Toolbar is Visible:
Simply select the Settings button on the Toolbar. The Settings menu will open.
Open the Settings Menu if the Toolbar is Not Visible
1. Select the Modify button in the top right corner of your screen.
MODIFY BUTTON
NOTE
On the All Access and Navigator pagesets, the Modify button is located at the bottom right corner of the screen.
A dialog will open presenting you with two options:
2. Select the Settings button. The Settings menu will open.
REFERENCE
When the Toolbar is enabled, the Settings button will always be visible on your screen. See Toolbar Editor for instructions on enabling the Toolbar.
Part # 401484 - B 19

Customizing the Compass Software
Access Method
The Compass software allows you to choose and refine a selection method that best suits your user’s needs.
NOTE
If you are using the Navigator or All Access pageset, you will have chosen your access method during initial setup when customizing your pageset.
REFERENCE
To watch a video that explains the various access methods in detail, go to myDynaVox.com. and select the video, Making Selections (Access Methods). (This video can be quickly accessed through the Help menu. [Settings > Help > Help Videos.])
Open the Settings menu. (See Open the Settings Menu). Then select Access Method.
ACCESS METHOD SETTINGS
Simply select the access method that you would like to use.
NOTE
Simple Touch is the default access method.
20

Compass User’s Guide
NOTE
The Eye Gaze access method is available only on Tobii I-Series devices.
When you make a selection on the Access Method menu, a Settings button will appear (circled in the above illustration). Select the Settings button to open a menu that will enable you to customize the settings for your selection method.
Simple Touch Settings
SIMPLE TOUCH SETTINGS MENU
For simple touch, select the check box to enable swiping, and choose from the scrollbar visibility options. Select an audio cue. (See Audio Cue.)
Part # 401484 - B 21

Touch Enter Settings
TOUCH ENTER SETTINGS MENU
For the touch enter access method, select a hold time and release time, and choose from scrollbar visibility options. Select an audio cue. (See Audio Cue.)
Touch Exit Settings
TOUCH EXIT SETTINGS MENU
For the touch exit access method, select a hold time and release time, and choose from scrollbar visibility options. Select a highlight style and color (see Highlight Style and Color) and an audio cue. (See Audio Cue.)
22

Compass User’s Guide
Scanning Settings
SCANNING SETTINGS MENU
Scanning Settings - Scan Type
Select a scan type, 1 switch autoscan or 2 switch step scan:
1 Switch Autoscan:
1. Select the blue Settings button under 1 Switch Autoscan. A dialog will open enabling you to select a scan speed. (Use the up and down arrows to adjust the speed.)
SELECT A SCAN SPEED
2. Select the Trans. Time tab. A dialog will open enabling you to set the transition time (the pause time between levels in the scan pattern). (Use the up and down arrows to adjust the time.)
Part # 401484 - B 23

SELECT A TRANSITION TIME
3. Select the Scan After tab to enable or disable scanning options.
SCAN AFTER DIALOG
4. Select OK on the Scan After dialog to return to the Scanning Settings menu.
5. On the Scanning Settings menu, select a switch input to signal the software to advance the scan highlight.
24

Compass User’s Guide
SELECT A SWITCH INPUT FOR 1 SWITCH AUTOSCANT
2 Switch Step Scan
1. Select 2 Switch Step Scan on the Scanning Settings menu.
SELECT A SWITCH INPUT FOR 2 SWITCH STEP SCAN
2. Select the Switch 1 Input drop-down list to choose the keyboard key that will provide a switch input to signal the software to advance the scan highlight.
3. Select the Switch 2 Input drop-down list to choose the keyboard key that will provide a switch input to signal the software to make a selection.
Part # 401484 - B 25

NOTE
The default switch inputs are the left arrow for switch 1 and the right arrow for switch 2.
Scanning Settings - Scan Pattern
1. Select the Pattern tab on the Scanning Settings menu.
SCANNING SETTINGS - PATTERN TAB
2. Select a scan pattern (row/column, column/row, or linear).
3. Select the number of passes. The software can be set to scan infinitely or to stop scanning if no selection has been made after the page has been scanned a set number of times.
4. To restart scanning where a selection was made, select the Enabled check box next to Scan from Last Selection.
26

Compass User’s Guide
Scanning Settings - Interface
1. Select the Interface tab on the Scanning Settings menu.
SCANNING SETTINGS - INTERFACE TAB
2. Select the Enabled check box next to Enable Back if you want the scan highlight to return to the previous level after a selection has been made.
3. Select the Enabled check box next to Enable Reset if you want the scan highlight to reinitialize after a selection has been made.
4. Select the Enabled check box next to Scan Back/Reset First if you want to move the scan icon to the beginning of the scan pattern.
5. To automatically increase the size of each object as it is scanned, select the Enabled check box next to Zoom.
6. Select a highlight style and color. (See Highlight Style and Color.)
7. Make a selection next to Scrollbar Visibility.
Part # 401484 - B 27

Scanning Settings - Pages
1. Select the Pages tab on the Scanning Settings menu.
SCANNING SETTINGS - PAGES TAB
2. Next to Scan Toolbar, make a selection as to how you want the Toolbar to scan.
3. Select the appropriate Enabled check box:
• To include the Modify button in the scan pattern.
• To include the message window in the scan pattern.
• To include blank buttons in the scan pattern.
Scanning Settings - Audio Cue
Select the Audio Cue tab on the Scanning Settings menu. See Audio Cue for information on audio cue settings.
28

Compass User’s Guide
Eye Gaze Settings
NOTE
Eye Gaze is available only on Tobii I-Series devices.
EYE GAZE SETTINGS MENU
Eye Gaze Settings - View Track Status
Opens the Track Status viewer where you can verify that the eye gaze software recognizes the user’s eyes and that the user is well positioned in front of the device.
TRACK STATUS VIEWER
The two dots that represent the user’s eyes should be in the middle of the viewer. The white triangle in the distance meter on the right side of the viewer should be near the center, in the green, when the optimal distance from the device is reached.
Part # 401484 - B 29

Eye Gaze Settings - Start a New Calibration
Opens a screen that begins the calibration process. The software will automatically calibrate the user’s gaze as he or she follows the targets onscreen. When calibration is completed, a dialog will open with the results of the calibration.
Eye Gaze Settings - Pause Eye Tracking
When this feature is enabled, a Pause icon appears onscreen - the user can temporarily stop gaze interaction to rest his or her eyes.
Eye Gaze Settings - Activation Settings
Select an activation method:
• Dwell Settings:
Select Dwell, then select the Settings button under Dwell. The Dwell Settings dialog will open. Select a dwell time.
• Switch Settings: Select Switch, then select the Settings button under Switch. A dialog will open.
• Select an activation time. Then select OK.
• Select the Wait Time tab, and select the time between switches.Then select OK.
• Select the Switch tab, and select a switch input. (If you are not using the switch ports on the device.) Then select OK.
• Blink Settings: Select Blink, then select the Settings button under Blink. A dialog will open.
• Select a minimum blink time. Then select OK.
• Select the Max.Time tab, then select a maximum blink time. Then select OK.
Eye Gaze Settings - Feedback
Select the Feedback tab on the Eye Gaze Settings menu. Select a color, size, and type of feedback target to be used during use.
30

Compass User’s Guide
EYE GAZE SETTINGS MENU - FEEDBACK TAB
Eye Gaze Settings - Windows Control
Select the Windows Control tab on the Eye Gaze Settings menu to set the mode of desktop access.
EYE GAZE SETTINGS MENU - WINDOWS CONTROL TAB
Gaze Selection
Gaze selection mode of Windows control makes it possible for the user to control a standard Windows desktop operating system with a two-step selection method, which reduces the risk of unwanted clicks.
Part # 401484 - B 31

Mouse Emulation
The mouse emulation mode makes it possible for the user to emulate and control a standard PC mouse pointer on the screen.
Eye Gaze Settings - Eye Gaze Profile
Select the Eye Gaze Profile tab on the Eye Gaze Settings menu.
EYE GAZE SETTINGS MENU - EYE GAZE PROFILE TAB
The Eye Gaze profile tab is used to switch between different eye gaze profiles. Profiles can be created using the Gaze Interaction Settings program on your desktop.
Eye Gaze Settings - Audio Cue
Select the Audio Cue tab on the Eye Gaze Settings menu. See Audio Cue for information on audio cue settings.
32

Compass User’s Guide
Mouse Settings
MOUSE SETTINGS MENU
Mouse Settings - Select With
Dwell
1. Select Dwell.
2. Select the blue Settings button under Dwell. A dialog will open enabling you to select a dwell time. (Use the up and down arrows to adjust the time.)
DWELL TIME SETTINGS
Switch
1. Select Switch.
2. Select the blue Settings button under Switch.
Part # 401484 - B 33

SWITCH SETTINGS - SWITCH INPUT
3. Select a switch input.
4. Select OK.
Mouse Settings - Scrollbar Visibility
Choose from scrollbar visibility options.
Mouse Settings - Highlight Style and Color
Choose a highlight style and color. (See Highlight Style and Color.)
Mouse Settings - Audio Cue
Select the Audio Cue tab on the Mouse Settings menu. See Audio Cue for information on audio cue settings.
Highlight Style and Color
HIGHLIGHT STYLE AND COLOR IN MOUSE SETTINGS MENU
34

Compass User’s Guide
1. Use the Highlight Style drop-down list to select how a selected object(s) will visually stand out on the page.
HIGHLIGHT STYLES
2. Select the Color button (circled in the illustration above. The Color Selector dialog will open. Select a highlight color. (You can also create a custom color using the Color Selector dialog.)
Audio Cue
An audio cue is a single word or short message that is played to identify an object when the cursor (or scanning highlight) moves over the object. You can select a different voice to speak audio cues than the voice you use for regular communication. You can enable or disable audio cues, choose the volume and speech rate for the voice you’ve chosen, and boost the sound level.
An Audio Cue tab is available on the Settings menus for all the access methods.
AUDIO CUE TAB ON SIMPLE TOUCH SETTINGS MENU
NOTE
On some devices, you will have the option selecting between private or public output for the audio cue.
Part # 401484 - B 35

NOTE
The audio cue is by default the object’s label.
1. Select the check box next to Usage to enable audio cues.
2. Select a voice for audio cues from the Voice drop-down list.
REFERENCE
See Voice Settings for information on downloading voices from myDynaVox.com.
3. Select the check box next to Voice Boost to enable the volume boosting feature.
NOTE
If you notice the speech is "breaking up," disable the Voice Boost feature.
4. Use the Volume slider to set the volume from 0 to 100.
5. Use the Rate slider to adjust the speaking rate. Dragging the slider from left to right increases the speech rate.
Select the Speak button to the right of Voice Preview to hear how the voice and rate of speech you have selected sounds. You can change the voice and increase or decrease the rate of speech until you are happy with the voice and the speaking rate you have chosen.
NOTE
The default text in the Voice Preview text box is, "This is how the voice currently sounds." To change the text in the text box, select it and enter your own personalized message.
36

Compass User’s Guide
Voice Settings
You can select and customize a speaking voice for the Compass software as well as manage pronunciation exceptions for frequently used words.
NOTE
You can select a different speaking voice for audio cues. (See Audio Cue.)
Open the Settings menu. (See Open the Settings Menu.) Then select Voice Settings.
VOICE SETTINGS
Voice
Select a speaking voice from the Voice drop-down list.
Download & Manage Voices
Select the Download & Manage Voices button to download voices from myDynaVox.com and install them.
When you select the Download & Manage Voices button, the Manage Voices menu will open.
Part # 401484 - B 37

MANAGE VOICES MENU
Select a voice, then select the Install button to download and install the voice, or
select the trash can icon to delete it.
NOTE
Certain voices are designated as Read Only and cannot be deleted.
Manage Pronunciations
The speaking voice may not always say words correctly - especially in the case of proper names and some foreign-derived words. You can save alternate text or phonetic spellings of words to correct any pronunciation problems.
1. Select the Manage Pronunciations button on the Voice Settings menu. The Pronunciation Exceptions menu will open.
2. Select the Manage button at the top right corner of the screen.
3. Select either the New Text Exception or the New Phoneme Exception button.
4. A dialog will open. Use the onscreen keyboard to type the proper spelling of the word, and then type the phonetic spelling (or select the appropriate phonemes). Then select Save (or OK for phonemes) to close the dialog and save the pronunciation exception.
38

Compass User’s Guide
TEXT EXCEPTION DIALOG (EXAMPLE)
Highlighting
You can choose whether or not you want the text in the message window to be highlighted when it is spoken. You can then select a highlight style and color.
To enable highlighting, select the drop-down arrow next to Highlighting, and select Enabled.
HIGHLIGHTING ENABLED
Then select the Configure button to open the Highlighting menu.
HIGHLIGHTING MENU
1. Use the Highlight Type drop-down list to choose what you want highlighted when the message window is selected:
• Highlight Word - Each word will be highlighted as it is spoken.
Part # 401484 - B 39

• Highlight Word and Symbol - Each word and its corresponding symbol will be highlighted as the word is spoken.
• Highlight Sentence - Each sentence will be highlighted as it is spoken.
• Highlight Sentence and Word - Each sentence will be highlighted (with Highlight Style 2) as it is spoken. Each word will be highlighted (with Highlight Style 1) as it is spoken.
• None - Nothing will be highlighted when the message window is selected.
2. Use the Style 1 and Style 2 drop-down lists to choose the style of highlighting when the message window text when is spoken.
NOTE
Highlight Style 2 will only apply when you select the Highlight Sentence and Word option in the Highlight Type drop-down list.
Select from the following highlight styles:
• Fill Color - The word (or sentence) will be highlighted with the color you choose.
• Outline Color - The word (or sentence) will be outlined with the color you choose.
• Invert - The text and the text background color will switch. (For example, if the text is black, and the background is white, the text will appear white and the text background, black.)
• Text Color - The text in the word or sentence will change to the selected color as it is spoken.
3. Choose a color for Highlight Styles 1 and 2.
Select the color button to the far right of Style 1 drop-down list (circled in the illustration above). The Choose Color dialog will open.
CHOOSE COLOR DIALOG
a. Select a color for the highlight.
NOTE
You can choose a color from the Standard Colors drop-down list on the Choose Color dialog, or you can use the Red, Green, and Blue and Opacity slider bars to create a custom color.
40

Compass User’s Guide
b. Select OK to close the Choose Color dialog and save your color choice.
c. Select the Color button to the right of the Style 2 drop-down list. Repeat steps a and b above to choose a color for Highlight Style 2.
Voice Boost
Select the drop-down arrow next to Voice Boost to disable the volume boosting feature.
NOTE
If you notice the speech is "breaking up," disable the Voice Boost feature.
Volume
Use the Volume slider to set the volume from 0 to 100.
Rate
Use the Rate slider to adjust the speaking rate. Dragging the slider from left to right increases the speech rate.
Voice Preview
Select the Speak button to the right of Voice Preview to hear how the voice and rate of speech you have selected sounds. You can change the voice and increase or decrease the rate of speech until you are happy with the voice and the speaking rate you have chosen.
Part # 401484 - B 41
Interface Settings
Use the Interface Settings menu to adjust or define how certain objects are presented onscreen. The Interface Settings menu is organized by tab, with each tab pane presenting a different group of controls and options.
NOTE
Interface settings options may vary, depending on the pageset you are using. The NavBar pageset is used as an example here.
Open the Settings menu. (See Open the Settings Menu.) Then select Interface. The Interface Settings menu will open to the default General Settings tab.
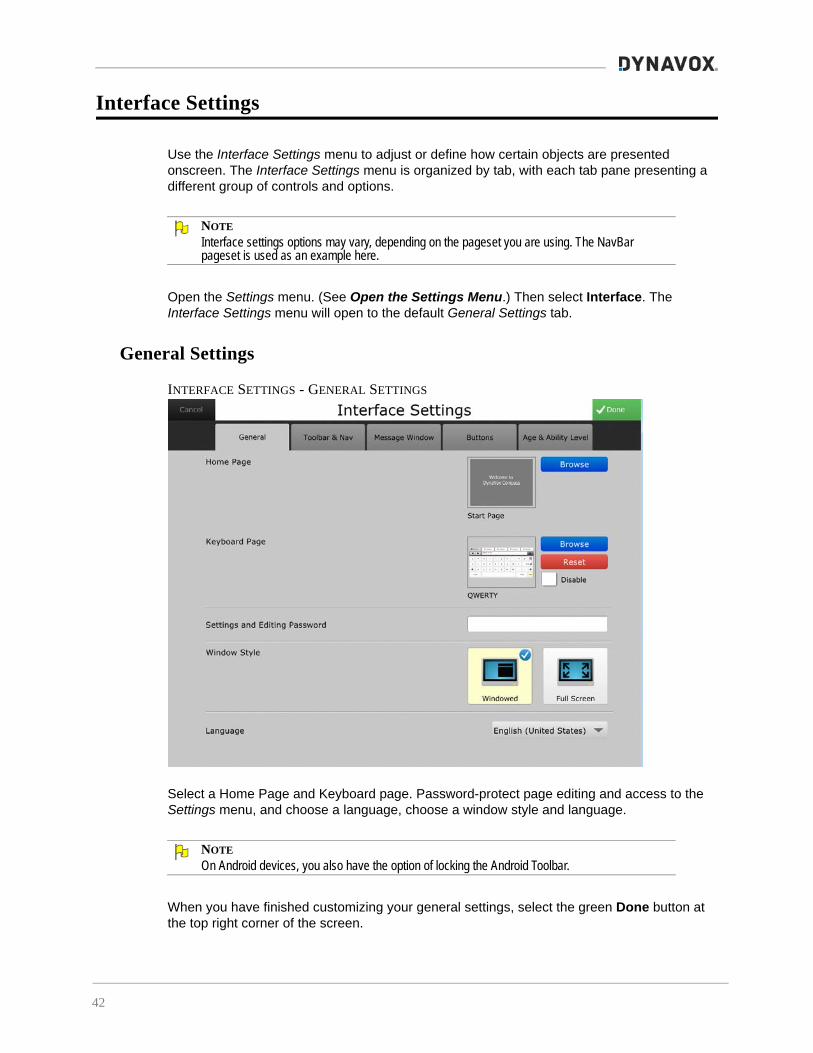
General Settings
INTERFACE SETTINGS - GENERAL SETTINGS
Select a Home Page and Keyboard page. Password-protect page editing and access to the Settings menu, and choose a language, choose a window style and language.
NOTE
On Android devices, you also have the option of locking the Android Toolbar.
When you have finished customizing your general settings, select the green Done button at the top right corner of the screen.
42

Compass User’s Guide
Toolbar and Navigation Bar Settings
INTERFACE SETTINGS - TOOLBAR AND NAVBAR SETTINGS
Select a location for your Toolbar and Navigation bar, and enable or disable (hide) the Toolbar.
Message Window Settings
INTERFACE SETTINGS - MESSAGE WINDOW SETTINGS
Part # 401484 - B 43

Customize the settings for your message window: use symbols, auto-capitalize words at the beginning of a sentence, auto-space between words, use a thicker, more visible cursor, clear the message window after speech, speak as words are entered into the message window, show misspellings, and/or use large symbols and select a custom slot popup.
Select the Browse button to open the Page Browser and search for a popup to use for slots (in some pagesets).
When you have finished customizing your message window settings, select the green Done button at the top right corner of the screen.
Button Settings
INTERFACE SETTINGS - BUTTON SETTINGS
Track button usage.
NOTE
The animation feature is not available at this time.
When you select Enabled and Display Usage, usage counts will appear on each button. (See the illustration below.)
DISPLAY BUTTON USAGE (EXAMPLE)
When you have finished customizing your button settings, select the green Done button at the top right corner of the screen.
44

Compass User’s Guide
Age & Ability Level Settings
INTERFACE SETTINGS - AGE & ABILITY LEVEL
Changes the content based on your selection of age and ability level.
When you have finished customizing your age and ability level settings, select the green Done button at the top right corner of the screen.
Part # 401484 - B 45

Toolbar Editor
You can personalize the Toolbar - add a new button or folder, edit or delete buttons or folders, move them up or down the Toolbar, and hide items on the Toolbar.
NOTE
Toolbar settings options may vary, depending on the pageset you are using. The NavBar pageset is used as an example here.
Open the Settings menu. (See Open the Settings Menu.) Then select Toolbar Editor. This menu shows all of the buttons and folders - both hidden and visible - in your Toolbar.
CONFIGURE TOOLBAR SETTINGS
Select Manage at the top right corner of the screen to edit the Toolbar. A button bar will open at the top of the Configure Toolbar menu that will let you edit your Toolbar.
46

Compass User’s Guide
BUTTON BAR ON CONFIGURE TOOLBAR MENU
• Select New Button or New Folder to open a dialog and add a new button or folder:
NEW BUTTON
NEW FOLDER
Part # 401484 - B 47

• To edit a folder or button - select it (a blue check mark will appear on the object), and then select Edit.The Toolbar Button or Toolbar Folder dialog will open to allow you to edit the object.
EDIT TOOLBAR ITEM
NOTE
If you select the Open Page command, you must also designate the page that will open when the button is selected.
• To move a Toolbar button or folder, select it, then select Move Up or Move Down.
• To hide a Toolbar button or folder select it, then select Hide.
• To show a hidden item, select Show.
NOTE
Selecting a hidden item in the list will change the Hide button to Show on the button bar.
• To delete an item, select it, then select the trash can icon .
When you have finished customizing your Toolbar settings, select the green Done button at the top right corner of the screen.
48

Compass User’s Guide
Rate Enhancement
The DynaVox Compass software offers rate enhancement features that can help the user communicate more quickly and efficiently.
Both abbreviation expansions and word prediction allow the user to enter only a few letters in the message window using the onscreen keyboard, and the software will anticipate word choices.
Open the Settings menu. (See Open the Settings Menu.) Then select Rate Enhancement.
RATE ENHANCEMENT SETTINGS
Abbreviation Expansions
You can compile your own list of abbreviations for frequently used words (for example, names of friends, family, places, pets, etc.).
NOTE
Make sure that the Auto Expand Abbreviations check box in the Auto Expand Abbreviations section of the Rate Enhancement menu is selected to use the abbreviations you create.
1. Select the Manage button in the Auto Expand Abbreviations section, and the Abbreviation Expansions menu will open.
Part # 401484 - B 49

ABBREVIATION EXPANSIONS MENU
2. Select the Manage button. A button bar will open.
To Add an Abbreviation Expansion:
3. Select the New button, and the Edit Abbreviation Expansion dialog will open.
NEW ABBREVIATION EXPANSION
4. In the Abbreviation text box, use the system keyboard to type a few letters that represent the word you are abbreviating. (For example, enter "fl" for "Fluffy."
5. Type the entire word in the Expansion text box.
6. Select Save.
7. Select Done in the upper right corner of the screen.
To expand the abbreviation, just type it into the message window. It will automatically expand after entering a space.
NOTE
Please note that the abbreviation must be entered into the message window exactly as it appeared when you created it. For example, if the abbreviation you created is "als" (without spaces between the letters), entering "a l s" into the message window will not expand.
50
Compass User’s Guide
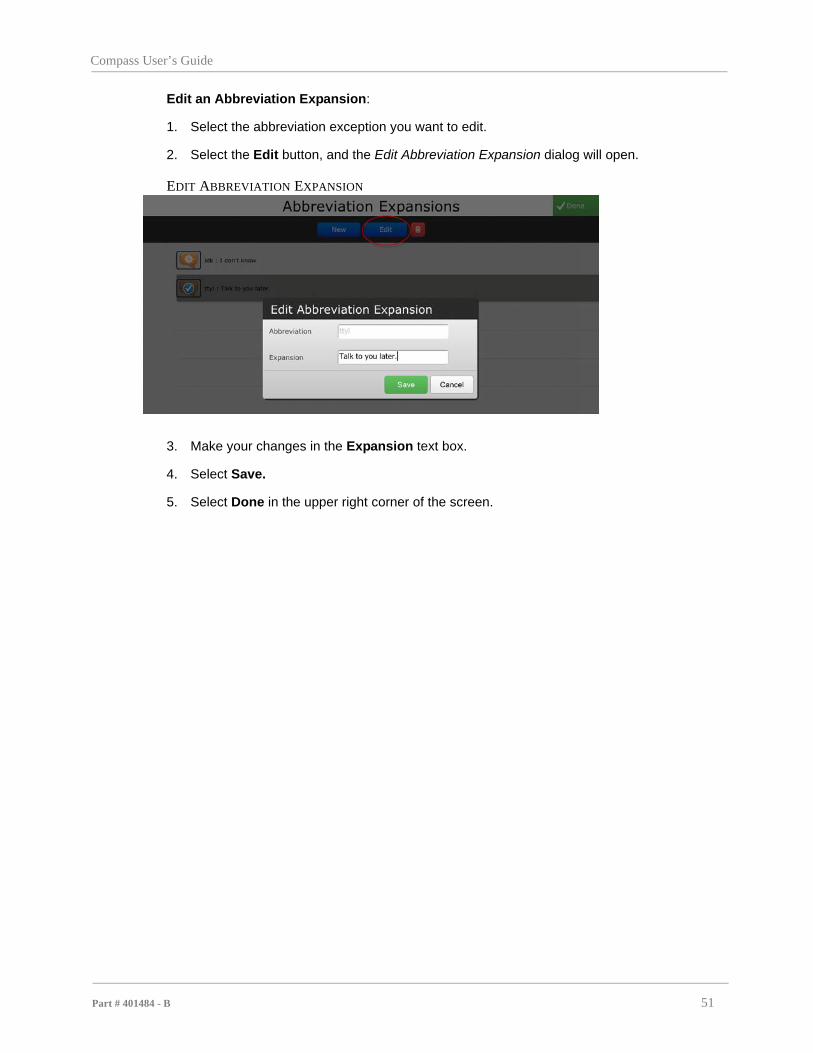
Edit an Abbreviation Expansion:
1. Select the abbreviation exception you want to edit.
2. Select the Edit button, and the Edit Abbreviation Expansion dialog will open.
EDIT ABBREVIATION EXPANSION
3. Make your changes in the Expansion text box.
4. Select Save.
5. Select Done in the upper right corner of the screen.
Part # 401484 - B 51

Word Prediction
Word prediction can be used on any page that includes a message window and predictor buttons. As the user composes a message, the prediction feature anticipates word choices and displays vocabulary options for quick selection - these vocabulary options are displayed on the predictor buttons.
You can activate and deactivate prediction features using the Rate Enhancement menu.
WORD PREDICTION SETTINGS ON RATE ENHANCEMENT MENU
1. Select the Manage button in the Prediction section of the Rate Enhancement menu, and the Prediction Settings menu will open.
NOTE
Make sure the Enabled check box is selected. Word prediction is enabled by default. Clear the check box to disable automatic word prediction.
52

Compass User’s Guide
PREDICTION SETTINGS
2. Select or clear the following check boxes on the Rate Enhancement menu to enable/disable the following word prediction features:
• Show Symbols with Predictions - This feature is also enabled by default. Clear the check box to hide symbols.
• Predict Words only Once - When the Predict Words only Once check box is selected, the user has only one chance to select a word in a predictor button. If a word is not selected, that word will not be predicted again until after the user completes the word he or she is entering - by adding ending punctuation or a space.
• Context Predictions Off - When this feature is enabled, the Compass software will not anticipate word selections based on the grammatical structure or word sequence of the sentence being entered.
• Next Letter Prediction - On a keyboard, when this feature is enabled, any letters that would not be a feasible option based on the letter or sequence of letters entered will not be predicted.
• Don’t Predict Words on Buttons - When this feature is enabled, a word that already appears on a button on the current page will not be predicted.
• Enable Prediction Learning - Prediction learning enables the Compass software to learn frequently used words and add these words as prediction options.
Part # 401484 - B 53

Message History
NOTE
Message history functionality is currently available on the Toolbar in only in the Navigator and All Access pagesets.
Message History is attached to the message window content. Anything that has been spoken or entered into the message window will be saved to message history. The message history then is used to repeat a message or to save the message to a topic or to another page.
You can choose the amount of time (one week to forever) that the message history will be stored.
Message history can be searched by keyword. Single items can be deleted from message history or the entire history can be cleared.
Message history settings are selected through the Rate Enhancement menu. (See Message History Settings below.)
Access your message history through the Message History topic on the Toolbar of your Navigator or All Access pageset. (See Access Message History.)
MESSAGE HISTORY
54
Compass User’s Guide
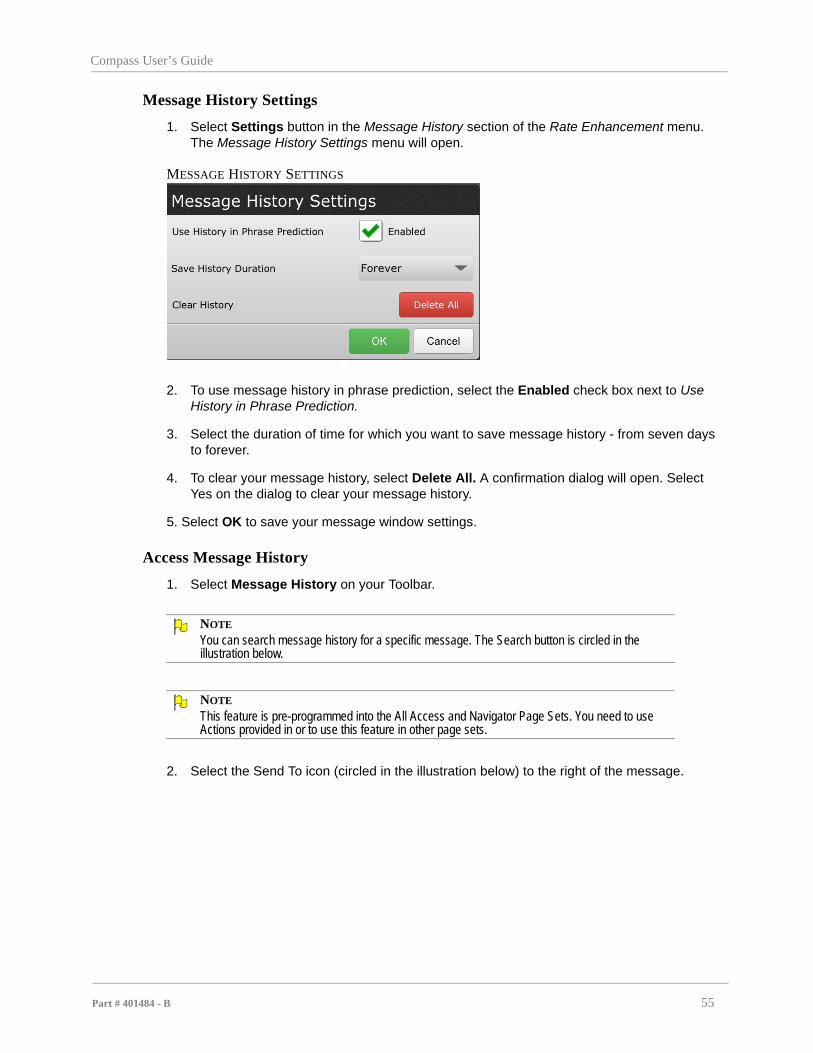
Message History Settings
1. Select Settings button in the Message History section of the Rate Enhancement menu. The Message History Settings menu will open.
MESSAGE HISTORY SETTINGS
2. To use message history in phrase prediction, select the Enabled check box next to Use History in Phrase Prediction.
3. Select the duration of time for which you want to save message history - from seven days to forever.
4. To clear your message history, select Delete All. A confirmation dialog will open. Select Yes on the dialog to clear your message history.
5. Select OK to save your message window settings.
Access Message History
1. Select Message History on your Toolbar.
NOTE
You can search message history for a specific message. The Search button is circled in the illustration below.
NOTE
This feature is pre-programmed into the All Access and Navigator Page Sets. You need to use Actions provided in or to use this feature in other page sets.
2. Select the Send To icon (circled in the illustration below) to the right of the message.
Part # 401484 - B 55

MESSAGE HISTORY SELECTED IN ALL ACCESS PAGESET
3. Select the destination to which you want the message sent. (Or select the trash icon to delete the message.)
56

Compass User’s Guide
Vocabulary
Most vocabulary items are stored in folders. You can edit, copy, delete, change the order of appearance onscreen, and add new vocabulary items using the Vocabulary menu.
Open the Settings menu. (See Open the Settings Menu.) Then select Vocabulary.
VOCABULARY MENU
Select the Word Lists, My Phrases, or Topics folder.
VOCABULARY MENU - WORD LISTS (EXAMPLE)
Navigate through the folders (use the arrow button at the upper left of the screen - to move up through the layers of folders.) Select a folder to open it.
Part # 401484 - B 57

When you find the folder or item you wish to edit, select Manage at the top right corner of the screen.
NOTE
If you are adding a new folder or item, navigate to the level at which you want to add the folder or item, then select Manage.
EDIT VOCABULARY MENU (EXAMPLE)
When you select the Manage button, a button bar will open.
BUTTON BAR ON VOCABULARY SCREEN
Select the item you want to modify. Then select the applicable button on the button bar.
• Edit - The Vocabulary Properties panel will open to the default Edit tab.
58

Compass User’s Guide
VOCABULARY PROPERTIES PANEL
Enter a new label, browse for a symbol, and/or add or change the message.
NOTE
The Message field will not be present when you are editing a folder.
Select the Properties tab in the Vocabulary Properties panel to change the age and ability level for the item you are editing.
• Copy To - The Select a Folder screen will open. Navigate through the levels to find the destination folder.
• Order - Use the First, left arrow, right arrow, or Last buttons at the top of the screen to reorder the selected item.
• New Folder - Create a new folder. Use the onscreen keyboard to enter a label and symbol for the new folder. Select the Properties tab in the Vocabulary Properties panel to define the age and ability level for the new folder.
• New Item - Create a new item. Use the onscreen keyboard to enter a label, symbol, and message for the new item. Select the Properties tab in the Vocabulary Properties panel to define the age and ability level for the new item.
• Delete item - Select the trash can icon . To delete the selected item.
Part # 401484 - B 59

Ability Levels
Depending on the pageset you are using, a Levels button may be present on the Settings menu.
One of the most exciting features of the Compass software is the ease of moving up through ability levels as your user’s communication skills progress.
The Levels menu enables you to quickly and easily choose among ability levels to get the most appropriate tools and content and button size.The Levels menu also provides access to overview videos and allows you to configure your topics, keyboard layouts, Quickfires, etc.
Open the Settings menu. (See Open the Settings Menu.) Then select Levels.
LEVELS SETTINGS (NAVBAR PAGESET)
1. Select an appropriate level from the Ability Level tabs at the top of the screen.
NOTE
Select the Intro to Levels button at the top left of the screen and watch the video(es) for more information on levels.
60

Compass User’s Guide
2. Customize your settings Under Configure Tools.
Simply select a tool, and a dialog will open. The dialogs for Quickfires and Topics for the NavBar pageset (Level 3) are illustrated below.
QUICKFIRES SETTINGS ON LEVELS PAGE (NAVBAR PAGESET)
TOPICS SETTINGS ON LEVELS PAGE (NAVBAR PAGESET)
NOTE
Please note that the tools in the Levels menu give you another opportunity to configure your Navigation Bar.
3. As you make changes on each dialog, select the green Save button to close the dialog and save your changes.
4. When you are finished, select the green Done button at the top right corner of the screen.
Part # 401484 - B 61

Page Browser
The Page Browser is the quickest way to find a page to open or edit. You can search for a page by name, or look through the folders and see preview images of pages before opening them. You can also create a new page using the Page Browser.
Open the Settings menu. (See Open the Settings Menu.) Then select Page Browser.
PAGE BROWSER (EXAMPLE - NAVBAR PAGESET)
The icons at the top right of the screen (circled in the illustration above) enable you to display the pages and folders as a grid (default) or list.
Use the arrow button at the upper left of the screen (circled in the illustration above) to move up through the layers of folders. Select a folder to open it and display the pages inside. Select a page, and a large thumbnail of the page will open.
SELECTED PAGE IN PAGE BROWSER
Simply select Open to open the selected page or Editor to open the Editing Toolbar and edit the page. (See The Compass Editor.)
62

Compass User’s Guide
Modifying an Object on a Page
You can easily customize your pages - modify any object - including the page itself - to change its properties - its symbol, label, audio cue, layout, actions performed when it is selected, etc.
1. Select the Modify button on your screen:
• For all pagesets except All Access and Navigator, the Modify button is located in the top right corner of your screen. (See the illustration below.)
MODIFY BUTTON - ALL PAGESETS EXCEPT ALL ACCESS AND NAVIGATOR -
• For the All Access and Navigator pagesets, the Modify button is located in the bottom right corner of your screen. (See the illustration below.)
MODIFY BUTTON - ALL ACCESS AND NAVIGATOR PAGESETS -
NOTE
If the Toolbar is disabled, when you select the Modify button, a dialog will open with two options: Modify or Settings. Select Modify.
You will enter Modify Mode (A red bar will appear at the bottom of the screen with the message, "Modify Mode. Select an object to modify").
Part # 401484 - B 63

MODIFY MODE
2. Select the object on the page to be modified. (Or select the page itself.)
The object’s Properties Panel will open.
The instructions that follow are specific to modifying a button, as that is the object on the page that is most often modified, but all page objects are modified in much the same manner - the Properties panel for each object will differ, however, depending on the object’s properties.
Modifying a Button
BUTTON PROPERTIES PANEL - CONTENT TAB OPEN
The Button Properties panel contains six tabs:
Content Tab
On the Content tab, you can assign a label, a message, a symbol, and apply actions that will execute when that button is selected.
1. Label - the label will appear on the face of the button.
a. Select the Label field or the keyboard icon to the right of the Label field.
64

Compass User’s Guide
b. Type the new label using the onscreen keyboard.
c. Select Done on the onscreen keyboard.
2. Message
The message will not appear on the face of the button. Messages can be used for a more lengthy or more complex line of text. For example, if the label of the button is "Address," the message could be the user's actual address. When using messages, be sure to assign corresponding actions. It can be used with actions such as Insert Message or Speak Message. (See Actions below.)
a. Select the Message field
b. Select the Replace button.
c. Type the new message using the onscreen keyboard.
d. Select Done on the onscreen keyboard.
NOTE
Selecting Reset will cause the button to reset the message to match the text in the Label field.
3. Symbol
Symbols help users associate concepts more quickly and easily. To assign or change a symbol:
a. Select the blue Select... button next to the Symbol field. Symbols based on the label you entered will be suggested, but you can search for different symbols using the search field at the top of the screen. Just select the Search field, and use the onscreen keyboard to type what you're searching for.
b. Select a symbol. When a symbol is selected, a blue check mark will appear over the symbol. To choose a different symbol, just select a new one. The first choice will automatically deselect.
NOTE
You can also select the Images tab to browse for a photo or drawing, or, if your device has an integrated camera, take a photo with the camera.
Part # 401484 - B 65

SELECT A SYMBOL
c. Select the green Select button at the top right corner of the screen.
4. Actions
Actions make the button do something. Whether you want to speak a label directly from a button or compose text in a message window, you'll need to assign actions to your button.
To assign actions:
a. Select the Actions field. The Script Editor will open.
b. From the drop-down list in the left panel of the Script Editor, select the type of actions you're looking for. For example, if you're assigning actions to a button, select Buttons from the list. This will show you a list of popular button actions.
66

Compass User’s Guide
SCRIPT EDITOR - DROP-DOWN LIST
c. A list of available actions will display in the left panel. For example, if you selected Buttons, button actions will be displayed with a brief description of each action.
NOTE
Select the pencil icon next to an action to view variations of the action.
d. Select the action to assign to your button. As you make your selections, actions assigned to your button will appear in a list in the right panel.
To delete actions, make selections from the list of assigned actions, and select the red
trash can icon at the top of the screen.
e. After assigning actions, select the green Done button at the top right corner of the screen.
Font Tab
Font choices are available for all text, including button labels. Select the Font tab to choose font types, styles, sizes, and colors.
Part # 401484 - B 67
FONT TAB
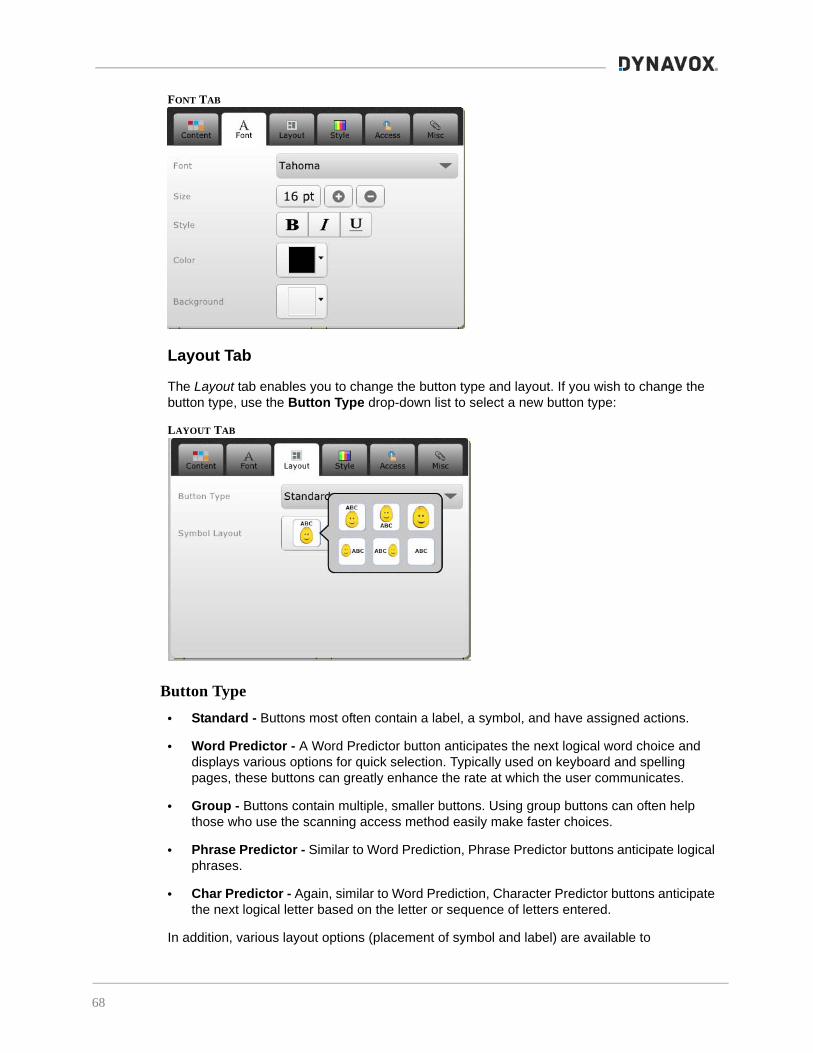
Layout Tab
The Layout tab enables you to change the button type and layout. If you wish to change the button type, use the Button Type drop-down list to select a new button type:
LAYOUT TAB
Button Type
• Standard - Buttons most often contain a label, a symbol, and have assigned actions.
• Word Predictor - A Word Predictor button anticipates the next logical word choice and displays various options for quick selection. Typically used on keyboard and spelling pages, these buttons can greatly enhance the rate at which the user communicates.
• Group - Buttons contain multiple, smaller buttons. Using group buttons can often help those who use the scanning access method easily make faster choices.
• Phrase Predictor - Similar to Word Prediction, Phrase Predictor buttons anticipate logical phrases.
• Char Predictor - Again, similar to Word Prediction, Character Predictor buttons anticipate the next logical letter based on the letter or sequence of letters entered.
In addition, various layout options (placement of symbol and label) are available to
68

Compass User’s Guide
accommodate the user's preferences and needs. Select the Symbol Layout button to choose a layout for the button.
Style Tab
Many style choices are available, including different shapes, fill colors, border color and border width and style, gradient, and gradient color.
NOTE
Swipe or scroll down the Style tab to see all the style options.
STYLE TAB
Access Tab
ACCESS TAB
For auditory scanning users, fields for audio cue and row/column cue are provided. The row/column cue is used if the button is the first button in the row or column. To enter an audio cue:
1. Select Replace.
2. Type the new audio cue using the onscreen keyboard.
Part # 401484 - B 69

3. Select Done on the onscreen keyboard.
To have the software skip the button when it is scanning, clear the Touch Only check box.
Misc Tab
MISC TAB
To hide the button, select the check box next to Hidden.
70

Compass User’s Guide
The Compass Editor
The Compass Editor allows you to edit a page to your own specifications or to create an entirely new page. (See Creating a Page).
NOTE
If you just want to modify an object on a page, for example, to change the symbol or action on a button, or to change an object’s layout or style, see Modifying an Object on a Page.
Select the Editor button on the Settings menu. (See Open the Settings Menu). The Editing Toolbar will appear at the top of the page.
NOTE
The Editing Toolbar will also open automatically when you create a new page using the Page Browser or Page Creator.
The Editing Toolbar contains all of the tools that you will need for creating and editing pages.
EDITING TOOLBAR
1. File
New Create a new page.
New From Template Create a new page from a template or "like" an existing page.
Save Save all the changes you have made to the page that is currently open.
Open Opens the Select Page menu to open a new page to edit. (Opening a new page will close the currently open page.)
Part # 401484 - B 71

2. Edit
NOTE
The Edit options will vary, depending on the selected object(s) on the page. For example, if a tab control is selected, there will be an option for adding a new tab; if a standard button is selected, there will be fill options. (The options shown in the illustration above are for a group button.)
Revert Cancel all the changes you have made to the currently open page since you last saved it.
Page Size Select a page size (or create a custom page size) that anticipates the positions of the Navbar and Toolbar (Left, Right, Top, Bottom, or Off).
Macros Opens the Macro Editor.
Preferences Change editor preferences.
Undo Undo the last change you made. (The software allows multiple levels of undo and redo.)
Redo Redo the last change you made. (The software allows multiple levels of undo and redo.)
Delete Permanently remove the selected object from the page.
Duplicate Copy the selected object and place the copy immediately next to the selected object.
Cut Remove the selected object(s) from the page and save to the clipboard so the object(s) can be pasted back onto the page or onto another page.
Copy Make a duplicate of the selected object(s) and save to the clipboard so the duplicate can be pasted elsewhere on the page or onto another page.
Paste Paste an object that has been cut or copied.
Select Parent Change the selection to contain the "parent" object of the object that was originally selected. For example, if a button within a group box is selected, the "parent" of the button would be the group box.
Select Contents Select all content (including label, symbol, and all objects in a group button or group box) in the selected object.
Clear Contents Remove all content (including label, symbol, audio cue, and all objects in a group button or group box) from the selected object.
72

Compass User’s Guide
3. Select
Select Select a single object on the page (or the page itself).
Multi Select Select multiple objects on the page. (This tool replicates holding down the Ctrl key on a keyboard while clicking on multiple objects with a mouse.)
Spray Spray out copies of a selected object to make a rectangular grid.
Scan Order Set the order in which the objects on the page will scan.
Lock “Lock” an object so that it will not be editable. Selecting the Lock tool will place lock icons on each object on the page (including the page itself). Select each object that you want to lock. Its lock icon will change from green to red, indicating that it is locked. (To unlock the object, select the Lock tool again and then select the object you want to unlock.)
Measure Gives the measurements of the selected object or area.
Part # 401484 - B 73

4. Buttons
To place a button on the page, simply select the appropriate button tool and then select a location on the page.
To draw out a button on the page, touch the screen of your device and use your finger (or mouse if using the editing software) to draw out the button.
Standard Place a "standard" (rectangular) button.
Group Place a group button.
(A group button is a button into which you can place other objects [a "multi-object" button]).
Word Predictor Place a word predictor button.
(A word predictor button anticipates the user’s word choices as a message is composed in the message window.)
Phrase Predictor Place a phrase predictor button.
(A phrase predictor button works on the same principle as a word predictor button but will predict a phrase.)
Char Predictor Place a character predictor button.
(A character predictor button works on the same principle as a word predictor button but will predict the next character based on the letter or sequence of letters the user has chosen.)
(Rectangular) Hotspot
Place a rectangular hotspot.
(Hot spots are usually placed over portions of images or visual scenes on a page. Then the hot spot is programmed so that when it is selected, an action will be performed.)
(Invisible) Hotspot Place an invisible hotspot.
(An invisible hot spot can have actions assigned to it, but it has no borders, color, symbol, or other visible characteristics.)
Freeform Button Draw a button of any shape you want. (Touch the screen of your device and move your finger [or mouse if using the editing software] around the page until the button is the size and shape you want.)
74
Compass User’s Guide
To resize the button, select it, and then move your finger (or mouse) over the edge or corner of the button until a double arrow appears. Drag until the button is the size and shape you want.
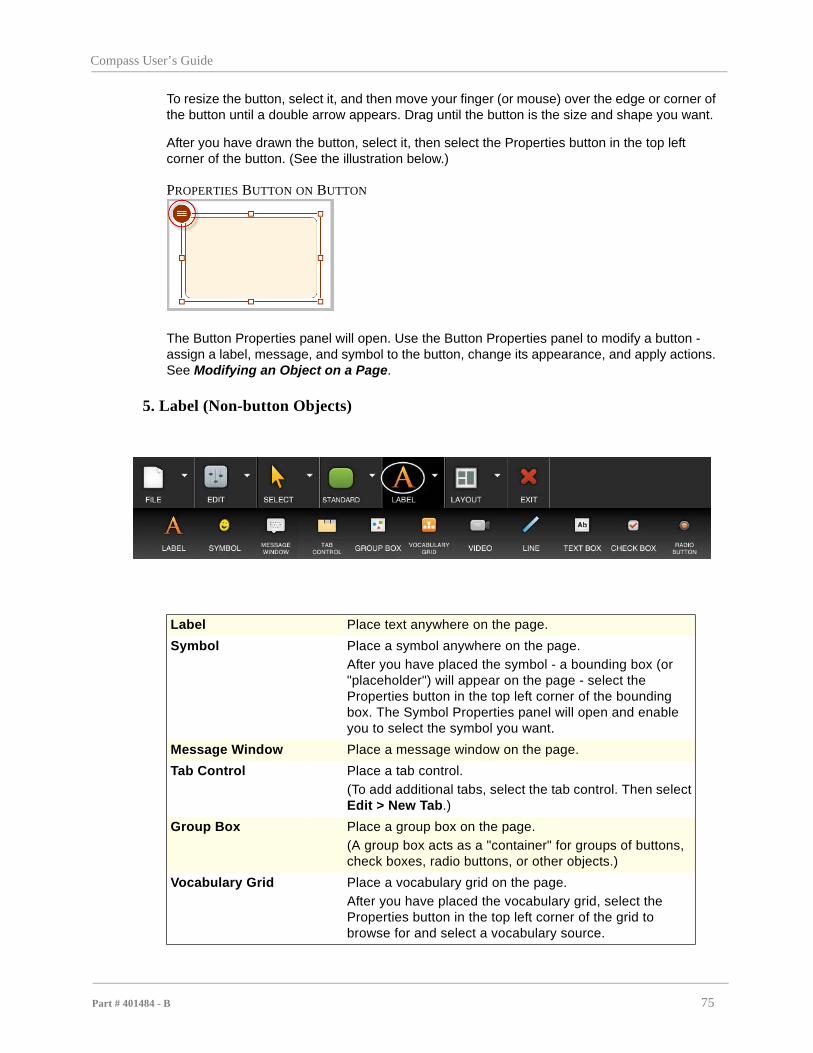
After you have drawn the button, select it, then select the Properties button in the top left corner of the button. (See the illustration below.)
PROPERTIES BUTTON ON BUTTON
The Button Properties panel will open. Use the Button Properties panel to modify a button - assign a label, message, and symbol to the button, change its appearance, and apply actions. See Modifying an Object on a Page.
5. Label (Non-button Objects)
Label Place text anywhere on the page.
Symbol Place a symbol anywhere on the page.
After you have placed the symbol - a bounding box (or "placeholder") will appear on the page - select the Properties button in the top left corner of the bounding box. The Symbol Properties panel will open and enable you to select the symbol you want.
Message Window Place a message window on the page.
Tab Control Place a tab control.
(To add additional tabs, select the tab control. Then select Edit > New Tab.)
Group Box Place a group box on the page.
(A group box acts as a "container" for groups of buttons, check boxes, radio buttons, or other objects.)
Vocabulary Grid Place a vocabulary grid on the page.
After you have placed the vocabulary grid, select the Properties button in the top left corner of the grid to browse for and select a vocabulary source.
Part # 401484 - B 75

To place an object on the page, simply select the appropriate tool and then select a location on the page.
To draw out the object, touch the screen of your device and use your finger (or mouse) to draw it out.
To resize the object, select it, and then move your finger (or mouse) over the edge or corner of the object until a double arrow appears. Drag until the object is the size and shape you want.
After you have drawn the object select it, then select the Properties button in the top left corner. (See the illustration below.)
PROPERTIES BUTTON ON TAB CONTROL
The object’s Properties panel will open. Use the Properties panel to modify the object. See Modifying an Object on a Page.
Video Place a video object on the page.
After you have placed the video object, select the Properties button in the top left corner of the object to select a video.
Line Place a line on the page. (To draw out a line on the page, touch the screen and use your finger [or mouse if using the editing software] to draw out the line).
Text Box Place a text box on the page.
(Text boxes are similar to message windows in that they display text messages entered by keyboard input. They differ from message windows, however, in that text boxes are used for short text entries - only one word or line of text.)
Check Box
Radio Button
Place a check box or radio button on the page.
By default, each radio button/check box includes a frame in which a symbol will appear when it is selected.
Radio buttons and check boxes share the same properties. The major difference between them is that in each group of radio buttons, only one selection is allowed.
Check boxes, however, work independently of one another and are useful when multiple selections are allowable.
76

Compass User’s Guide
6. Layout
NOTE
The Layout options will vary, depending on the selected object(s) on the page. (The options shown in the illustration above are for two buttons - with labels - selected.)
Arrange
Arrange objects on the page. (Objects on a page are layered and can overlap.)
• Bring Forward - Move the selected object up one layer.
• Bring to Front - Reposition the selected object as the top item on the page.
• Send Backward - Move the selected object down one layer.
• Send to Back - Reposition the selected object as the bottom item on the page.
Part # 401484 - B 77

NOTE
If you have multiple objects selected on a page, the "primary" object is the object displaying the Properties button.
Align
Adjust the relative positions of multiple selected objects on the page by aligning the selected objects on the page based on the position of the primary object.
Center
Center the selected objects on the page horizontally, vertically, or both horizontally and vertically.
78
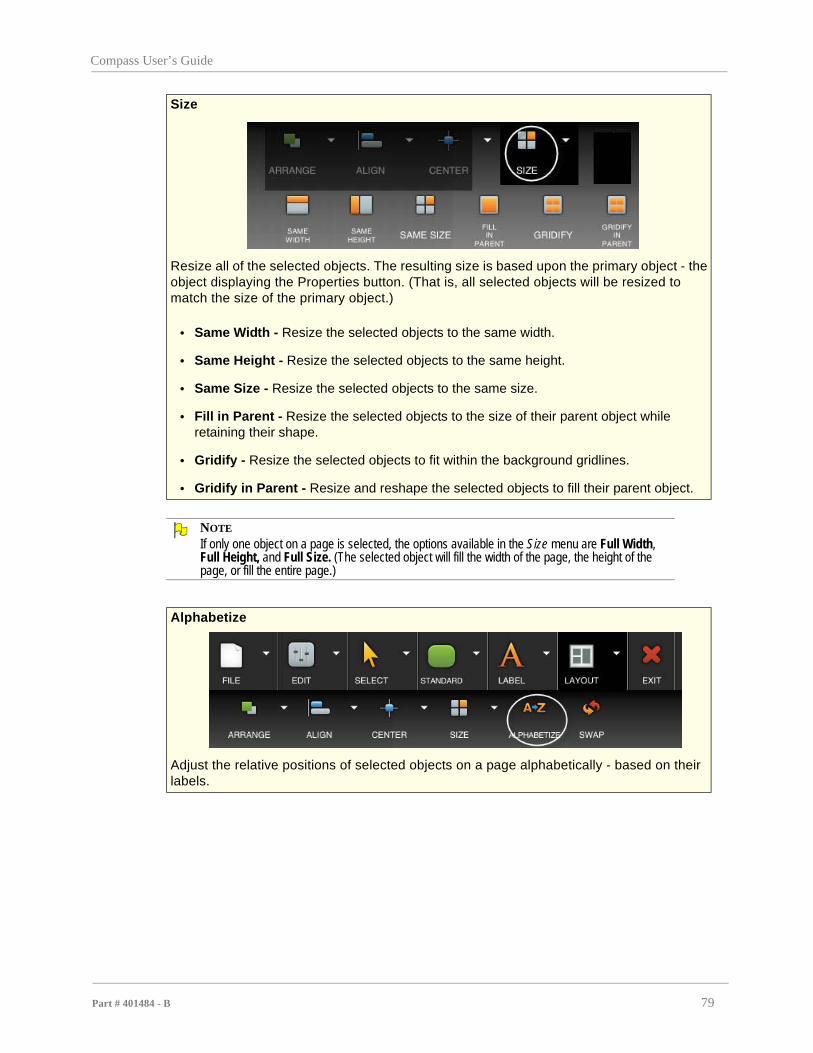
Compass User’s Guide
NOTE
If only one object on a page is selected, the options available in the Size menu are Full Width, Full Height, and Full Size. (The selected object will fill the width of the page, the height of the page, or fill the entire page.)
Size
Resize all of the selected objects. The resulting size is based upon the primary object - the object displaying the Properties button. (That is, all selected objects will be resized to match the size of the primary object.)
• Same Width - Resize the selected objects to the same width.
• Same Height - Resize the selected objects to the same height.
• Same Size - Resize the selected objects to the same size.
• Fill in Parent - Resize the selected objects to the size of their parent object while retaining their shape.
• Gridify - Resize the selected objects to fit within the background gridlines.
• Gridify in Parent - Resize and reshape the selected objects to fill their parent object.
Alphabetize
Adjust the relative positions of selected objects on a page alphabetically - based on their labels.
Part # 401484 - B 79

7. Exit
Swap
Exchange the positions of two selected objects. (The contents of the objects will remain with the original object)
(This option is only available if two objects on the page are selected.)
Spacing
Adjust the horizontal and vertical spacing of three or more selected objects on the page.
(This menu option is only available if three or more objects on the page are selected.)
Closes the Editing Toolbar.
(A confirmation dialog will appear asking if you want to save changes to the page.)
80

Compass User’s Guide
Creating a Page
Create an new page - either from a template (including a blank template), or based on the layout of an existing page. You can customize your new pages with your own content - vocabulary, symbols, media files, etc.
NOTE
You can also create a new page directly from the Compass Editor. (See The Compass Editor.)
Open the Settings menu. (See Open the Settings Menu.) Then select Page Creator.
PAGE CREATOR
The icons at the top right of the screen (circled in the illustration above) enable you to display the pages and folders as a grid (default) or list.
Select from a number of templates (blank or by activity type or instructional area) or select the Like Page tab to create a new page using the layout of an existing page. You can also use the Search text field to find a page you would like to use as a template.
Use the arrow button at the upper left of the screen (circled in the illustration above) to move up through the layers of folders. Select a folder to open it and display the pages inside. Select a page, and then select Create at the top right corner of the screen. A dialog will open - name the page and browse for a location for it.
The Editing Toolbar will open. Use the Editing Toolbar to place new objects on the page, resize, duplicate, delete, rearrange objects, etc. (See The Compass Editor.) Select the
Properties button at the upper left corner of a selected object to open its Properties panel and customize the object - symbol, label, message, layout, actions performed when it is selected, color, etc. (See Modifying an Object on a Page.)
Part # 401484 - B 81

The Remote Manager
On selected devices the Compass software has the capability of sending and receiving infrared (IR) signals, so the device can function as a remote control for electronic equipment such as stereos, cable boxes, televisions, DVD players, and IR-enabled telephones.
On your device:
Open the Settings menu. (See Open the Settings Menu.) Then select Remote Manager. The Remote Manager will open.
REMOTE MANAGER (ON DYNAVOX T15)
1. Select the Manage button. A button bar will open at the top of the Remote Manager.
2. Select the New button. A dialog will open.
ENTER NEW REMOTE DIALOG
3. Select the text box and use the onscreen keyboard to enter a name for the new remote.
4. Select OK on the New Remote dialog.
A new screen will open to enable you to begin adding commands.
82

Compass User’s Guide
5. A message will appear, "No commands selected, Select here to add a command." Select the message.
The New Command dialog will open.
NEW COMMAND DIALOG
6. Select in the Name text box, and use the onscreen keyboard to type the name of the command (e.g., power).
7. Select the drop-down arrow next to Type, and select Use built-in command.
NEW COMMAND DIALOG
Part # 401484 - B 83

NOTE
If you need a number of commands (more than one command, such as power), for the remote, select the Automatically create related commands check box.
8. Select Save on the New Command dialog.
The Edit Command screen will open with a list of electronic equipment that can be remotely controlled with the Compass software.
EDIT COMMAND SCREEN - DEVICE
9. Select the device you want to remotely control. The Edit Command screen will open with a list of manufacturers.
84

Compass User’s Guide
EDIT COMMAND SCREEN - MANUFACTURERS
10. Scroll down the list to find the manufacturer of your device.
SHORTCUT
Select in the Manufacturers text box and use the onscreen keyboard to type in the name of the manufacturer.
11. Select the manufacturer of your device.
The Edit Command screen will open with a list of IR command sets.
EDIT COMMAND SCREEN - IR COMMAND SETS
Part # 401484 - B 85

12. Go down the list and select the Run Test button until the electronic device you want to control turns on or off.
13. Select the IR command set on which you ran the successful test. The Edit Command screen will open.
14. Scroll down the list of commands until you find the command name you entered in Step 6, and then select it.
EDIT COMMAND SCREEN - TEST COMMAND
15. Select the Test Command button to verify that the command works.
16. Select Save to save the command.
If you selected the Automatically create related commands check box, all of the commands necessary to operate your electronic equipment will be automatically added. An example of a populated remote is illustrated below.
86

Compass User’s Guide
POPULATED REMOTE (EXAMPLE)
If you did not select the Automatically create related commands check box, repeat steps 6 through 16 to program each command.
You can now control your new remote from the remote control page in your pageset.
Part # 401484 - B 87

Camera
If your Compass software is running on a device with an integrated camera, the camera module will be enabled.
Open the Settings menu. (See Open the Settings Menu.) Then select Camera.
CAMERA
1 Opens your Media Library, and, if an image has been snapped, also saves that image.
2 Switches the camera from rear facing to front facing.
3 Select to snap a photograph. After an image has been snapped, the Snap Image button updates to New Image. Selecting New Image again saves the current image to your Media Library and snaps another image.
1 2 3
88

Compass User’s Guide
Your Media Library
The Media Library is a viewer for all of your photos and videos. Videos and any photos that you take with your device will be displayed in folders under the Images and Videos tabs.
Open the Settings menu. (See Open the Settings Menu.) Then select Media Library.
MEDIA LIBRARY (EXAMPLE - IMAGES)
When you select a folder under the Images tab and then select a specific image, a full-screen photo viewer will open.
.
Use the Previous and Next buttons at the top of the screen to scroll through all of the images in the folder.
Select the Videos tab to open your video library. Select a videos folder, and then select the video file you want to play. Then select Open on the Options dialog.
Part # 401484 - B 89

Backing Up and Restoring
When you completed the Setup Wizard, you saved many settings for the pageset, vocabulary, media library, rate enhancement information, selection method settings, etc. A backup file saves these customized settings, your edited pages, and data such as vocabulary.
It is important that you back up regularly.
Open the Settings menu. (See Open the Settings Menu.) Then select Backup/Restore.
BACKUP/RESTORE SETTINGS
You can back up and restore your pageset either locally or to myDynavox.
NOTE
A micro USB adapter may be needed to back up and restore locally on selected devices.
Back up to myDynaVox.com
1. Select the Backup to myDynaVox button.
2. If you are prompted, sign in to your account by entering your username and password.
3. Enter a name (and description [optional]) for your backup file in the text box. (It’s a good idea to include the date in the file name.)
4. Select OK.
Back up Locally
You can back up to your local hard drive or to a USB drive.
90

Compass User’s Guide
1. Select the Backup Locally button.
2. On the screen that opens, select a destination directory (backups is the default backup folder). Use the arrow button at the upper left of the screen to move up through the layers. of directories. Select a directory in which to save your backup file or locate your USB drive.
3. Select the green Select button in the top right corner of the screen.
4. Enter a name for your backup file in the text box. (It’s a good idea to include the date in the file name.)
5. Select OK.
Restore from myDynaVox.com
1. Select the Restore from myDynaVox button.
2. If prompted, sign in to your account by entering your username and password.
3. The Select Backup File screen will open. Select the backup file you want to restore. If necessary, use the arrow button at the upper left of the screen to move up through the layers of directories.Then select the green Select button in the top right corner of the screen.
4. Select OK. A progress bar will appear.
Selecting this option will reset the device and overwrite all user data, settings, and content.
Restore Locally
1. Select the Restore Locally button. The Select Backup File screen will open, displaying all of the backup files in the Backups folder.
2. Locate the file you want to restore. If necessary, use the arrow button at the upper left of the screen to move up through the layers of directories. Select your backup file or locate the file on your USB drive.
3. Select the backup file you want to restore. Then select the green Select button in the top right corner of the screen.
4. Select OK. A progress bar will appear.
Selecting this option will reset the device and overwrite all user data, settings, and content.
New Pageset Wizard
Open the New Pageset Wizard to walk you through the steps to choose an appropriate pageset.
Manage Login
Sign out/sign in to your myDynaVox account.
Part # 401484 - B 91

92