ClientTrack HMIS User Manual - Homeless Services · ClientTrack HMIS User Manual . Emergency...
46
Updated October 1, 2017 ClientTrack HMIS User Manual Emergency Housing Providers Courtesy of HMIS Training Department
Transcript of ClientTrack HMIS User Manual - Homeless Services · ClientTrack HMIS User Manual . Emergency...

Updated October 1, 2017
ClientTrack HMIS User Manual Emergency Housing Providers Courtesy of HMIS Training Department

CLIENTTRACK USER MANUAL FOR EMERGENCY HOUSING PROVIDERS
Page 2 : 10.1.17
Overview
This user manual is designed to support the information received in training on the basic and project specific features of ClientTrack and how ClientTrack supports the relevant data specific elements required to be collected for Emergency Housing projects.
In this manual you will find the following information:
• OHS Staff Contacts - Page 2 o Staff List and Contact Information o OHS HMIS Help Desk Information
• Review Security Policies and Procedures – Page 3
o Informed Consent Policy o Computer Storage o User Name and Password o PA Limited English Proficiency o ClientTrack Access
• Overview of ClientTrack Features
o Basic Navigation – Page 7 o Home Workspace – Page 11 o Client Workspace –Page 14 o Housing Workspace – Page 16 o Support Workspace – Page 16
• What Does Data Entry Look Like in ClientTrack
o Project Entry – Page 17 o Completing the OHS Housing Application– Page 25 o Incident Reporting - 33 o The Annual Update Assessment Workflow – Page 40 o Case Notes – Page 42 o The Project Exit Workflow – Page 43
CLIENTTRACK USER MANUAL FOR EMERGENCY HOUSING PROVIDERS
Page 3 : 10.1.17
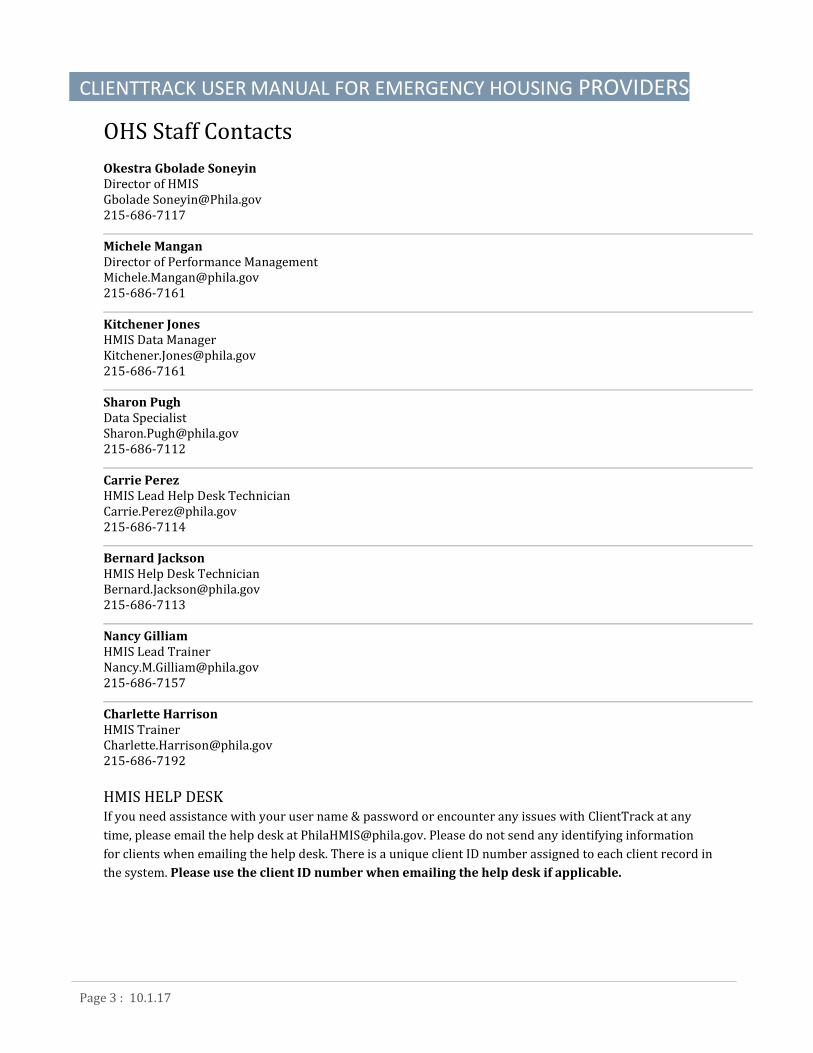
OHS Staff Contacts Okestra Gbolade Soneyin Director of HMIS Gbolade [email protected] 215-686-7117
Michele Mangan Director of Performance Management [email protected] 215-686-7161
Kitchener Jones HMIS Data Manager [email protected] 215-686-7161
Sharon Pugh Data Specialist [email protected] 215-686-7112
Carrie Perez HMIS Lead Help Desk Technician [email protected] 215-686-7114
Bernard Jackson HMIS Help Desk Technician [email protected] 215-686-7113
Nancy Gilliam HMIS Lead Trainer [email protected] 215-686-7157
Charlette Harrison HMIS Trainer [email protected] 215-686-7192 HMIS HELP DESK If you need assistance with your user name & password or encounter any issues with ClientTrack at any time, please email the help desk at [email protected]. Please do not send any identifying information for clients when emailing the help desk. There is a unique client ID number assigned to each client record in the system. Please use the client ID number when emailing the help desk if applicable.

CLIENTTRACK USER MANUAL FOR EMERGENCY HOUSING PROVIDERS
Page 4 : 10.1.17
Security Policies & Procedures
Information that could lead to individual identification is considered Personal Protected Information (PPI). Agencies participating in HMIS should have procedures in place for the secure storage and disposal of hardcopy and electronic data generated from ClientTrack or created for entry into ClientTrack. PPI should be stored in locked drawers/file cabinets and hardcopy data should be shredded before disposal. Electronic PPI including data contained on disks, CD’s, jump drives, computer hard drives and/or other media should be reformatted before disposal.
PRIVACY AND CLIENT INFORMATION RESTRICTIONS Notice of Privacy Practices: The Notice of Privacy Practices including the purpose for data collection should be posted in a public area and in an office where an intake professional meets with clients. The full privacy policy notice should be posted on the web sites of agencies, as well as made available to clients who request it. The document can be requested from the Office of Supportive Housing HMIS department by emailing the OHS HMIS Help Desk.
Informed Consent Policy: Effective 10/1/2017, providers must obtain informed, signed consent prior to entering any client identifiable information into HMIS. The client must sign an Authorization to Disclose Client Information form. Clients that provide permission to enter personal information allow sharing of client and household data within the continuum. If a client refuses to consent, end users should not include the client’s First & Last Name, Social Security Number, or Date of Birth in the record. End users should create a name to identify the client record by, indicate it as “Partial, street name, or code name reported” & enter Client Refused for the SSN & DOB. Services are not to be denied if a client chooses not to include personal information. PA Limited English Proficiency: Policy mandates that any entity receiving federal funds must present any critical documents in the State’s list of 15 most common languages. Please reference the website: http://www.dhs.pa.gov/learnaboutdhs/dhsorganization/officeofadministration/languageservices/index.htm
CLIENTTRACK COMPUTERS All computers used to access ClientTrack should be situated in secure locations. ClientTrack computers in publicly accessible areas should be staffed at all times and not viewable by other individuals. All computers should be password protected, and the password you use to log onto your computer should NOT be the same password as your ClientTrack password, but rather a password to prevent access to the computer itself.
ClientTrack usernames and passwords should NEVER be shared with other users. Users should not keep username/password information in a public location (i.e., sticky notes on monitors or filed under HMIS or Password in a Rolodex). You will be required to change your password every 90 days for security purposes. Accounts are automatically deactivated after 90 days of inactivity for security purposes. To have an account re-activated, the end user will be required to attend refresher training with a member of the HMIS training department.

CLIENTTRACK USER MANUAL FOR EMERGENCY HOUSING PROVIDERS
Page 5 : 10.1.17
ClientTrack Access
ClientTrack is a web based application that can be accessed through your web browser on personal computers as well as mobile devices. For maximum functionality, we strongly recommend the use of Google Chrome. The website URL is www.clienttrack.net/philahmis
Your User ID is the business email address listed on the HMIS User Agreement. For your first login, you will use a temporary password provided by HMIS support, and you will be prompted to change your password. ClientTrack security policies require the use of strict passwords. Passwords must
• Be a minimum of 8 characters long • Have at least one capital letter • Have at least one number • Have at least one special character (! @#$%^&*)
Once you hit the Sign In key, please use your mouse to click on the following link if it appears:
You will also be prompted to update your recovery information. This entails creating a security question, which will allow you to recover your password if it’s forgotten.

CLIENTTRACK USER MANUAL FOR EMERGENCY HOUSING PROVIDERS
Page 6 : 10.1.17
Once you enter your log-in information, you will see the following screen:
The Workgroup dropdown box shows the workgroup you will be using. The workgroup determines what kind of functionality you will have in the system. Unless you work with other projects in your organization, you should always see Emergency Housing Providers displayed in this dropdown. The Organization dropdown shows your organization, which will determine the projects you have access to. If locations have been provided to PhilaHMIS and entered in the system, you will be able to select your location option from Location dropdown.
Clicking Use these settings will cause the HOME Workspace to load. In addition to this workspace, you will also have access to the Client Workspace, the Housing Workspace and the Support Workspace.
Before we review the workspaces, let’s get familiar with some of the features and frequently used navigation icons in the system.

CLIENTTRACK USER MANUAL FOR EMERGENCY HOUSING PROVIDERS
Page 7 : 10.1.17
Overview of ClientTrack Features
Basic Navigation There are basic navigation tools you will use to work your way through ClientTrack. Let’s begin with the top tool bar starting on the left hand side. Here you will find: 1) Workspace Menu, 2) Workspace Navigation Toggle Box, 3) Search Field* 4) Settings [your name], Help and Sign Out links.
1. Workspace Menu: The name of this menu and the menu options available will depend on the workspace you are in: Home, Client or Issues. All menu headers have one thing in common, the pushpin. The position of the pushpin will determine whether or not the menu remains visible while you are working. If the pushpin is facing down (as shown above), the menu will remain visible.
If the pushpin is facing to the left, when you click anywhere in the workspace the menu will collapse.
To restore the menu, click on the Hamburger Menu button.
Workspace with Menu Visible

CLIENTTRACK USER MANUAL FOR EMERGENCY HOUSING PROVIDERS
Page 8 : 10.1.17
Workspace with Menu Collapsed
2. Workspace Navigation Toggle Box: This toggle box enables you to navigate amongst the four workspaces you have available to you in ClientTrack. Clicking on the toggle box will populate the workspace carousel on the screen. Click on the box of the workspace you need to access to cause the appropriate screen to load.
3. Search Field: You can search for system related functions using this field. (Case Notes, Enrollments, etc.) Not recommended to search for clients.
The preferred method of searching for clients in the system is the Find Client option located in the client workspace. This option will be reviewed later.

CLIENTTRACK USER MANUAL FOR EMERGENCY HOUSING PROVIDERS
Page 9 : 10.1.17
4. Settings, Help & Sign-Out Links: These links are shortcuts available to help you manage your workspace in HMIS.
Settings: The settings link is your name next to the bell. Click to open the Settings Box. Users with multiple workgroups or multiple locations within their organization can switch between workgroups and locations without signing-out of ClientTrack. You have the ability to upload a picture and to change the appearance of your dashboard by choosing a theme (default, metallic or light).
Clicking the Change Password option will open new window where you can change your password and update your recovery information. You will be asked to create a new password. Enter your new password in the field indicated using the guidelines stated earlier in this manual. Re-enter it in the Confirm Password field, and enter you current password in the Your Current Password field. Click Change Password to confirm the change. To cancel the change & keep your current password, click Cancel. There is also an option in this box which allows you to update your password recovery information. Clicking that link will open a form where you can select your security question and answer.
Load any changes made in the settings box by clicking the Apply option on the bottom of the settings box. You can also sign out of ClientTrack from this box.

CLIENTTRACK USER MANUAL FOR EMERGENCY HOUSING PROVIDERS
Page 10 : 10.1.17
Help: The Help link activates a window where you can report issues, ask questions, & make suggestions.
Report an Issue: When you select Report an Issue, you are taken to a small form in which you can give a brief summary of the issue you are facing in the system. Please be sure to report the issue from the page that it was encountered. This will allow staff to see what was going on in the system when the issue was encountered. You can attach screenshots to your issue, but be sure that the screenshot contains no identifiable client information. You can notify additional people on your issue by clicking that option and adding their name, email address and phone number. Issues are first sent to the PhilaHMIS Help Desk. If the issue cannot be resolved by the Help Desk staff, it is escalated to Clienttrack. You will receive an email when the issue has been received and assigned. You can also check the issue status in the Issues workspace.
Ask a Question Similar to reporting issues, the Ask a Question form allows you to ask a short question and provide more detailed background, as well as upload files and screen shots. When you ask a question through this form, it is sent to the HMIS Lead Agency, who will respond to you as soon as possible with clarification. Make a Suggestion If you have feedback or have a recommended change that you would like to communicate, submitting it through this form is always best. It also provides the level of detail required from the Submit an Issue and Ask a Question forms. View Documentation The documentation available through this link is the ClientTrack Comprehensive User Guide, a general guide that provides standard information for newer users. Sign Out: You are asked to sign-out of HMIS prior to closing the window, as some internet browsers retain your information. For security reasons, it is critical that you use this button or any of the other available sign out options to log-out of ClientTrack when you are finished working or when you are leaving your computer.

CLIENTTRACK USER MANUAL FOR EMERGENCY HOUSING PROVIDERS
Page 11 : 10.1.17
The Home Workspace As stated previously, you will have access to three workspaces in ClientTrack: the Home Workspace, the Client Workspace & the Issues Workspace. Logging in will direct you to the Home Workspace, where you will find the Home Menu and your User Dashboard.
The Home Menu
The Home Menu lists the functionality available to you as an end user.
The first menu option is a link to the User Dashboard.
Clicking it will restore your dashboard in the workspace.
The Recent menu option will display a list of entities you recently worked with for quick access.
T The My Clienttrack section houses the following menu options:
Incoming Referrals loads a list of referrals sent to your
organization by intake.
The Current Enrollments menu option lists clients enrolled in a specific project.
The My User Configuration menu option hosts the sub-options Change My Password & Set Recovery Information.
The Paused Workflows menu option essentially allows you
to save the work you have completed in a workflow. (In ClientTrack, a workflow is a series of forms and assessments needed to complete a specific task like a project entry or an update assessment.) When you begin a workflow, you might find yourself in a situation where you have to stop working on it. You can save your place in the workflow by using this pause option.

CLIENTTRACK USER MANUAL FOR EMERGENCY HOUSING PROVIDERS
Page 12 : 10.1.17
At the top of the workflow menu itself, you will see a cancel symbol (X) and a pause symbol (||). To save any work completed in a workflow, click (||). This allows you to pause the workflow and go back to it later. Click the (X) to cancel the workflow and remove any information you entered while in the workflow. This does not delete information entered outside of the workflow. To resume the workflows you have paused, select the Paused Operations menu option. You will be shown a list of all of the workflows you have paused. (Be advised that these workflows will remain on the list until you retrieve them. They do not expire.) Select the appropriate option based on the action
you want to complete with the workflow:
This option resumes the workflow where you left off.
This option starts the workflow over from the beginning.
This option deletes the workflow. This option can cause you to lose some or all of the data that you entered.
The My Submitted Issues menu option is another link to the Support workspace outside of the workspace carousel.
The Additional Tools menu option contains sub-folders that link to Open Enrollments w/Most Recent Assessment & Case Load Reassignment.
The Reports menu option links to basic reports such as Clients in Projects, Enrollment Demographics, Service Summary, and others.

CLIENTTRACK USER MANUAL FOR EMERGENCY HOUSING PROVIDERS
Page 13 : 10.1.17
The User Dashboard
The dashboard is divided into 3 sections:
1. Global News: Here you will find news items that impact all agencies participating in HMIS. OHS will post information regarding reporting deadlines, HUD updates and upcoming trainings in this section.
2. Current Program Enrollments: This section lists all current project enrollments in your organization by Project, Cases & Clients.
3. My Case Assignments: For case managers, this section will list all clients that are currently on your caseload. You can access the client record by clicking the Select This Client icon by the client
name. Doing so will take you to the client dashboard.

CLIENTTRACK USER MANUAL FOR EMERGENCY HOUSING PROVIDERS
Page 14 : 10.1.17
The Client Workspace The Client Workspace is very similar to the Home Workspace. Every client in the system has their own unique workspace that consists of a Client Menu and a Client Dashboard.
The Client Menu
The Client Menu lists the functionality available to you for use when working with specific clients in the system. Client Dashboard restores the dashboard in the workspace. Find Client is used to search for clients. New Housing Application opens the housing application workflow.
CLIENT MANAGEMENT hosts the following- Edit Client Information opens the form to edit basic client information. Family Members shows the selected client's family members & history. Assessments opens a list assessments that have been created for the client. Enrollments opens a list of all enrollments for the client. Housing Applications: a list of client’s completed housing applications. Case Notes opens the Case Not History & Add New case note option.

CLIENTTRACK USER MANUAL FOR EMERGENCY HOUSING PROVIDERS
Page 15 : 10.1.17
The Edit Client Information section also hosts a sub-folder in which you will find:
Address History is a list of all of the clients addresses recorded in the system.
Case Managers shows the client’s history of assigned case managers. You can also assign a case manager from this link and print a case manager’s assignment history.
Identification opens the form to record, review & print case notes.
Veteran Information opens the Veteran Assessment form.
Information Release Information Release Exceptions Paused Workflows shows workflows in
process specific to the client. The Client Dashboard
This dashboard is divided into 5 sections:
1. Basic Client Information: This section contains the client’s basic demographic information, including the unique Client ID Number that is generated by the system for every client.
2. Enrollments: This section shows all of the projects the client has been enrolled in, both current and previous.
3. Services: This section provides a list of all of the services provided to the client during a project enrollment.
4. Housing Application: This section provides a list client’s completed housing applications
5. Centralized Simple Referrals Intake: This section provides a list of all of the referrals provided to the client from centralized intake.

CLIENTTRACK USER MANUAL FOR EMERGENCY HOUSING PROVIDERS
Page 16 : 10.1.17
The Housing Workspace The Housing Workspace hosts the facility dashboard where end users are able to record facility incidents. Using the Find Facility menu option will load the form where you can search for your facility. Please note, the Facility Incidents menu option will be inactivated until the facility is chosen.
The Support Workspace The Support Workspace consists of a dashboard upon which you will find a list of every problem, question and suggestion that you submitted in the system via the Help link. The dashboard lists the issue number, submission date, type (issue, question, or suggestion), a summary, the status and whom the issue was assigned to. You can track the progress of your submissions in this workspace and add additional information to previously submitted issues by selecting the edit icon next to the submitted issue.
CLIENTTRACK USER MANUAL FOR EMERGENCY HOUSING PROVIDERS
Page 17 : 10.1.17
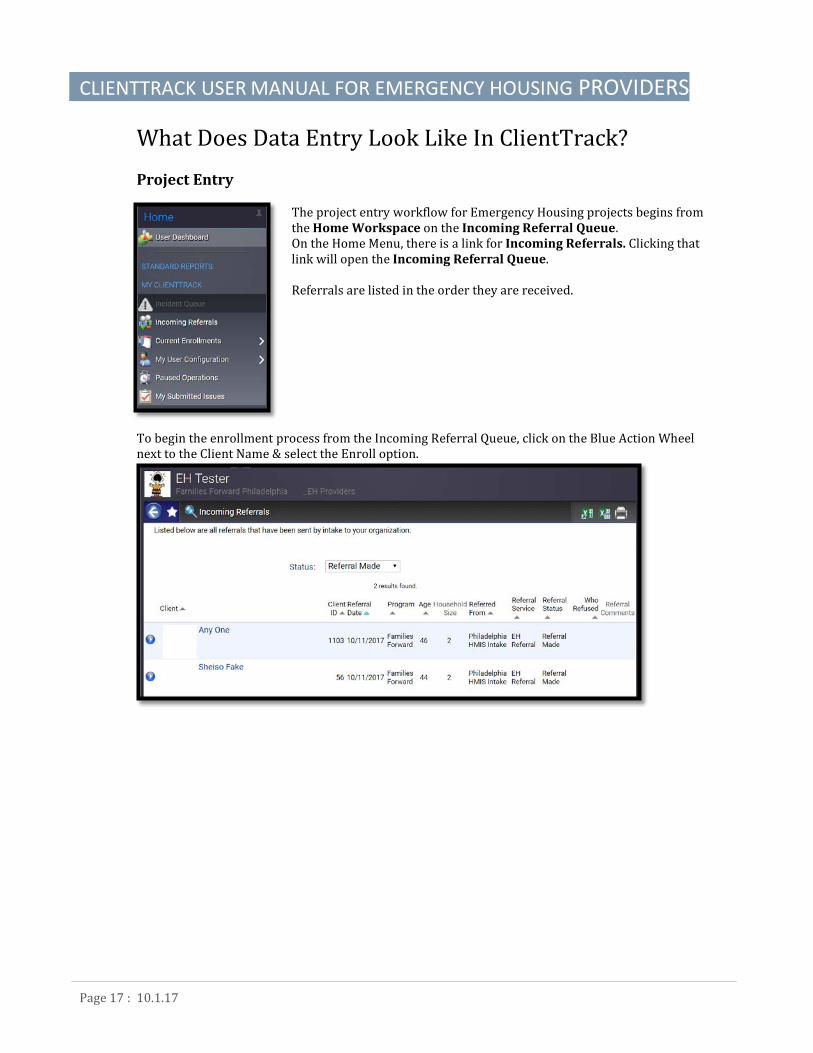
What Does Data Entry Look Like In ClientTrack? Project Entry
The project entry workflow for Emergency Housing projects begins from the Home Workspace on the Incoming Referral Queue. On the Home Menu, there is a link for Incoming Referrals. Clicking that link will open the Incoming Referral Queue.
Referrals are listed in the order they are received.
To begin the enrollment process from the Incoming Referral Queue, click on the Blue Action Wheel next to the Client Name & select the Enroll option.

CLIENTTRACK USER MANUAL FOR EMERGENCY HOUSING PROVIDERS
Page 18 : 10.1.17
The Basic Client Information Form will load. This data will have been collected during intake. Verify the information is correct. If the client states that something is incorrect, make the change. All fields marked * are required. All data is self-report. Confirm the spelling of the client’s name. Use proper capitalization. If the full name is not reported, change the Name Quality to “Partial, street name or code name reported”. If only the last four digits of the SS# are collected, leave the first two fields blank & record the last four in the last box. If client doesn’t know his or her SS#, select “Client doesn’t know”. If client refuses to give SS#, select “Client refused”.
If the Birth Date is partial, change the Date of Birth Quality field to Approximate or Partial DOB Reported.

CLIENTTRACK USER MANUAL FOR EMERGENCY HOUSING PROVIDERS
Page 19 : 10.1.17
Checking the box for Show Address and Contact Information will populate a field where any contact information for the client is or can be recorded (shelter address, message phone number, etc).
The Household identification number & the Relationship to Head of Household will default as will Emergency Contact Information if any. Click Finish to continue.
You will be directed to the Household Members form next. This form is used this to enter data for the additional household members. It should be completed as well. If there are additional Household members, add them on this form.

CLIENTTRACK USER MANUAL FOR EMERGENCY HOUSING PROVIDERS
Page 20 : 10.1.17
Complete all fields marked *for each additional household member.
Click Save & Close to proceed.
The HUD Project Enrollment form will load. The project will populate from the referral. Check all clients being enrolled. Enter the date the client(s) started the project if you are doing data entry on a different day. Click Save to continue.

CLIENTTRACK USER MANUAL FOR EMERGENCY HOUSING PROVIDERS
Page 21 : 10.1.17
The HUD Universal Data Assessment will populate next. The top of the form will be pre-filled with the exception of the Disabling Condition field. Select the correct response. Client Location will default to PA-500 – Philadelphia CoC. Answer the Living Situation questions.
Select Default Last Insurance Status to pull in the Health Insurance assessment collected by intake. Verify the information. Click Save.

CLIENTTRACK USER MANUAL FOR EMERGENCY HOUSING PROVIDERS
Page 22 : 10.1.17
The Barrier Assessment for the HOH will load next. The last assessment collected will automatically default. Verify. If the client identifies additional barriers, you will then need to change the No to Yes in the Barrier Present column and complete the Condition is Indefinite field. Do not uncheck any of the boxes on the left hand side of the screen. Doing so will produce an error message when you try to move to the next page. If Disabling Condition is Yes, one or more barriers must also be Yes on the Barrier Assessment. Click Save & Close to continue.
The Domestic Violence Assessment is next. Select Default Client’s Last Assessment to pull the assessment completed at intake. Verify. Make changes if needed. Click Save to continue.

CLIENTTRACK USER MANUAL FOR EMERGENCY HOUSING PROVIDERS
Page 23 : 10.1.17
The Income Assessment is next. Select Default Last Assessment to pull in the assessment from intake. Verify. Make changes if necessary. *Please note, if the household has a child that has income (SSI, SSDI), it must be recorded on the HOH’s assessment, as Income assessments are not collected for clients under the age
of 18. Indicate the income belongs to the dependent in the Description field.
If the HOH is the only client on the enrollment, the workflow will end here. If the household has other members, assessments will be completed for them as well. Clients over 18 will complete the same assessments as the HOH. Clients under 18 will only complete the Universal Data Assessment & the Barriers/Special Needs Assessment. The following example is for the HOH’s child.
First, you will complete the Universal Data Assessment by filling in the Disabling Condition field and selecting Default Last Insurance Status. Verify information. Click Save.

CLIENTTRACK USER MANUAL FOR EMERGENCY HOUSING PROVIDERS
Page 24 : 10.1.17
The Barrier Assessment will load. Verify information. Remember, if Disabling Condition is Yes, one or more barriers must also be Yes on the Barrier Assessment. Click Save & Close to continue.
You have completed the Intake workflow.
Click Finish to close the workflow menu and to be redirected to the Client Dashboard.

CLIENTTRACK USER MANUAL FOR EMERGENCY HOUSING PROVIDERS
Page 25 : 10.1.17
The Housing Application
One of the first case management assignments that should be completed on behalf of the client is the OHS Housing Application. The application can be accessed from the client’s dashboard by selecting the Housing Application option at the top of the Client Menu.
Clicking that link will open the housing application workflow and load the Find Client page. Enter the client’s first and last name and click Search.
Select the client from the results by clicking on that row of data.

CLIENTTRACK USER MANUAL FOR EMERGENCY HOUSING PROVIDERS
Page 26 : 10.1.17
Doing so will load the Basic Client Information form, which will already be completed. Verify the information and click Finish to continue.

CLIENTTRACK USER MANUAL FOR EMERGENCY HOUSING PROVIDERS
Page 27 : 10.1.17
The Family Members form will load next. It too will be completed. If there are additional household members to be added, do so on the rows provided. Click No Changes if no additional household member information is recorded. Click Save if you add additional household members.
The Financial Assessment will load next. Click Default Last Assessment to load the most recent income assessment completed. Verify the information & make changes if needed. Click Save and Close to continue.

CLIENTTRACK USER MANUAL FOR EMERGENCY HOUSING PROVIDERS
Page 28 : 10.1.17
The Utility Assessment form will load next. Indicate whether or not the client has received utility assistance from OHS. If they have, indicate the amount of assistance received. Record a comment if necessary and click Save.
Next, you will complete the Adult Education Assessment for the HOH. Complete all fields and click Save.

CLIENTTRACK USER MANUAL FOR EMERGENCY HOUSING PROVIDERS
Page 29 : 10.1.17
You will now complete the Employment Assessment. Answer all questions and click Save.
The next form you will see is the Income Assessment for the next household member. If this member is over the age of 18, select Default Last Assessment to pull in the last assessment completed. If this member is under the age of 18, this will be the first time this assessment is completed, as HUD does not require Income Assessments to be collected for these clients at program entry & exit points. Complete the information required. Be mindful that if the client under 18 has income such as disability income, it has already been reported on the Head of Household’s Income Assessment. You will be instructed how to avoid double reporting of income on page 36 in this manual. When you have completed this form, click Save & Close.

CLIENTTRACK USER MANUAL FOR EMERGENCY HOUSING PROVIDERS
Page 30 : 10.1.17
If the current client is under the age of 18, the next form you will see is the Child Education form. Complete the information. If the client is not school age, select No for Current Enrollment Status & use the comment field to indicate that in the comment field. Click Save to continue.
Next, you will complete the Family Financial Evaluation. On this form, income from all assessments completed for the clients will appear. Select the most recent assessment. If a client under 18 has income and it has been reported on his or her own assessment and the assessment of the Head of Household, select the Do not use any of this client’s assessments option to avoid over reporting income. Once selections are made, the system will calculate the Area Median Income and the Federal Poverty Level for the household. These figures will appear at the bottom of the form. Click Save.

CLIENTTRACK USER MANUAL FOR EMERGENCY HOUSING PROVIDERS
Page 31 : 10.1.17
Next, you will complete the Past Debt/Arrearage form. Select the type of arrearage from the options available on the dropdown menu (PHA, PECO, PGW, or Other Landlord) and answer the corresponding questions. Activate as many rows as necessary to capture the data. Leave the form blank if there are no arrearages to report. Click Save.
The next form you will see is the Housing Applications form. It will show if the client has any other housing applications submitted. Click Continue to move to the next form.

CLIENTTRACK USER MANUAL FOR EMERGENCY HOUSING PROVIDERS
Page 32 : 10.1.17
You will now complete the Housing Referral Application form. All fields marked (*) are required. The URL for the sex offender registry is located at the top of the form as an active hyperlink for your convenience. Click on the link to check the client’s sex offender status. It is crucial that the Population Specific, Wheelchair Access, First Floor/Elevator Needed & Bedroom Needed fields are completed accurately to insure proper housing matching. When you have completed this form, click Save.
CLIENTTRACK USER MANUAL FOR EMERGENCY HOUSING PROVIDERS
Page 33 : 10.1.17
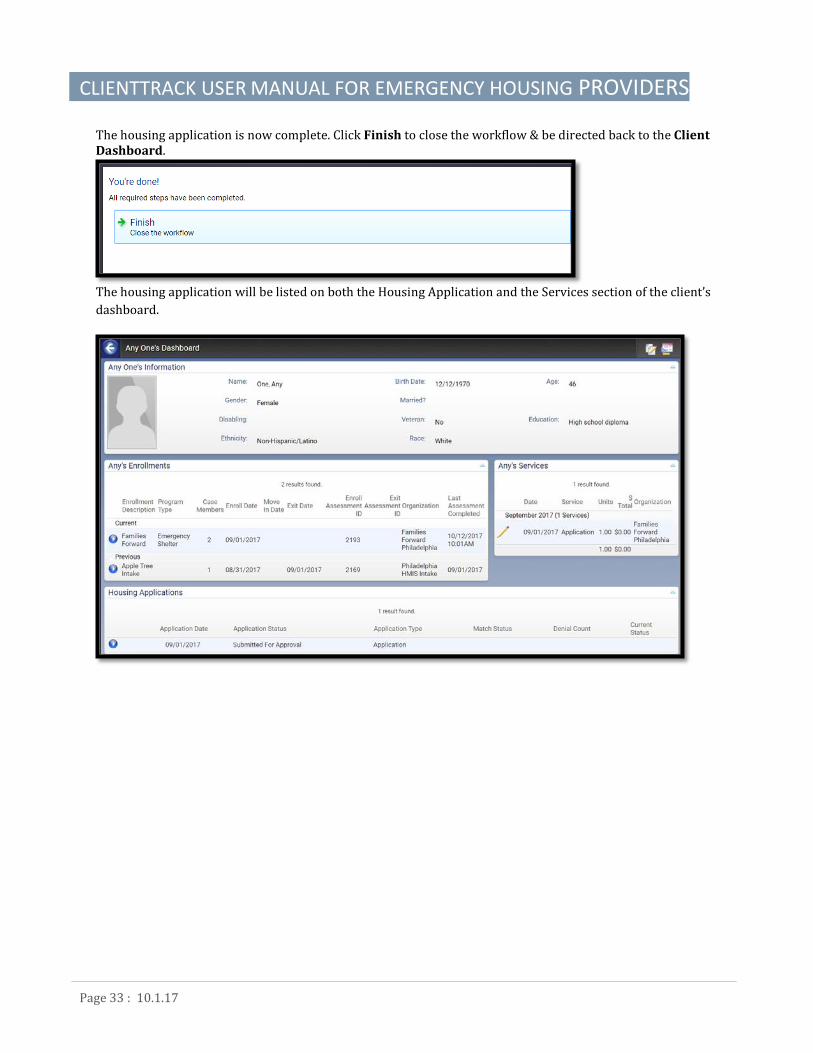
The housing application is now complete. Click Finish to close the workflow & be directed back to the Client Dashboard.
The housing application will be listed on both the Housing Application and the Services section of the client’s dashboard.

CLIENTTRACK USER MANUAL FOR EMERGENCY HOUSING PROVIDERS
Page 34 : 10.1.17
Incident Reporting Incidents that need to be reported to OHS will be recorded in the Housing Workspace under Facility Incidents. Using the Find Facility menu option will load the form where you can search for your facility. You cannot access Facility Incidents until the facility is chosen.
Select Emergency Shelter as the Housing Type and click Search to find your facility.

CLIENTTRACK USER MANUAL FOR EMERGENCY HOUSING PROVIDERS
Page 35 : 10.1.17
When your facility is selected from the list that populates, you will see a red flag. The red flag indicates the Facility Incidents menu option is live. Selecting that option will load the Facility Incidents list.
All incidents reported at the facility you selected will be listed. Select Add New to record a new incident.

CLIENTTRACK USER MANUAL FOR EMERGENCY HOUSING PROVIDERS
Page 36 : 10.1.17
You are asked to complete as much detailed information as possible. Fields marked * are required. You will not be able to move forward in the process if they are not completed. Other fields may not be required, but you are strongly encouraged to enter as much detail as possible.
The Date Reported is the date at which the user became aware of the Incident. For an incident that does not involve a specific client, you will not need to search for or add a Primary Client Participant.

CLIENTTRACK USER MANUAL FOR EMERGENCY HOUSING PROVIDERS
Page 37 : 10.1.17
If an incident involves a specific client, click on the magnifying glass to search for that client. This look-up will only list clients who have a current enrollment in the project. Select the client from the list. (Please note, if there is more than client involved in an incident, operational procedure is to record a separate incident for each client.) The Location Description is the specific location of the incident. The Incident Date is the precise date of the incident. The Incident(s) list is a multi-select field that contains common incident types. More than one may be selected if appropriate. The Description of Incident, Grievance or Complaint field allows users to include a narrative description regarding the incident.
If there were staff members involved in the incident, you will record that information in the fields provided. Staff with HMIS accounts can be selected from the options in the Staff Involved field. Staff not using HMIS can be inputted in the Non-HMIS staff involvement field.

CLIENTTRACK USER MANUAL FOR EMERGENCY HOUSING PROVIDERS
Page 38 : 10.1.17
The next section includes information regarding injuries, property damage and police/fire department involvement. Yes responses will generate additional fields to be completed. Physical Injury = Yes
Property Damage = Yes
Incident Reported to Police or Authorities = Yes

CLIENTTRACK USER MANUAL FOR EMERGENCY HOUSING PROVIDERS
Page 39 : 10.1.17
The next part of the form is where you will record information regarding clients, employees & other parties who witnessed the incident. Use the Search options in the Client/Witness & Employee/Witness fields to enter the witness information. If the witness is not a user of HMIS, you can record his or her name in the Other Witness field.
The last part of this form will be the Disposition. Complete the Action Taken section. The Disposition field will default to New. The Reported By field will default to the end user doing the data entry. It can be changed if another person reported the incident, but that person must have an HMIS account to be found in the system. The Report by Date will default to the date the data entry is being completed.

CLIENTTRACK USER MANUAL FOR EMERGENCY HOUSING PROVIDERS
Page 40 : 10.1.17
You will notice that the Approved By & Analyzed By sections are grayed out. The first field will be available only to the Supervisor who reviews & approves the incident and the latter will be available only to the OHS analyst who completes the final analysis of the incident. Click Finish to complete the incident report.
The incident you recorded will display on the Facility Incidents list. You have the option of editing, viewing participants or deleting the incident from the Blue Action Wheel next to the incident. Check this list regularly updates on the issue’s disposition.
The Annual/Update Assessment Workflow There are several instances in which you will be required to use the Annual/Update Assessment workflow. All projects will use it when a significant change has taken place in the life of a client. You might have helped the client get insurance, helped him or her increase income, etc. This information is captured as a point in time using this workflow. All projects are also required to complete an annual assessment for the household 30 days before or 30 days after the one year anniversary date of the head of household. This is also accomplished using this workflow. From the Blue Action Wheel next to the current enrollment, select the Annual/Update Assessment option.

CLIENTTRACK USER MANUAL FOR EMERGENCY HOUSING PROVIDERS
Page 41 : 10.1.17
This will open the Assessment for Enrollment workflow and direct you to the HUD Project Enrollment form. Verify that this is the enrollment you want to update. Click Save to continue.
The system will ask you for the Assessment Type. If you are recording changes that occurred during the project enrollment, select During Project (Program) Enrollment. If you are completing the required annual assessment, select Annual.
The remainder of this workflow mimics the Project Entry workflow. You will be able to go through each assessment, verify information and make the changes necessary to the Health Insurance Assessment, the Barrier Assessment, and the Income Assessment. You can click Default to pull in the last Health Insurance Status and the last Income Assessment. The Barrier Assessment will automatically default. Click Save and you are done. Click Finish to close the workflow.

CLIENTTRACK USER MANUAL FOR EMERGENCY HOUSING PROVIDERS
Page 42 : 10.1.17
Case Notes Timely and robust case notes assist you and other case managers at your organization in serving your clients. It is extremely important that meetings, calls and other relevant information regarding your client are properly documented in case notes.
To add a case note, select the Case Note menu option on the Case Management section of the Client menu. This will open the Client Case Notes History. Click Add New Case Note in the upper right hand corner to record a new case note.
The case note form will load. The Entry Date will default. Change if needed. Verify the User recording the note. Enter what the note is about in the Regarding field. Complete the case note in the text editor field. If Read Only is checked, no one else will be able to delete or edit the case note. When all info is entered, click Save.
The case note will be listed on the client’s Case Note History. You can use the Blue Action Wheel beside the case note to View Case Note, Edit Case Note or Delete Case Note To print case notes, click the box next to the note desired and then click Print Selected.

CLIENTTRACK USER MANUAL FOR EMERGENCY HOUSING PROVIDERS
Page 43 : 10.1.17
The Project Exit Workflow Project Exit is initiated from the Client Workspace. On the Client Dashboard next to the “Current Enrollment”, select the Exit the Enrollment option from the Blue Action Wheel.
This will open the HUD Exit menu. Enter the Exit Date, Destination & Exit Reason. End Case Assignment box should be checked to end the case management assignment. Click Save.
You will now complete the HUD Project Exit Assessment. The top fields are pre-filled with data from previous forms. You have the option to Default Last Insurance Status if the information has not changed, or you can enter the new information. Remember, a Yes response requires you to record the type of insurance. Click Save.

CLIENTTRACK USER MANUAL FOR EMERGENCY HOUSING PROVIDERS
Page 44 : 10.1.17
The Barrier Assessment will automatically default. Make any changes if necessary and click Save & Close to proceed.
The Income Assessment will load next. Click Default Last Assessment to pull the last assessment completed. Make changes if necessary and click Save & Close.
If the HOH is the only client on the enrollment, the workflow will end here. If the household has other members, exit assessments will be completed for them as well. Clients over 18 will complete the same assessments as the HOH. Clients under 18 will only complete the Universal Data Assessment & the Barriers/Special Needs Assessment. The example That follows is for the HOH’s child.

CLIENTTRACK USER MANUAL FOR EMERGENCY HOUSING PROVIDERS
Page 45 : 10.1.17
The system will ask if you want to exit the next client on the workflow menu. Select Yes.
Complete the Exit Date & Destination.
The Universal Data Assessment will load. Confirm and change (if need be) the insurance information. Click Save.

CLIENTTRACK USER MANUAL FOR EMERGENCY HOUSING PROVIDERS
Page 46 : 10.1.17
You will then complete the Barrier Assessment. Remember, if Disabling Condition is Yes, one or more barriers must also be Yes on the Barrier Assessment. Click Save & Close to continue.
You have completed the Project Exit workflow. Click Finish to close the workflow menu and to be redirected to the Client Dashboard.
The enrollment will now be listed as previous. You will see the exit date and the exit assessment ID.