Circulation & Gas Exchange 2000 - Washington State …wsu.edu/~rlee/biol103/circgasexchange.pdf ·...
15
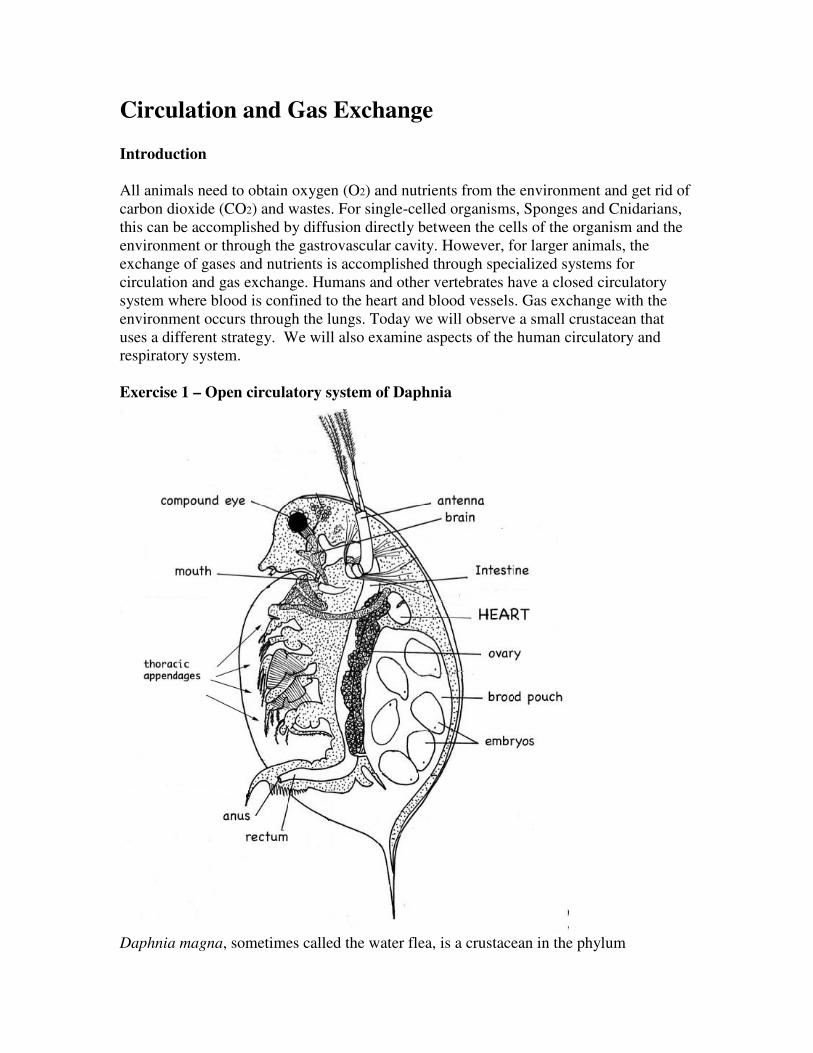
Circulation and Gas Exchange Introduction All animals need to obtain oxygen (O2) and nutrients from the environment and get rid of carbon dioxide (CO2) and wastes. For single-celled organisms, Sponges and Cnidarians, this can be accomplished by diffusion directly between the cells of the organism and the environment or through the gastrovascular cavity. However, for larger animals, the exchange of gases and nutrients is accomplished through specialized systems for circulation and gas exchange. Humans and other vertebrates have a closed circulatory system where blood is confined to the heart and blood vessels. Gas exchange with the environment occurs through the lungs. Today we will observe a small crustacean that uses a different strategy. We will also examine aspects of the human circulatory and respiratory system. Exercise 1 – Open circulatory system of Daphnia Daphnia magna, sometimes called the water flea, is a crustacean in the phylum
Transcript of Circulation & Gas Exchange 2000 - Washington State …wsu.edu/~rlee/biol103/circgasexchange.pdf ·...
Circulation and Gas Exchange
Introduction
All animals need to obtain oxygen (O2) and nutrients from the environment and get rid of
carbon dioxide (CO2) and wastes. For single-celled organisms, Sponges and Cnidarians,
this can be accomplished by diffusion directly between the cells of the organism and the
environment or through the gastrovascular cavity. However, for larger animals, the
exchange of gases and nutrients is accomplished through specialized systems for
circulation and gas exchange. Humans and other vertebrates have a closed circulatory
system where blood is confined to the heart and blood vessels. Gas exchange with the
environment occurs through the lungs. Today we will observe a small crustacean that
uses a different strategy. We will also examine aspects of the human circulatory and
respiratory system.
Exercise 1 – Open circulatory system of Daphnia
Daphnia magna, sometimes called the water flea, is a crustacean in the phylum

Arthropoda. Like other arthropods, daphnia has an open circulatory system. Blood-like
fluid, called hemolymph, is pumped throughout the body cavity. This type of cavity,
called a hemocoel, is well developed in arthropods and mollusks where the coelom is
small. An open circulatory system is not as efficient as a closed one, but for many
ectotherms, it is perfectly adequate.
Procedure – work in pairs
1. Carefully pick up a single daphnia with a plastic pipette and place it on a
depression slide. Use the pipette to remove all but a thin film of water covering
the daphnia. This will immobilize the daphnia while still allowing it to breath.
Observe under a dissecting microscope. Don’t let your specimen dry out.
Add small amounts of water as necessary.
2. Observe the various structures noted on the diagram. The thoracic appendages
will be actively moving. These are used to generate feeding currents and for
swimming. Find the oval shaped heart – it is almost transparent. The circulatory
fluid, hemolymph, is clear also. You may see reddish tissue running the length
of the animal. What do you think this is?
Can you count the rate of the heartbeat? Do you think this is the “normal” resting
heart rate of daphnia? Why or why not?
How does the heart rate in daphnia compare to your own?
What would account for the difference?
How do you think daphnia acquires O2 and expels CO2?
Introduction to the Heart
The heart is a muscular organ that pumps circulatory fluid – blood or hemolymph –
throughout the body. In Arthropods and Annelids, the simplified “heart” is just a thicker,
more muscular part of the circulatory system, with no compartments or valves. We
observed this in the two previous labs. Vertebrates have hearts with compartments and

valves for more efficient circulation.
Can you think of characteristics of animals that would require more efficient
circulation?
Different groups of vertebrates have different numbers of circuits in their circulatory
systems and different numbers of chambers of the heart (see Fig. 42.5 in Campbell).
Regardless of the number, there are two types of chambers: the atrium (plural atria), and
the ventricle, the more muscular pump. Valves that separate the chambers insure that the
blood flows in only one direction through the system.
The simplest of the chambered hearts is that of fish with a 2-chambered heart comprised
of one atrium and one ventricle. The blood flows in a single circuit from the body to the
heart, then to the gill, and on to the body again. The atrium is separated from the ventricle
by a valve. When the ventricle pumps, it forces the valve closed so that the blood can
only flow toward the gill capillaries where the blood is oxygenated. When the heart
muscle relaxes, there is negative pressure so the valve opens and allows passive flow
down the pressure gradient of blood from the atrium. Flow of blood in fish is also
facilitated by muscular contractions of the body. We observed the 2-chambered heart in
the fish we dissected last week.
Amphibians have a 3-chambered heart that pumps blood through two circuits. The first
is the pulmocutaneous circuit (pulmo=lung, cutaneous=skin) where the blood is
oxygenated. The second is a systemic circuit throughout the body to deliver O2 and
remove CO2. The single ventricle pumps a mixture of oxygenated and deoxygenated
blood to both circuits. Deoxygenated blood from the body goes into the right atrium
whereas the oxygenated blood from the pulmocutaneous circuit enters into the left
atrium. Reptiles (except crocodiles) also have a 3-chambered heart, but they have a
partial division in the single ventricle that helps to separate the oxygenated and
deoxygenated blood.
Mammals and birds (and crocodiles) have a 4-chambered heart with two atria and two
ventricles. This allows the two blood circuits of oxygenated blood and deoxygenated
blood to be completely separated, thus making for a very efficient circulatory system. In
addition to the sheep heart dissection below, we dissected a quail in a last week. Look at
Figure 42.5 in Campbell for comparison of vertebrate circulatory systems.
Exercise 2 – Sheep Heart Dissection
The sheep heart, like that of humans is a 4-chambered heart with 4 valves. First, observe
the heart from the outside. The white areas are fat and the dark red areas, the muscle. The
muscular ventricles comprise a great majority of the heart. Depending upon where the
arteries and veins were cut, there may be four or more openings. The aorta comes out
from the left ventricle where the oxygenated blood goes to the body. The pulmonary
artery sends deoxygenated blood from the right ventricle to the lungs. The pulmonary

vein then brings the oxygenated blood back to the left atrium. Finally, there are vena
cava, that bring deoxygenated blood back to the heart from the body. The vena cava in
the photo below looks large because it was cut below where the anterior and posterior
Because the heart is a vital and continually working muscle, it needs its own blood
supply, the coronary arteries. You may be able to see these arteries that originate from the
aorta and run down both sides of the surface of the heart. These vessels serve the tissues
of the heart itself. It is when these arteries get clogged that you have a heart attack!
Now cut the heart open parallel to the line connecting the aorta and pulmonary vein.
Remember that the thickness of the muscle determines its strength.
Which is thicker, the region surrounding the atrium or the ventricle?
What about the difference in thickness of the right versus left ventricle?
Note also the valves between atrium and ventricle and also the valves exiting from the
ventricle. Notice the fibrous connective tissue that connects the flaps to muscles. These
help the valves flaps to be positioned so that they can close properly.
Use the diagram above to trace the flow of blood in the sheep heart.
Introduction to Human Circulatory System
The human circulatory system is comprised of the heart, blood, and vessels. Blood is
carried in three types of vessels: arteries, veins, and capillaries. Arteries are defined as
vessels that carry blood away from the heart whereas veins carry the blood back to the
heart. (This definition does NOT include whether the blood is oxygenated or not. Refer to
the previous section on sheep heart for arteries that carry deoxygenated blood and veins
that carry oxygenated blood.) Connecting arteries and veins are the tiny capillaries.
Capillaries form a vast system of branched vessels. If you could remove all the vessels
from an adult human and lay them end-to-end, they would measure almost 100,000
miles!
The function of veins, arteries and capillaries are reflected in their structure. The walls of
the capillaries are relatively thin and made of flat endothelial cells to facilitate exchange
of gases, nutrients, and waste between the blood and the fluid surrounding the cells.
Arteries, by contrast, have thick, strong walls to withstand the high speed and pressure of
blood pumped from the heart. Blood in the veins returns to the heart from the capillary
bed at much lower pressures, and thus veins have thinner walls than arteries and are
equipped with one-way valves to prevent the blood from flowing backwards.
Exercise 3 –EKG or ECG - Electrocardiogram
Heart muscle autonomically contracts and relaxes, that is, it does not require any
conscious thought for our hearts to beat. A pacemaker (sinoatrial node), composed of a
set of specialized muscle cells, (located near the superior vena cava’s entrance to the right
atrium) sets the heart rate by sending out electrical signals. This signal is relayed to the
rest of the heart by another group of specialized cells located between the right atrium

and right ventricle, called the atrioventricular node. These electrical signals can be
detected on our skin and are the basis of the electrocardiogram, EKG or ECG. Because an
EKG is a recording of the heart’s electrical events, it is valuable in diagnosing diseases or
ailments that damage the heart. An EKG can show cardiac arrhythmia, where the heart
skips a beat or where the heart beats too fast, sometimes called heart palpitations. The
duration for an electrical signal to travel through the heart is indicates the condition of the
tissue through which the signal passes. For actual medical diagnosis, 12 electrodes are
used.
Procedure
1. 1. Prepare the computer for data collection by double-clicking on the EKG
icon.
2. 2. Attach three electrode tabs to your arms, as shown in Figure 2. The key to
obtaining a good EKG recording is to have good electrical conductivity of the electrodes.
This means cleaning the area well with an alcohol swab (oils and lotion reduce
conductivity), and then letting it dry before attaching the electrodes. A single patch
should be placed on the inside of the right wrist, on the inside of the right upper forearm
(below elbow), and on the inside of the left upper forearm (below elbow).
3. 3. Connect the EKG clips to the electrode tabs as shown in Figure 2. Sit in a
reclined position in a chair. The arms should be hanging at the side unsupported. When
everything is positioned properly, click COLLECT to begin data collection. If your
unstable baseline, collect a new set of data by clicking
. Repeat data
collectionuntil your graph has a stable baseline.

Figure 2
3. Click the examine button, to analyze the data. As you move the mouse pointer across
the screen, the x and y values are displayed in the Examine window that appears. For
three heart beats, identify parts of an EKG waveform referring to the following
figure.
The atria make the first wave, “P wave”, whereas the ventricles make the next wave
called the “QRS complex” and the last group called the “T wave” is the recovery to the
resting state. This time interval is compared to the standard. Of course, we do not have
the equipment to accurately measure for medical diagnostic purposes, but you may wish
to compare your time intervals to the following standard time intervals. Time from the
beginning of P wave to the start of the QRS complex: 0.12 to 0.2 sec. The time from Q
deflection to S deflection: < 0.1s. The time from Q deflection to the end of the T wave:
0.3 to 0.4 s.
You will find that not all EKGs look alike. Do not be alarmed by this. Each heart will
differ from one individual to another. What you can see is that EKGs contain the same
waveforms even though they differ in size and shape.
Two common problems that can be diagnosed from an EKG are atrial fibrillation and
ventricular fibrillation. During atrial fibrillation, the atria quiver instead of beating
effectively. Blood isn't pumped out completely, so it may pool and clot. If a blood clot in
the atria leaves the heart and becomes lodged in an artery in the brain, a stroke results.
About 15 percent of strokes occur in people with atrial fibrillation. During ventricular
fibrillation, abnormal impulse conduction in the ventricles results in rapid disorganized
contractions (the ventricles "flutter" rather than beat) in which the heart pumps little or no
Atrial fibrillation ventricular fibrillation

Additional examples of abnormal EKG's are shown below. Can you find all 3 parts
of the wave? What abnormalities can you detect?
Some diseases affect the heart without altering its electrical properties. A physical defect
such as a faulty pulmonary or aortic valve will disturb the mechanical action of the heart,
but not the electrical activity that shows up on an EKG.
Introduction: Gas exchange
Organisms require a continuous supply of O2 for cellular respiration and they need to
expel the CO2 created. Most organisms must expose a large moist area to the
environment where the diffusion of these gases can occur (remember diffusion?). In
single-celled organisms, gases simply diffuse through the cell membrane. Some small
animals, such as earthworms, use their entire outer skin for gas exchange. Insects have an
extensive system of internal tubes, called tracheae, that delivers air directly to body cells.
Many other aquatic animals, such as fish and some salamanders, exchange gases through
specialized organs called gills. Most terrestrial vertebrates exchange gases to and from
the blood across the lining of the lungs.
Exercise 4: Control of Breathing (Ventilation)
When you inhale, O2 from the air diffuses into the blood that flows in the tiny capillaries
in your lungs. Carbon dioxide diffuses out of the blood and into the lung cavities to be
exhaled. This exercise demonstrates not only our need for O2, but also the necessity of
ridding the body of CO2. The concentration of CO2 in the blood is the main factor
regulating the rate and depth of breathing. Working with a lab partner, determine the
length of time you can hold your breath. Procedure -Work in pairs

First one partner should do Part A while the other partner times. Then the second person
does Part A while the first student times. Then in a similar manner, do Parts B, C, D, E,
and F.
Be sure to recover completely between tests! If you feel light-headed during any of these
activities, stop immediately!
Record your results. A. Seconds breath is held after a normal exhalation
B. Seconds breath is held after a normal inhalation
C. Seconds breath is held after a maximal exhalation
D. Seconds breath is held after a maximal inhalation
E. Seconds breath is held after several maximal inhalations and exhalations taken in
rapid succession. Start holding your breath with an inhalation.
F. Repeat Part E but inhale and exhale into a paper bag instead of in the open air.
Breath-hold divers, who dive for long periods without air tanks, take several deep breaths
before each dive. This practice does not increase the levels of oxygen in their blood.
What does it do?
Exercise 5: Vital Capacity
The volume of air an animal inhales and exhales with each breath is called the tidal
volume. The average tidal volume in humans is about 500 ml. The maximum volume of
air that can be inhaled and exhaled during forced breathing is called vital capacity, which
averages about 3400 ml and 4800 ml for college-age females and males respectively.
Among other factors, vital capacity depends on the resilience of the lungs. Vital capacity
diminishes as a result of aging or disease.
Procedure
Determine your vital capacity by blowing into the spirometer after taking a deep breath in
the open air. Measure the volume of water displaced: _____________ml. If you wish,
you may retest using the same mouthpiece. When you are finished, dispose of your
mouthpiece in the trash (one mouthpiece per student please). Reset the spirometer to
zero between tests.
Compare your results with others to see if there was any relationship between vital
capacity and results from Exercise 4. Also, what other factors might vital capacity
be related to?

EMG and Muscle Fatigue
Voluntary muscle contraction is the result of communication between the brain and individual muscle fibers of the musculoskeletal system. A thought is transformed into electrical impulses which travel down motor neurons (in the spine and peripheral nerves) to the neuromuscular junctions that form a motor unit (see Figure 1).
The individual muscle fibers within each motor unit contract with an “all or none” response when stimulated, meaning the muscle fiber contracts to its maximum potential or not at all. The strength of contraction of a whole muscle depends on how many individual fibers are activated, and can be correlated with electrical activity measured over the muscle with an EMG sensor.
Regular exercise is important for maintaining muscle strength and conditioning. The most common form of non-aerobic exercise is isotonic (weight training). In isotonic exercise, the muscle changes length against a constant force. In isometric exercise the length of the muscle remains the same as greater demand is placed on it. An example of this is holding a barbell (or suitcase) in one position for an extended period of time. Muscle fatigue occurs with both forms of exercise.
In this experiment, you will use a Vernier Hand Dynamometer to measure maximum grip strength and correlate this with electrical activity of the muscles involved as measured using the Vernier EKG Sensor. You will see if electrical activity changes as a muscle fatigues during continuous maximal effort. Finally, you will observe the results of a conscious effort to overcome fatigue in the muscles being tested.
Figure 1
Important: Do not attempt this experiment if you suffer from arthritis, or other conditions of the hand, wrist, forearm, or elbow. Inform your instructor of any possible health problems that might be exacerbated if you participate in this exercise.

OBJECTIVES
In this experiment, you will
• Obtain graphical representation of the electrical activity of a muscle.
• Correlate grip strength measurements with electrical activity data.
• Correlate measurements of grip strength and electrical activity with muscle fatigue.
• Observe the effect on grip strength of a conscious effort to overcome fatigue.
MATERIALS
computer Vernier Hand Dynamometer Vernier computer interface Vernier EKG Sensor Logger Pro electrode tabs
PROCEDURE
Select one person from your lab group to be the subject.
Part I Grip Strength without Visual Feedback
1. Connect the Hand Dynamometer and the EKG Sensor to the Vernier computer interface.
Open the file “18 EMG and Muscle Fatigue” from the Human Physiology with Vernier folder.
2. Zero the readings for the Hand Dynamometer.
a. Click the Zero button, .
b. Hold the Hand Dynamometer along the sides, in an upright position (see Figure 2). Do not put any force on the pads of the Hand Dynamometer.
c. Click the box in front of Hand Dynamometer to select it and click .
3. Attach three electrode tabs to on of your arms, as
shown in Figure 3. Two tabs should be placed on the ventral forearm, 5 cm and 10 cm from the medial epicondyle along an imaginary line connecting the epicondyle and the middle finger.
4. Attach the green and red leads to the tabs on ventral forearm. For this activity, the green and red leads are interchangeable. Attach the black lead to the upper arm.
5. Have the subject sit with his/her back straight and feet flat on the floor. The elbow should be at a 90° angle, with the arm unsupported.
6. Have the subject close his/her eyes, or avert them from the screen.
7. Instruct the subject to grip the sensor with full strength and click to begin data collection. The subject should exert maximum effort throughout the data-collection period.
8. At 80 s, the lab partner(s) should encourage the subject to grip even harder. Data will be collected for 100 s.
Figure 3
Figure 2

9. Record statistical information about the grip strength data.
a. Position the cursor at 0 s on the Grip Strength graph (the top graph). Click and drag to highlight 0–20 s on the graph. Click the Statistics button, . Record the mean force during that interval in Table 1, rounding to the nearest 0.1 N.
b. Move the statistics brackets to highlight the time interval between 60 and 80 s on the same graph. Record the mean force during that interval in Table 1 (round to the nearest 0.1 N).
c. Move the statistics brackets to highlight the time interval between 80 and 100 s. Record the mean force during that interval in Table 1, rounding to the nearest 0.1 N.
10. Record statistical information about the EMG data.
a. Position the cursor at 0 s on the EMG graph (the bottom graph). Click and drag to highlight 0–20 s on the graph. Click the Statistics button, . Record the maximum and minimum mV during that interval in Table 1, rounding to the nearest 0.01 mV.
b. Move the statistics brackets to highlight the time interval between 60 and 80 s on the same graph. Record the maximum and minimum mV during that interval in Table 1, rounding to the nearest 0.01 mV.
c. Move the statistics brackets to highlight the time interval between 80 and 100 s on the EMG graph. Record the maximum and minimum mV during that interval in Table 1, rounding to the nearest 0.01 mV.
d. Calculate the difference between each minimum and maximum value and record this value in the ∆mV column in Table 1.
Part II Grip Strength with Visual Feedback
11. Have the subject sit with his/her back straight and feet flat on the floor. The Hand Dynamometer should be held in the same hand used in Part I of this experiment. Instruct the subject to position his/her elbow at a 90° angle, with the arm unsupported, and to close his/her eyes, or avert them from the screen.
12. Instruct the subject to grip the sensor with full strength and click to begin data collection. The subject should exert near maximum effort throughout the duration of the experiment.
13. At 80 s, instruct the subject to watch the screen, and attempt to match his/her beginning grip strength (the level achieved in the first few seconds of the experiment) and to maintain this grip for the duration of the experiment. Data will be collected for 100 s.
14. Record statistical information about the grip strength data.
a. Position the cursor at 0 s on the Grip Strength graph (the top graph). Click and drag to highlight 0–20 s on the graph. Click on the Statistics button, . Record the mean force during that interval in Table 2, rounding to the nearest 0.1 N.
b. Move the statistics brackets to highlight the time interval between 60 and 80 s on the same graph. Record the mean force during that interval in Table 2, rounding to the nearest 0.1 N.
c. Move the statistics brackets to highlight the time interval between 80 and 100 s on the same graph. Record the mean force during that interval in Table 2, rounding to the nearest 0.1 N.

15. Record statistical information about the EMG data.
a. Position the cursor at 0 s on the EMG graph (the bottom graph). Click and drag to highlight 0–20 s on the graph. Click on the Statistics button, . Record the maximum and minimum mV during that interval in Table 2, rounding to the nearest 0.01 mV.
b. Move the statistics brackets to highlight the time interval between 60 and 80 s on the same graph. Record the maximum and minimum mV during that interval in Table 2, rounding to the nearest 0.01 mV.
c. Move the statistics brackets to highlight the time interval between 80 and 100 s on the same graph. Record the maximum and minimum mV during that interval in Table 2, rounding to the nearest 0.01 mV.
d. Calculate the difference between each minimum and maximum value and record this value in the ∆mV column in Table 2.
Part III Repetitive Grip Strength
16. Have the subject sit with his/her back straight and feet flat on the floor. The Grip Strength Sensor should be held in the same hand used in Parts I and II of this experiment. Instruct the subject to position his/her elbow at a 90° angle, with the arm unsupported, and to close his/her eyes, or avert them from the screen.
17. Instruct the subject to rapidly grip and relax his/her grip on the sensor (approximately twice per second). Click to begin data collection. The subject should exert maximum effort throughout the duration of data collection.
18. At 80 s, the lab partner(s) should encourage the subject to grip even harder. Data will be collected for 100 s.
19. Record statistical information about the grip strength data.
a. Position the cursor at 0 s on the Grip Strength graph (the top graph). Click and drag to highlight 0–20 s on the graph. Click on the Statistics button, . Record the mean force during that interval in Table 3, rounding to the nearest 0.1 N.
b. Move the statistics brackets to highlight the time interval between 60 and 80 s on the same graph. Record the mean force during that interval in Table 3, rounding to the nearest 0.1 N.
c. Move the statistics brackets to highlight the time interval between 80 and 100 s on the same graph. Record the mean force during that interval in Table 3, rounding to the nearest 0.1 N.
20. Record statistical information about the EMG data.
a. Position the cursor at 0 s on the EMG graph (the bottom graph). Click and drag to highlight 0–20 s on the graph. Click on the Statistics button, . Record the maximum and minimum mV during that interval in Table 3, rounding to the nearest 0.01 mV.
b. Move the statistics brackets to highlight the time interval between 60 and 80 s on the same graph. Record the maximum and minimum mV during that interval in Table 3, rounding to the nearest 0.01 mV.
c. Move the statistics brackets to highlight the time interval between 80 and 100 s on the same graph. Record the maximum and minimum mV during that interval in Table 3, rounding to the nearest 0.01 mV.
d. Calculate the difference between each minimum and maximum value and record this value in the ∆mV column in Table 3.

DATA
Table 1–Continuous Grip Strength without Visual Feedback
EMG Data Time Interval Mean grip strength (N)
Max (mV) Min (mV) ∆mV
0–20 s
60–80 s
80–100 s
Table 2–Continuous Grip Strength with Visual Feedback
EMG data Time Interval Mean grip strength (N)
Max (mV) Min (mV) ∆mV
0–20 s
60–80 s
80–100 s
Table 3–Repetitive Grip Strength
EMG data Time interval Mean grip strength (N)
Max (mV) Min (mV) ∆mV
0–20 s
60–80 s
80–100 s
DATA ANALYSIS
1. Use the data in Table 1 to calculate the percent loss of grip strength that occurs between the 0–20 s and 60–80 s intervals. Describe a situation in which such a loss of grip strength is noticeable in your day-to-day life.

2. Use the data in Table 1 to calculate the percent change in amplitude (∆mV) in electrical activity that occurs between the 0–20 s and 60–80 s intervals. Do the same for grip strength. What accounts for the difference in the percent change observed in grip strength and ∆mV for the two time intervals?
3. Compare mean grip strengths and ∆mV for the 0–20 s and 80–100 s in Table 1. Do your findings support or refute the practice of “coaching from the sidelines” at sporting events?
4. Use the graphs and your data from Table 1 to explain how our neuromuscular systems attempt to overcome fatigue during heavy work or exercise. How might fatigue increase the risk of musculoskeletal injury?
5. Compare the data in Tables 1 and 2. Explain any differences seen in the 80-100 s time intervals between the two tables. What does this tell you about the brain’s role in fatigue?
6. The mean grip strength is much less for repetitive gripping (Table 3) because repetitive relaxation of the hand is averaged into the calculation.
(a) Compare your mean grip strength during the 0–20 s and 80–100 s time intervals in Tables 1 and 3. Was there a difference in your ability to recover strength with coaching during continuous vs. repetitive gripping?
(b) Calculate the percent change in mean grip strength between the 1–20 s and 60–80 s time intervals in Tables 1 and 3. Do your answers support brief relaxation of muscles to delay fatigue?