Chapter 4: Microscopic techniques and principles of ... · Staining techniques ... Specialized...
20
Applied Veterinary Bacteriology and Mycology: Bacteriological Techniques Chapter 4: Microscopic techniques and principles of staining methods used in a diagnostic bacterial laboratory 1 | Page Applied Veterinary Bacteriology and Mycology: Bacteriological techniques Chapter 4: Microscopic techniques and Principles of Staining Methods Used in a Diagnostic Bacteriology Laboratory Author: Dr. J.A. Picard Licensed under a Creative Commons Attribution license. TABLE OF CONTENTS INTRODUCTION .......................................................................................................................................... 2 COMPOUND LIGHT, BRIGHT-FIELD MICROSCOPY ............................................................................... 2 Adjustment of Köhler illumination ............................................................................................................ 3 Precautions when using a microscope .................................................................................................... 6 Determination of the size of objects viewed under the compound light microscope ............................... 6 Methods in light microscopy .................................................................................................................... 7 Fluorescence microscopy ........................................................................................................................ 8 Methods of Sample Preparation for Microscopic Examination ................................................................ 9 Staining techniques ............................................................................................................................... 10 REFERENCES ........................................................................................................................................... 13 APPENDIX ................................................................................................................................................. 14
Transcript of Chapter 4: Microscopic techniques and principles of ... · Staining techniques ... Specialized...

Applied Veterinary Bacteriology and Mycology: Bacteriological Techniques Chapter 4: Microscopic techniques and
principles of staining methods used in a diagnostic bacterial laboratory
1 | P a g e
Applied Veterinary Bacteriology and Mycology: Bacteriological techniques
Chapter 4: Microscopic techniques and Principles of Staining Methods Used in a Diagnostic Bacteriology Laboratory
Author: Dr. J.A. Picard
Licensed under a Creative Commons Attribution license.
TABLE OF CONTENTS
INTRODUCTION .......................................................................................................................................... 2
COMPOUND LIGHT, BRIGHT-FIELD MICROSCOPY ............................................................................... 2
Adjustment of Köhler illumination ............................................................................................................ 3
Precautions when using a microscope .................................................................................................... 6
Determination of the size of objects viewed under the compound light microscope ............................... 6
Methods in light microscopy .................................................................................................................... 7
Fluorescence microscopy ........................................................................................................................ 8
Methods of Sample Preparation for Microscopic Examination ................................................................ 9
Staining techniques ............................................................................................................................... 10
REFERENCES ........................................................................................................................................... 13
APPENDIX ................................................................................................................................................. 14

Applied Veterinary Bacteriology and Mycology: Bacteriological Techniques Chapter 4: Microscopic techniques and
principles of staining methods used in a diagnostic bacterial laboratory
2 | P a g e
INTRODUCTION
In spite of the development of new identification techniques, microscopic examination of clinical material remains
one of the most effective means of judging specimen quality and detecting the presence of potential pathogens
in clinical material. It is also used to examine the morphology and differential staining characteristics of artificially
cultivated bacteria and fungi. Specialized techniques and stains when used with different microscopy techniques
will further aid in the identification of an organism.
COMPOUND LIGHT, BRIGHT-FIELD MICROSCOPY
This is the most commonly used of all microscopes, due to its versatility, ease of use and low cost of
maintenance.
A typical light microscope is illustrated in Figure 1. A light source, usually provided by a coiled tungsten filament
starts as a horizontal beam, which is transmitted through the condenser via a mirror.When reaching the
condenser lens it is focused just below the plane of the specimen (Figure 2). This prevents glare from the beam
as well as affects the resolution of the image. This type of light transmission is known as Köhler illumination and
is most efficient when properly centred in the light path of the specimen. This is accomplished by using the
condenser adjustment screws on the stage.
Applied Veterinary Bacteriology and Mycology: Bacteriological Techniques Chapter 4: Microscopic techniques and
principles of staining methods used in a diagnostic bacterial laboratory
3 | P a g e
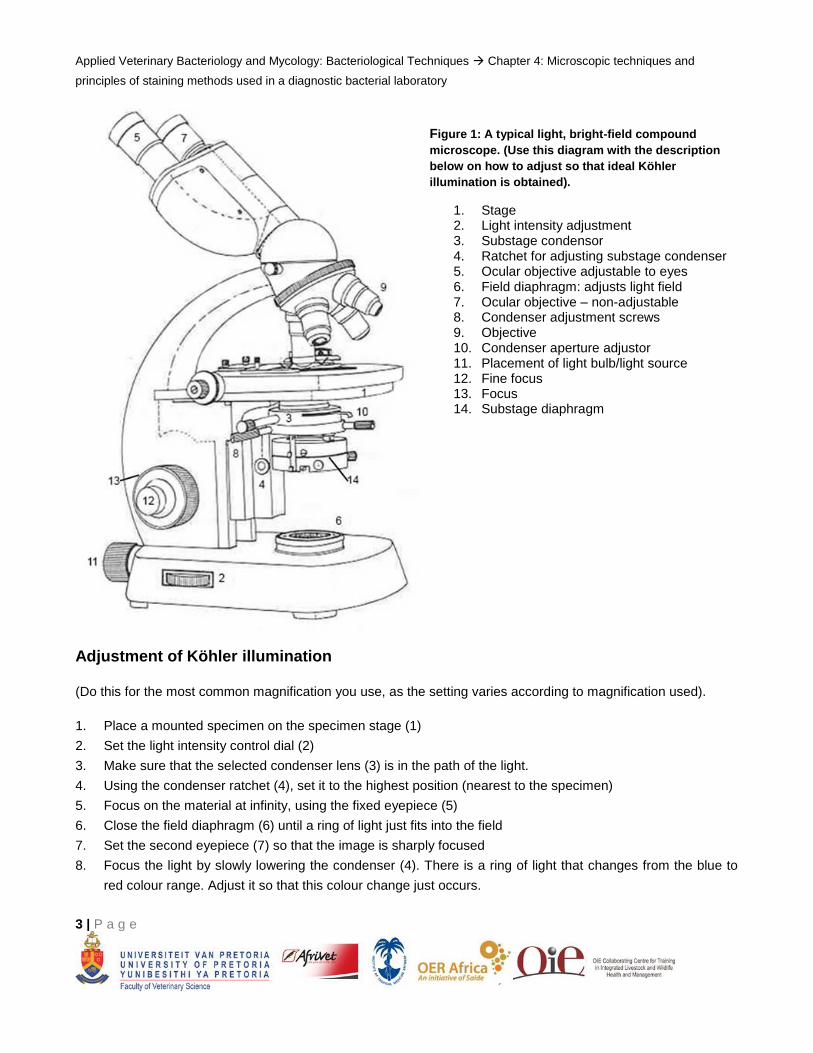
Adjustment of Köhler illumination
(Do this for the most common magnification you use, as the setting varies according to magnification used).
1. Place a mounted specimen on the specimen stage (1)
2. Set the light intensity control dial (2)
3. Make sure that the selected condenser lens (3) is in the path of the light.
4. Using the condenser ratchet (4), set it to the highest position (nearest to the specimen)
5. Focus on the material at infinity, using the fixed eyepiece (5)
6. Close the field diaphragm (6) until a ring of light just fits into the field
7. Set the second eyepiece (7) so that the image is sharply focused
8. Focus the light by slowly lowering the condenser (4). There is a ring of light that changes from the blue to
red colour range. Adjust it so that this colour change just occurs.
Figure 1: A typical light, bright-field compound
microscope. (Use this diagram with the description
below on how to adjust so that ideal Köhler
illumination is obtained).
1. Stage 2. Light intensity adjustment 3. Substage condensor 4. Ratchet for adjusting substage condenser 5. Ocular objective adjustable to eyes 6. Field diaphragm: adjusts light field 7. Ocular objective – non-adjustable 8. Condenser adjustment screws 9. Objective 10. Condenser aperture adjustor 11. Placement of light bulb/light source 12. Fine focus 13. Focus 14. Substage diaphragm

Applied Veterinary Bacteriology and Mycology: Bacteriological Techniques Chapter 4: Microscopic techniques and
principles of staining methods used in a diagnostic bacterial laboratory
4 | P a g e
9. Centre the light in the field of vision using the two centering screws (8) in the condenser holder. If the light
path is not visible, lower the condenser first, find the light path and follow this while raising the condenser
again.
10. Open up the field diaphragm (6) until the edge of light path starts to disappear from view.
11. The diameter of the diaphragm must be two-thirds of the opening of the objective. Check by removing
eyepiece (5).
12. Contrast can be adjusted by setting the condenser opening (10).
13. If the light is not uniform, check the lamp (11). Do not touch the globe. The reflection of the filament image
must be the same size, when looking through the eyepiece (5) with ocular lenses removed.
The contrast of the specimen may be enhanced by decreasing the condenser aperture and thus the amount of
oblique light waves reaching the specimen. This is useful when examining wet mounts or uniformly stained
specimens. It does result however, in decreased resolution of the image.
As the human eye is most sensitive to blue wave lengths, a blue filter over the field diaphragm enhances
visualization and causes less fatigue when multiple slides are viewed.
Lenses
This microscope uses at least two magnifying lenses, namely the ocular and objective lenses. The total
magnification of the microscope is the product of the magnification of the ocular and objective lenses.
The ocular lens is usually set at a magnification of 10X. Several objective lenses are used, they are
commonly:
4X scanning lens
10X or 20X intermediate lenses
40X high dry lens
100X immersion oil lens

Applied Veterinary Bacteriology and Mycology: Bacteriological Techniques Chapter 4: Microscopic techniques and
principles of staining methods used in a diagnostic bacterial laboratory
5 | P a g e
Figure 2: Illustration of condenser function showing focusing light paths at the plane of the specimen
Achromatic (corrected for light distortion in the red and blue ranges) objective lenses are important to use in
microscopy as they correct for chromatic aberration (splits the light into colours – prism effect) which is an
inherent property of most convex lenses. Apochromatic lenses are used in microphotography as they correct for
both chromatic and spherical aberrations (fuzzy images). Another factor which affects the viewing of the image
is the resolution, which is defined as the smallest distance between two objects which allows them to be viewed
as distinct objects. Immersion oils with a refractive index similar to glass are used with the 100X objective lens.
The 100X objective lens is usually close (0.2 mm) to allow the entry of more rays of light. This is further assisted
by the use of immersion oil. Note that the immersion oil used is specified by the manufacture and it is not
recommended that oils are mixed as it can decrease the resolution power of the lens. Also clean the lens with a
lens paper every time after use to prevent the oil hardening on the lens. Note that many solvents can cause the
glue holding the lens in its casing to dissolve. The resolution limit for the compound light microscope is 0.2m
that is obtained with the 100X oil immersion lens.

Applied Veterinary Bacteriology and Mycology: Bacteriological Techniques Chapter 4: Microscopic techniques and
principles of staining methods used in a diagnostic bacterial laboratory
6 | P a g e
Precautions when using a microscope
As the light supply and lens must meet each other in a straight line, it is critical that care is taken not to handle
them roughly or drop them. They must always be placed in a sturdy box with packaging to prevent any
movement and to protect them.
Determination of the size of objects viewed under the compound light microscope
An eyepiece micrometer is used to measure the size of objects. Before use, it should be calibrated for the
magnification you will be using.
This is done by placing a table micrometer on the specimen stage and focusing on the scale.
Turn the eyepiece containing the micrometer so that the two scales are parallel to each other (Figure 3).
Find the number of units on the eyepiece scale that exactly coincides with one or more units on the table
micrometer: each unit on the table micrometer represents 0.1mm. To calculate the value of one eyepiece unit
(X), the following calculation is done:
X = table micrometer units (mm)
Number of eyepiece micrometer units over the same distance
Figure 3: The positioning of the eyepiece micrometer to lie adjacent to the table micrometer when viewed through the microscope.

Applied Veterinary Bacteriology and Mycology: Bacteriological Techniques Chapter 4: Microscopic techniques and
principles of staining methods used in a diagnostic bacterial laboratory
7 | P a g e
Methods in light microscopy
Dark-field microscopy
This method of microscopy, using a darkfield condenser, excludes directly transmitted light and only
allows oblique or scattered light to be directed onto the specimen (Figure 4). This set-up allows finer
structures to be seen as the resolution improves to approximately 0,1 m. The background appears dark
whereas objects in the fluid such as bacteria appear as brightly luminous against a black background. It is
commonly used for visualization of the spirochaetes.
Figure 4: Comparison of bright-field microscopy (A) and dark-field microscopy (B)
Phase contrast microscopy
Due to the small nature of micro-organisms, it is not possible to discern internal structures with the use of
a normal microscope. Phase contrast microscopy increases the contrast of an object by converting slight
differences in refractive index and cell density into easily detected variations in light intensity (Figure 5). In
order to achieve this effect an annular diaphragm is placed at the lower focal plane (Figure 5). This
permits only a ring of light to pass through the condenser and objective lens which is then focused on the
phase ring just before reaching the eyepiece. This ring is there to change the phase of the light (not hitting
an object on the slide) reaching it, so that it is not a quarter of a wavelength different to the diffracted rays

Applied Veterinary Bacteriology and Mycology: Bacteriological Techniques Chapter 4: Microscopic techniques and
principles of staining methods used in a diagnostic bacterial laboratory
8 | P a g e
(those scattered by bouncing off an object on the slide). At some points these waves will come into
contact with each other either amplifying each other (bright) or nullifying (dark) each other. By using this
method of microscopy the background is illuminated and the unstained object is dark surrounded by a
halo of light. Internal structures of cells such as endospores and nuclear bodies will also show up in a
similar fashion.
Figure 5: The optics of a phase-contrast microscope
Nomarski interference
This type of microscopy is used for bigger objects than bacteria, such as vegetative cells and spores of fungi.
Normarski interference is similar to phase contrast microscopy, but the presence of a polarizer and special
prisms in the condenser result in the formation of a clearer image that can be obtained by phase contrast
microscopy. The object being examined has no halo and appears three dimensional. The resolution power is
0.1m compared to 0.2m of a phase contrast microscope.
Fluorescence microscopy
This technique has become commonplace in most laboratories. Fluorescence is dependent on the ability of
fluorophores (naturally fluorescent substances) or fluorochromes (fluorescent dyes) to absorb the energy of non-
visible UV and short visible wavelenghts become excited, and remit the energy in the form of longer visible
wavelenghts. Figure 6 gives a diagrammatic representation of illumination required for fluorescent microscopy.
A special adapter containing the light source (high pressure gas lamps of mercury, xenon or halogen), filters,
and a dichromatic mirror beam splitter can be attached to a compound bright-field microscope so that light

Applied Veterinary Bacteriology and Mycology: Bacteriological Techniques Chapter 4: Microscopic techniques and
principles of staining methods used in a diagnostic bacterial laboratory
9 | P a g e
passes through the objective lens. This option has greatly reduced the costs of fluorescence microscopy. This
adapter is usually adequate to detect most organisms or their antibodies using direct or indirect fluorescence
staining techniques. Its sensitivity is 84% and specificity 93% compared to that of a standard fluorescence
microscope when fluorescence (auramine stain) is used to detect acid-fast bacteria. Note that a special
ultraviolet, opaque filter is placed in the microscope tube to protect the eyes from the ultraviolet rays.
Figure 6: Fluorescence microscope incident illumination light path and microscope components
Methods of Sample Preparation for Microscopic Examination
Wet preparations and hanging mounts
These are unstained, wet preparations of the material, usually made to observe the viable microorganism
and examined using reduced light, phase contrast or dark field microscopy. On these smears one is able
to observe motility, which is indicative of flagellae or fimbriae, bacterial spores, intracellular granules and
spirochaetes. A plain wet mount is done by suspending bacteria in a drop of fluid on a microscope slide
and covering it with a thin cover slip. A ring of petroleum jelly (Vaseline) can be drawn around the drop
with a toothpick to prevent drying out.
A hanging drop method is used when free movement of the micro-organisms is necessary. Briefly pick
some bacteria (not too many – as it will result in overcrowding) from a colony on a culture plate or a
loopful from a broth and suspend in a drop of water or saline on a coverslip. Invert to coverslip position

Applied Veterinary Bacteriology and Mycology: Bacteriological Techniques Chapter 4: Microscopic techniques and
principles of staining methods used in a diagnostic bacterial laboratory
10 | P a g e
either over a slide with a hollow or over a thin ring made from plasticine (Prestik) (Figure 12). A hanging
drop method is not suitable for anaerobes, as air might inhibit their movement. It is best to observe them in
sealed capillary tubes containing growth media.
Staining techniques
Stains are used to determine bacterial morphology and to distinguish bacteria belonging to different groups or
species by their differential staining characteristics. Prior to staining all slides are fixed by heat (most common),
methyl alcohol, formalin, magnesium chloride or osmic acid. Fixation immobilises and kills vegetative bacteria
and thus renders them more permeable to staining. As a result of fixation, there is protoplasmic shrinkage, thus
a string of bacteria, will appear to have spaces between them, and some bacteria, such as the diphtheria
bacterium will be beaded and Pasteurella species will appear to be bipolar.
Different types of stains can be used and include:
Simple stains e.g. carbol fuschin stain.
Negative staining e.g. India ink.
Silver impregnation.
Differential stains e.g. Gram’s stain
Simple stains
The application of a basic dye, such as methylene blue, methyl violet, basic fuschin or carbol fuschin, will
show the presence of organisms and the nature of cellular contents in exudates. Sometimes a mordant is
added to these dyes to allow better penetration of the dye. A basic dye stains bacteria because coloured
positively charged particles combines firmly with the negatively charged group in the bacterial protoplasm,
especially with the phosphate group in nucleic acids. The excess stain is then washed off with water and
the combined stain remains. Very rarely are acid dyes used as they stain bacteria at a low pH. They are,
however, used for negative staining. Carbol fuschin is useful for visualising Campylobacter, Helicobacter,
spirochaetes and Fusobacterium in tissue smears. Mature Löffler’s methylene blue stain (see Appendix) is
used to stain Bacillus anthracis in blood and tissue smears.

Applied Veterinary Bacteriology and Mycology: Bacteriological Techniques Chapter 4: Microscopic techniques and
principles of staining methods used in a diagnostic bacterial laboratory
11 | P a g e
Negative staining
A stain such as India ink or nigrosin, stains the background dark, so that bacteria or fungi are visualised
as clear transparent objects. It is a good method to show shape, size and arrangement of bacteria and
fungi. For example, it is the best stain to visualize the heavily capsulated yeast, Cryptococcus neoformans
in tissue smears. Some bacilli, such as those of the coliform and haemophilic groups, also have a central
dark staining portion in their cells resembling a nucleus.
Silver impregnation
This method aids in the visualization of fine, morphological distinct microorganisms such as spirochaetes
and Gram-negative curved bacteria e.g. Campylobacter in tissue sections.
Differential stains
Note that the methods for performing the stains are described in the Appendix.
Gram’s stain
This is the stain most commonly used in diagnostic bacteriology and is used to place bacteria into one of
two groups: Gram-negative and Gram-positive, as well as to examine the morphology of bacteria. The wall
of Gram-positive bacteria is able to retain basic dyes, such as crystal violet, at a higher hydrogen ion
concentration and is more permeable to these dyes. Crystal violet and iodine form a complex within the
cell wall which is impermeable to water, but moderately soluble and dissociable in alcohol or acetone.
Thus on decolourization by acetone-alcohol, a thinner wall (as is possessed by Gram-negative bacteria)
will allow easier leaching of dye. Thus, Gram-positive bacteria will stain purple and Gram-negative
bacteria, being decolourized, will stain with the pink counterstain (Safranin). Old or damaged Gram-
positive bacteria e.g. Bacillus spp. and Streptococcus spp. will, however, stain Gram-negative. Note too
that bacteria cultured in acidic media will also stain Gram-negative. Some bacteria such as mycobacteria
which have a highly impermeable cell wall do not stain well with Gram’s stain.
Acid-fast or Ziehl-Neelsen stain
Certain bacteria such as mycobacteria are relatively impermeable to most stains, but do stain with a
strong reagent such as hot carbol fuschin in 5% phenol. Once stained these bacteria resist
decolourisation by strong acids e.g. sulphuric acid. The smear is then counterstained with either
methylene blue or malachite green. Acid-fast bacteria stain pink and any cellular material or other bacteria
stain blue or green, dependent on the counterstain used. Mycobacteria are acid-fast as their cell wall is
rich in lipids, fatty acids and the higher alcohols.
Partial acid-fast stains or Stamp’s stain

Applied Veterinary Bacteriology and Mycology: Bacteriological Techniques Chapter 4: Microscopic techniques and
principles of staining methods used in a diagnostic bacterial laboratory
12 | P a g e
Certain bacteria cannot withstand decolourisation by a strong acid, but do if a weaker acid such as 0,5%
acetic acid is used. Brucella, Chlamydia, Coxiella and Nocardia species stain with this method. Some
bacterial endospores are also partially acid-fast.
Giemsa and Diff Quik (CAM’s Quick, Rapid-Diff) stains
These stains are very useful in the staining of certain bacteria and to visualize cellular morphology in
tissue smears. They are used to demonstrate the capsule of Bacillus anthracis and the spirochaete
Borrelia in blood and tissue smears. Bacteria usually stain well (deep purple) as the relationship of
bacteria to tissue cells can be well demonstrated. Yeasts also stain well with these stains. However,
moulds and mycobacteria tend to stain poorly or not at all.
Staining for spores
Spores are usually easy to observe as they stain negatively, whereas bacteria stain positively when
normal bacterial stains are used. It is, however, possible to stain spores using acid-fast staining
techniques. At times, the ideal growth conditions of artificial culture media can inhibit the production of
spores. Therefore, before a spore stain is attempted, it might be necessary to culture the bacteria on a
starch or trace element constrained medium.
Staining of capsules
The capsules of bacteria present in pathological material are often clearly stained with standard bacterial
stains, such as basic fuschin, methylene blue, Giemsa or Diff Quik stains. Gram’s, Giemsa and Diff Quik
stains colours them pink. However, capsules of bacteria cultured artificially usually do not stain well. Thus
negative or relief staining techniques should be used. The best method to use is a wet-film India ink stain,
as there is no protoplasmic shrinkage which could cause a false positive result. Slime produced by
bacteria appears as irregular masses of pink amorphous material lying between the bacteria and outside
the capsule of capsulated bacteria. Some bacteria lose their capsules when cultured on artificial media
and special media and growth conditions may be required e.g. capsules will only be produced by Bacillus
anthracis if grown in 5% CO2 on bicarbonate rich agar medium.
Staining of flagella
Because of the small size of flagella, they are difficult to visualize with light microscopy. Thus techniques
are used to thicken them to ten times their normal size. A modified Leifson’s method is used, making use
of basic fuschin with tannic acid, which is deposited on the bacteria from an evaporating alcohol solution.
This stain will both swell and stain the flagella. The protoplasm of the bacteria is then stained with
methylene blue.
Staining of fungal hyphae and yeast cells

Applied Veterinary Bacteriology and Mycology: Bacteriological Techniques Chapter 4: Microscopic techniques and
principles of staining methods used in a diagnostic bacterial laboratory
13 | P a g e
Fungi often stain with difficulty when bacterial or cytological stains are used. Thus special stains have
been developed to observe them. In cultured material the vital stain lactophenol cotton blue is preferred.
Stains for the observation of fungi in clinical material include the Periodic-Acid-Schiff (PAS), and calcofluor
white. An Indian ink wet mount is used to observe Cryptococcus neoformans blastospores and 10-20%
potassium hydroxide with a vital dye to examine fungal infected hairs.
The PAS stain is a two-step procedure, in that the periodic acid hydrolyzes the cell wall aldehydes, which
then are able to combine with the modified Schiff reagent colouring the cell wall carbohydrates a bright
pink magenta.
Calcofluor is a nonspecific fluorochrome that binds to the 1,3-linked polysaccharides, specifically
cellulose and chitin in cell walls of fungi. This stain can be mixed with KOH to clear the specimens.
REFERENCES
1. Veterinary Microbiology and Microbial Disease, (2011). Quinn, P.J., Markey, B.K., Leonard, F.C., FitzPatrick,
E.S., Fanning, S., Hartigan, P.J. Wiley-Blackwell. ISBN 978-1-4051-5823-7

Applied Veterinary Bacteriology and Mycology: Bacteriological Techniques Chapter 4: Microscopic techniques and
principles of staining methods used in a diagnostic bacterial laboratory
14 | P a g e
APPENDIX
Stains used in bacteriology
Included are formulae and preparation methods
of commonly used stains in a bacteriology
laboratory. Although formulas for stains are
given, ready to use solutions are available
commercially. For other staining procedures it is
best to refer to bacteriology textbooks.
Points to be considered when making stains.
a) All dyes should be weighed accurately on an
analytical balance.
b) The dyes should be ground in a mortar with
the diluent, adding a small amount of the
diluent at a time until all has been added.
c) All staining solutions should be filtered
before use, but not before they have been
allowed to stand for at least 24 hours.
d) No solutions should be used after
precipitation has occurred. When
precipitation occurs, discard the solutions
from the bottom of the bottle after the stain
has been used or filter and use the filtrate.
e) Diluted solutions should be made in small
quantities. The stock solutions keep for a
much longer period of time than the diluted
solutions.
f) All solutions should show on the labels the
concentration of the dye present and the
date of preparation. Use stain-resistant
labels.
g) Keep all staining solutions out of direct
sunlight.
h) Keep all staining solutions in glass-
stoppered or sealed bottles.
Preparation of smears from pure cultures
a) Slides should be fat-free and free from lint or
any other foreign substance. New slides can
be cleaned by soaking in 95% ethyl alcohol,
then wiping dry with clean gauze.
b) Label slide with a diamond tipped pen,
graphite pencil or wax marker.
c) Place a loopful of distilled water in the centre
of the slide.
d) Flame a platinum wire
e) Lift cover of Petri dish, or lid from container
holding the culture. If necessary flame
mouth of container. Please note that if a
broth culture is used, solids may interfere
with the stain.
f) Cool the loop inside the tube or in a clean
portion of the agar, pick up a small portion of
the material to be smeared. If too much it
will be difficult to study the morphology of
individual bacteria and to observe motility.
g) Replace lid of container.
h) Holding slide in one hand, gently emulsify
material on platinum loop in water or saline
on the slide.
i) Flame loop.
j) Allow material on the slide to dry.
k) Fix smear by passing it three times through
the blue portion of the flame,
l) Allow to cool before staining. Hot slides
cause artefacts.
m) If fixation by alcohol instead of dry heat is
desired, the slide is placed in a Coplin jar of
methanol or ethanol.
n) Stain slide according to individual staining
instructions.
o) Always clean the back of the slide after
staining.
p) Allow the slides to air dry or if hasty use a
hand held hair dryer.

Applied Veterinary Bacteriology and Mycology: Bacteriological Techniques Chapter 4: Microscopic techniques and
principles of staining methods used in a diagnostic bacterial laboratory
15 | P a g e
Supplies
1. Absolute methanol
2. Analytical balance
3. Bunsen burner or alcohol flamer
4. Coplin jars (dependent on staining
technique)
5. Culture to be tested or specimen for direct
smears
6. Distilled water
7. Ethanol (95%)
8. Frosted or dark glass bottles
9. Glass microscope slides, frosted at one end
10. Gloves
11. Graphite marker (pencil)/ wax marker/
diamond tipped pen.
12. Bacteriological loop
13. Standard light compound bright-field
microscope
14. Blotting paper
15. Stains (see list of suppliers) according to
requirements of laboratory.
16. Non-absorbant paper and marking pen
17. Tripod for Bunsen burner
18. Water bath.
1. CAMSQuik/Rapid Diff/ DiffQuick
Use stain according to manufacturer’s
instructions. In samples where there is a heavy
bacterial load, it is best to use staining racks, to
prevent contamination of the stains. This stain
tends to overstain, particularly when new.
Procedure
1. Fix smear for 30s in methanol (fixative)
2. Stain in solution one (pink stain) for 8
seconds or eight dips or until stain clings to
smear.
3. Stain in solution two (purple) for 20 seconds.
4. Wash under running tap water, air dry and
examine.
Interpretation
Cell nuclei, protozoa, bacteria and yeast stain a
dark blue to purple. Cell cytoplasm, fibrin and
debris stain a light blue to pink.
1. Gram’s Stain (Hucker’s Modification)
Stock crystal violet
Crystal violet 10g
Ethanol (95%) 100ml
Stock oxalate solution
Ammonium oxalate 1g
Distilled water 100ml
Crystal violet working solution: Mix 20ml of stock
crystal violet with 80 ml stock oxalate solution.
Gram’s iodine solution.
Iodine crystals 1g
Potassium iodide 2g
Dissolve completely in 10ml of distilled water,
and then add distilled water to make 200ml
Store in an amber bottle.
Decolourizer
Ethanol (95%) 75ml
Acetone 25ml
Counterstain
Saffranin 2.5g

Applied Veterinary Bacteriology and Mycology: Bacteriological Techniques Chapter 4: Microscopic techniques and
principles of staining methods used in a diagnostic bacterial laboratory
16 | P a g e
Ethanol (95%) 100ml
Dissolve this stock solution 1:4 with distilled
water.
An alternative counterstain is:
Basic fuschin 3g
Ethanol (95%) 100ml
Procedure
Best performed on young cultures, because
older cultures decolourize too rapidly.
1. Make a thin smear of clinical material or thin
emulsion of colony. Air dry smear. Fix the
film by passing through a Bunsen burner
flame three times.
2. Flood the slide with crystal violet stain.
Leave for 60s.
3. Pour off the stain, and wash with water.
4. Flood the slide with Gram’s iodine. Leave for
60s.
5. Wash off iodine with water and shake off
excess water.
6. Decolourize with acetone-alcohol until
decolourizer flows off colourless from the
slide, but for a maximum of 20 seconds.
7. Counterstain with safranin for 30 s and wash
off with water. Weak carbol fuschin at a
dilution of 1:10 can also be used.
Interpretation
Gram-positive: Dark blue
Gram-negative: Pink
Note that old cultures of gram-positive bacteria
may stain Gram-negative.
2. Giemsa stain
Stock solution
Giemsa powder 0,3g
Glycerin 25ml
Absolute acetone-free methanol 25ml
(Available commercially)
If the stain does not go into complete solution, it
should be filtered.
Giemsa buffer
Sodium phosphate Na2HPO4 (anhydrous) M/15
9,47 g/l or Na2HPO4.2H2O M/15 11.87 g/l
61.1 ml
Potassium phosphate KH2PO4 (anhydrous) M/15
9,08 g/l 38.9 ml
Distilled/deionised water 900 ml
One volume of stock solution is diluted with 9
volumes of Giemsa buffer.
Staining procedure
1. Fix smear in methanol for 3-5 mins.
2. Dry in air
3. Immerse in diluted stain for 5 min (5%
Giemsa) or for 30 mins (10% Giemsa).
4. Wash with distilled water or buffer.
5. Allow to air dry.
Interpretation
Bacteria, fungi, protozoa and nuclei will stain a
dark blue. Cytoplasm and fibrin will stain a light
pink/blue. The capsule of Bacillus anthracis
stains magenta red.
3. Loeffler’s Methylene Blue Stain

Applied Veterinary Bacteriology and Mycology: Bacteriological Techniques Chapter 4: Microscopic techniques and
principles of staining methods used in a diagnostic bacterial laboratory
17 | P a g e
This is a simple basic stain. After the stain
ripens or is oxidized (12 months), it is useful for
staining the capsules of Bacillus anthracis.
(McFadyean’s reaction).
Methylene blue (1% in 95% ethanol) 30ml
Potassium hydroxide (0,001%
aqueous solution)
1ml
Distilled water 100ml
Procedure
1. The fixed smear is stained with the above
solution for 1 min.
2. Wash in running tap water and allow to air
dry.
Interpretation
Bacteria stain blue, with endospores appearing
as unstained bodies within the cells. The
beading and granules of corynebacteria may
also be seen. The capsule of Bacillus anthracis
appears as amorphous purplish material around
the bacteria (McFaydean’s reaction).
5. Schaeffer and Fulton spore stain
5% aqueous solution of malachite green
0,5% aqueous solution of safranin
Staining procedure
1. Prepare smear and heat fix as for Gram’s
stain.
2. Flood with malachite green.
3. Steam gently over a flame for 30 sec (don’t
allow to boil). The stain should be just
steaming. Placing the glass smear over a
jar with boiling water in the area of the
steam will have the same effect.
4. Wash with water and stain with safranin for
30 sec.
5. Wash under running tap water, allow drying
and examine.
Interpretation
Endospores stain a bright refractive green and
bacteria protoplasm pink.
6. Stamp’s stain (modified acid-fast for
Brucella)
a. Stock carbol fuschin (weak)
Basic fuschin 1g
Absolute methanol 10ml
Phenol (5%) 90ml
b. Decolourizer
Acetic acid 0,5ml
Distilled water 95,5ml
For Nocardia 0,05% aqueous sulphuric acid
4. Counterstain
Loeffler’s methylene blue (see Ziehl Neelsen
method)
Staining procedure
1. Make smear and heat fix.
2. Stain smears in a 1:10 solution of the stock
carbol fuschin for 15 mins.
3. Wash in running tap water to remove
excess stain.
4. Decolourize with acetic acid for 20 - 30
secs.
5. Wash in running tap water.
6. Counterstain with Loeffler’s methylene blue
for 30sec.
7. Wash and air dry. Examine.

Applied Veterinary Bacteriology and Mycology: Bacteriological Techniques Chapter 4: Microscopic techniques and
principles of staining methods used in a diagnostic bacterial laboratory
18 | P a g e
Interpretation
Red: Brucella, Nocardia, Chlamydia, Coxiella
Blue: Other organisms and background
7. Ziehl-Neelsen Acid-Fast Stain (rapid
method)
Solutions:
1. Carbolfuchsin stain
Basic fuchsin
Ethanol, 95%
2. This solution is mixed with
5% Phenol
3. Acid alcohol
Hydorchloric acid
(concentrated)
Ethanol, 95%
4. Counterstain
Malachite
green/methylene blue
Distilled water
0.3 g
100 ml
45 g/ 900
ml water
32 ml
970 ml
2.0 g
1000 ml
Procedure
1. Heat fix impression smears
2. Cover slides with carbolfuchsin stain and
heat steam for 5 minutes
3. Rinse with tap water
4. Decolorise by rinsing with acid alcohol for 2
minutes
5. Rinse with tap water
6. Counterstain with malachite green for 0.5 –
1 minute
7. Rinse with tap water and leave to air dry
Interpretation
Red: Mycobacteria
Blue (or green); Other organisms and
background material
8. Modified acid-fast stain for Nocardia
species.
Staining procedure
1. Make a smear of the organism from growth
media and heat fix.
2. Flood the slide with Kinyoun carbol fuchsin
for 5 minutes.
3. Pour off excess stain.
4. Decolourize with 1% aqueous sulphuric
acid.
5. Wash with tap water.
6. Counterstain with methylene blue for 1
minute.
7. Rinse with water and dry.
8. Examine with the 100X oil immersion optics.
Acid-fastness can be enhanced by growth on
Middlebrook 7H11 agar.
Interpretation
Acid-fast (red): Most Nocardia spp.
Negative (blue): Other actinomycetes.
1. Diene’s stain for mycoplasma cultures
Methylene blue 2.5g
Azure II 1.25g
Maltose 10g
Sodium carbonate 0.25g
Distilled water 100ml

Applied Veterinary Bacteriology and Mycology: Bacteriological Techniques Chapter 4: Microscopic techniques and
principles of staining methods used in a diagnostic bacterial laboratory
19 | P a g e
Staining procedure
1. Place a small amount of the stain next to a
suspected colony (with a loop or cotton
swab).
2. The stain will diffuse and the colony will
become blue if it is mycoplasma. Live
bacteria decolourize the stain within a few
minutes.
Staining procedures for fungi
India ink wet mount
Clinical material or organisms from cultures are
mixed on a slide in a drop made up of loopfuls of
distilled water and India ink or permanent black
pen ink. Experience will indicate the amount of
India ink to use. A coverslip is added, and the
preparation examined. The large capsules of
Cryptococcus neoformans show up. An
alternative method is to suspend the material in
distilled water under a coverslip and then add
the India ink to the edge of the coverslip. The ink
will seep under the coverslip and provide areas
of variable density.
1. Lactophenol cotton blue
Lactophenol blue is used both as a mounting
fluid and a stain. Lactic acid acts as a clearing
agent and aids in the preservation of fungal
structures, phenol acts as a killing agent,
glycerol prevents drying and cotton blue gives
colour to the structures.
Stain preparation
Lactic acid 20ml
Phenol crystals (conc. Phenol) 20g
Glycerol or glycerine 40ml
Distilled water 20ml
Cotton blue
or 1% aqueous solution
0,05g
2ml
Dissolve phenol in the lactic acid, glycerol, and
water by gently heating (if crystals were used).
Then add cotton blue (Poirrier’s blue and aniline
blue are analogous to cotton blue). Mix well.
Staining procedure
1. Place a drop of the stain on a clean
microscope slide.
2. Pick up some fungal hyphae by using
either a dissecting needle or cellophane
tape (for methods refer to Chapter 25).
3. Place in or on the drop of stain.
4. Place a coverslip on top and examine
under a light microscope, with reduced
condenser aperture.
Interpretation
Young fungal hyphae stain blue.
3. Periodic-acid-Schiff (PAS)
Procedure
1. Fix the smear with formalin-ethanol for 1
min.
2. Drain alcohol and place in 5% periodic acid
for 5 mins.
3. Wash in running water for 2 mins.
4. Place in basic fuschin zinc (or sodium)
hydrosulphite (Schiff reagent) for 2 mins.
5. Wash for 2 mins. Under running water.
6. Immerse slide in sodium metabisulphate for
2 to 5 mins.
7. Wash for 5 mins under running water.
8. Counterstain with picric acid or light green
for 5 seconds.

Applied Veterinary Bacteriology and Mycology: Bacteriological Techniques Chapter 4: Microscopic techniques and
principles of staining methods used in a diagnostic bacterial laboratory
20 | P a g e
9. Wash for 5-10 seconds.
10. Dip slide for 5 second intervals in 85%,
95% and absolute alcohol consecutively.
11. Dip in xylene, add mounting medium and
cover with a coverslip.
Interpretation
Fungal elements stain a bright pink-magenta or
purple against an orange background if picric
acid is used or green background if light green is
used.
4. Calcofluor white
This is a very rapid and useful method to
examine fungi in specimens.
To make up the stain
Calcofluor white M2R* 100mg
Evans Blue 50mg
Distilled water 100ml
*Fluorescent brightener 28 Product no F3397.
Sigma
Mix well and store at room temperature in a dark
bottle.
Method
1. Use I drop of calcofluor white
2. Add I drop of 10% KOH (for clearing)
3. Add a coverslip, allow to sit at room
temperature for approximately 3 minutes
and examine under a fluorescent
microscope with an exciter that transmits
wavelengths between 300 and 412nm.
4. If the slide is to be saved, remove the
coverslip, rinse the slide briefly with distilled
water and allow to air dry. The smear then
can be stained with a permanent stain.
Interpretation
Fungal structures are seen as a brilliant apple-
green or ghostly white, dependent on the
wavelength of light they are examined under.