
CarePhone Configuration application · PDF fileCarePhone Configuration application ......
14
PA1-Config-ed0 Page 1 of 14 CarePhone Configuration application Abstract: This document contains the manual for CarePhone Configuration application PA1Config
Transcript of CarePhone Configuration application · PDF fileCarePhone Configuration application ......

PA1-Config-ed0 Page 1 of 14
CarePhone Configuration application
Abstract: This document contains the manual for CarePhone Configuration application PA1Config

PA1-Config-ed0 Page 2 of 14
Revision history
Date D.Rev. S.Rev. Init. Comment
12-02-2014 00.1 0.01 HM Document created...

PA1-Config-ed0 Page 3 of 14
Contents
1. Communication ................................................................................................................................. 4
2. Subscription Setup ............................................................................................................................ 5
3. Firmware download .......................................................................................................................... 7
4. Configuration .................................................................................................................................... 8
4.1 General ..................................................................................................................................... 8
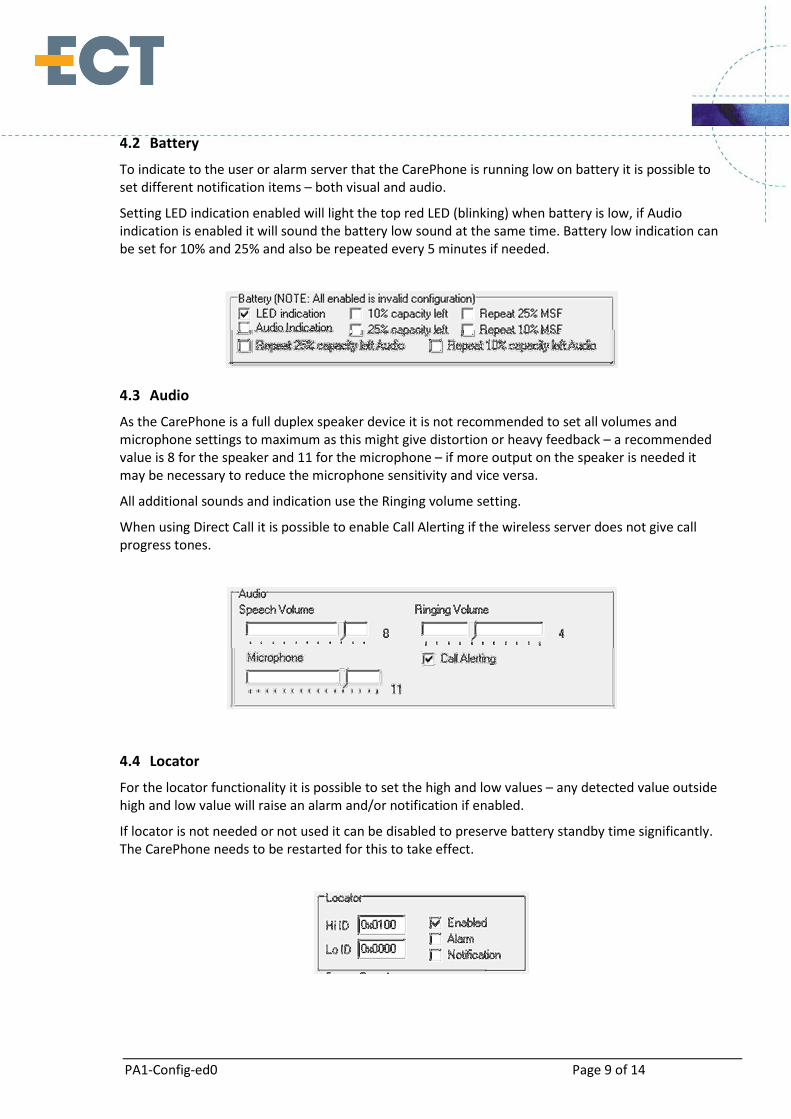
4.2 Battery ...................................................................................................................................... 9
4.3 Audio ........................................................................................................................................ 9
4.4 Locator ...................................................................................................................................... 9
4.5 Alarm ...................................................................................................................................... 10
4.6 Button Function ...................................................................................................................... 10
4.7 Broadcast ................................................................................................................................ 10
4.8 Setting a single item ............................................................................................................... 10
5. Info/status ....................................................................................................................................... 11
5.1 Status ...................................................................................................................................... 11
5.2 Info .......................................................................................................................................... 11
5.3 Alarm Status ........................................................................................................................... 12
6. Direct Call ........................................................................................................................................ 13
7. Monitoring communication ............................................................................................................ 14
Introduction
References
Acronyms

PA1-Config-ed0 Page 4 of 14
1. Communication
It is possible to communicate with the CarePhone in 2 ways, either through a programming charger
(COM port) or through the MSF/XML-RPC IP interface to a Spectralink wireless server.
2 windows specify how communication is setup.
To select which method to use, select the wanted communication in the Com method field.
If IP/MSF is selected it is possible to use the IP/MSF Communication windows fields, otherwise it is
not possible to enter anything in these fields.
Communication status is shown in the main window status bar at the bottom
Or
Depending on which communication method is selected

PA1-Config-ed0 Page 5 of 14
2. Subscription Setup
To be able to set the subscription parameters it is necessary that the application communicates with
the CarePhone through the USB connection. The subscription setup can setup the base ARI in the
CarePhone and/or clear any previous subscription data - another subscription feature is to clear the
base ARI, in which case the CarePhone tries to subscribe to the first base it detects (not necessarily
the one with the strongest signal)
To setup and read Base/CarePhone ARI/IPEI use the Subscription window.
To configure the base station, the base station must know the CarePhone’s IPEI code. This is found by
pressing the “Read IPEI” button – and use the information retrieved in the text field to configure the
base station.
If Access Codes are used these can be set by the Get and Set AC buttons
To configure the CarePhone for subscription to the base, it is possible to make it in 3 ways:
1. If the base station ARI is known, it can be entered in the base ARI text field, either as 12 digits with space or as 12-digit IPEI as shown in the next picture.
2. It is also possible to clear the base ARI information in the CarePhone, which makes the CarePhone search the first base and subscribe to it (if subscription is allowed by the base).
3. Automatic subscription. With the CarePhone in the charger and the charger is powered, press 5 times on the front button of the charger within 5 seconds – the CarePhone automatically clears its (if any) existing subscription and starts searching for a new base station
If the CarePhone has been subscribed to another base before, it is necessary to clear the subscription data first (unless using the automatic subscription). This is done by pressing the “Clear Subscription Data” button.
When using Automatic subscription, by default it will use empty Access codes unless being set before hand.
To enable the changes, the CarePhone must be restarted, unless the automatic subscription is used

PA1-Config-ed0 Page 6 of 14
To check if the CarePhone is subscribed use the “Get Subscribed” button – the subscription status
indication is green if successful or red if not subscribed. If the CarePhone is located in the charger
when

PA1-Config-ed0 Page 7 of 14
3. Firmware download
To download new firmware to the CarePhone, the CarePhone must be placed in a programming
charger (the charger has 4 pogo pin instead of normal 2) and connected to a PC. OTA is not
supported.
Select COM port as communication method, select the firmware file and press the download button
After a few seconds the progress bar should start showing progress.
In case the Programming Charger is not recognized by windows – please download relevant drivers
from http://www.ftdichip.com/FTDrivers.htm and select VCP

PA1-Config-ed0 Page 8 of 14
4. Configuration
On the configuration tab it is possible to set almost all configuration settings available on the
CarePhone, however some settings have been reduced to a couple of values even if it is possible to
set many more e.g. Power Off timeout can be set in any seconds (<254) but the configuration tab
only shows 5 different values. Also Charging Notification and Night Mode settings actually sets 2
configuration item each (but it’s possible to set them independently by MSF/XML-RPC interface)
4.1 General
Auto Answer on incoming calls can be set to disabled, Immediate Hook off or the number of rings
before auto answer. If it is disabled, answering the call can only be done by pressing the front button
on the CarePhone, on immediate hook off no ringing melody is sounded and speech is available
immediately.
The Ringing Melody can be set to 5 different ring tones – at the moment only Ring Tone 1 and 2 is
populated – selecting a Ringing melody which is not active will make the vibrator (if enabled during
ringing) vibrate during the ringing.
Power off timeout can be selected from 3, 5, 10, 20, 30 sec and is the time needed to hold the front
button on the charger pressed before the CarePhone turns off power. The CarePhone needs to be
put in the powered charger before it is possible to use power off.
Vibrator enabled during ringing makes the vibrator vibrate during the ringing signal and follows the
melody length
If vibrator enabled for the button, a short vibrator feedback is felt when pressing the CarePhone
button.
Out of range enabled plays a melody when the CarePhone is out of range of the base station –
besides the audio indication of out of range it is also possible to see this on the 4 front red LED’s
which is running in a circle if there is no connection to the base station (or not registered during
startup). The Out Of Range is indicated 15 seconds after the CarePhone loses connection.
Night mode can be enabled to have the 4 red LED’s glow with the specified Night mode intensity
when the CarePhone is placed in a powered charger – this will make the CarePhone easier to find in
the dark at night, and by reducing the LED intensity it will only glow slightly.
PA1-Config-ed0 Page 9 of 14
4.2 Battery
To indicate to the user or alarm server that the CarePhone is running low on battery it is possible to
set different notification items – both visual and audio.
Setting LED indication enabled will light the top red LED (blinking) when battery is low, if Audio
indication is enabled it will sound the battery low sound at the same time. Battery low indication can
be set for 10% and 25% and also be repeated every 5 minutes if needed.
4.3 Audio
As the CarePhone is a full duplex speaker device it is not recommended to set all volumes and
microphone settings to maximum as this might give distortion or heavy feedback – a recommended
value is 8 for the speaker and 11 for the microphone – if more output on the speaker is needed it
may be necessary to reduce the microphone sensitivity and vice versa.
All additional sounds and indication use the Ringing volume setting.
When using Direct Call it is possible to enable Call Alerting if the wireless server does not give call
progress tones.
4.4 Locator
For the locator functionality it is possible to set the high and low values – any detected value outside
high and low value will raise an alarm and/or notification if enabled.
If locator is not needed or not used it can be disabled to preserve battery standby time significantly.
The CarePhone needs to be restarted for this to take effect.

PA1-Config-ed0 Page 10 of 14
4.5 Alarm
If button function (or locator alarm is enabled) is set to Alarm, the Alarm setting is active.
Indication can be set to either Sound or LED indication or both, also if no indication is wanted it can
be set to none.
To repeat the alarm the time between repetitions can be set and the number of repetitions as well
Please note that a repetition of 1 gives 2 alarms – the initial alarm and the repetition.
4.6 Button Function
When pressing the CarePhone front button it can either generate an alarm or call a preprogrammed
number directly (Direct Call).
4.7 Broadcast
It is possible to broadcast the configuration setup to all connected units if the communication is set
to IP MSF/XML-RPC. As no reply is received the message can be repeated for a better chance of each
CarePhone getting the broadcast message
4.8 Setting a single item
It is not possible to set a single configuration item through the Configuration tab page, however it is
possible if using MSF/XML-RPC from e.g. an alarm server (see MSF documentation).

PA1-Config-ed0 Page 11 of 14
5. Info/status
The Info and Status page gives general information and status of the specified CarePhone (either
connected buy COM port or selected by call number in IP/MSF setting).
Also Alarm status can be monitored here.
5.1 Status
By pressing the Get button the latest status can be retrieved – the latest status contains info on
battery state, general CarePhone state (Idle, alarm, calling, speech etc.) and also its present charger
state. IF locator is enabled and a locator beacon has been detected the latest id is shown. If locator is
not enabled this value is undetermined.
5.2 Info
Information about production date, serial number, hardware and software version can be retrieved
by pressing the Get button in the Info window. The serial number is the CarePhone IPEI number in
hexadecimal form. Production date is week/year.

PA1-Config-ed0 Page 12 of 14
5.3 Alarm Status
If a CarePhone has initiated an alarm, the indicator will blink red – to acknowledge the alarm press
the Ack button and the indicator will switch to constantly red – also the alarm will be acknowledged
on the CarePhone and only the red LEDs will blink (if enabled). To clear the alarm press the Clear
button and the CarePhone will enter idle mode.
Please note this feature will require a proper alarm server to handle multiple alarms, as the
configuration tool only responds to the latest initiated alarm.

PA1-Config-ed0 Page 13 of 14
6. Direct Call
If the CarePhone button setting is set to Direct Call in configuration, a press on the front button will
initiate a call to the specified number set in the Direct Call window.
At present it is only possible to enter maximum 16 digits and select Direct call

PA1-Config-ed0 Page 14 of 14
7. Monitoring communication
In the about menu it is possible to activate the monitor window.
The Monitor window shows the packages send and received (subscription setup being an exception)
and can be used to debug/help with communication from other applications.