Progress Reporting Set Up / Configuration Administrator ... · Progress Reporting Set Up /...
21
Progress Reporting: Administrator Guide © 1990 - 2016 SunGard Public Sector Inc. All Rights Reserved. Page 1 of 21 Last Modified: 11/29/2016 Progress Reporting Set Up / Configuration Administrator Guide IEPPLUS © 1990 – 2016 SunGard Public Sector Inc. All rights reserved. No part of this publication may be reproduced without the prior written permission of SunGard Public Sector Inc., with the exception of copies made for your internal use. AssessmentBUILDER, BusinessPLUS, CurriculumCONNECTOR, eFinancePLUS, eSchoolPLUS, IEPPLUS, OLA, PerformancePLUS, PerformanceTRACKER, PLUS 360, PLUS SERIES, SunGard, and the SunGard logo are trademarks or registered trademarks of SunGard Data Systems Inc. or its subsidiaries in the U.S. and other countries. All other trade names are trademarks or registered trademarks of their respective holders.
Transcript of Progress Reporting Set Up / Configuration Administrator ... · Progress Reporting Set Up /...

Progress Reporting: Administrator Guide
© 1990 - 2016 SunGard Public Sector Inc. All Rights Reserved. Page 1 of 21 Last Modified: 11/29/2016
Progress Reporting Set Up / Configuration Administrator Guide
IEPPLUS
© 1990 – 2016 SunGard Public Sector Inc. All rights reserved. No part of this publication may be reproduced without the prior written permission of SunGard Public Sector Inc., with the exception of copies made for your internal use. AssessmentBUILDER, BusinessPLUS, CurriculumCONNECTOR, eFinancePLUS, eSchoolPLUS, IEPPLUS, OLA, PerformancePLUS, PerformanceTRACKER, PLUS 360, PLUS SERIES, SunGard, and the SunGard logo are trademarks or registered trademarks of SunGard Data Systems Inc. or its subsidiaries in the U.S. and other countries. All other trade names are trademarks or registered trademarks of their respective holders.

Progress Reporting: Administrator Guide
© 1990 - 2016 SunGard Public Sector Inc. All Rights Reserved. Page 2 of 21 Last Modified: 11/29/2016
TABLE OF CONTENTS
OVERVIEW ......................................................................................................................................................................................... 3
STEP 1: TABLE SETUP ......................................................................................................................................................................... 3
GRADE TABLE ............................................................................................................................................................................................ 3 ORGANIZATION TABLE ................................................................................................................................................................................. 4
STEP 2: CONFIGURE SYSTEM OPTIONS .............................................................................................................................................. 6
PHASE IN BY IEP......................................................................................................................................................................................... 7 PHASE IN BY PERIOD.................................................................................................................................................................................... 7
STEP 3: DEFINE PROGRESS KEYS, REPORTING TEMPLATES & OTHER OPTIONS .................................................................................. 7
PROGRESS KEYS ......................................................................................................................................................................................... 7 REPORTING TEMPLATES ............................................................................................................................................................................... 9
How to Modify a Marking period (e.g. Snow Day) .......................................................................................................................... 11 Exception Templates ....................................................................................................................................................................... 12
PROGRESS VALIDATION .............................................................................................................................................................................. 13 REPORT OPTIONS ..................................................................................................................................................................................... 14 GENERAL OPTIONS ................................................................................................................................................................................... 14 ACTIVE PERIOD TO OPEN IN ........................................................................................................................................................................ 15 ATTACHMENT DISPLAY .............................................................................................................................................................................. 15 SCREEN CONFIGURATION OPTIONS .............................................................................................................................................................. 16
STEP 4: SECURITY SETUP .................................................................................................................................................................. 17
NEW PROGRESS REPORTING ....................................................................................................................................................................... 17 LEGACY PROGRESS REPORTING ................................................................................................................................................................... 18
PROGRESS REPORTING AUDIT EXTRACT .......................................................................................................................................... 19
TROUBLESHOOTING ........................................................................................................................................................................ 20
DOCUMENT REVISION HISTORY ...................................................................................................................................................... 21

Progress Reporting: Administrator Guide
© 1990 - 2016 SunGard Public Sector Inc. All Rights Reserved. Page 3 of 21 Last Modified: 11/29/2016
OVERVIEW
The Progress Reporting module allows the staff to document progress against a set of goals and objectives in a Plan (i.e., IEP, Gifted IEP, and Services Plan). This document is written to guide the administrators of the IEPPLUS program to set up the Progress Reporting module. This documentation is not intended for the typical end-user of IEPPLUS that will be creating Progress Reports for individual students. Steps to configure Progress Reporting:
1. Table Setup
2. Configure System Options
3. Define Progress Keys, Reporting Template, Validation & Options
4. Security Setup
STEP 1: TABLE SETUP
The first step is to verify the tables that need to be setup, and there are two tables that control what is displayed in the Student Filters Template:
1. Grade Table – determines the order in which the grades appear. 2. Organization Table – determines which grades appear.
GRADE TABLE
The Grade Table contains the codes designating the student groupings for teaching purposes (e.g., K-Kindergarten, 01-First Grade, 02-Second Grade). Each grade in this table must be setup with an “Order Number” Alternate Code and Description (sequence number) which controls the grade’s position in the grade ranges used in the progress reporting template slider. In this example, First Grade has 1 in the Description field, and Second Grade has 2 in the Description field, etc. The IEPPLUS program defaults Kindergarten to have an Order Number Description = 0. If a Preschool is present, then the user can make this the first choice in the progress reporting slider by making it a negative number such as -1. If Preschool through 12 exists, then the Order Number Description would be like this: Preschool = -1, Kindergarten = 0, Grade 1 = 1, Grade 2 = 2, etc.
To verify and setup the Grade table Alternate Code, follow these steps:
1. From the Home Page, Maintenance section, select Manage Code Tables.

Progress Reporting: Administrator Guide
© 1990 - 2016 SunGard Public Sector Inc. All Rights Reserved. Page 4 of 21 Last Modified: 11/29/2016
2. Select the Grade code table from the drop down list.
3. Click on the Show Alternate Codes link.
4. Verify that each grade has an Alternate Code with Type=Order Number and Description=a number
designating that grade’s sequence in the grade range.
5. To modify a record, click the Edit link.
The links to add or edit Alternate Code Type and Description will display.
6. Click on the Add or the Edit link (as appropriate), select Type = Order Number and enter a sequence
number in the Description field.
7. Click Update to save the changes.
The slider bars to the left and right allow selection of the grade range that will apply to a given progress reporting template. Please see section on Reporting Templates herein for more information.
ORGANIZATION TABLE
The Organization Table contains the codes designating the student Start Grade & End Grade groupings. The grades identified in these two fields controls the grade range used in the progress reporting template slider. In this example, we chose Organization = TEST HIGH SCHOOL in the Organizations Table, in which we set the Start Grade = 09 and the End Grade = 23. By doing so, we determine that the only grade levels 09 through 23 can be chosen in the progress reporting template slider for the grade range. To verify and setup the Organizations Start & End Grade, follow these steps:
1. From the Home Page, Maintenance section, select Manage Organizations.
2. Use the Search box to find the Organization, and click the ‘Edit’ button to enter into the form.
3. Choose the Start Grade (in this example, we chose “09”) from the form’s drop-down.
4. Choose the End Grade (in this example, we chose “23”) from the form’s drop-down.
5. Click on the ‘Save’ button to save the changes.

Progress Reporting: Administrator Guide
© 1990 - 2016 SunGard Public Sector Inc. All Rights Reserved. Page 5 of 21 Last Modified: 11/29/2016
Below is the ‘Manage Organizations’ link screenshot (on the Main page):
Below is the Organization Form (‘Main’ tab)
Below is the Organizations Summary screenshot:
The screenshot below illustrates how the values entered in the Grade Code & Organization Tables determine the grade that can be chosen, and the order in which they appear, in the progress reporting template slider (this shows our example using the “TEST HIGH SCHOOL” building):

Progress Reporting: Administrator Guide
© 1990 - 2016 SunGard Public Sector Inc. All Rights Reserved. Page 6 of 21 Last Modified: 11/29/2016
STEP 2: CONFIGURE SYSTEM OPTIONS
This step will determine the type of Progress Reporting that will be used by the school district. There are two
options: New Progress Reporting (available in version 4.3.74.63002 or greater) or Legacy Progress Reporting.
Note: This documentation references the configuration and set up of the “new” Progress Reporting feature. Refer to the screen shot below. Selecting the “New Progress Reporting” option is to be used when the district will be using the “new” progress reporting method. Select “Legacy Progress Reporting” for the original progress reporting tool.
By selecting the “New Progress Reporting” option, the system will then activate the additional two options within this area (Phase In by IEP and Phase in by Period). When the ‘Options > Set Systemwide Options > Progress Reporting > ‘New Progress Reporting’ option is chosen, the system will no longer display the ‘Progress Reporting’ link in the ‘Utilities’ menu drop-down. The will help prevent users from inadvertently entering Legacy Progress Reporting notes into a student’s IEP that is already using the New Progress Reporting.

Progress Reporting: Administrator Guide
© 1990 - 2016 SunGard Public Sector Inc. All Rights Reserved. Page 7 of 21 Last Modified: 11/29/2016
PHASE IN BY IEP
Selecting this option will allow the users to only use the new progress reporting feature for new IEP’s and existing
IEP’s that do not have legacy progress associated to the goals or objectives. Existing IEP’s that do have legacy
progress associated to any goals or objectives will continue to be managed using the legacy progress reporting tool.
PHASE IN BY PERIOD
Selecting this option will allow the users to use the new progress reporting feature immediately for existing IEP’s that have legacy progress. Existing periods with legacy progress associated to the goals and/or objectives will be managed using legacy progress reporting. Periods without legacy progress will be managed using the new progress reporting method. Note, this option is for Ohio only.
To configure system options for progress reporting, follow these steps.
1. From the Home Page, Options section, select Set Systemwide Options.
2. Click on the Progress Reporting tab at the top of the page.
3. Select from the available options and click Save.
STEP 3: DEFINE PROGRESS KEYS, REPORTING TEMPLATES & OTHER OPTIONS
PROGRESS KEYS
Progress Keys identify a collection of progress indicators (e.g., the letter grades A-F being used at the high school level). To setup Progress Keys, follow these steps.
1. From the Home Page, Options section, select Manage Progress Reporting.
2. Click the Add Progress Key link and enter a Progress Key Name (e.g., High School).
3. Enter a Progress Indicator Code (e.g., A) and Description (e.g., Superior), then click the + icon to add the
record. Repeat this step for each indicator being added.

Progress Reporting: Administrator Guide
© 1990 - 2016 SunGard Public Sector Inc. All Rights Reserved. Page 8 of 21 Last Modified: 11/29/2016
As each item is added, it will display beneath the entry area.
4. To change an entry, click the pencil icon, enter corrections and click the appropriate icon (see screenshot
below) to save or cancel the update.
5. When the Progress key is completed, click on Save Progress Key.

Progress Reporting: Administrator Guide
© 1990 - 2016 SunGard Public Sector Inc. All Rights Reserved. Page 9 of 21 Last Modified: 11/29/2016
REPORTING TEMPLATES
A Reporting Template defines the marking periods and student filters applicable to a given Progress Key.
To add a Reporting Template, follow these steps.
1. From the Home Page, Options section, select Manage Progress Reporting.
2. Click the Add Template link.
3. Enter a name for the template, select a Progress Key from the drop down list and click the appropriate icon
to save (or cancel) the update.
4. Next, click the appropriate icon to enter the Reporting Periods for the reporting template.
5. Enter the end date for the marking period (or select a date from the calendar displayed after clicking in the
New Reporting Period field). Then click the + icon to add the record. Repeat these steps for each Reporting
Period being added.
As each item is added, it will display beneath the entry area.

Progress Reporting: Administrator Guide
© 1990 - 2016 SunGard Public Sector Inc. All Rights Reserved. Page 10 of 21 Last Modified: 11/29/2016
6. To change an entry, click the pencil icon, enter corrections and click the appropriate icon to save (or cancel)
the update.
7. When all the Reporting Periods have been entered, click the Save button.
8. Lastly, click the icon to apply Student Filters to the template (see screenshots below).
The screen illustrated below will display.
9. Select a Building from the drop down list. Then select a Grade Range for the template, by clicking on and dragging the bars on the slider to the left or right.
10. Click on the + icon to save the building/grade options selected.
11. When all the buildings and grade ranges have been added, click the Save button.

Progress Reporting: Administrator Guide
© 1990 - 2016 SunGard Public Sector Inc. All Rights Reserved. Page 11 of 21 Last Modified: 11/29/2016
The building and grade in the student’s current Enrollment or Placement record (as appropriate) will determine
the template used. Marking Periods will reflect date ranges of Recommended, Summer and Next Recommended
Placements. For example, if no services are being offered during the summer session, the summer marking periods
(if any) would be excluded.
HOW TO MODIFY A MARKING PERIOD (E.G. SNOW DAY) If a marking period date has changed once progress for students have been entered, follow the steps below:
1. From the Home Page, Options section, select Manage Progress Reporting.
2. Select the appropriate Template icon as indicated below.
3. Select the appropriate Reporting Period to be modified.
4. Select the appropriate Period End Date (In Use) by choosing the edit link and modify the date.
(Note: If a period is not ‘in use’ (e.g. 04/21/16), just select edit and modify the date).

Progress Reporting: Administrator Guide
© 1990 - 2016 SunGard Public Sector Inc. All Rights Reserved. Page 12 of 21 Last Modified: 11/29/2016
5. Select Save Period and another screen will be displayed. If you wish to change all existing student progress
reporting dates to the new date. Select OK.
EXCEPTION TEMPLATES Reporting Templates can be setup to take precedence over other applicable (non-exception) templates by selecting the Exception check box. For Example: A School District could have a Reporting Template for all students in all buildings, in grades K thru 5 and an Exception Template applicable to one building in grades K thru 5. Since the one building is setup as an exception, the grade key for that one building would take precedence over the one assigned to all buildings. If a student is in grade K-5 and also in the building specified in the Exception Reporting Template, the Exception Reporting Template would be chosen.
To create an Exception Template, simply click the Exception check box when adding a template. The template will display under Exception Reporting Templates. Then click the appropriate icons to create reporting periods and student filters (Buildings and Grade Ranges) as explained in the previous section.
Progress Reporting: Administrator Guide
© 1990 - 2016 SunGard Public Sector Inc. All Rights Reserved. Page 13 of 21 Last Modified: 11/29/2016
To edit or delete a reporting template, click the large pencil or the deletion icon (as appropriate). *Note: Reporting Templates cannot be deleted if they are in use in a student’s progress reporting.
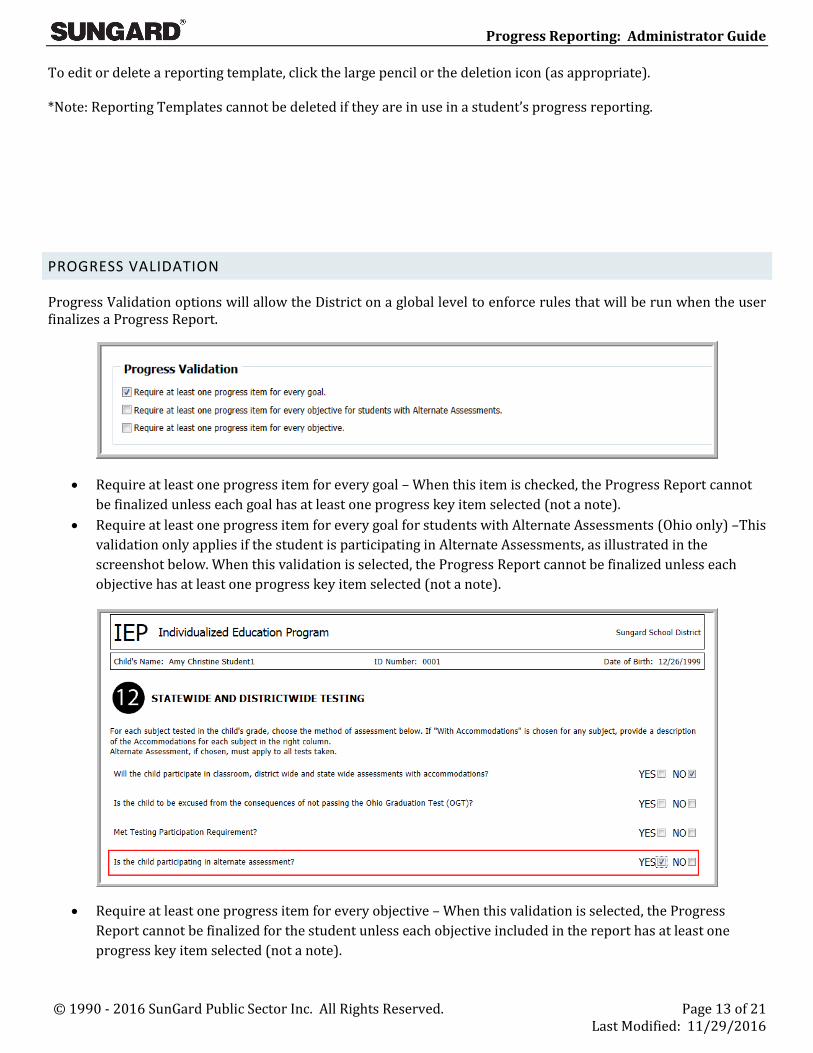
PROGRESS VALIDATION
Progress Validation options will allow the District on a global level to enforce rules that will be run when the user finalizes a Progress Report.
Require at least one progress item for every goal – When this item is checked, the Progress Report cannot
be finalized unless each goal has at least one progress key item selected (not a note).
Require at least one progress item for every goal for students with Alternate Assessments (Ohio only) –This
validation only applies if the student is participating in Alternate Assessments, as illustrated in the
screenshot below. When this validation is selected, the Progress Report cannot be finalized unless each
objective has at least one progress key item selected (not a note).
Require at least one progress item for every objective – When this validation is selected, the Progress
Report cannot be finalized for the student unless each objective included in the report has at least one
progress key item selected (not a note).

Progress Reporting: Administrator Guide
© 1990 - 2016 SunGard Public Sector Inc. All Rights Reserved. Page 14 of 21 Last Modified: 11/29/2016
REPORT OPTIONS
Report options allow the selection of default printing options for progress reporting. The following options are available.
Reporting Mode: There are two options within this section. a) Historical option will print all locked (i.e., finalized) reporting periods. b) Current Period will print only the most recently locked period based on an “As of Date” specified during the time of printing. When printing using the Current Period option, it is recommended to select an ‘As of Date’ equal to the period end date for the report being printed.
Staff Printing: Several options are available that control printing (or not printing) of staff name and position.
Print Category, Subcategory and level of information. If checked, this option will enable display and printing of the Category, Subcategory and Level for goals and objectives that were selected from a Goal Book, if applicable.
Print Goals/Objectives with ‘Not Addressed’ checked – prints ‘Not Addressed’ after a goal or objective that was marked as not addressed. The ‘Not Addressed’ verbiage is configurable (see Screen Configuration Options).
Print Goals/Objectives Date Ranges – prints the date range of goals and objectives on progress reports. Verbiage is configurable (see Screen Configuration Options).
Auto Number Statements on Report - enables auto numbering of printed progress reports – use ONLY IF IEP does not have code numbers. *Note: If this option is ON (checked), the ‘Display codes for Non-Transition Goals’ option should be OFF (unchecked) under Options > Manage Progress Reporting > General Options.
GENERAL OPTIONS
Display Codes for Non-Transition Goals (web form and report) – select this option to display/print goal
numbers from the IEP on progress reports. Implementations that do not include numbering of goals and objectives within the IEP form itself may want to auto-number progress reports (see Report Options).

Progress Reporting: Administrator Guide
© 1990 - 2016 SunGard Public Sector Inc. All Rights Reserved. Page 15 of 21 Last Modified: 11/29/2016
Report Progress on Transition Goals – if your district wishes to report progress against Transition Goals, check this box. Any Transition goals and objectives will then display for Progress Reporting.
Display codes for Transition Goals – check this box to print the actual Transition Goal code number on the Progress Report.
Display ‘Needs’ – where ‘Needs’ are part of the Goals and Objectives section of the IEP, select this option to display/print the ‘Need’, then the Goal, then the Objective, then the Marking Period (Type = Attachment, Category = Marking Period) in progress reports.
Display ‘Not Addressed’ option – provides a way to mark a Goal or Objective as ‘Not Addressed’. If users mark a Goal ‘Not Addressed’, the Objectives also will be marked. The Goal or Objective so marked will be excluded when validation runs.
Progress Code Not Used – check the box to suppress (hide) the progress key (e.g. M=Mastered) on the web form and report. This option displays only the Notes text box.
Progress Code Not Required – check the box to report either the progress key (e.g. M=Mastered) AND/OR enter a progress note. (If this option is not selected, the progress key is required to save.)
ACTIVE PERIOD TO OPEN IN
Active Period to Open In – this option allows the district to choose which period will open when the user opens the Progress Reporting. The user will be brought into the; 1) the Reporting Period as of today’s date, or 2) the earliest unlocked Marking Period.
ATTACHMENT DISPLAY
This section of the screen determines if the following items appear on the student’s Progress Reporting screen:
Goals and/or Objectives evaluative statements Which of the Attachment Categories for the Goals and/or Objectives
The administrator may toggle on/off any of these by checking on/off the associated check boxes. The attachment categories will vary from State to State as in the example below:

Progress Reporting: Administrator Guide
© 1990 - 2016 SunGard Public Sector Inc. All Rights Reserved. Page 16 of 21 Last Modified: 11/29/2016
In the above example, the district admin has setup the ability for the users to see both the Goals & Objectives Evaluative Statements, and all 4 Attachment Categories for each of the Goals & Objectives. Below is an example of what the New Progress Reporting Notes screen looks like after these options are set:
Again, the exact wording for each of the 4 Attachment Categories will differ based on the State.
SCREEN CONFIGURATION OPTIONS

Progress Reporting: Administrator Guide
© 1990 - 2016 SunGard Public Sector Inc. All Rights Reserved. Page 17 of 21 Last Modified: 11/29/2016
Maintenance, Manage Screen Configuration, Progress Reporting Form:
Change the ‘Display Text’ field from ‘Not Addressed’ to something else (effects both the progress reporting web form and report). Change ‘Display Text’ field from ‘Objective’ to something else (effects both the progress reporting web form and report).
Maintenance, Manage Screen Configuration, Statement:
Change ‘Display Text’ field from ‘Objectives’ to something else.
STEP 4: SECURITY SETUP
NEW PROGRESS REPORTING
In order to control what features of Progress Reporting are accessible to a particular Security Group or individual user, the appropriate check boxes must be checked. From the Home page, Security area, select Manage Groups or Manage Users. Edit the item and click on the Permissions tab or link. Scroll down to the Progress Reporting section to display the sections of Progress Reporting.
View – Determines whether the Progress Reporting link is available from the Student’s IEP/plan summary
screen.
Progress Reporting Setup
Edit – Determines whether the user has access to the “Manage Progress Reporting” link that
is on the Home Page under the Options menu.
Progress Report
Add – Determines whether a user can create a new Progress Report.

Progress Reporting: Administrator Guide
© 1990 - 2016 SunGard Public Sector Inc. All Rights Reserved. Page 18 of 21 Last Modified: 11/29/2016
Edit – Determines whether a user has access to the “Manage this Report” screen.
Delete – Determines whether a user can delete a Progress Report.
Reporting Periods
Lock – Determines whether a user can lock a period on a Progress Report and whether a
user can exclude a reporting period from a report.
Unlock – Determines whether a user can unlock a period on a Progress Report. This
permission also allows a user to re-include a reporting period.
Revise – Determines whether a user can modify a student’s existing Progress Report (i.e.,
add additional progress periods, remove progress periods). Once a user modifies an
individual student’s progress report, any changes to the template that was used to create
the progress report will not filter down to that student’s progress report, as it now marked
as ‘Manual’.
Goal/Objective Achievement Status
Edit – Determines whether a user can mark a goal (or objective) achieved. No further
progress is required on these items.
Progress
Add – Determines whether a user can enter progress for a student.
Edit – Determines whether a user can edit progress they entered for a student.
Delete – Determines whether a user can delete progress they entered for a student.
Other’s Progress
Edit – Determines whether a user can edit progress entered by others.
Delete – Determines whether a user can delete progress entered by others.
Goal/Objective Not Addressed Edit - User with restricted access will not see this field on the progress reporting web form.
Report Progress on Unlocked Forms Checking this box allows the user to report progress (the Progress Reporting link will be
visible) on unlocked forms (forms that were finalized and then revised). Note: users will not be able to report progress on new IEP’s that have yet to be finalized.
LEGACY PROGRESS REPORTING
The Progress Reporting link illustrated in the screenshot below (located on the student toolbar) will no longer be applicable when using the new Progress Reporting utility. To remove the Progress Reporting link from the student toolbar (as illustrated below), go to Security (Users/Groups), Permissions, Students area, Program – Progress Reporting and uncheck the Edit box.

Progress Reporting: Administrator Guide
© 1990 - 2016 SunGard Public Sector Inc. All Rights Reserved. Page 19 of 21 Last Modified: 11/29/2016
To remove the Progress Reporting link from the Utilities menu (as illustrated below), go to Security (Users/Groups), Permissions, Utilities area, Progress Reporting and uncheck the Edit box.
PROGRESS REPORTING AUDIT EXTRACT

Progress Reporting: Administrator Guide
© 1990 - 2016 SunGard Public Sector Inc. All Rights Reserved. Page 20 of 21 Last Modified: 11/29/2016
A Progress Reporting Audit feature is available from the Advanced Reporting menu (Reporting > Advanced Reporting > Progress Reporting Audit). This feature provides the ability to export Progress Reporting information into an Excel file that the district can then filter and sort. All forms that report Progress are included in the extract (IEP, 504, Gifted IEP, Service and ISP plans). For more information, navigate to the Progress Reporting Audit Report in Advanced Reporting and click the Docs button.
TROUBLESHOOTING
User is unable to create progress report and is receiving the following error message, after clicking on the Progress Reporting link.
First, check to see if the student has a Building and Grade assignment within the date range of the IEP. Some states keep this information in the student’s Enrollment record (e.g., Ohio) while others maintain this information in the Placement record (e.g., Delaware). If the student’s records are correct, go to Options > Manage Progress Reporting and ensure that at least one Reporting Template includes the student’s Building and Grade, as well as appropriate Reporting Periods within the IEP date range. See section on Reporting Templates in this guide for more information.

Progress Reporting: Administrator Guide
© 1990 - 2016 SunGard Public Sector Inc. All Rights Reserved. Page 21 of 21 Last Modified: 11/29/2016
DOCUMENT REVISION HISTORY
11/28/2016:
Added Progress Reporting, General Options, Progress Code Not Required. Added ability to modify Progress date that is ‘In Use’ (e.g. Snow day).
05/09/2016:
Update the Report Options to indicate ‘Print Category, subcategory, and level information check box addresses both the web form and Report.
1/5/2015: Updated the General Options screenshot and logic to include the “Progress Code Not Used” option.
9/8/2014:
The application now includes a new option that displays the Goal and/or Objective attachments on the Progress Note screen. These new options have been added to the Options > Manage Progress Reporting screen to control the new attachments display on the Progress Notes pop-up screen. They can be found under the “Attachment Display” heading.
9/3/2014:
When the ‘Progress Reporting > Phase In by IEP’ option is chosen, the system no longer displays the ‘Progress Reporting’ link in the ‘Utilities’ menu drop-down. This will help prevent users from inadvertently entering Old Progress Reporting notes into a student’s IEP that is already using the New Progress Reporting.
Another new Progress Reporting option has been added to the Options > Progress Reporting drop-down menu that allows the district to specify what period opens up when the user navigates to it; the option is called “Active Period to Open In”.
4/21/2014:
Added a new item to the security area called ‘Report Progress on Unlocked Forms’. 11/18/2013:
Common Errors section added. 6/4/2013:
Reporting Templates and ‘Printing of Not Addressed’ sections revised. Progress Reporting Audit section added.
5/20/2013:
Manage Progress Reporting, General Options, ‘Display Needs’, ‘Display Not Addressed’ and ‘Display Codes for Non-Transition Goals’ added.
Report Options, ‘Print Goals/Objectives with Not Addressed’, ‘Print Goals/Objectives Date Ranges’ and ‘Auto Number Statements’ added.
Screen Configuration Options added. Security, Edit option for ‘Not Addressed’ added.
9/27/2012:
Added additional explanation to the “STEP 1: CODE TABLE SET UP” section to explain how the Organization values also affect what is able to be chosen in the ‘Grade Range’ slider in the ‘Edit Template Student Filters’ screen.