Capture software installation via snapshot before/after · Capture software installation via...
9
Capture software installation via snapshot before/after In this quick guide we will explain how you can create a project using the built-in snapshot module that is able to capture all activities in the files and registry system between two scans. We recommend to install ZOLA Repackage And Deployment on a fresh install of Windows or running the product inside a VMWare, Oracle VirtualBox etc... client. The advantage of running ZOLA Repackage And Deployment program on a fresh installed Windows will increase the capture rate of monitoring all the files and registry system changes when installing a software. If you are going to monitor a uninstallation of a software it is not so important to have a fresh Windows as the uninstallation process is always the same i.e.. removing of files and registry in Windows. Create a new project using the built-in Snapshot module Before you start please make sure you already downloaded the software you are going to install and have the setup file available on the Windows desktop or in another place where you can execute it. To take a system snapshot click on the ... Project Management button or right click on the listview to get the popup menu. Then next select ... Create New Project > Based on System Snapshot Before/After. From this dialog you can tweak your capture settings but we recommend you to always use default settings from the original installation of the product. If you are going to monitor software installation that contains complex driver installation you must check the ... My modification is heavily advanced and contains one or more service or driver installations.
Transcript of Capture software installation via snapshot before/after · Capture software installation via...
Capture software installation via snapshot before/after
In this quick guide we will explain how you can create a project using the built-in snapshot module
that is able to capture all activities in the files and registry system between two scans. We recommend
to install ZOLA Repackage And Deployment on a fresh install of Windows or running the product
inside a VMWare, Oracle VirtualBox etc... client.
The advantage of running ZOLA Repackage And Deployment program on a fresh installed Windows
will increase the capture rate of monitoring all the files and registry system changes when installing a
software. If you are going to monitor a uninstallation of a software it is not so important to have a
fresh Windows as the uninstallation process is always the same i.e.. removing of files and registry in
Windows.
Create a new project using the built-in Snapshot module
Before you start please make sure you already downloaded the software you are going to install and
have the setup file available on the Windows desktop or in another place where you can execute it.
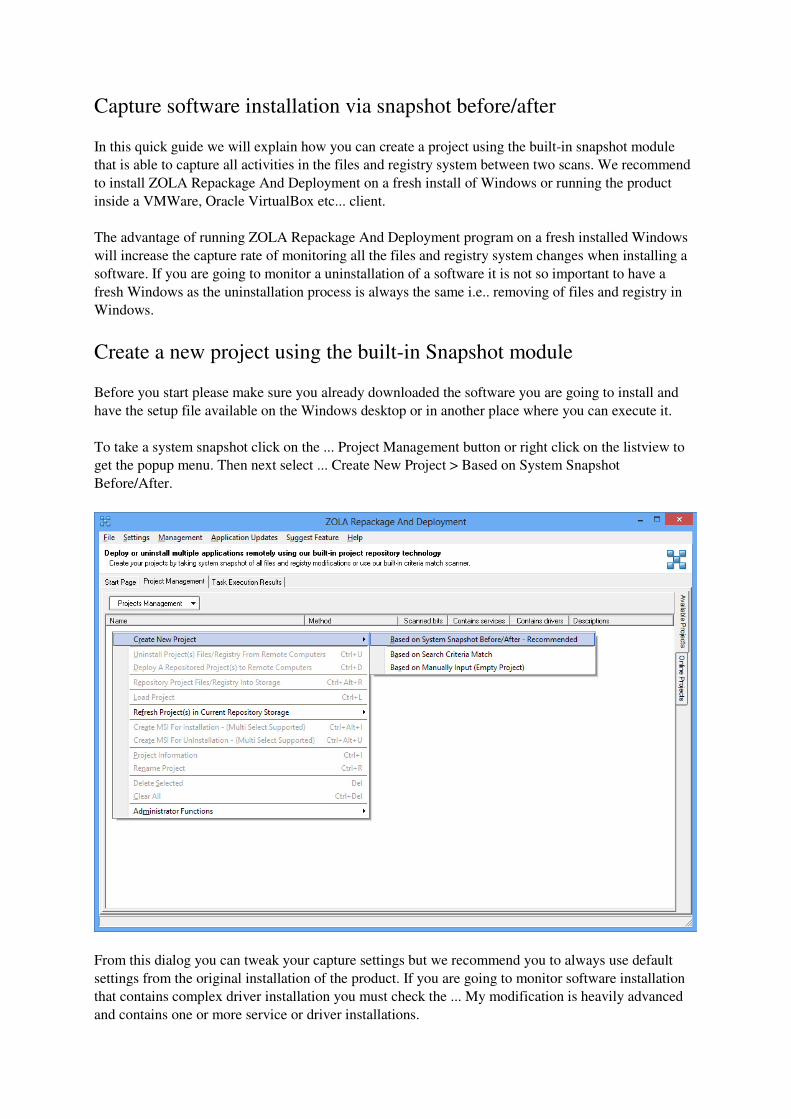
To take a system snapshot click on the ... Project Management button or right click on the listview to
get the popup menu. Then next select ... Create New Project > Based on System Snapshot
Before/After.
From this dialog you can tweak your capture settings but we recommend you to always use default
settings from the original installation of the product. If you are going to monitor software installation
that contains complex driver installation you must check the ... My modification is heavily advanced
and contains one or more service or driver installations.

To start the capture click on the ... Create First Snapshot button.
Taking first snapshot started.

First snapshot of files and registry system complete, now install your software and configure it for
your needs.

After completing the software installation and other modifications to the operating system then click
on the ... Compare Changes button to take the second snapshot and compare the changes that where
applied during the software installation process.
Now the first and second snapshot is ready and you can view your results in the project editor. Click
next on the ... Show Results button to move to the next step and view your captured results.

Project editor will be opened and there you can review your captured results, and modify it
on your own knowledge. When you are sure you have the desired results then click on the ... Save
Project button to move to the next step.

Next we need to give the project a name and description. It is very important before you click the ...
Save Now button to have the Repository project results checked. The repository action will copy all
the files and registry that where captured into a repository storage. When a project is available in the
repository storage you can deploy it to remote computers in your network.

After clicking the ... Save Now button the program will copy all files and registry entries that where
captured into the assigned repository storage and show the results.

When repository task is completed you should have your project created successfully and should be
available in the program project view.
Now when you have a project available you can perform various tasks like Deploy it to remote
computers, Uninstall the project file and registry info from your remote computers or
convert it into a self-installing Windows Installer msi file for distribution etc...