Capture One 6 - User Guide
84
Transcript of Capture One 6 - User Guide


Capture OneHelp site
Thank you for installing Capture One!
Capture One Pro is professional RAW converter and image editing software that helps you capture, organize, edit, share andprint amazing images with excellent color and detail in a fast, flexible and intuitive workflow.
Capture One is photographic workflow software; our improved image quality processes deliver perfect results with maximumefficiency. We've tailored each aspect of the software to ensure every supported file and camera attains optimum imagequality.
Capture One software provides a logical, step-by-step workflow throughout the optimization process from captured image to thefinal output result. Large volumes of images can be effectively processed to deliver stunning effects with the highest quality.
The product key determines the operating capacity of Capture One software. When you download the application it containsthree possible operating versions.
The Capture One DB (Digital Back) version provides owners of Phase One, Leaf & Mamiya Digital Backs with a set of highlyadvanced image editing tools to help streamline and make any photographer’s daily workflow more efficient, whether shootingtethered or not.
Capture One Pro delivers the same functionality as DB although it also includes support for digital camera jpeg images andnumerous other Raw files. It also includes tethered support for some DSLRs. Giving DSLR owners the ability to get the highestlevel of quality from their files. (See release notes for supported file types).
Capture One Express is a simplified version of Capture One Pro and omits some features such as tethered shooting.
You will need online access for the initial activation of Capture One Express and Capture One Pro. Capture One DB does notneed internet connection for activation.
This guide describes Capture One for Apple® Macintosh®. The guide is also applicable to Capture One for Microsoft®Windows®, though some specifics are not listed. All features tagged with the slightly raised Pro-feature text are only accessible in Capture One Pro versions.
On rights ©2010 Phase One A/S. All rights reserved. Made in Denmark.Ver. 6.0 last edit November 2010Colorspace images created in CROMiX ColorThink.This Userguide is created in screenresolution, find printready userguide onhttp://help.phaseone.com/
Photos by:Phase OnePeter Eastway, http://www.petereastway.com/Michael Roscoe, http://www.roscoephotography.com/ Drew Gardner, www.drew.itMelissa Mercier, www.melissamercier.comUli Dinger
Text By:Phase OneMichael RoscoeLearn more about Capture One on www.phaseone.comSpecial thanks toChristian Mailand
On liability:The information in this user guide is provided “as is”.Under no circumstances, including negligence, shall Phase One be liable for any incidental, special, direct,indirect or consequential damages arising out of or relating to use of the information provided in this guide withor without the software described in the guide.Trademarks & acknowledgementsCapture One and Phase One are either registered trademarks or trademarks of Phase One A/S in the EuropeanUnion and/or other countries.All other trademarks are the property of their respective owners.This product includes DNG technology under license by Adobe Systems Incorporated.
Introduction to Capture One 6
Page 1 of 84

Capture OneHelp site
Setting up Capture One
Recommended hardware and software
Phase One recommends following the minimum system requirements (below) to ensure optimum performance. (CaptureOne may run on older computers and on varying computer/OS configurations that are not listed but to get best resultsplease follow the recommendations).
Apple® Macintosh®: Intel based processor 2 GB RAM 10 GB free hard disk space Calibrated color monitor with at least 1280x800, 24-bit screen resolution Mac OS X 10.5.6 Mac OS X 10.6
Microsoft® Windows®: Intel® Pentium® 4 or equivalent 2 GB RAM 10 GB free hard disk space Calibrated color monitor with at least 1280x800, 24-bit screen resolution Windows XP®, Service Pack 3 or higher Windows Vista® Service Pack 1 Windows® 7 Microsoft® .NET Framework 3.5 Service Pack 1 Redistributable package – In case you do not already have this installed, Capture One will initiate installation of this.
We would recommend upgrading your computer in the areas below if you work with high pixel-count cameras or simplywant to optimize performance: Use processors with multiple cores, e.g. Intel Core™ DUO or better. Upgrade to 4GB RAM or more. Ensure that there is plenty of free hard disk space for your images.
Installation
Please read the release notes carefully before you install Capture One.
Install on Mac OS X: Capture One software includes an easy-to-use installer that will install all the software necessary to run the application onMac OS X. To install the software please follow the procedure below: 1. Either load the Capture One DVD or download the application from the Phase One website: www.phaseone.com. 2. Open the Capture One disk image. 3. Read and accept the license agreement presented. 4. Drag the Capture One icon to the Applications folder. 5. Open Capture One from your Applications folder.
Install on Windows: Capture One software includes an easy-to-use installer that will install all the software you need to run the application on aWindows based computer. To install the software please follow the procedure below: 1. Either load the Capture One DVD or download the application from the Phase One website: www.phaseone.com. 2. Run the executable software install file. 3. Read and accept the license agreement presented. 4. Follow the on-screen instructions to complete the installation. N.B. Capture One will initiate installation of Microsoft® .NET Framework 3.5 if you do not already have it.
Manual update to latest versionIt is important to keep Capture One software updated. You will usually receive a newsletter reminder that an update isready for download although it can be more convenient to choose Capture One>Check for Updates. If your Capture One application is downloaded from www.phaseone.com it will always be the latest version. Installation froma CD version may need to be updated. You can also schedule an automated update if desired. Check Preferences.
Page 2 of 84
You can also schedule an automated update if desired. Check Preferences.
Activation
Ensure that you have an Internet connection to activate Capture One(Express and Pro).
The first step towards activating Capture One is to open the License Activationdialogue box in the application by going to Capture One > License.Type your license code and personal account details in the required fields.Once the information is entered, press the “Activate License” button, and yourlicense will be validated by Phase One’s Activation Server. Your software isnow activated and ready for use! Troubleshooting If you are experiencing problems activating the software, follow the instructionsprovided in the Application or visit our website for help and troubleshooting:http://www.phaseone.com/support
Quick tip: When running the application choose between: 1. Trial mode Capture One OR Capture One Pro (30 days in total) 2. Digital Back only mode (only Phase One digital back supported) 3. Activating the Application
Deactivation
To deactivate Capture One from a computer you need to be connected to theinternet. Open the License dialogue box via the menu Capture One>License. Press the Deactivate button. The application will return to Trial Mode once deactivate. Once the trial periodfor the computer has expired all current and pending processing will becancelled. You will need to reactivate Capture One to continue working with it.Confirm that you want to perform the deactivation. After doing so, you canactivate Capture One on another computer.
Registration
Register your license to authenticate your installed software. Registration willallow full usage of your Capture One version. The Online registration will automatically register your license key. When thisis validated, it will be kept alongside with information on your computerplatform, ID and IP numbers. Phase One keeps all information confidentialaccording to EU law and international standards. For more information on thelicense, please read the License Agreement.
The registration of the software will create a personal profile onwww.phaseone.com. This profile will provide the opportunity to register yourhardware/software and to contact Phase One for any support or sales relatedquestions. This information will also be of great help to us in the futuredevelopment of Phase One products.
How do I register my hardware product? Attach a camera and a dialogue box will automatically open and ask if youwould like to register your product. Click "Yes" in the Registration dialoguebox and follow the procedure; this will help in future support cases as well astrack ownership of the product.
Can I change my registration? It is possible to change the priority and even remove the registrationcompletely. Select the Digital Back that you wish to change updating prioritieson, and then re-arrange by using the arrows icons. If a Digital Back is removed completely you will have the option of re-registering it the next time you connect the Back to Capture One.
Page 3 of 84

Capture OneHelp site
In Library tool you can access files located on your local computer or on external drive and networks. The Library tool is a“filtered” file explorer that displays supported files.
The Library tool tab in Capture One is where all file navigation and organization takes place. Navigate via the tree-view to afolder that contains the image files you wish to edit. Thumbnails of the images within your highlighted folder will be created anddisplayed in the Image Browser.
You do not necessarily have to import images to a local drive (although this is recommended for optimal performance). CaptureOne applies non-destructive editing because any image adjustments will not affect the actual raw file – only the Capture Onesettings file will change. You can also import and watch videos supported by your particular OS. See “Viewer” for details on videos.
Library
Import
File naming
Page 4 of 84

Capture OneHelp site
Import
You can add Copyright and Captions directly at Import. Inserting a memory card into a card reader will open the Import dialogue window automatically.
If a file is unsupported or you don’t have the acess rights to edit a file then you will see a little eye icon (PC) or a crossed overpencil (MAC) in the bottom right corner of the image. You might see this read-only icon if you try to edit images files located ona camera or a cd.
Notice: if you uncheck the “Enable JPEG Editing” you will find JPEG files has this read-only icon. See “Preferences &Custumization”.
To import images
1. Go to File and select “Import Images…”The dialog box will open to browse files.2. Navigate to the applicable folder, card or disk in the Locations tool.3. Select Capture folder (import location) and type in the job name and Metadata (copyright, caption) if desired.4. If you want to select a naming format for the imported files, press “Format” in the Naming tool. 5. You can select all or specific images to import.NOTE: You can always rename files later; see “Renaming multiple files.” 6. Press “Import All”.You can continue working while images are imported in the background.
Export
Exporting files from Capture One will create a copy of the original file with all the specified applied settings. This is definedas "Processing" an image. The raw file will remain untouched in its original folder location after the processed copy of it has been exported to adifferent folder.
Page 5 of 84

Capture OneHelp site
File naming
To support a quick and easy end-to-end workflow you can "design" your filenames to match the naming convention that fitsyour needs. The “Token Based Naming tool” is particular useful when shooting tethered or importing from a memory card or anexternal disk. You can also create an output recipe and specify a Token Based naming convention. See ”Process Recipe”.
The Token Based naming function enables easy access to create individual naming criteria that can be tailored to your ownpersonal preference. You can access the Token Based renaming from separate features: Import Images, Capture Tool Tab(Tethered shooting), Process Recipe and Batch Rename function.
Output naming PC
The appearance of the Format text box varies from PC to Mac. On Windows,the tokens will be converted into text when dropped on the text box. TheTokens are illustrated as follows, [Token Name]. You can also enter tokensdirectly in the text box manually. A green line will appear beneath the name ifa token is recognized by the application.
To change Output naming settings in the Output tab
Go to Output naming tool in the output tab PC: 1. Delete the Name Token you do not need. 2. Drag’n’drop new elements into the desired place.
Mac: 1. You will see the Name Tokens in the Output Naming tool.2. Individual Token provides a dropdown menu providing various options.Remove unwanted Tokens by selecting the element and pressing backspace.
To name your output files when processing images
1. In the Output Naming Tool click the button next to the Format text box to get the Naming dialog box.2. Select your naming favorite in the Presets dropdown menu or create your own naming format by dragging tokens and/oradding custom text to the Format text box. Tokens with a down arrow are a group of tokens – select the desired one byclicking this arrow.3. Click OK to accept your changes.4. Verify that the sample below the Format text box is the desired format.
To name your files when importing images
1. Select File ->Import Images from the menu or click the Import icon.2. In the Naming Tool click the button next to the Format text box to get the Naming dialog box.3. Select your naming favorite in the Presets dropdown menu or create your own naming format by dragging tokens and/oradding custom text to the Format text box. Tokens with a down arrow are a group of tokens – select the desired one byclicking this arrow.4. After choosing the desired token, drag and drop the token into the format line.5. Click OK to accept your changes.6. Verify that the sample below the Format text box is the desired format.
Page 6 of 84

To rename multiple files-Batch Rename
1. Select multiple images in the Thumbnail Browser.2. Choose File>Batch Rename Images.3. Click the button next to the Format text box to get the Naming dialog box.4. Select your naming favorite in the Presets dropdown menu or create your own naming format by dragging tokens and/oradding custom text to the Format text box. Tokens with a down arrow are a group of tokens – select the desired one byclicking this arrow.5. Click OK to accept your changes.6. Verify that the sample below the Format text box is the desired format.7. Click Rename to start renaming all your selected images.
To control the counter in Batch Rename
1. Select the images you want to rename.2. Choose File>Batch Rename Images.3. Open the Preset menu.4. Select “Set Batch Rename Counter” to set the starting number.5. Select “Set Batch Rename Counter Increment” to control increment of the Counter.6. Press the Rename button.
To name files when capturing
1. In the Next Capture Naming Tool click the button next to the Format text box to get the token name dialog box.2. Select your naming favorite in the Presets dropdown menu or create your own naming format by dragging tokens and/oradding custom text to the Format text box. Tokens with a down arrow are a group of tokens – select the desired one byclicking this arrow3. Click OK to accept your changes.4. Verify that the sample below the Format text box is the desired format.
To create custom naming presets
1. In the Naming dialog box create your custom format by dragging tokens and/or adding custom text to the Format textbox.2. In the Presets dropdown menu select Save Custom Preset…3. Name your custom preset and click OK.
Learn more about Output naming
MAC ONLY: You can add the fileextension in the Batch Renaming. This will change the file from a e.g. .TIF(RAW) from aPhase One digital back to a .IIQ. To add the file extension activate the “Include File Extension” in the Batch Rename presetdrop-down menu.
Subname is entered in the Advanced tab in Process Recipe.
You will not have the exact same naming options in e.g. Capture tab and Output tab.
Page 7 of 84

Capture OneHelp site
Capture One user interface
The main Capture One User Interface elements are a Tool tab bar, Image Viewer and Image Browser. Located on the top barof many tools you will find a help icon which can take you directly to relevant online help articles.
Viewing photosCapture One provides a wide range of possible ways of viewing and inspection images. Youcan customize the Image Viewer and the Image Browser to fit your need and particularworkflow.
ToolbarThe interface is divided into a number of elements, all providing a set of tools. The toolbarprovides graphical shortcuts to some of the most useful functions of Capture One.
Tool TabsEach Tool Tab contains a number of utilities. Each tool has its own set of controls to adjustan image file.
Page 8 of 84

Capture OneHelp site
Viewing photos
Capture One provides a wide range of possible ways of viewing and inspection images. You can customize the Image Viewerand the Image Browser to fit your need and particular workflow.
The ViewerThe Viewer displays a large preview of one image or a number of selected images.
Browser ViewThe Image Browser displays thumbnails of selected images from a folder or album.
Loupe ToolThe Loupe tool can be used to complement the other focus functions. Use it to quickly checkfocus while simultaneously viewing the whole image.
Full screenThe Full Screen feature gives you the maximum view of a preview image. You can work inFull Screen mode while having access to a selected set of tools.
SlideshowThe Slideshow feature allows you to present your photos or videos with transitions in a fullscreen view.
Capture Pilot (TM) Pro
Capture Pilot lets you present photos on an iPad, iPhone and iPod Touch directly fromCapture One Pro software on a computer.
Page 9 of 84

Capture OneHelp site
The Viewer displays a large preview of one image or a number of selected images.
The Viewer gives you the option to view a single image or multiple images at once. You can control the zoom level of theimages. The RGB and Lightness, or CMYK, readout values are displayed in the center of the Viewer toolbar.
The Viewer is a fundamental element of the Capture One user interface. The Viewer window enables users to view image filesand check the effect of any adjustments that have been made. It also is easy to make image comparisons. Up to 12 differentimages can be selected and seen in Viewer at one time making it effortless to compare images side-by-side. It is even possibleto simultaneously zoom (up to 400%) into multiple images and compare them in close-up detail. The Icons located in the top-left corner of the Viewer allows you to choose between one or multiple image viewer). Alternatively, see the Viewer in full-screen mode where Tools, menu items and the Image Browser will automatically hide and only pop-up when the mousecursor is moved to the relevant part of the screen.
The Viewer
View image
After editing a single file (with a thick white border) it is possible to apply anyadjustments that have been to it, to other images by using the Copy andApply tools (See the diagonal arrow icons in the menu bar). After you’vefinished editing, use these tools to apply changes to a single image or use theEdit Selected Variants (function) to change multiple images at the same time.
Alternatively, the Adjustments Clipboard can be used to copy any imageediting adjustments and applied to a selected single file or multiple images aslong as the ’Edit All Selected Variants’ option has been selected either fromthe Edit section (in the top menu bar) or via a keyboard shortcut (cmd+shift+E)or by clicking on the relevant tool icon.
Quick tip: Activate the Edit Selected Variants to help adjust large group ofimages that have similar exposures. Select a chosen group of images, pressShift and click on the “A” (Auto Adjust) function.
Viewer settings
Some tools that contain an “Auto” (A) function that can be used to provide aninstant adjustment (e.g. Exposure in the Exposure tool ) where changes willonly be applied to the selected variant (image file).
Adjust the Viewer margin (which is the distance between the edge of yourimage file and the frame of the viewer) by going to Capture One Preferencesmenu in the Appearance options. You can adjust the distance from 3 px(default) up to 40px.The Proof Margin can also be adjusted in the same preference window usingthe slider from 0 to 100 pixels.
You can toggle the proof margins on and off by clicking on the (square within asquare) icon that can be found at on the edge of the Viewer window. This willgive you a margin around your image file or a slightly larger image.
Quick Tip - Zoom viewer
Quick tip: If you have more than one image in the viewer you can zoom allimages simultaneously by holding down SHIFT and dragging the zoom sliderin the top right tool bar or by scrolling the mouse wheel.
Page 10 of 84

Viewing videos
Video files are displayed with a movie camera icon (in center of the thumbnail)in the Image Browser. Once the thumbnail has been selected it is possible toplay the video in the Viewer. By moving your mouse cursor over the moviefile (in the Viewer) a control panel will appear. You can view videos in fullscreen or add movies to a slideshow. Please note that it is only possible toplay videos in this software as Capture One provides no video editingwhatsoever.
If you don’t want to see videos appearing in the Image Browser then you canselected View > Global filters > Always Hide Movie Files.
Page 11 of 84

Capture OneHelp site
The Image Browser displays thumbnails of selected images from a folder or album.
When browsing images you have three different thumbnail view options: Filmstrip, Grid View and List View to suit yourpersonal preference.
Browser View
Browsing thumbnails
Thumbnails of all recognized image files in a selected folder or Album areshown in the Image Browser. The Image Browser will show Thumbnails asthey are corrected, and show the entire view and mask if the image iscropped. Use the Image Browser to navigate images in a collection and toselect images. A number of actions can be performed in the Image Browserthat include adding a (star) rating and use of the Loupe function to examinethumbnails in close-up detail. Choose which thumbnail view option you wantto see from the Image Browser toolbar.
Variants and thumbnail size
You may often have variants of a certain image. When viewing thumbnailsin the Image Browser you can collapse or expand the Variant stack by clickingthe small icon in the top left corner of the thumbnail. In the example below thethumbnail to the left has a collapsed variant stack and the thumbnail to theright is expanded to show all three variants.
You can adjust and set the thumbnail size by dragging the “Fit” slider (locatedto right of the Image Browser window) or by clicking View > Browser Zoom.
Filmstrip View
Filmstrip View leaves more space for the Image Viewerand supports a fast workflow for sessions with fewer images. To adjust thesize of the thumbnails in the browser drag the browser window up or downand the size of the thumbnails will adapt automatically to fit the browser sizeyou have selected.
Grid View
Grid View gives you the possibility to browse numerousimages quickly especially when using the arrows keys to scroll UP/DOWN orLEFT/RIGHT.
List View
The List View displays more file information and provide asequential view of the images in a folder or an album.
Page 12 of 84

Capture OneHelp site
The Loupe tool can be used to complement the other focus functions. Use it to quickly check focus while simultaneouslyviewing the whole image.
The Loupe tool is used to check focus or inspect close-up details of an image. It can be used in the Viewer or browser area ofthe session window. Clicking and holding down the left mouse button will activate the loupe. Location mode, Size and zoomlevel of loupe can be customized.
Loupe Tool
To change loupe settings
1. Open the zoom cursor group in the cursor toolbar.2. Release the mouse button to select a highlighted menu item.3. Select “Use Centered Loupe” to operate the loupe directly under themouse cursor. When off, the loupe opens next to the cursor so the selectedarea is visible in the Viewer as well as enlarged in the loupe.4. Set the zoom level in the Loupe Zoom (menu option). There are three loupesize choices to help inspect image details.
To use the Loupe
1. Open the zoom cursor group in the top tool bar; click and hold the mousebutton until a menu appears. 2. Choose the Loupe cursor tool. 3. Click and hold the mouse in the areas of an image where you wish toinspect details. 4. Drag the mouse to move the loupe.
Learn more about Loupe
Press 'p' at any time to select the Loupe cursor tool.
Use the scroll wheel (on a mouse) while the loupe is open to change the zoom level and size. Go to the Loupe menuoption to reset the zoom to 100%.
Hold the alt+space keys (Mac) while scrolling to change the size of the Loupe.
Page 13 of 84

Capture OneHelp site
Full screen
The Full Screen feature gives you the maximum view of a preview image. You can work in Full Screen mode while havingaccess to a selected set of tools.
You can toggle between full screen and normal viewer by pressing the CMD + SHIFT + >/F11 (Mac/PC).
To view images in full screen
1. Select Window>Full Screen2. Moving the cursor to the edges of the screen will reveal the Image Browser,menu and editing tools.3. Exit full screen view by pressing Esc.
Page 14 of 84

Capture OneHelp site
Slideshow
The Slideshow feature allows you to present your photos or videos with transitions in a full screen view.
You can customize your slideshow by specifying transition type and duration.
To create Slideshow
1. Select the initial file for the slideshow. If no file is selected the first file in the session will start the slideshow.2. Select Window>Start Slide Show.
To edit slideshow settings
1. Move the mouse when the slideshow has started.2. Click the settings icon.3. Transition provides a number of graphical options.4. Settings changes are applied instantly.
To use the slideshow controls
1. Move the mouse when the slideshow has started.2. Use the Controls to see the next or previous image.3. Pause will stop the slideshow. The Pause function will also stop a movie fileif it is the viewed slide.4. Exit will terminate slideshow.
Page 15 of 84

Capture OneHelp site
Capture Pilot (TM) Pro
Capture Pilot lets you present photos on an iPad, iPhone and iPod Touch directly from Capture One Pro software on acomputer.
Capture One and Wireless
Use your iPad, iPhone and iPod Touch to wirelessly view, zoom and panhigh-res DSLR and medium format RAW, JPEG and TIFF images while youshoot and get instant feedback from clients and colleagues.
Before you start: Download Capture Pilot from the Apple App Store. CapturePilot requires local network Wi-Fi. Ensure your computer and iPad areconnected to the same network.
Go to Systems Preferences > Sharing and highlight the Internet Sharingoption. Highlight the Internet Sharing option (but don’t checkmark yet) and inthe “To computers using” box checkmark Airport. (Click on the AirPort Optionsbutton (below the box) and checkmark the Enable encryption and add aPassword if desired.) Checkmark the Internet Sharing option and press Start.
Next click on the Settings (icon) on your iPad/iPhone/iPod Touch and selectWi-Fi. Now choose the applicable Network and type in your password.
To connect your iPad or iPhone to Capture One
Open Capture Pilot at the bottom of the Capture Tool in Capture One Pro.Add a Server Name and choose a Folder from the drop down menu that youwant to appear on your iPad/iPhone/iPod Touch. Type in the password ifapplicable.
Now open the Capture Pilot app on your iPad/iPhone/iPod Touch. Select yournamed Server from the Server List.Capture Pilot can connect to multiple running Capture One Pro Servers ifthese are within WI-FI range. (E.g. you can view images on multiplecomputers by changing Server in the iPad/iPhone/iPod Server List).
To browse images in a folder on your iPad or Phone Touch
Touch-press any thumbnail to view a full screen image. Zoom in and out ofthe image (by pinching the screen) and navigate around to inspect close-updetail up to 200%. Touch-scroll to the next image.
To browse images using the controls
Click the forward arrow to inspect next image or backward to inspect previousimage. When shooting tethered, press pause to highlight it in orange, to hold thecurrent image on screen. Press the pause icon again (so that it looks white) toautomatically see images appear on the screen as they are being captured.Images that are edited in Capture One Pro will automatically display anyamendments in Capture Pilot. (E.g. An image that has been converted toBlack and White in Capture One Pro will also be displayed as Black and Whiteon an iPad).
Page 16 of 84

Learn more
Note: The Capture Pilot Advanced Tab (in Capture One Pro) enables users toset a port number if you have a special WI-FI setup.
TIP1: Click the “Back” icon in the top left corner to go to the previous state(e.g. Thumbnail view or Server list).
TIP2: Press the Histogram Icon in the top left hand corner of the screen (inCapture Pilot) to view or remove a floating/movable Histogram.
TIP3: Thumbnail size can be adjusted in Capture Pilot by pressing the S, Mand L letters in the top right corner of the screen on a connectediPad/iPhone/iPod Touch.
Page 17 of 84
Capture OneHelp site
Toolbar
The interface is divided into a number of elements, all providing a set of tools. The toolbar provides graphical shortcuts to someof the most useful functions of Capture One.
The interface is divided into a number of elements, all providing a set of tools. The toolbar provides graphical shortcuts to someof the most useful functions of Capture One.
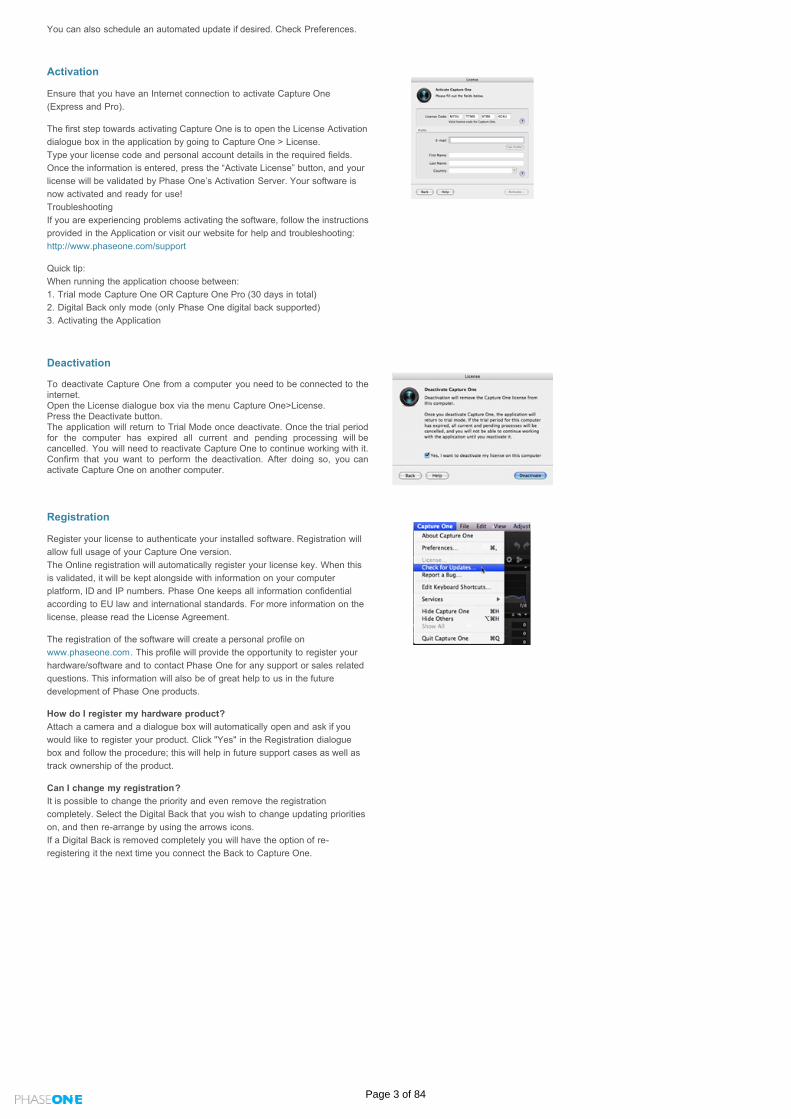
Cursor tools
The Cursor tools are part of the toolbar. The Cursor tools provide easy access to a number of closely related sub-features.
The Cursor tools can be activated by keyboard shortcuts. Read more on this in the Shortcuts section.
Tooltabs
Tooltabs are sets of related tools that include some of the most common and frequently used features of Capture One.
Each Tool Tab contains a number of tools. Each tool has its own set of controls to adjust your image file.
The Toolbar can be customized to display a set of controls to suit your needs. See “Customize the Toolbar.” You also select apredefined workspace by selection Window > Workspace.
Trash
When deleting images, the image file will be placed in the Session’s trash folder.
Files will not be permanently deleted unless you select File>Delete Permanently from the Capture One menu.
To delete the files directly in the OS trash, press CMD+delete.
To delete the files permanently, press Shift+CMD+delete.
Page 18 of 84

Capture OneHelp site
Tool Tabs
Each Tool Tab contains a number of utilities. Each tool has its own set of controls to adjust an image file.
If you can't find a particular Tool Tab in your workspaces setup then you can add the Tool Tab (right click the tool tab bar ->Add Tool) or select a new workspace (see “Customized Workspaces”).
Details tool tabs
Library
The Library tool allows access to the images within the Albums in the Session as well as to any image collections stored infolders on the computer.
The Library is very similar to the file browser in a Mac or PC operating system (Finder on Mac, Explorer on Windows®).Browse through the image collections using the hierarchical tree structure of the library.
The Library tool features an Output folder, a Move-To folder, a Capture folder, a Trash folder and enables users to browsebetween recently used sessions.
Capture
The Capture tool tab is your gateway to tethered shooting with a Phase One digital back, Leaf back, Mamiya back orselected DSLR camera. Check the release notes for details on the supported cameras .
Adjust some basic camera exposure settings here and control image file naming elements.
Automatically copy settings from one capture to the subsequent captures.
The Exposure Evaluation illustrates the exposure values of the capture not only as a histogram, but also on the slidershowing the under/over exposure in aperture values.
Quick
The Quick tool tab includes a selection of key tools to help get a faster workflow.
Base characteristics provide different ICC camera profiles and film curves. An ICC profile is automatically applied accordingto the make and model of the selected RAW file. Set White Balance traditionally or by using the Skin Tone tool.Control Exposure and High Dynamic Range and process directly.
Color
The Color tool tab provides more detailed options of controlling the colors of the image file.
Set White Balance traditionally or using the Skin tone tool.
Color balance will control the overall tone of color.
The Color editor provides adjustments on groups of colors, specific colors or on the skin tones, when a desired colorscheme is achieved this can be saved for later work, even as an ICC profile or style directly in a tethered session.
The Color tool also provides a Black & White inspector allowing you to adjust individual tonal channels for a variant.
Exposure
The Exposure tool tab provides controls to adjust the exposure aspects of images.
Basic controls (e.g. Exposure Compensation) affects the whole image, and more advanced controls (e.g. brightness) allowfor fine-tune adjustments.
Levels and Curves can adjust overall lightness values, but also in the individual Red, Green and Blue color channels.
Page 19 of 84

Lens correction - PRO Feature
The Lens Correction tool tab provides various different lens correction options, either automatically using Phase Oneknowledge on the individual lens or manually correction of each element, e.g. distortion.
You will find many presets created to adjust 3rd party lenses.
Composition
The Composition tool tab provides the crop feature and its related settings.
Aspect ratios can be applied to images to meet output format needs. Rotate and Straighten tools are also available fromthis tool tab as well as the overlay feature.
Details
Image sharpness and noise reduction is controlled from the Details tool tab as well as the PRO features Advanced NoiseReduction and Moiré.
The Details tool tab includes a navigation tool and focus tool that allow you to quickly check the details anywhere on theimage at any zoom level.
Use the Focus window to keep track of the sharpness in 100% view, and the Spot Removal tool to get rid of dust andspots.
Metadata
Any copyright and caption information you have added to an image are shown in the Metadata tool tab. Basic fileinformation and basic EXIF information for the image, such as camera make, model and exposure data are also shownhere. You can enter many different IPTC recognizable keywords as well as other Metadata and options of synchronizing orreloading the metadata to/from the original imagefile.
Local Adjustment - PRO Feature
The Local Adjustments tool allows you to create layers and work on specific areas in any photo.Local Adjustment is useful when you only want to adjust selected areas of an image (e.g. specific areas that areoverexposed).
Adjustments Clipboard
The Adjustments tool tab provides a clipboard with image adjustments which can be copied from one image and applied toother images. The default copy function contains only the parameters where actual adjustments are made to the settings ofthe source image. De-selection of specific adjustments is possible as well as saving a set of adjustments as a Style for later use.
Process Recipe
This tab allows the process parameters to be defined and for the images to be processed.
Define Process Recipe; parameters such as file formats, quality, color space, resolution, and size can be configured.
Decide what metadata that will be included in the processed image file and systematically rename the output files asdesired.
Capture One PRO provides the possibility of adding watermarks, saving process recipes as well as processing for multipleformats at the same time.
Batch
Control the queue for processing and check which images have been processed previously in the Batch tool tab.
Options of changing the order of processing by drag-and-drop. Delete images from the batch queue by marking andpressing backspace.
Page 20 of 84

The Batch will start automatically when Process button is pressed.
Learn more
A guidance histogram is placed at the top of a few Tool Tab options. This histogram gives you an up to date graphicvisualization of the exposure in your image.
The histogram reflects the output RGB color space.
The histogram will displays monochrome values should the image file be converted to black and white. It is worth notingthat the processed image will still be RGB even though the Histogram displays monochrome values. The Auto feature optimizes the image from the controls in the specific tool.
Reset cancels all adjustments made in a given tool.
The Presets feature allows saving tool settings for later use.
Note: If an ICC profile is not applied to all files in a folder, then an ICC file will only follow a profiled primary selected RAW file.
Page 21 of 84

Capture OneHelp site
With Capture One you can speed up the creative process by capturing images directly to the computer and have them appearalmost instantly in the application.
Capture and Tethered Shooting
Tethered shooting Pro
Instantly import and view images as you shoot them with the world’s most advanced tetheredcapture solution - operate remotely and you can apply multiple styles during capture.
Page 22 of 84

Capture OneHelp site
Instantly import and view images as you shoot them with the world’s most advanced tethered capture solution - operateremotely and you can apply multiple styles during capture.
Tethered shooting Pro
To start a Tethered Session
1. Choose File>New Session.2. In the Type drop down menu choose Tethered.3. Check placement of the session and the naming of the individual Session folders.4. Plug-in a supported camera.
To Make Tethered Photography from a Phase One, Mamiya or LEAF Digital Back
1. Start a Tethered session.2. Plug in a Phase One Digital Back via a FireWire cable.3. Capture One will immediately recognized the Back. 4. Set the desired ISO and File format.5. Press the Capture button.6. Set the White Balance.7. Check Next Capture Adjustments settings. The ‘Copy from Last’ choice will copy the settings from the previous captureand will ensure that resulting images attain a similar look within the Session.
To Set White Balance in Tethered photography
1. Take a first shot of the Tethered session.2. Press the White Balance Icon in the Camera Tool.3. Use the White Balance picker to set White Balance from a neutral area of an image file.4. When the desired White Balance setting is achieved, press the Set button.
To Do Testshots
1. Choose Camera > Composition Mode OR press the Composition mode icon.2. The Composition mode is activated as soon as the X Icon is displayed in the Viewer.3. Remove the Composition mode to keep test shot files.
Note: Each new capture taken in Composition mode overwrites the previous one. This mode makes it possible to shootmultiple test shots without filling up hard drive space.
To Auto Rotate
1. Choose Camera>Orientation.2. Set the desired rotation.
Note: Early Phase One digital back models do not integrate sensor orientation. In some cases, owners of other Phase OneBacks are shooting at angles that are not supported by the orientation sensor. This mostly occurs when the camera isfaced downwards and rotated at the same time.
Phase One P and P+ series Backs will all have an image orientation sensor. H-backs made for 645-format will also havethis sensor.Select Camera>Orientation Capture One to rotate the capture automatically.
Page 23 of 84
It is important to emphasize that Orientation will not only rotate, but it will also overwrite the orientation information in animage. Hence the orientation will be kept in the image file when it is moved to another Capture One user.
To work with Live View (Phase One, LEAF & Mamiya digital backs only)
1. Start a Tethered session.2. Plug in a Phase One digital back via a FireWire cable.3. Capture One will immediately recognized the Back. 4. Choose Window>Live View OR press Live View Icon 5. Set Aperture. 6. Set the Shutter time to BULB or TIME function.7. The Live View will start as soon as the shutter is opened.8. Press RGB icon to switch between a RGB or a Black and White view.9. Adjust Lightness and Quality as desired to set sharpness.10. Set White Balance using the White Balance picker (WB is only for Live View).11. Start the Overlay tool (using an additional file) to, for example, shoot a comparison image or to help composition inaccordance to a specific layout.12. Adjust composition.13. Set sharpness. 14. Close the Live View window and set the correct shutter speed to exposure an image.
Live View is created to work in a studio environment and is fully integrated into Capture One software. The preview can beoverexposed beyond the parameters of the adjustment sliders if Live View is used outdoors or if a camera is pointingdirectly towards a light source.
Details - Tethred shooting
The following Digital Backs support Live View out-of–the-box: P 20+, P 21+, P 25+, P 30+, P 45+, P 40+ and P 65+. TheLive View functionality can be purchased for the following Digital Backs as a hardware upgrade: P 21, P 30 and P 45. LiveView may provide limited options for LEAF or MAMIYA Digital Backs.
Camera body support. The following camera bodies support Live View functionality: - Phase One 645DF - Phase One 645 AF - Hasselblad H series - Hasselblad V series - Mamiya 645AFD and 645AFD II - Mamiya RZ67 Pro II and Pro IID - Contax 645 - Technical cameras (4x5): Arca Swiss, Cambo 4x5 Rollei Xact Linhof M679/4x5 Toyo Sinar Plaubel and Horseman. - Wide angle: Horseman SWD, Cambo Wide DS and a range of adapters with 35 mm support.
Shutter Settings Technical and wide angle cameras: Use the camera on Full Open or in Stopped Down mode (with the shutter set on thepreferred f-stop). Medium format cameras: Open shutter and keep it in B or T mode depending on choice of camera system. Hasselblad H: T-mode.Hasselblad V: B-mode. Phase One/Mamiya 645: B-mode. Mamiya RZ67 Pro II and Pro IID: T-mode. Contax 645: B-mode.
Live Preview elements:Play Start Live view if paused.
Turn Overlay On Turns overlay on or off independently of the check mark in the overlay function.
Alignment function Turn Alignment tool on/off
RGB Decide on preview in color or Black and White, the Black and White image may appear more fine-grained compared tocolor image.
Preferences Shortcut to preferences. The Capture tab is where Live View pause settings can be adjusted.
Customize Customize the user interface of Live View.
RefreshRefresh the navigation window according to the Live View.
LightnessAdjust the lightness slider if the Live View image seems too dark or too bright.
Page 24 of 84

Adjust the lightness slider if the Live View image seems too dark or too bright.
QualityAdjusts Live View quality. Higher Quality levels will produce a slower rate to update the image.
Frame Rate The actual Frame Rate of the Live View window.
Overlay Overlay can guide your composition. Read more on Overlay.
Set image sceneSubject matter can be composed once an appropriate exposure is set. It is possible to turn on a square grid to aidcomposition. The color and amount of grid lines can be adjusted through Preferences.
To further improve the workflow, it is possible to load an overlay image and compose a shot using this as a guideline.Overlay Opacity is configurable in the Overlay panel.
Hand cursor tool Works as a standard hand cursor tool. Zoom to 100% by double clicking and move the crop if desired.
Zoom cursor tool Works as a standard zoom cursor tool. Zoom in or out in the image.
White Balance cursor tool When White Balance appears incorrect, it is possible to set a new White Balance with this tool by clicking on a gray area inthe Live View window. This new White Balance setting only applies to the Live View window.
Pause Live Preview Adjust focus while viewing the focus window. When the focus has been suitable adjusted, then the Live Preview can bepaused by pressing the pause button.
Digital camera back support
To shoot into a draft
1. Start a tethered session.2. Set up the camera for tethered photography.3. Start Live View.4. Insert draft file into the Overlay window either by drag’n’drop OR press browse icon to select the relevant file.5. Adjust your subject according to the layout or composition of your chosen draft file. Alternatively, adjust the position ofthe draft file to your subject. OR1. Start a tethered session.2. Set up the camera for tethered photography.3. Go to Crop tool tab.6. In the Overlay tool insert a draft file either by drag’n’drop OR press browse icon to select the relevant file.4. Press the Composition mode icon to do test shot.5. Adjust the draft file and/or the test shot to match each other accordingly.
The draft file (e.g. a sketch drawing) should be a RAW, TIFF, JPEG or PDF. A PC can use JPEG, TIFF, BMP, PNG, GIF.
To adjust what images are shown during tethered photography
1. Choose Camera>Auto Select New Capture.2. Select the update rate of new captures.
Never: will show the chosen primary variant.Immediately: will show a new capture as soon as possible (before all sharpening calculations are done).When Ready: will show new captures as soon as all auto-adjustments are done.Auto Pause: Will allow viewing a selected primary variant while the tethered session continues.
Learn more
Exposure Evaluation (in the Capture Tool Tab) displays a Histogram of the latest captured raw file. Subsequentadjustments made to the raw file capture will be reflected in the histograms in the tool tabs. However, the ExposureEvaluation Histogram will stay as originally captured, as it refers to the raw file.
The Exposure meter is located directly below the Exposure Evaluation Histogram. This meter provides an indication onunder/overexposure that based on center weighted measuring and calculated in aperture values.
The Exposure meter is designed to be seen at a long viewing distance to make estimating the exposure easier whenworking tethered in studio or when shooting tethered on location. Using Hot Folder If you have installed Remote Capture and Control software for a 3rd party camera (see tips box) you can use the Hot folderfunctionality that will enable captures to appear almost instantly in Capture One. Activate this feature from the Cameramenu. Capture One will automatically show the latest image added to the folder. Compare images while shooting
Page 25 of 84

Compare images while shooting Combine tethered shooting (or shooting using a Hot folder) with the “Compare Item” feature in Capture One to view two ormore images at the same time for a side-by-side comparison. You can set it up to have a favorite image (i.e. The CompareItem) on one side and have incoming captures on the other to enable easy comparisons to be made between a selectedpreferred shot and your latest capture. Change ICC profile during a tethered session You can change the ICC profile at any given time. It is important to note that some supported camera models have morethan one ICC profile that are designed to optimize images in a wide variety of shooting scenarios that professionalphotographer may experience. You are likely to experience substandard captures if you select an ICC profile for a camera other than the one being used.Color interpretation can widely vary depending on the camera make and model.
Quick Tip: You will typically need designated (capture) software provided by a camera manufacturer to capture images from3rd party cameras to Capture One using Hot folder functionality. This 3rd party software is not provided with Capture One.
Page 26 of 84

Capture OneHelp site
Editing photos
Working with colorsCapture One provides a number of tools to adjust colors. The tools are designed to supportyour workflow when handling specific issue like saturation, white balance or skin tone.
ExposureUse the Capture One Exposure tool to adjust exposure, contrast, brightness and saturation.
CompositionThe tools in the Composition tab enable you to control the layout of a photo. You can crop,rotate or do keystone corrections.
DetailsThe Details tab includes tool for sharpening, noise reduction, Moiré and spot removal.
Lens correction tool - RAW ONLY! Pro
The Lens correction tool addresses many issues that can commonly occur due to lensdistortions.
Local AdjustmentThe Local Adjustments tool allows you to create layers and work on specific areas in anyphoto.
Page 27 of 84

Capture OneHelp site
Capture One provides a number of tools to adjust colors. The tools are designed to support your workflow when handlingspecific issue like saturation, white balance or skin tone.
Working with colors
White BalanceUse the Capture One White Balance tool to establish perfect natural colors and neutral grays.
Color BalanceThe Color Balance tool gives you the opportunity to fine tune and get a unique look. Finetuning of color to the highest standards is possible in Capture One, but the accuracy of theresults is dependent on having a well calibrated monitor to accurately reflect the changesmade to images.
Color EditorThe Color Editor allows you to select a narrow color area, and adjust this area withoutaffecting other colors in the capture.
Black and White tool Pro
The B & W tool allows you to convert your images to razor sharp black and white photos.
Multiple RGB-readouts Pro
Capture One provides an option to have multiple RGB-readouts displayed in various areas ofa photo.
Page 28 of 84

Capture OneHelp site
Use the Capture One White Balance tool to establish perfect natural colors and neutral grays.
White balanceThe Mode drop down box provides a list of different white balance presets e.g. Daylight, Tungsten, Fluorescent, etc but alsoCamera Custom and As Shot which is the white balance used by the camera when the image was shot. Advanced users may prefer to create their own or to choose alternative options.
The Kelvin slider changes the color temperature of the image within the range 800 to 14000 degrees Kelvin. By moving theslider to the right, the image will become warmer (yellowish) and to the left cooler (bluish). To fine tune the green/magenta balance, it is necessary to use the tint slider.
Tint allows for fine tuning of the green and magenta balance. The scale on the slider represents actual Kelvin value, subject to slight variations from camera to camera.
White Balance
To set White Balance
1. Go to Color Tool Tab2. In White Balance Tool choose the Grey tab3. Use the Pick white balance picker to set white balance4. Set white balance from gray-card or a color neutral area5. Use local Adjustments Clipboard to copy and apply for more images
To set Skin Tone White Balance Pro
1. Go to Color Tool Tab2. In White Balance Tool choose the Skin Tone tab3. Choose from the User- or built-in skin tones4. Use the Skin tone picker to define the skin tone color5. Use local Adjustments Clipboard to copy and apply for more images
To set user defined Skin Tone
1. Go to Color Tool Tab2. Ensure that white balance and color balance are set accurately3. In White Balance Tool choose the Skin Tone tab4. Checkmark the “Pick to create new”5. Use the Skin tone picker to define the new skin tone color6. Name the newly defined Skin Tone7. The new skin tone will be stored in the Skin Tones application folder and can be copied to other workstations from thislocation8. The user defined Skin Tone can now be selected or deleted from the skin tone drop-down menu
To set white balance automatically
1. Go to Color Tool Tab2. Select the images for adjustment3. Press Auto Adjust on the top of the White Balance tool
To set White balance “as shot in camera”
1. Go to Color Tool Tab2. Select the images for adjustment3. From the Mode drop-down menu select “shot”
Learn more
Page 29 of 84

For most images, with correct exposure and white balance, few edits will be required. For images requiring optimization, the best workflow is as follows: • Set the correct white balance and fine tune if necessary • Color correct or enhance • Fine tune exposure using exposure, brightness and/or contrast sliders
Page 30 of 84

Capture OneHelp site
The Color Balance tool gives you the opportunity to fine tune and get a unique look. Fine tuning of color to the higheststandards is possible in Capture One, but the accuracy of the results is dependent on having a well calibrated monitor toaccurately reflect the changes made to images.
First, an accurate white balance should be set. Then color adjustments can be made to create the desired mood for the image.Like other settings in Capture One, these changes can be saved as a Preset and applied to additional images. A group of images can be white balanced to a neutral value and then a preset can be applied. An example would be to use apreset to warm up the colors in a selected group of images.
The Color wheel Changes the color balance of the image by moving the neutral point around the color wheel, you can drag it using the mousebut fine tuning should be done with the H and S sliders. ‘H’ Hue Moves the color-tone point around the color wheel to provide subtle color changes. ‘S’ Saturation Increases the saturation by moving in or out along the radius of the color wheel.
Color Balance
To Set color balance
1. Go to Color Tool tab2. In the color wheel use the pointer circle to set the color tone needed3. If needed a Color Balance can be saved using the Manage Presets Icon
Learn more
Color adjustment can be saved and named by selecting the preset button and selecting ‘Add preset’. Give it a relevantname and select ‘OK’. Color presets are relative to the image they are applied to, not absolute. This means that all valuesadded are added to the values created in White Balance.
Page 31 of 84

Capture OneHelp site
The Color Editor allows you to select a narrow color area, and adjust this area without affecting other colors in the capture.
The Color Editor tool is available in two modes, Basic and Advanced, Basic is created for standard editing, whereas Advancedprovides a much more specialized tool for editing defined shades of color in terms of saturation, brightness, hue andsmoothness.
Smoothness indicates how far in the color spectra the adjustment will be applied; this ensures a natural look to the selectivelychanged colors.
Color Editor
To Adjust Color Slice
1. Go to Color Tool Tab2. In the Color Editor choose the Basic tab3. Use the Basic Color Picker to choose the color in need of correction4. The active slice are adjustable
To Adjust individual colors Pro
1. Go to the Color Tool Tab2. Choose the Advanced Tab3. Pick the color for adjustment4. Checkmark “View Selected Colors only” will automatically desaturated allnot-selected colors in the viewer5. Adjust the adjustable area by pull/push the border markings 6. Adjust smoothness7. Adjust the chosen color(s) using the Hue, Saturation and lightness sliders8. The color will instantly be adjusted in the viewer9. Add more adjustments by pressing the + Icon
To Adjust all but one color Pro
1. Go to the Color Tool Tab2. Choose the Advanced Tab3. Pick the color for adjustment4. Checkmark “View Selected Colors only” will automatically desaturated allnot-selected colors in the viewer5. Adjust the adjustable area by pull/push the border markings 6. Adjust smoothness to ensure the coverage of the colors you wishpreserved7. Press the Invert slice8. Adjust the chosen color(s) using the Hue, Saturation and lightness sliders9. the color will instantly be adjusted in the viewer10. Add more adjustments by pressing the + Icon
To Save Color Scheme as ICC Pro
1. Adjust all colors to the desired look2. Press presets and choose Save as ICC Profile3. Name the new ICC profile4. The new ICC profile is now stored in the Profiles folder5. Add the new ICC profile from the Base Characteristics Tool, ICC dropdown menu, the ICC profile is found in the Othersection
Page 32 of 84

To Save Color Scheme as Preset Pro
1. Adjust all colors to the desired look2. Press Manage Presets3. Press presets and choose Save User Preset4. Checkmark the desired preset adjustments5. Name the new Color Preset profile6. The new Color Preset is now stored in the Color Editor folder based in the Capture One Presets folder7. Add the new Color Preset from the Manage Presets menu, the Color Preset is found in the User Presets
Neutralizing Skintones Pro
1. Go to the Color Tool Tab2. In Color Editor choose the Skintone tab3. Go to 100% image view4. Select a color or area that needs to be less protruding using the colorpicker5. Adjust the selected color
Learn more
Working in larger areas of color will avoid the image to appear unnatural. The slice will allow adjustments to all shades ofthe selected color slice.
The black circle indicates the picked color value, and the thin black line indicates the end of the smoothness effect.
It is possible to just select one slice of color from the menu below the sliders or choose global if affecting all colors at onceis desired.
To help determining the areas that actually changes, check-mark “View selected color range” this will remove color from allcolors that are not selected.
The Saturation slider is created to adjust up to 80% in both directions, so repeat de-saturation 2-3 times on the selectedcolors and the image will have black/white areas whilst preserving other colors.
You can make up to 30 selective color changes in one image.
Pulling the uniformity slider will pull Hue in the direction of the picked color.
ICC profiles can of course be used later on in future work, like presets. ICC profiles created in Capture One can betransferred to 3rd party applications, to keep the color space exactly like needed.
Page 33 of 84

Capture OneHelp site
The B & W tool allows you to convert your images to razor sharp black and white photos.
The B & W effect will give portraits photos more contrast. With the B & W tool you can add a dramatic look or create deepcontrasts in nature and landscape photos.
Black and White tool Pro
To Adjust B&W tones in a color image file
1. Go to the Color tab2. Select the image for B&W conversion3. In the Black & White tool checkmark enable4. To adjust all tones mapped to red in the original image, use the “Red”slider.
To Create a split tone image
1. Go to the Color tab2. Select the image for Split tone work3. In the Black & White tool checkmark enable4. Set the light and dark color values for the split tone image.
Learn more
When a desirable look is achieved this color scheme can be saved as User Preset, in the manage presets menu.
Page 34 of 84

Capture OneHelp site
Capture One provides an option to have multiple RGB-readouts displayed in various areas of a photo.
Multiple RGB-readouts Pro
To set multiple readouts
1. Select the image2. Choose the Readout picker from the cursor tools3. Click anywhere in the image to set readout points
To delete readouts
1. Place the readout cursor tool above the readout2. Press OPT and mouseclick. [MAC]3. Press ALT and mouseclick [PC]4. Holding shift while removing readout, will remove all readouts at once
Lean more
Any readout point can be moved by dragging the point using the mouse.Hide the readout by changing to any other cursor toolsReadouts are shown with the appropriate channel values depending on what proof profile is selected. Should the proofprofile be CMYK or BW the readouts will therefore change to reflect these values
Page 35 of 84

Capture OneHelp site
Use the Capture One Exposure tool to adjust exposure, contrast, brightness and saturation.
Exposure
Managing exposure
Enable the “Exposure Warning” icon and a red color will fill the areas that may be overexposed. Use “LocalAdjustments” to alter the exposure (or color) if there are specific areas of an image that are overexposed.
If the image is generally overexposed, use the High Dynamic Range tool to help recover loss of detail in highlights andshadow areas. The Highlight and Shadow slider will also affect all colors and shades. Start by trying to carefully recoverthe information (pixels) hidden in the highlights and then gently adjust the shadow tones.
The Exposure tool will change the appearance of colors. For example, you can boost colors in most images without oversaturating tones by setting the Saturation Slider in the Exposure tool to 25%-30%.
Exposure This slider is calibrated to provide a range of +/- 2.5 stops. It adjusts the exposure in a similar way to the controls on acamera.
Contrast Moving the slider to the right increases contrast throughout the image. Moving to the left decreases contrast.
Brightness Provides a tool to primarily brighten the mid-tones of an image. Move the slider to the left to increase mid-tone contrast orto the right to lighten shadow areas and reduce contrast.
Saturation Increases or decreases saturation of an image. Decreasing the saturation will ultimately turn an image Black and White.This in turn will change the histogram from RGB to monochrome although the image will remain in a RGB color space aschosen by the output color space. This tool uses ‘intelligent saturation’ so it does more than simply affect normal saturationvalues. The positive values (attained when the slider is moved to the right) are comparable to what 3rd party software oftenrefers to as “Vibrance”. Vibrance is gentler to the skin tones and will be able to enhance, for instance, a blue sky withoutover-saturating the rest of the image. The negative values represent regular saturation settings.
Levels and Curve Levels are used to control the overall tonal distribution of an image. Curves provide the ability to remap the area within theshadow and highlight limits that are set by the Levels tool, to produce a desired image.
To Adjust Exposure
1. Go to the Exposure Tool tab.2. In the Exposure Tool, use the exposure slider to adjust exposure up or down.
To Adjust High Dynamic range images
1. Go to the Exposure Tool tab.2. In the High Dynamic Range Tool, use the Shadow slider to adjust dark areas and the Highlight slider for bright and overexposed areas.3. The Auto adjust button will provide a good starting point.
To Adjust input Levels Pro
1. Go to the Exposure Tool tab.2. In the Exposure Tool, use the Auto function or adjust by pulling thelow/mid/highlight points.3. IF needed, individual colors and separate R-G and B channel can beadjusted.
Page 36 of 84

To Adjust input Levels using shadow and highlight picker Pro
1. Go to the Exposure Tool tab.2. In the Levels Tool, adjust by pulling the low/highlight points.3. IF needed, individual colors and separate R-G and B channel can beadjusted.
To Adjust output levels Pro
1. Go to the Exposure Tool tab.2. In the Levels Tool, adjust the levels by pulling the low/highlight points.3. IF needed, individual colors and separate R-G and B channel can beadjusted
To Adjust Curves Pro
1. Go to the Exposure Tool tab.2. In the Levels Tool, adjust by setting points, then pull/push the curve line.3. Curve points can be set using the curve point picker.4. Presets found in Manage Presets, can provide a good starting point.
To Adjust “Hazy” images – adjusting microcontrast
1. Go to the Exposure Tool tab.2. In the Clarity tool, use the slider to adjust micro-contrast.3. A positive value on the slider will provide increased contrast and a negative value will decrease contrast.
Learn more
The white point and black point pickers are best used with images that have been captured using controlled studio lightingin conjunction with a quality color chart. They can be used to precisely set the black and white points of an image.
Custom Target Levels (Output Levels) Custom Target Levels extend the abilities of the Levels tool to control the output values and to reduce contrast in theimage. This is particularly useful where an image has data in the highlight area that is in danger of clipping. Set the targetlevel to the desired value and then use the picker tool to choose the area within the image that you wish to match thatbrightness level.
With conventional pixel based image tools, output levels are used to compress the tonal range of the image in order to fit ina smaller space, for example re-mapping highlight values of 255 to 245. Whilst this prevents clipping, it means that there isa sharp cut-off of image data, leading to a hard transition between data and no data when the image is re-opened.
Capture One Target Levels work in such a way that the tones are remapped, whilst avoiding hard transitions in highlightareas that result in more natural looking images.
Preferences allow these values to be set for every image in Pick Target Levels.
There are certain ‘classic’ curves that are used in image applications to achieve specific photographic results. Best knownis the “S” curve which is used to increase contrast in an image. The S curve achieves the increase in contrast by pulling down the shadow values, normally on the quarter tones andincreasing the values of the tones at the three-quarter tone mark as shown in the image. For advanced control, the Pick Curve point picker tool (p) can be used to pick a specific tonal area within an image. Thisvalue is added to the curve to allow adjustment of the values for that part of the image.
Page 37 of 84

Capture OneHelp site
The tools in the Composition tab enable you to control the layout of a photo. You can crop, rotate or do keystone corrections.
You can also utilize the Overlay tool to save time when considering the composition of a shot.
Composition
Crop
Rotation
Keystone correction Pro
Overlay tool Pro
Page 38 of 84

Capture OneHelp site
To revert to the un-cropped image. Click Reset adjustments button the crop mask.
Crop
To create an unconstrained crop on an image
1. GO to the Composition tool tab or select the cursor tool. 2. Select the Unconstrained Ratio from the drop down menu and drag a cropframe in the image area. Depending on your preference settings there will bea semi-transparent mask hiding the area that is being cropped. 3. The orange numbers on the sides indicate the size of the cropped image. 4. Selecting another cursor tool will show the crop in its final form.
To add and use Aspect Ratio
1. Go to the composition tool tab.2. From the Aspect drop-down menu choose Add Aspect Ratio.3. In the pop-up window add a name and the ratio needed.4. Press OK and the new ratio will appear in the Ratio drop down menu
To apply crop for several image files
1. Set the crop desired on one image file.2. Choose Adjustments>Copy Adjustments or the Copy Adjustments Icon.3. Select the image you would like to apply the crop to.4. Choose Adjustments>Apply Adjustments or the Apply Adjustments Icon.
To crop outside the image area
1. Go to the composition tool tab.2. In the Crop Tool checkmark the Crop Outside Image.3. Now it is possible to adjust the crop area outside the image area.4. When another tool is selected the new crop is shown in the Viewer.
Learn more
The original image with the cropping mask is shown in the thumbnails.
Re-selecting the crop tool at any time will allow adjustment of the cropsettings.
Adjust the crop by dragging the edges of the preview inwards (the cursor willturn into a two-way arrow) until the desired crop has been achieved.
Move the cropped area by clicking in the middle and the cursor will turn into across.
The crop masking can be changed in preferences. Go to CaptureOne>Preferences and select the Crop option to change the opacity andbrightness of the mask being used.
Page 39 of 84

Capture OneHelp site
Rotation
To straighten lines
1. Open the Composition tool tab. 2. Go to the Rotation tool and select the Straighten option from the drop-down menu OR select the Straighten option fromthe cursor tool menu bar.3. Mark-up a horizontal or vertical line in need of correction.4. The image will automatically be corrected when you release the mouse-button.5. Fine-tune the straightening by using the slider (you can use the mouse scroll over the slider to adjust as well).over theslider to adjust as well).
To apply straighten or rotate for multiple images
1. Select the group of images you wish to correct.2. Open the Composition tool tab. 6. Go to the Rotation tool and select the Straighten option from the drop-down menu OR select the Straighten option fromcursor tool menu bar.3. Mark-up a horizontal or vertical line in need of correction.4. The image will automatically be corrected when you release the mouse-button.5. Activate the local Adjustments Clipboard, Rotation shows a check-mark. 6. Click Apply.
To Rotate Freehand
1. Open Composition tool tab.2. Alter the orientation by adjusting the Angle slider. (Hover your mouse over the slider and change the setting with yourscroll wheel if desired). 3. Perpendicular correction can be done using the Left/Right buttons.
Page 40 of 84

Capture OneHelp site
Keystone correction Pro
Introduction to Keystone correction
It is not always possible to get the best angle on a subject and eliminate all distortion. Architecture photographers oftenhave to correct perspective distortion of tall buildings. Capture One Pro gives you the ability to do keystone correction. Youcan quickly correct any distortion by using the vertical and horizontal sliders or use the cursor markers to pinpoint lines that should be parallel.
The Keystone function can be operated manually by adjusting individual sliders or you can use the Auto option.
The Auto keystone correction icons can be selected beneath the sliders or in the cursor tools. Choose between theautomatic vertical, horizontal or full correction.
You can use the local Copy/Apply functions to apply the settings to multiple images that need the same correction.
To apply Keystone correction manually
1. Go to the “Keystone” tool under the Composition tab.2. Adjust the Vertical or Horizontal sliders. 3. Adjust the Amount slider.4. Fine-tune Aspect if necessary.
To apply Horizontal or Vertical keystone correction
1. Go to the “Keystone” tool under the Composition tab. 2. Select Keystone Horizontal or the Keystone Vertical icon. 3. Set the four points to mark up the vertical or horizontal lines you need aligned. 4. Press the Apply button (Placed on top of your image) 5. Adjust the Amount and Aspect as desired.
To apply automatic vertical and horizontal keystone correction
Page 41 of 84

1. Go to the “Keystone” tool under the Composition tab. 2. Select the “Keystone” icon. 3. Set the four points to mark up the horizontal and vertical lines that you need aligned.4. Press the apply button.
To hide Distorted Edges
In some situations after doing keystone corrections you might need to hide the distorted edges. This is easily done byenabling the, “Hide distorted areas”, checkbox, found in Lens tool, see below. In rare situations you might need to cropoutside the image, see “To crop outside image area.”
1. Go to Lens Correction tool tab2. Enable the checkbox “Hide distorted areas” beneath Distortion slider.3. Distorted edges will now automatically be clipped.
Learn more about Keystoning
The photo to the left is corrected 80% the photo to the right is 100% corrected.
When applying Vertical Keystone correction the default is set to 80%. In most cases the 80% correction will give a naturalappearance but if needed you can adjust manually by dragging the Keystone sliders. The Keystone correction works optically (like a true large format camera) by adjusting each corner individually to adjust theselected lines. The aspect slider will trim the corrected photo. The Aspect slider will alter the aspect ratio of the shot and can be used to adjust the Keystone corrected shot. It willpreserve your crop and create a more realistic look.
Page 42 of 84

Capture OneHelp site
The overlay tool provides advanced composition assistance. This function is often used to shoot an image that will match aspecific layout. For example, an image could be captured for a magazine cover where space needs to be left for a mastheadand headline copy.
Simply drop an image file (with the magazine headlines and copy) into the Overlay function and alter the opacity, scale andplacement as needed.
Overlay tool Pro
Page 43 of 84

Capture OneHelp site
The Details tab includes tool for sharpening, noise reduction, Moiré and spot removal.
Details
Sharpening
Noise reduction
Dust and Spots Pro
Page 44 of 84

Capture OneHelp site
Sharpening
To check sharpness without zoom in viewer
1. Go to Detail Tool Tab 2. The Focus Tool shows a section of the image that can be magnified up to 400%.3. Use the Pick Focus Point icon to select the desired area to inspect in detail.4. Adjust the magnification on the slider below the window.5. The presets offers different sizing options for the Focus Tool window.
To check sharpness in the viewer without zoom Pro
1. Press the Focus Mask icon on the right top bar.2. The Focus Mask will automatically display sharp areas with a greenmarking.3. Adjust the sharpness settings in the Preferences – read more onPreferences.
To sharpen image file
1. Go to Details Tool Tab 2. Either set viewer to 100% or choose a sharp area with the picker in theFocus Tool.3. Manage Presets will provide a variety of sharpening settings.4. Fine-tune the desired setting using the sliders.5. Use the Hand Tool to check all areas of the image in 100%
Learn more
The effects of sharpening and noise reduction are shown as they will appear on the final image that is displayed in theViewer.
Try this workflow if you are not experienced in applying Sharpening to an image.First, sharpen the fine detail in the image. Use the capture or raw pre-sharpening setting. (In the Manage Preset menu). Secondly, a more aggressive sharpening affect can be used but this should be applied after the image has been sizedaccording to desired printing dimensions.
Page 45 of 84

Capture OneHelp site
Luminance noise exists in every digital image. Noise is caused by the light sensitive chip, regardless of ISO. Normally thisnoise is more visible at high ISO values. Higher Noise levels at high ISO values are caused because the signal has been amplified.
Luminance Removes the pattern-like noise often present in shadow areas. Best practice is to set Luminance to 25, even for low ISOimages. Increase the setting value for images that display displeasing noise levels and check the effect in the Viewer at 100%magnification.Color Removes color noise from images that are typically noticeable as subtle green/ magenta patterns. It is very difficult torecommend specific settings as noise varies from camera to camera, but the program defaults provide a good starting point.The Viewer provides a clear view of the effect of filters on image noise.
Capture One allows the removal of luminance and color noise from images using the color and luminance noise reductionsliders.
Noise reduction
To remove noise from image files
Note that Capture One automatically adds an amount of noise reductionbased on the individual image evaluation.
1. Go to Detail tab 2. The Noise Reduction tool will display the auto adjustment settings.3. Use the Luminance slider to adjust the level of luminance noise.4. Use the color slider to adjust the level of chromatic noise.5. Adding too much noise reduction may give an image a soft appearance.
To smoothen image surface without loosing sharpness Pro
1. Go to Detail Tab 2. Open Noise Reduction Advanced.3. Use the Surface slider to smooth the surface of an image.4. A high Surface value setting will significantly soften an image althoughmore gently on edges.
To Avoid Moiré Pro
1. Go to Detail tab 2. Open Moiré Tool.3. Zoom to 100% in the Viewer and keep the moiré area visible.4. Adjust the Amount value first, followed by the Pattern value, bit-by-bit in
Page 46 of 84

4. Adjust the Amount value first, followed by the Pattern value, bit-by-bit insmall increments. 5. When the moiré has disappeared do not add more Amount or Pattern.
To add grain Pro
1. Go to Detail tab 2. Open Noise Reduction Advanced.3. Set starting point by using the presets: High/low ISO look.4. Adjust level of added grain and surface to achieve the desired look.
To remove Long Exposure artifacts and high ISO noise Pro
1. Go to Detail Tab 2. Open Noise Reduction tool.3. Use the Single Pixel slider to reduce the artifacts of long exposure.4. The higher number, the harder the tool works. Check e.g. stars and similarsubjects on the image file after using the Single Pixel tool should these havedisappeared, turn down until visible.
Learn more
In simple terms Moiré can occur when capturing a subject with fine pattern details. An image sensor may reproduce thispattern with a moiré effect because it lacks resolution. Moiré can be an issue when photographing clothes and can occur inarchitecture photography.
The simplest way to avoid Moiré is by adjusting the position of a camera by moving it back/forward while photographingand/or changing your aperture setting.
When working with the Moiré tool, check areas that naturally have narrow stripes or a stripe-like pattern; if these havedisappeared gradually turn down the Amount and Pattern and re-check the original Moiré issue.
The image file may appear too polished after using Surface or a negative clarity setting. If this is the case, it can be a goodidea to add a bit of structure by using Fine Grain in the image, which will create a more natural look.
Increase the Fine Grain setting with caution. Use in the right amount in conjunction with the Surface tool. Increases to theFine Grain setting will produce the appearance and feel of high ISO photography. Adding Fine Grain can achieve morethan just a high-ISO look, as it can also reduce or remove banding when it occurs.
Images that are exposed using a long exposure may be susceptible to the occasional ‘hot-pixel’, which is a single whitepixel that should appear dark. The Single Pixel slider can be used (in the Noise Reduction tool) to eliminate hot-pixelsalthough it can also affect the rest of the image. The filter will analyze single pixels compared to the surrounding area andcorrect the errors. But apply adjustments appropriately as the Single Pixel effect is very powerful especially at its maximum100 setting.
‘Less is better’ - do check the complete result before processing.
The Single Pixel slider, like many other adjustments tools should always be used with caution and in moderation.Remember to try and check the final result before processing.
Page 47 of 84

Capture OneHelp site
Dust and Spots Pro
To remove dust
1. Go to Detail tool tab.2. Open Spot Removal tool.3. Zoom the primary image file to 100%.4. Select Dust in the Type drop-down menu.5. Mark up the dust or hair in the image file.6. Adjust the size of each circle to match the size of the spot by dragging theline at the edge of the circle OR by adjusting the Radius slider.7. The circle is movable. Place the cursor tool in the centre of the circle anddrag and drop to change its position. 8. Switch between the individual circles by using the Spot drop-down menu orthe arrows to the right of this.
When all dust particles have been marked up and removed, copy the dustremoval filters and paste into the rest of the session, as dust particles normallydo not move. The dust removal, of course, needs to be checked.
To remove spots
1. Go to Detail tool tab.2. Open Spot Removal tool.3. Zoom the primary image file to 100%.4. Select Spot in the Type drop-down menu.5. Mark up the spots that need to be removed.6. The Spot Removal tool is created to find the sharp edges and remove thespot by analyzing the underlying colors and structure.7. Adjust the size of each circle to match the size of the spot by dragging theline at the edge of the circle OR by adjusting the Radius slider.9. The circle is movable. Place the cursor tool in the centre of the circle anddrag and drop to change its position. 10. Switch between the individual circles by using the Spot drop-down menuor the arrows to the right of this.
Learn more
Dust can be commonly seen in similar patterns on all images from one session. The dust can appear on the front plate of adigital back; this is why a dust spot will reappear out of focus on sequential following shots. To save time, make a localcopy of the dust spots and paste the dust spot setting into the rest of the session. ALWAYS check image files whenautomatically removing spots.
Page 48 of 84

Capture OneHelp site
The Lens correction tool addresses many issues that can commonly occur due to lens distortions.
Capture One has many preset profiles available for medium format lenses and when used appropriately the image results willgreatly improve. In order to fully correct for lens imperfections, use the tool at 100%. If there is no specific profile available foryour lens, use a generic profile as described in the next item.
Lens correction tool - RAW ONLY! Pro
Introduction to Lens correction
You can correct almost any lens using the "Generic" or "Generic Pincushion Distortion" profiles available in the tool. Theseprofiles can address almost any simple spherical lens. Complex distortion however, which may have a specific moustacheshape can only be fully corrected with specific preset profiles.
Some effects, such as Chromatic Aberration and Purple Fringing may depend on Aperture Value and Focal Length. Tobetter account for these variances you can create and save presets for the lenses you use the most.
Geometric Distortion, often referred to simply as "Distortion", causes straight lines to appear curved. This is especiallypronounced with wide-angle captures, fisheye images being the extreme example. If your lens is already recognized byCapture One Pro, you will find it listed in the Lens Drop Down Menu of the Lens Correction Tool. If the lens is notrecognized by Capture One Pro, it may be listed in the Preset Menu. These settings are developed by the Phase OneDevelopers team and will perform standard corrections for each image.
If you need to hide distorted areas of the image after Lens correction or Keystone Correction have been applied then selectthe "Hide Distorted Areas" checkbox within the Lens Tool tab. In special cases you might, after Lens correction orKeystone correction is applied, need to crop outside the actual captured pixel material. See Crop and Keystone Correction.
Digital Back - To apply a specialized lens profile
1. Select an image and your specific lens profile in the drop-down box in the Lens tool. The Chromatic aberration is enabled, the light falloff is set to 10% and the distortion is set to 100%.2. Fine-tune by adjusting the Light Falloff and Distortion sliders. 3. Zoom to 400% and inspect the details, select the “Purple Fringing” checkbox if needed (e.g. purple or bluish fringes onthe lines of objects).
See below for detailed corrections: Chromatic aberration and Sharpness falloff.
Lens Cast Calibration
If you have a LCC plate, you can take a new Lens Cast Calibration (LCC) and then create an up-to-date LCC profile of thatparticular lens. If you want the exact profile and optimal correction then the LCC shot should be created with the same lens
Page 49 of 84

particular lens. If you want the exact profile and optimal correction then the LCC shot should be created with the same lensand shutter setting as the images you are correcting. Alternatively, you can use a similar LCC shot if you keep a library ofpreviously captured LCC images. With this “generic” approach we don’t recommend selecting the Dust Removal checkboxto correct for dust on the lens.
If your specific lens model is not supported in the Lens Correction Tool, then the LCC profile approach will give the bestlens correction.
To create and apply a LCC profile
1. Select the LCC image, i.e. the image captured with the white plate. 1. Select "Analyze" from the LCC Drop Down Menu and then give the LCC profile a name. Click Save. Capture One will now analyze the image and create the LCC profile. When completed, the checkbox "Color Cast" is selected. The color differences across the image should now be even.You can now apply the LCC to other images that were captured with the same camera. 2. Select the image to be corrected.3. Select your created LCC profile in the LCC drop-down box.
You get the best result if you use a specialized Lens Profile and an LCC together IMPORTANT: For best results, the LCC should be created under the exact same conditions as the image. This includesfocal length, aperture and (when practical) ISO. If you use Tilt and Shift adjustments on the camera they MUST match forbest results. ISO and exposure settings can be changed to improve exposure if necessary.
If you enable Light Falloff from the LCC options, the Lens Cast Calibration will replace the falloff specified by the lensprofile. If the LCC accurately reflects the conditions of the image, this will provide the most accurate correction.However, you will get a flat image if you set the correction to 100% (selected by default when you enable LCC LightFalloff).
DSLR - To apply a generic lens profile
1. Select an image and a generic lens profile in the drop-down box in the Lens tool.All sliders in the tool are reset (no default setting for a generic lens).2. Set the desired adjustments with the sliders.
For better correction use an LCC profile, see “To create and apply an LCC prolife”.
Generic lens profile - To correct for Chromatic Aberration
1. Select an Image and a Generic Lens Profile from the drop-down menu of the Lens Correction Tool.2. Select "Analyze" in the Chromatic Aberration drop-down box. The image is analyzed and the correction is enabled.3. Inspect the image.
If you selected a specialized lens profile, Chromatic Aberration is enabled by default. You may still choose to analyze animage to get a custom correction.TIP: Inspect an image for chromatic aberration by looking at high-contrast edges that run perpendicular to the center of animage. Examine the image at 400% and set saturation to a high level during the inspection.
Soft Corners can occur for many reasons and are common when used with classic wide-angle lenses. Soft Corners areoften a desired retro-focus effect, but when it is not, Capture One can help correct it using the "Sharpness Falloff" tool.If you have a lens profile for your lens, set it to 100% to fully correct this issue. Otherwise, you need to experiment to getan appropriate setting.
Page 50 of 84

To correct for Sharpness falloff for generic lens
1. Select an image.2. Enable the Sharpness Falloff checkbox and Zoom to 400% to inspect the details.3. Drag the Sharpness Falloff slider while inspecting the areas towards the corners for sharpness falloff.
Using Vignetting
Vignetting is a controlled exposure adjustment that will either darken or brighten the edges and corners of an image. Thecorner will be brighter when you add EV value and darker when you reduce the EV value.Note that Vignetting will be effected by any color tone you may choose to add to a photo including the styles Sepia andBlue tone.
Learn more about Lens correction
Light falloff arises because an image is exposed more at the center of the frame than at the corners. There are severalreasons for this – the distance from the lens to the backplane is longer at the edges than it is at the center and, therefore,less light can get through the lens at oblique angles. This means corners are exposed less than the center, resulting indarker corners than the center. This effect is most common with wide-angle lenses that are used with a wide-openaperture. If you have a profile for your lens; set the amount to 100% to get a completely flat and even looking image.Otherwise, use a generic profile and manually set the desired amount with care.
Chromatic aberration (CA) occurs because light of different wavelengths takes different paths through the lens that may notbe in focus and the backplane. As most light is a mix of several wavelengths, the lens will focus the colors differently andcreate color fringes on edges of high contrast. Since CA results from colors that are shifted, a white or light color on a darkbackground will have colors on either side. The most common manifestations of the error are seen as red/cyan andblue/yellow but others are possible. One of the worst is the green/purple, although this should not to be confused with“purple fringing”.
Page 51 of 84

Brass, chrome and other metallic products often give rise to extreme contrast. In particular, they may be effected by “purplefringing”. Purple Fringing (PF) is, like chromatic aberration, an artifact that occurs because a lens interacts differently withlight of different wavelengths. Unlike chromatic aberration, purple fringing will not usually show fringes of different colors.PF is mostly visible on edges of very high contrast, such as metallic products or branches on a tree against a bright sky.Purple Fringing is often seen on images that also show chromatic aberration. Wide-angle lenses are more likely to showthis artifact.
Page 52 of 84
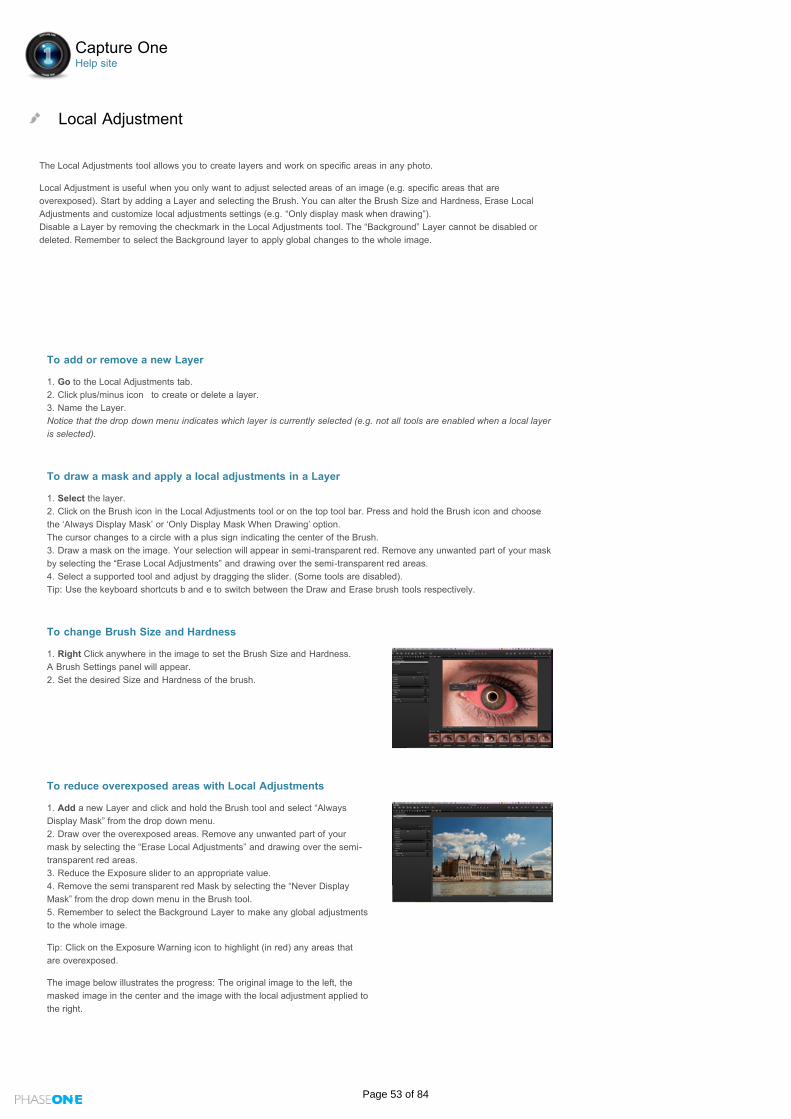
Capture OneHelp site
The Local Adjustments tool allows you to create layers and work on specific areas in any photo.
Local Adjustment is useful when you only want to adjust selected areas of an image (e.g. specific areas that areoverexposed). Start by adding a Layer and selecting the Brush. You can alter the Brush Size and Hardness, Erase LocalAdjustments and customize local adjustments settings (e.g. “Only display mask when drawing”). Disable a Layer by removing the checkmark in the Local Adjustments tool. The “Background” Layer cannot be disabled ordeleted. Remember to select the Background layer to apply global changes to the whole image.
Local Adjustment
To add or remove a new Layer
1. Go to the Local Adjustments tab.2. Click plus/minus icon to create or delete a layer.3. Name the Layer.Notice that the drop down menu indicates which layer is currently selected (e.g. not all tools are enabled when a local layeris selected).
To draw a mask and apply a local adjustments in a Layer
1. Select the layer.2. Click on the Brush icon in the Local Adjustments tool or on the top tool bar. Press and hold the Brush icon and choosethe ‘Always Display Mask’ or ‘Only Display Mask When Drawing’ option. The cursor changes to a circle with a plus sign indicating the center of the Brush.3. Draw a mask on the image. Your selection will appear in semi-transparent red. Remove any unwanted part of your maskby selecting the “Erase Local Adjustments” and drawing over the semi-transparent red areas.4. Select a supported tool and adjust by dragging the slider. (Some tools are disabled). Tip: Use the keyboard shortcuts b and e to switch between the Draw and Erase brush tools respectively.
To change Brush Size and Hardness
1. Right Click anywhere in the image to set the Brush Size and Hardness.A Brush Settings panel will appear. 2. Set the desired Size and Hardness of the brush.
To reduce overexposed areas with Local Adjustments
1. Add a new Layer and click and hold the Brush tool and select “AlwaysDisplay Mask” from the drop down menu.2. Draw over the overexposed areas. Remove any unwanted part of yourmask by selecting the “Erase Local Adjustments” and drawing over the semi-transparent red areas.3. Reduce the Exposure slider to an appropriate value.4. Remove the semi transparent red Mask by selecting the “Never DisplayMask” from the drop down menu in the Brush tool. 5. Remember to select the Background Layer to make any global adjustmentsto the whole image.
Tip: Click on the Exposure Warning icon to highlight (in red) any areas thatare overexposed.
The image below illustrates the progress: The original image to the left, themasked image in the center and the image with the local adjustment applied tothe right.
Page 53 of 84

To draw with a particular Local Adjustments directly
1. Select the Layer.2. Click and hold the Brush tool and select “Never Display Mask” from thedrop down menu.3. Select a supported tool and set the slider to a particular value. (E.g.Increase the Sharpening Amount slider).4. Draw the local adjustment. The adjustment is applied directly to theselected area. 5. If needed, click and hold the Brush tool and select “Erase LocalAdjustments” to remove any unwanted areas of the mask. Tip: Use the keyboard shortcuts b and e to switch between the Draw andErase brush functions tools respectively.
Page 54 of 84

Capture OneHelp site
Organizing photos
Capture One provides a variety of ways to organize your images. You can add metadata to images and use search and filterto organize your photos.
Folders
Rating images
Search and filters
Smart albums
Metadata
Styles and presets
Page 55 of 84

Capture OneHelp site
Folders
We recommend importing images to a folder on a main drive using the importer dialogue box (File > Import Images). You canuse rating, color tags or filters (See Smart album) to organize your images.
The “Selects Folder” (Move-To Folder) can be assigned to any folder to make it a temporary destination when you wantto quickly transfer images from one folder to another. The “Move-To Folder” function can come in particularly useful when youwant to edit and move your best images into a different folder whilst browsing through multiple other image collections.
First create and name a new folder (Right Click > Add New Folder). Next, assign this folder as Selects Folder folder (RightClick > Set as Selects Folder). Now you can browse image collections and click the Selects Folder icon (located in the top lefttool bar) whenever you find an image that you want to add to the new folder. If you don’t want to physically move the images,then create a Smart album to represent a collection of references to the images.
Once rated and moved, the best images can be quickly optimized before proofing to clients as JPEGs or by creating a WebContact Sheet. The Capture One Web Contact Sheet function will help you to create a web gallery to send to clients(File>Make Web Contact Sheet). The Web Contact Sheet will, in addition to the images, show caption and copyrightinformation, which can be added when importing files.
Albums and folders Album folders are virtual image collections. To create a new Album, click File > New Album. Alternatively, right click (andselect New Album) in Library Tool or press the New Album option at the bottom of this Library panel. Get quick access to certain folders by creating a favorite folder. A favorite folder is cached enabling rapid access.
In general, it is possible to drag images to a folder. Images can also be dragged from a Capture One folder to a file systemfolder and vice versa, if the operating system supports this action. You cannot drag images or groups of images into a SmartAlbum; only into a simple or favorite folder. (See “Smart album”).
Page 56 of 84

Capture OneHelp site
You can use stars or colors to rate and organize your images. Star ratings can be set from 1-5. Simply click on the rating barbelow the image in the Browser to select a number. You can clear the rating by pressing “0” or by clicking on the desired ratingposition, e.g. if you want to change a 5 star rated image to a 3 star rating, then click the third star and the unwanted stars willdisappear.
The PRO version provides color tagging as an additional rating option. You can combine a star rating with a color rating or useone exclusively. Set the color tag by clicking the small square under the image (located next to the stars) or right click on thethumbnail image to select the desired color tag.
Rating images
Colors and rating
Page 57 of 84

Capture OneHelp site
A simple text and filter search can help you find, sort and organize your images. The images in a selected collection (an actualfolder, session folders, album, and smart album) are displayed in the thumbnail Browser.
Search and filters
To filter a collection
Perform a simple search by inserting text in the search field next to themagnifying glass icon and watch the result change in the browser as you type.Adding multiple words will produce a search with resulting images that containone or all of the inserted search terms. E.g. Inserting “blue red phase” willproduce resulting images that contain either blue or red, or phase in anymetadata field or in the filename.
You can filter an image collection by inserting text in the search field locatedjust above the Browser or by opening the filter dialog box (by clicking on themagnifying glass icon) to create a custom filter. Any customized filter can besaved as a smart album by clicking “Create Smart Album” option in the Createfilter dialog box. See “Smart album”.
An image collection can be filtered by rating, or by combining a rating and acolor filter. This will help narrow down a search to find images that contain aspecific rating AND a certain color tag.
To filter a collection by rating
1. Click the magnifying glass icon and select Rating from the drop downmenu. 2. Select a star rating in the search menu. You can continue to filter byselecting a different higher or lower rating as desired.The result is displayed in the Browser.
Follow the same procedure to filter by color tag. N.B. You may occasionallyneed to clear all the filter criteria by selecting the “Clear filter” option (in thePresets drop down menu) within the Create filter dialog box when combining arating and color tag in a filter.
Page 58 of 84

Capture OneHelp site
A Smart Album is a filtered album containing a subset collection. The Smart Album only contains the references andadjustments that will be applied to all views of the image. You can search and/or filter within a Smart Album. This will help tonarrow down a collection of images to get a smaller subset to work on and accelerate workflow; e.g. Filter all images rated withthree or more stars in the Smart Album that need retouching and finalizing. Smart Albums will only contain images located in Session folders (albums and favorite folders). If you select a folder in the Library and filter it, you can create an empty Smart folder as the images in the filter result will not bein any Sessions folders.
Quick tip: In general, use CTRL+A (PC) to select all images in the Browser. Use simple search or filter (color or rating tags) toget a quick subset of a collection to help accelerate workflow. This tip is also useful when selecting images in the Browser toperform output tasks (Print, Processing or Web Gallery).
Smart albums
To create a smart album in the Library Tool
1. Choose File> New Smart Album or right click in the Library Tool and select “New Smart Album”.A new Smart Album is created with a default name. If no filter criteria are selected, then the Smart folder will include all theimages in the session folders (albums and favorite folders).2. Give the smart album a name.To populate the Smart Folder with images, see “To edit Smart Album”.
To edit a smart album
1. Right click a Smart Album in Library Tool, select “Edit Smart Album”.The Filter collection dialog box will open and display the criteria that were created earlier. 2. Change one or more criteria.The result is not displayed in the Browser. You may not be able to see result before pressing “Save”.3. Press “OK”.The Smart Folder is now updated and will only contain images that match the filter settings.
To create a smart album from filtered collection with multiplecriteria’s
1. Click the magnifying glass icon and select “Filter Collection”.The Filter collection dialog box will open. 2. Add a filter criteria rows, e.g. Date “Is after”, by clicking the buttons to theright. The result is displayed in the Browser. When changing the parameter (e.g.“Date”) in the drop down menu the matching possibilities will also change (e.g.“Is before” is now selectable). 3. Add a filter criteria’s, For example Date “Is before” The result is displayed in the Browser. 4. Add a filter criteria, e.g. “Red” The result is displayed in the Browser. In this example the Browser will showimages containing the text “Red” in any metadata field or file name and has ametadata date between “is after” and “is before”. 5. Click “Create Smart Album”.A Smart Album is created in the Library Tool with a default name.6. Give the Smart Album a name
Page 59 of 84

Capture OneHelp site
The Metadata tool allows you to insert keywords and specific information. You will always have the basic metadata from thecamera and you can add your own keywords or create your own “Metadata Presets”(a collection of values).
Metadata can be very useful when organizing photos or used to simply "brand" your photos with some indications of the imagetype or photo creator. You can set up your own metadata stamps (e.g. copyright, client profiles) and apply these to multiplephotos.
You can add metadata by inserting keywords in the Metadata tab. Another way to add metadata to your images is to apply aStyle or a Preset. Your Metadata Preset can be applied as a Style containing a number of presets or as one preset containingmetadata from one metadata category.
Metadata
To create a Metadata Preset
1. Go to the Metadata tab and insert keywords and info into one or more ofthe metadata categories. 2. Click the on the little preset icon and select “Save User Preset”.The Save Preset window will open.
NOTE: In the Save Preset window (clipboard) you can uncheck the specificmetadata details you want stripped from your image (see below for details on“stripping”).
3. Uncheck the metadata values you don’t need and press “Save”The Save Dialog will open.4. Save the Preset on your computer
Now you have your own Metadata Preset. You can have any number ofmetadata presets. You can apply any number of presets to any number ofimages (Stacked preset, see “Styles & Presets”).Learn more about metadata, watch the video.
To strip specific metadata from your output files
1. Go to the Output tab and click the advanced tab in the “ProcessRecipe”. 2. Uncheck the metadata categories you don’t want to include in the outputfile. Your current Process recipe is now updated containing the checkedcategories.
Learn more about Metadata
Metadata is stored in the Capture One settings file and can be embedded in the output file (e.g. JPG) if desired. You canchange the Basic metadata such as the filename, rating, caption and copyright. You can also set Caption & Copyrightinformation when you import photos. This saves time when you need to process a batch of photos or produce a WebContact Sheet. In some cases, you might want to strip metadata from an output file and this can easily be achieved bycreating a “Process recipe”, watch the video .
If you have metadata related to a raw file in a standard metadata format like XMP (Extensible Metadata Platform) thenCapture One will automatically reload the metadata and merge the .XMP “sidecar” with the metadata already created inCapture One. Capture One can read and store metadata in the following four formats: Embedded EXIF, Embedded IPTC-IIM, Embedded XMP, .XMP Sidecar file – these 4 types of metadata will be automatically updated and read.
Reloading & Auto loadIf you change metadata belonging to an image in an external application (e.g. Expression Media) you can then view thechanges in Capture One by pressing “Reload” in the Metadata tool’s action menu. If preferred, you can set Capture One toauto load metadata by checking the “Auto load” checkbox in Edit -> Preferences -> Image -> Metadata. You also have theability to sync the metadata between the Variant and the XMP sidecar. If no preferred sync option is checked the softwarewill use the sidecar values. Otherwise the embedded Capture One values will be applied.
Page 60 of 84

Capture OneHelp site
A Style is comprised of multiple different settings included in a template that can be saved and applied to series of photos. Anexisting Style can be previewed if you mouse-over the particular style in the "Styles & Preset library". A Style is created byusing the Clipboard tool. Any combination of settings that are copied to the clipboard can be saved as a new Style.
A Style can give you a good starting point when you need to apply a certain look to multiple photos. You can optimize workflowand save time by having your own Styles applied to a series of photos. A Style can contain settings that are not directlynoticeable in the photo and it can be very useful to build metadata into your Styles (e.g. your own “signature” and client profilecould serve as a basic style for a particular client).
Styles and presets
Using styles Pro
A Style can contain any number of presets or ungrouped settings. A Preset is a group of settings belonging to one tool. Forexample, you can create a Preset containing keywords from numerous metadata categories (E.g. IPTC Contact and IPTCImage). At any given time in your workflow you can create your own style by copying the current settings on the clipboardor changing and saving an existing Style. Quick tip: Do not try to always include White balance in a Style. It can be best practice to set this value manually. You canalso use color balance to create toning effect, watch the video .
Applying more than one Style to an image will result in the latest applied Style overriding any previous settings. (This willhappen as the two Styles may, for example, have two different Exposure settings).
To apply a style Pro
Select your image and follow these basic steps:1. Select the Style icons in the top tool bar.NOTE: You can add/remove icons, see Customize the Toolbar.NOTE: if you have Quick tab then click “Styles & Preset” tool. For details ontool tab, see "Workspaces". 2. Select the “Built-in-Styles” or “User Styles” and preview the look of yourimage while scrolling the list of existing styles. 3. Click on the style you want to apply.
To create a Style Pro
Perform your preferred editing changes, select the image and follow thesebasic steps: 1. Go to the “Styles & Presets” tool and click on the plus sign or “Save UserStyle”. 2. Uncheck the settings you don’t want to include in your Style.The Save dialog will open.3. Save the Style on your computer.
TIP: Press F2 or click Image > New variant to get a copy of the original photo.This way you can work on the style while comparing the original and thealtered photo.
TIP: Once a Style is saved on your computer it can be shared and imported toother users. The Capture One style format “.costyle” can be copied to othercomputers or platforms.
To delete a Style Pro
1. Go to the “Styles & Presets” and click the “Delete User Style”. 2. Select the User Style you want to delete.The Delete dialog box will open. 3. Confirm the “Delete User Style” query.
Page 61 of 84

To create a Preset
1. Click the “Preset” icon on the tool2. Select “Save User Preset”. The Save dialog box will opens.3. Save the Preset on your computer.
In some cases the creation of a Preset involves an extra step, see “To create a Metadata Preset” for a more detailed stepprogress.
Un-stacked Styles & Presets
Presets are un-stacked by default (only one valid Preset related to a tool). In some case it could be useful to stack andmerge Presets. If you have more than one metadata preset you might not want these to be merged into a “collected”metadata preset (e.g. your profile and a client profile). You can check or uncheck the “Stack styles” in the “Styles & Preset”menu and check the “Stack Presets” in the menu for a particular tool.
Page 62 of 84

Capture OneHelp site
Optimizing your workflow
Capture One provides a wide range of customization options and different ways to perform the same tasks. This sectionprovides background info about customization and gives a few workflow tips.
When importing images or shooting tethered to a computer, a .COS settings file is created (located in the Capture folder withraw files). This file contains all the adjustment and changes that have been applied to the original raw file, which remainsunchanged. This file is located in the Capture One folder with the RAW files.
Workflow tips
Preferences and customization
Shortcuts
Working in Sessions Pro
Page 63 of 84

Capture OneHelp site
Workflow tips
Primary Variant You can toggle between editing the Primary Variant (the thumbnail with the thick white border) and editing Selected Variants(all selected images in viewer). If the Primary toggle is not selected then edit actions are only performed on the Primary(image) with the thick border.
VARIANTS AND CLONESIt is often useful to see two versions of an image in pre and post product once you’ve applied your adjustments. Working withVariants or Local Reset can help you these compare before and after images.Press F3/F8 (Mac/PC) to get a "Clone Variant" of your selected image. This will produce another preview of the selected imagewith the same adjustments applied. Press F2/F8 (Mac/PC) to create a "New Variant". This is a preview of the same image thathas had no adjustments applied (so it is in essence, a duplicate of your original RAW file). Alternatively, you can press ALT andclick “Local Reset” while holding and releasing the mouse button down to toggle that tool's adjustments on and off.
You can reset all adjustments made to an image by pressing the “Global Reset” icon. Alternatively, you can reset “Local”adjustments that have been made by a particular tool by pressing the small reset button located in the tool’s options.
Local Copy and Apply You can copy adjustments made with a tool to one or more images. To copy, press the small double-ended arrow icon on thetool. Select the settings to be copied in the “Adjustments Clipboard” and press “Copy”. Then select the images that you want toapply the (copied) changes to, and press the “Apply-arrow” in the top toolbar.
Quick tip: Quickly copy a local adjustment setting to a group of images.
First, select all images that you want to apply the setting to and remember to ensure that the image you're copying from is yourPrimary (marked with thick white border). Then hold SHIFT down and click the little double-ended arrow on the tool you'd liketo copy and apply. Now the adjustments are copied to all selected images. Changes made in one tool can also be saved as a“Preset”. See “To create a Preset”.
Global Copy and Apply By pressing the left-arrow (Copy) and the right-arrow (Paste) in the top toolbar you can do a “Global Copy and Apply” ofadjustments made in all tools to other images. All changes made to an image can also be saved as a “Style”. See “To create aStyle”.Capture One offers numerous customization possibilities. You can reposition the users interface to have the Image Browser orthe tools on the right hand side. To experiment with the default workspaces press Window > Workspace and select an optionthat best fits your workflow. You can also set preferences by going to Capture One > Preferences.
Page 64 of 84

Capture OneHelp site
Preferences and customization
You can customize Capture One to support your specific workflow, needs and preferences. You can manage keyboardshortcuts, customize the toolbar and setup your own workspaces. Try to experiment with workspace variations shipped withCapture One by going to Window>Workspaces.
Global application preferences
Customize toolbar Pro
Customized workspaces Pro
Page 65 of 84

Capture OneHelp site
Global application preferences
Capture One Preferences enables customization of the application to help aid workflow.
By choosing Capture One>Preferences [MAC] or Edit>Preferences [PC] you can choose to personalize Capture One by editingthe global applications preferences.
General Adjust function of mouse scroll wheel. Other options include whether or not to open a new Session in a new window.
Image Image preferences provide options to adjust the functionality or handling of different types of files.
Cache provides the option of adjusting the size of the proxy file. The higher the Preview Image Size, the higher quality of theQuickproof output recipe and preview image that Capture One generates. A large cache setting will, however, increase theamount of time it takes to load previews and thumbnails in the application.
If an .EIP workflow is preferred, then .EIP packing can be made automatically on import or capture (Phase One digital backsonly).
Many users shoot both RAW and JPEG simultaneously. To avoid working on JPEGs and TIFFs remove the Editing option toensure these files are viewable but not editable.
Metadata: When working in different applications, metadata will be stored in different ways. Choose your favored option. If nochoice is made, the metadata entered in Capture One will be preferred to 3rd party metadata.
Appearance in Preferences The background Pattern and Color of the Viewer can be adjusted to different shades of gray, white and black. The CaptureOne default is a dark neutral background. The size of margins can also be controlled here.
Capture in preferences Choose standard extension from Phase One digital back, IIQ or Raw TIF files. The TIF extension is default as it is compatiblewith older applications. It is important to emphasize that the TIF extension is a RAW file not the TIF format known from e.g.Photoshop®.
The pause settings for Live Preview can be controlled here.
Shutter Latency controls the timing between back and camera. Power Mode and Safe Mirror Up are both related to olderPhase One backs.
Removing check-marks from “Providers” will eliminate automatic start of Capture One when the individual camera brands areconnected to a computer.
Color in Preferences Color allows control of the Rendering Intent; how to convert one color to another. The conversion is referred to as RenderingIntent.
Perceptual (default)Compresses the total gamut from one device’s color space into the gamut of another device’s color space when one or morecolors in the original image is out of the gamut of the destination color space. This preserves the visual relationship betweencolors by shrinking the entire color space and shifting all colors – including those that were in gamut.
Saturation Reproduces the original image color saturation (vividness) when converting into the target device’s color space. In thisapproach, the relative saturation of colors is maintained from gamut to gamut. This render intent is primarily designed forbusiness graphics, where the exact relationship between colors (such as in a photographic image) is not as important as arebright saturated colors.
Relative Colorimetric When a color in the current color space is out of gamut in the target color space, it is mapped to the closest possible colorwithin the gamut of the target color space, while colors that are in gamut are not affected. Only the colors that fall outside ofthe destination gamut are changed. This Render Intent can cause two colors, which appear different in the source color space,to be the same in the target color space. This is called “clipping.” Relative colorimetric is the default method of color conversionbuilt into Photoshop 4.0 and earlier.
Absolute Colorimetric Colors match exactly with no adjustment made for white point or black point that would alter the image’s brightness. AbsoluteColorimetric is valuable for rendering “signature colors”, those colors that are highly identified with a commercial product suchas the yellow used by the Eastman Kodak Company™, or the red used by the Coca-Cola Company™.
Black Point CompensationWill improve the black tone when printing on different paper types. BPC can help achieve finer details in the darkest colors andgive shadow areas the same look and feel as seen on screen.
Page 66 of 84
Exposure in Preferences Adjust the values of exposure warning. When enabled in Capture One areas that fall outside the set values will be shown by acolor overlay.
By default the highlight warning value is 250 and the shadow warning is not enabled.
Double click on the highlight and shadow color area to change the overlay color. The default highlight color is red and theshadow is blue.
Crop in Preferences Adjusts the Crop tool settings e.g. crop Mask (graying of area outside the crop), Frame, Labels and Grids.
The appearance of Guides and the number of horizontal and vertical guides can also be selected here. Focus in Preferences The Focus Mask can be adjusted to increase and decrease the threshold setting for the preferred sharpness. The color (defaultis a lime green) and the opacity of the mask are also adjustable.
Update in Preferences This tab will show the registered and unregistered Capture One applications. The frequency of how often Capture One shouldbe checked for updates is also selectable here.
Capture One can register all Phase One products automatically or by prompt. Registering products will help support thedevelopment of future products and software features.
When an update is available it should be downloaded and installed “on-top” of the current installed application.
Page 67 of 84

Capture OneHelp site
Customize toolbar Pro
Capture One offers a wide range of customizations options. You can add icons to the top tool bar or reorder the tab-menu andcreate your own personal tool tab with selected tools, see “To create a personal tab”.
Click the “Customize Toolbar” icon to open the Customize Toolbar window. The Customize Toolbar feature is aplaceholder for icons - you can drag icons from the placeholder to a position in the toolbar or remove icons from the Toolbar bydragging them to the placeholder. NOTE: If “Customize Toolbar” icon is removed it can be found under the “View” menu and by Ctrl + Click on the toolbar itself.
Arrange toolbar
Page 68 of 84

Capture OneHelp site
Customized workspaces Pro
You can experiment with various workspaces by selecting Window > Workspace and select one that fits your workflow. Inaddition you can change the layout of the current workspace by selecting the options in View menu (e.g. View > Place ToolRight).
In principle you can add unlimited tools to your tool tab. When an area is crowded, the tools will automatically collapse to makemore space. However, it is recommended that you avoid this and keep tools open to help aid a smooth and efficient workflow.
To remove a tool tab
1. Choose View>Remove Tool Tab and select the tool tab that is not needed.2. Alternatively, select the tool that you want to remove and right click on an empty space in the tab. Now choose Remove(tool name) Tab from the drop down menu.
To create a personal tab
1. Choose View >Add Tool Tab.2. Alternatively, right click on an empty space in the tab.3. Choose Custom Tool Tab from the drop-down menu. 4. From the New Custom Tool Tab window, name the Tab and select an icon. 5. Right click in the empty tool tab and choose the desired tools.
NOTE: To rearrange the Tool tab menu press OPT/ALT (MAC/PC) and dragicons in the tab menu to the preferred position.
To create personal workspace
The View drop-down menu offers a wide variety of changes to the userinterface; some prefer the Image Browser on the right side, the tools on theleft side or the Viewer on full screen.
When the desired workspace is created follow the action points. 1. Choose Window >Save Workspace.2. In the Save Workspace window name the workspace.3. The workspace is now available from Window>Workspace.
Learn more about tool tabs
All tools can be removed from the tab, moved to float freely or grouped together if preferred. All individual tools can be moved to a second monitor. Select Window>Viewer to create an extra Viewer that can also bemoved to a second monitor.
Page 69 of 84

Capture OneHelp site
Shortcuts
To get an overview of all shortcuts choose Help>Keyboard Shortcut Summary.A complete list of all shortcuts will be generated in the primary browser.
To Create Personal Shortcuts on PC
1. Choose Edit >Keyboard Shortcuts.2. Press Duplicate.3. Name new shortcut set.4. Select the function that needs a new or different shortcut.5. To delete a shortcut press delete button on keyboard.6. To delete a complete set of personal shortcuts press delete button in thepop-up window.
To Create Personal Shortcuts on MAC
1. Choose Capture One>Edit Keyboard Shortcuts.2. Press Duplicate.3. Name new shortcut set.4. Select the function that needs a new or different shortcut.5. To delete a shortcut double-click on the shortcut and leave the shortcut.6. To delete a complete set of personal shortcuts press delete button in the pop-up window
Mouse Functionality
The Viewer Place the mouse cursor over an image in the Viewer; moving the scroll wheel up will zoom in and out of an imageaccordingly.
The Image Browser Place the mouse cursor anywhere in the Image Browser. Use the mouse scroll wheel to scroll up and down in the imagecollection.
Sliders and input fields Place the mouse cursor over a slider in any given tool and use the scroll wheel to fine-tune the slider settings.
Place the mouse cursor over any input field and adjust it by moving the scroll wheel up or down.
Curve points The mouse scroll wheel control can help fine-tune a Curve. Pick Curve points and use the mouse scroll wheel to preciselyadjust them as desired.
Page 70 of 84

Capture OneHelp site
Working in Sessions Pro
You can create a Session as a project container that primarily stores folder locations and paths to drives used in a project. Forquick access and fast loading of folders you can create favorite folders for the locations used in a particular project. Sessionsis especially useful when you are shooting tethered. Just create a tethered session, plug in the camera and capture the imagesdirectly to Capture One. This saves time compared to importing images after a shoot. Shooting tethered in Capture One canalso help users get superior control. A shoot can be scrutinized as it happens, to help users attain the perfect camera settingsto match the particular light and surroundings.
To create a new session
1. GO to Library tool tab and press + in the session tool or File>New Session.2. Name the Session.3. Re-name folders if desired.4. Decide the placement of the Session folders.5. Note that a tethered session will contain a Capture Folder.6. Press OK.
To open a session
1. Choose File>Open Session OR File>Open Recent Session.2. Browse the Session file and open “Sessionname.COL50”. N.B. The Session drop-down menu allows browsing between the previous 6 sessions.
To move location of a session
1. Browse the Session’s folder, and move all files in the folder.2. When moving a Session, the session subfolders should be linked relative, to assure automatic update of the link. If thelink is absolute, you will loose connection to the folders when changing location.
To delete files from a session
1. Select the files to be deleted.2. Press Backspace.3. The files are placed in the Session Trash Folder, where they can be deleted or retrieved.4. Empty Session Trash folder by selecting File>Empty Session Trash.
To work in two sessions simultaneously
1. When one session is open, choose File >Open Session.2. Browse and open the next session file “Sessionname.COL50”. 3. It is now possible to drag’n’drop images files from one Session to another.N.B. Capture One can handle numerous open Sessions at the same time.
Learn More
The Capture tool tab is present in an untethered session; you can remove the tab by right-clicking and choose RemoveTool Tab. The session drop-down menu allows browsing between the previous 6 sessions. Once a session is completed,close the window; all adjustments to files are instantly stored.
Page 71 of 84

Capture OneHelp site
Capture One provides a variety of ways to showcase your work. You can print photos, create a slideshow or export to a WebContact Sheet.
Output
Printing photos
Process recipe
File formats in Capture One
Web gallery
Page 72 of 84

Capture OneHelp site
Printing photos
This feature allows you to print selected images using customized print layouts (Margins, Rows, Columns and image size) withWatermarks, Annotations and Color profiles.Before adjusting other parameters select “TEMPLATES” and choose how many images you want to print on a page.Experiment with the check boxes in the “IMAGE SETTINGS” to familiarize yourself with the relationship between“TEMPLATES” and “IMAGE SETTINGS”.
IMAGES SETTINGS - Rotate to fill
Checkmark the “Rotate to fill” option to ensure all images have the samelayout and are rotated to fit the paper.
IMAGES SETTING - Zoom to fill
Enable the “Zoom to fill” option to attain a “Postcard” effect where all imagesare cropped to fill the paper. In the example below “Zoom to fill” is checkedand the TEMPLATE 2 x 2 cells is selected.
To Print or Preview images
1. Select images to print in the Browser.2. Choose File->Print... to display print sheet.3. Adjust page layout using TEMPLATES, MARGINS and LAYOUT tools.4. Adjust image appearance using ANNOTATION, IMAGE SETTINGS and WATERMARK tools.5. Adjust printer, output quality and Page Setup using PRINTER tool.6. Click the “Print…” button7. In Print panel choose additional Layout, Quality, pages to print via the preferences.8. Finally choose Preview (mac) or Save As PDF or Print(mac).9. Images will be rendered first in Capture One (with progress indication) then sent to Printer or PDF file or Preview.
To Change Print Page Setup
1. Choose File >Print... 2. Click “Page Setup...” in PRINTER tool.3. Change page attributes; click OK.4. Click Cancel to close Print sheet.
To Change current Printer
Page 73 of 84

1. Choose File > Print... 2. Click “Print Settings...” in PRINTER tool.3. MAC: Choose printer and click Save (MAC).4. PC: Choose printer by double clicking on the desired printer.5. Click Cancel to close Print sheet or Print to start printing.
To Change Print layout
1. Choose File > Print... 2. Choose a layout template in TEMPLATES tool.3. Adjust margins in MARGINS tool.4. Adjust Row, Columns, Spacing and Cell Size in the LAYOUT tool.5. Click Cancel to close Print Sheet.
To Change image settings
1. Choose File > Print... 2. Choose Zoom to Fill, Rotate to Fill, or Repeat on Image per Page in IMAGE SETTINGS tool.3. Choose an optional annotation (filename or IPTC Content Description) in ANNOTATION tool.4. Choose an optional watermark (text or image) in WATERMARK tool.5. Click Cancel to close Print Sheet.
To Change image appearance
1. Choose File > Print... 2. Adjust print Resolution, Sharpening, Color profile in PRINTER tool. (The Automatic resolution option will choose theresolution selected by the printer driver based on print quality).3. If a specific Color Profile is chosen, then also choose the rendering intent (Rend. Intent) and optionally Black PointCompensation.4. Click Cancel to close Print Sheet.
Page 74 of 84

Capture OneHelp site
You can customize Output Recipes and subsequently have any number of recipes processed simultaneously. You cancontinue working in Capture One while photos are processed in the background.
You can process images for output as TIFF, JPEG or DNG. Capture One provides a range of options for setting the filecompression, bit depth, color space, resolution and size. The Scale option is especially useful if you want to process imagesfor various purposes. Use the “Web Contact Sheet” option to get a quick showcase of your work that is easy to share. Thisoption produces and exports a folder with JPEGs into a web gallery that is compatible with most current Internet browsers.
You can customize your output workflow with “Output Recipes” to create, for example, multiple output recipes to process thesame collection of images for various output purposes.
Process recipe
To Create multiple process recipe Pro
1. Go to Output tool tab.2. In Process Recipes tool press “+”.3. Name the new recipe.4. In Process Recipe tool, choose the desired Format, bit depth, ICC profileand Resolution5. Choose the Scale setting from the drop-down menu. 6. Automatic opening of a processed image can be selected although this isnot recommended if multiple images are processed in one batch.7. File names are set using the Output Naming tool. Read more on namingfiles here.8. The output destination can be changed if the session folder is not thedesired output folder. A new output folder can be chosen in the “Output To”option. 9. In Advanced tab, choose the Root Folder if subfolders are used.10. Name subfolders.11. Choose the Metadata checkmarks options to include in the processedfiles. 12. Choose whether or not to include Watermark in the image from therelevant tab.13. Every step is instantly saved to the recipe and will re-appear next time therecipe is selected.
Multiple recipes are only available in PRO or DB version. Start at #4 if theinstalled version is not PRO.
To Process images
1. Select the image files for processing.2. Go to Output tool tab.3. In Process Recipes checkmark the necessary recipe(s) for the selected images.4. Press Process. 5. Processing can be stopped at any time, then edited and re-started from the Batch tool tab.
To Create Text Watermark Pro
1. Go to Output tool tab.2. In the Process Recipe tool choose the Watermark tab.3. From the Type drop-down menu select Text. 4. Type the Watermark in the Text Window.5. Press the character menu icon to adjust the text 6. The character menu will allow complete setup of the watermark text.
Page 75 of 84

6. The character menu will allow complete setup of the watermark text.7. Finish by adjusting the placement of the Watermark.
To Create graphical Watermark Pro
1. Go to Output tool tab.2. In the Process Recipe tool choose the Watermark tab.3. From the Type Drop-down menu select Image.4. Drag’n’drop a file to the image area or browse for an image using the File link below the image area.5. Adjust the Opacity and Scale of the Watermark image as desired.6. Adjust the position of the Watermark using the Horizontal and Vertical sliders or use the hand cursor tool.
N.B. Capture One supports all common image file format for use as a watermark.
To Process into different folders Pro
1. Go to Output tool tab.2. In the Process Recipe tool choose the Advanced tab.3. The Sub Folder will allow automatic creation of subfolders e.g. For jpeg files only.
To use multiple output recipes at the same time Pro
1. Go to Output tool tab.2. Checkmark all process recipes needed.3. Select the image files in need of processing.4. Press process button.
To edit the batch
1. Go to Batch tool tab.2. Choose queue tab. 3. A batch of files can be changed and reordered by drag’n’drop during processing.4. Any files can be removed from the batch queue at any time by highlighting the file and pressing backspace.5. The batch can be stopped and re-started at any time.
To reprocess files (History tab)
1. Go to Batch tool tab.2. Choose the History tab.3. Any previously processed file can be reprocessed if needed without reopening the individual session.
Learn more
Summary and benefits of each output setting:
Format TIFF for maximum quality. TIFF files provide the option of 16 bit output.
JPEG for size and convenience.
The JPEG QuickProof format will create ultra quick images for evaluation purposes. Capture will create the image file fromthe proxy file and the settings file without additional calculations or filters. JPEG QuickProof should not be considered as acompleted file; it is a file that is ideal for evaluation purposes only.
Outputting to DNG format in Capture One in essence creates a new RAW file. There are no options for size or compressionwith this format. All changes made to the image will be discarded when creating the DNG file.
Compression TIFF and JPEG files may be compressed. TIFF is lossless format, as are both forms of TIFF compression; LZW and ZIP.
JPEG is a compressed file, the higher the compression, the smaller the file. However, the higher the compression, thegreater the loss of information from the file. JPEG compression also adds noise to an image.
ICCChoice of Color space depends on the final purpose of the file.
ICC profiles can be selected in the Process Recipe tool. The Color space can also be changed to CMYK in View>ProofProfile. There is the same selection of color space options in this menu as there are in the ICC Profile choices in theProcess Recipe tool. Use this to make final adjustments after converting an image file.
Resolution Controls resolution can be change to pixels per inch, cm or mm.
Scale The Scale options in a recipe determine how much a cropped image will be scaled when processed with that recipe. Allscaling options will retain the original aspect ratio - scaling options will never cause a processed image to be distorted,
Page 76 of 84

scaling options will retain the original aspect ratio - scaling options will never cause a processed image to be distorted,cropped or rotated with other proportions other than the Capture One view.
Fixed: The image is scaled proportionally with the percentage specified.
Width: The image is scaled proportionally to the specified width.
Height: The image is scaled proportionally to the specified height.
Width x Height: The image is scaled proportionally to fit inside a box with the specified width and height. This is useful when you want to ensure that a set of processed images with different aspect ratios will fit on certain sizedpaper.
Dimensions: An image is scaled proportionally to fit inside a box with the specified dimensions. This is useful when youwant to process a mix of portrait and landscape images.The dimensions are interpreted as either width x height or height x width whatever yields the largest scale.
Long Edge: The image is scaled proportionally with the longest edge set to the specified value.
Short Edge: The image is scaled proportionally with the shortest edge set to the specified value.
Never Upscale: Limit the scale to a maximum of 100%.
Output Scaling New to Capture One is the ability to scale images on output from 10-250%. The option was previously only available in the Pro version of the software and means that upsizing images is as simple asselecting the output size required. As the scaling is carried out on the original data, the scaling is of the highest quality andsuitable for any type of use.
Open with Allows Capture One to automatically open a processed file in another selected application.
Naming Output naming provides a range of options for naming processed files. See “Output naming”.
Output To The “Output To” option enables an output destination to be chosen for processed files. Click on the button to navigate andselect a desired folder.
Process Summary The Process Summary window provides an overview of all the settings chosen for an image before processing.
This includes the actual and final processed size, name, format and file size.
Red figures are there as a warning that something will not be processed in a desired way. Check the red figures and makethe necessary alterations. E.g. Change the dimensions.
WatermarkIn general, all MAC/PC image files hold recognizable embedded thumbnails. This includes the most common files formatssuch as, jpeg, gif, png, EPS as well as other photographic files if a proper codec is installed. Read more on image codecson the relevant camera manufacturer’s website.
A watermark is added to an individual process recipe. When the process recipe is check-marked, the effects of this recipewill be shown on all images.
A watermark can be included in all processed images and on your web contact sheets to help protect the files that are sentto a client. If desired, watermarks cannot be removed from the processed file or from a web contact sheet.
MetadataThe advanced Process Recipe tab offers the option of removing the metadata.
Capture One offer 5 stripping options: Rating, Copyright, GPS coordinate, Camera data and “all other” to provide thenecessary options of data stripping for most photographer’s needs.
As default all information are included in the processed file apart from the Rating setting.
Metadata stripping settings are a part of each process recipe.
History The Batch tool tab shows a history of all recent files that have been processed. If for any reason, there is a need for furthercopies of these images, the relevant ones can be selected and the ‘Reprocess’ button selected.
Page 77 of 84

Capture OneHelp site
File formats in Capture One
RAW,IIQ and TIF
EIP
Colors in Capture One
Page 78 of 84

Capture OneHelp site
RAW,IIQ and TIF
Capture One and RAW
RAW data is generated when light is received by the photodiodes on a sensor. Depending on the intensity of the light astronger or weaker signal is generated. This data is read off and stored as unprocessed data on the memory card.
A RAW file contains more than one set of data. A DSLR file contains calibrated RAW data plus the file header. A digitalback file contains the actual raw data, calibration data for the digital back files and the file header information.
The file header is kept separate from the image data in digital back raw files. The file header contains what is described asmetadata; data about data. Metadata is information recorded by the camera at the time of capture and consists of thefollowing: • Image Thumbnail (usually a TIF, but sometimes a JPEG) • Time/Date • ISO • Exposure information • White Balance (that the image was shot at) • Contrast curve • Recorded pixel size • Camera data (shutter speed/aperture/focal length etc)
More than 100 pieces of data are stored all together.
The White Balance determines how the file will look when Capture One creates the preview. The ISO, exposure data andcamera model information are used to calculate the noise reduction used by Capture One.
Capture One “de-mosaic” the RAW-file information to produce image files with three colors per pixel. This process uses anextremely sophisticated and patented algorithm.
The in-camera ISO and White Balance settings are applied to the image together with the formula developed for CaptureOne when the preview is created and displayed in the Viewer.
Once the preview file has been created, nearly all the variables can be changed such as Contrast Curves, Sharpening andWhite Balance e.g. all are applied to the image when the preview is created by Capture One and displayed in the Viewer.
The adjustments made to the image in Capture One are applied to the preview and added to a settings file. No changesare made to the RAW data at any time.
Once the process button is pressed, RAW data is processed using the settings file. At this point the true pixel-based imageis formed and output to specific dimensions.
IIQ RAW S and IIQ RAW L
Phase One digital back users can choose between storing their tethered captures in 2 different types of compressed RAWfiles. The format for the captures can be set by using the Camera tool in the Capture tab.
Intelligent Image Quality RAW, IIQ RAW, is an intelligent way of turning the full 16 bit image data captured by the camerainto a compact RAW file format.
What makes the IIQ large RAW format unique is that it is completely lossless. IIQ RAW Large can be processed into a 16bit TIFF even though it is only half the size of a traditional RAW file.
IIQ RAW Small format is based on the full 16 bit data captured by the CCD, but unlike IIQ RAW Large it is not 100%lossless. If the capture is made on low ISO and well exposed, there will be no significant difference.
Capture One and JPEG, TIFF etc.
Capture One can support and edit JPEG and TIFF files. Many DSLR and smaller digital cameras can create a JPEG atvery high quality, which can be further adjusted and improved in Capture One.
JPEG is short for Joint Photographic Experts Group. It is a compressed format that in definition is a lossy-format, whichmeans you lose some of the original information in the image file but benefit by having a much smaller file than TIFF orRAW. Jpeg organization = http://www.jpeg.org/
Page 79 of 84

Jpeg organization = http://www.jpeg.org/
TIFF stands for Tagged Image File Format. It is a popular lossless format that provides high color depth, and loads ofgraphical possibilities. TIFF files are known as an output format but are now supported by most graphics and photographicapplications.
JPEG and TIFF are files already processed to a certain level, either by a camera’s internal software or in conversionsoftware such as Capture One. When Capture One locates a file, the White Balance (WB) setting is determined by thecamera that captured the image or by the conversion software that originally created the file.
The White Balance setting can be adjusted. But note, a jpg or tiff file usually has a significant smaller dynamic rangecompared to RAW capture that might result in burned or darkened areas when the auto White Balance is applied or if theWhite Balance Picker tool is used to set White balance.
Page 80 of 84

Capture OneHelp site
EIP
Enhanced Image Package is a convenient way of packing your master file for a true Capture One user based workflow. Theimage file will be seen exactly as you created it. The original untouched RAW file will be packed with your setting file, ICC andLCC profile. Using .EIP will, in essence, simply pack the aforementioned files. .EIP does not copy the files so you will not need more diskspace. You will find the .EIP in the same folder that the RAW file was placed and the .EIP will have the same name as theoriginal RAW file. .EIP will support RAW files from any Phase One back.
To Pack as .EIP
1. Select the intended images that will be packed as .EIP2. Choose File > Pack as EIP3. The files are now automatically packed and will be named .EIP
To Unpack .EIP files
1. Select the images that need to be unpacked.2. Choose File>Unpack EIP3. The files are now automatically unpacked and will display the original file extension.
Note that unpacking is not necessary to further edit image files
To automatically convert all phase one digital files to .EIP
1. Choose Capture One>Preferences. 2. Open the Image tab.3. Checkmark Pack as EIP when importing.4. Checkmark Pack as EIP when capturing.
The image file is now integrated in the Enhanced Image Package. The .EIP is simply replacing the image files. The settingfiles will be removed from the relevant folders and will also be included in the package.
Page 81 of 84

Capture OneHelp site
Colors in Capture One
Capture One deals with color in two ways; internally and for output.
Internal Color: Capture One works in a very large color space, similar to that captured by camera sensors. A large color spaceensures that little clipping of the color data can occur. Clipping is the loss of image information in a region of an image.Clipping appears when one or more color values are larger than the histogram (color space of the output file).
At the end of the workflow, the RAW data has to be processed to pixel based image files, in defined color spaces. Thesespaces are smaller than the internal color space used by Capture One. When processing, some color data will be discarded.This is why it is paramount to perform color corrections and optimizations to images before processing to a smaller colorspace.
Capture One provides accurate color by reading the camera-generated RAW information, file header and settings file
A RAW file is assigned a color profile once Capture One has established which camera model has been used. The RAW datais then translated to the internal working color space of Capture One and it is here that edits can be applied.
Image data is converted, by means of ICC profiles, to industry standard spaces such as Adobe RGB or sRGB during theprocessing stage.
Purpose and Color spaces
Color output settings Capture One Express can output to any RGB color space while Capture One PRO can also output CMYK. (It is necessarythat the ICC profile is available on the local machine).
For Web Images that are intended to be published on web sites should be processed into the sRGB color space as few web-browsers are capable of color management and the subtleties of images will not only be lost but can also be incorrectlydisplayed.
For Print Images for print should be output to suit the requirements of the client or lab. Adobe RGB color space is a large colorspace that is capable of expressing a wider gamut of colors than sRGB. RGB is therefore the preferred choice for imagesthat are likely to receive extensive processing or retouching.
Camera Profiling Embedding the ICC color profile into the processed file (ICC Profile> Embed Camera profile) ensures that no color changesare made to the image data, which is particularly important for creating camera profiles.
Retouching/Manipulation Image files that are intended to receive intensive retouching and manipulation can benefit by being processed and outputin 16 bit to ProPhoto RGB, which is an even larger color space than Adobe RGB.
CMYK Color spaces Capture One Pro provides a selection of the most common CMYK color spaces. The photographer can convert to CMYKduring processing to secure picture quality instead of applying this color space conversion in postproduction. CMYK iscontrolled on the output tab.
To Control color space
The default setting displays the image in the viewer in the color space that is selected in the highlighted Process Recipe.
To ensure image quality for off-set printing; Highlight the CMYK process recipe and the colors are instantly converted to thecolor space selected in the process recipe. Perform final corrections before processing.
By using View>Proof Profile you can select a fixed color profile. Please note that colors may fluctuate widely betweendifferent color spaces. It is therefore recommended to do your editing in the color space that you intend to output.
To set permanent color space
1. Choose View > Proof Profile.2. Select the desired profile or output recipe for permanent usage in the Viewer.
Note: A permanent Color Profile seen in the Viewer may produce moderately different colors than the actual output image.
Page 82 of 84

Capture OneHelp site
Web gallery
Introduction
The Web Contact Sheet module lets you showcase your work by creating web photo galleries. You can create a webgallery from a selection of flexible templates for impressive web based images presentations. You can insert a title, a textdescription and a copyright and set the image size and quality (e.g. smaller size files when zipping and e-mailing to aclient).
To create a Web Contact Sheet
1. Select the images in the Browser.2. Press File > “Make Web Contact Sheet”.The Web Contact Sheet module opens in a small window on top of theCapture One window. 3. Select a template.4. Set the desired thumbnail and preview size.5. Select a folder in the Web Sheet Output tool Notice that you can checkmark the “Show after Export” if you want to see thegallery in your web browser. 7. Press the “Export” button.
Image Caption
You can select which caption to show in the Web Contact Sheet below aselected image. If you use the filename (see Output naming) in anydescriptive way (e.g. rating or personal notes) then you can set the caption tosequence number.
Page 83 of 84