Can the router table serve as a joiner? About 6 years … · Can the router table serve as a...
37
Can the router table serve as a jointer? Can the router table serve as a joiner? About 6 years ago I was preparing a technical manual on a router table and the manufacturer insisted that it could work. I set it up and was amazed at how well it worked. Now you can see by the pic at right that I have not abandoned my 6" long bed joiner, but in the pictures below I will demonstrate how it is done. If your router table has a split fence as does this one from Woodhaven, it is a simple matter of loosening the screws on the left hand side and slipping in shim material. I use a scrap of Formica in which I have cut slots to go around the screws. There are many ways to shim the left hand fence out. For me, using Formica is fast, simple and accurate. I just slide the shim in place and re-tighten the screws. With the router unplugged, I install a straight cutting bit. This one has a pattern bearing which is useful for setting the depth of cut accurately but you can use any straight bit. The bearing isn't used but for setup.
Transcript of Can the router table serve as a joiner? About 6 years … · Can the router table serve as a...
Can the router table serve as a jointer?
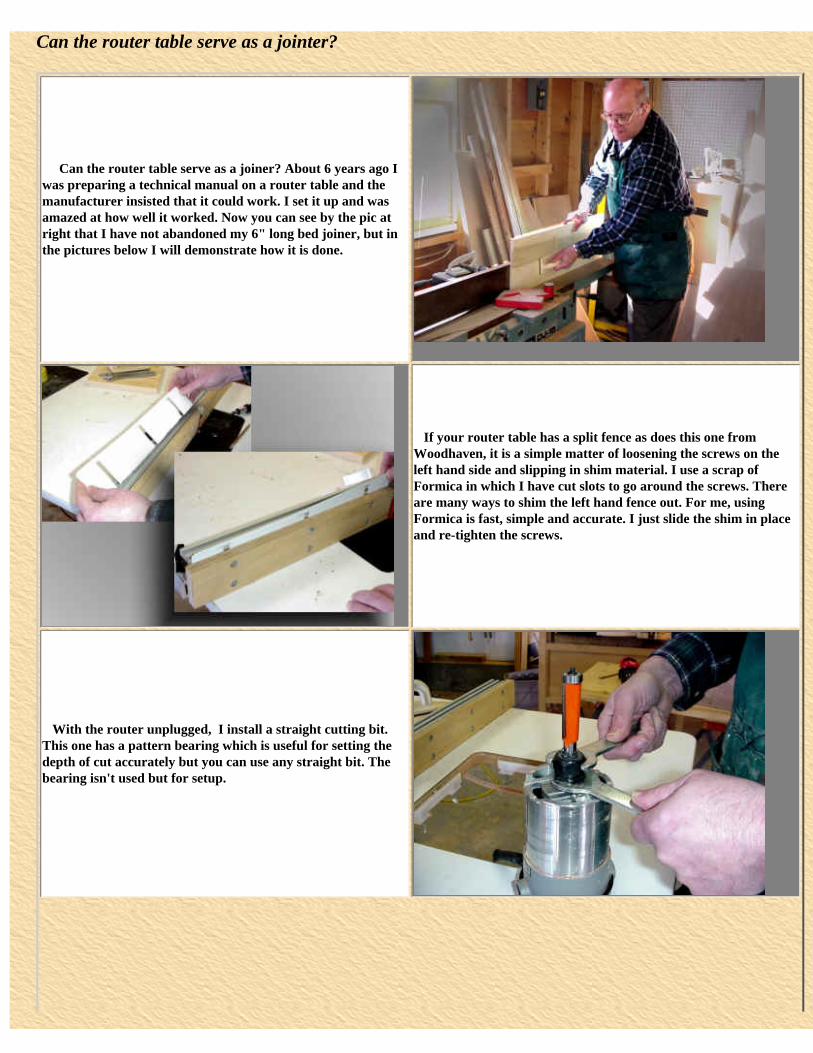
Can the router table serve as a joiner? About 6 years ago I was preparing a technical manual on a router table and the manufacturer insisted that it could work. I set it up and was amazed at how well it worked. Now you can see by the pic at right that I have not abandoned my 6" long bed joiner, but in the pictures below I will demonstrate how it is done.
If your router table has a split fence as does this one from Woodhaven, it is a simple matter of loosening the screws on the left hand side and slipping in shim material. I use a scrap of Formica in which I have cut slots to go around the screws. There are many ways to shim the left hand fence out. For me, using Formica is fast, simple and accurate. I just slide the shim in place and re-tighten the screws.
With the router unplugged, I install a straight cutting bit. This one has a pattern bearing which is useful for setting the depth of cut accurately but you can use any straight bit. The bearing isn't used but for setup.
Project - Stickley Style Writing Desk - "Making the Top"...continued
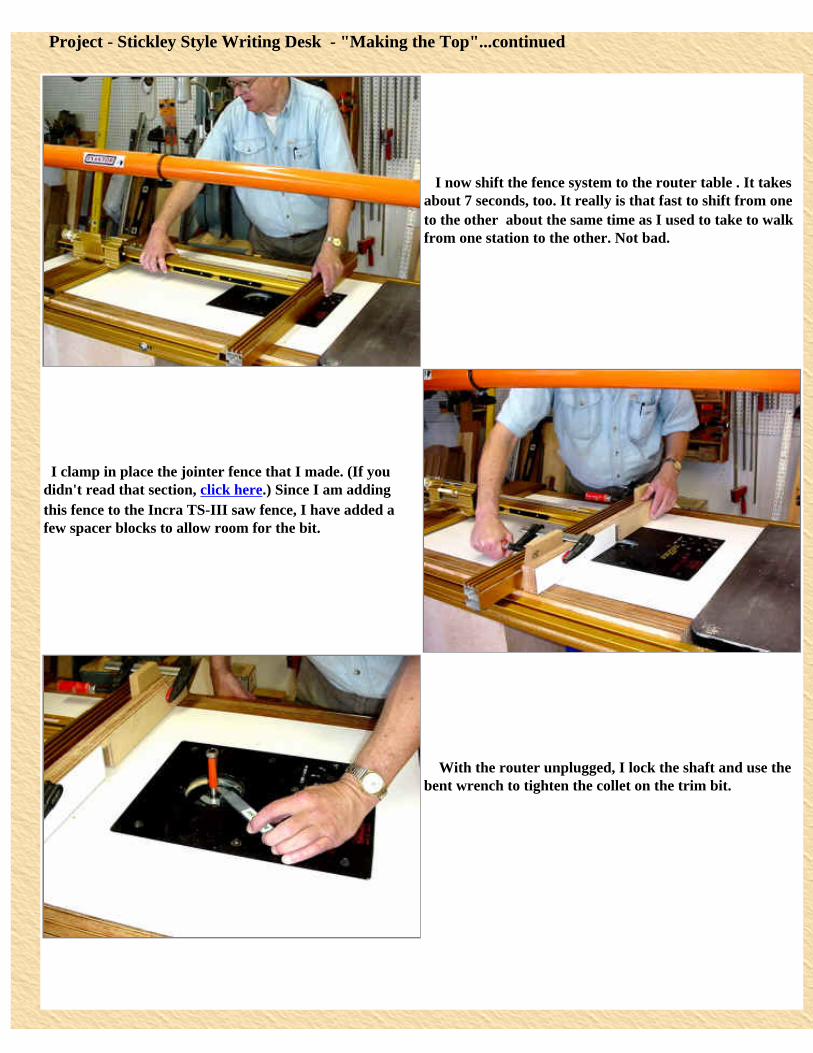
I now shift the fence system to the router table . It takes about 7 seconds, too. It really is that fast to shift from one to the other � about the same time as I used to take to walk from one station to the other. Not bad.
I clamp in place the jointer fence that I made. (If you didn't read that section, click here.) Since I am adding this fence to the Incra TS-III saw fence, I have added a few spacer blocks to allow room for the bit.
With the router unplugged, I lock the shaft and use the bent wrench to tighten the collet on the trim bit.
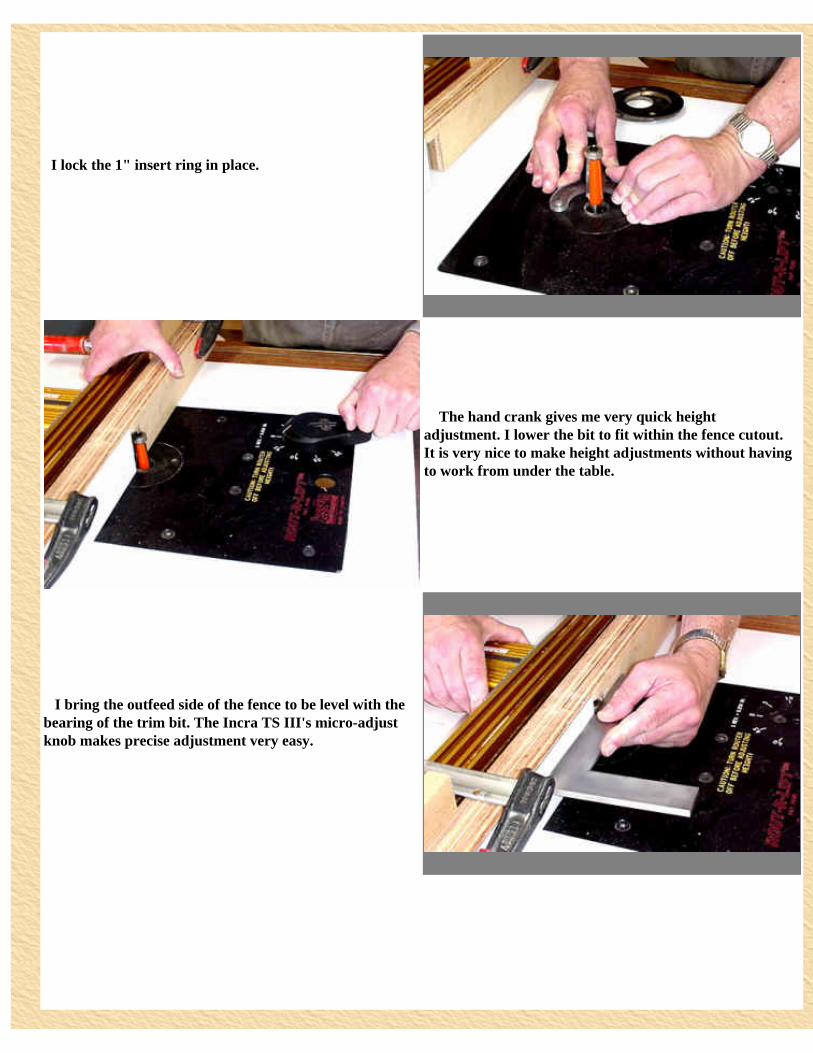
I lock the 1" insert ring in place.
The hand crank gives me very quick height adjustment. I lower the bit to fit within the fence cutout. It is very nice to make height adjustments without having to work from under the table.
I bring the outfeed side of the fence to be level with the bearing of the trim bit. The Incra TS III's micro-adjust knob makes precise adjustment very easy.

I run all the boards through the jointer. I have wedged a vacuum pick up between the fences. This type bit exhausts its dust behind the fence so a vacuum pick up is necessary in some form. I plan to make a fence that includes a dust collection port � coming soon.
The boards look good and tight.
My next step is to cut slots for biscuits. I mark each of the joining boards at four points along the length. Note that I have flipped the boards over. The bottom sides are up now. I want this side up when I cut the slots. That way the top side will be down and flat to the router table. If there is any discrepancy in thickness, the top, at least, should be nice and flat.
Main Menu Previous Page Next Page
http://www.woodshopdemos.com/ss-p2-2.htm (3 of 3) [09/09/2008 12.30.58]

Project - Stickley Style Writing Desk - "Making the Top"...continued
Earlier in the week, I had time to figure out how to use the router table for making biscuit joints. (If you haven't seen that page, click here.) Now is the time to use what I learned. At the router table, I install the 5/32" slotting cutter. As with all the bits, I press the bit until it seats in the collet. Remember, I have placed two "O"-rings in the collet to serve as the spacer that is required. (This was discussed in an earlier site - click here to go there.)
I place the auxiliary fence on the table and set the router bit height to the opening. This fence opening was cut for centering the slot on 3/4" stock, so this should work fine for the table top. The Rout-R-Lift height adjustment is very fine. Turning the crank one revolution raises or lowers the bit 0.05". This makes fine tuning the bit height a breeze.
With the bit in the opening, I know the fence is centered so I clamp it here. Note that I have added spacer blocks between the auxiliary fence and the Incra TS III fence. This allows for me to wedge a vacuum pick up in between the fences. As I said earlier, I plan to make an auxiliary fence that will connect directly to the dust collector.
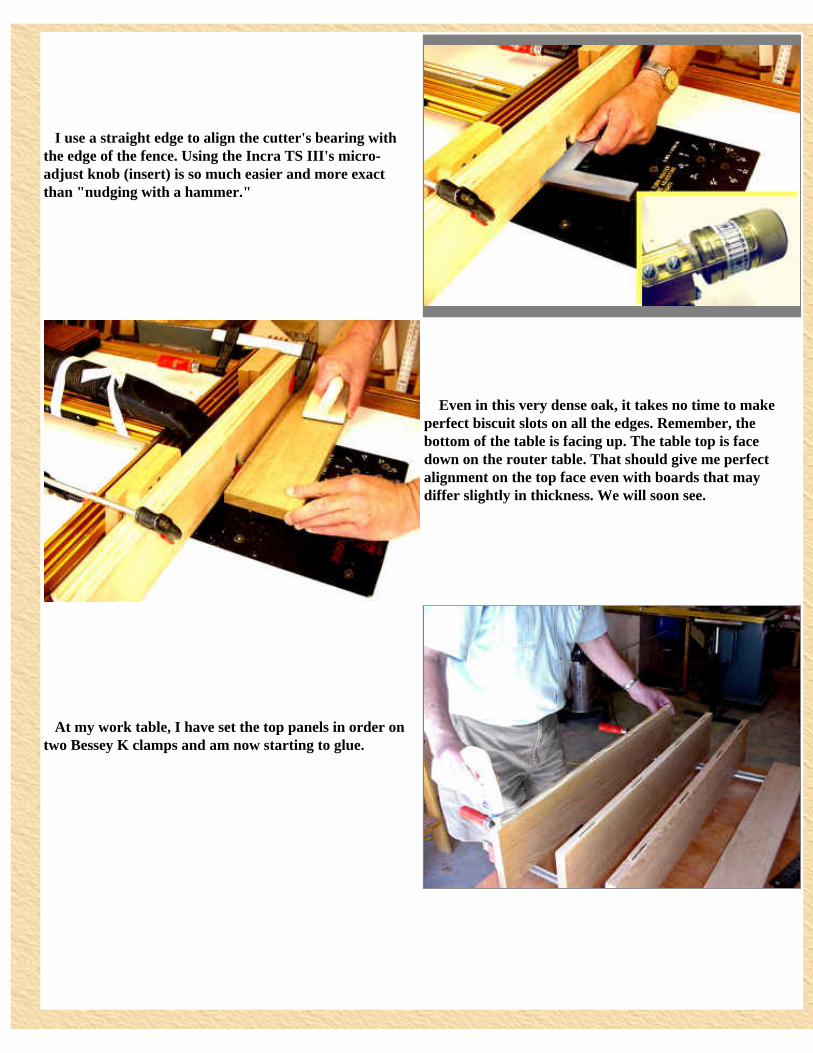
I use a straight edge to align the cutter's bearing with the edge of the fence. Using the Incra TS III's micro-adjust knob (insert) is so much easier and more exact than "nudging with a hammer."
Even in this very dense oak, it takes no time to make perfect biscuit slots on all the edges. Remember, the bottom of the table is facing up. The table top is face down on the router table. That should give me perfect alignment on the top face even with boards that may differ slightly in thickness. We will soon see.
At my work table, I have set the top panels in order on two Bessey K clamps and am now starting to glue.
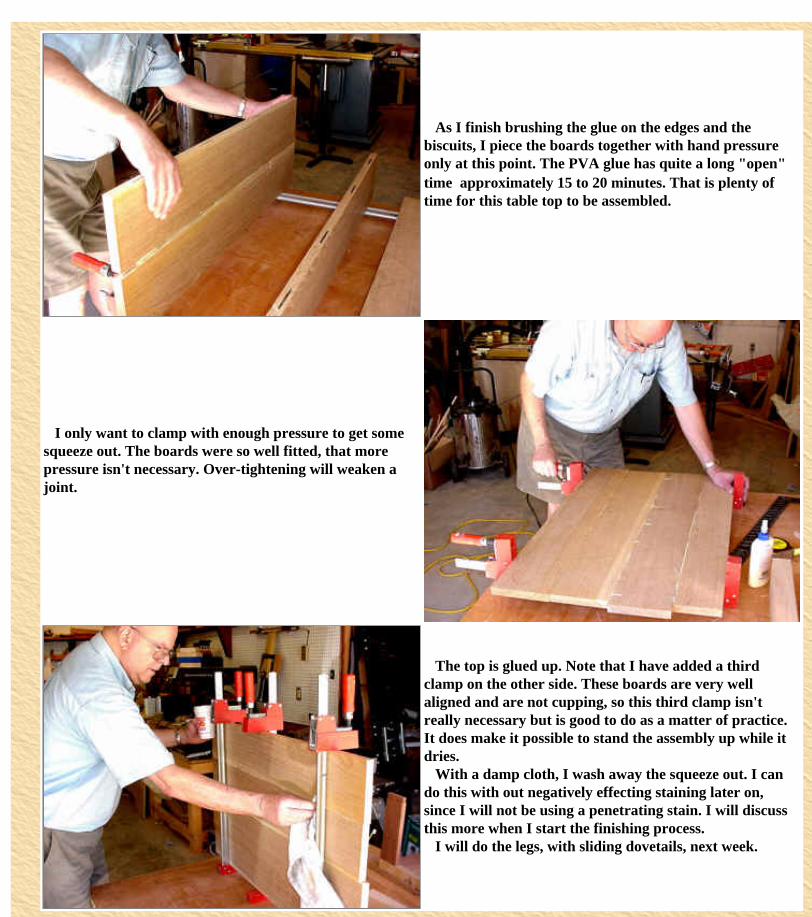
As I finish brushing the glue on the edges and the biscuits, I piece the boards together with hand pressure only at this point. The PVA glue has quite a long "open" time � approximately 15 to 20 minutes. That is plenty of time for this table top to be assembled.
I only want to clamp with enough pressure to get some squeeze out. The boards were so well fitted, that more pressure isn't necessary. Over-tightening will weaken a joint.
The top is glued up. Note that I have added a third clamp on the other side. These boards are very well aligned and are not cupping, so this third clamp isn't really necessary but is good to do as a matter of practice. It does make it possible to stand the assembly up while it dries. With a damp cloth, I wash away the squeeze out. I can do this with out negatively effecting staining later on, since I will not be using a penetrating stain. I will discuss this more when I start the finishing process. I will do the legs, with sliding dovetails, next week.

SuperStation Project - Stickley Style Writing Desk - "Legs and Sides"
This picture says a whole lot. First, in the background, note that I have a Performax thickness sander that I would normally use for sanding the glued up desk top. I chose, instead, to use a cabinet scraper because it gives a finer end finish. Secondly, the top was so flat, that little scraping was required. Lastly, I am trying to do this project sticking to the SuperStation. To use the Performax would be like Norm* going to his $14,000 Timesaver wide belt sander � not really fair for the rest of us. So scraping I did. and I enjoyed every minute of it.
* No ill meaning towards Norm. On the contrary, I love what he, and the New Yankee Workshop, has done for woodworkers.
I cut the width of the desk top using the sliding table. I said last week, that this top does not get any edge treatment other that the slightest round over, which I will do later on.
Cutting the legs to length is a breeze, too. It helps to be using the fence stop � the table should stand level with four equal legs.
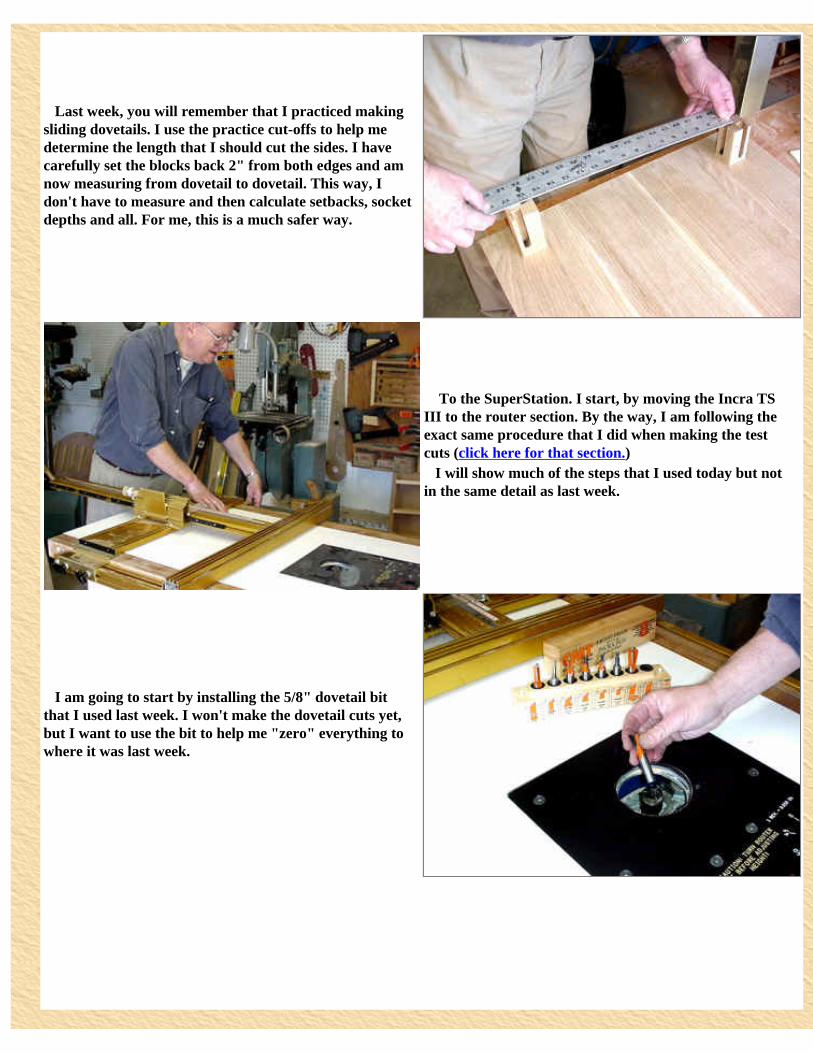
Last week, you will remember that I practiced making sliding dovetails. I use the practice cut-offs to help me determine the length that I should cut the sides. I have carefully set the blocks back 2" from both edges and am now measuring from dovetail to dovetail. This way, I don't have to measure and then calculate setbacks, socket depths and all. For me, this is a much safer way.
To the SuperStation. I start, by moving the Incra TS III to the router section. By the way, I am following the exact same procedure that I did when making the test cuts (click here for that section.) I will show much of the steps that I used today but not in the same detail as last week.
I am going to start by installing the 5/8" dovetail bit that I used last week. I won't make the dovetail cuts yet, but I want to use the bit to help me "zero" everything to where it was last week.
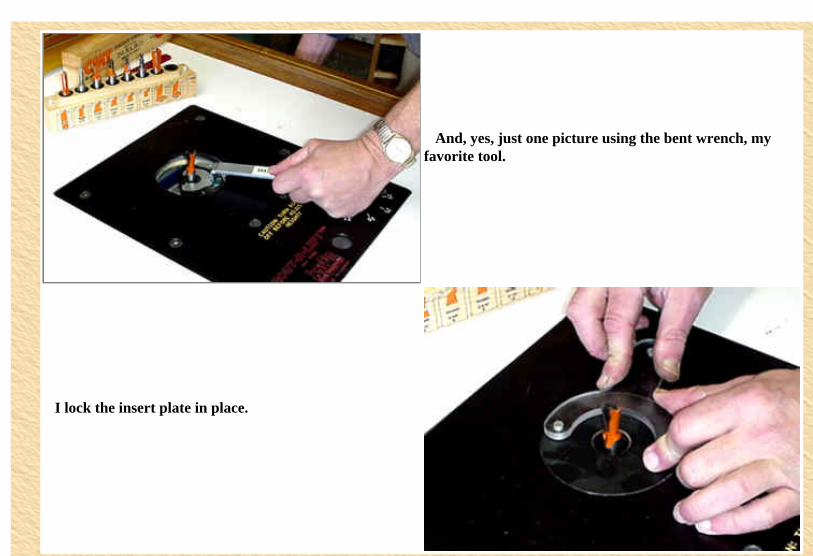
And, yes, just one picture using the bent wrench, my favorite tool.
I lock the insert plate in place.
Main Menu Previous Page Next Page
http://www.woodshopdemos.com/ss-p2-4.htm (3 of 3) [09/09/2008 12.32.40]

SuperStation Project - Stickley Style Writing Desk - "Legs and Sides"...continued.
I add the Incra router fence to the TS-III fence and center it over the bit.
I could have used the settings I came up with last week, but, instead, use my sample piece to set the fence to the correct distance and the bit to the right height.
Once the fence is positioned and locked, I adjust the scale to zero.
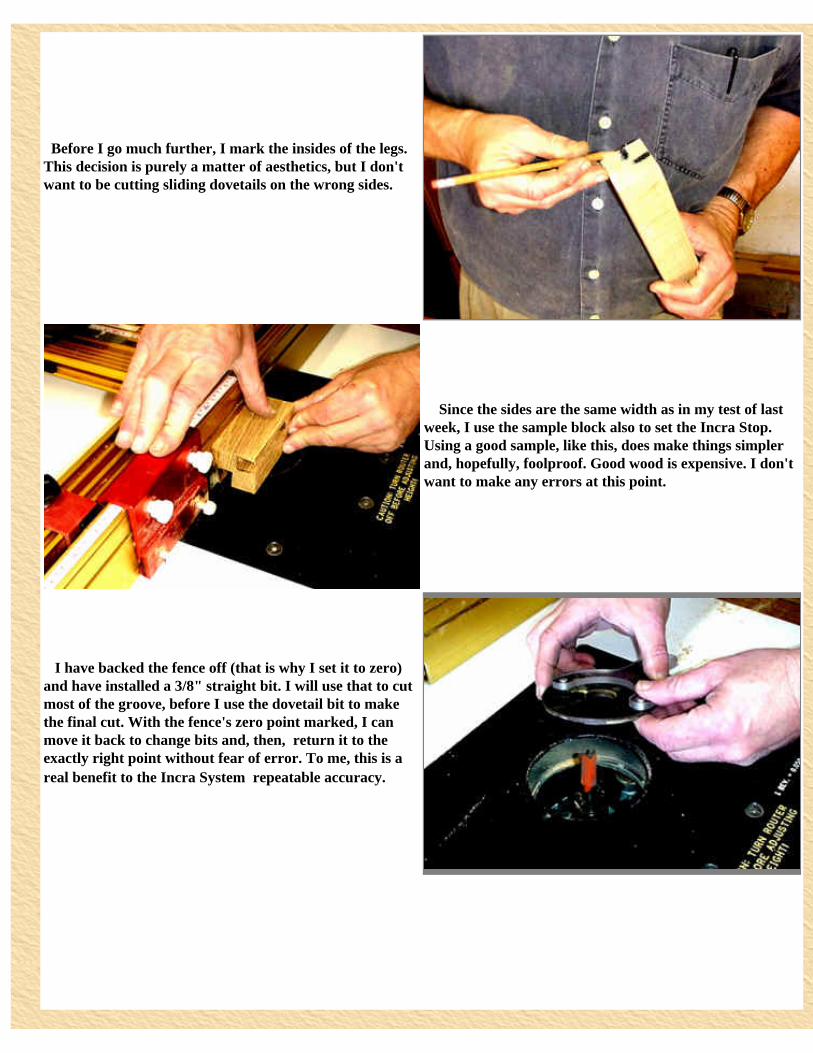
Before I go much further, I mark the insides of the legs. This decision is purely a matter of aesthetics, but I don't want to be cutting sliding dovetails on the wrong sides.
Since the sides are the same width as in my test of last week, I use the sample block also to set the Incra Stop. Using a good sample, like this, does make things simpler and, hopefully, foolproof. Good wood is expensive. I don't want to make any errors at this point.
I have backed the fence off (that is why I set it to zero) and have installed a 3/8" straight bit. I will use that to cut most of the groove, before I use the dovetail bit to make the final cut. With the fence's zero point marked, I can move it back to change bits and, then, return it to the exactly right point without fear of error. To me, this is a real benefit to the Incra System � repeatable accuracy.

I cut the groove, with straight bit, making several shallow passes. I have used the Rout-R-Lift's hand crank to adjust the bit down from the final height. In doing this, I have counted the number of turns of the crank. I went down exactly 10 turns from the set height, and now I keep track of the turns as I raise the bit and make the passes. When I have added 10 turns, I know I have reached the right height. Note that I am cutting only the one groove on each leg. I will complete this one and then reset the fence and do the other.
After I have cut the straight groove to depth, I switched to the dovetail bit and made one pass. Even in the dense oak, the dovetail bit cuts smoothly. It would have done nothing but burn if the straight bit hadn't done its work first. There is no way to get around this two step method. The Rout-R-Lift and Incra System make the task very easy and accurate.
With the one dovetail groove done on each of the legs, I use my sample block and move the fence to the other dovetail position. I lock the fence here and reset the scale to zero. I then repeat the operation of cutting several shallow cuts with the straight bit, followed by the dovetail cut.

So here I am making that final dovetail cut on the last of the four legs. Even with all the setting and resetting, this leg cutting operation took about 20 minutes. What I like best about it is that it is a safe way to cut the legs, and they came out perfectly. Now it's time to cut the sides to fit.
Main Menu Previous Page Next Page
http://www.woodshopdemos.com/ss-p2-41.htm (4 of 4) [09/09/2008 12.33.31]
SuperStation Project - Stickley Style Writing Desk - "Legs and Sides"...continued.
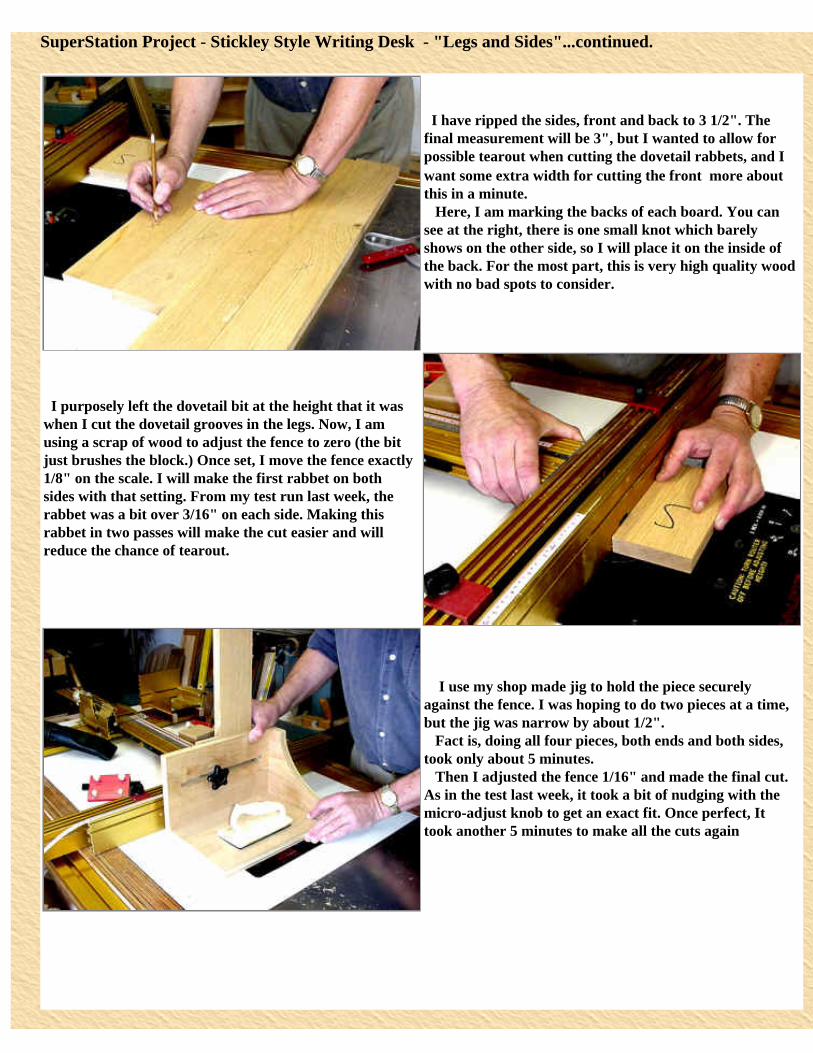
I have ripped the sides, front and back to 3 1/2". The final measurement will be 3", but I wanted to allow for possible tearout when cutting the dovetail rabbets, and I want some extra width for cutting the front � more about this in a minute. Here, I am marking the backs of each board. You can see at the right, there is one small knot which barely shows on the other side, so I will place it on the inside of the back. For the most part, this is very high quality wood with no bad spots to consider.
I purposely left the dovetail bit at the height that it was when I cut the dovetail grooves in the legs. Now, I am using a scrap of wood to adjust the fence to zero (the bit just brushes the block.) Once set, I move the fence exactly 1/8" on the scale. I will make the first rabbet on both sides with that setting. From my test run last week, the rabbet was a bit over 3/16" on each side. Making this rabbet in two passes will make the cut easier and will reduce the chance of tearout.
I use my shop made jig to hold the piece securely against the fence. I was hoping to do two pieces at a time, but the jig was narrow by about 1/2". Fact is, doing all four pieces, both ends and both sides, took only about 5 minutes. Then I adjusted the fence 1/16" and made the final cut. As in the test last week, it took a bit of nudging with the micro-adjust knob to get an exact fit. Once perfect, It took another 5 minutes to make all the cuts again
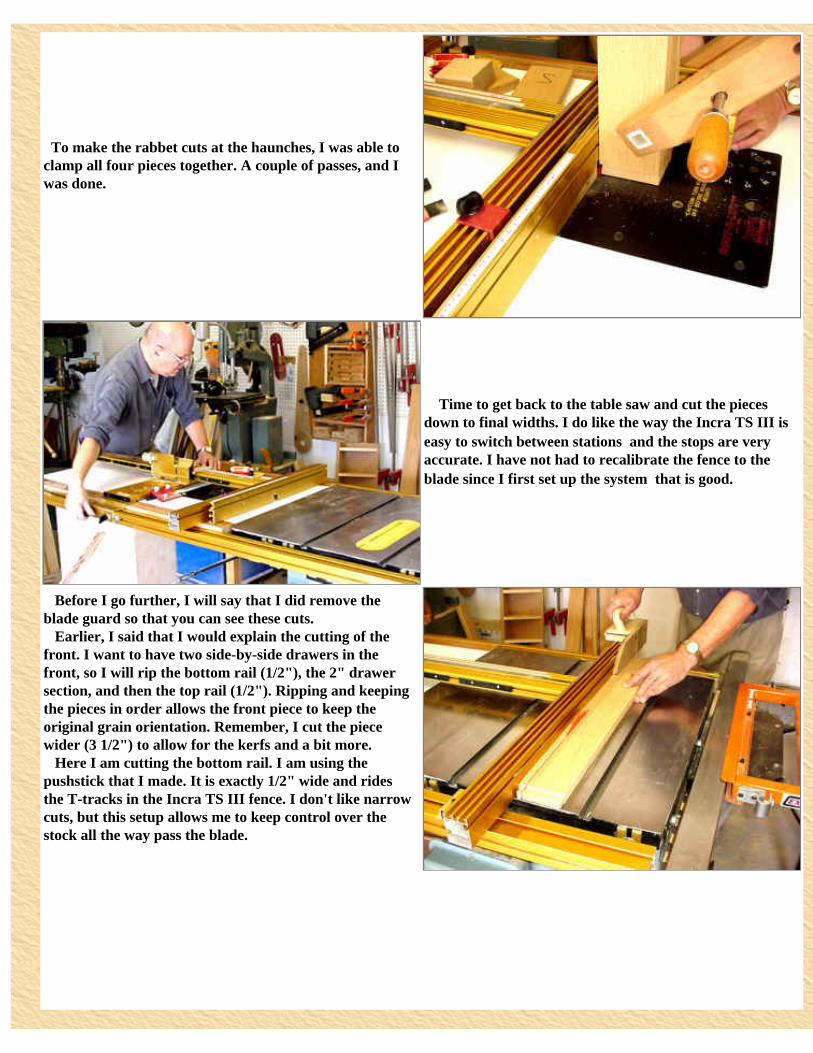
To make the rabbet cuts at the haunches, I was able to clamp all four pieces together. A couple of passes, and I was done.
Time to get back to the table saw and cut the pieces down to final widths. I do like the way the Incra TS III is easy to switch between stations � and the stops are very accurate. I have not had to recalibrate the fence to the blade since I first set up the system � that is good.
Before I go further, I will say that I did remove the blade guard so that you can see these cuts. Earlier, I said that I would explain the cutting of the front. I want to have two side-by-side drawers in the front, so I will rip the bottom rail (1/2"), the 2" drawer section, and then the top rail (1/2"). Ripping and keeping the pieces in order allows the front piece to keep the original grain orientation. Remember, I cut the piece wider (3 1/2") to allow for the kerfs and a bit more. Here I am cutting the bottom rail. I am using the pushstick that I made. It is exactly 1/2" wide and rides the T-tracks in the Incra TS III fence. I don't like narrow cuts, but this setup allows me to keep control over the stock all the way pass the blade.
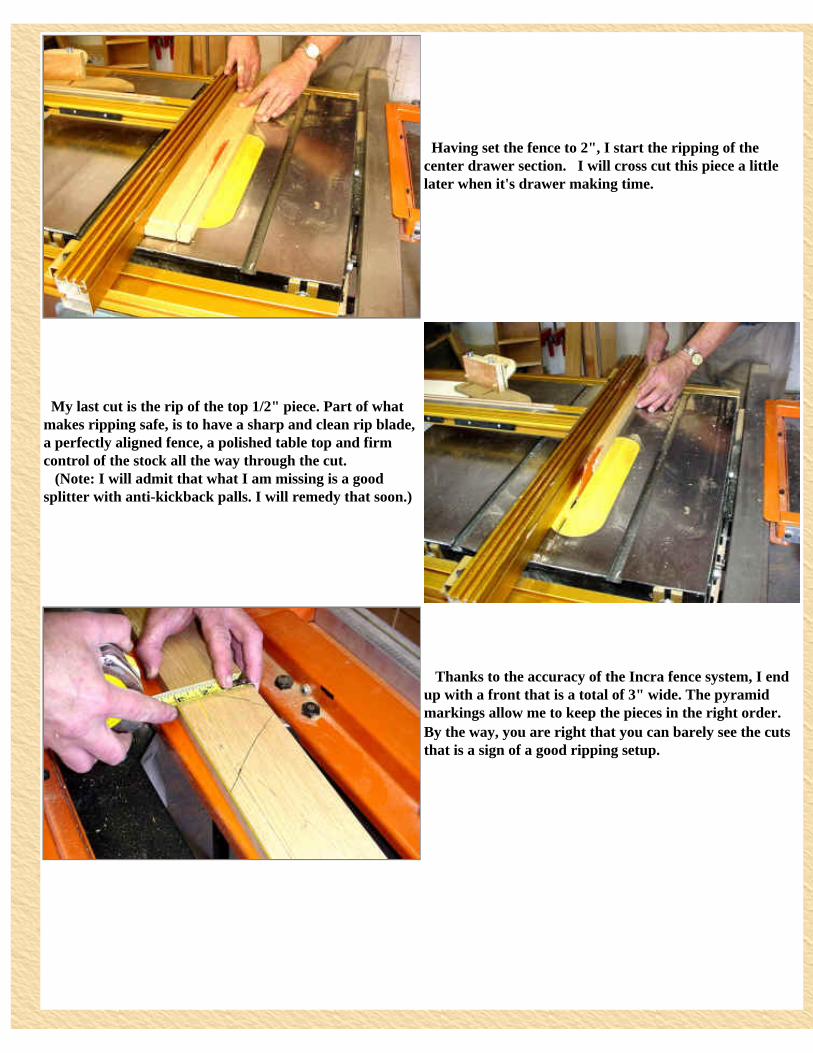
Having set the fence to 2", I start the ripping of the center drawer section. I will cross cut this piece a little later when it's drawer making time.
My last cut is the rip of the top 1/2" piece. Part of what makes ripping safe, is to have a sharp and clean rip blade, a perfectly aligned fence, a polished table top and firm control of the stock all the way through the cut. (Note: I will admit that what I am missing is a good splitter with anti-kickback palls. I will remedy that soon.)
Thanks to the accuracy of the Incra fence system, I end up with a front that is a total of 3" wide. The pyramid markings allow me to keep the pieces in the right order. By the way, you are right that you can barely see the cuts � that is a sign of a good ripping setup.
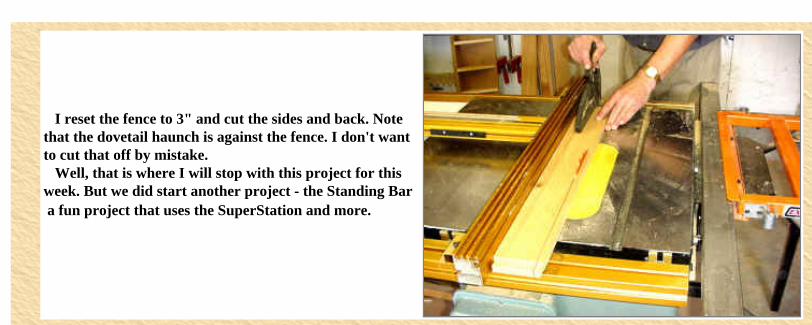
I reset the fence to 3" and cut the sides and back. Note that the dovetail haunch is against the fence. I don't want to cut that off by mistake. Well, that is where I will stop with this project for this week. But we did start another project - the Standing Bar � a fun project that uses the SuperStation and more.
Main Menu Previous Page Next New Project "The Bar"
http://www.woodshopdemos.com/ss-p2-5.htm (4 of 4) [09/09/2008 12.34.35]
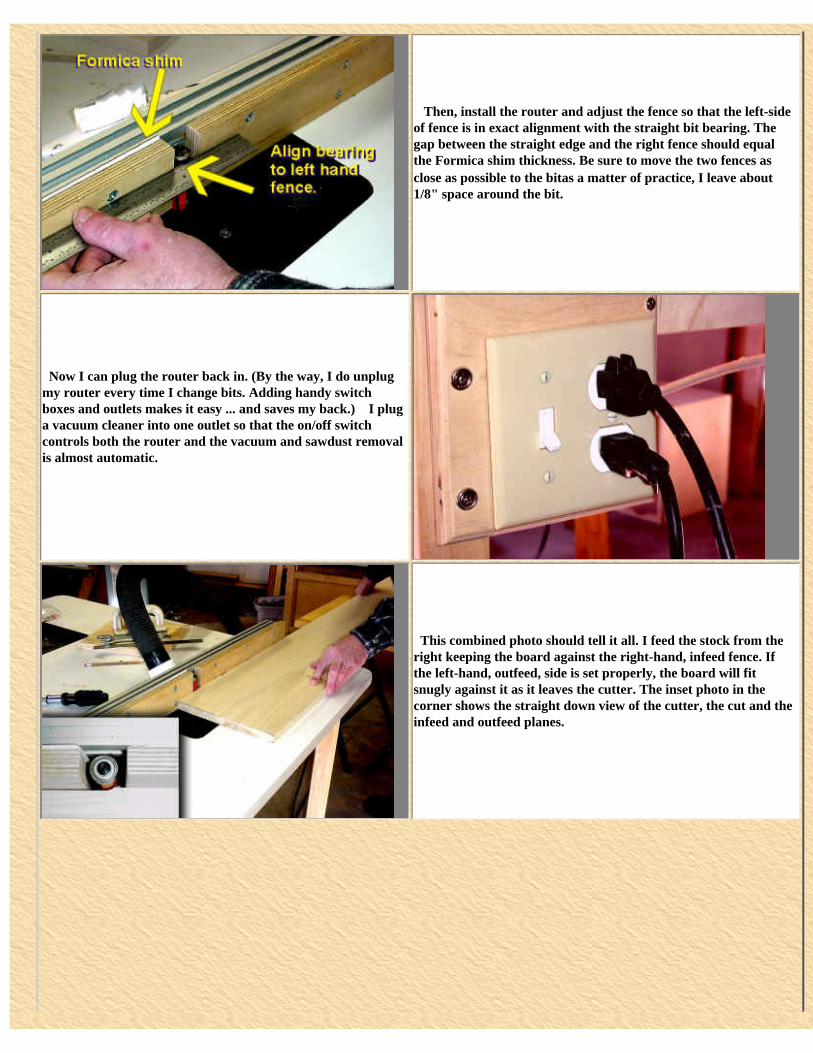
Then, install the router and adjust the fence so that the left-side of fence is in exact alignment with the straight bit bearing. The gap between the straight edge and the right fence should equal the Formica shim thickness. Be sure to move the two fences as close as possible to the bit�as a matter of practice, I leave about 1/8" space around the bit.
Now I can plug the router back in. (By the way, I do unplug my router every time I change bits. Adding handy switch boxes and outlets makes it easy ... and saves my back.) I plug a vacuum cleaner into one outlet so that the on/off switch controls both the router and the vacuum and sawdust removal is almost automatic.
This combined photo should tell it all. I feed the stock from the right keeping the board against the right-hand, infeed fence. If the left-hand, outfeed, side is set properly, the board will fit snugly against it as it leaves the cutter. The inset photo in the corner shows the straight down view of the cutter, the cut and the infeed and outfeed planes.
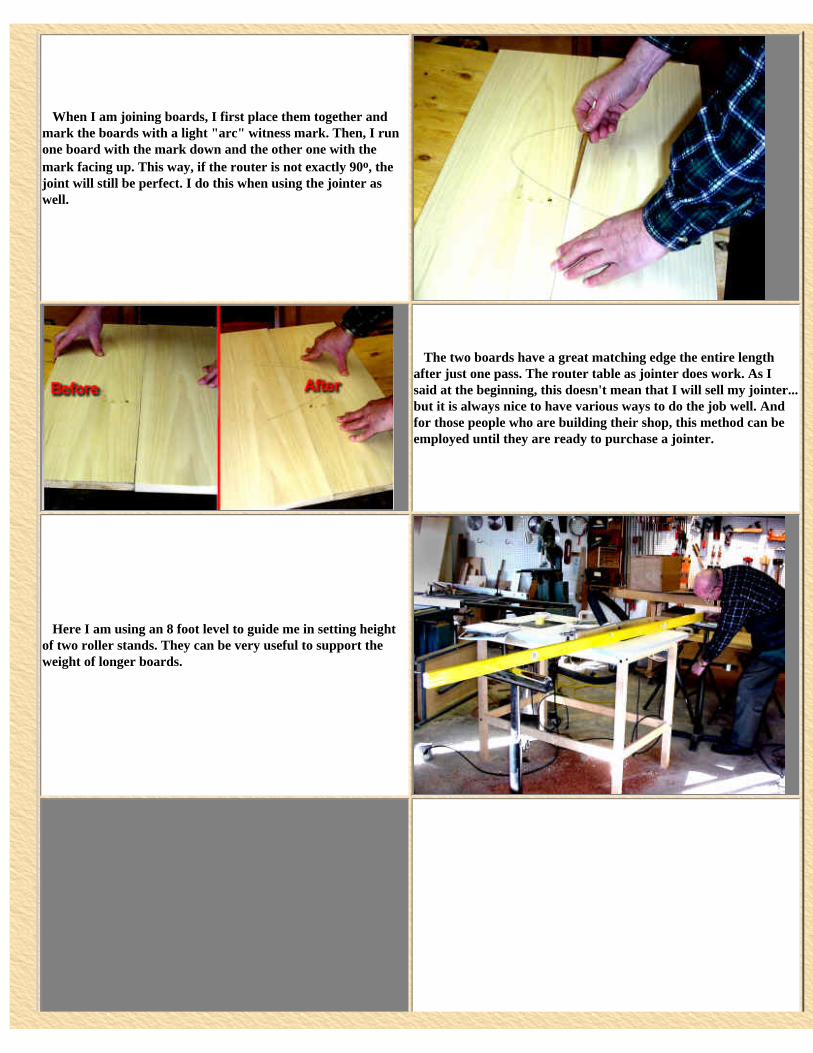
When I am joining boards, I first place them together and mark the boards with a light "arc" witness mark. Then, I run one board with the mark down and the other one with the mark facing up. This way, if the router is not exactly 90o, the joint will still be perfect. I do this when using the jointer as well.
The two boards have a great matching edge the entire length after just one pass. The router table as jointer does work. As I said at the beginning, this doesn't mean that I will sell my jointer...but it is always nice to have various ways to do the job well. And for those people who are building their shop, this method can be employed until they are ready to purchase a jointer.
Here I am using an 8 foot level to guide me in setting height of two roller stands. They can be very useful to support the weight of longer boards.
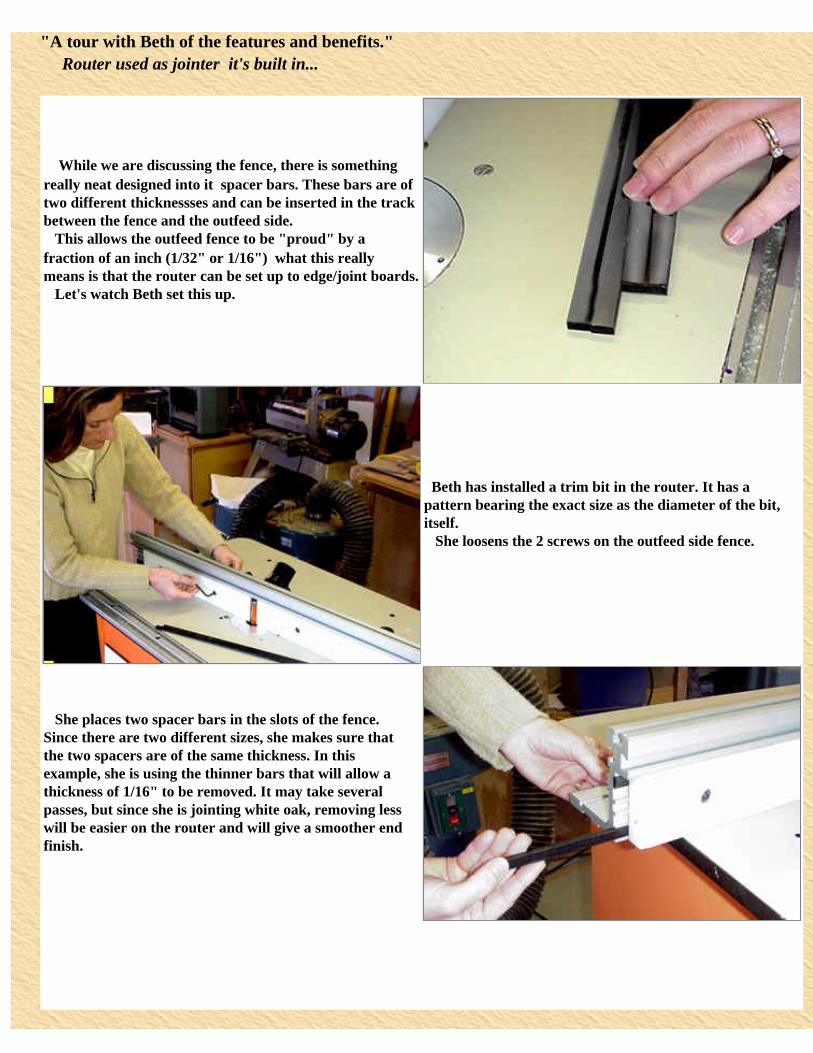
"A tour with Beth of the features and benefits." Router used as jointer � it's built in...
While we are discussing the fence, there is something really neat designed into it � spacer bars. These bars are of two different thicknessses and can be inserted in the track between the fence and the outfeed side. This allows the outfeed fence to be "proud" by a fraction of an inch (1/32" or 1/16") � what this really means is that the router can be set up to edge/joint boards. Let's watch Beth set this up.
Beth has installed a trim bit in the router. It has a pattern bearing the exact size as the diameter of the bit, itself. She loosens the 2 screws on the outfeed side fence.
She places two spacer bars in the slots of the fence. Since there are two different sizes, she makes sure that the two spacers are of the same thickness. In this example, she is using the thinner bars that will allow a thickness of 1/16" to be removed. It may take several passes, but since she is jointing white oak, removing less will be easier on the router and will give a smoother end finish.

Now, she tightens the outfeed fence.
Beth adjusts the fence until the outfeed side lines up with the pattern bearing � exactly. This is a birds-eye view of the setup. You can see the the pattern bearing and outfeed fence are aligned, and the infeed fence is back a fraction.
Now she can route a board and have an edge that is ready to glue up with other edged boards. I found two boards that had rough edges � good ones to try out the "router-as-jointer" system. She is inspecting these boards and sees that they are pretty good but are not ready for gluing. They both have rough sawn edges.
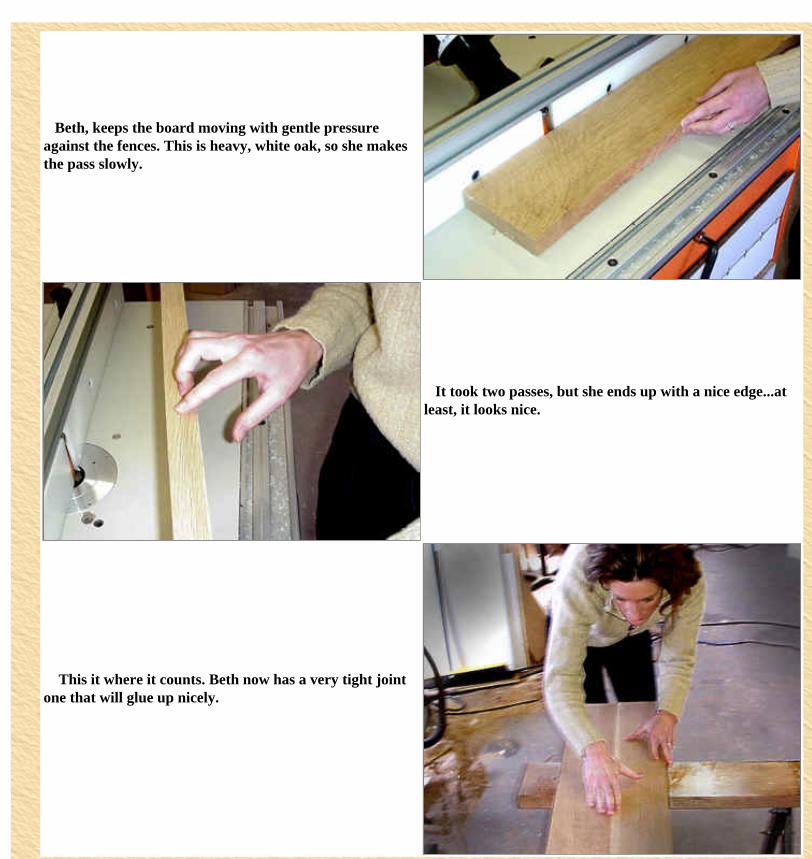
Beth, keeps the board moving with gentle pressure against the fences. This is heavy, white oak, so she makes the pass slowly.
It took two passes, but she ends up with a nice edge...at least, it looks nice.
This it where it counts. Beth now has a very tight joint � one that will glue up nicely.
"A tour with Beth of the features and benefits." A step-by-step of changing bits.
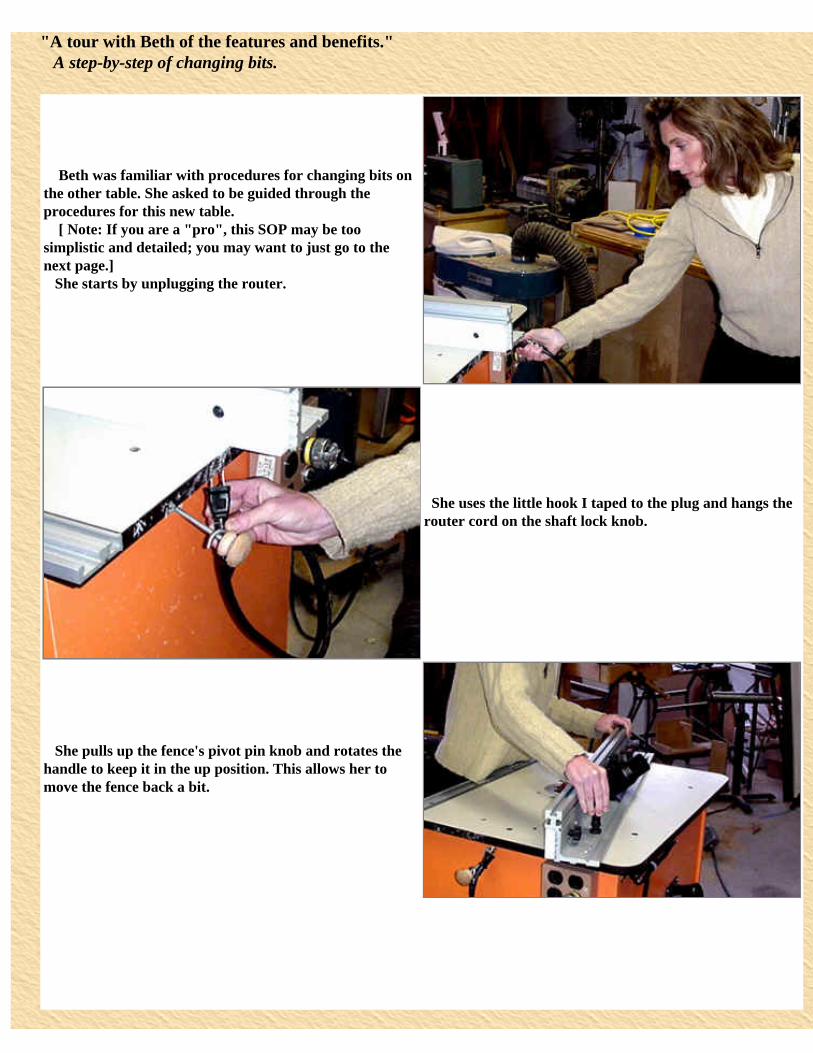
Beth was familiar with procedures for changing bits on the other table. She asked to be guided through the procedures for this new table. [ Note: If you are a "pro", this SOP may be too simplistic and detailed; you may want to just go to the next page.] She starts by unplugging the router.
She uses the little hook I taped to the plug and hangs the router cord on the shaft lock knob.
She pulls up the fence's pivot pin knob and rotates the handle to keep it in the up position. This allows her to move the fence back a bit.
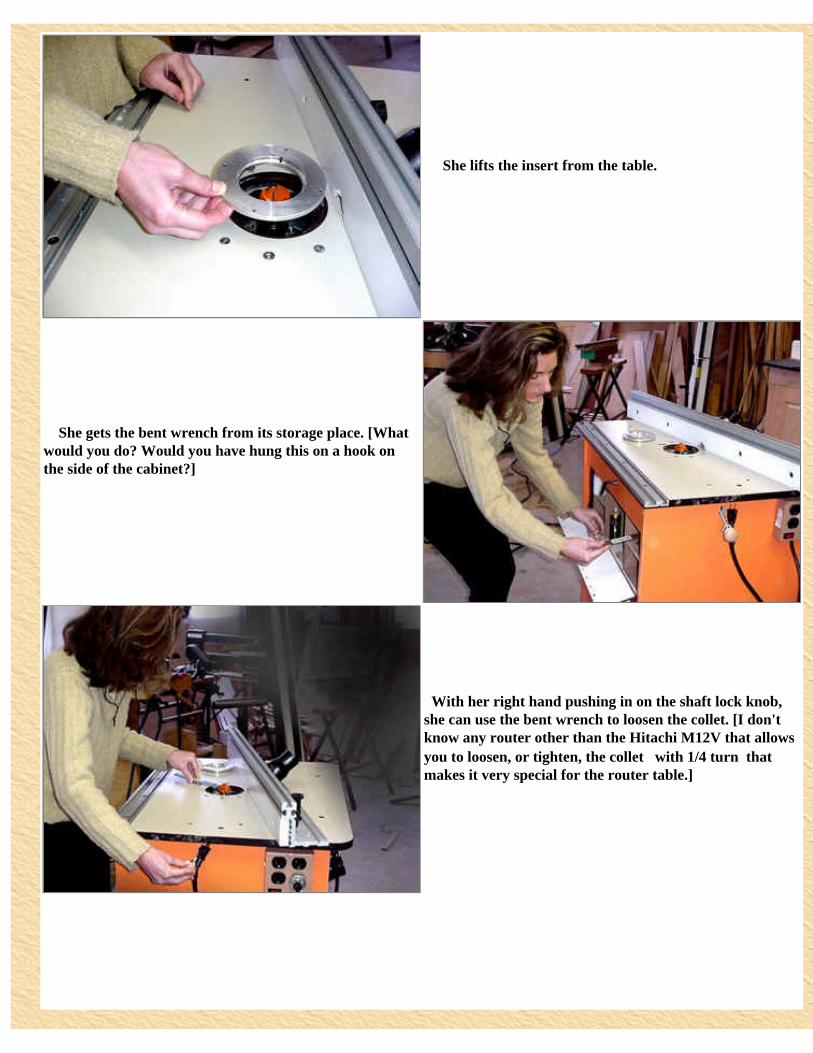
She lifts the insert from the table.
She gets the bent wrench from its storage place. [What would you do? Would you have hung this on a hook on the side of the cabinet?]
With her right hand pushing in on the shaft lock knob, she can use the bent wrench to loosen the collet. [I don't know any router other than the Hitachi M12V that allows you to loosen, or tighten, the collet with 1/4 turn � that makes it very special for the router table.]
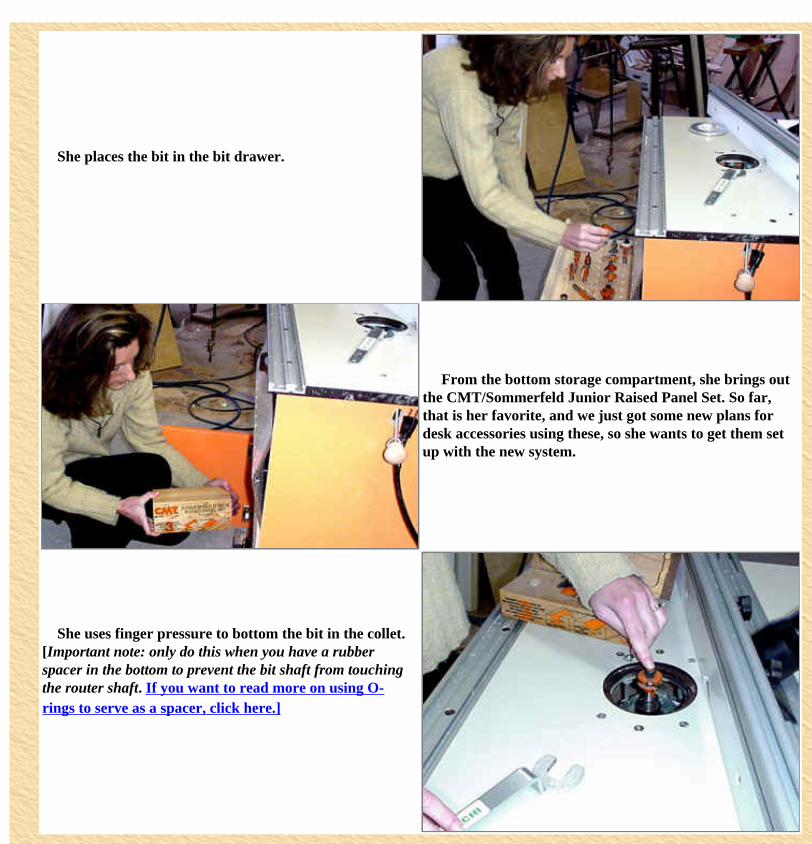
She places the bit in the bit drawer.
From the bottom storage compartment, she brings out the CMT/Sommerfeld Junior Raised Panel Set. So far, that is her favorite, and we just got some new plans for desk accessories using these, so she wants to get them set up with the new system.
She uses finger pressure to bottom the bit in the collet. [Important note: only do this when you have a rubber spacer in the bottom to prevent the bit shaft from touching the router shaft. If you want to read more on using O-rings to serve as a spacer, click here.]
http://www.woodshopdemos.com/table-8.htm (3 of 3) [09/09/2008 12.38.04]
"A tour with Beth of the features and benefits." A step-by-step of changing bits...continued
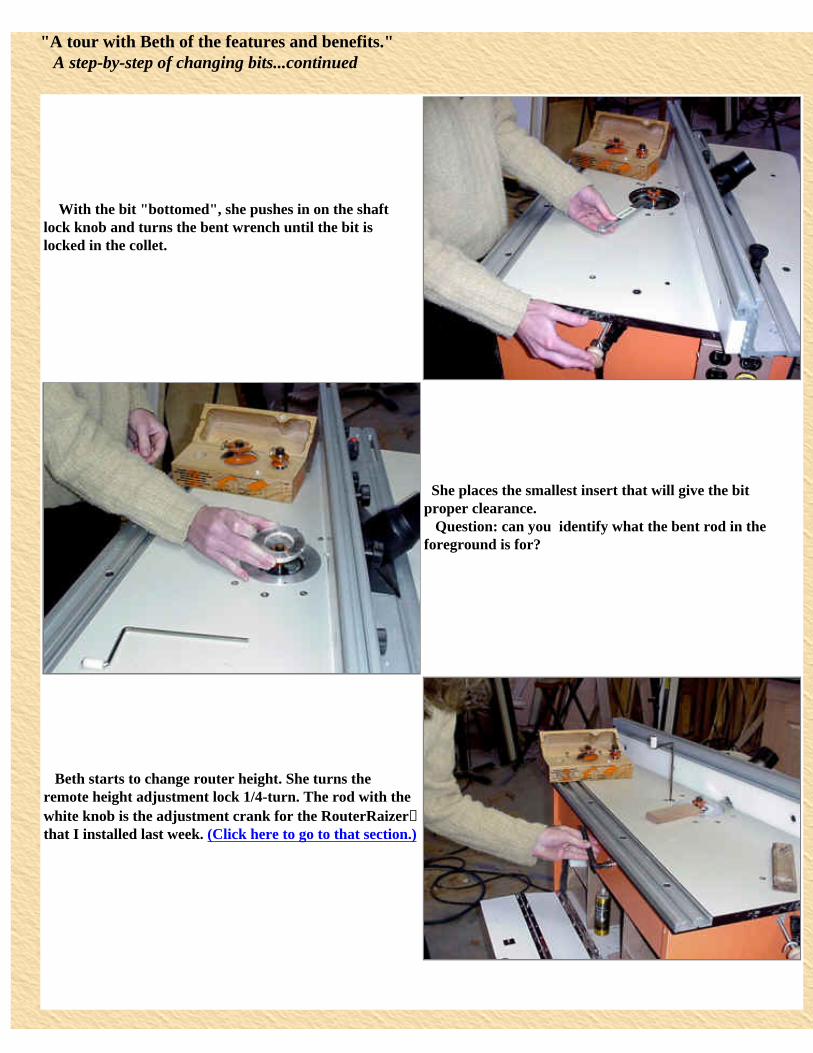
With the bit "bottomed", she pushes in on the shaft lock knob and turns the bent wrench until the bit is locked in the collet.
She places the smallest insert that will give the bit proper clearance. Question: can you identify what the bent rod in the foreground is for?
Beth starts to change router height. She turns the remote height adjustment lock 1/4-turn. The rod with the white knob is the adjustment crank for the RouterRaizer� that I installed last week. (Click here to go to that section.)

This is how easy it is. With the shaft unlocked, she uses the crank to adjust the height of the bit to match the sample that she has been using. When it is right, she simply turns her right hand, and locks the shaft.
The RouterRaizer has a small metal dust cover which fits into a hole over the access to the height adjustment screw. The crank has a small magnet which is used to remove the dust cover for easy access. It stays in place on the magnet until the height adjustment is complete, and it can be "swiped" off as easy as it was to pick it up � a very neat and workable device.
With the bit changed and the height set, Beth double-checks to see that the shaft lock is disengaged. She now unhooks the plug from the knob.
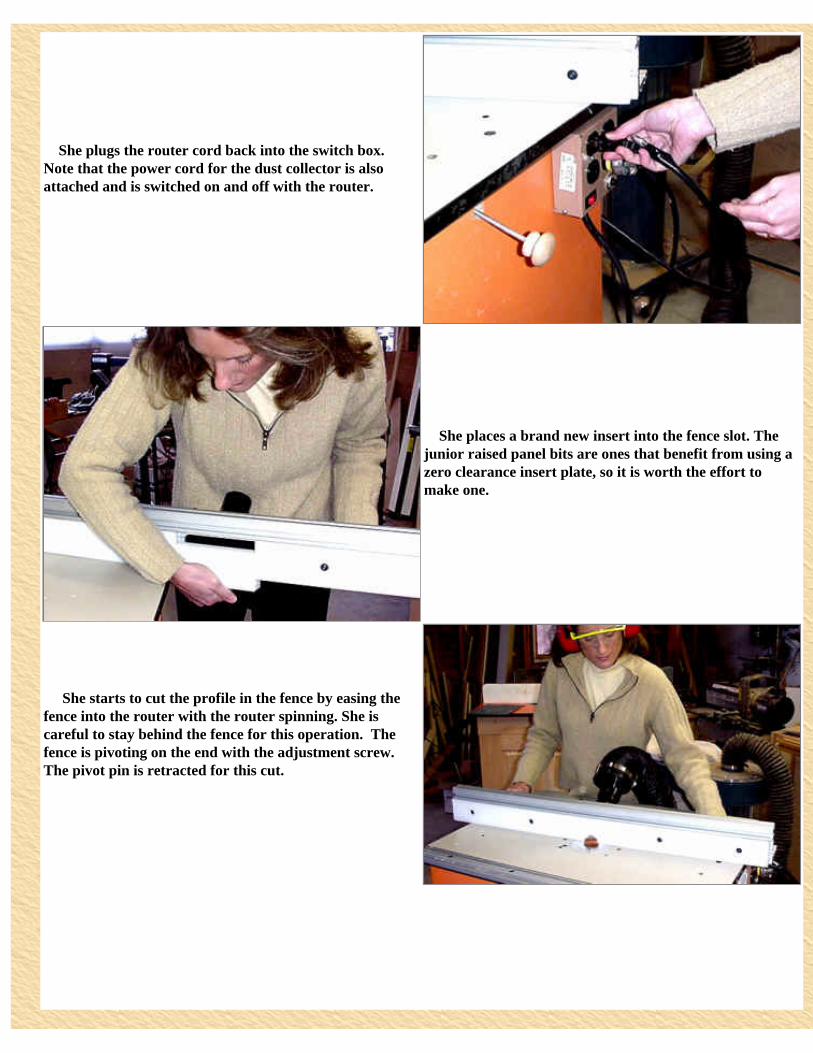
She plugs the router cord back into the switch box. Note that the power cord for the dust collector is also attached and is switched on and off with the router.
She places a brand new insert into the fence slot. The junior raised panel bits are ones that benefit from using a zero clearance insert plate, so it is worth the effort to make one.
She starts to cut the profile in the fence by easing the fence into the router with the router spinning. She is careful to stay behind the fence for this operation. The fence is pivoting on the end with the adjustment screw. The pivot pin is retracted for this cut.
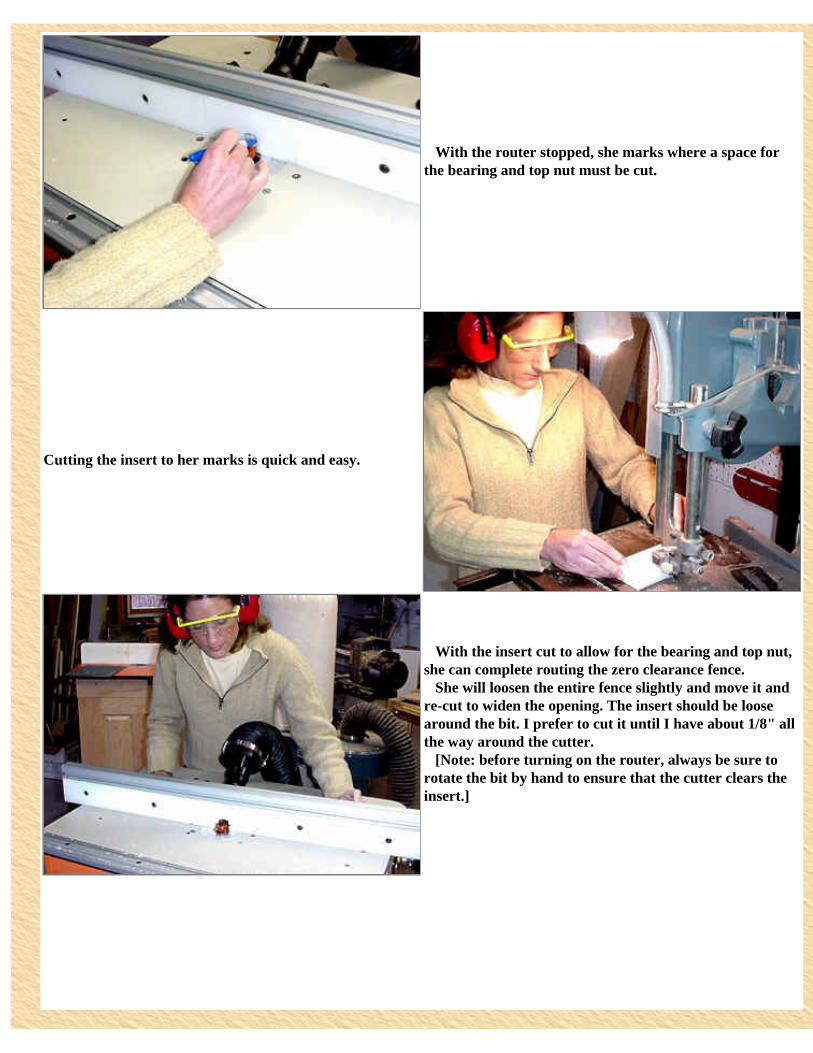
With the router stopped, she marks where a space for the bearing and top nut must be cut.
Cutting the insert to her marks is quick and easy.
With the insert cut to allow for the bearing and top nut, she can complete routing the zero clearance fence. She will loosen the entire fence slightly and move it and re-cut to widen the opening. The insert should be loose around the bit. I prefer to cut it until I have about 1/8" all the way around the cutter. [Note: before turning on the router, always be sure to rotate the bit by hand to ensure that the cutter clears the insert.]

Beth brings the fence forward until the bearing is absolutely aligned with the fence and locks the fence in place. She is ready to make her cut. On the last two pages, I have presented the step-by-step in great detail. In real time, changing of the bits takes about 1 minute, even with following all the safety rules. Cutting a new insert takes a couple of minutes longer, but only has to be done for a new bit � and then only if you want a zero clearance insert for that bit.
"A tour with Beth of the features and benefits."
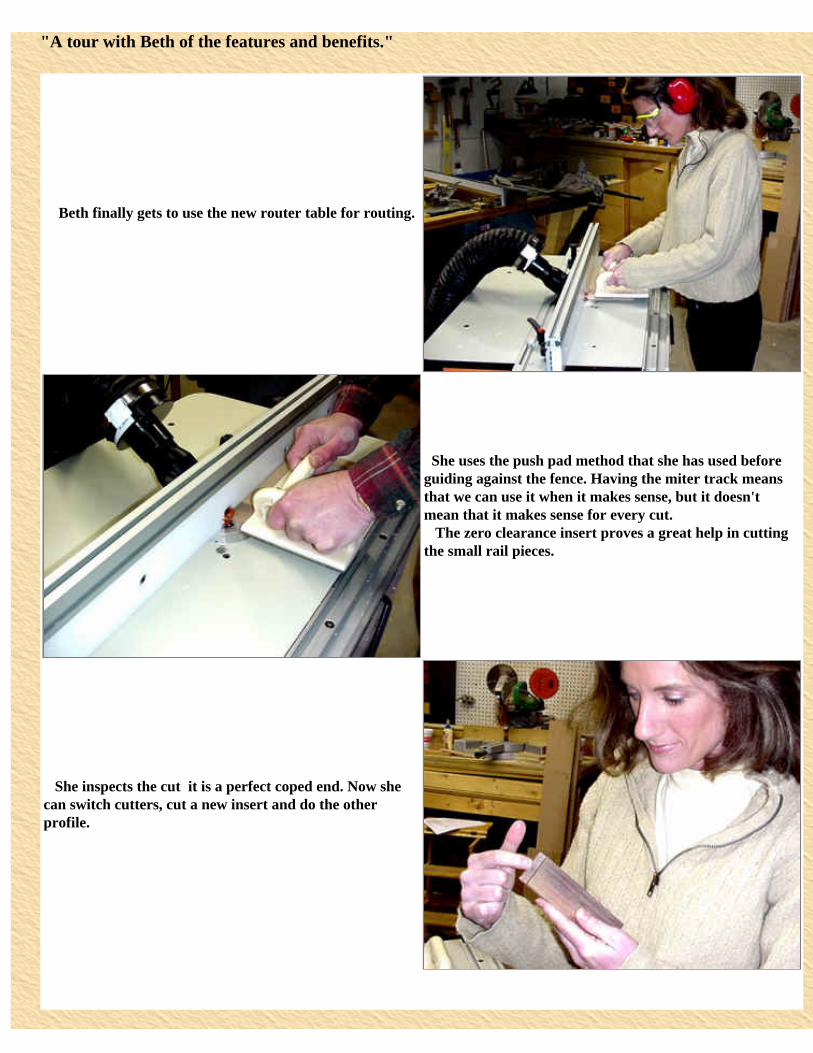
Beth finally gets to use the new router table for routing.
She uses the push pad method that she has used before � guiding against the fence. Having the miter track means that we can use it when it makes sense, but it doesn't mean that it makes sense for every cut. The zero clearance insert proves a great help in cutting the small rail pieces.
She inspects the cut � it is a perfect coped end. Now she can switch cutters, cut a new insert and do the other profile.

We skipped to the final cutting of this mating profile, but for information sake, it took less than five minutes to make the whole change, including cutting the new insert. Here Beth is making the profile cut on the rail and stiles.
As an aside, we get so caught up with doing things the same way, time after time, that we forget that there are other ways. I have watched Marc's demonstrations and have always liked this simple holddown block. It just fits this one piece, but is so simple, it would make sense to have a number of sizes around.
On ours, I have added a piece of 120 grit sandpaper to have a more positive hold on the work piece � now, back to the story.
The pieces match perfectly, as they should with such a really great set-up as this.
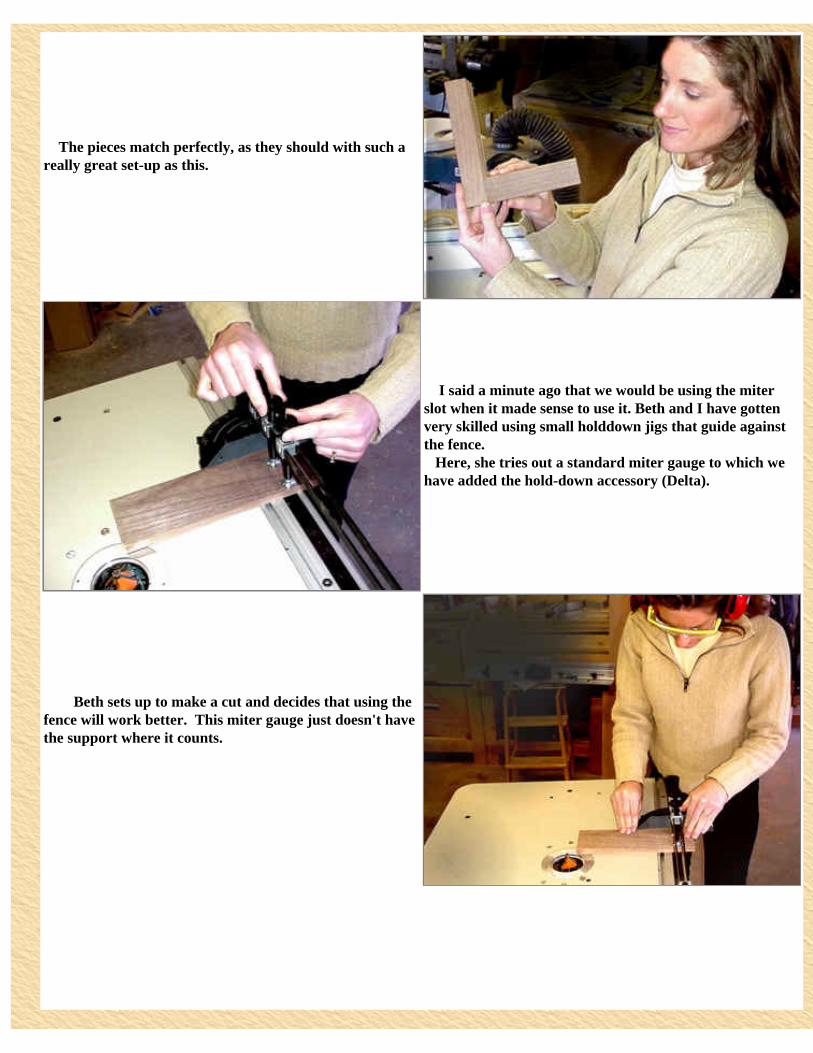
I said a minute ago that we would be using the miter slot when it made sense to use it. Beth and I have gotten very skilled using small holddown jigs that guide against the fence. Here, she tries out a standard miter gauge to which we have added the hold-down accessory (Delta).
Beth sets up to make a cut and decides that using the fence will work better. This miter gauge just doesn't have the support where it counts.
When I heard that the new table would have a miter track, this Delta Sliding Shaper Jig (photo from the Delta website) came to mind. I have seen it used on shaper tables, and it seems like it would work well. There are two problems that I found: 1) it is around $100 and 2) it has a 1/2" thick base plate which means the router bit has to come up that much further. This is easy to do on a shaper; not easy with a router.
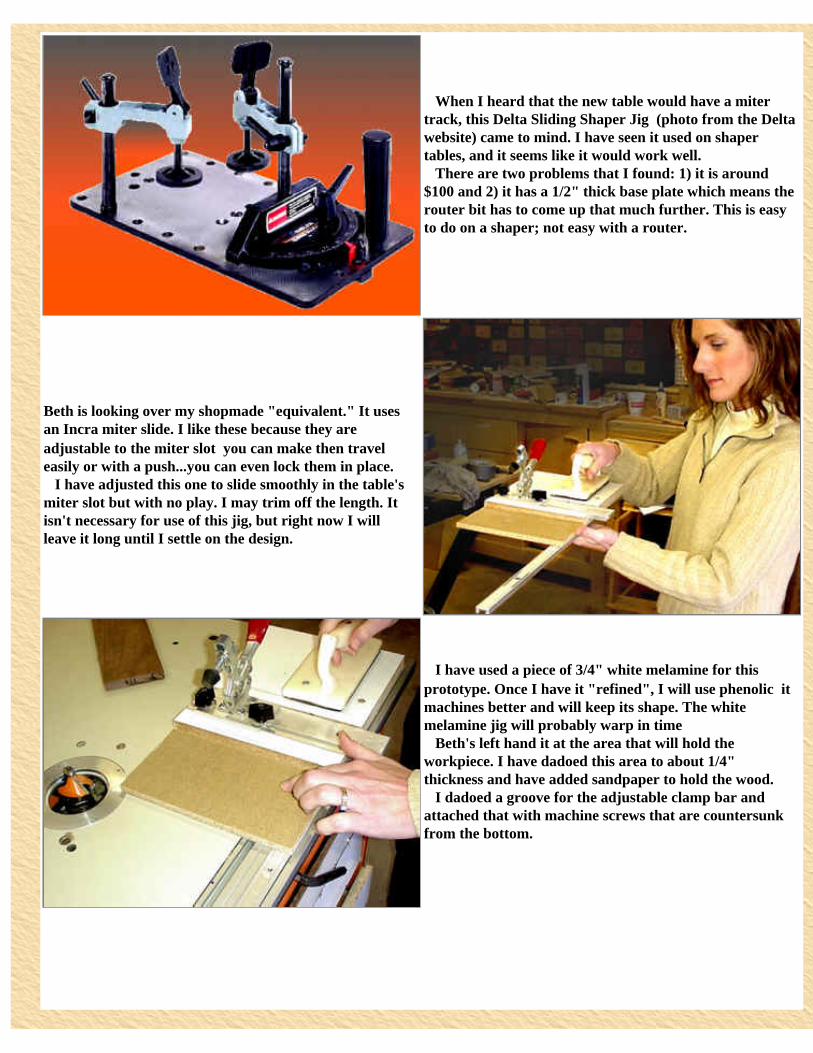
Beth is looking over my shopmade "equivalent." It uses an Incra miter slide. I like these because they are adjustable to the miter slot � you can make then travel easily or with a push...you can even lock them in place. I have adjusted this one to slide smoothly in the table's miter slot but with no play. I may trim off the length. It isn't necessary for use of this jig, but right now I will leave it long until I settle on the design.
I have used a piece of 3/4" white melamine for this prototype. Once I have it "refined", I will use phenolic � it machines better and will keep its shape. The white melamine jig will probably warp in time Beth's left hand it at the area that will hold the workpiece. I have dadoed this area to about 1/4" thickness and have added sandpaper to hold the wood. I dadoed a groove for the adjustable clamp bar and attached that with machine screws that are countersunk from the bottom.
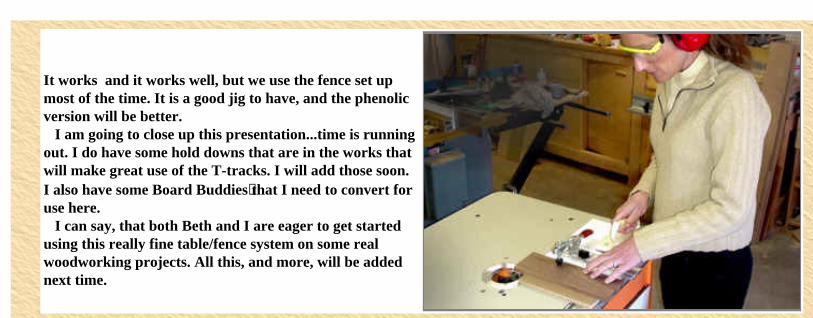
It works � and it works well, but we use the fence set up most of the time. It is a good jig to have, and the phenolic version will be better. I am going to close up this presentation...time is running out. I do have some hold downs that are in the works that will make great use of the T-tracks. I will add those soon. I also have some Board Buddies� that I need to convert for use here. I can say, that both Beth and I are eager to get started using this really fine table/fence system on some real woodworking projects. All this, and more, will be added next time.
Main Menu Previous Page To the CMT Page
http://www.woodshopdemos.com/table-10.htm (5 of 5) [09/09/2008 12.40.37]
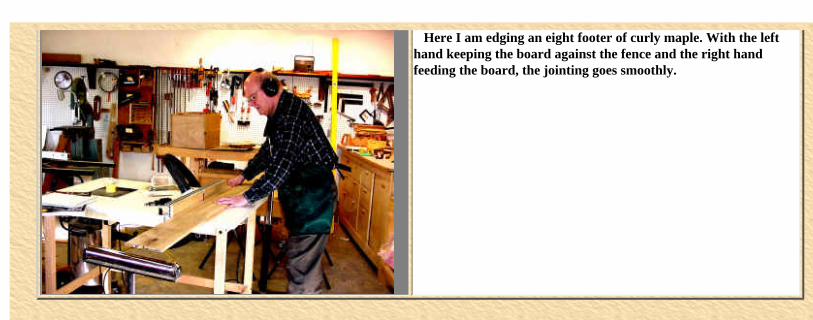
Here I am edging an eight footer of curly maple. With the left hand keeping the board against the fence and the right hand feeding the board, the jointing goes smoothly.
http://www.woodshopdemos.com/rtrplnr.htm (4 of 4) [09/09/2008 12.29.25]