CALL FORWARD CONTROL - PDF.TEXTFILES.COMpdf.textfiles.com/manuals/TELECOM-F-R/NEC Call Forward...
120
CALL FORWARD CONTROL Installation & Operations Manual NEC America, Inc. NDA-30030-003 July, 1997 Stock # 241712
Transcript of CALL FORWARD CONTROL - PDF.TEXTFILES.COMpdf.textfiles.com/manuals/TELECOM-F-R/NEC Call Forward...

CALL FORWARD CONTROL
Installation & Operations Manual
NEC America, Inc.NDA-30030-003
July, 1997Stock # 241712

LIABILITY DISCLAIMER
NEC America reserves the right to change the specifications, functions, or features in this document at any time without notice. NEC America has prepared this document for use by its employees and customers. The information contained herein is the property of NEC America and shall not be reproduced without prior written approval from NEC America.
Copyright 1996
NEC America, Inc.

Call Forward Control - Installation & Operations Manual CONTENTS
TABLE OF CONTENTSPage
Chapter 1 - INTRODUCTION . . . . . . . . . . . . . . . . . . . . . . . . . . . . . . . . . . . . . . . . . . . . . . . 1OVERVIEW. . . . . . . . . . . . . . . . . . . . . . . . . . . . . . . . . . . . . . . . . . . . . . . . . . . . . . . . . . . . . . . . . . . 1MANUAL ORGANIZATION . . . . . . . . . . . . . . . . . . . . . . . . . . . . . . . . . . . . . . . . . . . . . . . . . . . . . . 3
Chapter 2 . . . . . . . . . . . . . . . . . . . . . . . . . . . . . . . . . . . . . . . . . . . . . . . . . . . . . . . . . . . . . . . . . 3Chapter 3 . . . . . . . . . . . . . . . . . . . . . . . . . . . . . . . . . . . . . . . . . . . . . . . . . . . . . . . . . . . . . . . . . 3
SCREEN ILLUSTRATIONS . . . . . . . . . . . . . . . . . . . . . . . . . . . . . . . . . . . . . . . . . . . . . . . . . . . . 3PROCEDURES . . . . . . . . . . . . . . . . . . . . . . . . . . . . . . . . . . . . . . . . . . . . . . . . . . . . . . . . . . . . . . 5GENERAL KEY USAGE . . . . . . . . . . . . . . . . . . . . . . . . . . . . . . . . . . . . . . . . . . . . . . . . . . . . . . 5REQUIREMENTS . . . . . . . . . . . . . . . . . . . . . . . . . . . . . . . . . . . . . . . . . . . . . . . . . . . . . . . . . . . . 6
UAP Basic Configuration. . . . . . . . . . . . . . . . . . . . . . . . . . . . . . . . . . . . . . . . . . . . . . . . . . . . . . 6PBX Basic Configuration. . . . . . . . . . . . . . . . . . . . . . . . . . . . . . . . . . . . . . . . . . . . . . . . . . . . . . 6
Chapter 2 - INSTALLATION INTRODUCTION. . . . . . . . . . . . . . . . . . . . . . . . . . . . . . . . . . 7Software Installation. . . . . . . . . . . . . . . . . . . . . . . . . . . . . . . . . . . . . . . . . . . . . . . . . . . . . . . . . 7Application Configuration . . . . . . . . . . . . . . . . . . . . . . . . . . . . . . . . . . . . . . . . . . . . . . . . . . . . . 7Tenant Database Configuration . . . . . . . . . . . . . . . . . . . . . . . . . . . . . . . . . . . . . . . . . . . . . . . . 7MAT Assignments . . . . . . . . . . . . . . . . . . . . . . . . . . . . . . . . . . . . . . . . . . . . . . . . . . . . . . . . . . . 7Initialization / Termination . . . . . . . . . . . . . . . . . . . . . . . . . . . . . . . . . . . . . . . . . . . . . . . . . . . . . 7
SOFTWARE INSTALLATION . . . . . . . . . . . . . . . . . . . . . . . . . . . . . . . . . . . . . . . . . . . . . . . . . . . . . 9STEP 1: Active CFC Application Check . . . . . . . . . . . . . . . . . . . . . . . . . . . . . . . . . . . . . . . . . 9STEP 2: Existing CFC Installation Check . . . . . . . . . . . . . . . . . . . . . . . . . . . . . . . . . . . . . . . . 9STEP 3: Superuser (Root) Password . . . . . . . . . . . . . . . . . . . . . . . . . . . . . . . . . . . . . . . . . . 10STEP 4: MCS Enhancement or Independent APM Application . . . . . . . . . . . . . . . . . . . . . . 10STEP 5: CFC Directories and Database. . . . . . . . . . . . . . . . . . . . . . . . . . . . . . . . . . . . . . . . 10STEP 6: CFC Login Names . . . . . . . . . . . . . . . . . . . . . . . . . . . . . . . . . . . . . . . . . . . . . . . . . 11STEP 7: CFC Auto-Config . . . . . . . . . . . . . . . . . . . . . . . . . . . . . . . . . . . . . . . . . . . . . . . . . . 12STEP 8: CFC Installation Processing (No input required.) . . . . . . . . . . . . . . . . . . . . . . . . . . 13STEP 9: CFC Installation Complete . . . . . . . . . . . . . . . . . . . . . . . . . . . . . . . . . . . . . . . . . . . 14STEP 10: SCO UNIX Subsystem Database . . . . . . . . . . . . . . . . . . . . . . . . . . . . . . . . . . . . . . 14STEP 11: Reboot . . . . . . . . . . . . . . . . . . . . . . . . . . . . . . . . . . . . . . . . . . . . . . . . . . . . . . . . . 15
APPLICATION CONFIGURATION . . . . . . . . . . . . . . . . . . . . . . . . . . . . . . . . . . . . . . . . . . . . . . . . 16STEP 1: APPLICATION CHARACTERISTICS. . . . . . . . . . . . . . . . . . . . . . . . . . . . . . . . . . . 16STEP 2: PRIMARY CONFIGURATION PARAMETERS . . . . . . . . . . . . . . . . . . . . . . . . . . . 17STEP 3: FACILITIES . . . . . . . . . . . . . . . . . . . . . . . . . . . . . . . . . . . . . . . . . . . . . . . . . . . . . . 18STEP 4: OAI CONFIGURATION . . . . . . . . . . . . . . . . . . . . . . . . . . . . . . . . . . . . . . . . . . . . . 18STEP 5: USER-DEFINED PARAMETERS. . . . . . . . . . . . . . . . . . . . . . . . . . . . . . . . . . . . . . 19MCI_SERVER. . . . . . . . . . . . . . . . . . . . . . . . . . . . . . . . . . . . . . . . . . . . . . . . . . . . . . . . . . . . . 20STEP 1: APPLICATION CHARACTERISTICS. . . . . . . . . . . . . . . . . . . . . . . . . . . . . . . . . . . 20STEP 2: PRIMARY CONFIGURATION PARAMETERS . . . . . . . . . . . . . . . . . . . . . . . . . . . 20STEP 3: USER-DEFINED PARAMETERS. . . . . . . . . . . . . . . . . . . . . . . . . . . . . . . . . . . . . . 21
TENANT DATABASE . . . . . . . . . . . . . . . . . . . . . . . . . . . . . . . . . . . . . . . . . . . . . . . . . . . . . . . . . . 22TENANT DATABASE RECORDS. . . . . . . . . . . . . . . . . . . . . . . . . . . . . . . . . . . . . . . . . . . . . . 22TENANT DATABASE EXAMPLES . . . . . . . . . . . . . . . . . . . . . . . . . . . . . . . . . . . . . . . . . . . . . 23TENANT DATABASE CONFIGURATION . . . . . . . . . . . . . . . . . . . . . . . . . . . . . . . . . . . . . . . 23STEP 1: BUILD THE MASTER DATABASE. . . . . . . . . . . . . . . . . . . . . . . . . . . . . . . . . . . . . 23STEP 2: PROCESS THE APPLICATION DATABASE. . . . . . . . . . . . . . . . . . . . . . . . . . . . . 24STEP 3: INSTALL THE APPLICATION DATABASE . . . . . . . . . . . . . . . . . . . . . . . . . . . . . . 24
MAT ASSIGNMENTS . . . . . . . . . . . . . . . . . . . . . . . . . . . . . . . . . . . . . . . . . . . . . . . . . . . . . . . . . . 25
NDA-30030-003 Revision 3 Page i

CONTENTS Call Forward Control - Installation & Operations Manual
Page
INITIALIZATION/TERMINATION . . . . . . . . . . . . . . . . . . . . . . . . . . . . . . . . . . . . . . . . . . . . . . . . . 26INITIALIZATION . . . . . . . . . . . . . . . . . . . . . . . . . . . . . . . . . . . . . . . . . . . . . . . . . . . . . . . . . . . 26TERMINATION . . . . . . . . . . . . . . . . . . . . . . . . . . . . . . . . . . . . . . . . . . . . . . . . . . . . . . . . . . . . 26
Chapter 3 - ADMINISTRATOR MAIN MENU INTRODUCTION. . . . . . . . . . . . . . . . . . . . 27STARTING THE CFC ADMINISTRATOR PROGRAM. . . . . . . . . . . . . . . . . . . . . . . . . . . . . . . . . 29MAIN MENU OPTIONS . . . . . . . . . . . . . . . . . . . . . . . . . . . . . . . . . . . . . . . . . . . . . . . . . . . . . . . . 30
Extensions - . . . . . . . . . . . . . . . . . . . . . . . . . . . . . . . . . . . . . . . . . . . . . . . . . . . . . . . . . . . . . . 30Hard Forward Control - . . . . . . . . . . . . . . . . . . . . . . . . . . . . . . . . . . . . . . . . . . . . . . . . . . . . . . 30Call Routing Control - . . . . . . . . . . . . . . . . . . . . . . . . . . . . . . . . . . . . . . . . . . . . . . . . . . . . . . . 30Time Parameters - . . . . . . . . . . . . . . . . . . . . . . . . . . . . . . . . . . . . . . . . . . . . . . . . . . . . . . . . . 30Special Events - . . . . . . . . . . . . . . . . . . . . . . . . . . . . . . . . . . . . . . . . . . . . . . . . . . . . . . . . . . . 30Validate and Install - . . . . . . . . . . . . . . . . . . . . . . . . . . . . . . . . . . . . . . . . . . . . . . . . . . . . . . . . 31Quit - . . . . . . . . . . . . . . . . . . . . . . . . . . . . . . . . . . . . . . . . . . . . . . . . . . . . . . . . . . . . . . . . . . . . 31
ASSIGNMENT WORKSHEETS . . . . . . . . . . . . . . . . . . . . . . . . . . . . . . . . . . . . . . . . . . . . . . . . . . 31EXTENSIONS. . . . . . . . . . . . . . . . . . . . . . . . . . . . . . . . . . . . . . . . . . . . . . . . . . . . . . . . . . . . . . . . 34
OVERVIEW . . . . . . . . . . . . . . . . . . . . . . . . . . . . . . . . . . . . . . . . . . . . . . . . . . . . . . . . . . . . . . . . 34Procedure . . . . . . . . . . . . . . . . . . . . . . . . . . . . . . . . . . . . . . . . . . . . . . . . . . . . . . . . . . . . . . . . 34Commands . . . . . . . . . . . . . . . . . . . . . . . . . . . . . . . . . . . . . . . . . . . . . . . . . . . . . . . . . . . . . . . 34Number of Extensions. . . . . . . . . . . . . . . . . . . . . . . . . . . . . . . . . . . . . . . . . . . . . . . . . . . . . . . 34Expanded Display . . . . . . . . . . . . . . . . . . . . . . . . . . . . . . . . . . . . . . . . . . . . . . . . . . . . . . . . . . 35ADD AN EXTENSION. . . . . . . . . . . . . . . . . . . . . . . . . . . . . . . . . . . . . . . . . . . . . . . . . . . . . . . 35Procedure . . . . . . . . . . . . . . . . . . . . . . . . . . . . . . . . . . . . . . . . . . . . . . . . . . . . . . . . . . . . . . . . 35Field Entries . . . . . . . . . . . . . . . . . . . . . . . . . . . . . . . . . . . . . . . . . . . . . . . . . . . . . . . . . . . . . . 36DELETE AN EXTENSION . . . . . . . . . . . . . . . . . . . . . . . . . . . . . . . . . . . . . . . . . . . . . . . . . . . 36Procedure . . . . . . . . . . . . . . . . . . . . . . . . . . . . . . . . . . . . . . . . . . . . . . . . . . . . . . . . . . . . . . . . 36MODIFY AN EXTENSION . . . . . . . . . . . . . . . . . . . . . . . . . . . . . . . . . . . . . . . . . . . . . . . . . . . 37Procedure . . . . . . . . . . . . . . . . . . . . . . . . . . . . . . . . . . . . . . . . . . . . . . . . . . . . . . . . . . . . . . . . 37Database Search . . . . . . . . . . . . . . . . . . . . . . . . . . . . . . . . . . . . . . . . . . . . . . . . . . . . . . . . . . 38VIEW EXTENSIONS. . . . . . . . . . . . . . . . . . . . . . . . . . . . . . . . . . . . . . . . . . . . . . . . . . . . . . . . 39Procedure . . . . . . . . . . . . . . . . . . . . . . . . . . . . . . . . . . . . . . . . . . . . . . . . . . . . . . . . . . . . . . . . 39PRINT EXTENSIONS . . . . . . . . . . . . . . . . . . . . . . . . . . . . . . . . . . . . . . . . . . . . . . . . . . . . . . . 40Procedure . . . . . . . . . . . . . . . . . . . . . . . . . . . . . . . . . . . . . . . . . . . . . . . . . . . . . . . . . . . . . . . . 40
HARD FORWARD CONTROL . . . . . . . . . . . . . . . . . . . . . . . . . . . . . . . . . . . . . . . . . . . . . . . . . . . 41OVERVIEW . . . . . . . . . . . . . . . . . . . . . . . . . . . . . . . . . . . . . . . . . . . . . . . . . . . . . . . . . . . . . . . . 41
Procedure . . . . . . . . . . . . . . . . . . . . . . . . . . . . . . . . . . . . . . . . . . . . . . . . . . . . . . . . . . . . . . . . 41Groups - . . . . . . . . . . . . . . . . . . . . . . . . . . . . . . . . . . . . . . . . . . . . . . . . . . . . . . . . . . . . . . . . . 41Patterns - . . . . . . . . . . . . . . . . . . . . . . . . . . . . . . . . . . . . . . . . . . . . . . . . . . . . . . . . . . . . . . . . 41Quit - . . . . . . . . . . . . . . . . . . . . . . . . . . . . . . . . . . . . . . . . . . . . . . . . . . . . . . . . . . . . . . . . . . . . 42
HARD FORWARD GROUPS . . . . . . . . . . . . . . . . . . . . . . . . . . . . . . . . . . . . . . . . . . . . . . . . . . . . 42OVERVIEW . . . . . . . . . . . . . . . . . . . . . . . . . . . . . . . . . . . . . . . . . . . . . . . . . . . . . . . . . . . . . . . . 42
Procedure . . . . . . . . . . . . . . . . . . . . . . . . . . . . . . . . . . . . . . . . . . . . . . . . . . . . . . . . . . . . . . . . 42Hard Forward Group Information . . . . . . . . . . . . . . . . . . . . . . . . . . . . . . . . . . . . . . . . . . . . . . 42Commands . . . . . . . . . . . . . . . . . . . . . . . . . . . . . . . . . . . . . . . . . . . . . . . . . . . . . . . . . . . . . . . 43Expanded Display . . . . . . . . . . . . . . . . . . . . . . . . . . . . . . . . . . . . . . . . . . . . . . . . . . . . . . . . . . 43ADD A HARD FORWARD GROUP . . . . . . . . . . . . . . . . . . . . . . . . . . . . . . . . . . . . . . . . . . . . 44Procedure . . . . . . . . . . . . . . . . . . . . . . . . . . . . . . . . . . . . . . . . . . . . . . . . . . . . . . . . . . . . . . . . 44DELETE A HARD FORWARD GROUP . . . . . . . . . . . . . . . . . . . . . . . . . . . . . . . . . . . . . . . . . 45Procedure . . . . . . . . . . . . . . . . . . . . . . . . . . . . . . . . . . . . . . . . . . . . . . . . . . . . . . . . . . . . . . . . 45MODIFY A HARD FORWARD GROUP . . . . . . . . . . . . . . . . . . . . . . . . . . . . . . . . . . . . . . . . . 46
Page ii NDA-30030-003 Revision 3

Call Forward Control - Installation & Operations Manual CONTENTS
Page
Procedure . . . . . . . . . . . . . . . . . . . . . . . . . . . . . . . . . . . . . . . . . . . . . . . . . . . . . . . . . . . . . . . . 46Database Search . . . . . . . . . . . . . . . . . . . . . . . . . . . . . . . . . . . . . . . . . . . . . . . . . . . . . . . . . . 47VIEW HARD FORWARD GROUPS . . . . . . . . . . . . . . . . . . . . . . . . . . . . . . . . . . . . . . . . . . . . 48Procedure . . . . . . . . . . . . . . . . . . . . . . . . . . . . . . . . . . . . . . . . . . . . . . . . . . . . . . . . . . . . . . . . 48PRINT HARD FORWARD GROUPS . . . . . . . . . . . . . . . . . . . . . . . . . . . . . . . . . . . . . . . . . . . 49Procedure . . . . . . . . . . . . . . . . . . . . . . . . . . . . . . . . . . . . . . . . . . . . . . . . . . . . . . . . . . . . . . . . 49
HARD FORWARD PATTERNS . . . . . . . . . . . . . . . . . . . . . . . . . . . . . . . . . . . . . . . . . . . . . . . . . . 50OVERVIEW . . . . . . . . . . . . . . . . . . . . . . . . . . . . . . . . . . . . . . . . . . . . . . . . . . . . . . . . . . . . . . . . 50
Procedure . . . . . . . . . . . . . . . . . . . . . . . . . . . . . . . . . . . . . . . . . . . . . . . . . . . . . . . . . . . . . . . . 50Hard Forward Patterns Information. . . . . . . . . . . . . . . . . . . . . . . . . . . . . . . . . . . . . . . . . . . . . 50Commands . . . . . . . . . . . . . . . . . . . . . . . . . . . . . . . . . . . . . . . . . . . . . . . . . . . . . . . . . . . . . . . 51Expanded Display . . . . . . . . . . . . . . . . . . . . . . . . . . . . . . . . . . . . . . . . . . . . . . . . . . . . . . . . . . 51ADD A HARD FORWARD PATTERN. . . . . . . . . . . . . . . . . . . . . . . . . . . . . . . . . . . . . . . . . . . 52Procedure . . . . . . . . . . . . . . . . . . . . . . . . . . . . . . . . . . . . . . . . . . . . . . . . . . . . . . . . . . . . . . . . 53DELETE A HARD FORWARD PATTERN . . . . . . . . . . . . . . . . . . . . . . . . . . . . . . . . . . . . . . . 54Procedure . . . . . . . . . . . . . . . . . . . . . . . . . . . . . . . . . . . . . . . . . . . . . . . . . . . . . . . . . . . . . . . . 54 . . . . . . . . . . . . . . . . . . . . . . . . . . . . . . . . . . . . . . . . . . . . . . . . . . . . . . . . . . . . . . . . . . . . . . . . 54MODIFY A HARD FORWARD PATTERN . . . . . . . . . . . . . . . . . . . . . . . . . . . . . . . . . . . . . . . 55Procedure . . . . . . . . . . . . . . . . . . . . . . . . . . . . . . . . . . . . . . . . . . . . . . . . . . . . . . . . . . . . . . . . 55Database Search . . . . . . . . . . . . . . . . . . . . . . . . . . . . . . . . . . . . . . . . . . . . . . . . . . . . . . . . . . 56VIEW HARD FORWARD PATTERNS . . . . . . . . . . . . . . . . . . . . . . . . . . . . . . . . . . . . . . . . . . 57Procedure . . . . . . . . . . . . . . . . . . . . . . . . . . . . . . . . . . . . . . . . . . . . . . . . . . . . . . . . . . . . . . . . 57PRINT HARD FORWARD PATTERNS . . . . . . . . . . . . . . . . . . . . . . . . . . . . . . . . . . . . . . . . . 58Procedure . . . . . . . . . . . . . . . . . . . . . . . . . . . . . . . . . . . . . . . . . . . . . . . . . . . . . . . . . . . . . . . . 58
CALL ROUTING CONTROL. . . . . . . . . . . . . . . . . . . . . . . . . . . . . . . . . . . . . . . . . . . . . . . . . . . . . 59OVERVIEW . . . . . . . . . . . . . . . . . . . . . . . . . . . . . . . . . . . . . . . . . . . . . . . . . . . . . . . . . . . . . . . . 59
Procedure . . . . . . . . . . . . . . . . . . . . . . . . . . . . . . . . . . . . . . . . . . . . . . . . . . . . . . . . . . . . . . . . 59Monitored Numbers - . . . . . . . . . . . . . . . . . . . . . . . . . . . . . . . . . . . . . . . . . . . . . . . . . . . . . . . 59Groups - . . . . . . . . . . . . . . . . . . . . . . . . . . . . . . . . . . . . . . . . . . . . . . . . . . . . . . . . . . . . . . . . . 59Patterns - . . . . . . . . . . . . . . . . . . . . . . . . . . . . . . . . . . . . . . . . . . . . . . . . . . . . . . . . . . . . . . . . 60Destinations - . . . . . . . . . . . . . . . . . . . . . . . . . . . . . . . . . . . . . . . . . . . . . . . . . . . . . . . . . . . . . 60Quit - . . . . . . . . . . . . . . . . . . . . . . . . . . . . . . . . . . . . . . . . . . . . . . . . . . . . . . . . . . . . . . . . . . . . 60
CALL ROUTING MONITORED NUMBERS . . . . . . . . . . . . . . . . . . . . . . . . . . . . . . . . . . . . . . . . . 61OVERVIEW . . . . . . . . . . . . . . . . . . . . . . . . . . . . . . . . . . . . . . . . . . . . . . . . . . . . . . . . . . . . . . . . 61
Procedure . . . . . . . . . . . . . . . . . . . . . . . . . . . . . . . . . . . . . . . . . . . . . . . . . . . . . . . . . . . . . . . . 61CALL ROUTING GROUPS. . . . . . . . . . . . . . . . . . . . . . . . . . . . . . . . . . . . . . . . . . . . . . . . . . . . . . 62
OVERVIEW . . . . . . . . . . . . . . . . . . . . . . . . . . . . . . . . . . . . . . . . . . . . . . . . . . . . . . . . . . . . . . . . 62Procedure . . . . . . . . . . . . . . . . . . . . . . . . . . . . . . . . . . . . . . . . . . . . . . . . . . . . . . . . . . . . . . . . 62Call Routing Group Information. . . . . . . . . . . . . . . . . . . . . . . . . . . . . . . . . . . . . . . . . . . . . . . . 62Expanded Displays . . . . . . . . . . . . . . . . . . . . . . . . . . . . . . . . . . . . . . . . . . . . . . . . . . . . . . . . . 62Commands . . . . . . . . . . . . . . . . . . . . . . . . . . . . . . . . . . . . . . . . . . . . . . . . . . . . . . . . . . . . . . . 63ADD A CALL ROUTING GROUP . . . . . . . . . . . . . . . . . . . . . . . . . . . . . . . . . . . . . . . . . . . . . . 64Procedure . . . . . . . . . . . . . . . . . . . . . . . . . . . . . . . . . . . . . . . . . . . . . . . . . . . . . . . . . . . . . . . . 64DELETE A CALL ROUTING GROUP. . . . . . . . . . . . . . . . . . . . . . . . . . . . . . . . . . . . . . . . . . . 65Procedure . . . . . . . . . . . . . . . . . . . . . . . . . . . . . . . . . . . . . . . . . . . . . . . . . . . . . . . . . . . . . . . . 65MODIFY A CALL ROUTING GROUP. . . . . . . . . . . . . . . . . . . . . . . . . . . . . . . . . . . . . . . . . . . 66Procedure . . . . . . . . . . . . . . . . . . . . . . . . . . . . . . . . . . . . . . . . . . . . . . . . . . . . . . . . . . . . . . . . 66Database Search . . . . . . . . . . . . . . . . . . . . . . . . . . . . . . . . . . . . . . . . . . . . . . . . . . . . . . . . . . 67VIEW CALL ROUTING GROUPS. . . . . . . . . . . . . . . . . . . . . . . . . . . . . . . . . . . . . . . . . . . . . . 68Procedure . . . . . . . . . . . . . . . . . . . . . . . . . . . . . . . . . . . . . . . . . . . . . . . . . . . . . . . . . . . . . . . . 68PRINT CALL ROUTING GROUPS . . . . . . . . . . . . . . . . . . . . . . . . . . . . . . . . . . . . . . . . . . . . . 69
NDA-30030-003 Revision 3 Page iii

CONTENTS Call Forward Control - Installation & Operations Manual
Page
Procedure . . . . . . . . . . . . . . . . . . . . . . . . . . . . . . . . . . . . . . . . . . . . . . . . . . . . . . . . . . . . . . . . 69CALL ROUTING PATTERNS . . . . . . . . . . . . . . . . . . . . . . . . . . . . . . . . . . . . . . . . . . . . . . . . . . . . 70
OVERVIEW . . . . . . . . . . . . . . . . . . . . . . . . . . . . . . . . . . . . . . . . . . . . . . . . . . . . . . . . . . . . . . . . 70Procedure . . . . . . . . . . . . . . . . . . . . . . . . . . . . . . . . . . . . . . . . . . . . . . . . . . . . . . . . . . . . . . . . 70Call Routing Pattern Information. . . . . . . . . . . . . . . . . . . . . . . . . . . . . . . . . . . . . . . . . . . . . . . 70Expanded Display . . . . . . . . . . . . . . . . . . . . . . . . . . . . . . . . . . . . . . . . . . . . . . . . . . . . . . . . . . 70Movement Among Fields . . . . . . . . . . . . . . . . . . . . . . . . . . . . . . . . . . . . . . . . . . . . . . . . . . . . 71ADD A CALL ROUTING PATTERN . . . . . . . . . . . . . . . . . . . . . . . . . . . . . . . . . . . . . . . . . . . . 72Procedure . . . . . . . . . . . . . . . . . . . . . . . . . . . . . . . . . . . . . . . . . . . . . . . . . . . . . . . . . . . . . . . . 72DELETE A CALL ROUTING PATTERN . . . . . . . . . . . . . . . . . . . . . . . . . . . . . . . . . . . . . . . . . 73Procedure . . . . . . . . . . . . . . . . . . . . . . . . . . . . . . . . . . . . . . . . . . . . . . . . . . . . . . . . . . . . . . . . 73MODIFY A CALL ROUTING PATTERN . . . . . . . . . . . . . . . . . . . . . . . . . . . . . . . . . . . . . . . . . 74Procedure . . . . . . . . . . . . . . . . . . . . . . . . . . . . . . . . . . . . . . . . . . . . . . . . . . . . . . . . . . . . . . . . 74Database Search . . . . . . . . . . . . . . . . . . . . . . . . . . . . . . . . . . . . . . . . . . . . . . . . . . . . . . . . . . 75VIEW CALL ROUTING PATTERNS . . . . . . . . . . . . . . . . . . . . . . . . . . . . . . . . . . . . . . . . . . . . 76Procedure . . . . . . . . . . . . . . . . . . . . . . . . . . . . . . . . . . . . . . . . . . . . . . . . . . . . . . . . . . . . . . . . 76PRINT CALL ROUTING PATTERNS . . . . . . . . . . . . . . . . . . . . . . . . . . . . . . . . . . . . . . . . . . . 77Procedure . . . . . . . . . . . . . . . . . . . . . . . . . . . . . . . . . . . . . . . . . . . . . . . . . . . . . . . . . . . . . . . . 77
CALL ROUTING DESTINATIONS . . . . . . . . . . . . . . . . . . . . . . . . . . . . . . . . . . . . . . . . . . . . . . . . 78OVERVIEW . . . . . . . . . . . . . . . . . . . . . . . . . . . . . . . . . . . . . . . . . . . . . . . . . . . . . . . . . . . . . . . . 78
Procedure . . . . . . . . . . . . . . . . . . . . . . . . . . . . . . . . . . . . . . . . . . . . . . . . . . . . . . . . . . . . . . . . 78Call Routing Destinations Information. . . . . . . . . . . . . . . . . . . . . . . . . . . . . . . . . . . . . . . . . . . 78Expanded Display . . . . . . . . . . . . . . . . . . . . . . . . . . . . . . . . . . . . . . . . . . . . . . . . . . . . . . . . . . 78ADD A CALL ROUTING DESTINATION . . . . . . . . . . . . . . . . . . . . . . . . . . . . . . . . . . . . . . . . 79Procedure . . . . . . . . . . . . . . . . . . . . . . . . . . . . . . . . . . . . . . . . . . . . . . . . . . . . . . . . . . . . . . . . 79Non-Existent Data. . . . . . . . . . . . . . . . . . . . . . . . . . . . . . . . . . . . . . . . . . . . . . . . . . . . . . . . . . 80DELETE A CALL ROUTING DESTINATION . . . . . . . . . . . . . . . . . . . . . . . . . . . . . . . . . . . . . 81Procedure . . . . . . . . . . . . . . . . . . . . . . . . . . . . . . . . . . . . . . . . . . . . . . . . . . . . . . . . . . . . . . . . 81MODIFY A CALL ROUTING DESTINATION . . . . . . . . . . . . . . . . . . . . . . . . . . . . . . . . . . . . . 82Procedure . . . . . . . . . . . . . . . . . . . . . . . . . . . . . . . . . . . . . . . . . . . . . . . . . . . . . . . . . . . . . . . . 82Database Search . . . . . . . . . . . . . . . . . . . . . . . . . . . . . . . . . . . . . . . . . . . . . . . . . . . . . . . . . . 83VIEW CALL ROUTING DESTINATIONS . . . . . . . . . . . . . . . . . . . . . . . . . . . . . . . . . . . . . . . . 84Procedure . . . . . . . . . . . . . . . . . . . . . . . . . . . . . . . . . . . . . . . . . . . . . . . . . . . . . . . . . . . . . . . . 84PRINT CALL ROUTING DESTINATIONS . . . . . . . . . . . . . . . . . . . . . . . . . . . . . . . . . . . . . . . 85Procedure . . . . . . . . . . . . . . . . . . . . . . . . . . . . . . . . . . . . . . . . . . . . . . . . . . . . . . . . . . . . . . . . 85
TIME PARAMETERS . . . . . . . . . . . . . . . . . . . . . . . . . . . . . . . . . . . . . . . . . . . . . . . . . . . . . . . . . . 86OVERVIEW . . . . . . . . . . . . . . . . . . . . . . . . . . . . . . . . . . . . . . . . . . . . . . . . . . . . . . . . . . . . . . . . 86
Procedure . . . . . . . . . . . . . . . . . . . . . . . . . . . . . . . . . . . . . . . . . . . . . . . . . . . . . . . . . . . . . . . . 86Time Parameters Information . . . . . . . . . . . . . . . . . . . . . . . . . . . . . . . . . . . . . . . . . . . . . . . . . 86Time Formula . . . . . . . . . . . . . . . . . . . . . . . . . . . . . . . . . . . . . . . . . . . . . . . . . . . . . . . . . . . . . 86Examples . . . . . . . . . . . . . . . . . . . . . . . . . . . . . . . . . . . . . . . . . . . . . . . . . . . . . . . . . . . . . . . . 87ADD A TIME PARAMETER . . . . . . . . . . . . . . . . . . . . . . . . . . . . . . . . . . . . . . . . . . . . . . . . . . 88Procedure . . . . . . . . . . . . . . . . . . . . . . . . . . . . . . . . . . . . . . . . . . . . . . . . . . . . . . . . . . . . . . . . 88DELETE A TIME PARAMETER . . . . . . . . . . . . . . . . . . . . . . . . . . . . . . . . . . . . . . . . . . . . . . . 89Procedure . . . . . . . . . . . . . . . . . . . . . . . . . . . . . . . . . . . . . . . . . . . . . . . . . . . . . . . . . . . . . . . . 89MODIFY A TIME PARAMETER . . . . . . . . . . . . . . . . . . . . . . . . . . . . . . . . . . . . . . . . . . . . . . . 90Procedure . . . . . . . . . . . . . . . . . . . . . . . . . . . . . . . . . . . . . . . . . . . . . . . . . . . . . . . . . . . . . . . . 90Database Search . . . . . . . . . . . . . . . . . . . . . . . . . . . . . . . . . . . . . . . . . . . . . . . . . . . . . . . . . . 91VIEW TIME PARAMETERS . . . . . . . . . . . . . . . . . . . . . . . . . . . . . . . . . . . . . . . . . . . . . . . . . . 92Procedure . . . . . . . . . . . . . . . . . . . . . . . . . . . . . . . . . . . . . . . . . . . . . . . . . . . . . . . . . . . . . . . . 92PRINT TIME PARAMETERS . . . . . . . . . . . . . . . . . . . . . . . . . . . . . . . . . . . . . . . . . . . . . . . . . 93
Page iv NDA-30030-003 Revision 3

Call Forward Control - Installation & Operations Manual CONTENTS
Page
Procedure . . . . . . . . . . . . . . . . . . . . . . . . . . . . . . . . . . . . . . . . . . . . . . . . . . . . . . . . . . . . . . . . 93SPECIAL EVENTS . . . . . . . . . . . . . . . . . . . . . . . . . . . . . . . . . . . . . . . . . . . . . . . . . . . . . . . . . . . . 94
OVERVIEW . . . . . . . . . . . . . . . . . . . . . . . . . . . . . . . . . . . . . . . . . . . . . . . . . . . . . . . . . . . . . . . . 94Procedure . . . . . . . . . . . . . . . . . . . . . . . . . . . . . . . . . . . . . . . . . . . . . . . . . . . . . . . . . . . . . . . . 94Special Events Information . . . . . . . . . . . . . . . . . . . . . . . . . . . . . . . . . . . . . . . . . . . . . . . . . . . 94ADD A SPECIAL EVENT . . . . . . . . . . . . . . . . . . . . . . . . . . . . . . . . . . . . . . . . . . . . . . . . . . . . 95Procedure . . . . . . . . . . . . . . . . . . . . . . . . . . . . . . . . . . . . . . . . . . . . . . . . . . . . . . . . . . . . . . . . 95Time Parameters. . . . . . . . . . . . . . . . . . . . . . . . . . . . . . . . . . . . . . . . . . . . . . . . . . . . . . . . . . . 96Time Formula . . . . . . . . . . . . . . . . . . . . . . . . . . . . . . . . . . . . . . . . . . . . . . . . . . . . . . . . . . . . . 96Examples . . . . . . . . . . . . . . . . . . . . . . . . . . . . . . . . . . . . . . . . . . . . . . . . . . . . . . . . . . . . . . . . 96MODIFY A SPECIAL EVENT . . . . . . . . . . . . . . . . . . . . . . . . . . . . . . . . . . . . . . . . . . . . . . . . . 97Procedure . . . . . . . . . . . . . . . . . . . . . . . . . . . . . . . . . . . . . . . . . . . . . . . . . . . . . . . . . . . . . . . . 97MODIFY A SPECIAL EVENT’S TIME PARAMETERS. . . . . . . . . . . . . . . . . . . . . . . . . . . . . . 98Procedure . . . . . . . . . . . . . . . . . . . . . . . . . . . . . . . . . . . . . . . . . . . . . . . . . . . . . . . . . . . . . . . . 98MODIFY A SPECIAL EVENT’S HARD FORWARD GROUPS. . . . . . . . . . . . . . . . . . . . . . . . 99Procedure . . . . . . . . . . . . . . . . . . . . . . . . . . . . . . . . . . . . . . . . . . . . . . . . . . . . . . . . . . . . . . . 100General Information . . . . . . . . . . . . . . . . . . . . . . . . . . . . . . . . . . . . . . . . . . . . . . . . . . . . . . . 100MODIFY A SPECIAL EVENT’S CALL ROUTING GROUPS . . . . . . . . . . . . . . . . . . . . . . . . 101Procedure . . . . . . . . . . . . . . . . . . . . . . . . . . . . . . . . . . . . . . . . . . . . . . . . . . . . . . . . . . . . . . . 102General Information . . . . . . . . . . . . . . . . . . . . . . . . . . . . . . . . . . . . . . . . . . . . . . . . . . . . . . . 102DELETE A SPECIAL EVENT . . . . . . . . . . . . . . . . . . . . . . . . . . . . . . . . . . . . . . . . . . . . . . . . 103Procedure . . . . . . . . . . . . . . . . . . . . . . . . . . . . . . . . . . . . . . . . . . . . . . . . . . . . . . . . . . . . . . . 103VIEW SPECIAL EVENTS . . . . . . . . . . . . . . . . . . . . . . . . . . . . . . . . . . . . . . . . . . . . . . . . . . . 104Procedure . . . . . . . . . . . . . . . . . . . . . . . . . . . . . . . . . . . . . . . . . . . . . . . . . . . . . . . . . . . . . . . 104PRINT SPECIAL EVENTS . . . . . . . . . . . . . . . . . . . . . . . . . . . . . . . . . . . . . . . . . . . . . . . . . . 105Procedure . . . . . . . . . . . . . . . . . . . . . . . . . . . . . . . . . . . . . . . . . . . . . . . . . . . . . . . . . . . . . . . 105
VALIDATE AND INSTALL . . . . . . . . . . . . . . . . . . . . . . . . . . . . . . . . . . . . . . . . . . . . . . . . . . . . . 106OVERVIEW. . . . . . . . . . . . . . . . . . . . . . . . . . . . . . . . . . . . . . . . . . . . . . . . . . . . . . . . . . . . . . 106Procedure . . . . . . . . . . . . . . . . . . . . . . . . . . . . . . . . . . . . . . . . . . . . . . . . . . . . . . . . . . . . . . . 106When to Use . . . . . . . . . . . . . . . . . . . . . . . . . . . . . . . . . . . . . . . . . . . . . . . . . . . . . . . . . . . . . 106VALIDATE DATABASE. . . . . . . . . . . . . . . . . . . . . . . . . . . . . . . . . . . . . . . . . . . . . . . . . . . . . 107Procedure . . . . . . . . . . . . . . . . . . . . . . . . . . . . . . . . . . . . . . . . . . . . . . . . . . . . . . . . . . . . . . . 107Treatment of Discrepancies . . . . . . . . . . . . . . . . . . . . . . . . . . . . . . . . . . . . . . . . . . . . . . . . . 108Possible Actions . . . . . . . . . . . . . . . . . . . . . . . . . . . . . . . . . . . . . . . . . . . . . . . . . . . . . . . . . . 108INSTALL DATABASE . . . . . . . . . . . . . . . . . . . . . . . . . . . . . . . . . . . . . . . . . . . . . . . . . . . . . . 109Procedure . . . . . . . . . . . . . . . . . . . . . . . . . . . . . . . . . . . . . . . . . . . . . . . . . . . . . . . . . . . . . . . 109Validated Data . . . . . . . . . . . . . . . . . . . . . . . . . . . . . . . . . . . . . . . . . . . . . . . . . . . . . . . . . . . 110Schedule Instructions . . . . . . . . . . . . . . . . . . . . . . . . . . . . . . . . . . . . . . . . . . . . . . . . . . . . . . 110
NDA-30030-003 Revision 3 Page v
Page vi NDA-30030-003 Revision 3
CONTENTS Call Forward Control - Installation & Operations Manual
This Page Left Blank.

Call Forward Control - Installation & Operations Manual FIGURES
LIST OF FIGURESFigure Title Page
1-1 Call Forward Control System . . . . . . . . . . . . . . . . . . . . . . . . . . . . . . . . . . . . . . . . . . . . 11-2 Main Menu with Screen Sections . . . . . . . . . . . . . . . . . . . . . . . . . . . . . . . . . . . . . . . . . 31-3 Screen Hierarchy and Movement . . . . . . . . . . . . . . . . . . . . . . . . . . . . . . . . . . . . . . . . . 41-4 Procedure Layout . . . . . . . . . . . . . . . . . . . . . . . . . . . . . . . . . . . . . . . . . . . . . . . . . . . . . 5
2-1 Installation Requirements . . . . . . . . . . . . . . . . . . . . . . . . . . . . . . . . . . . . . . . . . . . . . . . 8
3-1 CFC Administrator Main Menu . . . . . . . . . . . . . . . . . . . . . . . . . . . . . . . . . . . . . . . . . . 293-2 Call Routing Control Assignment Worksheet . . . . . . . . . . . . . . . . . . . . . . . . . . . . . . . 323-3 Hard Forward Control Assignment Worksheet . . . . . . . . . . . . . . . . . . . . . . . . . . . . . . 333-4 Extensions Option . . . . . . . . . . . . . . . . . . . . . . . . . . . . . . . . . . . . . . . . . . . . . . . . . . . . 343-5 Add An Extension . . . . . . . . . . . . . . . . . . . . . . . . . . . . . . . . . . . . . . . . . . . . . . . . . . . . 353-6 Delete An Extension . . . . . . . . . . . . . . . . . . . . . . . . . . . . . . . . . . . . . . . . . . . . . . . . . . 363-7 Modify An Extension . . . . . . . . . . . . . . . . . . . . . . . . . . . . . . . . . . . . . . . . . . . . . . . . . . 373-8 View Extensions . . . . . . . . . . . . . . . . . . . . . . . . . . . . . . . . . . . . . . . . . . . . . . . . . . . . . 393-9 Print Extensions . . . . . . . . . . . . . . . . . . . . . . . . . . . . . . . . . . . . . . . . . . . . . . . . . . . . . 403-10 Hard Forward Control Option . . . . . . . . . . . . . . . . . . . . . . . . . . . . . . . . . . . . . . . . . . . 413-11 Hard Forward Groups Option . . . . . . . . . . . . . . . . . . . . . . . . . . . . . . . . . . . . . . . . . . . 423-12 Add A Hard Forward Group. . . . . . . . . . . . . . . . . . . . . . . . . . . . . . . . . . . . . . . . . . . . . 443-13 Delete A Hard Forward Group. . . . . . . . . . . . . . . . . . . . . . . . . . . . . . . . . . . . . . . . . . . 453-14 Modify A Hard Forward Group . . . . . . . . . . . . . . . . . . . . . . . . . . . . . . . . . . . . . . . . . . 463-15 View Hard Forward Groups. . . . . . . . . . . . . . . . . . . . . . . . . . . . . . . . . . . . . . . . . . . . . 483-16 Print Hard Forward Groups . . . . . . . . . . . . . . . . . . . . . . . . . . . . . . . . . . . . . . . . . . . . . 493-17 Hard Forward Patterns Option . . . . . . . . . . . . . . . . . . . . . . . . . . . . . . . . . . . . . . . . . . 503-18 Add A Hard Forward Pattern . . . . . . . . . . . . . . . . . . . . . . . . . . . . . . . . . . . . . . . . . . . . 523-19 Delete A Hard Forward Pattern . . . . . . . . . . . . . . . . . . . . . . . . . . . . . . . . . . . . . . . . . . 543-20 Modify A Hard Forward Pattern. . . . . . . . . . . . . . . . . . . . . . . . . . . . . . . . . . . . . . . . . . 553-21 View Hard Forward Patterns . . . . . . . . . . . . . . . . . . . . . . . . . . . . . . . . . . . . . . . . . . . . 573-22 Print Hard Forward Patterns . . . . . . . . . . . . . . . . . . . . . . . . . . . . . . . . . . . . . . . . . . . . 583-23 Call Routing Control Option. . . . . . . . . . . . . . . . . . . . . . . . . . . . . . . . . . . . . . . . . . . . . 593-24 Call Routing Monitored Numbers Option. . . . . . . . . . . . . . . . . . . . . . . . . . . . . . . . . . . 613-25 Call Routing Groups Option . . . . . . . . . . . . . . . . . . . . . . . . . . . . . . . . . . . . . . . . . . . . 623-26 Add A Call Routing Group . . . . . . . . . . . . . . . . . . . . . . . . . . . . . . . . . . . . . . . . . . . . . . 643-27 Delete A Call Routing Group . . . . . . . . . . . . . . . . . . . . . . . . . . . . . . . . . . . . . . . . . . . . 653-28 Modify A Call Routing Group. . . . . . . . . . . . . . . . . . . . . . . . . . . . . . . . . . . . . . . . . . . . 663-29 View Call Routing Groups . . . . . . . . . . . . . . . . . . . . . . . . . . . . . . . . . . . . . . . . . . . . . . 683-30 Print Call Routing Groups . . . . . . . . . . . . . . . . . . . . . . . . . . . . . . . . . . . . . . . . . . . . . . 693-31 Call Routing Patterns Option. . . . . . . . . . . . . . . . . . . . . . . . . . . . . . . . . . . . . . . . . . . . 703-32 Add A Call Routing Pattern . . . . . . . . . . . . . . . . . . . . . . . . . . . . . . . . . . . . . . . . . . . . . 723-33 Delete A Call Routing Pattern . . . . . . . . . . . . . . . . . . . . . . . . . . . . . . . . . . . . . . . . . . . 733-34 Modify A Call Routing Pattern . . . . . . . . . . . . . . . . . . . . . . . . . . . . . . . . . . . . . . . . . . . 743-35 View Call Routing Patterns . . . . . . . . . . . . . . . . . . . . . . . . . . . . . . . . . . . . . . . . . . . . . 763-36 Print Call Routing Patterns . . . . . . . . . . . . . . . . . . . . . . . . . . . . . . . . . . . . . . . . . . . . . 773-37 Call Routing Destinations Option . . . . . . . . . . . . . . . . . . . . . . . . . . . . . . . . . . . . . . . . 783-38 Add A Call Routing Destination. . . . . . . . . . . . . . . . . . . . . . . . . . . . . . . . . . . . . . . . . . 793-39 Delete A Call Routing Destination . . . . . . . . . . . . . . . . . . . . . . . . . . . . . . . . . . . . . . . . 81
NDA-30030-003 Revision 3 Page vii

FIGURES Call Forward Control - Installation & Operations Manual
Figure Title Page
3-40 Modify A Call Routing Destination. . . . . . . . . . . . . . . . . . . . . . . . . . . . . . . . . . . . . . . . 823-41 View Call Routing Destinations . . . . . . . . . . . . . . . . . . . . . . . . . . . . . . . . . . . . . . . . . . 843-42 Print Call Routing Destinations . . . . . . . . . . . . . . . . . . . . . . . . . . . . . . . . . . . . . . . . . . 853-43 Time Parameters Option . . . . . . . . . . . . . . . . . . . . . . . . . . . . . . . . . . . . . . . . . . . . . . . 863-44 Add A Time Parameter . . . . . . . . . . . . . . . . . . . . . . . . . . . . . . . . . . . . . . . . . . . . . . . . 883-45 Delete A Time Parameter . . . . . . . . . . . . . . . . . . . . . . . . . . . . . . . . . . . . . . . . . . . . . . 893-46 Modify A Time Parameter . . . . . . . . . . . . . . . . . . . . . . . . . . . . . . . . . . . . . . . . . . . . . . 903-47 View Time Parameters . . . . . . . . . . . . . . . . . . . . . . . . . . . . . . . . . . . . . . . . . . . . . . . . 923-48 Print Time Parameters . . . . . . . . . . . . . . . . . . . . . . . . . . . . . . . . . . . . . . . . . . . . . . . . 933-49 Special Events Option. . . . . . . . . . . . . . . . . . . . . . . . . . . . . . . . . . . . . . . . . . . . . . . . . 943-50 Add A Special Event . . . . . . . . . . . . . . . . . . . . . . . . . . . . . . . . . . . . . . . . . . . . . . . . . . 953-51 Modify A Special Event . . . . . . . . . . . . . . . . . . . . . . . . . . . . . . . . . . . . . . . . . . . . . . . . 973-52 Modify A Special Event’s Time Parameters . . . . . . . . . . . . . . . . . . . . . . . . . . . . . . . . 983-53 Modify Special Event Hard Forward Groups . . . . . . . . . . . . . . . . . . . . . . . . . . . . . . . 993-54 Modify Special Event Call Routing Groups . . . . . . . . . . . . . . . . . . . . . . . . . . . . . . . 1013-55 Delete A Special Event . . . . . . . . . . . . . . . . . . . . . . . . . . . . . . . . . . . . . . . . . . . . . . . 1033-56 View Special Events . . . . . . . . . . . . . . . . . . . . . . . . . . . . . . . . . . . . . . . . . . . . . . . . . 1043-57 Print Special Events . . . . . . . . . . . . . . . . . . . . . . . . . . . . . . . . . . . . . . . . . . . . . . . . . 1053-58 Validate and Install . . . . . . . . . . . . . . . . . . . . . . . . . . . . . . . . . . . . . . . . . . . . . . . . . . 1063-59 Validate Database. . . . . . . . . . . . . . . . . . . . . . . . . . . . . . . . . . . . . . . . . . . . . . . . . . . 1073-60 Install Database . . . . . . . . . . . . . . . . . . . . . . . . . . . . . . . . . . . . . . . . . . . . . . . . . . . . 109
Page viii NDA-30030-003 Revision 3

Call Forward Control - Installation & Operations Manual INTRODUCTION
Chapter 1 INTRODUCTION
OVERVIEW
Call Forward Control (CFC) is an application suite that enhances the forwarding of incoming calls from both internal and external sources. The CFC programs use the Status Monitor, Switch Control, and Service Set facilities of the NEAX2400 IMS as accessed through the OAI. Telephones may be forwarded directly to an extension using the Hard Forward feature. Incoming calls received by an extension that has been forwarded to a monitored number may be routed to a specified destination using the Call Routing feature. Both Hard Forwarding and Call Routing can be controlled and tailored to suit the needs of the phone user based on time of day and/or day of week/year.
The CFC package consists of the following applications:
• CFC Administration Program
• Call Routing Control Program (CRC)
• Hard Forward Control Program (HFC)
CFC performs its call forwarding functions either within the Medical Center System (MCS) or as an independent application in the Applications Manager (APM) environment. Its communication with the NEAX PBX is based upon the NEC Open Application Interface (OAI). Figure 1-1 below illustrates the relationship of these system components.
Figure 1-1 Call Forward Control System
NEAX PBX
Internal
APM
Password
CFC
IncomingHard Forward Time
Validate,
Call Routing
Special
Medical Center
Extensions
Extensions
Trunks
System (MCS) Menus
Administrator
Control Control Parameters
Events Process andInstall
A BReal-Time
Call ReroutingMenu-DrivenAdministration
Processes
CRCHFC
NDA-30030-003 Revision 3 Page 1

INTRODUCTION Call Forward Control - Installation & Operations Manual
OVERVIEW (Cont)
The CFC Administration program is used to create and modify the telephone databases and event schedules used by the HFC and CFC applications. Telephone extensions can be grouped by common forwarding (HFC) and routing (CRC) patterns. This grouping feature makes it possible to forward and/or reroute whole departments at a time or different departments according to different schedules or destination extensions. A Special Events table will allow Hard Forwarding and Call Routing groups to override their normal routing patterns temporarily during a specified time.
The Call Routing Control application runs in the background and performs the routing of monitored extensions using tables created by the CFC Administration application. CRC allows calls that originate internally to be routed differently than calls that originate externally. The CRC application requires the assignment of several monitored numbers, and phone users must forward their calls to these monitored numbers to activate Call Routing for their telephone. The monitored numbers will be associated with the call forwarding options available on the NEAX2400 and the Dterm phone. These forwarding options are:
• Forward all calls.
• Forward calls when line is busy.
• Forward calls on no-answer.
Each forwarding option has a list of possible destinations. The first idle extension in the list is used as the routing destination. If all extensions are busy, then a default destination is used.
The Hard Forward Control application runs in the background and performs the direct forwarding of extensions to specific destinations at scheduled intervals using tables created by the CFC Administration application. Like the CRC application, HFC destinations may be specified for each of the NEAX 2400 forwarding options (all calls, busy, and no-answer). Unlike the CRC, HFC cannot route internal and external calls differently, and it only supports a single destination for each forwarding option. The HFC application may be used to forward phones automatically to a monitored number used by CRC to provide automatic activation of Call Routing.
Briefly then, CFC makes it possible to:
• Assemble extensions into Hard Forward and Call Routing groups whose in-coming calls are forwarded and routed to the same destination(s).
• Implement different Hard Forward and Call Routing patterns at different times for the same group.
• Assign different Hard Forward and Call Routing patterns to different NEAX 2400 forwarding options (i.e., all calls, busy, no answer).
• Route calls originating from internal extensions differently than calls origi-nating from telephones that are outside of the organization (Call Routing only).
Page 2 NDA-30030-003 Revision 3

Call Forward Control - Installation & Operations Manual INTRODUCTION
MANUAL ORGANIZATION
Chapter 2
Chapter 2 of this manual provides detailed information to be used in the software installation and configuration of Call Forwarding Control. The APM Operations Manual provides step-by-step instructions for entering the data that is presented in this chapter.
Chapter 3
This chapter describes the system of interrelated assignments that can be made through the CFC Administrator Main Menu. Each Main Menu option is described individually in a separate section in the chapter (e.g., Extensions, Groups, Forwarding Patterns, etc.). And each Main Menu option section contains subsections for the actions that can be taken with that option. For instance, extensions can be added, deleted, modified, viewed, or printed. So, within Section 3.1 Extensions, there is a separate subsection for each of these actions. This arrangement of subsections is true of most Main Menu options.
Each description contains an illustration of the screen(s) involved, information that is important to understand before making the assignment, and a step-by-step procedure for actually manipulating the CFC screens and functions. Because the assignments are very detailed and their relationships are important, an Assignment Worksheet, provided in the Main Menu Overview, makes it possible to plan and prepare the assignments before actually making them in CFC.
SCREEN ILLUSTRATIONS
The CFC screen contains the three basic sections that are shown below on the Main Menu and defined after the figure.
Figure 1-2 Main Menu with Screen Sections
CFC Administrator Fri Apr 1 16:10 pm
*** Main Menu ***
Extensions Hard Forward ControlCall Routing ControlTime ParametersSpecial EventsValidate and InstallQuit
Arrow keys to move cursor, <RET> to select, <ESC> to quit.
Main Working Area
Heading or Title
Message/Command Area
NDA-30030-003 Revision 3 Page 3

INTRODUCTION Call Forward Control - Installation & Operations Manual
SCREEN ILLUSTRATIONS (Cont)
• Heading or TitleA display of the CFC name and a date and time stamp that is periodically updated.
• Main Working AreaThe area in which CFC menus are displayed, input is made to data entry prompts, and data is displayed for on-screen viewing.
• Message / Command AreaThe bottom of the screen where instructions (e.g., Arrow keys to move cursor), commands (e.g., Add, Delete), and messages (e.g., extension must be unique.) are displayed.
The graphics in this manual illustrate both what is displayed on the terminal screens and the movement from one or more previous screens to the one under discussion. (See Figure 3)
Figure 1-3 Screen Hierarchy and Movement
CFC Administrator Fri Apr 1 16:10 pm
*** Main Menu ***
Hard Forward ControlCall Routing ControlTime ParametersSpecial EventsValidate and InstallQuit
Arrow keys to move cursor, <RET> to select, <ESC> to quit
Extensions
CFC Administrator Fri Apr 1 16:10 pm
*** Extensions ***
Extension:
Hard Forward Group Index:
Call Routing Group Index:
Add Delete Modify View Print Quit
Name or Department:
CFC Administrator Fri Apr 1 16:10 pm
*** Extensions ***
Extension:
Hard Forward Group Index:
Call Routing Group Index:
<ESC> to return to command line
Name or Department:
Page 4 NDA-30030-003 Revision 3

Call Forward Control - Installation & Operations Manual INTRODUCTION
SCREEN ILLUSTRATIONS (Cont)
Each Section Overview displays graphically the movement from the Main Menu to the next screen level (i.e., Screen (1) to screen (2)). Thereafter, each subsection displays the movement from the second level screen to any third or fourth (i.e., Screen (2) to screen (3)). This progression of screens and the progression of subsections by Main Menu options makes it easier to stay in touch in the manual with the activity and position in the actual terminal screens.
PROCEDURES Each description includes a step-by-step set of instructions on how to select and move to the necessary screen and how to perform the possible actions. As shown below, the procedures are presented in a 2-column layout: The left column contains the action to be taken and the right, the results of having taken that action. Where there are field entries to be made on the screen, this manual provides field definitions in the right-hand column corresponding to the field name on the left.
Figure 1-4 Procedure Layout
GENERAL KEY USAGE
Throughout CFC, the following keys serve the purposes indicated for each: (Note: Clear notation is made wherever other key or key combinations apply or these do not.)
ENTER Accepts an indicated selection or field entry.
ESCGenerally exits the current screen or action to the most previous screen or action.
Arrow KeysMove the cursor in the direction indicated. If more than one screen full of items are displayed, press the DOWN arrow to scroll the list upwards and the UP arrow to scroll the list downwards.
Space BarSelects an option when more than one are available in a field; serves to toggle among scrolled or side-by-side options in a field.
BackspaceErases any data in a field.
Action Result
On the Extension menu, Press ENTER to select the Add command.(1)
The first field is highlighted for data entry. (2)
Enter data to the fields according to the defini-tions below, pressing ENTER after each
entry:
Extension - The extension number being added to the system; up to 5 digits in length; must be
assigned through the PBX MAT.
Group Index - The index to the group definition to which this extension is to be assigned; up to
3 digits in length.
After ENTER is pressed on the last field, the cursor returns to the command line.
To exit the data entry screen, enter q to select the Quit command.
The original command line of the Extension Database screen is displayed.
NDA-30030-003 Revision 3 Page 5

INTRODUCTION Call Forward Control - Installation & Operations Manual
GENERAL KEY USAGE (Cont)
Tab KeyPressed while in a field, displays information that corresponds to that field in other options. The following notation is includes in the description wherever this key can be used.
REQUIREMENTS Two groups of hardware are required for any OAI application: the User Application Processor (UAP) and the Private Branch Exchange system (PBX). The minimum configuration for each of these groups is specified below.
UAP Basic Configuration
Requires a UAP 1000 or equivalent system
PBX Basic Configuration
• NEAX 2400 IMS with OAI compatible software
• Release J4.80 or greater
• Interface Processor (IP) Unit (or OAI module). The specific hardware associated with the IP varies with the NEAX configuration -- IMG, MMG, UMG. Detailed lists of the hardware are provided in the OAI Module Installation Manual for the NEAX 2400 IMS.
Press the TAB key while in the Group Index field to display the groupForwarding Pattern Index. Press ESC to exit the display.
Page 6 NDA-30030-003 Revision 3

Call Forward Control - Installation & Operations Manual INSTALLATION INTRODUCTION
Chapter 2 INSTALLATION INTRODUCTION
This chapter provides specific field entries that need to be made during the installation and configuration of Call Forward Control. In addition to this chapter, use instructions in the following manuals for this installation:
Applications Manager (APM) Installation Manual – Contains step-by-step instructions for installing the software from the release media.Applications Manager (APM) Operations Manual – Explains how applications like Call Forward Control are configured in the APM environment and how its databases are created, using the entries and values provided in this chapter.NEAX2400 System Manuals – Give very detailed explanations about the assignments that need to be made through the Maintenance Administration Terminal (MAT) commands on the NEAX2400.
Briefly, the installation and set up of CFC involves the following sequence of steps, presented in this chapter as sections:
Software Installation
This section describes installation and configuration of the Call Forward Control software onto the User Application Processor from the release media.
Application Configuration
Call Forward Control is internally supported by the APM and must be configured in the APM environment. Call Forward Control is comprised of three internal components, all three of which must be configured. SECTION 2.2 of this chapter provides the information that must be entered into this APM configuration file. Use the instructions provided in the APM Operations Manual to make the entries contained in this section.
Tenant Database Configuration
The Call Forward Control applications use the Tenant Database, which is configured using the APM. SECTION 2.3 of this chapter describes the creation and modification of the Tenant Database under the APM. Use the instructions provided in the APM Operations Manual to make the entries contained in this section.
MAT Assignments
There are data settings which must be assigned at the NEAX Maintenance Administration Terminal (MAT) before Call Forward Control can function. SECTION 2.4 specifies the necessary commands and the values at which they are to be set. Use the instructions provided in the NEAX2400 IMS System Manuals to make the entries contained in this section.
Initialization / Termination
Call Forward Control must be initialized (and terminated) through the APM Operations Menu. Use the instructions provided in the APM Operations Manual.
NDA-30030-003 Revision 3 Page 7

INSTALLATION INTRODUCTION Call Forward Control - Installation & Operations Manual
The installation process, including its description in this manual and other manuals that are necessary, is illustrated in Figure 2-1.
Figure 2-1 Installation Requirements
Initialization / Termination APM OperationsManual
NEAX 2400 IMSMaintenance AdministrationTerminal (MAT) Assignments
AMNO (Assignment of Monitored Numbers)AKYI (Assignment of Dterm Function Keys)
NEAX 2400 IMSSystem Manuals
Application ConfigurationApplication Characteristics
Primary Parameter ConfigurationOAI Facilities (Optional)
OAI Configuration Parameters (Optional)User-Defined Parameters
APM OperationsManual
Software InstallationInstallationof Applications/Packages
CALL FORWARD CONTROLINSTALLATION REQUIREMENTS
APM InstallationManual
Tenant Database ConfigurationDefine Database FieldsBuild Master Database
Specify Application Database FieldsProcess Application DatabaseInstall Application Database
APM OperationsManual
Page 8 NDA-30030-003 Revision 3

Call Forward Control - Installation & Operations Manual INSTALLATION INTRODUCTION
SOFTWARE INSTALLATION
Installation of CFC software is initiated from the Applications Manager (APM) Platform Administration Main Menu. To display this menu, enter the login apmadm at the UNIX prompt and press ENTER. Using instructions in the APM Operations Manual, select and implement the Installation of Applications/Packages option from this menu to load CFC software from release media. As the installation process executes, follow the steps described below as they correspond to the screen display and make input as directed. (Note: Necessary input is shown in boldface type.)
_____________________________________________
STEP 1: Active CFC Application Check
The first step performed during installation is to determine if any CFC applications are currently running on the system. If there are no active CFC programs, then installation continues with STEP 2. If CFC applications are running, then an error screen is displayed and installation is terminated. Use the APM to terminate all active CFC programs before attempting another CFC installation.
STEP 2: Existing CFC Installation Check
The next check performed during installation is to determine if a previous version of CFC is installed on the system. If CFC is not installed, then the Superuser (Root) Password screen is displayed as described in STEP 3. If CFC is installed, then a warning screen is displayed indicating that all CFC files will be saved in a backup directory if the installation is continued. Type y <ENTER> to continue or n <ENTER> to terminate.
The Call Forward Control Application is currently active.Installation cannot continue until Call Forward Control hasbeen terminated through the Applications Manager.
Press Enter to continue. [ ] <ENTER>
WARNING: An existing CFC installation was detected on this system.If you continue with this installation, all existing CFC fileswill be saved in the /oai/app/cfc.s1 directory.
Do you wish to continue? (y/n) [y] <ENTER>
NDA-30030-003 Revision 3 Page 9

INSTALLATION INTRODUCTION Call Forward Control - Installation & Operations Manual
SOFTWARE INSTALLATION (Cont)
STEP 3: Superuser (Root) Password
Type the correct password for the root login and press <ENTER> to continue. An invalid password displays the message “Invalid root password. Do you wish to continue? (Y/N) [ ]”. Type y <ENTER> to try again, or n <ENTER> to cancel the installation.
STEP 4: MCS Enhancement or Independent APM Application
At this point in the installation, a search is made on the system to find the Medical Center software. If it is found, it is assumed that CFC is being installed to serve as an enhancement to the Medical Center System, and the screen in STEP 5 is displayed. If Medical Center software is not found, a status screen is displayed, indicating that if the installation is continued, CFC will be installed as an independent APM application. Type y <ENTER> to continue or n <ENTER> to terminate.
STEP 5: CFC Directories and Database
The next step performed during installation is to create the necessary CFC directories. If a previous version of CFC is installed on the system, then a copy of the current database is saved. If the current database format is compatible with the new installation, the following status screen is displayed. Press the <ENTER> key at the prompt to continue to the next step.
Super User (root) privileges are required.
Please enter the Super User Password: su/root password <ENTER>.
The CFC application can be installed as an extensionof the Medical Center System or as an APM application.
If you continue with this installation CFC will be
installed as an APM application.
Do you wish to continue? (y/n) [y] <ENTER>
Creating CFC directories...
The existing /oai/app/cfc/data directory containsconfiguration information that is compatible with thisversion of the CFC. The /oai/app/cfc/data directorywas left unchanged.
Press Enter to continue. [ ] <ENTER>
Page 10 NDA-30030-003 Revision 3
Call Forward Control - Installation & Operations Manual INSTALLATION INTRODUCTION
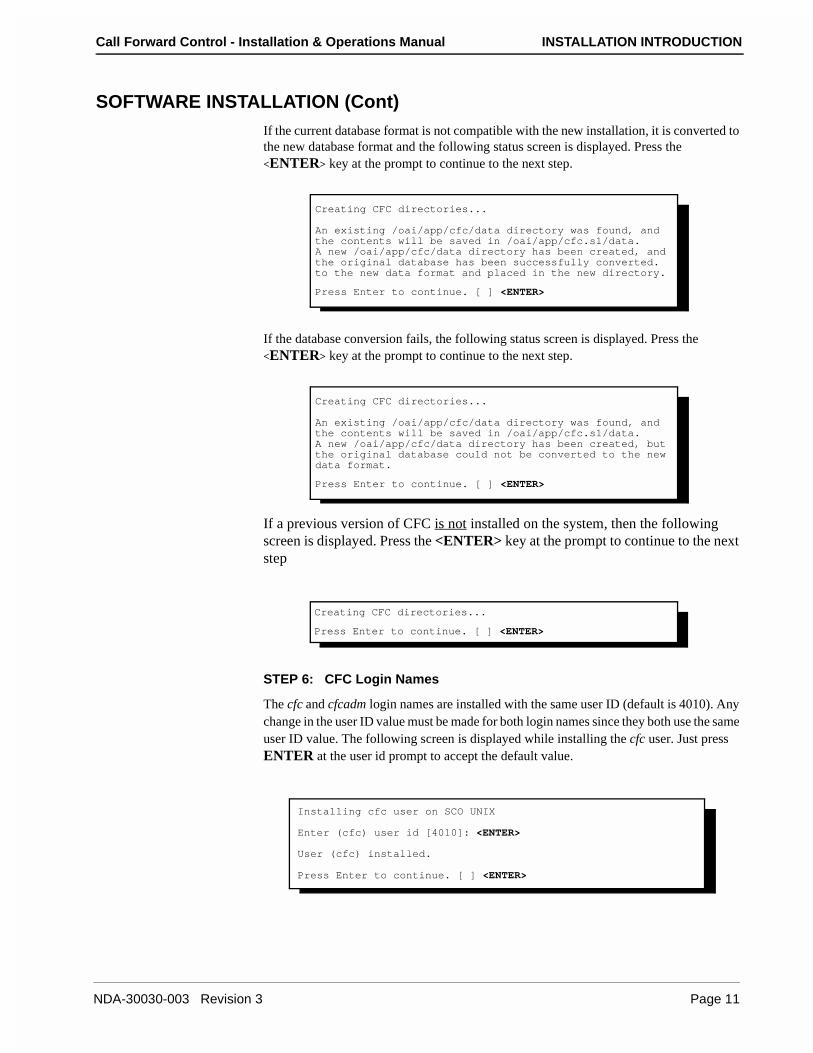
SOFTWARE INSTALLATION (Cont)If the current database format is not compatible with the new installation, it is converted to the new database format and the following status screen is displayed. Press the <ENTER> key at the prompt to continue to the next step.
If the database conversion fails, the following status screen is displayed. Press the <ENTER> key at the prompt to continue to the next step.
If a previous version of CFC is not installed on the system, then the following screen is displayed. Press the <ENTER> key at the prompt to continue to the next step
STEP 6: CFC Login Names
The cfc and cfcadm login names are installed with the same user ID (default is 4010). Any change in the user ID value must be made for both login names since they both use the same user ID value. The following screen is displayed while installing the cfc user. Just press ENTER at the user id prompt to accept the default value.
Creating CFC directories...
An existing /oai/app/cfc/data directory was found, andthe contents will be saved in /oai/app/cfc.s1/data.A new /oai/app/cfc/data directory has been created, andthe original database has been successfully converted.to the new data format and placed in the new directory.
Press Enter to continue. [ ] <ENTER>
Creating CFC directories...
An existing /oai/app/cfc/data directory was found, andthe contents will be saved in /oai/app/cfc.s1/data.A new /oai/app/cfc/data directory has been created, butthe original database could not be converted to the newdata format.
Press Enter to continue. [ ] <ENTER>
Creating CFC directories...
Press Enter to continue. [ ] <ENTER>
Installing cfc user on SCO UNIX
Enter (cfc) user id [4010]: <ENTER>
User (cfc) installed.
Press Enter to continue. [ ] <ENTER>
NDA-30030-003 Revision 3 Page 11

INSTALLATION INTRODUCTION Call Forward Control - Installation & Operations Manual
SOFTWARE INSTALLATION (Cont)
The following screen is displayed while installing the cfcadm user. Just press ENTER at the user id prompt to accept the default value. Note that a warning message is given when installing the cfcadm user, since it has the same user id as the cfc user. Enter y <ENTER> at the warning prompt and continue.
STEP 7: CFC Auto-Config
The installation script can load default HFC, CRC, and MCI_Server application configurations (see the Application Configuration section for additional details) if desired. The script will display the following screen:
Type n <ENTER> to skip the “auto-config” step, or y <ENTER> to load the default configurations. During the CRC configuration load the following screen is displayed:
At the prompt, type <ENTER> to continue.
Installing cfcadm user on SCO UNIX
Enter (cfcadm) user id [4010]: <ENTER>
Warning: The user id [4010] is already assigned on this system.Install (cfcadm) with user id [4010]? (y/n) y <ENTER>
User (cfcadm) installed.
Press Enter to continue. [ ] <ENTER>
Would you like this script to ’auto-config’the CFC applications into the APM Platform?
You can skip applications within’auto-config’ if already configured.
Enter Yes [y] to ’auto-config’. (y/n) [y] <ENTER>
/oai/utils/autocfg: running...
/oai/utils/autocfg: CRC
/oai/utils/autocfg: terminated normally
Press any key to continue. <ENTER>
Page 12 NDA-30030-003 Revision 3

Call Forward Control - Installation & Operations Manual INSTALLATION INTRODUCTION
SOFTWARE INSTALLATION (Cont)
During the HFC configuration load the following screen is displayed:
At the prompt, type <ENTER> to continue.
During the MCI_Server configuration load the following screen is displayed:
At the prompt, type <ENTER> to continue.
STEP 8: CFC Installation Processing (No input required.)
The installation script performs several tasks following the auto configuration and displays the results. Note that none of these actions require input. This process may include one or more of the following actions:
Installing the Tenant Database files.Enter boot-up commands into UNIX boot-up sequence.Install all remaining CFC files and directories as well as CFC host directories and executables.Enter CFC crontab information.Saving old CFC files from previous installations.
After these tasks have been completed, installation continues to the next step.
/oai/utils/autocfg: running...
/oai/utils/autocfg: HFC
/oai/utils/autocfg: terminated normally
Press any key to continue. <ENTER>
/oai/utils/autocfg: running...
/oai/utils/autocfg: MCI_Server
/oai/utils/autocfg: terminated normally
Press any key to continue. <ENTER>
NDA-30030-003 Revision 3 Page 13

INSTALLATION INTRODUCTION Call Forward Control - Installation & Operations Manual
SOFTWARE INSTALLATION (Cont)
STEP 9: CFC Installation Complete
When the installation script has completed the following screen is displayed.
Press <ENTER> to return the APM Administration Main Menu, then either exit the APM Administration program or use an Alt F(#) key combination to switch to another screen to perform Step 10.
STEP 10: SCO UNIX Subsystem Database
In this step, the SCO UNIX Subsystem Databases are updated to accept the new CFC information. Following this update, the passwords for the cfc and cfcadm login names are deleted, as follows:
At the SCO UNIX prompt, enter the superuser (root) and execute the SCO UNIX Subsystem Database authorization checking program (/tcb/bin/authck -s) and password deletion program (passwd -d) as shown below.
Answer yes when asked to fix the subsystem databases. This ensures that the SCO UNIX Subsystem Databases are left in a proper state. Deleting passwords for the cfc and cfcadm login names causes the system to ask for new passwords when first logging on using these names.
CFC Installation Complete
Press Enter to continue. [ ] <ENTER>
SysnameWelcome to SCO System V/386sysname!login: root
Password: <root password># /tcb/bin/authck -s
The following users have Protected Password Database entries
that do not match their Subsystem Database entries:
cfc cfcadmThere are errors in the databases.
Fix them (y/n)? y <ENTER>
# passwd -d cfc
Deleting password for user: cfc
Last Unsuccessful password change for cfc: Mon Mar 31 11:36:48 1997
# passwd -d cfcadm
Last successful password change for cfcadm: xxxxxxxxxxxx
Last Unsuccessful password change for cfcadm: NEVER
#
Page 14 NDA-30030-003 Revision 3

Call Forward Control - Installation & Operations Manual INSTALLATION INTRODUCTION
SOFTWARE INSTALLATION (Cont)
If the MCI_Server component is used, two tty devices must be created in the SCO Subsystem database. This can be done by entering the SCO UNIX administration shell (sysadmsh), selecting Account –>Terminal –>Create and then creating each tty device (ttyn1a, ttyn1b, etc.). Refer to the SCO UNIX Administration Manual.
STEP 11: Reboot
When finished, the entire system should be rebooted. At the “#” prompt, enter the follow-ing command:
shutdown -g0 -i0 -y
When the message Safe to Power Off or Press Any Key to Reboot is displayed, reset theUAP by pressing a key and allowing it to reboot. Then continue with the installation.
This completes the loading of CFC software in the APM. Now go to Application Config-uration to configure the CFC applications.
NDA-30030-003 Revision 3 Page 15
INSTALLATION INTRODUCTION Call Forward Control - Installation & Operations Manual
APPLICATION CONFIGURATION
If the “auto-config” utility was used during installation then default APM configuration data was loaded for the CRC, HFC, and MCI_Server applications. These default settings may require modification using the Select function of the Application Configuration option on the APM System Administration menu. If the “auto-config” utility was skipped, then the CRC, HFC, and MCI_Server applications must be configured into the APM system using the Add function of the Application Configuration option on the APM System Administration menu.
–Enter the APM option from the APM Platform Management Menu.
–Enter the System Administrator password at the APM password screen.
–Enter the Application Configuration option from the System Administration menu.
–To add a new application type “A” and press <ENTER>. Fill out the configuration forms as described in the following steps.
–To modify an application installed by “auto-config” type “S” and press <ENTER>. Use the arrow keys to select the desired application (HFC or CRC) and then press <ENTER>. Fill out the configuration forms as described in the following steps.
This section contains the information that should be entered to the configuration file forCRC and HFC. For specific instructions on what these parameters mean and how to makethese entries, use the APM Operations Manual.
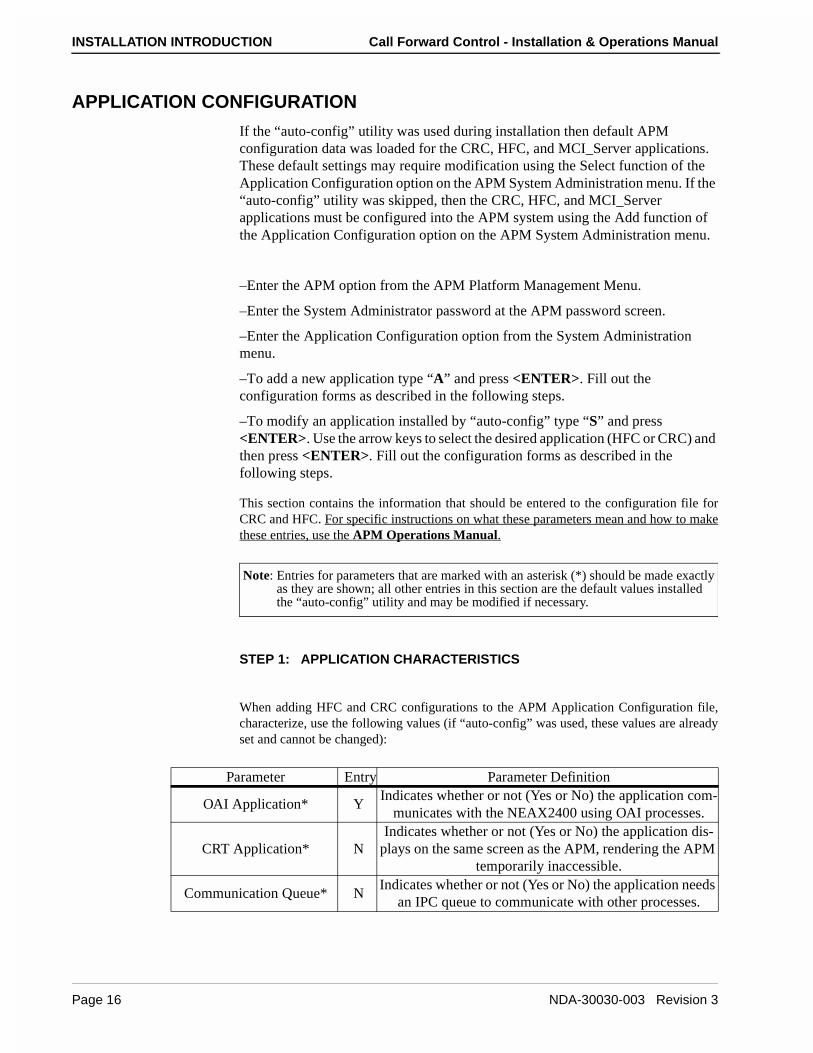
STEP 1: APPLICATION CHARACTERISTICS
When adding HFC and CRC configurations to the APM Application Configuration file,characterize, use the following values (if “auto-config” was used, these values are alreadyset and cannot be changed):
Note: Entries for parameters that are marked with an asterisk (*) should be made exactlyas they are shown; all other entries in this section are the default values installedthe “auto-config” utility and may be modified if necessary.
Parameter Entry Parameter Definition
OAI Application* YIndicates whether or not (Yes or No) the application com-
municates with the NEAX2400 using OAI processes.
CRT Application* NIndicates whether or not (Yes or No) the application dis-
plays on the same screen as the APM, rendering the APM temporarily inaccessible.
Communication Queue* NIndicates whether or not (Yes or No) the application needs
an IPC queue to communicate with other processes.
Page 16 NDA-30030-003 Revision 3

Call Forward Control - Installation & Operations Manual INSTALLATION INTRODUCTION
APPLICATION CONFIGURATION (CONT)
STEP 2: PRIMARY CONFIGURATION PARAMETERS
On the APM Configuration Entry screen, make the entries shown below for CRC:
Make the entries shown below for HFC:
Parameter Entry Parameter Definition
Application Name CRC
Specifies the name to be displayed in the APM menus. This name is displayed however it is entered here; lower case letters and punctuation are acceptable; spaces are
not.
Executable Filename*/oai/app/cfc/
bin/CRCDefines the path name of the executable file.
Group* CFC Names the group to which CRC is associated.
Response Mode* N(otify)Indicates the action that the APM is to take with CRC
should a member of the group terminate.
Initialization Batch N(o)Indicates whether or not (Yes or No) CRC is to be initial-ized automatically when the OAI system is initialized.
Termination Mode* M(essage) Indicates how the APM is to notify CRC to terminate.Standard Output /dev/null Designates the file into which CRC output is redirected.
Number of Restarts 0Indicates how many times the APM may restart CRC af-
ter it terminates erroneously.
Parameter Entry Parameter Definition
Application Name HFC
Specifies the name to be displayed in the APM menus. This name is displayed however it is entered here; lower case letters and punctuation are acceptable; spaces are
not.
Executable Filename*/oai/app/cfc/
bin/HFCDefines the path name of the executable file.
Group* CFC Names the group to which HFC is associated.
Response Mode* N(otify)Indicates the action that the APM is to take with HFC
should a member of the group terminate.
Initialization Batch N(o)Indicates whether or not (Yes or No) HFC is to be initial-ized automatically when the OAI system is initialized.
Termination Mode* M(essage) Indicates how the APM is to notify HFC to terminate.Standard Output /dev/null Designates the file into which HFC output is redirected.
Number of Restarts 0Indicates how many times the APM may restart HFC af-
ter it terminates erroneously.
NDA-30030-003 Revision 3 Page 17

INSTALLATION INTRODUCTION Call Forward Control - Installation & Operations Manual
APPLICATION CONFIGURATION (CONT)
STEP 3: FACILITIES
According to instructions in the APM Operations Manual, designate the following NEAX2400 facilities for CRC using the Facilities command on the APM Configuration Entry screen:
SCF– Switch Control Facility
SMFN– Status Notification Facility
SMFR– Status Request Facility
Designate the following NEAX2400 facilities for HFC using the Facilities command on the APM Configuration Entry screen:
SSFM– Service Set Facility Monitor
SSFR– Service Set Facility Request
STEP 4: OAI CONFIGURATION
Using the OAI-Conf command on the APM Configuration Entry screen, make the entry shown for each of the following parameters for CRC and HFC: (Note: Make no entries to parameters that are not shown.)
Parameter Entry Parameter Definition
Tenant Number 1Specifies the number of the tenant that the application
serves.
Source Link Name OAI1TCPIdentifies the port on the source side of the communication link; entry should correspond to a link name in the APM
system configuration file.
Destination Link Name
PBX1TCPIdentifies the port on the destination side of the communi-cation link; entry should correspond to a link name in the
APM system configuration file.
Association Recovery 30Designates the number of seconds the application waits be-
fore trying to re-establish an association with the NEAX that has been released.
Page 18 NDA-30030-003 Revision 3

Call Forward Control - Installation & Operations Manual INSTALLATION INTRODUCTION
APPLICATION CONFIGURATION (CONT)
STEP 5: USER-DEFINED PARAMETERS
Make the entries below through the UserDefined command on the OAI Configuration screen for CRC:.
Make the following OAI Configuration entries for HFC:.
U-D # Entry Parameter Definition
#1* /oai/app/cfc/data/Names-
File
Identifies the full path and filename of the file that contains the names of the databases used by CRC and listed on the CFC Administration Main Menu.
#2* MCI_Server If CRC is to forward calls to an existing on-site voice mail system, indicates the name of the message center interface used to ensure correct delivery of calls to the voice mail box. If an on-site voice mail system exists and the MCI_Server name is entered here, enter the MCI_Server configuration informa-tion provided below to the APM Application Configuration f ile.
#3 3 Indicates the maximum number of times a call is forwarded before it is sent to the default extension that is designated for the group through the Main Menu.
#4 5 Indicates the number of seconds CRC waits before trying to deliver a call to voice mail after a previous attempt has failed.
#5 0# Serves as a system default; that is, if all call forwarding assignments in CRC were to fail, all calls are forwarded to this entry; must be the actual digits dialed, even to indicate the operator (0#).
U-D # Entry Parameter Definition
#1* /oai/app/cfc/data/Names-
File
Identifies the full path and filename of the file that contains the names of the databases used by HFC and listed on the CFC Administration Main Menu.
#2* /oai/db/cur/tenants
Identifies the full path and filename of the Tenant Database file.
NDA-30030-003 Revision 3 Page 19

INSTALLATION INTRODUCTION Call Forward Control - Installation & Operations Manual
APPLICATION CONFIGURATION (CONT)
MCI_SERVER
If there is an existing on-site voice mail system with which CRC is to communicate, the MCI_Server application must be configured through the Application Configuration option on the APM Administration Menu. The name MCI_Server must be entered as User-Defined Parameter #2 in the CRC configuration (see Step 5 above). The information that should be entered to the configuration file for MCI_Server is shown below.
STEP 1: APPLICATION CHARACTERISTICS
Set the MCI_Server application characteristics as follows (if “auto-config” was used, these values are already set and cannot be changed):
STEP 2: PRIMARY CONFIGURATION PARAMETERS
Set the MCI_Server primary configuration parameters as follows:
Parameter Entry Parameter Definition
OAI Application* NIndicates whether or not (Yes or No) the application com-
municates with the NEAX2400 using OAI processes.
CRT Application* NIndicates whether or not (Yes or No) the application dis-
plays on the same screen as the APM, rendering the APM temporarily inaccessible.
Communication Queue* YIndicates whether or not (Yes or No) the application needs
an IPC queue to communicate with other processes.
Parameter Entry Parameter Definition
Application Name MCI_Server
Specifies the name to be displayed in the APM menus. This name is displayed however it is entered here; lower case letters and punctuation are acceptable; spaces are
not.
Executable Filename*/oai/app/cfc/
bin/MCI_Server
Defines the path name of the executable file.
Group* CFC Names the group to which MCI_Server is associated.
Response Mode* I(gnore)Indicates the action that the APM is to take with
MCI_Server should a member of the group terminate.
Initialization Batch N(o)Indicates whether or not (Yes or No) MCI_Server is to be initialized automatically when the OAI system is initial-
ized.
Termination Mode* M(essage)Indicates how the APM is to notify MCI_Server to termi-
nate.
Standard Output /dev/nullDesignates the file into which MCI_Server output is re-
directed.
Number of Restarts 0Indicates how many times the APM may restart
MCI_Server after it terminates erroneously.Communication
Queue500
UNIX Message Queue key used by MCI_Server to re-ceive queue messages.
Page 20 NDA-30030-003 Revision 3

Call Forward Control - Installation & Operations Manual INSTALLATION INTRODUCTION
APPLICATION CONFIGURATION (CONT)
STEP 3: USER-DEFINED PARAMETERS
Make the entries below through the UserDefined command on the Configuration Entry screen:
This completes the configuration of Call Forward Control in the APM. Now go to the Tenant Database Section to set up the Tenant Database.
U-D # Entry Parameter Definition
#1 /dev/tty1a Identifies the UAP port used in the communication with the NEAX2400 IMS.
#2 /dev/tty2a Identifies the UAP port used in communication with the voice mail system.
NDA-30030-003 Revision 3 Page 21

INSTALLATION INTRODUCTION Call Forward Control - Installation & Operations Manual
TENANT DATABASE
The Tenant Database is an APM database that is used by the HFC application and other OAI applications. It provides a mechanism for retrieving the tenant number of an extension. Since the Tenant Database may be used by other OAI Applications installed under the APM, it is configured using the APM and can not be modified by the Call Forward Control Administrator program.
TENANT DATABASE RECORDS
During CFC installation, the files tenant_m.mdf and tenants.adf are copied to the /oai/db/cur directory. The tenant_m.mdf file specifies the master database fields and contains the following definitions:
The tenants.adf file specifies the application database fields and contains the following definitions:
The Tenant Number field contains the Tenant Number that is used by one or more extensions. Tenant Numbers are associated with extensions using the following methods:
• A Tenant Number may be associated with a set of extensions defined by the First and Last Extension fields. The First Extension field contains the smallest extension number in the set, and the Last Extension field contains the largest extension number in the set.
• A Tenant Number may be associated with a single extension by setting the First and Last Extension fields to the same extension value.
• A Tenant Number may be associated with a single extension that contains a non-numeric character such as ’*’ or ’#’. The First Extension field contains the extension value, and the Last Extension field is left blank.
Field Description Type Size Minimum Value
Maximum Value
First Extension ASCII 10Last Extension ASCII 10Tenant Number Numeric 3 1 255
Field Description Data TypeFirst Extension ASCIILast Extension ASCIITenant Number Short Integer
Page 22 NDA-30030-003 Revision 3

Call Forward Control - Installation & Operations Manual INSTALLATION INTRODUCTION
TENANT DATABASE EXAMPLES
The following examples display how the Tenant Database may be configured:
Example 1All extensions use Tenant Number 1.
Example 2Extensions 2000-2500 use Tenant Number 1.Extensions 1000-1500 use Tenant Number 2.Extensions 1900, 2900, and 3900 use Tenant Number 3.Extensions “#68” and “*69” use Tenant Number 4.All other Extensions use Tenant Number 5.
TENANT DATABASE CONFIGURATION
The Tenant Database is configured using the Database Administration utilities provided by the APM. The following steps are required:
STEP 1: BUILD THE MASTER DATABASE
• From the APM System Administration menu, use the arrow keys to select the Database Administration command and press <ENTER>. The Database Administration menu is displayed.
• From the Database Administration menu, use the arrow keys to select the Build Master Database command and press <ENTER>. The Master File Selection menu is displayed.
• From the Master File Selection menu use the arrow keys to select the tenant_m database and press <ENTER>. The Database Entry menu is displayed.
First Extension Last Extension Tenant Number0 99999 1
First Extension Last Extension Tenant Number#68 4*69 4
0 999 51000 1500 21501 1899 51900 1900 32000 2500 12501 2899 52900 2900 32901 3899 53900 3900 33901 99999 5
NDA-30030-003 Revision 3 Page 23

INSTALLATION INTRODUCTION Call Forward Control - Installation & Operations Manual
• Use the Add, Delete, and Modify commands to change the database. Use the Quit command when all changes have been made, answering ’Y’ when prompted “Do you want to save changes? (Y,N)”. The Master File Selection menu is displayed. At the Master File Selection menu press <ESC> to return to the Database Administration Menu.
STEP 2: PROCESS THE APPLICATION DATABASE
• At the Database Administration Menu use the arrow keys to select the Process Application Database command and press <ENTER>. The Process Application Database menu is displayed.
• From the Process Application Database menu use the arrow keys to select the tenant_m database and press <ENTER>.The APM will process the database, and the message “Database process operation complete” will be displayed. Press <ESC> to return to the Database Administration Menu.
STEP 3: INSTALL THE APPLICATION DATABASE
• At the Database Administration Menu use the arrow keys to select the Install Application Database command and press <ENTER>. The Install Application Database menu is displayed.
• From the Install Application Database menu use the arrow keys to select the tenant_m database and press <ENTER>.The APM will install the database, and the message “Installing application database ’tenants’" will be displayed. After the database is installed, the Database Administration Menu is displayed.
• At the Database Administration Menu use the arrow keys to select the Quit command and press <ENTER>. The APM System Administration menu is displayed.
This completes the configuration of the Tenant Database in the APM. Now go to the MAT Assignments Section to make the necessary assignments at the NEAX Maintenance Administration Terminal.
Page 24 NDA-30030-003 Revision 3

Call Forward Control - Installation & Operations Manual INSTALLATION INTRODUCTION
MAT ASSIGNMENTS
This guide assumes that data settings that affect the operation of all OAI software on a system-wide basis have already been assigned on the NEAX Maintenance Administration Terminal (MAT). Such settings include, for instance, system index values and assignment of Interface I/O Port Data in the Interface Processor (IP).
For more information about these system data settings and for instructions in making the following Call Forward Control settings, consult the OAI Module Installation Manual for the NEAX2400 IMS.
AMNO Command (Assignment of Monitored Numbers): Whenever a call comes into a monitored number, CRC is informed and implements forwarding activity. Use this command to assign each number (forward busy, forward no answer, and forward all) to be monitored.
TN:Tenant to which the monitored number is assigned.MNO:The actual extension number that is to be monitored.NMI:An unique and arbitrary number from 1 to 4000 assigned to the monitored number for internal use by the PBX. (Use LNMI to list indexes to determine which are available.)UCD:A flag specifying the course of action to be taken with any call that is dialed into the monitored number when CRC is not operative, using the following values:0 =(No) Call is not redirected to a UCD group, and caller hears re-order tone.1 =(Yes) Call is redirected to a UCD group, which must then be specified.
AKYD Command (Assignment of Function Keys): Use this command to assign function keys on each Dterm that has previously been assigned through the ASDT command and is to be supported by CRC.
(Note: In making these assignments, the Dterm type must be indicated as Dterm.)
Station Number:Corresponds to one assigned through the ASDT Command.Dterm Type:Must be entered as Dterm.Function Keys:Forward – all calls, Forward – busy, Forward – no answer
This completes the MAT assignments for Call Forward Control. Now go to the Initialization/Termination Section to initialize the CRC and HFC applications.
NDA-30030-003 Revision 3 Page 25

INSTALLATION INTRODUCTION Call Forward Control - Installation & Operations Manual
INITIALIZATION/TERMINATION
INITIALIZATION
The CRC and HFC applications must be initialized through the Non-CRT Application option on the APM Operations Menu according to instructions provided in the APM Operations Manual.
If an on-site voice mail system exists and the MCI_Server has been configured and named in the CRC configuration under User-Defined Parameter #2, MCI_Server must also be initialized from the Non-CRT Application option. CRC can perform its functions with or without MCI_Server, but CRC cannot communicate with a voice mail system without it.
Once the CRC, HFC, and optional MCI_Server applications are initialized, use an Alt F(#) key combination to switch to an unused screen, then enter the cfcadm at the system login prompt and press ENTER. The CFC Administrator Main Menu is displayed (refer to Chapter 3).
TERMINATION
Exit the CFC Administrator Main Menu either by selecting the Quit option or by pressing the ESC key. The cursor is positioned at the UNIX prompt. Then enter the Non-CRT Application option on the APM Operations Menu and terminate CRC and HFC. (Note: If MCI_Server has been initialized to enable CRC communication with a voice mail system, terminate it in the same manner.)
Page 26 NDA-30030-003 Revision 3

Call Forward Control - Installation & Operations ManualADMINISTRATOR MAIN MENU INTRODUCTION
Chapter 3 ADMINISTRATOR MAIN MENU INTRODUCTION
A brief discussion of how the CRC and HFC applications process calls will show how the Administrator Main Menu assignments fit together to equip CRC and HFC for the variety of rerouting tasks that it is capable of performing. Here are some examples:
Example 2: Hard Forward
The Engineering Department has a lunch hour from 12:00 noon to 1:00 p.m. Monday through Friday. During this time all calls received by members of this department will be handled by Pat the receptionist at extension 3470. HFC can automatically forward all engineering department telephones to Pat’s extension using the following settings:
All Engineering Department extensions are assigned to Hard Forward Group 1 (Engineering Department). Hard Forward Group 1 uses to Hard Forward Pattern 3, which specifies the following forwarding schedule:
Date and Time Destination ActionMon-Fri, 12:00 noon 3470 SetMon–Fri, 1:00p.m. 3470 Cancel
At 12:00 noon Monday through Friday HFC will forward all extensions in Hard Forward Group 1 (Engineering Department) to extension 3470. At 1:00 p.m. Monday through Friday HFC will cancel the forwarding on all extensions in Hard Forward Group 1 (Engineering Department).
Example 1: Call Routing
At 9:00 Monday morning, Susan, who works in the Engineering Department, forwards her extension (3465) to the CRC monitored number 3995 so that she can attend a meeting. At 9:25 her phone receives a call from another internal extension. CRC detects the incoming call that has been forwarded from Susan’s extension. In response CRC checks its database for information about how to reroute calls to the Engineering Department and finds the following information:
Extension 3465 is assigned to Call Routing Group 1 (Engineering Department). Call Routing Group 1 uses Call Routing Pattern 3, which specifies the following routing schedule:
Date and Time Internal Destinations External DestinationsMon–Fri, 6:00 p.m. to 8 a.m. 2308, 2307, 2303, 2305 3300, 3301
Daily, 12:00 noon to 1:00 p.m. 2304, 2305, 2301, 2302 3400, 3401Mon–Fri, 8:00a.m. to 5:00 p.m. 2300, 2301, 2302, 2303 3500, 3501
Sat & Sun, all day long 2300, 2301, 2302, 2303 3600, 3601
CRC examines the pattern and determines that extensions 2300, 2301, 2302, and 2303 should be used at 9:25 a.m., Monday for internal calls. CRC first checks 2300 to see if it is busy or idle. If it is idle, CRC reroutes the incoming call the extension. If 2300 is busy, CRC checks the remaining extensions until the call is successfully connected to a destination. If a call from an external source is received by Susan’s phone, CRC will route the call to extensions 3500 or 3501.
NDA-30030-003 Revision 3 Page 27
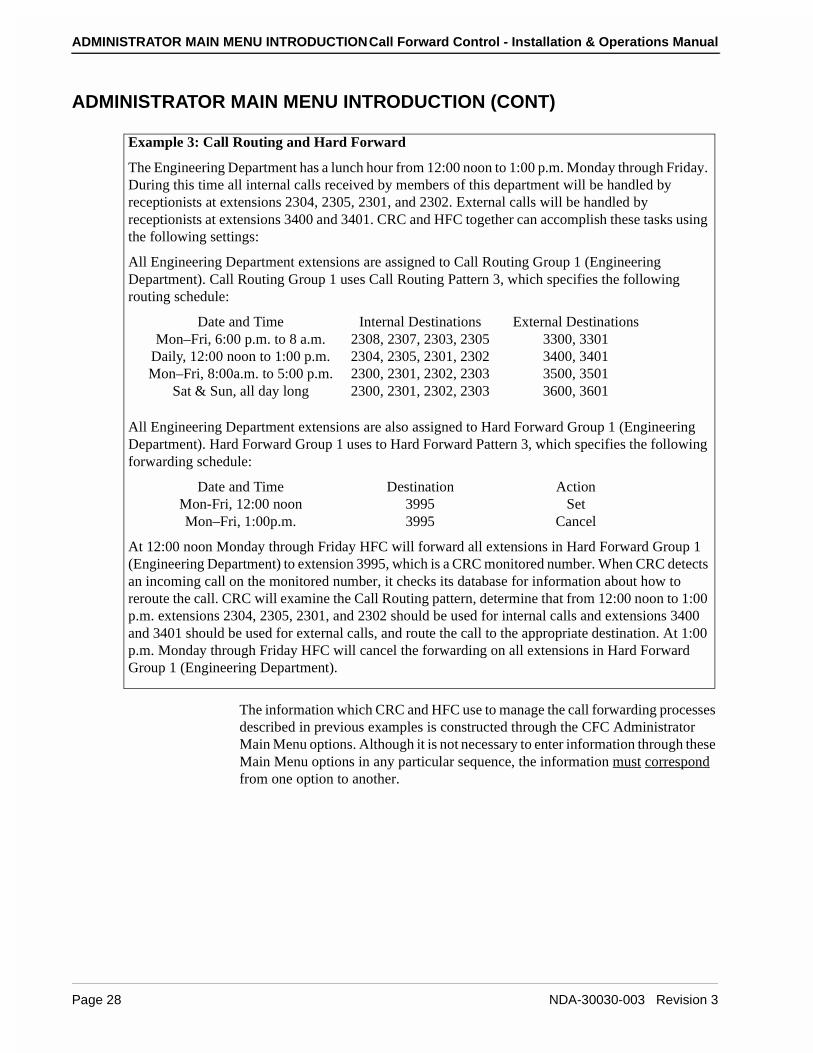
ADMINISTRATOR MAIN MENU INTRODUCTIONCall Forward Control - Installation & Operations Manual
ADMINISTRATOR MAIN MENU INTRODUCTION (CONT)
The information which CRC and HFC use to manage the call forwarding processes described in previous examples is constructed through the CFC Administrator Main Menu options. Although it is not necessary to enter information through these Main Menu options in any particular sequence, the information must correspond from one option to another.
Example 3: Call Routing and Hard Forward
The Engineering Department has a lunch hour from 12:00 noon to 1:00 p.m. Monday through Friday. During this time all internal calls received by members of this department will be handled by receptionists at extensions 2304, 2305, 2301, and 2302. External calls will be handled by receptionists at extensions 3400 and 3401. CRC and HFC together can accomplish these tasks using the following settings:
All Engineering Department extensions are assigned to Call Routing Group 1 (Engineering Department). Call Routing Group 1 uses Call Routing Pattern 3, which specifies the following routing schedule:
Date and Time Internal Destinations External DestinationsMon–Fri, 6:00 p.m. to 8 a.m. 2308, 2307, 2303, 2305 3300, 3301
Daily, 12:00 noon to 1:00 p.m. 2304, 2305, 2301, 2302 3400, 3401Mon–Fri, 8:00a.m. to 5:00 p.m. 2300, 2301, 2302, 2303 3500, 3501
Sat & Sun, all day long 2300, 2301, 2302, 2303 3600, 3601
All Engineering Department extensions are also assigned to Hard Forward Group 1 (Engineering Department). Hard Forward Group 1 uses to Hard Forward Pattern 3, which specifies the following forwarding schedule:
Date and Time Destination ActionMon-Fri, 12:00 noon 3995 SetMon–Fri, 1:00p.m. 3995 Cancel
At 12:00 noon Monday through Friday HFC will forward all extensions in Hard Forward Group 1 (Engineering Department) to extension 3995, which is a CRC monitored number. When CRC detects an incoming call on the monitored number, it checks its database for information about how to reroute the call. CRC will examine the Call Routing pattern, determine that from 12:00 noon to 1:00 p.m. extensions 2304, 2305, 2301, and 2302 should be used for internal calls and extensions 3400 and 3401 should be used for external calls, and route the call to the appropriate destination. At 1:00 p.m. Monday through Friday HFC will cancel the forwarding on all extensions in Hard Forward Group 1 (Engineering Department).
Page 28 NDA-30030-003 Revision 3

Call Forward Control - Installation & Operations ManualADMINISTRATOR MAIN MENU INTRODUCTION
STARTING THE CFC ADMINISTRATOR PROGRAM
The CFC Administrator program is started as described below:
Figure 3-1 CFC Administrator Main Menu
Action Result
At the UAP system console, press the Alt key and a function key (F1...F12) at the same time to select a
login screenThe UNIX login prompt is displayed
Type cfcadm at the UNIX prompt and press EN-TER. If prompted for a password, then type the
<password> and press ENTER.
The CFC Administrator Main Menu is displayed as shown in Figure 3-1.
Once inside the CFC menus, selection of an option or a command line function is made simply by typ-ing the highlighted key letter. It is not necessary to press ENTER after making the selection. Also notice that the key letter is not always the first letter of the menu option
or command.
Refer to the following pages for information and instructions in the use of each option and com-
mand line function.
To exit the CFC Administrator Main Menu, type q to select the Quit menu option.
The CFC Administrator Main Menu is cleared, and the cursor is positioned on the UNIX prompt.
CFC Administrator Fri Apr 1 16:10 pm
*** Main Menu ***
ExtensionsHard Forward ControlCall Routing ControlTime ParametersSpecial eventsValidate and InstallQuit
Arrow keys to move cursor, <RET> to select, <ESC> to quit
NDA-30030-003 Revision 3 Page 29

ADMINISTRATOR MAIN MENU INTRODUCTIONCall Forward Control - Installation & Operations Manual
MAIN MENU OPTIONS
The CFC Administrator Main Menu contains the following options:
Extensions -
Phone extensions supported by CRC and HFC are assembled into Call Routing and Hard Forward groups according to common needs. That is, if the phones in the Human Resources department are to be routed to the Operator at 5:00 p.m., all of these phones can be assembled into a Call Routing group which will route calls received by any phone in the group to the Operator after 5:00 p.m. Extensions can also be added to and deleted from the extensions database, they can be viewed on the display, or a hard copy can be printed. Each extension has a Call Routing and Hard Forward group index number which specifies the groups to which the extension belongs. One or both index values may be left blank to disable Call Routing and/or Hard Forwarding for an extension.
Hard Forward Control -
The Hard Forward Control option is used manipulate Hard Forward Control data. This option displays a sub-menu that contains Groups and Patterns options. Hard Forward groups and patterns may be created, deleted, modified, displayed, and printed using selections from this sub-menu.
Call Routing Control -
The Call Routing Control option is used manipulate Call Routing Control data. This option displays a sub-menu that contains Monitored Numbers, Groups, Patterns, and Destinations options. Call Routing groups, patterns, and destinations may be created, deleted, modified, displayed, and printed using selections from this sub-menu. Call Routing monitored numbers may also be set from this sub-menu.
Time Parameters -
Each Start Time Index identifies a schedule, or time frame, that is defined in hour, minute, month, and day detail. A time frame can be illustrated as “Daily at midnight”, “The first Monday of every month at 8:00 a.m., or “Monday through Friday, from 8:00 a.m. to 5:00 p.m.”. It is by these schedules that different Call Routing and Hard Forward patterns can be instituted for the same group at difference times. For instance, all of the phones in Accounting can be forwarded to the operator at noon every day, Monday through Friday, and to the Accounting receptionist console on Monday morning from 9:00 to 10:00 a.m.
Special Events -
There will occasionally be times during which the scheduled Call Routing and Hard Forward settings will need to be altered to accommodate holidays, organizational events, etc. The Special Events option is used to instruct CRC and HFC in the pattern changes that are to be implemented for holidays or scheduled events.
Page 30 NDA-30030-003 Revision 3

Call Forward Control - Installation & Operations ManualADMINISTRATOR MAIN MENU INTRODUCTION
MAIN MENU OPTIONS (CONT)
Validate and Install -
CRC and HFC depend upon accurate correspondence among all of the assignments made through the CFC Administrator program. Thus, anytime a change is made to the information contained in one or more options, the Validate and Install option should be used to check compatibility of the new information with the existing information in other options and to process the changes so that CRC and HFC can implement them. Messages are displayed as necessary to notify the CFC administrator of any errors or inconsistencies that are found during this checking and processing activity.
Quit -
The Quit option terminates the CFC Administrator program.
ASSIGNMENT WORKSHEETS
To save time and assure accuracy, use the CRC and HRC Assignment Worksheets on the next two pages to lay out the assignments that need to be made and to work out the necessary correspondence among the options before actually getting involved with the menu system.
NDA-30030-003 Revision 3 Page 31

ADMINISTRATOR MAIN MENU INTRODUCTIONCall Forward Control - Installation & Operations Manual
CALL ROUTING CONTROL ASSIGNMENT WORKSHEET Group Name: ________________________________________________________________________________ Group Index:_________
Extension No. Name: Extension No. Name: _____________ _________________________ _____________ _________________________ _____________ _________________________ _____________ _________________________ _____________ _________________________ _____________ _________________________ _____________ _________________________ _____________ _________________________ _____________ _________________________ _____________ _________________________ _____________ _________________________ _____________ _________________________ _____________ _________________________ _____________ _________________________ _____________ _________________________ _____________ _________________________
Default Destination: _____ Routing Pattern Index: ________
Internal Routing Patterns
Monitored Destination Start No. Index Extensions Time Index Schedule ______ _____ _______________________________ _____ ___________________________ ______ _____ _______________________________ _____ ___________________________ ______ _____ _______________________________ _____ ___________________________ ______ _____ _______________________________ _____ ___________________________ ______ _____ _______________________________ _____ ___________________________ ______ _____ _______________________________ _____ ___________________________ ______ _____ _______________________________ _____ ___________________________ ______ _____ _______________________________ _____ ___________________________ ______ _____ _______________________________ _____ _________________________________ _____ _______________________________ _____ _________________________________ _____ _______________________________ _____ ___________________________
External Routing Patterns
Monitored Destination Start No. Index Extensions Time Index Schedule ______ _____ _______________________________ _____ ___________________________ ______ _____ _______________________________ _____ ___________________________ ______ _____ _______________________________ _____ ___________________________ ______ _____ _______________________________ _____ ___________________________ ______ _____ _______________________________ _____ ___________________________ ______ _____ _______________________________ _____ ___________________________ ______ _____ _______________________________ _____ ___________________________ ______ _____ _______________________________ _____ ___________________________ ______ _____ _______________________________ _____ _________________________________ _____ _______________________________ _____ _________________________________ _____ _______________________________ _____ ___________________________
Figure 3-2 Call Routing Control Assignment Worksheet
Page 32 NDA-30030-003 Revision 3

Call Forward Control - Installation & Operations ManualADMINISTRATOR MAIN MENU INTRODUCTION
HARD FORWARD CONTROL ASSIGNMENT WORKSHEET Group Name: __________________________________________________________________________________Group Index:_________
Extension No. Name: Extension No. Name: _____________ _________________________ _____________ _________________________ _____________ _________________________ _____________ _________________________ _____________ _________________________ _____________ _________________________ _____________ _________________________ _____________ _________________________ _____________ _________________________ _____________ _________________________ _____________ _________________________ _____________ _________________________ _____________ _________________________ _____________ _________________________ _____________ _________________________ _____________ _________________________
Default Destination: _____ Forward Pattern Index: ________
Forward Busy Patterns
Destination Start Time Destination Start TimeIndex Extension Index Action Index Extension Index Action_____ __________ _____ ___________ _____ __________ _____ _________________ __________ _____ ___________ _____ __________ _____ _________________ __________ _____ ___________ _____ __________ _____ _________________ __________ _____ ___________ _____ __________ _____ _________________ __________ _____ ___________ _____ __________ _____ _________________ __________ _____ ___________ _____ __________ _____ ____________
Forward No Answer Patterns
Destination Start Time Destination Start TimeIndex Extension Index Action Index Extension Index Action_____ __________ _____ ___________ _____ __________ _____ _________________ __________ _____ ___________ _____ __________ _____ _________________ __________ _____ ___________ _____ __________ _____ _________________ __________ _____ ___________ _____ __________ _____ _________________ __________ _____ ___________ _____ __________ _____ _________________ __________ _____ ___________ _____ __________ _____ ____________
Forward All Calls Patterns
Destination Start Time Destination Start TimeIndex Extension Index Action Index Extension Index Action_____ __________ _____ ___________ _____ __________ _____ _________________ __________ _____ ___________ _____ __________ _____ _________________ __________ _____ ___________ _____ __________ _____ _________________ __________ _____ ___________ _____ __________ _____ _________________ __________ _____ ___________ _____ __________ _____ _________________ __________ _____ ___________ _____ __________ _____ ____________
Figure 3-3 Hard Forward Control Assignment Worksheet
NDA-30030-003 Revision 3 Page 33

ADMINISTRATOR MAIN MENU INTRODUCTIONCall Forward Control - Installation & Operations Manual
EXTENSIONS
OVERVIEW The Extensions option on the Administrator Main Menu is used to add, remove, or make changes to the extensions that are assembled into groups.
Figure 3-4 Extensions Option
Procedure
Commands
The Extensions command line provides options to add extensions to a Hard Forward or Call Routing group, delete an extension from a Hard Forward or Call Routing group, modify the Hard Forward and Call Routing group selections for an extension, view a selected range of extensions, or print a hardcopy of a selected range of extensions.
Number of Extensions
The number of extensions in a group are dynamically allocated as the administrator adds entries to a record through the Add or Modify commands. The number of entries is constrained only by the memory available on the computer system running CFC. Duplicate extension numbers within and between records is not allowed.
CFC Administrator Fri Apr 1 16:10 pm
***Main Menu***
ExtensionsHard Forward ControlCall Routing ControlTime ParametersSpecial EventsValidate and InstallQuit
Arrow keys to move cursor, <RET> to sel
(1)
***Extensions***
Extension:
CFC Administrator Fri Apr 1 16:10 pm
Add Delete Modify View Print Quit
Hard Forward Group Index:Call Routing Group Index:
Name of Department:
(2)
Action ResultOn the Main Menu, type e to select the Extension option.(1)
The Extensions screen is displayed. (2)
Refer to the following pages for informa-tion and instructions in the use of each command.To exit the Extension option, type q to se-lect the Quit command.
The Main Menu is redisplayed.
Page 34 NDA-30030-003 Revision 3

Call Forward Control - Installation & Operations ManualADMINISTRATOR MAIN MENU INTRODUCTION
OVERVIEW (Cont) Expanded Display
Press the TAB key or the Ctrl-V key combination while in the Hard Forward or Call Routing Group Index field to display the Group Name and Pattern Index used by the group. Press ESC to return to the Extensions screen.
ADD AN EXTENSION
The Add command on the Extensions screen is used to add an extension to the database and to assign it Hard Forward and Call Routing Group Index values.
Figure 3-5 Add An Extension
Procedure
CFC Administrator Fri Apr 1 16:10 pm
***Extensions***
Extension:
Add Delete Modify View Print
Hard Forward Group Index:Call Routing Group Index:
Name or Department:Extension:
<ESC> to return to command line
Hard Forward Group Index:Call Routing Group Index:
Name or Department:
(1)
(2)
*** Extensions ***
Action ResultOn the Extension menu, type a to select the Add com-mand. (1)
The first field is highlighted for data entry. (2)
Type data to the fields according to the definitions be-low, pressing ENTER after each entry:
Field Extension
Hard Forward Group Index
Call Routing Group Index
Name or Department
Definition– The extension number being added to the system;
up to 5 digits in length; must also be assigned through the PBX MAT.
– The index to the Hard Forward group definition to which this extension is to be assigned; up to 3 digits in length.
– The index to the Call Routing group definition to which this extension is to be assigned; up to 3 digits in length.
– A name identifying the user of the extension; can be an individual, a department, etc.; entry to this field is optional.
When ENTER is pressed from the last field, the mes-sage “Do you want to add this? (Y/N)” is displayed.
Type Y and press ENTER to add the extension record or N and press ENTER to cancel it.
The Extensions data entry screen is cleared, and the cursor is positioned on the original command line.
NDA-30030-003 Revision 3 Page 35

ADMINISTRATOR MAIN MENU INTRODUCTIONCall Forward Control - Installation & Operations Manual
ADD AN EXTENSION (CONT)
Field Entries
A new extension record can be added to the database with no entries in the Hard Forward Group Index, the Call Routing Group Index, or the Name or Department field.
DELETE AN EXTENSION
The Delete command on the Extensions screen is used to remove an extension record from the database.
Figure 3-6 Delete An Extension
Procedure
CFC Administrator Fri Apr 1 16:10 pm
***Extensions***
Extension:
Add Delete Modify View Print
Hard Forward Group Index:Call Routing Group Index:
Name or Department:
(1)
1101110211031104110511061107
Extension
Bottom
Enter Extension:Up/Down Arrows to move, <RET> to select, <ESC> to quit
(2)Hard Fwd Group Call Routing Group Name or Department
1122334
2211433
Majors, KathrynGarza, DavidThompson, SharonWerner, PamRyan, Mary BethRobbins, FredBillings, Sarah
***Extensions***
Extension:Hard Forward Group Index:Call Routing Group Index:
Do you want to delete this? (Y/N)
(3)
Name or Department:
110112Majors, Kathryn
Action Result
On the Extensions screen, type d to select the Delete command. (1)
An Extension entry field is displayed below and, at the top of the screen, a highlighted ex-tension heading is displayed.
Type the extension number at the prompt and press ENTER. To display all extensions, leave the extension field blank and press EN-TER. The “*” may be included in the exten-sion field as a wild card (“10*” will display all extensions where the first two digits are “10”).
All of the matching extensions in the data-base are displayed. (2)
Use the Up and Down Arrow keys to select the extension to delete, then press ENTER to delete the extension.
The Extensions screen displays field data for the selected extension, and the confirmation “Do you want to delete this? (Y/N)” is dis-played. (3)
Type Y and press ENTER to confirm the de-letion or N and press ENTER to cancel it.
The fields are cleared, and the cursor is posi-tioned on the original command line.
Page 36 NDA-30030-003 Revision 3

Call Forward Control - Installation & Operations ManualADMINISTRATOR MAIN MENU INTRODUCTION
MODIFY AN EXTENSION
The Modify command on the Extensions screen is used to make changes to an extension record.
Figure 3-7 Modify An Extension
Procedure
CFC Administrator Fri Apr 1 16:10 pm
***Extensions***
Extension:
Add Delete Modify View Print
Hard Forward Group Index:Call Routing Group Index:
Name or Department:
(1)
1101110211031104110511061107
Extension
Bottom
Enter Extension:Up/Down Arrows to move, <RET> to select, <ESC> to quit
(2)Hard Fwd Group Call Routing Group Name or Department
1122334
2211433
Majors, KathrynGarza, DavidThompson, SharonWerner, PamRyan, Mary BethRobbins, FredBillings, Sarah
***Extensions***
Extension:Hard Forward Group Index:Call Routing Group Index:
<ESC> to return to command line
(3)
Name or Department:
1101
2Majors, Kathryn
1
Action Result
On the Extensions screen, type m to select the Modify command. (1)
An Extension entry field is displayed at the bottom of the screen, and a highlighted ex-tension heading is displayed at the top of the screen.
Type the extension number at the prompt and press ENTER. To display all extensions, leave the extension field blank and press EN-TER. The “*” may be included in the exten-sion field as a wild card (“10*” will display all extensions where the first two digits are “10”).
All the matching extensions in the database are displayed. (2)
Use the Up and Down Arrow keys to select the extension to be modified, then press EN-TER to modify the record.
The contents of the selected record are dis-played. (3)
Use the Up and Down Arrow keys to move between the Extension record fields. The Backspace key may be used to erase existing data. Type new data where necessary and press ENTER after each entry.
After the last entry, the message “Do you want to save changes? (Y/N)” is displayed.
Type Y and press ENTER to save the chang-es, or type N and press ENTER to cancel them.
The fields are cleared, and the cursor is posi-tioned on the
NDA-30030-003 Revision 3 Page 37

ADMINISTRATOR MAIN MENU INTRODUCTIONCall Forward Control - Installation & Operations Manual
MODIFY EXTENSION RECORD (CONT)
Database Search
The extension cannot be changed since it is the key to the record. A change in the extension number means either another existing record or a new record is being entered. After the extension is entered, CFC searches the database for the corresponding record and displays it. If it does not exist in the database, CFC displays a prompt requesting the entry of a different extension.
Page 38 NDA-30030-003 Revision 3

Call Forward Control - Installation & Operations ManualADMINISTRATOR MAIN MENU INTRODUCTION
VIEW EXTENSIONS
The View command on the Extensions screen is used to display extension records on screen for viewing or printing.
Figure 3-8 View Extensions
Procedure
Delete Modify View Print
CFC Administrator Fri Apr 1 16:10 pm
***Extensions***
Extension:
Add
Hard Forward Group Index:Call Routing Group Index:
Name or Department:
(1)(2)
Search Key:
Start value: 1100
<ESC> to return to command line
Extension Hard Forward Group Call Routing Group Name
End value: 1200
1101110211031104110511061107
Extension
End Of File
(3)
Hard Fwd Group Call Routing Group Name or Department
1122334
2211433
Majors, KathrynGarza, DavidThompson, SharonWerner, PamRyan, Mary BethRobbins, FredBillings, Sarah
DownPage UpPage Search Top Bottom Print Quit
Top Of File
*** Extensions ***
Action Result
On the Extensions screen, type v to select the View command.(1)
A window requests the search key and the starting and ending values for the range. (2)
Use the Spacebar or Left and Right Arrow keys to select a search key, then press ENTER. Type the start value, press ENTER, type the end value, and press ENTER to indicate the range of records to be viewed. If both record values are blank then all records will be displayed. If the last record value is blank then the record matching the first record val-ue is displayed.
All records lying within the indicated range are displayed for on-screen view-ing. (3)
Type d to select the DownPage command. The next page of data is displayed.Type u to select the UpPage command. The previous page of data is displayed.Type t to select the Top command. The first page of data is displayed.Type b to select the Bottom command. The last page of data is displayedType s to select the Search command. At the prompt type the desired pattern and press ENTER.
All of the occurrences of the pattern on that page are highlighted.
Type p to select the Print command. At the prompt, type f to indicate the whole file or s to indicate just the screen and press ENTER.
There is a pause while the material is sent to the printer.
To return to the Extensions screen, type q to select the Quit command.
The Extensions screen is displayed, and the cursor is positioned on the command line.
NDA-30030-003 Revision 3 Page 39

ADMINISTRATOR MAIN MENU INTRODUCTIONCall Forward Control - Installation & Operations Manual
PRINT EXTENSIONS
The Print command on the Extensions screen is used to print a hardcopy of the extension records lying within a specified range.
Figure 3-9 Print Extensions
Procedure
Delete Modify View Print
CFC Administrator Fri Apr 1 16:10 pm
***Extensions***
Extension:
Add
Hard Forward Group Index:Call Routing Group Index:
Name or Department:
(1)
(2)
Search Key:
Start value: 1100
<ESC> to return to command line
Extension Hard Forward Group Call Routing Group Name
End value: 1200
Action Result
On the Extensions screen, type p to select the Print command. (1)
A window requests the search key and the starting and ending values for the range. (2)
Use the Spacebar or Left and Right Arrow keys to select a search key, then press ENTER. Type the start value, press ENTER, type the end value, and press ENTER to indicate the range of records to be printed. If both record values are blank then all records will be printed. If the last record value is blank then the record matching the first record val-ue is printed.
The records lying within the indicated range are sent to the printer, and the cursor is positioned on the command line.
Page 40 NDA-30030-003 Revision 3

Call Forward Control - Installation & Operations ManualADMINISTRATOR MAIN MENU INTRODUCTION
HARD FORWARD CONTROL
OVERVIEW The Hard Forward Control option on the Administrator Main Menu is used to add, remove, or make changes to the to Hard Forward Control Groups and Patterns.
Figure 3-10 Hard Forward Control Option
Procedure
The Hard Forward Control Menu contains the following options:
Groups -
Each Hard Forward Group has a unique group index which is referenced by the Extensions record, a group name, and a pattern index that specifies the Hard Forward Pattern used by the group. The Groups option is used to create, delete, modify, view and print Hard Forward Groups.
Patterns -
Each Hard Forward Pattern has a unique pattern index which is referenced by the Hard Forward Group record, and a list of destination extensions and time index values. The Patterns option is used to create, delete, modify, view and print Hard Forward Patterns.
CFC Administrator Fri Apr 1 16:10 pm
***Main Menu***
ExtensionsHard Forward ControlCall Routing ControlTime ParametersSpecial EventsValidate and InstallQuit
Arrow keys to move cursor, <RET> to sel
(1)
(2)
*** Hard Forward Control Menu ***
CFC Administrator Fri Apr 1 16:10 pm
GroupsPatternsQuit
Arrow keys to move cursor, <Enter> to select, <Esc> to quit
Action ResultOn the Main Menu, type h to select the Hard Forward Control option.(1)
The Hard Forward Control screen is dis-played. (2)
Refer to the following pages for information and instructions in the use of each command.To exit the Hard Forward Control option, type q to select the Quit command.
The Main Menu is redisplayed.
NDA-30030-003 Revision 3 Page 41

ADMINISTRATOR MAIN MENU INTRODUCTIONCall Forward Control - Installation & Operations Manual
Quit -
The Quit option exits the Hard Forward Control Menu and returns to the Main Menu.
HARD FORWARD GROUPS
OVERVIEW The Groups option on the Hard Forward Control Menu is used to add, remove, or make changes to the Hard Forward Groups.
Figure 3-11 Hard Forward Groups Option
Procedure
Hard Forward Group Information
Each Hard Forward Group record contains a unique index which identifies the group, a group name, and a pattern index which specifies the Hard Forward Pattern that is used by the group.
CFC Administrator Fri Apr 1 16:10 pm
***Main Menu***
ExtensionsHard Forward ControlCall Routing ControlTime ParametersSpecial EventsValidate and InstallQuit
Arrow keys to move cursor, <RET> to sel
(1)
(2)
*** Hard Forward Control Menu ***
CFC Administrator Fri Apr 1 16:10 pm
GroupsPatternsQuit
Arrow keys to move cursor, <Enter> to select, <Esc> to quit
***Hard Forward Groups***
Group Index:
CFC Administrator Fri Apr 1 16:10 pm
Add Delete Modify View Print Quit
Group Name:Pattern Index:
(3)
Action ResultOn the Main Menu, type h to select the Hard Forward Control option.(1)
The Hard Forward Control screen is dis-played. (2)
On the Hard Forward Control screen, type g to select the Groups option. (2)
The Hard Forward Groups screen is dis-played. (3)
Refer to the following pages for information and instructions in the use of each command.To exit the Hard Forward Groups option, type q to select the Quit command.
The Hard Forward Control screen is re-displayed.
Page 42 NDA-30030-003 Revision 3

Call Forward Control - Installation & Operations ManualADMINISTRATOR MAIN MENU INTRODUCTION
OVERVIEW (Cont.) Commands
The Hard Forward Groups command line provides options to add or remove Hard Forward Group definitions, change an existing group definition, display group data for on screen viewing, or print a hardcopy of either the displayed group definition, a selected range of group definitions, or the entire file of group definitions.
Expanded Display
Press the TAB key or the Ctrl-V key combination while in the Hard Forward Pattern Index field to display the Hard Forward Pattern description used by the group. Press ESC to return to the Hard Forward Groups screen.
NDA-30030-003 Revision 3 Page 43

ADMINISTRATOR MAIN MENU INTRODUCTIONCall Forward Control - Installation & Operations Manual
ADD A HARD FORWARD GROUP
The Add command on the Hard Forward Group screen is used to add a Hard Forward Group definition to the database. Note that a Hard Forward Pattern must be added before a Hard Forward Group may be added.
Figure 3-12 Add A Hard Forward Group
Procedure
***Hard Forward Groups***
Group Index:
CFC Administrator Fri Apr 1 16:10 pm
Add Delete Modify View Print Quit
Group Name:Pattern Index:
(1)
***Hard Forward Groups***
Group Index:
CFC Administrator Fri Apr 1 16:10 pm
<ESC> to return to command line
Group Name:Pattern Index:
(2)
Action ResultOn the Hard Forward Groups menu, type a to select the Add command. (1)
The first field is highlighted for data entry. (2)
Type data to the fields according to the definitions below, pressing ENTER after each entry:
Field Group Index
Group Name
Pattern Index
Definition– The group identifying number, up to 3 digits in
length and referenced by the Extensions option under the Main Menu.
– The group name; up to 30 characters.
– The index to the Hard Forward Pattern used by this group.
When ENTER is pressed from the last field, the message “Do you want to add this? (Y/N)” is dis-played.
Type Y and press ENTER to add the Hard Forward Group or N and press ENTER to cancel it.
The Hard Forward Groups data entry screen is cleared, and the cursor is positioned on the original command line.
Page 44 NDA-30030-003 Revision 3

Call Forward Control - Installation & Operations ManualADMINISTRATOR MAIN MENU INTRODUCTION
DELETE A HARD FORWARD GROUP
The Delete command on the Hard Forward Groups screen is used to remove a Hard Forward Group from the database.
Figure 3-13 Delete A Hard Forward Group
Procedure
(1)
***Hard Forward Groups***
Group Index:
CFC Administrator Fri Apr 1 16:10 pm
Add Delete Modify View Print Quit
Group Name:Pattern Index:
1236
Group Index
Bottom
Enter Extension:Up/Down Arrows to move, <RET> to select, <ESC> to quit
(2)Group Name Pattern Index
Human ResourcesMarketingAccountingTraffic
3421***Hard Forward Groups***
Group Index:
CFC Administrator Fri Apr 1 16:10 pm
Do you want to delete this> (Y/N)
Group Name:Pattern Index:
(3)
1Human Resources3
Action Result
On the Hard Forward Groups screen, type d to select the Delete command. (1)
A Hard Forward Group Index entry field is displayed below and, at the top of the screen, a highlighted Hard Forward Group heading is displayed.
Type the Hard Forward Group Index at the prompt and press ENTER. To display all groups, leave the group index field blank and press ENTER. The “*” may be included in the group index field as a wild card (“1*” will display all groups that start with “1”).
All of the matching Hard Forward Group de-scriptions in the database are displayed. (2)
Use the Up and Down Arrow keys to select the Hard Forward Group to delete, then press ENTER to delete the group.
The Hard Forward Groups screen displays field data for the selected group, and the con-firmation “Do you want to delete this? (Y/N)” is displayed. (3)
Type Y and press ENTER to confirm the de-letion or N and press ENTER to cancel it.
The fields are cleared, and the cursor is posi-tioned on the original command line.
NDA-30030-003 Revision 3 Page 45

ADMINISTRATOR MAIN MENU INTRODUCTIONCall Forward Control - Installation & Operations Manual
MODIFY A HARD FORWARD GROUP
The Modify command on the Hard Forward Groups screen is used to make changes to a Hard Forward Group.
Figure 3-14 Modify A Hard Forward Group
Procedure
***Hard Forward Groups***
Group Index:
CFC Administrator Fri Apr 1 16:10 pm
Add Delete Modify View Print Quit
Group Name:Pattern Index:
(1)
1236
Group Index
Bottom
Enter Extension:Up/Down Arrows to move, <RET> to select, <ESC> to quit
(2)Group Name Pattern Index
Human ResourcesMarketingAccountingTraffic
3421***Hard Forward Groups***
Group Index:
CFC Administrator Fri Apr 1 16:10 pm
<ESC> to return to command line
Group Name:Pattern Index:
(3)
1Human Resources3
Action Result
On the Hard Forward Groups screen, type m to select the Modify command. (1)
A Hard Forward Group entry field is dis-played at the bottom of the screen, and a highlighted Hard Forward Group heading is displayed at the top of the screen.
Type the Hard Forward Group Index at the prompt and press ENTER. To display all groups, leave the group index field blank and press ENTER. The “*” may be included in the group index field as a wild card (“1*” will display all groups that start with “1”).
All the matching Hard Forward Groups in the database are displayed. (2)
Use the Up and Down Arrow keys to select the Hard Forward Group to be modified, then press ENTER to modify the record.
The contents of the selected record are dis-played. (3)
Use the Up and Down Arrow keys to move between the Hard Forward Group fields. The Backspace key may be used to erase existing data. Type new data where necessary and press ENTER after each entry.
After the last entry, the message “Do you want to save changes? (Y/N)” is displayed.
Type Y and press ENTER to save the chang-es, or type N and press ENTER to cancel them.
The fields are cleared, and the cursor is posi-tioned on the command line.
Page 46 NDA-30030-003 Revision 3
Call Forward Control - Installation & Operations ManualADMINISTRATOR MAIN MENU INTRODUCTION
MODIFY A HARD FORWARD GROUP (CONT)
Database Search
The Hard Forward Group Index cannot be changed since it is the key to the record. A change in this field means either another existing record or a new record is being entered. After the Hard Forward Group Index is entered, CFC searches the database for the corresponding record and displays it. If it does not exist in the database, CFC displays a prompt requesting the entry of a different group index.
NDA-30030-003 Revision 3 Page 47

ADMINISTRATOR MAIN MENU INTRODUCTIONCall Forward Control - Installation & Operations Manual
VIEW HARD FORWARD GROUPS
The View command on the Hard Forward Groups screen is used to display a selected range of Hard Forward Group definitions for on-screen viewing or printing.
Figure 3-15 View Hard Forward Groups
Procedure
***Hard Forward Groups***
Group Index:
CFC Administrator Fri Apr 1 16:10 pm
Add Delete Modify View Print Quit
Group Name:Pattern Index:
Start value: 1
<ESC> to return to command line
End value: 20
Search Key: Group Pattern Name
(1)
(2)(3)
1236
Group Index Group Name Pattern Index
Human ResourcesMarketingAccountingTraffic
3421
DownPage UpPage Search Top Bottom Print Quit
End Of File
Top Of File
*** Hard Forward Groups ***
Action Result
On the Hard Forward Groups screen, type v to se-lect the View command.(1)
A window requests the search key and the starting and ending values for the range. (2)
Use the Spacebar or Left and Right Arrow keys to select a search key, then press ENTER. Type the start value, press ENTER, type the end value, and press ENTER to indicate the range of records to be viewed. If both record values are blank then all records will be displayed. If the last record value is blank then the record matching the first record val-ue is displayed.
All records lying within the indicated range are displayed for on-screen view-ing. (3)
Type d to select the DownPage command. The next page of data is displayed.Type u to select the UpPage command. The previous page of data is displayed.Type t to select the Top command. The first page of data is displayed.Type b to select the Bottom command. The last page of data is displayedType s to select the Search command. At the prompt type the desired pattern and press ENTER.
All of the occurrences of the pattern on that page are highlighted.
Type p to select the Print command. At the prompt, type f to indicate the whole file or s to indicate just the screen and press ENTER.
There is a pause while the material is sent to the printer.
To return to the Hard Forward Groups screen, type q to select the Quit command.
The Hard Forward Groups screen is dis-played, and the cursor is positioned on the command line.
Page 48 NDA-30030-003 Revision 3

Call Forward Control - Installation & Operations ManualADMINISTRATOR MAIN MENU INTRODUCTION
PRINT HARD FORWARD GROUPS
The Print command on the Hard Forward Groups screen is used to print a hardcopy of the Hard Forward Group records lying within a specified range.
Figure 3-16 Print Hard Forward Groups
Procedure
***Hard Forward Groups***
Group Index:
CFC Administrator Fri Apr 1 16:10 pm
Add Delete Modify View Print Quit
Group Name:Pattern Index:
(1)
Start value: 1
<ESC> to return to command line
End value: 20
Search Key: Group Pattern Name(2)
Action Result
On the Hard Forward Groups screen, type p to se-lect the Print command. (1)
A window requests the search key and the starting and ending values for the range. (2)
Use the Spacebar or Left and Right Arrow keys to select a search key, then press ENTER. Type the start value, press ENTER, type the end value, and press ENTER to indicate the range of records to be printed. If both record values are blank then all records will be printed. If the last record value is blank then the record matching the first record val-ue is printed.
The records lying within the indicated range are sent to the printer, and the cursor is positioned on the command line.
NDA-30030-003 Revision 3 Page 49

ADMINISTRATOR MAIN MENU INTRODUCTIONCall Forward Control - Installation & Operations Manual
HARD FORWARD PATTERNS
OVERVIEW The Patterns option on the Hard Forward Control Menu is used to add, remove, or make changes to the Hard Forward Patterns.
Figure 3-17 Hard Forward Patterns Option
Procedure
Hard Forward Patterns Information
Each Hard Forward Pattern record contains a unique index which identifies the group, an event list used when the extension is busy, an event list used when the extension does not answer, and an event list used for all calls. Each event list can have up to six events. Each event has a time index value that references an entry in the Time Parameters table, a destination extension, and an event action that is selected from one of the following:
Set: forward the extension to the destination unless it is already forwarded by a user directly from the telephone.
CFC Administrator Fri Apr 1 16:10 pm
***Main Menu***
ExtensionsHard Forward ControlCall Routing ControlTime ParametersSpecial EventsValidate and InstallQuit
Arrow keys to move cursor, <RET> to sel
(1)(2)
*** Hard Forward Control Menu ***
CFC Administrator Fri Apr 1 16:10 pm
GroupsPatternsQuit
Arrow keys to move cursor, <Enter> to select, <Esc> to quit
(3)
***Hard Forward Patterns***
CFC Administrator Fri Apr 1 16:10 pm
Add Delete Modify View Print Quit
Pattern Index Call Type Time Index Destination ActionBusy:
No Answer:
All Calls:
Action ResultOn the Main Menu, type h to select the Hard Forward Control option.(1)
The Hard Forward Control screen is dis-played. (2)
On the Hard Forward Control screen, type p to select the Patterns option. (2)
The Hard Forward Patterns screen is dis-played. (3)
Refer to the following pages for information and instructions in the use of each command.To exit the Hard Forward Patterns option, type q to select the Quit command.
The Hard Forward Control screen is re-displayed.
Page 50 NDA-30030-003 Revision 3

Call Forward Control - Installation & Operations ManualADMINISTRATOR MAIN MENU INTRODUCTION
OVERVIEW (Cont) Override: forward the extension to the destination, overriding any existing forwarding.
Cancel: if the extension is currently forwarded to the extension, cancel the forwarding.
None: this value is used by default when the time index value is zero, and indicates that no forwarding action is scheduled.
Commands
The Hard Forward Patterns command line provides options to add or remove Hard Forward Pattern definitions, change an existing pattern definition, display pattern data for on screen viewing, or print a hardcopy of either the displayed pattern definition, a selected range of pattern definitions, or the entire file of pattern definitions.
Expanded Display
Press the TAB key or the Ctrl-V key combination while in a Time Index field to display the time description used by the event. Press ESC to return to the Hard Forward Patterns screen.
NDA-30030-003 Revision 3 Page 51

ADMINISTRATOR MAIN MENU INTRODUCTIONCall Forward Control - Installation & Operations Manual
ADD A HARD FORWARD PATTERN
The Add command on the Hard Forward Pattern screen is used to add a Hard Forward Pattern definition to the database. Note that Time Index entries referenced by the pattern must be added before a Hard Forward Pattern may be added.
Figure 3-18 Add A Hard Forward Pattern
(1)
***Hard Forward Patterns***
CFC Administrator Fri Apr 1 16:10 pm
Add Delete Modify View Print Quit
Pattern Index Call Type Time Index Destination ActionBusy:
No Answer:
All Calls:
(2)
***Hard Forward Patterns***
CFC Administrator Fri Apr 1 16:10 pm
<ESC> to return to command line
Pattern Index Call Type Time Index Destination ActionBusy:
No Answer:
All Calls:
Page 52 NDA-30030-003 Revision 3

Call Forward Control - Installation & Operations ManualADMINISTRATOR MAIN MENU INTRODUCTION
Procedure
Action ResultOn the Hard Forward Patterns menu, type a to select the Add command. (1)
The first field is highlighted for data entry. (2)
Type a unique Pattern Index value and press EN-TER.
The Pattern Index identifies this Hard Forward Pat-tern and is referenced by the Hard Forward Group records. It can have up to 3 digits.
Type data into the Busy, No Answer, and All Calls event fields, pressing ENTER after each field is completed. Each Category can have up to six events using the fields described below:
Field Time Index
Destination
Action
Definition– The Time Parameter table index that specifies the
time the event will occur. It can have up to 3 dig-its. A value of 0 indicates that the entry is unused.
– The destination extension used by the event. It can have up to 16 digits.
– Select from Set, Override, or Cancel. If 0 is specified in the Time Index field, the action de-faults to None.
When ENTER is pressed from the last event field, the message “Do you want to add this? (Y/N)” is displayed.
Type Y and press ENTER to add the Hard Forward Pattern or N and press ENTER to cancel it.
The Hard Forward Patterns data entry screen is cleared, and the cursor is positioned on the original command line.
NDA-30030-003 Revision 3 Page 53

ADMINISTRATOR MAIN MENU INTRODUCTIONCall Forward Control - Installation & Operations Manual
DELETE A HARD FORWARD PATTERN
The Delete command on the Hard Forward Patterns screen is used to remove a Hard Forward Pattern from the database.
Figure 3-19 Delete A Hard Forward Pattern
Procedure
(1)
***Hard Forward Patterns***
CFC Administrator Fri Apr 1 16:10 pm
Add Delete Modify View Print Quit
Pattern Index Call Type Time Index Destination ActionBusy:
No Answer:
All Calls:
1234
Pattern Index
Bottom
Enter Index:Up/Down Arrows to move, <RET> to select, <ESC> to quit
(2)Call Type Time Index
BusyBusyBusyBusy
2010
Destination Action
SetNoneOverrideNone
3400043670
(3)
***Hard Forward Patterns***
CFC Administrator Fri Apr 1 16:10 pm
Do you want to delete this? (Y/N)
Pattern Index Call Type Time Index Destination ActionBusy:
No Answer:
All Calls:
2 4 6 0 0 0 0 0 0 0 0 0 0 0 0 0 0 0
3400 3410 3410 00 0 0 0 0 0 0 0 0 0 0 0 0 0
Set Override Cancel None None None None None None None None None None None None None None None
1
Action Result
On the Hard Forward Patterns screen, type d to select the Delete command. (1)
A Hard Forward Pattern Index entry field is displayed below and, at the top of the screen, a highlighted Hard Forward Pattern heading is displayed.
Type the Hard Forward Pattern Index at the prompt and press ENTER. To display all patterns, leave the pattern index field blank and press ENTER. The “*” may be included in the pattern index field as a wild card (“1*” will display all patterns that start with “1”).
All of the matching Hard Forward Pattern de-scriptions in the database are displayed. (2)
Use the Up and Down Arrow keys to select the Hard Forward Pattern to delete, then press ENTER to delete the pattern.
The Hard Forward Patterns screen displays field data for the selected pattern, and the confirmation “Do you want to delete this? (Y/N)” is displayed. (3)
Type Y and press ENTER to confirm the de-letion or N and press ENTER to cancel it.
The fields are cleared, and the cursor is posi-tioned on the original command line.
Page 54 NDA-30030-003 Revision 3

Call Forward Control - Installation & Operations ManualADMINISTRATOR MAIN MENU INTRODUCTION
MODIFY A HARD FORWARD PATTERN
The Modify command on the Hard Forward Patterns screen is used to make changes to a Hard Forward Pattern.
Figure 3-20 Modify A Hard Forward Pattern
Procedure
(1)
***Hard Forward Patterns***
CFC Administrator Fri Apr 1 16:10 pm
Add Delete Modify View Print Quit
Pattern Index Call Type Time Index Destination ActionBusy:
No Answer:
All Calls:
1234
Pattern Index
Bottom
Enter Index:Up/Down Arrows to move, <RET> to select, <ESC> to quit
(2)Call Type Time Index
BusyBusyBusyBusy
2010
Destination Action
SetNoneOverrideNone
3400043670
(3)
***Hard Forward Patterns***
CFC Administrator Fri Apr 1 16:10 pm
<ESC> to return to command line
Pattern Index Call Type Time Index Destination ActionBusy:
No Answer:
All Calls:
2 4 6 0 0 0 0 0 0 0 0 0 0 0 0 0 0 0
3400 3410 3410 00 0 0 0 0 0 0 0 0 0 0 0 0 0
Set Override Cancel None None None None None None None None None None None None None None None
1
Action Result
On the Hard Forward Patterns screen, type m to select the Modify command. (1)
A Hard Forward Pattern entry field is dis-played at the bottom of the screen, and a highlighted Hard Forward Pattern heading is displayed at the top of the screen.
Type the Hard Forward Pattern Index at the prompt and press ENTER. To display all patterns, leave the pattern index field blank and press ENTER. The “*” may be included in the pattern index field as a wild card (“1*” will display all patterns that start with “1”).
All the matching Hard Forward Patterns in the database are displayed. (2)
Use the Up and Down Arrow keys to select the Hard Forward Pattern to be modified, then press ENTER to modify the record.
The contents of the selected record are dis-played. (3)
Use the Up and Down Arrow keys to move between the Hard Forward Pattern fields. The Backspace key may be used to erase ex-isting data. Type new data where necessary and press ENTER after each entry.
After the last entry, the message “Do you want to save changes? (Y/N)” is displayed.
Type Y and press ENTER to save the chang-es, or type N and press ENTER to cancel them.
The fields are cleared, and the cursor is posi-tioned on the command line.
NDA-30030-003 Revision 3 Page 55

ADMINISTRATOR MAIN MENU INTRODUCTIONCall Forward Control - Installation & Operations Manual
MODIFY A HARD FORWARD PATTERN (CONT)
Database Search
The Hard Forward Pattern Index cannot be changed since it is the key to the record. A change in this field means either another existing record or a new record is being entered. After the Hard Forward Pattern Index is entered, CFC searches the database for the corresponding record and displays it. If it does not exist in the database, CFC displays a prompt requesting the entry of a different pattern index.
Page 56 NDA-30030-003 Revision 3

Call Forward Control - Installation & Operations ManualADMINISTRATOR MAIN MENU INTRODUCTION
VIEW HARD FORWARD PATTERNS
The View command on the Hard Forward Patterns screen is used to display a selected range of Hard Forward Pattern definitions for on-screen viewing or printing.
Figure 3-21 View Hard Forward Patterns
Procedure
(1)
***Hard Forward Patterns***
CFC Administrator Fri Apr 1 16:10 pm
Add Delete Modify View Print Quit
Pattern Index Call Type Time Index Destination ActionBusy:
No Answer:
All Calls:
Search Key:
Start value: 1
<ESC> to return to command line
End value: 20
Pattern Call Type Time Destination Action(2) (3)
1
Pattern Index Call Type Time Index
Busy: 2460
DownPage UpPage Search Top Bottom Print Quit
More
Top Of File
*** Hard Forward Patterns ***Destination Action
0000000
No Answer:
34003410341000000000
SetOverrideCancelNoneNoneNoneNoneNoneNoneNoneNone
Action Result
On the Hard Forward Patterns screen, type v to se-lect the View command.(1)
A window requests the search key and the starting and ending values for the range. (2)
Use the Spacebar or Left and Right Arrow keys to select a search key, then press ENTER. Type the start value, press ENTER, type the end value, and press ENTER to indicate the range of records to be viewed. If both record values are blank then all records will be displayed. If the last record value is blank then the record matching the first record val-ue is displayed.
All records lying within the indicated range are displayed for on-screen view-ing. (3)
Type d to select the DownPage command. The next page of data is displayed.Type u to select the UpPage command. The previous page of data is displayed.Type t to select the Top command. The first page of data is displayed.Type b to select the Bottom command. The last page of data is displayedType s to select the Search command. At the prompt type the desired pattern and press ENTER.
All of the occurrences of the pattern on that page are highlighted.
Type p to select the Print command. At the prompt, type f to indicate the whole file or s to indicate just the screen and press ENTER.
There is a pause while the material is sent to the printer.
To return to the Hard Forward Patterns screen, type q to select the Quit command.
The Hard Forward Patterns screen is dis-played, and the cursor is positioned on the command line.
NDA-30030-003 Revision 3 Page 57

ADMINISTRATOR MAIN MENU INTRODUCTIONCall Forward Control - Installation & Operations Manual
PRINT HARD FORWARD PATTERNS
The Print command on the Hard Forward Patterns screen is used to print a hardcopy of the Hard Forward Pattern records lying within a specified range.
Figure 3-22 Print Hard Forward Patterns
Procedure
(1)
***Hard Forward Patterns***
CFC Administrator Fri Apr 1 16:10 pm
Add Delete Modify View Print Quit
Pattern Index Call Type Time Index Destination ActionBusy:
No Answer:
All Calls:
Search Key:
Start value: 1
<ESC> to return to command line
End value: 20
Pattern Call Type Time Destination Action(2)
Action Result
On the Hard Forward Patterns screen, type p to se-lect the Print command. (1)
A window requests the search key and the starting and ending values for the range. (2)
Use the Spacebar or Left and Right Arrow keys to select a search key, then press ENTER. Type the start value, press ENTER, type the end value, and press ENTER to indicate the range of records to be printed. If both record values are blank then all records will be printed. If the last record value is blank then the record matching the first record val-ue is printed.
The records lying within the indicated range are sent to the printer, and the cursor is positioned on the command line.
Page 58 NDA-30030-003 Revision 3

Call Forward Control - Installation & Operations ManualADMINISTRATOR MAIN MENU INTRODUCTION
CALL ROUTING CONTROL
OVERVIEW The Call Routing Control option on the Administrator Main Menu is used to add, remove, or make changes to the to Call Routing Control Monitored Numbers, Groups, Patterns, and Destinations.
Figure 3-23 Call Routing Control Option
Procedure
The Call Routing Control Menu contains the following options:
Monitored Numbers -
The CRC application waits for incoming calls on three monitored numbers, then routes the calls to the appropriate destinations. Each user must forward their telephone to a monitored number to activate Call Routing. The Monitored Numbers menu option is used to make, alter, delete, and otherwise manage the monitored number assignments.
Groups -
Each Call Routing Group has a unique group index which is referenced by the Extensions record, a group name, a default destination, and a pattern index that specifies the Call Routing Pattern used by the group. The Groups option is used to create, delete, modify, view and print Call Routing Groups.
CFC Administrator Fri Apr 1 16:10 pm
***Main Menu***
ExtensionsHard Forward ControlCall Routing ControlTime ParametersSpecial EventsValidate and InstallQuit
Arrow keys to move cursor, <RET> to sel
(1)
(2)
*** Call Routing Control Menu ***
CFC Administrator Fri Apr 1 16:10 pm
Monitored NumbersGroupsPatterns
Arrow keys to move cursor, <Enter> to select, <Esc> to quit
DestinationsQuit
Action ResultOn the Main Menu, type c to select the Call Routing Control option.(1)
The Call Routing Control screen is dis-played. (2)
Refer to the following pages for information and instructions in the use of each command.To exit the Call Routing Control option, type q to select the Quit command.
The Main Menu is redisplayed.
NDA-30030-003 Revision 3 Page 59

ADMINISTRATOR MAIN MENU INTRODUCTIONCall Forward Control - Installation & Operations Manual
OVERVIEW (Cont.) Patterns -
Each Call Routing Pattern has a unique pattern index which is referenced by the Call Routing Group record, and a list of destination index values that specify Call Routing Destinations. The Patterns option is used to create, delete, modify, view and print Call Routing Patterns.
Destinations -
Each Call Routing Destination has a unique destination index which is referenced by the Call Routing Pattern record, a list of destination extensions, and a start time index value. The Destinations option is used to create, delete, modify, view and print Call Routing Destinations.
Quit -
The Quit option exits the Call Routing Control Menu and returns to the Main Menu.
Page 60 NDA-30030-003 Revision 3

Call Forward Control - Installation & Operations ManualADMINISTRATOR MAIN MENU INTRODUCTION
CALL ROUTING MONITORED NUMBERS
OVERVIEW The Monitored Numbers option on the Call Routing Control Menu is used to maintain the CRC monitored number and voice mail number assignments.
Figure 3-24 Call Routing Monitored Numbers Option
Procedure
CFC Administrator Fri Apr 1 16:10 pm
***Main Menu***
ExtensionsHard Forward ControlCall Routing ControlTime ParametersSpecial EventsValidate and InstallQuit
Arrow keys to move cursor, <RET> to sel
(1)(2)
*** Call Routing Control Menu ***
CFC Administrator Fri Apr 1 16:10 pm
Monitored NumbersGroupsPatterns
Arrow keys to move cursor, <Enter> to select, <Esc> to quit
DestinationsQuit
(3)
*** Call Routing Monitored Numbers ***
CFC Administrator Fri Apr 1 16:10 pm
Busy Calls:No Answer Calls:
All Calls:
Modify
*** Voice Mail Number ***
Voice Mail:
Quit
Action ResultOn the Main Menu, type c to select the Call Routing Control option.(1)
The Call Routing Control screen is dis-played. (2)
On the Call Routing Control screen, type m to select the Monitored Numbers option. (2)
The Call Routing Monitored Numbers screen is displayed. (3)
To change a monitored number, type m to se-lected the Modify command.
The cursor is positioned on the first ex-tension field.
Use the Backspace key to delete existing monitored numbers and the Up and Down Arrow keys to move among the fields. Make the necessary changes to the monitored num-bers, pressing ENTER after each entry.
When ENTER is pressed on the last en-try, the cursor is returned to the com-mand line.
To exit the Monitored Numbers option, type q to select the Quit command.
The message “Do you want to save changes? (Y/N)” is displayed.
Answer ’Y’ and press ENTER to save the changes, or answer ’N’ and press ENTER to cancel the changes.
The Call Routing Control Menu is dis-played.
NDA-30030-003 Revision 3 Page 61

ADMINISTRATOR MAIN MENU INTRODUCTIONCall Forward Control - Installation & Operations Manual
CALL ROUTING GROUPS
OVERVIEW The Groups option on the Call Routing Control Menu is used to add, remove, or make changes to the Call Routing Groups.
Figure 3-25 Call Routing Groups Option
Procedure
Call Routing Group Information
Each Call Routing Group is given a Group Index, a Group Name, a Pattern Index, and a Default Destination. The Pattern Index specifies the Call Routing pattern used by the extensions in the Group. The Default Destination is used if all destinations in the Call Routing Pattern are unavailable.
Expanded Displays
Press the TAB key or the Ctrl-V key combination while in the Call Routing Pattern Index field to display the Call Routing Pattern description used by the group. Press ESC to return to the Call Routing Groups screen.
CFC Administrator Fri Apr 1 16:10 pm
***Main Menu***
ExtensionsHard Forward ControlCall Routing ControlTime ParametersSpecial EventsValidate and InstallQuit
Arrow keys to move cursor, <RET> to sel
(1)(2)
*** Call Routing Control Menu ***
CFC Administrator Fri Apr 1 16:10 pm
Monitored NumbersGroupsPatterns
Arrow keys to move cursor, <Enter> to select, <Esc> to quit
DestinationsQuit
Add Delete Modify View Print Quit
CFC Administrator Fri Apr 1 16:10 pm
*** Call Routing Groups***
(3)
Group Index:
Group Name:Pattern Index:
Default Destination:
Action ResultOn the Main Menu, type c to select the Call Routing Control option.(1)
The Call Routing Control screen is dis-played. (2)
On the Call Routing Control screen, type g to select the Groups option. (2)
The Call Routing Groups screen is dis-played. (3)
Refer to the following pages for information and instructions in the use of each command.To exit the Call Routing Groups option, type q to select the Quit command.
The Call Routing Control screen is redis-played.
Page 62 NDA-30030-003 Revision 3

Call Forward Control - Installation & Operations ManualADMINISTRATOR MAIN MENU INTRODUCTION
OVERVIEW (Cont.) Commands
The Call Routing Groups command line provides options to add or remove a group definition, change an existing group definition, display group data for on-screen viewing, or print a hardcopy of either the displayed group definition or the entire file of group definitions.
NDA-30030-003 Revision 3 Page 63

ADMINISTRATOR MAIN MENU INTRODUCTIONCall Forward Control - Installation & Operations Manual
ADD A CALL ROUTING GROUP
The Add command on the Call Routing Groups screen is used to add a Call Routing Group. Note that a Call Routing Pattern must be added before a Call Routing Group may be added.
Figure 3-26 Add A Call Routing Group
Procedure
Add Delete Modify View Print Quit
CFC Administrator Fri Apr 1 16:10 pm
*** Call Routing Groups***
(1)
Group Index:
Group Name:Pattern Index:
Default Destination:
<ESC> to return to command line
CFC Administrator Fri Apr 1 16:10 pm
*** Call Routing Groups***
(2)
Group Index:
Group Name:Pattern Index:
Default Destination:
Action ResultOn the Call Routing Groups menu, type a to select the Add command. (1)
The first field is highlighted for data entry. (2)
Type data to the fields according to the definitions below, pressing ENTER after each entry:
Field Group Index
Group Name
Pattern Index
Default Destination
Definition– The group identifying number, up to 3 digits in
length and referenced by the Extensions option under the Main Menu.
– The group name; up to 30 characters.
– The index to the Call Routing Pattern used by this group.
– The destination used if all destinations specified in the Call Routing Pattern are busy.
When ENTER is pressed from the last field, the message “Do you want to add this? (Y/N)” is dis-played.
Type Y and press ENTER to add the Call Routing Group or N and press ENTER to cancel it.
The Call Routing Groups data entry screen is cleared, and the cursor is positioned on the original command line.
Page 64 NDA-30030-003 Revision 3

Call Forward Control - Installation & Operations ManualADMINISTRATOR MAIN MENU INTRODUCTION
DELETE A CALL ROUTING GROUP
The Delete command on the Call Routing Groups screen is used to remove a Call Routing Group index from the database.
Figure 3-27 Delete A Call Routing Group
Procedure
Add Delete Modify View Print Quit
CFC Administrator Fri Apr 1 16:10 pm
*** Call Routing Groups***
(1)
Group Index:
Group Name:Pattern Index:
Default Destination:
Group Index
1236
Bottom
Enter Index:Up/Down Arrows to move, <RET> to select, <ESC> to quit
(2)
Traffic
3800MarketingAccounting
Group Name Pattern Index Default Ext
Human Resources 1236
400025001034
Do you want to delete this? (Y/N)
CFC Administrator Fri Apr 1 16:10 pm
*** Call Routing Groups***
(3)
Group Index:
Group Name:Pattern Index:
Default Destination:
1
Human Resources13800
Action ResultOn the Call Routing Groups screen, type d to select the Delete command. (1)
A Call Routing Group Index entry field is displayed below and, at the top of the screen, a highlighted Call Routing Group heading is displayed.
Type the Call Routing Group Index at the prompt and press ENTER. To display all groups, leave the group index field blank and press ENTER. The “*” may be included in the group index field as a wild card (“1*” will display all groups that start with “1”).
All of the matching Call Routing Group descriptions in the database are displayed. (2)
Use the Up and Down Arrow keys to select the Call Routing Group to delete, then press ENTER to delete the group.
The Call Routing Groups screen displays field data for the selected group, and the confirmation “Do you want to delete this? (Y/N)” is displayed. (3)
Type Y and press ENTER to confirm the deletion or N and press ENTER to cancel it.
The fields are cleared, and the cursor is positioned on the original command line.
NDA-30030-003 Revision 3 Page 65

ADMINISTRATOR MAIN MENU INTRODUCTIONCall Forward Control - Installation & Operations Manual
MODIFY A CALL ROUTING GROUP
The Modify command on the Call Routing Groups screen is used to make changes to a Call Routing Group record.
Figure 3-28 Modify A Call Routing Group
Procedure
Add Delete Modify View Print Quit
CFC Administrator Fri Apr 1 16:10 pm
*** Call Routing Groups***
(1)
Group Index:
Group Name:Pattern Index:
Default Destination:
Group Index
1236
Bottom
Enter Index:Up/Down Arrows to move, <RET> to select, <ESC> to quit
(2)
Traffic
3800MarketingAccounting
Group Name Pattern Index Default Ext
Human Resources 1236
400025001034
<ESC> to return to command line
CFC Administrator Fri Apr 1 16:10 pm
*** Call Routing Groups***
(3)
Group Index:
Group Name:Pattern Index:
Default Destination:
1
Human Resources13800
Action ResultOn the Call Routing Groups screen, type m to select the Modify command. (1)
A Call Routing Group entry field is displayed at the bottom of the screen, and a highlighted Call Routing Group heading is displayed at the top of the screen.
Type the Call Routing Group Index at the prompt and press ENTER. To display all groups, leave the group index field blank and press ENTER. The “*” may be included in the group index field as a wild card (“1*” will display all groups that start with “1”).
All the matching Call Routing Groups in the database are displayed. (2)
Use the Up and Down Arrow keys to select the Call Routing Group to be modified, then press ENTER to modify the record.
The contents of the selected record are displayed. (3)
Use the Up and Down Arrow keys to move between the Call Routing Group fields. The Backspace key may be used to erase existing data. Type new data where necessary and press ENTER after each entry.
After the last entry, the message “Do you want to save changes? (Y/N)” is displayed.
Type Y and press ENTER to save the changes, or type N and press ENTER to cancel them.
The fields are cleared, and the cursor is positioned on the command line.
Page 66 NDA-30030-003 Revision 3

Call Forward Control - Installation & Operations ManualADMINISTRATOR MAIN MENU INTRODUCTION
MODIFY A CALL ROUTING GROUP (Cont.)
Database Search
The Call Routing Group Index cannot be changed since it is the key to the record. A change in this number means either another existing record or a new record is being entered. After the Call Routing Group Index is entered, CFC displays it. If it does not exist, CFC displays a prompt requesting the entry of a new record for the Group Index.
NDA-30030-003 Revision 3 Page 67

ADMINISTRATOR MAIN MENU INTRODUCTIONCall Forward Control - Installation & Operations Manual
VIEW CALL ROUTING GROUPS
The View command on the Call Routing Groups screen is used to display a selected range of Call Routing Group definitions for on-screen viewing or printing.
Figure 3-29 View Call Routing Groups
Procedure
Add Delete Modify View Print Quit
CFC Administrator Fri Apr 1 16:10 pm
*** Call Routing Groups***
(1)
Group Index:
Group Name:Pattern Index:
Default Destination:
Search Key:
Start value:
<ESC> to return to command line
Group Pattern Name Default Destination
End value:110
(3)
1236
Group Index Group Name Pattern Index
Human ResourcesMarketingAccountingTraffic
3421
DownPage UpPage Search Top Bottom Print Quit
End Of File
Top Of File
*** Call Routing Groups ***Default Ext
3800400025001034
(2)
Action ResultOn the Call Routing Groups screen, type v to select the View command.(1)
A window requests the search key and the starting and ending values for the range. (2)
Use the Spacebar or Left and Right Arrow keys to select a search key, then press ENTER. Type the start value, press ENTER, type the end value, and press ENTER to indicate the range of records to be viewed. If both record values are blank then all records will be displayed. If the last record value is blank then the record matching the first record value is displayed.
All records lying within the indicated range are displayed for on-screen viewing. (3)
Type d to select the DownPage command. The next page of data is displayed.Type u to select the UpPage command. The previous page of data is displayed.Type t to select the Top command. The first page of data is displayed.Type b to select the Bottom command. The last page of data is displayedType s to select the Search command. At the prompt type the desired pattern and press ENTER.
All of the occurrences of the pattern on that page are highlighted.
Type p to select the Print command. At the prompt, type f to indicate the whole file or s to indicate just the screen and press ENTER.
There is a pause while the material is sent to the printer.
To return to the Call Routing Groups screen, type q to select the Quit command.
The Call Routing Groups screen is displayed, and the cursor is positioned on the command line.
Page 68 NDA-30030-003 Revision 3

Call Forward Control - Installation & Operations ManualADMINISTRATOR MAIN MENU INTRODUCTION
PRINT CALL ROUTING GROUPS
The Print command on the Call Routing Groups screen is used to print a hardcopy of the Call Routing Group records lying within a specified range.
Figure 3-30 Print Call Routing Groups
Procedure
Add Delete Modify View Print Quit
CFC Administrator Fri Apr 1 16:10 pm
*** Call Routing Groups***
(1)
Group Index:
Group Name:Pattern Index:
Default Destination:
Search Key:
Start value:
<ESC> to return to command line
Group Pattern Name Default Destination
End value:110
(2)
Action ResultOn the Call Routing Groups screen, type p to select the Print command. (1)
A window requests the search key and the starting and ending values for the range. (2)
Use the Spacebar or Left and Right Arrow keys to select a search key, then press ENTER. Type the start value, press ENTER, type the end value, and press ENTER to indicate the range of records to be printed. If both record values are blank then all records will be printed. If the last record value is blank then the record matching the first record value is printed.
The records lying within the indicated range are sent to the printer, and the cursor is positioned on the command line.
NDA-30030-003 Revision 3 Page 69

ADMINISTRATOR MAIN MENU INTRODUCTIONCall Forward Control - Installation & Operations Manual
CALL ROUTING PATTERNS
OVERVIEW The Patterns option on the Call Routing Control Menu is used to add, delete, modify, view, and print Call Routing Patterns.
Figure 3-31 Call Routing Patterns Option
Procedure
Call Routing Pattern Information
Each Call Routing Pattern is given a Pattern Index and two lists of Destination Index values. One list is used for Internal Calls, the other for External Calls. Each list provides up to six entries in each of the following categories: busy calls, caller does not answer, and all calls. The Destination Index values reference entries in the Call Routing Destinations database, which contain a start time and a list of destination extensions calls will be routed to after the start time. The monitored numbers associated with the busy, no answer, and all calls categories are displayed on the Call Routing Patterns screen if they have been set, but they cannot be modified; use the Call Routing Monitored Number screen to set them.
Expanded Display
Press the TAB key or the Ctrl-V key combination while in a Call Routing Destination Index field to display the Call Routing Destination description. Press ESC to return to the Call Routing Patterns screen.
CFC Administrator Fri Apr 1 16:10 pm
***Main Menu***
ExtensionsHard Forward ControlCall Routing ControlTime ParametersSpecial EventsValidate and InstallQuit
Arrow keys to move cursor, <RET> to sel
(1)(2)
*** Call Routing Control Menu ***
CFC Administrator Fri Apr 1 16:10 pm
Monitored NumbersGroupsPatterns
Arrow keys to move cursor, <Enter> to select, <Esc> to quit
DestinationsQuit
Add Delete Modify View Print Quit
CFC Administrator Fri Apr 1 16:10 pm
***Call Routing Patterns***
(3)
Pattern Index:Call Types
Busy:No Answer:
All Calls:
xxxxxxxx3997
Internal Destinations External Destinations
Action ResultOn the Main Menu, type c to select the Call Routing Control option.(1)
The Call Routing Control screen is displayed. (2)
On the Call Routing Control screen, type p to select the Patterns option. (2)
The Call Routing Patterns screen is displayed. (3)
Refer to the following pages for information and instructions in the use of each command.To exit the Call Routing Patterns option, type q to select the Quit command.
The Call Routing Control screen is redisplayed.
Page 70 NDA-30030-003 Revision 3

Call Forward Control - Installation & Operations ManualADMINISTRATOR MAIN MENU INTRODUCTION
OVERVIEW (Cont.) Movement Among Fields
When modifying or viewing existing Call Routing Patterns, move quickly from one field (Internal Destinations) to the other field (External Destinations) or vice versa by pressing the Cntl n combination while in either field. Also, the Cntl e combination moves the cursor quickly to the end of the display.
NDA-30030-003 Revision 3 Page 71

ADMINISTRATOR MAIN MENU INTRODUCTIONCall Forward Control - Installation & Operations Manual
ADD A CALL ROUTING PATTERN
The Add command on the Call Routing Patterns screen is used to add a Call Routing Pattern to the database
Figure 3-32 Add A Call Routing Pattern
Procedure
Add Delete Modify View Print Quit
CFC Administrator Fri Apr 1 16:10 pm
***Call Routing Patterns***
(1)
Pattern Index:Call Types
Busy:No Answer:
All Calls:
xxxxxxxx3997
Internal Destinations External Destinations
<ESC> to return to command line
CFC Administrator Fri Apr 1 16:10 pm
***Call Routing Patterns***
(2)
Pattern Index:Call Types
Busy:No Answer:
All Calls:
xxxxxxxx3997
Internal Destinations External Destinations
Action Result
On the Call Routing Patterns screen, press a to select the Add command. (1)
The Call Routing Pattern Index field is highlighted for data entry. (2)
Type data in the fields according to the definitions below, pressing ENTER after each entry:FieldPattern Index
Definition–The index by which this pattern is identified; up to 3 digits in length.
FieldInternal Destination Index Fields:BusyNo AnswerAll CallsExternal Destination Index Fields:BusyNo AnswerAll Calls
Definition–Six destination indexes, from 1 to 255, for each Call Routing feature (Busy, No Answer, All Calls); each destination index corresponds to a specified starting time and series of destination extensions (See Call Routing Destinations option); arranged here in the sequence in which they are to be assessed for use by CRC.
When ENTER is pressed from the last field, the message “Do you want to add this? (Y/N)” is displayed.
Type Y and press ENTER to add the Call Routing Pattern or N and press ENTER to cancel it.
The Call Routing Patterns screen is cleared, and the cursor is positioned on the command line.
Page 72 NDA-30030-003 Revision 3
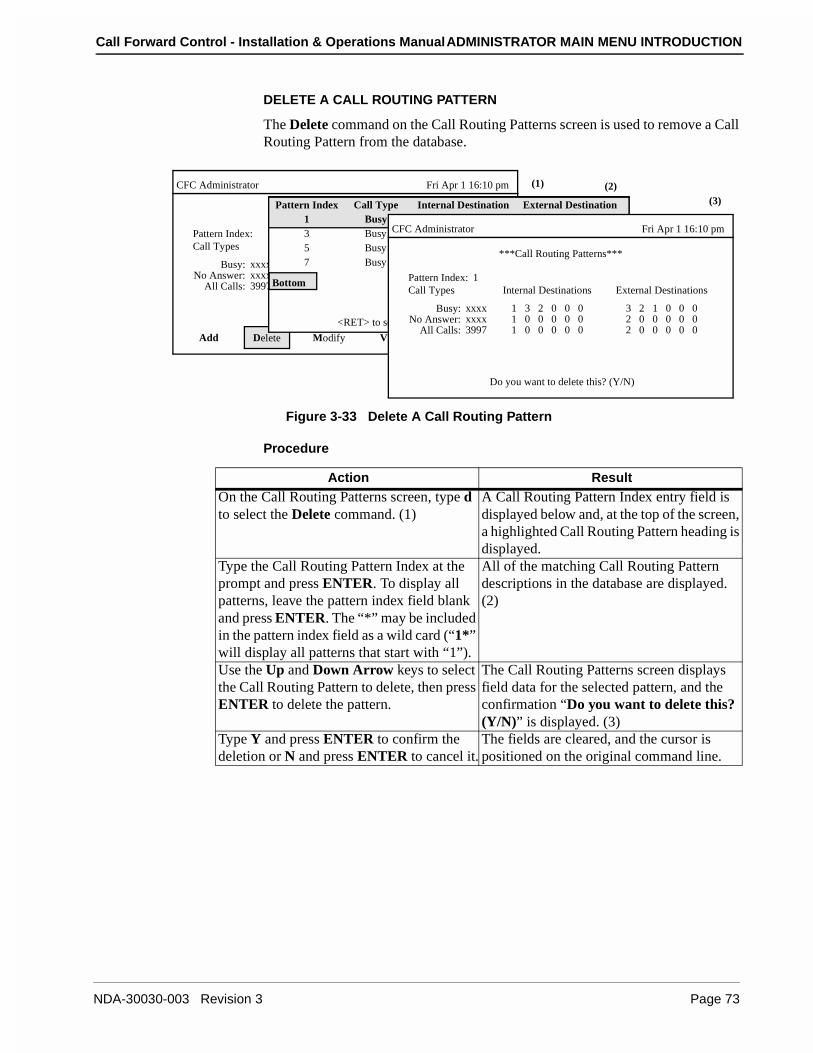
Call Forward Control - Installation & Operations ManualADMINISTRATOR MAIN MENU INTRODUCTION
DELETE A CALL ROUTING PATTERN
The Delete command on the Call Routing Patterns screen is used to remove a Call Routing Pattern from the database.
Figure 3-33 Delete A Call Routing Pattern
Procedure
Add Delete Modify View Print Quit
CFC Administrator Fri Apr 1 16:10 pm
***Call Routing Patterns***
(1)
Pattern Index:Call Types
Busy:No Answer:
All Calls:
xxxxxxxx3997
Internal Destinations External Destinations
Pattern Index1357
Bottom
Enter Index:<RET> to search, <ESC> to return to command line
(2)
BusyCall Type
1 3 2 0 0 0Internal Destination External Destination
BusyBusyBusy
4 2 0 0 0 00 0 0 0 0 01 5 7 0 0 0
3 2 1 0 0 00 0 0 0 0 01 3 0 0 0 01 5 7 0 0 0
Do you want to delete this? (Y/N)
CFC Administrator Fri Apr 1 16:10 pm
***Call Routing Patterns***
(3)
Pattern Index:Call Types
Busy:No Answer:
All Calls:
xxxxxxxx3997
Internal Destinations External Destinations
1 3 2 0 0 01 0 0 0 0 01 0 0 0 0 0
3 2 1 0 0 02 0 0 0 0 02 0 0 0 0 0
1
Action ResultOn the Call Routing Patterns screen, type d to select the Delete command. (1)
A Call Routing Pattern Index entry field is displayed below and, at the top of the screen, a highlighted Call Routing Pattern heading is displayed.
Type the Call Routing Pattern Index at the prompt and press ENTER. To display all patterns, leave the pattern index field blank and press ENTER. The “*” may be included in the pattern index field as a wild card (“1*” will display all patterns that start with “1”).
All of the matching Call Routing Pattern descriptions in the database are displayed. (2)
Use the Up and Down Arrow keys to select the Call Routing Pattern to delete, then press ENTER to delete the pattern.
The Call Routing Patterns screen displays field data for the selected pattern, and the confirmation “Do you want to delete this? (Y/N)” is displayed. (3)
Type Y and press ENTER to confirm the deletion or N and press ENTER to cancel it.
The fields are cleared, and the cursor is positioned on the original command line.
NDA-30030-003 Revision 3 Page 73

ADMINISTRATOR MAIN MENU INTRODUCTIONCall Forward Control - Installation & Operations Manual
MODIFY A CALL ROUTING PATTERN
The Modify command on the Call Routing Patterns screen is used to make changes to the currently displayed Call Routing Pattern.
Figure 3-34 Modify A Call Routing Pattern
Procedure
Add Delete Modify View Print Quit
CFC Administrator Fri Apr 1 16:10 pm
***Call Routing Patterns***
(1)
Pattern Index:Call Types
Busy:No Answer:
All Calls:
xxxxxxxx3997
Internal Destinations External Destinations
Pattern Index1357
Bottom
Enter Index:<RET> to search, <ESC> to return to command line
(2)
BusyCall Type
1 3 2 0 0 0Internal Destination External Destination
BusyBusyBusy
4 2 0 0 0 00 0 0 0 0 01 5 7 0 0 0
3 2 1 0 0 00 0 0 0 0 01 3 0 0 0 01 5 7 0 0 0
<ESC> to return to command line
CFC Administrator Fri Apr 1 16:10 pm
***Call Routing Patterns***
(3)
Pattern Index:Call Types
Busy:No Answer:
All Calls:
xxxxxxxx3997
Internal Destinations External Destinations
1 3 2 0 0 01 0 0 0 0 01 0 0 0 0 0
3 2 1 0 0 02 0 0 0 0 02 0 0 0 0 0
1
Action ResultOn the Call Routing Patterns screen, type m to select the Modify command. (1)
A Call Routing Pattern entry field is displayed at the bottom of the screen, and a highlighted Call Routing Pattern heading is displayed at the top of the screen.
Type the Call Routing Pattern Index at the prompt and press ENTER. To display all patterns, leave the pattern index field blank and press ENTER. The “*” may be included in the pattern index field as a wild card (“1*” will display all patterns that start with “1”).
All the matching Call Routing Patterns in the database are displayed. (2)
Use the Up and Down Arrow keys to select the Call Routing Pattern to be modified, then press ENTER to modify the record.
The contents of the selected record are displayed. (3)
Use the Up and Down Arrow keys to move between the Call Routing Pattern fields. The Backspace key may be used to erase existing data. Type new data where necessary and press ENTER after each entry.
After the last entry, the message “Do you want to save changes? (Y/N)” is displayed.
Type Y and press ENTER to save the changes, or type N and press ENTER to cancel them.
The fields are cleared, and the cursor is positioned on the command line.
Page 74 NDA-30030-003 Revision 3

Call Forward Control - Installation & Operations ManualADMINISTRATOR MAIN MENU INTRODUCTION
MODIFY A CALL ROUTING PATTERN (Cont.)
Database Search
The Call Routing Pattern Index cannot be changed since it is the key to the record. A change in this number means either another existing record or a new record is being entered. After the Call Routing Pattern Index is entered, CFC searches the database for the corresponding record and, when it finds it, displays it.
NDA-30030-003 Revision 3 Page 75

ADMINISTRATOR MAIN MENU INTRODUCTIONCall Forward Control - Installation & Operations Manual
VIEW CALL ROUTING PATTERNS
The View command on the Call Routing Patterns screen is used to display Call Routing Patterns on-screen for viewing or printing.
Figure 3-35 View Call Routing Patterns
Procedure
Add Delete Modify View Print Quit
CFC Administrator Fri Apr 1 16:10 pm
***Call Routing Patterns***
(1)
Pattern Index:Call Types
Busy:No Answer:
All Calls:
xxxxxxxx3997
Internal Destinations External Destinations
Search Key:
Start value:
<ESC> to return to command line
Pattern Call Type Internal External
End value:110
(2)
(3)
1
Index Call Type Internal Destination Index
Busy:No Answer:
All Calls:
1 3 2 0 0 01 0 0 0 0 01 0 0 0 0 0
DownPage UpPage Search Top Bottom Print Quit
More
Top Of File
*** Call Routing Patterns ***External Destination Index
3 2 1 0 0 02 0 0 0 0 02 0 0 0 0 0
3 Busy:No Answer:
All Calls:
4 2 0 0 0 04 2 0 0 0 00 0 0 0 0 0
0 0 0 0 0 00 0 0 0 0 00 0 0 0 0 0
Action ResultOn the Call Routing Patterns screen, type v to select the View command.(1)
A window requests the search key and the starting and ending values for the range. (2)
Use the Spacebar or Left and Right Arrow keys to select a search key, then press ENTER. Type the start value, press ENTER, type the end value, and press ENTER to indicate the range of records to be viewed. If both record values are blank then all records will be displayed. If the last record value is blank then the record matching the first record value is displayed.
All records lying within the indicated range are displayed for on-screen viewing. (3)
Type d to select the DownPage command. The next page of data is displayed.Type u to select the UpPage command. The previous page of data is displayed.Type t to select the Top command. The first page of data is displayed.Type b to select the Bottom command. The last page of data is displayedType s to select the Search command. At the prompt type the desired pattern and press ENTER.
All of the occurrences of the pattern on that page are highlighted.
Type p to select the Print command. At the prompt, type f to indicate the whole file or s to indicate just the screen and press ENTER.
There is a pause while the material is sent to the printer.
To return to the Call Routing Patterns screen, type q to select the Quit command.
The Call Routing Patterns screen is displayed, and the cursor is positioned on the command line.
Page 76 NDA-30030-003 Revision 3

Call Forward Control - Installation & Operations ManualADMINISTRATOR MAIN MENU INTRODUCTION
PRINT CALL ROUTING PATTERNS
The Print command on the Call Routing Patterns screen is used to print a hardcopy of the Call Routing Patterns lying within a specified range.
Figure 3-36 Print Call Routing Patterns
Procedure
Add Delete Modify View Print Quit
CFC Administrator Fri Apr 1 16:10 pm
***Call Routing Patterns***
(1)
Pattern Index:Call Types
Busy:No Answer:
All Calls:
xxxxxxxx3997
Internal Destinations External DestinationsSearch Key:
Start value:
<ESC> to return to command line
Pattern Call Type Internal External
End value:110
(2)
Action ResultOn the Call Routing Patterns screen, type p to select the Print command. (1)
A window requests the search key and the starting and ending values for the range. (2)
Use the Spacebar or Left and Right Arrow keys to select a search key, then press ENTER. Type the start value, press ENTER, type the end value, and press ENTER to indicate the range of records to be printed. If both record values are blank then all records will be printed. If the last record value is blank then the record matching the first record value is printed.
The records lying within the indicated range are sent to the printer, and the cursor is positioned on the command line.
NDA-30030-003 Revision 3 Page 77

ADMINISTRATOR MAIN MENU INTRODUCTIONCall Forward Control - Installation & Operations Manual
CALL ROUTING DESTINATIONS
OVERVIEW The Destinations option on the Call Routing Control Menu is used to add, delete, or change the destination lists and start times used by Call Routing Patterns.
Figure 3-37 Call Routing Destinations Option
Procedure
Call Routing Destinations Information
Each Destination record has a unique Destination Index which identifies the record, a list of extensions that are the actual destinations to which calls are rerouted., and a Start Time Index which corresponds to an actual time frame under the Time Parameters option on the Main Menu. If an incoming call arrives during the time frame indicated by the Start Time Index, the destination extensions will be searched for an available connection. If the time frame indicated by the Start Time Index does not correspond to the time of the incoming call, another Destination record is evaluated for possible use, and so on, until the appropriate time frame is located and its corresponding destination extensions are checked for a connection.
Expanded Display
Press the TAB key or the Ctrl-V key combination while in the Start Time Index field to display the Start Time record. Press ESC to return to the Call Routing Destinations screen.
CFC Administrator Fri Apr 1 16:10 pm
***Main Menu***
ExtensionsHard Forward ControlCall Routing ControlTime ParametersSpecial EventsValidate and InstallQuit
Arrow keys to move cursor, <RET> to sel
(1)(2)
*** Call Routing Control Menu ***
CFC Administrator Fri Apr 1 16:10 pm
Monitored NumbersGroupsPatterns
Arrow keys to move cursor, <Enter> to select, <Esc> to quit
DestinationsQuit
Add Delete Modify View Print Quit
CFC Administrator Fri Apr 1 16:10 pm
***Call Routing Destinations***
(3)
Destination Index:Start Time Index:Distribute Calls:
Extensions:
Action ResultOn the Main Menu, type c to select the Call Routing Control option.(1)
The Call Routing Control screen is displayed. (2)
On the Call Routing Control screen, type d to select the Destinations option. (2)
The Call Routing Destinations screen is displayed. (3)
Refer to the following pages for information and instructions in the use of each command.To exit the Call Routing Destinations option, type q to select the Quit command.
The Call Routing Control screen is redisplayed.
Page 78 NDA-30030-003 Revision 3

Call Forward Control - Installation & Operations ManualADMINISTRATOR MAIN MENU INTRODUCTION
ADD A CALL ROUTING DESTINATION
The Add command on the Call Routing Destinations screen is used to add a Call Routing Destination to the database.
Figure 3-38 Add A Call Routing Destination
Procedure
Add Delete Modify View Print Quit
CFC Administrator Fri Apr 1 16:10 pm
***Call Routing Destinations***
(1)
Destination Index:Start Time Index:Distribute Calls:
Extensions:
<ESC> to return to command line
CFC Administrator Fri Apr 1 16:10 pm
***Call Routing Destinations***
Destination Index:Start Time Index:Distribute Calls:
Extensions:
(2)
Action Result
On the Call Routing Destinations screen, press a to select the Add command. (1)
The first field is highlighted for data entry. (2)
Type data to the fields according to the definitions below, pressing ENTER after each entry:
Field Destination Index
Definition– The destination identifier; up to 3 digits in length,
from 1 to 255.Field Start Time Index
Distribute Calls
Extensions
Definition– The index to the Time Parameter used by this
destination list; up to 3 digits in length.
– Distribution of calls to the extensions in this routing pattern to equalize the load (Yes) rather than in sequence by priority (No). Use the Space Bar to toggle between the two options.
– The list of up to 5 extensions to which forwarded calls can be rerouted according to the distribution indicated.
When ENTER is pressed from the last field, the message “Do you want to add this? (Y/N)” is displayed.
Type Y and press ENTER to add the destination record or N and press ENTER to cancel it.
The fields are cleared, and the cursor is positioned on the original command line.
NDA-30030-003 Revision 3 Page 79

ADMINISTRATOR MAIN MENU INTRODUCTIONCall Forward Control - Installation & Operations Manual
ADD A CALL ROUTING DESTINATION (Cont.)
Non-Existent Data
During data input to the Call Routing Destinations screen, if the entered time index does not exist in the time parameters database, the administrator is notified that the index does not exist. If the associated record is not added, the error will be caught in the validation process. (See Validate and Install option on Main Menu).
Page 80 NDA-30030-003 Revision 3

Call Forward Control - Installation & Operations ManualADMINISTRATOR MAIN MENU INTRODUCTION
DELETE A CALL ROUTING DESTINATION
The Delete command on the Call Routing Destinations screen is used to remove a Call Routing Destination entry from the database.
Figure 3-39 Delete A Call Routing Destination
Procedure
Add Delete Modify View Print Quit
CFC Administrator Fri Apr 1 16:10 pm
***Call Routing Destinations***
(1)
Destination Index:Start Time Index:Distribute Calls:
Extensions:
Index123
Bottom
Enter Index:
<RET> to search, <ESC> to return to command line
Time Index Destination NumbersDistribute
4
2456
YESNONOYES
3600450023002800
3601450102805
0450200
Do you want to delete this? (Y/N)
CFC Administrator Fri Apr 1 16:10 pm
***Call Routing Destinations***
Destination Index:Start Time Index:Distribute Calls:
Extensions:
(3)
12YES36013602000
(2)
Action ResultOn the Call Routing Destinations screen, type d to select the Delete command. (1)
A Call Routing Destination Index entry field is displayed below and, at the top of the screen, a highlighted Call Routing Destination heading is displayed.
Type the Call Routing Destination Index at the prompt and press ENTER. To display all destinations, leave the destination index field blank and press ENTER. The “*” may be included in the destination index field as a wild card (“1*” will display all destinations that start with “1”).
All of the matching Call Routing Destination descriptions in the database are displayed.(2)
Use the Up and Down Arrow keys to select the Call Routing Destination to delete, then press ENTER to delete the destination.
The Call Routing Destinations screen displays field data for the selected destination, and the confirmation “Do you want to delete this? (Y/N)” is displayed. (3)
Type Y and press ENTER to confirm the deletion or N and press ENTER to cancel it.
The fields are cleared, and the cursor is positioned on the original command line.
NDA-30030-003 Revision 3 Page 81

ADMINISTRATOR MAIN MENU INTRODUCTIONCall Forward Control - Installation & Operations Manual
MODIFY A CALL ROUTING DESTINATION
The Modify command on the Call Routing Destinations screen is used to make changes to a Call Routing Destination.
Figure 3-40 Modify A Call Routing Destination
Procedure
Add Delete Modify View Print Quit
CFC Administrator Fri Apr 1 16:10 pm
***Call Routing Destinations***
(1)
Destination Index:Start Time Index:Distribute Calls:
Extensions:
Index123
Bottom
Enter Index:
<RET> to search, <ESC> to return to command line
Time Index Destination NumbersDistribute
4
2456
YESNONOYES
3600450023002800
3601450102805
0450200
(2)
<ESC> to return to command line
CFC Administrator Fri Apr 1 16:10 pm
***Call Routing Destinations***
Destination Index:Start Time Index:Distribute Calls:
Extensions:
12YES36013602000
(3)
Action ResultOn the Call Routing Destinations screen, type m to select the Modify command. (1)
A Call Routing Destination entry field is displayed at the bottom of the screen, and a highlighted Call Routing Destination heading is displayed at the top of the screen.
Type the Call Routing Destination Index at the prompt and press ENTER. To display all destinations, leave the destination index field blank and press ENTER. The “*” may be included in the destination index field as a wild card (“1*” will display all destinations that start with “1”).
All the matching Call Routing Destinations in the database are displayed. (2)
Use the Up and Down Arrow keys to select the Call Routing Destination to be modified, then press ENTER to modify the record.
The contents of the selected record are displayed. (3)
Use the Up and Down Arrow keys to move between the Call Routing Destination fields. The Backspace key may be used to erase existing data. Type new data where necessary and press ENTER after each entry.
After the last entry, the message “Do you want to save changes? (Y/N)” is displayed.
Type Y and press ENTER to save the changes, or type N and press ENTER to cancel them.
The fields are cleared, and the cursor is positioned on the command line.
Page 82 NDA-30030-003 Revision 3

Call Forward Control - Installation & Operations ManualADMINISTRATOR MAIN MENU INTRODUCTION
MODIFY A CALL ROUTING DESTINATION (Cont)
Database Search
The value in the Destination Index field cannot be changed since it is the key to the record. A change in this number means either another existing record or a new record is being entered. After the Destination Index is entered, CFC searches the database for the corresponding record and, when it finds it, displays it. If the record does not exist in the database, CFC displays a prompt requesting the entry of a new record for the Destination Index.
NDA-30030-003 Revision 3 Page 83

ADMINISTRATOR MAIN MENU INTRODUCTIONCall Forward Control - Installation & Operations Manual
VIEW CALL ROUTING DESTINATIONS
The View command on the Call Routing Destinations screen is used to display Call Routing Destination records.
Figure 3-41 View Call Routing Destinations
Procedure
Add Delete Modify View Print Quit
CFC Administrator Fri Apr 1 16:10 pm
***Call Routing Destinations***
(1)
Destination Index:Start Time Index:Distribute Calls:
Extensions:
Search Key:
Start value:
<ESC> to return to command line
Destination Time Distribution Extension
End value:110
(2)
(3)
DownPage UpPage Search Top Bottom Print Quit
More
Top Of File
*** Call Routing Destinations ***Index Time Index Destination NumbersDistribute
1
2
YES
36000
36010
00
2
4
NO
45004503
45010
45020
Action ResultOn the Call Routing Destinations screen, type v to select the View command.(1)
A window requests the search key and the starting and ending values for the range. (2)
Use the Spacebar or Left and Right Arrow keys to select a search key, then press ENTER. Type the start value, press ENTER, type the end value, and press ENTER to indicate the range of records to be viewed. If both record values are blank then all records will be displayed. If the last record value is blank then the record matching the first record value is displayed.
All records lying within the indicated range are displayed for on-screen viewing. (3)
Type d to select the DownPage command. The next page of data is displayed.Type u to select the UpPage command. The previous page of data is displayed.Type t to select the Top command. The first page of data is displayed.Type b to select the Bottom command. The last page of data is displayedType s to select the Search command. At the prompt type the desired pattern and press ENTER.
All of the occurrences of the pattern on that page are highlighted.
Type p to select the Print command. At the prompt, type f to indicate the whole file or s to indicate just the screen and press ENTER.
There is a pause while the material is sent to the printer.
To return to the Call Routing Destinations screen, type q to select the Quit command.
The Call Routing Destinations screen is displayed, and the cursor is positioned on the command line.
Page 84 NDA-30030-003 Revision 3

Call Forward Control - Installation & Operations ManualADMINISTRATOR MAIN MENU INTRODUCTION
PRINT CALL ROUTING DESTINATIONS
The Print command on the Call Routing Destinations screen is used to print a hardcopy of the entire Call Routing Destination database, or simply the currently displayed record.
Figure 3-42 Print Call Routing Destinations
Procedure
Add Delete Modify View Print Quit
CFC Administrator Fri Apr 1 16:10 pm
***Call Routing Destinations***
(1)
Destination Index:Start Time Index:Distribute Calls:
Extensions:
Search Key:
Start value:
<ESC> to return to command line
Destination Time Distribution Extension
End value:110
(2)
Action ResultOn the Call Routing Destinations screen, type p to select the Print command. (1)
A window requests the search key and the starting and ending values for the range. (2)
Use the Spacebar or Left and Right Arrow keys to select a search key, then press ENTER. Type the start value, press ENTER, type the end value, and press ENTER to indicate the range of records to be printed. If both record values are blank then all records will be printed. If the last record value is blank then the record matching the first record value is printed.
The records lying within the indicated range are sent to the printer, and the cursor is positioned on the command line.
NDA-30030-003 Revision 3 Page 85

ADMINISTRATOR MAIN MENU INTRODUCTIONCall Forward Control - Installation & Operations Manual
TIME PARAMETERS
OVERVIEW The Time Parameters option on the Administrator Main Menu is used to add, remove, or make changes to the start time descriptions.
Figure 3-43 Time Parameters Option
Procedure
Time Parameters Information
Each Start Time Index identifies a schedule, or time frame, that is defined in hour, minute, month, and day detail. A time frame can be illustrated as “Daily at midnight”, “The first Monday of every month at 8:00 a.m.”, or “Monday through Friday, from 8:00 a.m.”. It is by the schedules that different rerouting patterns can be instituted for the same group at the different times.
Time Formula
The desired start time is specified using five fields. These fields combine to form a pattern that is interpreted by the CRC and HFC applications. If any field is left blank, the entire record is rejected. The fields are listed below and each is followed in parentheses by the range within valid responses must lie:
- Hour of Day (0-23) (Midnight = 0)
- Minutes (0-59)
- Month of Year (1-12)
CFC Administrator Fri Apr 1 16:10 pm
***Main Menu***
ExtensionsHard Forward ControlCall Routing ControlTime ParametersSpecial EventsValidate and InstallQuit
Arrow keys to move cursor, <RET> to sel
(1)
***Time Parameters***
Hour of Day
CFC Administrator Fri Apr 1 16:10 pm
Add Delete Modify View Print Quit
MinutesMonth of YearDay of Month
(2)
Day of Week
(0-23):(0-59):(1-12):(1-31):(0-6):
Index:
Action ResultOn the Main Menu, type t to select the Time Parameters option.(1)
The Time Parameters screen is displayed. (2)
Refer to the following pages for information and instructions in the use of each command.To exit the Time Parameters option, type q to select the Quit command.
The Main Menu is redisplayed.
Page 86 NDA-30030-003 Revision 3

Call Forward Control - Installation & Operations ManualADMINISTRATOR MAIN MENU INTRODUCTION
OVERVIEW (Cont) - Day of Month (1-31)
- Day of Week (0-6) (Sunday = 0)
It is important to keep the following guidelines in mind when constructing the values for these fields:
- Use a single number within the allowable range.
- Use an asterisk (*) to indicate all values within the given range.
- Use a hyphen to indicate a range (1-3).
- Separate numbers in a list using commas.
- Comma-separated lists of numbers and ranges are not allowed.
- A range (e.g., 1-3) is only allowed in the Day of Week field.
- A single number must be entered for the Minutes and Hours fields. All data following a command, asterisk, or hyphen is ignored.
Examples
Perhaps the following examples might be helpful:
Hours Minutes MonthDay of Month
Day of Week
Events Occur
0 0 * * * Daily at 12:00 midnight
1 0 * 1* The first of every month
at 1:00 a.m.
1 0 * *1-5 Monday through Friday
at 1:00 a.m.
12 0 12 25* December 25 at 12:00
noon.
NDA-30030-003 Revision 3 Page 87

ADMINISTRATOR MAIN MENU INTRODUCTIONCall Forward Control - Installation & Operations Manual
ADD A TIME PARAMETER
The Add command on the Time Parameter screen is used to add a start time, identified by an index.
Figure 3-44 Add A Time Parameter
Procedure
***Time Parameters***
Hour of Day
CFC Administrator Fri Apr 1 16:10 pm
Add Delete Modify View Print Quit
MinutesMonth of YearDay of Month
(1)
Day of Week
(0-23):(0-59):(1-12):(1-31):
(0-6):
Index:
***Time Parameters***
Hour of Day
CFC Administrator Fri Apr 1 16:10 pm
<ESC> to return to command line
MinutesMonth of YearDay of Month
(2)
Day of Week
(0-23):(0-59):(1-12):(1-31):
(0-6):
Index:
Action Result
On the Time Parameters screen, type a to select the Add command. (1)
The first field is highlighted for data entry. (2)
Enter data to the fields according to the definitions below, pressing ENTER after each entry:
Field Index
Hour of Day
Minutes
Month of Year
Day of Month
Day of Week
Definition– The number by which this start time is identified;
up to 3 digits in length.– The hour of the day at which the corresponding
extensions are appropriate destinations for forwarded calls.
– The minute in the hour of the day at which the corresponding extensions are appropriate destinations for forwarded calls.
– The month of the year at which this start time begins; * can be used to indicate “every” month.
– The day of the month at which this start time begins; * can be used to indicate “daily”.
– The day of the week at which this start time begins; * can be used to indicate “any day”.
When ENTER is pressed from the last field, the message “Do you want to add this? (Y/N)” is displayed.
Enter Y and press ENTER to add the time parameter or N and press ENTER to cancel it.
The Time Parameter screen is cleared, and the cursor is positioned on the command line.
Page 88 NDA-30030-003 Revision 3

Call Forward Control - Installation & Operations ManualADMINISTRATOR MAIN MENU INTRODUCTION
DELETE A TIME PARAMETER
The Delete command on the Time Parameter screen is used to remove a Time Parameter record.
Figure 3-45 Delete A Time Parameter
Procedure
***Time Parameters***
Hour of Day
CFC Administrator Fri Apr 1 16:10 pm
Add Delete Modify View Print Quit
MinutesMonth of YearDay of Month
(1)
Day of Week
(0-23):(0-59):(1-12):(1-31):
(0-6):
Index:
<RET> to search, <ESC> to return to command line
(2)
Index12345
Bottom
8161010
300000
***12*
***25*
**1-5*0
Hours Minutes Month Day of Month Day of Week
Enter Index:
***Time Parameters***
Hour of Day
CFC Administrator Fri Apr 1 16:10 pm
Do you want to delete this? (Y/N)
MinutesMonth of YearDay of Month
(3)
Day of Week
(0-23):(0-59):(1-12):(1-31):
(0-6):
Index:
830***
1
Action ResultOn the Time Parameters screen, type d to select the Delete command. (1)
A Time Parameter Index entry field is displayed below and, at the top of the screen, a highlighted Time Parameters heading is displayed.
Type the Time Parameter Index at the prompt and press ENTER. To display all Time Parameters, leave the index field blank and press ENTER. The “*” may be included in the index field as a wild card (“1*” will display all Time Parameters that start with “1”).
All of the matching Time Parameter descriptions in the database are displayed.(2)
Use the Up and Down Arrow keys to select the Time Parameter to delete, then press ENTER to delete the destination.
The Time Parameters screen displays field data for the selected destination, and the confirmation “Do you want to delete this? (Y/N)” is displayed. (3)
Type Y and press ENTER to confirm the deletion or N and press ENTER to cancel it.
The fields are cleared, and the cursor is positioned on the original command line.
NDA-30030-003 Revision 3 Page 89

ADMINISTRATOR MAIN MENU INTRODUCTIONCall Forward Control - Installation & Operations Manual
MODIFY A TIME PARAMETER
The Modify command on the Time Parameter screen is used to make changes to a time parameter.
Figure 3-46 Modify A Time Parameter
Procedure
***Time Parameters***
Hour of Day
CFC Administrator Fri Apr 1 16:10 pm
Add Delete Modify View Print Quit
MinutesMonth of YearDay of Month
(1)
Day of Week
(0-23):(0-59):(1-12):(1-31):
(0-6):
Index:
<RET> to search, <ESC> to return to command line
(2)
Index12345
Bottom
8161010
300000
***12*
***25*
**1-5*0
Hours Minutes Month Day of Month Day of Week
Intermixed:
***Time Parameters***
Hour of Day
CFC Administrator Fri Apr 1 16:10 pm
<ESC> to return to command line
MinutesMonth of YearDay of Month
(3)
Day of Week
(0-23):(0-59):(1-12):(1-31):
(0-6):
Index: 1
830***
Action ResultOn the Time Parameters screen, type m to select the Modify command. (1)
A Time Parameter Index field is displayed at the bottom of the screen, and a highlighted Time Parameters heading is displayed at the top of the screen.
Type the Time Parameter Index at the prompt and press ENTER. To display all Time Parameters, leave the index field blank and press ENTER. The “*” may be included in the index field as a wild card (“1*” will display all Time Parameters that start with “1”).
All the matching Time Parameters in the database are displayed. (2)
Use the Up and Down Arrow keys to select the Time Parameter to be modified, then press ENTER to modify the record.
The contents of the selected record are displayed. (3)
Use the Up and Down Arrow keys to move between the Time Parameter fields. The Backspace key may be used to erase existing data. Type new data where necessary and press ENTER after each entry.
After the last entry, the message “Do you want to save changes? (Y/N)” is displayed.
Type Y and press ENTER to save the changes, or type N and press ENTER to cancel them.
The fields are cleared, and the cursor is positioned on the command line.
Page 90 NDA-30030-003 Revision 3

Call Forward Control - Installation & Operations ManualADMINISTRATOR MAIN MENU INTRODUCTION
MODIFY A TIME PARAMETER (Cont.)
Database Search
The Index cannot be changed since it is the key to the record. A change in this number means either another existing record or a new record is being entered. After the time parameter is entered, CFC searches the database for the corresponding record and, when it finds it, displays it. If it does not exist in the database, CFC displays a prompt requesting the entry of a different time parameter.
NDA-30030-003 Revision 3 Page 91

ADMINISTRATOR MAIN MENU INTRODUCTIONCall Forward Control - Installation & Operations Manual
VIEW TIME PARAMETERS
The View command on the Time Parameters screen is used to display a selected range of time parameters on-screen for viewing or printing.
Figure 3-47 View Time Parameters
Procedure
***Time Parameters***
Hour of Day
CFC Administrator Fri Apr 1 16:10 pm
Add Delete Modify View Print Quit
MinutesMonth of YearDay of Month
(1)
Day of Week
(0-23):(0-59):(1-12):(1-31):
(0-6):
Index:
(2)
Search Key:
Start value:End value:
Time Index
110
(3)Top of File
End of File
***Time Parameters***
DownPage UpPage Search Top Bottom Print Quit
Index Hours Minutes Month Day of Month Day of Week12345
8161010
300000
***12*
***25*
**1-5*0
Action ResultOn the Time Parameters screen, type v to select the View command.(1)
A window requests the starting and ending Time Index values for the range. (2)
Type the Start Time Index, press ENTER, type the End Time Index, and press ENTER to indicate the range of records to be viewed. If both record values are blank then all records will be displayed. If the last record value is blank then the record matching the first record value is displayed.
All records lying within the indicated range are displayed for on-screen viewing. (3)
Type d to select the DownPage command. The next page of data is displayed.Type u to select the UpPage command. The previous page of data is displayed.Type t to select the Top command. The first page of data is displayed.Type b to select the Bottom command. The last page of data is displayedType s to select the Search command. At the prompt type the desired pattern and press ENTER.
All of the occurrences of the pattern on that page are highlighted.
Type p to select the Print command. At the prompt, type f to indicate the whole file or s to indicate just the screen and press ENTER.
There is a pause while the material is sent to the printer.
To return to the Time Parameters screen, type q to select the Quit command.
The Time Parameters screen is displayed, and the cursor is positioned on the command line.
Page 92 NDA-30030-003 Revision 3

Call Forward Control - Installation & Operations ManualADMINISTRATOR MAIN MENU INTRODUCTION
PRINT TIME PARAMETERS
The Print command on the Time Parameters screen is used to print a hardcopy of the time parameters lying within a specified range.
Figure 3-48 Print Time Parameters
Procedure
***Time Parameters***
Hour of Day
CFC Administrator Fri Apr 1 16:10 pm
Add Delete Modify View Print Quit
MinutesMonth of YearDay of Month
(1)
Day of Week
(0-23):(0-59):(1-12):(1-31):
(0-6):
Index:(2)
Search Key:
Start value:End value:
Time Index
110
Action Result
On the Time Parameters screen, enter p to select the Print command (1).
A window requests the starting and ending values for the range. (2)
Type the Start Time Index, press ENTER, type the End Time Index, and press ENTER to indicate the range of records to be printed. If both record values are blank then all records will be printed. If the last record value is blank then the record matching the first record value is printed.
The records lying within the indicated range are sent to the printer, and the cursor is positioned on the command line.
NDA-30030-003 Revision 3 Page 93

ADMINISTRATOR MAIN MENU INTRODUCTIONCall Forward Control - Installation & Operations Manual
SPECIAL EVENTS
OVERVIEW The Special Events option on the Administrator Main Menu is used to set up and manage Hard Forward and Call Routing on holidays or during special events when regularly scheduled patterns do not apply. These “special” arrangements override the usual daily patterns that are established through the other options on the Main Menu.
Figure 3-49 Special Events Option
Procedure
Special Events Information
Under this option, each special event is set up with the following information:
Time Parameters: The time at which the special event begins and ends.
Hard Forward Data: The Hard Forward Groups affected by the special event change and the new destination for each group.
Call Routing Data: The Call Routing Groups affected by the special event change and the new Call Routing Destination index for each group.
CFC Administrator Fri Apr 1 16:10 pm
***Main Menu***
ExtensionsHard Forward ControlCall Routing ControlTime ParametersSpecial EventsValidate and InstallQuit
Arrow keys to move cursor, <RET> to sel
(1)
***Special Events Menu***
CFC Administrator Fri Apr 1 16:10 pm
Select Add Delete View Print Quit
(2)
New Years Eve/DayMemorial DayIndependence DayChristmas Eve/DayThanksgiving DayOrganizational Retreat
Action ResultOn the Main Menu, type s to select the Special Events option.(1)
The Special Events screen is shown. (2)
Refer to the following pages for information and instructions in the use of each command.To exit the Special Events option, type q to select the Quit command.
The Main Menu is redisplayed.
Page 94 NDA-30030-003 Revision 3

Call Forward Control - Installation & Operations ManualADMINISTRATOR MAIN MENU INTRODUCTION
ADD A SPECIAL EVENT
The Add command on the Special Events screen is used to add an event to the database.
Figure 3-50 Add A Special Event
Procedure
***Special Events Menu***
CFC Administrator Fri Apr 1 16:10 pm
Select Add Delete View Print Quit
(1)
New Years Eve/DayMemorial DayIndependence DayChristmas Eve/DayThanksgiving DayOrganizational Retreat
(2)
HourMinutesMonth of YearDay of MonthDay of Week
(0-23):(0-59):(1-12):(1-31):(0-6):
*** Special Events Time Parameters***
Event Name:
Begin: End:
<ESC> to return to command line
Action Result
On the Special Events screen, enter a to select the Add command. (1)
The Special Events Time Parameters screen is displayed with the Event Name field highlighted. (2)
Type the event name and press ENTER The Event name identifies this event. A name may be up to 30 characters in length. Duplicate names are not allowed.
Type the hour the event starts and press ENTER A value from 0 to 23 must be entered (0 = 12:00 midnight).
Type the minutes the event starts and press ENTER A value from 0 to 59 must be entered.Type the month the event starts and press ENTER A value from 1 to 12 may be entered, or * can be used
to indicate every month.Type the day the event starts and press ENTER A value from 1 to 31 may be entered, or * can be used
to indicate daily.Type the weekday the event starts and press ENTER
A value from 0 to 6 may be entered (0 = Sunday), * can be used to indicate any weekday, or two values separated by a hyphen can be used to indicate a range.
Type the hour, minutes, month, day, and weekday the event ends, pressing ENTER after each entry.
When ENTER is pressed from the last field, the message “Do you want to save changes? (Y/N)” is displayed.
Type Y and press ENTER to add the event or N and press ENTER to cancel it.
If the event is not added (N), the Special Events screen is cleared, and the cursor is returned to the original command line. Otherwise, the Special Events Time Parameters screen is displayed, and Hard Forward and Call Routing Groups may be added as described in the following sections.
NDA-30030-003 Revision 3 Page 95
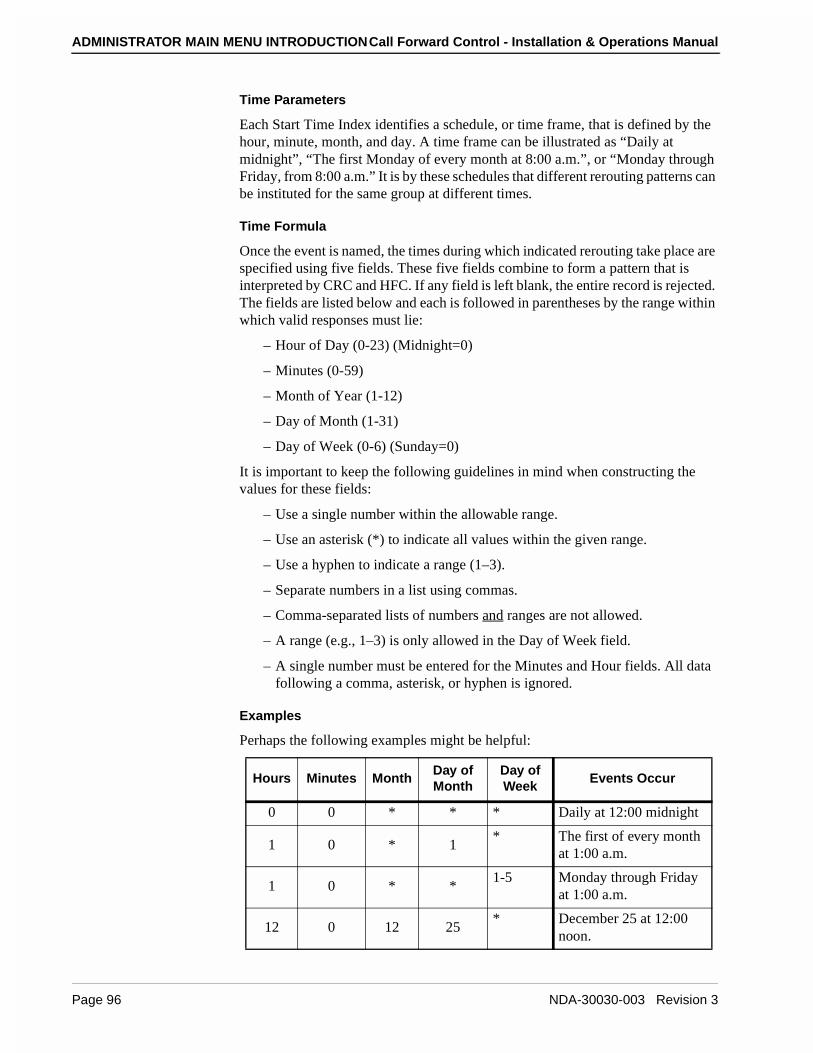
ADMINISTRATOR MAIN MENU INTRODUCTIONCall Forward Control - Installation & Operations Manual
Time Parameters
Each Start Time Index identifies a schedule, or time frame, that is defined by the hour, minute, month, and day. A time frame can be illustrated as “Daily at midnight”, “The first Monday of every month at 8:00 a.m.”, or “Monday through Friday, from 8:00 a.m.” It is by these schedules that different rerouting patterns can be instituted for the same group at different times.
Time Formula
Once the event is named, the times during which indicated rerouting take place are specified using five fields. These five fields combine to form a pattern that is interpreted by CRC and HFC. If any field is left blank, the entire record is rejected. The fields are listed below and each is followed in parentheses by the range within which valid responses must lie:
– Hour of Day (0-23) (Midnight=0)
– Minutes (0-59)
– Month of Year (1-12)
– Day of Month (1-31)
– Day of Week (0-6) (Sunday=0)
It is important to keep the following guidelines in mind when constructing the values for these fields:
– Use a single number within the allowable range.
– Use an asterisk (*) to indicate all values within the given range.
– Use a hyphen to indicate a range (1–3).
– Separate numbers in a list using commas.
– Comma-separated lists of numbers and ranges are not allowed.
– A range (e.g., 1–3) is only allowed in the Day of Week field.
– A single number must be entered for the Minutes and Hour fields. All data following a comma, asterisk, or hyphen is ignored.
Examples
Perhaps the following examples might be helpful:
Hours Minutes MonthDay of Month
Day of Week
Events Occur
0 0 * * * Daily at 12:00 midnight
1 0 * 1* The first of every month
at 1:00 a.m.
1 0 * *1-5 Monday through Friday
at 1:00 a.m.
12 0 12 25* December 25 at 12:00
noon.
Page 96 NDA-30030-003 Revision 3

Call Forward Control - Installation & Operations ManualADMINISTRATOR MAIN MENU INTRODUCTION
MODIFY A SPECIAL EVENT
The Select command on the Special Events screen is used to select an existing event for the purpose of making changes to definition
Figure 3-51 Modify A Special Event
Procedure
***Special Events Menu***
CFC Administrator Fri Apr 1 16:10 pm
Select Add Delete View Print Quit
(1)
New Years Eve/DayMemorial DayIndependence DayChristmas Eve/DayThanksgiving DayOrganizational Retreat
(2)
HourMinutesMonth of YearDay of MonthDay of Week
(0-23):(0-59):(1-12):(1-31):(0-6):
*** Special Events Time Parameters***
Event Name: Independence Day
Begin: End:
1 10000 5907 0704 04* *
Modify Hard Forward Groups Call Routing Groups Quit
Action Result
On the Special Events screen, type s to choose the Select command. (1)
The cursor is positioned on the first listed event.
Use the Up and Down Arrow keys to position the cursor on the desired event and press ENTER.
The Special Events Time Parameters screen is displayed. (2)
Refer to the following pages for information and instructions in the use of each command.To exit the Special Events Time Parameters screen, type q to select the Quit command.
The Special Events screen is redisplayed.
NDA-30030-003 Revision 3 Page 97

ADMINISTRATOR MAIN MENU INTRODUCTIONCall Forward Control - Installation & Operations Manual
MODIFY A SPECIAL EVENT’S TIME PARAMETERS
The Select command on the Special Events screen is used to select an existing event for the purpose of making changes to a definition
Figure 3-52 Modify A Special Event’s Time Parameters
Procedure
(1)
HourMinutesMonth of YearDay of MonthDay of Week
(0-23):(0-59):(1-12):(1-31):
(0-6):
*** Special Events Time Parameters***
Event Name: Independence Day
Begin: End:
1 10000 5907 0704 04* *
Modify Hard Forward Groups Call Routing Groups Quit
(2)
HourMinutesMonth of YearDay of MonthDay of Week
(0-23):(0-59):(1-12):(1-31):
(0-6):
*** Special Events Time Parameters***
Event Name: Independence Day
Begin: End:
1 10000 5907 0704 04* *
<ESC> to return to command line
Action Result
On the Special Events Time Parameters Screen, type m to select the Modify command. (1)
The Begin Hour field is highlighted. (2)
Use the Backspace key to erase existing field entries and the Arrow keys to move among fields. Make the necessary changes to the Begin and End time periods, pressing ENTER after each entry. (Refer to Add a Special Event Section for instructions in completing the time period definition.)
After the last field, the cursor is returned to the command line.
Page 98 NDA-30030-003 Revision 3

Call Forward Control - Installation & Operations ManualADMINISTRATOR MAIN MENU INTRODUCTION
MODIFY A SPECIAL EVENT’S HARD FORWARD GROUPS
The Hard Forward Groups command on the Special Events Time Parameters screen is used add, delete, and modify the Hard Forward Groups affected by the event.
Figure 3-53 Modify Special Event Hard Forward Groups
(1)
HourMinutesMonth of YearDay of MonthDay of Week
(0-23):(0-59):(1-12):(1-31):
(0-6):
*** Special Events Time Parameters***
Event Name: Independence Day
Begin: End:
1 10000 5907 0704 04* *
Modify Hard Forward Groups Call Routing Groups Quit
(2)
*** Hard Forward Special Event***
Event Name: Christmas Day
Group Index: Destination Extension:213
320032103220
Add Delete Modify Quit
NDA-30030-003 Revision 3 Page 99

ADMINISTRATOR MAIN MENU INTRODUCTIONCall Forward Control - Installation & Operations Manual
Procedure
General Information
The Hard Forward groups referred to in this option correspond directly to those defined through the Hard Forward Control option on the Main Menu. Therefore, a group specified by a Special Event must first be defined through the Main Menu., and the maximum number of groups addressed by Special Events cannot exceed the number of groups defined through the Main Menu. Duplicate group entries are not allowed.
Action Result
On the Special Events Time Parameters screen, type h to select the Hard Forward Groups command. (1)
The Hard Forward Special Event screen is displayed for the named event. (2)
To Add Hard Forward Groups: Type a to select the Add command, then enter Hard Forward Group Index and a Destination Extension, pressing ENTER after each. Continue until all Group Indexes and Destination Extensions have been added, then press ESC to return to the command line.
The new indexes and extensions are added to the end of the list, and the cursor returns to the Group Index field. After all additions have been made, pressing ESC returns control to the command line.
To Modify Hard Forward Groups: Type m to select the Modify command. Use the Arrow keys to position the cursor on the index to be modified and press ENTER. As the Hard Forward Group Indexes and Destination Extensions are moved up to the prompts, use the Backspace key to erase the previous values, make the new entry, and press ENTER. Continue until all values have been modified, then press ESC.
The cursor is returned to the command line.
To Delete Hard Forward Groups: Type d to select the Delete command. Use the Arrow keys to select a group to delete and press ENTER.
Type Y and press ENTER to delete the selected group, or N and press ENTER to cancel.
The confirmation “Do you want to delete this? (Y/N)” is displayed below.
The selected group is removed from the list, and the cursor is returned to the command line.
Type q to select the Quit command.
Enter Y and press ENTER to save all changes or N and press ENTER to cancel them.
The confirmation “Do you want to save changes? (Y/N)” is displayed. The Special Events Time Parameters screen is displayed.
Page 100 NDA-30030-003 Revision 3

Call Forward Control - Installation & Operations ManualADMINISTRATOR MAIN MENU INTRODUCTION
MODIFY A SPECIAL EVENT’S CALL ROUTING GROUPS
The Call Routing Groups command on the Special Events Time Parameters screen is used add, delete, and modify the Call Routing Groups affected by the event.
Figure 3-54 Modify Special Event Call Routing Groups
(1)
HourMinutesMonth of YearDay of MonthDay of Week
(0-23):(0-59):(1-12):(1-31):
(0-6):
*** Special Events Time Parameters***
Event Name: Independence Day
Begin: End:
1 10000 5907 0704 04* *
Modify Hard Forward Groups Call Routing Groups Quit
(2)
*** Call Routing Special Event***
Event Name: Christmas Day
Group Index: Destination Index:213
511
Add Delete Modify Quit
NDA-30030-003 Revision 3 Page 101

ADMINISTRATOR MAIN MENU INTRODUCTIONCall Forward Control - Installation & Operations Manual
Procedure
General Information
The Call Routing groups referred to in this option correspond directly to those defined through the Call Routing Control option on the Main Menu. Therefore, a group specified by a Special Event must first be defined through the Main Menu., and the maximum number of groups addressed by Special Events cannot exceed the number of groups defined through the Main Menu. Duplicate group entries are not allowed.
Action Result
On the Special Events Time Parameters screen, type c to select the Call Routing Groups command. (1)
The Call Routing Special Event screen is displayed for the named event. (2)
To Add Call Routing Groups: Type a to select the Add command, then enter a Call Routing Group Index and a Call Routing Destination Index, pressing ENTER after each. Continue until all Call Routing Group and Destination Indexes have been added, then press ESC to return to the command line.
The new indexes are added to the end of the list, and the cursor returns to the Group Index field. After all additions have been made, pressing ESC returns control to the command line.
To Modify Call Routing Groups: Type m to select the Modify command. Use the Arrow keys to position the cursor on the index to be modified and press ENTER. As the Call Routing Group and Destination Indexes are moved up to the prompts, use the Backspace key to erase the previous values, make the new entry, and press ENTER. Continue until all values have been modified, then press ESC.
The cursor is returned to the command line.
To Delete Call Routing Groups: Type d to select the Delete command. Use the Arrow keys to select a group to delete and press ENTER.
Type Y and press ENTER to delete the selected group, or N and press ENTER to cancel.
The confirmation “Do you want to delete this? (Y/N)” is displayed below.
The selected group is removed from the list, and the cursor is returned to the command line.
Type q to select the Quit command.
Enter Y and press ENTER to save all changes or N and press ENTER to cancel them.
The confirmation “Do you want to save changes? (Y/N)” is displayed. The Special Events Time Parameters screen is displayed.
Page 102 NDA-30030-003 Revision 3

Call Forward Control - Installation & Operations ManualADMINISTRATOR MAIN MENU INTRODUCTION
DELETE A SPECIAL EVENT
The Delete command on the Special Events screen is used to remove an event.
Figure 3-55 Delete A Special Event
Procedure
***Special Events Menu***
CFC Administrator Fri Apr 1 16:10 pm
Select Add Delete View Print Quit
(1)
New Years Eve/DayMemorial DayIndependence DayChristmas Eve/DayThanksgiving DayOrganizational Retreat
(2)
HourMinutesMonth of YearDay of MonthDay of Week
(0-23):(0-59):(1-12):(1-31):(0-6):
*** Special Events Time Parameters***
Event Name: Independence Day
Begin: End:
1 10000 5907 0704 04* *
Do you want to delete this? (Y/N)
Action Result
On the Special Events screen, enter d to select the Delete command.(1)
A cursor is positioned on the first listed event.
Use the Arrow keys to move the cursor to the de-sired event. If more than one screenful of events
exist, press the Down Arrow to scroll the list up-wards and the Up Arrow to scroll the list down-
wards. Press ENTER to select the event.
The field data of the selected event is displayed, and the confirmation “Do you want to delete
this? (Y/N)” is displayed. (2)
Type Y and press ENTER to delete the event, or type N and press ENTER to cancel the deletion.
The cursor is positioned on the original command line.
NDA-30030-003 Revision 3 Page 103

ADMINISTRATOR MAIN MENU INTRODUCTIONCall Forward Control - Installation & Operations Manual
VIEW SPECIAL EVENTS
The View command on the Special Events screen is used to display the special events, including their time periods, group indexes, and forwarding indexes.
Figure 3-56 View Special Events
Procedure
***Special Events Menu***
CFC Administrator Fri Apr 1 16:10 pm
Select Add Delete View Print Quit
(1)
New Years Eve/DayMemorial DayIndependence DayChristmas Eve/DayThanksgiving DayOrganizational Retreat
(2)
Top of File
More
*** Special Events Menu ***
DownPage UpPage Search Top Bottom Print Quit
Event Name:
Start:End:
Hour178
New Years Eve/Day
Minutes00
Month121
Day of Month302
Day of Week**
Hard Forward Group Data: Group Index Destination Extension2 3200
Call Routing Group Data: Group Index Destination Index2 5
13
32103220
13
11
Action ResultType v to select the View command.(1) The Special Events data is displayed. (2) Type d to select the DownPage command. The next page of data is displayed.Type u to select the UpPage command. The previous page of data is displayed.Type t to select the Top command. The first page of data is displayed.Type b to select the Bottom command. The last page of data is displayedType s to select the Search command. At the prompt type the desired pattern and press ENTER.
All of the occurrences of the pattern on that page are highlighted.
Type p to select the Print command. At the prompt, type f to indicate the whole file or s to indicate just the screen and press ENTER.
There is a pause while the material is sent to the printer.
To return to the Call Routing Destinations screen, type q to select the Quit command.
The Call Routing Destinations screen is displayed, and the cursor is positioned on the command line.
Page 104 NDA-30030-003 Revision 3

Call Forward Control - Installation & Operations ManualADMINISTRATOR MAIN MENU INTRODUCTION
PRINT SPECIAL EVENTS
The Print command on the Special Events screen is used to print a hardcopy of selected special events.
Figure 3-57 Print Special Events
Procedure
***Special Events Menu***
CFC Administrator Fri Apr 1 16:10 pm
Select Add Delete View Print Quit
(1)
New Years Eve/DayMemorial DayIndependence DayChristmas Eve/DayThanksgiving DayOrganizational Retreat
***Special Events Menu***
CFC Administrator Fri Apr 1 16:10 pm
Arrow keys to move cursor, <RET> to select, <ESC> to quit
(2)
New Years Eve/DayMemorial DayIndependence DayChristmas Eve/DayThanksgiving DayOrganizational Retreat
>
Action Result
Enter p to select the Print command and press ENTER. (1)
The “>” cursor is positioned to the left of the first entry in the list. (2)
Use the Arrow keys to move the “>” cur-sor next to an event, then press ENTER to select the event.
Each time an event is selected it is high-lighted.
When all events to be printed are selected, press ESC.
The selected events are sent to the printer, and the cursor is positioned on the com-mand line.
NDA-30030-003 Revision 3 Page 105

ADMINISTRATOR MAIN MENU INTRODUCTIONCall Forward Control - Installation & Operations Manual
VALIDATE AND INSTALL
OVERVIEW
The Validate and Install option on the Administrator Main Menu is used to check any changes made to any of the CFC databases for compatibility with data in all of the other databases and to install the changes into the actual databases with which CFC works.
Figure 3-58 Validate and Install
Procedure
When to Use
Since the CRC and HFC programs depend upon the accurate correspondence of the information assigned through different Main Menu options, this last menu option is provided to assure this accuracy. After a series of changes have been made through the other Main Menu options, use this option to check for the necessary compatibility and to install all the changes for use by CRC and HFC.
CFC Administrator Fri Apr 1 16:10 pm
***Main Menu***
ExtensionsHard Forward ControlCall Routing ControlTime ParametersSpecial EventsValidate and InstallQuit
Arrow keys to move cursor, <RET> to sel
(1)
CFC Administrator Fri Apr 1 16:10 pm
Validate Install Quit
(2)
***Validate and Install***
Action Result
On the Main Menu, enter v to select the Validate and Install option. (1)
The Validate and Install screen is displayed.(2)
Refer to the following pages for information and instructions in the use of each command.
To exit the Validate and Install option, enter q to selectthe Quit command.
The Main Menu is redisplayed.
Page 106 NDA-30030-003 Revision 3

Call Forward Control - Installation & Operations ManualADMINISTRATOR MAIN MENU INTRODUCTION
VALIDATE DATABASE
Anytime a change is made to the information contained in one or more options, the Validate command should be used to check compatibility of the new information with the existing information in other options.
Figure 3-59 Validate Database
Procedure
CFC Administrator Fri Apr 1 16:10 pm
Validate Install Quit
(1)
***Validate and Install***CFC Administrator Fri Apr 1 16:10 pm
Validate Install Quit
(2)
***Validate and Install***
Processing Complete
(3)
CFC Administrator Fri Apr 1 16:10 pm
Validating
This record has an invalid HARD FORWARD GROUP INDEX
*** Extensions ***
Extension:Hard Forward Group Index:
Call Routing Group Index:Name or Department:
11011242Majors, Kathryn
Exit Validation, Next table, or Continue with this table? (<ESC>, N, C)
Action Result
Type v to select the Validate option. (1) The text “Validating” is displayed at the top of the screen. If the database is valid, the message “No errors found during validation, press any key to continue” is displayed.
Press any key. The message “Processing Database” is displayed briefly, followed by “Processing Complete”. The Validate and Install screen is displayed with the Install command highlighted. (2)
Validation Errors: If an error is detected during validation, the invalid record is displayed, and the invalid field is highlighted. (3)
To Skip to the Next Table, type N. CFC skips the current table and continues the validation process with the remaining database tables.
To Continue with this Table, type C. CFC skips over the displayed entry and continues validating the current database table.
To Exit Validation, press ESC. The message “Errors found during validation” is displayed, and the Validate and Install screen is displayed with the Validate command highlighted
NDA-30030-003 Revision 3 Page 107

ADMINISTRATOR MAIN MENU INTRODUCTIONCall Forward Control - Installation & Operations Manual
VALIDATE DATABASE (Cont)
Treatment of Discrepancies
As the validation is performed, any discrepancies are displayed one by one on the data entry screens on which they were originally entered. In the figure above, the Hard Forward Group Index entered originally for Extension 1101 is incorrect because there is no Hard Forward Group assigned to that Index. It is therefore necessary to either return to Extensions screen and change the Hard Forward Group, or to create a Hard Forward Group that is indexed by the value entered to this field.
Possible Actions
Notice that the command line makes it possible to take any one of the following three actions:
• _ <Esc>– Exit the validation process and return to the Main Menu. From there it is possible to select the option through which to correct the invalid value found on validation.
• _ N – Move to the next table, disregarding this invalid entry and skipping over the remainder of this database.
• _ C – Disregard this invalid entry and continue with this database validation.
Note that every time an invalid entry is displayed, this same series of actions is available. It is possible, then, to skip through a database, making note of all the invalid entries during one validation process, before exiting to the corresponding data entry screens to make all of the necessary corrections.
Page 108 NDA-30030-003 Revision 3
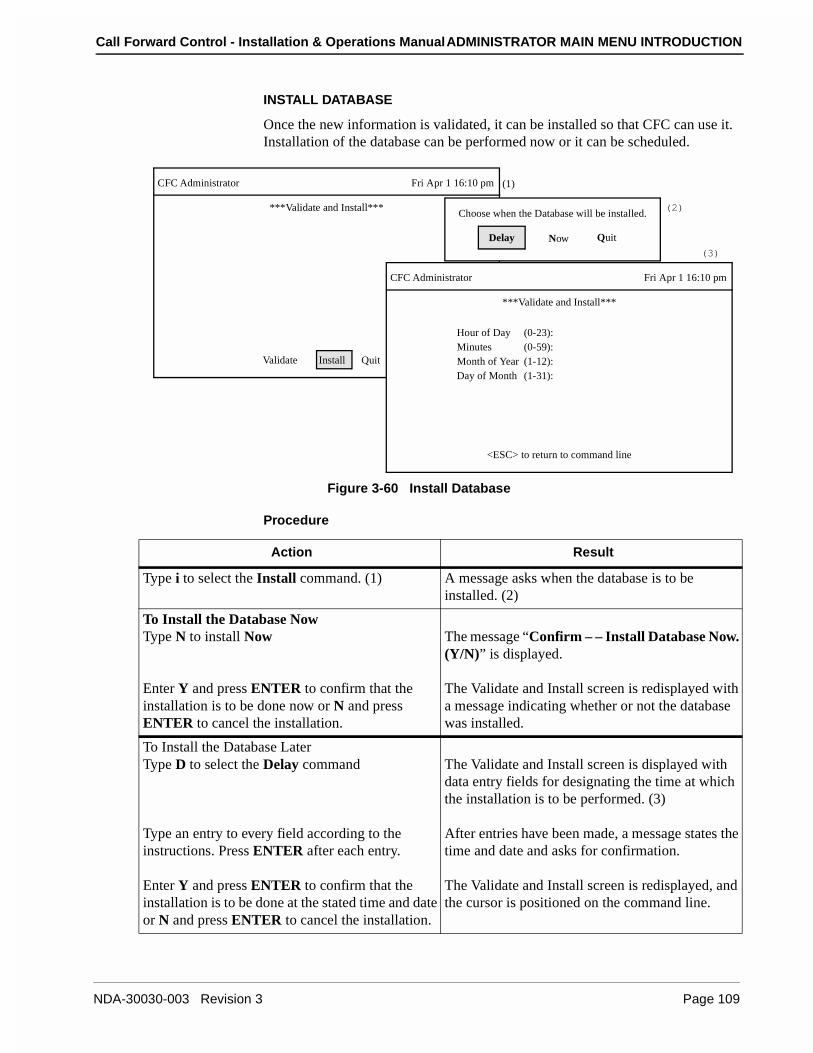
Call Forward Control - Installation & Operations ManualADMINISTRATOR MAIN MENU INTRODUCTION
INSTALL DATABASE
Once the new information is validated, it can be installed so that CFC can use it. Installation of the database can be performed now or it can be scheduled.
Figure 3-60 Install Database
Procedure
CFC Administrator Fri Apr 1 16:10 pm
Validate Install Quit
(1)
***Validate and Install***
Delay Now Quit
Choose when the Database will be installed.(2)
CFC Administrator Fri Apr 1 16:10 pm
<ESC> to return to command line
***Validate and Install***
Day of MonthMonth of YearMinutesHour of Day (0-23):
(0-59):(1-12):(1-31):
(3)
Action Result
Type i to select the Install command. (1) A message asks when the database is to be installed. (2)
To Install the Database Now Type N to install Now
Enter Y and press ENTER to confirm that the installation is to be done now or N and press ENTER to cancel the installation.
The message “Confirm – – Install Database Now. (Y/N)” is displayed.
The Validate and Install screen is redisplayed with a message indicating whether or not the database was installed.
To Install the Database LaterType D to select the Delay command
Type an entry to every field according to the instructions. Press ENTER after each entry.
Enter Y and press ENTER to confirm that the installation is to be done at the stated time and date or N and press ENTER to cancel the installation.
The Validate and Install screen is displayed with data entry fields for designating the time at which the installation is to be performed. (3)
After entries have been made, a message states the time and date and asks for confirmation.
The Validate and Install screen is redisplayed, and the cursor is positioned on the command line.
NDA-30030-003 Revision 3 Page 109
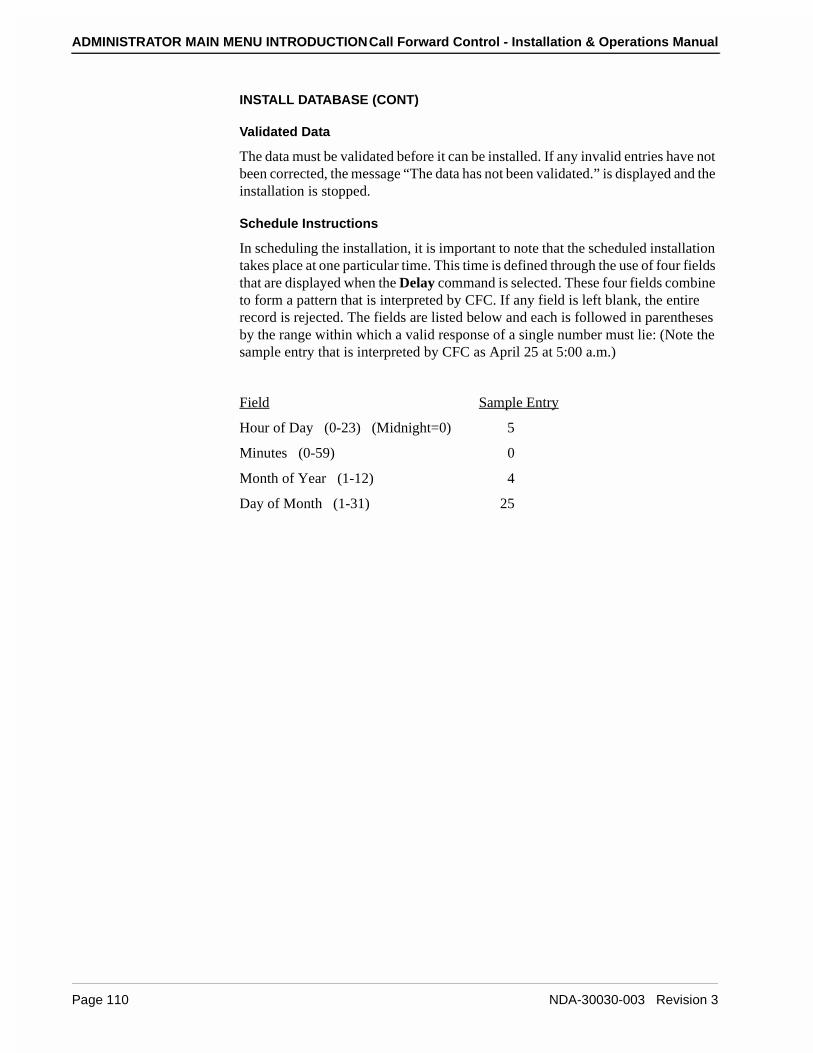
ADMINISTRATOR MAIN MENU INTRODUCTIONCall Forward Control - Installation & Operations Manual
INSTALL DATABASE (CONT)
Validated Data
The data must be validated before it can be installed. If any invalid entries have not been corrected, the message “The data has not been validated.” is displayed and the installation is stopped.
Schedule Instructions
In scheduling the installation, it is important to note that the scheduled installation takes place at one particular time. This time is defined through the use of four fields that are displayed when the Delay command is selected. These four fields combine to form a pattern that is interpreted by CFC. If any field is left blank, the entire record is rejected. The fields are listed below and each is followed in parentheses by the range within which a valid response of a single number must lie: (Note the sample entry that is interpreted by CFC as April 25 at 5:00 a.m.)
Field Sample Entry
Hour of Day (0-23) (Midnight=0) 5
Minutes (0-59) 0
Month of Year (1-12) 4
Day of Month (1-31) 25
Page 110 NDA-30030-003 Revision 3