Cabinet, Roll In & Modular 2004 Shock Freeze with ... Manuals/Blast Chiller 2004... · Cabinet,...
44
Cabinet, Roll In & Modular 2004 Blast Chiller & Shock Freeze with Surf Navigation (FCC) Dial and Click Wheel Controllers Service Manual Issued October 2010 ISO 14001 ISO 9001
Transcript of Cabinet, Roll In & Modular 2004 Shock Freeze with ... Manuals/Blast Chiller 2004... · Cabinet,...

Cabinet, Roll In & Modular 2004 Blast Chiller &
Shock Freeze with Surf Navigation (FCC) Dial and Click Wheel
Controllers
Serv
ice M
an
ual
Issued October 2010
ISO 14001 ISO 9001

1
Contents
Manual Information & Health & Safety Notes 1 Parameters 14 to 24
Environmental Management Policy 2 Alarms & Warnings 25 to 26
Disposal Requirements 2 Foot Print Test Operation 26 to 27
Introduction & Cabinet Descriptions 3 Probes 27
Operations 4 IrDA Printer Installations & Operating Guide 28
Controller Technical Details 5 to 6 Enabling the Printer Function 29 to 30
Blast Chill & Shock Freeze Operating Instructions 6 to 8 Configuring the Print Function 30 to 31
Further Operational Features 8 to 10 Printer Setup 31
Main Programmes 10 Printing Operation & Output 32 to 34
Guide to Blast Chilling & Freezing 11 Technical Data 35
Electrical Connections 11 Wiring Diagrams 36 to 37
Service Information 12 to 14 Troubleshooting & Notes 38 to 40
Service Manual Information
The products and all information in this manual are subject to change without prior notice. We assume by the information given that the person(s) working on these refrigeration units are fully trained and skilled in all aspects of their workings. Also that they will use the appropriate safety equipment and take or meet
precautions where required. The service manual does not cover information on every variation of this unit; neither does it cover the installation
or every possible operating or maintenance instruction for the units.
Health & Safety Warnings and Information
Make sure the power supply is turned off before making any electrical repairs.
To minimise shock and fire hazards, please do not plug or unplug the unit with wet hands.
During maintenance and cleaning, please unplug the unit where required.
Care must be taken when handling or working on the unit as sharp edges may cause personal injury, we recommend the wearing of suitable PPE.
Ensure the correct moving and lifting procedures are used when relocating a unit.
Do NOT use abrasive cleaning products, only those that are recommended. Never scour any parts of the refrigerator. Scouring pads or chemicals may cause damage by
scratching or dulling polished surface finishes.
Failure to keep the condenser clean may cause premature failure of the motor/compressor which will NOT be covered under warranty policy.
Do NOT touch the cold surfaces in the freezer compartment. Particularly when hands are damp or wet, skin may adhere to these extremely cold surfaces and cause frostbite.
Please ensure the appropriate use of safety aids or Personnel Protective Equipment (PPE) are used for you own safety.

2
Environmental Management Policy for Service Manuals and Duets.
Product Support and Installation Contractors
Foster Refrigerator recognises that its activities, products and services can have an adverse impact upon the environment. The organisation is committed to implementing systems and controls to manage, reduce and eliminate its adverse environmental impacts wherever possible, and has formulated an Environmental Policy outlining our core aims. A copy of the Environmental Policy is available to all contractors and suppliers upon request. The organisation is committed to working with suppliers and contractors where their activities have the potential to impact upon the environment. To achieve the aims stated in the Environmental Policy we require that all suppliers and contractors operate in compliance with the law and are committed to best practice in environmental management.
Product Support and Installation contractors are required to:
1. Ensure that wherever possible waste is removed from the client’s site, where arrangements are in place all waste should be returned to Foster Refrigerator’s premises. In certain circumstances waste may be disposed of on the client’s site; if permission is given, if the client has arrangements in place for the type of waste.
2. If arranging for the disposal of your waste, handle, store and dispose of it in such a way as to prevent its escape into the environment, harm to human health, and to ensure the compliance with the environmental law. Guidance is available from the Environment Agency on how to comply with the waste management ‘duty of care’.
3. The following waste must be stored of separately from other wastes, as they are hazardous to the environment: refrigerants, polyurethane foam, and oils.
4. When arranging for disposal of waste, ensure a waste transfer note or consignment note is completed as appropriate. Ensure that all waste is correctly described on the waste note and include the appropriate six-digit code from the European Waste Catalogue. Your waste contractor or Foster can provide further information if necessary.
5. Ensure that all waste is removed by a registered waste carrier, a carrier in possession of a waste management licence, or a carrier holding an appropriate exemption. Ensure the person receiving the waste at its ultimate destination is in receipt of a waste management licence or valid exemption.
6. Handle and store refrigerants in such a way as to prevent their emission to atmosphere, and ensure they are disposed of safely and in accordance with environmental law.
7. Make arrangements to ensure all staff who handle refrigerants do so at a level of competence consistent with the City Guilds 2078 Handling Refrigerants qualification or equivalent qualification.
8. Ensure all liquid substances are securely stored to prevent leaks and spill, and are not disposed of to storm drains, foul drain, or surface water to soil.
Disposal Requirements If not disposed of properly all refrigerators have components that can be harmful to the environment. All old
refrigerators must be disposed of by appropriately registered and licensed waste contractors, and in accordance with national laws and regulations.

3
IMPORTANT CONTROLLER CHANGE INFORMATION
AS OF 2ND
JUNE 2008 THE CONTROLLER LCD DISPLAY FST-FCC-DU1 (00-555394) & DIAL BUTTON ASSEMBLY FOR BC CONTROLLER (01-233329-01) HAVE BEEN CHANGED TO BLAST CHILLER DISPLAY
FST-FCC-DU2 (FOR CLICK WHEEL) (00-556021) & CONTROLLER CLICK WHEEL FST-FCC-DE2 (00-556020)
THE SHAFT ENCODER WILL NO LONGER BE REQUIRED WHEN REPLACING THE CONTROLLER AND THE CABLES, NETWORK CONNECTION CARD AND PCB BOARDS HAVE REMAINED THE SAME.
This manual provides information on both controllers.
Introduction and Cabinet Descriptions Cabinet Blast Chiller & Freezers The entire cabinet range incorporate the refrigeration system mounted on the bottom of the unit with the evaporator located on the back wall. The controls are located in the unit covers and the fan switches are operated by the door. When the door is open the fans will stop. Each have a dished base with drain to the vaporisation tray located in the unit compartment. The Range: BC11, BCF11, QC11, BC 21, BCF21, BC36 all 230/1/50Hz 13amp (it is important to note that the BC36 13 amp option the chilling capacity reduces to 30kg). BC11, BC36 230/1/50Hz 16amp option has 36kg capacity. BCF36, BC51, BCF51 all 400/3/50Hz. Capacities: BC11: Blast Chiller, 11kg capacity with three GN1/1 shelves. BCF11: Blast Chill Shock Freeze, 11kg capacity with three GN1/1 shelves. QC11: Economy Blast Chiller, 11kg capacity with three GN1/1 shelves. BC21: Blast Chiller, 21kg capacity with six GN1/1 shelves. BCF 21: Blast Chill Shock Freeze, 21kg capacity with six GN1/1 shelves. BC 36: Blast Chiller, 36kg capacity (13amp option 30kg capacity) with ten GN1/1 shelves. BCF 36: Blast Chill Shock Freeze, 36kg capacity with ten GN1/1 shelves. BC 51: Blast Chiller, 51kg capacity with fourteen GN1/1 shelves. BCF 51: Blast Chill Shock Freeze, 51kg capacity with fourteen GN1/1 shelves.
Roll In Cabinet Blast Chillers & Freezers The Roll In models have top mounted refrigeration systems (compressor supplied and installed by Foster dealer) using R404a refrigerant. The evaporator is located on the rear wall of the cabinet, with the fans being operated by the door switch. When the door is open the fans will stop. The Range: BCCF 1 has a drip tray beneath the evaporator with drain tube exiting the bottom of the cabinet into the vaporiser tray located on slides attached to the base of the cabinet. BCF RI 1 has a drip tray beneath the evaporator with the drain tube exiting the cabinet at the back left hand side (viewed from the rear) into a heated vaporisation tray attached to the rear of the cabinet. BCCF1, BCF RI 1 supply option 230/1/50 20amp (condensing unit requires separate supply). BCCF1, BCF RI 1 supply option 400/3/50Hz (condensing unit requires separate supply). Capacities: BCCF 1: Blast Chill Shock Freeze, chilling capacity 75kg, freezing capacity 15kg with racking 600x550x1590. BCF RI 1: Blast Chill Shock Freeze, chilling capacity 75kg, freezing capacity 15kg with Trolley 680x640x1825.
Modular Blast Chillers & Freezers There are 4 Blast Chiller/Freezers and each are constructed from modular panels for easy installation. With the choice of 700mm and 900mm door opening widths. The fans are operated by door switches and so when the door is open the fans are off. The evaporator is wall mounted and uses R404a refrigerant with the option of Glycol cooling available. The evaporator also has a drip tray beneath it with a stainless steel tube attached for connecting a 22mm Conex compression elbow. Depending on the drain exit position, a 35mm hole can be placed through the wall panel at the front, side or rear to allow a fall from the pan to an external drain. Blast Chillers are supplied floorless, whereas the Blast Freezer come with a 25mm built in floor. The Range: MBC 75, 100, 150, (700mm and 900mm door opening) 230/1/50Hz 20amp supply (separate supply required for condensing unit). MBC 250 (700mm and 900mm door opening) 400/3/50Hz 16amp supply (separate supply required for condensing unit).

4
MBC 75, 100, 150, 250 (700mm and 900mm door opening) 400/3/50Hz supply (separate supply required for condensing unit). Capacities: MBC 75: Blast Chill shock Freeze (700mm and 900mm Door openings). Chilling and nominal freezing capacity 75kg. 1 x trolley. MBC 100: Blast Chill shock Freeze (700mm and 900mm Door openings). Chilling and nominal freezing capacity 100kg. 1 x trolley. MBC 150: Blast Chill shock Freeze (700mm and 900mm Door openings). Chilling and nominal freezing capacity 150kg. 1 x trolley. MBC 250: Blast Chill shock Freeze (700mm and 900mm Door openings). Chilling and nominal freezing capacity 250kg. 2 x trolleys.
Operations Cook Chill Operation. Blast chilling is a process to reduce the temperature of cooked food by swiftly arresting the cooking process, locking in its colour, flavour, texture and nutritional value. Department of health guidelines state that to safely blast chill food the temperature must be reduced from +70°c to +3°c within 90 minutes.
Pre Chill ensures the correct cabinet temperature in the unit before chilling commences therefore improving the chilling performance.
Blast freezing also helps keep food looking good. The slower food freezes the larger the ice crystals are formed and ice crystals can damage food, dry it out, and break down the physical structure leaving you with an unrecognisable product. The blast freezing process requires that the food temperature be reduced from +70°c to -18°c in no more than 240 minutes.
Soft Chilling Soft chilling is the process of rapid but gentle chilling of food. This cycle brings down the food temperature to +3°c in no more than 90 minutes without the air or food temperature going below 0°c. This prevents large ice crystals forming therefore maintaining the texture, consistency and appearance of food such as vegetables, rice, pasta, custard and fruit with no dehydration or cell damage. Hard Chilling Hard chilling is the process of general purpose chilling. This cycle brings down the food temperature to +3°c in no more than 90 minutes and is ideal for chilling meat pies, lasagne, pasta and individually portioned meals. The air temperature for this process goes down to -15°c for the first 70% of the cycle, to extract the maximum amount of heat from the product quickly. The air temperature then increases to +3°c for the final 30% of the time to reduce surface damage and ensure quality. Hard Chill Max Hard chill max brings down the food temperature to +3°c in no more than 90 minutes and is used for chilling high density or high fat content food such as meat joints, stews or packaged products. The air temperature during the cycle is allowed to go down to -20°c. After either a pre-designated time has elapsed or product temperature has been achieved, the air temperature is allowed to rise to the ‘hold’ value with the temperature being maintained at this level indefinitely. Shock Freeze. Shock freeze is the process of reducing the food product temperature to -18°c in less than 240 minutes. Once in the frozen state longer term storage is enabled. The air temperature during the freeze mode will be -35°c to -40°c. The actual duration would depend on several factors including the type of product load, how it is packaged and the initial entry temperature. Surface Protection Removing the heat energy from food product as rapidly as possible by the combination of powerful refrigeration and evaporator fans moving large volumes of cooled air can cause damage to the food product. The food product could have a form of ‘Frost Burn’ caused by the fast moving air feeling cooler than the actual air temperature ‘Wind Chill Effect’. This may lead to product discoloration, dehydration, localised freezing and spoilage of the food product. Surface protection overcomes this by reducing the evaporation operation, and hence the air speed at pre-determined stages in the cycle to ensure that this does not happen. This is a discreet function and happens automatically without any intervention from the operator. To enable the surface protection; and determine at what stage it would be activated values are set in the service operating parameters.

5
Longer Term Storage – ‘Hold’ Mode (Conservation) Upon the completion of the blast chilling cycle the controller will automatically enter the ‘Hold’ mode. This will either be because the selection set time has elapsed or the product core temperature has been achieved. When the hold period commences an alarm will sound for a period denoted in the service operating parameters. The controller will determine the temperature to be maintained during the hold phase based on the chilling or freezing cycle that has been completed. If a soft or hard chill has taken place the controller will maintain an air temperature of 2°c, if a shock freeze is completed the air temperature of -21°c will be maintained. The hold mode is principally intended as a temporary storage facility offering the operator flexibility until the product can be unloaded into a longer term storage units at the correct storage temperature. On occasion this hold period may become extended to operate overnight or to provide emergency refrigeration backup. In such instances defrosting would automatically occur as necessary.
Controller Information Surf Navigation (FCC) – Dial (Used until June 2008)
Display (00-555394) Dial Button (01-233329-01) Dial Shaft Encoder (00-555396)
Surf Navigation (FCC) – Click Wheel (Introduced June 2008)
Display (00-556021) Click Wheel (00-556020)
Probes (both controller types have the same) Air Probe SN2K25P1 (00-555909) Evaporator Probe SN2K25P2 (00-555910) Food Probe (00-555663)

6
Controller Description The FCC Dial Controller is a three-piece unit made up of the Front Display and Dial Shaft Encoder, Mother Board plus Evaporator, Food and Air temperature probes. The front display PCB and the CPU/ Switching PCB unit are interconnected by a ribbon cable. The membrane attached to the front provides an IP rating of IP54 providing a scratch free, wipe clean finish. The control dial is the method by which the controller is accessed for all requirements. It has three planes of movement, clockwise, anticlockwise and inwards. The control dial allows the operator/ engineer to move forward and backwards through various menu selections shown on the display, and enter a desired programme. The control system will then respond appropriately either commencing the operating cycle or allowing further configuration. The Click Wheel version works in the same way but instead of the dial it has a touch sensitive click wheel (therefore it does not require the Dial Shaft Encoder). The selection of menus and settings is much the same only instead of turning the dial and pressing inwards to select, you lightly drag you finger around the wheel to select the setting or menu, then press the button in the centre of the wheel to confirm your selection.
Controller Use
All of the following instructions are the same for both controllers. The only difference is in how to select with the different dials (shown below).
Dial Version
Click Wheel Version
Blast Chill & Shock Freeze Operating Instructions
Standard Operation
When mains electrical power is first applied to the controller it will carry out a self-test function, for approximately 3 seconds. During this period the display will show (as across).
Move your finger lightly around the click wheel, either clockwise or counter clockwise to select the programme you require.
Press and release the centre button to start the program Press and hold for 2 seconds to stop. the Program
Rotate to select Program.
Press and Release to Start Program Press and hold for 2 seconds to Stop the Program.

7
On completion of the self test, the controller will revert to the last chill program that was run (Pre-chill, Soft Chill, Hard Chill, Hard Chill Max, Shock Freeze, Professional 1, Professional 2 or Professional 3). The availability of these is dependent on how the controller has been configured. The example shows the controller in ‘Hard Chill’ mode with the previous and next programs indicated at the top of the display. To change the program rotate the dial or click wheel (by lightly touching with your finger) either clockwise or anticlockwise to select the type of program you require (for guidelines refer to page 8 & 9).
To initiate the program just press and release the dial or centre button for the program to start
The program starts with the screen on the left being displayed for 10 minutes.
After which the intelligent probe determines if the cycle is controlled either by time (as in above image) or by temperature (as displayed in the lower image).
NOTE: On early versions of the controller the time displayed was 2 minutes.
On completion of the program the controller will cause the Blast Chiller to enter the ‘Hold Mode’, as displayed on the left. An alarm will sound, press and release the dial or centre button to cancel the alarm. If the alarm is not cancelled the Blast Chiller will still enter the ‘Hold Mode’ with the periodical sounding of the alarm. To cancel, press and release the dial or centre button.
To stop the Blast Chiller during operation, press and hold the dial or centre button for 2 seconds, the display
returns to the program selection screen.
8
At any time when the Blast Chiller is operational the dial or click wheel can be rotated to give information on the status of the particular mode of operation. The display will remain for 10 seconds and then revert to the normal operating screen automatically.
Pre Chill
This program is used to ‘Pre Chill’ the cabinet prior to the first cycle. This is done with the Blast Chiller empty and is a short time based program of about 20 minutes. It is generally recognised as the correct method of preparing for a ‘Blast Chill’ cycle. The program is selected by rotating the dial or click wheel until the display shows, press and release the dial or centre button to start the program.
Defrost
Defrosting is not normally required but if there is an ice build up on the coil inside the cabinet a manual defrost can be selected. Rotate the dial or click wheel until the ‘Defrost’ screen is displayed.
Press and release the dial or centre button to start defrost. During defrost the screens will alternate between the two screens shown on the left. Defrost will last 20 minutes and when completed the alarm will sound. Press the dial or centre button to acknowledge, or if not, wait until it comes to the end of the alarm period. The alarm will stop and the display will revert to the previous screen.
Further Operational Features Chill Time Adjustment. (All programs excluding Professional 1, 2 or 3)
Whilst in the pre-programmed selection screen press and hold the dial or centre button for 2 seconds, the information screen will be displayed.
Press and release the dial or centre button to move to time set. Rotate the dial or click wheel clockwise to increase and anticlockwise to decrease the time. Once the time has been selected, press and release the dial or centre button and ‘CHILL TEMP’ will be highlighted. On completion, press and hold the dial or centre button for 2 seconds to return to the program selection screen. Continue by pressing and releasing the dial or centre button for the program to start. When the program has finished the time changes will revert to the default settings.

9
Chill / Hold Temperature Adjustments. (Professional 1, 2 or 3 only)
Professional 1, 2 and 3 (if configured) are programs that can be used to tailor the chill time and temperature to suit specific product requirements.
With ‘CHILL TEMP’ highlighted (see top image) press and release the dial or centre
button to move to the temp set. (See below)
Then rotate the dial or click wheel clockwise to increase the time and anticlockwise to decrease. Once the time has been selected, press and release the dial or centre button and ‘HOLD TEMP’ will be highlighted. Follow the procedure for changing chill temp to change the hold temp.
On completion press and hold the dial or centre button for 2 seconds to return to the program selection screen, to continue press and release the dial or centre button for the program to start. The chill time and chill / hold temperature adjusted settings are retained for Professional 1, 2 and 3 programs and will not revert to the default.
Information
Whilst in the program selection screen press and hold the dial or centre button for 2 seconds, the information screen will be displayed. Rotate the dial or click wheel until ‘INFORMATION’ is highlighted. Press and release the dial or centre button to display the screen showing the last run cycle. The information relates to date, program run, start time, start temperature and end temperature
HACCP Settings Whilst in the program selection screen press and hold the dial or centre button for 2 seconds, the information screen will be displayed. Rotate the dial or click wheel until ‘HACCP SETTINGS’ is highlighted. Press and release the dial or centre button to access the HACCP option screen. Press and release the dial or centre button again to move to the selection screen for long or short reports, rotate the dial or click wheel to select which option and once selected, press and release the dial or centre button to confirm. Press and release the dial or centre button to move to the selection screen for the print sample, select 3 or 5 minute selection rate. On completion press and hold the dial or centre button for 2 seconds to return to the program selection screen.

10
Print Data Whilst in the program selection screen press and hold the dial or centre button for 2 seconds, the information screen will be displayed. Rotate the dial or click wheel until ‘PRINT DATA’ is highlighted. (If using a hand held printer, switch the printer on now). Point the printer at the infra red download sensor (optional), located in the display area, press and release the dial or centre button to download the print data. On completion press and hold the dial or centre button for 2 seconds to return to the program selection screen. Set the Time and Date
Whilst in the program selection screen press and hold the dial or centre button for 2 seconds, the information screen will be displayed. Rotate the dial or click wheel until ‘SET TIME/DATE’ is highlighted.
Press and release the dial or centre button to access the service screen. Press and release the dial or centre button to move to the displayed time in hours and minutes, rotate the dial or click wheel to alter the time. Once the correct time has been achieved press and release the dial, or centre button, to move to ‘DAY’. If it is necessary to change the day, month and year change the settings using the same procedure for setting the time. On completion press and hold the dial or centre button for 2 seconds to return to the program selection screen.
Change Text Language
Whilst in the program selection screen, press and hold the dial or centre button for 2 seconds. The information screen will be displayed, continue by pressing the dial or centre button for a further 2 seconds to display the ‘SERVICE MENU’. ‘LANGUAGE’ will be highlighted; press and release the dial or centre button, ‘ENG’ (English) will be highlighted. Rotate the dial or click wheel to change the language. Select the preferred language then press and release the dial or centre button to confirm.
Screen Saver The Screen saver is displayed if the machine is not used for 20 minutes (providing power is connected). It shows a series of Z’s indicating sleep mode. Pressing and releasing the dial or centre button or opening the door will awaken the unit; the program selection screen will be displayed.
Main Programmes There are four main programmes in the Blast Chiller or Freezer. Soft Chill- for the safe chilling of delicate products such as gateaux and patisserie items, and high water content items such as vegetables, rice and pasta. Hard Chill- for general purpose chilling. The Hard Chill cycle is ideal for chilling ‘standard products’ such as meat pies, lasagne, individually portioned meals etc. The later part of the program includes surface protection. Hard Chill Max- for high density and high fat content products such as meat joints, stews and sous-vide. Shock Freeze- for products to be frozen and that can be shock frozen to below -18°c within 240 minutes.

11
Guide for Blast Chilling & Freezing.
Food Type Includes Blast Chill Programme required
Time required to Blast Chill (Minutes)
Time required to Shock Freeze. (Minutes)
Meat Beef, pork, lamb, poultry & mince Hard 40 - 90 60 – 240
Fish Fried, poached or baked – haddock, plaice, salmon, cod fillets etc
Soft 30 - 90 60 – 240
Prepared dishes
Stews & casseroles, lasagne, risotto, shepherds pie
Hard 50 - 90 90 - 240
Vegetables & Pulses
Steamed or roasted veg, rice and potatoes etc. Soft 30 - 90 60 – 240
Fruit Stewed and cooked fruits. Soft 60 – 90 60 – 240
Bakery Cakes Hard 30 – 90 70 – 240
Bakery Pastries Hard 60 – 90 50 – 240
Desserts Fruit Based desserts & egg based flans. Soft 30 – 90 70 – 240
Desserts Sponge puddings and dense desserts such as cheesecake.
Hard 30 – 90 70 - 240
NOTE: All times listed should be used as a guide only, and will depend on type, size and quantity
Electrical Connections. Inputs L - Mains ‘Live’ supply (115V 230V, 50Hz / 60Hz). 4 terminals. N - Mains ‘Neutral’ supply – 16 terminals. E - Protective Earth – 16 terminals. DOOR - Door Switching connection (not voltage carrying). DOOR2 - Safety door switch connection (not voltage carrying). HP - High Pressure switch connection (not voltage carrying). TA - Air probe connection. TE - Evaporator probe connection. FP1 - Food/ product temperature connection. FP2 - Additional second food / product temperature probe connection. FP3 - Additional third food / product temperature probe connection. Outputs C1 - Condensing system switched relay (30A/ 8A) – normally open (NO) output – 3 terminals. F1 - Evaporator fan 1 switch relay (8A/ 4A) – normally open (NO) output – 3 terminals. F2 - Evaporator fan 2 switch relay (8A/ 4A) – normally open (NO) output – 3 terminals. D1 - Defrost system switched relay (8A/ 4A) – normally open (NO) output – 3 terminals. S1 - UV light system switched relay (8A/ 4A) – normally open (NO) output 2 terminals. A1 - Alarm relay (8A/ 4A) normally closed (NC) – 1 terminal, normally open (NO) 2 terminals. P1 - Capacity relay (8A/ 4A) normally closed (NC) – 1 terminal, normally open (NO) 2 terminals. Display Power - Man Machine socket 2 – way connection. Display Data - Man Machine RJ54 Type 4 – way connection. Logger - 4 – way RS 485 connections.

12
Service Information It is important that a full understanding of the controller is obtained prior to making any
changes to the controller settings.
When mains electrical power is first applied to the controller it will carry out a self test function for approximately 3 seconds. This is to ensure that there are good connections between the component parts. During this period the display shown to the left will show. The information displayed in the centre of the screen refers to which of the profiles the controller is set for. The software version relates to the software release with the number relating to the major operating changes or model variants. The letter relates to the minor operating changes that may have been made from the original, such as parameter settings.
On completion of the self test the controller will revert to the last chill program that was run (Pre-chill, Soft Chill, Hard Chill, Hard Chill Max, Shock Freeze, Professional 1, Professional 2, or Professional 3). The availability of these is dependent on how the controller has been configured. (The example shows the controller in Hard Chill).
Press and hold the dial or centre button for 5 seconds. The first display will show the information page.
Continue pressing until the ‘SERVICE’ screen is displayed. (For changes to language see page 10.)
Diagnostics
In the ‘Service’ screen rotate the dial or click wheel until you reach ‘Diagnostics’.
Press and release the dial or centre button to highlight the component. In this program you can test each of the major components on the machine in sequence, 1- COMPRESSOR, 2-FAN1, 3-FAN2, 4- DEFROST, 5- ALARM, 6- CCAP (Capacity Control), 7- UV-L (UV light if fitted), ESC (escape). Rotate the dial or click wheel until the relay output is highlighted. Once selected press and hold the dial or centre button to test the relay. The relay will remain energised for as long as it is pressed.

13
On completion of the test you must rotate the dial or click wheel until you highlight ‘ESC’, press and release the dial or centre button to move to the next program.
Function Test
Rotate the dial or click wheel until you reach ‘FOOTPRINT’, press and release the dial or centre button to initiate the controller function self test. Self test allows the engineer to test the operation of the machine without having to wait for a full program to run. The test lasts for ten minutes and should be carried out with the cabinet / room empty. Each of the relays will be energised to simulate the chill process. Relay 1-COMPRESSOR, Relay 2-FAN1, Relay 3-FAN2, Relay 4-DEFROST, Relay 5-ALARM, Relay 6-CCAP (Capacity Control), and Relay 7- UV-L will all be switched on and off automatically in a pre determined manner to simulate program operation (whether they are connected or not). The test is based around an algorithm built into the software. Prior to starting the program it is advisable to place a probe in the centre of the cabinet/room, attached to an independent measuring device to check the air temperature as the air, coil and food probes are not active during this program. The temperature achieved will depend on the model. The air temperature should be checked 5 to 6 minutes into the program. The temperature achieved should be the minimum temperature and can be checked against the model type found in the parameter table starting on page 14. Once the test is completed the display reverts to the last chill program and not to the service parameters.
Passcode
In the Service screen, rotate the dial or click wheel until you reach ‘PASSCODE’.
Press and release the dial or centre button to highlight the code. Rotate the dial or click wheel until you reach the code ‘131’. Once achieved press and release the dial or centre button to acknowledge.
Profiles
You are now in the program profiles. The controller has 9 operating programs – Pre Chill, Soft Chill, Hard Chill, Hard Chill Max, Shock Freeze, Professional 1, Professional 2, Professional 3, Defrost and 2 optional programs – UV Sanitisation and Information. These programs are all available depending upon which of the profiles are selected (see table below). To change the profile, rotate the dial or click wheel to select program, press and release the dial or centre button to accept the change. The 3 chevrons in the box opposite the selected program confirm the change. The default operating profile is ‘CHEF’.

14
This table identifies which programs are available from the profile selected.
PROFILES SIMPLE SIMPLE + CHEF CHEF+ LE CHEF EXPERT EXPERT+
PRE CHILL SOFT CHILL HARD CHILL HARD CHILL MAX SHOCK FREEZE PROFESSIONAL 1 PROFESSIONAL 2 PROFESSIONAL 3 DEFROST UV SANITISATION OPTIONAL OPTIONAL OPTIONAL OPTIONAL OPTIONAL OPTIONAL OPTIONAL
INFORMATION OPTIONAL OPTIONAL OPTIONAL OPTIONAL OPTIONAL OPTIONAL OPTIONAL
Parameter Access
From the profile screen, once the selection has been made, press and release the dial or centre button to access the parameter list. The screen will display the parameters as shown in the screen to the left.
To access the system parameters rotate the dial or click wheel anticlockwise. Selections are made by pressing and releasing the dial or centre button.
The next table contains the complete parameter list and includes the selectable range and default values.
Parameters
PARAMETER DESCRIPTION VALUE MINIMUM MAXIMUM DEFAULT
PRE-CHILL
PO1 AIR TEMP °C -15 15 -10
PO2 CHILL TIME MINUTES 5 60 15
PO3 HOLD TEMP °C -10 15 3
SOFT-CHILL
PO4 AIR TEMP °C -10 15 1
PO5 CHILL TIME MINUTES 5 480 90
PO6 CHILL TEMP °C -5 15 3
PO7 HOLD TEMP °C -5 15 3
HARD CHILL
PO8 AIR TEMP °C -20 15 -15
PO9 CHILL TIME MINUTES 5 480 90
P10 CHILL TEMP °C -15 15 3
P11 HOLD TEMP °C -15 15 3
P12 CHANGE TIME % 5 95 80
P13 CHANGE TEMP % 5 95 80
HARD MAX
P14 AIR TEMP °C -20 15 -15
P15 Chill Time MINUTES 5 480 90
P16 CHILL TEMP °C -15 15 3

15
P17 HOLD TEMP °C -15 15 3
SHOCK FREEZE
P18 AIR TEMP °C -35 15 -30
P19 CHILL TIME MINUTES 5 480 240
P20 CHILL TEMP °C -35 15 -21
P21 HOLD TEMP °C -35 15 -21
PROFFESSIONAL 1
P22 Air Temp. Std. °C -20 15 -15
P23 Chill Time Std. Minutes P24 P25 90
P24 Chill Time Minimum Minutes 5 60 5
P25 Chill Time Maximum Minutes 60 480 240
P26 Chill Temp. Std. °C P27 P28 3
P27 Chill Temp. Minimum °C -20 -5 -10
P28 Chill Temp. Maximum °C -5 15 5
P29 Hold Temp. Std. °C P30 P31 3
P30 Hold Temp. Minimum °C -10 0 0
P31 Hold Temp. Maximum °C 0 10 10
P32 Change Time % 5 95 80
P33 Change Temp. % 5 95 80
PROFFESSIONAL 2
P34 Air Temp. Std. °C -20 15 -15
P35 Chill Time Std. Minutes P36 P37 90
P36 Chill Time Minimum Minutes 5 60 5
P37 Chill Time Maximum Minutes 60 480 240
P38 Chill Temp. Std °C P39 P40 3
P39 Chill Temp. Minimum °C -20 -5 -10
P40 Chill temp. Maximum °C -5 15 5
P41 Hold Temp. Std. °C P42 P43 3
P42 Hold Temp. Minimum °C -10 0 0
P43 Hold Temp. Maximum °C 0 10 10
P44 Change Time % 5 95 80
P45 Change Temp. % 5 95 80
PROFESSIONAL 3
P46 Air Temp. Std. °C -20 15 -15
P47 Chill Time Std. Minutes P48 P49 90
P48 Chill Time Minimum Minutes 5 60 5
P49 Chill Time Maximum Minutes 60 480 240
P50 Chill Temp. Std. °C P51 P52 3
P51 Chill Temp. Minimum °C -20 -5 -10
P52 Chill Temp. Maximum °C -5 15 5
P53 Hold Temp. Std. °C P54 P55 3
P54 Hold Temp. Minimum °C -10 0 0
P55 Hold Temp. Maximum °C 0 10 10
P56 Change Time % 5 95 80
P57 Change Temp. % 5 95 80
SYSTEM
P58 UV Light Enable Minutes 0 120 0
P59 HACCP Enable Function NO YES NO
P60 Shock Chill Temp. Function NO YES NO
P61 Chill Hysteresis °K 2 20 4
P62 Hold Hysteresis °K 2 20 4
P63 APM Time Minutes 0 30 10
P64 APM Differential °K 0 20 10
P65 FAN 1 Hold Operation Function OFF/ CYCLE/ AUTO/ ON AUTO
P66 FAN 2 Hold Operation Function OFF/ CYCLE/ AUTO/ ON AUTO
P67 Capacity Enable Function OFF/ AUTO/ ON OFF
P68 Capacity Hysteresis °K 2 20 5
P69 Defrost Type Function OFF/ ELE/ GAS OFF
P70 Smart Defrost Inc Integer 0 240 30
P71 Defrost End Time Minutes 1 60 20
P72 Defrost End Temp. °C 0 50 20

16
P73 Drain Time. Minutes 0 30 1
P74 Fan Delay Temp. °C -15 15 5
P75 Duty Cycle % 0 100 60
P76 Comp. Rest Time Minutes 0 30 3
P77 HP Switch Function NO YES YES
P78 Door Switch 2 Function NO YES NO
P79 Door Switch 1 Function NO YES YES
P80 Door Stop Minutes 0 30 1
P81 Door Alarm Delay Minutes 0 30 5
P82 High Alarm Temp. °K 0 50 10
P83 High Alarm Delay Minutes 0 120 30
P84 Alarm Time Minutes 0 120 1
P85 Alarm Repeat Interval Minutes 0 480 0
P86 Alarm Buzzer Function NO YES NO
P87 Air Probe Offset °K -15 15 0
P88 Coil Probe Offset °K -15 15 0
P89 Food 1 Offset °K -15 15 0
P90 Food 2 Enable Function NO YES NO
P91 Food 2 Offset °K -15 15 0
P92 Food 3 Enable Function NO YES NO
P93 Food 3 Offset °K -15 15 0
P94 Address Integer 1 255 255
Parameter Definitions Pre-Chill P01 Pre-Chill Enable
The air temperature which the air probe must read before the condensing system is de-energised in the chill mode of the Pre-Chill Program. Range -15°C to 15°C.
P02 Chill Time The period Pre-Chill is in the chill mode prior entering the Hold mode. Range 5 minutes to 60 minutes. P03 Hold Temp
The temperature which the air probe must read before the condensing system is de-energised in the Hold mode of the Pre-Chill program.
Range -15°C to 15°C. Soft-Chill P04 Air Temp
The temperature which the air probe must read before the condensing system is de-energised in the Chill mode of the Soft Chill Program. Range -10°C to 15°C.
P05 Chill Time The period Soft Chill program is in Chill mode prior to entering Hold mode in a time based chill cycle. Range 5 minutes to 480 minutes. P06 Chill Temp
The temperature which the Food Probe 1 must read before the condensing system is de-energised in the Chill mode of the Soft Chill program, prior to entering the Hold mode of a temperature based cycle. Range -5°C to 15°C.
P07 Hold Temp
The temperature which the air probe must read before the condensing system is de-energised in the Hold mode of the Soft Chill program.
Range -5°C to 15°C.

17
Hard Chill P08 Air Temp
The temperature which the air probe must read before the condensing system is de-energised in the Chill mode of the Hard Chill Program. Range -20°C to 15°C.
P09 Chill Time
The period Hard Chill program is in Chill mode prior to entering Hold mode in a time based chill cycle. Range 5 minutes to 480 minutes.
P10 Chill Temp
The temperature which the Food Probe 1 must read before the condensing system is de-energised in the chill mode of the Hard Chill program, prior to entering the Hold mode of a temperature based cycle. Range -15°C to 15°C.
P11 Hold Temp
The temperature which the air probe must read before the condensing system is de-energised in the Hold mode of the Hard Chill program.
Range -15°C to 15°C. P12 Change Time
The percentage period of a time based chill cycle, which is to have passed before automatically adjusting the air temperature set point to 1°C.The range is adjustable in 5% increments.
Range 05% to 95%. P13 Change Temp
The percentage of a temperature based chill cycle, which is passed before automatically adjusting the air temperature set point to 1°C.The range is adjustable in 5% increments.
Range 5% to 95%. Hard Max P14 Air Temp
The temperature which the air probe must read before the condensing system is de-energised in the Chill mode of the Hard Chill Max Program. Range -20°C to 15°C.
P15 Chill Time
The period Hard Chill Max program is in Chill mode prior to entering Hold mode in a time based chill cycle. Range 5 minutes to 480 minutes.
P16 Chill Temp
The temperature which the Food Probe 1 must read before the condensing system is de-energised in the Chill mode of the Hard Chill Max program, prior to entering the Hold mode of a temperature based cycle. Range -15°C to 15°C.
P17 Hold Temp
The temperature which the air probe must read before the condensing system is de-energised in the Hold mode of the Hard Chill Max program.
Range -15°C to 15°C. Shock Freeze P18 Air Temp
The temperature which the air probe must read before the condensing system is de-energised in the Chill mode of the Shock Freeze Program. Range -35°C to 15°C.
P19 Chill Time
The period Shock Freeze program is in Chill mode prior to entering Hold mode in a time based chill cycle. Range 5 minutes to 480 minutes.
P20 Chill Temp
The temperature, which the Food Probe 1 must read before the condensing system is de-energised in the chill mode of the Shock Freeze program, prior to entering the Hold mode of a temperature based cycle. Range -15°C to 15°C.

18
P21 Hold Temp The temperature which the air probe must read before the condensing system is de-energised in the Hold mode of the Shock Freeze program.
Range -35°C to 15°C. Professional 1 P22 Air Temp Std
The standard temperature which the air probe must read before the condensing system is de-energised in the Chill mode of the Professional 1 Program. Range -20°C to 15°C.
P23 Chill Time Std.
The standard period Professional 1 program is in chill mode, prior to entering Hold mode in a time based chill cycle. Range 5 minutes to 480 minutes.
P24 Chill Time Minimum
The minimum period Professional 1 program is in chill mode, prior to entering Hold mode in a time based chill cycle that it can be adjusted to by the operator.
Range 5 minute to 60 minutes. P25 Chill Time Maximum
The maximum period Professional 1 program is in chill mode, prior to entering Hold mode in a time based chill cycle that it can be adjusted to by the operator.
Range 60 minute to 480 minutes. P26 Chill Temp Std
The standard temperature, which the Food Probe 1 must read before the condensing system is de-energised in the chill mode of the Professional 1 program prior to entering the Hold mode of a temperature based cycle. Range -15°C to 15°C.
P27 Chill Temp Minimum
The minimum value that the temperature, which Food Probe 1 must read before the condensing system is de-energised in the chill mode of the Professional 1 program, prior to entering the Hold mode of a temperature based cycle, which it can be adjusted to by the operator.
Range -20°C to -5°C. P28 Chill Temp Maximum
The maximum value that the temperature, which Food Probe 1 must read before the condensing system is de-energised in the chill mode of the Professional 1 program, prior to entering the Hold mode of a temperature based cycle, which it can be adjusted to by the operator.
Range -5°C to -15°C. P29 Hold Temp Std
The standard temperature, which the air probe must read before the condensing system is de-energised in the Hold mode of the Professional 1 Program. Range -15°C to 15°C.
P30 Hold Temp Minimum
The minimum value that the Hold temperature set point can be adjusted to by the operator in the Professional 1 program. Range -10°C to 0°C.
P31 Hold Temp Maximum
The maximum value that the Hold temperature set point can be adjusted to by the operator in the Professional 1 program. Range 0°C to 10°C.
P32 Change Time
The percentage period of a time based chill cycle, which is to have passed before automatically adjusting the air temperature set point to 1°C.The range is adjustable in 5% increments.
Range 05% to 95%.

19
P33 Change Temp The percentage of a temperature based chill cycle, which is passed before automatically adjusting the air temperature set point to 1°C.The range is adjustable in 5% increments.
Range 5% to 95%. Professional 2 P34 Air Temp Std
The standard temperature, which the air probe must read before the condensing system is de-energised in the chill mode of the Professional 2 Program. Range -20°C to 15°C.
P35 Chill Time Std
The standard period Professional 2 program is in chill mode prior to entering Hold mode in a time based chill cycle. Range 5 minutes to 480 minutes.
P36 Chill Time Minimum
The minimum period Professional 2 program is in chill mode prior to entering Hold mode in a time based chill cycle that it can be adjusted to by the operator.
Range 5 minute to 60 minutes. P37 Chill Time Maximum
The maximum period Professional 2 program is in chill mode prior to entering Hold mode in a time based chill cycle that it can be adjusted to by the operator.
Range 60 minute to 480 minutes. P38 Chill Temp Std
The standard temperature, which the Food Probe 1 must read before the condensing system is de-energised in the chill mode of the Professional 2 program prior to entering the Hold mode of a temperature based cycle. Range -15°C to 15°C.
P39 Chill Temp Minimum
The minimum value that the temperature, which Food Probe 1 must read before the condensing system is de-energised in the chill mode of the Professional 2 program, prior to entering the Hold mode of a temperature based cycle, which it can be adjusted to by the operator.
Range -20°C to -5°C. P40 Chill Temp Maximum
The maximum value that the temperature, which Food Probe 1 must read before the condensing system is de-energised in the chill mode of the Professional 2 program, prior to entering the Hold mode of a temperature based cycle, which it can be adjusted to by the operator.
Range -5°C to -15°C. P41 Hold Temp Std
The standard temperature, which the air probe must read before the condensing system is de-energised in the Hold mode of the Professional 2 Program. Range -15°C to 15°C.
P42 Hold Temp Minimum
The minimum value that the Hold temperature set point can be adjusted to by the operator in the Professional 2 program. Range -10°C to 0°C.
P43 Hold Temp Maximum
The maximum value that the Hold temperature set point can be adjusted to by the operator in the Professional 2 program. Range 0°C to 10°C.
P44 Change Time
The percentage period of a time based chill cycle, which is to have passed before automatically adjusting the air temperature set point to 1°C.The range is adjustable in 5% increments.
Range 05% to 95%.

20
P45 Change Temp The percentage of a temperature based chill cycle, which is passed before automatically adjusting the air temperature set point to 1°C.The range is adjustable in 5% increments.
Range 5% to 95%. Professional 3 P46 Air Temp Std
The standard temperature, which the air probe must read before the condensing system is de-energised in the chill mode of the Professional 3 Program. Range -20°C to 15°C.
P47 Chill Time Std
The standard period Professional 3 program is in chill mode prior to entering Hold mode in a time based chill cycle. Range 5 minutes to 480 minutes.
P48 Chill Time Minimum
The minimum period Professional 3 program is in chill mode prior to entering Hold mode in a time based chill cycle that it can be adjusted to by the operator.
Range 5 minute to 60 minutes. P49 Chill Time Maximum
The maximum period Professional 3 program is in chill mode prior to entering Hold mode in a time based chill cycle that it can be adjusted to by the operator.
Range 60 minute to 480 minutes. P50 Chill Temp Std
The standard temperature, which the Food Probe 1 must read before the condensing system is de-energised in the chill mode of the Professional 3 program prior to entering the Hold mode of a temperature based cycle. Range -15°C to 15°C.
P51 Chill Temp Minimum
The minimum value that the temperature, which Food Probe 1 must read before the condensing system is de-energised in the chill mode of the Professional 3 program, prior to entering the Hold mode of a temperature based cycle, which it can be adjusted to by the operator.
Range -20°C to -5°C. P52 Chill Temp Maximum
The maximum value that the temperature, which Food Probe 1 must read before the condensing system is de-energised in the chill mode of the Professional 3 program, prior to entering the Hold mode of a temperature based cycle, which it can be adjusted to by the operator.
Range -5°C to -15°C. P53 Hold Temp Std
The standard temperature, which the air probe must read before the condensing system is de-energised in the Hold mode of the Professional 3 Program. Range -15°C to 15°C.
P54 Hold Temp Minimum
The minimum value that the Hold temperature set point can be adjusted to by the operator in the Professional 3 program. Range -10°C to 0°C.
P55 Hold Temp Maximum
The maximum value that the Hold temperature set point can be adjusted to by the operator in the Professional 3 program. Range 0°C to 10°C.
P56 Change Time
The percentage period of a time based chill cycle, which is to have passed before automatically adjusting the air temperature set point to 1°C.The range is adjustable in 5% increments.
Range 05% to 95%.

21
P57 Change Temp The percentage of a temperature based chill cycle, which is passed before automatically adjusting the air temperature set point to 1°C.The range is adjustable in 5% increments.
Range 5% to 95%. System P58 UV Light Enable Determines whether the user can select the UV sanitisation.
Minutes 0 = disabled, 1 to 120 = enabled (set the time between 1 and 120 to determine the length of the program).
P59 HACCP Enable Determines whether the logging system is available to the user. Function, YES = enabled. NO = disabled. P60 Shock Freeze Temp Allows for the probe to be used in the Shock Freeze mode.
Function, YES = enables. NO = disables. P61 Chill Hysteresis
Allowable temperature increase from chill cycle air temperature Set Point before switching on the refrigeration system.
Range 02°K to 20°K. P62 Hold Hysteresis
Allowable temperature increase from hold cycle air temperature Set Point before switching on the refrigeration system.
Range 02°K to 20°K. P63 APM Time
Automatic Program Mode Time. The time period that must pass before the air temperature and Food Probe 1 temperature are compared to determine whether the cycle is time or temperature based.
00 = Instantaneous decision. 01 to 30 = the time selected determines the start time decision. P64 APM Differential
Automatic Program Mode Differential. The difference in temperature between the air temperature and food probe 1 temperature after APM time to determine whether the cycle is time or temperature based. If air probe temperature + the APM differential is greater than or equal to food temperature the chill cycle will be time based. If air probe temperature + APM differential is less than the food probe temperature the chill cycle will be temperature based. Range 0°K to 20°K.
P65 FAN 1 Hold Operation Determines the evaporator fan relay energisation during ‘Hold’ mode. ‘OFF’ = Evaporator fan 1 relay is not energised in ‘Hold’. ‘CYCLE’ = Evaporator fan 1 relay cycles with condensing system relay in ‘Hold’. ‘AUTO’ = Evaporator fan 1 relay cycles with condensing system and fan hysteresis in ‘Hold’. ‘ON’ = Evaporator fan 1 relay is always energised in ‘Hold’. Note: The fan 1 hold operation does not affect routine defrost operation. P66 FAN 2 Hold Operation Determines the evaporator fan relay energisation during ‘Hold’ mode. ‘OFF’ = Evaporator fan 2 relay is not energised in ‘Hold’. ‘CYCLE’ = Evaporator fan 2 relay cycles with condensing system relay in ‘Hold’. ‘AUTO’ = Evaporator fan 2 relay cycles with condensing system and fan hysteresis in ‘Hold’. ‘ON’ = Evaporator fan 2 relay is always energised in ‘Hold’. Note: The fan 2 hold operation does not affect routine defrost operation. P67 Capacity Control Enable
Determines if capacity control is enabled. ‘OFF’ = Capacity Control is disabled. ‘AUTO’ = Capacity control is enabled in chill and hold modes in conjunction with P68 Capacity Control Hysteresis. ‘ON’ = Capacity is enabled in hold mode only in conjunction with P68 Capacity Control Hysteresis.

22
P68 Capacity Control Hysteresis The function of ‘Capacity Control’ is to reduce the refrigeration capacity of the condensing unit during periods when the internal air temperature is above a set value. Capacity control is achieved by unloading one cylinder of a multi-cylinder compressor by means of a solenoid valve or by disabling a condenser fan, on systems having multiple condensers/fans this would be achieved by using a contactor.
Capacity Control, when set to ‘AUTO’ in the ‘chill’ and ‘hold’ cycle, switches off the output to the condensing system when the internal air temperature goes below the Set Point (3°c)+ Chill Hysteresis (4°k) + Capacity Hysteresis (5°k) = below the internal air temperature (12°c). Capacity Control, when set to ‘AUTO’ or ‘ON’ in the ‘hold’ cycle, switches off the output to the condensing system when the internal air temperature goes below the Hold Set Point (3°c)+ Hold Chill Hysteresis (4°k) + Capacity Hysteresis (5°k) = below the internal air temperature (12°c). P69 Defrost Type Identifies the type of defrost cycle to be initiated either standard or manually. OFF = Off cycle defrost. ELE = Electric defrost. GAS = Hot gas defrost. P70 Smart Defrost Inc DO NOT ADJUST. P71 Defrost End Time The length of time that the Defrost period will last before reverting to the chill or hold cycle. Range 01minute to 60 minutes. P72 Defrost End Temp
The coil temperature as detected by the evaporator probe at which the Defrost function will terminate before reverting back to chill or hold mode.
Range 0°C to 10°C. P73 Drain Time
The time period following the defrost routine (terminated by time or temperature) that is allowed for ‘melt water’ to drain from the evaporator coil prior to the condensing system restarting.
00 = No drain down time. 01 to 30 = Drain down period in minutes. P74 Fan delay Temp
The temperature the evaporator coil must reach following a defrost before the evaporator fan/s are allowed to re-start.
Range -15°C to 15°C. P75 Duty Cycle
The percentage time that the condensing system will operate in order to maintain Hold temperature in the event of an air probe failure.
Range 0% to 100%. P76 Comp. Rest Time The forced rest period before the condensing system can be energised from when it was de-energised. 00 = Excludes compressor rest period. 01 to 30 = Compressor rest period in minutes. Note: This is not a compressor start delay. P77 HP Switch
Terminates the condensing system in the event of a high pressure developing in the refrigeration system as a result of, to high food temperature, condenser fan failure, blocked condenser, air flow restriction etc. Automatically re – sets when the normal working pressure is achieved.
YES = enabled. NO = disabled. P78 Door Switch 2
Determines if a safety door switch is fitted. If enabled this will not allow any chill, defrost or UV Sanitisation programs to be run if the door is open.
NO = No safety door switch fitted. YES = Safety door switch fitted. Note: Usually fitted to the evaporator fan door on Modular Blast Chillers.

23
P79 Door Switch 1 Determines if a door switch is fitted or not, and consequently dictates Evaporator Fan operation, UV Sanitisation operation and door alarm activation’s. Also used to initiate the controller from the energy saving mode.
NO = No door switch fitted. YES = Door switch fitted. P80 Door Stop
The delay period between the door being opened and the condensing unit stopping (only active if the ‘Door Switch’ is set to ‘YES’).
00 minutes = Condensing unit stops instantaneously. 01 to 30 minutes = Delay before unit stops. P81 Door Alarm Delay
The delay following the ‘Door Stop’ period before the door open alarm sounds. Therefore if the ‘Door Stop’ is set for 1 minute, and the ‘Door Alarm’ is set to 5 minutes, the door alarm will sound 6 minutes after the door was opened. (Only active if ‘Door Switch’ = YES).
00 minutes = //instantaneous door alarm. 01 to 30 minutes = Delay before alarm sounds. P82 High Alarm Temp
The temperature at which the alarm will sound to warn that the measured air temperature value is too high. The alarm sounding is dependent upon the selected program and the stage of the cycle. I.e. during a chill cycle if the measured temperature is greater than or equal to program air set point temperature + chill hysteresis + high alarm temperature value (after the appropriate alarm delay period) the alarm will sound. Similarly if the measured hold temperature is greater than or equal to program hold set point + hold hysteresis + high alarm temperature value the alarm will sound.
Range 1°C to 50°C. P83 High Alarm Delay The delay period between a temperature alarm condition occurring. 00 minutes = Instantaneous audible alarm. 01 to 120 minutes = period of delay. P84 Alarm Time
The length of time, which the alarm will sound for an end of program cycle alarm or any other alarm warning prior to automatically muting. 00 minutes No alarm. 01 to 120 minutes = Alarm energised period.
P85 Alarm Repeat Interval
The length of time between an acknowledged alarm being automatically muted and the alarm sounder being re-energised.
00 minutes = No alarm reminder. 01 to 480 minutes = Alarm reminder period. P86 Alarm Buzzer Enables or disables the board alarm buzzer. NO = Alarm disabled. YES = Alarm enabled. P87 Air Probe Offset Allows the value of the Air Probes to be offset allowing the product temperature to be accurately measured. Range -15°C to +15°C P88 Coil Probe Offset
Allows the value of the Evaporator Coil Probe to be offset allowing the coil temperature to be accurately measured.
Range -15°C to +15°C. P89 Food 1 Offset
Allows the value of Food Probe 1 to be offset allowing for the product temperature to be accurately measured.
Range -15°C to +15°C. P90 Food 2 Enable Determines whether a second Food Probe is fitted. NO = No second food probe fitted. YES = Second food probe fitted.
24
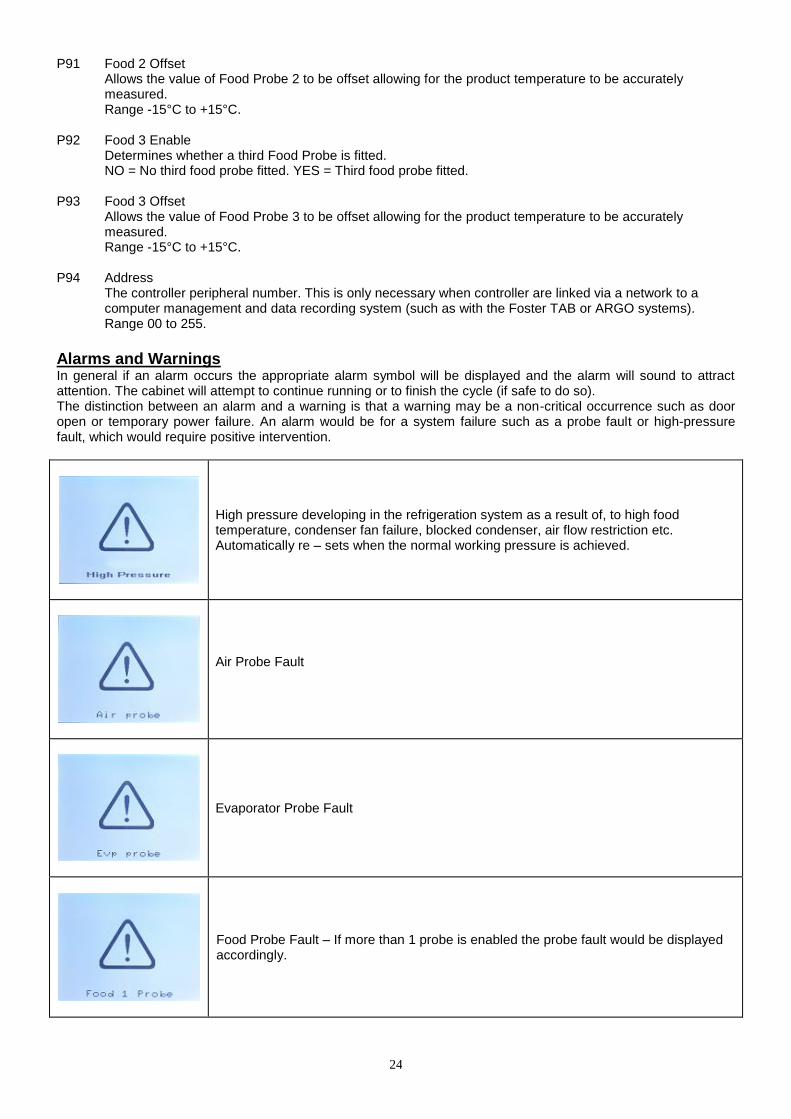
P91 Food 2 Offset Allows the value of Food Probe 2 to be offset allowing for the product temperature to be accurately measured.
Range -15°C to +15°C. P92 Food 3 Enable Determines whether a third Food Probe is fitted. NO = No third food probe fitted. YES = Third food probe fitted. P93 Food 3 Offset
Allows the value of Food Probe 3 to be offset allowing for the product temperature to be accurately measured.
Range -15°C to +15°C. P94 Address
The controller peripheral number. This is only necessary when controller are linked via a network to a computer management and data recording system (such as with the Foster TAB or ARGO systems).
Range 00 to 255.
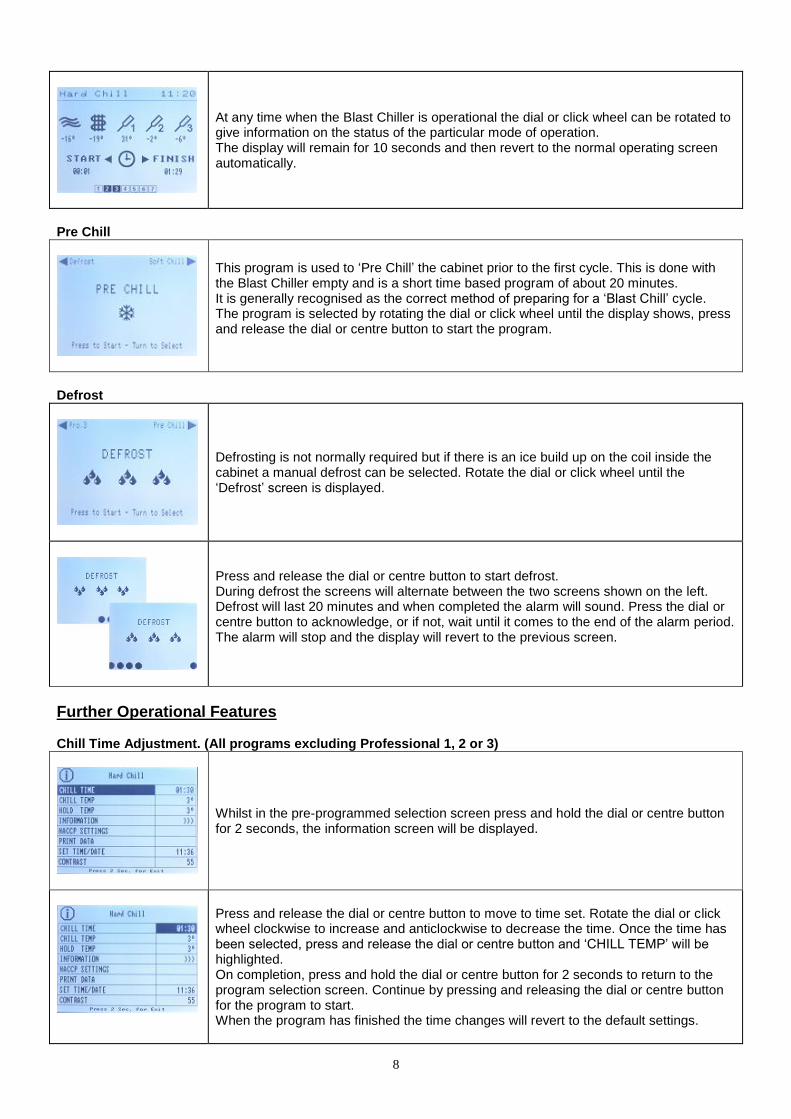
Alarms and Warnings In general if an alarm occurs the appropriate alarm symbol will be displayed and the alarm will sound to attract attention. The cabinet will attempt to continue running or to finish the cycle (if safe to do so). The distinction between an alarm and a warning is that a warning may be a non-critical occurrence such as door open or temporary power failure. An alarm would be for a system failure such as a probe fault or high-pressure fault, which would require positive intervention.
High pressure developing in the refrigeration system as a result of, to high food temperature, condenser fan failure, blocked condenser, air flow restriction etc. Automatically re – sets when the normal working pressure is achieved.
Air Probe Fault
Evaporator Probe Fault
Food Probe Fault – If more than 1 probe is enabled the probe fault would be displayed accordingly.

25
Door 2 Open – Will not allow any chill, defrost or UV sanitisation programs to be run if the door is open.
Ribbon cable between the power switching PCB and the display disconnected also displayed if there is a communication error with the printer function.
Alarms and Actions Air Probe: If this alarm occurs it will remain in the program selected until it is completed, however no further
operation will be possible. Action: Check connections or replace faulty probe.
Evap Probe: If this alarm occurs it will remain in the program selected until it is completed. However no further
operation will be possible. Action: Check connections or replace faulty probe.
Food Probe: If this alarm occurs it will automatically change to a timed program until it is completed, further
operation will be possible using time chill. Action: Check connections or replace faulty probe.
Door Open: The display will continue to show the alarm message until the door is closed. If this does not cancel
the alarm check connections or replace faulty probe. High Temperature: This alarm will only occur in the hold mode. Probe the product to determine it is at the correct
temperature. If the product temperature is above the guidelines check the chill time selected or the weight of product being chilled does not exceed the specification for the cabinet. Possible causes: Is the evaporator iced up? Are the evaporator fans working? Check door switch operation
for the fan/s. Loss of refrigerant? or Compressor failure?. HP Switch: Causes for this alarm could be:
Does the product temperature exceed 90°c? Has too much product been placed in the cabinet? Is the airflow to the condensing unit restricted? Does the condenser filter require cleaning? Is the condenser fan working? On a pump down system is the solenoid valve energising? Is the HP switch faulty? Is the HP switch set to the correct operating pressure? For pressure settings see below:
HP Switch 28 Bar – 3 Bar Diff (G63)
LP Switch 2.5 Bar 0.5 Bar Diff (G60)
. Power Fail: If the power fails for up to five minutes the unit will re-start on the resumption of the power supply
(without affecting the selected cycle). If it is longer than five minutes the controller will enter the hold mode. To check the cycle operation look in the information screen to check the cycle time. To re-start press and release the dial or centre button, the screen will return to the hold screen. Press and hold the dial or centre button for two seconds the display will return to the program selection.
Foot Print Test Operation The foot print test is a method of checking the operation of the process in a reduced time period as it only takes 10 minutes. The first ten seconds are used for the display test, after that the relays are energised in a simple operating pattern to ensure each are energised. During the final ten seconds the alarm is sounded to indicate the end of the test.

26
The graph below shows how the relays are energised relating to time. The air, coil and food temperature probes are disregarded (the only exception is an over temperature alarm).
Operation Summary All relays commence Footprint test in the de-energised state. Relay 1 is energised after 10 seconds from start of test for 470 seconds (de-energises 480 seconds from start). Relay 2 is energised after 60 seconds from start of test for 30 seconds (de-energises 90 seconds from start). Relay 2 is energised again after 120 seconds from start of test for 300 seconds (de-energises 420 seconds from start). Relay 3 is energised after 90 seconds from start of test for 330 seconds (de-energises 420 seconds from start). Relay 3 is energised after 540 seconds from start of test for 30 seconds (de-energises 570 seconds from start). Relay 4 is energised after 450 seconds from start of test for 90 seconds (de-energises 540 seconds from start). Relay 5 is energised after 590 seconds from start of test for 10 seconds (de-energises 600 seconds from start). Relay 6 is energised after 360 seconds from start of test for 90 seconds (de-energises 450 seconds from start). Relay 7 is energised after 570 seconds from start of test for 20 seconds (de-energises 590 seconds from start). All relays are de-energised on completion of the test. At any point during the test pressing and holding the dial or centre button for 2 seconds can stop it. The test will be terminated and the display will revert to the last run cycle. Upon normal completion of the test the display will revert to the last run cycle (not the service parameters).
Probes Air and Evaporator Probes The air and evaporator probes are the same and are identified as T1 Air Probe and T2 Evaporator Probe. These are the thermistor type and are fully enclosed to make it completely waterproof and resilient to temperature variation within the limits of rapid cycling. The probe is capable of measuring temperature in excess of -30°C and 50°C with 1°K accuracy at 1°C and no more than 2°K at the upper and lower temperature ranges.
Food Probe The food probe is inserted directly into the product that is being chilled to measure the core temperature. The resistance values are the same as for the air and evaporator probes.
Probe temperature resistance values
°C K ohm °C K ohm °C K ohm °C K ohm °C K ohm
-40 44.657 -5 7.198 30 1.651 65 0.497 100 0.189
-35 33.505 0 5.716 35 1.371 70 0.426 105 0.166
-30 25.388 5 4.571 40 1.143 75 0.367 110 0.142
-25 19.402 10 3.682 45 0.958 80 0.318 115 0.125
-20 14.961 15 2.987 50 0.807 85 0.276 120 0.111
-15 11.644 20 2.437 55 0.683 90 0.24 125 0.099
-10 8.133 25 2 60 0.582 95 0.21

27
IrDA PRINTER INSTALLATION & OPERATING GUIDE A044 / FST – FCC-IRC COMPONENT REQUIREMENT
The controller must have Software Revision 2a or later (i.e. 2b, 2c, 3a, etc). The
software revision is displayed on the controller at the bottom of the ‘SYSTEM TEST’ screen during the first 3 seconds after mains electricity is supplied to the cabinet. To check the ‘Software Revision’ isolate and reinstate the electricity supply to the machine.
The controller system must have the optional IrDA PCB fitted to the unit cover and connected to the display PCB. This is usually a factory fitted option but could be retrofitted by a competent service technician
Foster part number 00-555461 (FST-FCC-IRB)
The controller must be fitted with the appropriate label. These are as shown below (not to scale).
SYSTEM TEST
EXPERT
Software Revision 2b
By LAE ELECTRONIC
Foster Cabinet Blast Chiller Label
Foster Modular Blast Chiller Label
The printer selected for use must be capable of operating using a fully configured IrDA system. The controller infra red system is a bi- directional device utilising IrDA in the physical layer only.
The standard printer (part number 00-555459) is such a device. Additional information / drivers etc can be downloaded from the supplier website at: http://www.custom.it/ing/wireless/01-02.htm

28
Enabling the Printer Function The logging and printing system is enabled through the Service Parameters in the following manner. If this procedure is not followed and the ‘HACCP Enable’ parameter is not changed to ‘YES’, the controller will not output any information to the printer (or other device) when asked to perform this function.
1. With the blast chiller in Standby mode (not running in chill cycle or in hold mode) press the operating dial or centre button for 5 seconds to show the ‘SERVICE’ menu
2. Rotate the operating dial or click wheel to change the highlighted section on the display from ‘LANGUAGE’ to ‘PASCODE’
SERVICE
LANGUAGE ENG
DIAGNOSTIC 1-COMP
FOOTPRINT
PASSCODE 0
Press 2 Sec. for Exit
SERVICE LANGUAGE ENG
DIAGNOSTIC 1-COMP
FOOTPRINT
PASSCODE 0
Press 2 Sec. for Exit
SERVICE LANGUAGE ENG
DIAGNOSTIC 1-COMP
FOOTPRINT
PASSCODE 0
Press 2 Sec. for Exit
3. Press and release the operating dial or centre button. The display will change to highlight the ‘PASSCODE’ value
4. Rotate the dial or click wheel to change the displayed ‘PASSCODE’ value to ‘131’. Press and release the dial or centre button to enter the service program menu.
SERVICE LANGUAGE ENG
DIAGNOSTIC 1-COMP
FOOTPRINT
PASSCODE 131
Press 2 Sec. for Exit
6. Rotate the dial or click wheel to highlight the selected (indicated by symbol ‘>>>’ beside the name) or the required operating profile. Press and release the dial or centre button.
5. The display will show the operating profile menu with '’SIMPLE'’ highlighted.
SERVICE SIMPLE
SIMPLE +
CHEF
CHEF +
LE CHEF
EXPERT >>>
EXPERT +
Press 2 Sec. for Exit
SERVICE SIMPLE
SIMPLE +
CHEF
CHEF +
LE CHEF
EXPERT >>>
EXPERT +
Press 2 Sec. for Exit
7. The display will show the operating program parameter setting screen with '‘RE CHILL'’ highlighted.
EXPERT
PRE CHILL
SOFT CHILL
HARD CHILL
HARD MAX
SHOCK FREEZE
PROFESSIONAL 1
PROFESSIONAL 2
PROFESSIONAL 3
Press 2 Sec. for Exit
8. Rotate the dial or click wheel until the display changes to show ‘SYSTEM’ highlighted on a page by itself. Press and release the dial or centre button.
EXPERT
SYSTEM
Press 2 Sec. for Exit
9. The display will show the individual system parameters with ‘UV Light Time’ highlighted
10. Rotate the dial or click wheel to highlight the parameter ‘HACCP Enable’. Press and release the dial or centre button.
SYSTEM
UV Light Time 0 min
HACCP Enable NO
Shock Chill Temp. NO
Chill Hysteresis 4°
Hold Hysteresis 4°
APM Time 2 Min.
APM Diff. 10°
Fan 1 Hold OP. AUTO
Press 2 Sec. for Exit
SYSTEM
UV Light Time 0 min
HACCP Enable NO
Shock Chill Temp. NO
Chill Hysteresis 4°
Hold Hysteresis 4°
APM Time 2 Min.
APM Diff. 10°
Fan 1 Hold OP. AUTO
Press 2 Sec. for Exit
11. The display will show the value of ‘HACCP Enable’ (typically ‘NO’) highlighted. Rotate the dial or click wheel until the value changes to ‘YES’
12. With the value changed the dial or centre button should be pressed and released. The display will automatically highlight the next parameter (Shock Chill Temp.) the dial or centre button should then be pressed and held for 2 seconds to exit the Service Settings menu
SYSTEM
UV Light Time 0 min
HACCP Enable NO
Shock Chill Temp. NO
Chill Hysteresis 4°
Hold Hysteresis 4°
APM Time 2 Min.
APM Diff. 10°
Fan 1 Hold OP. AUTO
Press 2 Sec. for Exit
SYSTEM
UV Light Time 0 min
HACCP Enable YES
Shock Chill Temp. NO
Chill Hysteresis 4°
Hold Hysteresis 4°
APM Time 2 Min.
APM Diff. 10°
Fan 1 Hold OP. AUTO
Press 2 Sec. for Exit

29
Configuring the Print Function The printing function can be configured by the user in two ways to tailor the system to their specific requirements. These are: Data Rate – Which is the frequency of (or interval between) temperature recordings during the chill cycle. Type – This determines if a complete time and temperature or summary printout is produced. The logging and printing system is configured through the controller in the following manner:
1) With the blast chiller in ‘Standby’ mode (not running a chill cycle or in hold mode) press the operating dial or centre button for 2 seconds
2) The display will show the Program Information Menu. Rotating the dial or click wheel, scroll down until ‘HACCP SETTINGS’ is highlighted.
3) Press and release the dial or centre button. This will cause the controller to display the ‘HACCP SETTINGS’ menu.
4) ‘DATA RATE’ will be displayed highlighted. This is the time interval between temperature values being recorded (and subsequently printed) during the chill part of the cycle.
5) Pressing and releasing the dial or centre button will cause the value to be highlighted. The data rate may then be changed from 3 minutes to 5 minutes by rotating the dial or click wheel. Once the required value is displayed the dial or centre button is pressed to set it.
6) From Point 4 the dial or click wheel can be rotated; or by following through Point 5, the display will change to show ‘TYPE’ highlighted. To adjust the value of ‘TYPE’ the dial or centre button must be pressed and released.
7) The ‘TYPE’ of printout can be changed from ‘FULL’ (a complete detailed record) to ‘SHORT’ (a summary version) by rotating the dial or click wheel. Once the required value is displayed the dial or centre button is pressed to set it. The display will revert to highlighting ‘DATA RATE’.

30
8) When the ‘HACCP SETTINGS’ have been configured the menu is exited either by pressing and holding the dial or centre button for 2 seconds or allowing the controller to revert after 20 seconds by itself.
IrDA Printer Setup Switching the printer ON and OFF To switch the printer ON press and release the button, the indicator will flash ON and OFF intermittently at approximately 2 second intervals. If the unit is not used it will switch OFF after 5 minutes.
If the unit doesn’t respond it may require the batteries in the printer being re-charged. Plug the charger cable into the RS232 socket and the charger into the mains electrical supply and leave overnight.
To switch the printer OFF double press the button and the indicator will flash rapidly for 5 seconds and then stop, the printer is now OFF.
Checking the Setup. With the printer switched OFF press and hold the button until the default settings start to be printed then release.
Once the default settings have been printed check to see if they are the same as shown in the listing below.
SETUP DEFAULT 40 Col.: HEAD TEMP. [°C] = 22.5 BATT. TEMP. [°C] = 22.5 indicates the status of the printer. HEAD VOLT [V] = 5.4
INTERFACE: Infrared IR Protocol: Enabled Baud Rate: 9600 bps Data Length: 8 Bits/chr Parity: None Handshaking: XON/XOFF Autofeed: CR Enabled Battery: 1850 mÅh Standby: 60 min Columns: 40 col: Print Mode: Normal Aligment: Disabled Print Dens.: 0 If the print out differs in any way change the settings to suit those listed. To change the settings press and hold the button, when the printer starts to print release the button and the first setting ‘Interface: Infrared’ will be printed. If the setting printed defaults to an ‘Interface: RS232’ a setting change is required, change the setting by pressing and releasing the button ‘Interface: Infrared’ will be printed. To save the change press and hold the button, when the printer starts to print release the button and the next settings ‘IR Protocol: Enabled’ will be printed. If this differs i.e. ‘IR Protocol: Disabled’ change the setting as previously described. Continue through the settings and change accordingly. NOTE: ‘Handshaking: XON/XOFF’ is not changeable. Once all of the changes have been completed the new settings will be printed followed by ‘PRINTER RESET’ the printer is now ready for use.
}

31
Printing Operation
The printing operating is identical for both the cabinet and modular Blast Chiller controller. For simplicity the diagrams below show just the cabinet variant, but the principles can be directly applied to modular versions.
Prior to starting it is necessary to ensure that the controller has been correctly configured to allow printing, and that the printer has sufficient battery charge and is correctly loaded with paper.
Note: It is not possible to print details of a Pre- Chill or Defrost cycle – the last chill cycle details will be printed
1) With the blast chiller in Standby mode (not running a chill cycle or in half mode) press the operating dial or centre button for 2seconds.
2) The display will show the Program Information Menu. Rotating the dial or click wheel, scroll down until ‘PRINT DATA’ is highlighted.
3) Press the black button (1) on the top of the printer to switch it on. Align the printer LED lens (2) with the Blast chiller LED window (3). The lens and window should be directly facing each other, and about 300mm-450mm (12”-18”) apart. Press and releases the Blast Chiller operating dial or centre button.
4) Once the printing has been complete the display will revert to the Program selection menu. Further copies of the printout can be produced as required following the same procedure as in detailed in Points 1 to 3
5) If ‘COMMUNICATION’ is shown on the controller – then there has been a problem with the controller sending data to the printer (i.e. printer not switched on, too far away, window not pointing at the controller etc). After 2 seconds the message will disappear and the display will revert to the program selection menu.
Note: Once a new chill cycle has been started all the data in the print memory will be lost.
2
1 3
32
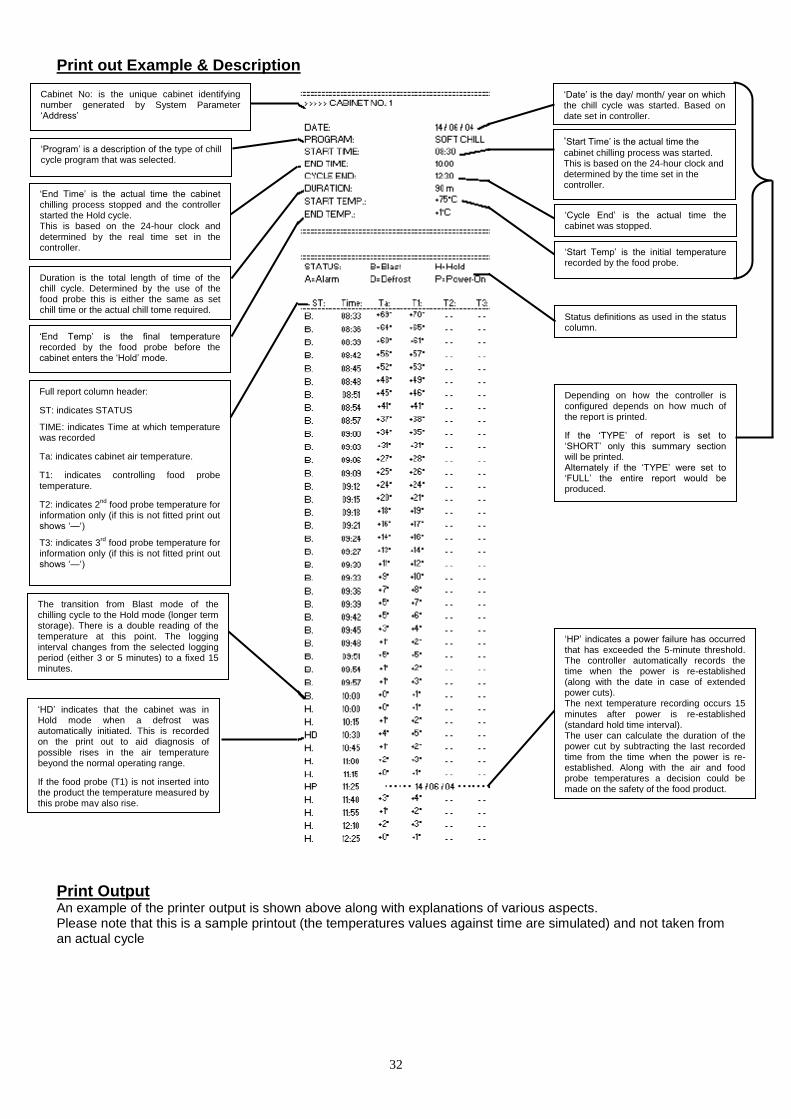
Print out Example & Description
Print Output An example of the printer output is shown above along with explanations of various aspects. Please note that this is a sample printout (the temperatures values against time are simulated) and not taken from an actual cycle
Cabinet No: is the unique cabinet identifying number generated by System Parameter ‘Address’
‘Program’ is a description of the type of chill cycle program that was selected.
‘End Time’ is the actual time the cabinet chilling process stopped and the controller started the Hold cycle. This is based on the 24-hour clock and determined by the real time set in the controller.
Duration is the total length of time of the chill cycle. Determined by the use of the food probe this is either the same as set chill time or the actual chill tome required.
‘End Temp’ is the final temperature recorded by the food probe before the cabinet enters the ‘Hold’ mode.
Full report column header:
ST: indicates STATUS
TIME: indicates Time at which temperature was recorded
Ta: indicates cabinet air temperature.
T1: indicates controlling food probe temperature.
T2: indicates 2nd
food probe temperature for information only (if this is not fitted print out shows ‘—‘)
T3: indicates 3rd
food probe temperature for information only (if this is not fitted print out shows ‘—‘)
The transition from Blast mode of the chilling cycle to the Hold mode (longer term storage). There is a double reading of the temperature at this point. The logging interval changes from the selected logging period (either 3 or 5 minutes) to a fixed 15 minutes.
‘HD’ indicates that the cabinet was in Hold mode when a defrost was automatically initiated. This is recorded on the print out to aid diagnosis of possible rises in the air temperature beyond the normal operating range.
If the food probe (T1) is not inserted into the product the temperature measured by this probe may also rise.
‘Date’ is the day/ month/ year on which the chill cycle was started. Based on date set in controller.
‘Start Time’ is the actual time the
cabinet chilling process was started. This is based on the 24-hour clock and determined by the time set in the controller.
‘Cycle End’ is the actual time the cabinet was stopped.
‘Start Temp’ is the initial temperature recorded by the food probe.
Status definitions as used in the status column.
Depending on how the controller is configured depends on how much of the report is printed.
If the ‘TYPE’ of report is set to ‘SHORT’ only this summary section will be printed. Alternately if the ‘TYPE’ were set to ‘FULL’ the entire report would be produced.
‘HP’ indicates a power failure has occurred that has exceeded the 5-minute threshold. The controller automatically records the time when the power is re-established (along with the date in case of extended power cuts). The next temperature recording occurs 15 minutes after power is re-established (standard hold time interval). The user can calculate the duration of the power cut by subtracting the last recorded time from the time when the power is re-established. Along with the air and food probe temperatures a decision could be made on the safety of the food product.

33
Technical Data
QC/BC11 BC21 BC36 BC51 Remote
BC51 Integral
Nominal Chilling Capacity 11Kg 21Kg 36Kg 51Kg 51Kg
Duty @ -15°C 826w 1182w 1909w 2786
Fans 1 1 2 2 2
Defrost Load (amps) N/A N/A N/A N/A N/A
Evaporating Temperature -15°C -15°C -15°C -15°C -15°C
Refrigerant Control TEV TEV TEV TEV TEV
Refrigerant R404a R404a R404a R404a R404a
Refrigerant Quantity 1000g 1500g 2700g 2550g 2550g
Electrical Supply 230/1/50 – 13amp
230/1/50 – 13amp
230/1/50 – 16amp 230/1/50 – 16amp 400/3/50 16 amp per phase
Power Consumption Watts 738 Amps 3.44
Watts 1089 Amps 5.1
Watts 1994 Amps 9.05
Watts Amps
Watts 2435 Per Phase Amps 5.95 Per Phase
Power absorbed W 730 1120 1990 2430 2430
Total Heat Rejection 1564w 2271w 3903w 5221w
BCF11 BCF21 BCF36 BCF51 Remote
BCF51 Integral
Nominal Chilling Capacity 11Kg 21Kg 36Kg 51Kg 51Kg
Nominal Freezing Capacity 11Kg 21Kg 36Kg 51Kg 51Kg
Duty @ -30°C 601 793 954 1510w
Fans 1 1 2 2 2
Defrost Load (amps) 0.5 1.0 1.5 1.5 1.5
Evaporating Temperature -30°C -30°C -30°C -30°C -30°C
Refrigerant Control TEV TEV TEV TEV TEV
Refrigerant R404a R404a R404a R404a R404a
Refrigerant Quantity 1300g 1500g 2400g 3200g 3200g
Electrical Supply 230/1/50 – 13amp
230/1/50 – 13amp
400/3/50 16 amp per phase
230/1/50 – 16amp 400/3/50 16 amp per phase
Power Consumption Watts 913 Amps 4.06
Watts 1246 Amps 5.55
Watts 1922 Per Phase Amps 4.72 Per Phase
Watts Amps
Watts 2242 Per Phase Amps 5.35 Per Phase
Power absorbed W 900 1275 1920 2240 2240
Total Heat Rejection 1514w 2039w 2876w 3748w
The controller can record 1000 events. That is 1000 time related readings (independent of the number of food probes fitted).
Some samples of the time period that this allows are given below:
‘Data Rate’ set at 3 minutes. 90 minutes chill cycle:
30 chill time recordings @3 minute intervals. 970 hold time recordings @ 15 minute intervals. Total time span 244 hours (10 days 4 hours)
Data Rate’ set at 5 minutes. 90 minutes chill cycle:
18 chill time recordings @ 5 minute intervals. 982 hold time recordings @ 15 minute intervals. Total time span 247 hours (10 days 7 hours)
Once the controller memory is full the controller will stop. It will not over write the memory until a new chill cycle has started.
240 minute chill (freeze) cycle:
80 chill time recordings @ 3 minute intervals. 920 hold time recordings @ 15 minute intervals. Total time span 234 hours (9 days 18 hours).
480 minute (maximum) chill cycle: 160 chill time recordings @ 3 minute intervals. 840 hold time recordings @ 15 minute intervals.
Total time span 218 hours (9 days 2 hours).
480 minute (maximum) chill cycle: 96 chill time recordings @ 5 minute intervals. 904 hold time recordings @ 15 minute intervals. Total time span 234 hours (9 days 18 hours).
240 minute chill (freeze) cycle:
48 chill time recordings @ 5 minute intervals. 952 hold time recordings @ 15 minute intervals. Total time span 242 hours (10 days 2 hours).

34
Modular
MBC75 MBC100 MBC150 MBC250
Nominal Chilling Capacity 75Kg 100Kg 150Kg 250Kg
Duty @ -15°C 7kW 8.5kW 11.5kW 21kW
Fans 3 3 3 6
Fan Load 0.6kW 0.6kW 0.6kW 1.2kW
Defrost Load 0kW 0kW 0kW 0kW
Drain Connection 22mm 22mm 22mm 22mm
Evaporating Temperature -15°C -15°C -15°C -15°C
Refrigerant Control TEV (MOP @ +10°C) TEV (MOP @ +10°C) TEV (MOP @ +10°C) TEV (MOP @ +10°C)
Refrigerant R404a R404a R404a R404a
Inlet size 1/2’’ 1/2’’ 1/2’’ TBS
Outlet Size 1 1/8” 1 1/8” 1 1/8” TBS
Electrical Supply 230/1/50 – 13 A 230/1/50 – 13A 230/1/50 – 13A 400/3/50 – 16A/ phase
MBCF75 MBCF100 MBCF150 MBCF250
Nominal Chilling Capacity 75Kg 100Kg 150Kg 250Kg
Nominal Freezing Capacity 75Kg 100Kg 150Kg 250Kg
Duty @ -30°C 6 6.4 9 18
Fans 3 3 3 6
Fan Load 0.6kW 0.6kW 0.6kW 1.2kW
Defrost Load 4 kW 4 kW 4 kW 8 kW
Drain Connection 22mm 22mm 22mm 22mm
Evaporating Temperature -30°C -30°C -30°C -30°C
Refrigerant Control TEV (MOP @ +10°C) TEV (MOP @ +10°C) TEV (MOP @ +10°C) TEV (MOP @ +10°C)
Refrigerant R404a R404a R404a R404a
Inlet size 1/2’’ 1/2’’ 1/2’’ 1/2’’
Outlet Size 1 1/8” 1 1/8” 1 1/8” 1 1/8”
Electrical Supply 230/1/50 – 16 A 230/1/50 – 16A 230/1/50 – 16A 400/3/50 – 16A/ phase

35
Wiring Diagram – BC11 & BCF11 Remote Models

36
Wiring Diagram - BC21, BCF21

37
Wiring Diagram - BC36 (13amp singe phase version)

38
Wiring Diagram - BC36 (16 amp single phase version)

39
Wiring Diagram - BCF36, BC51, BCF51 (3 phase)

40
Troubleshooting
Problem Possible Cause Solution
Compressor will not start No voltage in socket Use voltmeter to check
Electrical conductor or wires may be cut
Use ohmmeter to check for continuity
Defective electrical component: thermostat, relay, thermal protector etc
Replace defective component
Compressor motor has a winding open or shorted
Measure ohmic resistance of main and auxiliary winding using ohmmeter. Compare with correct values
Compressor stuck Change compressor
Temperature control contacts are open
Repair or replace the contacts
Incorrect wiring Check wiring diagram and correct
Fuse blown or circuit breaker tripped.
Replace fuse or reset circuit breaker
Power cord unplugged Plug in power cord.
Controller set too high Set controller to lower temperature.
Cabinet in defrost cycle Wait for defrost cycle to finish
The temperature is too cold Controller is set at a very cold position
Set to warmer position and check if the compressor stops according to controllers operating range.
Controller does not disconnect the condensing unit
Check the insulation of the thermostat. If problem persists, change the thermostat
Control contacts are stuck closed Change the control. Check amperage load
Defective or incorrect temperature control
Determine correct control and replace.
The temperature is not cold enough
Controller is set at a very warm position
Adjust to colder setting
Condenser is dirty Clean condenser
The refrigerator has been placed at an inadequate location
The unit must not be near stoves, walls that are exposed to the sun, or places that lack sufficient air flow.
Compressor is inefficient or there is a high pressure due to the air in the system
If there is air in the system, purge and recharge
Iced up evaporator coil
Check temperature control, refrigerant charge, and defrost mechanism. Remove all ice manually and start over.
Restriction in system Locate exact point of restriction and correct
The refrigerator has been overcharged with the refrigerant gas
Check to see if condensation or ice crystals have formed on the suction line. If so, charge with the correct amount of gas.
The refrigerant gas is leaking
Find the location of gas leak in order to seal and replace the defective component. Change the drier. Perform a good vacuum and recharge unit.

41
The evaporator and/or condenser fans are not working
Check electrical connections and make sure that the fan blade isn’t stuck. Replace the fan motor if it doesn’t work.
Blocking air flow
Re-arrange product to allow for proper air flow. Make sure there is at least four inches of clearance from evaporator.
Fuse blown or circuit breaker tripped Replace fuse or reset circuit breaker.
Electrical Shocks
Wires or electrical components are in direct contact with metallic parts.
Check for appropriate insulation on the connections of each component.
Noise
The refrigerator is not properly levelled
Check if the noise goes away after you level the refrigerator
The condenser is not fastened correctly. Copper tubing is in contact with metal
While the compressor is working, check to see if metal parts are in contact with one another and/or if the screws that fasten the condenser are tightened.
The evaporator and/or condenser fans are loose
Check if the fans are securely fastened. Also, check if the fan blades are loose, broken or crooked. If so, change the faulty blade.
Compressor has an internal noise If the noise persists after all other measures have been taken, it may be originating from the compressor.
Loose part(s) Locate and tighten loose part(s)
Extreme condensation inside the refrigerator
Controller is set at a very cold position
Set the controller to a warmer position & check to see if compressor stops as should.
The outside environment’s relative humidity is very high (over 75%)
This type of occurrence is caused by local climatic conditions and not by the refrigeration unit.
The refrigerator door won’t shut completely
Check the door and/or the magnetic gasket. Adjust the door hinges if needed; replace the gasket if broken.
The refrigerator had been placed at an inadequate location
The unit must not be near sources that produce too much heat.
Condensing unit runs for long periods of time
Prolonged door opening or door ajar
Advise user to ensure doors are closed when not in use and to avoid opening doors for long periods of time.
Door gasket(s) not sealing properly
Ensure gaskets are snapped in completely. Remove gasket and wash with soap and water. Check condition of gasket & replace if necessary
Dirty condenser coil Clean condenser coil
Evaporator coil iced over
Unplug unit and allow coil to defrost. Make sure thermostat is not set too cold. Ensure that door gasket(s) are sealing properly. Select manual defrost and ensure system works.

42
Notes

43
Foster European Operations France Foster Refrigerator France SA Tel: (33) 01 34 30 22 22. Fax: (33) 01 30 37 68 74. Email: [email protected] Germany Foster Refrigerator Gmbh, Tel: (49) 781 990 7840. Fax (49) 781 990 7844. Email: [email protected] Foster Refrigerator Oldmedow Road Kings Lynn Norfolk PE30 4JU Tel: 0843 216 8833 Fax: 0843 216 4707 Website: www.fosterrefrigerator.co.uk Email: [email protected] a Division of ‘ITW (UK) Ltd’
BCHILLER04/SURF DIAL & CLICK/SM 10/10