By Rebecca Hayter B yr wn te - DIYNO Kitset Boats
10
By Rebecca Hayter Pre-cut panels Jigsaw cut panels. PHOTOGRAPHS: JIM PAULING/GERALD SHACKLOCK
Transcript of By Rebecca Hayter B yr wn te - DIYNO Kitset Boats

By Rebecca Hayter
Pre-cut panels
A 3.6 metre aluminium runabout ina couple of weekends
Build your own tinnie
Jigsaw cut panels.
PHOT
OGRA
PHS:
JIM
PAU
LIN
G/GE
RALD
SHA
CKLO
CK

13f e b r u a ry/m a r c h 2010 th e s h e d
The aluminium runabout – bet-ter known as the tinnie – is the
quintessential Kiwi bach boat. Most arrive in the backyard direct from the showroom or the For Sale pag-es, but Auckland boat designer Jim Pauling has created a new way of getting a tinnie: building it by kit-set.He has several sizes in his range.
The newest is the baby, the DIYNO 361, at 3.6 metres long. Thanks to
improved technology and lower prices for power
tools generally, it is much eas-ier for the home handyman to
pick up a welder, have a few prac-tice runs on some scrap aluminium, or do a course at night school, and build his own kitset, 12-foot tinnie.
Weekend buildingPauling is a diehard fan of alumin-ium as a building material. Thanks to CNC (computer numerically controlled) cutters, it can be accu-rately cut to shape for sale as a kit-set, which saves labour and vastly improves the result. The tools re-quired are inexpensive and found in most home workshops. Unlike timber, aluminium requires no glu-ing, fibre-glassing, sealing, fairing or painting so, once the aluminium boat is finished, it’s finished, mak-ing for a much quicker build-time. Pauling says a couple of good keen builders could put this boat togeth-er in a couple of weekends.When pushed for a disadvantage, he will concede that aluminium is slightly more difficult to weld than steel; however, thanks to its simple build, the DIYNO 361 is well within the capabilities of most amateurs. Or, if you don’t wish to tackle the welding, you can tack-weld the pieces together and call in a more proficient welder to do the seams. Mostly, the DIYNO is a one-man job, but certain stages require two pairs of hands. For that reason, it’s a great father-son project.If you have access to a press brake, some parts of the boat such as the
131313
Aluminium jig in place.
Millimetres matter.
Jim and Jason fit bottom panel into aluminium jig.

14 th e s h e d f e b r u a ry/m a r c h 2010
seat or thwart, transom and gird-ers can be folded into a three-sided, box section from one flat piece. This gives the best result but if no press brake is available, the relevant pan-el can be cut into three pieces and welded into a box section.
AluminiumPauling says the thickness of the 3 mm aluminium is about the practi-cal, lower limit for amateur weld-ing. This is heavier than would normally be used for a small boat, so the DIYNO 361 ends up on the heavy side for its length, which has in turn required a generous beam to support it. The bonus is that it is quite a big, little boat and extremely strong and stable for its size range.The kitset arrives as two, 6.1 m x 1.8 m sheets of aluminium in a flat pack. The panels for the kitset are pre-cut within the sheet, but attached by tabs at regular inter-vals. You can release them using a crowbar but it tends to pucker the aluminium; a jigsaw does a neater job.The kitset comes with computer-drawn plans and comprehensive instructions. Use these to identify every part of the kitset, the length and type of welds for different ar-eas, and to mark out placement lines. If you still have questions, Pauling is just a phone call away.For home handyman purposes, the DIYNO kitset includes a custom-
wood jig. However, when building the demonstration boat for these photos, Pauling used an alumini-um jig as he wanted to use it for subsequent builds, for which he had orders. The aluminium and customwood jigs are pretty similar in terms of setting up, but where they differ, we have illustrated the technique with photos of a custom-wood jig Pauling built for a bigger DIYNO model. He says the custom-wood jig is the easier one to set up because its pieces automatically lock in and screw together.
The jig The boat is built the right way up, with all welds on the inside, until it is nearly complete. Then, it is turned over for welding the out-
sides of the seams. The jig com-prises two side rails, a centrepiece, and cross members which will hold the shape of the hull. Ideally, the building area will be clean, tidy and perfectly flat. If a flat floor is not available, set up the jig on timber bearers as you would if building a deck.We’ll assume you have a flat floor. Use a builder’s pencil to draw a straight, centreline of at least 3.6 m—the length of the boat—on the floor. A long, aluminium off-cut will provide a straight-edge. At one end of the centre line, mark out a perpendicular line using the 3, 4, 5 method to make sure the right an-gles are exactly 90 degrees. This is a crucial step, before continuing in the construction of the jig.
The customwood jig is the traditional support that comes with this aluminium boat. The aluminium jig also featured in this article was made especially for the prototype of the 3.6 metre boat. The aluminium bottom panels are tack-welded to an aluminium jig and strapped down to a customwood jig through scrap aluminium tags welded onto the hull plates.
CUSTOMWOOD JIG
Crucial fit. Panels are tack-welded on aluminium jig, but strapped to customwood jig.
Customwood jig being set up. Interlocking customwood jig detail. Hull tags strapped to jig.
15f e b r u a ry/m a r c h 2010 th e s h e d
top of box girder
top of box girder
Deck
Front screen
Side screen
Box girderBottom panel
Chine
Topside
Side screen
Front screen
Thwart
Girder extensions for outboawrd
Side screenFront screen
Deck
Thwart
Thwart
Plan
ProfileBody Section
8 1 0234567
8 1 0234567
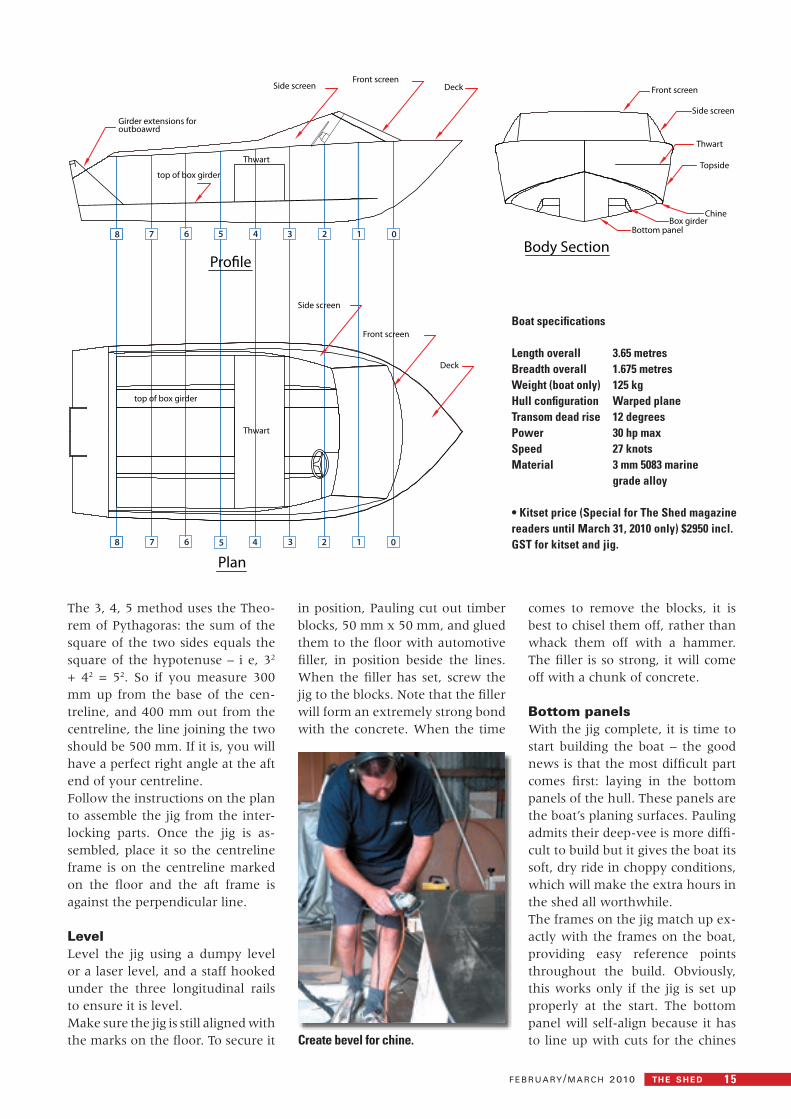
The 3, 4, 5 method uses the Theo-rem of Pythagoras: the sum of the square of the two sides equals the square of the hypotenuse – i e, 32 + 42 = 52. So if you measure 300 mm up from the base of the cen-treline, and 400 mm out from the centreline, the line joining the two should be 500 mm. If it is, you will have a perfect right angle at the aft end of your centreline.Follow the instructions on the plan to assemble the jig from the inter-locking parts. Once the jig is as-sembled, place it so the centreline frame is on the centreline marked on the floor and the aft frame is against the perpendicular line.
LevelLevel the jig using a dumpy level or a laser level, and a staff hooked under the three longitudinal rails to ensure it is level.Make sure the jig is still aligned with the marks on the floor. To secure it
in position, Pauling cut out timber blocks, 50 mm x 50 mm, and glued them to the floor with automotive filler, in position beside the lines. When the filler has set, screw the jig to the blocks. Note that the filler will form an extremely strong bond with the concrete. When the time
comes to remove the blocks, it is best to chisel them off, rather than whack them off with a hammer. The filler is so strong, it will come off with a chunk of concrete.
Bottom panelsWith the jig complete, it is time to start building the boat – the good news is that the most difficult part comes first: laying in the bottom panels of the hull. These panels are the boat’s planing surfaces. Pauling admits their deep-vee is more diffi-cult to build but it gives the boat its soft, dry ride in choppy conditions, which will make the extra hours in the shed all worthwhile.The frames on the jig match up ex-actly with the frames on the boat, providing easy reference points throughout the build. Obviously, this works only if the jig is set up properly at the start. The bottom panel will self-align because it has to line up with cuts for the chines
Boat specifications
Length overall 3.65 metresBreadth overall 1.675 metresWeight (boat only) 125 kgHull configuration Warped planeTransom dead rise 12 degreesPower 30 hp maxSpeed 27 knotsMaterial 3 mm 5083 marine grade alloy
• Kitset price (Special for The Shed magazine readers until March 31, 2010 only) $2950 incl. GST for kitset and jig.
Create bevel for chine.

16 th e s h e d f e b r u a ry/m a r c h 2010
on the jig.Placing the panels is definitely a two-person job. Paul-ing had his friend Jason Swan help man-handle the panels into position and do the welding. Do one side at a time, adhering exactly to the centreline of the jig. Be-gin at the transom and work your way forward, tack-ing as you go. The panels are conically developed but do have considerable shape in the forward sections, so it is imperative that you force the forward sections of the hull right down to the jig; this requires some grunt, so get tough and let the panels know that you’re in charge. Pauling was using his aluminium jig, so he held the sheets in place while Swan tacked the sheets to the jig. If using the customwood jig, cut 50 mm x 50 mm tags from the scrap aluminium and tack-weld these to the bottom panels, on the positions indicated on the plans. Use these tags to strop down the bottom panels, running the strops through the holes drilled in the jig, as shown on the plans. The tags are removed once the hull has been welded. Be aware that it may take some time to get the panels exactly right, but it is imperative that you do.
Second bottom panel tacked.
Tack welding the transom.
“Considerable shape” in the forward section.
Spacers and tack-welded girders in place.
Tack welding the chine.
17f e b r u a ry/m a r c h 2010 th e s h e d
We ‘picked up’ this 1.4 tonne ute using 2 metal plates glued together with ADOS Ultra High Strength Adhesive. ADOS UHS Adhesive is an ultra high strength contact adhesive that is water resistant, heat resistant up to 90 ̊C, versatile and durable. UHS’s easy spray application is ideally suited to the jobs of industry. It bonds concrete, wood, metal, plastics and more. Since 1960, Ados has made a range of top quality adhesives, sealants and epoxies to meet every kiwi’s need. It’s what we know. It’s what you know. To find see a video of this demonstration or to find out more information go to www.crc.co.nz.
How we turned a ute into a ‘pickup’
CR
C_2
50
6_S
HE
D
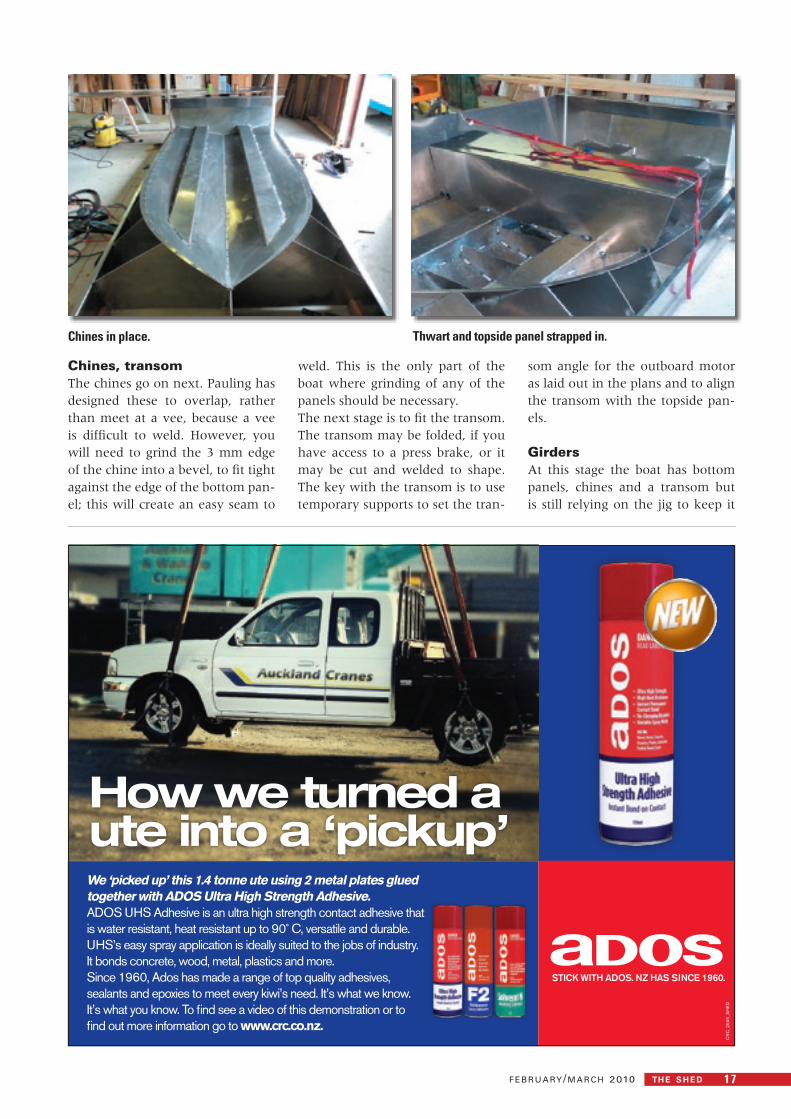
Chines, transomThe chines go on next. Pauling has designed these to overlap, rather than meet at a vee, because a vee is difficult to weld. However, you will need to grind the 3 mm edge of the chine into a bevel, to fit tight against the edge of the bottom pan-el; this will create an easy seam to
weld. This is the only part of the boat where grinding of any of the panels should be necessary.The next stage is to fit the transom. The transom may be folded, if you have access to a press brake, or it may be cut and welded to shape. The key with the transom is to use temporary supports to set the tran-
som angle for the outboard motor as laid out in the plans and to align the transom with the topside pan-els.
GirdersAt this stage the boat has bottom panels, chines and a transom but is still relying on the jig to keep it
Thwart and topside panel strapped in.Chines in place.
18 th e s h e d f e b r u a ry/m a r c h 2010
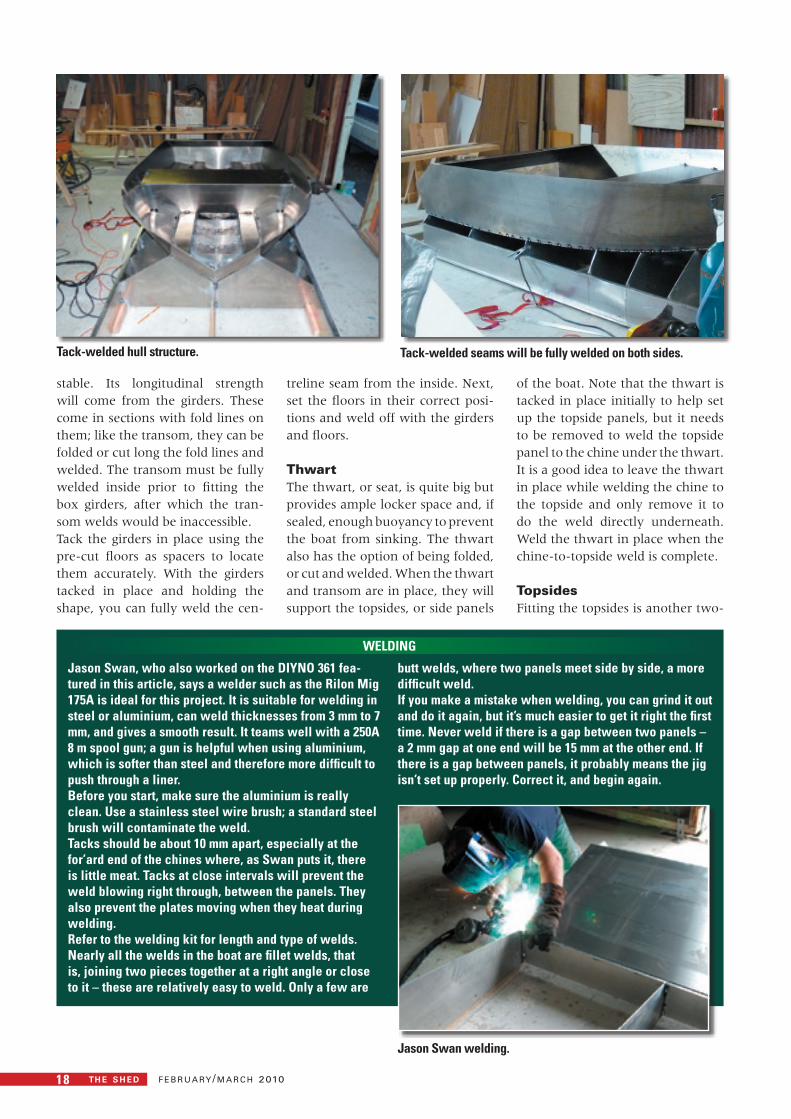
stable. Its longitudinal strength will come from the girders. These come in sections with fold lines on them; like the transom, they can be folded or cut long the fold lines and welded. The transom must be fully welded inside prior to fitting the box girders, after which the tran-som welds would be inaccessible.Tack the girders in place using the pre-cut floors as spacers to locate them accurately. With the girders tacked in place and holding the shape, you can fully weld the cen-
treline seam from the inside. Next, set the floors in their correct posi-tions and weld off with the girders and floors.
ThwartThe thwart, or seat, is quite big but provides ample locker space and, if sealed, enough buoyancy to prevent the boat from sinking. The thwart also has the option of being folded, or cut and welded. When the thwart and transom are in place, they will support the topsides, or side panels
of the boat. Note that the thwart is tacked in place initially to help set up the topside panels, but it needs to be removed to weld the topside panel to the chine under the thwart. It is a good idea to leave the thwart in place while welding the chine to the topside and only remove it to do the weld directly underneath. Weld the thwart in place when the chine-to-topside weld is complete.
TopsidesFitting the topsides is another two-
Tack-welded seams will be fully welded on both sides.Tack-welded hull structure.
Jason Swan, who also worked on the DIYNO 361 fea-tured in this article, says a welder such as the Rilon Mig 175A is ideal for this project. It is suitable for welding in steel or aluminium, can weld thicknesses from 3 mm to 7 mm, and gives a smooth result. It teams well with a 250A 8 m spool gun; a gun is helpful when using aluminium, which is softer than steel and therefore more difficult to push through a liner.Before you start, make sure the aluminium is really clean. Use a stainless steel wire brush; a standard steel brush will contaminate the weld. Tacks should be about 10 mm apart, especially at the for’ard end of the chines where, as Swan puts it, there is little meat. Tacks at close intervals will prevent the weld blowing right through, between the panels. They also prevent the plates moving when they heat during welding. Refer to the welding kit for length and type of welds. Nearly all the welds in the boat are fillet welds, that is, joining two pieces together at a right angle or close to it – these are relatively easy to weld. Only a few are
butt welds, where two panels meet side by side, a more difficult weld.If you make a mistake when welding, you can grind it out and do it again, but it’s much easier to get it right the first time. Never weld if there is a gap between two panels – a 2 mm gap at one end will be 15 mm at the other end. If there is a gap between panels, it probably means the jig isn’t set up properly. Correct it, and begin again.
WELDING
Jason Swan welding.

19f e b r u a ry/m a r c h 2010 th e s h e d
person job, as the panel has to be persuaded into place against its natural tendency to flare outwards. Start at the bow, making sure you push the edge of the topside panel hard down onto the chine so that the edges meet continuously along the whole length. Use a strop on
the thwart, as shown, to bring the topside panel in to near-vertical to finish snug at the transom. If the panels don’t fit at any point, grind off the tacks and start again.“If it’s not touching,” Pauling em-phasises, “don’t weld it. There must not be any gaps between compo-
nents.”When you’ve welded on the top-sides, you’re ready to fit the decks. Tack the panels in place over the full length, carefully aligning the topside panels underneath. Once you are happy with the position of the decks, mark off the screen posi-
Deck panels set up.Inside seams are fully welded.
Wel
d N
Z 1
2101
1
20 th e s h e d f e b r u a ry/m a r c h 2010
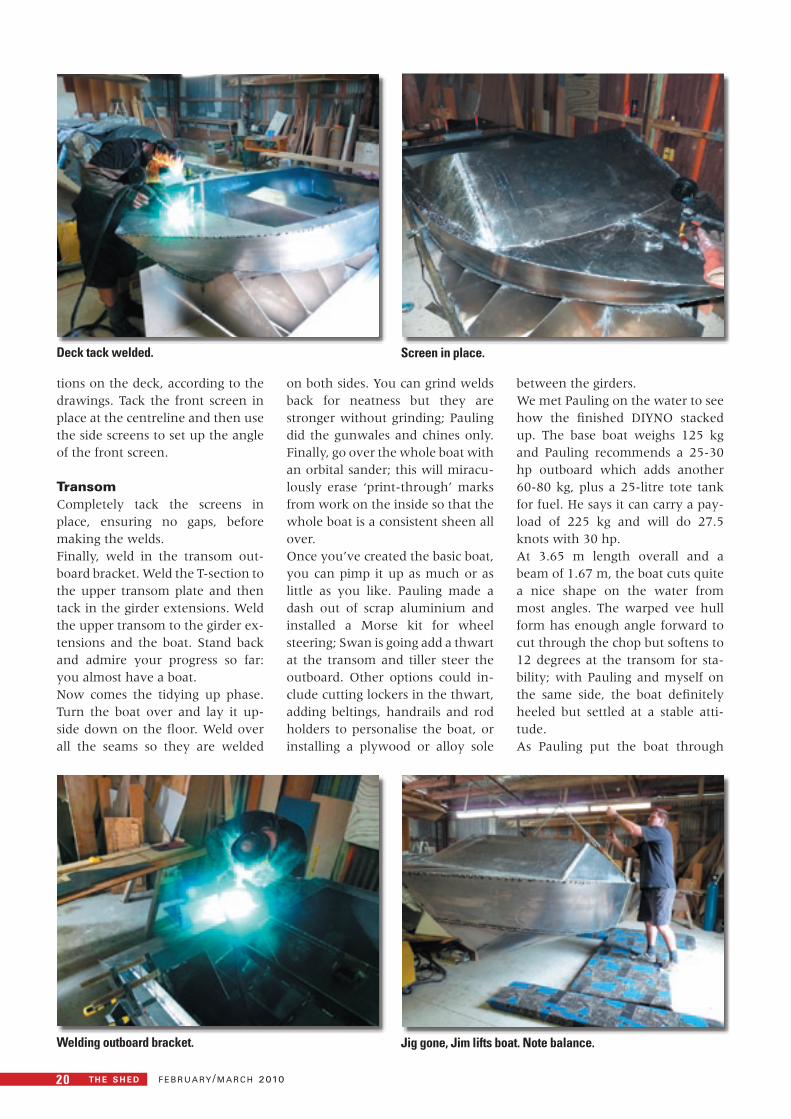
tions on the deck, according to the drawings. Tack the front screen in place at the centreline and then use the side screens to set up the angle of the front screen.
TransomCompletely tack the screens in place, ensuring no gaps, before making the welds. Finally, weld in the transom out-board bracket. Weld the T-section to the upper transom plate and then tack in the girder extensions. Weld the upper transom to the girder ex-tensions and the boat. Stand back and admire your progress so far: you almost have a boat.Now comes the tidying up phase. Turn the boat over and lay it up-side down on the floor. Weld over all the seams so they are welded
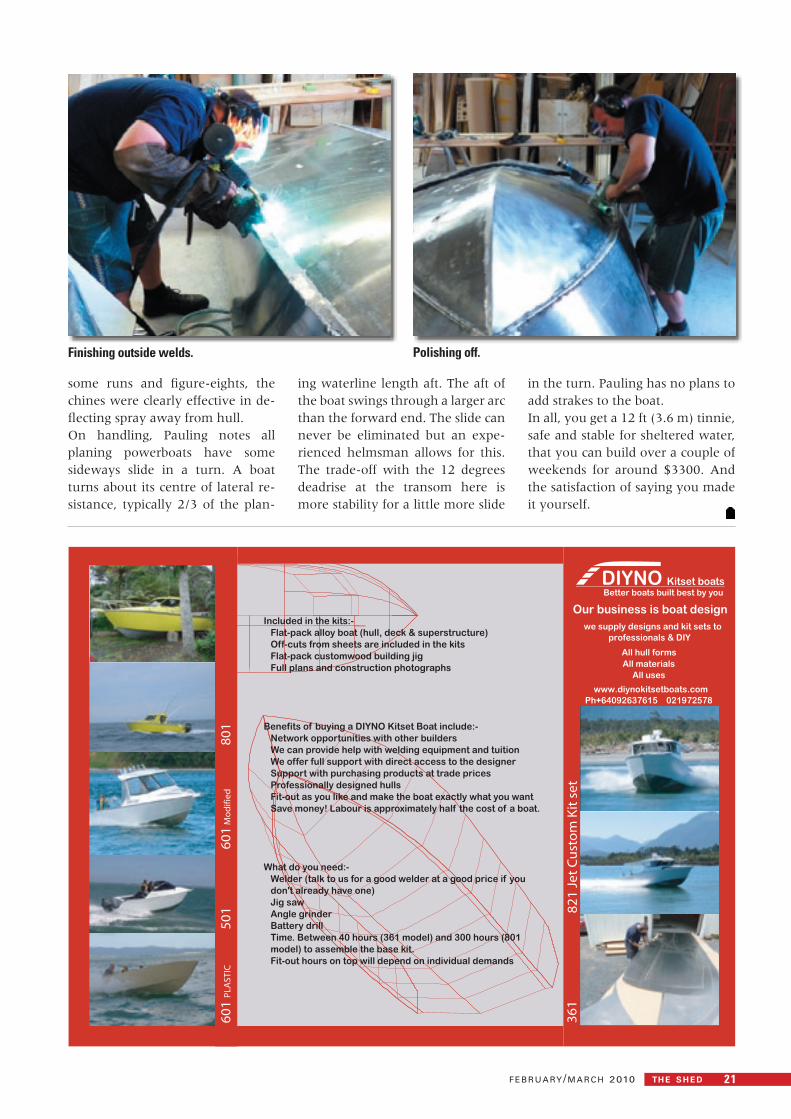
on both sides. You can grind welds back for neatness but they are stronger without grinding; Pauling did the gunwales and chines only. Finally, go over the whole boat with an orbital sander; this will miracu-lously erase ‘print-through’ marks from work on the inside so that the whole boat is a consistent sheen all over.Once you’ve created the basic boat, you can pimp it up as much or as little as you like. Pauling made a dash out of scrap aluminium and installed a Morse kit for wheel steering; Swan is going add a thwart at the transom and tiller steer the outboard. Other options could in-clude cutting lockers in the thwart, adding beltings, handrails and rod holders to personalise the boat, or installing a plywood or alloy sole
between the girders.We met Pauling on the water to see how the finished DIYNO stacked up. The base boat weighs 125 kg and Pauling recommends a 25-30 hp outboard which adds another 60-80 kg, plus a 25-litre tote tank for fuel. He says it can carry a pay-load of 225 kg and will do 27.5 knots with 30 hp.At 3.65 m length overall and a beam of 1.67 m, the boat cuts quite a nice shape on the water from most angles. The warped vee hull form has enough angle forward to cut through the chop but softens to 12 degrees at the transom for sta-bility; with Pauling and myself on the same side, the boat definitely heeled but settled at a stable atti-tude.As Pauling put the boat through
Deck tack welded.
Welding outboard bracket.
Screen in place.
Jig gone, Jim lifts boat. Note balance.
21f e b r u a ry/m a r c h 2010 th e s h e d
80
1
36
18
21
Je
t C
usto
m K
it s
et
60
1 M
od
ifie
d5
01
60
1 P
LA
ST
IC
Included in the kits:-
Flat-pack alloy boat (hull, deck & superstructure)
Off-cuts from sheets are included in the kits
Flat-pack customwood building jig
Full plans and construction photographs
Benefits of buying a DIYNO Kitset Boat include:-
Network opportunities with other builders
We can provide help with welding equipment and tuition
We offer full support with direct access to the designer
Support with purchasing products at trade prices
Professionally designed hulls
Fit-out as you like and make the boat exactly what you want
Save money! Labour is approximately half the cost of a boat.
What do you need:-
Welder (talk to us for a good welder at a good price if you
don't already have one)
Jig saw
Angle grinder
Battery drill
Time. Between 40 hours (361 model) and 300 hours (801
model) to assemble the base kit.
Fit-out hours on top will depend on individual demands
www.diynokitsetboats.com
Ph+64092637615 021972578
Our business is boat design
we supply designs and kit sets to
professionals & DIY
All hull forms
All materials
All uses
Better boats built best by you
Kitset boats
some runs and figure-eights, the chines were clearly effective in de-flecting spray away from hull.On handling, Pauling notes all planing powerboats have some sideways slide in a turn. A boat turns about its centre of lateral re-sistance, typically 2/3 of the plan-
ing waterline length aft. The aft of the boat swings through a larger arc than the forward end. The slide can never be eliminated but an expe-rienced helmsman allows for this. The trade-off with the 12 degrees deadrise at the transom here is more stability for a little more slide
in the turn. Pauling has no plans to add strakes to the boat.In all, you get a 12 ft (3.6 m) tinnie, safe and stable for sheltered water, that you can build over a couple of weekends for around $3300. And the satisfaction of saying you made it yourself.
Polishing off.Finishing outside welds.