Business Services Server Reference Guide Release 9.1
48
[1]JD Edwards EnterpriseOne Tools Business Services Server Reference Guide Release 9.1.x E20240-05 December 2014 Discusses administrative tasks for configuring the JD Edwards EnterpriseOne business services server.
Transcript of Business Services Server Reference Guide Release 9.1
[1] JD Edwards EnterpriseOne ToolsBusiness Services Server Reference Guide
Release 9.1.x
E20240-05
December 2014
Discusses administrative tasks for configuring the JD Edwards EnterpriseOne business services server.

JD Edwards EnterpriseOne Tools Business Services Server Reference Guide, Release 9.1.x
E20240-05
Copyright © 2011, 2014, Oracle and/or its affiliates. All rights reserved.
This software and related documentation are provided under a license agreement containing restrictions on use and disclosure and are protected by intellectual property laws. Except as expressly permitted in your license agreement or allowed by law, you may not use, copy, reproduce, translate, broadcast, modify, license, transmit, distribute, exhibit, perform, publish, or display any part, in any form, or by any means. Reverse engineering, disassembly, or decompilation of this software, unless required by law for interoperability, is prohibited.
The information contained herein is subject to change without notice and is not warranted to be error-free. If you find any errors, please report them to us in writing.
If this is software or related documentation that is delivered to the U.S. Government or anyone licensing it on behalf of the U.S. Government, the following notice is applicable:
U.S. GOVERNMENT END USERS: Oracle programs, including any operating system, integrated software, any programs installed on the hardware, and/or documentation, delivered to U.S. Government end users are "commercial computer software" pursuant to the applicable Federal Acquisition Regulation and agency-specific supplemental regulations. As such, use, duplication, disclosure, modification, and adaptation of the programs, including any operating system, integrated software, any programs installed on the hardware, and/or documentation, shall be subject to license terms and license restrictions applicable to the programs. No other rights are granted to the U.S. Government.
This software or hardware is developed for general use in a variety of information management applications. It is not developed or intended for use in any inherently dangerous applications, including applications that may create a risk of personal injury. If you use this software or hardware in dangerous applications, then you shall be responsible to take all appropriate fail-safe, backup, redundancy, and other measures to ensure its safe use. Oracle Corporation and its affiliates disclaim any liability for any damages caused by use of this software or hardware in dangerous applications.
Oracle and Java are registered trademarks of Oracle and/or its affiliates. Other names may be trademarks of their respective owners.
Intel and Intel Xeon are trademarks or registered trademarks of Intel Corporation. All SPARC trademarks are used under license and are trademarks or registered trademarks of SPARC International, Inc. AMD, Opteron, the AMD logo, and the AMD Opteron logo are trademarks or registered trademarks of Advanced Micro Devices. UNIX is a registered trademark of The Open Group.
This software or hardware and documentation may provide access to or information on content, products, and services from third parties. Oracle Corporation and its affiliates are not responsible for and expressly disclaim all warranties of any kind with respect to third-party content, products, and services. Oracle Corporation and its affiliates will not be responsible for any loss, costs, or damages incurred due to your access to or use of third-party content, products, or services.

iii
Contents
Preface ................................................................................................................................................................. v
Audience....................................................................................................................................................... vDocumentation Accessibility ..................................................................................................................... vRelated Documents ..................................................................................................................................... vConventions ................................................................................................................................................. vi
1 Understanding Business Services Server
1.1 Business Services Server Overview.......................................................................................... 1-11.2 Server Manager Overview......................................................................................................... 1-2
2 Configuring Business Services Server
2.1 Setting Up the Business Service Server Logging.................................................................... 2-12.1.1 Setting Up Web Service Logging Using SM Console ................................................. 2-12.2 Configuring the Business Services Server to Consume Web Services ................................ 2-22.2.1 Understanding Business Services Server Configuration for Consuming
Web Services........................................................................................................................ 2-22.2.2 Configuring JDENet ............................................................................................................ 2-22.2.2.1 Configuring a Business Services Server to Use a Single Port................................. 2-32.2.2.2 Configuring a Clustered Business Services Server Instance for Consumer
Business Services (Release 9.1 Update 5) .................................................................. 2-32.2.3 Configuring an HTTP Proxy Server ................................................................................ 2-42.2.3.1 Configuring a Secure HTTP Connection................................................................... 2-52.2.3.2 Configuring an HTTP Proxy Server for WAS .......................................................... 2-52.2.4 Enabling Business Services Running on WAS 7.0 to Consume Third-Party
Web Services......................................................................................................................... 2-62.2.5 Enabling Business Services Running on WebLogic Server to Consume
Third-Party Web Services ................................................................................................... 2-72.3 Allowing for a PS_Token to be Received by the EnterpriseOne Login Module ............... 2-72.4 Business Services Server Fault Tolerance ................................................................................ 2-72.4.1 Enterprise Server is Unavailable ....................................................................................... 2-82.4.2 Security Server is Unavailable ........................................................................................... 2-82.4.3 Business Services Server is Unavailable ........................................................................... 2-92.5 Configuring the Business Services Server for Media Object
Operations (Release 9.1 Update 2)............................................................................................ 2-9

iv
3 Configuring Business Services Server Security
3.1 Understanding Business Services Server Security ................................................................. 3-13.2 Securing WAS profiles (WebSphere application servers only)............................................ 3-23.3 Setting Up Anonymous Login .................................................................................................. 3-23.3.1 Understanding Anonymous Login ................................................................................... 3-23.3.2 Configuring WebSphere to Use Anonymous Login....................................................... 3-33.3.3 Configuring WebLogic to Use Anonymous Login ......................................................... 3-43.3.3.1 Removing the Class Path from a WebLogic Server Running on a
Windows Platform ....................................................................................................... 3-53.3.3.2 Adding the Class Path Back to the WebLogic Server (Windows Platform
Only)............................................................................................................................... 3-63.3.4 Removing the Security Policy from an EnterpriseOne Web Service (Release 9.1
Update 3.1)............................................................................................................................ 3-63.4 Enabling SSL for Provider and Consumer Business Services .............................................. 3-83.4.1 Configuring SSL with IBM WebSphere Application Server (WAS)............................. 3-83.4.1.1 Configuring SSL on the IBM HTTP Server ............................................................... 3-83.4.1.2 Configuring SSL on IBM WebSphere ..................................................................... 3-103.4.1.3 Configuring BSSV for SSL and WebSphere and Server Manager...................... 3-113.5 Enabling SSL for HTTP Request/Reply ............................................................................... 3-113.5.1 INI Configuration Changes for Communication Over SSL ....................................... 3-123.5.2 Configuring Production Application Server to Work with Certificates................... 3-123.5.2.1 Configuring the HTTP Adapter Service................................................................. 3-123.5.2.2 Configuring the Listener Service............................................................................. 3-14
4 Configuring Business Services Server Security for JAX-WS Based Business Services (Release 9.1 Update 2)
4.1 Understanding Business Services Server Security for JAX-WS Based Business Services on WAS ......................................................................................................................... 4-1
4.2 Securing JAX-WS Based Business Services on WAS ............................................................. 4-14.3 Configuring WebSphere to Use Anonymous Login.............................................................. 4-2
A Troubleshooting
A.1 Exceptions ................................................................................................................................... A-1A.1.1 Simple Object Access Protocol (SOAP) faults................................................................. A-1A.1.2 JD Edwards EnterpriseOne System Exceptions ............................................................. A-1A.1.2.1 Server Connectivity ..................................................................................................... A-1A.1.2.2 Authorization/Authentication .................................................................................. A-1A.1.3 JD Edwards EnterpriseOne Application Exceptions/Errors ....................................... A-2A.2 JD Edwards EnterpriseOne Application Warnings .............................................................. A-2A.3 Business Services Server Logs.................................................................................................. A-2

v
Preface
Welcome to the JD Edwards EnterpriseOne Tools Business Services Server Reference Guide.
Note: This guide has been updated for JD Edwards EnterpriseOne Tools Update 3, Update 4, and Update 5 releases. For details on documentation updates, refer to the JD Edwards EnterpriseOne Tools Net Change for Tools Documentation Library.
AudienceThis guide is intended for system administrators and technical consultants who are responsible for administering the JD Edwards EnterpriseOne business services server.
Documentation AccessibilityFor information about Oracle's commitment to accessibility, visit the Oracle Accessibility Program website at http://www.oracle.com/pls/topic/lookup?ctx=acc&id=docacc.
Access to Oracle SupportOracle customers have access to electronic support through My Oracle Support. For information, visit http://www.oracle.com/pls/topic/lookup?ctx=acc&id=info or visit http://www.oracle.com/pls/topic/lookup?ctx=acc&id=trs if you are hearing impaired.
Related DocumentsFor additional information about business services, see the following guides:
■ JD Edwards EnterpriseOne Tools Business Services Development Guide
■ JD Edwards EnterpriseOne Tools Business Services Development Methodology Guide
■ JD Edwards EnterpriseOne Tools Interoperability Guide
This guide contains references to server configuration settings that JD Edwards EnterpriseOne stores in configuration files (such as jde.ini, jas.ini, jdbj.ini, jdelog.properties, and so on). Beginning with the JD Edwards EnterpriseOne Tools Release 8.97, it is highly recommended that you only access and manage these settings for the supported server types using the Server Manager program. See the Server Manager Guide for more information.

vi
ConventionsThe following text conventions are used in this document:
Convention Meaning
Bold Indicates field values.
italic Indicates emphasis and JD Edwards EnterpriseOne or other book-length publication titles.
monospace Indicates a JD Edwards EnterpriseOne program, other code examples, or URL.

1
Understanding Business Services Server 1-1
1Understanding Business Services Server
This chapter contains the following topics:
■ Section 1.1, "Business Services Server Overview"
■ Section 1.2, "Server Manager Overview"
1.1 Business Services Server OverviewThe Business Services Server enables JD Edwards EnterpriseOne to natively produce and consume web services. The Business Services Server is built on top of a Java 2 Platform, Enterprise Edition (J2EE) server, which can be an Oracle WebLogic Server or a WebSphere Application Server. Applications that are developed or run on the Business Services Server are written in the Java programming language.
This guide does not provide instructions on how to install the Business Services Server; it provides other Business Services Server configuration that you should consider, such as security options and logging.
For information about installing and setting up a Business Services Server, see:
■ "Create a Business Services Server as a New Managed Instance" in the Server Manager Guide.
This section contains information on how to use Server Manager to install a J2EE container on the machine that you want to use as your Business Services Server.
■ "Working with Packages for Business Services" in the JD Edwards EnterpriseOne Tools Package Management Guide.
This section contains information on how to use the JD Edwards EnterpriseOne Package Deployment and Tools applications to build a package that contains business services and deploy that package to the J2EE container installed by Server Manager.
■ Customers must conform to the supported platforms for the release as detailed in the JD Edwards EnterpriseOne Minimum Technical Requirements. In addition, JD Edwards EnterpriseOne may integrate, interface, or work in conjunction with other Oracle products. Refer to the following link for cross-reference material in the Program Documentation for Program prerequisites and version cross-reference documents to assure compatibility of various Oracle products.
http://www.oracle.com/corporate/contracts/index.html
See document 745831.1 (JD Edwards EnterpriseOne Minimum Technical Requirements Reference) on My Oracle Support. https://support.oracle.com/epmos/faces/DocumentDisplay?id=745831.1

Server Manager Overview
1-2 Business Services Server Reference Guide
1.2 Server Manager OverviewBeginning with JD Edwards EnterpriseOne Tools Release 8.97, a new tool called Server Manager is provided. This tool is a complete replacement for the JD Edwards EnterpriseOne legacy management and installation tools including internal components known as Server Administration Workbench (SAW), Server Management Console (SMC), and the InstallShield based installers previously used to install or upgrade JD Edwards EnterpriseOne servers. As a result, you should refer to the JD Edwards EnterpriseOne Server Manager Guide for details on installing and configuring all JD Edwards EnterpriseOne server products. This guide contains only reference information for functionality outside the Server Manager tool.
Note: Management of JD Edwards EnterpriseOne Tools Release 8.96 or earlier must be done using the existing tools. Server Manager cannot be used to manage any JD Edwards EnterpriseOne Tools Release prior to 8.97.
The Server Manager tool provides:
■ Configuration Management
Server Manager provides a web-based interface for managing the configuration of each managed server. Each configuration item is accessible along with integrated help describing the configuration setting.
Note: Beginning with the availability of Server Manager, it is strongly advised that all configuration changes to configuration files (such as jde.ini, jas.ini, jdbj.ini, jdelog.properties, and so on) for any JD Edwards EnterpriseOne server managed by Server Manager be accomplished only through the Management Console interface of Server Manager. In addition to usability improvements, using Server Manager reduces the risk of introducing configuration errors by providing drop-down lists with the valid values where applicable. Further, the tool provides a useful Audit History for any modifications made to configurations using Server Manager.
■ Audit History
Server Manager maintains a history of changes made to the managed servers. This includes a history of each configuration change, each server start and stop, and each tools release update, including the user that performed the change or operation. The information is logged to a history file that you can query from within Server Manager.
■ Configuration Comparison
Use Server Manager to compare the configuration of two or more servers to identify configuration differences. This can be done directly through the Management Console application regardless of the platform or location of the actual JD Edwards EnterpriseOne server. You can also compare individual servers with the default configuration of the corresponding server group to which the server belongs.
■ Web Based System Management

Server Manager Overview
Understanding Business Services Server 1-3
You can securely access and manage your JD Edwards EnterpriseOne installation from anywhere using a standard web browser.
■ Remote Deployment ad Upgrades
You can install, uninstall, and update your JD Edwards EnterpriseOne servers regardless of their physical location or platform.
■ Remote Operational Control
You can start and stop any of your JD Edwards EnterpriseOne servers, Oracle J2EE application servers, or third-party J2EE application servers directly through the Management Console.
■ Secure Administration Tasks
Server Manager permits you to specify which existing JD Edwards EnterpriseOne users that may access the Management Console, including which servers users are allowed to view within the Management Console, and which administrative tasks users may perform on those servers for which the user is allowed to view.
■ Integrated EnterpriseOne Software Management
Use Server Manager to centrally maintain all your JD Edwards EnterpriseOne server tools releases, including the ability to copy the software to the remote server machines.
■ Logical Server Grouping
Server Manager allows grouping similar purposed servers into a logical grouping. These groups can include any of the server types such as Enterprise Server, Web Server, and so on. A default, or template, configuration is maintained for each server group.
■ Application Release Independence
Server Manager is compatible with any supported JD Edwards EnterpriseOne application release beginning with Application Release 8.10 through the currently supported release. There are no electronic software updates (ESUs) required to support Server Manager.
■ Self-Contained Installation
The Server Manager installation delivers all components that are necessary for the tool to run. There are no third-party requirements regardless of your existing or intended middleware topology (for example, Oracle WebLogic Server, WebSphere Application Server, or no application server).
■ Tools Release Independence
The current version of Server Manager can be used regardless of the service pack level of JD Edwards EnterpriseOne Tools Release 8.98 or later of the managed JD Edwards EnterpriseOne servers.

Server Manager Overview
1-4 Business Services Server Reference Guide

2
Configuring Business Services Server 2-1
2Configuring Business Services Server
This chapter contains the following topics:
■ Section 2.1, "Setting Up the Business Service Server Logging"
■ Section 2.2, "Configuring the Business Services Server to Consume Web Services"
■ Section 2.3, "Allowing for a PS_Token to be Received by the EnterpriseOne Login Module"
■ Section 2.4, "Business Services Server Fault Tolerance"
■ Section 2.5, "Configuring the Business Services Server for Media Object Operations (Release 9.1 Update 2)"
2.1 Setting Up the Business Service Server LoggingThis section provides an overview of business service logging and discusses how to set up web service logging.
The business service framework package provides an interface that provides logging utilities for activities related to published business services and business services. You use log files to troubleshoot system behavior. The location of the business service and published business service log files is defined in the jdelog.properties file.
At runtime, the system updates the log file with these kinds of errors:
■ Severe
■ Warning
■ Application
■ Information
2.1.1 Setting Up Web Service Logging Using SM ConsoleTo set up web service logging when using SM Console:
1. Login to the EnterpriseOne SeverManager Console.
2. Navigate to the specific EnterpriseOne Business Services Server Instance for which logging needs to be enabled.
3. In the Configuration section - Click on jdelog.properties Logging.
4. In the Log File Configuration screen; the following can be configured:
Log File Name

Configuring the Business Services Server to Consume Web Services
2-2 Business Services Server Reference Guide
Log Level Threshold - For detailed logging you can set Log Level to Low Level Troubleshooting Messages (Verbose).
Log Format - For detailed logging you can set Log Format to Technical Format with Threads.
Log Components - For detailed logging you can set Log Components to ALL so as to get information on all the Tools Components.
Click on Apply.
Restart the EnterpriseOne Business Services Server Instance for changes to take effect.
2.2 Configuring the Business Services Server to Consume Web ServicesThis section contains the following topics:
■ Section 2.2.1, "Understanding Business Services Server Configuration for Consuming Web Services"
■ Section 2.2.2, "Configuring JDENet"
■ Section 2.2.3, "Configuring an HTTP Proxy Server"
■ Section 2.2.4, "Enabling Business Services Running on WAS 7.0 to Consume Third-Party Web Services"
■ Section 2.2.5, "Enabling Business Services Running on WebLogic Server to Consume Third-Party Web Services"
2.2.1 Understanding Business Services Server Configuration for Consuming Web Services
You must start the JDENet kernel on the business services server so that the business services server can communicate with JD Edwards EnterpriseOne. You must also configure the business services server with an HTTP proxy server so that outgoing connections can be made.
2.2.2 Configuring JDENetThe business services server uses JDENet to communicate with a JD Edwards EnterpriseOne client (Microsoft Windows or HTML) or JD Edwards EnterpriseOne Enterprise Server. You can configure your system to use either one port or multiple ports to listen for and receive JDENet messages from the Enterprise Server.

Configuring the Business Services Server to Consume Web Services
Configuring Business Services Server 2-3
2.2.2.1 Configuring a Business Services Server to Use a Single PortIf your business services server is a standalone machine, or if you want to use only one port to listen for and receive JDENet messages from the JD Edwards Enterprise Server, you must configure the Object Configuration Manager (OCM). The client or Enterprise Server uses OCM to look up the machine name and port of the business services server. (Release 9.1 Update 5)
See "Setting Up OCM for Business Functions Calling Business Services" in the JD Edwards EnterpriseOne Tools Business Services Development Guide. (Release 9.1 Update 5)
A JDENet kernel, SBFServerJavaKernel, is started on the business services server. The business service server listens for messages for this kernel. This kernel listens for a ping message and for messages that call a business service. The business services server response to the ping message indicates that the kernel is up and running on the business services server.
Configure these settings in the [JDENET] section of the jdeinterop.ini file on the business services server:
Parameter Description
serviceNameListen= Enter the port on which the business service server listens for JDENet messages. The setting for the business services server and OCM must be the same. The port specified must be different than the serviceNameConnect port setting.
maxKernelRanges= The maxKernelRanges setting defines the maximum allowed kernels on the business services server. SBFServerJavaKernel is the only kernel supported on the business services server, and this kernel is responsible for processing web service call messages from the client or Enterprise Server. Currently, the only allowed value for this property is 1.
Configure these settings in the [JDENET_KERNEL_DEF1] section of the jdeinterop.ini file on the Business Services Server:
Note: Values for all of the properties except maxNumberOfThread are static and do not change.
Parameter Value or Description
krnlName= SBFServerJavaKernel
processClassName= oracle.e1.bssvfoundation.impl.jdenet.SBFServerJavaKernel
startMessageRange= 16201
endMessageRange= 16450
maxNumberOfThread=
Defines the number of threads that will be started for the SBFServerJavaKernel, thereby defining the number of simultaneous web service call requests the kernel can process. This maxNumberOfThread value must be set appropriately, based on metrics such as call volume and server machine size.
2.2.2.2 Configuring a Clustered Business Services Server Instance for Consumer Business Services (Release 9.1 Update 5)You can use Server Manager to create a clustered business services server instance to support clustering for consumer business services. This clustering feature enables scalability, load balancing, and high availability for consumer business services by

Configuring the Business Services Server to Consume Web Services
2-4 Business Services Server Reference Guide
providing multiple incoming ports so that multiple servers in the cluster can open socket connection to different ports to receive incoming JDENet messages from the Enterprise Server, and the Enterprise Server can send JDENet messages to multiple clustered business services server ports.
See "Configuring a Clustered Business Services Server Instance for Consumer Business Services" in the JD Edwards EnterpriseOne Tools Server Manager Guide.
When you use Server Manager to create the business services server instance, you enter host/port information for all of the servers in the cluster in the Cluster Listen Host/Port field in the Miscellaneous area of the Configuration section. This information is stored with the property clusterHostPort under the CLUSTEROUTBOUND section of the JDEINTEROP.ini of the business services server instance. When the business services server instance is started, the configuration information is read, and the host/port information is written to the Cluster Server Info table (F986102). Table F986102 includes a status for each business services server in the cluster. A status of AV indicates that the server is active and available. A status of NA indicates the server is stopped. When a business services server has a status of NA, the Enterprise Server does not attempt to send the JDENet message to that particular server.
When a consumer business service runs, the business service calls a business function that is running on the Enterprise Server. The business function reads the clustered business services server host/port information from the F986102 table and identifies only those business services servers in the cluster that have a status of AV and stores the host/port information for the available business services servers in a list. To minimize database calls, the business function does not read from the table if data already exists in the list. To ensure there is update-to-date information in the list, the business function reads and stores the information from the table and refreshes the list.
The business function tries to send the JDENet message to the first host/port item in the list. For subsequent requests, the business function tries to send the JDENet message to the next host/port item in the list in a round-robin fashion. Before sending the JDENet message, the business function pings the host/port. If the ping is successful, the message is sent; if the ping is not successful, the business function tries to send the message to the next active host/port in a round-robin fashion.
When a stopped business services server is started, this business services server is added to the list within 15 minutes, due to the database refresh for Table F986102. This enables load balancing and failover to be achieved effectively.
2.2.3 Configuring an HTTP Proxy ServerThe Business Services Server also supports web services consumer functionality. The Business Services Server is deployed and configured using Server Manager. This section provides information on the additional configuration for consuming third-party web services.
An HTTP proxy server is commonly used for outgoing HTTP connections. When an HTTP proxy server is present, all Internet connections are made through the HTTP proxy server. The Business Services Server might need to make an Internet connection when calling an external web service. These HTTP proxy parameters are available for the Business Services Server:
Parameter Description
http.proxyHost The host name of the proxy server.
http.proxyPort The port number of the proxy server.

Configuring the Business Services Server to Consume Web Services
Configuring Business Services Server 2-5
2.2.3.1 Configuring a Secure HTTP ConnectionBoth the Oracle WebLogic Server and the WebSphere application server support secure HTTP (HTTPS) connections. If you are using an HTTPS connection, you must manually configure HTTPS proxy parameters. The HTTPS proxy configurations are in addition to the HTTP proxy server configurations set by Server Manager. This table identifies the HTTPS proxy server parameters:
Parameter Description
https.proxyHost The host name of the proxy server.
https.proxyPort The port number of the proxy server.
https.nonProxyHosts Optional. The machines and domains that do not need to be routed through the proxy server. Typically, these are all machines on the intranet. Multiple entries must be separated by a vertical bar (|).
https.proxyUser Optional. The user name to be used for authentication on the proxy server.
https.proxyPassword Optional. The password for the user name that is being used for authentication.
2.2.3.2 Configuring an HTTP Proxy Server for WASUse these steps to set up an HTTP proxy server for WAS.
To set up an HTTP proxy on WAS:
1. On the IBM WebSphere Application Server, open the WebSphere Application Server console.
2. In the left navigation pane, click the Application Servers link under Servers.
3. Click the application server that is hosting the Business Services Server.
4. Expand Process Definition on the right, and then click the Java Virtual Machine (JVM) link.
5. On the JVM properties page, click Custom Properties.
6. Add the required http proxy configuration properties.
■ http.nonProxyHosts
■ http.proxyHost
■ http.proxyPassword
■ http.proxyPort
■ http.proxyUser
■ javax.xml.rpc.ServiceFactory - oracle.j2ee.ws.client.ServiceFactoryImpl
http.nonProxyHosts Optional. The machines and domains that do not need to be routed through the proxy server. Typically, these are all machines on the intranet. Multiple entries must be separated by a vertical bar (|).
http.proxyUser Optional. The user name to be used for authentication on the proxy server.
http.proxyPassword Optional. The password for the user name that is being used for authentication.
Parameter Description

Configuring the Business Services Server to Consume Web Services
2-6 Business Services Server Reference Guide
7. Add the required https proxy configuration properties.
■ https.nonProxyHosts
■ https.proxyHost
■ https.proxyPassword
■ https.proxyPort
■ https.proxyUser
2.2.4 Enabling Business Services Running on WAS 7.0 to Consume Third-Party Web Services
To consume third-party web services from Business Services Server proxy objects running on WAS 7.0, you must add specific JVM arguments. This section provides information on setting the JVM arguments for Business Services Server on WAS 7.0 for consuming third-party web services.
To configure JVM arguments for WAS 7.0:
1. On the IBM WebSphere Application Server 7.0, open the WebSphere Application Server console.
2. In the left navigation pane, click to expand the Servers link.
3. Click to expand the Server Types link.
4. Click the WebSphere application servers link.
5. In the Application servers page, click the application server that is hosting the Business Services Server.
6. Under the Server Infrastructure section, expand Java and Process Management link.
7. Click the Process Definition link.
8. In Additional Properties on right, click the Java Virtual Machine (JVM) link.
9. On the JVM properties page, add these separate arguments in the Generic JVM arguments text box after the default_path argument:
-Djavax.xml.rpc.ServiceFactory=oracle.j2ee.ws.client.ServiceFactoryImpl-Djavax.xml.soap.SOAPConnectionFactory=oracle.j2ee.ws.saaj.client.p2p. HttpSOAPConnectionFactory
Note: Enter each argument as a contiguous string with no spaces; however, each argument string must be separated with a space.
10. Click Apply.
11. In Messages, click the Save link to save the JVM arguments directly to the master configuration.
12. In order for the changes to take effect, you must restart the Business Services Server Instance on WAS 7.0.

Business Services Server Fault Tolerance
Configuring Business Services Server 2-7
2.2.5 Enabling Business Services Running on WebLogic Server to Consume Third-Party Web Services
A business services .ear file that was built for WebLogic Server (WLS) using JDeveloper 11g that contains business services proxy (consumer) objects created out of a secure web service running on WLS, requires that you perform the following tasks so that the business services proxy object can successfully run on WLS and consume the secure web service:
■ Copy the policy file Wssp1.2-2007-Https-UsernameToken-Plain.xml to the domain where WLS is installed. For example, copy the policy file Wssp1.2-2007-Https-UsernameToken-Plain.xml to the Weblogic_Install_Path\\user_projects\domains\domain_name path.
■ Copy the certificate file DemoTrust.jks to the domain where WLS is installed. For example, copy the DemoTrust.jks file needs to the Weblogic_ Install_Path\\user_projects\domains\domain_name path.
Note: The policy file Wssp1.2-2007-Https-UsernameToken-Plain.xml can be found in the weblogic.jar or wseeclient.jar in the Weblogic_Install_Path\wlserver_10.3\server\lib path.
The certificate file DemoTrust.jks can be found in the Weblogic_Install_Path\wlserver_10.3\server\lib path.
2.3 Allowing for a PS_Token to be Received by the EnterpriseOne Login Module
In order to support all the mechanisms used by JD Edwards EnterpriseOne for authentication, the E1LoginModule allows a PS_TOKEN to be received. To use a PS_TOKEN for authentication, the web service call needs to provide additional information in the username field. At minimum both "DN=<E1 user id>" and "PS_TOKEN=true" must be specified. For example:
username - DN=KB5236952,PS_TOKEN=truepassword - PS_TOKEN in string form
In addition, environment and role can be specified in combination with the PS_TOKEN indicator.
username - DN=KB5236952,ENV=STGAWSC1,ROLE=*ALL,PS_TOKEN=truepassword - PS_TOKEN in string form
The sequence and case of the user name values are not significant.
2.4 Business Services Server Fault ToleranceWhen a machine in the system goes down or is brought down, other machines in the system should gracefully degrade while it is down and reconnect once it is back up. For the Business Services Server the relevant machines are the Security Server and the Enterprise Server. The connection to the Enterprise Server is fault tolerant. If the Enterprise Server is down, the SOAP faults thrown from a called web service are descriptive and indicate the problem. If the Enterprise Server comes back up, subsequent web service calls connect correctly without restarting or any further administration of the Business Services Server. If connections to the Enterprise Server time out the connections are reestablished.

Note: When the Security and Enterprise Servers are bounced, or kernel recycling occurs, the Business Services Server does not need to be bounced.
Business Services Server Fault Tolerance
2-8 Business Services Server Reference Guide
2.4.1 Enterprise Server is UnavailableThe connection from the Business Services Server to the Enterprise Server is based on a token. If the Enterprise Server is down or cannot be contacted, the exception thrown to the web service caller indicates that server login has failed. When the Security Server comes back up, the token is revalidated as necessary without any administrator interaction. If the Enterprise Server remains unavailable, the caller receives a descriptive message.
The following sample messages in the Business Services Server log indicate that the Enterprise Server is unavailable:
17 Sep 2007 16:27:13,140 [Line ?] [main] [SEVERE] - [INTEROP] Fail to execute BSFNMethod com.jdedwards.system.kernel.CallObjectSystemException: COSE#1002 Connection failed: LOCALHOST:6081 com.jdedwards.system.connector.dynamic.ServerFailureException: Fail to execute BSFNMethod com.jdedwards.system.kernel.CallObjectSystemException: COSE#1002 Connection failed: LOCALHOST:6081com.jdedwards.system.connector.dynamic.ServerFailureException: Fail to execute BSFNMethod com.jdedwards.system.kernel.CallObjectSystemException: COSE#1002 Connection failed: LOCALHOST:6081
2.4.2 Security Server is UnavailableThe connection from the Business Services Server to the Security Server is based on a token. If the security server is down or cannot be contacted, the exception thrown to the web service caller indicates that server login has failed. When the Security Server comes back up, the token is revalidated as necessary without any administrator interaction.
When the first published business service call makes a new connection after the security token expires, the cached token is revalidated.
The following sample messages in the Business Services Server log indicate that the Security Server is unavailable:
17 Sep 2007 16:37:20,281 [Line ?] [main] [SEVERE] - [INTEROP] Cannot connect to any OneWorld Security Server.FAILURE: null com.jdedwards.system.connector.dynamic.ServerFailureException: Cannot connect to any OneWorld Security Server.FAILURE: null com.jdedwards.system.connector.dynamic.ServerFailureException: Cannot connect to any OneWorld Security Server.FAILURE: nullat com.jdedwards.system.connector.dynamic.Connector.loginBase(Unknown Source)at com.jdedwards.system.connector.dynamic.Connector.login(Unknown Source)at oracle.e1.bssvfoundation.impl.security.E1Principal.login(Unknown Source)at oracle.e1.bssvfoundation.impl.security.PrincipalCache.getIniPrincipal(Unknown Source)at oracle.e1.bssvfoundation.impl.jdenet.CallSBFHandler.callSBF(Unknown Source)at oracle.e1.bssvfoundation.base.TestBusinessService.callBSSVWithXMLFile(Unknown Source)at oracle.e1.bssv.JTRH90I10.RI_HTTP_ParseTransformSendMessage.main(RI_HTTP_ParseTransformSendMessage.java:22)17 Sep 2007 16:37:20,281 [Line ?] [main] [DEBUG ] - [BSSVFRAMEWORK] [Context ID: ] Login failed

Configuring the Business Services Server for Media Object Operations (Release 9.1 Update 2)
Configuring Business Services Server 2-9
Cannot connect to any OneWorld Security Server.FAILURE: null 17 Sep 2007 16:37:20,500 [Line ?] [main] [DEBUG ] - [INTEROP] Connector shut down completely
2.4.3 Business Services Server is UnavailableWhen the Business Services Server is down, the Business Services Server log displays these messages:
4756/5824 WRK:Starting jdeCallObject Mon Nov 12 11:55:39.171089 XMLRequest.cpp1260 ICU0000017 - ICU CodePage for 1252 is ibm-1252.4756/5824 WRK:Starting jdeCallObject Mon Nov 12 13:03:06.734001 callsbfmsg.c311 Error when sending JDENET message. JDENET Error = eConnectionFailed4756/664 WRK:Starting jdeCallObject Mon Nov 12 13:07:15.390053 XMLRequest.cpp1260 ICU0000017 - ICU CodePage for 1252 is ibm-1252.4756/664 WRK:Starting jdeCallObject Mon Nov 12 13:08:24.453002 callsbfmsg.c311 Error when sending JDENET message. JDENET Error = eConnectionFailed4756/664 WRK:Starting jdeCallObject Mon Nov 12 13:12:37.093001 callsbfmsg.c311 Error when sending JDENET message. JDENET Error = eConnectionFailed4756/664 WRK:Starting jdeCallObject Mon Nov 12 13:15:09.546001 B953002.c367 Internal Server Error during execution of Business Service.
2.5 Configuring the Business Services Server for Media Object Operations (Release 9.1 Update 2)
The Business Services Server is deployed and configured using Server Manager. This section provides information on the additional configuration for Media Object operations. For supporting Media Object operations, the Business Services Server has to know the Media Object Server type, user, and password to access the Media Object Server shared location.
These media object parameters are available in the Server Manager for the Business Services Server under the section "Media Object Settings":
■ Use WinNT Shared Directory
Represents the Media Object Server type for a Windows or an FTP server. The default value is true and will use standard Windows networking to obtain media object attachments.
■ Invalid Media Object Extensions
Represents the invalid media object file extensions. Media objects with these extensions are not allowed in EnterpriseOne.
■ FTP Server Port
Represents the FTP server port used to obtain media object attachments.
■ FTP Server User Name
Represents the FTP server user name used to obtain media object attachments.
■ FTP Server Password

Configuring the Business Services Server for Media Object Operations (Release 9.1 Update 2)
2-10 Business Services Server Reference Guide
Represents the FTP server password used to obtain media object attachments.

3
Configuring Business Services Server Security 3-1
3Configuring Business Services Server Security
This chapter contains the following topics:
■ Section 3.1, "Understanding Business Services Server Security"
■ Section 3.2, "Securing WAS profiles (WebSphere application servers only)"
■ Section 3.3, "Setting Up Anonymous Login"
■ Section 3.4, "Enabling SSL for Provider and Consumer Business Services"
■ Section 3.5, "Enabling SSL for HTTP Request/Reply"
Note: This chapter covers the authentication of users of business services. For information about authorizing users to access published business service objects, see "Managing Published Business Services Security" in the JD Edwards EnterpriseOne Tools Security Administration Guide.
3.1 Understanding Business Services Server SecurityJD Edwards EnterpriseOne provides authentication security to ensure that published business service users are authenticated in JD Edwards EnterpriseOne. The Business Services Server uses the JD Edwards EnterpriseOne Login Module as the authentication mechanism for authenticating users against the security server.
The module is automatically installed during the deployment of a JD Edwards EnterpriseOne business services package to the Business Services Server and configured for all published services. The module uses Java authentication and authorization service (JAAS) to validate the JD Edwards EnterpriseOne users against the JD Edwards EnterpriseOne Security Server.
To allow access to JD Edwards EnterpriseOne published business services without providing user credentials, you must set up anonymous login. Anonymous login directs the application server to use the anonymous login credentials stored in the jdbj.ini file for user authentication, instead of the EnterpriseOne Login Module.

See Also:
■ "Create a Business Services Server as a New Managed Instance" in the Server Manager Guide for information on how to install a Business Services Server instance.
■ "Working with Packages for Business Services" in the JD Edwards EnterpriseOne Tools Package Management Guide for information on how to use JD Edwards EnterpriseOne to deploy published business services to the Business Services Server.
Securing WAS profiles (WebSphere application servers only)
3-2 Business Services Server Reference Guide
3.2 Securing WAS profiles (WebSphere application servers only)As specifically directed by the IBM WebSphere administration documentation, you should ensure that your WebSphere installation meets these general recommendations:
■ Standalone configuration - Secure the default profile
■ Network Deployment configuration - Create a new profile and secure that profile
■ Recommended method of securing profile via WAS Integrated Solutions Console:
– Administrative security: Enable Administrative security.
– Application security: Enable application security.
– Java 2 security: Disabled.
– User account repositories: Federated repositories with the admin_user and admin_password (same as defined in soap.client.props file for profile).
3.3 Setting Up Anonymous LoginThis section contains the following topics:
■ Section 3.3.1, "Understanding Anonymous Login"
■ Section 3.3.2, "Configuring WebSphere to Use Anonymous Login"
■ Section 3.3.3, "Configuring WebLogic to Use Anonymous Login"
■ Section 3.3.4, "Removing the Security Policy from an EnterpriseOne Web Service (Release 9.1 Update 3.1)"
3.3.1 Understanding Anonymous LoginAnonymous login provides a mechanism to access published business services without providing JD Edwards EnterpriseOne user credentials. To enable anonymous login, you must disable the authentication mechanism (E1 Login Module) for a published business service in the application server. When the authentication mechanism is disabled, instead of using the user credentials of the consumer of the published business service for authentication, the application server uses the anonymous login credentials stored in the jdbj.ini file on the application server. These credentials are authenticated by the JD Edwards EnterpriseOne Security Server. The anonymous login password in the jdbj.ini file is encrypted.
You must configure anonymous login for each individual published business service by disabling the default authentication mechanism for that service. If the authentication mechanism is not disabled for a published business service, the user request will be rejected even if the anonymous login credentials have been entered in the jdbj.ini file.

Setting Up Anonymous Login
Configuring Business Services Server Security 3-3
You use Server Manager to enter these anonymous login credentials in the jdbj.ini configuration file:
■ Bootstrap User
■ Bootstrap User Password
■ Bootstrap Role
■ Bootstrap Environment
Note: The anonymous login must be configured every time the Business Services Server is deployed.
See "JDBJ Bootstrap Session" in the Server Manager Guide for information on how to configure these settings.
3.3.2 Configuring WebSphere to Use Anonymous LoginIn WebSphere, you can disable security for a published business service, which directs the system to use anonymous login credentials.
Note: If you want to configure Anonymous login for a JAX-WS web service package on IBM WebSphere, see Configuring WebSphere to Use Anonymous Login.
This section provides an example of turning off the security for the CustomerManager reference implementation, which is a fully functional example of a published business service. Use it as an example to help you disable security for a particular published business service so that the system uses anonymous login instead.
To set up anonymous login on IBM WebSphere:
1. Locate ibm-webservices-bnd.xmi and ibm-webservices-ext.xmi, which are in the following two locations:
■ WebSphere Home\AppServer\profiles\profile name\config\cells\Cell Name\applications\Application Name\deployments\Server\Web Module\WEB-INF
■ WebSphere Home\AppServer\profiles\profile name\installedApps\Cell Name\Application Name\Web Module Name\WEB-INF
2. Make a backup of these two files in both locations.
3. Using the following example of the RI_CustomerManager web service, delete the bold text from both the ibm-webservices-bnd.xmi and ibm-webservices-ext.xmi files. You must delete the code from these files in both locations where the files reside:
■ In the ibm-webservices-bnd.xmi file, delete the text shown in bold in this code sample:
<wsdescBindings xmi:id="WSDescBinding_1185554582312" wsDescNameLink="RI_CustomerManager"> <pcBindings xmi:id="PCBinding_1185554582312" pcNameLink="RI_CustomerManagerHttpPort" scope="Application"> <securityRequestConsumerBindingConfig

Setting Up Anonymous Login
3-4 Business Services Server Reference Guide
xmi:id="SecurityRequestConsumerBindingConfig_1185554610375910436757521891737910436757521891737"> <tokenConsumer xmi:id="TokenConsumer_1185554610375910436757521891737" classname="com.ibm.wsspi.wssecurity.token.UsernameTokenConsumer" name="UserTokenConsumer"> <valueType xmi:id="ValueType_1185554610375910436757521891737" localName="http://docs.oasis-open.org/wss/2004/01/oasis-200401-wss-username-token-profile-1.0#UsernameToken" name="Username Token"/> <jAASConfig xmi:id="JAASConfig_1186013028227" configName="e1BssvLogin"/> <partReference xmi:id="PartReference_1185554610375910436757521891737" part="UserToken"/> </tokenConsumer> </securityRequestConsumerBindingConfig> </pcBindings> </wsdescBindings>
■ In the ibm-webservices-ext.xmi file, delete the text shown in bold in this code sample:
<wsDescExt wsDescNameLink="RI_CustomerManager" xmi:id="WsDescExt_1185554582328"> <pcBinding pcNameLink="RI_CustomerManagerHttpPort" xmi:id="PcBinding_1185554582328"> <serverServiceConfig xmi:id="ServerServiceConfig_118555460310966390350416797703696639035041679770369"> <securityRequestConsumerServiceConfig xmi:id="SecurityRequestConsumerBindingConfig_118555460310966390350416797703696639035041679770369"> <caller name="basicAuth" part="" uri="" localName="http://docs.oasis-open.org/wss/2004/01/oasis-200401-wss-username-token-profile-1.0#UsernameToken"/><requiredSecurityToken xmi:id="RequiredSecurityToken_11855546031096639035041679770369" name="UserToken" uri="" localName="http://docs.oasis-open.org/wss/2004/01/oasis-200401-wss-username-token-profile-1.0#UsernameToken" usage="Required"/> </securityRequestConsumerServiceConfig> </serverServiceConfig> </pcBinding> </wsDescExt>
4. Restart the application server.
3.3.3 Configuring WebLogic to Use Anonymous LoginFor a business services.ear that was built for the WebLogic Server (WLS) by running the Migration Utility or that was built directly by using JDeveloper 11g, you cannot enable anonymous login for published business services running on WLS 10.3.2 through the WLS administrative console.
With Tools Release 9.1 Update 3.1, if you are working on WLS 10.3.5 or later WLS version, you can use the WebLogic Server Admin Console to remove the security policy that is attached to a web service so that you can use Anonymous Login.
If you are using WLS 10.3.5 or later version, you must install the WebLogic service patch. For detail information about installing the service patch, see Bug 12761125.

Note: If you have applied any other type of SSL certificate to WLS, this patch may not work. The workaround is to remove the certificate, then remove the WS-policy, and then apply the certificate again.
Setting Up Anonymous Login
Configuring Business Services Server Security 3-5
If you are running a WebLogic Server (version 10.3.5 or 10.3.6) on a Windows platform, you must remove the class path from the server before you remove the security policy, and then you must add the class path back to the server after you remove the security policy.
3.3.3.1 Removing the Class Path from a WebLogic Server Running on a Windows Platform
Note: The steps in this task are required only if you are running a WebLogic Server 10.3.5 or later version on a Windows platform.
This task is not applicable if your WebLogic Server is running on a non-Windows platform.
Use these steps to remove and save the WebLogic server class path:
1. Log into the WebLogic Admin Console.
2. On the left side Domain Structure section, expand Environment, and then click the Server option.
3. From the list of servers, click on the server where your business service package is deployed.
The server does not need to be running at this time.
4. On the right side Settings page, click the Configuration tab, and then click the Server Start tab.
5. From the left side Change Center section, click the Lock & Edit button.
6. On the right side Settings page, copy the entire entry from the Class Path section and paste the entry in Notepad and save it.
7. On the Admin Console on the right side Settings page, delete the entry in the Class Path section.
8. Click Save.
A message stating that the settings were successfully updates appears on the Setting page.
9. On the left side Change Center section, click Activate Changes.
10. Find the server that you selected above and do one of the following:
■ If the managed server is in a stopped state, start it.
■ If the managed server is in a running state, then stop it and start it.
Now you can remove the security policy for a web service.
See Removing the Security Policy from an EnterpriseOne Web Service (Release 9.1 Update 3.1)

Setting Up Anonymous Login
3-6 Business Services Server Reference Guide
3.3.3.2 Adding the Class Path Back to the WebLogic Server (Windows Platform Only)
Note: The steps in this task are required only if you are running a WebLogic Server 10.3.5 or later version on a Windows platform.
This task is not applicable if your WebLogic server is running on a non-Windows platform.
After you remove one or more security policies from your web services, you must add the class path back to your WebLogic Server so that web services that still have a security policy work.
Use the following steps to add the server class path back to the WebLogic Server:
1. From the Change Center section on left side of the admin console, expand Environment, click the Server option, and select the same server you selected in the previous set of steps.
2. On the right side Settings page, click the Configuration tab, and then click the Server Start tab.
3. On left side Change Center section, click the Lock & Edit button.
4. On the right side Settings page, copy and paste the class path entry that you saved in Notepad from the previous task to the Class Path section.
5. Click Save.
6. On the left side Change Center section, click the Activate Changes button.
7. Restart the server.
Now, web services with security policy attached and web services without a security policy can be run on the Windows platform.
3.3.4 Removing the Security Policy from an EnterpriseOne Web Service (Release 9.1 Update 3.1)
If you are running WLS 10.3.5 or later, you can use the WebLogic Server Admin Console to remove the security policy that is attached to an EnterpriseOne web service so that you can use Anonymous Login.
Important: If you are running WLS 11g on a Windows platform you must remove the class path from the WebLogic Server before you remove the security policy.
See Removing the Class Path from a WebLogic Server Running on a Windows Platform
If you are running WLS 12c on a Windows platform, you are not required to remove the server start class path. (Release 9.1 Update 4)
When you remove the HTTP security policy, the authentication uses the BootStrap User ID and Password in jdbj.ini for BSSV. You are not able to use WS-Security in the Soap Header section because Anonymous login is mandatory.
Every time you redeploy the business service package, you must manually detach the security policy file from the web services using the WebLogic Admin Console.
Note:
■ The policy file name for JAX-RPC is Wssp1.2-20077-Https-Usernametoken-Plain.xml.
■ The policy file name for JAX-WS is bssvpolicy.xml.
Setting Up Anonymous Login
Configuring Business Services Server Security 3-7
Use these steps to remove the security policy from an EnterpriseOne web service:
Important: The deployment must be active.
1. On the WebLogic Admin Console, go to Deployments and click the deployment that you want to modify.
The list of services appears under the deployment that you selected.
2. Click the service from which you want to remove the security policy.
3. On the right side Settings page, click the Configuration tab, and then click the WS-Policy tab.
The service endpoint and the policy attached to it appear on the Settings page.
4. Click the service end point.
5. From the left side Change Center section, click Lock & Edit.
A list of policies appears in the Settings page.
6. Under Chosen Endpoint Policies on the Settings page, select the security policy to be removed and use the arrow button to move the policy to the Available Endpoint Policies on the left side.
7. Click OK.
A message appears on the Settings page indicting that the deployment plan was successfully created and identifies the location of the deployment plan.
The first time that you remove a policy, the Plan.xml file is created under these two locations:
■ -C:\jde_agent\SCFHA\targets\BSSV_WLS_7020\owl_deployment\E1Services-DV900-wls.ear\ app\Plan.xml
■ -C:\Oracle\Middleware\user_projects\domains\BSSVHTTP\servers\BSSV_HTTP_7080\stage\BSSV_HTTP_7080\plan\Plan.xml
8. Repeat steps 2 through 7 to remove security policies from additional web services.
After completing all of the policy removals, perform the next steps to update the deployment.
9. On the WebLogic Admin Console, go to Deployments and select the deployment that you modified.
10. Click Update.
11. In the next screen, select the option, Update this application in place with new deployment plan changes.
A deployment plan must be specified for this option.
12. Click Next.

Enabling SSL for Provider and Consumer Business Services
3-8 Business Services Server Reference Guide
13. Click Finish.
Now the web services from which you removed the policy can be invoked without passing the user name and password (anonymous access) in the SOAP header.
Important: If you are running your WLS on a Windows platform you must add the class path back to the WebLogic Server before you run your web service.
See Adding the Class Path Back to the WebLogic Server (Windows Platform Only)
Note: To reattach a policy to a web service, use the above steps, except in Step 6, move the security policy from the left side (Available Endpoint Polices) to the right side (Chosen Endpoint Policies).
3.4 Enabling SSL for Provider and Consumer Business ServicesThis section describes how to enable SSL for business services running on an IBM WebSphere Application Server (WAS) for both Provider and Consumer Scenarios. SSL is enabled for business services running on Oracle WebLogic Server by default. (Release 9.1 Update 4)
You can disable SSL for business services running on the Oracle WebLogic Server. See Removing the Security Policy from an EnterpriseOne Web Service (Release 9.1 Update 3.1)
3.4.1 Configuring SSL with IBM WebSphere Application Server (WAS)The section describes how to configure Secure Socket Layer (SSL) with the IBM WebSphere Application Server and includes these tasks:
■ Configuring SSL on the IBM HTTP Server
■ Configuring SSL on IBM WebSphere
■ Configuring BSSV for SSL and WebSphere and Server Manager
3.4.1.1 Configuring SSL on the IBM HTTP ServerFor production environments, we recommend you request a Self-Signed Certificate from a Certificate Authority. For instructions to request a CA-Signed Personal Certificate, refer to the IBM Info Center. The procedure in this section assume you have already obtained the CA-Signed Personal Certificate.
To configure SSL on the IBM HTTP Server:
1. Start the Key Management Utility by navigating the following path:
Start > Programs > IBM HTTP Server V 6.1 > Start Key Management Utility
2. Create a folder named keys in the HTTP Server directory.
3. Start the ikeyMan utility which is located in your HTTP Server's bin directory (for Windows platforms, this path is typically:
C:/WebSphere/IBM HTTP Server/bin
4. In the ikeyMan utility, create a Key Database File by selecting:

Enabling SSL for Provider and Consumer Business Services
Configuring Business Services Server Security 3-9
Key Database File > New
5. At the prompt, complete these fields:
Field Values
Key Database Type CMS
Note that only CMS is supported with the IBM HTTP Server.
File Name serverkey.kdb
Location C:\WebSphere\IBM HTTP Server\keys
6. Enter the password (for example, serverkey) and select this option:
stash the password file
7. Click the OK button.
8. From the drop down box, select this option:
Personal Certificates
9. Click the New Self-Signed button.
10. On the next screen complete these fields:
Field Values
Key Label Enter any label. For example:
■ server_cert
Version X509V3
Key Size 1024
Common Name Enter a fully qualified server name. For example:
■ denicdep5.mlab.jdedwards.com
Organization Enter your organization name. For example:
■ Oracle
Country or region Enter your country or region. For example:
■ US
Validity Period Enter the validity for your certificate. For example:
■ 365 days
11. Click the OK button.
The program displays your certificate in the list.
12. Delete all other certificates that might exist.
13. Open the httpd.conf file in a text editor, and add the following virtual host definition.
Note: The text in the httpd.conf file is case sensitive; type the host definition exactly as shown.
If you have already configured a port on the HTTP Server (for example, port 85), the file will include an Alias. You should use the same alias under your Virtual Host definition as shown by the bold segment in the section file sample below.
Enabling SSL for Provider and Consumer Business Services
3-10 Business Services Server Reference Guide
LoadModule ibm_ssl_module modules/mod_ibm_ssl.so<IfModule mod_ibm_ssl.c>Listen 443<VirtualHost denicdep5.mlab.jdedwards.com:443>Alias /jde "C:/WebSphere/AppServer/installedApps/denicdep5Node01/EA_JS_85.ear/webclient.war"SSLEnable</VirtualHost></IfModule>SSLDisableKeyFile "C:/WebSphere/IBMIHS/keys/serverkey.kdb"
For BSSV, the following Virtual Host definition should be used.
Listen 0.0.0.0:443## IPv6 support:<VirtualHost *:443>Alias /PD812_WEB "C:\WebSphere61\AppServer\profiles\BSSV/installedApps/[node_name]/BSSV_PD_93.ear\PD812_WEB.war"SSLEnable</VirtualHost><Directory "C:\WebSphere61\AppServer\profiles\BSSV/installedApps/[node_name]/BSSV_PD_93.ear\PD812_WEB.war\WEB_INF">Order Deny,AllowDeny from All</Directory><Directory "C:\WebSphere61\AppServer\profiles\BSSV/installedApps/[node_name]/BSSV_PD_93.ear\PD812_WEB.war">Order Deny,AllowAllow from All</Directory></IfModule>KeyFile C:\WebSphere61\IHS2\keys\serverkey.kdbSSLDisable# End of example SSL configuration
3.4.1.2 Configuring SSL on IBM WebSphereTo configure SSL on the IBM HTTP Server:
1. Log on to your WebSphere Admin Console.
2. Navigate to Environment > Virtual Hosts.
3. Select your virtual host.
For example, if you initially installed your application on port 85, then the virtual host should have a name similar to VH_EA_JS_85.
4. Under the virtual host, select Additional Properties > Host Aliases.
5. Under Host Aliases, click the New button.

Enabling SSL for HTTP Request/Reply
Configuring Business Services Server Security 3-11
6. Create a new host alias by completing these fields:
Field Values
Host Enter a fully qualified server name. For example:
■ denicdep5.mlab.jdedwards.com
Port Enter the default SSL port number, which is:
■ 443
7. Regenerate the plugin and restart your Application Server.
8. Restart the HTTP Server.
At this point you should be able to login to the WebSphere Application Server using the following URL:
https://fully_qualified_server_name/jde/E1Menu.maf
3.4.1.3 Configuring BSSV for SSL and WebSphere and Server ManagerThis section describes the additional steps that are required in order for BSSV to work with SSL and WebSphere and the Server Manager for JD Edwards EnterpriseOne.
1. From the WAS Admin Console, extract the signer and personal certificates from the node default trust store and node default key store.
2. Using the ikeyman tool, open the dummy client key file (DummyClientKeyFile.jks) and import the personal signer certificate that you extracted in Step 1 of this procedure.
3. Open the dummy client trust file (DummyClientTrustFile.jks) and import the signer certificate that you extracted in Step 1 of this procedure.
4. Using the ikeyman tool, open the plugin-key.kdb of the HTTP Server that is configured with the WAS Profile hosting the BSSV Server.
5. Import the personal signer and signer certificates extracted in Step 1 of this procedure into the plugin-key.kdb file.
6. Modify the httpd.conf file and change the key store value as shown below:
keystore=plugin-key.kdb
7. If you want to disable HTTP access and only have HTTPS (SSL) access, you must comment the include file for BSSV that was automatically added by Server Manager. The name of the Server Manage configuration file is scf_xxxx.conf.
8. After completing these steps and restarting HTTP server, the secure https url should be working properly.
3.5 Enabling SSL for HTTP Request/ReplyIn JD Edwards EnterpriseOne, you can configure a business service to communicate with a third-party system using HTTP POST. You can secure communication between the Business Services Server and third-party sites by using the Secure Sockets Layer (SSL) protocol.
This section describes:
■ Section 3.5.1, "INI Configuration Changes for Communication Over SSL"

Enabling SSL for HTTP Request/Reply
3-12 Business Services Server Reference Guide
■ Section 3.5.2, "Configuring Production Application Server to Work with Certificates"
3.5.1 INI Configuration Changes for Communication Over SSLThe KEYSTORE and TRUST_STORE sections of the jdeinterop.ini file contain parameters that you must complete to enable SSL for HTTP Request/Reply. When you create a certificate for communication over SSL, the values that you enter for the certificate should match the values set for these parameters.
The following parameters in the KEYSTORE section of the jdeinterop.ini are used for the SSL configuration for HTTP Request/Reply:
Parameter Description
keystorefile= The path to the keystore file.
keystorepasswd= The keystore password.
keyalias= The keystore alias name.
certificatepasswd= The keystore certificate password.
Note: The default settings for these parameters are blank.
The following parameters in the TRUST_STORE section of the jdeinterop.ini are used for the SSL configuration for HTTP Request/Reply:
Parameter Description
truststorefile= The path to the truststore file.
truststorepasswd= The truststore password.
Note: The default settings for these parameters are blank.
3.5.2 Configuring Production Application Server to Work with CertificatesThis section describes how to:
■ Section 3.5.2.1, "Configuring the HTTP Adapter Service"
■ Section 3.5.2.2, "Configuring the Listener Service"
3.5.2.1 Configuring the HTTP Adapter ServicePerform these tasks to configure the HTTP Adapter Service:
■ Configure client authentication.
■ Check the trustability of the server during handshake.
To configure client authentication:
Create a certificate request (CSR) using keytool.
1. Go to the HTTP Adapter deployed location.
../WEB-INF/classes/.

Enabling SSL for HTTP Request/Reply
Configuring Business Services Server Security 3-13
2. From a command prompt navigate to:
<Business Services deployed location>/WEB-INF/classes/.
3. Use the following commands to create a certificate request:
<JAVA_HOME>\bin\keytool -genkey -keyalg RSA -alias httpclientcer -keystore HTTPAdapterKS.keystore -keypass httpadapter -storepass httpadapter -dname "CN=Oracle,OU=Oracle,O=Oracle USA L=Redwood Shores,S=CA,C=US"
Provide all the details for generating the key.
<JAVA_HOME>\bin\keytool -certreq -alias httpclientcer -file clientkeyCSR -keystore HTTAdapterKS.kestore -keypass httpadapter -storepass httpadapter
The preceding command generates the certificate request and writes to a file clientkeyCSR.
4. You obtain the user certificate from a certification authority by submitting the generated CSR and saving it to a file HTTPAdapter.cer.
5. Obtain the certification authority root certificate (rootCA.cer) and intermediate CA certificate (rootInterCA.cer).
6. Import the signer certificates rootCA.cer and rootInterCA.cer in to HTTP Adapter's keystore using this command:
<JAVA_HOME>\bin\keytool -import -alias rootCAcer -file rootCA.cer -keystore HTTAdapterKS.keystore -keypass httpadapter -storepass httpadapter
<JAVA_HOME>\bin\keytool -import -alias rootInterCAcer -file rootInterCA.cer -keystore HTTAdapterKS.keystore -keypass httpadapter -storepass httpadapter
7. Import the certificate HTTPAdapter.cer in to the HTTP Adapter's key store using the following command:
<JAVA_HOME>\bin\keytool -import -v -alias AliasName -file HTTPAdapter.cer -keystore HTTAdapterKS.keystore -keypass KeyPassword -storepass httpadapter
Where AliasName is the alias of the certificate. This value must be updated in the jdeinterop.ini file for keyalias parameter after the certificate is imported.
Where KeyPassword is the password for the certificate stored in the keystore. This value must be updated in the jdeinterop.ini file for property certficatepasswd after the certificate is imported
To check the trustability of the server during handshake:
Obtain the SSL certificate (ServerRoot.cer) of server's certificate root CA.
1. Go to the HTTP Adapter deployed location.
../WEB-INF/classes/.
2. From a command prompt navigate to:
<Business Services deployed location>/WEB-INF/classes/
3. Import the certificate ServerRoot.cer in to the HTTP Adapter's trust store using the following command:

Enabling SSL for HTTP Request/Reply
3-14 Business Services Server Reference Guide
<JAVA_HOME>\bin\keytool -import -v -trustcacerts -alias AliasName -file ServerRoot.cer -keystore cacerts -keypass KeyPassword -storepass changeit
where AliasName is the name for alias of the certificate.
where KeyPassword is the password for the certificate stored in the keystore.
3.5.2.2 Configuring the Listener ServicePerform these tasks to configure the listener service:
■ Configure SSL for the Listener Service on a IBM HTTP Server.
To configure SSL for the listener service on an IBM HTTP Server:
1. Open IKeyman tool (ikeyman.bat under:<IBM_HTTP_SERVER_INSTALL_ROOT>\bin).
2. On the New screen, select CMS from the Key database type list and complete these fields to create a new key database file:
■ File name
Enter a name or click the Browse button to select a key database file.
■ Location
Enter the path to the key database file.
3. Click OK.
The Password Prompt window opens.
4. On Password Prompt, enter a password in the Password and Confirm Password fields, and then select the "Stash password to a file?" option.

Enabling SSL for HTTP Request/Reply
Configuring Business Services Server Security 3-15
5. On Create New Key and Certificate Request, enter the name of the new certificate in the Common Name field. Enter the name of the file where the certificate request is stored, and click OK.
6. Select Personal certificate requests from Key database context menu and click New.

Enabling SSL for HTTP Request/Reply
3-16 Business Services Server Reference Guide
7. Provide the required information. The Certificate Request File is created at <IBM_HTTP_SERVER_INSTALL_ROOT>\bin. By default it is certreq.arm.
8. Create a CSR at any Certificate Authority with the Certificate Request information contained in the Certificate Request File.
Also, obtain Root CA and Intermediate CA certificate from the Certificate Authority vendor.
9. Select the Signer Certificates option from Key database content.

Enabling SSL for HTTP Request/Reply
Configuring Business Services Server Security 3-17
10. Add the Root CA and then Intermediate CA by clicking Add.

Enabling SSL for HTTP Request/Reply
3-18 Business Services Server Reference Guide
11. Select the Personal Certificates option from Key database content. Add the certificate provided by CA by clicking the Receive option.
12. Save the file. A key database file with extension.kdb is created.
13. Go to the file <IBM_HTTP_SERVER_INSTALL_ROOT>\conf\httpd.conf and add the following to the VirtualHost:
LoadModule ibm_ssl_module modules/mod_ibm_ssl.so Listen 443<VirtualHost DENOSCL244.mlab.jdedwards.com:443>SSLEnableSSLClientAuth none</VirtualHost> SSLDisableKeyfile "C:\Program Files\IBM\IBM HTTP Server\bin\key.kdb"
Customize it according to your environment.
DENOSCL244.mlab.jdedwards.com - DNS NameKeyfile "C:\Program Files\IBM\IBM HTTP Server\bin\key.kdb" -Key Database
14. Go to plugin-cfg.xml under <WAS_INSTALL_ROOT>/Plugin/config/webserver1, where webserver1 is the webserver name.
Add <Uri Name="/ListenerService/ ListenerService"/> under the node UriGroup.
Add <VirtualHost Name="*:443"/> under node VirtualHostGroup

Enabling SSL for HTTP Request/Reply
Configuring Business Services Server Security 3-19
15. Go to plugin-cfg.xml under<WAS_INSTALL_ROOT>/profiles/default/cells/DENOSCL244Node01Cell/node/webserver1_node/servers/webserver1.
Add <Uri AffinityCookie="JSESSIONID" AffinityURLIdentifier="jsessionid" Name="/ListenerService/ListenerService"/> under the node UriGroup.
Add <VirtualHost Name="*:443"/> under node VirtualHostGroup
16. Restart WAS.
17. Restart IBM HTTP Server.
18. Deploy the Listener service.
See Also:
■ "Testing a Business Service That Consumes an External Web Service" in the JD Edwards EnterpriseOne Tools Business Services Development Guide.

Enabling SSL for HTTP Request/Reply
3-20 Business Services Server Reference Guide

4
Configuring Business Services Server Security for JAX-WS Based Business Services (Release 9.1 Update 2) 4-1
4Configuring Business Services Server Security for JAX-WS Based Business Services (Release
9.1 Update 2)
This chapter contains the following topics:
■ Section 4.1, "Understanding Business Services Server Security for JAX-WS Based Business Services on WAS"
■ Section 4.2, "Securing JAX-WS Based Business Services on WAS"
■ Section 4.3, "Configuring WebSphere to Use Anonymous Login"
4.1 Understanding Business Services Server Security for JAX-WS Based Business Services on WAS
JAX-WS based EnterpriseOne business services deployed to the WebSphere Application Server (WAS) are secure by default. They are only invoked by supplying valid EnterpriseOne credentials in the WS-Security part of the SOAP header. The Business Services Server uses the JD Edwards EnterpriseOne Login Module as the authentication mechanism for authenticating the credentials in the SOAP Header against the EnterpriseOne Security Server.
PrerequisiteBefore you deploy a JAX-WS based business service application to a business services server on WAS, ensure that the WAS version, Fix Pack Level, and IFIX (required) are per the EnterpriseOne 9.1.2 Tools Release MTRs for the business services server on WAS.
Note: JAX-WS based business services deployed to Oracle WebLogic Server are secure by default, and they use the same security model as JAX-RPC business services, as discussed in Chapter 3.
4.2 Securing JAX-WS Based Business Services on WASWhen the business services application is deployed to the business services server on WAS, Server Manager automatically installs and configures the following modules for all published services to ensure they are secure:
■ The wss.generate.issuedToken, wss.consume.issuedToken, System Java Authentication and Authorization Service (JAAS) login configurations.

Configuring WebSphere to Use Anonymous Login
4-2 Business Services Server Reference Guide
■ The custom E1JAXWSBSSV_UNT JAX-WS policy set with WS-Security as the main policy to handle the UsernameToken element with user name and password elements in the SOAP Header.
■ The custom E1JAXWSBSSVBinding JAX-WS binding to configure the generic issued token consumer for the inbound UsernameToken and to configure the caller.
■ The custom Java Authentication and Authorization Service (JAAS) Application Login Module, application.e1JAXWSBssvLogin, to validate the JD Edwards EnterpriseOne users against the JD Edwards EnterpriseOne Security Server.
The system JAAS login module, the custom JAAS application login module, and the custom JAX-WS policy set are all installed once for a particular WAS profile. After a business service application is deployed to a business service instance, the custom JAX-WS policy set and binding are attached to the entire business service application making them applicable to all of the published services.
4.3 Configuring WebSphere to Use Anonymous LoginIn WebSphere, you can disable security for the entire business services server application by detaching the custom JAX-WS policy set and binding. When you disable security, the system uses anonymous login credentials for authentication for all of the published services instead of the user credentials supplied in the WS-Security part of the SOAP Header. The anonymous login credentials are stored in the jdbj.ini file on the business services server.
To set up anonymous login for JAX-WS business services on WAS:
1. Login to the WAS Admin Console.
2. From the left-hand menu, click Applications > Application Types > WebSphere enterprise applications.
3. On the right-hand Enterprise Applications page, select the business services server application/instance for which you want to set up anonymous login.
4. On the Business Services Server Applications page, with the Configuration tab selected, click the Service provider policy sets and bindings link under the Web Services Properties heading.
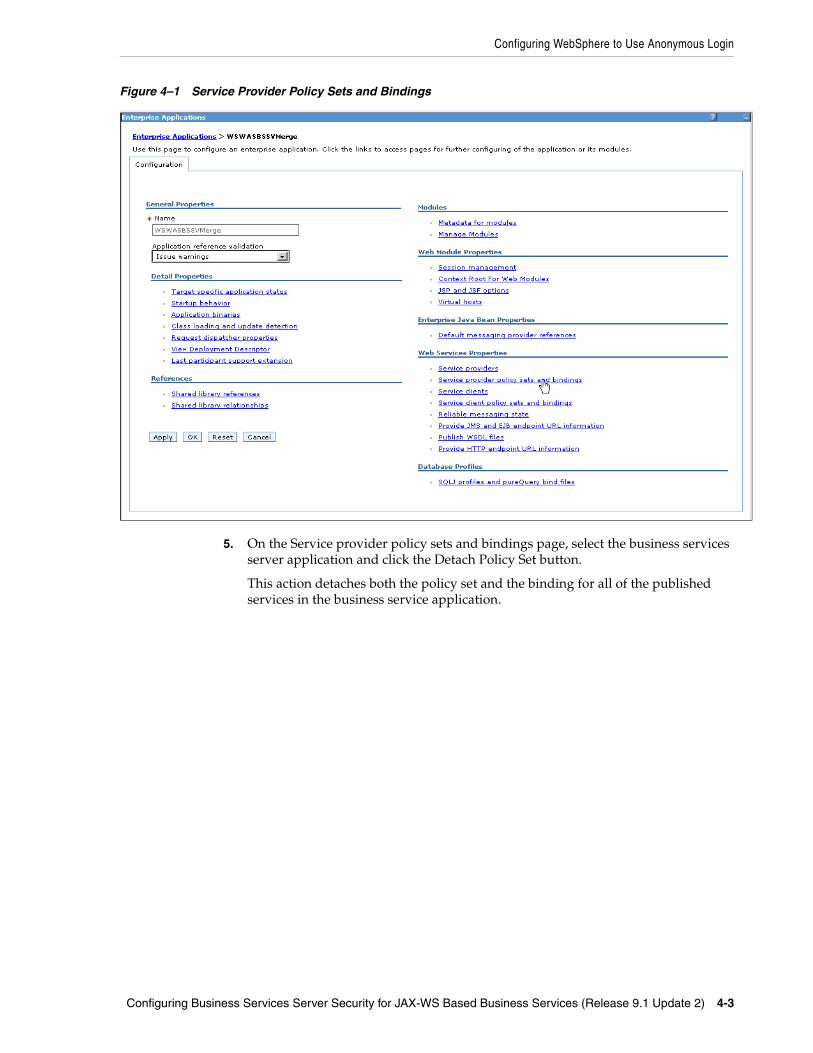
Configuring WebSphere to Use Anonymous Login
Configuring Business Services Server Security for JAX-WS Based Business Services (Release 9.1 Update 2) 4-3
Figure 4–1 Service Provider Policy Sets and Bindings
5. On the Service provider policy sets and bindings page, select the business services server application and click the Detach Policy Set button.
This action detaches both the policy set and the binding for all of the published services in the business service application.

Configuring WebSphere to Use Anonymous Login
4-4 Business Services Server Reference Guide
Figure 4–2 Detach Service Provider Polity Sets and Bindings
6. Save the changes.
7. Restart the business services server for changes to take effect.
After anonymous login is set up, you can invoke all of the published services in the business services application anonymously without passing user credentials in the WS-Security part of the SOAP Header.

A
Troubleshooting A-1
ATroubleshooting
This appendix contains the following topics:
■ Section A.1, "Exceptions"
■ Section A.2, "JD Edwards EnterpriseOne Application Warnings"
■ Section A.3, "Business Services Server Logs"
A.1 ExceptionsWhen an error occurs an exception is thrown to the caller. These exceptions fall into different categories.
This section discusses:
■ Simple Object Access Protocol (SOAP) faults
■ JD Edwards EnterpriseOne System Exceptions
■ JD Edwards EnterpriseOne Application Exceptions/Errors
A.1.1 Simple Object Access Protocol (SOAP) faultsThis is most generic of the categories, all exceptions in this category are expressed as SOAP faults. For example, if something is incorrectly configured on the applications server or connectivity problems exist you will see these as SOAP faults.
A.1.2 JD Edwards EnterpriseOne System ExceptionsThis category identifies errors inside the JD Edwards EnterpriseOne space. Most commonly these are server connectivity issues. For example, if a server is dropped, an exception is thrown to the caller to report this. The caller receives an exception if the authorization/authentication fails. Typically such exceptions are the result of a temporary system condition or are configuration issues.
A.1.2.1 Server ConnectivityIt is important to be aware that inside the Business Services Server the feature used to contact the Enterprise Server is the Dynamic Java Connector. If the configuration settings for the Dynamic Java Connector are incorrect, it could cause connectivity problems with the Enterprise Server.
A.1.2.2 Authorization/AuthenticationThe system is secure by default, if you are getting authorization/authentication errors, most likely you are missing Security Workbench records.

JD Edwards EnterpriseOne Application Warnings
A-2 Business Services Server Reference Guide
A.1.3 JD Edwards EnterpriseOne Application Exceptions/ErrorsEvery error that happens within the application logic is reported as an exception to the caller. For example; an error in the business data setup indicates that incorrect data was passed to the business data or a necessary service property could be missing.
A.2 JD Edwards EnterpriseOne Application WarningsWarnings from the JD Edwards EnterpriseOne application are not expressed as exceptions. Warnings are reported back to the caller in the response information.
A.3 Business Services Server LogsBusiness Services Server logs are configured and accessed through Server Manager.
See Also:
■ "View Log Files" in the JD Edwards EnterpriseOne Server Manager Guide
A log component called BSSVFRAMEWORK is available for component level logging. When this is enabled, the log file displays system errors and enables you to gain insight to some application errors.
To enable component level logging:
1. Access Server Manager.
2. Select a Business Services Server instance.
3. Select Log File Configuration.
4. On Log File Configuration, enter BSSVFRAMEWORK in thee Log Components column for the Business Services server log.
5. Click the Save button.

Business Services Server Logs
Troubleshooting A-3

Business Services Server Logs
A-4 Business Services Server Reference Guide