
BUSINESS CARDS - DIGI Express - Print2Day · Finished card has a High Gloss section spelling out...
5
BUSINESS CARDS - DIGI Express WHAT WE NEED FROM YOU FOR DIGITAL CARDS We prefer a Hi-Res pdf (print quality) (PDF1.4) or an eps file Colours should be CMYK if possible - except black text which is 100% K Images should be converted to cmyk before embedding and be 300dpi Allow 2mm bleed - no trim/crop marks needed Keep all text or anything you don’t want to get chopped off at least 3.5-4mm from the trim edge Convert text to outlines - if you are not able to do this you will need to supply the font(s) used Prefix your file name with your order ref. number If you want your images or colour to go to the edges of your card we need a ‘bleed’ area. To avoid unsightly white lines on the edges of the card or having some of your wording chopped off, you need to set up the design like this:- The same principle applies for the set-up of all stationery products where the colour or images go to the edge of the page This Business Card is 90 x 55mm - Make your document size 94 x 59mm (as shown in grey) Centre the card in the document (as shown in yellow) the remaining grey area that you can see is the 2mm bleed area - this part will be cut off when the business card is finished Once the business card has been printed it is trimmed back to the finished size (90 x 55mm) and all your wording and images are in position and intact Extend any background images or blocks of colour so that they cover the grey bleed area - you can go past the area if you need to. Add your wording, keeping it at least 3.5-4mm from the trim line - the dotted line indicates where the card will be trimmed. www.classic2repairs.com.au All mechanical work including exhausts suspension brakes car servicing paintless dent removal hail damage specialists www.classic2repairs.com.au All mechanical work including exhausts suspension brakes car servicing paintless dent removal hail damage specialists Printing both sides? - Do the same for the reverse side - so both sides are exactly the same size even if the colour or images aren’t going to the edge of the page If you are setting up your Digital card in Word or Publisher you need to read the fact sheet ‘Using Word or Publisher’ first ©PRINT2DAY PTY LTD FEB 2012
Transcript of BUSINESS CARDS - DIGI Express - Print2Day · Finished card has a High Gloss section spelling out...

BUSINESS CARDS - DIGI Express
WHAT WE NEED FROM YOU FOR DIGITAL CARDS
We prefer a Hi-Res pdf (print quality) (PDF1.4) or an eps �le
Colours should be CMYK if possible - except black text which is 100% K
Images should be converted to cmyk before embedding and be 300dpi
Allow 2mm bleed - no trim/crop marks needed
Keep all text or anything you don’t want to get chopped o� at least 3.5-4mm from the trim edge
Convert text to outlines - if you are not able to do this you will need to supply the font(s) used
Pre�x your �le name with your order ref. number
If you want your images or colour to go to the edges of your card we need a ‘bleed’ area.To avoid unsightly white lines on the edges of the card or having some of your wording chopped o�, you need to set up the design like this:-
The same principle applies for the set-up of all stationery products where the colour or images go to the edge of the page
This Business Card is 90 x 55mm - Make your document size 94 x 59mm (as shown in grey)Centre the card in the document (as shown in yellow) the remaining grey area that you can see is the 2mm bleed area - this part will be cut o� when the business card is �nished
Once the business card has been printed it is trimmed back to the �nished size (90 x 55mm) and all your wording and images are in position and intact
Extend any background images or blocks of colour so that they cover the grey bleed area - you can go past the area if you need to. Add your wording, keeping it at least 3.5-4mm from the trim line - the dotted line indicates where the card will be trimmed.
www.classic2repairs.com.au
All mechanical work including
exhausts
suspensionbrakescar servicingpaintless dent removalhail damage specialists
www.classic2repairs.com.au
All mechanical work including
exhausts
suspensionbrakescar servicingpaintless dent removalhail damage specialists
Printing both sides? - Do the same for the reverse side - so both sides are exactly the same size even if the colour or images aren’t going to the edge of the page
If you are settingup your Digital cardin Word or Publisheryou need to read the
fact sheet ‘Using Wordor Publisher’
first
©PRINT2DAY PTY LTD FEB 2012
BUSINESS CARDS - Round Corners, Deluxe, Executive, Mini, Square & Recycled
WHAT WE NEED FROM YOU
We prefer a Hi-Res pdf (print quality) (PDF 1.4) or an eps �le
All colours must be CMYK - except black text which is 100% K
All images need to be converted to cmyk before embedding and be 300dpi
Allow 2mm bleed and use automatic trim/crop marks only (not ‘All Printers Marks’)
Keep all text or anything you don’t want to get chopped o� at least 3.5-4mm from the trim edge
Convert text to outlines - if you are not able to do this you will need to supply the font(s) used
Pre�x your �le name with your order ref. number
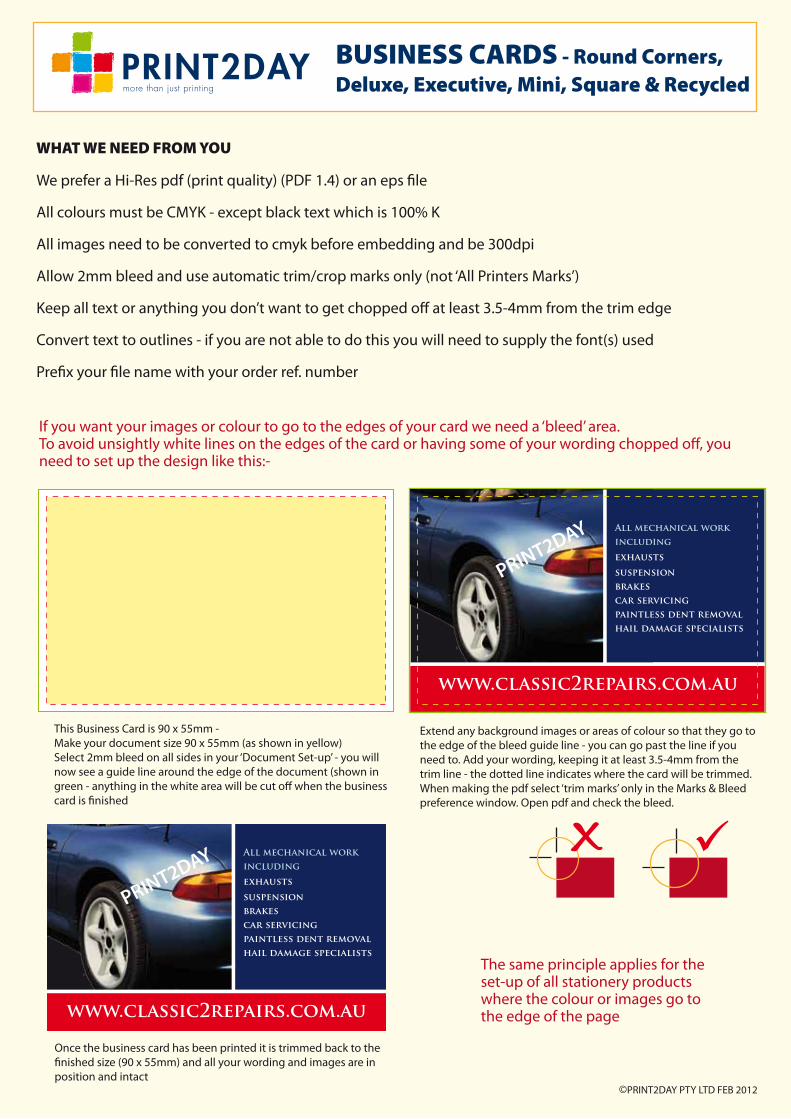
If you want your images or colour to go to the edges of your card we need a ‘bleed’ area.To avoid unsightly white lines on the edges of the card or having some of your wording chopped o�, you need to set up the design like this:-
The same principle applies for the set-up of all stationery products where the colour or images go to the edge of the page
This Business Card is 90 x 55mm - Make your document size 90 x 55mm (as shown in yellow)Select 2mm bleed on all sides in your ‘Document Set-up’ - you will now see a guide line around the edge of the document (shown in green - anything in the white area will be cut o� when the business card is �nished
Once the business card has been printed it is trimmed back to the �nished size (90 x 55mm) and all your wording and images are in position and intact
Extend any background images or areas of colour so that they go to the edge of the bleed guide line - you can go past the line if you need to. Add your wording, keeping it at least 3.5-4mm from the trim line - the dotted line indicates where the card will be trimmed.When making the pdf select ‘trim marks’ only in the Marks & Bleed preference window. Open pdf and check the bleed.
www.classic2repairs.com.au
All mechanical work including
exhausts
suspensionbrakescar servicingpaintless dent removalhail damage specialists
www.classic2repairs.com.au
All mechanical work including
exhausts
suspensionbrakescar servicingpaintless dent removalhail damage specialists
©PRINT2DAY PTY LTD FEB 2012
WHAT WE NEED FROM YOU
We prefer a Hi-Res pdf (print quality) (PDF 1.4) or an eps �le
All colours must be CMYK except Silver which is spot colour PMS 877 - keep all on one layer onlyBlack text needs to be 100% K
All images need to be converted to cmyk before embedding and be 300dpi
Allow 3mm bleed and use automatic trim/crop marks only (not ‘All Printers Marks’)
Keep all text or anything you don’t want to get chopped o� at least 3.5-4mm from the trim edge
Convert text to outlines - if you are not able to do this you will need to supply the font(s) used
Pre�x your �le name with your order ref. number
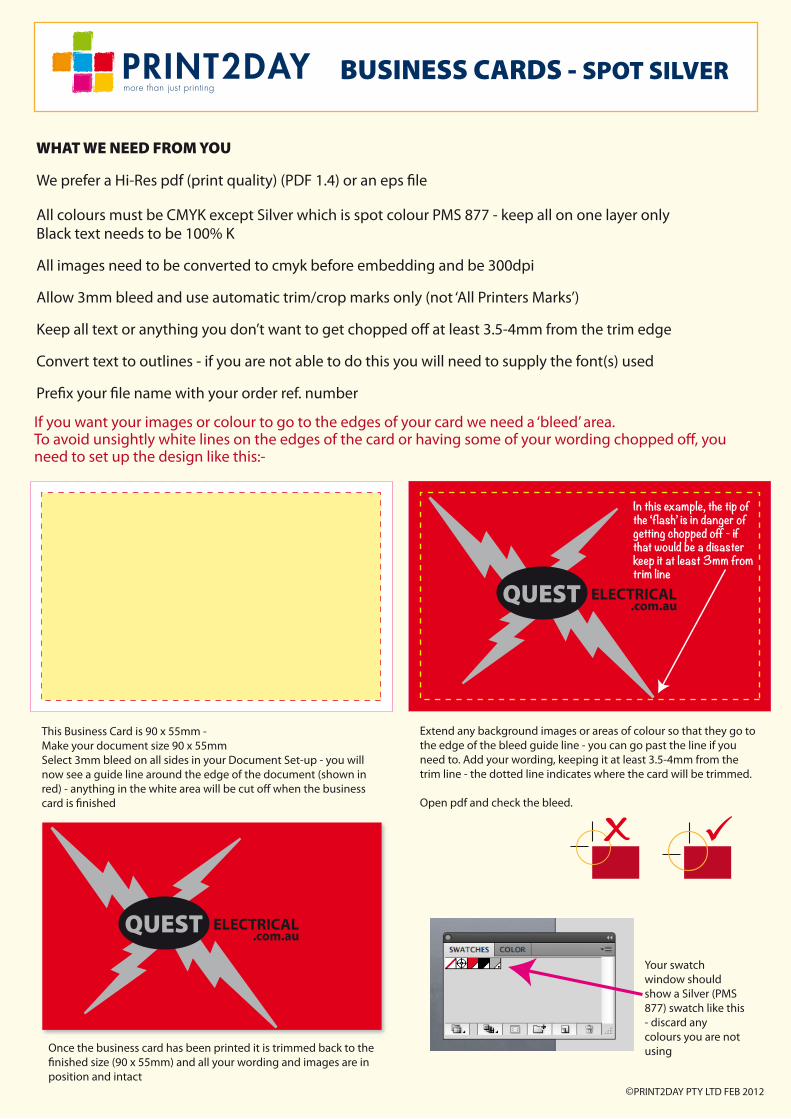
If you want your images or colour to go to the edges of your card we need a ‘bleed’ area.To avoid unsightly white lines on the edges of the card or having some of your wording chopped o�, you need to set up the design like this:-
This Business Card is 90 x 55mm - Make your document size 90 x 55mmSelect 3mm bleed on all sides in your Document Set-up - you will now see a guide line around the edge of the document (shown in red) - anything in the white area will be cut o� when the business card is �nished
Once the business card has been printed it is trimmed back to the �nished size (90 x 55mm) and all your wording and images are in position and intact
Extend any background images or areas of colour so that they go to the edge of the bleed guide line - you can go past the line if you need to. Add your wording, keeping it at least 3.5-4mm from the trim line - the dotted line indicates where the card will be trimmed.
Open pdf and check the bleed.
ELECTRICAL.com.auQUEST
ELECTRICAL.com.auQUEST
Your swatch window should show a Silver (PMS 877) swatch like this - discard any colours you are not using
In this example, the tip of the ‘flash’ is in danger of getting chopped off - if that would be a disaster keep it at least 3mm from trim line
©PRINT2DAY PTY LTD FEB 2012
BUSINESS CARDS - SPOT SILVER
WHAT WE NEED FROM YOU
We prefer a Hi-Res pdf (print quality) (PDF1.4)
All colours must be CMYK except the Spot UV which is a solid colour - not tintedBlacktext needs to be 100% K
Your base artwork needs to be on one layer (cmyk) with the Spot UV on it’s own layer above it
Create a pdf �le with the UV layer turned o� - then create a pdf �le with the base artwork turned o�
Any images need to be converted to cmyk before embedding and be 300dpi
Allow 3mm bleed and use automatic trim/crop marks only (not ‘All Printers Marks’)
Keep all text or anything you don’t want to get chopped o� at least 3.5-4mm from the trim edge
Convert text to outlines - if you are not able to do this you will need to supply the font(s) used
Pre�x your �le name with your order ref. number
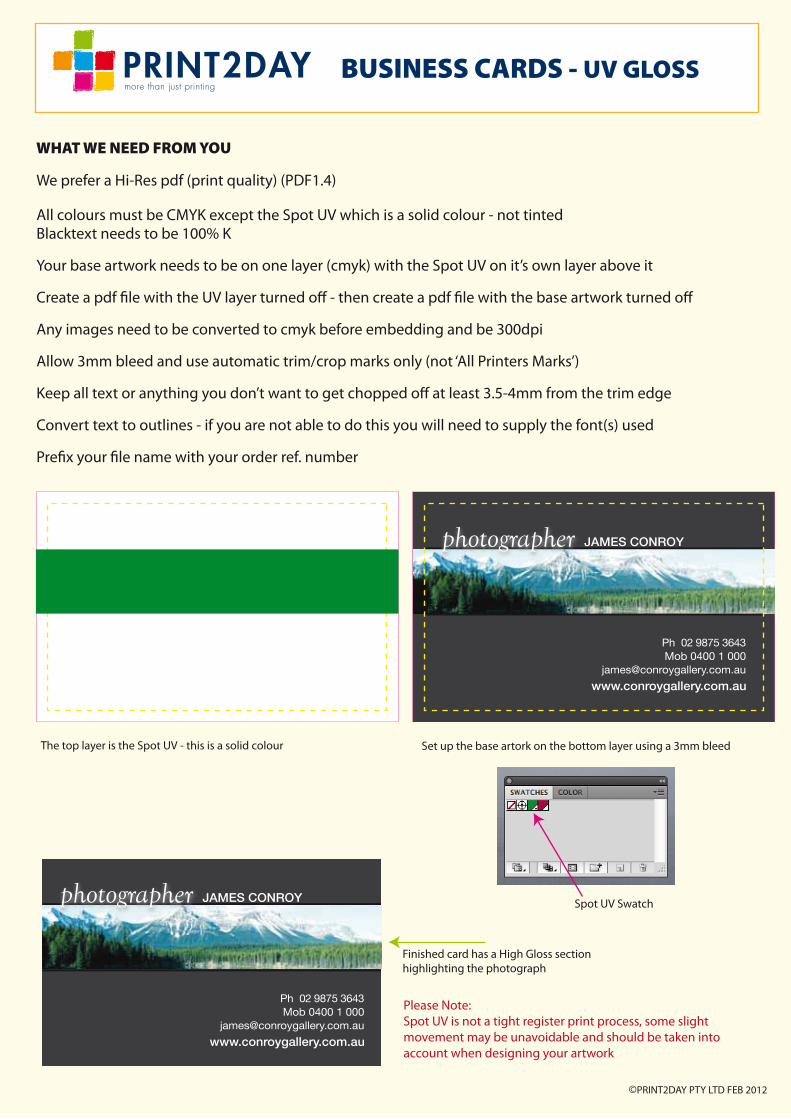
The top layer is the Spot UV - this is a solid colour
Spot UV Swatch
Set up the base artork on the bottom layer using a 3mm bleed
www.conroygallery.com.au
JAMES CONROY
www.conroygallery.com.au
Ph 02 9875 3643Mob 0400 1 000
JAMES CONROY
www.conroygallery.com.au
Ph 02 9875 3643Mob 0400 1 000
Finished card has a High Gloss section highlighting the photograph
Please Note:Spot UV is not a tight register print process, some slight movement may be unavoidable and should be taken into account when designing your artwork
©PRINT2DAY PTY LTD FEB 2012
BUSINESS CARDS - UV GLOSS

Use a 3mm bleed and two layersThe top layer is the Spot UV - this shows as a solid (spot) colour
Set up the base artwork in cmyk on the bottom layer
Finished card has a High Gloss section spelling out the initials CWF
www.conroygallery.com.au
Please Note:Spot UV is not a tight register print process, some slight movement may be unavoidable and should be taken into account when designing your artwork
Spot UVSwatch
©PRINT2DAY PTY LTD FEB 2012
BUSINESS CARDS - UV GLOSS