Building a Guitar - The Guild of New Hampshire Woodworkers
40
The The Newsletter of the Guild of New Hampshire Woodworkers John Whiteside – lessons in lutherie and life www.gnhw.org W O O D W O R K E R S • • N E W H A M P S H I R E T H E G U I L D O F Founded 1990 February 2008 Volume 19 No. 3 mock-ups calculating board feet sculpting a contemporary leg finishing for woodturners three phase motors beginners corner shellac photo by John Whiteside Feb 2 BIG Feb 16 Guild Meeting … Homestead in Newmarket, NH Mar 15 Guild Meeting … New Event … Sylvania in Danvers, MA Mar 9 Luthiers … New Date Mar 22 GSWT Apr 5 BIG Apr 19 Finishing Symposium May 10 Period Furniture May 18 Luthiers May 24 GSWT Jun 7 BIG Jun 14 Summer Trip Jul 26 GSWT Aug 2-10 NH Craftsmen’s Fair Building a Guitar Hand Cut Sliding Dovetails preparing thin stock
Transcript of Building a Guitar - The Guild of New Hampshire Woodworkers

TheThe Newsletter of the Guild of New Hampshire Woodworkers
John Whiteside – lessons in lutherie and life
www.gnhw.org
WOODWORKERS••
NEW H
AMPS
HIRETHE G U I L D OF
Founded 1990
February 2008Volume 19 No. 3
mock-ups calculating board feet sculpting a contemporary legfinishing for woodturnersthree phase motorsbeginners cornershellac
photo by John Whiteside
Feb 2 BIGFeb 16 Guild Meeting … Homestead in Newmarket, NH
Mar 15 Guild Meeting … New Event … Sylvania in Danvers, MA
Mar 9 Luthiers … New Date
Mar 22 GSWTApr 5 BIGApr 19 Finishing SymposiumMay 10 Period FurnitureMay 18 LuthiersMay 24 GSWTJun 7 BIGJun 14 Summer TripJul 26 GSWTAug 2-10 NH Craftsmen’s Fair
Building a Guitar
Hand Cut Sliding Dovetailspreparing thin stock

2 The Guild of New Hampshire Woodworkers
At times we all have an idea or two that rattles around in our heads half
formed for months and which seems to come back to us at the strangest times. You know what I mean, you’re supposed to be paying attention to something else but the train of thought keeps persisting. When it is about woodworking it’s mostly considered harmless day dreaming. Such is the case here.
My train of thought was really a series of questions about why we do the strangest things related to working with wood in relation to our everyday life. I guess I should start out with a personal example. My wife has trouble getting me, and I have trouble getting myself, to go shopping for clothes – even for something so simple as a few pairs of socks where I could be in and out of the store in less than half an hour. Contrast this with the fact that I drove three hours up and three hours back to attend the Lie-Nielsen 25th Anniversary and spend a whopping $100. The absurdity comes when I know that I could have spent the same amount for the same tool (also a Lie-Nielsen) locally with a short round trip of an hour.
president’s message by Dave Anderson
The Guild of New Hampshire Woodworkers – Bringing together the diverse interests of the New Hampshire woodworking community.“The Old Saw” is published five times per year. To join the Guild, go to www.gnhw.org and click on “Membership “ to download an application form.
Day DreamingDo some of the following behaviors
seem familiar to you?
1 You spend days, weeks, or even months debating which $25 woodworking widget to buy – Yet you pick out your spouse’s $500 Christmas present in about half an hour.
2 You silently debate with yourself over whether you should spend $5 per pull for the drawers or whether you should get the expensive ones at $7.50 each for that high chest. You already spent $400 for the wood and have about 200 hours in the project.
3 You can’t find time to take out the trash for pickup, but you can find time to spend most of a day at a guild meeting without feeling the slightest bit of guilt.
4 All of the chisels, plane blades, carving tools, and saws in your shop are razor sharp – sharp enough for use in surgery. Your kitchen knives would have trouble cutting through a marshmallow.
5 You couldn’t find your marriage
Steering CommitteePresident Dave Anderson 603-887-6267 [email protected] President David Frechette 802-633-2561 [email protected] Caleb Dietrich 603-556-1629 [email protected] Peter James 603-435-8133 [email protected] Large Peter Breu 603-647-2327 [email protected] Large Jon Siegel 603-768-5882 [email protected] At Large Bob LaCivita 603-942-1240 [email protected] Large Andy Young 603-672-9558 [email protected] Large John Whiteside 603-679-5443 [email protected] Large Ed Orecchio 603-542-0322 [email protected] Saw Editor Jim Seroskie 603-673-2123 [email protected] President Roger Myers 603-773-9634 [email protected] Sal Morgani 603-772-1006 [email protected]
Volunteer PositionsBooks Tony Immorlica 603-673-9629 [email protected] DJ Delorie 603-463-5996 [email protected] Saw Mailing Syd Lorandeau 603-542-5295 slorandeau@verizon. netShirts/Hats Peter James 603-435-8133 [email protected] Meetings Ed Orecchio 603-542-0322 [email protected] Fair Coordinator Open Position Sunapee Raffle Coordinator Jim Dimick 603-228-1131 [email protected] Librarian John Pitrone 603-894-5893 [email protected] Recording Peter Bloch 603-526-6152 [email protected] Master DJ Delorie 603-463-5996 [email protected]
SubGroupsBIG Bob LaCivita 603-942-1240 [email protected] State Woodturners Jon Siegel 603-768-5882 [email protected] Luthier John Whiteside 603-679-5443 [email protected] Furniture Mike Noel 603-744-3821 [email protected] Furniture John Faro 603-968-9800 [email protected]
license, birth certificate, or last year’s tax return if your life depended on it. Every design note, measurement, tool users manual, and copy of The Old Saw is filed and indexed neatly.
6 You have a lot of yard work to do, but you’re hoping it will rain so you can spend the day in the shop.
7 Your spouse is afraid to take you out looking for furniture. By previous experience she knows your going to embarrass her by stating that “you could build it better and cheaper” and then you’re going to get down on all fours and crawl around looking at the underside of the piece.
8 The mailman arrives and drops off the day’s mail. After you go get it, you ignore the bills, what you know is a birthday card for you, and dive immediately into the latest woodworking magazine.
9 Your wife pointedly mentions to the folks touring your shop
Scholarship Committee Chairman Peter Breu 603-647-2327 [email protected] David Frechette 802-633-2561 [email protected] Ed Bartlett 603-364-5242 [email protected] — Please send all applications to Peter Breu, Selection Committee Chair In addition, Peter Bloch and Bob Jarrett are non-voting members
Continued on Page 3

On Saturday, March 15, the Guild will
have a special meeting on the subject of lighting for the workshop and studio. This meeting will be held in lieu of the small group meetings that would normally be scheduled in March.
The meeting will be hosted by osram sylvania at their North American Headquarters in Danvers, MA. The meeting, which will be hosted by Roger Myers and will take place in Sylvania’s state of the art “Lightpoint” customer education and meeting center. Presenters will include Bob Nigrello, Group Product Marketing Manager and Jeff Waymouth, Senior Applications Engineer. Topics will be product and technology specific and applicable to all brands of lighting
– although Roger appreciates when you purchase Sylvania.
The lighting presentation will focus on lighting topics of interest to woodworkers. What type of lighting is best? How much lighting should I have in my shop or gallery? How do the different types of lighting affect how colors look? These are subjects that seem to generate a lot of questions from woodworkers in discussions on on-line forums and in magazines, and the subjects are generally not handled very well. Here, you will have the chance to listen to lighting experts explain the facts about different types of lighting and lighting design, and ask questions. You will also be able to see many different types of lighting displayed in room settings and observe the differences between different types of light sources such as incandescent, halogen, fluorescent or led. You are encouraged to bring samples of finished woods to observe them under different light sources and see why sometimes what you saw in the shop looks different when it is in the living room.
The meeting will begin at 9:00 am, with the lighting presentations starting around 9:30. There is plenty of parking available on site, and a large area where you can eat your lunch between the morning and afternoon session. You should bring your own lunch or there are several nearby places to grab a bite. Topics for the afternoon session have not yet been determined. You are also welcome and encouraged to bring samples of your recent work to display. There will be plenty of chairs, so there is no need to bring your own.
If you have any questions or topics you would like to see addressed, feel free to contact Roger at 978-239-7654 or by e-mail at [email protected].
3The Guild of New Hampshire Woodworkers
The next Guild m e e t i n g
will be held February 16 at the Homestead Woodworking School in N e w m a r k e t , NH. The session will run from 10:00 am until noon, followed by lunch from noon until 1:00 pm, then a continuation of the presentations.
Please bring chairs and don’t forget your lunch. Do to the tremendous success at the last Guild meeting, we ask you once again to bring a project to the meeting, either one you are working on or one completed. It was a great way to see what others are doing and to give us some inspiration.
Continuing our theme of workshop related lectures, our main presenter for this meeting will feature Casey Hallowell, a representative from Lie-Nielsen who will discuss workbenches.
at the Homestead School in Newmarket, NH
at the Sylvania Corporate Headquarters in Danvers, MA
Directions to Homestead Woodworking School in Newmarket, NH
• FromRt125north,turnrightontoRt 87 in Epping. After 3 miles, turn left onto Bald Hill Road. The school is 1.1 miles on the left.
• FromRt108south,turnrightontoRt 152 in Newmarket. Go past the high school and turn left onto Grant Road. After 3.5 miles turn left onto Bald Hill Road. The school is 0.5 miles on the right.
for the first time that your shop cabinets are better than the ones she has in the kitchen. Ouch!!
10 Then finally there’s that small matter of the table, or other piece of furniture, you promised your wife you’d build her three years ago. The first piece of wood has yet to be purchased.
Well friends, you get the general idea I’m trying to convey. I’m sure that you all could come up with a list of your own which would tell tales on yourself. Isn’t it amazing the kinds of things we do and the way we have these fun foibles. Work safely folks.
President’s Message – continued
February Guild MeetingFebrurary 16th, 2008 – 10:00 am March 15th, 2008 – 9:00 am
March Guild Meeting
announcements
Directions to Osram Sylvania in Danvers, MA
• Interstates93or95southtoRt128.Take Rt 128 North to the Endicott St exit.
• Attheendoftheexitramp,turnleft and Osram Sylvania is the first building on the right.
• Parkinthemainparkingareaandenter the building through the front (100 Endicott Street) entrance and follow the signs to “Lightpoint”.

4 The Guild of New Hampshire Woodworkers
Write to [email protected] with your questions 4
Q Lathe aLignment – I have a rotating head stock. How do
I ensure alignment when I rotate it back to align with the bed? – David Belser
DJ Delorie replies: The most reliable easy way is to chuck a length of wood into it, and turn on the lathe at low speed. You’ll be able to see the center of rotation on the free end, and decide if it needs further adjustment.
However, you can also experiment with various “push here” techniques to see if one of them just works. For example, on my lathe, the back edge of the slot guide is properly aligned, so if I push the headstock away from me while tightening, it tends to be properly aligned.
You can also purchase alignment jigs, like a rod with a Morse #2 taper on both ends, to help align the headstock to the tailstock. If you happen to have a pen turning mandrel, or three-buff mandrel, those can be used as well. In that case, there’s often no need to turn the lathe on if the mandrels are accurate enough and properly seated in the taper.
Q ngR Stain – Please explain NGR stain. – Bob St. Laurent
Terry Moore replies: Non Grain Raising stains use a different solvent for the pigment. Water based stain uses water as the solvent for the pigment, and applying water to wood raises the grain and makes it rough to the touch. Alcohol base stains use alcohol as a solvent, but there is still a percentage of water in the alcohol solvent, so it will also raise the grain slightly when applied.
NGR stains use a lacquer thinner base, or similar solvents that make up what we commonly call “lacquer thinner”, and these carry the pigments, dry faster and do not raise the grain because there is no water in the solvent.
Marty Milkovitz replies: It will not raise the grain when applied, basically it’s not water based.
Q Removing acetone Stain – How do I get an acetone (nail
polish remover) stain off of a cabinet? – David Belser
Terry Moore replies: Acetone is not a stain, it is a solvent. Unfortunately, it has not stained the cabinet in question, it has melted the finish. The acetone is a strong fast drying solvent that will attack any finish such as lacquer, urethane, oil or varnish. If you know what the finish is, you may be able to spot sand it and re-apply some new finish. Good luck!
Marty Milkovitz replies: You don’t. If the blemish is not too deep, you can try rubbing it out with emery paper progressing to smaller and smaller grits.
Q vacuum Bag – Is there a simple, cost effective vacuum
bag process for gluing and clamping? – Harvey Best
Terry Moore replies: The question is gluing what? Gluing veneer is best accomplished using a vacuum bag. Some curved forms can also be used in a vacuum bag for re-sawn lamination work. Most of the guitar making factories use a small vacuum press to glue the braces to the top and back of the guitar. In certain circumstances a vacuum bag is fine, but it is not an economical alternative to a pipe clamp for pulling together a mortise and tenon joint.
I made my own first vacuum system by gluing together a vinyl bag, and using an old hospital vacuum pump. It worked ok. I finally broke down and bought a commercial system from Vacuum Pressing Systems of Brunswick, Maine. It is an investment, but it is also a much better system.
Q mahogany – I understand that mahogany is considered
an oily wood. What is the best glue to use for joints in mahogany and is special cleaning needed before gluing? – Bob Jarrett
Terry Moore replies: I would not consider mahogany an oily wood. Teak and rosewood, yes, but not mahogany. For interior work such as furniture and cabinetry, regular yellow wood glue such as Titebond works well. For exterior work such as boat building or say an entrance door, epoxies or urethane (gorilla) glue would work better. In either case, no special preparation is needed beyond sanding and dusting.
Jon Siegel replies: Mahogany is not an oily wood and requires no special glue or methods.
Marty Milkovitz replies: Mahogany is probably the least oily of the oily woods, It glues well with any glue intended for wood and other than making sure the surface is dry, bare wood does not require any sort of cleaning. Of more concern is selecting the right glue for the job. For general indoor projects I use an Aliphatic Resin glue (Yellow glue); outdoor or marine I’ll use a Resorcinol Resin or Urea Resin glue. If you are a purest period furniture maker, use Hide glue. The book Gluing & Clamping by Patrick Spielman is probably the best laymen’s guide for the different types of glue application.
Q DiviDing BuRL – How should I divide a burl into sections for
bowls. I want to maximize the burl especially the large circumferential burls. – Ed Orecchio
Graham Oakes replies: Burls can be very difficult to divide into sections. The
Continued on Page 7

5The Guild of New Hampshire Woodworkers
Mock-ups
I have been involved with generating furniture designs
that are personal in nature for a number of years now.
The shapes and forms in the pieces appeal to me.
I notice certain elements or details that keep showing up in the sketch papers – and maybe evolving there. The influences at this point are sometimes hard to track. Sure I appreciate certain styles or techniques – Japanese woodworking, Danish furniture or New England pine furniture for example. These things may come into play when designing and making a piece, but there is so much more.
One quote that sticks in my mind from an early Guild meeting on design was from my good friend Jere Osgood. He was talking about the sketch book and said “It was a place to record things that were important to you…which could be anything from a Hepplewhite leg design to the Wind blowing around a corner’’ — Well there is a wide range of things between those two ideas!
What I want to talk about is the design process. There is a class that is run at the Center for Furniture Craftsmanship in Rockport, ME that I have been co-teaching for a number of years called Design and Craftsmanship. I first taught it with John McAlevey, then Ross Straker from Tasmania, David Upfill Brown and most recently with Jere Osgood.
It’s an interesting approach because the students get viewpoints from two makers which sometimes makes for a lively discussion. For the design section, we relay our individual process and help the students to develop their own from conception to building a piece of furniture. Generally we highlight the sketch book, scale drawings, mockups and a full-scale shop drawing to get them building the piece.
by Ted Blachley
This is not, at least for me, an A B C…1 2 3 sequential process. I work all four at the same time until I get the final design. Typically it starts with a sketch and then a scale drawing. But if I get to a point where the drawing isn’t answering a question, I’ll switch to making a full scale mock-up to really let me see what’s going on. For the joinery and details I’ll go back to the drawing board. If a complicated drawer hanging detail crops up, out comes the sketch papers to help me see it. It’s all about getting your questions and concerns answered as you make your way through.
Sometimes I’ll have some nice wood that I’ve paid a few dollars for. If I first make a full scale mockup of a leg, section, or even the whole piece in inexpensive spruce or pine, I can check the shape and scale of the piece. Mock-ups are fun and go fast. Forget the joinery. Pull out the glue, screws and nails and render the thing in an afternoon. It’s better than building the whole project in your beautiful wood then stepping back and saying “I wish that table apron was 1/2˝ narrower”.
Below is a sequence of mock-up and “real life” testing of a 5´6˝ diameter dining table.
Ted Blachly makes furniture in Warner, New Hampshire

6 The Guild of New Hampshire Woodworkers
Calculating board footage is one of the biggest headaches in woodworking. Many of us have just gotten fed up with it and gone to the lumberyard and guessed at
how much we’ll need.The inevitable result is either too little or too much material. Buy too much and
you can have some very pricey material collecting sawdust and representing capital that could have been better utilized. Too little material presents issues with availability and matching what you already have. Commercial grading of the oaks, for example, considers fourteen different species of oak as Red Oak. If the last load was mostly Northern Red Oak and the new load is Black Oak you may well have matching issues.
The board foot is the measure used to sell wood. It represents 144 cubic inches of material. The basic board foot is a piece of wood 1˝ thick, 12˝ wide and 12˝ long. A 2˝ x 6˝ x 12˝ piece is also just one board foot because it has the same volume. You calculate this by multiplying the thickness by the width and by the length.
The headaches come from the formulas for computing board footage. They mix inch and foot measurements in a manner guaranteed to produce both confusion and error. The standard formulas are as follows:
Method #1: Board Feet = Thickness (inches) x Width (inches) x Length (feet) 12
Note the use of feet in the length dimension. The following formula eliminates the need for that confusing mix of dimensions.
Method #2: Board Feet = Thickness (inches) x Width (inches) x Length (inches) 144
There are a couple other formulas for computing board footage that get even more complex with the dimensions expressed as feet. Having to use either a fraction or decimal equivalent to express measurements of less than a foot seems to be excessive from my point of view.
by Joe Barry
how the James Bond formula can help terminate calculation problems
Calculating Board Feet
The James Bond formula is an easily remembered formula that provides a
quick and easy way to calculate board footage.
• Alldimensions(thickness,widthandlength)areexpressedininches.Thisreducesthechanceforerrorandiseasilyremembered.
• Multiplicationisby0.007(thus,JamesBondformula).Thereisnoconfusionofwhetherdivisionisby12or144oranyothernumber.Useof0.007iseasilyremembered.Bytheway,multiplicationby0.007istheequivalentofdivisionby144.
• Thecalculationsareeasilydonewithahandcalculatorwithsimplemultiplication.TheEngineersamonguswouldalsonotethatanExcelspreadsheetcouldalsobesetuptodothecalculationsonceyouputinthedimensions.
I like to take the next step and make my cut list to include the board footage calculations. The table below shows an example of a cut list for a simple cherry table.
Once the dimensions are filled in (inches only), you just need to multiply
Cherry Table Example — Cut list & pricing
Part Name Qty T˝ W˝ L˝ Multiplier Total BF Plus 20% 4/4 5/4 6/4 8/4
A Top 1 1.5 24 72 0.007 18.14 21.76 21.76
B Legs 4 2 2 30 0.007 3.36 4.03 4.03
C Apron, short 2 1 3 20 0.007 0.84 1.00 1.00
D Apron, long 2 1 3 68 0.007 2.85 3.42 3.42
Total Board Feet 4.42 — 21.76 4.03
Cost per Board Foot – Cherry $4.50 $4.85 $5.15 $6.50
Total Cost (Total BF x Cost per BF) $158.14 Total $19.89 — $112.06 $26.19
——— Multiply for Total BF ——>

7The Guild of New Hampshire Woodworkers
across to get the board footage per piece. The right hand columns allow you to tally the total number of each thickness required.
In doing drawers and other pieces that require less than 1˝ in thickness, I usually cheat on the calculations and treat it as if it were an inch. Since multiplication by 1 doesn’t change anything I usually will skip that step and only multiply width, length and 0.007.
Of course we don’t live in a perfect world. There will be wastage as we select for figure and defects. Generally, a 20% wastage is used in planning. You can add a column to the table or just multiply the Total BF column by 1.2 to arrive at the total number.
The above information can now be
CalCulating Board Feet – continued
ask this old saw – continued
tallied when computing what you need to buy and bid on this job.
Some woodworkers will further use this number to price the job by either multiplying the total by a factor of 3 ($474.42); 4 ($632.56); or 5 ($790.70). This method is simple but fraught with the possibility of under pricing. It doesn’t take into account your overhead (heat, lights, rent, etc.) or how complex the job may be and the total hours required.
In bidding a job, having these numbers does make it easier to present a bid with alternatives. You can easily calculate the same total price using the current prices for other species. That would allow you to answer your customer’s questions with alternative prices for a change in species.
“Well, oak is currently cheaper and will
cost you about $35 less and walnut will almost double the materials cost.”
Given the go ahead, you can now go to the lumberyard with your cut list in hand knowing that you need about 5 BF of 4/4, 22 BF of 6/4 and about 4 BF of 8/4. It should cost you $150-$200.
If this still seems to be too much work there is a book of tables on the market. Simply Board Feet: The Definitive Guide to Lumber Calculation by Douglas E. Maxwell is available in paperback for $9.95 at Amazon.com. It has tables for material ranging from 1 to 25 inches wide; 1-20 feet long; and 1-4 inches thick. That should meet the needs for almost all woodworkers.
reason for this is that no two burls are alike. Some burls are a lump on the side of the tree, and others wrap all the way around the tree and these are the kind that give the most problems. The key to dividing a burl into sections is to keep two things in mind.
First is that you cannot have the pith of the tree in your finished bowl, unless the burl is completely dry, which takes a very long time. The second is that you never know what you are going to find on the inside of the burl. Taking apart the burl requires a person to visualize where the bowl is inside the burl and then make cuts to extract the piece.
Something I have noticed about burls is that most have natural veins running through the wood that help a person decide where to cut. When I cut a burl, I strictly follow these veins which can usually be seen on the surface of the bark.
One mistake many people make when trying to turn large burl bowls is they cut the burl directly in half sideways and turn a large bowl that has the pith of the tree running through it. This kind of bowl looks great but it most likely will crack badly because of the pith in the
wood. Your bowls will come out much better if the burl is cut lengthwise thus eliminating the pith.
Another point to remember is that burl wood is highly reactive and can crack, split and warp in a matter of seconds. When people ask me about turning burl, I tell them two things
– don’t get discouraged and just keep turning. Happy turning.
Q aLLeRgieS – With specific allergies aside, are there
species of wood that are known to cause more serious acute and/or long term health issues? – Caleb Dietrich
Marty Milkovitz replies: Many of the tropical exotics contain resins that are irritants to the mucus membranes and respiratory system. In fact OSHA considers air-born wood dust above a certain level to be a carcinogen. Of all the ones that are commonly used, I have found that the fine dust from cocobolo to be the most irritating. In fact it is the only wood that I have any reaction too, including poison ivy.
Continued on Page 13
The scholarship committee recently approved three
scholarships and one grant.A $200 grant was made to
the Period Furniture group to defray some of the costs of a special guided tour of Strawbery Banke. Three scholarships of $400 each were made to John Keeling (working with Garrett Hack at the Shelburne Art Center in VT), Phil Gamache (to study with luthier Alan Carruth) and Donna Zils Banfield (to work with JoHannes Michelsen learning to turn a wooden hat).
By the time you read this, the scholarship information and applications should be on our website. Please check it out and consider taking a class!
Applications are now due a week following any regular guild meeting. Peter Breu – Chairman: [email protected] or 603-647-2327
ScholarshipCommittee Report

8 The Guild of New Hampshire Woodworkers
Way back in 1989, I wrote an article on cutting sliding dovetails by hand. It was published in issue #79 of Fine Woodworking Magazine. A companion article
on making a set of hanging shelves was not published, even though it was the original genesis for the topic since the shelves were held together with sliding dovetails.
I had been asked by a client to copy a set of shelves. At the time there had been very little written about making sliding dovetails. So I felt that it was time to remedy the situation.
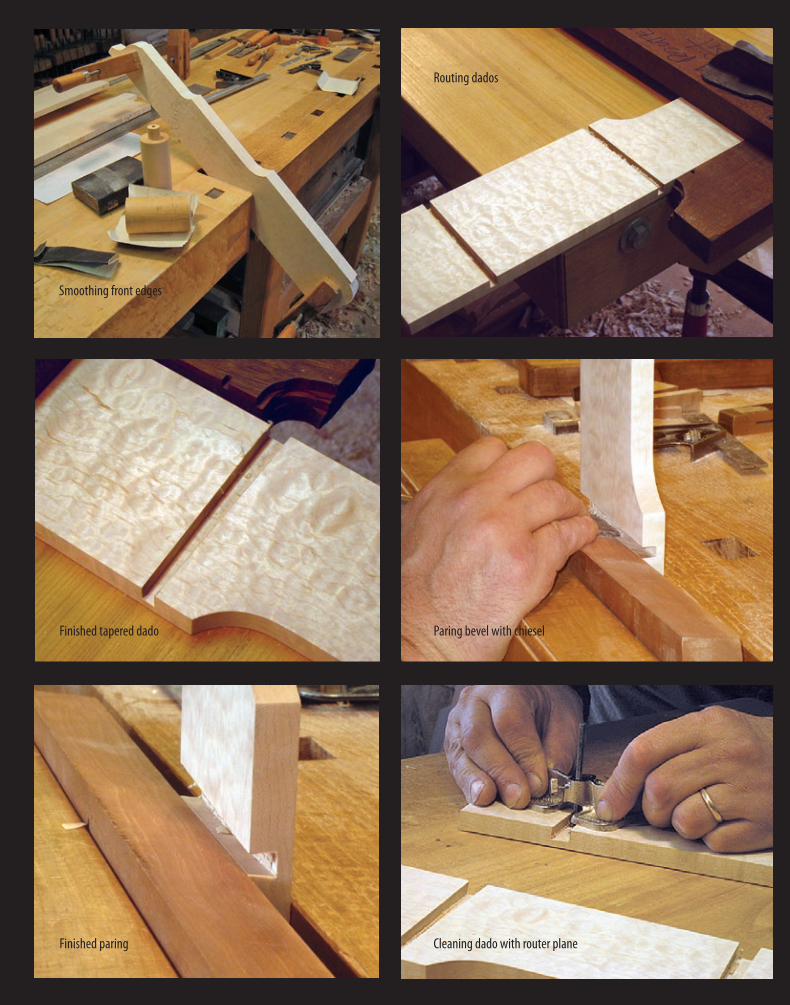
One of my main contentions when I wrote the original article was that it is faster to cut sliding dovetails by hand than with a jig and a router. In over twenty years of using the joint, I have never found any reason to change that opinion. I will be clear that I use a router to cut the basic dados for the shelves, but the beveled side of the dado is trimmed by hand with a chisel and guide block. I have done it with a router and dovetail bit, but in this case the dado is so narrow at the front that it is impractical. There are dovetail bits made that are that small, but they are expensive and break in a very short time.
Sliding dovetails, like other types of dovetails generally
have about a one in six bevel, which translates to approximately nine degrees. This bevel is made with a dovetail plane. When I wrote the original article in FWW, they also published a sidebar article on making a dovetail plane. A dovetail plane is the essential tool to cut this joint. I made mine from an old skew rabbet plane. A matching angle guide block is needed, and this is made by transferring the bevel angle of the dovetail plane to a bevel square and then planing a long edge of the block to that angle. The other side of the block is planed square and is used as a fence for planing the dovetail on the end of the shelf.
The original shelves in question were about 3´ square and 6˝ deep with the parts made from stock 9/16˝ thick. The design was very traditional with the widest shelves at the bottom and two step backs with narrower shelves towards the top. I have since made several sets of a reduced size – 2´ square, 4˝ deep and 1/2˝ stock. This is the size of the shelves we will make here.
These shelves are the perfect use for that one highly figured board that you have been saving but isn’t enough for a larger project. In this case I had a single board of blistered maple that was just enough stock for the shelves. I started by milling everything to 1/2˝ thick. I did that
by Bill Thomas
Hand Cut Sliding DovetailsIt is faster to cut sliding dovetails by hand than with a jig and a router.
Dovetail plane and guide block
9The Guild of New Hampshire Woodworkers
Smoothing front edges
Paring bevel with chieselFinished tapered dado
Finished paring
Routing dados
Cleaning dado with router plane

10 The Guild of New Hampshire Woodworkers
on the end of the shelves for the male part of the dovetail, and a cutting gauge will make that line cleanly. Next, I scribe the lines of the top edge of the shelves across the inside faces of the ends to the front. Then I carefully bring that line across the front edges to the
5/16˝ depth remembering that if I run over the end of the line, it will show.
The angle is scribed with a bevel square onto the back edge of the stock for each dovetail. The lower bottom corner is set at 1/2˝ – the thickness of the shelves.
The next question is how much do the dovetails taper from the back to the front? In this case there are three different shelf widths which means there are three different tapers. This is actually irrelevant. As I pointed out in the original article, the advantage of planing the dovetail to fit is that different tapers are not a problem. As a rule I leave the narrowest part of the dovetail-at the root of the front edge-at least half the thickness of the shelf stock. In this case that is 1/4˝. I mark out the 1/4˝ width on the front edge and then lay a straightedge across each end and carefully scribe the taper line for each joint.
The dados can now be routed. I have a T-square router fence which I butt up against the back
in several stages because removing that much thickness from a 4/4 board is an invitation to bowing. The stock could be re-sawn from thicker planks, but again, giving it time to settle is important.
Once the pieces are milled to dimension, they are sorted into shelves and upright ends. I like to match the ends if I can. The two ends are ripped to final thickness and the details of the decorative step backs are scribed onto their faces. After sawing out the profiles they are clamped together and the front edges are smoothed together to ensure uniformity. At this stage, the inside faces of the ends are scraped and sanded smooth because any change in the thickness of the ends after doing the joinery will make the dovetails loose.
Now it is time to lay out the dovetail dados on the two ends. I start by scribing a line across the back edge of the ends at the top line of each shelf. Then I decide how deep the dovetails are going to be. In the case of 1/2˝ stock, 5/16˝ is about the right depth. I set a cutting gauge to this depth and scribe a bottom line on the back of the stock extending 1/2˝ down from the top line. I use a cutting gauge to lay out the dovetails because the same gauge at the same setting will mark out the cross grain line
Finished ends
Scribing for the dovetail
First trial fit
Beginning cut
Difference between tapers

11The Guild of New Hampshire Woodworkers
Test fitting
Planing the dovetail
Backer clamped to shelf
Fully fit dovetail
side of the stock to ensure good square dados. All my routers have rectangular bases, so it is easy to measure from the edge of the base to the 1/4˝ bit to establish how far the fence needs to be from the scribed line. I am very fussy about setting the bit depth and the fence position because accuracy is essential. I rout all the dados square first, 1/4˝ wide and 5/16˝ deep. I am very careful not to go over the depth. If anything I will shade the cut to be too shallow because I can deepen it later.
The second stage is to rout the taper. Again, this is a square cut with a 1/4˝ router bit. I set the fence the correct distance from the taper line and rout to that line. This involves clamping the fence at an angle to the edge of the stock. I make sure the fence will not move during the cut.
The ends are now ready to have the actual dovetail bevel cut. I do this by clamping the end vertically in a vise with my dovetail block clamped along the taper line that I just routed. With a chisel I pare the bevel down until the flat back of the chisel is resting on the guide block. Inevitably there are a few fibers left in the inside corner of this paring cut. I clamp the end flat on the bench and use a small router plane to clean these
up. I carefully set the router plane to exactly the final depth of the dado and this also cleans up any possible depth questions left from the original routing. The ends are now finished.
The shelves can now be fit to the end dados. The shelves must be all exactly the same length and the ends have to be perfectly square. It is a wise idea to leave them about 1/8˝ wider than final dimension however. This allows for the shelves to be driven home with a bit of allowance in case any dovetails are slightly loose. With the cutting gauge I scribe the depth line across the underside of each shelf end. It is not necessary to scribe the top edge.
It is worth pointing out that the shelves have a dovetail at both ends-a right and a left. One end will be planed going uphill and the other end will be planed downhill. What this means is that the downhill cut will be exiting the stock at the front and there is a danger of blowing out the front corner. This is prevented by using a backup block.
I clamp the shelf I’m working on flat on the bench with the bottom side up. In the photos I had the stock on a piece of thicker stock to extend it out away from the bench edge. The end of the

12 The Guild of New Hampshire Woodworkers
shelf needs to hang out clear of obstructions so that it can be test fit. I start with the widest shelf and work on the uphill dovetail first. I clamp the square edge of the guide block on the scribe line and then begin to plane the end of the dovetail that needs the most stock removed. The initial aim is to establish the correct taper angle. I take several passes with the dovetail plane until it will fit partway into the dado.
I fit the end over the shelf dado and push it on as far as it will go. I then rock the end to gauge how the angles compare. If it is tight at the inner end, I need to increase the angle. Loose at the inner end and the angle is too steep. I then take a few more passes until the dovetail is bearing evenly all along the beveled side of the dado.
Once I have established the correct taper, I continue planing the entire length of the dovetail stopping often to check the fit. As I get closer to the final fit I check more often (after a pass or two) to make sure I am maintaining the correct angle. It is important to be careful because one pass can mean the difference between a well fit
joint and one that is too loose. I know the fit is correct when I can push the shelf in by hand and it comes to rest about 1/8˝ back from being flush with the front edge of the end. All this takes longer to write about than to do.
The procedure to cut the downhill dovetail on the other end is the same except a backer needs to be clamped on to protect the front edge. I make this backer out of a cutoff from one of the shelves so that it is the same thickness. The backer is planed right along with the rest of the dovetail. It can be left in place almost up to the end when it needs to be removed to check the close to final fit. I put it back in place before resuming planing and it protects the edge until I’m done. Otherwise the process is the same as for the other end.
Once the first shelf is fit I proceed to the others. I like to start with the widest because it gives me the most leeway for getting my head into the process. The narrower the shelf the shorter the dovetail is and the quicker it gets cut down to thickness, so there is a need to establish the correct
Finished dovetail
Tearout
Setting the bevel angle
Finished joint

13The Guild of New Hampshire Woodworkers
ask this old saw – continued
sliding dovetails – continued
Figure 5 – Plan B is best for beginners
taper before getting very far. In this way I work until all the dovetails are fitted.
Once the joints are fitted the rest of the job follows quickly. Some method for hanging the shelves must be devised. I typically use a keyhole router bit to make slots in the back of each end for hanging on screw heads.
The parts are all sanded and then it is time for final assembly. I lay the sides front edge down on a smooth surface and insert the bottom shelf from behind. No glue is necessary although I will swipe a bit on the tapered dovetail just to assist in preventing the dovetail from backing out. Using a scrap block to
protect the back edge of the shelf I drive the dovetails home with a mallet. I aim to make them perfectly flush with the front edge of the ends. I add the shelves one at a time until they are all installed. I usually have a bar clamp and some blocks handy in case the ends need to be pushed in against the shelf shoulders. With care the joints all seat well and the shelves are tight.
Just a bit more work is needed to finish the job. The shelves are planed off flush with the back of the ends. Then the front edges are carefully leveled with a scraper and fine sandpaper. Any small gaps can be filled with a mixture
of sawdust and glue. Then it is time for finishing.
This small shelf project is a good way to get comfortable with the use of sliding dovetails. They are an important joint to understand because any shelf to case end dado is a poor glue joint that needs mechanical enhancement. Sliding dovetails are the best way to achieve that. In larger projects the dovetails may be longer and thicker. Often they will be blind in the front which necessitates a notch in the shelf. I use tapered dovetails to join the legs to the pedestal for tripod tables. Regardless of the application the process is the same.
Q ScRapeR pLane – What angles work best with a scraper
plane? Where do I start? – Joe Barry
Terry Moore replies: The common practice for sharpening a scraper plane is to file the blade at approximately 45 degrees, hone the file marks off, and turn a hook on the edge by using a burnisher. This works well and produces an aggressive cutting hook.
However, you can also refine the cutting edge and make a less aggressive cutting edge by filing and honing it like you would a regular scraper, at a 90 degree angle, or slightly less, at an 80 degree angle, or indeed, any angle between 45 and 90 degrees. Experiment around until you achieve the right cutting edge for the job.
Q Setting JointeR KniveS – What is the easiest way to
set jointer or planer knives? – Roger Bradley
Marty Milkovitz replies: I use the magnetic jig that came with my Powermatic planer. For the jointer I use a height micrometer which will measure to 10,000, set in on the outfeed table and rotate the knife under the feeler, set to a tolerance of +/- 3/10,000.
Jon Siegel replies: The most accurate way is with a dial indicator. No woodworker should be without one because they have countless uses in the woodshop for setting up machines. Thanks to global trade, the price of dial indicators has gone down to a starting point of under $20 for an indicator and magnetic base combination. If you don’t have one, stop procrastinating!
Set your indicator base on the outfeed table of your jointer, and rotate the head until the edge is at the top. This gives the maximum reading on the indicator, and all knives must be measured in this orientation. Now set the first knife parallel to the outfeed table. Set the remaining knives so they have the same reading as the first knife. If you can get them to within 0.002 inches of the same reading, this is close enough. If not, then possibly only one knife will be doing all the cutting, depending of course on how fast you feed the wood. Anyway, minor adjustments of one or two thousandths can be made later by hand honing. This should be accomplished upon subsequent hand sharpenings: only sharpen the knives which measure high.
After you are satisfied with the placement of the knives, whether you have hand-honed or not, you now need to take some trial cuts, and set the height
of the outfeed table correctly. If it snipes at the end, the table is too low, if the wood rides up, the table is too high. A few Craftsman and other small jointers do not have adjustable outfeed tables. On these machines, set the height of the knives about 0.003 inch above the height of the outfeed table.
Planer knives are set parallel to the head, that is, each knife projects the same amount. This is measured with a dial indicator in radial orientation, and the measurement should be written with black marker on the head itself. Each time you replace the blades, use this same measurement for the projection of the edge above the surface of the head.
This way you will not have to readjust any other part of the machine when you change blades.
If the head and the bed are parallel, then this gives good results. If not, then the work may have uneven thickness from left to right. It is usually recommended to correct this by adjusting the bed, but if this not possible, it can be corrected by installing the knives at an angle to compensate.
Fine tuning of this type can only be accomplished with a dial indicator.

14 The Guild of New Hampshire Woodworkers
lessons from the luthier’s shop
Preparing Thin StockBy Paul Miller
When you make cabinets, furniture or other larger items from wood,
you generally use wood that is 3/4˝ or more in thickness. Because the wood is relatively thick, glue joints are seldom a problem as they are nearly always stronger than the wood itself when properly executed.
After selecting the wood and cutting it to rough length, you usually surface one side flat on a jointer, thickness the material with a thickness planer, clean up the edges with a jointer and tablesaw, and glue up your panels. Then it is off to making your joints, gluing up subassemblies, cleaning up surfaces with planes, scrapers or sandpaper and applying finishes.
With musical instruments, such as guitars, the basic flow of the work is the same but the techniques used can be very different. There are several reasons for this.
Why Guitars are DifferentBecause the acoustical properties of
the wood are paramount to making a fine instrument, the wood for the top of the guitar, known as the soundboard, has
to be very thin and is most often made from quartersawn softwoods such as spruce. For the same reason but also to reduce the weight of the instrument, the back and sides also need to be thin, but for strength reasons, are usually made from strong and dense hardwoods. The soundboard and the back are often also called the top plate and the bottom plate, respectively.
Thicknesses vary depending on many factors. The species of the wood and the acoustical properties, which relates to the stiffness, of the particular piece being used are important. The kind of instrument and the tonal qualities desired are also factors. For example, a small classical guitar is substantially different from a large steel-string dreadnought guitar. A general range would be from 2 to 3.5 mm (0.08 to 0.14 inches) in thickness.
Because the material is so thin, and flexible softwoods are being used, it is impractical to use a jointer and thickness planer to process the material all the way down to its final thickness. The thickness planer, in particular, would likely destroy the piece before it reached
its final thickness. Very often highly figured hardwoods are used for the backs and sides, and a jointer or thickness planer would cause unacceptable tearout. A well-tuned thickness sander is an acceptable substitute for the thickness planer and is used by some individual luthiers and probably all guitar factories.
It is important to realize that for many people, a hand-made guitar is a precious possession. Anything less than perfection is unacceptable for a musical instrument which is held and examined closely every time it is played. A huge effort was made to build it and a customer likely paid a large price for it.
Selecting the StockAny of several varieties of
quartersawn spruce are used for the vast majority of guitar soundboards but cedar, redwood, mahogany and other woods are sometimes used. The soundboard is quartersawn for added stiffness and strength which allows the soundboard to be made thinner, enhancing the acoustic quality of the guitar. Soundboards are most often purchased from a supplier who specializes in musical instrument
1

15The Guild of New Hampshire Woodworkers
woods because the quality of the instrument is so dependant on the quality of the soundboard material. It is usually not practical to find your local spruce tree in the woods and harvest it for making a quality guitar.
Backs and sides are made from a large variety of hardwoods, from local woods such as figured maple and cherry to almost any of the exotic tropical hardwoods you could name. Rosewoods are predominant as is mahogany but blackwood, bloodwood, bocote, bubinga, jarrah, lacewood and ebony are just a few of the other varieties available. These woods are available from the same luthier suppliers that provide the soundboard material. Prices for a set of the two sides and a bookmatched two-pieced back range from less than $50 for a common species to almost $600 for a highly figured set in koa wood.
Backs and sides are also often quartersawn but sometimes are not. The sides are bent using heat and moisture and care must be taken with the exotic hardwoods as many of them are not well suited to being bent. Woods that are good for bending tend to have straighter grain with less figuring and no defects on the surfaces. For aesthetic reasons this if often contrary to making attractive guitars. Our local hardwoods such as maple and cherry are often better suited for this purpose.
Making Your Own Backs and Sides
It is practical and far less costly to create your own backs and sides from thicker boards as long as you have access to a well-tuned bandsaw with at least an 8˝ resaw capability. It is more difficult to find wide quartersawn boards so you may have to use flatsawn or riftsawn boards for the sides and back of your guitar. That is less of a problem than it would be for the soundboard, which should be accurately quartersawn. Depending on the accuracy you can achieve, you might resaw the stock to 1/4˝ or less in thickness, which will leave
you with more thicknessing to do than a purchased set but at a huge savings in cost.
After resawing the back halves, it is best if some preliminary flattening is done with a handplane prior to jointing and gluing up. The ends of the backs should be marked so they can be placed in the correct orientation as bookmatched halves after the surfaces have been planed.
Jointing the Bookmatched HalvesPhoto 1 shows the shooting
board setup used for jointing the two bookmatched halves of the soundboard. The identical setup would be used for the back. Initially, a couple of passes over a
jointer would be done to straighten the joint, but this is not sufficient for joining the pieces as it would be for a furniture panel. The rotating nature of the jointer knives leaves a rippled effect at the joint, reducing its strength.
Because the pieces are so thin the joint must be perfect. Anything less will result in a weak joint. If these joints came apart in a finished guitar it would be very difficult to repair. A very sharp well-tuned plane will leave a very clean surface for a stronger joint.
The bookmatched halves are placed on the shooting board as they were situated in the tree. After jointing they are “unfolded” into the bookmatched orientation they will assume in the guitar. Because they are jointed by the plane in this way, the angle of the plane blade does not have to be at a perfect 90 degrees to the surface of the shooting board since the two halves will be cut at complementary angles. The shooting board ensures a consistent angle, close to 90 degrees, along the entire length of the joint.
It is difficult to make even a large plane cut a perfectly straight joint over a 22˝ length. The shooting board does not attempt to provide a straightedge
for the plane to ride against. The edges of the panels being jointed actually float in space as the plane runs along it. We rely on an iterative process of cutting the joint and testing the fit and then refining the joint until we have it right. As we approach perfection, we lower the plane blade so it is taking only the finest of shavings.
Photo 2 shows a setup that makes testing the fit predictable if not easy. It is substantially better than trying to hold the two pieces in your hands up to a light. A sheet of plastic is set up over saw horses with a bright light underneath to act as a makeshift light-table. Any deviations in the joint will show up readily so we can concentrate on correcting them. Photo 2 shows a joint that has not yet been prepared but is only roughly
straight. As we repeatedly test the joint and then replace the panels in the shooting board for further refinement, we make sure that the panels remain in the same alignment.
Gluing UpPhoto 3 shows a setup for gluing the
two bookmatched halves together. A sheet of waxed paper would be placed under the joint to prevent gluing the surfaces to the jig. Wedges provide pressure to the glue joint while cauls
2

16 The Guild of New Hampshire Woodworkers
clamp the joint down flat to the table. There are many other ways of doing this; the important thing is to be able to glue the joint solidly and to keep the joint flat. We have had mixed results using hot hide glue for this joinery and, since there is little reason to be able to undo this joint on a finished guitar, I will continue to use Titebond III glue for this purpose.
Surfacing the PlatesOnce the glue is sufficiently dry we
can start hand planing the surface of the plates. It is important that the joints be completely dry before starting both for strength and to ensure that the joint will not shrink from further drying and create a depression after the plates are surfaced. Photo 4 shows a soundboard ready to be surfaced. It is being clamped to a very flat table. We use a sheet of MDF for this purpose and clamp it at one end, generally with two clamps so it can not rotate as we are planing.
Because the plates are so thin the weight of the plane and the pressure applied to planing will flex the underside of the plate and flatten it to the MDF table. It is necessary to be aware of this and be very sensitive to the movement. Using a straightedge, find the high spots on the surface and mark them with a soft pencil. Concentrate your planing only on the high spots, at first. To flatten the panel, we plane the surface at a 45 degree angle diagonal to the grain followed by reversing and planing orthogonal to the first pattern from the other edge of the plate.
We are very sensitive to the grain direction and take care that we don’t cause any tearout. A very sharp plane is set to take as fine a cut as necessary to ensure this. Occasionally, we will even plane totally across the grain or reverse the planing direction in one area when we find especially difficult grain. After planing for a short time we reclamp the plate at the other end to plane the area where the clamps were initially.
We then turn the plate over and repeat the process on the other side, especially trying to lower the high spots. We have decided by this time which of the two sides will be the best surface,
the one that will show on the outside of the guitar. Once the side opposite to the best surface is flat, so it will rest on the MDF table without flexing, we then concentrate on making the best surface perfectly flat without tearout.
Using a straightedge, we continually test the surface in all directions, lengthwise, across the grain and diagonal to the grain, looking for any high spots. Once satisfied, we then make a few very light passes along the length on the grain looking to make an absolutely smooth surface. It is important to realize that, because the plates are bookmatched, the
grain runs in opposite directions on each half of the plate. Also, especially with figured woods, there may be areas where the grain reverses and you have to plane that area from a different direction.
Thicknessing the PlatesOnce you are satisfied with the quality
of the surface, it is time to thickness the plate. There are several possible techniques for doing this. As mentioned before, you could use a thickness sander if available. You can also continue with planing the back side and complete the task strictly by hand. This would be
3
4
17The Guild of New Hampshire Woodworkers
appropriate if you are already close to the final dimension.
What we have generally done is to use a Wagner Safe-T-Planer mounted in a drill press to thickness to near the final dimension. It is a somewhat fearsome tool to use and some experience is necessary before using it on a guitar plate on which you have already spent considerable time. You need to know how close to final dimension you dare to go with this tool as the surface is fairly rough and it is possible to have the plate raise up off the drill press table and gouge the surface if you are not very attentive.
Once roughly dimensioned, final planing is done, being very careful to constantly check the thickness over the whole surface with calipers. We use a special dial caliper for this purpose which has a throat large enough to reach everywhere on the panel. You could use a regular dial caliper and straightedge
but that is a less accurate and more time consuming technique.
Final CleanupWe stop planing when the thickness
over the whole panel is just slightly larger than our desired finished dimension. We then use a hand-held cabinet scraper to do the final cleanup, trying to make as fine a surface finish as possible. No sandpaper is used at this stage. Once the guitar is assembled and ready for finishing a final light scraping is done where needed. Finally, just before the finish is applied, we sand the guitar with fine grit sandpapers.
If you have read this far, you realize that there is considerable work done and time spent to reach this stage. All we have done, so far, is make a few thin flat boards in preparing to do the more difficult tasks of making the guitar. Much time, patience and attention to detail was required to accomplish what
appears to be a simple task. It is also one of the most satisfying and rewarding woodworking experiences you may ever have.
Bright summer sunlight slanting in through
your windows can damage furniture just
as a sunburn can damage your skin. It is
a good idea to take protective measures,
especially for valuable or heirloom pieces.
The only real solution is to place furniture
away from direct sunlight. Many polishes
say they have ultraviolet protection but
any layer of polish applied is so sheer that
it will not have that much effect. It is like
wearing sunglasses that are 3% darker than
your regular glasses and assuming you have
protected your eyes from the sun glare.
If moving the pieces is not an option, put
a protective layer of film on the windows
to filter out ultraviolet rays. Marine finishes
and spar varnishes are made to withstand
weather but often are unsuitable for formal
furniture. The way furniture stands up
to sunlight also depends on factors like
the position of the house, orientation of
windows, wood types and construction
methods.
A solid wood piece may be able to
withstand some temperature and humidity
fluctuations, but the goal is to make the
range of changes less broad and not as
abrupt. A piece with a veneer surface or
delicate mother-of-pearl inlay and metal
pieces that expand and contract at different
rates make things more problematic.
Heat, humidity and light are all enemies of
fine finishes. In the summer, open windows
or fans used for breezes which put moisture
in the air that can swell wood and contract
it as it dries. Polish will peel, crack or become
opaque and dull under such conditions.
Fragile pieces should be away from
entrances and exits. Opening and
closing doors twenty times every day has
temperature and humidity fluctuating
effects.
Do not put a console table under a window
exposing it to light because it will degrade
over time. Try to plan ahead.
Protect Furniture From Ultraviolet RaysReprinted with permission – Gallery M in Half Moon Bay, CA – www.gallerym.net

18 The Guild of New Hampshire Woodworkers
This article will show how you can make a contemporary sculptured leg
by using some of the methods used to make a cabriole leg.
The process starts by designing the leg itself. This leg evolved from an elliptical leg that I used on a chest of drawers in 2003. The sculptural element was inspired by a client that wanted me to design a pair of night stands for him. This client had some very free form sculptures throughout his home. So for the night stands to work in his home, I felt the need to have a sculptured element in them.
I use 1/4˝ thick and 3/4˝ wide wood of varying length to come up with shapes that I design in my furniture. All we need to get started is a one dimension shape or the profile of the leg in this case. The profile shape will be used to make jigs and as a template to bandsaw out the legs. This leg basically tapers in two plans, both from top to bottom. The leg has an inside and outside. The inside is concaved and the outside is convexed.
Now that we have the basic design, we have to plan out how to make the leg. Just as with the cabriole leg, there is a sequence to cutting this sculptured leg out, so one must think through the tentative process of making the leg. This is not always completed in one sitting. Sometimes one has to sleep on it.
The leg will come out of a 27/8˝ thick by 3˝ wide by 27˝ long block. The legs for the night stands are Marado, which is only available in 4/4 and 8/4, so I had to glue up two pieces of 8/4 to get my 27/8˝ thickness. It is very important to select the wood for color and grain as this seam runs down the center of the leg. After the selection of
stock and keeping the pairs of each leg together. I mill the two halves to 17/16˝ thick x 31/4˝ wide x 29˝ long.
I then glue up the two halves as accurately as possible. I’m already at my finished thickness after the gluing up. So now I only have to joint one edge square with the top surface and rip the width to 3˝ wide, square one end, and cut the leg to the finished length of the
leg template using a stop so all the legs are the same length. At this point, we are ready to machine any joinery into the leg while everything is square.
On this leg we need a round tenon for attaching the leg to the top and a round
mortise for the stainless steel stretcher that connects the four legs together at the base.
I use a machine called a multi-router that uses templates to cut the round tenon. The placement of tenons on the top of the leg is determined by using the leg profile template.
The round mortise is done on the drill press using the bottom of the leg
as a reference. The depth of this mortise is critical. So again by using the leg profile template we can see how deep to drill the mortise in the 27/8˝ wide surface using the glue seam as a center line.
Now comes the fun part. We need to trace the profile of the leg on to the 3˝ wide face of our leg blocks. The reference points for the profile template are the backside of the leg at the bottom and the top. We are going to bandsaw off the inside of the leg. We need to bandsaw to within a 1/16˝ of the line.
Next we have to make a template that will help clean-up the bandsaw marks and be used as a guide for making the concave inside of the leg. This is done by cutting two pieces of scrap MDF or plywood 3/4˝ thick by 3˝ wide by 27˝ long.
Now trace the inside leg profile only onto the two jig boards using the same reference point as you did on the leg blocks. Bandsaw out the inside leg profile. Then screw the leg template onto one of the jig blocks. Use a router and a bit
with a bearing to give you a jig that matches your template exactly.
You will then use this jig to clean up the bandsaw cut on our leg blocks. You will need a router bit with a bearing that has at least 2˝ of cutter length and a
Contemporary Legsculpting a
by Brian Sargent

19The Guild of New Hampshire Woodworkers
router table. You must screw one of the templates that you just made to the leg block referencing the back side of the block. Place the screws near the edge of the backside of the leg, so the screw holes don’t end up showing in the finish leg. You should only be taking off the
1/16˝ that you left when you bandsawed out the inside of the leg. It will take two passes to clean up one leg because your leg is 27/8˝ thick and you only have a 2˝ cutter.
Now we are ready to set up our jig for convexing the inside of the leg. Take the two jig pieces you made and a leg block and make a sandwich with the leg block in the middle. Line up the back and the bottom of the leg just like you did when you routered the inside of the leg. Lay the back side of the leg and jigs on a 3/4˝ piece of plywood and clamp your sandwich together at the bottom only. At the top drill a small hole large enough to get a #6 screw through the round tenon and screw the top of the leg block to the 3/4˝ piece of plywood and clamp the plywood to your bench.
Now as we said earlier, the leg is tapered in two planes so the concaved
inside of the leg must be tapered from top to bottom. The finish width of the leg is 23/4˝ at the bottom and 13/8˝ at the top. So we need to lay this out on the inside face of the leg so we can see this taper. You will need a router and a fence that mounts to your router and a 11/2˝ diameter cove bit. The depth of the concave is 1/4˝ at the bottom and a 1/8˝ at the top of the leg.
This translates into a 43/4˝ radius that needs to be drawn on the bottom and top of the leg so you can line up your router and fence to know the depth of the concave radius across the width of the leg.
The trick to getting the concave taper is elevating the top ends of both of the jig pieces 13/64˝. This set up is for roughing out the inside of the leg. You only need to reset your router fence three times and make a total of five passes per leg – one down the middle and two passes down each side. You will also have to adjust the depth three times. When you run the router on top of the jig, the fence runs on the outside of the jig and you press the front of the router base down as you push forward. It takes
a little getting use to having the front of the router base in contact with the jig. I always make up one extra leg usually out of poplar to make sure the taper depth is right and to get comfortable with the jig.
After all of the legs are roughed out on the inside, it is time to shape the back side of the leg. I used a French curve to make the template for the shape of the back of the leg. By tracing the template onto the bottom and top of the legs, I have a guide to remove the material with my spoke shave.
The next step is to bandsaw the taper on the leg. By placing the back side of the leg on the bandsaw, the inside curve will be face up. The line that was used for the tapered concave jig should still be visible. Just leave the line when you bandsaw the taper.
Next flip the leg on its side and trace the curve of the back of the leg onto the leg and bandsaw it out.
Now for the hand work. To hold the leg for the hand work, I use a bar clamp and a hand screw clamp. The bar clamp holds the leg and the hand screw clamp holds the bar clamp. I then clamp the hand screw to the bench.
I like to start with the inside of the leg. First, I grind a scraper to 41/2˝ radius. Just a little smaller than what I roughed out the leg to. I do this because when you tip the scraper to cut it matches the finished radius.
The secret to shaping the inside of the leg is to stay focused and keep your awareness on the outside of the leg because this is your guide.
I use a spoke shave to do the back of the leg. The key to this is remembering that the leg is tapered and there is more stock to remove from the bottom than the top. Keep looking at the bottom of the leg where you traced the template. This will keep your mind focused on the shape of the leg. You will find that you can easily get lost in the process. When you get close to your desired shape with the spoke shave, I use 80 grit sandpaper wrapped around a 1/4 “ thick piece of cork to smooth everything together. My final sand is 220 grit.
Now you have a sculptured leg. Just remember to enjoy the process.
Free-form inlay jig (left) & jig detail (right)

20 The Guild of New Hampshire Woodworkers
With wood you can build a house to live in, a chair to sit in, a bed to sleep on or, as a departure, an
instrument to play. That’s versatility. Does any other material even come close?
A couple of years ago, my wife bought me a music stand, some guitar lessons, and a capo (a device for raising the pitch of guitar strings). I have played guitar since childhood but had lost interest in recent years and her thoughtful gift reawakened that interest. So the thought occurs to build a guitar. I place an ad in The Old Saw asking if anyone is interested in joining the adventure. Two Guild members respond – Franz Summers and Paul Miller. So we find a teacher, Alan Carruth in Newport, NH and start classes in August, 2006. The Guild awards us a scholarship to help with some of the expenses.
In December, 2007, I put strings on my first guitar and hear its first notes. You can hear a sound clip of it on the Guild web site at www.gnhw.org. A rough estimate of the total building time to date is around 1000 hours. Now that is a little misleading because I decided to build two guitars at once. The idea was to perform a series of operations on one, noting the difficulties and mistakes, and then to redo the operations better on the second one in order to reinforce the newly acquired skills. This has worked very well and is to be recommended for anyone learning something complex and new. Also, the 1000 hours includes the time to research and build or purchase all the tools and jigs needed to make more guitars. Bear in mind also that I spent 200 of those hours making the twenty jigs necessary to make a side-grain inlay rosette.
The instrument, to my ear, sounds beautiful, far exceeding my expectations. The appearance, while it has imperfections, is far above what I would have thought it possible to achieve. And the 1000 hours have been among the most enjoyable I have ever spent in my life doing anything.
In this article I will share some of the high and low points of the process, emphasizing things that might be especially startling to woodworkers or that particularly caught my imagination. This is mainly about my building experience but I also talk a bit about Franz’s and Paul’s guitars.
by John Whiteside
The day we arrived at Alan’s shop, everyone was very friendly except for one student, a grim middle aged man who did not say hello. He had glued the two halves of his soundboard together, inlaid his mail order rosette, and was hand planing the back of his glued soundboard to make the finished thickness about 2.5 mm thick.
To get to that point, it is necessary to edge glue two thin but rough surfaced, book matched pieces. The edges have to be absolutely straight, which can be done with a really good hand plane. I ended up making a simple planing jig and also a light table to view any gaps in the seam between the two boards. Once the boards are glued together, it is necessary to smooth plane one side and then rout out a circular channel for the rosette. Next the rosette is glued into the channel and then the soundboard is turned over and planed to thickness.
In any event, this individual was planing away with grim determination not checking what he was doing. Alan, who had given him explicit instructions, got to him to follow up quickly but not quite quickly enough. The sound board was now less than 2 mm and had to be redone from scratch! The grim man left sullenly and never returned.
As unfortunate as this incident was, it taught me three valuable lessons – stay lighthearted, think through what you are doing, and be very patient.
Plates and BracesThe top of a guitar (the
soundboard) and the back are collectively called plates. Each plate is typically made of two (sometimes three for backs) thin edge-joined book-matched boards. The soundboard joint is obviously an especially critical one – two boards joined along a 2.5 mm edge. What glue to use? Some authors advise yellow glue, but traditionally the choice is hide glue, because it is reversible when repairs are needed. Hide glue also
lessons in lutherie and life
part one of a two part series

21The Guild of New Hampshire Woodworkers
has the advantage of drawing the components of a joint together as it dries.
Our experience with hide glue was mixed. First, one has to find a high quality glue of the correct strength. Then it must be dissolved in water and heated to the correct temperature of 140 degrees. It is possible to buy an expensive glue pot but I had good results with a heating plate, a cheap saucepan, a candy thermometer, and a glass jelly jar in a sort of double boiler configuration. The instructions call for careful measuring of the glue crystals and water but it turns out that after a short time in the glue pot, water evaporates and the glue becomes too thick so you have to add more water. What I ended up doing was ignoring the suggested measurements and simply making and maintaining the mixture to about the consistency of molasses.
Artist’s brushes with short,
on that particular piece of Engleman spruce. I should mention that Alan keeps a meticulous log book of the physical properties of every piece of wood that goes into every one of his and his students’ guitars.
Franz is building a flamenco guitar which uses nylon stings that exert much less force than steel strings. Photo 3 shows his bracing pattern which is completely different.
The face of each brace that is glued onto the plates is not flat. This is because the top and back plates of a guitar are not flat. Instead they are slightly domed. The extent of this doming can be varied, but on our three guitars the top dome is a section of a sphere with a 25 foot radius, whereas the back dome has a 15 foot radius. So the brace faces must be slightly curved where they glue onto the plates. Alan makes curved braces by hand but I make a simple jig for use on a router table that greatly speeds up the process.
Once the braces are shaped, they must be glued onto the plates. But remember, the plates are domed. To achieve this, one needs to construct a dish that is hollowed out according to the correct radius. Photo 4 shows Franz and Paul making a dish out of 2 foot diameter pieces of MDF.
They are using an ingenious jig loaned to us by Alan. A router is mounted on a carriage over the dish. The carriage is on wheels that ride along two tracks curved to the correct radius. The MDF dish blank
fairly stiff nylon bristles proved to be the ideal way to apply it evenly to surfaces. A warning though – mixed hide glue has limited shelf life and weakens if repeatedly reheated. The three of us had some joint failures and this may have been the cause.
Once the top plates are glued up, the rosette is applied. My hand-made rosette is described in a previous article (Old Saw, Feb ‘07). Very nice pre-made rosettes are readily available or one can make them of materials other than wood. Photo 1 shows Paul’s rosette which contains mother of pearl.
The next step is to glue the braces onto the back of the top plate. The design of these structural elements varies greatly from maker to maker and they must perform a real feat of engineering. They must simultaneously prevent the guitar from collapsing under the several hundred pounds of pressure from the strings on a steel string guitar and also must be as light as possible to allow the top plate to resonate.
Photo 2 shows my braces. They form a Double X pattern designed by Alan Carruth. The upper X is set at 90 degrees but the lower X is splayed out an additional 5 degrees. That was Alan’s suggestion due to his measurements of the ratio of transverse to longitudinal stiffness
1
2
3

22 The Guild of New Hampshire Woodworkers
is fastened to a Lazy Susan mount underneath so it can rotate. In the photo Paul is pushing the router back and forth whilst Franz is rotating the blank slightly after each pass that Paul makes. It takes them about half an hour to complete a dish. We made six – two for each of us.
Photo 3 shows how the curved braces are glued onto the plates. The plate rests on the newly manufactured dish and the braces are held down by devices known as
“gobars”. These are simply dowels under tension – one end of each dowel rests on the brace to be clamped, the other end on the ceiling, or rather, a “gobar deck” which is a surface dropped from the ceiling. The photo shows my gobar deck and Franz’ top.
The deck could be improved. The downward force is inversely proportional to the length of the gobar, so by lowering my deck I can achieve greater clamping force. Indeed, my first attempt at brace gluing was a failure. There were parts of the braces under which one could slip a piece of paper. So it needed to be redone.
Gobars, which are nothing but long dowels, have nonetheless the most astonishing physical properties. For example, their downward force does
not vary with the degree to which they are bent!
I can’t believe this when I hear it, so I make measurements with a postal scale and it turns out to be true. At the same time, as mentioned above, they exert more force the shorter they are. For the life of me I cannot understand this. It would suggest that a given bow shoots an arrow the same distance regardless of the degree to which is it bent, and that short bows should shoot further. But Franz, who knows about such things, assures me this is not the case. Paul, an engineer, makes an effort to explain but it turns out that physics was one of my worst subjects in school. One thing that does make intuitive sense is that larger diameter gobars exert much more force than
small diameter ones. The best advice I can give is that if you use gobars, use a lot of them.
Redoing the braces is almost a disaster. In theory the hide glue braces can be removed by heat. When we try this, they come off all right, but the center seam sound board joint (also held by hide glue) also starts to come apart, threatening the hand-made rosette on which I have spent 200 hours! In despair I ask Alan to make it right, which, bless him, he does by planing off all the braces and repairing the center seam. So as a consequence, I now use yellow glue for the center seam joint. In theory, next time I have to take off braces, heat will loosen their hide glue bond before it affects the center seam yellow glue bond.
The back of the guitar is built in similar manner to the top, except there is no rosette and there is the possibility of including a decorative stripe down the center. Photo 5 shows the back of my second guitar (photographed much later in the process) with the center stripe made of a strip of ebony flanked by two strips of holly.
Once in place, the braces are hand-carved to just that
shape which will provide the least possible mass, sufficient strength, and just the right tonal qualities.
How is this achieved? Beats me. All the sources say different things. One (controversial) source even recommends evaluating the resonant frequency of each brace using an expensive piece of equipment called a strobe tuner. Instead, I carve the braces until they look good and seem right. I also hold the plate up with two fingers lightly near the edge and rap on it. It actually rings and the quality and pitch of the ring changes a bit with each shaving I take off a brace. I even try to get the pitch of each plate close to notes that appear in the musical scale. But I know enough about acoustics to know that the resonances will change drastically once the plates are glued down to the sides.
SidesIn parallel with the top
and back, the sides need to be made. For these there is need of specialized equipment and jigs. My particular guitar has Indian rosewood backs and sides which come from the supplier as slightly oversized blanks, rough finished to about 4.5 mm thickness and bookmatched. My particular design calls for the finished 5
6
4

23The Guild of New Hampshire Woodworkers
sides to be about 2.5 mm thick. Removing 2 mm thickness may not sound like much but it takes an astonishing amount of time using a hand plane. The ideal solution for thinning the sides to rough dimension would be a thickness sanding planer, but such a tool is beyond my budget at the moment. There exists a poor man’s alternative, somewhat dangerous to use, which is a rotary planer head that fits on a drill press, shown in photo 6.
This device has teeth on its surface so that by sliding the wood underneath it (and keeping it absolutely flat), one can reduce its thickness much faster than with a hand plane. The finished surface is rough, so hand planing is necessary anyway, but that is needed to give a really smooth surface regardless. The danger lies in getting your fingers too close to the spinning head. Franz does this and suffers a nasty cut. Consequently, I cannot recommend this device though I admit to using it myself.
One of the most the interesting and challenging aspects of guitar making to me is the need to think many steps ahead. There are a lot of operations that cannot be done in sequence and that nonetheless are dependent on each other. Consequently, I find it impossible to make a simple ordered list of tasks. A flow chart might work but it would be very complicated. You have more or less to keep the whole thing straight in your mind. Indeed, prior to each work session, I find myself spending thirty minutes to an hour just thinking things through and double checking them.
The next step with the sides is a case in point. Once they are bent, it will be more difficult to saw them and so it is helpful to saw them to approximate dimension whilst they are still flat. The top and back of a guitar, when viewed from the side, do not lie on the same plane in most models. So the side widths taper from bottom to top. To saw the blanks to even approximate dimension (leaving plenty of extra) it is necessary to make a geometric projection of the bent side onto a flat surface.
Bending the sides is fun. Basically they are moistened, heated, forced into shape, and allowed to cool. Studying how to do this teaches me what turns out to be a general rule. There is no standard method of guitar making. All the teachers use different methods, as do all the factories, and all the books are different.
Some authorities have you do the bending freehand, bending the wood around a heated pipe, with a blow torch as the heat source. Others recommend building a form. It is also possible to buy pre-bent sides as part of a kit. At the high end, it is possible to buy or make a form that is adjustable. Professional violin maker Jim Robinson has made one of these in his shop which he uses for bending violin sides.
I decide to make a jig based on the kind Alan Carruth uses. Of course, I could use his, but part of the exercise for me is to acquire everything I need to make guitars in my own shop. There are many models of guitars. I chose what is called a 12-fret 000. These models have more or less a standard shape. I copy my shape from Alan’s template. The resulting jig, shown in photo 7, is heavily constructed from layers of 3/4˝ baltic ply on top of which I have fastened a stainless steel sheet.
To use it, I lightly spray the side with water, wrap it in clean kraft paper, place a thermostatically controlled rubber heating blanket over it, and then a stainless steel sheet on top. The pad is very powerful, capable of reaching 500 degrees, though such a temperature would scorch the wood. Naturally, this operation is done with heavy gloves. I use my leather motorcycling gloves. Within minutes the wood softens.
I use the dowel that you see in the photo to press and clamp the waist down. Then I use clamps to fasten the ends to the form. I find that if you press the wood too hard, too quickly, it splits. Its a question of waiting until it gives relatively
easily. Once in place, I let it cook for a few minutes and then turn off the heat, only removing the clamps when the whole apparatus has completely cooled.
The kraft paper is an example of an interesting general lesson. There is no single source that contains all the information that is needed or even helpful. None of my sources mention wrapping the sides in kraft paper. I find that tip on an excellent series of videos on the Taylor Guitar Company website (www.taylorguitars.com). The advantage comes from the fact that heated wood (especially exotics) gives off oils. When dry, these oils stick to the surface of the wood and are quite difficult to scrape or sand off. The kraft paper soaks up most of these oils and also keeps the jig clean.
OK, so the sides are bent. Now another jig is needed – the female version of the bending jig. This is shown in photo 8. It is made of two layers of 3/4˝ baltic ply with spacers in between the layers. Its shape, naturally, corresponds to the shape of the side bending jig, plus an allowance for the thickness of the sides. Its purpose is to hold the sides in the proper shape until the back and top are glued on.
7
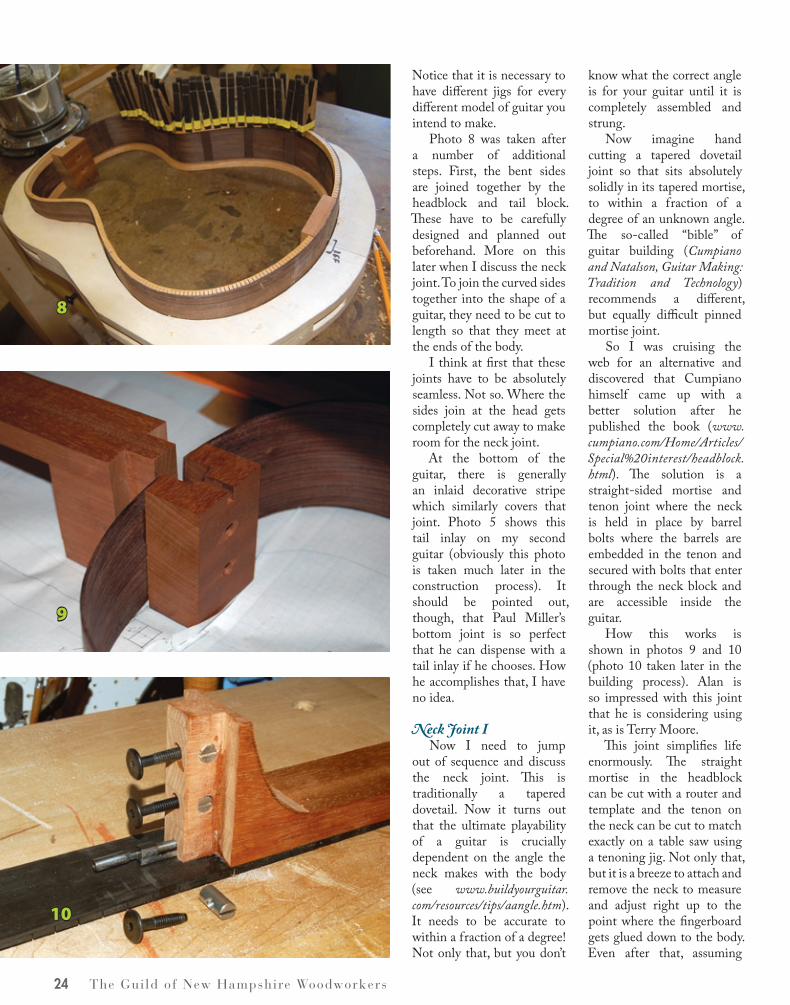
24 The Guild of New Hampshire Woodworkers
Notice that it is necessary to have different jigs for every different model of guitar you intend to make.
Photo 8 was taken after a number of additional steps. First, the bent sides are joined together by the headblock and tail block. These have to be carefully designed and planned out beforehand. More on this later when I discuss the neck joint. To join the curved sides together into the shape of a guitar, they need to be cut to length so that they meet at the ends of the body.
I think at first that these joints have to be absolutely seamless. Not so. Where the sides join at the head gets completely cut away to make room for the neck joint.
At the bottom of the guitar, there is generally an inlaid decorative stripe which similarly covers that joint. Photo 5 shows this tail inlay on my second guitar (obviously this photo is taken much later in the construction process). It should be pointed out, though, that Paul Miller’s bottom joint is so perfect that he can dispense with a tail inlay if he chooses. How he accomplishes that, I have no idea.
Neck Joint INow I need to jump
out of sequence and discuss the neck joint. This is traditionally a tapered dovetail. Now it turns out that the ultimate playability of a guitar is crucially dependent on the angle the neck makes with the body (see www.buildyourguitar.com/resources/tips/aangle.htm). It needs to be accurate to within a fraction of a degree! Not only that, but you don’t
know what the correct angle is for your guitar until it is completely assembled and strung.
Now imagine hand cutting a tapered dovetail joint so that sits absolutely solidly in its tapered mortise, to within a fraction of a degree of an unknown angle. The so-called “bible” of guitar building (Cumpiano and Natalson, Guitar Making: Tradition and Technology) recommends a different, but equally difficult pinned mortise joint.
So I was cruising the web for an alternative and discovered that Cumpiano himself came up with a better solution after he published the book (www.cumpiano.com/Home/Articles/Special%20interest/headblock.html). The solution is a straight-sided mortise and tenon joint where the neck is held in place by barrel bolts where the barrels are embedded in the tenon and secured with bolts that enter through the neck block and are accessible inside the guitar.
How this works is shown in photos 9 and 10 (photo 10 taken later in the building process). Alan is so impressed with this joint that he is considering using it, as is Terry Moore.
This joint simplifies life enormously. The straight mortise in the headblock can be cut with a router and template and the tenon on the neck can be cut to match exactly on a table saw using a tenoning jig. Not only that, but it is a breeze to attach and remove the neck to measure and adjust right up to the point where the fingerboard gets glued down to the body. Even after that, assuming
9
10
8

25The Guild of New Hampshire Woodworkers
one has used hide or fish glue on the fingerboard, removing the neck on the finished guitar is relatively easy in the likely event that the neck needs to be reset down the road. And barrel bolts are available at Ace hardware!
Gluing the BodyHeadstock digressions
aside, back to the sides in their form as shown in photo 8. Recall that the back and top are not flat – each forms a section of a sphere. The edges of the sides need to be shaped to match so that they intersect this sphere. To achieve this, I get out the MDF dishes I made with Paul and Franz and place the sides in their form on a dish
– the 25´ radius dish for the top and the 15´ radius dish for the bottom. I find myself becoming very confused because the larger number (25´) actually corresponds to the shallower curve. So I label the forms top and bottom.
The general rule here is to label everything! The whole guitar-making process has a number of irrecoverable mistakes that can be made. Using the wrong jig or measurement can ruin hundreds of hours of work and hundreds of dollars of materials.
Putting, for example, the top of the sides face down on the top dish, I can draw right around the perimeter of the sides a line whose height corresponds to the surface of the dish. You have used a similar procedure if you have scribed a cut line onto a piece of baseboard that you wanted to sit flush on an irregular floor, using a pencil in a compass. The bottom of the compass rides along the
floor whilst the pencil point, which rides a bit higher, transcribes the line onto the baseboard.
The only difference here is that pencil lines cannot be seen on dark Indian rosewood, so I have to use a white pencil. Once these lines are scribed I work around the edges with a small plane, cutting the sides down to the line. To get the final fit, I place a piece of sandpaper right on the dish and rub the whole frame-and-side assembly over the sandpaper until the fit to the dish is as perfect as I can get.
Returning to photo 8, it shows the shaped sides in their jig. The next step, shown in progress in the photo, is to apply kerfing around both the top and bottom perimeters. In my case, the kerfing is made from mahogany with cuts in it about every 1/4˝ that
leave just a couple of 64ths of an inch of material left to allow the kerfing to remain in a continuous piece.
The exact amount of material to leave depends on the wood and on the shape of the guitar. Too little left and the pieces break off. Too much left and they do not bend without splitting. Franz Summers makes us a simple jig that allows the kerfing to be made using repetitive cuts on the bandsaw. Notice also that a large number of closely spaced clamps are used to hold each section in place whilst the hide glue dries.
The purpose of the kerfing is to provide a gluing surface for the top and bottom. So its contour has to match exactly the finished contour of the sides. The final fit is achieved by planing and sanding. A good fit also depends on not
having glued any part of the kerfing below the sides, as that would leave a gap.
Photo 8 shows one other wrinkle Alan has us do before applying the kerfing. He has us glue strips of sewing tape on the inside of the sides, as a precaution against splits.
Later, I will address the complex topic of guitar acoustics. As a preview, it occurs to me that the fabric strips inside the guitar probably have a diffusing effect on how the sound reflects and resonates inside the body chamber. On a future guitar I intend to experiment with thin wooden strips in place of the cloth. Whether or not it will make any difference to the sound I will probably never know, since any two guitars differ by an astonishing
Continued on Page 27
11

26 The Guild of New Hampshire Woodworkers
Shellac is a very convenient furniture finish for a small shop. It is easier to
apply by hand than any other finish, and is extremely easy to repair.
Shellac has some weaknesses. It is less resistant to abrasion than varnishes. It softens at high temperatures, so a shellacked tabletop can be marked if unprotected from hot dishes. Shellac is readily attacked by alcohols (drinking, patent medicine, rubbing, some cosmetics) and by alkalies (ammonia and strong cleaners).
These disadvantages are easily outweighed by its ease of application and repair for finishes that will be treated with care. High quality finishes can be produced by brushing, padding, French polishing or spraying. The finishing area does not need to be dust-free because it dries so fast. Ventilation of the finishing area is less critical than with all other finishes (except water-borne), because the solvent is less toxic and the fumes are less flammable. Shellac is easy to sand and polish with abrasives to any sheen. Dewaxed shellac is very resistant to water, so it can be wet-sanded. Shellac
is unaffected by oils and hydrocarbon solvents (paint thinner, naphtha), so hydrocarbon-based glazes can be applied, worked, and even completely removed. Its water resistance allows shellacked furniture to be safely cleaned with mild soap and water. A worn or lightly scratched surface is immediately restored by simply wiping with a pad dampened with thinned shellac. Deeper repairs are easier than varnishes, because it bonds well to any original finish (except wax) and is easy to color.
GradesNatural shellac contains 4-5% wax,
which has a strong effect on the physical properties of the coating but little effect on the method or ease of application. Nearly all the wax can be removed, and the resulting product is sold as dewaxed shellac. Natural shellacs are available in a range of colors, obtained by removing or bleaching part or all of the colorants in the natural lac resin.
I have a strong preference for dewaxed shellac over natural (waxy) shellac, since varnishes and all water-borne finishes adhere better to it, and it is more resistant to white water stains
(rings). Natural shellac solutions have a fairly short shelf life – a few years at most if stored where cool, only months if warm. Dry flakes can be stored indefinitely if kept cool, and at least a few years at room temperature. Zinsser sells a dewaxed premixed shellac called SealCoat™, which eliminates the preparation chore. I have been told that SealCoat™ has a shelf life of over five years, although Zinsser does not claim that much. Zinsser clear shellac in spray cans also is dewaxed. Amber and clear Zinsser Bulls Eye shellac carried by many local stores is not. If you are not certain whether a shellac solution is dewaxed, simply stir it up and observe the opacity. Natural shellac solutions have a milky appearance, since the wax is not very soluble in alcohol and is left in suspension. Dewaxed shellac solutions are clear, with no hint of haziness.
Dissolving FlakesUntil recently I mixed all my shellac
from flakes because I use shellac at irregular intervals, and because dewaxed shellacs were only available as flake. Freshly dissolved shellac dries very rapidly (it can be sanded in less than 30 minutes) and is a real joy to use. To speed up the dissolution process, I chop the flakes into a coarse powder in a small coffee bean mill, and then agitate the flake-alcohol slurry frequently while it is dissolving. It takes about a day to get all the flake into solution, and there is usually some insoluble matter that must be filtered out. I have had occasional problems with the flakes caking (sticking together in one large clump), but they dissolved satisfactorily once broken up. The darker natural grades of shellac often contain pieces of bugs and bark, but those are filtered out with the undissolved resin.
I have started using SealCoat™ for most of my applications because
Frank Wooley is a member of the Eastern Massachusetts Guild of Woodworkers (www.emgw.org). Although first appearing in the EMGW guild newsletter, Frank has revised and expanded upon his original article for inclusion in The Old Saw.
Shellac
by Frank Wooley

27The Guild of New Hampshire Woodworkers
Building a guitar – continued
shellaC – continued
number of sound-influencing variables. Existentially, this groping about in the unknown and unknowable is part of what gives lutherie its great fascination and charm.
Once the kerfing is all in place, I cut rabbits into it that accept the ends of the braces on the top and back. This has to be done very precisely with no gaps. The end of each brace has to be precisely supported by the bottom of the gap in the kerfing. A loose joint means structural weakness and possible buzz or rattle in the finished instrument. I find I need a dial gauge to measure the cut depths. Parenthetically, guitar
making uses both metric and imperial measurements, so I need two complete sets of dial gauges, feeler gauges, and rulers of varying lengths. With careful and iterative measuring and trimming, I get the top and back to the point where they, as it were, snap into place. Now it is time to glue the body together.
Photo 11 shows this part of the operation. It uses a lot of specialized spool clamps, which take a fair amount of time to put into place, far longer than the 10 minutes open time for yellow glue, to say nothing of hide glue. What to do? Well I could practice to become very fast. But I don’t like to hurry and don’t like to work under pressure.
Good old Alan has been experimenting with a solution – fish glue! In fact, one of his students has recently completed an entire guitar using nothing but fish glue as the adhesive. The great advantage of fish glue is its working time of 40 minutes! It does not have to be heated or mixed, comes in squeeze bottles from Lee Valley, and does not smell. I make some test glue joints on scrap wood using yellow glue, hide glue, and fish glue. All make joints stronger than the wood itself. The big disadvantage of fish glue is that it readily dissolves in water, so a fish-glued guitar will rapidly come apart if submerged. — to be continued in the April, 2008 issue of The Old Saw.
it eliminates the process of chopping, dissolving and filtering flake. It does not dry quite as fast as freshly dissolved shellac, but usually that is a minor disadvantage. It only comes in one color (light amber) but it can easily be colored.
Coloring ShellacShellac solutions are colored by
intermixing the variously colored natural shellac resins or by adding dyes and pigments. Dyes may be added as liquid dyes in glycol (like TransTint™ or other NGR dyes) or as dry alcohol-soluble dye powders (after dissolving in alcohol and filtering). Pigments may be added as dry powders (after dispersing in alcohol) or as powders predispersed in a glycol base (like Universal Tinting Colors).
Shellac lightly colored by these methods is very useful for subtly changing the color of wood, since the color can be added and corrected layer by layer. It is only a partial substitute for staining before finishing because of the difficulty of obtaining a finish coat of perfectly uniform thickness. Shellac deeply colored by these methods is excellent for touching up dings and deep scratches and for blending in wood patches in colored finishes.
Applying ShellacThis is a very large subject, best
covered in books, not short articles. Three books are suggested below. The method I use depends on the trade off between drying time and my time. Drying time for finishes generally increases with the square of the finish thickness, but my time is proportional to the number of layers it takes to build an adequate finish thickness. For example, twice as many half-thickness layers can be completed in half the total elapsed time, but with twice as much of my time.
I generally apply shellac with a fine-bristle brush when I am trying to save my time but can afford to wait the longer time that thicker layers need for the alcohol to evaporate. Sanding between coats removes the dust and brush marks. For a quicker finish (but with more of my time) I apply shellac in thinner layers with a pad. Some sanding is necessary to remove dust and streaks. A final coat of very thin shellac leaves a gloss surface, and duller sheens are then obtained with abrasives or steel wool. For a fine high-gloss finish in a short time (but with even more of my time) I use the French polishing technique, in which very thin layers are applied to produce a high-gloss finish without abrasives.
I shellac all surfaces of fine furniture except tops of tables and case pieces. To improve heat and solvent resistance, I finish these with varnishes which I color and rub out to match the shellac.
Sources of ShellacI have had satisfactory results with
unbranded flake from www.shellac.net, JT Moser Super Blonde flake ordered from Woodworkers’ Supply and Zinsser Bulls Eye liquid shellac from Home Depot and other local stores. For dry flake, www.shellac.net offers a wide variety of grades and has very good prices. Jeff Jewitt’s Homestead Finishing Products (www.homesteadfinishing.com) also has a good variety of grades of flake, and I have found him to be a reliable supplier of good quality products.
Sources of informationThe best book I have found on
finishing is Bob Flexner’s Understanding Wood Finishing, Readers’ Digest Assn, 2005. Flexner gives very clear explanations for the nature and behavior of finishing materials. He gives you a real understanding of the materials and finishing processes, rather than just a collection of recipes and techniques to be blindly followed.
Jeff Jewett’s Hand Applied Finishes, Taunton Press, Newtown, CT, 1997, has excellent instructions for application of shellac and most other small-shop finishes.
Sam Allen’s Classic Finishing Techniques, Sterling Publishing, 1994, has excellent detailed instructions for French polishing. Although out of print, used copies are readily available.

28 The Guild of New Hampshire Woodworkers
Thirty two half lap cuts to make. The typical tool in
many shops will be the tablesaw with a dado blade. I don’t like the rough surface left by the dado blade. It’s a fine choice in many applications but for this joint, a smooth flat surface was necessary. So the router table makes that possible and makes a beautiful, square finish to the shoulder and flat. However, it’s a slow process to hog out all the material, and prone to tear out, requiring diligent use of a backing board.
The shortcut is not rocket science. Use the bandsaw and table saw to eliminate the bulk of the material.
First, with the bandsaw, rip a cut slightly shallower than the final dimension cut in from the end. Stop short slightly before the final length of the cut. Use a stop board clamped to the fence to get consistent depth of cut. And drift angle, while small on this short cut, needs to be considered.
Then to the tablesaw for a crosscut to trim off and release the little piece. Use a spacer block on the fence (not shown here) to prevent the off cut from rocketing out of the saw.
Finally, make the cleanup pass on the router table. Here a 1˝ router bit makes quick work with minimum passes and swirl marks.
Saw Blade Solutions
Half Lapbeginner’s corner
by Bob Oswald
by Bob Oswald
Make the first pass forward near the end of the piece with a miter gauge. The final pass is a backwards climb cut to prevent tear out on the back side of the shoulder.
fast & clean
I had a chance to learn a few tidbits about saw blades
from the Freud rep recently. Thought I’d pass them on to you.
In answer to questions about what blade to choose, what diameter, best use of dado blades, a lengthy discussion about these and many subjects ensued. Here are some interesting high points, especially for people with smaller tablesaws such as the table top variety.
For stalling or burning problems, go to a smaller diameter blade. It takes less horsepower to spin it up and keep it moving. You don’t have to be driven to maintain a 10˝ blade.
Clean your blade often. Resin buildup will cause overheating
and burning. The blade will appear to be dull. How many dull blades have been sharpened by cleaning?
Change blades for the application. It’s easy to be lazy and run a combo all the time. You’ll get cleaner cuts and better performance on a small saw by using a ripping blade to rip. This summer I observed OCAC folks changing blades all the time. It gets easier as you do it. On that note, tightening the new blade is not a contest of strength. OCAC technique is to put the wrench on the nut and rest it against the table. Then with two fingers, pull the blade tight. It works, it doesn’t slip, it’s safe and it’s much easier to get off.
Thin kerf blades are not about
less waste. It’s less mass, less wear on the motor at startup, more power cutting rather than overcoming inertia. For 1/32˝ narrower cut, the body of the blade is even thinner. A thin kerf blade will weigh almost half as much. It increases the sweet spot, the trade off in feed rate between going slow and causing burn, and pushing to fast and causing a stall.
An 8˝ dado is often too big for a smaller saw. Drop to a 6˝ blade. You’re typically only cutting a half inch deep or so. You don’t need a monster blade. Low horsepower will handle the smaller blade better.
What’s the difference between a 10˝ 50T Industrial Blade and a less expensive Home Depot version? The industrial blades have more steel, bigger carbide teeth, better stabilization with more complex tuning cuts, and therefore more cost. Use what’s appropriate for your application.
Use an out feed table to take stress off the saw system. A roller drifting sideways against the blade increases the torque required and puts a greater load on a small saw.

Using
29The Guild of New Hampshire Woodworkers
by Norm Brewer
Three Phase MotorsI have recently been looking at
purchasing some older commercial woodworking equipment. A major impediment to using this type of equipment is that it often comes equipped with three phase electric motors. I’ve been investigating options for dealing with this problem and found that there are several good solutions.
First of all, most residential electric service is 117/234 volt single phase. The two separate 117 volt lines are in phase with each other which makes the voltage of the two lines additive. Three phase power is usually only available to commercial or industrial users and getting three phase power is not an option for most homeowners.
Conceptually, you can think of a three phase motor as having three separate stator windings. Each winding is connected to one of the three phases supplied by the electric utility. These three windings produce a rotating magnetic field, and the motor’s rotor chases the rotating field providing rotating power.
Three phase motors have several advantages over single phase motors. They can be simpler since they don’t need capacitors for starting, or centrifugal switches to disconnect starting windings once they start. They also can provide dynamic braking to stop rotation quickly. The rotation of a 3-phase motor can be reversed without stopping the motor. This is important in some applications. Finally, 3-phase motors produce a more even torque than single phase motors, so devices using them run smoother.
In many cases the simplest option may be to replace the three phase motor with a single phase one of equivalent power and speed. Whether this is feasible will depend on how the motor is mounted and whether or not the equipment uses any of the special capabilities of 3-phase motors. Also, replacement cost for larger motors may be prohibitive.
Static phase converters do not have any moving parts as the name implies, but contain phase shifting capacitors and switching circuits. These devices produce an artificial third phase for starting the motor and supply two of the motor’s windings with the two separate 117 volt sides of a single phase 220 volt circuit. The net result is that the motor develops 1/2 to 2/3 of its rated horsepower, but the unbalanced power can cause overheating if the motor is heavily loaded. Static converters are cheap, small and lightweight, and a separate converter is often used for each piece of equipment. Static converters work only for motors and not other 3-phase equipment. A 3/4 to 11/2 HP converter costs $147 from www.phase-a-matic.com.
Rotary phase converters are special three phase motors that have additional circuitry added to start and run the motor on single phase power. Rotary converters act as rotating transformers and create true 3-phase output power for use by 3-phase equipment. Motors running from a rotary phase converter develop full power and there should be no overheating problems. Multiple pieces of equipment can be run simultaneously from a single converter if it is properly sized. Rotary converters will also power non-rotating three phase equipment like welders.
Large rotary phase converters can consume a significant amount of power while idling. A typical 10 HP converter consumes
about 1500 watts with no load. Keeping it on all the time could be expensive in a small shop.
A one HP rotary phase converter costs less than $200. One good place to start investigating rotary converters is www.phaseconverter.com.
Variable Frequency Drives (VFDs) are a third class of converters. These devices convert incoming single or 3-phase power into DC, and then synthesize 3 separate AC phases from the DC. Motors run from VFDs will develop full power. This type of drive can create power at varying frequencies, which allows motor speed to be varied. The Powermatic lathe used at a recent Robert Sorby demo had a 2 HP three phase motor controlled by a VFD. It provided soft-start and speed control. One source I found is www.driveswarehouse.com/Drives/AC+Drives/Phase+Converter+VFD/L200-015NFU2.html. A 2 HP Hitachi VFD drive costs $216 from these folks. Call them to discuss various design options available.
Norm Brewer is a member of the Washington Woodworker’s Guild (www.washingtonwoodworkersguild.org) located in the Washington DC area. This article is reprinted with permission from the guild newsletter – The Wooden Word.
Static ConverterRotary Converter Variable Frequency Drive
Thre
e Ph
ase
Pow
er
Three phase motor stator has three windings

30 The Guild of New Hampshire Woodworkers
by John Pitrone
Historically, the Guild has always made the video library available to
members and had loosely kept track of who had videos. This was done using the honor system by leaving a notebook for members to sign out videos on their own. Since I have taken responsibility for the library, I have made a number of changes to how the videos are signed out and tracked. Initially, I made some of these changes because I had difficulty reading the member names in the notebook. I also wanted to keep better track of the videos. Of course, the growth of the Guild membership has also necessitated the changes to the procedures.
Now, when members borrow from the library, I write down the member name and stock number of the video. While my writing is also pretty poor, I can read it! So, please be sure to see me to sign out your videos, so that I can keep better track. I try to make the videos available at all Guild meetings as well as all the GSWT meetings.
Sometimes videos are kept out for an extended period of time. Some have been out for the better part of a year. I know that it is occasionally difficult to get the videos returned, but perhaps a friend could return them for you if you can’t make the meetings, or maybe they could be mailed back. I am open to suggestions on how we could get these videos back and into circulation sooner. Now that we have more members, it is becoming more important to return the videos in a timelier manner.
Now that we keep better track, we can identify which videos are the most popular and can make additional copies, so that they are available to more
members. We are also able to do a better job of replenishing missing videos. In the very near future, we will provide you with a list of videos sorted several ways, i.e. by category, by date, and alphabetical. These lists should be available in the form of PDF files downloadable from the new Guild web site. Having the list allows members to plan their borrowing or purchase ahead of time. This reminds me to mention that the videos are also available for purchase for just $10.
Good statistics require a high degree of data accuracy. So, if the following list doesn’t look right, it may be because
videos were not signed out properly. Please help us to maintain the needed accuracy by signing out all videos. This is especially true for those that are more popular.
As I occasionally view a video, I am reminded of how important they are for passing on information. In many of the videos, the audience is panned and I like to see who I recognize and who I don’t.
I sometimes wonder w h a t happened to those that I no longer see at the meetings. I am sure that some have chosen to move on, or to pursue other interests. This brings to mind that the videos are an important legacy of the Guild. They are a good method of capturing and sharing the knowledge and techniques of the demonstrators, members and non-members alike.
It is important to capture that knowledge before it is lost. Time and again, I read articles in woodworking
magazines talking about techniques that were used hundreds of years ago that have been lost due to the fact that the knowledge was never passed on.
Just recently, I was watching a program on TV about NASA engineers combing the rocketry junk yards for parts from the rocket that was used to land men on the moon. Apparently, the information for that rocket had been lost, or was never fully documented. Now that there are plans to go to Mars, the new engineers need that information, and they are looking for parts so that they can reverse engineer them! The videos are our (the Guild’s) method of fully documenting our rockets (or tables and chairs, etc.)! As I
remember it, passing on information is one of the Guild’s basic goals. I think it’s a great goal. We wouldn’t want to have to reinvent the wheel!
I look forward to continuing to provide you, the members, with access to the Guild’s legacy of knowledge in the form of the video library.
Thanks to all for sharing that knowledge.
Our VideoLending Library
Current 10 Most Popular Videos
Title Code# Times Out
Inlay 99-I 7
Christmas Ornament (project) 00TS3-4 5
Natural Edges from Green Wood 03TS4-4 5
Hand Cut Dovetails 05-JS10 5
Sharpening Day 95-SD 5
Bowl Turning 00TS3-6 4
Bowl Turning (2 disk set) 00TS3-7 4
Intro to Veneering 01-IV 4
Planing Wood by Hand 03-PWH 4
Sharpening for Turning 04-ST 4

31The Guild of New Hampshire Woodworkers
The November general meeting was held in the
Captains room in Coit Hall on the campus of St. Paul’s School.
Dave Anderson started with the Guild’s business report. Then in a departure from our normal format we had some of the members discuss the projects which they brought to the meeting. John Whiteside brought his guitar which is a work in progress. He shared with us the various aspects of guitar making with emphasis on the rosette and the dozens of jigs required. DJ Delorie brought in a completed table clock which he discussed and answered members questions. This beautiful piece will be entered in a contest (we hope you win DJ).
The other projects ranged from turning pieces such as candlesticks, to checker boards, benches, windsor chairs and a tea table. There was such a great interest in seeing what others are doing that we will continue this feature in future meetings.
The main presenter of the meeting was Web Andersen. He is an engineer and has been working with dust collection systems in various size shops. He discussed and had drawings of dust collection solutions for dealing with today’s vast array of power tools. A general question and answer period followed.
After lunch this author gave a lecture on debunking finishing myths. Topics discussed were linseed oil, varnish and shellac finishes and ranged from “replacing the natural oils in wood” to
“wax build up”. Between the great location,
the large member turnout, the questions and enthusiasm of the attendees, we had a wonderful meeting.
by Sal MorganiGuild Meeting
Nov 17th, 2007
at St. Paul’s School in Concord, NH
Web
And
erso
n
photos by Jim Seroskie
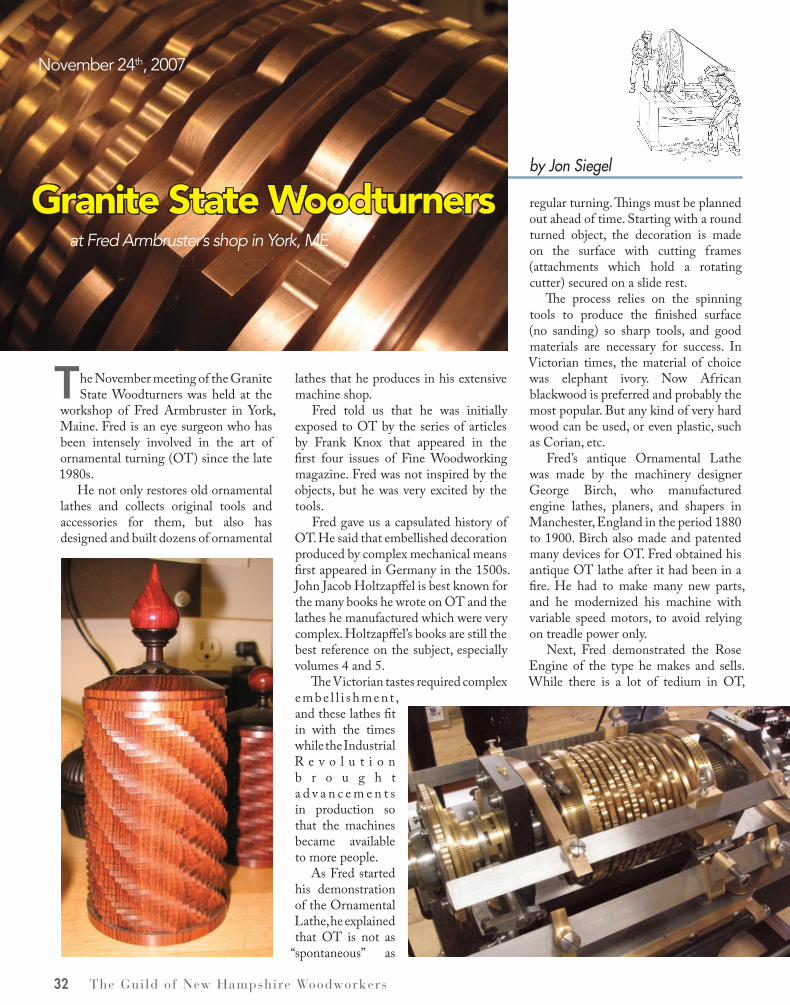
32 The Guild of New Hampshire Woodworkers
by Jon Siegel
November 24th, 2007
The November meeting of the Granite State Woodturners was held at the
workshop of Fred Armbruster in York, Maine. Fred is an eye surgeon who has been intensely involved in the art of ornamental turning (OT) since the late 1980s.
He not only restores old ornamental lathes and collects original tools and accessories for them, but also has designed and built dozens of ornamental
lathes that he produces in his extensive machine shop.
Fred told us that he was initially exposed to OT by the series of articles by Frank Knox that appeared in the first four issues of Fine Woodworking magazine. Fred was not inspired by the objects, but he was very excited by the tools.
Fred gave us a capsulated history of OT. He said that embellished decoration produced by complex mechanical means first appeared in Germany in the 1500s. John Jacob Holtzapffel is best known for the many books he wrote on OT and the lathes he manufactured which were very complex. Holtzapffel’s books are still the best reference on the subject, especially volumes 4 and 5.
The Victorian tastes required complex embe l l i shmen t , and these lathes fit in with the times while the Industrial R e v o l u t i o n b r o u g h t a d v a n c e m e n t s in production so that the machines became available to more people.
As Fred started his demonstration of the Ornamental Lathe, he explained that OT is not as
“spontaneous” as
regular turning. Things must be planned out ahead of time. Starting with a round turned object, the decoration is made on the surface with cutting frames (attachments which hold a rotating cutter) secured on a slide rest.
The process relies on the spinning tools to produce the finished surface (no sanding) so sharp tools, and good materials are necessary for success. In Victorian times, the material of choice was elephant ivory. Now African blackwood is preferred and probably the most popular. But any kind of very hard wood can be used, or even plastic, such as Corian, etc.
Fred’s antique Ornamental Lathe was made by the machinery designer George Birch, who manufactured engine lathes, planers, and shapers in Manchester, England in the period 1880 to 1900. Birch also made and patented many devices for OT. Fred obtained his antique OT lathe after it had been in a fire. He had to make many new parts, and he modernized his machine with variable speed motors, to avoid relying on treadle power only.
Next, Fred demonstrated the Rose Engine of the type he makes and sells. While there is a lot of tedium in OT,
at Fred Armbruster’s shop in York, ME
Granite State Woodturners

33The Guild of New Hampshire Woodworkers
Rose Engines produce work much more quickly, which Fred compared to
“putting up wallpaper”. On this lathe the entire headstock rocks back and forth as the spindle rotates. This motion is controlled by a series of built-in cams. Fred’s lathes have a lever on the cam follower (a special feature which he invented) that allows you to adjust the amplitude of motion, both above and below 100%. This invention vastly increases the versatility of the cams.
Fred explained a little of how he got involved in manufacturing the lathes. At the American Ornamental Turners Symposium in Portsmouth last year, “I hoped to sell ten lathes but I sold twenty-four”. Clearly Fred has been hard at work for the last year, making all the parts for these machines. He now has about 80% of the parts made, but all the assembly still lies ahead. Before we left, we toured the huge machine shop where this project is in progress. Since each lathe comes with a complete compliment of about ten cams, we observed stacks of brass cams all over the place. The quality of the brass turning was amazing and reminded me of Victorian microscopes and telescopes.
This was a fascinating meeting for anyone interested in mechanism, lathes, antique tools, or machine shop methods. Fred’s knowledge of machinery design, his ingenious creations, and his industrious pursuit were impressive and inspiring. A DVD of this meeting will soon be available from the Guild video library.
photos by DJ Delorie unless otherwise noted
photo by James Forbes
bottom three photos by Ed Bartlett
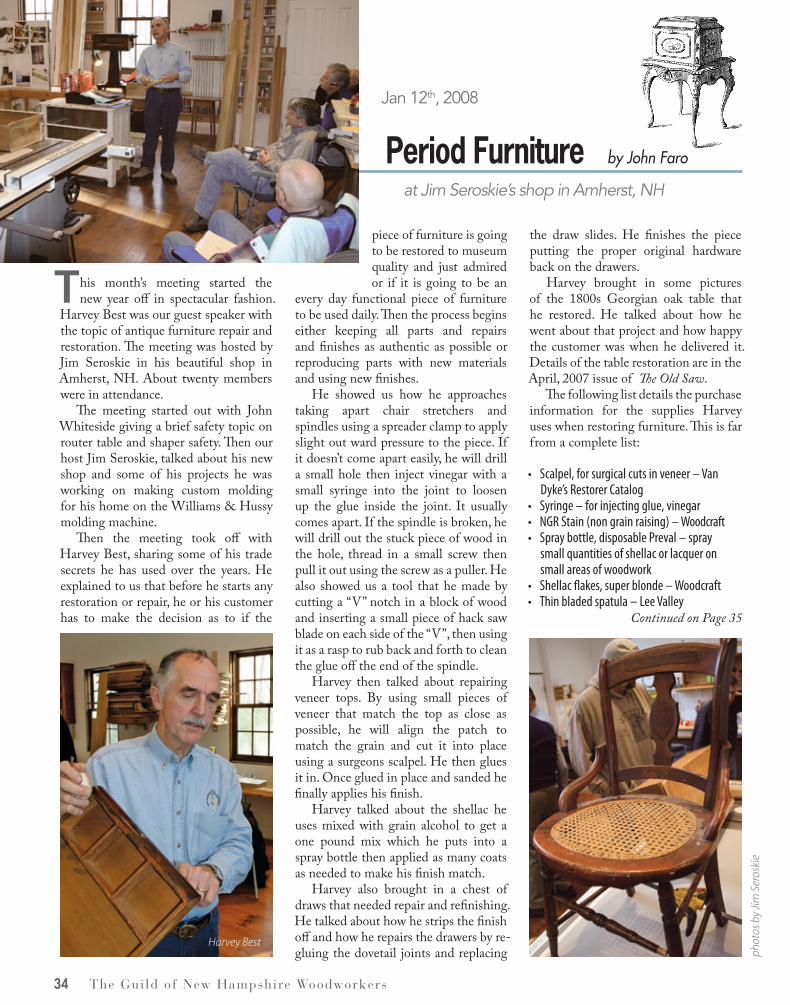
34 The Guild of New Hampshire Woodworkers
phot
os b
y Jim
Ser
oski
e
This month’s meeting started the new year off in spectacular fashion.
Harvey Best was our guest speaker with the topic of antique furniture repair and restoration. The meeting was hosted by Jim Seroskie in his beautiful shop in Amherst, NH. About twenty members were in attendance.
The meeting started out with John Whiteside giving a brief safety topic on router table and shaper safety. Then our host Jim Seroskie, talked about his new shop and some of his projects he was working on making custom molding for his home on the Williams & Hussy molding machine.
Then the meeting took off with Harvey Best, sharing some of his trade secrets he has used over the years. He explained to us that before he starts any restoration or repair, he or his customer has to make the decision as to if the
piece of furniture is going to be restored to museum quality and just admired or if it is going to be an
every day functional piece of furniture to be used daily. Then the process begins either keeping all parts and repairs and finishes as authentic as possible or reproducing parts with new materials and using new finishes.
He showed us how he approaches taking apart chair stretchers and spindles using a spreader clamp to apply slight out ward pressure to the piece. If it doesn’t come apart easily, he will drill a small hole then inject vinegar with a small syringe into the joint to loosen up the glue inside the joint. It usually comes apart. If the spindle is broken, he will drill out the stuck piece of wood in the hole, thread in a small screw then pull it out using the screw as a puller. He also showed us a tool that he made by cutting a “V” notch in a block of wood and inserting a small piece of hack saw blade on each side of the “V”, then using it as a rasp to rub back and forth to clean the glue off the end of the spindle.
Harvey then talked about repairing veneer tops. By using small pieces of veneer that match the top as close as possible, he will align the patch to match the grain and cut it into place using a surgeons scalpel. He then glues it in. Once glued in place and sanded he finally applies his finish.
Harvey talked about the shellac he uses mixed with grain alcohol to get a one pound mix which he puts into a spray bottle then applied as many coats as needed to make his finish match.
Harvey also brought in a chest of draws that needed repair and refinishing. He talked about how he strips the finish off and how he repairs the drawers by re-gluing the dovetail joints and replacing
the draw slides. He finishes the piece putting the proper original hardware back on the drawers.
Harvey brought in some pictures of the 1800s Georgian oak table that he restored. He talked about how he went about that project and how happy the customer was when he delivered it. Details of the table restoration are in the April, 2007 issue of The Old Saw.
The following list details the purchase information for the supplies Harvey uses when restoring furniture. This is far from a complete list:
• Scalpel,forsurgicalcutsinveneer–VanDyke’s Restorer Catalog
• Syringe–forinjectingglue,vinegar• NGRStain(nongrainraising)–Woodcraft• Spraybottle,disposablePreval–spray
small quantities of shellac or lacquer on small areas of woodwork
• Shellacflakes,superblonde–Woodcraft• Thinbladedspatula–LeeValley
by John Faro
Harvey Best
Continued on Page 35
Period Furniture
Jan 12th, 2008
at Jim Seroskie’s shop in Amherst, NH

35The Guild of New Hampshire Woodworkers
Period Furniture – continued
Our new Lutherie group held its third meeting on Sunday,
November 18, 2007 at master violin, viola, and cello maker Jim Robinson’s shop. Our group is growing rapidly with 25 members, about half of whom were at this meeting.
Jim gave an interesting presentation about how he builds instruments and emphasized, at our request, some of the business aspects. One difference between violin making versus guitar making is that the market expects
violins to look old. If you are interested in violin making, Jim offers individual instruction (www.renstrings.com).
The meeting provided an opportunity for Roger Myers to get some advice on repairing some violins he inherited and also for Ed Bartlett to get some feedback on the sound qualities of a violin he built. In the photo you can see Jim test-playing Ed’s violin.
At these meeting we play our instruments as well as discuss building them. Paul Miller, Steve Marcq, Phil Gamache, and Ray Sanville all played for us. I got to fulfill the dream of a lifetime, which was to do a duet with a really good violin player. The photo shows Keri-Ann Price and myself performing.
Everyone agreed that is was a really fun meeting. Our next planned meeting should be astonishing. We have invited Emmy-Award winning, master steel string guitarist Ed Gerhard to attend for the purpose of test playing and giving feedback on guitars we have
Nov 18th, 2007
at Jim Robinson’s shop in Nottingham, NH
Luthiers
made. Members of the New England Luthier’s Guild (based in Southern New England) have been invited to participate in what I hope will be a long and fruitful exchange and collaboration. That meeting, scheduled for late January is, not surprisingly, “sold out”. For the March 16 meeting, Steve Connor maker of the renowned Connor line of classical guitars (www.connorguitars.com) will demonstrate jigs and fixtures his company uses.
To get on the email list for times and directions, contact John Whiteside at johninf [email protected] or call 603-679-5443. Jim Robinson
• Paintstripper,Zip-Strip–hardwarestore• Denaturedalcohol–dissolvesshellac• Lacquerthinner–dissolveslacquer• Woodglue–TitebondTypeIII• Lemonoilfurniturepolish–lubricate
wet-dry 400 paper to rub-out finish• ReferenceBooks:
The Furniture Doctor by George GrotzUnderstanding Wood Finishing by Bob Flexner
We would all like to thank, John Whiteside, Jim Seroskie and Harvey Best for making this meeting another success.
As some of you have heard through e-mail or from being at the meeting Saturday, John Whiteside is stepping down as chairman of the Period Furniture Group. He has turned the group over to
Mike Noel and myself John Faro. John has done an excellent job with the group making it what it is today and also with the help of its members. John has a large pair of shoes to fill but with the support of the group and John as a mentor, I think we will do just fine. On behalf of myself and the Guild – Thankyou John for all the hard work you have done and the dedication you have given to the Period Furniture Group and to The Guild of New Hampshire Woodworkers.
To get on the contact list for the Period Furniture Group, or if you have any ideas on a interesting topic or a shop where we can meet, please contact one of us.• JohnFFaro:[email protected] or
603-968-9800• MikeNoel:[email protected] or
603-744-3821
by John Whiteside
photos by John Whiteside

36 The Guild of New Hampshire Woodworkers
members know that Wood Days is back. Dave Emerson: 603-783-4403 or [email protected]
Beginner & Intermediate Group
BIG, the Beginner and Intermediate Group, meets the first Saturday of the even numbered months from October to June. Feb. 2nd at 9:30 am is the next meeting.
I will continue to make the apple wall hung cabinet. Starting in April, I will begin a series on drawer construction and hanging drawers. We will explore a number of ways to build and hang drawers. This will take place over a year or so.
This year will be a little different. BIG will be meeting at Steve Colello’s shop at 119 Flynn Road, Sanbornville, NH for the short term.
Directions – Flynn Rd. is in North Wakefield off of
route 16. It is 6.0 miles north of the intersection of route 16 and 109 and 5.7 miles south of the intersection of route 16 and route 28. Going north, it is a right hand turn and going south, it is a left hand turn.
Once on Flynn Rd, go 0.25 mile and the shop is on the right. The name and number are on the board.
Please contact me if you plan to attend.Bob LaCivita: 603-942-1240 or [email protected]
Granite State WoodturnersThe next meeting of the
Granite State Woodturners will be March 22nd from
9:00 am to noon. The location and topic is TBA.
Contact DJ Delorie to be added to the e-mail notification list.DJ Delorie: [email protected]
Granite State WoodcarversThis small group of
dedicated woodcarvers meets Thursday nights at Rundlett Middle School in Concord, NH. Meetings are 6-9 pm during the school year. For info or directions contact…Lou Barchey: 603-753-2708 or [email protected]
LuthiersOur next meeting
will feature Chris and Stephen Connor, makers of fine classical guitars (www.connorguitars.com). To accommodate our invited speakers the date has been changed to Sunday, March 9, 2008, 1-4 pm. (ordinarily we would meet on March 16).
Our speakers will be demonstrating the jigs and fixtures they use in guitar making. Since the date conflicts with our sister group, the New England Luthiers, we have invited them to attend the meeting, which will be at Ric Miller’s shop in Eliot, Maine.
Our meetings are open to anyone interested in making stringed instruments, regardless of level of expertise. Besides presentations and discussions, we like to play our instruments at each meeting, so bring them along.
To sign up for the meeting and receive directions, contact:John Whiteside: 603-679-5443 or [email protected]
Wood DaysI am reviving Wood
Days the last weekend in June at my place, Old Ways Traditions in Canterbury (www.oldwaystraditions.net). Shaker village didn’t want it. It will be as much like it was as I can make it, depending on who wants to participate and how much help I get.
Old Ways Days, the third weekend of October last year, went well and will be repeated at the same date. (350 people came.) Covered
space for demonstrators will be limited – first come first served. I rent one 20 x 30 tent and there’s room for another if donated. I have several 10 x 20 tents available.
Pre-registration is not required but necessary if you want to be sure of space. Any volume of Guild participation would need a Guild coordinator to help find tentage and parking help especially. At the very least, I want to let Guild
bulletin board
Magazine Subscriptions 1 year 2 years 3 years
Fine Woodworking $27.96 $47.96 $67.16
Fine Homebuilding $30.36 $52.76 $75.16Fine Cooking $23.96 $39.96 $55.96Fine Gardening $23.96 $39.96 $55.96Threads $26.36 $43.96 $63.16
Discounted Taunton Magazine Subscriptions
Once again, we are making subscriptions to Taunton magazines available at special group rates. Discounts are available on any magazine Taunton offers, and are applicable to both new and renewal subscriptions. Since we do this only once a year (right after the February Guild Meeting), you may wish to renew now, even if your magazine expires mid year – Taunton will simple add to your current term.
The table below shows the group rates offered to the Guild.
If you wish to take advantage of this opportunity, send your name and address, the magazine(s) and term(s) you want. Specify if this is a new or renewal subscription – I do not need your current label for renewals – Taunton will search their database using your name. Send a check made out to the Guild for the appropriate amount, to:
Tony Immorlica 6 Purgatory Road Mont Vernon, NH 03057
Orders will be accepted up to the February Guild meeting.

37The Guild of New Hampshire Woodworkers
Period FurnitureIn case you didn’t make
our excellent January, 2008 meeting, there is news. I have decided to step down as chair of the Period Furniture Group. In the past three years, our membership has doubled to almost 50 people and we routinely attract almost half of these to our meetings. Thanks to great participation, we have consistently high quality events and presentations, of which Harvey Best’s talk on furniture restoration is but one example.
Many generous members are willing to host meetings and have shops large enough to hold 20 or more. And we have established a new precedent, with the Guild being willing to pay for us to visit the Strawbery Banke museum.
So, on a high note, I am happy to turn the leadership over to Mike Noel and John Faro. They will be contacting you shortly with their contact information and their plans for the future. Please give them the same excellent support and enthusiasm you have given me over the years.
To sign up for the meeting, contact:John Whiteside: 603-679-5443 or [email protected]
bulletin board
tooLS & LumBeR…Jet (HTC) mobile machine base JMB-JTAS excellent condition, never used, main base will accept a machine base as large as 24˝ x 52 3/4˝ also has 36˝ T extension – $125
Porter Cable biscuit cutter Model # 555 excellent condition – $40
Kuntz scraper plane – $50
All wood has been air dried and stored indoors min of 5 yrs…
4/4 Black Walnut rgh – $4.50 BF 4/4 Red oak – $2.50 BF 4/4 #2 common cherry rgh – $2.50 BF 4/4 soft maple 8´x10˝ – $2.00 BF 1/2” aromatic red cedar – $1.00 SF
Marty Milkovitz: 603-878-3591 or [email protected]
taBLeSaw…Craftsman 10” Tablesaw – Model 113.298032 in excellent condition. Has a cast iron table, a 1 HP motor, and casters – $195/BO
Tony Immorlica 603-673-9629 or [email protected].
ShaRe enD coating…Looking for a couple people to share a 5 gallon pail of the white End Coating (has anti-freeze).
Jerry Burt in Plainfield: 675-6141 or [email protected]
tooLS…Craftsman Lathe – $100
9˝ Swing 30 inch between centers. 1/4 hp Century motor. Extras include multiple spur centers and drill chuck. Bench top model but mounted on sturdy cast iron legs. Documentation included. Chisel
Small Meeting with Peter James
Buy
Neat
Stuff
Peter James hosted a Small Meeting on Saturday October 20, 2007 on Tuning Woodworking Machinery. Needless to say, the five of us Guild Members in attendance enjoyed the “done right Yankee ingenuity” Peter staged for three plus hours at his workshop in Barnstead.
Peter discussed everything from cleaning and conditioning to the importance of true alignment of motorized woodworking tools. Included was the tablesaw, utilizing Peter’s custom made alignment tool for checking the accuracy of the blade, the miter slot and fence. Also included was the jointer and thickness planers as well as various belt and thickness sanders. We all enjoyed his attributes applied to the sharpening and setting of jointer and thickness planer blades.
In general, Peter’s well equipped workshop consisted of any “wish list” tool sought by all of us. Of course in Peter’s process of acquiring many of his “used tools” (that look new) we were given the in-sight of his 40% rule philosophy. Although it appears he slipped when a noticable new 17˝ floor drill press with laser and a mustard colored lathe were seen. Peter also
included handouts covering his topics of discussion and how to tune each tool.
In addition to a very informative, enjoyable Fall
day we were all treated to home made muffins and coffee supplied by his lovely and gracious wife Verna. – Ned Gelinas
set available for extra cost. Excellent beginner lathe. Old but loved. – Let’s Talk
Rockwell/Delta Super 10 tablesaw – $100
22˝ by 24˝ cast iron top with extension on factory stand. Original documentation. Great for job site or small space. – Let’s Talk
Guy Senneville: [email protected] or 978-423-7827
taBLeSawS…Pinkerton Academy has replaced the tablesaws in our woodworking and building construction programs with SawStops. Two of the old saws are for sale.
Delta UNISAW, 3 hp(?), three phase with uniguard and Delta extension table and fence. $250. Although this a three phase saw it might be worth investing in a new motor or a converter at this price.
Delta Tablesaw (13/4 hp?), single phase with uniguard and delta extension table and fence. $750.
Jack Grube: [email protected] or 603-437-5200 x1176
ShopSmith…Real Old ShopSmith – Seems to have all the attachments & a wooden base it sets on. Runs OK. Make offer. Local pickup.
Real old Craftsman bandsaw – Runs fine. Comes with six extra blades. – Make offer. Local pickup in Claremont.
Syd Lorandeau: [email protected] or 603-542-5295

38 The Guild of New Hampshire Woodworkers
Supplier Discounts – Each supplier offers a minimum 10% discount to current GNHW members – some restrictions may apply.
This is a direct benefit to your Guild membership. Please support these advertisers when you can.
10% Discount to Guild Members
CTW
C HESTER T OOL W ORKS LLC
603-887-6267
www.chestertoolworks.com
Dave Anderson
146 Jennifer Drive • Chester, NH 03036 TEL 800-582-7229 • www.brentwoodmachine.com313 Route 125 • Brentwood, NH
10% Discount to Guild MembersExcept machinery, power tools & already discounted items
Serving NH for Over 30 yearsHighest Level of Customer Service
Quality Stationary & Powered Hand Tools
17 WHITE BIRCH LANEYORK, ME 03909
(207) 363-7426 • (800) 899-1664
MAINE COAST LUMBER, INC
www.mainecoastlumber.com
HARDWOOD PLYWOODS - HARDWOOD LUMBERSOFTWOOD LUMBER - MELAMINE
MARINE PLYWOODSEDGE BANDING - VENEER - MDO - MDF
PARTICLE BOARD - CUSTOM MOULDINGSDOVETAILED DRAWERS - TARGET COATINGS
All guild members receive a 10% discount
Discount to Guild Members
1-888-TURNING
www.bigtreetools.com
258 Breezy Hill Rd • Wilmot, NH 03287
Big Tree Tools, Inc.
Belt and Buff Sharpening System for Woodturners Set-up, grind, and deburr in 10 seconds total!
Sharpening System – $315 Side Grind Adaptor – $75
The Millwork Shopat Trumbull-Nelson Construction Co., Inc.
Rt. 120 - Hanover, New Hampshire
Milling Services, Hardwoods & PlywoodsContact Nate Carey – 603/643-3658
Fax 603-643-2924 • [email protected] • www.t-n.com10% discount to GNHW Members
24 Gristmill Hill Rd • Canaan, NHwww.garyrwood.com 603-523-4337
10% discount to Guild members
Shellacs, waxes, stains,varnishes & tools for an elegant finish.
Your questions are always welcome!
Gary R. Wood & Co.Select Finishing Supplies
www.gonavis.com/nh1063 • 603-424-1035
PACK&SHIP CENTERSNAVIS®
Reliable No-Hassle Shipping Partner for YourFine Furniture, Arts & Antiques
One-Stop White Glove Packaging & ShippingIn-State, Out-of-State & International Delivery
Local Pickup & Warehousing25 yrs Experience Specializing in FLAV
180 Locations in US – 5 Miles from Manchester Airport
10% Discount to Guild Members
722 East Industrial Park Dr Unit 3 • Manchester, NH
MANCHESTER TOOL REPAIR
Rich Burnett – Owner
10% Discount When You Present Your Card
603-622-0207 • www.tool-repair.com
Complete Repair Service
Finishing Symposium … April 19th, 2008
We will be holding an all day finishing symposium at Pinkerton
Academy with some of the best finishers around. There will be four rotations with several choices on each rotation and a trade show with many important vendors. Guilds from throughout New England will be invited and we can expect a great turnout. Admission is free. Some of the scheduled presenters and their topics will give you a sense of the day – put it on your calendar and come learn from the best!
Contact Peter Breu with questions or suggestions. Volunteers are always greatly appreciated!
Gary Wood – Different ways to use shellacTom McLaughlin – Traditional varnishingJim Morris – Waterborne finishesTerry Moore – Spray lacquerMarty Milkovits – Staining and dyingBruce Hamilton – Repairing finishes
Peter Breu: [email protected] or 603-647-2327
The Steering Committee usually meets six times per year about two to three
weeks before each major guild meeting. Meetings are open to any members. Current scheduled meeting dates are:
March 19, 2008May 21, 2008August 20, 2008
Meetings are held at The League of NH Craftsman’s offices in Concord from 6-8 pm. League offices are located at 205 North Main Street, Concord, NH.
Steering Committee Meetings

39The Guild of New Hampshire Woodworkers
The Breed SchoolAmerican 18th Century Furniture
By Hand13 Liberty Street, South Berwick, ME 03908
15% Discount to GNHW Members!www.allanbreed.com • 603-749-6231
email: [email protected]
44 Timber Swamp Rd • Hampton, NH 03842 • 603-929-9801
10% Discount for Sack Back Class &Supplies Purchased During that Class
�e WindsorInstitute
Read Mike Dunbar’s Weekly Blogwww.thewindsorinstitute.com
TEL 1-800-442-1812 • 603-679-1230 • FAX 603-679-1960
– HARDWOOD DISTRIBUTION CENTER –
P.O. BOX 426, KINGSTON, NH 03848 Route 125 • Brentwood, NH
10% Discount on Stock Items to Guild Members
36 Depot Road,Kingston,NH • 603.642.8275
MILL OUTLET STORE • 10% DISCOUNT FOR GUILD MEMBERS
Northern and Appalachian Hardwoods
4/4 - 16/4 Rough or Surfaced Kiln Dried LumberFixed and Special widths • FSC-certified wood from well-managed forests
Ash • Basswood • Birch • Cherry • Maple • Mahogany • Oak • Poplar • Walnut
visit www.northlandforest.com for stocking info
The Wood Finishing School
Learn wood finishingindividually or as part of a group
Twenty-seven years experience
Bruce Hamilton Antique Restoration
978-363-2638
10% Discount for Guild MembersTeaching & Class Instruction Only
www.patinarestoration.net
336 Baptist RoadCanterbury, NH603-783-9700
Enjoy a miniapprenticeshipwith some ofAmerica’s bestwoodworkers!
Come into the woods...
Furniture Making Classes
10% annual discount for GNHW
www.experiencewoodworking.com
PHONE: 603-659-2345TOLL FREE: 1-888-659-2345
Email: [email protected]: www.woodschoolnh.com
52 BALD HILL ROAD
NEWMARKET, NH 03857
HOMESTEADWOODWORKING SCHOOL
Alan S. MitchellDirector
10% Discount to GNHW Members
83 Dover Rd (US Route 4)Chichester, New Hampshire
(10 Minutes from I-93 Concord • Take exit 15 east)
Specializing in Bird’s Eye & Curly Maple Green & Kiln Dried Bowl Blanks & Turning Squares
Rare & Hard to Find Domestic & Imported Hardwoods
www.goosebaylumber.com
10% discount to members!
603-798-5135 Sawmill & Lumber
CLASSIC DESIGNSby MATTHEW BURAKSOLUTIONS FOR THE PROFESSIONAL WOODWORKER
Table Legs, Columns, Cabinet Feet
Windsor Chair Kits & Parts
10% Discount to
GNHW Members
1.800.843.7405
www.tablelegs.com
Wolfgang’s Wood
Strafford, NH603-664-7691
10% Off to GNHW Members
Specialty Native Woods
Except machinery, power tools & already discounted items
800-234-3818
45 Goslin RdNewington, NH 03801
313 Montvale AveWoburn, MA 01801
781-935-6414
10% discount for Guild members
Williams & Hussey Machine Co., Inc.Williams & Hussey Machine Co., Inc.
Straight, Round, and EllipticalMoldingSimple, Easy, SafeQuality ConstructionSeven Year Warranty
MADE IN THE USA10% Discount to GNHW Members
OFFER EXCLUDES CUSTOM KNIVES AND OTHER PROMOTIONS
800.258.1380 • www.williamsnhussey.com
We Care!www.ghevarts.comTEL (603) 763-4525
Route 4A • West Springfield, NH
10% Discountto Guild MembersNon-Sale Lumber Items Only
GH Evarts & Co., Inc.Kiln Dried Hardwood Lumber
From Our Sawmill Near Lebanon, NH
R O C K L E R®
WOODWORKING AND HARDWARE
10% Discount to Guild Members
978-774-0241
29 Andover St Danvers, MA 01923
617-497-1136
2154 Massachusetts Ave Cambridge, MA 02140
603-898-5941
373 S Broadway (Rt 28) Salem, NH 03079
Class schedules on rockler.com • Instructor inquires welcome www.westerntool.com • 603-627-4957
Low Prices – Guaranteed
Tim CorcoranStore Manager
Off South Willow St. in front of Home Depot100 Cahill Ave • Manchester, NH
10% Discountto Guild Members
on Non-Powered ToolsManchester, NH store only
�eContractor’s
Choice!™

40 The Guild of New Hampshire WoodworkersMINUTEMAN
PRESS ® “The Old Saw” is printed by MinuteMan Press • 88 Main St, Nashua, NH • 603-883-4890 • www.nashuaminuteman.com
We all have seen it. A table, a grandfather’s clock, a bureau, etc.,
all made out of wood that probably has a nice grain and was carefully constructed with good joints. But when it came to applying a finish, it was rushed through and ended up looking like the maker used dirty water or something similar. Woodturners can fall into the same trap.
It is not difficult if the proper preparation and sensible choice is made. The first question is, does the turning need protection and from what.
If it is going to be used outside, it will need protection from the elements. In this case, paint or maybe a finish that is used on boats will be a good choice.
If it is used to hold food, then you will want to have a finish that is food safe. Even though most manufacturers will claim that their finish is safe once it has dried or cured, some of us prefer to use something different. What finish is the most popular around the world where bowls and plates are made of wood? Believe it or not, it is no finish at all. It is not only the easiest but the safest as tests on wooden cutting boards have proved time and time again.
But if you want some finish, a safe bet will be to use Butcher Block Oil such as sold by Craft Supplies USA. Another way is to use a wax but one that contains no contaminates. If you cannot determine what the ingredients are as when you order from a catalog, a good clue will be if it contains citrus oils like lemon or orange.
When what you turn is to be used for non-food use like small boxes, pens and
craft items, you have more leeway. These items can use a finish that contain oil and varnish. For years, most turners used a combination of linseed oil, varnish and thinner in one third proportions each. This can be applied with a cloth or paper towel. A major drawback will be the fact that depending on the conditions in your shop, several days of drying are required between each coat, followed by a light sanding before the next is applied. In spite of this, most turners producing items for sale in gift shops prefer this finish as it is the most durable because it soaks into the fibers of the wood. When given a coat of wax and then buffed, you have a finish that is hard to beat.
For some of us, a shellac based finish is the way to go because it can be applied while the turning is still on the lathe. When a paper towel is held against the turning as it spins around, the friction heats the finish drying it and the process is complete. Simple and easy. The only drawback is that shellac has a limited shelf life. But in most cases, because it is so convenient, most turners will use up the bottle before that happens. This finish is popular with many turners because it is so easy to repair if the previous finish needs a touchup.
While all these ready mix and ready to use finishes do a good job, for a perfect finish, good preparation before it is applied and buffing after is necessary.
We all know that sharp tools are the best way to a great turning. Then the use of sanding up to maybe a 400 grit will be the frosting on the cake. But many of us forget to dampen (wet) the wood
between grits. Do that and sand with the grain where possible.
Bill Frost of the CNEW group demonstrated to
some of us years ago. He finished platters some of which were sanded with the
grain and some without. He held the turning on his
lap with a lamp shining across the work and dampened the turning
between grits. The difference was obvious.
Buffing the finish using what most of us call the Beall system will pay dividends. You start with Tropoli compound and linen buff, the White Diamond compound with a linen and cotton buff and lastly with Carnauba wax and a cotton buff. This will provide a final sheen. If you have ever held a turning that used this three step system, you will caress the piece and will find yourself touching it over and over. There is nothing like it.
What is the best finish for you? The one you feel most comfortable using and the one that gives you the result you want. For me, I use the one that suits what I have turned and what it will be used for. Some will be complicated and some will be as simple as a rubbing of walnut or maybe peanut oil and a coat of wax.
by Ernie Grimes