Budget Workbook for Agencies - core-ct.state.ct.us · workbook in Core-CT, utilizing the budget...
135
Budget Workbook for Agencies Core-CT Finance Upgrade Implementation March 2018
Transcript of Budget Workbook for Agencies - core-ct.state.ct.us · workbook in Core-CT, utilizing the budget...

Budget Workbook for Agencies Core-CT Finance Upgrade Implementation
March 2018

Introduction Budget Workbook for Agencies
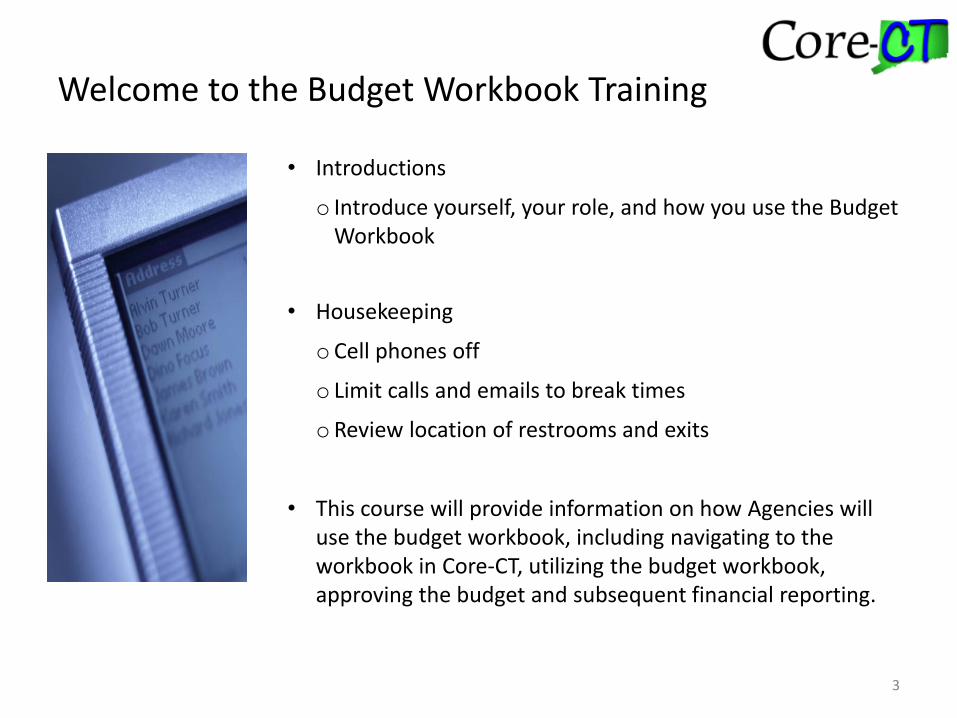
• Introductions
o Introduce yourself, your role, and how you use the Budget Workbook
• Housekeeping
o Cell phones off
o Limit calls and emails to break times
oReview location of restrooms and exits
• This course will provide information on how Agencies will use the budget workbook, including navigating to the workbook in Core-CT, utilizing the budget workbook, approving the budget and subsequent financial reporting.
Welcome to the Budget Workbook Training
3

At the end of this course, you will understand how to:
• Approve a Contract Budget
• Explain how a Supplier will submit the Budget
• Review and approve Financial Reports
• Explain how the Supplier will complete budget revisions
• Review and Approve Budget Revisions
• Review and Reset the Funding Period for Multi-Year Contracts
Course Objectives
4

Today’s Schedule
Module Name Duration
Budget Workbook Overview 30 minutes
Contract Budget Set Up & Approval 60 minutes
Budget Workbook Financial Reporting 30 minutes
Break 15 minutes
Budget Workbook Revisions 45 minutes
Reset Funding Period 15 minutes
Review and Q&A 15 minutes
5

Key Symbols Used in this Course
6
Demonstration Exercise
Guidelines Tips & Tricks Job Aids
This course uses the following key symbols to depict various references:

Budget Workbook Overview Budget Workbook for Agencies

At the end of this module, you will understand how to:
• Explain the Budget Workbook functionality
• List the expectations of using the Budget Workbook
• Review the roles that will interact with the Budget Workbook
• Provide Chart Account Definitions
Module Objectives
8

Roles and Responsibilities
User Type Role Name Role Description
Internal CT_F_A_BW_BUDGET_APPROVER Agency budget workbook approver. User responsible for reviewing and approving the supplier submitted budget workbook pages. This can be the same user as the CT_F_A_BW_BUDGET_PROCESSOR.
Internal CT_F_A_BW_BUDGET_PROCESSOR Agency budget workbook user responsible for managing the completion of the budget workbook by both the agency and provider. The user may complete all or parts of the Budget Workbook pages, manage the supplier's submission, and review all or parts of the supplier's submission.
9

Roles and Responsibilities, cont.
10
User Type Role Name Role Description
Internal CT_F_A_BW_BUDGET_VIEWER Agency program and/or budget staff who require view-only access to the Budget Workbook pages.
Internal CT_F_C_BW_UCOA_ADMIN Office of Policy and Management (OPM) and Core-CT team only access to UCOA configuration page.
External CT_F_SUPPLIER_BW_BUDGET_USER External budget workbook user responsible for completing the budget workbook pages on behalf of the supplier's organization via the supplier portal.
Internal CT_SCMT_Report Maker Can create and run reports

Contract Budget Set Up & Approval Budget Workbook for Agencies

At the end of this module, you will understand how to:
• Navigate to the Budget Workbook in Core-CT
• Create the Budget Definition
• Collaborate with the Supplier
• Approve the Budget Summary
Module Objectives
12

• Create the Budget Definition
• Add Suppliers in order to Collaborate on the Budget Definition
Budget Definition Entry
13

Budget Definition
Provider Entity*
Provider Program Information
Schedule A Salaries
Budget Summary Entry/Submission
Budget Summary Approval
Agency
Supplier
*Provider Entity is not specifically tied to the Budget Workbook, the Supplier
completes this when they have access to the Supplier Portal.
Budget Workbook Process

Budget Definition Entry/Submission
Once a procurement contract is in open status, the Budget Definition Entry can begin. Navigate to: Main Menu > Core-CT Financials > Supplier Contracts > Budgeting > Budget Definition
15

Budget Definition Entry/Submission
• Click Add a New Value tab
16

Budget Definition Entry/Submission
• Enter the Business Unit, Contract ID, and Funding Period
• Click Add
17

Budget Definition Entry/Submission
• Enter Funding Period begin and end dates
• Do not click Submit yet
18
• Select the appropriate action under Reporting Requirement and Payment Basis
• Each checkbox selected will be the content of the Budget Workbook, so select that checkboxes that will be used

Budget Definition Entry/Submission
• Enter Line, Program Name, Program Code, Funding Period Begin, Funding Period End, Level of Care, and DDAP Code
• Select the appropriate action under Reporting Requirement
19
• Click the Funding Distribution icon

Budget Definition Entry/Submission
• Enter Distribution Line, Amount, Account, SID, ChartField 2, and Project fields
• Account – The four digit code that selects where the funding will be coming from
• Click ‘+’ plus button to add additional distribution lines
• Click OK
20

Budget Definition Entry/Submission
• Click Save
21

Budget Definition Entry/Submission
The following shows how to add Processors, Approvers, and Suppliers to collaborate on the Budget Definition
• Click on the Notifications Contacts tab to enter the names of the Collaborators
22

Budget Definition Entry/Submission
• Click External checkbox
• Enter Supplier’s User ID
• Enter or update Email Address
• Click ‘+’ plus button to add internal contacts, including yourself
• Enter agency Contact’s User ID
• Enter or update Email Address
• Click Save
23

Budget Definition Entry/Submission
• Return to the Budget Definition tab
• Click Submit. This will open up the Submission Notification screen where the Supplier will be notified that the Budget is ready to be collaborated on.
24

Budget Definition Entry/Submission
• Enter Supplier User ID and make sure the following fields autofill – The Supplier Administrator will set up the User ID, and the Agency will need to submit a
CO-1092 form for the Supplier to gain access to the Budget Workbook
• Review and/or Update Email Address
• Enter message to be included in the email if needed
• Click OK
25

Budget Definition Entry/Submission
• Click OK. At this time, the email will be sent to the Supplier. The Supplier will now know what Budget Pages need to be completed and can click the hyperlink to start the process.
26

Budget Definition Entry/Submission
• The following email will be sent back to the Sender if the email does not go through
27

Let’s watch a demonstration on how to set up a contract budget.
Demonstration: Set Up a Contract Budget
Set Up a Contract Budget
28

Let’s set up a Contract Budget!
Locate Exercise 1 and follow the instructions to set up a Contract Budget.
Exercise 1: Set Up a Contract Budget
Set Up a Contract Budget
29

• Prior to Budget Summary Approval, the Supplier completes the following pages:
– Provider Entity Page
– Provider Program Information Page
– Schedule A Salaries
– Budget Summary Entry/Submission
• Once the Budget Summary is approved, it becomes the Contract Budget
Contract Budget Approval
30
Budget Definition
Provider Entity
Provider Program Information
Schedule A Salaries
Budget Summary Entry/Submission
Budget Summary Approval

Provider Entity Information (Supplier)
31

Provider Entity Information (Supplier)
32

Provider Entity Information (Supplier)
33

Provider Program Information (Supplier)
34

Provider Program Information (Supplier)
35
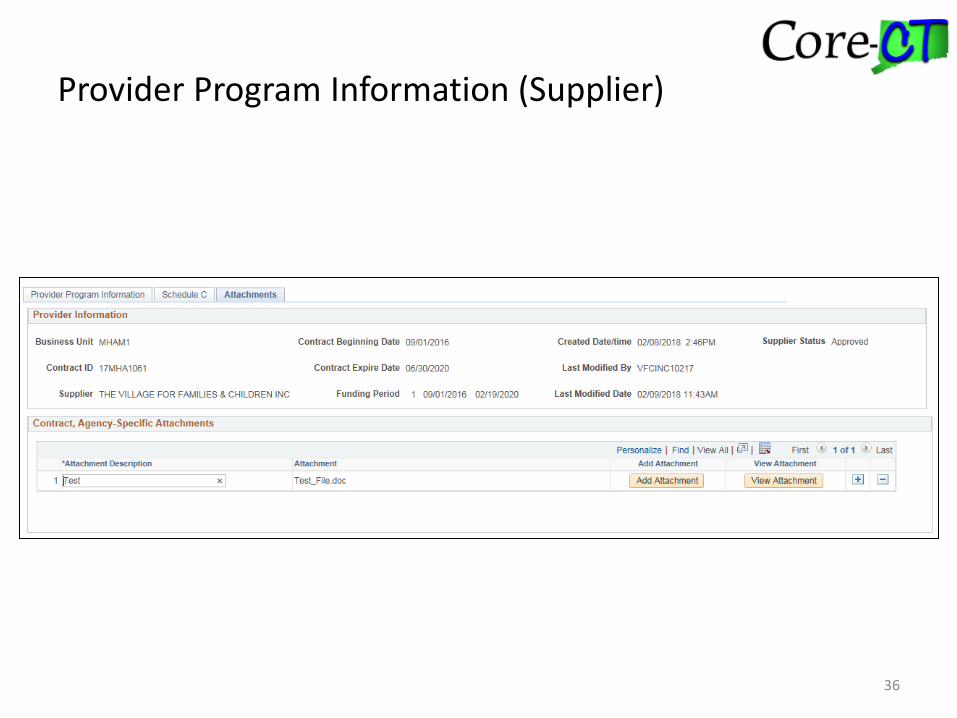
Provider Program Information (Supplier)
36

Schedule A Salaries (Supplier)
37

Schedule A Salaries (Supplier)
38

Budget Summary Entry/Submission (Supplier)
39

Agency
Supplier
Budget Workbook Process
Budget Definition
Provider Entity
Provider Program Information
Schedule A Salaries
Budget Summary Entry/Submission
Budget Summary Approval

Budget Summary Approval
• The following email will be sent to the State Agency user when the Provider Agency submits the Budget Summary
41

Budget Summary Approval
After the Supplier has collaborated, navigate to the Budget Summary page to approve the Budget: Main Menu > Core-CT Financials > Supplier Contracts > Budgeting > Budget Summary
42

Budget Summary Approval
• Enter the Contract ID, Funding Period, or Supplier Name
• Click Search
43

Budget Summary Approval
• Review the Budget Summary information
• Click Accept. This will open up the Acceptance Notification screen where the Supplier will be notified that the Budget is accepted.
44

Budget Summary Approval
• Enter Supplier User ID
• Enter message to be included in the email if needed
• Click OK
45

Budget Summary Approval
• Click OK. The email will now be sent to the Supplier. The Supplier can see the time date stamp of the acceptance.
46

Budget Summary Approval
Once the Budget Summary has been approved, run the Contract Budget Report by clicking Print
47

Budget Summary Approval
• Select PDF or XLS depending on preference, and click Print
48

Budget Summary Approval
• A new window will open up, showing the Contract Budget Report
49

Let’s watch a demonstration on how to submit a contract budget for approval.
Demonstration: Submit Contract Budget for Approval
Contract Budget Approval
50

Let’s submit the contract budget for approval!
Locate Exercise 2 and follow the instructions to submit the contract budget for approval.
Exercise 2: Submit the Contract Budget for Approval
Contract Budget Approval
51

Budget Workbook Financial Reporting Budget Workbook for Agencies

At the end of this module, you will understand how to:
• Navigate to the Reporting functionality in Core-CT
• Review and approve the financial reports submitted by Supplier
• Collaborate with the Supplier for corrections and errors
Module Objectives
53

Reporting Overview
54
Report Type Supplier Role Agency Role
Multi-Year Contract Budget Report
Run the Report Run the Report
Budget vs Actual Reporting
Entry and Submission
Approval
Consolidated Financial Report
Run the Report Run the Report
Salary Detail Actuals Reporting
Entry and Submission
Approval

Multi-Year Contract Budget Report
• To view the Multi-Year Contract Budget Report, navigate to: Main Menu > Core-CT Financials > Supplier Contracts > Budgeting > Multi-Year Contract Bud Report
55

Multi-Year Contract Budget Report
• Click on the Add a New Value tab
56

Multi-Year Contract Budget Report
• Enter Run Control ID
• Click Add
57

Multi-Year Contract Budget Report
• Enter Contract ID
• Enter Funding Period Begin
• Enter Funding Period End
• Click Save
• Click Run
58

Multi-Year Contract Budget Report
• Select PDF or XLS under Format
• Click OK
59

Multi-Year Contract Budget Report
• Click the Process Monitor link
60

Multi-Year Contract Budget Report
• Click Refresh until Run Status and Distribution Status contain values
• The process usually completes in less than 60 seconds
• Click the Details link
61

Multi-Year Contract Budget Report
• Click View Log/Trace
62

Multi-Year Contract Budget Report
• Select the file ending in “.xls” or “.pdf” , whichever was chosen previously
63

Multi-Year Contract Budget Report
• The Multi-Year Contract Budget Report is shown below
64

Budget vs Actual Reporting Entry
Budget vs Actual Reporting
Submission
Budget vs Actual Reporting Approval
Agency
Supplier
Budget vs Actual Report Process

Budget vs Actual Report Approval
• The following email will be received by the Agency once the Supplier submits the Budget vs Actual Report. The Agency can click the hyperlink or follow the navigation on the following slide.
66

Budget vs Actual Report Approval
Once the Supplier has submitted the report, the Approver will accept the Budget vs Actual Report by navigating to: Main Menu > Core-CT Financials > Supplier Contracts > Budgeting > Budget vs Actual Reporting
67

Budget vs Actual Report Approval
• Click Search and click on the Contract ID for the Budget Report that is to be accepted
68

Budget vs Actual Report Approval
• Review the Budget vs Actuals information
• Click Accept. This will open up the Acceptance Notification screen where the Supplier will be notified that the Budget vs Actual Report has been accepted.
69
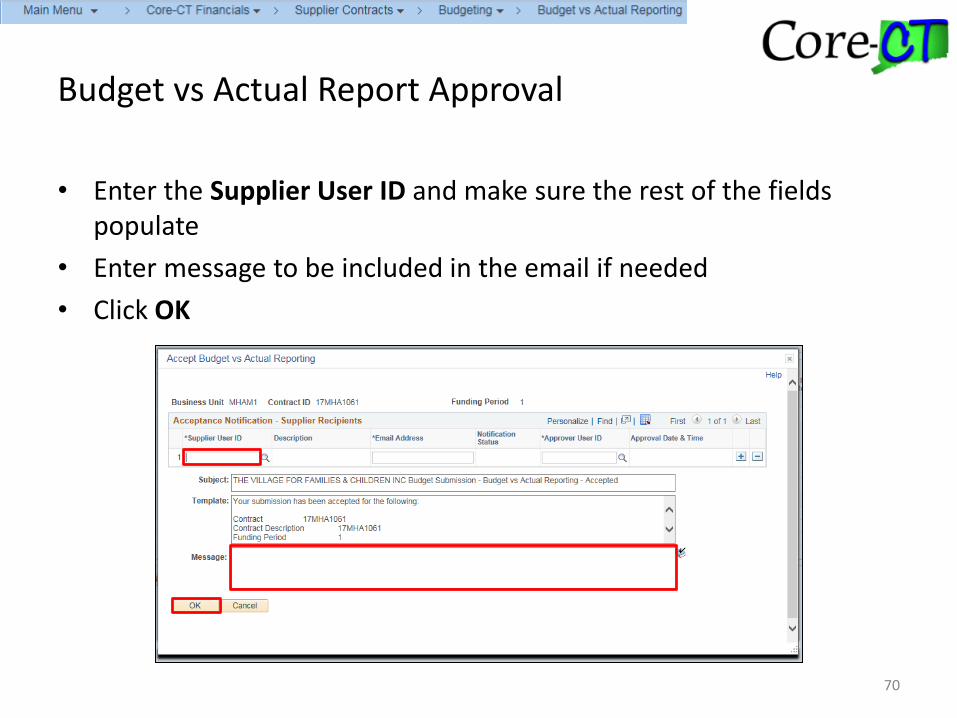
Budget vs Actual Report Approval
• Enter the Supplier User ID and make sure the rest of the fields populate
• Enter message to be included in the email if needed
• Click OK
70

Budget vs Actual Report Approval
• Click OK. At this time, the email will be sent to the Supplier. The Supplier will now know that the Budget vs Actual Report has been accepted.
71

Let’s watch a demonstration on how to approve a report.
Demonstration: Budget vs Actual Report Approval
Budget vs Actual Report Approval
72

Consolidated Financial Report
• To view the Consolidated Financial Report, navigate to: Main Menu > Core-CT Financials > Supplier Contracts > Budgeting > Consolidated Financial Report
73

Consolidated Financial Report
• Click the Add a New Value tab
74

Consolidated Financial Report
• Enter Run Control ID
• Click Add
75

Consolidated Financial Report
• Enter Contract ID and Funding Period
• Select Report Detail and Report Type
• Enter Program Code
• Click Save
• Click Run
76

Consolidated Financial Report
• Select PDF or XLS under Format
• Click OK
77

Consolidated Financial Report
• Click the Process Monitor link
78

Consolidated Financial Report
• Click Refresh until Run Status and Distribution Status contain values
• The process usually completes in less than 60 seconds
• Click the Details link
79

Consolidated Financial Report
• Click the View Log/Trace link
80

Consolidated Financial Report
• Select the file ending in “.xls” or “.pdf” , whichever was chosen previously
81

Consolidated Financial Report
• The Consolidated Financial Report is shown below
82

• Review the process for approving Salary Detail Actuals
Salary Detail Actuals Approval
83

Salary Detail Actuals Entry
Salary Detail Actuals
Submission
Salary Detail Actuals Approval
Agency
Supplier
Salary Detail Actuals Process

Salary Detail Actuals Approval
• The following email will be received by the Agency once the Supplier submits the Salary Detail Actuals Report
85

Salary Detail Actuals Approval
The Approver will accept the Salary Detail Actuals by navigating to: Main Menu > Core-CT Financials > Supplier Contracts > Budgeting > Salary Detail Actuals
86

Salary Detail Actuals Approval
• Enter Contract ID
• Click Search
87

Salary Detail Actuals Approval
• Review the Submitted Salary Details.
• Click Accept. This will open up the Acceptance Notification screen where the Supplier will be notified that the Salary Detail Actuals has been accepted.
88

Salary Detail Actuals Approval
• Enter the Supplier User ID and make sure the rest of the fields populate
• Enter message to be included in the email if needed
• Click OK
89

Salary Detail Actuals Approval
• Click OK. At this time, the email will be sent to the Supplier. The Supplier will now know that the Salary Detail Actuals Report has been accepted.
90
Budget Workbook Revisions Budget Workbook for Agencies

At the end of this module, you will understand how to:
• Review revisions in the Budget Workbook in Core-CT
• Approve budget revisions in Core-CT
Module Objectives
92

• Once the Supplier submits a revision, an email notification will be sent to the Agency contact for Approval
– Review revisions submitted by the Supplier
– Approve the Budget Revisions
Complete a Revision Approval
93

Budget Revision Entry
Budget Revision Submission
Budget Revision Approval
Agency
Supplier
Budget Revision Process

Complete a Revision Approval
• The following email will be received by the Agency once the Supplier submits the Budget Revision. The Agency can click the hyperlink or follow the navigation on the following slide.
95

Complete a Revision Approval
The Approver will approve the Revised Budget by navigating to: Main Menu > Core-CT Financials > Supplier Contracts > Budgeting > Budget Revision
96
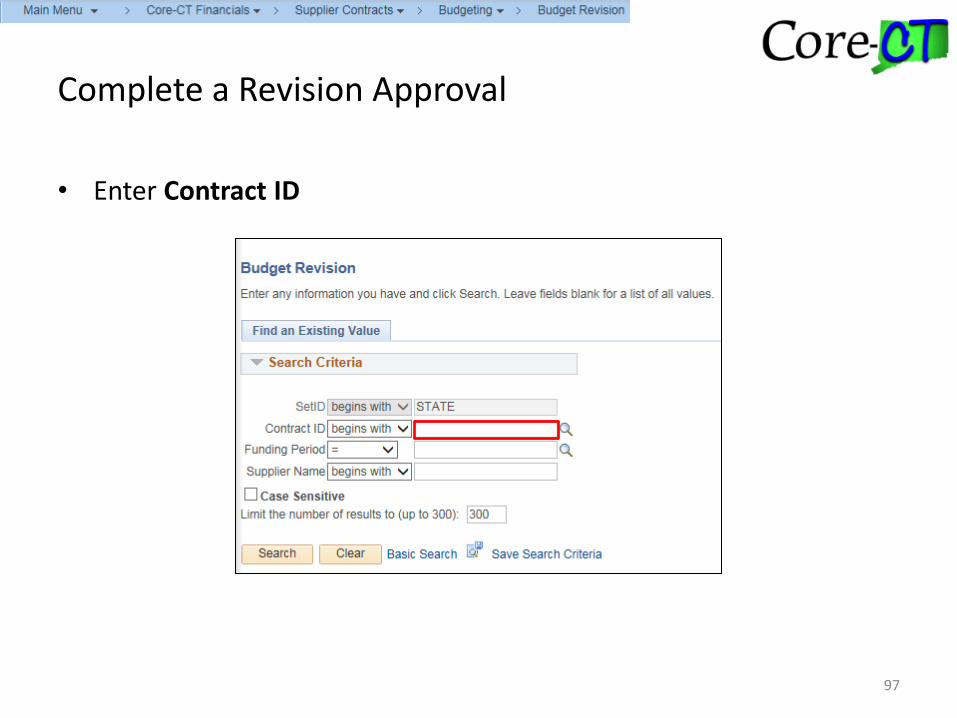
Complete a Revision Approval
• Enter Contract ID
97
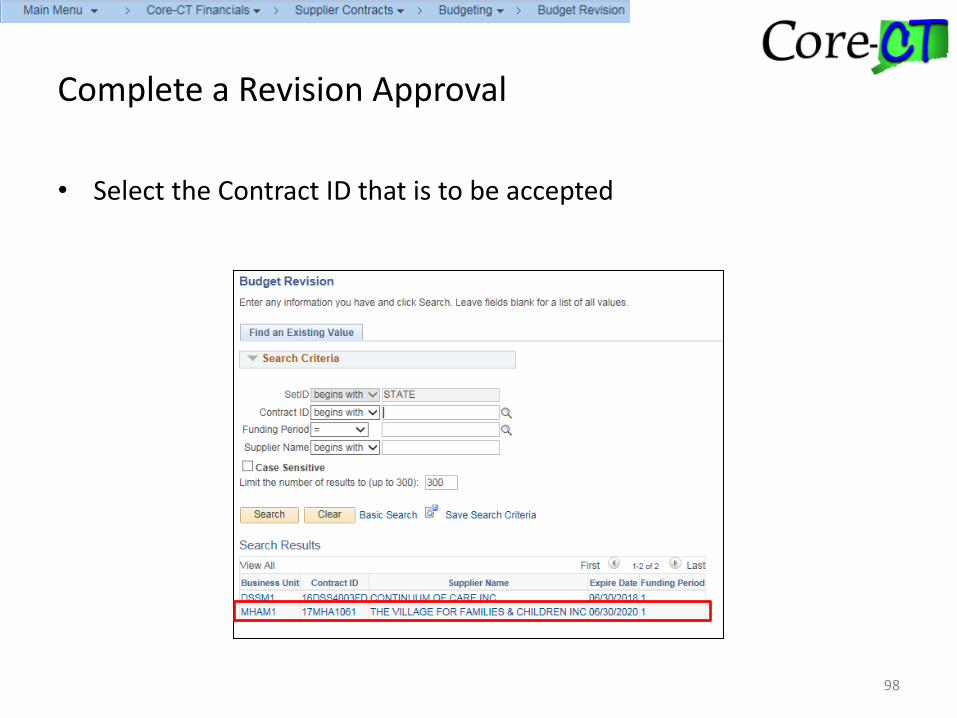
Complete a Revision Approval
• Select the Contract ID that is to be accepted
98

Complete a Revision Approval
• Review the Revisions that have been made by the Supplier
– The Supplier can continue to make changes as long as the revision is in Submitted Status
• Click Accept. This will open up the Acceptance Notification screen where the Supplier will be notified that the Budget has been Submitted for revision.
99
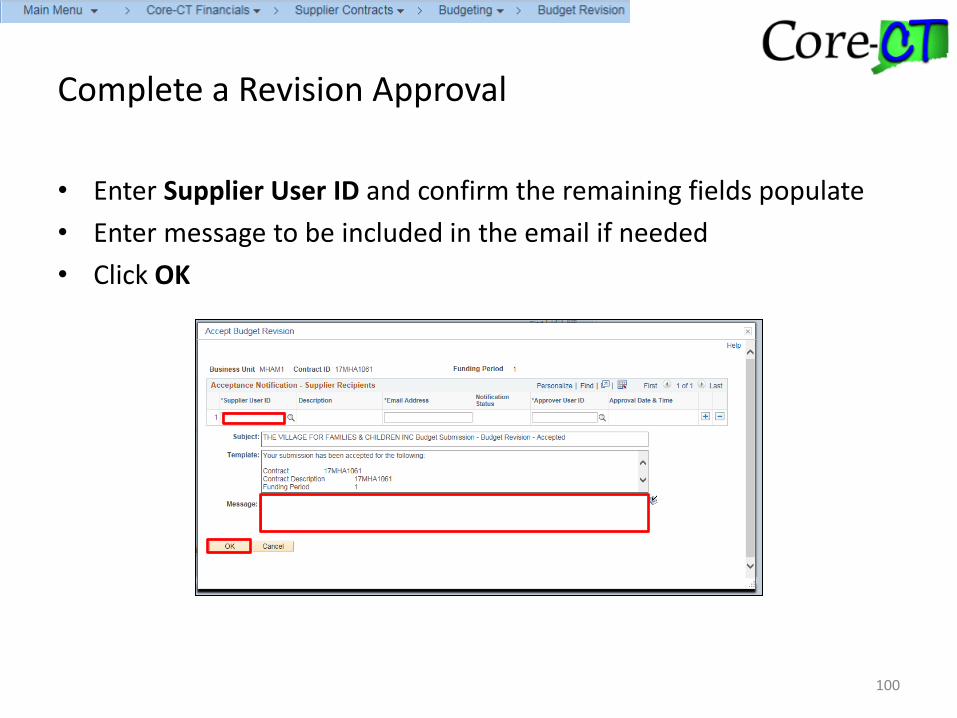
Complete a Revision Approval
• Enter Supplier User ID and confirm the remaining fields populate
• Enter message to be included in the email if needed
• Click OK
100

Complete a Revision Approval
• Click OK. At this time, the email will be sent to the Supplier. The Supplier will now know that the Budget Revision has been accepted.
101

Complete a Revision Approval
• Click the Schedule A Salaries link
102

Complete a Revision Approval
• Confirm that the Status is Accepted
• Confirm that the line items are un-editable. The ‘+’ plus and ‘-’ minus buttons that are normally present will not be there.
103

Let’s watch a demonstration on how to complete a revision approval.
Demonstration: Complete a Revision Approval
Complete a Revision Approval
104

Reset Funding Period Budget Workbook for Agencies

At the end of this module, you will understand how to:
• Use the same contract ID to reset the funding period
Module Objectives
106

Reset the Funding Period
To reset the funding period on a Multi-Year Contract navigate to: Main Menu > Core-CT Financials > Supplier Contracts > Budgeting > Reset Funding Period
107

Reset the Funding Period
• Click Add a New Value
108

Reset the Funding Period
• Enter Run Control ID
• Click Add
109

Reset the Funding Period
• Enter Business Unit
• Enter Contract ID
110

Reset the Funding Period
• Confirm the Contract Begin Date and Contract End Date populate
• Confirm the Funding Period dates populate
• Confirm Source Version defaults to max version of Accepted Budget Summary; however, the field is editable based on the versions available for the specified funding period.
111

Reset the Funding Period
• Confirm Target Funding Period populates with the next available funding period
• Enter the new Target Funding Period dates
• Click Save
• Click Run
112

Reset the Funding Period
• Make sure the Format selected is TXT
• Click OK
113

Reset the Funding Period
• Click on the Process Monitor link
114

Reset the Funding Period
• Click Refresh until Run Status and Distribution Status contain values
• The process usually completes in less than 60 seconds
115

Submit Budget with New Funding Period
Navigate back to the Budget Definition page to submit the new Budget Summary
• Main Menu > Core-CT Financials > Supplier Contracts > Budgeting > Budget Definition
116

Submit Budget with New Funding Period
• Enter the Business Unit, or Contract ID
• Select the created contract that contains the next number in the Funding Period sequence and “Draft” status in the Budget Definition Status column
117

Submit Budget with New Funding Period
• Click Submit. This will open up the Submission Notification screen where the Supplier will be notified that the Budget’s funding period has been changed.
118

Submit Budget with New Funding Period
• Enter Supplier User ID and make sure the rest of the fields populate
• Enter message to be included in the email if needed
• Click OK
119
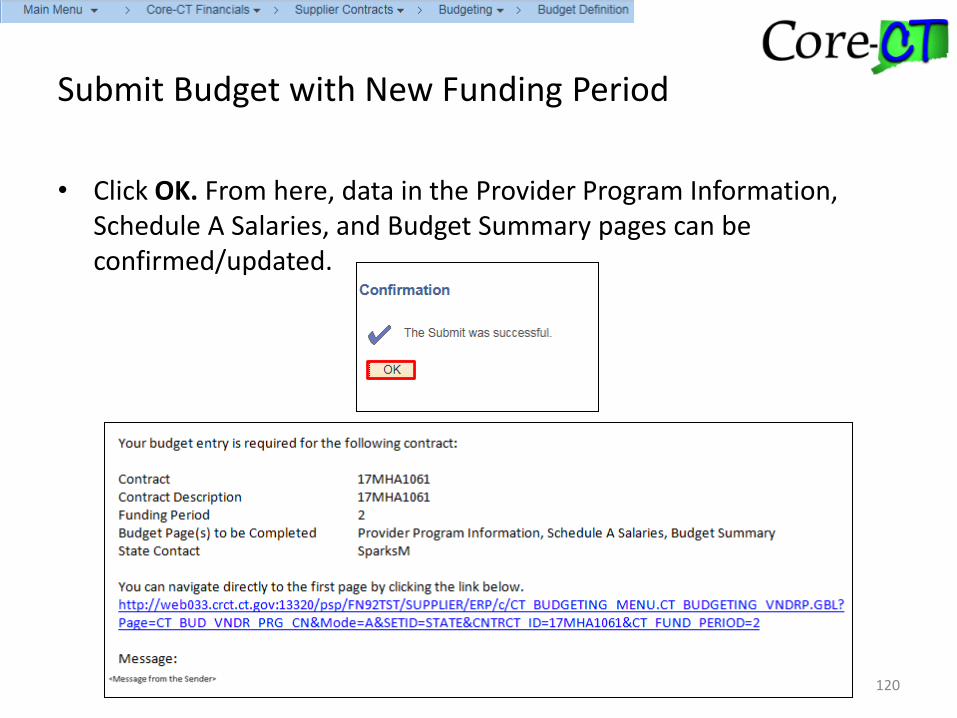
Submit Budget with New Funding Period
• Click OK. From here, data in the Provider Program Information, Schedule A Salaries, and Budget Summary pages can be confirmed/updated.
120

Let’s watch a demonstration on how to Reset the Funding Period.
Demonstration: Reset the Funding Period
Reset the Funding Period
121

Review and Q&A Budget Workbook for Agencies

Let’s review our Learning Objectives.
You should now be able to:
• Approve a Contract Budget
• Explain how a Supplier will submit the Budget Summary
• Review and approve Financial Reports
• Review and approve Budget Revisions
• Review and Reset the Funding Period for Multi-Year Contracts
Summary
123

= Q & A
Questions?
124

• Go Live is March 26th.
• For additional help, utilize the following resources:
– Subscribe to Daily Mail for updates and notifications.
• http://www.core-ct.state.ct.us/listserv/dailymail.html
– Job Aids will be posted on the Core-CT website under SCMT.
• http://www.core-ct.state.ct.us/financials/
– Utilize Footprints to log support tickets.
• For more information on logging a Footprint ticket: http://www.core-ct.state.ct.us/help.html
Congratulations!
125

Appendix Budget Workbook for Agencies

Notify Agency Contacts
The following shows how to notify Agency Contacts about the Budget Definition
• Navigate to the Budget Definition page: Main Menu > Core-CT Financials > Supplier Contracts > Budgeting > Budget Definition
127

Notify Agency Contacts
• Enter Contract ID
• Click Search
128

Notify Agency Contacts
• Click on the Notification Contracts tab
129

Notify Agency Contacts
• Click Notify
130

Notify Agency Contacts
• Click Lookup Recipient
131

Notify Agency Contacts
• Click Search
132

Notify Agency Contacts
• Click the “To” checkboxes for the recipients of the notification
• The “cc” and “bcc” are also options for recipients
• Click Add to Recipient List
133
• Click OK

Notify Agency Contacts
• Select Priority
• Enter Subject
• Enter message to be included in the email if needed
• Click OK
134

Frequently Asked Questions
• Q: Can you have multiple funding periods for the same contract?
• A: Yes
• Q: Can suppliers see past budgets?
• A: Yes
135