Bond Creation and Mgmt SuretyCompany - NMLS Resource Center · 2017-10-13 · Log in to NMLS. 2....
20
BOND CREATION AND MANAGEMENT SURETY COMPANY Updated: 10/13/2017 Copyright © State Regulatory Registry LLC This guide will walk you through the processes you must take to create a new bond, manage existing bonds, and report and view broker of record changes. • Create a New Bond • Create a Bond Rider • Change an Underwriter on an Existing Bond • Cancel a Bond • Rescind Notice of Bond Cancellation • Reinstate a Cancelled Bond • Report and View Broker of Record Changes • Remove Authority for Licensee • Bond Management Tools • Returned to Surety by Regulator • Revised Form Bond Requirement Create a New Bond 1. Log in to NMLS. 2. From the Home screen, click the Tasks tab. 3. Click Surety Bond Management either in the top menu bar or in the main description panel. 4. Click Create New Bond or Report BOR. This will display a list of all licensees who have granted you authority to create bonds on their behalf (see Figure 1). Figure 1: Surety Bond Management 5. Click the Create Bond button next to the licensee you will be creating a bond for.
Transcript of Bond Creation and Mgmt SuretyCompany - NMLS Resource Center · 2017-10-13 · Log in to NMLS. 2....

BOND CREATION AND MANAGEMENT SURETY COMPANY
Updated: 10/13/2017 Copyright © State Regulatory Registry LLC
This guide will walk you through the processes you must take to create a new bond, manage existing bonds, and report and view broker of record changes.
• Create a New Bond
• Create a Bond Rider
• Change an Underwriter on an Existing Bond
• Cancel a Bond
• Rescind Notice of Bond Cancellation
• Reinstate a Cancelled Bond
• Report and View Broker of Record Changes
• Remove Authority for Licensee
• Bond Management Tools
• Returned to Surety by Regulator
• Revised Form Bond Requirement
Create a New Bond
1. Log in to NMLS.
2. From the Home screen, click the Tasks tab.
3. Click Surety Bond Management either in the top menu bar or in the main description panel.
4. Click Create New Bond or Report BOR. This will display a list of all licensees who have granted you authority to create bonds on their behalf (see Figure 1).
Figure 1: Surety Bond Management
5. Click the Create Bond button next to the licensee you will be creating a bond for.

Copyright © State Regulatory Registry LLC Page 2 of 20
6. Provide the requested information. Fields will automatically adjust based on requirements of the state and license type selected.
NOTE: When creating a bond in NMLS to replace an existing paper bond previously provided to the Regulator (obligee), known as a bond conversion, select the Converted radio button and provide the existing information. The effective date on the bond (if applicable) will be the date the bond is signed in NMLS by the surety entity.
NOTE: A surety bond producer identified by the surety company during the bond creation process will become eligible to act as broker of record on the bond after the bond has been signed by the licensee.
NOTE: A “Not Formed in US” option is available at the bottom of the drop down for electronic surety bonds requiring “State of Formation” for the licensee or surety company.
7. Click the Save & Proceed button (see Figure 2).
Figure 2: Create Bond
8. Review all information in the rendered bond. At the bottom of the page, check the box to attest, then click the Sign button (see Figure 3).
Copyright © State Regulatory Registry LLC Page 3 of 20
Figure 3: Bond Attestation Language
Create a Bond Rider
1. Log in to NMLS.
2. From the Home screen, click the Tasks tab.
3. Click Surety Bond Management either in the top menu bar or in the main description panel.
4. Click Manage Bonds in the left navigation panel.
5. Use the filtering options to find the relevant bond. Once you have located the bond you would like to update, click the Manage button next to it.
6. Under the rendered bond, click the Create Rider button.
7. Enter the Rider Effective Date using the box provided.
8. Select the field(s) that will be updated, and then click the Next button (see Figure 4).

Copyright © State Regulatory Registry LLC Page 4 of 20
Figure 4: Create Rider
9. Enter the new values in the field(s) provided, then click the Save & Proceed button.
10. Use the checkbox to attest, then click the Sign button to send the rider to the Principal for approval.

Copyright © State Regulatory Registry LLC Page 5 of 20
Change an Underwriter on an Existing Bond
1. Log in to NMLS.
2. From the Home screen, click the Tasks tab.
3. Within the Tasks section, click Surety Bond Management either in the top menu bar or in the main description panel.
4. Click Manage Bonds in the left navigation panel.
5. Use the filtering options to find the relevant bond. Once you have located the bond you would like to update, click the Manage button next to it.
6. Within the Surety Details section, click the Update button for “Underwriter:”
7. Start typing the first or last name of the underwriter, then select the name from the dropdown list that appears.
8. Click the Save button (see Figure 5).
Figure 5: Change Underwriter
Cancel a Bond
1. Log in to NMLS.
2. From the Home screen, click the Tasks tab.
3. Within the Tasks section, click Surety Bond Management either in the top menu bar or in the main description panel.
4. Click Manage Bonds in the left navigation panel.
5. Use the filtering options to find the relevant bond. Once you have located the bond you would like to cancel, click the Manage button next to it.

Copyright © State Regulatory Registry LLC Page 6 of 20
Figure 6: Manage Bond
6. Under the rendered bond, click the Submit Cancellation Notice button (see Figure 6).
7. Enter the Cancellation Effective Date using the box provided and provide a Cancellation Note.
NOTE: Cancellation Effective Date must be a current or past date.
8. Use the checkbox to attest, then click the Submit Cancellation Notice button (see Figure 7).
Figure 7: Submit Notice of Bond Cancellation
Rescind Notice of Bond Cancellation
1. Log in to NMLS.
2. From the Home screen, click the Tasks tab.

Copyright © State Regulatory Registry LLC Page 7 of 20
3. Within the Tasks section, click Surety Bond Management either in the top menu bar or in the main description panel.
4. Click Manage Bonds in the left navigation panel.
5. Use the filtering options to find the relevant bond. Once you have located the bond you would like to cancel, click the Manage button next to it.
6. Under the rendered bond, click the Rescind Cancellation button.
7. Provide a Rescind Cancellation Note. Use the checkbox to attest, then click the Rescind Cancellation button (See Figure 8).
Figure 8: Rescind Notice of Bond Cancellation
Reinstate a Cancelled Bond
1. Log in to NMLS.
2. From the Home screen, click the Tasks tab.
3. Within the Tasks section, click Surety Bond Management either in the top menu bar or in the main description panel.
4. Click Manage Bonds in the left navigation panel.
5. Use the filtering options to find the relevant bond. Once you have located the bond you would like to reinstate, click the Manage button next to it.
6. Under the rendered bond, click the Reinstate Bond button.
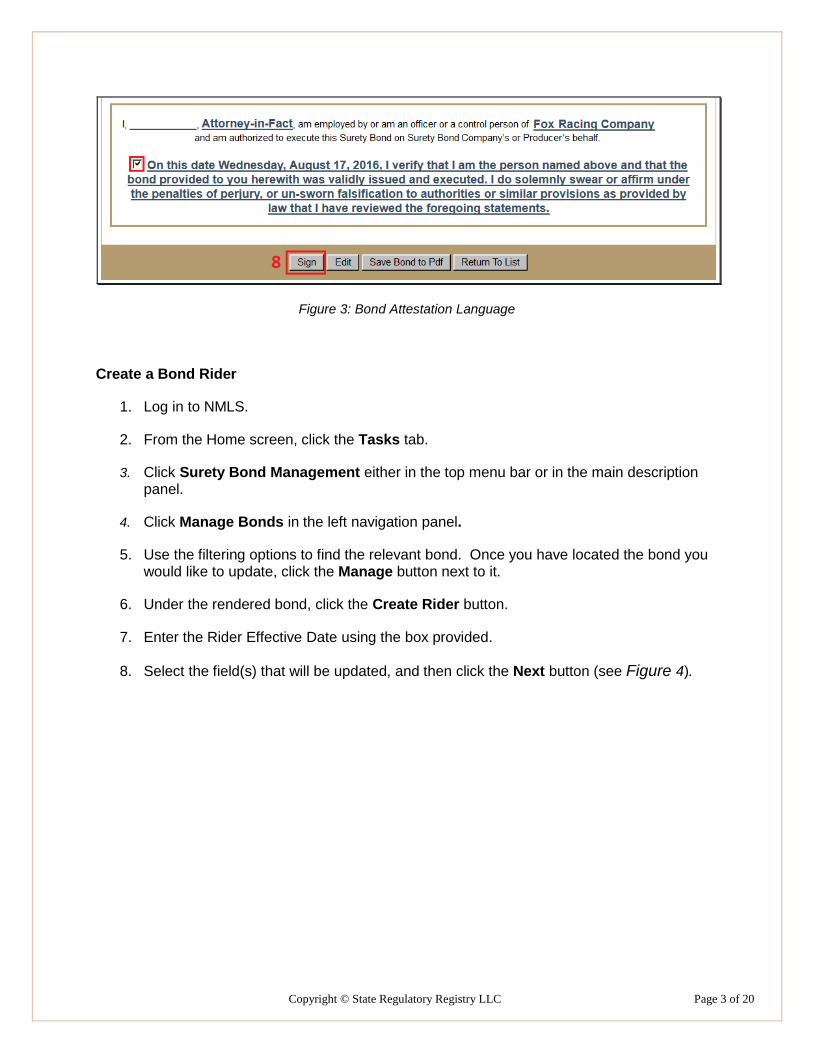
7. Provide a cancellation note. Use the checkbox to attest, then click the Reinstate Bond button (See Figure 9).
Copyright © State Regulatory Registry LLC Page 8 of 20
Figure 9: Reinstate a Cancelled Bond
Report a Broker of Record Change
1. Log in to NMLS.
2. From the Home screen, click the Tasks tab.
3. Within the Tasks section, click Surety Bond Management either in the top menu bar or in the main description panel.
4. Click Create New Bond or Report BOR. This will display the bond and broker of record screen which lists all of the licensees who have granted you authority to create bonds or broker of records on their behalf.
5. Click the Report BOR button next to the licensee you will be reporting a broker of record change on behalf of (see Figure 10).

Copyright © State Regulatory Registry LLC Page 9 of 20
Figure 10: Create New Bond or Report BOR
6. Enter the NPN or Name of the outgoing broker of record, then click the Next button.
7. Click the radio button next to the outgoing broker of record, then click the Next button.
8. If there is no outgoing broker of record, meaning the bond was created and managed by the Surety Company, click the No Outgoing Broker of Record button, then click the Next button.
9. Enter the NPN or Name of the incoming broker of record, then click the Next button.
10. Click the radio button next to the incoming broker of record, then click the Next button.
11. Enter the Effective Date of the broker of record change, then click the Next button.
12. Confirm the information you have provided, then click the Confirm button to submit the broker of record change.
NOTE: The BOR assignment/change will remain pending until the licensee accepts the BOR change.
View Broker of Record Changes
1. Log in to NMLS.
2. From the Home screen, click the Tasks tab.
3. Within the Tasks section, click Surety Bond Management either in the top menu bar or in the main description panel.
4. Click View BOR Changes in the left navigation panel.
Remove Authority for Licensee
Copyright © State Regulatory Registry LLC Page 10 of 20
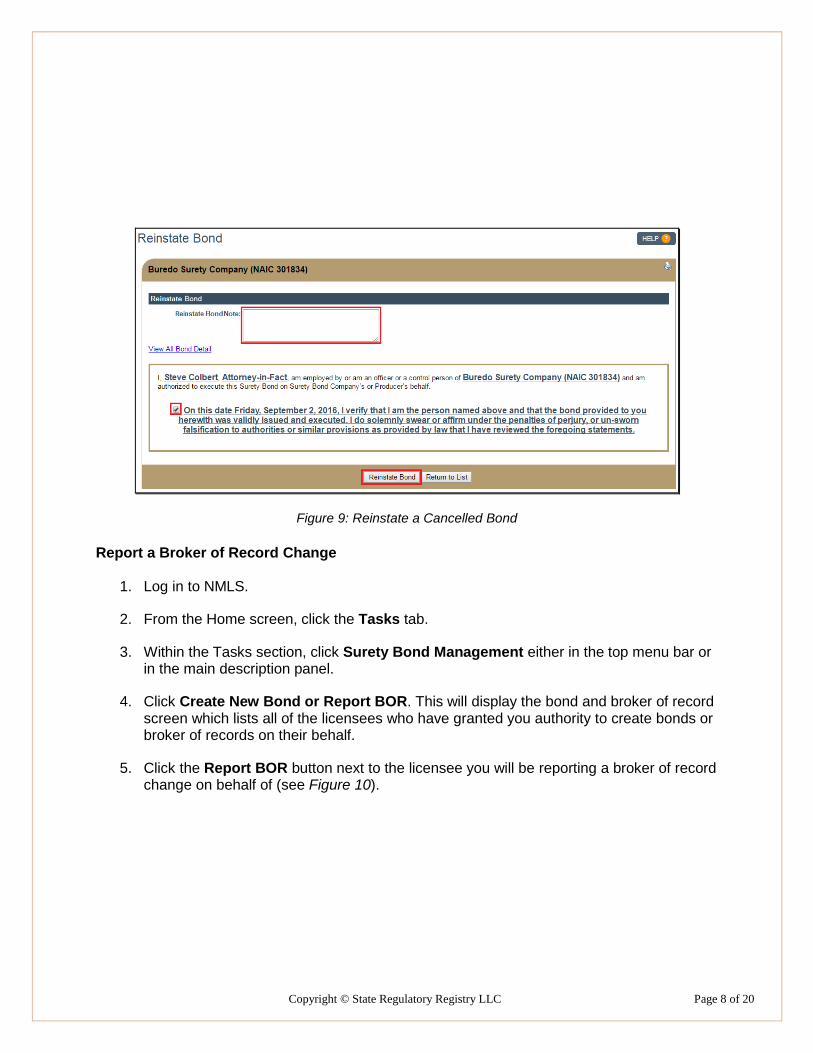
1. Surety companies can remove their authority to create bonds on behalf of a licensee if there are no pending or active bonds issued by the surety company or by a surety bond producer on behalf of the surety company. Log in to NMLS.
2. From the Home screen, click the Tasks tab.
3. Within the Tasks section, click Surety Bond Management either in the top menu bar or in the main description panel.
4. Click Licensee Authority List.
5. Click the Remove button next to the name of the desired licensee (see Figure 11).
Figure 11: Remove Authority of Licensee
Bond Management Tools
Signatory Controls - If a bond is created by a surety bond producer, the surety company/underwriting company listed on the bond will be able to sign or delete the bond while it is in the “Requires Rep Signature” or “Returned to Surety” status. The bond will appear in the Manage Bonds list of the Surety Company once it has been saved by the Surety Bond Producer.
Bond Versioning - When a bond form version change is required by a regulator, all undelivered bonds will be required to be upgraded to the new bond form version. Regulators will also have the ability to require all delivered bonds to be revised to the new bond form version. If regulators choose to require existing bonds to be updated to the new bond form revision, surety entities will be notified generally six months in advance of this change.
If at a later date, it is required, a license item will be placed on all licenses with a bond that requires revision. If a license has 2 or more bonds requiring revision, the license item will not clear until all bonds have been revised or submitted for cancellation.
Bond Upgrade due to Bond Form Revision

Copyright © State Regulatory Registry LLC Page 11 of 20
When a bond form upgrade is required by a regulator, a message will display at the top of the page when viewing the bond details for all bonds that have yet been delivered to the regulator. This includes bonds that have been “Executed” but not Marked Ready and bonds in a “Returned to Surety” status.
1. Log in to NMLS.
2. From the Home screen, click the Tasks tab.
3. Within the Tasks section, click Surety Bond Management either in the top menu bar or in the main description panel.
4. Click Manage Bonds in the left navigation panel (see Figure 12).
Figure 12: Surety Bond Management
5. Click on the Manage button beside the bond requiring upgrade.
NOTE: Email notifications will be sent to both the surety company and the surety bond producer informing users of the bond upgrade requirement. The notification is defaulted to be sent to the account administrators but is also available for subscription by organization users.
6. A message will appear at the top of the Manage Bonds page alerting the user to the bond upgrade requirement. Click the Continue button to proceed with the upgrade (see
Figure 13).

Copyright © State Regulatory Registry LLC Page 12 of 20
Figure 13: Bond Upgrade on Manage Bonds Page
7. A message will appear confirming the bond has been upgraded to the latest bond form
version. The bond is now ready to be re-signed and will follow the existing bond execution process (see Figure 14).
Figure 14: Bond Upgrade Completion on Manage Bonds Page

Copyright © State Regulatory Registry LLC Page 13 of 20
Returned to Surety by Regulator
There are only seven accepted reasons for returning a New/Original bond (see Table 1). A Converted bond should be returned if any bond detail does not match the latest paper bond or rider.
Return the Bond Request a Rider
Incorrect license type Bond amount
Incorrect signatory Bond effective date
Incorrect converted bond information Bond number
Incorrectly listed underwriting surety company Licensee name
Incorrect converted bond indicator
Duplicate bond
Unnecessary bond
Table 1: Return a Bond or Request a Rider
The returned bond and any delivered riders are captured as a snapshot with a “Returned to Surety” watermark. In addition, the regulator must provide a note explaining in more detail why the bond was returned. Once a bond is returned, the surety can amend the bond and resubmit by completing the standard signing process, or may void the bond (see Bond Recreation below for more details).
Riders – All riders associated with the returned bond are automatically voided by the system. Delivered riders are captured in the returned bond snapshot, but pending riders are not. It is possible to incorporate rider changes into the resubmitted bond, but not required. Any changes made by rider but not incorporated into the resubmitted bond must be recreated via a new rider. If the returned bond is a converted bond with riders, the original effective date of the resubmitted converted bond is the surety signatory date. Paper riders may need to be completed before the bond is converted.
Bond Recreation – A returned bond can be amended and recreated by a surety entity without voiding it. The Surety Company user must have either the Manage Bonds, Manage Bonds and Sign Bonds, or Account Administrator role to recreate a returned bond. If the Surety Company voids the bond, it can be recreated by either the SC or the Surety Bond Producer.
Bond Voiding – Voiding a returned bond allows for the bond number to be reused. Surety Companies can void a returned bond, but Surety Bond Producers cannot. Instances of Voided bonds are viewable by both the Surety Company and Surety Bond Producer within their respective Manage Bonds lists. A new Bond Status, Voided, has been added to assist with accessing these bonds.

Copyright © State Regulatory Registry LLC Page 14 of 20
Notifications – If the Surety Company created the bond with no Surety Bond Producer, then only the Surety Company is notified when a bond is returned. If the Surety Bond Producer created the bond, both the Surety Bond Producer and the Surety Company receive notification.
Surety Bond Transaction Report – The report will capture the new bond transactions types, including Returned to Surety by the Regulator, Rider Voided (for riders voided by the system if associated bond is returned), and Voided (for returned bonds voided by the Surety Company).
View a Returned Bond
1. Log in to NMLS.
2. From the Home screen, click the Tasks tab.
3. Within the Tasks tab, click Surety Bond Management either in the top menu bar or in the main description panel (see Figure 15).
Figure 15: Surety Bond Management
4. Click Manage Bonds.
5. Use the Returned to Surety Bond Status filtering option to find the relevant bond. Once you have located the bond you would like to update, click the Manage button next to it (see Figure 16).
NOTE: The return reason and regulator note both appear on the Manage Bond page.

Copyright © State Regulatory Registry LLC Page 15 of 20
Figure 16: Manage Bonds Page
6. Click the View Bond Status Transactions link to view a list of transactions related to the
bond.
7. Click the View Detail link in the “Returned to Surety by Regulator” row to view a snapshot of the returned bond and any delivered riders voided by the system (see Figure 17).
Figure 17: View Returned Bond Details
Copyright © State Regulatory Registry LLC Page 16 of 20
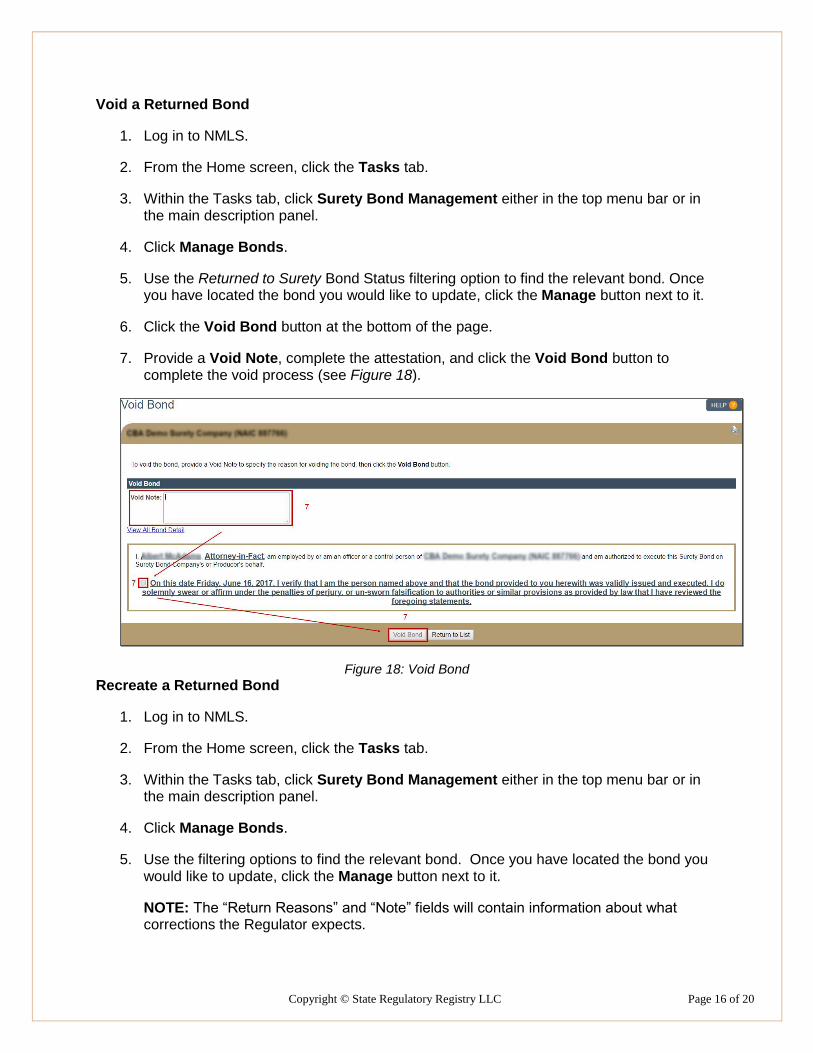
Void a Returned Bond
1. Log in to NMLS.
2. From the Home screen, click the Tasks tab.
3. Within the Tasks tab, click Surety Bond Management either in the top menu bar or in the main description panel.
4. Click Manage Bonds.
5. Use the Returned to Surety Bond Status filtering option to find the relevant bond. Once you have located the bond you would like to update, click the Manage button next to it.
6. Click the Void Bond button at the bottom of the page.
7. Provide a Void Note, complete the attestation, and click the Void Bond button to complete the void process (see Figure 18).
Figure 18: Void Bond Recreate a Returned Bond
1. Log in to NMLS.
2. From the Home screen, click the Tasks tab.
3. Within the Tasks tab, click Surety Bond Management either in the top menu bar or in the main description panel.
4. Click Manage Bonds.
5. Use the filtering options to find the relevant bond. Once you have located the bond you would like to update, click the Manage button next to it.
NOTE: The “Return Reasons” and “Note” fields will contain information about what corrections the Regulator expects.

Copyright © State Regulatory Registry LLC Page 17 of 20
6. Click the Edit button at the bottom of the page.
7. Correct the bond as necessary, then click the Save & Proceed button (see Figure 19).
Figure 19: Edit Pending Bond
8. Use the checkbox to attest, then click the Sign button to send the bond to the Licensee
for approval (see Figure 20).
Figure 20: Sign Amended Returned Bond
9. Once the Licensee signs the recreated bond and completes the Mark Ready process,
the bond will be redelivered to the regulator.

Copyright © State Regulatory Registry LLC Page 18 of 20
Revised Form Bond Requirement
At times, state agencies may need to update bond form language on existing bonds. When this occurs, the system facilitates the issuance of the new bond form version that needs to be signed by both parties. An email notification and a system generated license item alerts all impacted Surety Companies, Surety Bond Producers and Licensees when a Revised Form Bond is required.
1. Use the filtering options to identify bonds in which a Revised Form Bond is Required (see Figure 21).
Figure 21: Filter for Revised Form Bond
2. Click the Manage button beside the applicable bond.
Copyright © State Regulatory Registry LLC Page 19 of 20
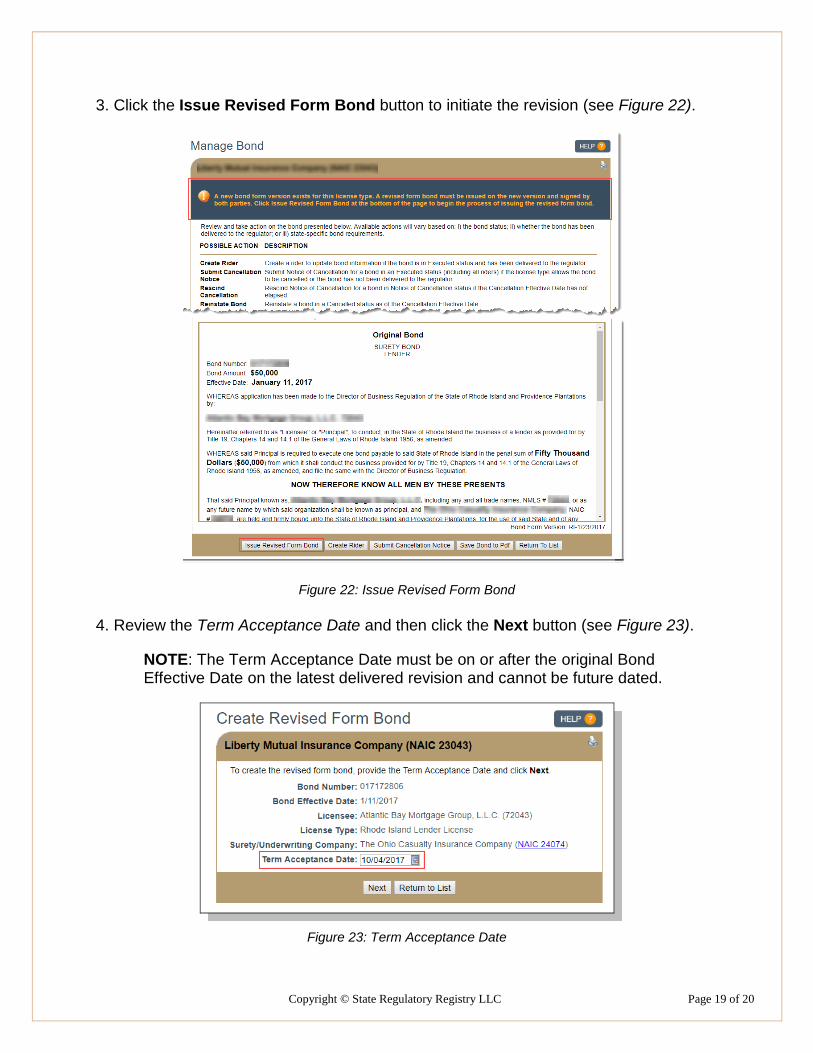
3. Click the Issue Revised Form Bond button to initiate the revision (see Figure 22).
Figure 22: Issue Revised Form Bond
4. Review the Term Acceptance Date and then click the Next button (see Figure 23).
NOTE: The Term Acceptance Date must be on or after the original Bond Effective Date on the latest delivered revision and cannot be future dated.
Figure 23: Term Acceptance Date

Copyright © State Regulatory Registry LLC Page 20 of 20
5. Click the Save & Proceed button to complete the attestation.
6. Proceed with the signing process by checking the attestation and clicking the Sign button. This delivers the bond to the licensee for their review and signature of the Revised Form Bond. When the Revised Form Bond is signed by both parties, the process is complete.
For further assistance, contact the NMLS Call Center at 1-855-NMLS-123 (1-855-665-7123).