BMC R 8.1 - I M R F - its.uncg.edu · PDF fileBMC REMEDY 8.1 - INCIDENT MANAGEMENT & REQUEST...
128
BMC REMEDY 8.1 - INCIDENT MANAGEMENT & REQUEST FULFILLMENT USER GUIDE Process Owner: Service Desk Manager Version: 1.0
-
Upload
phunghuong -
Category
Documents
-
view
219 -
download
6
Transcript of BMC R 8.1 - I M R F - its.uncg.edu · PDF fileBMC REMEDY 8.1 - INCIDENT MANAGEMENT & REQUEST...

BMC REMEDY 8.1 -
INCIDENT MANAGEMENT &
REQUEST FULFILLMENT
USER GUIDE
Process Owner: Service Desk Manager Version: 1.0
BMC REMEDY 8.1 - INCIDENT MANAGEMENT & REQUEST FULFILLMENT USER GUIDE
5/27/2015 Page 2
DOCUMENT REVISION HISTORY Revision Number
Description Date Approved by
V1.0 Initial Release 6/25/2015

BMC REMEDY 8.1 - INCIDENT MANAGEMENT & REQUEST FULFILLMENT USER GUIDE
5/27/2015 Page 3
Contents
1 Accessing BMC Remedy 8.1 .................................................................................................................. 6
2 New Features ........................................................................................................................................ 6
2.1 Overview Console ......................................................................................................................... 6
2.2 Applications ................................................................................................................................. 10
2.3 Incident Management Console ................................................................................................... 11
2.4 Incident Fields ............................................................................................................................. 12
2.5 Requested For and Requested By ............................................................................................... 14
2.6 Incident Type ............................................................................................................................... 14
2.7 Summary, Summary Addition, And Notes .................................................................................. 15
2.8 Email via Work Info ..................................................................................................................... 15
2.9 Resolution Email Requirement ................................................................................................... 15
2.10 Watch List.................................................................................................................................... 15
2.11 Counts ......................................................................................................................................... 15
2.12 Functions ..................................................................................................................................... 16
2.13 Quick Action ................................................................................................................................ 16
3 Creating Incidents ............................................................................................................................... 17
3.1 Creating A New Incident From The Applications List .................................................................. 17
3.2 Creating A New Incident From The Incident Management Console .......................................... 17
3.3 Creating a New Incident While Working on Another Incident ................................................... 18
3.4 Required Information for Creating a New Incident .................................................................... 19
3.5 Searching For A Client’s Name .................................................................................................... 20
3.6 Saving An Incident ....................................................................................................................... 22
4 Searching For Incidents ....................................................................................................................... 24
4.1 Searching For An Incident From The Applications List................................................................ 24
4.2 Searching For An Incident From the Incident Management Console ......................................... 24
4.3 Searching For An Incident By The Incident ID ............................................................................. 25
4.4 Creating A New Search From The Search Form .......................................................................... 25
4.5 Searching For An Incident By The Client’s Name ........................................................................ 26
4.6 Searching For An Incident By Assigned Group ............................................................................ 27
4.7 Clearing Out The Client’s Details From The Search .................................................................... 29
4.8 Loading A Recent Search ............................................................................................................. 29

BMC REMEDY 8.1 - INCIDENT MANAGEMENT & REQUEST FULFILLMENT USER GUIDE
5/27/2015 Page 4
4.9 Saving A Search ........................................................................................................................... 30
4.10 Running A Saved Search .............................................................................................................. 32
4.11 Managing Saved Searches........................................................................................................... 33
4.12 Adding An Incident To The Watch List. ....................................................................................... 36
4.13 Viewing Incidents On The Watch List.......................................................................................... 36
4.14 Removing Incidents From The Watch List................................................................................... 37
5 Updating Incidents .............................................................................................................................. 38
5.1 Adding Work Info ........................................................................................................................ 38
5.2 Viewing Work Info....................................................................................................................... 40
5.3 Adding An Attachment ................................................................................................................ 43
5.4 Viewing An Attachment .............................................................................................................. 47
5.5 Sending An Email Via Work Info In Incident ............................................................................... 48
5.6 Changing The Status Of An Incident ........................................................................................... 57
5.7 Changing The Status Of An Incident To Pending ........................................................................ 58
5.8 Assigning an Incident to Yourself ................................................................................................ 60
5.9 Requesting Reassignment ........................................................................................................... 62
6 Tasks .................................................................................................................................................... 64
6.1 Creating a Task ............................................................................................................................ 64
6.2 Adding Work Info ........................................................................................................................ 68
6.3 Viewing Work Info....................................................................................................................... 69
6.4 Adding An Attachment ................................................................................................................ 71
6.5 Viewing An Attachment .............................................................................................................. 73
6.6 Sending An Email Via Work Info In Task ..................................................................................... 75
6.7 Searching For A Task By Task ID .................................................................................................. 83
6.8 Changing The Status of A Task .................................................................................................... 85
6.9 Closing a Task .............................................................................................................................. 86
7 Relationships ....................................................................................................................................... 87
7.1 Relating An Incident To Another Incident ................................................................................... 87
7.2 Relating An Asset To A Task ........................................................................................................ 90
7.3 Relating An Incident To An Asset ................................................................................................ 93
7.4 Relating An Asset To A Person .................................................................................................... 96
7.5 Creating A Master Incident ....................................................................................................... 102
7.6 Viewing Relationships in Incident ............................................................................................. 103

BMC REMEDY 8.1 - INCIDENT MANAGEMENT & REQUEST FULFILLMENT USER GUIDE
5/27/2015 Page 5
7.7 Viewing Relationships in Task ................................................................................................... 103
8 Resolving An Incident ........................................................................................................................ 103
9 Service Level Management ............................................................................................................... 112
9.1 Service Level Standards............................................................................................................. 112
9.1.1 Case Acceptance Standards .............................................................................................. 112
9.1.2 Client Contact Standards ................................................................................................... 113
9.1.3 Case Update Frequency Standards ................................................................................... 113
9.2 Service Targets .......................................................................................................................... 114
9.2.1 Service Targets in Incident ................................................................................................ 114
9.2.2 Service Targets in Task ...................................................................................................... 116
9.3 SLM History ............................................................................................................................... 116
9.4 SLM Breaches ............................................................................................................................ 121
9.4.1 SLM Breaches in Incident .................................................................................................. 121
9.4.2 SLM Breaches in Task ........................................................................................................ 122
9.5 SLM Status ................................................................................................................................. 122
10 Queue Management ..................................................................................................................... 124
10.1 Managing Your Personal Queue ............................................................................................... 124
10.2 Managing Your Selected Groups’ Queues ................................................................................ 125
10.3 Managing All Of Your Groups’ Queues ..................................................................................... 127

BMC REMEDY 8.1 - INCIDENT MANAGEMENT & REQUEST FULFILLMENT USER GUIDE
5/27/2015 Page 6
1 ACCESSING BMC REMEDY 8.1
To access BMC Remedy 8.1, go to https://remedy.uncg.edu/ and log in with your username and
password.
2 NEW FEATURES
The following are highlights of new and improved features with our upgrade to BMC Remedy 8.1.
2.1 OVERVIEW CONSOLE When you log into Remedy, you will be taken to the Overview Console. The Overview Console is a
customizable dashboard that allows you to view your work assignments and important information
across multiple Remedy applications. By default the Overview Console will display your open Incidents.
This console is customizable, and you may have up to four quadrants for viewing your data. Click on the
plus sign in the upper right hand corner to add extra quadrants to the Overview Console.

BMC REMEDY 8.1 - INCIDENT MANAGEMENT & REQUEST FULFILLMENT USER GUIDE
5/27/2015 Page 7
This will populate four quadrants, in which you can select the data you wish to view.
Click on the drop down arrow next to Show to choose the data for each quadrant.

BMC REMEDY 8.1 - INCIDENT MANAGEMENT & REQUEST FULFILLMENT USER GUIDE
5/27/2015 Page 8
Click on the Close button in the right hand corner of the quadrant window to remove a quadrant.
Click on the Edit button on the right hand corner of the quadrant window to change the data in a
quadrant.
Click on the Collapse button to minimize a quadrant.
Click on the Expand button to restore the quadrant.

BMC REMEDY 8.1 - INCIDENT MANAGEMENT & REQUEST FULFILLMENT USER GUIDE
5/27/2015 Page 9
Click on the Save button on the right hand corner of the Overview Console to save your layout changes.
The following image is an example of all four quadrants being used for Remedy data.

BMC REMEDY 8.1 - INCIDENT MANAGEMENT & REQUEST FULFILLMENT USER GUIDE
5/27/2015 Page 10
2.2 APPLICATIONS There is an Applications list in the upper left corner of Remedy 8.1 that displays all of the modules you
have access to.
Click on the Applications tab to view your Remedy modules.

BMC REMEDY 8.1 - INCIDENT MANAGEMENT & REQUEST FULFILLMENT USER GUIDE
5/27/2015 Page 11
2.3 INCIDENT MANAGEMENT CONSOLE To open the Incident Management Console, hover over Incident Management in the Applications list.
You will be provided with three options: Incident Management Console, New Incident, and Search
Incident. Click on Incident Management Console.
The Incident Management Console is used to create Incidents and Requests, monitor the progress of
Incidents and Requests, and record the work that was performed while solving an Incident or Request.

BMC REMEDY 8.1 - INCIDENT MANAGEMENT & REQUEST FULFILLMENT USER GUIDE
5/27/2015 Page 12
2.4 INCIDENT FIELDS
A. Incident ID: A unique number for the Incident generated automatically by Remedy.
B. Kinetic ID: A unique number for the Incident generated automatically by Kinetic.
C. Requested For: The identification of the client who is actually having the service interruption or
needs a service request. This section is required.
D. Requested By: The identification of the person who is calling in and reporting the problem on
behalf of the client, and/or will be the contact for the Incident. This section is optional.
E. Name: The name of the client. Type in the last name of the client to search for possible matches
and select the correct identity match.

BMC REMEDY 8.1 - INCIDENT MANAGEMENT & REQUEST FULFILLMENT USER GUIDE
5/27/2015 Page 13
F. User Name: The client’s username. Type in the client’s username to search for possible matches
and select the correct identity match.
G. Pref Name: The client’s preferred name as specified by the client in UNCGenie. This field is not
editable in Remedy.
H. UID: The client’s University ID number. Type in the client’s University ID to search for the correct
identity match.
I. Phone: The client’s phone number as fed by Banner.
J. Campus OU: The client’s Department short name, followed by the Department Organization
Code.
K. Department: The client’s full Department name.
L. Campus Address: The client’s campus address listed by room number and building.
M. Additional Information: An open form to add additional contact, or client, information.
N. Incident Type: There are four Incident Types: User Service Restoration, User Service Request,
Infrastructure Restoration, and Infrastructure Event. An Incident Type must be selected in order
to determine which Summaries will populate.
O. Master Incident: The Yes checkbox indicates if the Incident is a Master Incident for a problem.
P. Summary: A brief description of the service request or service interruption.
Q. Summary Addition: An addendum to the summary.
R. Notes: A full description of the service request or service interruption. The notes are used to
record the initial contact with the client, and should include the problem, troubleshooting steps
taken, and the location of the client.
S. Priority: The Priority is determined by the urgency and impact of the problem, and has four
levels: Critical, High, Medium, and Low.
T. Reported Source: How the Incident was reported.
U. Assigned Group: The support group that the Incident is assigned to.
V. Assignee: The person who the Incident is assigned to.
W. Status: The current status of the Incident. There are seven statuses for Incidents: New, Assigned,
In Progress, Pending, Resolved, Closed, and Cancelled.
X. Status Reason: If the status is set to either Pending or Resolved, then it will require a status
reason.
Y. Resolution: The resolution field is required to be filled out if the status is set to Resolved.
Z. Could have been resolved at Tier 1: Check the Yes button if the Incident was escalated to a Tier 2
or Tier 3 support group when it could have been resolved at Tier 1, the Service Desk.
AA. Location: Select a location if the location is an ITS Lab or Non-Billable Classroom.
BB. Service: The Service that is affected by the interruption or request.
CC. CI: A Configuration Item that is an Asset being tracked in Remedy Asset Management.

BMC REMEDY 8.1 - INCIDENT MANAGEMENT & REQUEST FULFILLMENT USER GUIDE
5/27/2015 Page 14
2.5 REQUESTED FOR AND REQUESTED BY To accommodate clients that call the Service Desk for themselves and for clients that have other users
calling for them, we have created two sections: Requested For and Requested By.
The Requested For section is for the client who is actually having the service interruption or needs a
service request. The Requested For section is required to save an Incident.
The Requested By section is for the person who is calling in and reporting the problem on behalf of the
client, and/or will be the contact for the Incident. The Requested By section is optional.
2.6 INCIDENT TYPE There are four Incident Types that can be selected in order to determine which Summaries will
populate:
User Service Restoration: A user is experiencing a service outage.
User Service Request: A user is requesting a service, a change in service or asking for
information.
Infrastructure Restoration: A service is experiencing a service outage.
Infrastructure Event: A service has reached a threshold and should be reviewed.

BMC REMEDY 8.1 - INCIDENT MANAGEMENT & REQUEST FULFILLMENT USER GUIDE
5/27/2015 Page 15
2.7 SUMMARY, SUMMARY ADDITION, AND NOTES The Summary of an Incident will be selected from a predetermined list generated by the Incident Type.
Select the Summary that best fits the Incident. You may add a Summary Addition if a brief description is
required. NOTE: The Summary Addition does not replace the Notes field. The Notes field will still be
used for a complete description of the Incident.
Summary: A brief description of the Incident.
Summary Addition: A brief addendum to the Summary.
Notes: A complete description of the Incident.
2.8 EMAIL VIA WORK INFO You may now send emails through the Remedy Work Info tabs in both Incident and Task. For
instructions on how to send email through a Work Info entry please visit: 5.5 Sending An Email Via Work
Info in Incident and 6.6 Sending An Email Via Work Info in Task.
2.9 RESOLUTION EMAIL REQUIREMENT All Incident resolutions require that an email is sent to the client. The Incident will not resolve if you try
to skip this step. For instructions on how to send a resolution email to a client using Remedy please visit
8. Resolving An Incident.
2.10 WATCH LIST You may add Incidents from groups in which you are a member of to your Watch List in order to monitor
the progress of these Incidents. For instructions on how to use the Watch List please visit: 4.12 Adding
An Incident To The Watch List, 4.13 Viewing Incidents On The Watch List, and 4.14 Removing Incidents
From The Watch List.
2.11 COUNTS The Counts section in the Incident Management Console will help you keep track of your open Incidents,
unassigned Incidents in your group, and your breached Incidents. The data in Counts will reflect the
queue that you have open.

BMC REMEDY 8.1 - INCIDENT MANAGEMENT & REQUEST FULFILLMENT USER GUIDE
5/27/2015 Page 16
2.12 FUNCTIONS The Functions section in the Incident Management Console provides easy access to tools used most
often: New Incident, Search Incident, Advanced Search, Search Task, Reminders, and Reports.
2.13 QUICK ACTION The Quick Action section within an Incident provides easy access to tools used most often: Create
Relationship to, Create Related Request, Print, Customer’s Incidents, View Audit Log, Reminders, Assign
to Me, and Request Reassignment.

BMC REMEDY 8.1 - INCIDENT MANAGEMENT & REQUEST FULFILLMENT USER GUIDE
5/27/2015 Page 17
3 CREATING INCIDENTS
3.1 CREATING A NEW INCIDENT FROM THE APPLICATIONS LIST Click on the Applications list, hover over Incident Management, and click on New Incident.
3.2 CREATING A NEW INCIDENT FROM THE INCIDENT MANAGEMENT CONSOLE There are two options for creating a new Incident if you are already in the Incident Management
Console.
A. Click on New Incident in the Functions menu.

BMC REMEDY 8.1 - INCIDENT MANAGEMENT & REQUEST FULFILLMENT USER GUIDE
5/27/2015 Page 18
B. Click on the Create icon in the Tool Bar.
3.3 CREATING A NEW INCIDENT WHILE WORKING ON ANOTHER INCIDENT If you need to create a new Incident while working on another Incident, click on the plus sign in the
upper left corner.
Once you have saved the new Incident, click on the Incident ID of the previous ticket you were working
on in order to return back to it.

BMC REMEDY 8.1 - INCIDENT MANAGEMENT & REQUEST FULFILLMENT USER GUIDE
5/27/2015 Page 19
3.4 REQUIRED INFORMATION FOR CREATING A NEW INCIDENT
A. Requested For: The Requested For section is for the client who is having the service interruption
or needs a service request. To populate the client’s information in the Requested For section
you may search for the client by their last name in the Name field, their username in the User
Name field, or by their University ID number in the UID field. NOTE: These instructions also
apply to the Requested By field, which is an optional field to use if another user is calling on
behalf of the client or needs to be added as an additional contact for the Incident.

BMC REMEDY 8.1 - INCIDENT MANAGEMENT & REQUEST FULFILLMENT USER GUIDE
5/27/2015 Page 20
B. Incident Type: An Incident Type must be selected in order to populate the Summary options.
There are four Incident Types: User Service Restoration, User Service Request, Infrastructure
Restoration, and Infrastructure Event.
C. Summary: Select the appropriate Summary for your Incident or Request.
D. Priority: The Priority of an Incident is automatically determined by the name of the Summary.
This field can be manually changed if necessary.
E. Reported Source: Select how the client reported the issue.
F. Assigned Group: The Assigned Group is automatically determined by the name of the Summary.
The Service Desk has permissions in Remedy to select an alternate group when creating the
Incident in the special case that an Incident needs to be routed somewhere else. However, once
that Incident has been assigned to a group, the Service Desk does not have the permissions to
reroute it. If a ticket gets routed incorrectly, use the Request Reassign button to have it sent to
the Reassign queue.
G. Status: When creating a new Incident, the Incident will auto-route to the Assigned Group, and
have an Assigned status.
3.5 SEARCHING FOR A CLIENT’S NAME There are three methods for searching for a client’s name when creating a new Incident: search for the
client by their last name in the Name field, enter their iSpartan ID in the Login ID field, or search by their
University ID number in the UID field. The following instructions apply to both the Requested For and
Requested By sections.
A. Search by Last Name
a. Type in the client’s last name in the Name field and select their name.

BMC REMEDY 8.1 - INCIDENT MANAGEMENT & REQUEST FULFILLMENT USER GUIDE
5/27/2015 Page 21
b. If you press enter, a People Search window will pop up on your web browser. The
People Search allows you to search with both first and last name options.
B. Search by iSpartan ID
a. Type in the client’s iSpartan ID in the Login ID field.

BMC REMEDY 8.1 - INCIDENT MANAGEMENT & REQUEST FULFILLMENT USER GUIDE
5/27/2015 Page 22
C. Search by University ID
a. Type in the client’s University ID number in the UID field.
3.6 SAVING AN INCIDENT Click on the Save button on the lower left hand corner of the screen.

BMC REMEDY 8.1 - INCIDENT MANAGEMENT & REQUEST FULFILLMENT USER GUIDE
5/27/2015 Page 23
NOTE: There is no Close button in Incident. To exit the current Incident you have the option to:
A. Click the back arrow located next to the Home icon.
B. Click on the Home icon to return to Overview Console.
C. Click on the Incident Console link.
D. Click on the IT Home link.*
E. Click on the previous Incident number if you have multiple Incidents opened.
F. Select Incident Management Console from the Applications tab.

BMC REMEDY 8.1 - INCIDENT MANAGEMENT & REQUEST FULFILLMENT USER GUIDE
5/27/2015 Page 24
4 SEARCHING FOR INCIDENTS
4.1 SEARCHING FOR AN INCIDENT FROM THE APPLICATIONS LIST Click on the Applications List, hover over Incident Management, and click on Search Incident.
4.2 SEARCHING FOR AN INCIDENT FROM THE INCIDENT MANAGEMENT CONSOLE Open the Incident Management Console, and select Search Incident from the Functions menu.

BMC REMEDY 8.1 - INCIDENT MANAGEMENT & REQUEST FULFILLMENT USER GUIDE
5/27/2015 Page 25
4.3 SEARCHING FOR AN INCIDENT BY THE INCIDENT ID Type in the Incident number in the Incident ID field. NOTE: Do not include the zeros at the beginning of
the Incident number.
Press Enter after typing in the Incident number.
The top of the screen will display the search results.
4.4 CREATING A NEW SEARCH FROM THE SEARCH FORM If you need to search for another Incident after just completing a search, click on New Search in the
Search Form at the top of the screen.

BMC REMEDY 8.1 - INCIDENT MANAGEMENT & REQUEST FULFILLMENT USER GUIDE
5/27/2015 Page 26
4.5 SEARCHING FOR AN INCIDENT BY THE CLIENT’S NAME There are three methods for searching for a client’s name when searching for an Incident: search for the
client by their last name in the Name field, enter their username in the User Name field, or search by
their University ID number in the UID field. The following instructions apply to both the Requested For
and Requested By sections.
A. Search by Last Name
a. Type in the client’s last name in the Name field and select their name.
b. If you press enter, a People Search window will pop up on your web browser. The
People Search allows you to search with both first and last name options.

BMC REMEDY 8.1 - INCIDENT MANAGEMENT & REQUEST FULFILLMENT USER GUIDE
5/27/2015 Page 27
C. Search by Username
a. Type in the client’s username in the User Name field.
D. Search by University ID
a. Type in the client’s University ID number in the UID field.
4.6 SEARCHING FOR AN INCIDENT BY ASSIGNED GROUP Click on the drop down menu on the Assigned Group field.

BMC REMEDY 8.1 - INCIDENT MANAGEMENT & REQUEST FULFILLMENT USER GUIDE
5/27/2015 Page 28
Select the appropriate group from the list that populates.

BMC REMEDY 8.1 - INCIDENT MANAGEMENT & REQUEST FULFILLMENT USER GUIDE
5/27/2015 Page 29
Click on the Search button.
The top of the screen will display the search results.
4.7 CLEARING OUT THE CLIENT’S DETAILS FROM THE SEARCH Click on the Clear Customer Details button next to the User Name field.
4.8 LOADING A RECENT SEARCH Click on Search Incident from either the Applications List or the Functions menu.
Click on the Searches button in the Search Form.

BMC REMEDY 8.1 - INCIDENT MANAGEMENT & REQUEST FULFILLMENT USER GUIDE
5/27/2015 Page 30
Click on Load Recent from the drop down menu. Click on the recent search that you want to run.
4.9 SAVING A SEARCH Click on Search Incident, either from the Applications List or the Incident Management Console.

BMC REMEDY 8.1 - INCIDENT MANAGEMENT & REQUEST FULFILLMENT USER GUIDE
5/27/2015 Page 31
Run the search that you wish to save, and then click on the Searches button.
Click on Save Search.
A Save or Redefine Search window will pop up. Type in the name for the search in the Search Name
field.

BMC REMEDY 8.1 - INCIDENT MANAGEMENT & REQUEST FULFILLMENT USER GUIDE
5/27/2015 Page 32
Click the Ok button.
4.10 RUNNING A SAVED SEARCH Click on the Searches button within Search Incident.
Hover over Run My Searches.

BMC REMEDY 8.1 - INCIDENT MANAGEMENT & REQUEST FULFILLMENT USER GUIDE
5/27/2015 Page 33
Click on the desired saved search.
4.11 MANAGING SAVED SEARCHES Click on the Searches button within Search Incident.
Click on Manage My Searches.

BMC REMEDY 8.1 - INCIDENT MANAGEMENT & REQUEST FULFILLMENT USER GUIDE
5/27/2015 Page 34
The Manage Search window will pop up. Select the saved search that you wish to manage. You may
choose to either disable or delete the saved search.
Click on the Save button.

BMC REMEDY 8.1 - INCIDENT MANAGEMENT & REQUEST FULFILLMENT USER GUIDE
5/27/2015 Page 35
If you have disabled a saved search that you wish to use again, you can return to Manage My Searches
to enable the saved search.
Click on the Save button.

BMC REMEDY 8.1 - INCIDENT MANAGEMENT & REQUEST FULFILLMENT USER GUIDE
5/27/2015 Page 36
4.12 ADDING AN INCIDENT TO THE WATCH LIST. Within the Incident Management Console, click on the Incident that you wish to add to the Watch List.
Click on the Add to Watch List button. NOTE: You may only add Incidents from groups you are a member
of to your Watch List.
4.13 VIEWING INCIDENTS ON THE WATCH LIST Within the Incident Management Console, click on the drop down menu for the Show field.
Click on Watch List.

BMC REMEDY 8.1 - INCIDENT MANAGEMENT & REQUEST FULFILLMENT USER GUIDE
5/27/2015 Page 37
Your Watch List will display.
4.14 REMOVING INCIDENTS FROM THE WATCH LIST View your Watch List. Select the Incident that you wish to remove, and click on the Remove From Watch
List button.
The Incident will disappear from your Watch List.

BMC REMEDY 8.1 - INCIDENT MANAGEMENT & REQUEST FULFILLMENT USER GUIDE
5/27/2015 Page 38
5 UPDATING INCIDENTS
5.1 ADDING WORK INFO The Work Info tab is visible in an open Incident on the right hand side of the screen.

BMC REMEDY 8.1 - INCIDENT MANAGEMENT & REQUEST FULFILLMENT USER GUIDE
5/27/2015 Page 39
Select a Work Info Type from the drop down menu. There are three Work Info Types: Customer
Communication, Status Update, and Working Log. The Work Info Type is a required field to save a Work
Info entry.
Click in the Notes field to type the Work Info entry.

BMC REMEDY 8.1 - INCIDENT MANAGEMENT & REQUEST FULFILLMENT USER GUIDE
5/27/2015 Page 40
Click on the Save Incident button to save the Work Info entry.
The Work Info entry will be listed in the Work Info tab.
5.2 VIEWING WORK INFO The Work Info tab is visible in an open Incident on the right hand side of the screen.

BMC REMEDY 8.1 - INCIDENT MANAGEMENT & REQUEST FULFILLMENT USER GUIDE
5/27/2015 Page 41
Click on the Work Info entry that you wish to view.

BMC REMEDY 8.1 - INCIDENT MANAGEMENT & REQUEST FULFILLMENT USER GUIDE
5/27/2015 Page 42
The Work Info entry will appear in the area below the list of Work Info entries.

BMC REMEDY 8.1 - INCIDENT MANAGEMENT & REQUEST FULFILLMENT USER GUIDE
5/27/2015 Page 43
5.3 ADDING AN ATTACHMENT Select a Work Info Type from the drop down menu.
Click in the Notes field to type the Work Info entry.

BMC REMEDY 8.1 - INCIDENT MANAGEMENT & REQUEST FULFILLMENT USER GUIDE
5/27/2015 Page 44
Click on the folder icon to browse for the file you wish to attach.
Click on the Browse button to search for your file.

BMC REMEDY 8.1 - INCIDENT MANAGEMENT & REQUEST FULFILLMENT USER GUIDE
5/27/2015 Page 45
Select the file you wish to upload and click on the Open button.
Click on Ok to add the attachment.
BMC REMEDY 8.1 - INCIDENT MANAGEMENT & REQUEST FULFILLMENT USER GUIDE
5/27/2015 Page 46
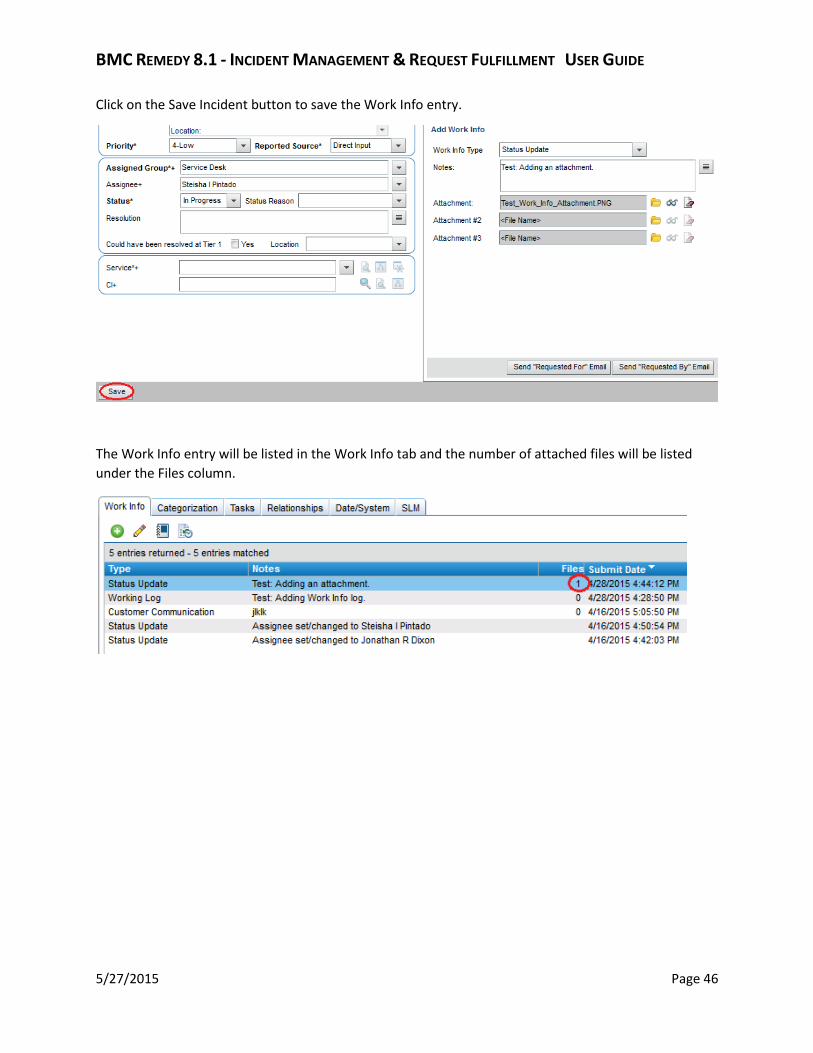
Click on the Save Incident button to save the Work Info entry.
The Work Info entry will be listed in the Work Info tab and the number of attached files will be listed
under the Files column.

BMC REMEDY 8.1 - INCIDENT MANAGEMENT & REQUEST FULFILLMENT USER GUIDE
5/27/2015 Page 47
5.4 VIEWING AN ATTACHMENT Double click on the Work Info entry that has an attachment you wish to view.
Click on the eye glasses icon to view the attachment.
You may choose to open the file or save the file. Click on Ok to continue.

BMC REMEDY 8.1 - INCIDENT MANAGEMENT & REQUEST FULFILLMENT USER GUIDE
5/27/2015 Page 48
5.5 SENDING AN EMAIL VIA WORK INFO IN INCIDENT To send an email to the client via Work Info, select either Send “Requested For” Email or Send
“Requested By” Email.

BMC REMEDY 8.1 - INCIDENT MANAGEMENT & REQUEST FULFILLMENT USER GUIDE
5/27/2015 Page 49
A new web browser window will pop up with the email template form.

BMC REMEDY 8.1 - INCIDENT MANAGEMENT & REQUEST FULFILLMENT USER GUIDE
5/27/2015 Page 50
As a reminder, the Requested For is the client who is actually having the service interruption or needs a
service request. The Requested By is the person who is calling in and reporting the problem on behalf of
the client, and/or will be the contact for the Incident.
In this example, SLWOOD will be the client whom the Incident was Requested For, and JEGAMBLE will
be the contact who requested the Incident (Requested By).
Select either Send “Requested For” Email or Send “Requested By” Email. The email template will
automatically CC the other option (Requested For or Requested By). You have the option to delete the
entry in the CC field if desired. The BCC field will automatically add you, the sender.

BMC REMEDY 8.1 - INCIDENT MANAGEMENT & REQUEST FULFILLMENT USER GUIDE
5/27/2015 Page 51
You may edit the Subject field if necessary.
Type into the body of the email the message you wish to send.
Click on the Attachments tab if you need to add an attachment to the email.

BMC REMEDY 8.1 - INCIDENT MANAGEMENT & REQUEST FULFILLMENT USER GUIDE
5/27/2015 Page 52
Click on Add Attachment.

BMC REMEDY 8.1 - INCIDENT MANAGEMENT & REQUEST FULFILLMENT USER GUIDE
5/27/2015 Page 53
An Attachment Information window will pop up for you to add the attachment. Type a brief description
of the attachment in the Attachment Name field. Click on the Add button.
An Add Attachment window will pop up. Click Browse to search for your file.

BMC REMEDY 8.1 - INCIDENT MANAGEMENT & REQUEST FULFILLMENT USER GUIDE
5/27/2015 Page 54
Select the file you wish to upload and click on the Open button.
Click the Ok button in the Add Attachment window.

BMC REMEDY 8.1 - INCIDENT MANAGEMENT & REQUEST FULFILLMENT USER GUIDE
5/27/2015 Page 55
Click the Save button.
Click the Refresh Table button in Message Information window.
The attachment will be listed under the Attachments tab of the email template.

BMC REMEDY 8.1 - INCIDENT MANAGEMENT & REQUEST FULFILLMENT USER GUIDE
5/27/2015 Page 56
Click on the Send button to send your email message.
Your email message will be recorded in the Work Info tab of the Incident.

BMC REMEDY 8.1 - INCIDENT MANAGEMENT & REQUEST FULFILLMENT USER GUIDE
5/27/2015 Page 57
5.6 CHANGING THE STATUS OF AN INCIDENT Click on the drop down menu next to the Status field.
Select a Status from the drop down menu.
Incident Statuses
Status Description
New This status is given automatically to new Incidents.
Assigned Once the Incident is assigned to a Group, the status will automatically change to Assigned. The status will stay in Assigned when the Incident has been assigned to an individual.
In Progress Once the Incident is assigned to an individual and a Work Info entry has been logged, then the Incident’s status will automatically change to In Progress.
Pending This status is set manually by the Incident Owner, and is specifically for Incidents that are waiting for the following status reasons: Task, Change, Business Approval, Client Action Required, Supplier Delivery, 3rd Party Vendor Action, Local Site Action Required, or Purchase Order Approval.
Resolved This status is set manually by the Incident Owner, and is for Incidents that have been resolved by the following status reasons: Customer Fixed Problem, Work Around Provided, Future Enhancement Request, No Further Action Required, Incident Escalated to Problem Management, Request Denied, or No Customer Response.
Closed This status is automatically given to Incidents that have been resolved for two weeks. Once the status of an Incident has been changed to Closed, you cannot reopen the Incident.
Cancelled This status is set manually by the Incident Owner in order to cancel an Incident.

BMC REMEDY 8.1 - INCIDENT MANAGEMENT & REQUEST FULFILLMENT USER GUIDE
5/27/2015 Page 58
If you change the Status or Priority of an Incident, a pop up window will prompt you to provide a reason
for the status change. Type in your status change reason in the Notes field and click Save.
This status change reason will be automatically entered into the Work Info log.
5.7 CHANGING THE STATUS OF AN INCIDENT TO PENDING Click on the drop down menu next to the Status field, and select Pending from the drop down menu.

BMC REMEDY 8.1 - INCIDENT MANAGEMENT & REQUEST FULFILLMENT USER GUIDE
5/27/2015 Page 59
Select a Status Reason from the drop down menu: Task, Change, Business Approval, Client Action
Required, Supplier Delivery, Third Party Vendor Action, Local Site Action Required, or Purchase Order
Approval.
Incident: Pending Status Reasons
Status Reason Description
Task A task must be completed before further work on the Incident can proceed, or before it can be resolved.
Change A change must take effect before further work on the Incident can proceed, or before it can be resolved.
Business Approval A business approval must take effect before further work on the Incident can proceed, or before it can be resolved.
Client Action Required Action is required by the client before further work on the Incident can proceed, or before it can be resolved.
Supplier Delivery A delivery from a supplier must be received before further work on the Incident can proceed, or before it can be resolved.
Third Party Vendor Action A third party vendor must complete a task before further work on the Incident can proceed, or before it can be resolved.
Local Site Action Required Action is required by the Incident owner, or another member of ITS, before further work on the Incident can proceed or before it can be resolved.
Purchase Order Approval A purchase order must be approved before further work on the Incident can proceed, or before it can be resolved.

BMC REMEDY 8.1 - INCIDENT MANAGEMENT & REQUEST FULFILLMENT USER GUIDE
5/27/2015 Page 60
Once you click Save to change the Incident’s status to Pending, a pop up window will prompt you to
provide a reason for the status change. Type in your status change reason in the Notes field, select your
Next Action Date, and click Save.
5.8 ASSIGNING AN INCIDENT TO YOURSELF To quickly assign an Incident to yourself, click on the Assign to Me button in the Quick Action menu on
the left hand side of the screen.

BMC REMEDY 8.1 - INCIDENT MANAGEMENT & REQUEST FULFILLMENT USER GUIDE
5/27/2015 Page 61
A window will pop up with the Support Groups that you are listed as a member. Select the appropriate
Support Group. Click Ok.
Click on the Save button to save the change.
A Prompt Information message at the top of the screen will indicate that the previous Incident owner
will be notified of the change.

BMC REMEDY 8.1 - INCIDENT MANAGEMENT & REQUEST FULFILLMENT USER GUIDE
5/27/2015 Page 62
5.9 REQUESTING REASSIGNMENT Click on the Request Reassignment button in the Quick Action menu.
Click on the drop down menu next to the Requested Assigned Group field.

BMC REMEDY 8.1 - INCIDENT MANAGEMENT & REQUEST FULFILLMENT USER GUIDE
5/27/2015 Page 63
Select the group that the Incident should be reassigned to.
Type in the reason why the Incident needs to be reassigned in the Reason field.
Click on the Request Group Reassignment button.

BMC REMEDY 8.1 - INCIDENT MANAGEMENT & REQUEST FULFILLMENT USER GUIDE
5/27/2015 Page 64
The Work Info log will update with a Status Update showing the Requested Reassignment.
The Incident will be reassigned to the Reassign queue for approval.
6 TASKS
6.1 CREATING A TASK Click on the Tasks tab in the Incident.

BMC REMEDY 8.1 - INCIDENT MANAGEMENT & REQUEST FULFILLMENT USER GUIDE
5/27/2015 Page 65
Click on the Create button to create a new Task.
The Task window will open to create the new Task.

BMC REMEDY 8.1 - INCIDENT MANAGEMENT & REQUEST FULFILLMENT USER GUIDE
5/27/2015 Page 66
Type in a short description of the Task in the Summary field.
Type in a full description of the Task in the Notes field.
Click on the drop down menu to select the Assignee Group.
BMC REMEDY 8.1 - INCIDENT MANAGEMENT & REQUEST FULFILLMENT USER GUIDE
5/27/2015 Page 67
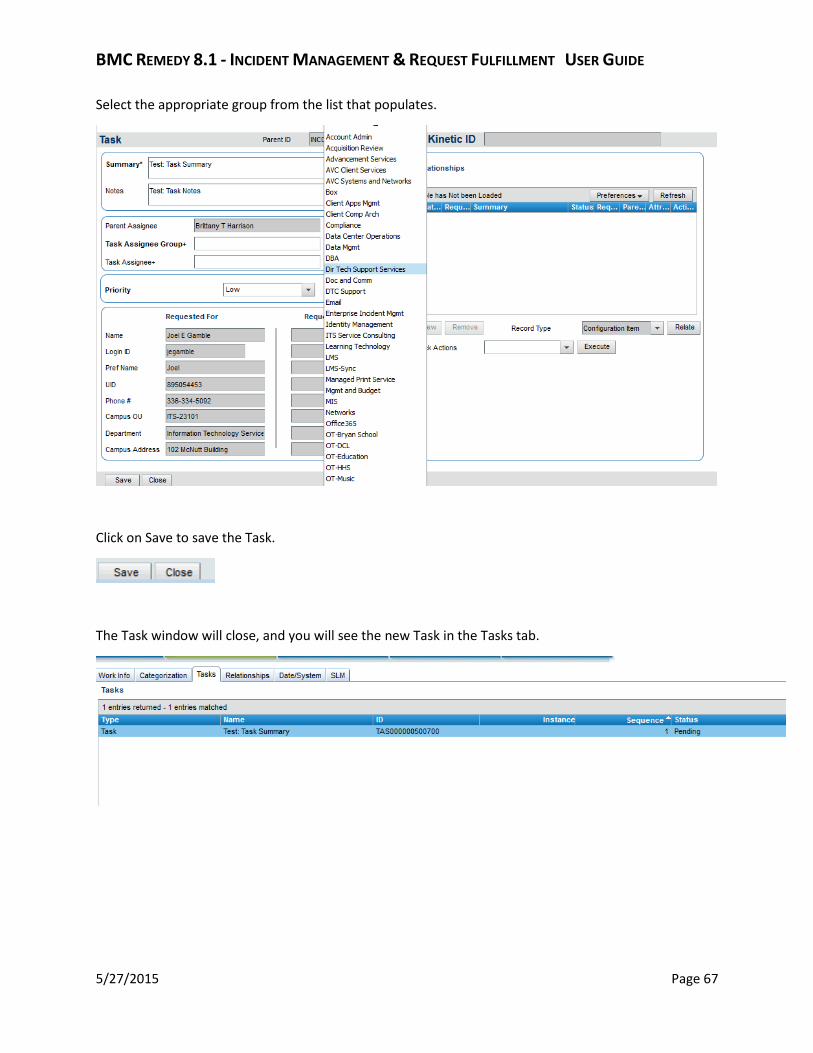
Select the appropriate group from the list that populates.
Click on Save to save the Task.
The Task window will close, and you will see the new Task in the Tasks tab.

BMC REMEDY 8.1 - INCIDENT MANAGEMENT & REQUEST FULFILLMENT USER GUIDE
5/27/2015 Page 68
6.2 ADDING WORK INFO The Work Info tab is visible in an open Task on the upper right hand side of the screen.
In the Add Work Info section, click on the drop down menu to select the Work Info Type. There are
three Work Info Types: Customer Communication, Status Update, and Work Log. The Work Info Type is a
required field to save a Work Info entry.

BMC REMEDY 8.1 - INCIDENT MANAGEMENT & REQUEST FULFILLMENT USER GUIDE
5/27/2015 Page 69
Type in a full description of the Work Info in the Notes field.
Click on the Save button in the bottom left corner of the Task to save the Work Info entry.
The Work Info will be listed in the Work Info tab.
6.3 VIEWING WORK INFO The Work Info tab is visible in an open Task on the upper right hand side of the screen.

BMC REMEDY 8.1 - INCIDENT MANAGEMENT & REQUEST FULFILLMENT USER GUIDE
5/27/2015 Page 70
Double click on the Work Info entry that you wish to view.
Alternatively you may also click on the View button to open the Work Info entry.
A Work Info window will pop up with the Work Info entry.

BMC REMEDY 8.1 - INCIDENT MANAGEMENT & REQUEST FULFILLMENT USER GUIDE
5/27/2015 Page 71
Click on the Close button when you are done reviewing the Work Info entry.
6.4 ADDING AN ATTACHMENT Click on the Add Attachment button to upload an attachment with the Work Info entry.
The Add Attachment window will pop up. Click on Browse to select the file you wish to upload.

BMC REMEDY 8.1 - INCIDENT MANAGEMENT & REQUEST FULFILLMENT USER GUIDE
5/27/2015 Page 72
Select the file you wish to upload and click on the Open button.
Click on Ok to add the attachment.
Click on the Save button in the bottom left corner of the Task to save the Work Info entry.

BMC REMEDY 8.1 - INCIDENT MANAGEMENT & REQUEST FULFILLMENT USER GUIDE
5/27/2015 Page 73
The Work Info will be listed in the Work Info tab and the number of attached files will be listed under
the Files column.
6.5 VIEWING AN ATTACHMENT Double click on the Work Info entry that has an attachment you wish to view. Alternatively you may also
click on the View button.

BMC REMEDY 8.1 - INCIDENT MANAGEMENT & REQUEST FULFILLMENT USER GUIDE
5/27/2015 Page 74
Select the file you wish to open in the Work Info, and click on the Display button.
You may choose to open or save the file. Click on Ok to continue.

BMC REMEDY 8.1 - INCIDENT MANAGEMENT & REQUEST FULFILLMENT USER GUIDE
5/27/2015 Page 75
6.6 SENDING AN EMAIL VIA WORK INFO IN TASK To send an email to the client via Work Info, you may select either the Send “Requested By” Email or
Send “Requested For” Email.
You may also use the mail buttons beside the Parent Assignee name or Login IDs of either the Requested
For or Requested By. The Parent Assignee is the person who owns the Incident.

BMC REMEDY 8.1 - INCIDENT MANAGEMENT & REQUEST FULFILLMENT USER GUIDE
5/27/2015 Page 76
A new web browser tab will open with the email template form.
This email template will not automatically CC any other recipients. You will have to manually type in
additional email addresses in the field. The email template will automatically BCC you, the sender.

BMC REMEDY 8.1 - INCIDENT MANAGEMENT & REQUEST FULFILLMENT USER GUIDE
5/27/2015 Page 77
You may edit the Subject field if necessary.
Type into the body of the email the message you wish to send.
Click on the Attachments tab if you need to add an attachment to the email.

BMC REMEDY 8.1 - INCIDENT MANAGEMENT & REQUEST FULFILLMENT USER GUIDE
5/27/2015 Page 78
Click on Add Attachment.

BMC REMEDY 8.1 - INCIDENT MANAGEMENT & REQUEST FULFILLMENT USER GUIDE
5/27/2015 Page 79
An Attachment Information window will pop up for you to add the attachment. Type a brief description
of the attachment in the Attachment Name field. Click on the Add button.
An Add Attachment window will pop up. Click on Browse to search your file.

BMC REMEDY 8.1 - INCIDENT MANAGEMENT & REQUEST FULFILLMENT USER GUIDE
5/27/2015 Page 80
Select the file you wish to upload and click on the Open button.
Click the Ok button in the Add Attachment window.
BMC REMEDY 8.1 - INCIDENT MANAGEMENT & REQUEST FULFILLMENT USER GUIDE
5/27/2015 Page 81
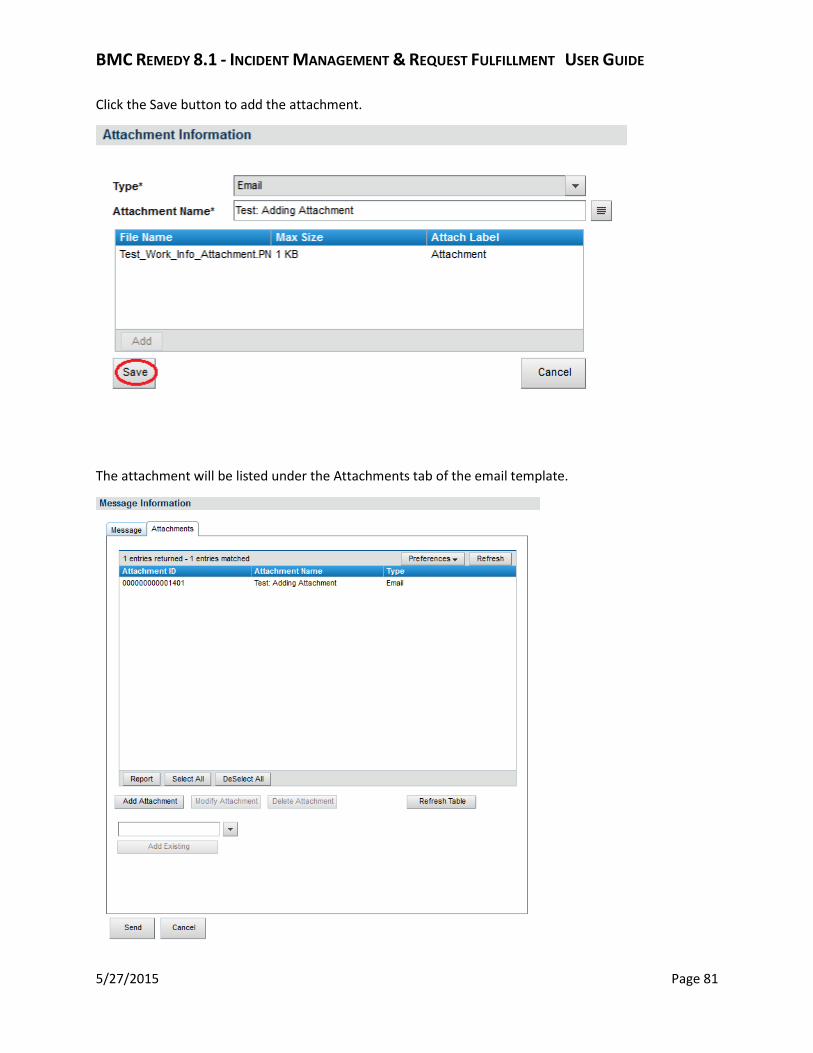
Click the Save button to add the attachment.
The attachment will be listed under the Attachments tab of the email template.

BMC REMEDY 8.1 - INCIDENT MANAGEMENT & REQUEST FULFILLMENT USER GUIDE
5/27/2015 Page 82
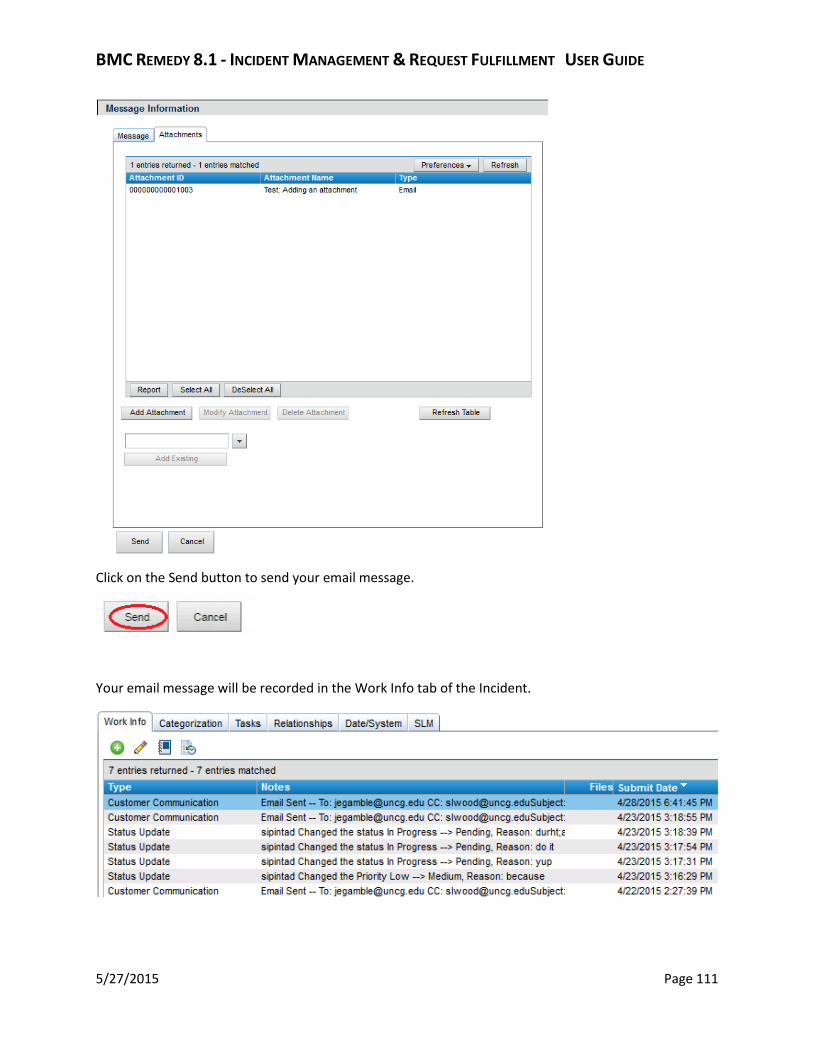
Click on the Send button to send your email message.
Your email message will be recorded in the Work Info tab of the Task.

BMC REMEDY 8.1 - INCIDENT MANAGEMENT & REQUEST FULFILLMENT USER GUIDE
5/27/2015 Page 83
6.7 SEARCHING FOR A TASK BY TASK ID To Search for a Task, open the Incident Management Console. Click on the Search Task link in the
Functions section.

BMC REMEDY 8.1 - INCIDENT MANAGEMENT & REQUEST FULFILLMENT USER GUIDE
5/27/2015 Page 84
A web browser tab will open with the Task Search fields. Type in the Task ID number and click Search.
The top of the screen will display the search results.

BMC REMEDY 8.1 - INCIDENT MANAGEMENT & REQUEST FULFILLMENT USER GUIDE
5/27/2015 Page 85
6.8 CHANGING THE STATUS OF A TASK Click on the drop down menu next to the Status field. Select a Status.
Task Statuses
Status Description
Staged These are automated tasks created by Kinetic or Remedy Workflow. Do not manually update tasks with a Staged status.
Assigned Once the task is assigned to an individual in a group, the Task Assignee, then the task will automatically change to the Assigned status.
Pending Once the task is assigned to a group, but has not been assigned to an individual, it will automatically go into the Pending status. Once the task has been assigned to an individual, it will then go into the Assigned status. This status can also be set manually by the Task Assignee, and can be used for tasks that are waiting for the following status reasons: Assigned, Error, Parts, or More Info.
Work in Progress Once the task is assigned to an individual and a Work Info entry has been logged, then the task’s status will automatically change to Work in Progress.
Waiting This status is not in use. Do not select this status.
Closed This status is manually set by the Task Assignee, and is for tasks that have been resolved for the following status reasons: Success, Failed, or Canceled.
Bypassed This status is not in use. Do not select this status.

BMC REMEDY 8.1 - INCIDENT MANAGEMENT & REQUEST FULFILLMENT USER GUIDE
5/27/2015 Page 86
6.9 CLOSING A TASK Click on the drop down menu next to the Status field. Select the Closed status from the drop down
menu.
The Status Reason field will auto populate to Success.
Click on the Save button on the bottom left corner of the screen to save the changes.

BMC REMEDY 8.1 - INCIDENT MANAGEMENT & REQUEST FULFILLMENT USER GUIDE
5/27/2015 Page 87
7 RELATIONSHIPS
7.1 RELATING AN INCIDENT TO ANOTHER INCIDENT Click on the Relationships tab in the Incident.
Click on the drop down menu in the Search field.

BMC REMEDY 8.1 - INCIDENT MANAGEMENT & REQUEST FULFILLMENT USER GUIDE
5/27/2015 Page 88
Select Incident from the drop down menu.
Click on the magnifying glass icon to search.
Type in the Incident number into the Incident ID field.
Click on Search.

BMC REMEDY 8.1 - INCIDENT MANAGEMENT & REQUEST FULFILLMENT USER GUIDE
5/27/2015 Page 89
Your search results will appear in the box below the Search Criteria.
Click on the Relate button to relate the two Incidents.
A pop up window will indicate if the new relationship was a success. Click on Ok to continue.
The related Incident will now be listed in the Relationships tab of the Incident.

BMC REMEDY 8.1 - INCIDENT MANAGEMENT & REQUEST FULFILLMENT USER GUIDE
5/27/2015 Page 90
7.2 RELATING AN ASSET TO A TASK Click on the Relationships tab in the Task.
Click on the Search button next to the Configuration Item Request Type field.

BMC REMEDY 8.1 - INCIDENT MANAGEMENT & REQUEST FULFILLMENT USER GUIDE
5/27/2015 Page 91
Type in any of the following information to search for the asset: CI ID, CI Name, or Serial Number. Click
on the Search button.
Your search results will appear in the box below the Search Criteria.
Click on the Relate button to relate the Asset to the Incident.

BMC REMEDY 8.1 - INCIDENT MANAGEMENT & REQUEST FULFILLMENT USER GUIDE
5/27/2015 Page 92
A pop up window will indicate if the new relationship was a success. Click on Ok to continue.
Click on the Close button to close the Relationship Attributes window.
The related Asset will now be listed in the Relationships tab of the Task.

BMC REMEDY 8.1 - INCIDENT MANAGEMENT & REQUEST FULFILLMENT USER GUIDE
5/27/2015 Page 93
7.3 RELATING AN INCIDENT TO AN ASSET Click on the drop down menu in the Search field of the Incident’s Relationships tab.
Select Configuration Item from the drop down menu and click on the magnifying glass icon to begin the
search.

BMC REMEDY 8.1 - INCIDENT MANAGEMENT & REQUEST FULFILLMENT USER GUIDE
5/27/2015 Page 94
Type in any of the following information to search for the asset: CI ID, CI Name, or Serial Number. Click
on the Search button.
Your search results will appear in the box below the Search Criteria.
Click on the Relate button to relate the Asset to the Incident.

BMC REMEDY 8.1 - INCIDENT MANAGEMENT & REQUEST FULFILLMENT USER GUIDE
5/27/2015 Page 95
A pop up window will indicate if the new relationship was a success. Click on Ok to continue.
The related Asset will now be listed in the Relationships tab of the Incident.

BMC REMEDY 8.1 - INCIDENT MANAGEMENT & REQUEST FULFILLMENT USER GUIDE
5/27/2015 Page 96
7.4 RELATING AN ASSET TO A PERSON Go to the Asset Manager Console from the Applications List.
The Asset Management Console will open, displaying Configuration Items (CIs). Click on the Advanced
Filter.

BMC REMEDY 8.1 - INCIDENT MANAGEMENT & REQUEST FULFILLMENT USER GUIDE
5/27/2015 Page 97
Click on the drop down menu for the Display CIs where field. Select the option that you wish to search
by.
Click on the next drop down menu and select “contains.”
In the next field, type in the appropriate information for your search. Click on the magnifying glass icon
to begin the search.
Your search results will appear in the Configuration Items (CIs) window. Double click on the CI to open it.

BMC REMEDY 8.1 - INCIDENT MANAGEMENT & REQUEST FULFILLMENT USER GUIDE
5/27/2015 Page 98
The Configuration Item will open. Click on the People tab.
Click on the Add button.

BMC REMEDY 8.1 - INCIDENT MANAGEMENT & REQUEST FULFILLMENT USER GUIDE
5/27/2015 Page 99
The CI Person Type window will pop up. Select for Yes for Primary Contact if that is applicable. Click on
the Ok button.
The People Search window will pop up. You can search by name, UID, or Spartan ID. Click on the Search
button.

BMC REMEDY 8.1 - INCIDENT MANAGEMENT & REQUEST FULFILLMENT USER GUIDE
5/27/2015 Page 100
The People Record should appear below the Search Criteria. Click on the Select button.
The Asset Person Role window will pop up. Click on the drop down menu for the Role field.
Select the appropriate Role.

BMC REMEDY 8.1 - INCIDENT MANAGEMENT & REQUEST FULFILLMENT USER GUIDE
5/27/2015 Page 101
Click on the Ok button.
The People tab will update showing the People Record relationship to the Asset.
To remove the People Record, select it and click on the Remove button.

BMC REMEDY 8.1 - INCIDENT MANAGEMENT & REQUEST FULFILLMENT USER GUIDE
5/27/2015 Page 102
A Message Box will pop up to verify that you wish to delete the record. Click on the Yes button.
The People Record will now be removed from the Asset.
7.5 CREATING A MASTER INCIDENT Master Incidents are used to track the quantity of a problem. Master Incidents are typically created at
the Service Desk and assigned to the Problem Management queue. If the Service Desk is receiving a
large number of calls related to one specific issue, then a Master Incident may be created to help track
how many clients are effected by the problem. Once the Master Incident has been created, all Incidents
related to this problem should be related in Remedy to the Master Incident. The Master Incident will
display all related Incidents in the Relationships tab. Once the problem has been fixed, the clients of the
related Incidents should be notified that the problem has been resolved.
In the Incident that you wish to make a Master, click on the box in the Master Incident field to check
Yes.
Click on the Save button on the bottom left of the screen to save the changes.

BMC REMEDY 8.1 - INCIDENT MANAGEMENT & REQUEST FULFILLMENT USER GUIDE
5/27/2015 Page 103
NOTE: Follow the instructions in 7.1 Relating An Incident To Another Incident to relate an Incident to a
Master Incident.
NOTE: Follow the instructions in 7.6 Viewing Relationships in Incident to view all Incidents related to a
Master Incident.
7.6 VIEWING RELATIONSHIPS IN INCIDENT Click on the Relationships tab in the Incident to view all related Incidents and Assets.
7.7 VIEWING RELATIONSHIPS IN TASK Click on the Relationships tab in the Task to view all related Assets.
8 RESOLVING AN INCIDENT
Click on the drop down menu next to the Status field.

BMC REMEDY 8.1 - INCIDENT MANAGEMENT & REQUEST FULFILLMENT USER GUIDE
5/27/2015 Page 104
Select the Resolved status from the drop down menu.
Select a Status Reason from the drop down menu: Customer Fixed Problem, Work Around Provided,
Future Enhancement Request, No Further Action Required, Incident Escalated to Problem Management,
Request Denied, or No Customer Response. You are required to manually select a Status Reason when
resolving an Incident.
Incident: Resolved Status Reasons
Status Reason Description
Customer Fixed Problem The client was able to resolve the service interruption without assistance.
Work Around Provided A work around solution was provided to the client regarding the known issue. The known issue should already have been escalated to the Problem Management queue. This Incident should be related to the Master Incident created for the problem.
Future Enhancement Request
The Incident cannot be resolved until a future enhancement is performed. The enhancement request has already been submitted.
No Further Action Required The Incident has been resolved and no further action is required.
Incident Escalated to Problem Management
A Master Incident has already been created and sent to the Problem Management queue, and there is no current work around solution. This Incident should be related to the Master Incident created for the problem.
Request Denied The request has been denied.
No Customer Response The client did not respond after three client contact attempts on three separate days.

BMC REMEDY 8.1 - INCIDENT MANAGEMENT & REQUEST FULFILLMENT USER GUIDE
5/27/2015 Page 105
Click on the Save button on the bottom left of the screen to save the changes.
A new browser tab will open an email template. All Incident resolutions require an email to the client.
The Incident will not resolve if you try to skip this step.
The email template will automatically send to the Requested For client and it will CC the Requested By
client. You have the option to delete the Requested By entry in the CC field if desired, or add other email
addresses to the CC field. The BCC field will automatically include you, the sender.

BMC REMEDY 8.1 - INCIDENT MANAGEMENT & REQUEST FULFILLMENT USER GUIDE
5/27/2015 Page 106
As a reminder, the Requested For is the client who is actually having the service interruption or needs a
service request. The Requested By is the person who is calling in and reporting the problem on behalf of
the client, and/or will be the contact for the Incident.
You may edit the Subject field if necessary.
Type into the body of the email the message you wish to send.

BMC REMEDY 8.1 - INCIDENT MANAGEMENT & REQUEST FULFILLMENT USER GUIDE
5/27/2015 Page 107
Click on the Attachments tab if you need to add an attachment to the email.
Click on Add Attachment.

BMC REMEDY 8.1 - INCIDENT MANAGEMENT & REQUEST FULFILLMENT USER GUIDE
5/27/2015 Page 108
An Attachment Information window will pop up for you to add the attachment. Type a brief description
of the attachment in the Attachment Name field. Click on the Add button.
An Add Attachment window will pop up. Click Browse to search for your file.

BMC REMEDY 8.1 - INCIDENT MANAGEMENT & REQUEST FULFILLMENT USER GUIDE
5/27/2015 Page 109
Select the file you wish to upload and click on the Open button.
Click the Ok button in the Add Attachment window.

BMC REMEDY 8.1 - INCIDENT MANAGEMENT & REQUEST FULFILLMENT USER GUIDE
5/27/2015 Page 110
Click the Save button to add the attachment.
Click the Refresh Table button in Message Information window.
The attachment will be listed under the Attachments tab of the email template.
BMC REMEDY 8.1 - INCIDENT MANAGEMENT & REQUEST FULFILLMENT USER GUIDE
5/27/2015 Page 111
Click on the Send button to send your email message.
Your email message will be recorded in the Work Info tab of the Incident.

BMC REMEDY 8.1 - INCIDENT MANAGEMENT & REQUEST FULFILLMENT USER GUIDE
5/27/2015 Page 112
9 SERVICE LEVEL MANAGEMENT
9.1 SERVICE LEVEL STANDARDS All tickets are subject to the service level targets which are defined based on the priority of the ticket. The three standards are:
Service Level Target Description
Case Acceptance Standards Allowed time lapse before a ticket should be assigned to an individual and work begin
Client Contact Standards How frequently a client should be contacted & a client contact entry should be made
Case Update Frequency Standards How frequently a ticket should have a status update – a meaningful work log entry – to determine the status the case
Details of determining whether or not the processing of a ticket is in compliance with these standards and what monitoring steps are taken in association with these standards are also included. Compliance to these standards is expected on all ITS incidents and service requests.
9.1.1 Case Acceptance Standards
Tickets that are not resolved at first client contact will be assigned to a group. The Case Acceptance
Standard refers to the allowed time lapse before a ticket should be assigned to an individual and work
begin. Any case with functional escalation from the Service Desk or transferred to a different group via
the reassign process is subject to the Case Acceptance Standards. All tasks are subject to the Case
Acceptance Standards. Elapsed time is business hours; i.e. the clock is only ticking M-F 8am – 5pm.
To meet the Case Acceptance Standards the case must be assigned to an individual. Failure to meet
standards results in notification sent to Group Manager at listed frequency.
The elapsed time permitted depends on the Priority level of the Case as shown below:
Case Acceptance Standards Priority Acceptance Standard in Elapsed Business Time
1 - Critical 15 minutes
Failure notification frequency: 15 minutes
2 - High 30 minutes
Failure notification frequency: 30 minutes
3 - Medium 4 business hours
Failure notification frequency: 1 business hour
4 - Low 9 business hours
Failure notification frequency: 1 business hour
BMC REMEDY 8.1 - INCIDENT MANAGEMENT & REQUEST FULFILLMENT USER GUIDE
5/27/2015 Page 113
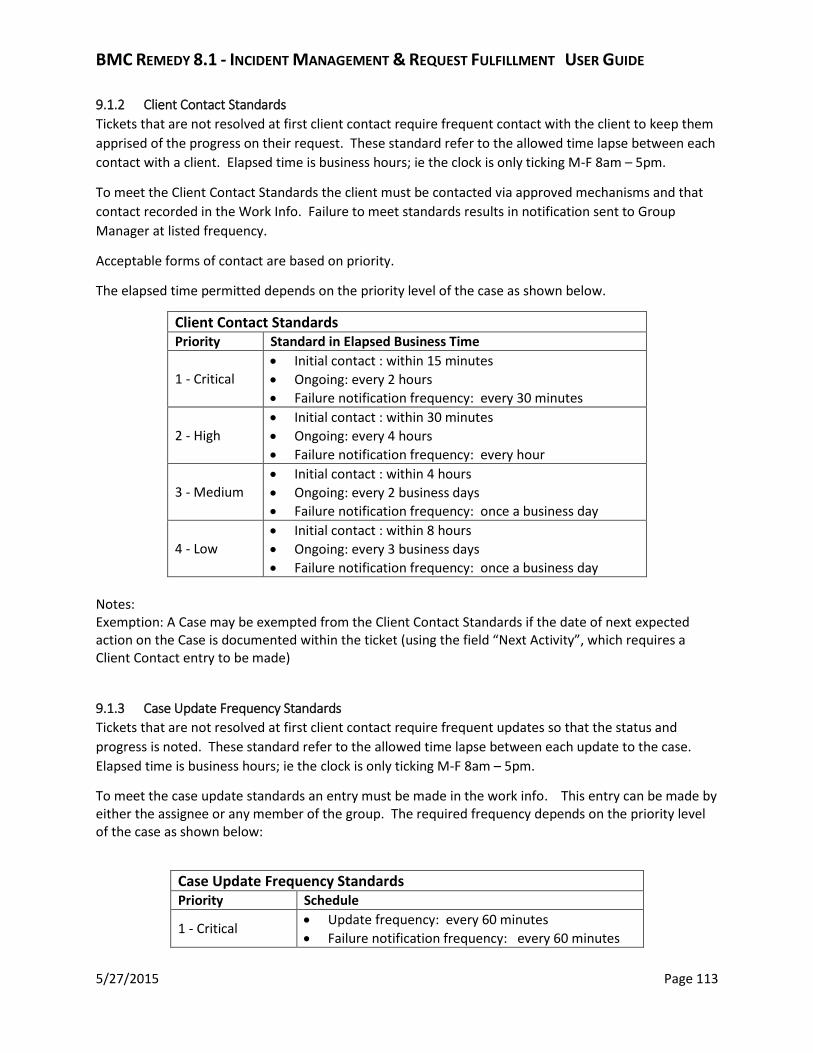
9.1.2 Client Contact Standards
Tickets that are not resolved at first client contact require frequent contact with the client to keep them
apprised of the progress on their request. These standard refer to the allowed time lapse between each
contact with a client. Elapsed time is business hours; ie the clock is only ticking M-F 8am – 5pm.
To meet the Client Contact Standards the client must be contacted via approved mechanisms and that
contact recorded in the Work Info. Failure to meet standards results in notification sent to Group
Manager at listed frequency.
Acceptable forms of contact are based on priority.
The elapsed time permitted depends on the priority level of the case as shown below.
Client Contact Standards Priority Standard in Elapsed Business Time
1 - Critical Initial contact : within 15 minutes
Ongoing: every 2 hours
Failure notification frequency: every 30 minutes
2 - High Initial contact : within 30 minutes
Ongoing: every 4 hours
Failure notification frequency: every hour
3 - Medium Initial contact : within 4 hours
Ongoing: every 2 business days
Failure notification frequency: once a business day
4 - Low Initial contact : within 8 hours
Ongoing: every 3 business days
Failure notification frequency: once a business day
Notes: Exemption: A Case may be exempted from the Client Contact Standards if the date of next expected action on the Case is documented within the ticket (using the field “Next Activity”, which requires a Client Contact entry to be made)
9.1.3 Case Update Frequency Standards
Tickets that are not resolved at first client contact require frequent updates so that the status and
progress is noted. These standard refer to the allowed time lapse between each update to the case.
Elapsed time is business hours; ie the clock is only ticking M-F 8am – 5pm.
To meet the case update standards an entry must be made in the work info. This entry can be made by either the assignee or any member of the group. The required frequency depends on the priority level of the case as shown below:
Case Update Frequency Standards Priority Schedule
1 - Critical Update frequency: every 60 minutes
Failure notification frequency: every 60 minutes

BMC REMEDY 8.1 - INCIDENT MANAGEMENT & REQUEST FULFILLMENT USER GUIDE
5/27/2015 Page 114
2 - High Update frequency: every 4 hours
Failure notification frequency: every 4 hours
3 - Medium Update frequency: every 2 business days
Failure notification frequency: once a business day
4 - Low Update frequency: every 3 business days
Failure notification frequency: once a business day
9.2 SERVICE TARGETS Service Targets are used to measure how long it takes to complete a process. For example: the Client
Contact Standard for a Priority 4 – Low Incident requires that the client be contacted every 3 business
days after the initial contact. These service targets apply to both Incident and Task.
9.2.1 Service Targets in Incident
Select the SLM tab in the Incident to view the Service Targets.
To continue with the Client Contact Standard example, you will notice that the Contact Service Target
was missed.
The Hours column displays how many hours you have to complete that target. You should note that the
Hours column has 9 hours in a day to allow for the expected lunch/dinner break an employee will take.

BMC REMEDY 8.1 - INCIDENT MANAGEMENT & REQUEST FULFILLMENT USER GUIDE
5/27/2015 Page 115

BMC REMEDY 8.1 - INCIDENT MANAGEMENT & REQUEST FULFILLMENT USER GUIDE
5/27/2015 Page 116
The Due Date/Time column displays when the target is due.
9.2.2 Service Targets in Task
Select the SLM tab in the Task to view the Service Targets.
9.3 SLM HISTORY The SLM History table displays all SLM entries for the Incident. Use the scroll bars to view all of the
columns and rows in the table.

BMC REMEDY 8.1 - INCIDENT MANAGEMENT & REQUEST FULFILLMENT USER GUIDE
5/27/2015 Page 117
Click on specific entries that you wish to create a report on (use the Control keyboard shortcut to select
multiple entries).
You may also use the Select All button, or the DeSelect All button.

BMC REMEDY 8.1 - INCIDENT MANAGEMENT & REQUEST FULFILLMENT USER GUIDE
5/27/2015 Page 118
Click on Report to generate the report on the Incident’s SLM entries.
A new window with the Report Console will pop up. Select the plus sign icon in the top right corner.
The New Report window will pop up. Give the new report a name. Select Ok.

BMC REMEDY 8.1 - INCIDENT MANAGEMENT & REQUEST FULFILLMENT USER GUIDE
5/27/2015 Page 119
A new window will pop up for the new report you created that will give you the option to edit/add
sorting fields. Select Preview to view your report.
A new window will pop up with your report.

BMC REMEDY 8.1 - INCIDENT MANAGEMENT & REQUEST FULFILLMENT USER GUIDE
5/27/2015 Page 120
The icons on the top left of the report give you the options to Toggle Table of Contents , Export
Report , and Print Report .
Click the X to close the report.
Select Save to save the report.
Once you save the report, you will be able to select the report again in the Report Console.

BMC REMEDY 8.1 - INCIDENT MANAGEMENT & REQUEST FULFILLMENT USER GUIDE
5/27/2015 Page 121
9.4 SLM BREACHES
9.4.1 SLM Breaches in Incident
The SLM Breaches in Incident are located below the SLM History. This section will how many times each
status has been breached, and will show its current status.

BMC REMEDY 8.1 - INCIDENT MANAGEMENT & REQUEST FULFILLMENT USER GUIDE
5/27/2015 Page 122
9.4.2 SLM Breaches in Task
The SLM Breaches in Incident are located below the Service Targets. This section will how many times
each status has been breached, and will show its current status.
9.5 SLM STATUS On the left hand side of the Incident, the SLM Status icon will display the Incident’s current status.
Click on Details to view the Related Service Targets.

BMC REMEDY 8.1 - INCIDENT MANAGEMENT & REQUEST FULFILLMENT USER GUIDE
5/27/2015 Page 123
The Service Targets section will display the entries for the Service Targets in the Incident and will display
in a when the target’s due date is, or how long the target has been past due.
The Milestones are located below the Service Targets. The Milestones display the percentage of the
service target goal in which the entry was completed.

BMC REMEDY 8.1 - INCIDENT MANAGEMENT & REQUEST FULFILLMENT USER GUIDE
5/27/2015 Page 124
10 QUEUE MANAGEMENT
10.1 MANAGING YOUR PERSONAL QUEUE Open the Incident Management Console. Click on the drop down menu for the Show field.
Select Assigned To Me.
The Incidents assigned to you will display.

BMC REMEDY 8.1 - INCIDENT MANAGEMENT & REQUEST FULFILLMENT USER GUIDE
5/27/2015 Page 125
10.2 MANAGING YOUR SELECTED GROUPS’ QUEUES Click on the drop down menu for the Show field.
Select Assigned To My Selected Groups from the drop down menu.
Click on the drop down menu in the Filter By field to filter the results in your queue.

BMC REMEDY 8.1 - INCIDENT MANAGEMENT & REQUEST FULFILLMENT USER GUIDE
5/27/2015 Page 126
A pop up window will display the groups that you are a member of. Check which groups’ queues you
would like displayed under the View Group column. Click on the Ok button.
Your selected groups’ Incidents will display.
Click on the drop down menu in the Filter By field to filter the results in your selected groups’ queue.

BMC REMEDY 8.1 - INCIDENT MANAGEMENT & REQUEST FULFILLMENT USER GUIDE
5/27/2015 Page 127
10.3 MANAGING ALL OF YOUR GROUPS’ QUEUES Click on the drop down menu for the Show field.
Select Assigned To All My Groups from the drop down menu.
All of your groups’ Incidents will display.

BMC REMEDY 8.1 - INCIDENT MANAGEMENT & REQUEST FULFILLMENT USER GUIDE
5/27/2015 Page 128
Click on the drop down menu in the Filter By field to filter the results in your groups’ queue.