Beltone Direct - Quick Guide PDF...
21
Wireless accessories F ti l t t Qik G id Functional test ‐ Quick Guide GTO, January 2011
-
Upload
dangkhuong -
Category
Documents
-
view
227 -
download
1
Transcript of Beltone Direct - Quick Guide PDF...

Wireless accessoriesF ti l t t Q i k G idFunctional test ‐ Quick Guide
GTO, January 2011

Beltone Direct Line
ContentsBeltone Direct Line: Tests – General information 3
Beltone Direct Line: Wireless connections 5
Beltone Direct Remote Control - Pairing test 6
Beltone Direct Remote Control – Functional test 7
Beltone Direct TV Link – Pairing test 10
Beltone Direct TV Link – Streaming test 11
Beltone Direct TV Link – Alternative pairing as 2nd or 3rd channel 12
Beltone Direct Phone Link – General information 13
B lt Di t Ph Li k P i i ith TRUE d i 14Beltone Direct Phone Link – Pairing with TRUE devices 14
Beltone Direct Phone Link (testing with a mobile phone) – Pairing test 15
Beltone Direct Phone Link (testing with a Bluetooth PC) – Pairing test 17
Beltone Direct Phone Link – Functional test 20
Beltone Airlink – Testing 21
Functional Test – Quick Guide | Global Technical Operation | Page 2

Direct Line service testFunctionality test in Direct LineThese instructions are meant for a quick functional test of the Beltone Direct Line devices.
The tests performed by following these instructions will test all functions of a Direct Line accessory bothThe tests performed by following these instructions will test all functions of a Direct Line accessory bothelectrically and electro-mechanical. The test is meant as a quick first hand evaluation in a service situation,whether a Direct Line device is working as intended.
These instructions should not be read as a user guide. The Direct Line device has more features than describedin this guide. Please refer to the User Guides for detailed user instructions.
How to use the guide:The guide is step by step instructions to be followed sequentially for each Direct Line device. By showing theinstruction on a Windows PC with sound card and Bluetooth functionality, the embedded sound files might beused as audio input for Direct Line TV and Direct Line Phone Link tests If the guide is used in a printed versionused as audio input for Direct Line TV and Direct Line Phone Link tests. If the guide is used in a printed version,then sound inputs for streamer and BTB test must be applied from another sound source and TRUE soundsamples cannot be heard.
The bullet points are either marked with which indicates that this is an instruction or an information for theoperator, or with which indentifies an actual check point.
Samples of sounds played by the TRUE devices can be heard by clicking the icon
By following the instruction step by step the functions will be tested with a minimum of operator actions.
Some test are described in multiple slides.
It the lower right corner of each slide is placed an arrow indication if the test sequence is finished or continued onIt the lower right corner of each slide is placed an arrow indication if the test sequence is finished or continued onnext slide.
The arrows contains hyperlinks, either going back to page 2 (Contents) or to continued test instructionson the next slide.
Functional Test – Quick Guide | Global Technical Operation | Page 3

Direct Line service testTest structure:Each device test consists of two parts, a pairing procedure and a function procedure. The pairing will ensure thatthe transmitter and receiver part of the device is working correctly. The functional test will ensure that the electro-mechanical parts switches plugs and cables are working correctly It is recommended to run both parts of the testmechanical parts, switches, plugs and cables are working correctly. It is recommended to run both parts of the testfor each device, even though they are separated in the table on contents.
Test conditions:Make sure that there is nothing in the test environment that can have a influence on the RF-transmission betweenthe TRUE devices and the Direct Line devices Do not place any of the devices on metallic tabletops or behind orthe TRUE devices and the Direct Line devices. Do not place any of the devices on metallic tabletops or behind ornearby metallic structures like steel wardrobes.
Some of the tests requires a certain distance between the TRUE and Direct Line devices. To get an indication ofthe transmitting power being sufficient, it is important to observe that these distances are kept, and that the spacebetween the devices is free of obstructions.
Re-setting a TRUE device used for testing Direct Line.To ensure that all pairing information are cleared from an TRUE devices it is recommended to run the devicethrough a test sequence on a DSA 6000 Final Device Test System.
Important notice!
Please notice that pairing of TRUE hearing devices with any Beltone Direct Line device will overwrite any priorpairing information. In a service situation it means that if a Direct Line accessory device has been tested using alocal set of TRUE hearing devices – all pairings of customers Hearing devices and accessories must bereestablished It is important that this information go to customers/dispensers as it might otherwise be interpretedreestablished. It is important that this information go to customers/dispensers, as it might otherwise be interpretedas a defective device being returned.If the customer’s TRUE devices are available for the test, the pairing test might be omitted.
Functional Test – Quick Guide | Global Technical Operation | Page 4

Direct Line wireless connections
Beltone TRUE™
AirlinkTMBeltone Direct Line
Phone Link
Beltone SolusPro®
fitting softwareBeltone Direct Line TV Link Beltone Direct Line
Remote ControlMobile phone
g
Cable connection
2.4 GHz wireless connection
TV Audio system Computer
Bluetooth connection
Functional Test – Quick Guide | Global Technical Operation | Page 5

Remote Control – part 1 (Pairing)p ( g)Equipment used in this test:
1 TRUE device programmed for Right side1 TRUE device programmed for Left sideOptional – 1 Direct Line TV Link (SAS).
1. Put the Remote Control in pairing mode. DO NOT switch TRUE devices on yet
The SAS is not necessary for checking the functionality of the Remote Control. If a SAS is used for this test it needs to be paired with the TRUE devices prior to this test.
• DO NOT switch TRUE devices on yet.• Remove battery cover on Remote Control• Press the pairing button using a point instrument.• Check that Remote Control display switch to pairing mode.• Pairing mode will be active for 20 seconds
Pairing button.
• Pairing mode will be active for 20 seconds.
2. While Remote Control is in pairing mode switch on both TRUE devices.
Sound sample:Delayed Activation
Searching for devices.
• TRUE devices will play the Delayed Activation sound
• When each of the devices has been detected, the TRUE devices will play the Pairing Complete tune.
• A delay between the two paring functions can be
Sound sample:Pairing Complete
experienced. When one side is paired the search for the other side will continue.
• Check that Remote Control display show:Both sides connected
Left side connected.Searching for right side
Both sides connected.
Functional Test – Quick Guide | Global Technical Operation | Page 6

Remote Control – part 2 (Functional Test)
1. With the devices connected, check the buttons on Remote Control.
p ( )
Remote Control. • If the Remote Control is in stand by mode (Display not lid), pressing any button
will bring it to active mode, but will not perform the function of the button.
• For the following tests move Remote Control approximately 150 cm away from TRUE devices.
2. Press Program button once. • TRUE devices will play Preset2 sound.
• Until communication between Remote Control and TRUE devices is complete, the volume bar will be light bluethe volume bar will be light blue.
• The display will show the preset name set entered into TRUE devices by the SolusPro fitting SW.
• Check that Remote Control changes the display to Preset 2.
Right side : finished
3. Multi function button test:• The multi function button on the Remote Control is used for:
: turning volume up : turning volume down
Right side : finished.Left side: on-going.
+
Sound sample:Pairing Complete
: turning volume down: Selecting left side TRUE device only: Selecting right side TRUE device only
_<>
Functional Test – Quick Guide | Global Technical Operation | Page 7

Remote Control – part 2 (Functional Test)
3a. Press Left button .The Remote Control will now only adjust the Left side TRUE device.
Fig 3a.
The Right side setting will still be displayed and the device is still connected.
Check that the display has changed to Fig. 3a
3b. Press Plus button a couple of times.
Right side : No adjust.Left side: Adjusted
Fig 3b.pThe Remote Control will turn up the volume in the Left side TRUE only.
Check that the Left side TRUE turns volume up.
The Right side TRUE should not be affected. Turn up volume in leftside TRUE.
3c. Press Right button twice.The first press will bring back dual side control.
The second press: Remote Control will only adjust the Right side TRUE device.
Fig 3c.
The Left side setting will still be displayed and device is still connected.
Check that the display has changed to Fig 3c.
3d. Press Minus button a couple of times.
Right side : AdjustedLeft side: No adjust.
Fig 3d.
The Remote Control will turn volume down in the Right side TRUE only.
Check that the Right side TRUE volume is turned down.
The Left side TRUE should not be affected. Turn up volume in leftside TRUE.
Functional Test – Quick Guide | Global Technical Operation | Page 8

Remote Control – part 2 (Functional Test)
4. Press Home button .Pressing the Home button will:
Sound sample: Preset 1
• Activate preset 1 in both hearing instruments and play preset 1 sound.• Adjust both hearing instruments to default volume settings• Set volume to simultaneous adjustment mode
Check that the Display changes back to default setting
Sound sample:SAS search
5. Press Direct Line TV button (SAS)TRUE devices will play SAS search sound
TRUE device will go quiet and start search for a SAS
Check that the Remote Control display change to Direct Line search screen.Searching for SAS
p y g
If no SAS is found devices will switch back to the setting it came from.
If a SAS is found the display will show the Direct Line TV screen. NOTE ! For TRUE devices to find the SAS they need to be paired to the SAS.
Connected to SAS6. Activate Key Lock switch.Slide switch upwards to lock
Check that display shows Lock-symbol
Slide downwards to unlock Remote Control
Connected to SAS
S de do a ds o u oc e o e Co o
End of test. Key lock activated
Key Lock switch
Functional Test – Quick Guide | Global Technical Operation | Page 9

TV Link – part 1 (Pairing)Equipment used in this test:
1 TRUE device programmed for Right side1 TRUE device programmed for Left sideHeadphone output on PC.Optional - 1 Direct Line Remote Control.Optional 1 Direct Line Remote Control.
The Remote Control is not necessary for checking the functionality of the SAS. If a Remote Control is used for this test it needs to be paired with the TRUE devices prior to this test.
1. Prepare for pairing of TRUE devices with SAS.p p g• DO NOT switch the TRUE devices on yet.• Connect the SAS to wall socket using the Power Supply.• Check that the Green Power light switches on. • Press the pairing button in SAS
Green light: Power onAmber light: Pairing mode onSmall amber light: Channel 1
• Check that the amber Activity light is switched on.• Check that the amber light for Channel 1 switches on.• Pairing mode will be active for 20 seconds.
2 Whil th SAS i i i i d it h b th TRUE
Sound sample:Delayed Activation
2. While the SAS is in pairing mode, switch on both TRUE devices.
• The TRUE devices will play the Delayed Activation sound.
• Check that all three channel indicators switch on for a short period.
C f f C Sound sample:Pairing Complete
• Check that each of the TRUE devices are found indicated by Pairing Complete tune played by each TRUE device..
• Channel 1 light will flash for the reminder of the pairing mode period.
Functional Test – Quick Guide | Global Technical Operation | Page 10

TV Link – part 1 (Streaming)1. Prepare for TV connection PC .
• Connect the red and white plug on SAS to the headphone output on the PC. Use the Jack adaptor.
• Switch the TRUE devices to the streaming (SAS) program by pressing the push button on each TRUE devices for three secondsthe push button on each TRUE devices for three seconds.
• As an alternative, press the SAS button on Remote Control • Each TRUE device will play the SAS connection sound
2. Streaming music from PC. • Click one of the icons in the Sound file library to play a music file in your
Audio Left Audio RightMono/Stereo Power Paring
Sound files libraryClick one of the icons in the Sound file library to play a music file in your preferred music genre through the streamer.
• Move the TRUE devices approximately 7 meters away from SAS.• Check the music is heard in the TRUE devices.
3. Check SAS Mono / Stereo switch.
Classic
Pop
• Remove Left side audio cable.• Check that music disappears from the left side TRUE• Slide Mono / Stereo switch left• Check that music returns to Left side TRUE (now in mono)
Slid th it h t th i ht d t th di bl
Rock
• Slide the switch to the right and reconnect the audio cable.
4. Check SAS volume control.• Press the SAS volume control Left side (-).• Check the volume of music in TRUE decreases.• Press the SAS volume control Right side (+).• Check the volume of music in TRUE increases.
Mono < > Stereo
End of test. Functional Test – Quick Guide | Global Technical Operation | Page 11

TV Link part 1 (Pairing)TV Link – part 1 (Pairing)
Alternative pairing for 2nd or 3rd Direct Line TV LinkAlternative pairing for 2nd or 3rd Direct Line TV Link.It is possible to pair up to three Beltone Direct Line TV Links with a given pair of TRUE devices. For testing pairing function for a second TV Link follow instructions for channel 1 (default), but press the pairing button on SAS twice (three times for third Direct Line TV)(three times for third Direct Line TV).
Pairing as second Direct Line TV will be indicated by Channel 2 light switches on.
Channel 2 indicator
End of test. Functional Test – Quick Guide | Global Technical Operation | Page 12

Phone Link – General information
Direct Line Phone Link (BTB): • The BTB (BlueToothBridge) is a “bridge” between the
Bluetooth “world” and the Direct LineTM wireless 2.4 GHz “world”.• BTB must be paired in both these directions meaning:
• Pairing with TRUE devices• Pairing with the Bluetooth device providing input to BTB.
• Two different procedures for pairing BTB with Bluetooth device are described in this document. Using a mobile phone as Bluetooth device• Using a mobile phone as Bluetooth device
• If a mobile phone is not available, use the PC as Bluetooth device. Only one of these needs to be performed to ensure correct functionality of the BTB.
If the Bluetooth PC procedure is used, the ”Own voice microphone inlet” will not be tested.• In both procedures the Bluetooth device, (PC or mobile phone) will be the ”Searching” device, and the BTB will be the !
”Found” device.• BTB has an internal rechargeable battery.
A functionality test of the BTB will consist of:• Testing the charger and the charging ability of the BTB.• Pairing BTB with one or two TRUE devices.• Pairing BTB with either a mobile phone or a Bluetooth PC
• If the PC running this presentation is equipped with a Blootooth module it can be used for this pairing.• - or alternatively use a Bluetooth mobile phoneor alternatively use a Bluetooth mobile phone.
• Playing one or more of the sound file embedded in this presentation• - or alternatively place a call to the mobile phone
Functional Test – Quick Guide | Global Technical Operation | Page 13

Phone Link – Pairing with TRUEEquipment used in this test:
1 Direct LineTM charger1 or 2 TRUE devices.
1. Checking Charger and charging.• Before any tests is performed, make sure the BTB is charged• Connect the charger to the mini-USB socket on the BTB.• Check that the LED turns red (or green if BTB is fully charged).
2. Prepare for pairing of TRUE devices with BTB. • Applicable for both Bluetooth pairing procedures.
DO NOT switch TRUE devices on yet.R th t lli t th b tt f th BTB
LED indicator!• Remove the metallic cover at the bottom of the BTB• Switch the BTB on by pressing the multifunction key for approx. 1 sec.• Check that the blue LED turns on and stays on for approx. 4 sec.
3. Pairing of TRUE devices with BTB.Pairing bottom
3. Pairing of TRUE devices with BTB. • Press the pairing bottom on the BTB• Check the blue LED turns on solid• The BTB will stay in pairing mode for 20 sec.• Close the battery doors on the TRUE devices Sound sample:• The TRUE devices will play the Delayed Activation sound.• Check that each of the TRUE devices are found indicated by Pairing Complete
tune played by each TRUE device
Delayed Activation
Sound sample:Pairing Complete
Functional Test – Quick Guide | Global Technical Operation | Page 14

Phone Link – Mobile phone paring
1. Prepare for pairing of BTB with mobile phone.• The Mobile phone will be the ”Searching” device and the BTB will be the ”Found” device”• The pairing procedure is controlled by the mobile phone.
• Procedure may vary depending on the mobile phone used, but the steps and sequence will be very similar.
• Refer to the manual for the mobile phone.pIn the following example a Blackberry 8900 phone is used .
• Make sure the BTB is turned OFF• Make sure the mobile phone is turned ON.• Press and hold the multifunction button (on the BTB) for 7 seconds.
Ch k th t th bl LED t• Check that the blue LED turns on.• The LED on the BTB can help indicate when the BTB is in Pairing mode.
• After approx. 3 seconds it will turn on solid blue.
• After 4 seconds it will turn off for a period of approx. 2 seconds.
When LED turns on again BTB will be Pairing mode for 2 minutes• When LED turns on again BTB will be Pairing mode for 2 minutes• Put the mobile phone in Bluetooth pairing mode (search mode)
Functional Test – Quick Guide | Global Technical Operation | Page 15
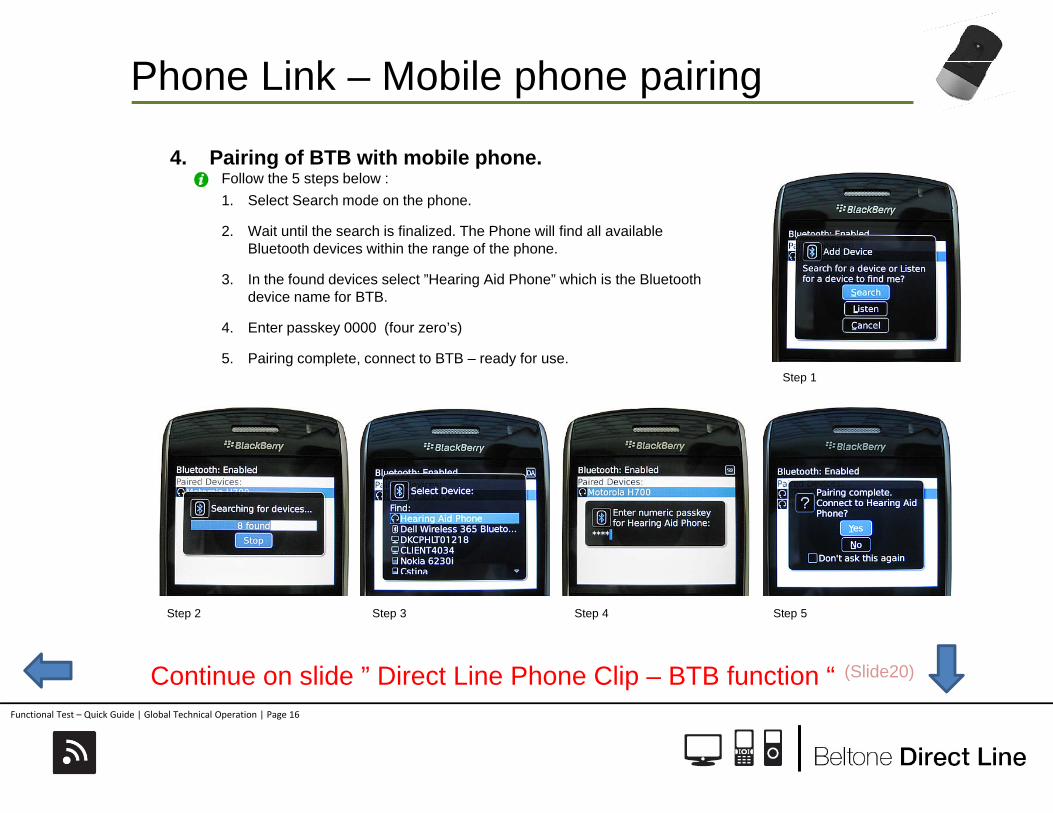
Phone Link – Mobile phone pairing
4. Pairing of BTB with mobile phone. • Follow the 5 steps below :
1. Select Search mode on the phone.
2. Wait until the search is finalized. The Phone will find all available Bluetooth devices within the range of the phone.
3. In the found devices select ”Hearing Aid Phone” which is the Bluetooth device name for BTB.
4. Enter passkey 0000 (four zero’s)
5. Pairing complete, connect to BTB – ready for use.Step 1
Step 2 Step 3 Step 4 Step 5
Continue on slide ” Direct Line Phone Clip – BTB function “ (Slide20)
Functional Test – Quick Guide | Global Technical Operation | Page 16

Phone Link – Bluetooth PC pairingEquipment used in this test:
PC ( running this presentation) with Bluetooth functionality, Windows XP and Service Pack 3. English version. Other country local settings might influence the Bluetooth Setup.
(- alternatively install a Jabra A320s Bluetooth USB adaptor)
Start Windows Bluetooth Setup Wizard.• Make sure the BTB is turned OFF.
• In the PC menu select
• Click on • In the Bluetooth Tasks menu select :
”Add a Bluetooth Device”. This will start the Bluetooth Setup Wizard.
• Before continuing make sure to put BTB into DiscoverableBefore continuing make sure to put BTB into Discoverable mode.
Put BTB in Discoverable mode.Press and hold the Multifunction button• Press and hold the Multifunction button . for 7 seconds.
• The LED on the BTB can help indicate when the BTB is in Discoverable mode.
• After approx. 3 seconds it will turn on solid blue.
• After 4 seconds it will turn off for a period of approx. 2 seconds.
• When LED turn on again BTB will be Discoverable mode for 2 minutes.
Functional Test – Quick Guide | Global Technical Operation | Page 17

Phone Link – Bluetooth PC pairing• The Wizard will search for all Bluetooth devices within range.• All found devices will be listed in the Selection window.• If needed you can limit the number of found devices by
selecting ”Show audio devices”selecting Show audio devices .• Enter Passkey: 0000 if prompted (only at the first BTB
paring)• Select the device “Hearing Aid Phone” which is the Bluetooth
device name for BTB.• Click [ Next >]• Click [ Next >]
• The Wizard will list the services available for the selected device.
• For this test you only need the ”Stereo Audio” service.• Use the service in default settings – do not use [ Configure ]
b ttbutton.• Click [ Next >]
Functional Test – Quick Guide | Global Technical Operation | Page 18

Phone Link – Bluetooth PC pairing
• The Wizard has placed a shortcut to Hearing Aid Phone (BTB) in My Bluetooth Places on PC.
• This shortcut can be used for future parings with otherThis shortcut can be used for future parings with other BTB’s to be tested.
• Click [ OK ]
• The Wizard is now ready to make the final connection to the BTBto the BTB.
• Click [ Finish ]• The Wizard will show the receipt window (shown below
this text), and the pairing and connection is complete.
BTB i d f i• BTB is now ready for testing
Functional Test – Quick Guide | Global Technical Operation | Page 19

Phone Link – BTB functional Test 1. BTB paired with Bluetooth PC.
• Make sure BTB is connected to Bluetooth PC.• Switch the TRUE devices on.
Th TRUE d i ill l th D l d A ti ti d
Sound files library
Classic
• The TRUE devices will play the Delayed Activation sound• Play one of the music files from the Sound files library.• Check that the TRUE devices switches to BTB mode and starts playing the music.• When the music stops, the TRUE devices will switch back to normal HI mode.
Pop
Rock2. BTB paired with a mobile phone.
• Make sure BTB is connected to the mobile phone.• Switch the TRUE devices on.• The TRUE devices will play the Delayed Activation sound
Pl ll t th bil h f th h ( h 2)
Sound sample:Delayed Activation
• Place a call to the mobile phone form another phone (phone 2).• Check that the TRUE devices play the BTB phone ringing sound• Check that sound is transmitted from phone2 to the TRUE devices• Talk into the ”Own voice microphone inlet”.• Check that the sound is transmitted to the phone 2
Sound sample:BTB phone ringing
p
3. Test the BTB volume control.• Press the Volume control button +. • Check that volume increases.• Press the volume control• Press the volume control –• Check that volume decreases. • Press the Multifunction button. • Check that the call has ended.
”Own voice” microphone inlet
Functional Test – Quick Guide | Global Technical Operation | Page 20

Beltone Airlink
1. Testing Beltone AirlinkThe Beltone Direct Line Airlink is a device primarily used by hearing care professionalsThe Beltone Direct Line Airlink is a device primarily used by hearing care professionals during fitting of the TRUE wireless products.No special functional test is available for Airlink.
For testing a Direct Line Airlink, a TRUE device should be paired using the SolusProfitting software.
Functional Test – Quick Guide | Global Technical Operation | Page 21