BASIC GAME - mas-yamazaki.net · designed to retain the playability of the old Avalon Hill classic...
28
STURM NACH OSTEN was developed in response to Donald L.Doy’s unrelenting exhortions for another classically simple Russian Front / Great Patriotic War game. It is a strategic-level simulation for two players of the conflict between the Axis and the Soviet Union in the Second World War. The game has two versions, basic and advanced, and in each version players can choose between a number of scenarios, including the entire campaign from June 1941 to May 1945. Sturm Nach Osten has been designed to retain the playability of the old Avalon Hill classic Stalingrad, whilst increasing realism and strategic flexibility. Some historical detail has been sacrificed to achieve the primary aim of playability, but the general tempo and most important variables of the campaign are accurately conveyed. While essentially simple in structure, the game contains a number of detailed and intricate rules, and introduces several new ideas and concepts. Players are advised to read the rules very carefully, bearing in mind that they have been carefully worded to mean exactly what they say. A number of Examples of Play are also given to illustrate the more difficult parts of the rules, and players are also adviced to study these. Don’t be put off by the apparent complexity of such rules as Supply and Combat - they will quickly become second-nature once play begins ! There are two sets of rules, one each for the basic and advanced versions of the game, and it is recommended that all players, no matter how experienced, begin by playing the basic game at least once before moving on to the advanced. The advanced game rules than add on to those of the basic game, altering some sections and expanding others to give greater complexity and realism. The two versions use different sets of counters, distinguished by a slight color difference. Counters in counter-sheet 1 (and some counters in sheet 3) are used for the basic game, and in sheets 2 and 3 are used for the advanced game. Sheet 4 contains markers. The basic game charts and tables are on one side while those relating to the advanced game are on the other. Sturm Nach Osten is played in turns, each representing one month of actual time. Each turn is sub-divided into two player-turns in which first the Axis and then the Soviet player move their units over the playing area and initiate combat. Victory is based both on the historical performance and on the war potential of the two sides, and is determined by control of geographical objectives known as Victory cities (see Appendix I), with the precise number required for victory by either side varying with the progress of the war. A defeat for the Soviet player does not necessarily imply the surrender of the Soviet Union, but rather the sustaining of such losses as to prolong the war well beyond May 1945. Overall, the game tries to provide the Axis and Soviet players with some insight into the strategic options, operational capabilities, and tactical opportunities available to the historical commanders. Good luck and good gaming ! BASIC GAME 1.0 GAME COMPONENTS 1.1 The Rules The Basic Game comprises Section 1.0 to 13.0 of the rules, and players will also need to refer to the Deployment sheet. Sections 14.0 to 23.0 contain the Advanced Game rules, and no reference should be made to them when playing the Basic Game. All of the charts and tables needed for play, apart from the Terrain Effects Chart which is printed on the mapboard, are contained on the Basic Game side of the player's sheet. It is strongly recommended that players play the Basic Game first, before moving on to the Advanced version. 1.2 The Mapboard The mapboard is a diagramatic representation of the area over which the campaign was fought. Superimposed on the map is a grid of hexagons, which regulates the movement and combat of the playing pieces. The hexagons are referred to as “hexes” and their sides as “hexsides”. Each hex contains a number which uniquely identities it. Hexes are either blank, or contain some symbol representing the various types of terrain of the region. The key to these symbols is given on the Terrain Effects Chart, together with their effects on movement and combat (note that these sometimes differ between the Basic and Advanced versions of the game). Rules Sections 4.5, 6.2, and 7.5 give further details of terrain effects. 1.3 The Playing Pieces The 1/2” die-cut counters represent the actual military units which took part in the campaign, and are hereafter simply referred to as “units”. There are different sets of units for the Basic and Advanced versions of the game. In the Basic Game, players use only those units printed numbers on two-tone background, in counter-sheet 1 (exception: the Soviet player also uses Factories and Zhukov units with two-tone background in counter-sheet 3). A code of "B (Basic)" is printed on the upper-left of those units' reverse-side. All of the Basic Game units, with one exception, are single-sided, and the reverse side of the counters is used only for prepare of play. The one exception is the Zhukov marker, both sides of which may be used in the Basic Game. Printed on the units is all the information necessary for their use in the game. The following is an explanation of the symbols and notation on the counters: 1
Transcript of BASIC GAME - mas-yamazaki.net · designed to retain the playability of the old Avalon Hill classic...

STURM NACH OSTEN was developed in response to Donald L.Doy’s
unrelenting exhortions for another classically simple Russian Front /
Great Patriotic War game. It is a strategic-level simulation for two
players of the conflict between the Axis and the Soviet Union in the
Second World War.
The game has two versions, basic and advanced, and in each version
players can choose between a number of scenarios, including the entire
campaign from June 1941 to May 1945. Sturm Nach Osten has been
designed to retain the playability of the old Avalon Hill classic Stalingrad,
whilst increasing realism and strategic flexibility. Some historical detail
has been sacrificed to achieve the primary aim of playability, but the
general tempo and most important variables of the campaign are
accurately conveyed.
While essentially simple in structure, the game contains a number of
detailed and intricate rules, and introduces several new ideas and
concepts. Players are advised to read the rules very carefully, bearing in
mind that they have been carefully worded to mean exactly what they
say. A number of Examples of Play are also given to illustrate the more
difficult parts of the rules, and players are also adviced to study these.
Don’t be put off by the apparent complexity of such rules as Supply and
Combat - they will quickly become second-nature once play begins !
There are two sets of rules, one each for the basic and advanced
versions of the game, and it is recommended that all players, no matter
how experienced, begin by playing the basic game at least once before
moving on to the advanced. The advanced game rules than add on to
those of the basic game, altering some sections and expanding others to
give greater complexity and realism. The two versions use different sets
of counters, distinguished by a slight color difference. Counters in
counter-sheet 1 (and some counters in sheet 3) are used for the basic
game, and in sheets 2 and 3 are used for the advanced game. Sheet 4
contains markers. The basic game charts and tables are on one side
while those relating to the advanced game are on the other.
Sturm Nach Osten is played in turns, each representing one month of
actual time. Each turn is sub-divided into two player-turns in which first
the Axis and then the Soviet player move their units over the playing area
and initiate combat. Victory is based both on the historical performance
and on the war potential of the two sides, and is determined by control
of geographical objectives known as Victory cities (see Appendix I), with
the precise number required for victory by either side varying with the
progress of the war. A defeat for the Soviet player does not necessarily
imply the surrender of the Soviet Union, but rather the sustaining of such
losses as to prolong the war well beyond May 1945.
Overall, the game tries to provide the Axis and Soviet players with
some insight into the strategic options, operational capabilities, and
tactical opportunities available to the historical commanders. Good luck
and good gaming !
BASIC GAME
1.0 GAME COMPONENTS1.1 The Rules
The Basic Game comprises Section 1.0 to 13.0 of the rules, and
players will also need to refer to the Deployment sheet. Sections 14.0 to
23.0 contain the Advanced Game rules, and no reference should be made
to them when playing the Basic Game. All of the charts and tables
needed for play, apart from the Terrain Effects Chart which is printed on
the mapboard, are contained on the Basic Game side of the player's
sheet.
It is strongly recommended that players play the Basic Game first,
before moving on to the Advanced version.
1.2 The MapboardThe mapboard is a diagramatic representation of the area over which
the campaign was fought. Superimposed on the map is a grid of
hexagons, which regulates the movement and combat of the playing
pieces. The hexagons are referred to as “hexes” and their sides as
“hexsides”. Each hex contains a number which uniquely identities it.
Hexes are either blank, or contain some symbol representing the
various types of terrain of the region. The key to these symbols is given
on the Terrain Effects Chart, together with their effects on movement and
combat (note that these sometimes differ between the Basic and
Advanced versions of the game). Rules Sections 4.5, 6.2, and 7.5 give
further details of terrain effects.
1.3 The Playing PiecesThe 1/2” die-cut counters represent the actual military units which
took part in the campaign, and are hereafter simply referred to as
“units”. There are different sets of units for the Basic and Advanced
versions of the game. In the Basic Game, players use only those units
printed numbers on two-tone background, in counter-sheet 1 (exception:
the Soviet player also uses Factories and Zhukov units with two-tone
background in counter-sheet 3). A code of "B (Basic)" is printed on the
upper-left of those units' reverse-side.
All of the Basic Game units, with one exception, are single-sided, and
the reverse side of the counters is used only for prepare of play. The one
exception is the Zhukov marker, both sides of which may be used in the
Basic Game.
Printed on the units is all the information necessary for their use in the
game. The following is an explanation of the symbols and notation on
the counters:
1

1.31 How to read Units
1.32 Unit Types
1.33 Unit SizesXXX Corps
XXXX Army
XXXXX Front (Army Group)
XXXXXX Zhukov (High Command)
1.34 Unit ColorsGrey Wehrmacht (German)
Dark Grey Waffen SS (German)
Light Blue Romanian
Light Green Hungarian
Light Yellow Italian
Red Soviet
1.35 Unit DesignationsSS: Schutzstaffel
Gd: Guards
Sh: Shock
Kv: Kiev S.M.D.
We: Western S.M.D.
Ba: Baltic S.M.D.
Od: Odessa M.D.
Ms: Moscow M.D.
OS: Oslikovsky
PL: Pliev
DO: Dovator
GO: Gorbatov
P.: PolandG: Guderran
M: Manstein
*S.M.D.=Special Military District
2
Juggernaut Unit
Unit Starts June�1941 on board
Unit Type
Unit Size Unit Identity
Unit Commands (4.33)
Stacking Factor
Combat Factor Movement Factor
《German Panzer Army》�
(Front)� (Back)�
Basic Game�Code
Deployment Note
《Axis》�
German�Panzer Corps
German�Motorized Infantry�
Corps
German�Infantry Army�
(Juggernaut Unit)�
German�Mountain Corps
German SS�Panzer Corps
Romanian�Infantry Army
German�Panzer Army�
(Juggernaut Unit)�
(Front)� (Back)�
German�Infantry Corps
Romanian�Mechanized �Cavalry Corps
Italian�Infantry Army
Hungarian�Infantry Army
Military District�Tank Group
《Soviet》�(Front)� (Back)�
Infantry Army
Shock Army
Mechanized�Infantry Army
Tank Army
《Soviet》(cont.)�(Front)� (Back)�
Mechanized�Cavalry Group
Front�(Juggernaut Unit)�
Factory�(Non-Combat Unit)�
Zhukov�(Non-Combat Unit)�

1.36 MarkersA few of the counters are not military units but function markers, used
to denote the altered status of a unit during play. Of these, only the
following markers are needed in the Basic Game.
One six-sided die (not provided) is needed for play.
2.0 SEQUENCE OF PLAYSturm Nach Osten is played in turns. Each game-turn, represents one
month, commences with determination of weather for that turn, and is
then divided into two player-turns, one Axis and one Soviet. The Axis
player-turn always comes first in each game turn, and play proceeds in
the sequence listed below.
A. Weather DeterminationThe weather for the month may be pre-determined, but if not, one die
is rolled to decide it. Refer to Section 6.1.
B. Axis Player-Tum1. REPLACEMENT/REINFORCEMENT PHASE (RRP)
The Axis player takes any replacements and reinforcements to which
he is entitled and places them on the mapboard in accordance with the
rules of Section 10.0. Replacements (not reinforcements) have a
“dispersed” marker placed on them.
2. OPERATIONAL MOVEMENT PHASE (OMP)The Axis player moves as many of his undispersed units as he wishes
in accordance with the rules of Section 4.0, indicating any overrun
attacks as he does so. No Soviet movement is allowed.
3. RECOVERY PHASEThe Axis player removes “dispersed” markers from all of his units.
4. COMBAT PHASEThe Axis player specifies all his attacks, and resolves them one by one,
beginning with overrun attacks. Following each attack Tactical
Movement (retreat and advance after combat) may take place. No
Soviet attacks are allowed.
C. Soviet Player-TurnThe Soviet player-turn is simply the converse of the Axis one, with the
same four phases carried out in the same order for Soviet units. No Axis
operational movement or combat is allowed.
On completion of the above steps, players record the passage of the
month on the Turn Record Chart, and the same procedure starts again for
the next game-turn.
D. A Note on the Sequence of PlayIn practice, players will undoubtedly find it a great temptation to vary
the above sequence of play by introducing replacements and
reinforcements during the Operational Movement Phase - in effect
combining the RRP and OMP. Also, with reference to Section 7.0, it is
obviously easier to specify attacks as they are resolved, rather than
detailing them all in advance.
Well, what you care to indulge in in the privacy of your own home is
your own business, but the designer’s intention is that the prescribed
sequence of play should be strictly adhered to, and such variations are
contrary to the rules. The sequence of play is deliberately designed to
make things more difficult for the players and simulate to some extent
the planning and logistic problems encountered by general staffs.
3.0 GAME TERMS AND DEFINITIONS
3.1 Zones of Control3.11 Every combat unit has a Zone of Control which consists of the six
hexes adjacent to the hex it occupies. This term implies the potential of
a unit for influencing the military situation in the neighborhood of its
position.
3.12 A unit does not exert a Zone of Control into any hex which is adjacent
via an impassable hexside, i.e. a sea or unfrozen lake hex-side (see
Sections 4.0 and 7.0).
3.13 Factory units and the Zhukov unit have no Zone of Control.
3.14 Units may temporaly lose their Zone of Control as a result of overrun
(Section 4.4).
3.2 Control of Major Cities and Victory Cities3.21 Control of Major cities and Victory cities has no connection with
Zones of Control, but implies “ownership” of such cities by one or other
player. A Major or Victory city can never be controlled by both players
at once, though it may be controlled by both players at once, though it
may be controlled by neither.
3.22 At the start of any scenario, players are assumed to already control all
Major and Victory cities on their own side of the scenario start-line or
border. (Exception: see rule 11.15).
3.23 A player gains control of a Major or Victory City as soon as both of the
following conditions are met:
a) one of his combat units either occupies or was the last unit to enter
the city, and
b) he can trace a rail line into the city (see Rule 10.18).
3.24 A player loses control of a Major or Victory city as soon as he can no
longer trace a rail line into the city, or as soon as an enemy unit enters
the city.
3.25 To represent the hexes which fit the condition as 3.23a, the player's
control markers are placed on the major city hexes which are under
3
Game-Turn Weather Replacement�Point
Frozen
Dispersed Control Neither�Control
Attacking�Voluntary
Overrun�(Axis)�
Overrun�(Soviet)�
Sea Area�Control
Hungarian�Uncommitted
Attack Target Attacked Defended

control and outside of the border of June 1941. Also, neither control
markers are placed on the major city hexes which are nor controlled by
neither player as 3.24.
3.26 The Axis player uses his Occupied Cities marker to record the number
of the Major city hex in the U.S.S.R. for his replacement (see Rule 10.15).
3.3 Control of Sea Areas3.31 Control of the sea areas of the mapboard is relevant only for purposes
of supply and disbandment/break-out (see Rules 8.22 and 7.7) and
reflects the capability of one side or the other to transport supplies or
personnel by sea.
3.32 The Baltic Sea is controlled by the player who last controlled
Konigsberg (hex 0520).
3.33 The Black Sea is controlled by the player who last controlled by the
player who last controlled Sevastopol (hex 3018).
3.34 The Sea of Azov is controlled by the player who last simultaneously
controlled both Rostov (hex 2911) and Sevastopol.
3.35 The Caspian Sea is always controlled by the Soviet player.
3.36 If neither player control one sea area, it is considered as that the
player who has controlled that sea area last still has control of that sea
area. However, in the case of the Sea of Azov, if both player have
controlled Rostov and Sevastopol each, neither player may control that
sea area.
3.37 Boundary of the Sea of Azov is Kerch Straits. Hex 3015 is in the Sea
of Azov, 3116 is in the Black Sea, and 3115 is in both of the Sea of Azov
and the Black Sea.
3.4 Other Definitions3.41 A “friendly” unit is any unit of the player’s own side, regardless of
nationality. An “enemy” unit is any unit of the opponent’s side. Sea
areas and Major or Victory cities controlled by a player’s own side or by
his opponent are referred to as being under friendly control or under
enemy control respectively.
3.42 A “combat” unit is any unit with a combat factor, i.e., any unit other
than a factory unit or Zhukov.
3.43 “Armor-type” units are all armor, armored infantry, and armored
cavalry units.
3.44 “Infantry-type” units are all infantry, mountain infantry, shock, front,
and armored infantry units. (Note that armored infantry are both armor
and infantry-type.)
3.45 The “phasing” player is the player whose player-turn is in progress at
any point; his opponent is the “non-phasing” player. The “owing”
player is the player to whom a unit belongs.
3.46 To avoid confusion, the term “City” (large C) will be used to refer only
to ordinary cities, not Major or Victory cities, while “city” (small c) will
refer to any kind of ordinary, Major, or Victory city.
3.47 Other definitions, relevant only to particular situations, will be
introduced in the rules as the need arises.
3.5 AbbreviationsThe following abbreviations are used in the rules:
ZOC - Zone of Control
RRP - Replacement/Reinforcement Phase
OMP - Operational Movement Phase
AWL - Arctic Weather Line
CRT - Combat Results Table
VDT - Victory Determination Turn
AV - Attack Voluntary
HAB - Heavy Artillery Bonus
Inf - Infantry
4.0 MOVEMENT IN THE OPERATIONALMOVEMENT PHASE (OMP)
4.1 General4.11 In the OMP of his own player-turn, a player may move as many of his
units as he wishes - all, some, or none - in accordance with the
restrictions of this Section.
4.12 Units are moved one at a time in any order the owning player wishes,
tracing a path from hex to hex in any direction or combination of
directions. Movement from hex to hex must be consecutive (i.e. units
may not “skip” hexes), and a unit may never enter a hex containing an
enemy unit (EXCEPTION: Section 4.4 - Overrun).
4.13 As a unit moves it expends movement points for each hex entered or
hexside crossed as laid down by the Terrain Effects Chart, up to the limit
of its movement allowance. Basically, it costs a unit one movement
point to enter each clear terrain hex, with increased costs for some units
entering swamp or mountain hexes, or crossing river or Kerch Straits
hexsides.
4.14 A unit’s movement allowance is its printed Movement Factor,
modified for the effects of weather, together with any movement
bonuses or penalties specified in Section 4.3. A unit may never exceed
its movement allowance in any OMP, and may not enter a hex if this
would cause it to do so; EXCEPTION: A unit may always move one single
hex in the OMP, regardless of movement point costs, if it is not moving
directly from one hex in enemy ZOC to another (see also Rule 4.23).
4.15 Movement allowances may not be accumulated from turn to turn or
transferred from one unit to another. Note that the die affects
movement only through its determination of weather.
4.16 A unit may never move across a sea hexside, across a lake hexside
which is not frozen (see Section 6.2 - Weather), or into a hex occupied by
an enemy combat with (EXCEPTION: Overrun - Section 4.4).
4.17 Units that are placed "Dispersed" marker at the friendly movement
phase may not move during that phase.
4.18 Units with movement allowance of zero may not move at all.
4.2 Movement and Zones of Control4.21 A unit which enters an enemy ZOC during its OMP must immediately
stop and move no further that phase (EXCEPTION: Overrun - Section 4.4).
4.22 A unit which begins its OMP in enemy ZOC may move out to a hex
not in enemy ZOC, but may then re-enter an enemy ZOC only if its total
movement point expenditure for that phase does not exceed one-half of
its movement allowance.
4.23 In certain cases, a unit which begins its OMP in enemy ZOC may move
directly to an adjacent hex in enemy ZOC (and there must cease
movement). The two cases are as follows:
a) A unit may move to an adjacent hex in the ZOC of a different enemy
unit (this hex may not be in the ZOC of the original enemy unit or
units as well), provided that in doing so it expends no more than
one movement point.
b) A unit may move to an adjacent hex in the ZOC of any enemy unit,
regardless of movement point costs (it may even exceed its
4

movement allowance), provided the hex to which it moves is
occupied by a friendly unit which remains stationary throughout the
OMP.
A unit may move directly from one hex in enemy ZOC to another only
if meets one of the above two conditions.
4.3 Movement Bonuses and Penalties4.31 In certain circumstances the Movement Factor of a unit may be
modified by the addition of a bonus, or the imposition of a penalty. The
two bonuses explained in Rules 4.32 and 4.33 below are cumulative, and
a unit may receive either or both of them even if subject to the penalty
explained in Rule 4.
4.32 STRATEGIC MOVEMENT BONUS: Any unit which neither begins nor
ends its OMP in enemy ZOC receives a strategic movement bonus. This
bonus is two movement points for Axis units, and three movement points
for Soviet units. This bonus is unaffected by weather (Section 6.0).
4.33 GUDERIAN AND MANSTEIN: The Three German units marked with a
“G” on the upper-right of counter historically represent the components
of General Heinz Guderian’s 2nd Panzer Group. Each of these units
receives a bonus of one movement point in each Good Weather turn of
1941 only, provided that at the start of the OMP it is within two hexes of
another Guderian unit (whether or not this latter unit is dispersed). If
one of those "G" units is eliminated, this bonus may never be applied.
The German 56th Panzerkorps (similarly marked with an “M”) was
initially commanded by General Erich von Manstein. This unit receives a
bonus of one movement point in each Good Weather turn of 1941 only.
4.34 FUEL SHORTAGE: Any armor, armored cavalry, or armored infantry
unit which cannot trace a fuel line at the beginning of its OMP suffers a
fuel shortage penalty for that entire OMP. A fuel line is traced in
precisely the same manner as a supply line (see Section 8.0), except that
it must be traced from the appropriate fuel source, rather than from a
supply source.
For Axis units, the fuel source is Ploesti (hex 2325), and for the
Russians it is both of Grozny (hex 3907) and Maikop (hex 3412) (i.e.,
Russian units must be able to trace a fuel line from both of these points
to avoid fuel shortage.
4.35 Movement bonuses and penalties never apply to dispersed units.
4.36 Movement Allowance of any unit that is considered as fuel shortage
at the beginning of OMP is reduced to 4 for Axis, to 3 for Soviet.
4.4 Overrun4.41 At any time during the OMP, the phasing player may declare an
Overrun Attack if his units are in a position to attack an enemy unit or
defending group (7.17) at combat odds (see Section 7.2) of at least 5-1
on CRT A or 6-1 on CRT B after all necessary modification.
Although the attack itself is not resolved until the Combat Phase, this
has the immediate effect of nullifying the ZOC of all enemy units being
overrun; from the instant the overrun attack is announced the unit or
units being overrun are treated as having no ZOC for the purpose of
Section 4.0. Overrun markers are placed to units which are overrunning
and being overruned.
4.42 The phasing player may even move his units into or through a hex
occupied solely by enemy units which have been overrun. To enter such
a hex, however, a unit must expend double the normal terrain cost of the
hex, and all units of both sides are counted towards stacking limits.
4.43 When declaring an overrun attack, the phasing player must indicate
which of his units are taking part in the attack. There is no limit to the
number of overrun attacks which may occur in an OMP, but no phasing
unit may take part in more than one. Units which conduct an overrun
attack may not take part in any other attacks in the Combat Phase.
4.44 The phasing player may bring up extra units to make the combat odds
greater than 5-1 (CRT A) or 6-1 (CRT B) before declaring an overrun
attack, but may not add any more units to the attack after it has been
declared.
4.45 Overrun attacks are resolved in the Combat Phase before normal
attacks. Note that an overrun attack always eliminates the defending
units, although possibly with an Exchange result.
4.46 The phasing player does not have to conduct all attacks at 5-1 (CRT A)
or 6-1 (CRT B) or greater as overruns - he may conduct any of them as
normal attacks instead. The phasing player may also choose to overrun
some of the units in a hex without overrunning all of them, but any units
not overrun would still retain their ZOC.
4.47 A phasing unit may participate in an overrun attack even if it is also
adjacent to other enemy units which would normally have to be attacked
under rule 7.110. Such enemy units must still be attacked by other
friendly units in the Combat Phase, although these could be units which
moved after the overrun was declared in the OMP.
4.48 A player making an overrun attack must ensure that the conditions of
Section 7.3 can be met in the Combat Phase; otherwise the overrun
attack is illegal.
4.5 Terrain Effects and Other Restrictions on Movement4.51 The effect of terrain features on movement is listed on the Terrain
Effects Chart printed on the mapboard. The normal cost of entering a
clear terrain (blank) hex is one movement point.
The following rules are intended to clarify certain aspects of this chart
and detail other special restrictions affecting movement.
4.52 All partial land hexes are playable for all purposes as if they were full
hexes.
4.53 A “lake hexside” is one that is contained entirely within the lake.
Where a lake covers only part of a hexside the lake has no effect on
movement. Similarly, a sea hexside is one that is entirely covered by
sea, including estuaries such as 2419/2420.
4.54 Rivers affect movement (by costing one additional movement point to
cross) only if they are unfrozen and the unit is to end its OMP in enemy
ZOC.
4.55 The Kerch Straits are hexsides 3015/3115 and 3116/3115, and a unit
may cross only by expending its entire movement allowance to move the
one hex. The following hexsides are treated in the same manner as the
Kerch Straits: 2816/2917, 0125/0224, 0225/0224, 0325/0224, and
0324/0224.
4.56 The terrain effect of “Stalin Line“ is only used if the strategic option of
13.3 is applied.
4.57 The terrain effect of “Freeze lines” are explained in Section 6.0.
4.58 Hexside 1205/1206 is in fact a canal, the only one on the map, but is
treated as a normal river hexside for all purposes.
4.6 Movement Restrictions for Axis Units4.61 As there are no Finnish units in the game, their effect on the
campaign is recreated by specifying a certain area as out of bounds to
Soviet units for a certain period. Between September 1941 and June
1944 inclusive, no Soviet unit may enter any hex North-West of the line
5

bounded by hexes 0308, 0407, 0406, 0405, 0404, 0504, 0503, 0402,
0303, 0202, 0103 (these hexes themselves may be entered); the area
covered by hexes 0104-10, 0203-08, 0304-07 and 0403 is considered
occupied by Finnish forces.
Any Soviet unit within this area in September 1941 must leave in its
OMP, and if unable to do so for any reason or forced to enter the area
between then and June 1944, it is eliminated instead. Axis units may
freely move through and attack from these Finnish hexes, but no Soviet
attacks into the area are permitted, nor may Soviet supply or rail lines be
traced through it.
These restrictions are immediately removed in July 1944.
4.62 The thick black lines represent 1941 borders. These have no effect on
movement except as laid down in rules 4.63 and 4.64 below.
4.63 Hungary is considered unactivated until the German player-turn of
April 1942, or until the Russian player moves or attacks into Hungary,
whichever occurs sooner. Prior to this activation, the Hungarian unit
may not leave or attack from Hungary, nor may other Axis units enter
Hungary (if forced to do so, they are eliminated instead), and ZOC’s do
not extend across the Hungarian border.
The Soviet player may choose to eliminate his units if they are forced
to retreat across the Hungarian border.
4.64 Rumanian units may never enter Hungary or Bulgaria, and the
Hungarian unit may never enter Rumania. Any such unit forced to
contravene this rule would be eliminated instead.
4.7 Attacking Voluntary Marker4.71 Non-dispersed units that are in enemy ZOC at the beginning of the
friendly OMP may be placed Attacking Voluntary marker if those units
don't move at all during that OMP.
4.72 Units with Attacking Voluntary marker are not forced to participate
any combat during the following Combat Phase (see Rule 7.14).
5.0 STACKING5.1 Each side may have more than one friendly unit in a common hex, and
this is known as stacking. The number of friendly units which may
occupy any single hex is limited by the following rules.
5.2 Each unit has a stacking point number in the upper-right corner. No
more than SEVEN (7) stacking points of friendly units in total may occupy
any one hex, regardless of terrain. Of these, no more than FIVE (5)
stacking points may be “pure” armor units (i.e. not including armored
infantry or armored cavalry).
5.13 These limits do not apply during operational or tactical movement, but
are applied only to the phasing player’s units at the end of his
Operational Movement and Combat phases. Stacking limits are never
applied against the non-phasing player’s units.
5.14 If at either of these times the stacking limit is exceeded, the phasing
player must eliminate sufficient of his own units from the hex to bring
the stacking down to permissable levels. The owning player has the
choice of which units to eliminate.
5.15 Units of opposing sides can never stack together except temporarily
when overrun (Section 4.4) occurs. In this case, the non-phasing units
must be counted for stacking limit purposes.
5.16 Dispersed units retain their normal stacking point value. Factory
units and the Zhukov unit are considered to have a stacking point value
of zero.
5.17 SPECIAL: Hungarian and Rumanian units may never stack with the
other in the same hex, nor may either of these nationalities’ units even
move through a hex occupied by the other at any instant during
movement. If any such unit would otherwise be forced to do so for any
reason, it is eliminated instead.
6.0 WEATHER6.1 Weather Determination6.11 Weather is determined at the beginning of each game-turn and
remains in force throughout both player-turns of that month.
6.12 In all June, July, August and September turns the weather is
automatically “Good”. In all December, January and February turns the
weather is automatically “Snow”. The weather in other months may
vary.
6.13 At the beginning of each October game-turn, one die is rolled:
a) On a die roll of 3-6, October has “Mud”, November then
automatically has “Good” weather, and the following March, April,
and May automatically have “Snow”, “Mud” and “Good” weather
respectively.
b) On a die roll of 1-2, October has “Good” weather, November then
automatically has “Snow” and the following March automatically
has “Mud”. Another die-roll is then made at the start of the April
turn; 1-3 gives April “Good” weather with May then automatically
having “Mud” and 4-6 gives April “Mud” with May then
automatically having “Good” weather.
6.14 This weather determination sequence is summarised in a flowchart on
the game map.
6.2 Weather Effects on Terrain6.21 During any month in which the weather is “Snow”, all swamp and
lake hexes and river hexsides on or north-east of the Arctic Weather Line
(AWL) are considered frozen.
There are three separate Arctic Weather Lines, each indicated on the
map as a row of hexes running NW to SE; one is for January only, one for
December and February, and one for November and March. If the
weather in any of these months is not “Snow”, the AWL has no
signiflcance and is ignored.
6.22 In “Snow” months (only), rivers are considered frozen along all
hexsides upstream (i.e, nearer the source of the river) of any point where
the river flows north-east of the AWL.
In most cases, “upstream” means in practice north-east of the AWL,
because most rivers flow roughly east to west. The river system
stemming from Gorki (1501), however, flows west to east, and hence the
whole of this system is frozen in any “Snow” month, including
November/March when some of it lies south-west of the AWL.
6.23 Frozen swamp and lake hexes are treated as clear hexes, and frozen
river hexsides are treated as clear hexsides (as if the river did not exist)
for all movement and combat purposes.
6.24 The hexes and hexsides of the Baltic Sea never freeze.
6.3 Weather Effects on Movement6.31 In all “Mud” weather turns, all units have their movement factor
halved, with any fractions being rounded up for all Soviet units and
rounded down for all Axis units. The maximum factor of any unit in
“Mud” turns (except the Zhukov unit) is “3”. This restriction is also
applied to the Strategic Movement (see Rule 4.32).
6

6.32 In all “Snow” weather tums, all units have their movement factor
halved with any fractions being rounded up for both sides. The two
EXCEPTIONS to this occur during “Snow” months of the Winter of
1941/42 only:
a) All Soviet Shock Armies (Sh) retain their normal movement factor.
b) All Axis units have any fractional movement factors rounded down,
rather than up.
6.33 THAW: In the first non-”Snow” game-turn after any Winter, any unit
which begins its player-turn on an all-lake hex is not immediately
eliminated but may move or attack from that hex to any permitted hex,
treating the lake hexsides as if they were river hexsides. No unit may
move or attack into an all-lake hex during such a “Thaw” turn, and any
unit still on an all-lake hex at the end of its own player-turn is then
eliminated.
6.4 Weather Effects on Combat6.41 In addition to the consequent effects on combat of frozen terrain,
weather also affects the question of which Combat Results Table is to be
used for combat resolution. (See Section 7.2).
6.42 In all “Mud” turns, CRT “B” is used by both sides for all attacks.
6.43 In “Snow” turns, CRT “B” is used by both sides for all attacks EXCEPT
that in the Winter of 1941/42 only, the Soviet player uses CRT “A” for all
attacks against Axis units which are not in any kind of town or city hex.
7.0 COMBAT7.1 How Combat Occurs7.11 Combat occurs during the Combat Phase only between opposing
combat units in adjacent hexes. The phasing player and his units are
referred to as the “attacker”, the non-phasing player and his units as the
“defender”, regardless of the overall strategic situation.
7.12 The circumstances in which combat can occur during the OMP are
described in Section 4.4 - Overrun. Such combats are resolved, however,
in the Combat Phase, before any non-overrun attacks.
7.13 In some cases, combat is discretionary on the part of the phasing
player (he is not obliged to attack, but may do so if he wishes), while in
other cases it is mandatory (he must attack). The non-phasing player
never has any choice in the matter.
7.14 A phasing combat unit which is adjacent to one or more enemy units
in the Combat Phase must attack at least one of them, unless:
a) it is in a Major or Victory city hex; or
b) it is adjacent to enemy units only across unfrozen river hexsides or
Straits (or similar - Rule 4.55) hexsides; or
c) all enemy units in its ZOC are being attacked by other units; or
d) Attacking Voluntary marker is placed (it was not dispersed and did
not move during the OMP; Rule 4.7); or
e) it is stacked with another combat unit which was not dispersed and
did not move during the OMP; or
f) both it and all enemy units to which it is adjacent are also adjacent
to another phasing combat unit which was not dispersed and did
not move during the OMP.
A unit is also not obliged to attack if a combination of (b), (d), and (f)
apply, as shown in the Examples of Play.
EXPLANATORY NOTE: With reference to (d), (e), and (f) above, it is
envisaged that undispersed units which did not move in their OMP have
had a chance to prepare positions in their part of the front (their own and
adjacent hexes), and that such fixed positions would allow serious
conflict to be avoided. In the Advanced Game this concept is replaced
by that of Fortification (Section 17.0).
Note that, particularly since “Dispersed” markers will have been
removed before the Combat Phase, players will have to remember or find
their own method of signifying which phasing combat units remained
undispersed and stationary throughout their OMP.
7.15 A phasing unit cannot attack across a sea or unfrozen lake hexside.
Since ZOCs do not extend across these hexsides, such units are not
considered to be “adjacent” in terms of this Section.
7.16 A non-phasing unit which finds itself adjacent to an enemy unit or
units in the Combat Phase must be attacked by at least one such unit
unless all of them either disband/break out (Rule 7.112 below and
Section 7.7) or are relieved of the obligation to attack by Rules 7.14 and
7.15 above.
7.17 The combat factor of a unit is always unitary and may never be
divided between different attacks. No attacking unit may take part in
more than one attack in a single player-turn (one “attack” is defined to
mean one roll of the die). A unit may, however, attack more than one
defending unit in a single attack, and may even attack enemy units in
more than one hex, provided they are all in its ZOC.
7.18 A defending unit may be attacked more than once in a single Combat
Phase, by different attacking units. More than one attacking unit,
adjacent to the same defender, may also attack together in a single
attack.
7.19 “Multi-unit/multi-hex” combat is possible, whereby attacking units in
one or more hexes (an “attacking group”) combine to attack defending
units in one or more hexes (a “defending group”) in a single attack. (The
term “Group”, where used later in these rules, includes the case of a
single unit).
Generally, the phasing player may divide attacking and defending
units into groups in any manner he desires; the non-phasing player has
no choice. In practice, however, the provisions of Section 7.3 (combat
odds limitations) may restrict the phasing player’s choice of grouping.
7.110 If any unit in a hex makes an attack, then all enemy units in its ZOC
must be attacked in that Combat Phase by some attacking group (not
necessarily from the original hex), unless the attacking unit’s hex
contains another combat unit which meets the terms of Rule 7.14 (d) and
does not attack.
This rule takes precedence over Rule 7.14, in that a unit not obliged to
attack under the terms of Rule 7.14 may find itself forced to do so in
order to satisfy the terms of this rule.
7.111 The phasing player may resolve his attacks in any order he wishes,
subject to the proviso that all overrun attacks must be resolved first.
However, he must specify all of his attacks, announcing which of his
units are attacking which defenders, before resolving any of them.
Attack and Target markers are used for those specification.
Should it occur that a defending group has already been retreated or
eliminated by a previous attack when the time comes to resolve an
attack allocated against it, then the attacking group concerned may
either:
a) not attack at all; or
b) attack instead any other defending group in the same hex or hexes
occupied by the original defenders; it may not attack enemy units in
any other hex.
In either case, the attacking group is eligible for Tactical Movement.
(Section 7.6).
7

7.112 Phasing units always have the option to disband or break out rather
than make an attack, even if the rules of this subsection would otherwise
require them to attack. The conditions of Rule 7.16 and 7.110 must still
be met, however.
7.2 How Combat is Resolved7.21 Each attack is resolved separately in a six-step process as follows:
STEP ONE: The combat factor of each unit in the attacking group is
modified for the effects of terrain (Section 7.5), if any, and these
modified factors are totalled.
STEP TWO: The combat factor of each unit in the defending group is
modified for the effects of terrain, if any, and these modified factors are
totalled.
STEP THREE: The attacker selects which CRT, A or B, is appropriate,
according to the constrints of terrain, weather, and nationality, as laid
down in Rule 7.23 below.
STEP FOUR: The attack strength arrived at in step one above is compared
with the defense strength arrived at in step two in the form of a ratio -
attack strength: defense strength. This numerical ratio is then simplified
down to one of the combat odds ratios found across the top of the CRTs,
always rounding off in favor of the defender. For example, 29:10 would
round down to 2:1 7:4 would round down to 3:2, and 5:12 would round
down to 1:3.
STEP FIVE: The choice of combat odds column may be affected by terrain
(Section 7.5) and the presence of the Zhukov marker (Section 9.3). If so,
the combat odds are modified accordingly, note that these effects are
cumulative.
STEP SIX: One die is rolled and the result is cross-referenced with the final
combat odds ratio to determine the result of the attack. The meaning of
the various combat results is explained in Section 7.4.
The above procedure is completed for each attack, and the result
implemented before moving on to the next, until all attacks have been
resolved.
7.22 a) Odds lower than 1:6 are not allowed, and the attacker may not
arrange his attacks in such a way that odds lower than 1:6 occur. If
such attacks are unavoidable, the attacking units concerned are
automatically eliminated at the beginning of the Combat Phase before
any other attacks (including overrun attacks) are resolved. This is
considered an “AE” combat result (Section 7.4).
b) Odds higher than the maximum odds on the CRTs are reduced to 7:1
(CRT A) or 9:1 (CRT B) before any further modification under Step Five of
rule 1 above.
7.23 Normally, the Axis player uses CRT A to resolve his attacks, while the
Soviet player uses CRT B. The exceptions to this are:
a) In turns with “Mud” or “Snow” weather, all Axis attacks must use
CRT B.
b) All Axis attacks against Soviet units in swamp hexes must use CRT
B.
c) In “Snow” turns of the winter of 1941/42, the Soviet player uses
CRT A for all attacks against Axis units which are not in any kind of
city or town (CRT B must be used if any of the defending group are
in a town or city).
7.3 Combat Odds Limitations7.31 A common tactic in many games is that of “soaking-off” - a low-odds
attack made to facilitate a high-odds attack elsewhere. This somewhat
unrealistic tactic is restricted in Sturm Nach Osten by the following
combat odds limitations.
7.32 If separate attacks are being made against defending units in the
same hex, the highest odds involved may not be more than double the
lowest odds.
7.33 An attacking unit may not take part in an attack at combat odds more
than three times greater than those being applied against any other
enemy unit to which it is adjacent. Example: a unit may not participate
in a 3:1 attack if it is adjacent to another enemy unit being attacked at
odds lower than 1:1.
Units attacking from hexes containing at least one friendly combat
unit which remained undisperses and stationary throughout the OMP and
is not participating in any attack (see Rule 7.110) are exempt from this
rule; such units may attack at any odds they please.
7.34 To clarify what is meant by multiples of combat odds ratios, treat
these ratios as fractions or while numbers by dividing the first digit by
the second: for example, 1:4 becomes 0.25, 3:2 becomes 1.5, and 5:1
becomes 5, so that three times 1:2 is 3:2.
7.4 Combat Results7.41 The combat results are interpreted as follows:
“DE” - Defender Eliminated: All units of the defending group are
eliminated. No effect for the Attacker.
“DD” - Defender Disbanded: All units of the defending group must
immediately disband (if in supply) or break out (if out of supply) as
described in Section 7.7. No effect for the Attacker.
“DX” - Defender Exchanged: All units of the defending group are
eliminated. The attacker then eliminates from the attacking group units
whose modified combat factors do not exceed the modified combat
strength of the defending group, but come as near as possible to this
figure. If the attacker cannot eliminate even a single unit without
exceeding the defender’s combat strength, then he removes nothing.
“DR” - Defender Retreat: All units of the defending group are retreated 1,
2, or 3 hexes at the defender’s option, according to the rules of Rule 7.65
(Tactical retreat after combat), and become “dispersed”(Rule 7.43
below), unless any one of them is an infantry-type unit in a Major or
Victory city, in which case none of them are obliged to retreat.
“DRi” - (Defender Retreat): Identical to a “DR” result except that defending
units are not obliged to retreat if any one of them is an infantry-type unit
in any kind of city (not town).
“-” - No Effect: All units involved remain in place with no combat losses.
“EX” - Exchange: All units of the defending group are eliminated. The
attacker then eliminates from the attacking group units whose modified
combat strength is in total at least equal to that of the defending group.
“2X” - Double Exchange: Identical to an “EX” result except that the
attacker must lose units totalling at least double the defender’s modified
strength.
“TX” - Total Exchange: All units involved are eliminated.
“AL” - Attacker takes losses: The attacker eliminates from the attacking
group units whose total modified combat strength is at least equal to
that of the defending group.(If the attacker’s total modified combat
strength is less than that of the defender, all of his units are eliminated).
”AE” - Attacker Eliminated: All units of the attacking group are eliminated.
7.42 In all cases where there is a choice of units to be eliminated, the
owning player has that choice.
7.43 Defending units are always “dispersed” by “DR” and “DRi” combat
8

results, even if they do not actually retreat. Units not obliged to retreat
by these results still have the 1 option to do so. (See Section 7.6).
7.44 Where the CRT indicates two results (“DR/AL” or “DRi/AL”), both are
applied, the DR or DRi result first.
7.45 If a defending group obliged to retreat by a “DR” or “DRi” result
cannot do so without contravening the rules of Section 7.6, the combat
result is treated as “DD” instead. This is the only way in which a “DD”
result can occur in the basic game.
7.46 The modified combat strengths referred to in the results are those
arrived at in Steps One and Two of Rule 7.21, after the effects of terrain
have been taken into account.
7.5 Terrain Effects on Combat7.51 Terrain may have the effect of making combat either voluntary or
mandatory as described in Rule 7.14. It may also affect the combat
factor of a unit, or the choice of which CRT column is to be used. These
effects are summarised on the Terrain Effects Chart and explained in
detail here.
7.52 Infantry-type units have 1 added to their combat factor when
defending in, or attacking into, mountain hexes. Mountain-type units
have their combat factor doubled when defending in, or attacking into,
mountain hexes. Note that this addition is per unit, not per hex.
7.53 Soviet infantry-type units have 1 added to their combat factor (again,
per unit, not per hex) when defending in Victory Cities in the Soviet
Union.
7.54 If defending units are being attacked from across an unfrozen river
hexside, the combat odds are shifted one column to the left in Step Five
of Rule 7.21. This does not apply if part or all of the defending group is
being attacked across a non-river hexside or hexsides by units of the
attacking group with a modified combat strength at least equal to that of
the defending group.
7.55 Defending units being attacked across Kerch Straits hexsides have
their combat factors doubled. Again, this does not apply if units of the
attacking group with a modified combat strength at least equal to that of
the defending group is attacking via non-Straits hexsides.
7.56 Rivers running through major cities have no effect.
7.57 Combat is never permitted across sea hexsides or unfrozen lake
hexsides.
7.58 Note that frozen rivers and frozen lakes are considered as clear (see
Rule 6.23).
7.6 Tactical Movement (Retreat and Advance After Combat)7.61 Only the non-phasing player may retreat after combat and only the
phasing player may advance after combat. Such movement is known as
Tactical Movement.
7.62 Tactical movement must be made immediately following the combat
resolution from which it results, if it is to be made at all. Retreat is
carried out first, followed by advance.
7.63 It is a general principle that tactical movement is subject to the same
restrictions as operational movement (movement in the OMP). The
provisions of rules sections 4.1 and 4.5 all apply to tactical movement as
well, and in particular, no unit may ever exceed its movement allowance
during tactical movement, except in the circumstances described in Rule
4.14.
7.64 RETREAT AFTER COMBAT
a) On an effective “DR” or “(DR)” combat result, the defender retreats
his affected units one, two, or three hexes at his option, provided
their movement allowance permits this.
b) If a unit retreats only one hex, it may retreat into a hex in enemy
ZOC which is occupied by a friendly unit, as long as that hex does
not have an attack yet to be resolved against it in the current
Combat Phase. It may not retreat into an unoccupied hex in enemy
ZOC.
c) If a unit retreats two or three hexes it must retreat further away
from the enemy with each hex moved. The first hex of retreat must
be at least two hexes away from all enemy units, the second hex at
least three hexes away from all enemy units, and the third hex at
least four hexes away. A unit may never retreat more than three
hexes.
d) Within the above restrictions, units may retreat in any direction the
defender desires. If a unit which is obliged to retreat cannot do so
without violating one of the above rules, then the “DR” or “DRi”
result is taken to be a “DD” result for that particular unit instead,
and it must disband or break out (Section 7.7). Other defending
units in that combat which are able to retreat may still do so.
7.65 DISPERSAL
Defending units which receive a “DR” or “DRi” combat result are
dispersed, and have a “Dispersed” marker placed on them, even if they
did not actually retreat. Dispersed units may not move in the OMP of
their own following player-turn. The “Dispersed” marker is removed in
the Recovery Phase of this following player-turn.
7.66 ADVANCE AFTER COMBAT
If a defended hex is completely vacated by the application of any DE,
DD, DX, DR, or DRi combat result (including DR/AL and DRi/AL results),
then surviving units of the phasing player which took part in that attack
may, at his option, advance after combat. The advance is limited to one
hex (Exception: Rule 7.69 below), and may be made into the vacated hex
itself or into any hex adjacent to it which is not enemy-occupied.
Advance after combat must take place before any other attacks are
resolved, and is not permitted if any units still occupy the defender’s hex
or if it would violate the rules of Sections 4.1, 4.2, or 4.5. (Exception:
Rule 7.610 below). It follows that if more than one attack is being made
on a hex, units involved in attacks prior to that which clears the hex of
enemy units may not advance.
Units which were scheduled to attack a hex and find it already cleared
by previous attacks in the same Combat Phase may advance as if their
attack had cleared it, provided that the attack which in fact cleared it
yielded one of the above five results.
7.67 Attacking units may not advance after combat if the defender’s hex
was left vacant by a EX or 2X combat result.
7.68 Juggernaut units may never advance after combat.
7.69 Armor and armored cavalry units eligible to advance after combat
have the option of advancing two hexes, rather than one. This advance
is permitted only if it costs no more than 2 movement points, and the
first hex of it must be that (or one of those) vacated by the defender in
that combat.
No armor unit may make this two hex advance if the weather is
“Mud” (armored cavalry may), and no Axis unit may do so in “Snow”
months of the winter of 1941/42.
7.610 If the defender’s hex is left empty by a DE, DD, or DX result (not by a
DR or DRi result), then armor and armored cavalry units may ignore all
enemy ZOCs in making their two-hex advance; none of the rules of
Section 4.2 apply. No more than two movement points may be
9

expended, however, and the additional river-crossing cost of Rule 4.54
still applies.
7.7 Disbandment and Break-Out7.71 Any combat unit may disband or break out, and this may occur in one
of two ways: either voluntarily by the phasing player, or involuntarily by
the non-phasing player following a “DD” combat result.
“Disbandment” refers to a unit which is in supply at that moment,
“Break-Out” refers to a unit which is isolated.
7.72 Voluntary disbandments and break-outs are carried out by the
phasing player at the end of his Combat Phase, after all combat and
tactical movement has taken place; disbandments are resolved first,
followed by break-outs. Involuntary (“DD”) disbandments and break-
outs are resolved at the moment of combat.
A player may disband or break out only his own combat units.
7.73 To disband, a unit in supply is simply removed from the board, and a
number of replacement factors equal to its combat factor
- less two if the unit is a juggernaut; or
- less one if it is any other combat unit
is added to the owning player’s replacement total for his next player-
turn (make a written note if this is likely to be difficult to remember).
EXAMPLES: A Soviet Front unit would yield 3 replacement factors if
disbanded; the German 24th Pz Corps (3-5) would yield 2, and any unit
with a combat factor of 1 would yield nothing at all.
7.74 A disbanded unit may always return to the game later as a
replacement (Section 10.1).
7.75 The procedure for breakout is identical to that for disbandment.
However, break-out is only permitted if the isolated unit:
a) can trace a break-out path no longer than three hexes to a hex
where it would be in supply. This path may follow any route
through any number of enemy ZOCS, but not through an enemy-
occupied hex or across on impossible hexside; OR
b) be in a “pocket” (Rule 7.76 below) with another unit that can trace
such a break-out path.
Any isolated unit unable to meet these requirements cannot break
out, and if forced to do so, is eliminated with no surviving replacement
points.
7.76 A group of isolated units which can trace a supply line to each other
(i.e. which would all be in supply if any one of them was) is known as a
“pocket”. All of the units in a pocket may break out if any one of them
meets the terms of Rule 5(i) above.
Note for purists only: it is possible for two units, let us call them A and
B, to be in a position such that A can trace supply from B but B cannot
trace supply from A. In this sort of case, if units A and B are isolated,
they are considered to be in the same pocket if A can trace supply to B or
vice versa.
7.77 Units which break out may return to the game later as replacements,
except for juggernaut units, which are permanently eliminated.
7.78 Units of the phasing player which voluntarily disband or break out
may have moved or been dispersed in their OMP, but may not attack in
the Combat Phase.
7.79 EVACUATION
For the purposes of disbandments and break-outs (only), any coast
(partial land/sea) hex on a sea area controlled by the owning player may
be treated as a hex in supply in the context of Rule 7.75a. Thus:
a) a unit on such a coastal hex may disband normally. and
b) a unit which can trace a break-out path (not more than three hexes
long) to such a hex may break out normally. The coast hex in
question cannot be enemy-occupied, and if it is in enemy ZOC then
one further replacement factor is eliminated from the unit, or
pocket as a whole, before evacuation.
Evacuation may not take place through sea areas not under friendly
control, and in any case a maximum of two replacement points per turn
may be evacuated through each of the Baltic and Black Seas.
8.0 SUPPLY8.1 Supply Sources and Supply Lines8.11 In order to be “in supply”, each combat unit on the map-board must
be able to demonstrate a supply line from a supply source to the unit
itself in accordance with these rules. Any combat unit which is not in
supply at the end of the Combat Phase of its own player-turn is said to
be isolated and is penalised as described in Section 8.3.
Note that other rules sections (e.g. 7.7; 10.18) may require supply to
be checked at other points during the player-turn.
Soviet factories and the Zhukov marker do not require supply and
suffer no penalty if they are isolated.
8.12 The supply sources are:
a) for all German and Italian units, all mapboard-edge hexes from
0130 to 1430 and from 2630 to 2724 inclusive.
b) for all Rumanian units, Bucharest (2425).
c) for the Hungarian unit, Budapest (1428).
d) for all Soviet combat units, all mapboard-edge hexes from 1101 to
3301 and from 3905 to 3912 inclusive.
8.13 A supply line is a continuous path of hexes running from any supply
source hex appropriate to that unit’s nationality to the unit, either
directly or via any number of friendly “supply points” (explained below).
In order to be part of a valid supply line, each hex on this path must be
either:
a) occupied by a friendly unit (not necessarily a combat unit), or
b) closer, as defined below, to the nearest friendly supply point than a
supply line may never be traced across a sea or unfrozen lake
hexside.
8.14 A “supply point” is any of the following:
a) any supply source hex appropriate to the unit’s nationality, which is
neither occupied by nor in the ZOC of an enemy unit.
b) any Major or Victory city under friendly control at the instant of
supply determination.
c) any friendly combat unit already established as being in supply at
the instant of supply determination.
The distance of a hex from a supply point, for the purpose of
Rule 3.b. above, is the length, in hexes, of the shortest route from
supply point to that hex which does not pass through an enemy unit
or an unoccupied hex in enemy ZOC. Count the hex to which this
route is being traced but not the hex of the supply point.
8.15 A “supply threat” is either of the following:
a) any enemy combat unit which, were it able to move at the instant
of supply determination and given an unlimited movement
allowance, could move to the hex in question without passing
through an opposing unit or opposing ZOC.
b) any Major or Victory city under enemy control such that, if it
contained an enemy combat unit, that unit would qualify as a
supply threat under (a) above.
10

The distance of a hex from an enemy supply threat, for the purpose of
Rule 8.13b above, is the length, in hexes, of the shortest route from
supply threat to that hex which does not pass through either a unit or
ZOC of the side tracing supply. Count the hex to which this route is
being traced but not the hex of the supply threat.
8.16 A supply point or supply source cannot be used as such if it is in
enemy ZOC. Such a hex occupied by a friendly unit could, however, be
used as part of a supply line from another supply point under Rule 8.13a
above.
8.17 Any combat unit unable to trace a valid supply line in accordance with
rules 8.11 to 8.16 above may still be in supply if one of the special supply
situations of Subsection 8.2 below applies.
8.2 Special Supply Situations8.21 There are two situations in which a combat unit may still be in supply
even if the conditions of Rules 8.1 are not met. “Sea Supply” simulates
the possibility of supplies being transported across a controlled sea area
to a port; “Siege Supply” recreates the situation of units surrounded in or
around a vital city.
8.22 SEA SUPPLY
A port (city or town) may act as a supply point provided that it is on a
sea controlled by the player tracing supply and is not in enemy ZOC.
Any number of units may draw supply from this point, and it is not
necessary for the player to control or occupy any other port along that
sea coast.
If a port on a controlled sea area is in enemy ZOC, then any friendly
units actually occupying the port hex are still considered to be in supply,
but no other units may use it as a supply point.
8.23 SIEGE SUPPLY
An isolated Victory city on a player’s own side of the 1941 Russian
border may provide supply for up to six stacking factors of friendly units
which either occupy or can trace a supply line from that city. In this
special case only, Rule 8.16. is negated in that such a city may provide
supply for adjacent friendly units (but not for non-adjacent ones) even if
it is in enemy ZOC.
Against this six-factor limit, friendly units actually occupying the
Victory city hex have their stacking factors doubled: for example, an
isolated Victory city in Russia which contained two stacking factors of
Soviet units could only support an additional two factors outside. Where
more than six stacking factors, counted in this way, are attempting to
draw supply from a single isolated Victory city, the owning player must
specify which units are supplied and which are isolated.
A player may never draw siege supply from a Victory city on his
opponent’s side of the 1941 Russian border, although such a city could,
of course, act as a normal supply point.
8.3 Effects of Isolation8.31 At the end of a player’s own Combat Phase, all of his units which are
isolated and are not in a Major or Victory city hex are eliminated and
removed from the mapboard. All except Juggernaut units and the Polish
1st Army are eligible to return later as replacements (Sections 9.1 and
10.1).
8.32 Any group of isolated units which occupies a Major or Victory city at
the end of a player’s own Combat Phase has stacking points equal to half
the number of isolated stacking points in the hex eliminated (fractions
rounded up). For example, if such a hex contained 5 stacking points of
isolated units at the end of his Combat Phase, the phasing player would
have to eliminate from the hex units of his choice totalling at least three
stacking points. The stacking factor modification of Rule 8.23. does not
apply here.
Note that if a single combat unit is isolated in a Major or Victory city it
is always eliminated under this rule.
8.33 Players should bear in mind that disbandment/break-out, which
occurs during the Combat Phase, is always preferable to having a unit
eliminated under these rules, unless a supply line can be restored by
tactical movement.
9.0 SPECIAL UNITS9.1 Juggernaut Units9.11 Soviet fronts and German infantry armies are termed “Juggernaut”
units. (Rumanian infantry armies are not juggernaut units).
9.12 Juggernaut units may enter the game as replacements in the normal
manner (Soviet fronts can only enter the game as replacements).
However, if any juggernaut unit is eliminated-
a) by an overrun attack, or
b) by a “DE”combat result, or
c) in any manner when it is out of supply,
it is permanently removed from the game and can never be replaced.
This also applies to the Polish 1st Army unit.
9.13 Juggernaut units may not use tactical advance after combat (Section
7.6).
9.2 Factory Units9.21 Factory units are used in Soviet replacement production (Rule 10.14)
and are placed on their own cities at the start of any scenario as laid
down in Section 11.0. In the Basic game the Leningrad and Tula factory
units are not used and the dates on the side of the counters should be
ignored; all factories on the mapboard are always fully operative, and are
unaffected by Dispersal (Rule 7.65).
9.22 Factory units are not combat units and have no combat factor or ZOC.
They cannot move at all during the game and are removed from the
mapboard as soon as an Axis unit enters the hex they occupy. Factory
units can never be replaced once eliminated.
9.3 Zhukov9.31 The Zhukov marker is not a combat unit; it represents an elite Soviet
military planning headquarters (not necessarily the man himself). It has
no combat factor or ZOC. It begins all scenarios in Moscow (1306), with
the side marked “D (Defense)” face-up.
9.32 The Zhukov marker can never be alone in a hex; it must always be
stacked with another Soviet unit, although this could be just a factory
unit, Zhukov may not use Tactical Movement, and if for any reason, other
than by virtue of rule 9.36 below, it is never left alone in a hex, it is
removed from the mapboard until the beginning of the next Soviet OMP,
when it automatically reappears (exception: Rule 9.37).
9.33 The Zhukov marker has no movement factor; it has an unlimited
movement capability. At the beginning of the Soviet OMP, before any
combat units are moved, the marker may be placed with any Soviet unit.
It remains, and may move, stacked with that unit for the rest of the OMP.
9.34 The Zhukov marker affects Axis attacks against Soviet units in or
adjacent to the hex it occupies. All Axis attacks on defending groups
11

which include any such Soviet units are modified by a one-column shift
to the left on the CRT in Step Five of Rule 7.21.
9.35 Zhukov can also affect Soviet attacks if he spends the whole of the
OMP of the previous Soviet player-turn in Moscow (making plant!).
If Zhukov spends an entire Soviet OMP in Moscow (may be in a turn in
which he returns to the mapboard), the marker is flipped over to the side
marked “AD (Attack and Defense)”. This means that Zhukov may now
influence one Soviet attack in addition to his normal defensive
capabilities: in the Combat Phase of the following Soviet player-turn, any
one attack on Axis units within two hexes of the marker is modified by a
one-column shift to the right on the CRT in Step Five of Rule 7.21. The
Zhukov marker is reverted back to the original “D” side at the end of this
Combat Phase, unless it is still on Moscow.
This rule is in effect irrespective of how close Axis units are to
Moscow, though not, of course, if the city is Axis-controlled.
9.36 In addition to the temporary removal described in rule 9.32 above, the
Zhukov marker can be eliminated in combat if all the Soviet units in its
hex are eliminated with no surviving replacement factors. It is also
eliminated if all the units with which it is stacked are overrun, or if an
Axis unit enters the hex it occupies.
9.37 Once eliminated under rule 9.36 above, the Zhukov marker cannot be
replaced in the normal way (Section 10.0). Instead, it reappears at no
replacement cost at the beginning of the OMP of the Soviet player-turn
exactly twelve months after its elimination.
10.0 REPLACEMENTS AND REINFORCEMENTS10.1 Replacements10.11 Both players may receive replacements each game-turn, in the RRP
of their own player-turn. Replacements are either previously eliminated
units re-entering the game or new units entering the game for the first
time in accordance with the rules of this section.
10.12 Each player receives a certain number of replacement factors per
turn, which may be used to bring into the game replacements whose
total combat factors do not exceed the total number of replacement
factors available.
10.13 Unused replacement factors may be accumulated from turn to turn
at the discretion of the owning player. Players should keep a written note
of these accumulated replacement factors, which may be freely used in
any later turn.
10.14 The Soviet player receives one replacement factor per month for each
factory unit still on the board, plus the following replacement factors
(from “factories in Siberia”):
In 1941 - 1 factor per month
In 1942 - 2 factors per month
In 1943 - 3 factors per month
In 1944 - 4 factors per month
In 1945 - 5 factors per month
These number is also printed on the Game-Turn Record Track.
10.15 The Axis player receives the following replacement factors:
In 1941 - 1 factor per month
In 1942 - 2 factors per month
From 1943 onwards - 3 factors per month
These number is also printed on the Game-Turn Record Track.
In addition, the Axis player receives replacement factors for two
victory cities in Russia that he controls, at the rate of one-half factor
every month. “Control” for the purpose of this rule is judged at the
moment the replacements are due. The Axis player gets no credit for
any “odd” victory city which is not one of a pair, but Moscow counts as
two victory cities by itself for the purposes of this count.
10.16 Replacements enter the game in a dispersed condition (place a
“dispersed” marker on them) and hence may not move in the turn in
which they enter the game.
10.17 When they enter the game, replacements may appear only on town,
city or mapboard-edge supply source hexes, and the number of stacking
points of replacements which may appear at any one such hex in a single
turn is limited to the following maxima:
Town hex - 3 stacking factors
Minor city hex - 4 stacking factors
Major city hex - 5 stacking factors
Victory city hex - 7 stacking factors
Mapboard-edge supply source - 7 stacking factors
For the purposes of this rule (only), the stacking factor of any unit is
considered to be 2 greater than its normal (printed) stacking factor if its
entry point is on the opponent’s side of the 1941 border. All
mechanized units, shock infantry and front units which appear as
replacements also have 2 added to their stacking factor for the purpose
of this rule, wherever they appear, and these two additions may be
cumulative.
EXAMPLE: Were the 1Gd infantry army unit to appear as a
replacement west of Russia’s 1941 border, its stacking factor of 2 would
be read as “4” and hence it could only appear at a major or victory city.
10.18 In addition to the above stacking limits, in order to start a
replacement on any kind of city or town hex, the owning player must be
able to trace a “rail line” to the hex at the moment the replacement is
due to appear. A rail line is identical to a supply line with the following
additional restrictions:
a) it must not cross any lake hexside (whether frozen or not), and
b) it must not pass through any hex in enemy ZOC (whether occupied
by a friendly unit or not).
10.19 Replacements may appear at any town or City within the above
restrictions, but may appear at a Major or Victory city only if it was
controlled by the phasing player at the beginning of his current turn.
10.110 Provided sufficient replacement factors are available, a player may
select any of his units not presently on board as replacements, whether
previously eliminated or not, subject to the following restrictions:
a) No unit listed as a reinforcement in Section 10.2. may enter the
game as a replacement until it has first entered as a reinforcement
and been eliminated.
b) No Soviet tank army may enter the game before 1942. Guards
tank armies are considered as "tank army", not "Guards army".
c) No Soviet Guards (Gd) unit may enter the game before 1943. Also,
PL. OS and GO mechanized cavalry units may not enter the game
before 1943.
d) No German SS unit may enter the game before 1943.
e) German 40th panzercorps, 2nd army, 31th corps, 50th corps and
51st corps units may enter on July 1941 and thereafter.
f) German 27th corps unit may enter on August 1941 and thereafter.
g) German 35th corps and 59th corps units may enter on January 1942
and thereafter.
h) Those info on entry turns are also printed on the reverse-side of
counters.
i) Juggernaut units may be taken as replacements only if they were not
previously eliminated in the manner described in Rule 9.12.
12

10.111 SPECIAL: In his RRP of each April turn, in addition to any normal
replacements, the Axis player may return to the game at no replacement
point cost, one previously eliminated unit of either Hungarian, Rumanian
or Italian nationality. A Hungarian unit may not be chosen if Budapest
is currently under Soviet control, a Rumanian unit may not be chosen if
Bucharest is currently under Soviet control, and the Italian unit may not
be chosen in 1944 or 1945.
10.112 Units may enter in excess of the restriction of stacking. However,
those units must be in the restriction of stacking at the end of friendly
OMP.
10.2 Reinforcements10.21 In addition to replacements, both sides receive reinforcements, new
units which enter the game at no replacement cost on certain fixed turns.
10.22 The Soviet reinforcements are:
July 1941 - 28th Army
December 1941 - DO mechanized cavalry
January 1942 - 1st and 2nd Shock (Sc) Armies
February 1942 - 3rd Shock Army
March 1942 - 4th Shock Army
April 1942 - 5th Shock Army
June 1944 - Polish 1st Army
The Axis reinforcements are:
May 1942 - Italian 8th Army
February 1943 - 2nd SS Panzer Corps
The Hungarian 2nd Army, although not strictly a reinforcement
because it begins the game on the board, is released in April 1942 unless
a Soviet attack on Hungary occurs earlier. (See Rule 4.63) When
released, it may enter the game like any other reinforcement, as if it had
been off-board at the start of the run.
10.23 Reinforcements enter the game during the RRP of their own side’s
player-turn in the specified month. Unlike replacements, they begin
undispersed and may move freely on their turn of entry.
10.24 Like replacements, reinforcements may appear on town, city or
mapboard-edge supply source hexes. Rules 10.17 to 10.19 and 10.112
apply in full to reinforcements in the same way as replacements, and
reinforcements appearing on a hex.
10.25 In addition to the above, reinforcements (not replacements) may also
appear on any hex adjacent to a friendly-controlled Victory city and to
which a rail line can be traced. In the absence of any city there, such a
hex has the same stacking restrictions as a town for the purposes of Rule
10.17.
10.26 In the RRP of the Axis player-turn, October 1943, the Italian 8th
Army is withdrawn from the game and can never be replaced. If on the
mapboard at the time, it is simply removed directly from its current
location. If the Italian 8th Army is already eliminated, this rule is
ignored.
10.27 Reinforcement units have red triangle on the upper-left of the
counter.
11.0 THE SCENARIOS 11.1 General11.11 Players of Sturm Nach Osten may either begin the game in 1941,
when the campaign historically started, or at one of a number of
alternative dates. These various different versions of the game, known
as scenarios, are detailed in this section.
11.12 The victory conditions of Section 12.0 apply to all scenarios.
Normally, any scenario is played from its start date through to May 1945
unless one player wins sooner; players may, however, agree to an earlier
finishing date under Rule 12.15, and in this way a large choice of start
dates and game lengths is available.
11.13 Each scenario is identified by its start date, and each has a “front
line” associated with it, defining the boundary between the two sides as
the scenario starts. The June 1941 boundary is the Russian border, the
green dotted lines are the front lines for the two 1942 scenarios, the red
dotted line is the 1943 boundary and the purple dotted line the 1944
boundary (see Game-Map).
11.14 For each scenario, the following are laid down:
(1) START DATE AND PLAYER MOVING FIRST
Since the Axis player-turn always comes first in each game-turn,
scenarios which begin with a Soviet player-turn omit the Axis player-turn
of that month.
(2) AVAILABLE FORCES
The number and size of combat units available to both sides is usually
defined in terms of a total number of combat factors. Some scenarios,
however, demand specific units. Players may never select units before
their historical date of availability as defined by Rules 10.110 and 10.22.
In addition to his combat units, the Soviet player begins all scenarios
with the Zhukov unit on Moscow.
(3) SET-UP RESTRICTIONS
The areas within which both sides may set up their units are defined.
Specific placement of some or all units may be demanded.
(4) SOVIET FACTORIES
The number and location of the Soviet pIayer’s factory units is laid
down.
(5) SPECIAL RULES
Rules applicable only to a specific scenario are listed.
11.15 At the start of any scenario, each side is assumed to control all Major
and Victory cities on its own side of the front line boundary, except those
to which it cannot trace a rail line.
11.16 The player whose player-turn is first in any scenario always sets up
his units after his opponent has set up his. Units may be set up in
enemy ZOC.
11.17 At the start of any scenario, both sides are assumed to have no
accumulated replacements.
11.2 June 1941 - The Campaign Scenario(1) This scenario begins with the Axis player-turn, June 1941.
(2) AVAILABLE FORCES:
Both sides begin the game with just those combat units whose
identity is lighter base color triangle on the upper-left of the counter.
There are 37 such Axis units and 31 such Soviet ones.
(3) SET-UP RESTRICTIONS:
Soviet: All Soviet units must be set up precisely as listed in the Deployment
Sheet / Basic Game.
13

Axis: The Hungarian unit sets up anywhere in Hungary, the Rumanian units
anywhere in Rumania. Up to SEVEN (7) stacking points of German
infantry or mountain infantry may, at the Axis player’s option, also set up
in Rumania.
(4) SOVIET FACTORIES: - See the Deployment Sheet / Basic Game.
(5) SPECIAL RULE:
In June 1941, the Soviet player receives 3 combat factors of
replacements, the Axis player none. Normal replacement rules apply
from July 1941 onwards.
11.3 May 1942 - The 1942a Scenario(1) This scenario begins with the Axis player-turn, May 1942.
(2) AVAILABLE FORCES:
Soviet: Combat units of the Soviet player’s choice totalling 50 combat
factors. Must include those units listed in Rule 3 below.
Axis: German combat units of the Axis player’s choice totalling 60 combat
factors, plus all Rumanian, Hungarian, and Italian units.
(3) SET-UP RESTRICTIONS:
Soviet: The following units set up precisely as listed:
6th Inf - 2412 57th Inf - 2512
9th Inf - 2511 2nd Shock Inf - 0309
21st Inf - 3018 One mechanized cavalry - 2411
42nd Inf - 0308
All other Soviet units may set up anywhere on the eastern side of the
1942a front line boundary EXCEPT Sevastopol (3018), Leningrad (0308),
and Kronstadt (0309).
Axis: Set up anywhere on the western side of the 1942a front line
boundary.
Note that the two 1942 scenarios share a common front line boundary
from hexside 1908/1909 northwards. South of this hexside, the 1942a
boundary is the more westerly of the two lines, including the two lines
on the Kerch peninsula.
(4) SOVIET FACTORIES on Moscow and Gorki only.
(5) SPECIAL RULE:
The weather in May 1942 is “Mud”.
11.4 November 1942 - The 1942b Scenario(1) This scenario begins with the Soviet player-turn, November 1942.
(2) AVAILABLE FORCES:
Axis: German combat units of the Axis player’s choice totalling 64 combat
factors, of which at least 16 factors must be armor, plus all Rumanian,
Hungarian, and Italian units. Must include those units listed in Rule 3
below.
Soviet: Combat units of the Soviet player’s choice totalling 70 combat
factors. Must include those units listed in Rule 3 below.
(3) SET-UP RESTRICTIONS:
Axis: The following units set up precisely as listed:
Rumanian 3rd Army - 2706 Italian 8th Corps - 2508
Rumanian 4th Army - 3005 14th Panzer Corps - 2804
Hungarian 2nd Army - 2208 German 6th Army - 2804
All other Axis units set up anywhere on the western side of the 1942b
boundary (the whole of the Kerch peninsula is now under Axis control).
Soviet: The following units set up precisely as listed:
2nd Shock Inf - 0309 42nd Inf - 0308
62nd Inf - 2904
All other Soviet units set up anywhere on the eastern side of the 1942b
boundary EXCEPT Leningrad (0308) and Kronstadt (0309).
(4) SOVIET FACTORIES on Moscow and Gorki only.
(5) SPECIAL RULES:
The weather in November 1942 is “Good”. This scenario cannot end
in December 1942; the December 1942 victory requirements do not
apply.
11.5 June 1943 - The 1943 Scenario(1) This scenario begins with the Axis player-turn, June 1943.
(2) AVAILABLE FORCES:
Soviet: Combat units of the Soviet player’s choice totalling 80 combat
factors.
Axis: German combat units of the Axis player’s choice totalling 70 combat
factors, plus the Hungarian 2nd and Rumanian 4th Armies. The German
6th Army has been permantently eliminated and cannot be taken either
initially or as a replacement.
(3) SET-UP RESTRICTIONS
Soviet: Set up anywhere on the eastern side of the 1943 boundary. Units
totalling at least 25 combat factors must be in Voronezh (2108) and/or in
or adjacent to Moscow. Units totalling at least 10 combat factors must
be on hexes 1810 and /or 2010.
Axis: Set up anywhere on the western side of the 1943 boundary.
(4) SOVIET FACTORIES on Moscow and Gorki only.
(5) SPECIAL RULE:
The weather in June 1943 is “Mud” (This is not normally possible - it
is peculiar to this scenario only).
11.6 June 1944 - The 1944 Scenario(1) This scenario begins with the Soviet player-turn, June 1944.
(2) AVAILABLE FORCES
Axis: German combat units of the Axis player’s choice totalling 74 combat
factors, plus all Hungarian and Rumanian units. Must include at least 20
factors of armor, and all units listed in Rule 3 below. The German 6th
and 17th Armies have been permanently eliminated and cannot be taken
either initially or as a replacement.
Soviet: Combat units of the Soviet player’s choice totalling 111 combat
factors.
(3) SET-UP RESTRICTIONS
Axis: The following German units set up precisely as listed:
2nd Army - 1218 4th Army - 1213
9th Army - 1315 16th Army - 0812
All other Axis units set up anywhere on the western side of the 1944
boundary.
Soviet: Set up anywhere on the eastern side of the 1944 boundary.
(4) SOVIET FACTORIES on Moscow and Gorki only.
(5) SPECIAL RULES - none.
14

12.0 VICTORY CONDITIONS12.1 General12.11 Victory depends on control of a certain number of the fourteen
Victory cities listed in Appendix I. Each player checks whether he has
achieved victory at the end of his opponent’s player-turn in each
December game-turn, and also in the May 1945 game-turn. These are
known as the five Victory Determination Turns (VDTs), and the game can
only be won in one of these five turns.
12.12 Players check the number of cities under their control at the end of
their opponents player-turn in each VDT, and compare this with the
number indicated in their own column of the Victory Requirements Table
(Rule 12.15 below) for that turn. If either player controls as many or
more Victory cities than indicated, he wins the game immediately at that
point. If neither player reaches the required target, play continues.
12.13 If neither player reaches their required number of Victory cities for
the May 1945 turn, the game is a draw.
12.14 For the purpose of counting Victory cities, Berlin and Moscow count
as the equivalent of two each. For example, the Axis player could win in
December 1941 by controlling Berlin, Moscow, and any six other Victory
cities at the end of the Soviet player-turn.
12.15 VICTORY REQUIREMENTS TABLE
Axis Soviet
December 1941 10 8
December 1942 12 6
December 1943 10 8
December 1944 7 11
May 1945 3 14
12.16 Players may elect to play a shortened version of any scenario by
deciding in advance to end the game no later than an agreed December
VDT. If neither player has achieved victory by this point, the game is a
draw. The November 1942 scenario, however, may not be ended in
December of the same year!
12.17 For victory determination purposes only, Warsaw is considered
Soviet-controlled only if currently occupied by the Polish 1st Army unit.
For all other purposes Warsaw is controlled in the normal way.
12.18 These victory conditions do not necessarily apply when any of the
Strategic Options of Section 13.0 are being utilized. They may be
modified or superseded as described in that Section.
13.0 STRATEGIC OPTIONS 13.1 General13.11 The strategic options are variations on the basic game, reflecting
historical possibilities which did not actually occur. All of the options
apply only to the Campaign Scenario, except Option 13.8 (Partisans)
which can be used with the 1942a Scenario as well.
13.12 Before setting up the game, players should agree between them
which of the strategic options may be used. It is then up to one player
or the other, depending on the option in question, to decide which if any
of them are used. It is strongly recommended that the use of option
13.7 at least is permitted.
13.13 In some cases, use of a strategic option may alter the game length
and victory conditions, those of Section 12.0 being modified as follows:
a) If the Soviet player elects to use option 13.2, 13.3 or 13.4, the game
automatically end after the December 1941 game-turn. If either
player controls 9 Victory cities (counting Moscow and Berlin as 2
each) at the end of his opponent’s player-turn in this month, he
wins; otherwise the game is a draw.
b) If the Axis player elects to use option 13.8, the victory conditions of
Section 12.0 apply as normal except than any Axis win counts
instead as a draw; the Axis player cannot win after using this
option.
The above options modify victory conditions only if they are actually
used, not if they are merely permitted. Options 13.5, 13.6, and 13.7
leave the victory conditions of Section 12.0 unaltered.
13.14 Options 13.2, 13.3, 13.4, 13.5, and 13.6 are referred to as the “start
options” because their use must be declared before the game begins.
Options 13.7 and 13.8 are known as the “playing options” as they are
introduced during the game. Each player may select at most one start
option and one playing option.
The Soviet player declares whether he is using any of options 13.2,
13.3, or 13.4 and sets up all his units before the Axis player has to decide
whether he is using either of options 13.5 or 13.6.
13.2 Free Soviet Set-UpInstead of setting up as listed in the Deployment Sheet / Basic Game,
all Soviet combat units which begin the Campaign Scenario on the map-
board may be set up as the Soviet player wishes on any hexes within the
1941 Russian borders. Factory units and the Zhukov marker set up as
listed in the Deployment Sheet / Basic Game.
13.3 The Stalin Line13.31 This option supposes that construction and activation of the Stalin
Line fortifications had been completed by the out-break of hostilities, and
its use is the only circumstance in which this terrain feature has any
effect on the game; otherwise it is ignored.
13.32 The Soviet 21st, 22nd, 24th, 26th and 27th Armies plus Ms and Od
Armored Unit are removed from the 1941 Soviet available forces (all may
be used as replacements later), and the remaining 1941 Soviet combat
units may be set up as the Soviet player wishes on any hexes within the
1941 Russian borders. Factory units and the Zhukov marker set up as
listed in the Deployment Sheet / Basic Game.
13.33 The Stalin Line hexsides benefit only the Soviet player, and only
when Axis units are approaching or attacking from the western side.
Their effect is identical in all respects to that of a river, except:
a) they never “freeze” (Section 6.2)
b) no Axis unit may ever move directly from one hex in Soviet ZOC to
another in an eastwards direction across a Stalin Line hexside. This
rule takes precedence over Rules 4.23 and 7.610.
13.34 Where the Stalin Line runs along a river hexside, their effects are
cumulative.
13.35 The Stalin Line never impedes Soviet movement or combat.
13.36 If two or more Axis units attack through the Stalin Line from the
western side, the restriction as same as 7.54 is applied.
13.37 Axis units may conduct overruns through the Stalin Line from the
western side.
13.4 Modernization of the Red Army13.41 This option supposes that the pre-war modernization of the Red
Army had not been curtailed, and that all Tank and Guards Armies were
immediately available.
13.42 The Soviet player may select any Soviet combat units he wishes,
15
except Shock Armies, totalling 42 combat factors, for his initial set-up.
At least 9 factors must be armor and/or armored cavalry units. These
units may be set up as the Soviet player wishes on any hexes within the
1941 Russian borders, with the restriction that every hex adjacent to the
border must be covered either by a Soviet combat unit or its ZOC.
Again, Factory units and the Zhukov marker are set up as listed in the
Deployment Sheet / Basic Game.
13.43 All Soviet combat units are immediately available for selection as
replacements, except the five Shock Armies which appear in the normal
way and cannot be taken as replacements before then.
13.5 May 1941 - The “Conservative”Axis Invasion13.51 Both this and the next option deal with the possibility of an Axis
attack on the Soviet Union a month earlier, in May 1941. Here it is
assumed that the Axis invasion of the Balkans is proceeding at the same
time.
13.52 If the Axis player elects to use this option, the Campaign Scenario
begins in May 1941. The Axis player receives no replacements in May
1941, the Soviet player 3 factors. Normal replacement rules (Section
10.1) apply from June 1941 onwards.
13.53 The Soviet 21st and 22nd Armies begin the game dispersed.
13.54 The German 1st Panzer Army begin the game in a dispersed
condition in or adjacent to Lodz (hex 0924).
13.55 One die is rolled for weather; a roll of 1-3 gives May 1941 “Good”
weather, a roll of 4-6 gives it “Mud”.
13.6 May 1941 - The “Daring” Axis Invasion13.61 This option supposes that Hitler has abandoned the Balkan invasion
in favor of an earlier attack at full strength on the Soviet Union.
13.62 If the Axis player elects to use this option, the Campaign Scenario
begins in May 1941. The Axis player receives no replacements in May
1941, the Soviet player 3 factors. Normal replacement rules (Section
10.1) apply from June 1941 onwards except that the Axis replacement
factor production rate (Rule 10.15a) is one factor per month less than
normal for the entire game.
13.63 The Soviet 21st and 22nd Armies begin the game dispersed.
13.64 All units normally available to the Axis player in June 1941 are
included in his May 1941 set-up.
13.65 One die is rolled for weather; a roll of 1-3 gives May 1941 “Good”
weather, a roll of 4-6 gives it “Mud”.
13.7 The Siberian Reserves13.71 The five Soviet Shock Armies are collectively titled the Siberian
Reserves. The Soviet player may elect to bring them into the game
sooner than scheduled by Rule 10.22a at the risk of facilitating a
Japanese invasion of Siberia (off-board) to the East.
13.72 The Soviet player may choose to commence the entry of his Siberian
Reserves in any turn from June to December 1941. Whenever he
chooses to commence their arrival the order of appearance is the same -
two in the first month and one in each of the three subsequent months.
13.73 At the beginning of the Soviet player-turn in which he chooses to
commence the arrival of the Siberian Reserves, and at the beginning of
each subsequent Soviet player-turn through to December 1941 inclusive,
a single die is rolled. On a die-roll of “1” the Japanese invasion of
Siberia occurs, with the following consequences:
a) Soviet replacement production is one factor per month less than
normal for the remainder of the game, and
b) in addition, the Soviet player loses the next 17 factors of
replacements to be produced.
c) Shock Armies yet to appear may have their entry cancelled, if the
Soviet player so chooses, in which case their combat factors are
deducted from the deficit. Once the Japanese invasion has
occurred, the relevant die-roll is discontinued.
13.74 Unless previously introduced under this option, the Siberian Reserves
begin to arrive in January 1942 with no risk of any penalty.
13.8 Partisans13.81 There are no partisan units in the game; instead, their considerable
effect on the campaign in “factored-in” to Axis replacement production.
This option hypothesises that Axis forces are able to contain the Partisan
threat.
13.82 The Axis player may choose to implement this option at the
beginning of his player-turn in any clear-weather month up to the end of
1942. Once implemented, the option remains in force for the rest of the
game.
13.83 This option has the effect of giving the Axis player one extra factor of
replacements each month from the turn it is implemented to the end of
the game. However, the Axis player cannot win the game if he employs
this option; a normal Axis win under Rule 12.2 would instead end the
game as a draw. A draw under Rule 12.0 remains a draw.
16

ADVANCED GAME
14.0 ADVANCED GAME COMPONENTS14.1 The Rules
Sections 14.0 to 23.0 contain the Advanced Game rules. All these are
additional to the Basic Game rules in that ALL BASIC GAME RULES ARE
STILL IN FORCE EXCEPT WHERE ALTERED OR REPLACED BY THESE
RULES. So, for example, if a subject is not mentioned in the Advanced
rules (e.g. Supply), the Basic Game rules remain unaltered.
The Advanced Game charts and tables, printed on the reverse of those
for the Basic Game, must be used in this version.
14.2 The MapboardThe Advanced Game of course uses the same mapboard as the Basic
Game. However, some of the terrain effects are different - see the
Terrain Effects Chart and also Section 19.0.
14.3 The Playing PiecesThe Advanced Game combat units are printed black on a darker shade
of grey (Axis) or red (Soviet). In addition the two German SS Corps are
printed white on dark grey (for aesthetic effect only!).
All Advanced Game combat units, except garrison units, are double-
sided, with the reverse side of the counter representing the same unit
either in fortified status (Section 17.0) or in an alternative mode (Section
15.0).
In the Advanced Game, players use units in counter-sheet 2 and 3
except some Soviet units for the Basic Game in sheet 3 (see Section 1.3).
A code of "B (Basic)" is not printed on the upper-left of Advanced Game
units' reverse-side.
The following are examples of double-sided units and their
significance:
14.31 How to read Units
14.32 Unit Types
14.33 Markers
“Dispersed” and “No Retreat” markers (which should be obvious!)
are also used. On the other hand,"Attacking Voluntary markers" are
not used in the Advanced Game (see Rule 17.14).
Players may only use fortified status and heavy artillery bonus markers
of their own color.
15.0 VARIABLE UNIT CAPABILITY15.1 General15.11 In the Advanced game, some combat units have more than one
possible combat and movement factor. The two sides of juggernaut,
factory, and armor unit counters signify two possible states in which
these units can exist.
Such units always operate with the combat and movement factor
currently face-up. All of these factors are subject to modification in the
normal way, and a unit’s movement allowance (Rule 4.14) is based on
the movement factor being used.
15.12 For replacement purposes, including selection of available forces at
the start of a scenario, the combat factor of a juggernaut unit is
considered to be its weaker factor; for armor units it is the stronger
(refitted) combat factor. Factory units can never be replaced.
15.13 Fortification (Section 17.0) is not considered a variable unit
capability, but is a formation that any combat unit (except Garrison and
Factory units) can adopt in addition to those of this Section.
15.2 Juggernaut Units15.21 In the Advanced game, juggernaut units are considered, more
realistically, to be composed of a number of smaller, lower-echelon,
infantry units (German corps or Soviet armies). Each juggernaut unit can
exist in one of two forms, represented by the two sides of the counter,
17
Combat Facto �(Only Defense)�
Unit Type �(Fortified)�
Combat Factor Movement Factor
《Soviet Infantry Army》�(Front)Normal (Back)Fortified
Movement Factor(Zero)�
Combat Factor �(Weaker)�
Combat Factor �(Unrefitted)�
Combat Factor Movement Factor
《German Juggernaut Unit》�(Front)Stronger Side (Back)Weaker Side
Movement Factor(Higher)�
Movement Factor�(Higher)�
Combat Factor�(Refitted)�
Movement Factor�(Normal)�
《German Panzer Army》�(Front)Refitted (Back)Unrefitted
Movement Factor
Combat Facto �(Only Defense)�
Entrain�Symbol
Activation Turn
《Soviet Factory》�(Front)In Production (Back)Entrained
German�Garrison
(表)� (裏)�
Soviet�Garrison
Fortified Status�(Juggernaut Unit)�
Fortified Status�(Armor Unit)�
Heavy Artillery�Bonus (HAB)
Refitting Exchange�Conversion
No Retreat
Activated�Factories
Activated�Turn
Occupied�Cities

and can in addition be broken down into and reformed from its
component parts.
15.22 Juggernaut units may never be brought into the game directly as
replacements, although they may be on board at the start of any
scenario. The only way in which they may appear during a scenario is by
the combining of lower-echelon units.
At the end of any OMP (before stacking limits are enforced), the
phasing player may combine any of his infantry units (German corps or
Soviet armies) which occupy the same hex by removing them from the
board and replacing them with a juggernaut unit whose weaker (lower)
combat factor is equal to or less than the total combat factors of the
units removed. The juggernaut is placed weaker-side up on the same
hex; it may not, of course, move in that player-turn. Juggernaut units
may not be formed in enemy ZOC.
German corps or Soviet armies which are combined into juggernaut
units may be moved during that OMP and may excess the restriction of
stacking temporarily, before creation of juggernaut units in that OMP.
Those German corps or Soviet armies may also be out of supply
(however, note Rule 9.12).
15.23 There is no limit to the number of juggernaut units that may be
created in a single turn, nor any restriction on which or how many
infantry units may combine to make them.
The component units must, however, be German infantry corps (for
Axis juggernauts) or Soviet infantry and armored infantry armies (for
Soviet juggernauts); mountain, motorized infantry, Axis armies (Romania,
Hungary and Italy), shock, tank and mechanized cavalry may not be
used.
No player may create additional juggernaut unit to create. The
counter-mix is the limit to create juggernaut units.
15.24 At the beginning of his OMP, all of the phasing player’s juggernaut
units currently on board automatically revert to their stronger side (at no
cost in replacements), provided they are in supply and not dispersed at
that point. This is the only time and only manner in which a juggernaut
unit may flip over from its weaker side (or Movement Mode).
15.25 A juggernaut unit may flip over from its stronger to its weaker side
during movement (either operational or tactical) at the discretion of the
owning player if he wishes to use the higher movement factor on the
weaker side; otherwise, he is restricted to the stronger side movement
factor.
15.26 In “ Snow” months of the winter of 1941-42 only (see Rule 6.32),
Axis juggernaut units which end their OMP on or north of the Arctic
Weather Line must immediately flip over to their weaker side,
irrespective of the movement factor used, unless they are in any kind of
city or town. In “Snow” months of the winter of 1941/42 only, all Axis
juggernauts on or north of the AWL which are still stronger-side up at the
end of their Combat Phase are flipped over to their weaker side.
15.27 A juggernaut unit may be broken down into low-echelon units (not
necessarily the same ones which combined to form it) by the owning
player at any time during his player-turn. Irrespective of which face is
uppermost at the time, a juggernaut unit always breaks down into units
(any number) whose total combat factors do not exceed that on the
weaker side of the juggernaut.
Any infantry corps (German) or infantry and/or armored infantry
armies (Soviet) may be selected from those available for replacement,
but again, mountain, motorized infantry, Axis armies (Romania, Hungary
and Italy), shock, tank and mechanized cavalry may not be used. The
juggernaut may re-enter the game (as described in Rule 15.22 above)
later only if it was in supply at the moment it was broken down.
15.28 A juggernaut unit may also break down in order to absorb combat
losses from “AL” or any kind of “_X” results, and any juggernaut which
begins the Combat Phase stronger-side up is considered to have lost
combat strength points equal to the difference between its two printed
combat factors before any component units have to be eliminated.
EXAMPLE: A soviet Front unit, stronger-side up attacks 5 Axis combat
strength points at 2-1 and rolls an “EX” result. All axis units are
removed; the Soviet player may break the juggernaut down into
components, and in doing so absorbs three combat strength points (12
minus 9) of his required loss. He need then remove only two combat
strength points in component units.
A juggernaut unit which absorbs losses in this way may not have to
lose any component units at all, if the required loss does not exceed the
difference between its two combat factors. It must still break down into
components, however - it cannot simply flip over to its weaker side.
15.29 A juggernaut may break down after combat resolution in order to
allow its component units to advance tactically after combat.
15.210 In the Basic Game, German panzer armies are considered as
juggernaut unit, but are not in the Advanced Game (however, see Rule
15.36). Therefore those German panzer armies may re-enter the game
as described in Section 10.1.
15.211 On the reverse side of juggernaut units, a color belt represents its
Movement Mode (see Rule 15.24) is printed.
15.3 Armor Units15.31 Refitted status for an armor unit is like a freshly sharpened cutting
edge on a sword. An armor unit does not have to be refitted to move,
attack, or defend, but is more effective in the status.
15.32 Armor units always begin any scenario in refitted status, and their
combat factor for replacement purposes is the higher one.
15.33 An armor unit loses its refitted status, and is flipped over to its
unrefitted side, in all of the following circumstances:
a) if it exceeds the movement factor printed in black or yellow on the
refitted side. A refitted armor unit may move using the movement
factor printed in white (i.e., larger number) but must immediately
over to unrefitted status on completion of such movement.
b) if it receives a “DR” or “DRi” combat result. In this case, a refitted
armor unit flips over instead of being dispersed (it must still retreat
if obliged to do so). Already-unrefitted armor units are dispersed in
the normal way.
c) as a combat loss following an “AL” or any kind of “_X” result in
the owning player’s combat phase. An armor unit may flip over to
unrefitted status in order to satisfy a combat loss equal to the
difference between its two combat factors (in a similar manner to a
juggernaut unit in Rule 15.28, except of course that it does not
break down).
15.34 Note that the movement factor on an armor unit’s unrefitted side is
not the same as that below the line on its refitted side. An armor unit
that begins its OMP unrefitted is restricted to the movement factor
printed on that side of the counter. The fuel shortage penalty (Rule
4.34) applies equally to both refitted and unrefitted armor units.
15.35 To flip back over from unrefitted to refltted status, an armor unit
must be undispersed and in supply at the start of its own player-turn, and
may not move or be in the ZOC of an enemy unit during its OMP. It is
then flipped back to its refitted side in the Recovery Phase at no cost in
18

replacements.
Refitting Markers are placed on all units which are refitting during its
OMP.
Armor units may fortify (Section 17.0) in either refitted or unrefitted
status, but may never become refitted while fortified.
15.36 German panzer armies are not considered as juggernaut units but
they may never advance after combat except they are the attacker and
the combat result is "DE". In the latter, the German panzer army unit
may advance one hex.
15.37 Armor units which are considered as fuel shortage (see Rule 4.34)
may not move using the movement factor printed in white (see Rule
15.33a). Also, if the current movement allowance is less than number
that is stated as 4.34, the smaller number is used.
15.38 On the reverse side of Armor units, a color belt represents its
unrefitted side (see Rule 15.33) is printed.
15.4 Factory Units 15.41 In the advanced game, factory units are combat units, representing
the value as militia of their workers. They have a normal ZOC and,
although it is not printed on the counter, are considered each to have a
combat factor of “1” for defense only - factory units may never attack.
They are neither infantry nor armor-type units, and their combat factor is
never modified for any reason.
As in the basic game, factory units have a stacking value of zero and
do not require supply. They may not retreat, and the only manner in
which they may move is explained in Rule 15.44 below.
Section 21.0 details the initial placement of factory units in advanced
game scenarios.
15.42 A factory unit cannot be attacked separately if stacked with any
fortified unit; it must be attacked together with the largest such fortified
unit in the hex (other units may be included as well). Furthermore, such
an attack may only be an Exchange Conversion, Overrun, or Blitz attack
(see Section 19.0).
15.43 Factory units each produce replacement points at the rate of one per
month provided that a rail line can be traced to that city in the RRP, but
do not begin to do so until the date printed on their counter, known as
the activation date.
For example, the Leningrad factory unit produces one replacement
point per month only from October 1941 onwards. The two factories
with no date on the counter, Dnepropetrovsk and Tula, are in production
from the start of the game.
15.44 Although they have a movement factor of zero, factory units may use
a special form of movement simulating their dismantling and evacuation
east of the Urals. The evacuation of a factory unit is a three-turn
process:
STEP ONE: In the RRP of any Soviet player-turn, the factory unit is simply
flipped over to its entrained side.
STEP TWO: In the RRP of the following Soviet player-turn, the factory unit is
removed from the mapboard and placed off~board to the East, provided
that at that moment a rail line can be traced to the city.
STEP THREE: In the RRP of the Soviet player-turn after that, the factory unit
is flipped back to its original (production) side.
15.45 The Soviet player may conduct the evacuation of any number of
factory units simultaneously. The process may even be interrupted or
delayed if, for example, no rail line can be traced in Step Two above.
Once entrained, however, the factory unit cannot re-enter production
until it has been evacuated.
15.46 A factory unit produces no replacements during any turn in which it
is entrained or flipped over from one side to the other (hence the process
of evacuation always halts production for at least three turns).
Any factory unit which commences evacuation on or before its
activation date has this date postponed by three months (or by however
long the evacuation took if this was more than three months).
15.47 A factory unit retains its defensive combat factor of “1” even if
entrained or not yet in production.
15.48 No factory unit may entrain (commence evacuation) on the first turn
of the campaign scenario (June 1941, or May 1941 if either of options
23.5 or 23.6 are in operation).
15.49 Activated Factories marker is used on the Soviet Point Record Track
to record the current number of Factories which are in production on the
map.
16.0 GARRISON UNITS
16.1 General
16.11 There are eight garrison units in the game (seven Soviet, one Axis),
representing fixed garrisons of regular troops rather than militia units.
They are placed on their indicated cities at the start of any scenario as
laid down in Section 23.0, and may not move at all during the game.
16.12 Garrison units are combat units with normal ZOCs, but are neither
infantry nor armor-type units. Their combat factor is defensive only -
garrison units may never attack - and is never modified for the effects of
terrain.
16.13 A garrison unit, like a factory unit, cannot be attacked separately if
stacked with any fortified unit. It must be attacked together with the
largest such unit in the hex. Again, such an attack may only be an
Exchange Conversion, Overrun, or Blitz attack.
16.14 Garrison units may never fortify, disband, or break out, and can
never be replaced once eliminated.
16.15 The number of garrison units on board has an effect on Soviet
replacements. See Rule 20.13.
17.0 FORTIFICATION
17.1 General
17.11 Any combat units, except factory and garrison units, which did not
retreat in the immediately preceding enemy Combat Phase, may be
fortified by the owning player in the Replacement/Reinforcement Phase
of his player-turn. A fortified unit is so indicated by flipping the counter
over, if its reverse side contains the fortification symbol (all infantry-type
units except juggernauts), or by having the appropriate fortification
marker placed on it (armor and juggernaut units).
By convention, fortified units are normally placed at the bottom of any
stack.
17.12 Factory and garrison units may never fortify. Dispersed units may
not fortify even if they did not actually retreat in the immediately
preceding enemy combat phase.
17.13 A fortified unit has no movement allowance and may not move at all
during its own player-turn. It may, however, retreat if it suffers a “DR”
or “DRi” result in the enemy Combat Phase, but loses its fortified status
in doing so.
17.14 A fortified unit may not attack, it can only defend. Further:
19

a) units stacked with a fortified unit are not obliged to attack enemy
units in their ZOC: and
b) a unit adjacent to both a friendly fortified unit and an enemy unit
which are also adjacent to each other is not obliged to attack that
enemy unit.
In effect, fortified units in the Advanced Game replace the concept of
stationary units in Basic Game Rule 7.14d etc. (with a slight difference
due to the fact that certain dispersed units can fortify). The words “was
not dispersed and did not move during the OMP” in Rules 7.14d, e and f,
7.110 and 7.33 are replaced by the words “is fortified” in the Advanced
Game.
17.15 As shown on the counters themselves, some units increase their
combat factor (for defense only) when fortified:
a) The combat factor of armor units is unaltered.
b) German Infantry corps, mountain infantry corps, and Romanian
mechanized cavalry corps have their combat factor increased by 1.
c) German infantry armies and Axis infantry armies have their combat
factor increased by 2.
d) Soviet front units have their combat factor increased by 3.
e) Soviet Shock and mechanized cavalry units have their combat factor
increased by 1.
f) Soviet infantry and mechanizied infantry units have their combat
factor increased by 2.
17.16 Armor units may fortify at either their refitted or unrefitted strengths,
but may never become refitted whilst fortified. Juggernaut units may
also fortify at either combat strength (with the same gain in defensive
combat strength) and may flip over to their stronger side while fortified.
17.17 Additional combat odds limitations are imposed when hexes
containing fortified units are attacked. See Rule 19.15.
17.18 To “defortify” (change from fortified to unfortified status) a unit,
other than by virtue of Rule 17.12, the owning player simply flips the unit
back to its normal combat side, or removes the fortification marker, in
the RRP of his player-turn. The unit may then move (if undispersed) and
attack normally in that player-turn.
17.19 On the reverse side of units except armor and juggernaut units, a
color belt represents its Fortified Mode is printed.
18.0 HEAVY ARTILLERY BONUS
18.1 General
18.11 All juggernaut units and Soviet shock armies which begin the OMP
of their own player-turn undispersed, unfortified, and in supply, and
which do not move during that OMP, may use the Heavy Artillery Bonus
(HAB) when attacking adjacent units in the Combat Phase.
No other types of unit may use this Bonus.
18.12 For ease of memory, HAB markers are placed on all eligible units at
the beginning of the OMP, and removed as these units move during the
OMP. All remaining HAB markers are removed at the end of the Combat
Phase.
18.13 The Heavy Artillery Bonus gives Soviet shock armies 1 additional
combat factor, and all juggernaut units 2 additional combat factors (use
the appropriate marker) when attacking in their own Combat Phase.
18.14 The Heavy Artillery Bonus cannot be used defensively (which is why
fortified units cannot use it).
18.15 Juggernauts may benefit from the HAB while at either of their
combat strengths, although will be definition always be stronger-side up
unless inverted only by virtue of Rule 15.26.
18.16 The Bonus combat factors allowed by the HAB can be used
as”padding” against “AL” or any kind of “_X” combat result, in the
same way as can the difference between the higher and lower combat
strengths of juggernaut units and armor units. The attacker may lose
the combat factors of the HAB before he has to begin taking losses from
combat units; this does not in any way affect the ability of that attacking
unit to use the HAB again in later turns.
EXAMPLE: The Soviet “Northwest” front unit, stronger-side up and
with its HAB of +2 attacks the German 5th infantry corps (3-4) at 14 to 3,
which rounds down to 4 to 1, and rolls a “DX” result. The German 5th
corps and the Soviet HAB marker are removed; the Soviet unit cannot
break down or take any more losses without exceeding the Axis loss, and
so loses nothing further.
Had the result of the above combat been “2X” the Soviet player could
have satisfied the required minimum six-factor loss by removing the HAB
marker (2 factors), breaking down his juggernaut (3 factors), and losing
any one component unit.
18.17 In “Snow” months of the winter of 1941/42 (only), no Axis unit on or
north of the Arctic Weather Line may use the HAB.
19.0 ADVANCED GAME COMBAT19.1 General19.11 The combat rules are perhaps the most complex part of the
Advanced Game, introducing a subtlety and flexibility rare in games of
this level. The general principle still holds, however, that Basic Game
rules remain in force except where modified or amended by these rules.
19.12 In the Advanced Game, the two sides use different CRTs, two each in
fact, replacing CRTs A and B of the Basic Game. Each player resolves his
attacks using his own CRTs, and the significance of the “Assault” and
“Overrun/Blitz” CRTs is explained in Section 19.2. The maximum odds
of Rule 7.22 are now 7:1 (Axis attacks) and 10:1 (Soviet attacks).
19.13 Section 7.1 remains in effect unaltered except for the change already
mentioned to Rule 7.14. This now reads:
A phasing combat unit which is adjacent to one or more enemy units
in the Combat Phase must attack at least one of them, unless:
a) it is a Major or Victory city hex; or
b) it is adjacent to enemy units only across unfrozen river hexsides or
Kerch Straits (or similar - Rule 4.55) hexsides; or
c) all enemy units in its ZOC are being attacked by other units; or
d) it is fortified; or
e) it is stacked with another combat unit which is fortified; or
vi) both it and all enemy units to which it is adjacent are also adjacent
to another phasing combat unit which is fortified.
A unit is also not obliged to attack if a combination of (b), (d), and (f)
apply, as shown in the Examples of Play. Rule 7.110 is altered
accordingly.
19.14 ADDITIONAL WEATHER EFFECT ON COMBAT:
In the Advanced Game, all “Assault” attacks (attacks other than
overrun and blitz attacks) in “Mud” turns, and all Axis Assault attacks in
“Snow” turns, are modified by a one-column shift to the left on the CRT
(Step Five of Rule 7.21), in addition to all other effects.
This replaces Rules Section 6.4.
19.15 ADDITIONAL COMBAT ODDS LIMITATIONS:
a) An attack against a defending group containing one or more
fortified units must be at higher odds than any attack against
20

unfortified units only in the same hex.
b) The total modified defense factor of a defending group containing
one or more fortified units must be greater than that of any
defending group of unfortified units attacked separately in the same
hex.
EXAMPLE: A fortified Soviet 2-3 infantry army, an unfortified
Soviet 2-3 infantry army and an unrefitted Soviet 6-6/4-5 tank army
are being attacked in Kiev which still contains its 1-factor garrison
unit. The modified combat values of the Soviet units are 4, 3, 4,
and 1 respectively. The garrison unit must be combined with the
fortified unit (Rule 16.13), and to satisfy this rule, either the
unfortified infantry unit or the tank unit must be included in the
defending group. This group must then be attacked at higher odds
than any unit attacked separately in the hex (the attacker could of
course attack the entire hex as a single defending group).
c) The words “remained undispersed and stationary throughout the
OMP” in Rule 7.33 are replaced by the words “is fortified” in the
Advanced Game.
19.16 ADDITIONAL TERRAIN EFFECTS ON COMBAT:
a) Soviet infantry-type units each have 1 added to their combat factor
when defending in any Major or Victory city in the Soviet Union (not
just Victory cities as in the Basic Game).
b) Mountain infantry units have their combat factor doubled when
defending in or attacking into mountain hexes, rather tan increased
by one.
19.2 Advanced Overrun and Blitz Attacks19.21 An overrun attack in the advanced game requires odds of at least
5-1, and is resolved on the attacker’s own Overrun/Blitz CRT.
19.22 Any attack made possible by an overrun attack (i.e. in which one or
more of the attacking units made a move during the OMP which was
possible only because an overrun attack had taken place) is termed a
“Blitz” attack, and must also be resolved on the Overrun/Blitz CRT.
19.23 Blitz markers are provided to indicate which attacking units must use
the Overrun/Blitz CRT, and should be placed during the OMP both on
units which make an overrun attack and on units which make a move
possible only because that overrun attack has taken place.
19.24 As indicated by the CRTs, the minimum odds for Blitz attacks are 2:1
for Axis attacks and 3:1 for Soviet attacks. Blitz attacks below these
odds are not allowed, and if unavoidable for any reason, yield an
automatic “AE” result.
19.25 Overrun and blitz attacks are never modified for the effects of
weather (although other modifiers apply as normal), nor can the Combat
Options of Section 19.32 be used in conjunction with them.
19.26 Overrun and blitz attacks must be resolved before normal attacks in
the Combat Phase, and can be resolved in any order the phasing player
chooses.
19.27 All attacks other than overrun and blitz attacks are resolved on the
attacker’s Assault CRT. A player may, however, choose to use the
Overrun/Blitz CRT for a particular attack, even if he is not obliged to do
so, provided that attack is resolved before any attacks on the Assault
CRT.
19.3 Combat Options19.31 In the Advanced Game, both attacker and defender may influence
the result of an attack by the employment of Combat Options. The
defender may order “No Retreat” which causes his units to remain in
place, usually at the cost of higher casualties. The attacker may choose,
or may be obliged to use, “Exchange Conversion” which tends to cause
higher losses to both sides. lt is possible for both of these options to be
in effect for the same attack.
19.32 Combat Options only affect results on the Assault CRT. The
Overrun/Blitz CRT results are never altered, and so, for example, it makes
no difference to an overrun attack whether the defender had a “No
Retreat” order or not.
19.33 EXCHANGE CONVERSION
Immediately prior to the combat die roll, the attacker may choose to
declare Exchange Conversion to be in effect for a particular Assault
attack. This has the effect of altering the combat result as indicated on
the Combat Options section of the Advanced Game CRTs. The result is
read from the Assault CRT as normal, and then converted to the result
shown under the “Exchange Conversion” heading.
Exchange Conversion Marker is placed on any Attacking units in this
case, and the marker is removed after the resolution of the attack.
There is no limit to choose Exchange Conversion during one Combat
Phase.
19.34 Exchange Conversion is mandatory (the attacker must use this
option) in:
a) all attacks against a defending group which includes a garrison or
factory unit; and
b) all Axis attacks against a Soviet unit in a swamp hex (or any
defending group that includes such a unit).
19.35 N0 RETREAT
a) A player who wishes to declare No Retreat orders must do so at the
end of his own player-turn, to be in effect for his units in the
immediately following enemy player-turn.
b) If the Soviet player invokes this Combat Option, he must do so for
all of his units or none at all.
c) The Axis player may declare this option to be in effect for individual
German occupied hexes (but not for separate units within a hex),
and such hexes are identified with a “No Retreat” marker.
d) The Axis player may not declare No Retreat orders for any hexes
containing Rumanian, Hungarian, or Italian units.
19.36 No Retreat orders alter combat results as indicated under the
appropriate heading in the Combat Options section of the Advanced
Game CRTs. Again, the result is read as normal from the Assault CRT,
and then converted to that shown under the “No Retreat” heading.
All No Retreat markers are removed at the end of that Combat Phase.
There is no limit to choose No Retreat during one Combat Phase.
19.37 Furthermore, any combat die roll of “1” in an attack at 1:4 or
greater against units with a No Retreat order causes at least a “DX”
result against the defender, even if the converted result is only a “-”.
19.38 It is possible for a Soviet attack directed against more than one hex
to include in the same defending group units both with and without No
Retreat orders. In this case, all units of the defending group are subject
to the No Retreat order, even if some of them are Rumanian, Hungarian,
or Italian.
19.39 The third column of the Combat Options section of the CRTs
indicates the alterations in effect when both Exchange Conversions are
used instead of either of the other two.
21

19.4 Advanced Game Combat Results19.41 The Advanced Game introduces three new combat results and
slightly modifies two of the existing ones. “DD” results can now occur
directly on the CRT.
19.42 “HX”- Defender Half Exchanged: All units of the defending group are
eliminated. The attacker then eliminates from the attacking group units
whose modified combat strength does not exceed half the modified
combat strength of the defending group, but comes as near as possible
to this figure.
19.43 “3X” - Triple Exchange: Identical to an “EX” result except that the
attacker must lose units totalling at least three times the defender’s
modified strength.
19.44 ”4X” - Quadruple Exchange: Identical to an “EX” result except that
the attacker must lose units totalling at least four times the defender’s
modified strength.
19.45 lt is possible in the Advanced Game for an “EX” result to occur when
the modified combat strength of the attacker is less than that of the
defender. In this case, all units of the attacking group are eliminated,
and the defender eliminates from the defending group units whose total
modified combat strength does not exceed that of the attacker, but
comes as near as possible to this figure. In effect, this is a “DX” result
in reverse.
The same principle applies to “2X”, “3X” and “4X” results if the
attacker’s modified combat strength is less than twice, three times, or-
four times (respectively) that of the defender. All units of the attacking
group are eliminated, and the defender eliminates from the defending
group units whose total modified combat strength does not exceed one-
half, one-third, or one-quarter (respectively) that of the attacker.
19.46 Any attacking unit required to take losses to satisfy an “AL” or any
kind of “_X” result may always lose, firstly, any HAB, and secondly, any
difference between the higher and lower strengths of juggernaut and
armor units, before having to take losses in actual combat units, even if,
in the case of “AL”, “DX” and “HX” results, he could come closer to the
maximum required loss by losing combat units first. For an example, see
Rule 18.16, where the Soviet player need lose only the HAB, even though
he could lose exactly three factors by breaking down his juggernaut unit.
This option is never open to the defender, even in cases where Rule
19.45 above applies, because armor and juggernaut units may never flip
over or break down during an opposing player-turn. So, for example, if
a German 10-2 juggernaut with a No Retreat order is attacked at odds of
1 to 2 by a Soviet 5-3 infantry army with Exchange Conversion declared,
and a “2” rolled on the die, the “-” result would convert to an “EX” the
Soviet unit would then be eliminated and the Axis player need lose
nothing.
19.47 Units which are forced to retreat by a “DR” or “DRi” result and
cannot do so still have the result converted to “DD”. This can only
happen, however, if neither Exchange Conversion nor No Retreat are
operative.
19.48 Tactical advance after combat, including the special provisions of
Rule 7.610, is permitted if an attacked hex is left vacant by a “HX”
result, but not if left vacant by a “3X” or “4X” result.
19.5 Advanced Disbandment and Break-Out19.51 Units in the Advanced Game disband in the same manner as in the
Basic Game (in spite of their higher combat factors).
However:
a) Fortified units which disband yield replacement factors equal to one
less than their normal (unfortified) combat factor.
b) Juggernaut units which disband yield replacement factors equal to
two less than their weaker combat strength, irrespective of their
current status (and even if fortified).
c) Disbanding armor units yield replacement factors equal to one less
than their current combat strength.
d) Factory and garrison units may never disband.
19.52 Break-out is treated more realistically in the Advanced Game by
considering in detail the break-out path. The break-out path to a hex in
supply can now be of any length, still passing through any number of
enemy ZOCS but not through enemy-occupied hexes. However, in
addition to the basic reduction imposed by Rule 7.55a (as modified by
Rule above), one replacement factor is lost from the total of the pocket
as a whole:
a) for each movement point in excess of three which would have to be
expended to move along the break-out path (from the nearest unit
in a pocket); and
b) for each hex in enemy ZOC along the break-out path which is not
occupied by a supplied friendly unit; and
c) in “Snow” months, each hex of the break-out path which is on or
north of the Arctic Weather Line.
This rule does not envisage units actually making such a break-out
movement, so the length of the path may be in excess of a unit’s
movement allowance. Obviously, however, paths containing too many
hexes or enemy ZOCs may reduce the number of surviving replacement
factors to zero.
20.0 ADVANCED GAME REPLACEMENTSAND REINFORCEMENTS
20.1 General20.11 The principle and mechanism of replacements and their introduction
into play remains the same as in the Basic Game. The only difference
lies in the manner and numbers of replacement factor production.
20.12 The Soviet player now receives:
a) one replacement factor per month for each factory unit emplaced
and in production (either on its original city or evacuated to the
east); plus
b) one replacement factor per month for each Soviet Victory city under
his control (including only one, not two, for Moscow); plus
c) from “Siberia”:
In 1941 - 2 factors per month
In 1942 - 3 factors per month
In 1943 - 4 factors per month
In 1944 - 5 factors per month
In 1945 - 6 factors per month
20.13 The Soviet player may never bring into the game as replacements in
any one player-turn more infantry-type units than he has garrison units
currently on the board.
20.14 a) Normal Axis replacement factor production is now:
In 1941 - 2 factors per month
In 1942 - 4 factors per month
From 1943 onwards - 6 factors per month
b) In addition, the Axis player now receives one replacement factor per
month (instead of every two months) for each pair of Soviet Victory
cities he controls (again counting Moscow as two).
22

20.15 Notwithstanding the above, the Axis player may never receive more
replacement factors in any one month than the total number of Victory
cities under his control at that instant.
20.16 In addition, Rule 10.111 from the Basic Game remains in force.
20.17 a) Juggernaut units may not enter the game as replacements.
See Rule 15.22.
b) The replacement factor cost of armor units is their refitted combat
strength, and such units enter the game with this side uppermost.
c) The replacement factor cost of all other units is their unfortified
combat factor.
d) Factory and garrison units can never be replaced.
20.18 Reinforcements in the Advanced Game are identical to those of the
Basic Game. The German 2nd SS Panzer Corps enters the game refitted.
20.19 No unit may fortify in the player-turn in which it enters the game as
a replacement or reinforcement.
21.0 ADVANCED GAME SCENARIOS21.1 General21.11 Each Basic Game scenario (see Section 11.0) has its counterpart in
the Advanced Game, with the same start date and essentially the same
set-up conditions and special rules. For ease of reference, however, the
Advanced scenarios are all detailed in full here.
21.12 Each scenario now specifies as rule (5) the Soviet garrison units
remaining. “Special Rules” becomes rule (6). The Berlin garrison unit
begins all scenarios on Berlin.
21.13 The combat factors referred to when defining a scenario’s available
forces are the weaker factors of juggernaut units, the refitted factors of
armor units, and the unfortified factors of all units. The defensive
combat factors of factory and garrison units are not included in the
totals; these are extra.
21.14 Juggernaut units of both sides begin all scenarios at their weaker
combat strength, unless otherwise specified. Those of the player moving
first may, of course, flip over to their stronger side at the beginning of his
first OMP, provided they are in supply.
21.15 Armor units of the player moving first begin all scenarios refitted;
those of the player who sets up first begin unrefitted, unless otherwise
specified.
21.16 Except where a scenario’s special rules decree otherwise, both
players may begin all scenarios with any units they wish in fortified
status.
21.17 No factory unit may ever begin any scenario entrained.
21.18 The non-phasing player may declare “No Retreat” orders for his
units in the first player-turn of any scenario.
21.2 June 1941 - The Campaign Scenario(1) This scenario begins with the Axis player-turn, June 1941.
(2) AVAILABLE FORCES:
Both sides begin the game with just those combat units whose
identity is lighter base color triangle on the upper-left of the counter.
There are 37 such Axis units and 40 such Soviet ones.
(3) SET-UP RESTRICTIONS:
Soviet: All Soviet units must be set up precisely as listed in the Deployment
Sheet / Advanced Game.
Axis: The Hungarian unit sets up anywhere in Hungary, the Rumanian units
anywhere in Rumania. Up to SEVEN (7) stacking points of German
infantry or mountain infantry may, at the Axis player’s option, also set up
in Rumania.
(4) SOVIET FACTORIES: - See the Deployment Sheet / Advance Game.
(5) SOVIET GARRISONS: - See the Deployment Sheet / Advance Game.
(6) SPECIAL RULE:
a) In June 1941, the Soviet player receives 6 combat factors of
replacements, the Axis player 1. Normal replacement rules apply
from July 1941 onwards.
b) No Soviet unit may begin the game fortified.
c) Axis juggernaut units begin the game at their stronger combat
factor.
d) The Soviet player may not declare “No Retreat” orders for his units
in the first player-turn of this scenario.
21.3 May 1942 - The 1942a Scenario(1) This scenario begins with the Axis player-turn, May 1942.
(2) AVAILABLE FORCES:
Soviet: Combat units of the Soviet player’s choice totalling 72 combat
factors, of which 14 must be armor and/or armored cavalry. Must
include those units listed in Rule 3 below.
Axis: German combat units of the Axis player’s choice totalling 90 combat
factors, plus all Rumanian, Hungarian, and Italian units.
(3) SET-UP RESTRICTIONS:
Soviet: The following units set up precisely as listed:
21st Inf - 3018 2nd Shock Inf - 0309
42nd Inf - 0308
All other Soviet units may set up anywhere on the eastern side of the
1942a front line boundary EXCEPT Sevastopol (3018), Leningrad (0308),
and Kronstadt (0309).
Axis: Set up anywhere on the western side of the 1942a front line
boundary.
(4) SOVIET FACTORIES:
Moscow, Gorki, Tula, and Leningrad are emplaced on board, although
Leningrad produces no replacement factors until a rail line can be traced
to it. Stalino and Kharkov have been evacuated to the east and are in
production, and Dnepropetrovsk has been eliminated.
(5) SOVIET GARRISONS: on Grozny, Moscow, Leningrad Stalingrad and
Sevastopol only.
(6) SPECIAL RULE: The weather in May 1942 is “Mud”
21.4 November 1942 - The 1942b Scenario(1) This scenario begins with the Soviet player-turn, November 1942.
(2) AVAILABLE FORCES:
Axis: German combat units of the Axis player’s choice totalling 100 combat
factors, of which at least 24 must be armor, plus all Rumanian,
Hungarian, and Italian units. Must include those units listed in Rule 3
below.
Soviet: Combat units of the Soviet player’s choice totalling 120 combat
factors. Must include those units listed in Rule 3 below.
(3) SET-UP RESTRICTIONS:
Axis: The following units set up precisely as listed:
Rumanian 3rd Army - 2706
Italian 8th Corps - 2508
Rumanian 4th Army - 3005
Hungarian 2nd Army - 2208
German 6th Army, 14th Panzer Corps - 2804
23

All other Axis units set up anywhere on the western side of the 1942b
boundary (the whole of the Kerch peninsula is now under Axis control).
Soviet: The following units set up precisely as listed:
2nd Shock Inf - 0309
42nd Inf - 0308
62nd Inf - 2904
All other Soviet units set up anywhere on the eastern side of the 1942b
boundary EXCEPT Leningrad (0308) and Kronstadt (0309).
(4) SOVIET FACTORIES:
Moscow, Gorki, Tula, and Leningrad are emplaced on board, although
Leningrad produces no replacement factors until a rail line can be traced
to it. Stalino and Kharkov have been evacuated to the east and are in
production, and Dnepropetrovsk has been eliminated.
(5) SOVIET GARRISONS: on Grozny, Moscow, and Leningrad only.
(6) SPECIAL RULES:
a) The weather in November 1942 is “Good”.
b) This scenario cannot end in December 1942; the December 1942
victory requirements do not apply.
21.5 June 1943 - The 1943 Scenario(1) This scenario begins with the Axis player-turn, June 1943.
(2) AVAILABLE FORCES:
Soviet: Combat units of the Soviet player’s choice totalling 140 combat
factors.
Axis: German combat units of the Axis player’s choice totalling 120 combat
factors, plus the Hungarian 2nd and Rumanian 4th Armies. The German
6th Army has been permanently eliminated and cannot be taken either
initially or as a replacement.
(3) SET-UP RESTRICTIONS:
Soviet: Set up anywhere on the eastern side of the 1943 boundary. Units
totalling at least 40 combat factors must be in Voronezh (2108) and/or in
or adjacent to Moscow (1306). Units totalling at least 20 combat factors
must be on hexes 1810 and/or 2010.
Axis: Set up anywhere on the western side of the 1943 boundary.
(4) SOVIET FACTORIES:
Moscow, Gorki, Tula, and Leningrad are emplaced on board, although
Leningrad produces no replacement factors until a rail line can be traced
to it. Stalino and Kharkov have been evacuated to the east and are in
production; and Dnepropetrovsk has been eliminated.
(5) SOVIET GARRISONS: on Grozny, Moscow, and Leningrad only.
(6) SPECIAL RULES:
a) The weather in June 1943 is “Mud” (This is not normally possible -
it is peculiar to this scenario).
b) Soviet units on or within two hexes of Kursk (1910) may not begin
the game fortified.
c) After the set-up, but before play begins, the Axis player rolls one die
for each of his armor units. A die roll of 1, 2, or 3 leaves the unit
refitted; a die roll of 4, 5, or 6 means the units begin the game
unrefitted.
21.6 June 1944 - The 1944 Scenario(1) This scenario begins with the Soviet player-turn, June 1944.
(2) AVAILABLE FORCES:
Axis: German combat units of the Axis player’s choice totalling 125 combat
factors, plus all Hungarian and Rumanian units. Must include at least 33
factors of armor, and all units listed in Rule 3 below. The German 6th
and 17th Armies have been permanently eliminated, and cannot be
taken either initially or as replacements.
Soviet: Combat units of the Soviet player’s choice totalling 240 combat
factors.
(3) SET-UP RESTRICTIONS:
Axis: The following German units set up precisely as listed:
2nd Army - 1218
4th Army - 1213
9th Army - 1315
16th Army - 0812
All other Axis units set up anywhere on the western side of the 1944
boundary.
Soviet: Set up anywhere on the eastern side of the 1944 boundary.
(4) SOVIET FACTORIES:
Moscow, Gorki, Tula, and Leningrad are emplaced on board, Stalino and
Kharkov have been evacuated to the east and are in production, and
Dnepropetrovsk has been eliminated.
(5) SOVIET GARRlSONS: on Grozny, Moscow, and Leningrad only.
(6) SPECIAL RULES: none.
22.0 ADVANCED GAME VICTORY CONDITIONS
The victory conditions for the Advanced Game are the same as those
for the Basic Game, and the Victory Requirements Table remains
unchanged. However, the Axis player may now count as the equivalent
of one Victory city each pair of Soviet factory units eliminated (not, of
course, those evacuated to the east by the Soviet player).
EXAMPLE: The Axis player would win the game if he controlled
Moscow, Berlin, and seven other Victory cities and had eliminated two
Soviet factories at the end of the Soviet December 1942 player-turn.
23.0 ADVANCED GAME STRATEGIC OPTIONS23.1 General23.11 The seven strategic options for the Advanced Game are the same as
those for the Basic Game, so the following subsections give details only
of the amendments and additions to the options necessary for their use
with Advanced Game rules. The rules of Section 13.0, and in particular
of Section 13.1, remain otherwise unaltered.
23.12 The provisions of Section 22.0 apply to all strategic options in the
Advanced Game. Those of Section 12.0 are modified as before.
23.2 Free Soviet Set-UpIdentical to the Basic Game (13.2) except that "Factory units and the
Zhukov marker set up as listed in the Deployment Sheet / Basic Game"
should be read "Factory units, Garrison units and the Zhukov marker set
up as listed in the Deployment Sheet / Advanced Game".
23.3 The Stalin LineIdentical to the Basic Game (13.3) except that "Factory units and the
Zhukov marker set up as listed in the Deployment Sheet / Basic Game"
should be read "Factory units, Garrison units and the Zhukov marker set
up as listed in the Deployment Sheet / Advanced Game".
24

23.4 Modernization of the Red ArmyIdentical to the Basic Game (13.4) except that the Soviet player may
now select any Soviet combat units (not counting factory and garrison
units) except Shock Armies totalling 85 factors, of which at least 20
factors must be armor and/or armored cavalry.
23.5 May 1941 - The “Conservative” Axis InvasionIdentical to the Basic Game (13.5) except that the Axis player now
receives 1 replacement factor in May 1941, the Soviet player 3 factors.
Normal replacement rules apply from June 1941 onwards. The German
1st panzer army unit is refitted, even though dispersed.
23.6 May 1941 - The “Daring” Axis InvasionIdentical to the Basic Game (13.6) except that the Axis player now
receives 1 replacement factor in May 1941, the Soviet player 3 factors.
Normal replacement rules apply from June 1941 onwards.
The reduction in German replacement factors is now:
1 factor per month in 1941
2 factors per month in 1942
3 factors per month in 1943
4 factors per month in 1944
5 factors per month in 1945
23.7 The Siberian ReservesIdentical to the Basic Game (13.7) except that the penalty to the
Soviet player if the Japanese invasion occurs is now a reduction in
replacement factor production of two per month, plus the loss of the next
30 replacement factors to be produced.
23.8 PartisansIdentical to the Basic Game (13.8) except that instead of simply one
extra replacement factor per month, the Axis player now receives three
(rather than one) replacement factors each month for each pair of Soviet
Victory cities he controls.
APPENDIX I
VICTORY CITIESIn Axis Territory
Berlin* (0327) Vienna (1130)
Prague (0729) Budapest (1428)
Bucharest (2425) Warsaw+ (0922)
In the Soviet Union
Moscow* (1306) Leningrad (0308)
Kiev (1816) Sevastopol (3018)
Rostov (2911) Stalingrad (2804)
Voronezh (2108) Grozny (3907)
*For the purposes of victory determination and German replacements Berlin
and Moscow each count as the equivalent of two Victory Cities.
+For victory determination purposes only, Warsaw is considered Soviet-
controlled only if currently occupied by the Polish 1st Army unit.
24.0 OPTIONAL RULES24.1 Priority of Retreat24.11 Retreating units must retreat ahead to the hex which is the nearest
hex from friendly supply point.
24.12 If retreating units enters the nearest friendly supply point hex during
retreat, it must stop ot once and end its retreat. If it is excess of the
stacking restriction, it may reatreat one additional hex, but player must
avoid such situation and end its retreat before such hex, if possible.
24.2 Leningrad and Odessa24.21 When the determination of supply for Soviet units, if any active
Factory unit in Leningrad (0308), the capacity of Siege supply (8.23) of
Leningrad increase from 6 to 9, even if that may never trace rail line to
the friendly supply source map edge.
24.22 When the determination of supply for Soviet units, if any Soviet
infantry type unit in Odessa (2419) and the Soviet player control Black
Sea, such unit (only) may receive Sea supply (8.22). Only Soviet infantry
units in Odessa may receive this benefit.
24.3 Soviet Replacement Points in Advanced Game24.31 Soviet Replacement Points in Advanced Game (20.12c) is changed
to:
c) from "Siberia":
In 1941 - 2 factors per month
In 1942 - 4 factors per month
In 1943 - 6 factors per month
In 1944 - 8 factors per month
In 1945 - 10 factors per month
24.4 Variant Units24.41 German 12th Army: At the beginning of Axis
Replacement/Reinforcement Phase, if Berlin (0327) may
never trace any rail line to the friendly supply source map
edge, the Axis player may place German 12th Army unit on any Axis
supply source map edge in Germany as reinforcement.
24.42 Romanian 1st Army (Pro-Soviet): At the beginning of
Axis Replacement/Reinforcement Phase, if Bucharest
(2425) is occupied by Soviet army, Romania is considered
as pulled out of the Axis and all Romanian (blue) units are removed from
the map. And the Soviet player may place Romanian 1st Army unit on
Bucharest as casual reinforcement at once.
Romanian 1st Army unit is considered as Soviet unit and it may ignore
4.64 to enter Hungary. If any Soviet attack contains Romanian 1st Army
and the defender contains Hungary 2nd Army, combat factor of
Romanian 1st Army (only) is doubled.
25

DESIGNER’S NOTESDesigning a military history game is like composing an historical
symphony. Such variables as supply, forces, their mobility, weather, and
so on, must be balanced and orchestrated in a playable fashion which
allows the more talented player freedom to innovate and execute
brilliant maneuvers within the framework of what was historically
possible.
My philosophy of military history game design is that nothing should
be free, it should be earned by good play. A military history boardgame
is successful as a game:
i) when its outcome is determined by the winner’s better strategic and
operational decision-making, not by luck,
ii) when each player is certain at the start of his player-turn that his
prospects of winning are nil,
iii) when each player is certain at the end of his player-turn that his
prospects of winning are assured, and
iv) when both players are convinced throughout the game that the
designer is a sadistic and diabolical - if competent - fiend.
A military history boardgame is successful as an historical simulation
when it puts the players in essentially the same decision-making
situation that the historical commanders were in. To achieve these
objectives, Sturm Nach Osten presents many game design innovations,
subtleties and refinements. As game complexity is not in itself any
guarantee of realism, however, the game attempts to dispense with any
detail which is nonessential.
Sturm Nach Osten revolves around a classic military situation wherein
the Soviets desperately struggle to retain strategic control of the
campaign against early Axis operational and tactical superiority. The
historical importance of weather and supply is emphasized and must be
anticipated in play. Regardless of the actual sequence of weather, for
example, the overall average of good and bad weather months is the
same, thus enhancing game balance.
The order of battle of the game attempts to depict the most important
types of units utilized by the Axis and Soviets, and their most important
operational characteristics - but not to such detail as would detract from
the desired tempo of play. 1941 Soviet motor-mechanized corps are
factored in to the Soviet rifle armies to which most of them were
attached (for example, the power of the 20th Army reflects the inclusion
of the 5th and 7th Motor-Mechanized Corps - the latter formation
including the elite 1st Moscow Motorized Rifle Division). Airpower is
factored into the amplified strengths of juggernaut units.
Soviet artillery corps and German heavy siege artillery are factored
into the Heavy Artillery Bonus. Equating the shock armies with the
Siberian Reserves is a non-historical generalization; although the Siberian
reinforcements did figure prominently in the strengths of these armies,
they infused many other Soviet units as well.
Airborne assaults and amphibious operations were omitted in keeping
with the strategic scale of the game. Geographically, Russia’s vast
forests and their effects were lumped in with the swamp designation on
the mapboard. As in most games of this scale, this one generalizes hills
into mountains.
Conspicuous by their absence are railroads. At this scale, railroads
would saturate the map - and did in one of my earlier versions of the
map, making it look like a railway switch-yard. The presence of railways
does not enhance game accuracy at this scale; quite the contrary is true
since many otherwise insignificant rail lines, such as the Shigiry spur
completed into Kursk during the defense of the salient in 1943, which
played crucial parts historically would be omitted anyway, and since a
rail line’s real effectiveness often depended on its relationship to other
lines.
A Russian city’s size was often directly proportional to the number of
rail lines through it. Thus, awarding rail capacities - or, in the game,
replacement unit introduction capacities - to cities in proportion to their
size is valid.
Obviously the most drastic assumption implicit in this rule is that
replacement units were the major consumers of rail services and that the
amount of rail service available was proportional to war production
capacity. Judging from the historical levels of rail capacity, and because
strategic redeployment of non-replacement forces is facilitated by the
Strategic Movement Bonus, I again felt that the concept was justified on
this scale.
Also obviously absent are roads. Once again, the Strategic
Movement Bonus should help to “fill in” the importance of roads to
operational deployment. Also, the hex-row alignment itself should help
reflect the Minsk-Moscow road axis.
The Siberian Reserves Strategic Option reflects very much what their
introduction in fact was - a gamble. By their military decisions the
German and Soviet leaders could only indirectly influence a Japanese
decision about an invasion of the Soviet Union in Manchuria.
The dispersal rule is an important refinement of “classic” combat
results. Whereas the old “Defender Retreat” leaves the defender
entirely free to redeploy as he wishes (as in Stalingrad, for example)
“dispersing” a retreated defending unit simulates the demoralization and
disorganization of retreat as well as the fact that this involuntary
movement consumes the operational potential of the unit which the
owning player might otherwise want to voluntarily utilize during his own
next player-turn.
In addition to the Soviet order of battle, the component in which I
take most pride is the map design. The map represents years of my
topographical analysis of European Russia as it was at that time, and is
also the happy - nay, miraculous - coincidence of a freakily fortuitous
hex-grid setting which scantly resolves much crucial terrain with
exceptional proportion and to considerable detail. The fortress-like
defensibility of Kronstadt-Oranienbaum (hex 0309), for example, is
implicitly simulated by the inability to attack it from more than one hex
without having to deal with Leningrad. Likewise, hex 0309 itself is
crucial to an attack upon - or defense of - Leningrad proper.
The Finnish Front was something of a war unto itself in special
geographical, political, and military conditions. The Finnish leadership
pursued its own limited war aims, usually regardless of Hitler’s wishes.
Thus, all Finnish forces are deleted from the game, as are the Soviet 7th,
14th, and 23rd armies.
The strategic military options retained are logical and profound. If
the Soviets had concentrated their pre-war military preparations on the
old static fortifications along their pre-1939 frontier - as the French did
with their Maginot Line - instead of on mancxuvre forces, the Stalin Line
would not have fallen into disuse as it did. A more conservative
deployment of Soviet forces in the early spring of 1941 might have
encouraged greater anti-Soviet participation by countries which
historically proved to be neutrals, or reluctant Axis allies at best.
Premature redeployment of Soviet Siberian reserves from the Far East,
coupled with the historical Axis successes early in the campaign might
have tempted the Japanese militarists to forget their defeat at Khalkhin
26

Gol in 1939 and attack the Soviet Union, rather than the Western Powers
as they eventually did.
I would especially like to thank.
i) Don Greenwood and Avalon Hill for their generous permission for
me to use verbatim any extracts from my July/Aug.’78 in Vo. 15/2 of
the Avalon Hill “General” - “Stalingrad -Revisited and Revised” as I
wish,
ii) my loyal and tolerant friend Frank Chadwick, who has always been
generous with his time and wisdom,
iii) the staff at Game Designers’ Workshop for their time, interest, and
suggestions when I visited them in September of 1979, and finally,
iv) all of my friends who have in the past ten years had occasion to
exclaim: “Good God! Another Coatney Stalingrad revision? ! “.
I welcome questions, comments and criticisms concerning the game’s
realism, playability, and play-balance.
Lou Coatney
DESIGN CREDITSORIGINAL VERSION:
Game Design and Development: Louis R. Coatney
Rules Compilation and Editing: Andy Bagley
Graphics: Ted Woods, Briony Doyle
SIX ANGLES EDITION:
Game Development: Masahiro Yamazaki
Additional Playtest: Hiroshi Ishida, Masahiro Yamazaki
Graphics: Masahiro Yamazaki
PUBLISHERMasahiro Yamazaki
100, Higashi-8, Yurigaoka
Nabari city, Mie 518-0478
JAPAN.
27
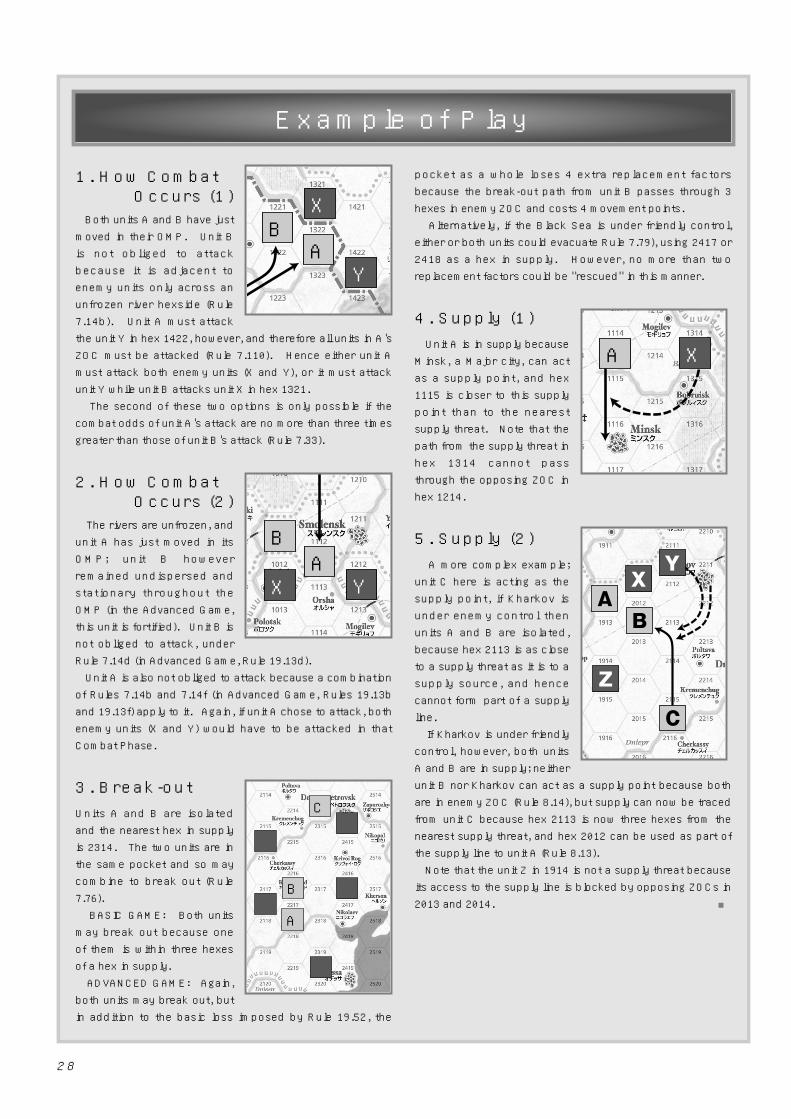
28
1. How CombatOccurs (1)
Both units A and B have just
moved in their OMP. Unit B
is not obliged to attack
because it is adjacent to
enemy units only across an
unfrozen river hexside (Rule
7.14b). Unit A must attack
the unit Y in hex 1422, however, and therefore all units in A's
ZOC must be attacked (Rule 7.110). Hence either unit A
must attack both enemy units (X and Y), or it must attack
unit Y while unit B attacks unit X in hex 1321.
The second of these two options is only possible if the
combat odds of unit A's attack are no more than three times
greater than those of unit B's attack (Rule 7.33).
2. How CombatOccurs (2)
The rivers are unfrozen, and
unit A has just moved in its
OMP; unit B however
remained undispersed and
stationary throughout the
OMP (in the Advanced Game,
this unit is fortified). Unit B is
not obliged to attack, under
Rule 7.14d (in Advanced Game, Rule 19.13d).
Unit A is also not obliged to attack because a combination
of Rules 7.14b and 7.14f (in Advanced Game, Rules 19.13b
and 19.13f) apply to it. Again, if unit A chose to attack, both
enemy units (X and Y) would have to be attacked in that
Combat Phase.
3. Break-outUnits A and B are isolated
and the nearest hex in supply
is 2314. The two units are in
the same pocket and so may
combine to break out (Rule
7.76).
BASIC GAME: Both units
may break out because one
of them is within three hexes
of a hex in supply.
ADVANCED GAME: Again,
both units may break out, but
in addition to the basic loss imposed by Rule 19.52, the
pocket as a whole loses 4 extra replacement factors
because the break-out path from unit B passes through 3
hexes in enemy ZOC and costs 4 movement points.
Alternatively, if the Black Sea is under friendly control,
either or both units could evacuate Rule 7.79), using 2417 or
2418 as a hex in supply. However, no more than two
replacement factors could be "rescued" in this manner.
4. Supply (1)Unit A is in supply because
Minsk, a Major city, can act
as a supply point, and hex
1115 is closer to this supply
point than to the nearest
supply threat. Note that the
path from the supply threat in
hex 1314 cannot pass
through the opposing ZOC in
hex 1214.
5. Supply (2)A more complex example;
unit C here is acting as the
supply point, if Kharkov is
under enemy control then
units A and B are isolated,
because hex 2113 is as close
to a supply threat as it is to a
supply source, and hence
cannot form part of a supply
line.
If Kharkov is under friendly
control, however, both units
A and B are in supply; neither
unit B nor Kharkov can act as a supply point because both
are in enemy ZOC (Rule 8.14), but supply can now be traced
from unit C because hex 2113 is now three hexes from the
nearest supply threat, and hex 2012 can be used as part of
the supply line to unit A (Rule 8.13).
Note that the unit Z in 1914 is not a supply threat because
its access to the supply line is blocked by opposing ZOCs in
2013 and 2014. ■
Example of Play
X
YA
B
X YA
B
A
B
C
XA