Avid MediaCentral | Indexresources.avid.com/.../MediaCentral_Index_2017_1_0_Configuration.pdf ·...
34
Avid MediaCentral | Index Configuration Guide Version 2017.1
Transcript of Avid MediaCentral | Indexresources.avid.com/.../MediaCentral_Index_2017_1_0_Configuration.pdf ·...

Avid MediaCentral | Index
Configuration GuideVersion 2017.1

2
Legal NoticesProduct specifications are subject to change without notice and do not represent a commitment on the part of Avid Technology, Inc.
This product is subject to the terms and conditions of a software license agreement provided with the software. The product may only be used in accordance with the license agreement.
This product may be protected by one or more U.S. and non-U.S patents. Details are available at www.avid.com/patents.
This guide is protected by copyright. This guide is for your personal use and may not be reproduced or distributed, in whole or in part, without permission of Avid. Reasonable care has been taken in preparing this guide; however, it may contain omissions, technical inaccuracies, or typographical errors. Avid Technology, Inc. disclaims liability for all losses incurred through the use of this document. Product specifications are subject to change without notice.
Copyright © 2017 Avid Technology, Inc. and its licensors. All rights reserved.
The following disclaimer is required by Apple Computer, Inc.:APPLE COMPUTER, INC. MAKES NO WARRANTIES WHATSOEVER, EITHER EXPRESS OR IMPLIED, REGARDING THIS PRODUCT, INCLUDING WARRANTIES WITH RESPECT TO ITS MERCHANTABILITY OR ITS FITNESS FOR ANY PARTICULAR PURPOSE. THE EXCLUSION OF IMPLIED WARRANTIES IS NOT PERMITTED BY SOME STATES. THE ABOVE EXCLUSION MAY NOT APPLY TO YOU. THIS WARRANTY PROVIDES YOU WITH SPECIFIC LEGAL RIGHTS. THERE MAY BE OTHER RIGHTS THAT YOU MAY HAVE WHICH VARY FROM STATE TO STATE.
The following disclaimer is required by Sam Leffler and Silicon Graphics, Inc. for the use of their TIFF library:Copyright © 1988–1997 Sam Leffler Copyright © 1991–1997 Silicon Graphics, Inc.
Permission to use, copy, modify, distribute, and sell this software [i.e., the TIFF library] and its documentation for any purpose is hereby granted without fee, provided that (i) the above copyright notices and this permission notice appear in all copies of the software and related documentation, and (ii) the names of Sam Leffler and Silicon Graphics may not be used in any advertising or publicity relating to the software without the specific, prior written permission of Sam Leffler and Silicon Graphics.
THE SOFTWARE IS PROVIDED “AS-IS” AND WITHOUT WARRANTY OF ANY KIND, EXPRESS, IMPLIED OR OTHERWISE, INCLUDING WITHOUT LIMITATION, ANY WARRANTY OF MERCHANTABILITY OR FITNESS FOR A PARTICULAR PURPOSE.
IN NO EVENT SHALL SAM LEFFLER OR SILICON GRAPHICS BE LIABLE FOR ANY SPECIAL, INCIDENTAL, INDIRECT OR CONSEQUENTIAL DAMAGES OF ANY KIND, OR ANY DAMAGES WHATSOEVER RESULTING FROM LOSS OF USE, DATA OR PROFITS, WHETHER OR NOT ADVISED OF THE POSSIBILITY OF DAMAGE, AND ON ANY THEORY OF LIABILITY, ARISING OUT OF OR IN CONNECTION WITH THE USE OR PERFORMANCE OF THIS SOFTWARE.
The following disclaimer is required by the Independent JPEG Group:This software is based in part on the work of the Independent JPEG Group.
This Software may contain components licensed under the following conditions:Copyright (c) 1989 The Regents of the University of California. All rights reserved.
Redistribution and use in source and binary forms are permitted provided that the above copyright notice and this paragraph are duplicated in all such forms and that any documentation, advertising materials, and other materials related to such distribution and use acknowledge that the software was developed by the University of California, Berkeley. The name of the University may not be used to endorse or promote products derived from this software without specific prior written permission. THIS SOFTWARE IS PROVIDED ``AS IS'' AND WITHOUT ANY EXPRESS OR IMPLIED WARRANTIES, INCLUDING, WITHOUT LIMITATION, THE IMPLIED WARRANTIES OF MERCHANTABILITY AND FITNESS FOR A PARTICULAR PURPOSE.
Copyright (C) 1989, 1991 by Jef Poskanzer.
Permission to use, copy, modify, and distribute this software and its documentation for any purpose and without fee is hereby granted, provided that the above copyright notice appear in all copies and that both that copyright notice and this permission notice appear in supporting documentation. This software is provided "as is" without express or implied warranty.
Copyright 1995, Trinity College Computing Center. Written by David Chappell.
Permission to use, copy, modify, and distribute this software and its documentation for any purpose and without fee is hereby granted, provided that the above copyright notice appear in all copies and that both that copyright notice and this permission notice appear in supporting documentation. This software is provided "as is" without express or implied warranty.
Copyright 1996 Daniel Dardailler.
Permission to use, copy, modify, distribute, and sell this software for any purpose is hereby granted without fee, provided that the above copyright notice appear in all copies and that both that copyright notice and this permission notice appear in supporting documentation, and that the name of Daniel Dardailler not be used in advertising or publicity pertaining to distribution of the software without specific, written prior permission. Daniel Dardailler makes no representations about the suitability of this software for any purpose. It is provided "as is" without express or implied warranty.
Modifications Copyright 1999 Matt Koss, under the same license as above.
Copyright (c) 1991 by AT&T.
Permission to use, copy, modify, and distribute this software for any purpose without fee is hereby granted, provided that this entire notice is included in all copies of any software which is or includes a copy or modification of this software and in all copies of the supporting documentation for such software.

3
THIS SOFTWARE IS BEING PROVIDED "AS IS", WITHOUT ANY EXPRESS OR IMPLIED WARRANTY. IN PARTICULAR, NEITHER THE AUTHOR NOR AT&T MAKES ANY REPRESENTATION OR WARRANTY OF ANY KIND CONCERNING THE MERCHANTABILITY OF THIS SOFTWARE OR ITS FITNESS FOR ANY PARTICULAR PURPOSE.
This product includes software developed by the University of California, Berkeley and its contributors.
The following disclaimer is required by Paradigm Matrix:Portions of this software licensed from Paradigm Matrix.
The following disclaimer is required by Ray Sauers Associates, Inc.:“Install-It” is licensed from Ray Sauers Associates, Inc. End-User is prohibited from taking any action to derive a source code equivalent of “Install-It,” including by reverse assembly or reverse compilation, Ray Sauers Associates, Inc. shall in no event be liable for any damages resulting from reseller’s failure to perform reseller’s obligation; or any damages arising from use or operation of reseller’s products or the software; or any other damages, including but not limited to, incidental, direct, indirect, special or consequential Damages including lost profits, or damages resulting from loss of use or inability to use reseller’s products or the software for any reason including copyright or patent infringement, or lost data, even if Ray Sauers Associates has been advised, knew or should have known of the possibility of such damages.
The following disclaimer is required by Videomedia, Inc.:“Videomedia, Inc. makes no warranties whatsoever, either express or implied, regarding this product, including warranties with respect to its merchantability or its fitness for any particular purpose.”
“This software contains V-LAN ver. 3.0 Command Protocols which communicate with V-LAN ver. 3.0 products developed by Videomedia, Inc. and V-LAN ver. 3.0 compatible products developed by third parties under license from Videomedia, Inc. Use of this software will allow “frame accurate” editing control of applicable videotape recorder decks, videodisc recorders/players and the like.”
The following disclaimer is required by Altura Software, Inc. for the use of its Mac2Win software and Sample Source Code:©1993–1998 Altura Software, Inc.
The following disclaimer is required by 3Prong.com Inc.:Certain waveform and vector monitoring capabilities are provided under a license from 3Prong.com Inc.
The following disclaimer is required by Interplay Entertainment Corp.:The “Interplay” name is used with the permission of Interplay Entertainment Corp., which bears no responsibility for Avid products.
This product includes portions of the Alloy Look & Feel software from Incors GmbH.
This product includes software developed by the Apache Software Foundation (http://www.apache.org/).
© DevelopMentor
This product may include the JCifs library, for which the following notice applies:JCifs © Copyright 2004, The JCIFS Project, is licensed under LGPL (http://jcifs.samba.org/). See the LGPL.txt file in the Third Party Software directory on the installation CD.
Avid Interplay contains components licensed from LavanTech. These components may only be used as part of and in connection with Avid Interplay.
Portions © Copyright 2003-2007 of MOG Solutions.
Attn. Government User(s). Restricted Rights LegendU.S. GOVERNMENT RESTRICTED RIGHTS. This Software and its documentation are “commercial computer software” or “commercial computer software documentation.” In the event that such Software or documentation is acquired by or on behalf of a unit or agency of the U.S. Government, all rights with respect to this Software and documentation are subject to the terms of the License Agreement, pursuant to FAR §12.212(a) and/or DFARS §227.7202-1(a), as applicable.
TrademarksAvid, the Avid Logo, Avid Everywhere, Avid DNXHD, Avid DNXHR, Avid Nexis, AirSpeed, Eleven, EUCON, Interplay, iNEWS, ISIS, Mbox, MediaCentral, Media Composer, NewsCutter, Pro Tools, ProSet and RealSet, Maestro, PlayMaker, Sibelius, Symphony, and all related product names and logos, are registered or unregistered trademarks of Avid Technology, Inc. in the United States and/or other countries. The Interplay name is used with the permission of the Interplay Entertainment Corp. which bears no responsibility for Avid products. All other trademarks are the property of their respective owners. For a full list of Avid trademarks, see: http://www.avid.com/US/about-avid/legal-notices/trademarks.
FootageWCAU Fire Story — Courtesy of NBC-10, Philadelphia, PA.
News material provided by WFTV Television Inc.
Avid MediaCentral | Index Configuration Guide • Created September 28, 2017 • This document is distributed by Avid in online (electronic) form only, and is not available for purchase in printed form.

Contents
Using This Guide . . . . . . . . . . . . . . . . . . . . . . . . . . . . . . . . . . . . . . . . . . . . . . . . . . . 6
Symbols and Conventions . . . . . . . . . . . . . . . . . . . . . . . . . . . . . . . . . . . . . . . . . . . . . . . . . . . . 6
If You Need Help. . . . . . . . . . . . . . . . . . . . . . . . . . . . . . . . . . . . . . . . . . . . . . . . . . . . . . . . . . . . 7
Avid Training Services . . . . . . . . . . . . . . . . . . . . . . . . . . . . . . . . . . . . . . . . . . . . . . . . . . . . . . . 7
Chapter 1 MediaCentral | Index Configuration Overview. . . . . . . . . . . . . . . . . . . . . . . . . . . . 8
Prerequisites for MediaCentral | Index Configuration . . . . . . . . . . . . . . . . . . . . . . . . . . . . . . . . 8
Checklist for Configuring MediaCentral | Index. . . . . . . . . . . . . . . . . . . . . . . . . . . . . . . . . . . . . 9
Chapter 2 Configuring MediaCentral | Index. . . . . . . . . . . . . . . . . . . . . . . . . . . . . . . . . . . . . 10
Preparing for the MediaCentral | Index Configuration. . . . . . . . . . . . . . . . . . . . . . . . . . . . . . . 10
Configuring MediaCentral | Index . . . . . . . . . . . . . . . . . . . . . . . . . . . . . . . . . . . . . . . . . . . . . . 10
Validating the MediaCentral | Index Configuration . . . . . . . . . . . . . . . . . . . . . . . . . . . . . . . . . 13
Continuing the Installation. . . . . . . . . . . . . . . . . . . . . . . . . . . . . . . . . . . . . . . . . . . . . . . . . . . . 14
Chapter 3 Configuring the Production Engine Bus Connector. . . . . . . . . . . . . . . . . . . . . . 15
Enabling Sync Events in the Interplay Administrator . . . . . . . . . . . . . . . . . . . . . . . . . . . . . . . 15
Creating a PEBCo Instance on the MCUX Server . . . . . . . . . . . . . . . . . . . . . . . . . . . . . . . . . 16
Configuring the ACS Bus Service in Interplay Administrator . . . . . . . . . . . . . . . . . . . . . . . . . 17
Configuring and Using the PEBCo Service. . . . . . . . . . . . . . . . . . . . . . . . . . . . . . . . . . . . . . . 18
Appendix A Working with MediaCentral Index. . . . . . . . . . . . . . . . . . . . . . . . . . . . . . . . . . . . . 22
MediaCentral Index Log Locations . . . . . . . . . . . . . . . . . . . . . . . . . . . . . . . . . . . . . . . . . . . . . 22
Displaying Information about Initialized Systems . . . . . . . . . . . . . . . . . . . . . . . . . . . . . . . . . . 22
Checking the Current Index Status . . . . . . . . . . . . . . . . . . . . . . . . . . . . . . . . . . . . . . . . . . . . . 23
Using the MediaCentral | Index Restart Command . . . . . . . . . . . . . . . . . . . . . . . . . . . . . . . . 24
Restarting the Search and PEBCo Services. . . . . . . . . . . . . . . . . . . . . . . . . . . . . . . . . . . . . . 26
Appendix B MediaCentral | Index Custom Configuration . . . . . . . . . . . . . . . . . . . . . . . . . . . . 28
Configuring the PEBCo for Custom Configurations . . . . . . . . . . . . . . . . . . . . . . . . . . . . . . . . 28
Changing the MediaCentral Index Refresh Interval . . . . . . . . . . . . . . . . . . . . . . . . . . . . . . . . 29
Modifying the MediaCentral | Index System Settings . . . . . . . . . . . . . . . . . . . . . . . . . . . . . . . 29

5
Using This Guide
This guide is intended for users of Avid MediaCentral Cloud UX (MCUX). This document describes the MediaCentral | Index configuration process for single-server systems as well as operating and customization options for the text-based indexing service.
For information on installing MCUX, see the Avid MediaCentral Cloud UX Installation Guide. For administrative information for MediaCentral Cloud UX, see the Avid MediaCentral | UX Administration Guide.
Important: See the following link on the Avid Knowledge Base for the latest updates to this guide and all related documentation:
http://avid.force.com/pkb/articles/en_US/user_guide/MediaCentral-CloudUX-Documentation
c If copying / pasting commands from this document into a command line interface such as Putty, be sure to verify the command after pasting. It is possible that some characters might be replaced during the paste process which can lead to a failed or problematic installation.
Revision History
Symbols and Conventions
Avid documentation uses the following symbols and conventions:
Date Revised Changes Made
September 29, 2017 Initial release.
Symbol or Convention Meaning or Action
nA note provides important related information, reminders, recommendations, and strong suggestions.
cA caution means that a specific action you take could cause harm to your computer or cause you to lose data.
wA warning describes an action that could cause you physical harm. Follow the guidelines in this document or on the unit itself when handling electrical equipment.
> This symbol indicates menu commands (and subcommands) in the order you select them. For example, File > Import means to open the File menu and then select the Import command.
This symbol indicates a single-step procedure. Multiple arrows in a list indicate that you perform one of the actions listed.
(Windows), (Windows only), (Macintosh), or (Macintosh only)
This text indicates that the information applies only to the specified operating system, either Windows or Macintosh OS X.

If You Need Help
7
If You Need HelpIf you are having trouble using your Avid product:
1. Retry the action, carefully following the instructions given for that task in this guide. It is especially important to check each step of your workflow.
2. Check the latest information that might have become available after the documentation was published. You should always check online for the most up-to-date release notes or ReadMe because the online version is updated whenever new information becomes available. To view these online versions, select ReadMe from the Help menu, or visit the Avid MediaCentral Cloud UX documentation page at:
http://avid.force.com/pkb/articles/en_US/user_guide/MediaCentral-CloudUX-Documentation
3. Check the documentation that came with your Avid application or your hardware for maintenance or hardware-related issues.
4. Visit the online Avid Knowledge Base. Online services are available 24 hours per day, 7 days per week. Search this online Knowledge Base to find answers, to view error messages, to access troubleshooting tips, to download updates, and to read or join online message-board discussions.
Avid Training ServicesAvid makes lifelong learning, career advancement, and personal development easy and convenient. Avid understands that the knowledge you need to differentiate yourself is always changing, and Avid continually updates course content and offers new training delivery methods that accommodate your pressured and competitive work environment.
For information on courses/schedules, training centers, certifications, courseware, and books, please visit www.avid.com/support and follow the Training links, or call Avid Sales at 800-949-AVID (800-949-2843).
Bold font Bold font is primarily used in task instructions to identify user interface items and keyboard sequences.
Italic font Italic font is used to emphasize certain words and to indicate variables.
Courier Bold font Courier Bold font identifies text that you type.
Ctrl+key or mouse action Press and hold the first key while you press the last key or perform the mouse action. For example, Command+Option+C or Ctrl+drag.
Symbol or Convention Meaning or Action

1 MediaCentral | Index Configuration Overview
The MediaCentral Index services are automatically installed on the Avid MediaCentral Cloud UX server and are responsible for indexing text-based metadata for all connected asset management systems. When a user completes a search through Avid MediaCentral Cloud UX, the Avid MediaCentral Phonetic Index server uses this index to return assets that match the name, creation date, or other text-based metadata value. This document describes the tasks required to configure MediaCentral Index on the Avid MediaCentral Cloud UX server.
MediaCentral Index comprises the following components:
• Elasticsearch® service, which manages data storage and runs the search engine.
• Data Import API, a bus-based service for metadata indexing, search, configuration, status, permissions, and updates for MediaCentral Index.
• Search API, a bus-based service that provides the search API
• MediaCentral Index Configuration API, a bus-based service that provides the API for the MediaCentral Index configuration
• MediaCentral Index Status API, a bus-based service that provides the API for the MediaCentral Index
• MediaCentral Index Permissions API, a bus-based service that provides per asset permissions for the search service
• MediaCentral Index Feed API, a bus-based service that provides an updated assets feed for external services
• MediaCentral Index Thesaurus API, a bus-based service that provides API for importing structured metadata (dictionaries)
Elasticsearch is an open source, distributed, real-time search and analytics engine. For more information on Elasticsearch operation and term definitions, visit the Elasticsearch website: https://www.elastic.co/guide/en/elasticsearch/guide/master/getting-started.html
Prerequisites for MediaCentral | Index Configuration
Before you configure MediaCentral Index, you must install and configure the following MediaCentral components:
• Avid MediaCentral Cloud UX (MCUX) — MediaCentral Index is configured after you have installed and configured your MCUX system. For more information, see the Avid MediaCentral Cloud UX Installation Guide.
MediaCentral servers configured with MediaCentral Index require a minimum of 128 GB of RAM in each server. Prior to configuring MediaCentral Index, verify that your server meets these requirements.
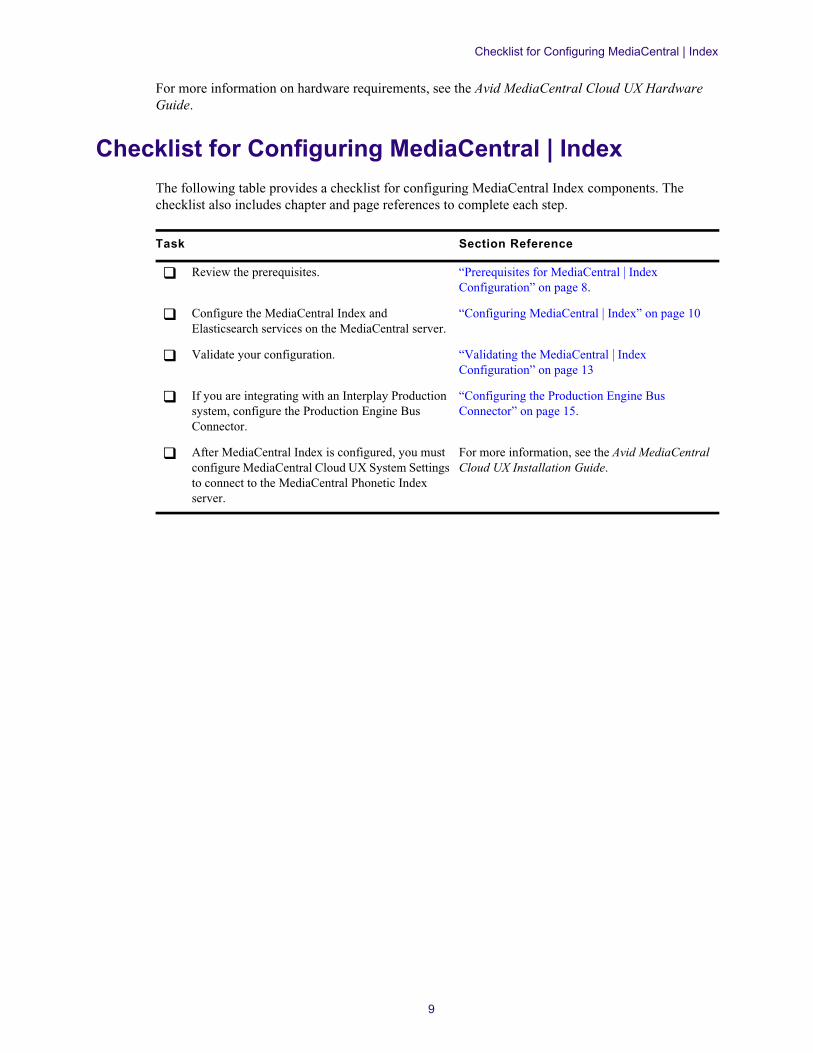
Checklist for Configuring MediaCentral | Index
9
For more information on hardware requirements, see the Avid MediaCentral Cloud UX Hardware Guide.
Checklist for Configuring MediaCentral | Index
The following table provides a checklist for configuring MediaCentral Index components. The checklist also includes chapter and page references to complete each step.
Task Section Reference
b Review the prerequisites. “Prerequisites for MediaCentral | Index Configuration” on page 8.
b Configure the MediaCentral Index and Elasticsearch services on the MediaCentral server.
“Configuring MediaCentral | Index” on page 10
b Validate your configuration. “Validating the MediaCentral | Index Configuration” on page 13
b If you are integrating with an Interplay Production system, configure the Production Engine Bus Connector.
“Configuring the Production Engine Bus Connector” on page 15.
b After MediaCentral Index is configured, you must configure MediaCentral Cloud UX System Settings to connect to the MediaCentral Phonetic Index server.
For more information, see the Avid MediaCentral Cloud UX Installation Guide.

2 Configuring MediaCentral | Index
When you set up MediaCentral Index, you enable Elasticsearch and several other services related to MediaCentral Index. Elasticsearch is used to create search-able indexes of media assets while the MediaCentral Index services add specific Avid logic to Elasticsearch.
Elasticsearch indexes are split into “shards” and “replicas”. Each shard contains indexed data and each replica contains a copy of that data. Replicas are used to spread the search load and provide redundancy. Single server installations default to one shard and zero replicas. This is the appropriate number of shards and replicas for single server configuration and in most cases the numbers should not be altered.
Preparing for the MediaCentral | Index Configuration
When you install Avid MediaCentral Cloud UX, MediaCentral Index services are not active (started), except for the avid-acs-media-index-configuration service. Before you begin configuring MediaCentral Index, you must start this configuration service if it has stopped.
To check the status of the MediaCentral Index configuration service:
1. Open a Linux terminal window on your MCUX server and type the following command:
service avid-acs-media-index-configuration status
The result must report that the service has started:
avid-acs-media-index-configuration is running
2. If the configuration service is not running, type the following command to start the service:
service avid-acs-media-index-configuration start
Configuring MediaCentral | Index
You configure MediaCentral Index in the MediaCentral Cloud UX System Settings. You must provide the following values when configuring the settings:
• Cluster Name — The “Cluster Name” is simply an identifier for the MediaCentral Index configuration on this system. Avid recommends using the local hostname or site location (e.g. NewYork).
• Elasticsearch Cluster Hosts — Specify the host name or IP address of the MediaCentral server running the Elasticsearch service.
• Elasticsearch TCP Port — Specify the TCP port of the Elasticsearch data node. The default value is 9300. In most cases you, you do not need to modify this property.
• Elasticsearch HTTP Port — Specify the port of the Elasticsearch data node HTTP API. The default value is 9200. In most cases you, you do not need to modify this property.
• Elasticsearch Tribe TCP Port — Specify the TCP port of the Elasticsearch tribe node. The default value is 9305. In most cases you, you do not need to modify this property.

Configuring MediaCentral | Index
11
• Elasticsearch Tribe HTTP Port — Specify the port of the Elasticsearch tribe node HTTP API. The default value is 9201. In most cases you, you do not need to modify this property
• Default Shards — Specify default shards count. Avid recommends using a default value of 1 shard.
• Index Replicas — Specify default replica count. The default number of replicas is 0, which is the required replica count for a single-server configuration.
• Minimum nodes for master election — This is the minimum number of nodes that must be active for Elasticsearch to elect a master node. The correct and default value for a single-server configuration is 1.
• Minimum active nodes — This is the minimum number of nodes that must be active for the Elasticsearch cluster to start. The correct and default value for a single-server configuration is 1.
• Ideal active nodes — This is the ideal number of nodes that should be active before the Elasticsearch cluster starts. If one or more nodes it not active, Elasticsearch uses the “Wait Time” value defined in the next setting before the cluster starts. After the Wait Time has expired, the cluster starts regardless of the number of ideal nodes – as long as the minimum values in the previous two settings have been met. The correct and default value for a single-server configuration is 1.
• Wait Time — Sets the number of minutes for the cluster to wait for the ideal number of active nodes. The default value for this field is 5 minutes. However, this option is actually not used in single-server configurations.
MediaCentral Index supports multiple languages for your search. However, enabling all languages can slow down searches. You should enable only those languages that your users require.

Configuring MediaCentral | Index
12
c If you change your language settings after you have configured MediaCentral Index, you must reset MediaCentral Index. This deletes all indexes, which you then need to re-index. This can be a time consuming process, so take care to determine the required languages at this time.
To configure MediaCentral Index:
1. Sign in to MediaCentral Cloud UX as an administrator.
You can access the system settings by entering the fully qualified domain name of your MediaCentral Cloud UX host with a colon (:) and port number 8443 at the end of the address. For example:
https://<host_name.domain>:8443
2. Select System Settings from the Layout selector.
The System Settings layout opens.
3. In the Settings pane select Media Index > Setup.
The MediaCentral Index settings display in the Details pane.
4. Specify the required settings for the following properties:
- Cluster Name (custom name for this server)
n The Cluster Name field must include only letters, numbers, dashes, and underscore symbols.
- Elasticsearch Cluster Hosts (hostname or IP address of the local MediaCentral node)
- Elasticsearch TCP Port
- Elasticsearch HTTP Port
- Elasticsearch Tribe TCP Port
- Elasticsearch Tribe HTTP Port
- Default Shards
- Index Replicas
- Minimum nodes for master election
- Minimum active nodes
- Ideal active nodes
- Wait Time
5. Enable the check boxes for any languages that you require for your workflow.
n The Default Language menu is not used in this release.
6. Click Apply. The system will display a message on the screen indicating “Update in progress...”.
After a few moments, a second message should appear indicating that Index has been configured successfully:
7. Click Close.

Validating the MediaCentral | Index Configuration
13
Validating the MediaCentral | Index Configuration
You can validate your setup by checking the status of the MediaCentral Index services in the System Settings > Cluster State pane.
This version of Avid MediaCentral Cloud UX includes a new setting under the Media | Index category called “Search Engine”. This setting relates to the configuration of MediaCentral Phonetic Index. Do not configure this setting at this time. The configuration of Phonetic Index is covered in the Avid MediaCentral Cloud UX Installation Guide.
To check the current status of MediaCentral Index:
1. Sign in to MediaCentral Cloud UX as an administrator.
2. Select System Settings from the Layout selector.
The System Settings layout opens.
3. In the Settings pane select Media Index > Cluster State.
The following illustration shows the Cluster State Details pane:
The core services for your configuration must display a status of “Running,” and the system_data must display the shard count in green.
Later, once you have configured an Interplay Production, additional information on the indexes appear in this window. The following image shows an index for an Interplay Production system:
Once configured, the string of characters listed in the index will match the System ID that appears in the System Settings > Media Index > Indexes pane.

Continuing the Installation
14
Continuing the Installation
Depending upon your workflow, proceed to one or more of the following sections as applicable:
• If you are integrating with and Interplay Production or Interplay Archive system, you need to configure and start the Production Engine Bus Connector (PEBCo) service. For information on PEBCo, see “Configuring the Production Engine Bus Connector” on page 15.

3 Configuring the Production Engine Bus Connector
The Production Engine Bus Connector (PEBCo) queries the change table of the Interplay Production Engine and delivers that data to the Avid Common Services (ACS) bus where the import service takes these messages and sends the data to the Elasticsearch index. A timestamp is saved on the Interplay Production Engine. The PEBCo service queries the Interplay Production Engine regularly and uses the timestamp to determine which assets have been indexed and which still require indexing. After each indexing operation, the timestamp is updated.
c If you want to use MediaCentral Index with Interplay Archive, create a PEBCo instance and configure the bus service for Interplay Production first. Once that process is complete, repeat the procedure for Interplay Archive. You must have a separate PEBCo instance for each database.
n For more information on configuring the ACS bus service for Interplay Archive, see the Interplay | Engine and Interplay | Archive Engine Administration Guide and the Avid MediaCentral Cloud UX ReadMe.
Configuring PEBCo involves the following steps:
• Enabling Sync Events in the Interplay Administrator
• Creating a PEBCo Instance on the MCUX Server
• Configuring the ACS Bus Service in Interplay Administrator
• Configuring and Using the PEBCo Service
Enabling Sync Events in the Interplay Administrator
Before you set up your PEBCo instance, you need to enable sync events. Syncing events allows changes in the search properties specified in Interplay Production and Interplay Archive to be pushed to MediaCentral Index.
To enable the sync events:
1. Start Interplay Administrator and log on to the Interplay Production or Interplay Archive database that you want to index.
2. In the Server section of the Interplay Administrator, click the Server Settings icon.
The Server Settings view opens.

Creating a PEBCo Instance on the MCUX Server
16
3. In the Update Tracking section, select Enabled to enable sync events.
4. Click Apply Changes to save the settings change.
Creating a PEBCo Instance on the MCUX Server
The Production Engine Bus Connector (PEBCo) is automatically installed during the MCUX installation. Although before the service can be used, it must first be configured.
Creating a PEBCo Instance
To create a PEBCo instance:
1. Type the following command to create a PEBCo instance on the MCUX server:
pam-agent-ctrl add <instance_name>
<instance_name> can be any meaningful name. Avid recommends that you use the Interplay Production Engine’s host name or virtual cluster host name so the PEBCo instance can be easily identified.
A single server will return no information after issuing this command.
2. Verify that the PEBCo instance has been created through the pam-agent-ctrl script:
pam-agent-ctrl list
The screen displays a list of all available PEBCo (pam-agent) instances on this machine. The following is a sample output from a single server:
[root@wavd-doc01 ~]# pam-agent-ctrl list
wavd-ie01
In this case “wavd-ie01” is both the name of the PEBCo instance and the host name of the Interplay Production Engine.
3. Type the following command to start the PEBCo instance:
pam-agent-ctrl start <instance_name>
The screen displays the status of all available PEBCo instances on this machine. The following is a sample output:
[root@wavd-doc01 ~]# pam-agent-ctrl start wavd-ie01
Starting pam-agent-service.wavd-ie01: [ OK ]

Configuring the ACS Bus Service in Interplay Administrator
17
4. To verify that the PEBCo instance is running, type the following command:
pam-agent-ctrl status
The command should return a confirmation that the service is running, similar to the following:
[root@wavd-doc01 ~]# pam-agent-ctrl status
Instance 'wavd-ie01' (pid 85540) is running...
Configuring the ACS Bus Service in Interplay Administrator
The PEBCo configuration requires a series of bus calls to the MCUX server. For the configuration to be successful, the Interplay Production and /or Interplay Archive Engines must have the proper bus URL so that the Interplay Administrator can configure the service correctly.
To configure the ICS bus service:
1. Start Interplay Administrator and log on to the Interplay Production database that you want to index.
2. In the Site Settings section of the Interplay Administrator, click the MediaCentral UX Settings icon.
3. In the ACS Bus Service Settings section, type the name of the Bus AMQP (Advanced Message Queuing Protocol) URL.
The bus URL must be entered in the following format:
amqp://<MCUX-server-IP-or-hostname>/acs
If you do not configure this setting correctly, Interplay Administrator cannot communicate with the bus on the MCUX server and no data displays in the Production Engine Bus Connector settings since the needed services cannot be queried. Instead, an error message appears: ACS Bus error: Error connecting to the bus (Make sure ACS Bus URL is correctly configured).
4. Click the Apply Changes button.

Configuring and Using the PEBCo Service
18
Configuring and Using the PEBCo Service
This section provides information about the Production Engine Bus Connector (PEBCo) Service. After you have reviewed the information in “About the PEBCo Service”, continue with the processes for “Configuring the Canonical Data” on page 20 and “Starting the PEBCo Service” on page 21.
About the PEBCo Service
Every PEBCo instance is bound to no more than one Interplay Production or Interplay Archive database.
You configure the PEBCo service in the Production Engine Bus Connector view in the Interplay Administrator. This view has two tabs:
• The Manage/Status tab provides the following:
- Fields that let you assign an instance of the PEBCo service to your Interplay Production or Interplay Archive database.
- Buttons that let you Start, Stop, and Resync the PEBCo service.
- Information about the status of the instance which is assigned to the selected database.
n Before you can configure the PEBCo service, you must configure the ACS Bus URL in the Interplay Administrator as described in “Configuring the ACS Bus Service in Interplay Administrator” on page 17.
The Manage/Status pane also includes a progress bar for the Resync process. Note the following about this feature:
- The bar is only visible when a Resync is in progress.
- When selecting the Stop button, the Resync process is essentially paused. When a user clicks the Start button to re-initiate the Resync, the process picks up from where it left off. When this happens, the percentage number in the progress bar resets to 0%. This new percentage does not include the previously indexed assets in its calculation.
- The progress bar might not provide an accurate “time remaining”. It is possible that the last 3% (for example) could take as long as the first 97%.
- Clicking “Resync” will always start Resync from the beginning (not from the last stop).

Configuring and Using the PEBCo Service
19
• The Canonical Data tab lets you select the Properties used in the indexing process. These properties can be selected by users when performing an indexed search in MediaCentral Cloud UX. Some properties are part of the standard data model. These properties are enabled by default and cannot be deselected.
Notice in the image above that one of the properties in the Canonical Data tab are highlighted in yellow. Highlighted fields contain special characters (mostly unicode characters in the ranges of U+0000 to U+001F and U+007F - U+009F). Make sure not to enable any highlighted fields when selecting data to be indexed. These special characters cannot be indexed properly and cause PEBCo to fail when attempting to start the service.
c When you change the database properties, a re-index operation occurs to adapt the index structure to your change. This runs in the background but does not add data from these new properties to the existing data within the index. Only newly indexed assets contain the data from this property. To have this property available for all assets, you need to use the Resync button on the Manage/Status tab. This resync might take a lot of time for bigger databases, so make changes to your database properties carefully.
Indexed searches map Interplay Production properties to MediaCentral Index criterion fields. The following table describes how MediaCentral Index categorizes some common Interplay Production properties:
Interplay Production Property MediaCentral Index Field
Name Name
Created By Creator
Creation Date Created
Modified Date Modified
Changed By Modifier
Start Start
End End
Duration Duration
Comments Description
Mime Type Type

Configuring and Using the PEBCo Service
20
Due to differences in the properties and fields used by Interplay Production and MediaCentral Index, some duplication appears in the criteria available for indexed searches with both Interplay Production and MediaCentral Index fields appearing. If you add the wrong fields as criteria, your search might return unexpected or possibly no results.
If your configuration includes multiple systems that use the same custom field ID, once you mark a field ID as hidden in one system, the field will be not searchable on any of the systems. Also, if the field IDs (keys) are the same in different systems, this could cause an issue. Avid recommends that you keep the selected fields consistent across all systems of the same type (Interplay Production, Interplay Archive). If this is not possible, then you need to re-index the index of the affected systems.
Configuring the Canonical Data
Prior to starting the PEBCo service, use the Canonical Data tab to configure the fields that you want to index.
To select database properties that can be used in an indexed search:
1. Start Interplay Administrator and log on to the Interplay Production database that you want to have indexed.
2. In the Site Settings section of the Interplay Administrator, click the “Production Engine Bus Connector” icon.
3. Click the Canonical Data tab.
4. Select the properties that you want to be available when using the MediaCentral Cloud UX Search App.
t Use individual checkboxes, the Select All button, or the Clear All button. You should select just the set of data that users will search for and not rely on the Select All button.
t Click the Sync with Property Layout button to match these selections with those in the Interplay Administrator Property Layout view.
n MediaCentral Index base properties and common properties are selected by default, and you cannot deselect these properties.
5. Click Apply to save your selections and to make them available in MediaCentral Cloud UX.

Configuring and Using the PEBCo Service
21
Starting the PEBCo Service
The final step in the process is to start the PEBCo service and initiate the indexing process.
To configure an instance of the PEBCo service:
1. Start Interplay Administrator and log on to the Interplay database that you want to index.
2. In the Site Settings section of the Interplay Administrator, click the Production Engine Bus Connector icon.
n The Production Engine Bus Connector view is not available on Macintosh clients.
3. Click the Manage Status tab.
4. In the Assign PEBCo Service section, do the following:
a. Click the Instance menu and select the PEBCo instance name you want to use.
b. Enter a user name and password for access to the Interplay Production or Archive Engine.
As a best practice, Avid recommends creating a separate user and password for this purpose (in the User Management settings). If you have a dedicated user, the process of troubleshooting an index-related issue can be simplified. Avid recommends creating an Interplay user called “pebco” with administrative privileges.
n The PEBCo settings respect the privileges set for the user configured in this section. If the user is not an administrator, database access can be limited to certain directories, and only those directories are indexed. Since indexed searches respect the permissions of this account and not that of individuals logging into MediaCentral Cloud UX, users with permissions different from the PEBCo user might be exposed to assets that they could not otherwise view in Interplay Access. Although MediaCentral Cloud UX users can view names and metadata for assets they do not have permission to view, they are blocked from playing the assets.
5. Click Assign.
The Interplay Administrator should reply with the following message:
If you need to remove the service from the selected Interplay Production or Archive Engine, click UnAssign.
6. Click the Resync button in the Manage pane to start the indexing process of the Interplay database. Do not click the Start button.
You can use the Status pane on the left side of the window to check on the progress of the indexing process. However, this pane does not refresh automatically. You must click the Refresh button to get a status update.
In most cases, you should not need to click the Resync button again. The Stop and Start buttons are used to stop and restart the indexing process. If you click the Resync button on a system that has already been indexed, a complete re-index is initiated. This process invalidates the existing content of your index and can take a long time to complete. During this process, the search only returns assets that are already processed within this run.
A Working with MediaCentral Index
This section covers additional commands and utilities that can be used with systems configured for MediaCentral Index. The following topics are covered:
• MediaCentral Index Log Locations
• Displaying Information about Initialized Systems
• Checking the Current Index Status
• Using the MediaCentral | Index Restart Command
• Restarting the Search and PEBCo Services
MediaCentral Index Log Locations
Logs for Elasticsearch are located in the Linux /var/log/ directory. Additional logs related to Avid MediaCentral Index services are located at /var/log/avid/.
For detailed information on each of the logs, see the “Best Practices, Troubleshooting and System Logs” chapter of the MediaCentral UX Concepts and Clustering Guide.
Displaying Information about Initialized Systems
You can use the info command to display the following data for all available systems within all configured Elasticsearch clusters:
• System id
• System type
• System display name
• Number of assets
To display system information, do the following:
t Type the following command:
/opt/avid/bin/avid-acs-elastic-index-setup -m info
The following is an example of MediaCentral Index configured for an Interplay Production system:
[root@wavd-doc01 ~]# avid-acs-elastic-index-setup -m infoFetching system information...Systems found: 1
***************************************System id : 8C213466-7A16-424F-9B72-EB239C04A3BBSystem type : interplay

Checking the Current Index Status
23
System display name : WAVD-IE01Number of assets : 138***************************************
Checking the Current Index Status
The Indexes pane in the MediaCentral Cloud UX System Settings can be used to view the status of the indexes in your configuration.
To check the current status of your indexes:
1. Sign in to MediaCentral Cloud UX as an administrator.
You can access the system settings by entering the fully qualified domain name of your MediaCentral Cloud UX host with a colon (:) and port number 8443 at the end of the address. For example:
https://<host_name.domain>:8443
2. Select System Settings from the Layout selector.
The System Settings layout opens.
3. In the Settings pane select Media Index > Indexes.
The MediaCentral Index Indexes status displays in the Details pane.

Using the MediaCentral | Index Restart Command
24
All indexes for your configuration display with their status and details listed in the pane. Use the Refresh button at the top of the pane to refresh the information.
Using the MediaCentral | Index Restart Command
When MediaCentral Index is configured on a MediaCentral system, multiple new services are enabled. In an effort to simplify working with MediaCentral Index, Avid includes a utility that allows you to start, stop, or restart many of the services in a single command. Additionally, a “status” option is available to provide the user with information on the affected services.
There is however one MediaCentral Index service that is not included in the utility. The avid-acs-media-index-configuration service is excluded and must be stopped, started, or restarted manually.
Type the following command to interact with the MediaCentral Index services:
/opt/avid/bin/avid-acs-media-index-restart.sh <service> <command>
n Although the word “restart” is included in the utility name, functionality is not limited to only restarting the services.

Using the MediaCentral | Index Restart Command
25
The command line tool takes the following parameters:
• [service name]— (optional) If desired, you can interact with one or more services by specifying the service name. Each service must be separated by a space. If you do not specify a service, all MediaCentral Index services except for avid-acs-media-index-configuration are affected. The following services or resources can be specified:
• [command] — Specify one of the following commands to interact with the services:
- start — start services
- stop — stop services
- restart — restart services
- status — get the status
n To get command line tool help information, run the command tool without parameters.
The following table includes examples of using the command line tool:
Since the avid-acs-media-index-configuration service is not included in the restart script, the service must be started, stopped or restarted separately from the other services.
Type the following command to interact with the avid-acs-media-index-configuration service:
service avid-acs-media-index-configuration <command>
Service Name
avid-acs-autocomplete
avid-acs-media-index-status-provider
avid-acs-media-index-feed
avid-acs-media-index-permission
avid-acs-media-index-thesaurus
avid-acs-search
avid-acs-search-import
elasticsearch
elasticsearch-tribe
Description Command
Restart one or more specific services
Alternatively, you can interact with a single service with the standard Linux commands such as: service elasticsearch-tribe restart
The following example restarts only the elasticsearch and elasticsearch-tribe services:
/opt/avid/bin/avid-acs-media-index-restart.sh elasticsearch elasticsearch-tribe restart
Stop all services /opt/avid/bin/avid-acs-media-index-restart.sh stop
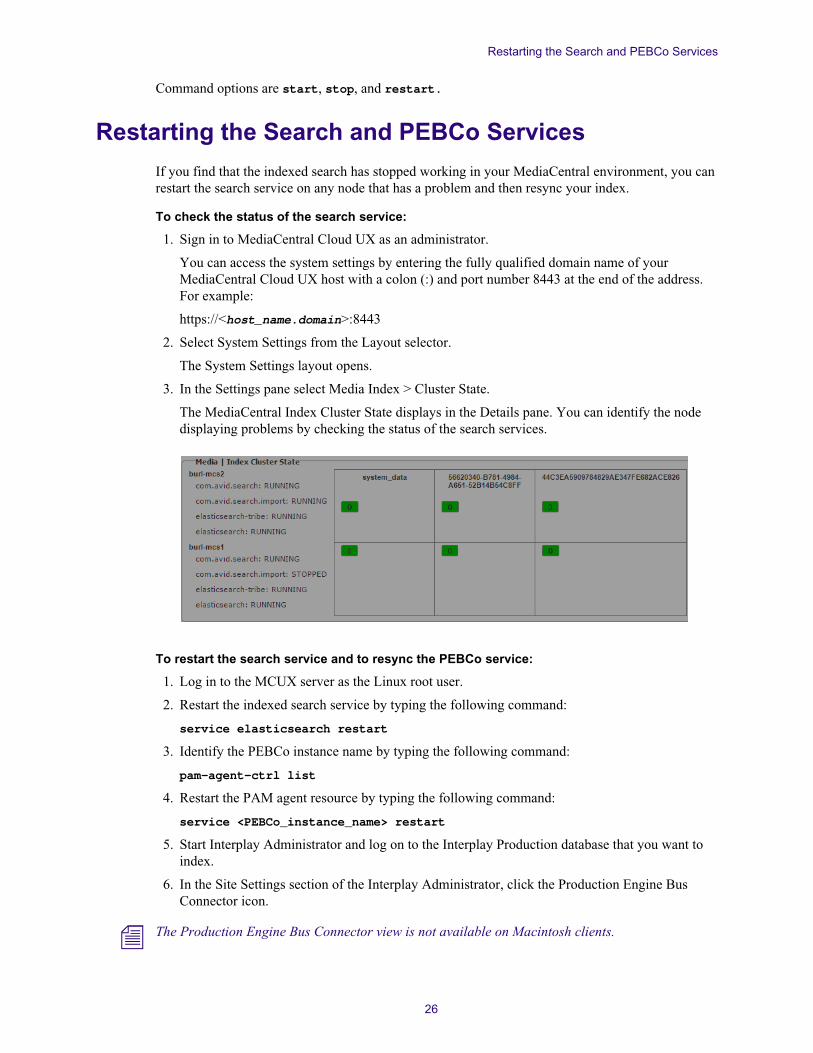
Restarting the Search and PEBCo Services
26
Command options are start, stop, and restart.
Restarting the Search and PEBCo Services
If you find that the indexed search has stopped working in your MediaCentral environment, you can restart the search service on any node that has a problem and then resync your index.
To check the status of the search service:
1. Sign in to MediaCentral Cloud UX as an administrator.
You can access the system settings by entering the fully qualified domain name of your MediaCentral Cloud UX host with a colon (:) and port number 8443 at the end of the address. For example:
https://<host_name.domain>:8443
2. Select System Settings from the Layout selector.
The System Settings layout opens.
3. In the Settings pane select Media Index > Cluster State.
The MediaCentral Index Cluster State displays in the Details pane. You can identify the node displaying problems by checking the status of the search services.
To restart the search service and to resync the PEBCo service:
1. Log in to the MCUX server as the Linux root user.
2. Restart the indexed search service by typing the following command:
service elasticsearch restart
3. Identify the PEBCo instance name by typing the following command:
pam-agent-ctrl list
4. Restart the PAM agent resource by typing the following command:
service <PEBCo_instance_name> restart
5. Start Interplay Administrator and log on to the Interplay Production database that you want to index.
6. In the Site Settings section of the Interplay Administrator, click the Production Engine Bus Connector icon.
n The Production Engine Bus Connector view is not available on Macintosh clients.

Restarting the Search and PEBCo Services
27
7. Click the Manage Status tab.
8. In the Manage section, click Resync to update the whole database content.
Resyncing the database might take a long time to complete and invalidates the existing content of your index. During this process, the search only returns assets that are already processed within this run.

B MediaCentral | Index Custom Configuration
The Configuring MediaCentral | Index chapter in this document details the most common MediaCentral Index deployment. In some instances, you might want to customize or need to modify the installation.
This section covers the following custom configuration procedures:
• Configuring the PEBCo for Custom Configurations
• Changing the MediaCentral Index Refresh Interval
• Modifying the MediaCentral | Index System Settings
Configuring the PEBCo for Custom Configurations
For standard installations, you do not need to modify the properties file for the PEBCo. For custom configurations, you can edit the PAM agent services properties file.
To configure the PEBCo:
1. Navigate to the directory containing the PAM agent services properties file:
/opt/avid/etc/pam-agent-service
2. Using the Linux text editor, vi, open the pamagent-service.properties file for editing:
vi pamagent-service.properties
3. Configure ACS Bus Access Layer (BAL) URL by editing the following uncommented line:
bal.amqp.url=amqp://localhost/acs
Replace localhost with the URL for your ACS bus — for example, amqp://gl-ipix-mcs/acs
4. Type the following command to create a PEBCo instance:
pam-agent-ctrl add <instance_name>
<instance_name> can be any meaningful name. By convention, the PEBCo instance name can include the database name and the engine host name ([db_name]@[engine_host]) — for example, AvidWG@avid-mpi-kbp.
5. Press the Escape key to return to command mode, then type :wq and press Return to write and quit the text editor.
6. Type the following command to start the PEBCo instance:
pam-agent-ctrl start <instance_name>
Changing the MediaCentral Index Refresh Interval
29
Changing the MediaCentral Index Refresh Interval
When you use MediaCentral Index to index an asset, you must wait for the next refresh for that asset to appear in a search. Refreshing the index requires some system resources, so by default the index refreshes after regular intervals instead of after each indexing operation. The interval is defined by the index.refresh_interval setting, which you can modify in either the Elasticsearch configuration file (/etc/elasticsearch/elasticsearch.yml) or the settings for each index. Because the refresh operation draws on system resources, one way to improve indexing performance is by increasing refresh_interval. The MediaCentral Index command line tool provides an option to change the refresh interval per system, and you can use the tool to increase the indexing throughput.
n By default, all systems have an index refresh interval of 1 second.
To change the refresh interval for a system:
t Type the following command:
/opt/avid/bin/avid-acs-elastic-index-setup -m setRefreshInterval --systemId="<id_of_the_system>" --interval=<n>
You can set the interval in seconds (for example, where <n> might be 1s, 10s, or 30s), minutes (for example, 1m, 5m, or 10m). You can also type disable instead of an interval to completely disable index refreshing.
Modifying the MediaCentral | Index System Settings
The MediaCentral Index section of the MediaCentral Cloud UX System Settings allows you to monitor and modify the MediaCentral Index configuration.
Modifying the Settings Pane
You can use the Settings pane in the System Settings to change the cluster name. This pane also allows you to delete all systems and restore MediaCentral Index into its initial state.
To change the cluster name:
1. Sign in to MediaCentral Cloud UX as an administrator.
You can access the system settings by entering the fully qualified domain name of your MediaCentral Cloud UX host with a colon (:) and port number 8443 at the end of the address. For example:
https://<host_name.domain>:8443
2. Select System Settings from the Layout selector.
The System Settings layout opens.
3. In the Settings pane select Media Index > Setup.
As seen in the following illustration, the MediaCentral Index settings are displayed in the Details pane:

Modifying the MediaCentral | Index System Settings
30
4. If you want to modify the name of the cluster, type the name in the Cluster Name field, and then click Apply.
c If you change the cluster name, during a restart Elasticsearch creates a new data folder. If you had any indexes before you changed the cluster name, the indexes fail to appear in your configuration and the information in them is not accessible. While the index data is not lost, Avid recommends that you not change the cluster name after your initial configuration.
To delete all systems and restore MediaCentral Index into the initial state:
1. Sign in to MediaCentral Cloud UX as an administrator.
You can access the system settings by entering the fully qualified domain name of your MediaCentral Cloud UX host with a colon (:) and port number 8443 at the end of the address. For example:
https://<host_name.domain>:8443
2. Select System Settings from the Layout selector.
The System Settings layout opens.

Modifying the MediaCentral | Index System Settings
31
3. In the Settings pane select Media Index > Settings.
The MediaCentral Index Settings display in the Details pane.
4. In the Reset Media | Index section, click Reset.
c Resetting MediaCentral Index removes all systems and index data from the configuration. A reset also removes the Elasticsearch tribe configuration. The old configuration is saved in a backup file next to the new one so that the tribe configuration can be copied and restored.
c You cannot undo this action.
The Reset MediaCentral Index dialog box opens.
5. Type RESET to reset the system, and then click OK. You can cancel the action by clicking Cancel.
The MediaCentral Index system is reset.
6. To restore the Elasticsearch tribe configuration, do the following:
a. Use the Linux vi text editor to edit the backup copy of the Elasticsearch tribe configuration file:
vi /etc/elasticsearch-tribe/elasticsearch.yml_backup<n>
b. Copy the configuration information, and then press the Escape key to return to command mode.
c. Open the elasticsearch.yml configuration file for editing:
vi elasticsearch.yml
d. Paste the information from the backup file into the configuration file.
e. Press the Escape key to return to command mode, then type :wq and press Return to write and quit the text editor.
f. Restart Elasticsearch tribe service:
service elasticsearch-tribe restart
Modifying the Indexes Pane
You can use the Indexes pane in the System Settings to view details about the indexes configured for MediaCentral Index and to delete a system from the central index.

Modifying the MediaCentral | Index System Settings
32
If you have indexed more than one system, each system will be listed separately in the Details pane. Although represented in this illustration, this release does not support indexing of iNEWS or Interplay MAM systems.
Area or Component Description
System Name (optional) The system name is set by the indexing agent. For Interplay Production, the system name is set by the Production Engine Bus Connector (PEBCo) and uses the Interplay Production Engine’s host name or virtual cluster host name.
Apply button Click this button to apply changes made to the System Name field.
Avid does not recommend changing the System Name in this release.

Modifying the MediaCentral | Index System Settings
33
To delete a system form the MediaCentral Index settings:
1. Sign in to MediaCentral Cloud UX as an administrator.
You can access the system settings by entering the fully qualified domain name of your MediaCentral Cloud UX host with a colon (:) and port number 8443 at the end of the address. For example:
https://<host_name.domain>:8443
2. Select System Settings from the Layout selector.
The System Settings layout opens.
3. In the Settings pane select Media Index > Indexes.
The MediaCentral Index Indexes display in the Details pane.
4. If you want to remove the system from the central index, click Delete.
c Deleting a system removes the system and all data from the index. You cannot undo this action.
The Delete System dialog box opens.
5. Type DELETE to delete the system, and then click OK. You can cancel the action by clicking Cancel.
The system and its data are removed from the MediaCentral Index configuration.
Delete button You can use the Delete button to remove the system and all of its data from MediaCentral Index.
c If you delete a system from this pane, the index of that system is removed. After this action is complete, users can no longer receive text-based metadata results for the associated system in the Search App.
Index summary This area lists some of the details of the index, including the system ID, system type (for example, Interplay Production), and when the index was created.
System ID The System ID is a unique identifier for an index that is generated by the indexing agent (PEBCO). It uniquely identifies the system in MediaCentral Index. Interplay Production systems are identified by a unique string of characters which cannot be altered.
Assets summary This area provides a brief summary of the assets indexed by MediaCentral Index.
Custom Properties list This list includes all properties set for the system that can appear in an indexed search. Search properties are set by administrators for the appropriate system — for example, Interplay Production properties are specified in the Canonical Data tab in the Production Engine Bus Connector view in the Interplay Administrator tool.
You cannot modify the properties in this pane. For more information, see “Configuring and Using the PEBCo Service” on page 18.
Area or Component Description

Avid75 Network DriveBurlington, MA 01803-2756 USA
Technical Support (USA)Visit the Online Support Center at www.avid.com/support
Product InformationFor company and product informa-tion, visit us on the web at www.av-id.com