AUTOMATION & CONTROL SURFACE MANUALProducts/ASP...84 onwards), you will have connected ASP2802 to...
42
AUTOMATION & CONTROL SURFACE MANUAL Version: 1.00
Transcript of AUTOMATION & CONTROL SURFACE MANUALProducts/ASP...84 onwards), you will have connected ASP2802 to...

AUTOMATION &CONTROL SURFACE
MANUAL
Version: 1.00

Page -2-© Audient Ltd
Contents
ASP2802 Fader Automation........................................ Page 3
Automation Overview 4 Automation Setup 5 Recording & Editing Automation Data 7 Automation Safe 8 Running Automation in HUITM Mode 9 ASP2802 Control Surface Setup................................. Page 10
Control Surface Panel Overview 11 Control Surface Setup 12
ASP2802 Control Surface Functions........................... Page 14
Entering DAW Layer 15 Setup Mode 15 Transport Panel 18 Navigation & Utility Controls 19 Zoom Functions 21 Banking & Nudges Control Surface Tracks 21 DAW Meters 22 Select Mode 24 Record Enable Mode 25 Automation Modes 25 Group Mode 27 Solo & Cut 30 Function Keys 30 Page Keys 31 Pan Encoder Mode 31 I/O Assign Mode 32 Aux Encoder Mode 34 Aux Fader Flip Mode 35 Aux Assign Mode 36 Insert Mode 37 Insert Encoder Control 39
Future Updates............................................................ Page 40
Panel Visualisation...................................................... Page 41
Contact........................................................................ Page 42
Mackie HUI™ (Human User Interface) is a registered trademark of LOUD Technologies Inc.

Fader Automation

Page -4-© Audient Ltd
Automation
Overview of Functions
The diagram below provides an overview of the automation system and the parameters that can be controlled.
ASP2802 provides fader and mute automation along side its full DAW control surface layer.
The sections of most interest when using the console automation are as follows:
• Faders• Cut (Mute) Switches• Select Mode Panel - Select and Auto Safe• DAW Transport

Page -5-© Audient Ltd
Automation Setup
Assuming that you have followed all steps outlined in the main manual networking section for Apple Mac or PC (page 84 onwards), you will have connected ASP2802 to your studio computer and connected to the console via AuNet.
To set up the 8-channel fader automation system in Pro Tools we must use 8 MIDI tracks and place them at the start or end of your session (we recommend the start so you can add tracks afterwards with ease as your session progresses).
Please note that both fader position and mute status is automatable, therefore you could use the silent muting system to reduce any noise floor from your vintage outboardgear during quiet sections.
Please follow the steps outlined below:
• Boot Pro Tools• Create a new session or open an existing one
Step 1: Setup > MIDI > Input Devices
Step 2:
Enable ASP2802 Automation & Control Surface MIDI Inputs, click OK.
Page -6-© Audient Ltd
Automation Setup
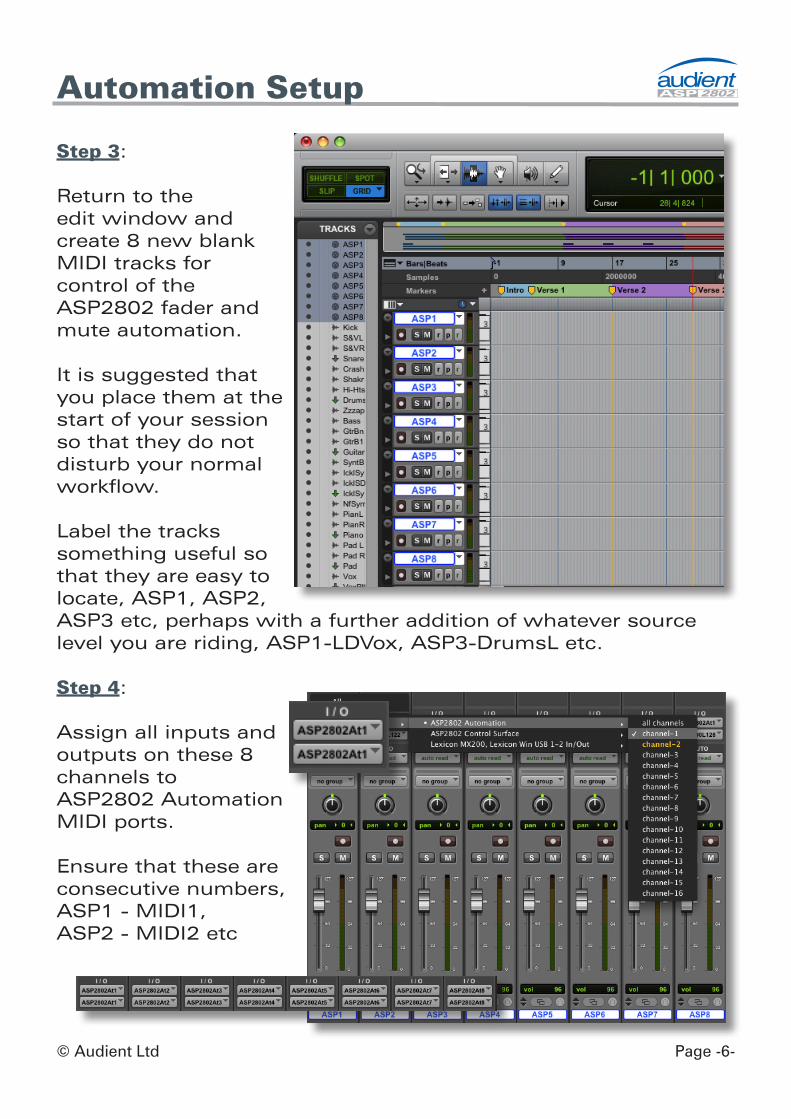
Step 3:
Return to the edit window and create 8 new blankMIDI tracks for control of the ASP2802 fader and mute automation.
It is suggested that you place them at the start of your session so that they do not disturb your normal workflow.
Label the tracks something useful so that they are easy to locate, ASP1, ASP2, ASP3 etc, perhaps with a further addition of whatever source level you are riding, ASP1-LDVox, ASP3-DrumsL etc.
Step 4:
Assign all inputs and outputs on these 8 channels toASP2802 Automation MIDI ports.
Ensure that these areconsecutive numbers,ASP1 - MIDI1, ASP2 - MIDI2 etc

Page -7-© Audient Ltd
Automation Setup
Recording Automation Data in Pro Tools
You must take an ASP2802 channel out of automation safe mode (the default state) before you are free to record automation data to Pro Tools MIDI channels and playback your passes. To do this please see page 8).
To record any automation passes you need onto the 8 MIDI tracks created - just record enable them and let your pass begin.
The MIDI regions can be edited, copied and pasted etc - just like any any other normal MIDI region.
Please note that due to the fact that the control surface peripheral is used for the ASP2802 control surface layer, the analogue automation must use these MIDI tracks to capture your data.
The MIDI controller used here is the modulation wheel, however it is not freely editable. You can copy and paste sections of automation but you cannot freely draw in your own curves and fades. Perhaps recording new passes is the best procedure here if you are unhappy with previous rides.

Page -8-© Audient Ltd
Automation Enable / Safe
A Note on Automation Safe
Automation safe should be used when you want to isolate a particular channel from automation - for example - to audition rides without “fighting” existing automation data or without “printing” the rides if channels are still in write enabled.
When the console boots automation safe is engaged by default. If you wish to automate a channel you must first press the automation safe switch (in the select mode panel) and then turn off automation safe from each channel you wish to automate.
Note that all select mode layers are stored and function simultaneously. By toggling the select mode switches in conjunction with the large green channel select switches it is possible to obtain rapid control of SIP safe, DAW record enable, select, unity and automation safe channel settings.
All select mode layers are stored even after a power down, so remember to clear them manually if the next session requires a different setup.

Page -9-© Audient Ltd
Automation Setup - A Note
Please note that it is not possible to run the ASP2802 analogue fader automation as a HUITM controlled device within Pro Tools alongside a HUITM based control surface.
However if you are not using the ASP2802 as a control surface within Pro Tools (i.e you have another controller that is not HUITM based such as a C|24), you can trick the automation system into responding to HUITM data to take advantage of Pro Tools automation modes when using the ASP2802 analogue automation.
To do this set the console into Logic mode (setup menu > host software).
Configure 8 mono dummy audio tracks at the start of your Pro Tools session that contain no audio.
In the peripherals menu of Pro Tools, set a single HUITM MIDI controller to address the ASP2802 Automation MIDI input and output ports.
Fix the controller to the first 8 dummy audio tracks using the scroll into view function (right click on the first track in Pro Tools) and now enjoy access to all automation modes within Pro Tools:
• Auto Read• Auto Touch• Auto Latch• Auto Write• Auto Off• Auto Trim (Pro Tools|HD only)

Control Surface Setup

Page -11-© Audient Ltd
Control Surface Panel
Control Surface Operation
The control surface panel on ASP2802 provides access to many common and useful DAW functions.
Please follow the setup procedure outlined on pages 12 & 13 and then read onwards from page 14 to learn how to operate the ASP2802 control surface.

Page -12-© Audient Ltd
Control Surface Setup
Assuming that you have followed all steps outlined in the main manual networking section for Apple Mac or PC (page 84 onwards), you will have connected ASP2802 to your studio computer and connected to the console via AuNet.
To set up the ASP2802 as a control surface for Pro Tools please follow these steps:
Step 1: Press the ASP2802 Setup button and select Pro Tools in the host software option page using the rotary encoder (press setup to confirm).
Please note that the setup light may flash if you have changed from another host software selection.
Step 2: Exit ASP Setup, boot Pro Tools and navigate to Setup > MIDI > Input Devices
Step 3:
Enable ASP2802 Control Surface MIDI Inputs, click OK.

Page -13-© Audient Ltd
Control Surface Setup
Step 4: Boot Pro Tools, create a new session and navigate toSetup > Peripherals...
Step 5:
Click on the MIDI Devices tab
Step 6:
Install a HUITM control surface, assigning the input and output MIDI ports to the ASP2802 control surface.
Click OK.
You are readyto use ASP2802.

Control Surface Functions

Page -15-© Audient Ltd
Control Surface Functions
Entering DAW Layer
To enter the DAW layer for control surfacefunctionality ensure that the DAW switch (1) is depressed and illuminated.
Whenever it is not illuminated, the faders and channel switches operate in the analogue layer.
However some of the control surfacefunctionality remains active when in the analogue layer to aid your session workflow, allowingsimultaneous control of both analogue fader level and important DAW functions.
These are:
• Transport switches (3-7) jog / shuttle disabled• Cycle toggle on / off• Track / region navigation cursor controls• Shift + navigation cursor controls for horizontal and vertical
zoom• DAW meters
Console Setup Switch
The setup switch (2) allows you to access a number of usefulnetworking parameters as well as set the host DAW platform of choice and check your current firmware revision.
Once the setup switch has been pressed, the OLED displays will show the first page of the setup menu.
To page through various other pages on the OLED displays, whether it be in the setup menu or when accessing insert plugin parameters, use the page function switches (26) located under the left most encoder.

Page -16-© Audient Ltd
Control Surface Functions
Editing Setup Parameters
To edit parameters in any of the OLED displays when in setup mode, rotate the corresponding rotary encoder to change values and then press the setup switch to apply the changes.
Note that once a change has been made, the setup switch LED will flash to indicate that a setting has changed andwill return to a solid red oncechanges are confirmed.
Console Setup Switch OLED Pages
Setup Page 1 - Host Software
Setup Page 2 - Use DHCP (networking option)

Page -17-© Audient Ltd
Control Surface Functions
Console Setup Switch
Setup Page 3 - IP Address (networking option)
Setup Page 4 - Subnet Mask (networking option)
Setup Page 5 - Port (default 1212, networking option)
Setup Page 6 - Firmware Info
Page -18-© Audient Ltd
Control Surface Functions
Transport Panel
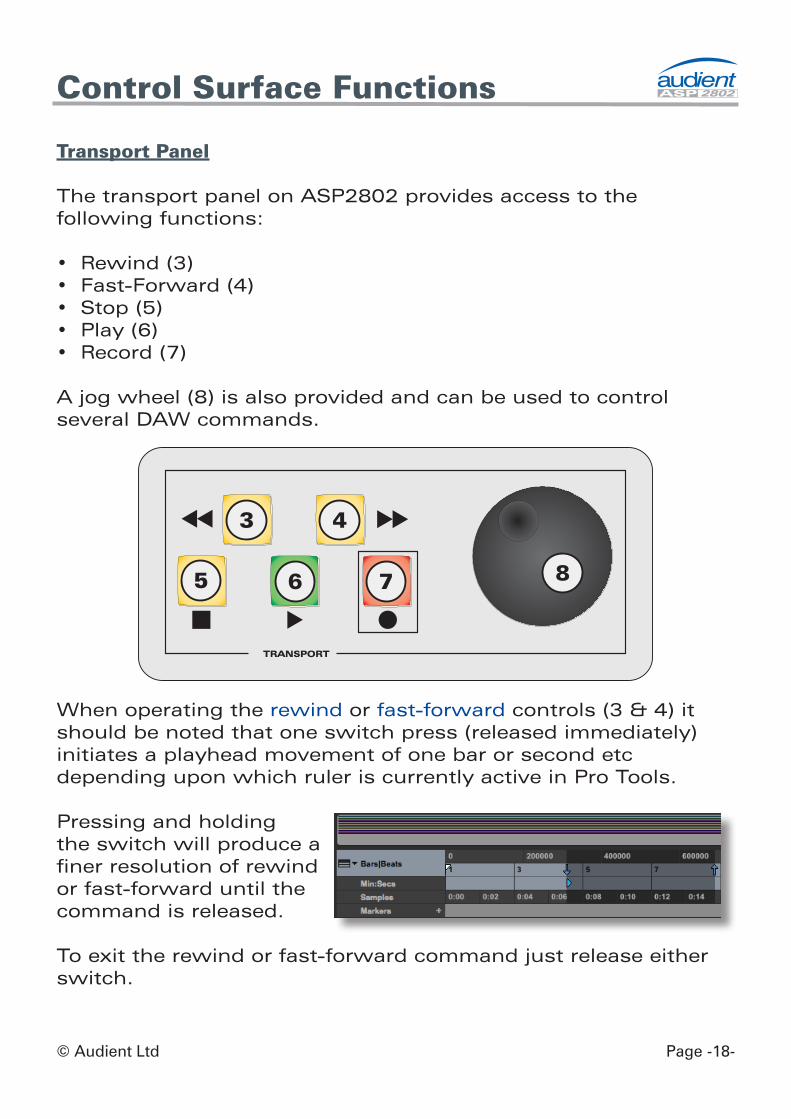
The transport panel on ASP2802 provides access to the following functions:
• Rewind (3)• Fast-Forward (4)• Stop (5)• Play (6)• Record (7)
A jog wheel (8) is also provided and can be used to control several DAW commands.
When operating the rewind or fast-forward controls (3 & 4) it should be noted that one switch press (released immediately) initiates a playhead movement of one bar or second etc depending upon which ruler is currently active in Pro Tools.
Pressing and holding the switch will produce a finer resolution of rewind or fast-forward until the command is released.
To exit the rewind or fast-forward command just release either switch.

Page -19-© Audient Ltd
Control Surface Functions
Transport Panel cont.
By using the scrub function (12) in conjunction with the jog wheel (8), the playhead cursor can be used to ‘scrub’ through the audio within your Pro Tools session in realtime as if ‘rocking the tape against the playhead’. This is useful for finding edit points and punch-in locations etc. When in this mode, the scrub switch will illuminated a solid green.
If the scrub switch (12) is pressed for a second time, the jog wheel (8) performs shuttle operation, providing continuous rewind or fast-forward of the playhead cursor. This is silent and indicated by a flashing green LED in the switch.
A third press on the scrub switch (12) toggles back to inactive jog wheel operation, indicated by no switch illumination.
Navigation & Utility Controls
ASP2802 provides several navigationand utility controls just above the transport section.
The cycle control (9) can be used to toggle Pro Tools’s cycle loop playback command on and off.

Page -20-© Audient Ltd
Control Surface Functions
Navigation & Utility Controls cont.
The marker control (10) can be used to add memory locations to the marker track in Pro Tools. This may be useful for flagging edit points during a take for example. Tap on the marker switch to place a marker in the timeline, a second tap will close the marker window. Multiple tap pairs will place multiple markers at their corresponding timeline positions.
The nudge control (11) is currently unsupported in the initial Pro Toolssoftware release.
Please see www.audient.com for the latest updates to controlfunctionality.
The navigation cursor controls (14)can be used to select both regions in your Pro Tools session and actual control surface track selection or just select regions for editing depending upon the state of the Link Track & Edit Selection parameter.

Page -21-© Audient Ltd
Navigation & Utility Controls cont.
If used with shift mode (pressing switch 13), the navigation cursors operate as zoom controls. Vertical audio zoom is achieved with the up & down cursor switches, while horizontal timeline zoom is achieved with the left & right cursor switches.
Track Select Mode
Audio Vertical Zoom Mode
Horizontal Zoom Mode
Track Navigation Controls
In order to navigate around your session and bring banks of 8 tracks onto the ASP2802 control surface, there are several switches that are useful.
The bank switches (15) allow you to ‘bank’ in eight channel blocks left and right, through either your tracks or arrange page channels (for example 1-8 or 9-16).
If using the bank switches (15) in conjunction with the shift switch function (13), it is possible to ‘nudge’ left or right on a channel by channel basis (one at a time).
Control Surface Functions

Page -22-© Audient Ltd
Track Navigation Controls cont.
To access encoder parameters and / or OLED display information for all eight channels, the 5-8 switch (16) must be used to access the last four channels in the bank of eight.
The channels that areactive and available on theencoders are illuminatedin blue. The encoders canbe used to access pan,aux, insert and input / output assigns for the four active channels.
DAW Meters
If you wish to display eight channels of DAW metering on ASP2802’s LED bargraph meters, a global command switch (17) DAW Meters, provides this functionality.
Control Surface Functions

Page -23-© Audient Ltd
DAW Meters cont.
Control Surface Functions

Page -24-© Audient Ltd
Channel Select Mode
The select mode panel provides various functions, some of which operate on the analogue layer and are useful for automation control (auto safe etc), while others are specificallyused for control over DAW functions on the DAW layer.
Above each fader are three illuminated push switches.
The first switch, select (18) can be used for several functions on both analogue and DAW layers when used in combination with the select modes available in the middle of the control surface panel.
When select mode is chosen (19), the large green channel select switches above the channel faders become DAW channel selects when in control surface mode. Selected channels are highlighted in white within Pro Tools and a box is shown around the channel name in the ASP2802 OLED display. Multiple channelscan be added or removed from larger selections by holding down one or more select switches at once and pressing other channels to add or remove.
Control Surface Functions

Page -25-© Audient Ltd
Record Enable Mode
Use record enable (20) within DAW control surface mode when arming tracks for recording in Pro Tools.
Activate this mode and then use the large green channel select switches (18) to record enable each track active on the eight channel HUITM bank.
Please note that by using multiple channel select switches (18), you can record enable more than one track at once.
Automation Modes
The automation mode control (21) is used in the DAW layer to set host specific automation modes like read, touch and latch etc.
This control can be used to access automation modes forchannels active on the control surface.
The available automation modes in Pro Tools are:
• Read• Write• Touch• Latch• Trim*• Off
* Pro Tools HD only
Control Surface Functions

Page -26-© Audient Ltd
Automation Modes cont.
To access the automation mode selections using the ASP2802 control surface press the automation mode switch (21).
Observing the OLED displays, you should see a series of options appear above each encoder. You can page to the right using the page switches (26) to access the next set of options (trim and off). Please note that trim is only available as an option within Pro Tools HD systems.
Select whichever tracks you wish to apply the automation mode to using the large green channel select switches (18). Tracks cannot be selected within Pro Tools.
Press down on the encoder below the option you require to apply the setting to the selected channels. Clear the selection if needed.
Control Surface Functions

Page -27-© Audient Ltd
Group Mode
To access Pro Tools’ internal grouping function press the group mode switch (22) in the select panel.
The OLED display will update to show the group control options.
Select the tracks you wish to group by holding down and pressing multiple channel select switches (18) at once.
To create the group press down on the create encoder. This will bring up the group attributes window in Pro Tools. Please note that you can select tracks first and then press the group mode switch (22) to create a group of already selected tracks.
Control Surface Functions

Page -28-© Audient Ltd
Group Mode cont.
To finalise the group you must click OK from withinPro Tools.
However it is most likely that at this point you will want to name your group and assign group attributes to the selection.
The final group optionavailable on ASP2802is the global suspendgroups function(shift+cmd+g).
This allows you tofreely move faders andother track parametersincluding regions (if usingan edit group) withoutfighting the group linking.
Please note that by holding one fader within a group and moving another, you can adjust the relative balance of the group without needing to suspend all.
Control Surface Functions

Page -29-© Audient Ltd
Other Select Modes - Analogue Layer.
There are three further select modes available on ASP2802 which are used in the analogue layer.
For more specfic information about the functionality of these modes, please see the main analogue manual.
Solo-In-Place Safe - not used in the DAW layer, please consult the full ASP2802 analogue manual for more information.
Automation Safe - used in the analogue layer for isolating channels from any automation control data, ideal for trying out a new ride before recording the pass of automation.
Unity - used in the analogue layer to provide a quick and easy way to position the channel fader at the unity gain (0 dB) position. This is very useful if you are setting up a stem session for analogue summing etc.
To use these functions press the function required in the select mode panel and then press the large channel select switches (18) on each and every channel that requires the application of the function selected.
Control Surface Functions

Page -30-© Audient Ltd
Control Surface Functions
Channel Solo & Cut
When in DAW layer the large channel cut and solo switches (23 & 24) perform mute and solofunctionality within Pro Tools.
If you are using any internal Pro Tools grouping you may find it useful to group these functions(Group Attributes) to provide quick and easy solo or cut auditioning across a larger group of channels.
Function Keys
Function keys F1 to F4 (25) are programmed to provide access to four useful Pro Tools window functions.
Their default configuration is as follows:
• F1 Edit Window • F2 Mixer• F3 Open / Close Current Active Plugin Window• F4 Transport

Page -31-© Audient Ltd
Control Surface Functions
Page Keys
The page keys (26) are used to page through various parameters that are assigned to the rotary encoders and OLED displays.
If editing aux sends, input and output routing or plugin insert effects, the parameters or host options will often cover more than one page. Scroll left to right through the available parameter pages using the page keys located beneath the left hand encoder.
Encoder Pan Mode
When selecting pan (27) as the encoder mode on the right hand side of the control surface, the encoders become pan controls for channels 1-4 (or 5-8) of the control surface selection.
The OLED displays indicate Pro Tools channelpan position with a horizontal slider located beneath the channel name.
Press the panswitch (27) for a second time to access the righthand pan on a stereochannel.

Page -32-© Audient Ltd
Pan Mode + Assign
By pressing the assign key (30) when in pan mode, the encoders provide access to assigning channel inputs and outputs.This is very useful for setting up inputs for recording or bussing architecture when mixing.
Input assigns are set on page one. Use the page keys (26) to access outputs via page two.
Rotate the encoder to the desired input, bus or output and press the encoder to select thedestination.
To aid you in navigating your studio setup at a faster pace, try using the Pro Tools setup I/O labelling system to name buses something simple (shortform text) and useful.
Control Surface Functions

Page -33-© Audient Ltd
Pan Mode + Assign cont.
Pro Tools I/O labelling can increase the speed of your session setup time. If you have a studio that is setup with a fixed routing system and / or a typical ‘normalled’ signal path, this is a very useful tool. Please bear in mind that the HUITM protocol only relays 4 characters to the control surface therefore short names may be more useful.
Control Surface Functions

Page -34-© Audient Ltd
Control Surface Functions
Encoder Aux Mode
When selecting aux (28) as the encoder mode on the right hand side of the control surface, the encoders become aux send controls for channels 1-4 (or 5-8) of the control surface selection.
The OLED displays indicate Pro Tools channel send level with a horizontal slider located beneath the channel name.
Use the page keys (26) to select other available sends (sends A - E).

Page -35-© Audient Ltd
Control Surface Functions
Aux / Fader Flip
When in aux mode pressing the aux switch (28) again will flip the aux send encoders on to the 8 channel faders. This provides faster access to send levels across an 8 channel bank and is very useful for setting up headphone mixes or fx sends.
This mode is indicated by a flashing aux switch LED.

Page -36-© Audient Ltd
Control Surface Functions
Aux Mode + Assign
When in aux mode, pressing the assign key(30) provides access to instantiating new sends and re-routing existing aux sends within Pro Tools.
To instantiate a send press the assign keyand use the page keys (26) to select the sendslot you wish to use (SndA, SndB, SndC, SndD or SndE).
Rotate the encoders to scroll through the available send destination options available within Pro Tools.
Once you have reached your desired send destination, press the encoders on the channel you wish to instantiate the send.
You will notice that the destination state will change from Bus 3 to >Bs3 when theassignment is confirmed.
To edit an existing send destination page to the appropriate send slot in assign mode, select a new destination via the rotary encoders and then press the corresponding encoder to reassign.

Page -37-© Audient Ltd
Control Surface Functions
Insert Mode
The ASP2802 control surface can be used to instantiate and control insert plugins within Pro Tools.
Firstly select the track you wish to instantiate the plugin insert on via the large green channel select switches (18)banking or nudging the control surface if needed.
Once your channel is selected, press the insert switch (29) in the encoder mode panel. Note that the OLED display changes to show you the first available four insert slots.The selected slot will be flashing. To select a different slot press the corresponding encoder.
To instantiate a plugin in the selected slot press the assign switch (30). The OLED display will update to enter assign mode(>NoInsert).
Here you can scroll through the available plugins using the rotary encoders.
Page -38-© Audient Ltd
Control Surface Functions
Insert Mode cont.
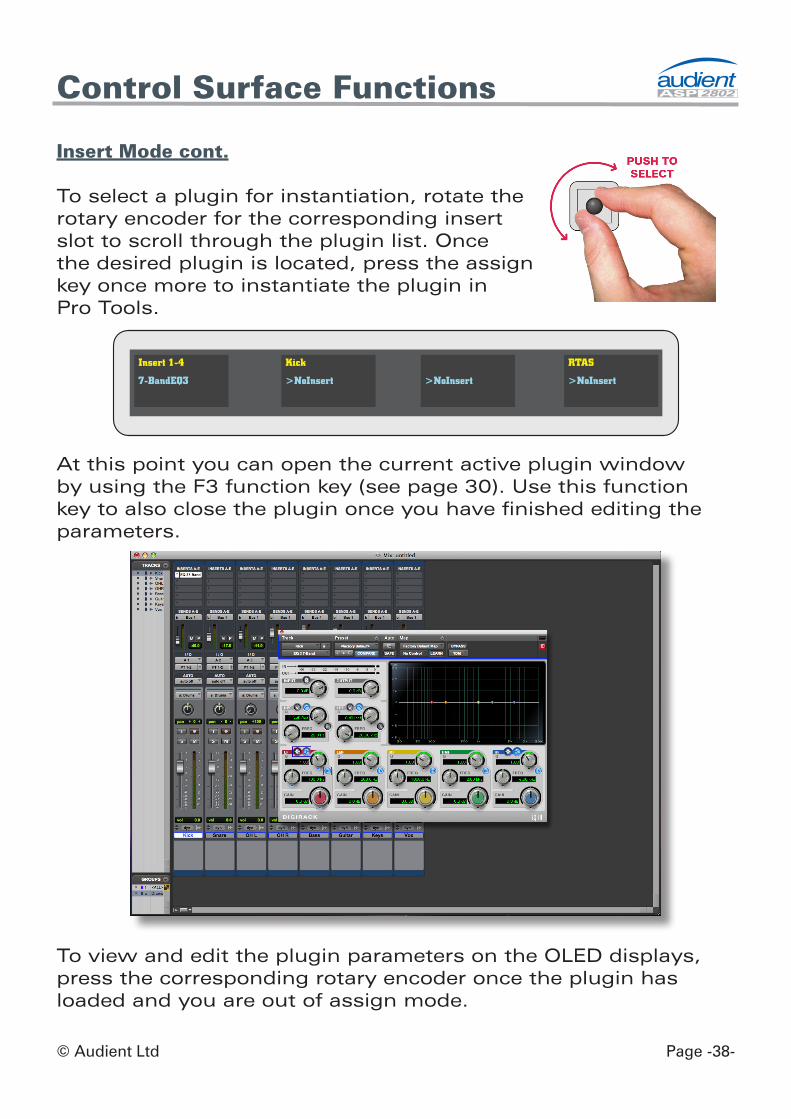
To select a plugin for instantiation, rotate the rotary encoder for the corresponding insert slot to scroll through the plugin list. Once the desired plugin is located, press the assignkey once more to instantiate the plugin in Pro Tools.
At this point you can open the current active plugin window by using the F3 function key (see page 30). Use this function key to also close the plugin once you have finished editing the parameters.
To view and edit the plugin parameters on the OLED displays, press the corresponding rotary encoder once the plugin has loaded and you are out of assign mode.

Page -39-© Audient Ltd
Insert Editing Mode
To edit plugin parameters use the page switches (26) to navigate through all available parameters.
Use the encoders to edit values.
Press the assign switch to exit edit mode and use F3 to toggle (open / close) the plugin window.
Control Surface Functions

Page -40-© Audient Ltd
For any future updates to the control surface functionality of ASP2802, please see the ASP2802 webpage and latest firmware available online at www.audient.com.
We hope you enjoy your new control surface and analogue console.
Thanks from the Audient team.
Future Updates

Page -41-© Audient Ltd
Panel Visualisation
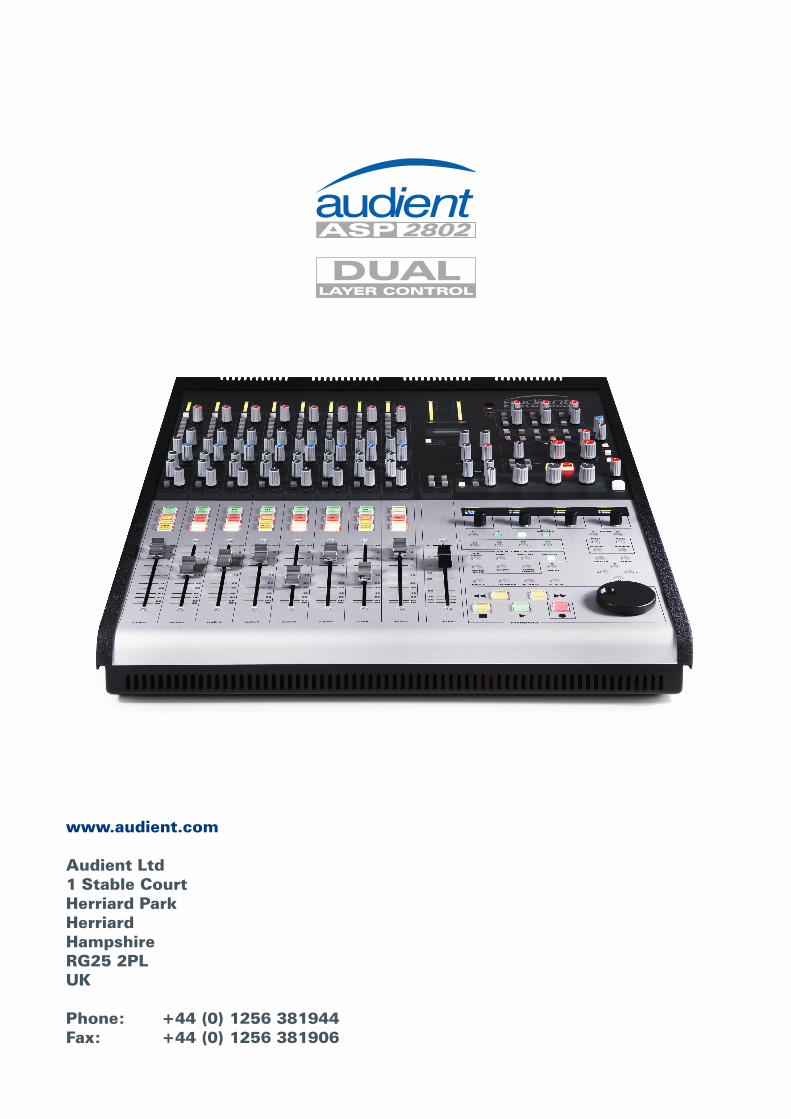
www.audient.com
Audient Ltd1 Stable CourtHerriard ParkHerriardHampshireRG25 2PLUK
Phone: +44 (0) 1256 381944Fax: +44 (0) 1256 381906